BasicSocial& Networking Skills& - Net Literacy ·...
17
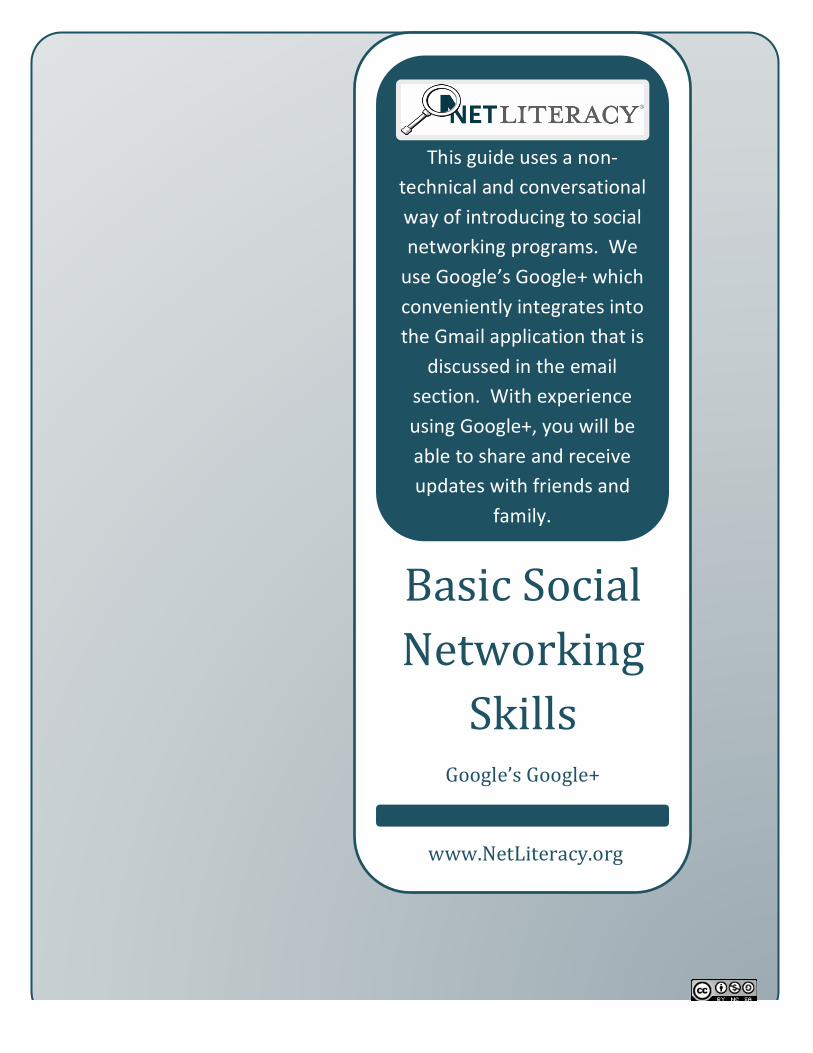
Basic Social Networking Skills Google’s Google+ This guide uses a non technical and conversational way of introducing to social networking programs. We use Google’s Google+ which conveniently integrates into the Gmail application that is discussed in the email section. With experience using Google+, you will be able to share and receive updates with friends and family. www.NetLiteracy.org
Transcript of BasicSocial& Networking Skills& - Net Literacy ·...
Basic Social Networking
Skills Google’s Google+
This guide uses a non-‐technical and conversational way of introducing to social networking programs. We use Google’s Google+ which conveniently integrates into the Gmail application that is
discussed in the email section. With experience using Google+, you will be able to share and receive updates with friends and
family.
www.NetLiteracy.org
| [Pick the date] 1
P a g e | 1
What is Social Networking? Social networking is the communicating and sharing of personal, business, or other information with your peers, friends, family, and co-‐workers. There are many different social networking websites such as Twitter, MySpace, Facebook, and Google+. People use these websites to share ideas, pictures, websites and updates about their life. It’s a great way to stay in touch with individuals you are unable to see and chat with on a regular basis.
How is Social Networking used? Social networking became popular around 2005 when many young users in their teens through early thirties began using these sites to communicate about their lives and their interests – ranging from music to movies and more. Within several years, older adults began to use social networking (sometimes more generally called social media) to stay in contact. Today, millions of people around the globe use social networking, and increasing numbers are using these services on their cellular telephones in addition to their computers.
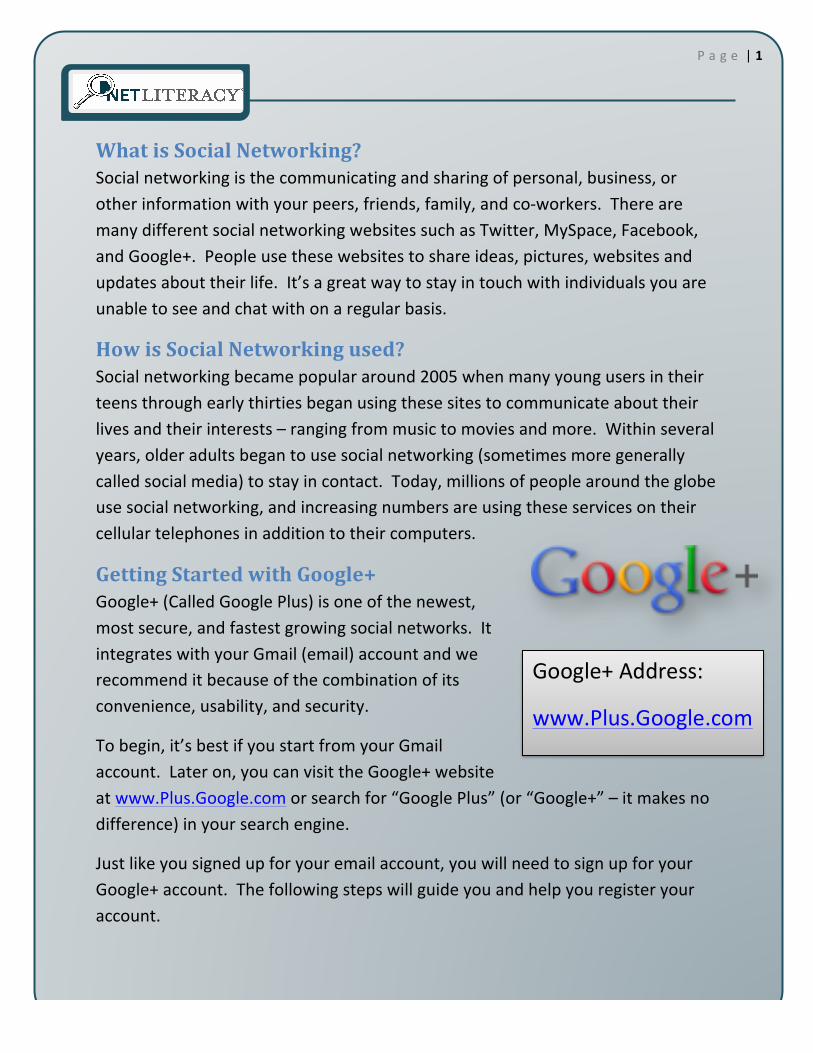
Getting Started with Google+ Google+ (Called Google Plus) is one of the newest, most secure, and fastest growing social networks. It integrates with your Gmail (email) account and we recommend it because of the combination of its convenience, usability, and security.
To begin, it’s best if you start from your Gmail account. Later on, you can visit the Google+ website at www.Plus.Google.com or search for “Google Plus” (or “Google+” – it makes no difference) in your search engine.
Just like you signed up for your email account, you will need to sign up for your Google+ account. The following steps will guide you and help you register your account.
Google+ Address:
www.Plus.Google.com
| [Pick the date] 2
P a g e | 2
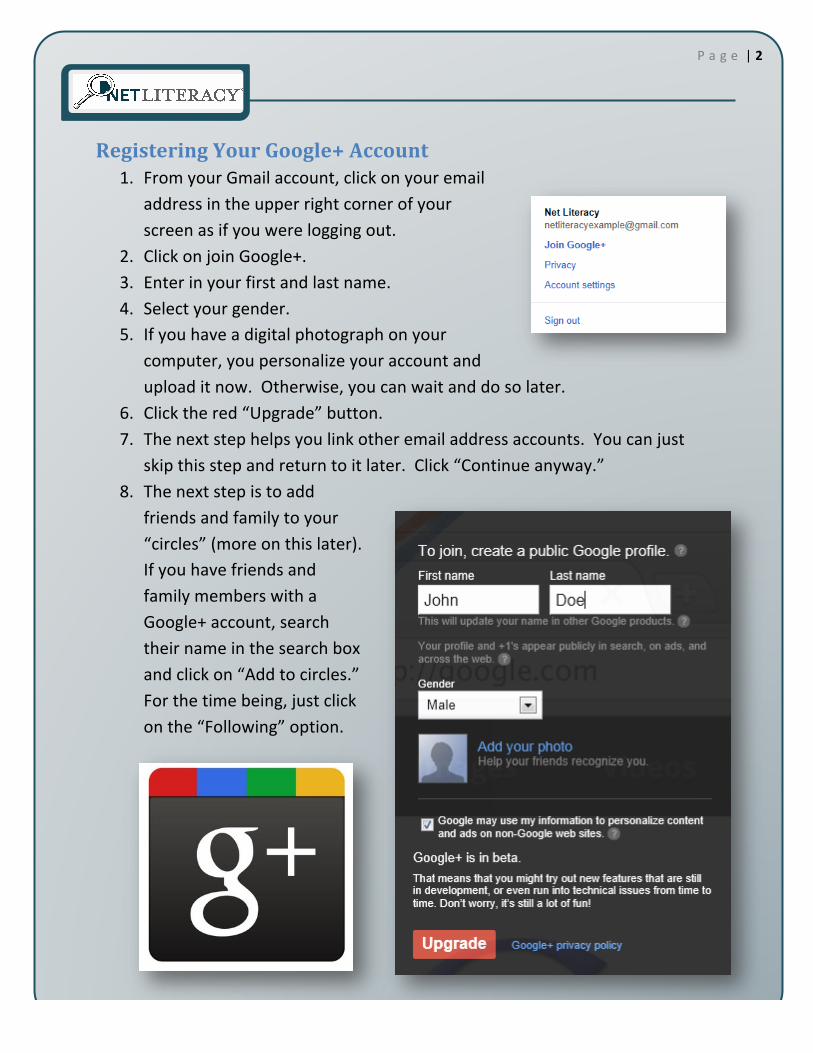
Registering Your Google+ Account 1. From your Gmail account, click on your email
address in the upper right corner of your screen as if you were logging out.
2. Click on join Google+. 3. Enter in your first and last name. 4. Select your gender. 5. If you have a digital photograph on your
computer, you personalize your account and upload it now. Otherwise, you can wait and do so later.
6. Click the red “Upgrade” button. 7. The next step helps you link other email address accounts. You can just
skip this step and return to it later. Click “Continue anyway.” 8. The next step is to add
friends and family to your “circles” (more on this later). If you have friends and family members with a Google+ account, search their name in the search box and click on “Add to circles.” For the time being, just click on the “Following” option.
| [Pick the date] 3
P a g e | 3
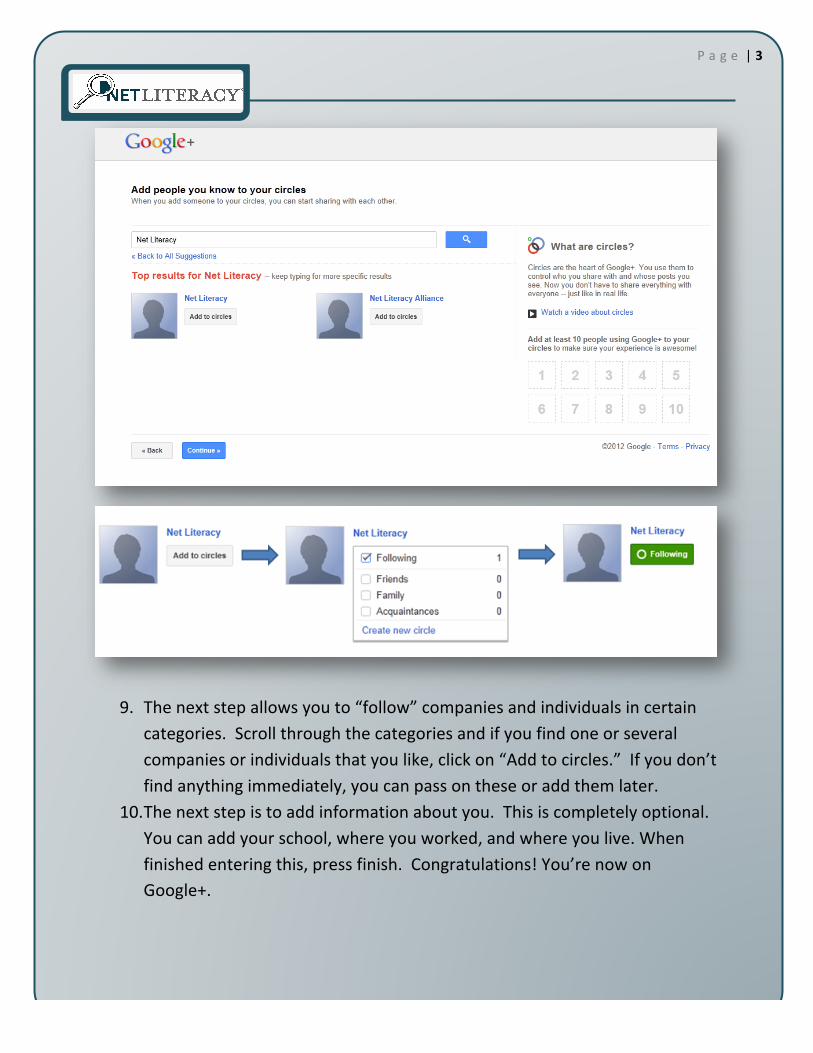
9. The next step allows you to “follow” companies and individuals in certain categories. Scroll through the categories and if you find one or several companies or individuals that you like, click on “Add to circles.” If you don’t find anything immediately, you can pass on these or add them later.
10. The next step is to add information about you. This is completely optional. You can add your school, where you worked, and where you live. When finished entering this, press finish. Congratulations! You’re now on Google+.
| [Pick the date] 4
P a g e | 4
| [Pick the date] 5
P a g e | 5
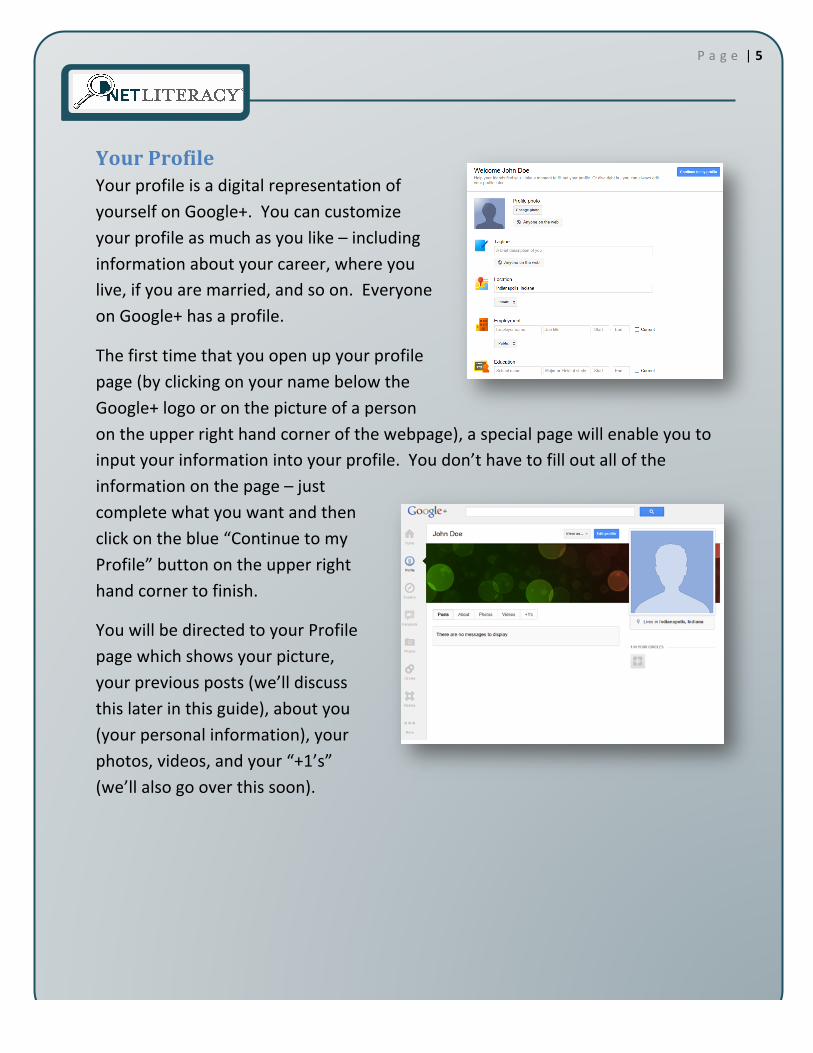
Your Profile Your profile is a digital representation of yourself on Google+. You can customize your profile as much as you like – including information about your career, where you live, if you are married, and so on. Everyone on Google+ has a profile.
The first time that you open up your profile page (by clicking on your name below the Google+ logo or on the picture of a person on the upper right hand corner of the webpage), a special page will enable you to input your information into your profile. You don’t have to fill out all of the information on the page – just complete what you want and then click on the blue “Continue to my Profile” button on the upper right hand corner to finish.
You will be directed to your Profile page which shows your picture, your previous posts (we’ll discuss this later in this guide), about you (your personal information), your photos, videos, and your “+1’s” (we’ll also go over this soon).
| [Pick the date] 6
P a g e | 6
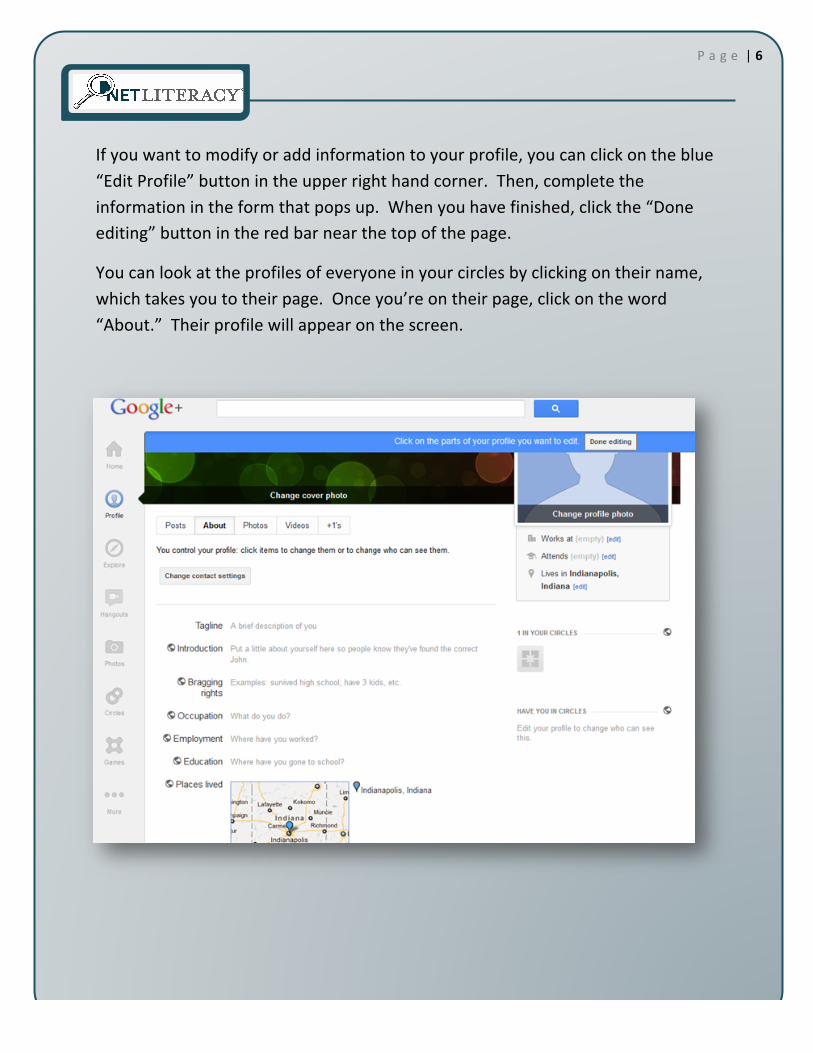
If you want to modify or add information to your profile, you can click on the blue “Edit Profile” button in the upper right hand corner. Then, complete the information in the form that pops up. When you have finished, click the “Done editing” button in the red bar near the top of the page.
You can look at the profiles of everyone in your circles by clicking on their name, which takes you to their page. Once you’re on their page, click on the word “About.” Their profile will appear on the screen.
| [Pick the date] 7
P a g e | 7
Google+ Circles Google+ organizes your contacts through a system called circles. To see updates from your contacts that have a Google+ account, you must add them to one of your circles. For them to see your updates, they must add you to one of their circles.
Each circle is customizable and can represent different groups of people, such as family, friends, co-‐workers, and neighbors. With Google+, you can also add celebrities, organizations, and companies to your circles – though for these individuals and groups, they might not add you back to one of their circles as they are trying to broadcast a message, and don’t necessarily seek two-‐way communication from you (as you may with your friends).
There is no limit to how many people you can add to a circle, but it pays to divide your contacts into circles representative of your relationships with them. What might be appropriate to share with your family members might not be appropriate to share with your co-‐workers (later, we’ll discuss how to limit and share information in your circles).
When you add someone to a circle or when someone adds you to a circle, both individuals are notified that they have become part of the other person’s circle. This is handy to learn if you have missed a family member or a friend who has added you to their circles! One extremely important concept is to understand is that circles are private – this means that no one can determine which circle they are in and who else is in the circle. This is a feature that is meant to help protect the user and the other individual from any misunderstanding. However, it is important to note that anyone that you add to any one of your circles will be publically visible in a “general” circle category that anyone can see.
When you add someone to your circles, you automatically have the ability to chat with them through the integrated instant messenger system. This system is also free and allows you to type a conversation with one or more people. We’ll examine this feature in depth later in this guide.
| [Pick the date] 8
P a g e | 8
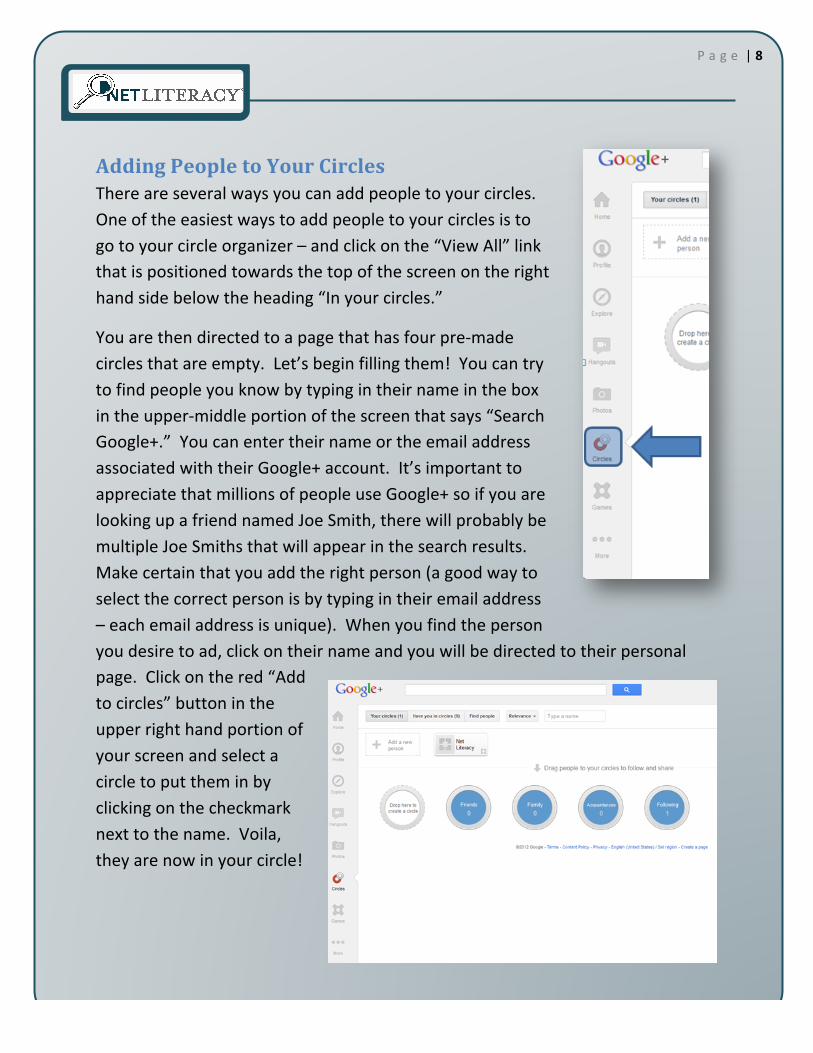
Adding People to Your Circles There are several ways you can add people to your circles. One of the easiest ways to add people to your circles is to go to your circle organizer – and click on the “View All” link that is positioned towards the top of the screen on the right hand side below the heading “In your circles.”
You are then directed to a page that has four pre-‐made circles that are empty. Let’s begin filling them! You can try to find people you know by typing in their name in the box in the upper-‐middle portion of the screen that says “Search Google+.” You can enter their name or the email address associated with their Google+ account. It’s important to appreciate that millions of people use Google+ so if you are looking up a friend named Joe Smith, there will probably be multiple Joe Smiths that will appear in the search results. Make certain that you add the right person (a good way to select the correct person is by typing in their email address – each email address is unique). When you find the person you desire to ad, click on their name and you will be directed to their personal page. Click on the red “Add to circles” button in the upper right hand portion of your screen and select a circle to put them in by clicking on the checkmark next to the name. Voila, they are now in your circle!
| [Pick the date] 9
P a g e | 9
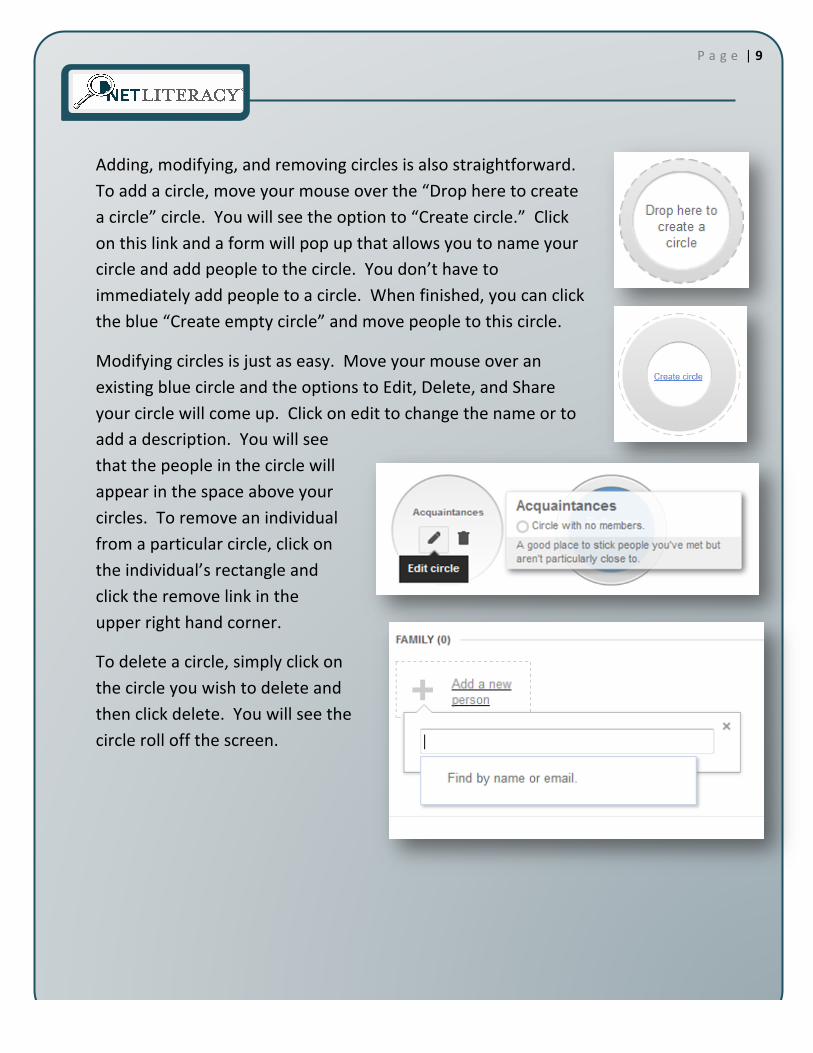
Adding, modifying, and removing circles is also straightforward. To add a circle, move your mouse over the “Drop here to create a circle” circle. You will see the option to “Create circle.” Click on this link and a form will pop up that allows you to name your circle and add people to the circle. You don’t have to immediately add people to a circle. When finished, you can click the blue “Create empty circle” and move people to this circle.
Modifying circles is just as easy. Move your mouse over an existing blue circle and the options to Edit, Delete, and Share your circle will come up. Click on edit to change the name or to add a description. You will see that the people in the circle will appear in the space above your circles. To remove an individual from a particular circle, click on the individual’s rectangle and click the remove link in the upper right hand corner.
To delete a circle, simply click on the circle you wish to delete and then click delete. You will see the circle roll off the screen.
| [Pick the date] 10
P a g e | 10
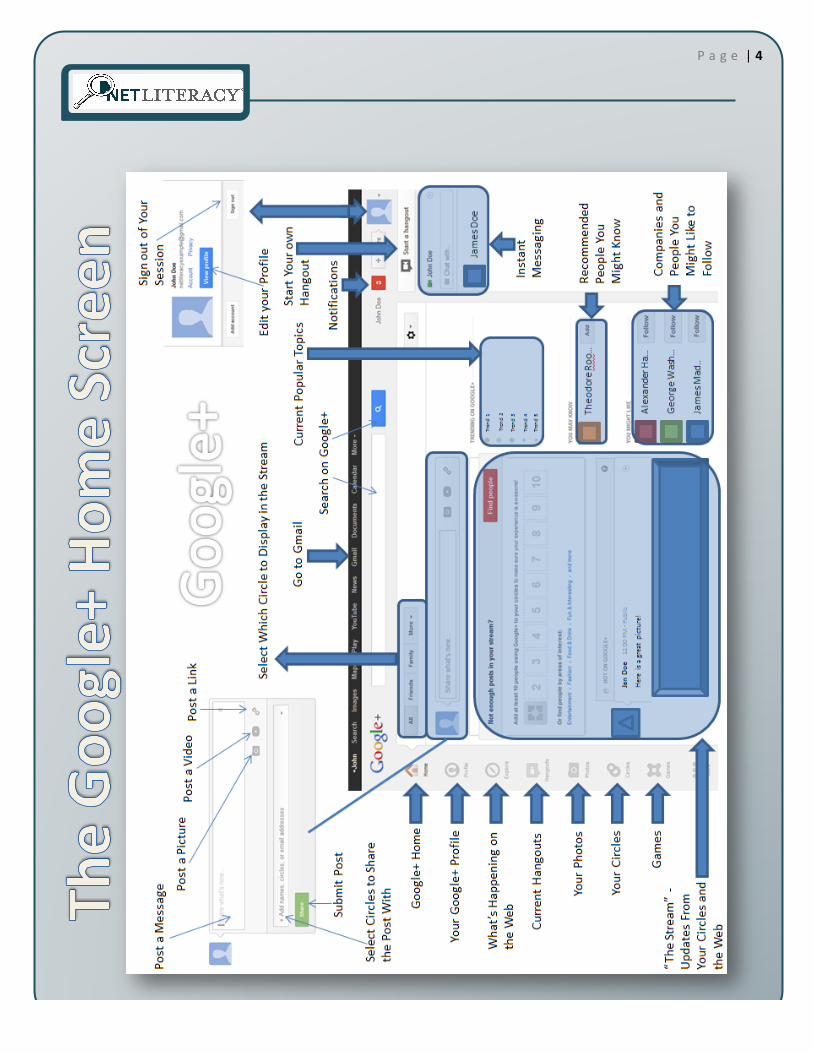
Your Stream All the updates from people and companies in your circles will appear in your stream. Likewise, all of the updates you post will appear in their streams. Recall that the stream is located on your Google+ Home Page. To navigate back to the homepage, you can just type www.plus.google.com into your address bar and it will take you back to your Google+ homepage – or, it’s even easier to just click on the Google+ logo in the in the top left of your screen.
Your stream is like a newsfeed that is updated in real time. For everyone who is in your circles, anything they post will show up automatically in your stream.
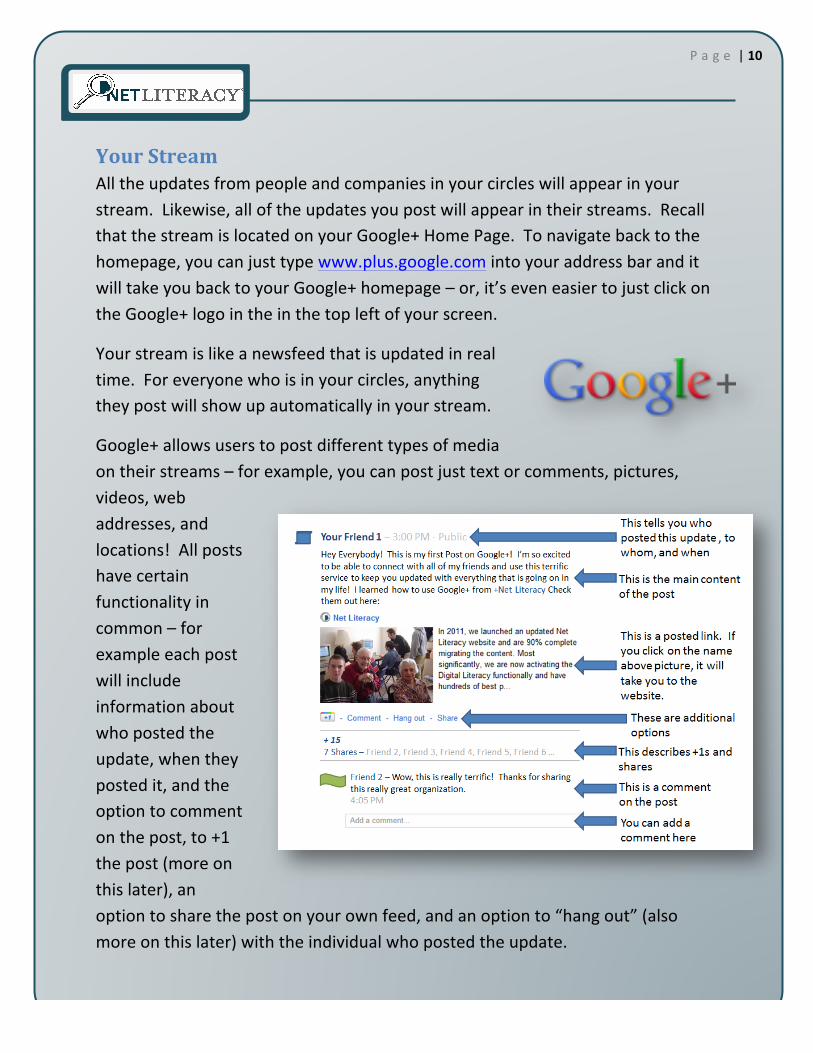
Google+ allows users to post different types of media on their streams – for example, you can post just text or comments, pictures, videos, web addresses, and locations! All posts have certain functionality in common – for example each post will include information about who posted the update, when they posted it, and the option to comment on the post, to +1 the post (more on this later), an option to share the post on your own feed, and an option to “hang out” (also more on this later) with the individual who posted the update.
| [Pick the date] 11
P a g e | 11
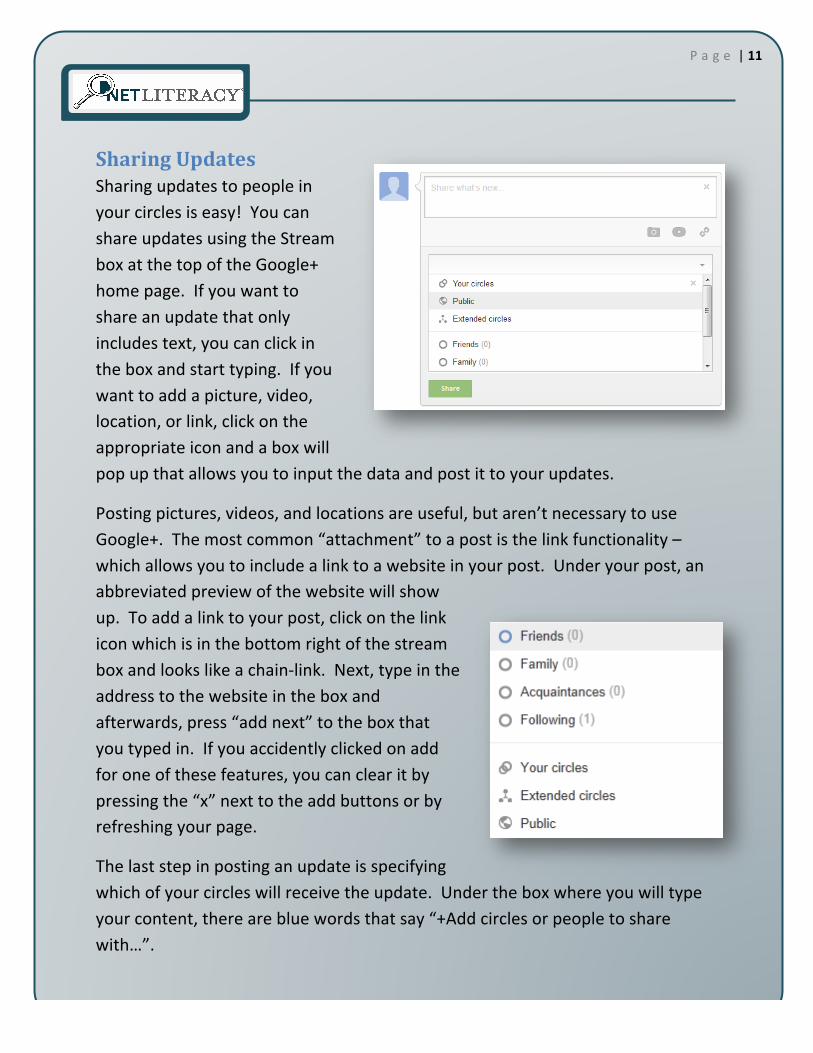
Sharing Updates Sharing updates to people in your circles is easy! You can share updates using the Stream box at the top of the Google+ home page. If you want to share an update that only includes text, you can click in the box and start typing. If you want to add a picture, video, location, or link, click on the appropriate icon and a box will pop up that allows you to input the data and post it to your updates.
Posting pictures, videos, and locations are useful, but aren’t necessary to use Google+. The most common “attachment” to a post is the link functionality – which allows you to include a link to a website in your post. Under your post, an abbreviated preview of the website will show up. To add a link to your post, click on the link icon which is in the bottom right of the stream box and looks like a chain-‐link. Next, type in the address to the website in the box and afterwards, press “add next” to the box that you typed in. If you accidently clicked on add for one of these features, you can clear it by pressing the “x” next to the add buttons or by refreshing your page.
The last step in posting an update is specifying which of your circles will receive the update. Under the box where you will type your content, there are blue words that say “+Add circles or people to share with…”.
| [Pick the date] 12
P a g e | 12
Click on the words and select one or more of your circles to share your post with. When you make a post to one of your circles, it will become visible to everyone who is included in your circle and will not be visible to everyone not in the circle that you selected. You can also select the option to post the update to all of your circles, extended circles, which includes everyone in your circles, and everyone in their circles, and then public – which will be available to everyone on the web if they search for your update.
You can also share an update with individual people. To do this, click on the blue text that says “Add circles or people to share with” and start typing the name of the individual who is in one of your circles -‐ and then when their name is displayed on a list that pops up, simply click on their name.
It’s important to carefully select the appropriate circles when you are talking about a subject that might be private or when you prefer to limit its distribution.
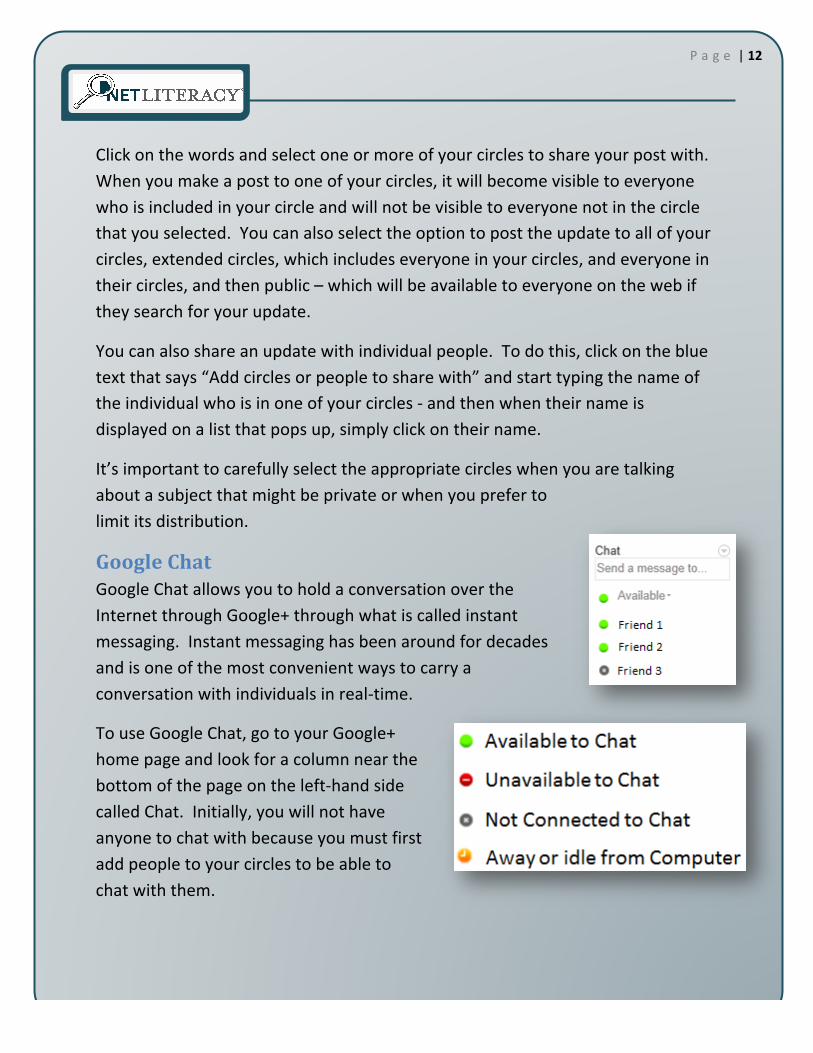
Google Chat Google Chat allows you to hold a conversation over the Internet through Google+ through what is called instant messaging. Instant messaging has been around for decades and is one of the most convenient ways to carry a conversation with individuals in real-‐time.
To use Google Chat, go to your Google+ home page and look for a column near the bottom of the page on the left-‐hand side called Chat. Initially, you will not have anyone to chat with because you must first add people to your circles to be able to chat with them.

| [Pick the date] 13
P a g e | 13
Once people are added to your circles, as they come online and log into Google+, they will have a green circle or rectangle next to their name in the chat list. If they have a red circle, it means that they are busy. An orange circle means that they haven’t touched their computer for a while and may be away while a dark grey circle means that they are offline.
To start a conversation with someone using Google chat, make certain that they have a green icon next to their name in the Google+ Chat. Click on their name and a chat box will pop up on the right, bottom-‐hand corner of your screen. Type your message in the lower box. When your message is complete, press the enter button on your keyboard.
If they are around, they will type a message back to you. You do not need to wait for them to reply to your message before you are able to type another message. Google Chat displays who typed what in the conversation.
When you have finished your conversation, press the “x” in the upper right hand corner to close the chat box.
If someone sends a message to you, the chat box will pop up and if you have speakers connected to your computer, a notification sound will play. This sound will also play when someone sends you a message in Google Chat.
| [Pick the date] 14
P a g e | 14
Google+ Hangout Google+ Hangout is like Google Chat – but with video and sound! Before you can use Google+ Hangout, you must have a webcam (a video camera specially built to be used by computers), a microphone, and speakers (or a set of headphones). Without these, when you use Google+ Hangout, the people with whom you are “hanging-‐out” will not be able to see or hear you, or you might not be able to hear them!
If you do not have a webcam, microphone or speakers, ask a trusted friend or family member to help you obtain them and help you hook them up to your computer. This equipment is relatively inexpensive and they will enrich your experience. Some webcams have built in microphones, but be sure that the webcam that you buy is compatible with your computer before purchasing it.
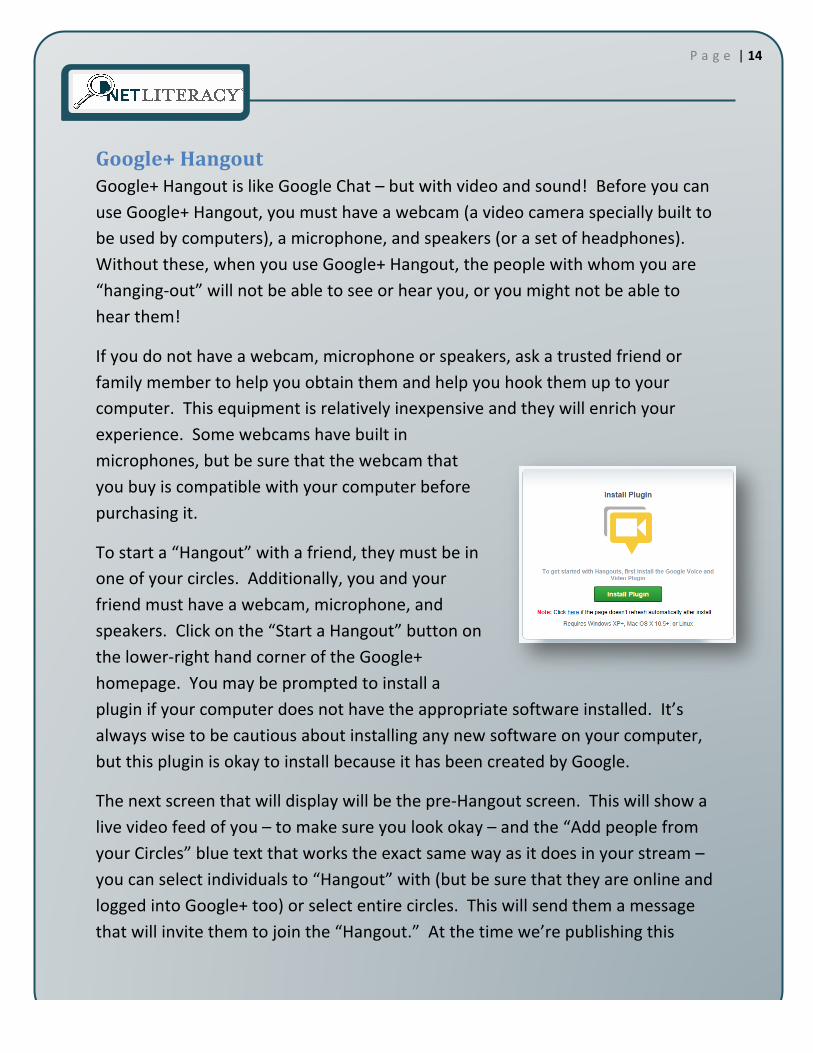
To start a “Hangout” with a friend, they must be in one of your circles. Additionally, you and your friend must have a webcam, microphone, and speakers. Click on the “Start a Hangout” button on the lower-‐right hand corner of the Google+ homepage. You may be prompted to install a plugin if your computer does not have the appropriate software installed. It’s always wise to be cautious about installing any new software on your computer, but this plugin is okay to install because it has been created by Google.
The next screen that will display will be the pre-‐Hangout screen. This will show a live video feed of you – to make sure you look okay – and the “Add people from your Circles” blue text that works the exact same way as it does in your stream – you can select individuals to “Hangout” with (but be sure that they are online and logged into Google+ too) or select entire circles. This will send them a message that will invite them to join the “Hangout.” At the time we’re publishing this
| [Pick the date] 15
P a g e | 15
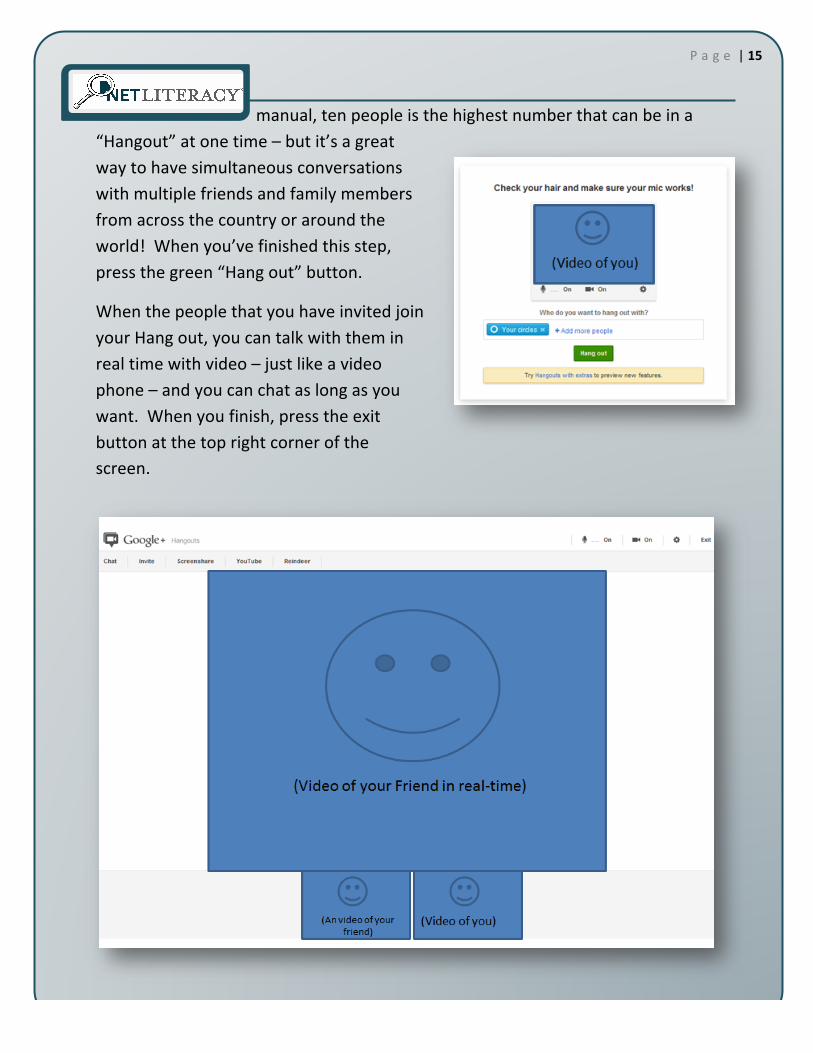
manual, ten people is the highest number that can be in a “Hangout” at one time – but it’s a great way to have simultaneous conversations with multiple friends and family members from across the country or around the world! When you’ve finished this step, press the green “Hang out” button.
When the people that you have invited join your Hang out, you can talk with them in real time with video – just like a video phone – and you can chat as long as you want. When you finish, press the exit button at the top right corner of the screen.
| [Pick the date] 16
P a g e | 16
Other Functionality Google+ has other functionality that you can explore. Google+ has a wide variety of games, ranging from poker to Uno to Pool and Sudoku. These casual games are integrated with Google+ and you can play with and against people in your circles.
Google +1, called “Plus One” is a feature that allows you to give your public stamp of approval on almost anything on the web – a picture, a website, or a Google+ post. These +1s will show up on your Google+ profile and also on any of the content that you +1. Additionally, for anything that anyone else +1s, their +1s will be displayed in your browser as you surf or browse the Net.
As an example, if you go to Google News (www.news.google.com), you will see a greyed out +1 button next to an article. When you find a news article compelling or well written, you can +1 the post and the button will turn blue to show you that you +1-‐ed it. In your Google+ Stream – you can +1 posts that you enjoy, or see posts that others really enjoyed.
Conclusion Congratulations! This completes the Google+ lesson. You are now versed in how to use most of the common features in Google+, the fastest growing social network in the world. If you have additional questions or need help troubleshooting, you can ask a trusted computer-‐savvy friend or family member, search for your question using the Google search engine, or visit the Google+ Support page at http://support.google.com/plus/


![ThemembraneofLiliequist asafehaveninthemiddleofthebrain. …[3, 27, 28].Qietal. suggest intheir study thatthe oculomotor nerve is not a site of attachment; it merely divides the mesen-cephalic](https://static.fdocuments.us/doc/165x107/5feaed2bdb93fe169c0d511d/themembraneofliliequist-asafehaveninthemiddleofthebrain-3-27-28qietal-suggest.jpg)