Lumber for basement partitions. Material for basement partitions.

Basement Window How to swap out those
corroded cast-in-place windows with new, more efficient units
Replacing a
Sealant
Mudsill
1⁄4-in. to 1⁄2-in. overhang
Concrete screws
Sealant around interior joint at all four sides of frame
2x8 pressure-treated sill
5° to 10° slope cut on tablesaw
Cedar bucks Cedar stops
Window fastened to bucks with screws
W H E R E B E S T P R A C T I C E S A R E P U T T O T H E T E S T
FHB’s
W H E R E B E S T P R A C T I C E S A R E P U T T O T H E T E S T
Fine Homebuilding’s
W H E R E B E S T P R A C T I C E S A R E P U T T O T H E T E S T
FHB’s
Online members can see a video of this process at FineHomebuilding.com/projecthouse.
Sealant
COPYRIGHT 2015 by The Taunton Press, Inc. Copying and distribution of this article is not permitted.
FINE HOMEBUILDING62 Drawing: Don Mannes
Traditionally, basements were designed for storage and utilities, not as oppor tunities for gaining living space. As a
result, basement-window choices fell to the common denominators of local prac-tice, which in my area meant low-cost, stock, cast-in-place units.
Often these old windows are over-looked until they have deteriorated beyond repair. Fortunately, replacing them is straightforward and pretty inex-pensive. Plus, modern vinyl windows are generally more airtight, are easier to oper-ate, and require less maintenance than the old options.
Houses built around 1950 and later usu-ally have metal basement windows mea-suring about 12 in. to 24 in. in height and between 30 in. to 36 in. in length. These units were designed to be set into the tem-porary wooden frames used to form foun-dation walls; the poured concrete would fill in around the window frames to lock the units in place. Gray primer is often the only coating these frames or sashes have ever received, so they frequently rust out from both the exposed and the concrete sides. While it is possible to fit a replace-ment window within the metal frame, I prefer to remove it rather than just con-ceal it under a new unit.
Although you can buy windows sized to match your exact concrete opening (see “The buckless option,” p. 65), the most common replacement approach is to install wood bucks into the rough open-ing and then fasten the new window to the wood. This is my preferred approach because it allows me to use inexpensive stock windows that are readily available at home centers and building suppliers for about $60. Additionally, the bucks allow me to adjust for out-of-parallel and out-of-square openings.
Because there are many types of metal basement windows, not every step I describe here will be applicable in every situation. Still, these windows share the same basic traits, and the steps for replace ment are the same: Remove the old window, prepare the opening, mea-sure and fit the new window, and then attach and seal the window in place. On the job shown here, from frame removal
By Mike Guertin
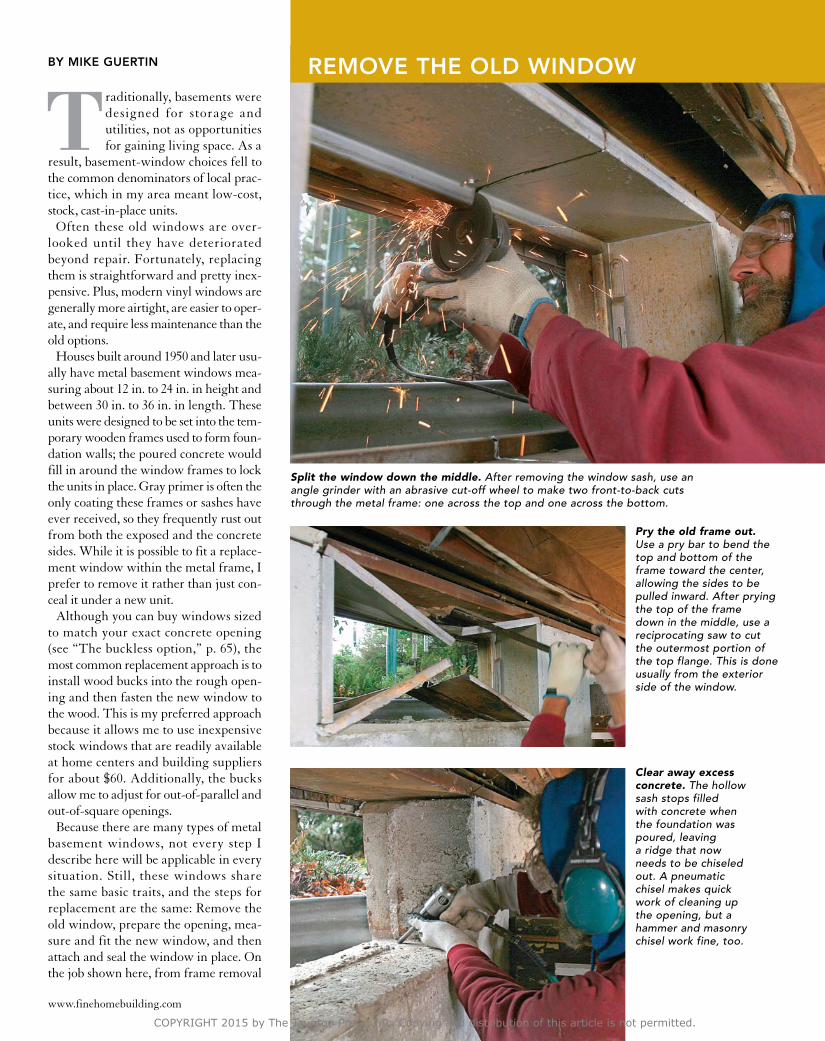
Split the window down the middle. After removing the window sash, use an angle grinder with an abrasive cut-off wheel to make two front-to-back cuts through the metal frame: one across the top and one across the bottom.
Pry the old frame out. Use a pry bar to bend the top and bottom of the frame toward the center, allowing the sides to be pulled inward. After prying the top of the frame down in the middle, use a reciprocating saw to cut the outermost portion of the top flange. This is done usually from the exterior side of the window.
Clear away excess concrete. The hollow sash stops filled with concrete when the foundation was poured, leaving a ridge that now needs to be chiseled out. A pneumatic chisel makes quick work of cleaning up the opening, but a hammer and masonry chisel work fine, too.
reMOve tHe Old windOw
COPYRIGHT 2015 by The Taunton Press, Inc. Copying and distribution of this article is not permitted.
www.finehomebuilding.com

Fit the sill. Cut correctly, the sill should fit snugly, requiring a few taps of the hammer to seat it in position. To attach the sill, drill and drive concrete screws into the concrete below.
Measure the opening. With the window resting in place on the sill and centered in the opening, measure the width of the gaps at several points of each vertical side to determine if the bucks need to be tapered.
Side bucks get angled fasteners. Mark plumb lines on the rough opening to help orient the bucks. Tap the side buck pieces in place, and toe-screw stainless-steel trim-head screws into the mudsill at the top and into the sill at the bottom (center right).
Secure the stops. Attach the wooden stops with stainless-steel trim-head screws. The upper stop can be secured up into the mudsill, and the side stops can be attached to the side bucks with screws driven at a slight angle (right).
through final installation, the whole process took about three hours.
Out with the oldA reciprocating saw with a metal-cutting blade may be your first thought for cutting out the old window frame, but the concrete beneath the steel kills such blades faster than you can replace them. A general-purpose metal-grinding wheel mounted in a 4-in. angle grinder works best. You may not need to cut completely through the frame, because the weakened metal often breaks along the grind line when you begin prying the frame out. Even if you do cut completely through the sash stop and the concrete within, the grinding wheel won’t be adversely affected.
The exterior side of the window may have a top flange that is covered by wall sheathing and siding. To get better access, wait to cut this flange until after you begin prying the frame out of the opening.
The idea is to pry the top and bottom of each side of the frame toward the center, making an X-shape from the severed frame parts. Usually the bottom of the metal frame extends about an inch into the concrete on each side of the window, so the sides have to be pried in at least that far to disengage them fully from the concrete. Prying out the old window may be quick, or it may be a major struggle. I’ve found that the oldest windows were built from the heaviest gauge of steel.
With the old window out of the way, I clean and seal the opening for the new win-dow. Siloxane solution, which can be found at masonry suppliers or online, is used to seal the opening to reduce the likelihood of freeze-thaw damage around the window, of efflorescence appearing below the window opening, and of moisture seeping up through the concrete and into the wood sill and bucks that will be installed.
A sill sets the bottomSet the new window atop a sill cut from 2x8 pressure-treated lumber. To reduce the chance of the wood warping, select a piece that’s free of large knots and has relatively straight grain. Plan for the interior side of the window to set flush with the inside edge of the 2x8, and use a tablesaw to rip a 5° to 10° slope on the outside edge of the sill to help water drain away. If the height of your opening or chosen window doesn’t permit the use of a full-thickness 2x sill, you can saw or plane the stock to be thinner. If
Build tHe Bucks
COPYRIGHT 2015 by The Taunton Press, Inc. Copying and distribution of this article is not permitted.
FINE HOMEBUILDING64
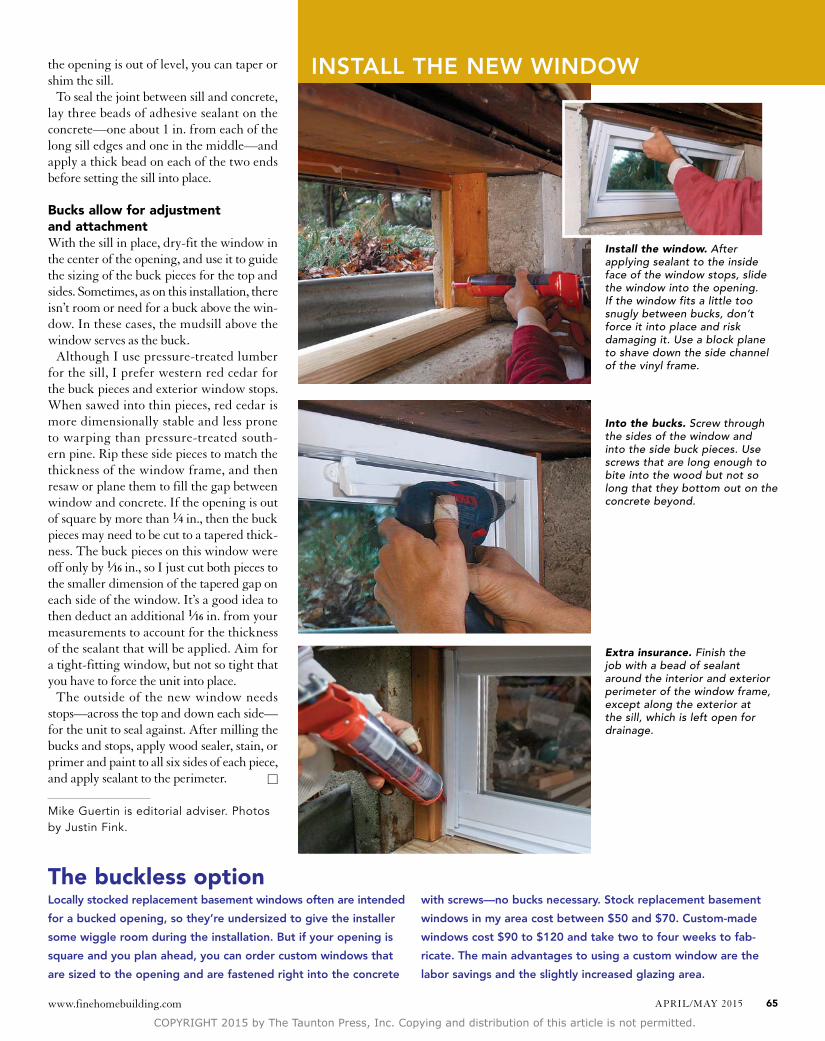
Install the window. After applying sealant to the inside face of the window stops, slide the window into the opening. If the window fits a little too snugly between bucks, don’t force it into place and risk damaging it. Use a block plane to shave down the side channel of the vinyl frame.
Into the bucks. Screw through the sides of the window and into the side buck pieces. Use screws that are long enough to bite into the wood but not so long that they bottom out on the concrete beyond.
Extra insurance. Finish the job with a bead of sealant around the interior and exterior perimeter of the window frame, except along the exterior at the sill, which is left open for drainage.
the opening is out of level, you can taper or shim the sill.
To seal the joint between sill and concrete, lay three beads of adhesive sealant on the concrete—one about 1 in. from each of the long sill edges and one in the middle—and apply a thick bead on each of the two ends before setting the sill into place.
Bucks allow for adjustment and attachmentWith the sill in place, dry-fit the window in the center of the opening, and use it to guide the sizing of the buck pieces for the top and sides. Sometimes, as on this installation, there isn’t room or need for a buck above the win-dow. In these cases, the mudsill above the window serves as the buck.
Although I use pressure-treated lumber for the sill, I prefer western red cedar for the buck pieces and exterior window stops. When sawed into thin pieces, red cedar is more dimensionally stable and less prone to warping than pressure-treated south-ern pine. Rip these side pieces to match the thickness of the window frame, and then resaw or plane them to fill the gap between window and concrete. If the opening is out of square by more than 1⁄4 in., then the buck pieces may need to be cut to a tapered thick-ness. The buck pieces on this window were off only by 1⁄16 in., so I just cut both pieces to the smaller dimension of the tapered gap on each side of the window. It’s a good idea to then deduct an additional 1⁄16 in. from your measurements to account for the thickness of the sealant that will be applied. Aim for a tight-fitting window, but not so tight that you have to force the unit into place.
The outside of the new window needs stops—across the top and down each side—for the unit to seal against. After milling the bucks and stops, apply wood sealer, stain, or primer and paint to all six sides of each piece, and apply sealant to the perimeter. □
Mike Guertin is editorial adviser. Photos by Justin Fink.
locally stocked replacement basement windows often are intended
for a bucked opening, so they’re undersized to give the installer
some wiggle room during the installation. But if your opening is
square and you plan ahead, you can order custom windows that
are sized to the opening and are fastened right into the concrete
with screws—no bucks necessary. stock replacement basement
windows in my area cost between $50 and $70. custom-made
windows cost $90 to $120 and take two to four weeks to fab-
ricate. the main advantages to using a custom window are the
labor savings and the slightly increased glazing area.
The buckless option
install tHe new windOw
COPYRIGHT 2015 by The Taunton Press, Inc. Copying and distribution of this article is not permitted.
www.finehomebuilding.com APRIL/MAY 2015 65