Baseball Positive Coaching Manual - North Central Little League
154
© 2011 Mark Linden 1 Baseball Posive Coaching Manual 2013 “Baseball is a Game of Movement” Focus on actions not results when teaching/playing Have FUN!
Transcript of Baseball Positive Coaching Manual - North Central Little League

© 2011 Mark Linden 1
Baseball Positive Coaching Manual
2013
“Baseball is a Game of Movement”
Focus on actions not results when teaching/playing
Have FUN!

© 2011 Mark Linden 2
The content in this manual is for the exclusive use of the league membership. If you desire to print, present, or use this material for any use other than your team practices and games contact Mark Linden of Baseball Positive for permission:
Mark Linden Director, Baseball Positive
Seattle, WA 98103 206 783 1604
206 714 5276 cell [email protected]
The information in this manual is in support of the content presented at the Baseball Posi-tive Coach Training programs. If you were not able to attend a program, first contact a coach or parent who did and they can likely help you with the finer details of the content. Further questions can be directed to Baseball Positive at [email protected]

© 2011 Mark Linden 3
Table of Contents
7 Overview of Manual
8 Introduction
9 12U Coaching Mindset
10 Teaching Phrases
11 Concepts
12 Defensive Movement and Responsibilities - Rules
13 Delivering Balls During Drills
14-6 Sequencing of Instruction Content
17 Diagrams Explained
18 Practice Structure
19 Practice Structure - Explained
20 Whiffle Ball Batting Practice – ‘Live 5’
21 Skill Building Warm-up – Menu of Drills
22 Playing Catch Practice – Detail
23 Team Skills & Drills
24 Batting Practice
25 Batting Practice Structure
26 BP Diagrams Explained
27 Batting Practice - Defensive Set up, ‘ages 7-8’
28 Batting Practice - Defensive Set up, ‘ages 9-10’
29 Batting Practice - Defensive Set up, ‘ages 10-11’
30 Batting Practice Structure – Skills Station, Examples of Activities
31 Batting practice Structure – Four Diagrams
32 Scrimmage
33 Scrimmage: Set up and Approach to Teaching
34-6 Scrimmage Focus Points for Teaching
37 Practice Schedule Templates / Menu of Drills
38 Hour and a Half Practice Template
39 Two Hour Practice Template
40 Menu of Drills for Building a Practice Plan
41 Guides for Coaching Each Level of Play
42-5 Tee Ball
46-50 Coach/Machine Pitch

© 2011 Mark Linden 4
Table of Contents (cont.)
51 First Year Player Pitch / Pinto
52 First Year Player Pitch / Pinto - Coaching Mindset
53-5 Sample Practice Plans
56 Minors/Mustang
57 Minors/Mustang - Coaching Mindset
58-60 Sample Practice Plans
61 Majors/Bronco
62 Majors/Bronco - Coaching Mindset
63-5 Sample Practice Plans
66 Maximizing Practice Opportunities
67 Tips for Greater Practice Efficiency
68-9 Planning and Organizing the First Practices of the Season
70 Shortage of Coaches - only 1 coach
71 Shortage of Coaches - only 2 coaches
72-3 Parents Seven
74 Rain/Wet Day Practice – Menu of Activities
75 Pre-Game Practice / Between Innings Practice / Game Day Dugout Management
76 Drill Diagrams
77 Position Numbering
78 Receiving a Throw at a Base – Four Diagrams: Two to third; Two to second
79 Positional Responsibilities
80 Infield Base Coverage Responsibilities - Explained
81 Infield Base Coverage Diagrams (pitchers moving toward corner base)
82 Outfielders Backing up Bases, Explained
83 Backing up Bases - Outfielders
84 Backing Up Bases – Pitchers
Full Team Base Coverage and Backing-up
85 Ball Hit to 1b
86 Ball Hit to 2b
87 Ball Hit to SS
88 Ball Hit to 3b
89 Full Team Movement, Balls Hit to the Outfield
90 Middle Infielders Movement on Balls Hit to the Outfield
91 Middle Infielders Movement on Balls Hit to the Pitcher

© 2011 Mark Linden 5
Table of Contents (cont.)
92 Infield Drills
93 Underhand Toss - Shuttle / Throwing on the Run – Shuttle
94 Catch, Tag & Throw
95 20’ Ground Balls
96 Ranging Laterally for Ground Balls
97 Middle Infielder - Throws to Second Base
98 Catching a Pop-up Going Back; Middle Infielder Cover, Tag & “Look for Other Runners”
99 Infielders Throwing Across – Rotation
100 “Double Plays”
101 Outfield Drills
102 Drop Step Routine
103 Toss Drills
104 Outfield Hitting Cut - ‘Box’ Mentality
105 Team Skills & Drills
106 Cuts and Relays
107 Rules & Communication for Cuts-Relays
108 Cut-Relay to Home, Phases I-III
109 Cut-Relay to Home, Phase I
110 Cut-Relay to Home, Phase II
111 Cut-Relay to Home, Phase III
112 Cut-Relay to Home, Ball Past Outfield
113 Two Bases Relay Game, Runner at Second
114 Cuts-Relays to Third
115 Two Bases Relay Game, Runner at First
116 9-6-5-4-2 Throwing & Communication Drill
117 Fly Ball Communication
118 Fly Ball Communication - Dominant Player Chart
119 Fly Ball Communication Drill
120 Pitchers Defense
121 Pitchers Defensive Plays to their Left
122 Pitchers Defensive Plays to their Right
123 1-6 Play: Comebacker to Pitcher, Throw to Shortstop Covering Second Base Bag
124 Pitchers Fielding - Three Groups Drill: 1-5 (bunt), 1-6, 1-3
125 Three Groups Drills
126 Three Groups Drills: 5-3, 6-4 Moving Away From Bag, 2B Going Back
127 Three Groups Drills: 5-4, 4-6, 3-1

© 2011 Mark Linden 6
Table of Contents (cont.)
128 Rundowns
129 Rundown Drill
130 Mass Ground Balls and Fly Balls
131 Mass Gb & Fb - Explained
132-5 Mass Ground Balls and Fly Balls - Diagrams
136 Base Running
137 BR: Through First Base / Balls Hit Into the Outfield
138 Base Running on Fly Balls - ‘Half Way’
139 Drill Sheets for Batting, Pitching and Catchers
140 Batting Drills and Exercises
141 Basic Teaching Points for Hitting Live Pitches
142-4 Batting Instruction - Links Supporting Teaching Content
145 Pitching Drills and Sheet
146 Pre-Game Throwing Routine
147-9 Catcher’s Training, Teaching Points and Basic Drills
150-2 Catcher’s Drills and Explanations I
153 Reservation of Rights

© 2011 Mark Linden 7
Overview of Manual
The purpose of this manual is to provide guidance to volunteer parents who commit so much time to enrich-
ing the lives of the children in our communities. The information found inside is based on thousands of hours
of hands on experience working with the 12U age group This manual provides a step by step approach to
developing young ball players from Tee-Ball through the Majors/Bronco level at a reasonable pace using a
tried and true, age appropriate approach.
Please read pages 8-16 before moving forward with the manual. This information provides a foundation for
clear understanding of not only the manual, but the challenge of coaching young children effectively.
Pages 18-36 outline the components for structuring an effective practice. This information is based on the
very efficient model used at the NCAA level, but modified to best teach, develop and prepare young ballplay-
ers.
Pages 37-40 contain templates for practices 90 minutes in length as well as two hours, as well as a menu of
drills and activities to plug into the templates. This section is the central focus of the manual for day to day
planning and preparation. Pull information for the menu and plug it into the practice template and note
which drill diagrams apply to the practice plan. This information can then be emailed to assistants and par-
ents who will be helping with the upcoming practice. Those folks can print out the practice plan as well as the
drill diagrams. This process ensures that all adults involved are prepared and on the same page going into
each practice. Bring a couple of extra copies for use by parents that might be recruited as impromptu assis-
tants during that practice.
Pages 41-65 provide information specific to each level of play. Tee-ball and Coach/Machine Pitch do not
require as in depth planning (and knowledge). Practices at these levels will are very elementary. Information
for the Player-Pitch levels include a Coaching Mindset page as well as sample practice plans. These practice
plans are ready to go and are provided for use ‘as is’ or can be quickly modified. These plans are not exclu-
sive for the level of play in which they are found. Look at the practice plans in all three sections: ‘First Year
Player Pitch/Pinto’, ‘Minors/Mustang’ and ‘Majors/Bronco’. The content in these practice plans is applicable
to all three levels.
Pages 66-75 provide a lot of ideas for maximizing practice opportunities over the course of the season.
Pages 76-138 contain drill diagrams and other information related specifically to drills, teaching and practice
activities.
Pages 139-152 contain information specific to developing Batters, Pitchers and Catchers. This information is
presented as support material for those who attend the clinics on teaching these skills.
© 2011 Mark Linden 8
Introduction
Philosophy: Keep kids constantly moving throughout practice, change up activities often, acknowledge kids when they
do things correctly and use a positive tone when making corrections (‘you are going to get this soon’) and keep it FUN.
We are in this for the kids. Its all about them and we aim to develop their baseball skills while providing an environ-
ment that they will want to come back to the following season.
Sticking to consistent terminology (‘Teaching Phrases’), so that players and coaches know exactly what statements
used in teaching mean increases the pace of learning and the rate of retention a great deal.
Baseball is not black and white; given the geometry of the field and the almost limitless situations with regard to the
location of the ball on the field and differing numbers of base runners, the possibilities for unique situations are end-
less. The basics of the game are very elementary and virtually all situations can be dealt with following a few basic
rules. When the odd situation comes up, a player/team that is well schooled in the basics will have a pretty good
chance of ‘figuring out’ what do when the rare odd situation comes up.
The content of this manual focuses on those basics. Situations will occur that are not covered here. Also, the infor-
mation in this manual, like baseball, is not black and white.
Experienced Coaches: look to this manual as a guide and don’t feel I am suggesting you follow all the content exactly.
My hope is this resource will enhance your experience and knowledge.
Novice and First Time Coaches: this manual does not give you everything, and don’t worry if you don’t follow every
detail exactly. This is a guide. Your greatest education as a coach comes through experience. Each day, week, month
and season you will learn more and more and your skills will improve. Enjoy being with the kids, keep this activity in
perspective (these are little kids playing baseball/softball) and maintain a sense of humor as you improve. Given some
time and patience you will surprise yourself with how effective you become over time.
Review the ‘Parents Seven’ on pages 72-3 prior to inviting parents to help. Emphasize that we don’t want to give the
kids too much information and for the Parent Assistant to not instruct beyond the information stated in the ‘Parents
Seven’ section. Explain that the teaching in the drills they help with are part of a broader instruction system and that
any variance from what is outlined will interrupt the consistency in the overall teaching structure. Keep in mind that
this may be difficult at first for parent helpers, because they, like you and the other coaches want to do everything they
can to help the kids and make the mistake of seeing the game from their adult perspective and not the kids’ limited
abilities, both physical and cognitive.
Reading this section will also reinforce your focus on the most fundamental areas of teaching.

© 2011 Mark Linden 9
12U Coaching Mindset
Children age 12U are physically and cognitively different from teenage and adult players.
The 60’ game is different from that played on larger diamonds.
Legs power the body, head controls power / The game is played with the feet. Teaching the ‘lower half’ is very important.
Recognition that momentum (movement) is paramount to generating power and fluidity in the throwing action.
We are working with kids. Patience is vital. Developing skills will take days, months and even years.
Each new concept, drill or activity generally needs to be covered three separate times to take hold.
All activities will take more time than anticipated when introducing them and training the players (and coaches). Plan on
giving each activity 3-5 days before expecting it to run within the ‘planned’ time frame.
Don’t get frustrated when your practice does not stick to the time frame you planned for; maintaining a tight schedule is
an on-going challenge for coaches at all levels.
Make it a goal, as a coach, to NOT tell players where to throw the ball during a game. DO NOT tell them where to throw
the ball during a scrimmage. Ask parents to refrain from this during games. Making the decision where to deliver the
ball is the one of the greatest learning opportunities for a young player to learn the game. Let them make mistakes, THEN
teach.

© 2011 Mark Linden 10
Teaching Phrases
These key “Teaching Phrases” are referenced throughout the manual and are hi-lighted by quotation marks. Repetitive and
consistent use of these statements will simplify teaching and learning. Having a common vernacular where statements
have a clear and specific meaning greatly increases the effectiveness of communication between coaches and players.
These statements provide quick reminders during drills, scrimmages and games.
When becoming acquainted with this manual do not spend a lot of time in this section ‘memorizing’ these phrases and their
meanings. As the season progresses and you spend more time using the manual and working with kids on the field, these
phrases will become more familiar, will start rolling off your tongue and their meanings will become second nature to you
(and the kids).
TEACHING PHRASES
1. “Baseball is a Game of Movement”
2. “Ready Position” (prior to every throw, pitch and drill repetition)
3. “Move Your Feet” (throwing and receiving throws)
4. “Reach Forward to Catch”
5. “Feet Wide” (fielding a ground ball; batting stance)
6. “Two Players in Position to Catch Every Throw” (backing up throws/bases)
7. “Power Position” (end of the pitcher’s stride; position players prior to throwing - key: elbows as high as shoulders)
8. “Head is Steering Wheel” (throwing/pitching)
9. “Follow Your Head” (after throws made by a position player)
10. “Head in Place” (batting)
11. “Cover the Base with Your Eyes” (receiving a throw at a base)
12. “The Base is for the Runner, The Ball is for the Defense” (receiving a throw at a base)
13. “Ball First, Base Second” (receiving a throw at a base)
14. “Look for Other Runners” (immediately following any play on a runner by the defense)
15. “Turn Glove Side” (primarily used when a player has their back to their target when fielding/receiving the ball)

© 2011 Mark Linden 11
CONCEPTS
Below are helpful concepts to make part of an effective 12U coaching mindset:
Focus on actions not results when teaching and providing feedback
Playing Catch Practice is the most important part of every practice
Legs power movements; head controls the power
Batters need a high percentage of good pitches to hit during live batting - it is the coach’s
responsibility to make this happen
Batting Practice is a 12-player drill
Every throw during practice should be made using sound throwing technique
Consistently hitting ground balls and fly balls exactly where you want them (using a bat) is
very difficult. Throwing/tossing/rolling the ball during drills ensures the ball goes exactly
where it is intended nearly 100% of the time
SS, 2b and P have two bases; one to their left and one to their right. 1b and 3b have one base
RF and LF have two bases to back up; CF has one
Catcher’s ‘position’ is in front of home plate
Two players in position to receive each throw (player backing up is the second person)
Players want to be 25’ behind the base when backing-up
Keep the ball moving (on defense)
You don’t have to throw the ball to transport it
No overhand throws after runners stop attempting to advance (Minors/Mustang and below;
recommended at Majors/Bronco level)
Get the ball to the middle of the infield (to conclude defensive plays as quickly as possible)

© 2011 Mark Linden 12
Defensive Movement and Responsibilities - Rules
“Baseball is a Game of Movement”
ALL 9 PLAYERS MOVE the moment the ball is put into play …EVERY Play
Three Defensive Responsibilities:
1. Play the Ball
2. Cover a Base
3. Back up a Base/Throw
Defense Objectives:
1. Stop the ball
2. Stop the runners
3. Get the ball to middle of infield
Move Towards the Ball
The first action/step when the ball is put into play is towards the ball: all nine players ...get moving!
SS/2B/P – this is rule is critically important for these three positions
Ball to your left, cover the base to your left; Ball to your right, cover the base to your right.
Infielders - Play the ball or cover a base (on rare occasions an infielder is needed to back up a base)
Catcher: Move to your Position (“Your #1 tool is your voice”)
Outfielders:
1. Play the Ball
2. Back up the two infielders in front of your position
3. Back up a base
Pitcher:
1. Cover/Back up a base (1st or 3rd) on balls in the infield
2. Back throws to bases on balls hit to the outfield
3. Cut-Relay person when a runner is scoring from second on ball hit to the outfield
Receiving Throws at a Base
1. “Cover the base with your eyes”
2. “Ready Position”
3. “The base is for the runner, the ball is for the defense”
4. “Ball First, Base Second”
5. “Look for other runners”
The ball is constantly moving on defense:
- THROW the ball (to cut player or the base ahead of the runner)
- RUN with the ball (a player IS allowed to transport the ball without throwing it!)
to cut player or the base ahead of a runner
toward middle of INF (Pitching rubber)
Getting the ball in to the Pitcher:
1. No overhand throws after runners have stopped attempting to advance
2. Run toward pitcher: hand it or UH toss; pitcher meet the player with the ball half way
3. Ignore all baiting; stand on the pitching rubber ASAP
Position players RUN back to their positions following the play
- Eyes in on catcher
- Constant movement by defensive players

© 2011 Mark Linden 13
Delivering Balls During Drills
In most practice activities coaches can deliver balls to their players by tossing or rolling rather than hitting them with
a bat. The benefit of tossing or rolling a ball is having greater control, accuracy and consistency. Delivering a ball by
hitting it with a bat can result in swings and misses popping the ball up or shanking ground balls. It is difficult to put
the ball exactly where we want it when hitting with a bat. Also, most drills are run with the coach in close proximity
of the players, so batting a ball does not work with in the context of the drill space.
When working on fielding skills, ground balls as well as fly balls, it is suggested that balls are hit repeatedly to the
same spot in order for the player to repeated and consistent reps of the same movement. In stead of mixing up the
location of hit balls, give the players a series of balls to their right, then to their left, in front, behind, etc.

© 2011 Mark Linden 14
DIAGRAMS EXPLAINED
Throughout the manual are drill diagrams. Drills that can be run on a MINI Diamond are noted as such at the top of the diagram page. Some dia-grams have instructions and teaching points, while others do not. Those without supporting info were covered in the coaching clinics and/or are covered in the accompanying text pages. At first glance there seems to be a lot of information in the diagrams. Many of the diagrams demonstrate a step by step progression in teaching. Cuts-Relays is a good example; the skills, concepts and communication for cuts-relays are pretty much the same for all situations. Look at the dia-grams in sections. Teach and master Phase I. When moving on to Phases II, III and ‘Balls past the OF’ there are no new skills or communication for the kids to learn, the positioning of a couple of players is what changes. Once the kids (and coaches) have Phase I understood the progression to the next phases requires only a small amount of adjustments and learning. The bulk of the content in subsequent phases builds off what is learned in Phase I (and in Playing Catch Practice). Symbols used in the Diagrams:
© 2011 Mark Linden 15
Sequencing
of
Instruction
Content

© 2011 Mark Linden 16
Sequencing of Instruction Content - page 1 Activities and drills are listed in a sequence that has proved effective working with many teams over many years. The age
of the players on a team, their stage of development and their group’s unique needs will impact the exact order to intro-
duce content. This list is provided to serve as a reference guide over the course of the season.
NOTE: items with “intro” following them are skills that require on-going work and development. Their placement in the sequencing is where these skills are introduced. Their on-going instruction is then planned within the context of the daily practice structure.
“Baseball is a Game of Movement” Ready Position Receiving Throws - Three Points: 1. Ready Position, 2. Move Feet to Catch, 3. Reach Forward to Catch Infield Positioning - 10’ from corner bases / Shortstop and Second Baseman, 20’ from second base bag Receiving a Throw at a Base Underhand Toss - a Major League play Throwing Mechanics Throwing Footwork Playing Catch Practice Three Defensive Responsibilities: 1. Ball, 2. Base, 3. Back-up Defensive Responsibilities - Intro
Base Coverage Responsibilities - Infield (4 – 1 = 3)
Catcher’s ‘Position’
OF Backing-up Bases
Pitcher Base Coverage Responsibilities
Full Team Movement
Pitcher’s Backing-up Throws from the Outfield
SS/2b Responsibilities on Balls to Pitcher and Center Field
Outfielder’s Defensive Responsibilities
Pitcher’s Defensive Responsibilities
Catcher’s Responsibilities Fielding Footwork - teach 20’ Ground Balls Batting - Intro first two drills to 9U / Intro first four drills to ages 10-12 Scrimmage – become familiar with “Scrimmage Focus Points for Teaching ” p33-6 Getting the ball in to the Pitcher – bottom of p 12

© 2011 Mark Linden 17
Sequencing of Instruction Content - page 2
Replaying Balls
Cut-Relay Footwork
Toss Drills
Drop Step Routine / Get Behind It
SBW Drills – begin introducing and teaching these drills and incorporate them into daily practices
Batting Practice - Teach Routine
Fly Ball Communication
Pitcher’s Defense
Three Groups Drills
Cuts-Relays
Pitching – Intro (Note: Prior to this players are developing the foundation for pitching instruction via disciplined throwing drills)
Base Running – Intro
Rundowns
1st and 3rd Defense
Bunting
Bunt Defense
Turning Double Plays - Feeds and Footwork
© 2011 Mark Linden 18
Practice
Structure

© 2011 Mark Linden 19
Practice Structure - Explained
Pre - Practice / Whiffle Ball Batting Practice It is strongly recommended that kids who are early arrivals not play catch on their own. Throwing and catching skills are the
foundation of the game. The kids should always be supervised when executing these critical skills. Instead of allowing our kids
to play catch when they arrive, set up a whiffle ball batting practice. One coach can throw to two kids at once, two coaches can
throw to four kids, and so on. Have half the kids batting and half chasing balls (they love this!). Give each player 8 swings then
switch (No ‘one mores’; doing this can eat up a lot of valuable time).
Skill Building Warm up There are many activities that can warm up our players’ bodies, which at the same time develop baseball skills. Instead of run-
ning the kids across the park and back, take them through a series of activities that develop baseball skills.
Playing Catch Practice The most important part of a practice is the Playing Catch Practice segment, traditionally referred to as ’Warming Up’. Unfor-
tunately this has evolved into a lazy and sloppy activity. The ten minutes our kids spend playing catch should be the most fo-
cused, most intense and most disciplined part of the practice. This is the time when we as coaches have to be at our best,
making sure each player is using proper catching and throwing technique. When the team is playing catch there should be a
coach standing behind each group of kids with extra balls in hand, ready to resupply kids when balls get past them. One of the
biggest time wasters in baseball practices is kids chasing after balls. We want every possible moment of practice to involve skill
building activities. The first few minutes of this routine the kids throw from 35’ and work on Pitching Mechanics; the next few
minutes throw from ~60’ moving their feet to throw. The final part of Playing Catch Practice the kids work on a skill activity
such as Cut-Relay Footwork or Replaying Balls.
Team Skills & Drills
Examples of activities include, Cuts-Relays, Fly Ball Communication, Rundowns, positional responsibility drills, Base Running,
Cuts-Relays, Mass Ground Balls and Fly Balls, etc.
Batting Practice This activity commonly has one kid batting and eleven kids standing out in the field shagging, or more specifically, getting board
and losing interest in the sport. Batting Practice is a ‘12 Person Drill’ where the entire team is engaged, active and developing
skills throughout the activity.
Scrimmage ‘Kids sign up to PLAY baseball, not to practice baseball’. Kids DO understand that they need to practice to develop their skills,
but they also have a strong desire to PLAY. Our goal as coaches is to create a practice environment that is FUN as well as ac-
tive, efficient and effective. It is strongly recommended that Each practice conclude with a scrimmage. This is a controlled ac-
tivity, however. The coach pitches (from a short distance, so to deliver a high percentage of strikes) and lays it in there so that
most every pitch is put into play. This ensures that the activity keeps moving and is fast paced. While the kids are having FUN
PLAYING, the scrimmage serves as a great teaching and learning tool. Following each play, the coaches acknowledge things
kids did correctly and instruct as needed. These teaching periods should be brief, 10-20 seconds; keep the game moving!
“Nobody ever said, "Work ball!" They say, "Play ball!" To me, that means having fun.” –Willie Stargell“

© 2011 Mark Linden 20
Whiffle Ball Batting Practice – ‘Live 5’
1. “See Ball, Turn Back (Load)”
2. “Let the ball come to your feet”
3. “Turn (& Swing) Fast” - (LEGS power the swing ) (No ‘careful swings’)
4. “Head in Place” (no reaching)
5. BALANCE (and centered)…consistent swings (100% every time)
NOTE: Whiffle Ball Batting Practice is not a time for in depth instruction. This is a chance for kids to get reps and
to adapt timing to their swing. Instruction is to be limited to the above key points. The points above are also followed when ‘instructing’ the live batter and the batters in the extra hitting group during batting practice.

© 2011 Mark Linden 21
Skill Building Warm-up - Menu of Drills
Base Running
Through First Base p137
Turns & Touches p137
Fly Balls - ‘Half Way’ p138
All the way around (9U)
Fielding Skills
Underhand Toss - shuttle p93
Throwing on the Run - shuttle p93
Ranging Laterally for Ground Balls p96
20’ Ground Balls p95
Rollers (Tee Ball)
Additional Drills:
Receiving Throws at a Base p78
Catch, Tag & Throw – Mini Diamond p94
Infield Pop up; receive throw at a base p98
Replaying Ground Balls
1-6 (using an underhand toss on a mini diamond) p123
1-3 / 3-1 / 4-1 p121
1-5 / 5-1 / 6-1 p122
6-4 / 4-6 (UH Toss) p97
Drop Step Routine ...add Drop and go p102
Get Behind It p102
Toss Drills – Coming In (UH Toss) p103
Wild Pitch / Past Ball Communication
Defense Positional Responsibilities
Infield Base Coverage (4 – 1 = 3) p81
OF Backing Up Bases p83
Relays Using Mini Diamond - all Underhand Toss p109
FB Communication p119
Rundowns p129

© 2011 Mark Linden 22
Playing Catch Practice - Detail
1 min. Muscle Memory Drills
Batting Drills: Pick two drills; each drill 5x - 30 seconds (see Batting Drills Sheet)
Throwing Drills:
1. Turn and Pull – 5x
2. Wrist Action – 5x
3-4 min. Pitching Practice
Focus Points
1. Glove Elbow: up and pull
2. Head: still, straight and centered
3. Wrist Snap - straight down; fingers evenly through the top of ball
3-4 min. Positional Player Throwing - “Move Feet”
2 min. Skills (only one per day)
1. Cut-Relay Footwork (down and back 3x)
2. Replying Balls (3x w/ ball in front; 2x with ball behind)
3. Catch, Tag & Throw (this will add 5 minutes to PCP)
— you will need to set up a second diamond prior to practice, so the team
can be divided into two groups in order to limit standing around.
Note: It will take some days of practice to get coaches and players into the flow of this routine in order
to get through it in 10 minutes. Plan accordingly early in the year, allowing extra time to get through
this routine. Be patient with yourself, assisting adults and kids. Through experience and familiarity this
activity will get to a point where it flows nicely.

© 2011 Mark Linden 23
Team Skills & Drills
Cuts and Relays p106
Fly Ball Communication p117
Pitcher’s Defense p120
Three Groups Drills p125
Rundowns p129
Mass Ground Balls and Fly Balls p130
Base Running p130
Bunting
Bunt Defense
1st & 3rd Defense

© 2011 Mark Linden 24
Batting
Practice
—— A 12-Player Drill ——

© 2011 Mark Linden 25
Batting Practice Structure — “A 12-Player Drill” —
Batting practice, when structured correctly is a multiple skills routine in which each player is developing skills during the entire activity. In addition to the player batting live on the field, other players are taking swings off a tee(s), working on base running, fielding, pitching, catching and getting additional live swings at the Skills Station. The most important aspect of the on-field batting aspect is that the batter is given a high percentage of ‘good pitches to hit’. If we are unable to provide a high percentage of strikes, using a tee for the ‘live’ batter is an acceptable solution. Using a tee is reasonable when we look at the live batter in the context of being just 1 of 12 players in the ‘Drill’. Also recognize that the defensive players and base runners count on the batter getting strikes and putting the ball in play in order for them to get their work in.
NOTE: Throwing pitches from full distance is not necessary and in almost every case leads to poorly located pitches. What percentage of good hittable pitches do we throw from full distance? How inactive are our players when we don’t throw good pitches consistently?
Three Groups of Four Players
Group 1: Offense: Live Bating, on deck batter(s) hitting off tee(s) & Base Runners
Group 2: Defense: Playing each ball off the bat ‘Like it’s the 6th inning of the Championship Game’
Group 3: Skills Station: Whiffle BP; Extra work with pitchers and catchers
...10 minutes per station. Allow 90 seconds for rotation. Eight swings per live batter = 32 total swings. If we can get in a minimum of four swings per minute we will have time to rotate and stay on schedule. If our BP pitcher is throwing strikes, kids may get more than eight Live swings.
OFFENSE: 4 Players
Live Batting (1 player) - Coaches throwing consistent strikes is a must
Soft Toss
Toss balls from a 45 degree angle (not from the side - 90 degrees), from about 3-4’ away. Use a slight back swing to allow the batter to time their load (‘Turn Back’). Toss the ball so it reaches the top of its arc at the intended contact point. This is ‘even with the front foot’ for pitches in the middle of the strike zone.
Short Front Toss
If you have a screen available (the smaller the better...2’w x 4’h) toss firm, level, underhand tosses from a point approximately 15’-20’ in front of home plate.
Short Distance Live Pitching
With kids age 9 and under, throw off a knee from approximately 20’ using a ‘Dart’ like arm action. With older kids you likely need protection; throw from about 25’-30’.
Location of Pitches (advanced): In / Middle / Away.
NOTE: always tell the batter where you will locate the pitch when locating in or away.
On Deck Batter(s) (1-2 players)
Tee work hitting whiffle balls into the backstop/fence Ideally outside the backstop/fence. Be sure they are safe from getting hit by batted or thrown balls.
Base Running (1-2 players) - Base runners reacting to batted balls
Ground Ball: Three or four hard steps, then go back and read the next possible pitch
Line Drive: Freeze; follow ball until it is caught or hits the ground; run 3-4 steps if ball is not caught
Fly Ball: Distance off the base relative to distance fly ball from the base - see page 138
DEFENSE: 4 players
Ready Position EACH pitch; reacting to, and playing, each ball off the bat as if it’s “The 6th inning of the Championship Game”. No shagging; if the ball is not playable, let it go and prepare for the next pitch. The entire team picks up all balls during rotation.
Alignments:
1. Four infielders
2. Three infielders and a center fielder or corner outfielder
3. Two infielders and two outfielders
—> Have a coach at first or second base taking throws from infielders.
—> Balls that cannot be fielded: let them go; all players help pick up during rotation.
SKILLS STATION - down the right field line: 4 players
Whiffle Ball BP: Two kids batting; eight swings each, then rotate other kids in.
Pitchers: Working with a coach (if a second coach is available to work this station). An option is to have a batter stand in while the pitcher is working. This gives the pitcher and batter ‘game like’ experience.
Note: at some point a batter will get hit. Take this fact into consideration when determining to have a batter stand in.
Catchers: Working with a coach: Receiving, Blocking, Throwing, Recovering balls in front of the plate, etc.

© 2011 Mark Linden 26
BP Diagrams Explained
The following pages have three diagrams showing the full field with different alignments for the Defensive Group. These
diagrams illustrate where Base Runners work. Each base is represented, but we always want the base runners working at
the same base on a given day. It is best to have the coach who is receiving throws from the infielders monitor the base
runners as well. Also illustrated are different locations from which to deliver balls to the live batter.
On one day have the infield throwing to a coach at first, while the base runners work from first base. On another day
make second base the focal point for defense and base running
The diagram that does not use the Field Template illustrates options for activities at the Skills Station.
The upper left hand box has one coach pitching whiffle balls to two batters, with two kids retrieve hit balls.
The upper right hand box shows two players hitting whiffle balls off tees and two pitchers working on their mechanics, throwing back and forth. The coach is monitoring the work of all four players.
The bottom left box shows two coaches, each pitching whiffle balls to two players. The players are lined up so that the hit balls are landing in the center of the activity, so they can be picked up more efficiently.
The bottom right box shows one coach pitching whiffle balls to two players while a second coach is working one-on-one with a catcher (this could also be one-on-one work with a pitcher). A fourth player would be re-trieving balls hit by the two batters.
NOTE: The headings for each defensive layout refer to a different age group. These are not absolute. Any
combination of infielders and outfielders can work with any age group. The primary factor to consider when
assigning positions to the defensive group is where the balls hit by the live batter are most likely to go.

© 2011 Mark Linden 27
Batting Practice - Defensive Set up, ‘ages 7-8’

© 2011 Mark Linden 28
Batting Practice - Defensive Set up, ‘ages 9-10’

© 2011 Mark Linden 29
Batting Practice - Defensive Set up, ‘ages 11-12’

© 2011 Mark Linden 30

© 2011 Mark Linden 31
Batting Practice Structure – Four Diagrams
© 2011 Mark Linden 32
Scrimmage

© 2011 Mark Linden 33
Scrimmage: Set up and Approach to Teaching
Make every effort to scrimmage at the end of each practice. “Kids don’t sign up to practice baseball, they sign up
to PLAY baseball.” A scrimmage can be a powerful teaching tool.
The coach provides pitches for the scrimmage*. Great pitches to hit are served up by the coach, from approxi-
mately 20’ (or as close to the batter as is safe for the coach), or side soft toss is used. Using a Tee is not out of the
question; the more balls that are put in play, and with as limited time between plays, is best. The goal is for most
every pitch is put into the play creating a fast moving environment, with no standing around and many defensive
and base running situations created in a short period of time.
The standard set up is to divide your team into four groups of three players; three groups (9 players) in the field
and one group on offense. Have one of the offensive players bat and start the other two on first and second
base. It makes more sense to have the extra two players getting base running experience rather than waiting in
the dugout to bat. Give each player in a group two at-bats, then rotate. If time permits, give each batter 3-4 at-
bats; if time is limited give each batter only one at-bat.
*Periodically, beginning in late March or early April, you may choose to have kids pitch to each other in
order to get exposure to pitching and batting in a game situation. When having kids pitch to each other
make it a ‘Situational Scrimmage’ with base runners (so more kids are involved and more defensive situa-
tions are created); also consider limiting each pitcher to throwing to 3-4 batters. Keep in mind that in a
format with kids pitching to each other the pace of the scrimmage will slow down considerably costing
opportunities for skill development and exposure to situations. Consider starting each batter with a 1-1
count, which speeds up the pace a bit.
NOTE: Do not correct content that has not been trained in drills/practice.
Batting – “Live 5” ...keep communication to a batter hitting live pitches limited to the following points:
1. “See Ball, Turn Back”
2. “Let the ball come to your feet”
3. “Turn (and swing) Fast (Full Speed)”
4. “Head in place, Feet in place”
5. “Centered” / “BALANCE”
Infield Positioning: Corners 10’ off line; SS/2b, 20’ from second base
GIVE POSITIVE REINFORCEMENT to KIDS FOLLOWING EACH PLAY
Acknowledge correct movement, defensive positioning, good base running, etc. as much as possible. Make cor-
rections in a TEACHING tone, NOT a scolding tone. Rule of Thumb: three positives for each correction.

© 2011 Mark Linden 34
Scrimmage Focus Points for Teaching
“Baseball is a Game of Movement”
De-program kids’ perception that Baseball is a ‘Standing Around Game’.
Three Defensive Responsibilities:
1. Play the ball
2. Cover a base
3. Back up a base
Ready Position is required prior to each time a ball might be thrown or hit to you (Practice, Drills, Game)
Receiving Throws (Practice, Drills, Game):
1. “Ready Position”
2. “Move Feet to Catch”
3. “Reach Forward to Catch”
Receiving Throws at a Base:
1. “Cover the base with your eyes”
2. “Ready Position”
3. “Ball first, base second”
4. “The base is for the runner, the ball is for the defense”
5. “Look for other runners” immediately after making a play at a base
Keep the Ball Moving at all Times:
After fielding a ball or receiving a throw, immediately
Throw the ball ahead of a runner attempting to advance
Run the ball in toward the middle of the infield/pitcher (when runners not trying to advance)
“Look for other runners” immediately after making a play at a base
Power Position (prepared to throw)
Moving toward the middle of the infield/pitcher (shuffle feet, ready to throw)

© 2011 Mark Linden 35
p2
Outfielders’ Responsibilities (in order of priority):
1. Play balls hit to the outfield
2. Back up Ground Balls hit to the two infielders in front of the outfielder
3. Back up throws to bases
NOTE: CF backs up second base; LF & RF back up the corner bases. LF & RF are also responsible to back up throws to second base when the angle of those throws make it difficult for the CF to get into position to back-up.
Infielders’ Responsibilities:
1. Play the ball
2. Cover a base
NOTE: The above sounds overly simplified, however think of how often an infielder is doing neither while a ball is in
play? i.e., standing around, watching the play and doing nothing.
Pitcher’s Responsibilities:
1. Cover/Back up a base (1st or 3rd) on balls in the infield
2. Back throws to bases on balls hit to the outfield
3. Cut-Relay person when a runner is scoring from second on ball hit to the outfield
“Always Move Towards the Ball” (initial movement) - Players in the Middle of the Infield (SS, 2B, P)
Middle Infielders (SS & 2b):
Ball hit to the infield on your left – move to, and cover, the base on your left
Ball hit to the infield on your right – move to, and cover, the base on your right
Ball hit to the outfield, both move toward the ball; lead player gets a minimum of 20’ from second base
Ball hit to Center Field: Short stop goes out, Second Baseman covers the base
Pitcher:
Ball hit to the infield on their left (including to the second baseman) – move straight toward the base on their left (first base)*
Ball hit to the infield on their right (including to the shortstop) – move straight toward the base on their right (third base)*
*When pitcher breaks towards first or third base they go through the progression of the Three Defensive Responsibilities: (1) Play the Ball; if the ball goes to an infielder, (2) Cover a Base (first or third); if the base is covered, (3) Back up the Base.

© 2011 Mark Linden 36
Catcher’s Responsibilities: p3
1. Move to the “Catcher’s Position’ (in front of home plate) immediately after ball is put into play
2. Direct the defense where to throw the ball (or to “Eat it!, Run it in”)
3. Prior to each new batter, alert the defense of: 1. Number of outs, 2. Runners (this call is made from the ‘Catcher’s Position’ in front of home plate.)
Communication on Balls Between Two Players:
Fly Balls
Subordinate player, “Mine”
Dominant player, “Get Out”
Ground Balls – dominant player rule
Balls between the four infielders follow same hierarchy as with fly balls
Ground Balls – player facing the play rule
Balls between P & C, or 1B/3B & C
Player with their back to the base play is to be made: “Mine”
Player facing the base: “Get Out”
Ground Balls Between the Pitcher and a Corner Infielder (1b or 3b)
Pitcher calls, “Mine”, Corner Infielder calls, “Get Out”
NOTE: this is a very difficult situation – one which MLB players also struggle with
Taking a Ball to the Bag
If the player who fielded a ball feels they can beat the runner to the bag, they tell the player covering the bag to, “Get Out”. Carrying the ball to the bag is always safer than making a throw.
Communication Between Two Players at the Same Point on the Field:
Backing Up
When the CF and LF/RF find themselves both backing up second base, the CF tells the LF/RF to, “Get Out”. The
LF/RF then moves to back up the corner base
When LF/RF find themselves both backing up a corner base the LF/RF tells the Pitcher to , “Get Out”. This frees
up the pitcher who may be needed at home to cover for the catcher.
Covering a Base (First or Third)
The First baseman/Third Baseman has priority over their bag – “Get Out”
The 2b/SS have priority over the pitcher when covering first or third base.
The Pitcher calls “Mine” when they see they will get to the bag ahead of an infielder. An infielder who sees they
will get to the bag ahead of the runner and have time to get in a ready position to take the throw, has the option
of telling the Pitcher to “Get Out”. Whichever of the two players is not taking responsibility for covering the
base moves on to back up the base.
NOTE: the situation where there is confusion of who will get to the base first doesn’t happen too often.
Usually it is pretty obvious who will get there first. However on some occasions this can be a difficult situation.
– Baseball isn’t always a perfect game.
© 2011 Mark Linden 37
Practice
Schedule
Templates
———
Menu
of Drills

© 2011 Mark Linden 38
Practice Schedule Template
( Hour and a Half)
Pre-practice Whiffle Ball BP
0:00 – 0:10 Skill Building Warm-up
0:10 – 0:20 Playing Catch Practice
0:20 – 0:35 Team Skills and Drills
0:35 – 0:40 Break
0:40 – 1:10 Batting Practice
1:10 – 1:35 Scrimmage
Note: It will take a few practices before the coaches, adult assistants and kids get a feel for the flow of the schedule. It
is suggested that Batting Practice not be in the schedule the first 3-4 practices. This allows extra time for the other
segments of practice to run longer while everyone gets accustomed to those. Whiffle Ball Batting Practice, which starts
each day, gets the kids some swings. They also get some swings during the scrimmage at the conclusion of practice.
Plan to set aside one practice, following those first few practices, and dedicate most of that day to teaching the batting
practice routine to the kids and other adults. Explain the routine, set up the three groups. Run through the rotations
slowly and checking often to see that everyone, including yourself, is going through the task for their spot on the field
correctly. Take the time to stop and correct and give direction as needed, so at the conclusion of the day everyone has
an idea of what all players and coaches are doing at each point on the field during batting practice.

© 2011 Mark Linden 39
Practice Schedule Template
(2 hour)
Pre-practice – 0:05 Whiffle Ball BP
0:05 – 0:15 Skill Building Warm-up
0:15 – 0:25 Playing Catch Practice
0:25 – 0:30 Break
0:30 – 0:50 Team Skills and Drills
0:50 – 1:25 Batting Practice
1:25 – 0:30 Break
1:30 – 2:00 Scrimmage
Note: It will take a few practices before the coaches, adult assistants and kids get a feel for the flow of the schedule. It
is suggested that Batting Practice not be in the schedule the first 3-4 practices. This allows extra time for the other
segments of practice to run longer while everyone gets accustomed to those. Whiffle Ball Batting Practice, which starts
each day, gets the kids some swings. They also get some swings during the scrimmage at the conclusion of practice.
Plan to set aside one practice, following those first few practices, and dedicate most of that day to teaching the batting
practice routine to the kids and other adults. Explain the routine, set up the three groups. Run through the rotations
slowly and checking often to see that everyone, including yourself, is going through the task for their spot on the field
correctly. Take the time to stop and correct and give direction as needed, so at the conclusion of the day everyone has
an idea of what all players and coaches are doing at each point on the field during batting practice.

© 2011 Mark Linden 40
Menu of Drills for Building a Practice Plan
Skill Building Warm Up see page 21
Team Skills and Drills see page 105
Batting Practice see pages 25-31
Scrimmage see pages 33-6
Rain/Wet Day Drills see pages 74
Pre-Game Practice see pages 75

© 2011 Mark Linden 41
Guides for
Coaching
Each
Level of Play

© 2011 Mark Linden 42
Tee Ball

© 2011 Mark Linden 43
Tee Ball
Coaching
In a perfect world each player’s parent invests 60 minutes to participate, so there is a 1:1 Adult-Player ratio at practices. Coaches should not be shy in reminding other parents that the coach is just a parent like them; all parents should make the effort to attend and participate in each practice. These are our children and there is great value and joy in partici-pating in a young child’s Baseball activities.
Teaching
Teach from their mental, emotional and physical perspective
Realistic expectations
Patience
Constant Movement and FUN
Throwing and Receiving Throws
Kids at this age have limited brain development regarding their ability to track a flying object. We must keep this in mind when we run playing catch activities. Our focus should be on the kids’ actions rather than the results of the throw-ing accuracy and catching. It must be understood that the teaching we are providing is ‘planting seeds’ for future results (months and years from now).
Receiving Throws 1. ”Ready Position” – Football Helmet 2. “Move Your Feet to Catch” / “Catch the ball with your FEET” 3. “Reach Forward”
“Base is for the Runner; Ball is for the Defense”
“Ball First, Base Second”
Suggestion: Players not allowed to touch the base until they have the ball.
Underhand Toss Covering Bases 4 – 1 = 3
Throwing Power Position: 1. Point glove toward target, 2. Point throwing hand away, 3. Feet wider than shoulders Drills:
1. Turn & Pull (power) – “Head is Steering Wheel” 2. Snap 3. Shuffle 4. Shuffle, Pull, Snap, Momentum
“Move Your Feet to Throw” / “Follow Your Head”

© 2011 Mark Linden 44
OF Drills
The percentage of balls the kids will catch is going to be low (both in practice and games). This does not mean these drills do not have value or will not be fun for the kids. Kids love running and chasing the ball. They will get plenty of these expe-riences and will always enjoy Fly Ball activities.
Keep in mind that we are more accurate by tossing fly balls underhand.
Toss Drills….all directions “Run Fast” “Keep Running” “Reach out to Catch”
Fielding Ground Balls
A primary objective in all our activities is train the kids to use their lower bodies to generate power for their movements. In all that the kids do, our focus in our teaching is for them to move their feet and use their legs. Ground ball and infield drills are the area where we can most emphasize movement with the focus being on what the feet and legs contribute to exe-cuting baseball actions:
“Ready Position” – Not Optional! 1) Quick steps to the ball 2) Slow down (under control) and “Feet Wide to Catch” 3) Quick, shuffle (gain ground) to throw
INF Drills Underhand Toss Infield Positional Responsibilities (4 - 1 = 3) Ranging Laterally for Ground Balls Rolling Ground Balls Back and Forth with a Partner Ground Balls 20’
“Double Plays” Rotation
Batting Mechanics Success in swinging the bat, at all levels of baseball and softball, begins with two key points: 1) Generating power with the legs 2) Keeping the head in place
DRILLS
Twist Turn Back, Turn Fast
1) Knees back 2) Front heel up 3) Switch heels …Head in place - kids need to be reminded of this constantly
Sideways Karate Chop

© 2011 Mark Linden 45
Practice
50% of the time: Skill building
Three groups or rotate the team together from one content type to the next. NOTE: at this age there is no need for every-
one to paly catch together to ‘Warm up’. The players can immediately break into three groups.
Warm-up: Run around the bases. Put three kids at each base; start the first group, after they run 10-15’ start the second
group, after they run 10-15’ start the third group, then let them chase each other
1) 10 min:
Playing Catch & Underhand Toss
2) 10 min:
Fielding: Ground ball drills and fly ball toss drills
3) 10 min:
T-ball Batting: two kids hitting whiffle balls off tees; other 2-3 kids fielding balls. If your groups have more than
four kids and you have three tees, have three kids batting at one time.
Scrimmage: 30 minutes
50% of the time: Scrimmage
Try to have two tees available for your T-ball practices. At scrimmage time, split the team into two groups and hold two
simultaneous games of with 3 or 4 kids on a side. Not every position in the infield (this includes pitcher and catcher) needs
to be covered by a player. The kids are more than happy to chase down the balls.
NOTE: Instead of wrapping your catcher up in oversized catcher’s equipment, consider setting up a screen off to the side
(approximately 15’ away) of home plate, then have the catcher run out to a spot in front of home plate AFTER the batter
drops the bat.
If you have first year Coach/Machine Pitch kids who don’t hit the ball very far into the outfield you can also set up two
games at one time filling the infield positions only (or have just a Center Fielder in the outfield). The fewer fielders the
better; the result is the fielders are more involved, get more repetitions handling the ball and have more FUN. Again, we
need to step outside the ‘box’ of our adult perspective of baseball and recognize that all positions do not need to be covered
at this age level and the need for outfielders is minimal.
Practice Structure
1. Plan in advance
2. Bases set out
3. Batting Tees available for early arrivals to bat and shag
4. Drills stations set up / Extra balls immediately available (no chasing)
5. Gloves - does the child have a ‘real’ glove? ...or is it made of plastic and have a picture of Dora the Explorer
Objectives for the Season
1. Legs power body movements; Head controls body movements
2. Basics of positional responsibilities
3. Have FUN and sign up to play again next year

© 2011 Mark Linden 46
Coach/Machine
Pitch

© 2011 Mark Linden 47
Coach/Machine Pitch
Teaching
Teach from their mental, emotional and physical perspective
Realistic expectations
Patience
Constant Movement and FUN
Throwing and Receiving Throws
Kids at this age have limited brain development regarding their ability to track a flying object. We must keep this in mind
when we run playing catch activities. Our focus should be on the kids’ actions rather than the results of the throwing
accuracy and catching. It must be understood that the teaching we are providing is ‘planting seeds’ for future results
(months and years from now).
Receiving Throws 1. ”Ready Position” – Football Helmet 2. “Move Your Feet to Catch” / “Catch the ball with your FEET” 3. “Reach Forward”
Receiving Throws at a Base
1. “Cover the base with your eyes”
2. “Ready Position”
3. “The base is for the runner, the ball is for the defense”
4. “Ball First, Base Second”
5. “Look for other runners”
Suggestion: Players are not allowed to touch the base until they have the ball.
Underhand Toss Train the underhand toss technique, using the ‘Underhand Toss - Shuttle’ Drill before introducing the players to throwing overhand
technique and drills.
Infield Base Coverage Responsibilities
4 – 1 = 3
Throwing
Power Position Drills
1. Turn & Pull (power) – “Head is Steering Wheel” 2. Snap 3. Wrist 4. Shuffle 5. Shuffle, Pull, Snap, Momentum
“Move Your Feet to Throw” / “Follow Your Head”

© 2011 Mark Linden 48
Receiving a Throw at a base
Many kids (and adults) have the misconception that a defensive player stands in a ‘Stretch’ position at a base with their back foot on the base prior to the ball being thrown by a team mate. The fact is the proper foot position at a base, prior to a throw, is a ‘Ready Position’. Players at advanced levels of baseball (and players at all levels should) prepare for a throw in a ‘Ready Position’. They move to a ‘Stretch’ position AFTER the ball is in the air and it is recognized that the throw is going to be on target.
It is strongly suggested that coaches make it a rule that the kids on defense, “Cannot touch the base without having the ball first”…and not ‘Stretch’ in any circumstance at this level of play. The use of the stretch position causes a myriad of prob-lems at all levels of youth baseball. At this level we want the kids to create the habit of Moving Their Feet to Catch and be concerned with the Ball First and worry about the Base Second.
Keep in mind that at lower levels of baseball the vast majority of throws are not thrown accurately to a base. Teach kids to always be in a Ready Position at the base (but not touching the base) and not use the ‘Stretch’ at any time. This approach will result in many, many more balls being caught (or at least knocked down) and not thrown past the base.
1. “Cover the base with your eyes” 2. “Ready Position” 3. “The base is for the runner, the ball is for the defense” 4. “Ball First, Base Second” 5. “Look for other runners”
Fielding Ground Balls
1. “Ready Position” 2. Quick steps to the ball - “Wide (feet) to Catch” 3. “Move Your Feet to Throw” - “Follow your head”
Base Running
Through First Base
Turns & Touches
First to Third; Second to Home
Batting Mechanics Success in swinging the bat, at all levels of baseball and softball, begins with two key points:
1. Generating power with the legs 2. Keeping the head in place
DRILLS 1) Twist 2) Turn Back, Turn Fast
a. Knees back b. Front heel up c. Switch heels
…Head in place - kids need to be reminded of this constantly
3) Lower Half Turn 4) Sideways Karate Chop
Keys: Centered & balanced
INF Drills
Underhand Toss - Shuttle
20’ Ground Balls
4-3 / 4-6 / 6-4 / 6-5 - all using underhand toss
Ranging laterally for ground balls
Fielding ground balls, throwing across
“Double Plays”
Pitchers Defense – see the ‘Pitchers Defense’ section of the manual

© 2011 Mark Linden 49
OF Drills:
Toss Drills
Drop Step Routine
Team Defense:
Three Defensive responsibilities 1. Play the ball
2. Cover a Base
3. Back up a base
Infield Base Coverage (4-1 = 3)
Outfield Backing up
Pitchers Defense:
1-3/ 1-5
3-1 / 5-1
Cut-Relay to Home – Mini Diamond; later on the full diamond
Two Basses Relay Game - Runner Scoring From Second
Practice Prep
Written practice plan prepared in advance of each practice
Drills stations set up / Extra balls immediately available (no need for kids to chase after missed throws)
50/50 Practice
50% of the time: skill building
50% of the time: scrimmage
Batting Practice: the BP pitcher pitches whiffle balls from a kneeling position, from 12’-15’ away, to two kids who are stand-
ing ~10’ apart; the other 2 kids are fielding the hit balls. If you have two coaches, have each pitch to one player. If you have
more than four kids, a coach can pitch to two kids at a time. If you have three coaches available, up to six kids can be bat-
ting at one time. Give the batters 8 swings, then switch with the kids chasing balls.
IMPORTANT NOTE: No, “One mores”, this becomes a big time waster while creating anxiety for both the coach and
the batter.
After a few weeks, once the kids have been doing their drills and gaining and understanding of a proper swing, you might
consider trying a Regular Batting Practice Routine (see the Batting Practice section of the manual). Plan on an hour to set
up and run through the routine on the first day. You, the kids and the other coaches, will need this amount of time to get
trained in how it runs. Schedule 45 minutes for the next 2-3 Batting Practices. At that time the team and coaches will be-
come accustomed to the routine and will be able to get through it in 30 minutes.
Objectives for the Season
1. Legs power body movements; Head controls body movements.
2. Mastery of positional responsibilities.
3. Have FUN and ultimately have the kids sign up to play again next year.

© 2011 Mark Linden 50
Basic Teaching Points for Hitting Live Pitches - Coach/Machine Pitch:
1. Training Players When to “Turn Back”: DRILL (to be done daily)
Line up your team and get them in their batting stance.
With a ball in your hand, go through the pitching motion stopping at release point.
Have your kids ‘Turn Back’ when “they see the ball”.
After they turn back the drill is complete (They do not turn and swing).
Have them go back to their starting stance, then repeat the drill.
Do this ten times each day before batting and before each game.
This routine will create a Pavlov’s Dog effect where each time, and any time, ‘he pitcher ‘shows them the ball’ they will ‘Turn Back’. This daily routine will ensure that your players use their legs every time they swing the bat. This drill will also create greater awareness of ‘picking up the ball’ before it is thrown. In machine pitch the kids should turn back when the ball is released by the machine.
NOTE: The duration of the pitcher ‘showing the ball’ is an arc of approximately two feet, NOT a specific point in time. This is important to understand as a coach. Every player’s internal timing mechanism is different and each player will Turn Back at a slightly different time.
NOTE II: Many young kids will START in the ‘front heel up’ position. We want them to start with their feet flat on the ground and their bodies relaxed. They are to wait to ‘Turn Back’ (and lift the front heel) only when the pitcher “shows them the ball”.
2. Live Hitting: It is the responsibility of the coach/batting practice pitcher to provide strikes during live work (this includes soft toss and short front toss). A batter should not swing at poorly located pitches in practice. Instruct batters to never reach for bad pitches during live work. The batter needs to be made aware of this error (reaching) when it occurs.
The batter’s focus when hitting live is to replicate the quality swing they developed in their drill and tee work and to maintain BALANCE at all times (“Centered” and “Feet in Place”). On a given repetition the swing is what matters, not the quality of contact. The batter’s goal is to develop the mental discipline to make the quality of the swing their focus (process oriented rather than results-oriented) and their judgment of what is “Success”.
When the batter remains consistent and balanced in each swing (and refrains from reaching for the ball), their timing will improve as the number of repetitions increase. Over time, the percentage of well struck balls will increase significantly.
3. “Let the Ball Get to Your Feet”: A very, very, very common error made by young hitters is to swing BEFORE the ball gets to the hitting zone. Generally speaking contact is made when the ball reaches the front foot. We want to train our players to make contact at this point and not swing too early and/or reach forward to make contact.
The simple teaching phrase, “Let the ball get to your feet” will help you help them to learn to wait longer before they swing. The reference to “feet” will resonate with them because they are hearing “feet” from you in all your teaching:
‘Catch the ball with your feet’
‘Throw the ball with your feet’
‘Swing the bat with your feet (and legs)’
…..”Let the (pitched) Ball Get to Your Feet”

© 2011 Mark Linden 51
First Year
Player Pitch /
Pinto

© 2011 Mark Linden 52
First Year Player Pitch / Pinto - Coaching Mindset
Playing Catch The brain development of kids in this age group is still not fully to the point where they have great depth perception and have the ability to track a flying object. Continue to put a great emphasis on acknowledging their actions and minimal attention on results. Build confidence by complementing their efforts in ‘doing it correctly’.
Pitching Many of the kids will be pitching to batters for the first time. Be sure to make ‘Pitching Practice’ part of the ‘Playing Catch Practice’ routine. Utilize the rocking action often when working on pitching. Focus points when working on pitching:
1. Glove Elbow up to shoulder height on the stride and ‘Pull’ the glove elbow straight back to help get the arm going. The glove arm has much more to do with generating power and accuracy than the throwing arm.
2. Keep the Head (“Steering Wheel”) straight throughout the delivery.
3. Wrist Snap with fingers moving evenly down through the top of the ball. It is the wrist action that fine tunes accura-cy. Also snapping straight down protects the elbow from injury/soreness. It is natural for the palm of the hand to go ‘around the ball’ as it approaches the ‘Release Point’. We are fighting nature, but in this case what is natural is unsafe.
Fielding Most fielding drills should involve the coach delivering the ball from a short distance with the emphasis on footwork and rep-etition.
Drills Keep drills moving with minimal standing around Keep drill segments brief with the kids moving to new activities every 5-10 minutes. Don’t worry about everyone ‘getting it’ the first day. The kids will develop their skills over the course of the season.
Batting Emphasis remains on the legs “Turning Fast” while keeping the “Head in Place”. Also start putting emphasis (‘Awareness’) on keeping the “Feet in Place’ also. This requires extra effort from the legs and will take time for the kids to master.
Batting Practice It will take a few practices for the kids to get used to the Batting Practice Routine, especially base running and defense playing balls off the bat. Maintain the discipline in these two areas and the kids (and team) will benefit from your efforts.
Scrimmage Coaches always do the pitching in scrimmages. Throw from a knee from as close as possible as it is safe for the coach doing the pitching; approximately 20-25’. The ‘pitcher’ (child) is positioned on the rubber and follows their defensive responsibili-ties outlined in the manual. The coach who is pitching avoids fielding the ball with the exception of line drives, which the player working at from the pitcher’s position might not see and be able to react to.
Scrimmage every day. The kids want to PLAY. Be sure the last activity of each practice is playing a game; this ensures that each time they come to the park they have the memory of the end of the last practice being a ‘game’ and that they had FUN. If we make Baseball FUN we will see all the kids back out on the field next year.
Practice Planning The following pages have sample practice plans. Earlier in the manual you will find Practice Templates and a Menu of Activi-ties that you can use when planning your practice. This should be a 10 minute exercise. Note on your practice plan which pages drill diagrams can be found. Email the plan to your other coaches and parent helpers the night before, so everyone is on the same page and ready to go at the start of practice.

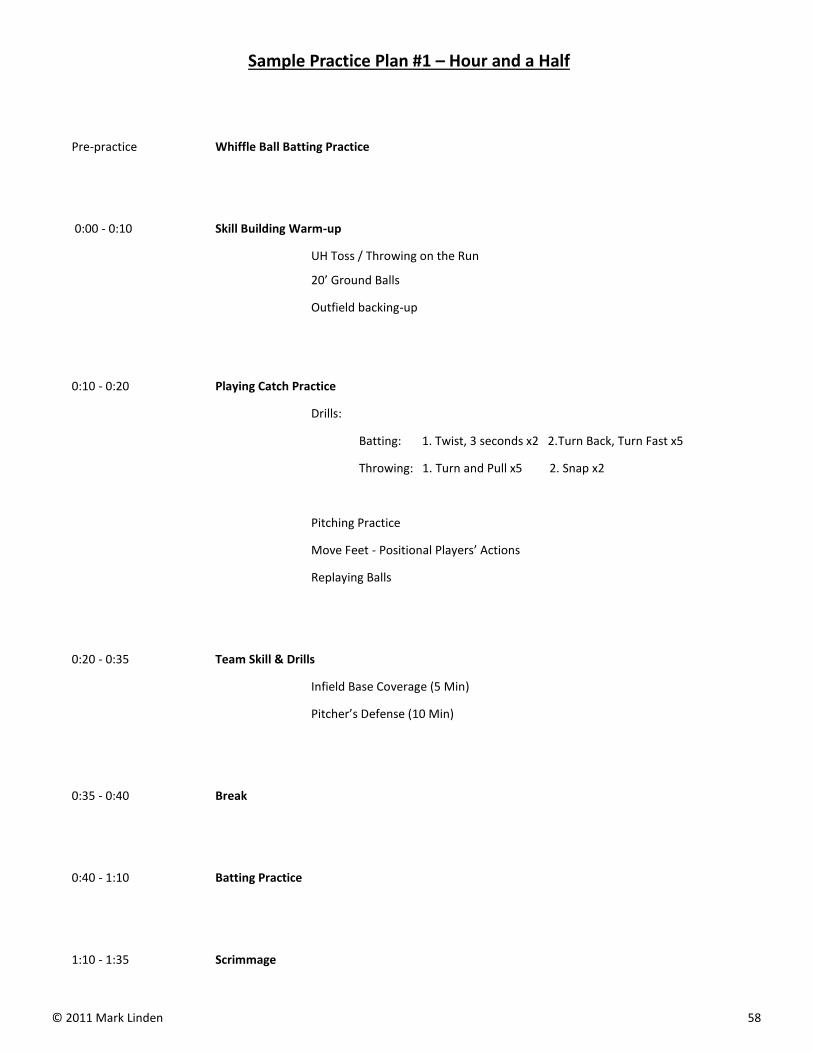
© 2011 Mark Linden 53
Sample Practice Plan #1 – Hour and a Half
Pre-practice Whiffle Ball Batting Practice
0:00 - 0:10 Skill Building Warm-up
UH Toss / Throwing on the Run
Base Running - Through First Base
Toss Drills - angling in, 45 degrees
0:10 - 0:20 Playing Catch Practice
Drills:
Batting: 1. Twist, 3 seconds x2 2.Turn Back, Turn Fast x5
Throwing: 1. Turn and Pull x5 2. Snap x2
Pitching Practice
Move Feet - Positional Players’ Actions
Replaying Balls
0:20 - 0:35 Team Skill & Drills
Receiving Throws at a Base (5 Min)
Pitchers Defense – three groups (10 Min)
0:35 - 0:40 Break
0:40 - 1:10 Batting Practice
1:10 - 1:35 Scrimmage

© 2011 Mark Linden 54
Sample Practice Plan #2 – Hour and a Half
Pre-practice Whiffle Ball Batting Practice
0:00 - 0:10 Skill Building Warm-up
6-4 UH Toss
20’ Ground Balls
Replaying Ground Balls
0:10 - 0:20 Playing Catch Practice
Drills:
Batting: 1. Twist, 3 seconds x2 2.Turn Back, Turn Fast x5
Throwing:1. Turn and Pull x5 2. Snap x2 3. Shuffle, Pull, Snap x2
Pitching practice
Move Feet - Positional Players’ Actions
Cut-Relay Player Footwork x3
0:20 - 0:35 Team Skill & Drills
Infield Base Coverage (5 Min)
Three Groups Drills (10 Min)
0:35 - 0:40 Break
0:40 - 1:10 Batting Practice
1:10 - 1:35 Scrimmage

© 2011 Mark Linden 55
Sample Practice Plan #3 – Two Hours
Pre-practice - 0:05 Whiffle Ball Batting Practice
0:05 - 0:15 Skill Building Warm-up
Base Running - Turns and Touches; two bases
Ranging Laterally for Ground Balls
Catch, Tag & Throw - Mini Diamond
0:15 - 0:25 Playing Catch Practice
Drills:
Batting: 1. Lower Half Turn x5 2. Sideways Karate Chop x5
Throwing: 1. Turn and Pull x5 2. Wrist Action x5
Pitching Practice
Move Feet - Positional Players’ Actions
Cut-Relay Footwork
0:25 - 0:30 Break
0:30 - 0:50 Team Skill & Drills
Cuts-Relays, Mini Diamond (15 minutes)
Outfield Backing up (5 minutes)
0:50 - 1:25 Batting Practice
1:25 - 1:30 Break
1:30 - 2:00 Scrimmage

© 2011 Mark Linden 56
Minors /
Mustang

© 2011 Mark Linden 57
Minors/Mustang - Coaching Mindset
Playing Catch This age group is becoming more mature; raise expectations of discipline during ‘Playing Catch Practice’. Continue to put an emphasis on acknowledging their actions. Build confidence by complementing their efforts in ‘doing it correctly’.
Pitching Maintaining discipline during the pitching aspect of ’Playing Catch Practice’ will result in developing 5-6+ kids who can throw enough strikes to pitch in games. Utilize the rocking action often when working on pitching. Focus points when working on pitching:
1. Glove elbow up to shoulder height on the stride and ‘Pull’ the glove elbow straight back to help get the arm going. The glove arm has much more to do with generating power and accuracy than the throwing arm.
2. Keep the Head (“Steering Wheel”) straight throughout the delivery.
3. Wrist Snap with fingers moving evenly down through the top of the ball. Ultimately it is the wrist action that determines accu-racy. Also snapping straight down protects the elbow from injury/soreness. It is natural for the palm of the hand to go ‘around the ball’ as it approaches the ‘Release Point’. We are fighting nature, but in this case what is natural is unsafe.
Fielding Most fielding drills should involve delivering the ball from a short distance with the emphasis on footwork and repetition. Expectations can be raised for consistency of proper footwork when fielding and throwing.
Drills Drill periods can be longer; up to 15 minutes. Don’t worry about everyone ‘getting it’ the first day. The kids will develop their skills over the course of the season.
Batting Emphasis remains on the legs “Turning Fast” while keeping the “Head in Place”. The kids are getting stronger now and keeping their “Feet in Place” is a reasonable expectation on most swings. Put a greater emphasis on being ‘Centered’ and ‘Balanced’ at the end of the swing. Coaches must be diligent to not let poor swings go unaddressed in feedback. Be sure to acknowledge proper actions and good discipline in swings. Throwing a high percentage of strikes, on the part of the coach, becomes more critical.
Batting Practice It will take a few practices for the kids to get used to the Batting Practice Routine, especially base running and playing balls off the bat. Maintain the discipline in these two areas and the kids (and team) will benefit from your efforts. All aspects of discipline and focus during batting practice should improve over the course of the season. Slowly raise expectations of kids to take a more mature approach to this segment of practice.
Scrimmage Coaches always do the pitching in scrimmages. Throw from a knee from as close as possible as it is safe for the coach doing the pitching;; approximately 20-25’. At this level some sort of protection for the coach doing the pitching is likely to be required. A garbage can works great. An “L’ screen is not a good source of protection. These are large and pick off too many hit balls. Balls that do hit whatever is being used to protect the pitcher are counted as base hits with the batter going to first and each batter advancing one base. The batter can be given the option to count this as a ‘foul ball’ and hit another pitch. The ‘pitcher’ is positioned on the rubber and follows their defensive responsibilities. The coach who is pitching avoids fielding the ball with the exception of line drives, which the player working at from the pitcher’s position might not see and be able to react to.
Scrimmage every day. The kids want to PLAY. Be sure the last activity of each practice is playing a game; this ensures that each time they come to the park they have them memory of the end of the last practice being a ‘game’ and that they had FUN. If we make Baseball FUN we will see all the kids back out on the field next year.
Practice Planning The following pages have sample practice plans. Earlier in the manual you will find Practice Templates and a Menu of Activities that you can use when planning your practice. This should be a 10 minute exercise. Note, on your practice plan which pages drill diagrams can be found. Email the plan to your other coaches and parent helpers, so everyone is on the same page and ready to go at the start of practice.
© 2011 Mark Linden 58
Sample Practice Plan #1 – Hour and a Half
Pre-practice Whiffle Ball Batting Practice
0:00 - 0:10 Skill Building Warm-up
UH Toss / Throwing on the Run
20’ Ground Balls
Outfield backing-up
0:10 - 0:20 Playing Catch Practice
Drills:
Batting: 1. Twist, 3 seconds x2 2.Turn Back, Turn Fast x5
Throwing: 1. Turn and Pull x5 2. Snap x2
Pitching Practice
Move Feet - Positional Players’ Actions
Replaying Balls
0:20 - 0:35 Team Skill & Drills
Infield Base Coverage (5 Min)
Pitcher’s Defense (10 Min)
0:35 - 0:40 Break
0:40 - 1:10 Batting Practice
1:10 - 1:35 Scrimmage

© 2011 Mark Linden 59
Sample Practice Plan #2 – Two Hours
Pre-practice - 0:05 Whiffle Ball Batting Practice
0:05 - 0:15 Skill Building Warm-up
Base Running - Turns and Touches; two bases
Ranging Laterally for Ground Balls
Infield Pop-up; Receive Throw at a Base
0:15 - 0:25 Playing Catch Practice
Drills:
Batting: 1. Lower Half Turn x5 2. Sideways Karate Chop x5
Throwing: 1. Turn and Pull x5 2. Wrist Action x5 3. Shuffle, Pull, Snap
Pitching Practice
Move Feet - Positional Players’ Actions
Cut-Relay Footwork
0:25 - 0:30 Break
0:30 - 0:50 Team Skill & Drills
Cuts-Relays, Mini Diamond (15 minutes)
3-1 Play; Pitcher covering on balls to their left (5 minutes)
0:50 - 1:25 Batting Practice
1:25 - 1:30 Break
1:30 - 2:00 Scrimmage

© 2011 Mark Linden 60
Sample Practice Plan #3 – Two Hours
Pre-practice - 0:05 Whiffle Ball Batting Practice
0:05 - 0:15 Skill Building Warm-up
Base Running - Through First Base
Receiving Throws at a Base
Drop Step Routine
0:15 - 0:25 Playing Catch Practice
Drills:
Batting: 1. Lower Half Turn x5 2. Sideways Karate Chop x5
Throwing: 1. Turn and Pull x5 2. Wrist Action x5 3. Shuffle, Pull, Snap
Pitching Practice
Move Feet - Positional Players’ Actions
Cut-Relay Footwork
0:25 - 0:30 Break
0:30 - 0:50 Team Skill & Drills
Two Bases Relay Game (20 minutes)
5-1 Play; Pitcher covering on balls to their right (groups of four; rotate in and out of
Two Bases Relay Game
0:50 - 1:25 Batting Practice
1:25 - 1:30 Break
1:30 - 2:00 Scrimmage

© 2011 Mark Linden 61
Majors /
Bronco
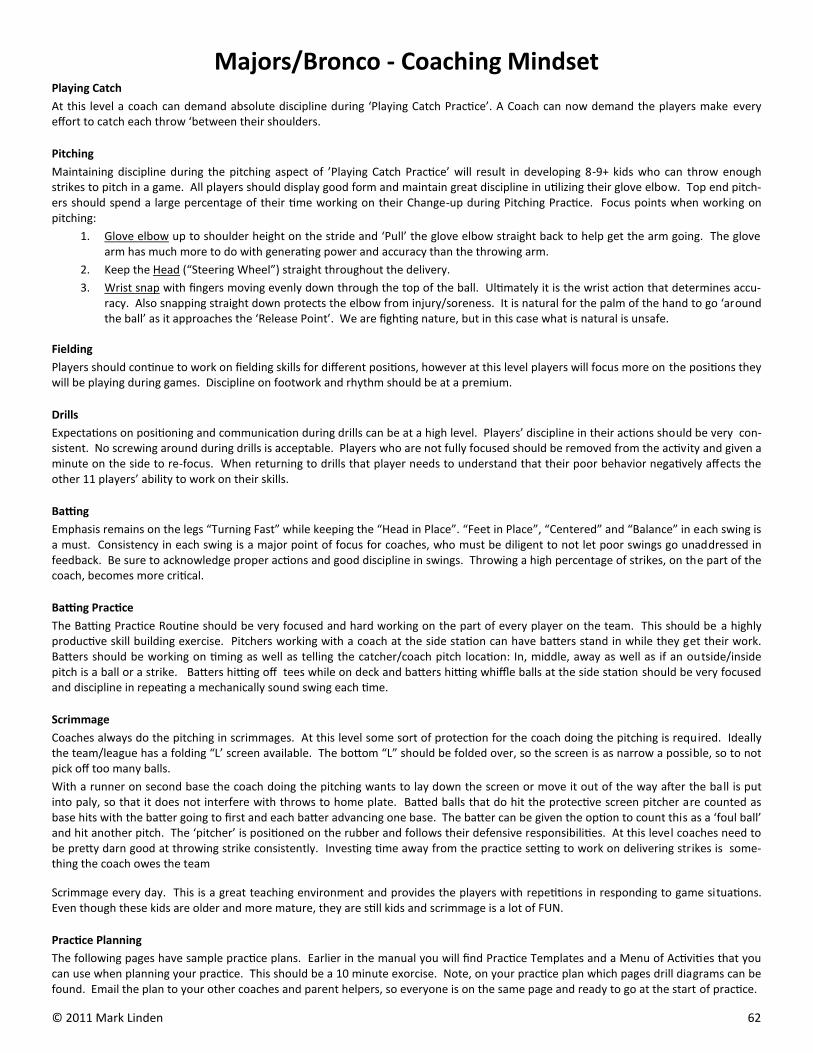
© 2011 Mark Linden 62
Majors/Bronco - Coaching Mindset
Playing Catch
At this level a coach can demand absolute discipline during ‘Playing Catch Practice’. A Coach can now demand the players make every effort to catch each throw ‘between their shoulders.
Pitching
Maintaining discipline during the pitching aspect of ’Playing Catch Practice’ will result in developing 8-9+ kids who can throw enough strikes to pitch in a game. All players should display good form and maintain great discipline in utilizing their glove elbow. Top end pitch-ers should spend a large percentage of their time working on their Change-up during Pitching Practice. Focus points when working on pitching:
1. Glove elbow up to shoulder height on the stride and ‘Pull’ the glove elbow straight back to help get the arm going. The glove arm has much more to do with generating power and accuracy than the throwing arm.
2. Keep the Head (“Steering Wheel”) straight throughout the delivery.
3. Wrist snap with fingers moving evenly down through the top of the ball. Ultimately it is the wrist action that determines accu-racy. Also snapping straight down protects the elbow from injury/soreness. It is natural for the palm of the hand to go ‘around the ball’ as it approaches the ‘Release Point’. We are fighting nature, but in this case what is natural is unsafe.
Fielding
Players should continue to work on fielding skills for different positions, however at this level players will focus more on the positions they will be playing during games. Discipline on footwork and rhythm should be at a premium.
Drills
Expectations on positioning and communication during drills can be at a high level. Players’ discipline in their actions should be very con-sistent. No screwing around during drills is acceptable. Players who are not fully focused should be removed from the activity and given a minute on the side to re-focus. When returning to drills that player needs to understand that their poor behavior negatively affects the other 11 players’ ability to work on their skills.
Batting
Emphasis remains on the legs “Turning Fast” while keeping the “Head in Place”. “Feet in Place”, “Centered” and “Balance” in each swing is a must. Consistency in each swing is a major point of focus for coaches, who must be diligent to not let poor swings go unaddressed in feedback. Be sure to acknowledge proper actions and good discipline in swings. Throwing a high percentage of strikes, on the part of the coach, becomes more critical.
Batting Practice
The Batting Practice Routine should be very focused and hard working on the part of every player on the team. This should be a highly productive skill building exercise. Pitchers working with a coach at the side station can have batters stand in while they get their work. Batters should be working on timing as well as telling the catcher/coach pitch location: In, middle, away as well as if an outside/inside pitch is a ball or a strike. Batters hitting off tees while on deck and batters hitting whiffle balls at the side station should be very focused and discipline in repeating a mechanically sound swing each time.
Scrimmage
Coaches always do the pitching in scrimmages. At this level some sort of protection for the coach doing the pitching is required. Ideally the team/league has a folding “L’ screen available. The bottom “L” should be folded over, so the screen is as narrow a possible, so to not pick off too many balls.
With a runner on second base the coach doing the pitching wants to lay down the screen or move it out of the way after the ball is put into paly, so that it does not interfere with throws to home plate. Batted balls that do hit the protective screen pitcher are counted as base hits with the batter going to first and each batter advancing one base. The batter can be given the option to count this as a ‘foul ball’ and hit another pitch. The ‘pitcher’ is positioned on the rubber and follows their defensive responsibilities. At this level coaches need to be pretty darn good at throwing strike consistently. Investing time away from the practice setting to work on delivering strikes is some-thing the coach owes the team
Scrimmage every day. This is a great teaching environment and provides the players with repetitions in responding to game situations. Even though these kids are older and more mature, they are still kids and scrimmage is a lot of FUN.
Practice Planning
The following pages have sample practice plans. Earlier in the manual you will find Practice Templates and a Menu of Activities that you can use when planning your practice. This should be a 10 minute exorcise. Note, on your practice plan which pages drill diagrams can be found. Email the plan to your other coaches and parent helpers, so everyone is on the same page and ready to go at the start of practice.

© 2011 Mark Linden 63
Sample Practice Plan #1 – Hour and a Half
Pre-practice Whiffle Ball Batting Practice
0:00 - 0:10 Skill Building Warm-up
UH Toss / Throwing on the Run
20’ Ground Balls
Base Running - Turns and Touches; two bases
0:10 - 0:20 Playing Catch Practice
Drills:
Batting: 1. Twist, 3 seconds x2 2.Turn Back, Turn Fast x5
Throwing: 1. Turn and Pull x5 2. Snap x2
Pitching Practice
Move Feet - Positional Players’ Actions
Replaying Balls
0:20 - 0:35 Team Skill & Drills
Outfield Backing-up (5 Min)
Pitcher’s Defense (10 Min)
0:35 - 0:40 Break
0:40 - 1:10 Batting Practice
1:10 - 1:35 Scrimmage

© 2011 Mark Linden 64
Sample Practice Plan #2 – Two Hours
Pre-practice - 0:05 Whiffle Ball Batting Practice
0:05 - 0:15 Skill Building Warm-up
Receiving Throws at a Base
Drop Step Routine
Ranging Laterally for Ground Balls
0:15 - 0:25 Playing Catch Practice
Drills:
Batting: 1. Lower Half Turn x5 2. Sideways Karate Chop x5
Throwing: 1. Turn and Pull x5 2. Wrist Action x5 3. Shuffle, Pull, Snap
Pitching Practice
Move Feet - Positional Players’ Actions
Cut-Relay Footwork
0:25 - 0:30 Break
0:30 - 0:50 Team Skill & Drills
Fly Ball Communication (6 minutes)
Two Bases Relay Game, Runner on Third (14 minutes)
0:50 - 1:25 Batting Practice
1:25 - 1:30 Break
1:30 - 2:00 Scrimmage

© 2011 Mark Linden 65
Sample Practice Plan #3 – Two Hours
Pre-practice - 0:05 Whiffle Ball Batting Practice
0:05 - 0:15 Skill Building Warm-up
6-4 / 4-6 (UH Toss)
3-1 Play
5-1 Play
0:15 - 0:25 Playing Catch Practice
Drills:
Batting: 1. Lower Half Turn x5 2. Sideways Karate Chop x5
Throwing: 1. Turn and Pull x5 2. Wrist Action x5 3. Shuffle, Pull, Snap
Pitching Practice
Move Feet - Positional Players’ Actions
Cut-Relay Footwork
0:25 - 0:30 Break
0:30 - 0:50 Team Skill & Drills
Rundowns (8 minutes)
Mass Ground Balls and Fly Balls (12 Minutes)
0:50 - 1:25 Batting Practice
1:25 - 1:30 Break
1:30 - 2:00 Scrimmage

© 2011 Mark Linden 66
Maximizing
Practice
Opportuni-
ties

© 2011 Mark Linden 67
Tips for Greater Practice Efficiency
1) Always have a Written Plan in advance, with time periods stated for each activity. Stick to your time plan.
2) Do not allow players to chase missed throws (only in scrimmages).
3) Train kids to always RUN from spot to spot (establish concrete expectations).
4) Buckets - “Dunks Only; No Jump Shots”. Each coach should have a bucket for balls; also place buckets where drills end, for
kids to drop balls into them. Keep a bucket of balls at any point in a drill where a large amount of balls might be missed and a
coach Is not available to be there feeding replacement balls to the kids.
5) Cones - Very helpful in organizing drills, making it clear to kids where they are to stand. Also, for younger kids, set up cones
to indicate where they are to stand during Playing Catch Practice. Can be used for bases when running drills when you don’t
have a diamond, or to set up a MINI Diamond.
6) Whiffle Balls - Indispensable tool for batting. Allows us to pitch to a batter straight on from a very close distance resulting in a
higher percentage of good pitches to hit. They are safe, don’t fly far and can quickly be collected, so to get in more pitches and
swings. They allow us to hold a batting practice in most any environment….No Field Assignment Required.
NOTE: Pickle Balls are much sturdier, last longer, are easier to throw accurately and have a better feel coming off the bat.
7) Synthetic Balls ...for wet weather. Using leather baseballs in a damp climate is costly and a safety risk to kids. When leather
balls get wet they become heavier and harder resulting in a ball that no longer plays like a good baseball. Effectively they are
then no good for further use and have to be replaced. More importantly, the added weight (even after they have ‘dried’)
puts a child’s arm at a much greater risk for injury. Synthetic Balls do not have a cloth component and resist water. They are
also less expensive to purchase than leather balls. They play just as well as leather, given the age group we are dealing with.
Save the leather balls for clear, sunny and dry days.
8) Throw Down Bases - Same use as cones, but give a real feel when being used as a ‘base’ in a drill. Ideal to help build a MINI
Diamond anywhere, anytime.
9) MINI Diamond - One of the most valuable tools a coach can use; is approximately 18’ square, but can be modified larger or
smaller depending on the activity. Anytime we can compact the teaching/learning environment distractions are reduced,
clear communication is increased and the players get many more repetitions during a drill.
Most drills, in which throwing a regular distance is not the central focus, can be conducted on a MINI Diamond. Examples are
relays, backing-up and base coverage responsibilities, and drill for receiving throws at a base. The MINI Diamond is also useful
for teaching how a drill is supposed to run before going to the full size diamond; the rundown is an example.
10) Tees (for all age groups...including Major Leaguers) - this gives the batter a guaranteed good pitch to hit 100% of the time.
Getting a good ball to hit as often as possible is the most important factor in developing the swing. This also is a great tool for
side work during batting practice, getting more kids swinging the bat during practice.
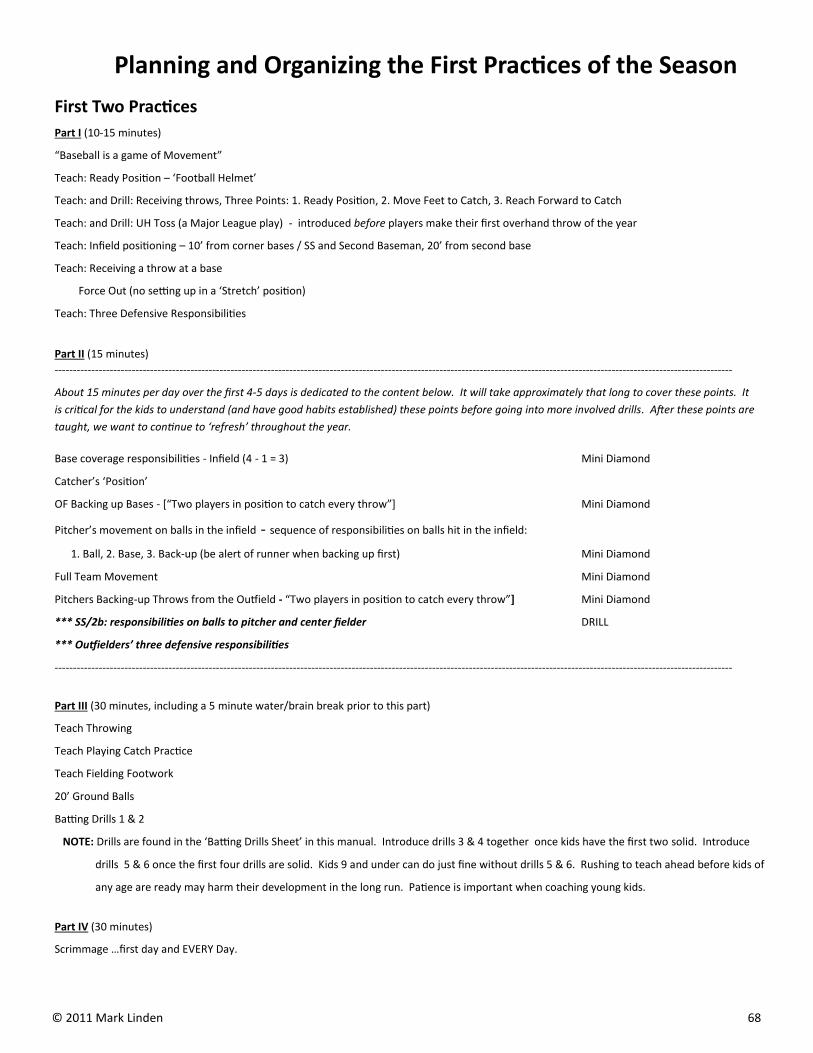
© 2011 Mark Linden 68
Planning and Organizing the First Practices of the Season
First Two Practices
Part I (10-15 minutes)
“Baseball is a game of Movement”
Teach: Ready Position – ‘Football Helmet’
Teach: and Drill: Receiving throws, Three Points: 1. Ready Position, 2. Move Feet to Catch, 3. Reach Forward to Catch
Teach: and Drill: UH Toss (a Major League play) - introduced before players make their first overhand throw of the year
Teach: Infield positioning – 10’ from corner bases / SS and Second Baseman, 20’ from second base
Teach: Receiving a throw at a base
Force Out (no setting up in a ‘Stretch’ position)
Teach: Three Defensive Responsibilities
Part II (15 minutes)
-----------------------------------------------------------------------------------------------------------------------------------------------------------------------------------------
About 15 minutes per day over the first 4-5 days is dedicated to the content below. It will take approximately that long to cover these points. It
is critical for the kids to understand (and have good habits established) these points before going into more involved drills. After these points are
taught, we want to continue to ‘refresh’ throughout the year.
Base coverage responsibilities - Infield (4 - 1 = 3) Mini Diamond
Catcher’s ‘Position’
OF Backing up Bases - [“Two players in position to catch every throw”] Mini Diamond
Pitcher’s movement on balls in the infield - sequence of responsibilities on balls hit in the infield:
1. Ball, 2. Base, 3. Back-up (be alert of runner when backing up first) Mini Diamond
Full Team Movement Mini Diamond
Pitchers Backing-up Throws from the Outfield - “Two players in position to catch every throw”] Mini Diamond
*** SS/2b: responsibilities on balls to pitcher and center fielder DRILL
*** Outfielders’ three defensive responsibilities
-----------------------------------------------------------------------------------------------------------------------------------------------------------------------------------------
Part III (30 minutes, including a 5 minute water/brain break prior to this part)
Teach Throwing
Teach Playing Catch Practice
Teach Fielding Footwork
20’ Ground Balls
Batting Drills 1 & 2
NOTE: Drills are found in the ‘Batting Drills Sheet’ in this manual. Introduce drills 3 & 4 together once kids have the first two solid. Introduce
drills 5 & 6 once the first four drills are solid. Kids 9 and under can do just fine without drills 5 & 6. Rushing to teach ahead before kids of
any age are ready may harm their development in the long run. Patience is important when coaching young kids.
Part IV (30 minutes)
Scrimmage …first day and EVERY Day.

© 2011 Mark Linden 69
Practices 3 and 4
Part I
The content from ‘Part I’ of the first two practices does not need to be covered, but continued reinforcement will be needed.
Part II
Continue building the content from ‘Part II’ on previous page. This is a step by step process with each subsequent concept building off the previous. It may take 5-6 days to get this all in. There is no rush. Be sure the kids really get these concepts. ‘Getting it ‘means the responsibili-ties become more of a reaction to the situation with less thinking.
Part III
Add the following teaching in the order listed (see Drills Diagrams section of this manual for each aspect below):
Outfield Footwork – Drop Step
Toss Drills - OF
Fly Ball Communication – “Mine”
Pitcher’s Defense
Practice #5 Teach Batting Practice Format
‘Practice’ running Batting Practice
Sixth Practice and Beyond Begin following the standard Practice Template, with a ‘Team Play’ component between ‘Playing Catch Practice’ and prior to Batting Practice and Scrimmage. (See Drills Diagrams section of this manual for each activity below.)
Three Groups Drills
Base Running
Through first
Turns & Touches
‘Two bases’ on balls hit to the outfield
Cuts-Relays
----------------------------------------------------------------------------------------------------------------------------------------------------------------------------------------------
Days 1-4
Defensive Responsibilities
Playing Catch
Batting Drills 1 & 2
Teach Fielding Footwork
Scrimmage
Day 5
Teach Batting Practice Routine
Days 6-10
Introduce Batting Drills 3 & 4
Begin teaching Team Play & Base Running I
Live Ground Balls
Begin Pitching Instruction (See ‘Pitching Drills Sheet’ in this manual)
----------------------------------------------------------------------------------------------------------------------------------------------------------------------------------------------

© 2011 Mark Linden 70
Shortage of Coaches - only 1 coach (Activities and Drills When It’s 12 Against 1)
Receiving Throws Footwork
Underhand Toss / Throwing on the Run
Have three of four groups working at the same time
Throwing Mechanics and Footwork Drills
Batting Mechanics Drills
Playing Catch Practice
This routine can be extended 5-10 minutes
Infield Base Coverage Responsibilities (with pitcher and catcher)
Outfielders Backing up Bases
Full Team Movement Responsibilities
Drop Step Routine (full team)
Pitchers Defense
Two groups instead of three, coach rolls balls to both groups
Base Running
Two Bases Relay Game (kids love this one)
Divide the kids into four groups of three:
1. Outfielders
2. Cut-Relay Group
3. Destination Base group
4. Base Runners.
Scrimmage – this can be a full hour.
The kids have a blast and the coach maintains discipline of basics of positional responsibilities and cut-relay
positioning and communication, etc.

© 2011 Mark Linden 71
Shortage of Coaches - only 2 coaches (Activities and Drills for Running an Effective Practice with Two Coaches)
All the one-coach activities, plus… Fielding and Throwing Drills (two groups of six) Ranging Laterally for Ground Balls
Two groups of six Catch Tag and Throw
Two groups of six
Mini diamond using underhand toss or full field. When throwing on a 60’ diamond with two groups, set up a second diamond in the outfield. Be sure this diamond is set up so that overthrows from one group don’t hit players in the other group
Toss Drills
Five kids fielding with one catching throws back in for the coach; rotate kids between catching for the coach and fielding.
Pitchers Defense
One coach rolls balls to two groups; one coach rolls balls to one group…or have only two groups of six. Three Groups Drills
Cut it back to two groups of six rather than three groups of four Cuts and relays on the mini diamond
Two groups of six Fly ball communication
Two groups of six rather than three groups of four Mass ground balls and fly balls
Six outfielders with one coach
Six infielders with the other coach – on ground balls the coach delivers the balls rapid fire to one player then on to the next. Rather than throwing across of throwing balls back in, the infielders, after completing their throwing footwork go back to their position and drop the ball in a bucket (have two buckets) one between the first baseman and second baseman and one between the shortstop and third baseman. Be sure the buckets are far enough back, so to not get in the way. In this situation leave the bat in the dugout and toss/throw all ground balls and fly balls.
Rundowns
Two groups of six One Coach works with Catchers, while the other coach picks an activity from the ‘One Coach’ list Whiffle Ball Batting Practice
Each coach tosses to three batters (six total batters); the other six chase hit balls Batting Practice
No infield throws at to a base; roll balls back into the pitcher
Side station coach sets up so they can see the defense and base runners. From that vantage point, this coach can keep an eye on the defense and base runners and provide support to the other coach by occasionally re-focusing those players
The coach pitching batting practice checks on infield and base runner after each ball put into play.
Another option is to have the live batter hit off a tee, so coach doesn’t have to have their back to the infield while pitching. Instead that coach is placing balls on the tee 9to manage the pace of hit balls0 and can face the infield and base runners the entire time, so to manage those players.

© 2011 Mark Linden 72
Parents Seven - page 1
The drills and activities in this section are very elementary and are fundamental to most aspects of practice activity.
Parents who might help occasionally with practices can use this as a guide to being an effective part time assistant. The
contents of this section are very simple to learn and can be taught/learned in minutes. Of course mastery comes
through repetition in practices. The hope is that this section helps build confidence in parents that they can be effective
helpers and the coaching staff can delegate some of these activities to parents during practices.
1. Playing Catch Practice
Feeding balls to players when they miss throws
Moving Feet Management: “Move Feet to Catch; Move Feet to Throw” while playing catch
NOTE: The Head Coach can explain the above to you in half a minute.
2. Rolling Ground Balls in Drills
When rolling ground balls the objective is ‘Footwork’, not catching the ball (of course we want them to catch
the ball, but that Result is secondary to the Action of good footwork). Ground balls should be rolled at a slow
to medium pace. Slow enough that the player can execute their footwork, but fast enough that the ball will
roll into their glove. Do not allow players to ‘run through’ the fielding action; they must ‘Slow Down’ and get
their feet “Wide to Catch”.
Teaching Phrases:
Call out “Ready Position” to get the player in a “Ready Position” prior to rolling the ground ball
“Wide (feet) to Catch” - stated just before the player is fielding the ball
“(Move) Feet to Throw” - stated as the player is fielding to remind them to move their feet in order to
power their throw with their legs.
NOTE: The player should maintain their momentum in a straight line toward their target following their throw.
In many drills, after throwing the ball the players rotate to the position they throw the ball to.
3. Toss Drills
When tossing fly balls DO NOT throw HIGH ‘pop flies’. Tosses should be no higher than 10-12’. The arc of your
toss should more resemble a football pass than a baseball fly ball. When running these drills follow this sequence:
1. Call out “Ready Position” to get the player in a “Ready Position” prior to the toss
2. Call out, ‘Go’, then allow the player to run 3-4 steps (10’), then toss the ball to a point where the play-
er has to run Full Speed to get to the ball.
3. Instruct the player to: 1. ‘Run Full Speed’ and 2. “Reach Out to Catch”.
NOTE: Young players have a tendency to slow down when looking up at a fly ball while running after it and have a
tendency to hold their gloves close to their body when trying to catch.
We want the players to extend their arms away from their body when attempting to catch. Most kids ages nine
and under are not proficient at tracking a fly ball and catching it. We want to focus our feedback on their actions
not the results (running full speed and reaching out, not if they catch the ball or not). Comments should be pretty
much limited to: “Good job running fast” and/or “Good job reaching out to catch”, or “Run Full Speed” and/or
“Reach out away from your body to catch”
Very Important: When working with any age group, make sure that on each return throw the players “Move Their
Feet to Throw”. On overhand throws they should ‘shuffle their feet’ to power the throw with their legs or, when
making and Underhand Toss, run with the ball a few steps toward you prior to delivering the ball/
See page 103 in the manual

© 2011 Mark Linden 73
Parents Seven - page 2
4. Covering a Base - a common aspect of most drills
Rules for covering a base:
a) “Cover the Base with your Eyes”. This means that the player looks at the base while approaching and does not look to
the ball until AFTER they arrive at the base
b) “Ready Position” on the side of the base the ball is coming from; and stand ‘in front‘ of the base. The ‘front’ is the side
of the base the runner is running toward.
c) The defensive player does NOT touch the base until after they catch the ball (unless instructed otherwise by the Head
Coach). We remind the defensive player that “The Base is for the Runner, The Ball is for the Defense”; they need to
“Move Their Feet to Catch” (thrown balls often do not come straight to the base), and that their priories are, “Ball First,
Base Second”.
d) After making a play at a base, the defensive player should immediately “Look for Other Runners”.
5. Positional Responsibilities
Infield Covering Bases (4 - 1 = 3) ...see pages 80-1 and review the explanation
Outfield Backing up ...see pages 82-3 and review the explanation
NOTE: prior to running these drills you will want to observe a trained coach a couple of times.
6. Batting Practice Assistance:
Taking throws at a base
- The infielders are fielding ground balls and throwing to you. Stay alert! Batting Practice moves fast.
Managing the infielders
Make sure the players are in a “Ready Position” prior to each pitch. The mindset of the defensive players is that
it’s the ‘Sixth inning of the Championship Game’ on each ball hit during Batting Practice and they should play
each ball as such. This includes picking up muffed balls and still making a throw to you at the base.
After making a play on a ball a player will likely be unable to get back to their position for the next hit ball. For
safety reasons it is imperative that we remind that player to keep their eyes on the batter while returning to
their position.
Players do not take throws at a base during Batting Practice. They all play balls off the bat. There is too much
going on for them to take throws at a base AND stay aware of balls being hit.
Managing base runners
- The adult taking throws at a base has a secondary responsibility, checking on the base runners to be sure they are
working on reacting to balls being hit by the batter. The base runners do not run in the base lines. Instead they
have bases/cones set up approximately 20’ behind the infielders and they practice their base running behind the
infielders, so to not interfere with the infielders’ work and to not be in the line of throws being made by infielders.
- The three keys for base runners;
1) Ground Ball - run towards the next base
2) Line Drive - ‘Freeze’, then track the flight of the ball. If the ball drops, they then run; if the ball is caught they go
back to their base.
3) Fly Ball - come off the base ‘half way’, then react to the ball. The ball lands, run; if the ball is caught, return to
your base.
NOTE: When a line drive is caught by an infielder we still want them to throw to you at the base, so to get more throwing prac-
tice. REMEMBER, the players always “Move their Feet to Throw”
7. Scrimmage Assistance
Playing a position (when the team is short players an adult is needed to play a position).
This is a ‘learn as you go’ assignment. The Head Coach will acknowledge you when you do things correctly and will correct you
as needed, just as if you were a player on the team. As the season progresses you will learn the positional responsibilities and
the teaching focus points for scrimmage (Pp. 34-5). Note: part of playing a position is doing so as if you are the age of the
players on the team. On most fly balls , except easy pop ups, let the ball drop so the kids get base running experience and the
defense gets experience reacting to situations.

© 2011 Mark Linden 74
Rain/Wet Day Practice (and when no diamond is available) Menu of Activities
NOTE: Make every effort to avoid cancelling practices unless there are extreme circumstances. Scout out your neighborhood to identify covered areas; this includes 10’ wide covered walkways at buildings such as schools, etc. A productive practice can be run using a covered walkway. Most, if not all of the activities below and be run on a concrete surface in a school yard. Make it clear to parents that you have a rain day plan and that you have no plans of cancelling practices. Positional Responsibilities: Infield Base Coverage (4 - 1 = 3), Backing up Bases, etc Batting Mechanics Drills Throwing Mechanics Drills Pitching Mechanics Drills and Pitching Practice Catcher’s Stance and Receiving & Drills Wild Pitch / Past Ball Communication Playing Catch Practice Receiving Throws at a Base Drills Pitchers Defense Three Groups Drills Fly Ball Communication Relays - MINI Diamond Base Running Rundowns Whiffle Ball Batting Practice Whiffle Ball Scrimmage also, see Skill Building Warm-up List

© 2011 Mark Linden 75
Pre-Game Practice
Plan now! Tell your parents and kids, that you will hold a (minimum) Practice for 45 min prior to each game; 60 minutes is ideal. Skills tend to deteriorate during the season b/c of a loss of practice time. Below is an outline of a 60 minute Pre-Game practice. Any of the activities in the above list (‘Rain/Wet Day Practice) can be used to design a Pre-Game Practice.
Early Arrivals – 0:10 Whiffle Ball Batting Practice
0:10 - 0:20 Skill Building Warm-up
0:20 – 0:30 Playing Catch Practice (include Underhand Toss)
0:30 – 0:40 Ground Balls and Fly Balls
0:40 – 0:50 Team Defense / Mini Infield Activity
0:50 – Game Time Starting Pitcher: Rocking Routine and 8-12 full distance pitches
Get players hydrated and organized in the dugout.
Between Innings Practice This is a concept more suited for an experienced coach and a group of players who are well in tune with getting organized into groups for drills and running drills at a crisp pace.
Plan, and prep your players, to run skills drills between innings of a game. The tradition to just play catch in the outfield and have the first base-man toss ground balls between innings began a century ago by adult players; adults who had already developed skills. Young kids can greatly benefit from making better use of this time. If each player (including your subs) can get three skill building reps per inning x 6 innings x 20 games = 360 extra reps to develop skills during the year.
This idea evolved from Ed Chef, Head Coach of 10 time NAIA National Champion Lewis and Clark State (ID). Coach Chef would have his infielders practice turning double plays between innings. He recognized how much skill development his club could gain by utilizing this valuable time between each inning over the course of a season.
Get your coaching staff outside the dugout and have two groups of kids on the infield dirt on your side of the infield working on infield skills and another group along the outfield foul line working on outfield skills.
Examples of quick drills to run between innings:
Outfielders fielding ground balls and hitting cut person (coach)
Catcher #2: receiving pitches, blocking pitches, etc.
Toss Drills
Relays (mini diamond) – Phase I
See ‘Skill Building Warm up’ for more ideas
Keep in mind that anytime we do something new it doesn’t run perfectly the first few times. It will take a few games to get this routine running smooth. However, this will become a tremendous tool to accelerate your kids’ development throughout the season, while keeping them more focused during the games.
NOTE: Umpires may find this activity conflicts with tradition, especially having coaches on the field between innings. Talk with the umpires be
fore the game and prep him for what you will be doing and why ...to develop skills (and keep the bench players involved).
Game Day Dugout Management The ideal scenario for managing a team on game day is to have two assistants, each with clear responsibilities during the game.
Have one in charge of the Pitchers: keeping pitch counts, alerting kids when they may be needed for relief and ensuring that pitchers get pre-pared properly before coming into the game.
A second assistant is in charge of movement in and out of dugouts between innings and structuring and running the BETWEEN INNINGS PRAC-TICE. A key to having these activities run smoothly is ids having their gloves together in one spot by position; infielders in one spot, outfielders in another. This allows the kids and coaches to find gloves immediately at the conclusion of the inning and to bring gloves out to kids left on base. This saves a lot of valuable ‘practice’ time. The second assistant tells the other two coaches what drill they are running between each inning
The Head Coach needs to limit their thoughts to making substitutions and running the game….and participating in drills between innings!

© 2011 Mark Linden 76
Drill
Diagrams
Receiving a Throw at a Base p 78
Positional Movement & Responsibilities p 79
Infield p 92
Outfield p 101
Team Skills & Drills p 105

© 2011 Mark Linden 77
Position Numbering
8
(CF)
7
(LF)
9
(RF)
6
(SS)
4
(2B)
5
(3B)
3
(1B)
1
(P)
2
(C)
Many of the drills in the manual use numbers to represent positions on the field. The chart below identifies the position
numbers.

© 2011 Mark Linden 78
Receiving a Throw at a Base
Right Fielder Going Back, Shortstop
Receiving a Throw at Second Base
Player runs to the base with eyes on the base. Gets in front of the base and on the side of
the base path the throw is coming from; in a Ready Position facing the coach/ball. Coach
throws ball to player from approximately 25’; player first moves feet to catch, then makes
tag in the baseline in front of the bag. NOTE: Coach should intentionally throw the ball
slightly off target so the fielder has to move feet to catch.
MINI Diamond
Receiving a Throw at Second Base — From Left Field
Player receiving the throw:
-Stands at a point ‘in front’ of the base and on the side of the base the throw is coming from.
>>> (The ‘front’ of the base is the side the runner is approaching)
- Is in a ‘Ready Position’ with feet, chest and hands facing the Left Fielder - prior to the throw.
- Does not touch the base; they position their right foot a few inches from the base.
- ‘Move feet to catch’ the ball first
- Take glove and ball to a point directly in front of the base (the player receiving the ball
does not look at the runner - the runner will run to the defensive player’s glove).
MINI Diamond
(or on a a full size field w/RF playing shallow)
Same rules as diagram of ball coming from left fielder
All the drills on this page can be done with a player in the OF position
or with a coach. All drills can be run on a Mini Diamond or a full field.
The distance between the OF and INF, when using a full field can be
shortened in order to ensure more accurate throws and to keep
the players closer to the coach to better facilitate instruction.
Also, when drills are run in a more compact space,
generally the result is more repetitions.
Receiving a Throw at Second Base from Right Field
>>> Drill - with coach tossing the ball to the right fielder

© 2011 Mark Linden 79
Positional
Responsibilities
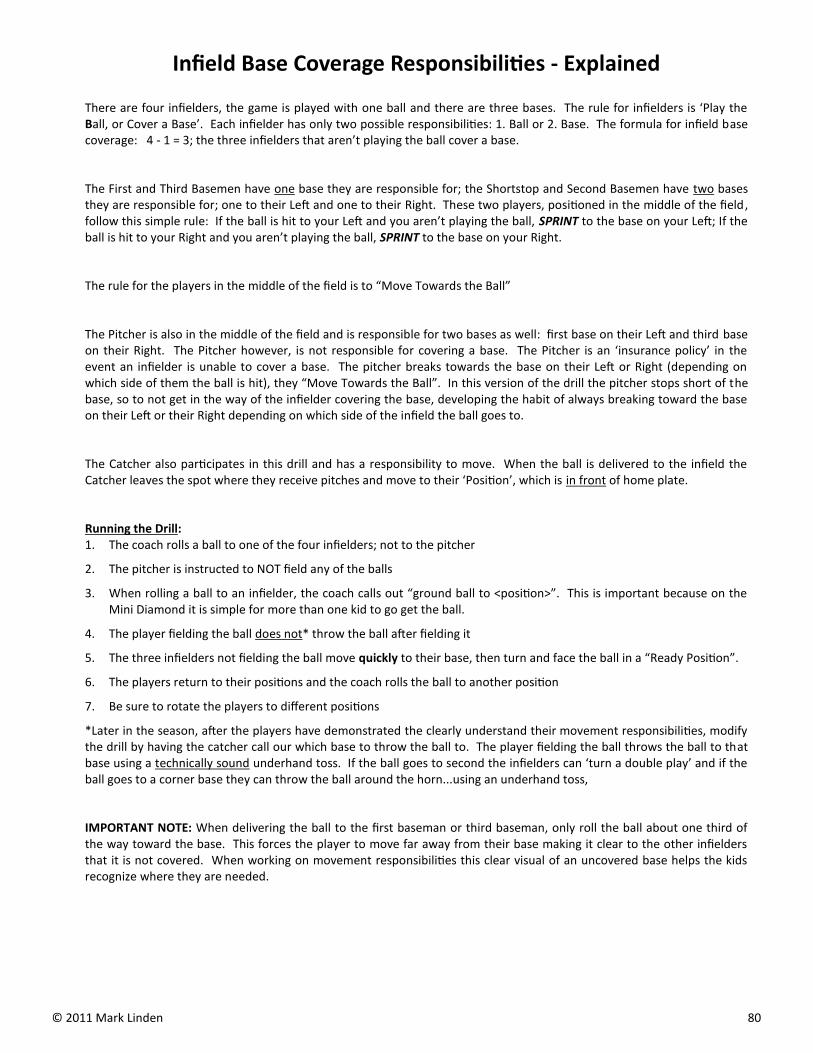
© 2011 Mark Linden 80
Infield Base Coverage Responsibilities - Explained
There are four infielders, the game is played with one ball and there are three bases. The rule for infielders is ‘Play the Ball, or Cover a Base’. Each infielder has only two possible responsibilities: 1. Ball or 2. Base. The formula for infield base coverage: 4 - 1 = 3; the three infielders that aren’t playing the ball cover a base.
The First and Third Basemen have one base they are responsible for; the Shortstop and Second Basemen have two bases they are responsible for; one to their Left and one to their Right. These two players, positioned in the middle of the field, follow this simple rule: If the ball is hit to your Left and you aren’t playing the ball, SPRINT to the base on your Left; If the ball is hit to your Right and you aren’t playing the ball, SPRINT to the base on your Right.
The rule for the players in the middle of the field is to “Move Towards the Ball”
The Pitcher is also in the middle of the field and is responsible for two bases as well: first base on their Left and third base on their Right. The Pitcher however, is not responsible for covering a base. The Pitcher is an ‘insurance policy’ in the event an infielder is unable to cover a base. The pitcher breaks towards the base on their Left or Right (depending on which side of them the ball is hit), they “Move Towards the Ball”. In this version of the drill the pitcher stops short of the base, so to not get in the way of the infielder covering the base, developing the habit of always breaking toward the base on their Left or their Right depending on which side of the infield the ball goes to.
The Catcher also participates in this drill and has a responsibility to move. When the ball is delivered to the infield the Catcher leaves the spot where they receive pitches and move to their ‘Position’, which is in front of home plate.
Running the Drill: 1. The coach rolls a ball to one of the four infielders; not to the pitcher
2. The pitcher is instructed to NOT field any of the balls
3. When rolling a ball to an infielder, the coach calls out “ground ball to <position>”. This is important because on the Mini Diamond it is simple for more than one kid to go get the ball.
4. The player fielding the ball does not* throw the ball after fielding it
5. The three infielders not fielding the ball move quickly to their base, then turn and face the ball in a “Ready Position”.
6. The players return to their positions and the coach rolls the ball to another position
7. Be sure to rotate the players to different positions
*Later in the season, after the players have demonstrated the clearly understand their movement responsibilities, modify the drill by having the catcher call our which base to throw the ball to. The player fielding the ball throws the ball to that base using a technically sound underhand toss. If the ball goes to second the infielders can ‘turn a double play’ and if the ball goes to a corner base they can throw the ball around the horn...using an underhand toss,
IMPORTANT NOTE: When delivering the ball to the first baseman or third baseman, only roll the ball about one third of the way toward the base. This forces the player to move far away from their base making it clear to the other infielders that it is not covered. When working on movement responsibilities this clear visual of an uncovered base helps the kids recognize where they are needed.

© 2011 Mark Linden 81
Infield Base Coverage

© 2011 Mark Linden 82
Outfielders Backing up Bases, Explained
Most kids view playing the outfield as ‘boring’. That is until they are trained to play the outfield properly. The Outfielder’s first responsibility, naturally, is to chase balls hit in the outfield. Their second responsibility s to back up on ground balls hit to either of the two infielders in front of their particular outfield position (they do this by SPRINTING toward the infield). Their third re-sponsibility is the one they will engage in the most: back up throws to bases.
Backing up throws to bases is Far from boring, this responsibility takes a lot of effort. In order to get to the correct spot on the field to back up a throw to a base an outfielder is often required to SPRINT 50’ or more. Over the course of one inning an out-fielder may have to SPRINT five times or more ...that isn’t boring. Once kids understand the backing up responsibilities of an outfielder a coach will never again hear a kids say playing outfield is boring. What a coach might hear is, “Coach, I don’t want to play outfield, I have to run too much”. My suggested response is, “Consider playing soccer, in that sport you don’t have to SPRINT so much”.
The key point that an outfielder needs to understand in backing up is they need to position themselves behind the base so there is a straight line from the ball, to the base to their position backing-up. It is important they understand that their backing up po-sition is different on every play depending on where the ball is being thrown from.
Drill Description: This drill is run using the MINI DIAMOND.
Position an outfielder at each outfield position; also have a second player at each position. After the first set of outfielders run the drill and are returning to their outfield spot the second set of outfielders are run through the drill. Using cones to mark the three outfield positions helps the drill stay organized. The cones are positioned about 15-20’ beyond the mini diamond.
The coach goes to any spot within the diamond, or in foul ground between home plate and a corner base (this provides a greater variety of angles to the bases), then calls, “Back up your base”. The Left Fielder backs up third; the Center Fielder backs up sec-ond; the Right Fielder backs up base first. The three outfielders SPRINT to a point five feet ‘behind’ the base they are backing up (on a full size field the backing up distance in 25’). The coach then moves to a different spot and repeats the process with the next group of Outfielders. Ideally two Mini Diamonds are set up with six players working at each diamond. This doubles the reps for the kids and reduces the amount of time spent standing around.
Soon the coaches (and players) will recognize that Right Field is not a place for a weak player. Many balls get past the First Base-man. When there are overthrows at first, base runners are trained to run to second base. If the Right Fielder is alert and work-ing hard, they will be in position to stop the runner from going to second, or be in a position to field the ball and have a good chance to throw the runner out at second base. It takes a good athlete to get into a backing up position in time, and then to exe-cute a strong throw to second. After a couple of days of running the drill we want to expand the teaching of the backing up situation. Point out to the kids that the fence line on most fields is only 10-15’ behind first and third base. Often the corner outfielders will back up the base by play-ing a carom off the fence. They need to learn to run to where the carom will land. The drill has the corner outfielders only backing up first and third. It needs to be pointed out that many throws to second, if overthrown, are going towards left field or right field. Therefore we explain to the corner outfielders that they will sometimes have to back up second base as well. NOTE: This does not mean the Center Fielder is not attempting to back up on these throws. The Center Fielder, on every potential throw to second base, is SPRINTING in an effort to get into position to back up that base.
FINAL NOTE: The objective on EVERY throw to a base in a game is to have “Two Players in Position to Catch the Throw”: the play-er at the base who we want to catch the throw, and a second player beyond the base backing up the throw. In theory, if the backing up players fulfill their responsibility, ZERO runners will advance on an overthrow during the entire season. Can you im-agine what a difference that would make???

© 2011 Mark Linden 83
Backing Up Bases - Outfielders Move to a wide variety of spots on, and within the base lines and in foul territory.

© 2011 Mark Linden 84
Backing Up Bases - Pitchers
On a ball hit to the outfield with a runner attempting to score the Pitcher is the Cut-Relay player to home plate. In any other circumstance where a ball is hit to the outfield the pitcher’s responsibility is to back up throws coming from the outfield; ALL throws.
Throws to first base are the least common, but on the 60’ diamond there are times when the right fielder will attempt to throw out a runner at first base. Backing up this throw is the pitcher’s responsibility.
Most throws from the outfield go to second or third base. When there are multiple runners the decision of which base to throw to is often not made until the last second. Because of this the pitcher initially goes to a spot midway between second and third base. IMPORTANT NOTE: The pitcher does not stand ‘half way’ between the bases, the pitcher positions themselves half way between where an overthrow will go.
Once the outfielder makes a commitment to throw to either second or third the pitcher must SPRINT to a point approximately 25’ beyond the base the ball is being thrown to, in line with the direction of the throw.
Drill Description:
This drill is run using the MINI DIAMOND.
Position three pitchers at the pitching rubber. Pitcher on the third base side backs up third; Pitcher in the middle backs up sec-ond; Pitcher on the first base side backs up first. Addition kids participating in the drill line up behind those three. Coach stands in the ‘outfield’, holds up a ball and hollers, ‘Back up a base’. The three pitcher SPRINT to a point 5’ ‘behind’ the base they are backing up. ‘Behind’ means standing at a point that is at the end of a straight line from the Ball to the Base to the Pitcher’s back-ing up position.
The three players backing up then run back to the middle of the diamond and get into a different line, so they will back up a different base on their next turn.
The coach then moves to a different spot in the ‘outfield’ and repeats the process with the next group of pitchers.
Ideally two Mini Diamonds are set up with six players working at each diamond. This doubles the reps for the kids and reduces the amount of time spent standing around.

© 2011 Mark Linden 85
MINI Diamond
v
(1) (2)
(3)
On a ball hit in the infield, to the Pitcher’s left
(first base side), the pitcher breaks towards first base
and follows the ‘Three Defensive Responsibilities’ in order
of progression: (1) ‘Play the ball’; if they don’t field the ball
they look to (2) ‘Cover a <first> base’; if the base is covered,
they move to foul territory to (3) ‘Back up a <first> base’.
NOTE: The Pitcher must be conscious of the base runner and
avoid a collision when crossing the base path. As a
general rule, instruct pitchers to run behind the base
runner to ensure safety.
Full Team Base Coverage and Backing up - Ball hit to 1b
MINI Diamond
All players’ first reaction is ‘Towards the Ball’, then
follow rules regarding their defensive responsibilities.
Outfield: 1. Play the ball, 2. Back up the two infielders
in front of them (as the play requires), 3. Back up a
base.
Right Fielder: In this situation with a ground ball hit
to the first baseman, the right fielder sprints to a point
right behind the first baseman, in case the ground
balls gets by (the Pitcher will be backing up first base).

© 2011 Mark Linden 86
v
(1) (2)
(3)
On a ball hit in the infield, to the Pitcher’s left
(first base side), the pitcher breaks towards first base
and follows the ‘Three Defensive Responsibilities’ in order
of progression: (1) ‘Play the ball’; if they don’t field the ball
they look to (2) ‘Cover a <first> base’; if the base is covered,
they move to foul territory to (3) ‘Back up a <first> base’.
NOTE: The Pitcher must be conscious of the base runner and
avoid a collision when crossing the base path. As a
general rule, instruct pitchers to run behind the base
runner to ensure safety.
Full Team Base Coverage and Backing up - Ball hit to 2b
MINI Diamond
All players’ first reaction is ‘towards the ball’, then
follow rules regarding their defensive responsibilities.
Outfield: 1. Play the ball, 2. back up the two infielders in
front of them (as the play requires), 3. back up a base.
Right Fielder: In this situation with a ground ball hit to
the second baseman, the right fielder sprints to a point
right behind the second baseman, in case the ground
balls gets by (the Pitcher will be backing up first base).

© 2011 Mark Linden 87
v
(1) (2)
(3)
On a ball hit in the infield, to the Pitcher’s right
(third base side), the pitcher breaks towards third base
and follows the ‘Three Defensive Responsibilities’ in order
of progression: (1) ‘Play the ball’; if they don’t field the ball
they look to (2) ‘Cover a <third> base’; if the base is covered,
they move to foul territory to (3) ‘Back up a <third> base’.
All players’ first reaction is ‘towards the ball’, then
follow rules regarding their defensive responsibilities.
Outfield: 1. Play the ball, 2. back up the two infielders
in front of them (as the play requires), 3. back up a
base.
Left Fielder: In this situation with a ground ball hit to
the shortstop, the left fielder sprints to a point right
behind the shortstop in case the ground balls gets by
(the Pitcher will be backing up third base).
Full Team Base Coverage and Backing up - Ball Hit to SS
MINI DIAMOND
————————————————————— Three responsibilities: of an Outfielder
1. Play the Ball
2. Back up the two infielders in front
3. Back up a Base

© 2011 Mark Linden 88
MINI Diamond
v
(1) (2)
(3)
On a ball hit in the infield, to the Pitcher’s right
(third base side), the pitcher breaks towards third base
and follows the ‘Three Defensive Responsibilities’ in order
of progression: (1) ‘Play the ball’; if they don’t field the ball
they look to (2) ‘Cover a <third> base’; if the base is covered,
they move to foul territory to (3) ‘Back up a <third> base’.
All players’ first reaction is ‘towards the ball’, then
follow rules regarding their defensive responsibilities.
Outfield: 1. Play the ball, 2. back up the two infielders
in front of them (as the play requires), 3. back up a
base.
Left Fielder: In this situation with a ground ball hit to
the third baseman, the left fielder sprints to a point
right behind the third baseman in case the ground
balls gets by (the Pitcher will be backing up third
base).
Full Team Base Coverage and Backing up - Ball Hit to 3b
MINI DIAMOND
————————————————————— Three responsibilities: of an Outfielder
1. Play the Ball
2. Back up the two infielders in front
3. Back up a Base

© 2011 Mark Linden 89
Full Team Movement, Balls Hit to the Outfield
5. Ball Hit to left Fielder
6. Ball hit to Right Fielder
7. Ball hit to Center Fielder
Rule: On balls to the Center Fielder, the Shortstop
is the cut-relay player; the Second Baseman
covers the base.
NOTE: These diagrams assume there are no runners
on base. If a runner is on first, second or first and
second, movement responsibilities are per diagrams
in ‘Cuts-Relays’ section.

© 2011 Mark Linden 90
SS SS SS 2B 2B 2B
(Cone indicating CF) (Cone indicating CF) (Cone indicating CF)
1. Coach Points to RF
2. Calls out, “Ball to RF”
3. Both players ‘Move toward the Ball’
4. 2B goes out 20’ beyond the second
base bag
5. SS covers second base
1. Coach Points to CF
2. Calls out, “Ball to CF”
3. Both players ‘Move toward the Ball’
4. SS goes out toward CF, 20’ beyond
the second base bag
5. 2B covers second base
1. Coach Points to LF
2. Calls out, “Ball to LF”
3. Both players ‘Move toward the Ball’
4. SS goes out 20’ beyond the second
base bag
5. 2B covers second base
Objective: Train middle infielders, through repetition, that they
‘move TOWARD the ball’, and that the player going toward the
outfielder must get out AWAY from second base.
1. On balls to the left fielder or right fielder the action is
pretty logical and straight forward
2. On balls to the center fielder, the players follow the rule:
SS goes out toward the center fielder; 2B covers the bag.
Middle Infielders Movement on Balls Hit to the Outfield
Note: The configuration of the diagrams on the page with the
drills beyond the diamond indicates that this is an activity that
can be, and generally is, run in the OF grass with multiple
groups working at one time
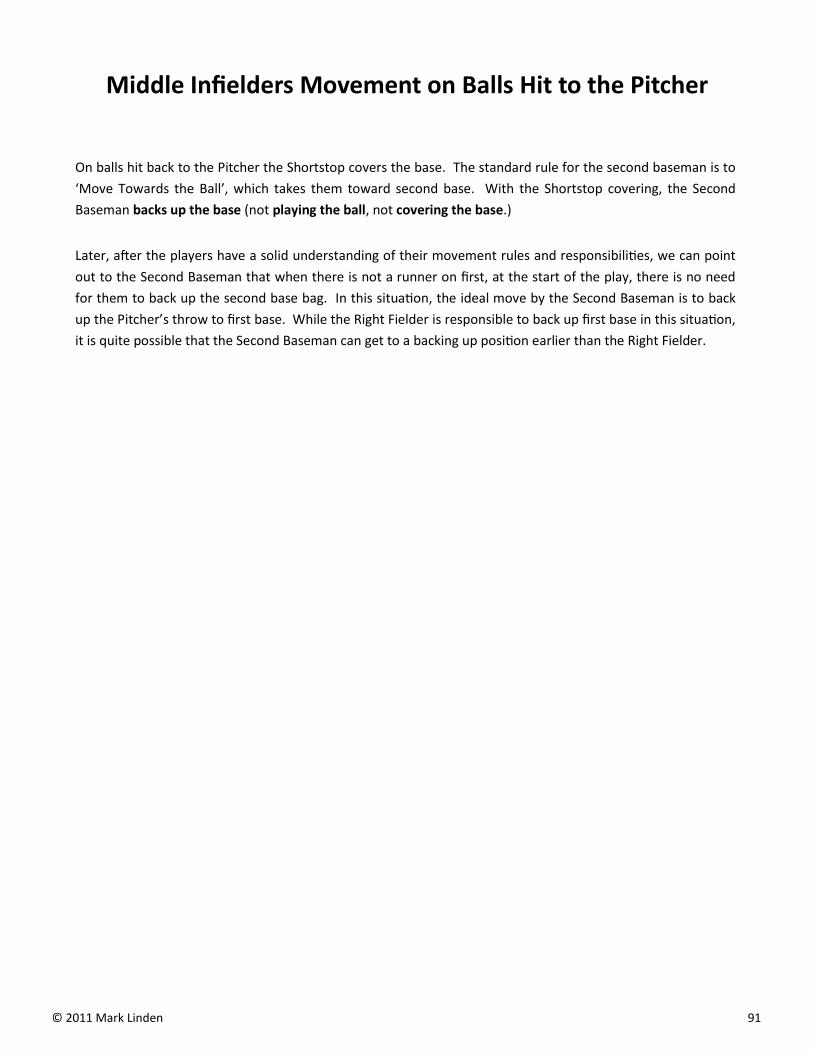
© 2011 Mark Linden 91
Middle Infielders Movement on Balls Hit to the Pitcher
On balls hit back to the Pitcher the Shortstop covers the base. The standard rule for the second baseman is to
‘Move Towards the Ball’, which takes them toward second base. With the Shortstop covering, the Second
Baseman backs up the base (not playing the ball, not covering the base.)
Later, after the players have a solid understanding of their movement rules and responsibilities, we can point
out to the Second Baseman that when there is not a runner on first, at the start of the play, there is no need
for them to back up the second base bag. In this situation, the ideal move by the Second Baseman is to back
up the Pitcher’s throw to first base. While the Right Fielder is responsible to back up first base in this situation,
it is quite possible that the Second Baseman can get to a backing up position earlier than the Right Fielder.

© 2011 Mark Linden 92
Infield
Drills

© 2011 Mark Linden 93
A C
A
B
C
A
“B”
”C”
B
C
C
A
A
B
B
C
“B”
“B”
“A”
“A”
”C”
Underhand Toss - Shuttle / Throwing on the Run - Shuttle
Each of these drills are run the same, just using a different type of throw. Player with the ball runs approximately half way toward the opposite base before making the throw. On the underhand toss the player with the ball may go slightly past half way; Throwing on the Run the ball may be thrown before the player is halfway. The point at which the player tosses/throws the ball will vary by age, skill, strength, etc.
Underhand Toss technique: Run holding ball near hip, in throwing hand. Momentum powers the throw, not the arm. Tossing technique: arm extends out FLAT/Level to the ground and ‘guides’ the ball to the receiving player. The arm provides minimal power to the throw. At the conclusion of the toss the arm is fully extended and palm is ‘flat’ and facing up to the sky.
Throwing on the Run technique: Run with throwing hand elbow at shoulder height and somewhat in front of throwing shoulder; throwing hand extended up above the elbow. Momentum powers most of the throw. Throwing technique: slight flexion back at the elbow, then a firm wrist snap forward toward receiving player.
Receiving Player: In a ‘Ready Position’ before the throw; ‘Reach Forward to Catch’. ‘Move Feet to Catch’ as needed.

© 2011 Mark Linden 94
Catch, Tag & Throw
Full Field
NOTE: can be run on a MINI Diamond using the Underhand Toss 1) “Ready Position”
2) “Move Feet to Catch”
3) Tag the ground in front of the base
4) “Move Feet to Throw”
5) Momentum continues in a straight line towards
the target after the throw; “Follow Your Head”.
= Ball bucket
= Additional player
= Feet
This drill can also be run on
a mini diamond as part of the
“Skill Building Warm up”
In this variation, the throwing aspect is
modified. The players run toward the next base
using an underhand toss. The distance between
the bases of the Mini Diamond for this drill should
be approximately 25’.
= ‘Move Feet to Catch’

© 2011 Mark Linden 95
20’ Ground Balls
Teaching Phrases:
“Ready Position”
“Feet Wide to Catch”
“Move Feet to Throw”
(Do Not Get in Front of the Ball…..until final, wide step to field the ball)
1) Quick feet to the ball
2) Slow (under control) “Feet Wide to Catch”
3) Quick feet (in a straight line) toward target ...use Underhand Toss when throwing in this drill
Get in front of the ball when CATHCING the ground ball, not when
approaching the ball.
This diagram illustrates three coaches, each work-
ing with a group of four players. The drill has the
players and coaches working in the dirt area of the
infield. This drill does not require a diamond or
even a baseball field. The drill can be run any-
where there is a relatively smooth, flat surface.

© 2011 Mark Linden 96
Ranging Laterally for Ground Balls
Players lined up 10’ from base; coach 20’ from players, directly in front of the players. This coach rolls balls approximately 20’-25’ to the side of
the fielder forcing the fielder to run full speed and just barely reach the ball. The players are to reach out and field the ball with just their glove
hand, while running full speed, then continue running and make an underhand toss to the coach (or player) at the opposite base. If the ball rolled
by the coach does not force the fielder to run full speed the player should angle in towards the ball so to continue running at full speed and field
the ball with one hand.
If a second coach is not available, have a player receive the first throw. That player then joins the fielding group. As each player finishes fielding
and tossing they receive the next player’s toss. Following the fielding and tossing action, players line up at the opposite base. When all players
have gone, the coach moves down to the other base and runs the drill in the opposite direction.
NOTE: Coach/Machine Pitch and Tee-ball kids can field the ball as they choose. Simply having them moving to field and toss will develop skills for
their stage of development.
Backhand plays: Teach ‘thumb down’ and to keep the ‘glove between eyes and the ball’; this will get their glove into a proper relationship be-tween their body and the ball. NOTE: left handed players will be working on forehand-backhand going in the opposite direction of the other play-ers.
Kids age 8 or 9 and younger don’t have to backhand balls if they are not comfortable with the skill. At the younger levels we are working to de-velop movement and confidence in catching and tossing while moving.
Skills developed in this drill: 1) Ability and confidence in fielding while ranging to the ball 2) Aggressiveness towards the ball 3) One handed fielding skills for when both hands are not available NOTE: Kids love this drill because there is a lot of movement and a lot of satisfaction gained from their improved fielding skills.

© 2011 Mark Linden 97
Middle Infielder - Throws to Second Base
2b
2b
SS
SS
Positioning of Players for the Drill:
Shortstop 25’ from the base for this drill (rather than the standard 20’), to allow extra room for emphasis on moving feet toward target to power the throw.
Second Baseman plays at the bag for this drill. They stand ‘behind’ the bag in line with the Shortstop, with the bag between them. The reason for this is because of the short distance of the throw. Standing ‘behind’ the bag gives the player covering a little more time to react to the throw.
Coach rolls the ball a couple steps to the Shortstop’s left. Shortstop fields, throws and follows their throw. Following the play the players switch posi-tions.
Player’s Actions Coach’s Teaching Phrases
1. Fields the Ball 1. “Wide (feet) to catch”
2. Underhand Toss 2. “Move feet (to throw)”
3. Follows the throw 3. “Follow your head”
NOTE: From time to time coaches will likely have to remind the player receiv-ing the throw to be in a “Ready Position”.
Same as above, but with Second Baseman fielding and tossing with the
Shortstop covering the base
6 - 4 Play
4 - 6 Play

© 2011 Mark Linden 98
2B
SS
Catching a Pop-up Going Back; Middle Infielder Cover, Tag & “Look for Other Runners”
MINI Diamond
SS goes to RF side of base; “moves feet to
catch”; “ball first, base second”; tags the
ground in front of the base, then moves
feet toward the middle of the infield and
“looks for other runners”.
Second Baseman goes to LF side of base;
“moves feet to catch”; ball first, base second”;
tags the ground in front of base, then moves
feet toward the middle of the infield and
“looks for other runners”.
The focus of this drill is catching the fly ball, properly receiving a
ball at a base, making a tag and instilling the habit of ’looking
for other runners’ after the play. Position the infielder catching
the pop up so they catch the ball 25-30’ from second base
SS
2b

© 2011 Mark Linden 99
Infielders Throwing Across - Rotation
Fielding Ground Balls:
Ready Position (to the start EVERY rep in every drill)
1) Quick feet to the ball
2) Slow (under control) “Wide Feet to Catch”
3) Quick feet (in a straight line) toward target to throw. Momentum after the throw; follow your head.
Get in front of the ball when CATHCING the ground ball, not when approaching the ball.
Two groups of six players.
Three players in each group are busy at all
times: Shortstop, First Baseman and player
next to the coach in a ready position taking
an underhand toss from the first baseman
as they rotate.
Note: keep a bucket of balls at first base,
so that if a ball is not caught the First Base-
man can grab another ball and keep the
drill moving.

© 2011 Mark Linden 100
C
“Double Plays” - Rotation
Full Field
The set up in the diagram is of two groups of six kids. The group without the
arrows follows the same pattern as the group with the arrows.
This drill can also be run with the second baseman tossing to the Shortstop.
IMPORTANT: the second baseman must fully follow their throw (“Follow
Your Head”), before backtracking to rotate to the first base position.
At the Majors/Bronco level a coach may eliminate the rotation aspect, in
order to keep players working at the positions they are more likely to play
during games.
Blue symbols illustrate positioning of a second
group of coach and players doing the drill.
...keep everyone busy and developing skills.
Six players in each group.
C

© 2011 Mark Linden 101
Outfield
Drills

© 2011 Mark Linden 102
1. Drop Step from Ready Position; back to ready position; repeat ~5x (throwing and foot back; glove up to catch)
2. ‘Drop and Go’ Drop Step and run back 4-5 steps ….Fast
3. Get Behind It: ‘Drop and Go’; after players are back 4-5 steps, Coach says, ‘Catch and Throw’. Players take a
step or two forward, simulate a catch, continue forward using feet to throw.
No ball is used for this drill, so one coach can run the entire group/team at once.
Drop Step Routine
Get Behind It Coach: “Drop and Go”
Player: Drop Step and starts running straight back
Coach: Let player get started back 2-3 steps then toss a pop fly ~15’ - 20’ in the air and a step or two beyond the
player. The height and depth of the throw should allow the player a fair amount of time to get ‘behind’ the ball, be
able to change directions and step forward to catch.
The player comes forward to catch then ‘moves feet’ and finishes the throwing action while gaining ground back to
the coach. At the completion of the action the player returns the ball to the coach using a proper underhand toss
technique.
= position of feet
Drop Step
Drop and Go Coach: ‘Drop and Go’
Player: Drop Step and starts running straight back
Coach: Let player get started back 2-3 steps then toss a pop fly ~10’ beyond the player, who is forced to run full
speed in order to make the catch.
Note: Be sure the player ALWAYS throws the ball back using proper throwing technique, “Move Feet to Throw”,
“Follow Your Head”.

© 2011 Mark Linden 103
Toss Drills - Fly Balls
Coach stands 10’ from player. Player breaks back, full speed, at 45 degrees. Allow player to run 10’ then toss a fly ball approximately 30’; limit height of toss to 12’-15’. This is a running and catching drill, not a high pop fly drill.
In most cases an underhand toss by the coach works fine, is more accurate and easier on the arm.
<— Going Back:
Coach: “Drop and Go”
Player drop steps and starts running back as fast as possible.
After a couple steps, the coach tosses the ball about 10-15’ beyond the player forcing them to run full speed to catch the ball.
Note: this can be a one handed catch.
<— Get Behind It:
Coach uses underhand toss.
Stand 10’ from player, toss the ball ~20’ in the air and ~5’ be-hind the player.
Player Drop Steps, runs 2-3 steps, then coach tosses ball. Player gets to a point a step or two behind the ball, then comes forward to catch.
NOTE: Early on put emphasis on footwork, not on catching the ball.
NOTE: All return throws require absolute adherence to proper throwing technique using legs, and moving feet toward target.
Coach stands 40’ from player who breaks in, full speed, at 45 degrees. Allow player to run 10’ then toss a fly ball to a point approximately 30’ ahead of the fielder; limit height of toss to 10’-12’.
NOTE: An Underhand Toss by the coach is usually more accurate.

© 2011 Mark Linden 104
The outfielder’s throwing responsibilities are limited to a ‘Box’
that is no larger than 80’ in length. The end of the box is where
the Cut-Relay Player is standing. Teach outfielders to make as
strong of a throw as possible TO THE CUT –RELAY PLAYER.
When the outfielder’s throw is strong enough to continue on to
the destination base and possibly beat the runner, the player at
the base makes that decision. It should not be in the outfielder’s
mind that ‘they are going to throw out a runner.
SS
CF
RF
Outfield Hitting Cut - ‘Box’ Mentality
P
The outfielder’s throwing responsibility ends at the Cut-Relay Player. Any game action going on beyond the Cut-Relay
Player IS NOT the responsibility of the outfielder. The outfielder will rarely be required to throw the ball more than 80’
and most of the time the throw will be shorter. Teach outfielders to: 1) quickly get to the ball, 2) come under control to
cleanly field the ball , 3) generate power to throw by moving their feet toward the Cut-Relay Player, getting rid of the balls
as quickly as possible.
A drill to train this
mindset is with a coach
standing in the place of the
SS or P in this diagram. The coach
throws a ground ball at a pace allowing
the outfielder to charge full speed, 20-25’
before fielding the ball. At the point the out-
fielder fields the ball they should be 60-80’ from
the coach. This distance can vary some depending
on the age of the player. The outfielder comes under
control to field the ball, then ‘moves their feet’, gaining
ground towards the coach to throw. The coach ‘calls for
the ball’ as a cut player would. This drill can be performed
anywhere. It does not need to be on the field as presented
in the diagram.
A variation of this drill
can be run as part of the
“Skill Building Warm-up”
The distance between the coach and Player is shortened. The pace of the ground ball is still such that the player charges the ball 20-25’ before slowing down and coming under control to field the ball. However, at this point the player is only about 20’ from the coach. Instead of throwing overhand the player speeds up their feet, run-ning toward the coach and throws to the coach using an underhand toss.

© 2011 Mark Linden 105
Team Skills
&
Drills
Cuts & Relays p 106-116
Fly Ball Communication p 119
Pitchers Defense p 121-4
Three Groups Drills p 126-7
Rundowns p 129
Mass Ground Balls & Fly Balls p 131-5
Base Running p 137-8

© 2011 Mark Linden 106
Cuts
&
Relays

© 2011 Mark Linden 107
Rules and Communication for Cuts-Relays
Cut-Relay Player Footwork
1. “Ready Position”
2. “Move Feet to Catch”
3. “Turn Glove Side”
4. “Move Feet to Throw”
5. “Follow Your Head”
Cut-Relay Player - Lining up
1. Find the line between the ball and the base; get on that line; ‘look both ways’
2. Move out toward outfielder, ‘Half Way’ between the ball and the base
A) The rule of thumb is to go out to the baseline between first and second base
i. Pitcher and Shortstop on balls to right field
ii. Pitcher on balls to left field
b) Pitcher, on balls to center field, goes to a point approximately midway between the pitching rubber and second base
c) Shortstop, on balls to center field and left field, is positioned outside the diamond; goes to a point half way between
the ball and third base. On balls to left field the Shortstop gets line up, but will move out of the way when the ball is
thrown. This throw is short enough for the Left Fielding to throw all the way to third base. The exception is when
the Third Baseman recognizes the base runner has stopped at second base or will surely make it to third. In these
circumstances the Third Baseman calls, “Eat It! Run it in”.
3. Call for the ball
Communication – Destination Base
1. “Left One (step)”, “Good” / “Right One”, “Good” — Good” indicates the Cut-Relay player is lined up
2. “Cut Three/Four”. “Go, go, go”, “Eat it!, Run it in” (this option call is used quite often….when chances of making a play
on a runner are slim to none)
a) The call by the player at the destination base is made while the ball is in the air between the outfielder and the Cut-
Relay player. A judgment is made based on the speed of the thrown ball and where the location of the runner at
that moment. If there is a chance to get the runner going to the destination base “Cut 3” or “Cut 4” is called
(depending on which is the destination base).
b) The second option is to redirect the ball. A call of “Cut” followed by which base the ball should be thrown to in
order to get a different runner than the on headed to the destination base.
c) The third option, and likely the one most often used, is “Eat it!, Run it in”. This is used when there is little to no
chance of getting a runner. We don’t want to risk having the Cut-Relay person make a throw in this situation.
NOTE: It is important to point out to our players that ‘Runners are safe a lot of the time’.
Timing of Catcher Calls:
1. Wait til ball is about to be fielded by the outfielder, then call which base to throw to
a) Infielders ‘Echo’ the call, so outfielder is sure to hear the call
2. If the call is to throw home the catcher makes a call to the Cut-Relay player while the ball in in the air between the
outfielder and Cut-Relay player
Catcher Running the Game:
1. Communicate the number of outs & location of runners prior to each new batter
2. Holler to the defense where to throw the ball after ball is put into play
3. Communicate to cut-relay player on plays to the plate
4. Managing the end of the play - communicate to the defense on getting the ball securely back into the pitcher
5. Managing the Pitcher —- keep their emotions in check; be sure the pitcher is aware of which part of the line they are
pitching to and uses a proper pitch selection and approach to each batter

© 2011 Mark Linden 108
Cut-Relay to Home, Phases I-III
Relay Communication (cont.)
- “Eat it” - Cut and hold the ball.
- “Run it in” - Usually follows an ‘Eat it’ Call

© 2011 Mark Linden 109

© 2011 Mark Linden 110

© 2011 Mark Linden 111

© 2011 Mark Linden 112
Cut-Relay to Home, Ball Past Outfield

© 2011 Mark Linden 113
Two Bases Relay Game, Runner at Second Full Field
This drill develops player discipline and good habits for Cut-Relay plays, communication, catching, throwing and tagging skills on defense. The
drill also gives players reps in base running skills in a fun, competitive environment.
Lining up: “Look both ways” (crossing the street)
Communication: Cut-Relay Player, “Hit me”; Player receiving the throw “Cut 4”, “Go, go” or “Eat it, Run it in”
Cut-Relay Person (Pitcher): “Move feet to catch, move feet to throw”
Be sure to “Turn Glove Side”, when preparing to throw.
(Young players have a tendency to catch the ball on their throwing arm side and turn in that direction.)
Base Runners: Discipline on proper approach and touch; push of base and accelerate in a straight line to next base.
Player Receiving the Throw: “Ready Position”
Communicate with Cut-Relay player
“Move feet to Catch”
“Ball First, Base Second”,
“Tag Ground in Front of the Base”
Safety Note: Use an extra home plate for the base runner to run to, so to avoid a collision with the catcher.

© 2011 Mark Linden 114
Cut-Relay to Third

© 2011 Mark Linden 115
Two Bases Relay Game, Runner at First Full Field
This drill develops player discipline and good habits for Cut-Relay plays, communication, and catching, throwing and tagging skills on defense. The
drill also gives players reps in base running skills in a fun, competitive environment.
Lining up: 1. “Look both ways” (crossing the street)
2. Move out to the baseline on balls to RF and LF; to a point midway between the pitching rubber and second base on balls to CF.
The objective is for the Cut-Relay Player to be ‘Half Way’ between the ball and the destination base. The baseline will generally be half way.
With younger kids the Cut-Relay person may not have to go out all the way to the baseline. With older kids the baseline may not be quite Half
Way out. As long as the Outfielder can get the ball to the Cut-Relay Person, the Cut-Relay person does not go out beyond the baseline. If re-
quired the Cut-Relay person can adjust to the strength of the Outfielder and may go a couple steps past the baseline.
Cut-Relay Person (Shortstop) must be reminded to “Turn Glove Side”, when preparing to throw and to “Move feet to catch, Move feet to throw”.
Base Runners want to touch the far side of the inside corner of the base and push off in a straight line to the next base.
Player receiving the throw: “Ready Position”; communicate with Cut-Relay player, “Cut 3”. “Move feet to Catch”, “Ball First, Base Second”. Tag
the ground in front of the base, then “Look for other runners”, by shuffling toward the “Middle of the Infield” in a “Power Position”.
3B
SS
R
RF

© 2011 Mark Linden 116
9-6-5-4-2 Throwing & Communication Drill - Six players involved in this drill -
1) Move Feet to Catch & Throw
2) all First, Base Second
3) Tag Ground In Front of the Base
4) Communication:
- Cut Player, “Hit Me”
- Third Baseman, “Cut Three”
- Second Baseman, “Two, Two”
- Catcher, “Four, Four”
5) Backing up and Base Coverage Responsibilities
6) The sixth player can be either the
Pitcher or Left Fielder.
FULL FIELD
(Train on MINI Diamond)

© 2011 Mark Linden 117
Fly Ball
Communication

© 2011 Mark Linden 118
Fly Ball Communication - Dominant Player Chart
CF
LF RF
SS
2B
3B 1B
P (“I Got It”)
C
1) Subordinate player hollers, “MINE” to indicate they feel they can get to the ball to make the catch.
2) Dominant player may call off the subordinate player by hollering “GET OUT”.
3) Pitcher hollers, “I GOT IT” if they feel they can catch the ball. The pitcher is subordinate to the infielders and steps
aside if they hear MINE” or “GET OUT”. The Catcher is subordinate to the Pitcher.

© 2011 Mark Linden 119
CF
RF LF
SS 2B
3B
1B
C
Fly Ball Communication Drill
MINI Diamond

© 2011 Mark Linden 120
Pitchers
Defense

© 2011 Mark Linden 121
Pitchers Defensive Plays to their Left
P
P
P
2b
1b
1b
1 - 3 Play
Roll the ball a step or two to the pitcher’s left. We want to establish with the pitcher, the recognition that most anytime the ball is hit to their left their throw to First Base will be an underhand toss.
Pitcher’s Actions Coach’s Teaching Phrases
1. Fields the Ball 1. “Wide (feet) to catch”
2. Underhand Toss 2. “Move feet (to throw)”
3. Follows the throw 3. “Follow your head”
First Baseman Coach
1. Cover First 1. “Cover the base with your eyes”
2. “Ready Position
3 - 1 Play
Roll the ball a few steps to the First Baseman’s right in order to create a enough distance from first base to execute an underhand toss from 8-10’. We want to establish with the pitcher that anytime the ball is hit to their left they sprint towards first base.
First Baseman Coach’s Teaching Phrases 1. Fields the Ball 1. “Wide (feet) to catch”
2. Underhand Toss 2. “Move feet (to throw)”
3. Follows the throw 3. “Follow your head”
Pitcher Coach
1. Cover First 1. “Cover the base with your eyes”
2. “Ready Position
4 - 1 Play
Roll the ball a few steps to the Second Baseman’s left. We want to establish with the Second Baseman the recognition that often when the ball is hit to their left an underhand toss can be used when throwing to first. In this drill the players are working as if the First Baseman is not available to cover the bag. We continue to establish with the pitcher that anytime the ball is hit to their left they sprint towards first base in case they are needed to cover.
Second Baseman Coach’s Teaching Phrases 1. Fields the Ball 1. “Wide (feet) to catch”
2. Underhand Toss 2. “Move feet (to throw)”
3. Follows the throw 3. “Follow your head”
Pitcher Coach
1. Cover First 1. “Cover the base with your eyes”
2. “Ready Position

© 2011 Mark Linden 122
Pitchers Defensive Plays to their Right
P
P
P
SS
3b
3b
1 - 5 Play
Roll the ball a step or two to the pitcher’s right. We want to establish with the pitcher, the recognition that most anytime the ball is hit to their right their throw to Third Base will be an underhand toss.
Pitcher’s Actions Coach’s Teaching Phrases
1. Fields the Ball 1. “Wide (feet) to catch”
2. Underhand Toss 2. “Move feet (to throw)”
3. Follows the throw 3. “Follow your head”
Third Baseman Coach
1. Cover First 1. “Cover the base with your eyes”
2. “Ready Position
5 - 1 Play
Roll the ball a few steps to the Third Baseman’s left in order to create a enough distance from third base to execute an underhand toss from 8-10’. We want to establish with the pitcher that anytime the ball is hit to their right they sprint towards third base.
Third Baseman Coach’s Teaching Phrases 1. Fields the Ball 1. “Wide (feet) to catch”
2. Underhand Toss 2. “Move feet (to throw)”
3. Follows the throw 3. “Follow your head”
Pitcher Coach
1. Cover First 1. “Cover the base with your eyes”
2. “Ready Position
6 - 1 Play
Roll the ball a few steps to the Shortstop’s right. We want to establish with the Shortstop the recognition that often when the ball is hit to their right an underhand toss can be used when throwing to third. In this drill the players are working as if the Third Baseman is not available to cover the bag. We con-tinue to establish with the pitcher that anytime the ball is hit to their right they sprint towards third base in case they are needed to cover.
Shortstop Coach’s Teaching Phrases 1. Fields the Ball 1. “Wide (feet) to catch”
2. Underhand Toss 2. “Move feet (to throw)”
3. Follows the throw 3. “Follow your head”
Pitcher Coach
1. Cover First 1. “Cover the base with your eyes”
2. “Ready Position

© 2011 Mark Linden 123
1 - 6 Play: Comebacker to Pitcher, Throw to Shortstop Covering Second Base Bag
P
SS
“Turn Glove Side”
Mix up the locations of the ground
balls. Make the pitchers move
away from the rubber to field.
This play is featured in ‘Team Play’ section of the manual as part of ‘Pitchers Defense’/’Three Groups Drills’. Training pitchers to throw to second base on comebackers with a runner on first will save the team a lot of runs over the course of the season by getting the lead runner and keeping them out of scoring position.
Initially kids are uncomfortable with making this play because they have their back to second base. Their tendency is to make the ‘easier’ play at first base. With training and repetitions kids will gain confidence in making this play.
Execution of the drill:
Coach rolls a ground ball to the pitcher. Mix up the locations of the ground balls, but still within a few steps of the rubber, so the pitchers get work at moving their feet to field ground balls in different locations.
Pitcher’s Actions Coaches Teaching Phrases
1. Field Ball 1. “Wide (feet) to Catch”
2. Turn to Second Base 2. “Turn Glove Side”
3. Throw Ball 3. “Move Feet (to throw)”
4. Follow Throw 4. “Follow Your Head”
Important Note: Make sure Shortstop is in a “Ready Position” to take each throw, that they “Move Feet to
Catch” and get the “Ball First, Base Second”.

© 2011 Mark Linden 124
Pitchers Fielding - Three Groups Drill: 1-5 (bunt), 1-6, 1-3
Full Field
Six players are involved; three
Pitchers and a player at each base.
The other six players are waiting their turn at each of these six spots.
Pitchers follow their throws and rotate to the base they throw to; the players receiv-ing throws ROLL the ball to the coach and rotate to pitcher.
The player coming from second base runs the ball to pitching rubber before deliver-ing the ball to their coach.
The extra pitcher in the second group stands to the side of the rubber, so there
is a clear throwing lane to second.
Teaching Phrases:
1-5: “quick to the ball”, “feet wide”, “turn glove side”, “move feet (to throw)”.
NOTE: The (right handed) pitcher points their back side toward third base to field the ball.
1-6: “feet wide”, “turn glove side”, “move feet (to throw)”.
1-3: “feet wide”, “move feet (to throw)”.

© 2011 Mark Linden 125
Three
Groups
Drills

© 2011 Mark Linden 126
Three Groups Drills: 5-3, 6-4 Moving Away From Bag, 2B Going Back
(example #1)
Full Field

© 2011 Mark Linden 127
Three Groups Drills: 5-4, 4-6, 3-1
(example #2)
Full Field

© 2011 Mark Linden 128
Rundowns

© 2011 Mark Linden 129
SS
R
1B
R SS 1B
SS R
1B
Rundown Drill (not ‘Pickle’)
Three Rules of a Rundown:
1) Force the runner to look away BEFORE throwing the ball; chase the runner.
2) Get to the side of the runner while chasing to clear a throwing lane; receiving player moves to the same side of the runner.
3) Player on the receiving end of the play comes out TEN FEET in front of the base.
This drill is executed with the shortstop and runner moving at a slow jogging pace. Toss the ball to the Shortstop; Shortstop starts towards the runner. The runner then ‘looks away’ and starts moving towards first base. The runner continues at a slow jog all the way to the base allowing the first baseman to tag them out. The runner does not change directions.
Players receiving throws are always in a “Ready Position”. Players throwing the ball always “follow their throw”. After making a play (tag), “Look for other runners” by moving feet toward the middle of the infield in a ‘Power Position’ prepared to immediately make another throw as needed.
Player with the ball is allowed ONE pump fake. This is used when the runner will not look away. This technique will often result in the runner slowing down, allowing the player with the ball to make a tag without needing to throw the ball.
Receiving player moves feet to catch, catches with two hands and tags with two hands.
NOTE: When first introducing this drill the coach should play the roll of the runner; kids are still thinking ‘pickle’ and do not per-form the runner’s duties properly. The coach, from the runner’s position, tosses the ball to the Shortstop to start the drill.

© 2011 Mark Linden 130
Mass
Ground Balls
&
Fly Balls
Note: the following diagrams show eight kids taking
ground balls in the infield. The other four kids are in
the outfield taking fly balls. Rotate the kids, in groups
of four, between the infield and outfield

© 2011 Mark Linden 131
Mass Ground Balls & Fly Balls - Explained
Mass ground balls and fly balls is a way to organize all 12 of your players, so that each player is getting work and there is
minimal standing around.
The set up is structured around three groups of four players. Two groups are in the infield for a total of eight participants
and one group of four is in the outfield. After a given amount of time the outfield group rotates into the infield and one
group of four infielders switches to the outfield getting fly balls. There is one more rotation to give the final infield group
time in the outfield.
Organizing the infield groups:
Have two players at each position, a coach/adult at a base taking throws and two coaches/adults on either side of home
plate , approximately 5-6’ from home plate. The coach adult on the third base side of home plate delivers ground balls to
the First Baseman and the Shortstop. The coach adult on the first base side of home plate delivers ground balls to the Sec-
ond Baseman and the Third baseman.
When delivering ground balls, let the players know if the balls will be to their left or their right. Have them position them-
selves, so that there is extra room on the side the balls will be delivered and they won’t get in the way of the players at the
adjacent positions. After approximately a half dozen ground balls deliver balls to the other side of the players. Have them
reposition themselves accordingly.
One group (1b & SS or 2b & 3b) throws to the coach/adult at a base, the other group throws back in to the coach delivering
balls to them. At the midway point before one group switches to the outfield change up where the two groups are throw-
ing; back to the coach or throwing to a base.
IMPORTANT NOTE: Be sure the players who are throwing back into the coach at home plate are playing extra deep so that
they do not cross the line of a throw to a base.
The coach/adult receiving throws at a base can be at first base or second base. It is suggested that on a given day all throws
go to first and on the next day all throw go to second. The diagrams on the following four pages illustrate the set up of the
infielders.
Outfield Group:
follow the same approach as with the infield. Deliver all balls to the same spot approximately a half dozen times for each
player, then switch to a different location.
Getting repeated reps fielding balls in the same location will allow the kids the opportunity to develop skills, more quickly,
than delivering each ball to a random location.
FINAL NOTE: I have used the term ‘deliver’ balls, not ‘hit’ balls. Hitting ground balls and fly balls is an option, however our
accuracy and consistency when hitting balls with a bat is much poorer than if we throw the ground balls and fly balls. Deliv-
ering balls by throwing eliminates swings and misses and mis-hit balls entirely and we are much more accurate in the loca-
tion of the ground ball/fly ball when throwing.

© 2011 Mark Linden 132

© 2011 Mark Linden 133

© 2011 Mark Linden 134

© 2011 Mark Linden 135

© 2011 Mark Linden 136
Base
Running

© 2011 Mark Linden 137
Base Running: Through First; Ball Into the Outfield
Through First Base Peek to see if ball is in the infield or through to the outfield
- If ball is through the infield run in a straight line to a point 10’ in front of the base and 6’ outside the base line. (see Touches and Turns below)
Ball in the infield:
1) RULE: Eyes on the front of first base until batter-runner sees foot touch the base
2) Run, FULL SPEED, one full step past base
3) Chop feet (to slow down)
4) Look to the RIGHT (to find ball if overthrown)
DRILL: Coach stands between first base and the pitching rubber. As players approach first base, coach occasionally (~2/3 of the time) tosses an ‘overthrow’ past first base. When base runner sees an overthrow, they break to sec-ond base. When there is no over throw the player turns to their right, into foul ground, and returns to first base.
Ball Into the Outfield
Kids age nine and above (or younger, if the outfield is play-
ing a fair distance behind the infield) should have in their
mind that they will advance two bases. Only when the
defense demonstrates they are likely to throw the runner
out, going for two bases, does the runner then stop after
advancing one base.
1) Run in a straight line to a point 10’ in front of the base
and 6’ outside the base line.
2) At the 10’ x 6’ point, lower shoulder toward base.
3) Touch the FAR SIDE of the inside corner of the base,
so the runners foot is pushing off the base driving
their momentum in a STRAIGHT line to the next base.
NOTE: Base Runner should keep eyes on the far side
of the inside corner of the base and SEE their
foot touch this part of the base; then look up
to find the ball and the next base.

© 2011 Mark Linden 138
Runner on Third Base:
If the fly ball is deep enough to score, then the runner goes to the base to tag up.
If the fly ball is shallow (not deep enough to tag and score) the runner comes off the bag as far as is safe to get back if ball is caught.
If ball is dropped, by coming off the bag, the runner may have an opportunity to score.
LF RF
CF
Runner on Second Base:
All fields are effectively the same distance from second base. The base runner, given their knowledge learned at first base, uses
their judgment to come off the base as far as possible, determined by how far the ball is hit from second base.
Runner on First Base:
General Rule:
Ball to RF - 15’ off base
Ball to CF - 30’ off base
Ball to LF - 45’ off base
Through repetitions running
bases during batting practice,
scrimmages and games, the
runners will develop their
instincts of how far they can
safely come off a base on a
fly ball.
Fly balls that are not hit far
enough away from the next
base for the runner to ad-
vance by tagging up, the run-
ner wants to come as far off
their base as possible, so to
have the best possible
chance to advance if the fly
ball is not caught. The dia-
gram at the right, and notes
below, serve as guides to
teaching.
Base Running on Fly Balls - ‘Half Way’

© 2011 Mark Linden 139
Drill Sheets
for
Batting, Pitching
& Catchers
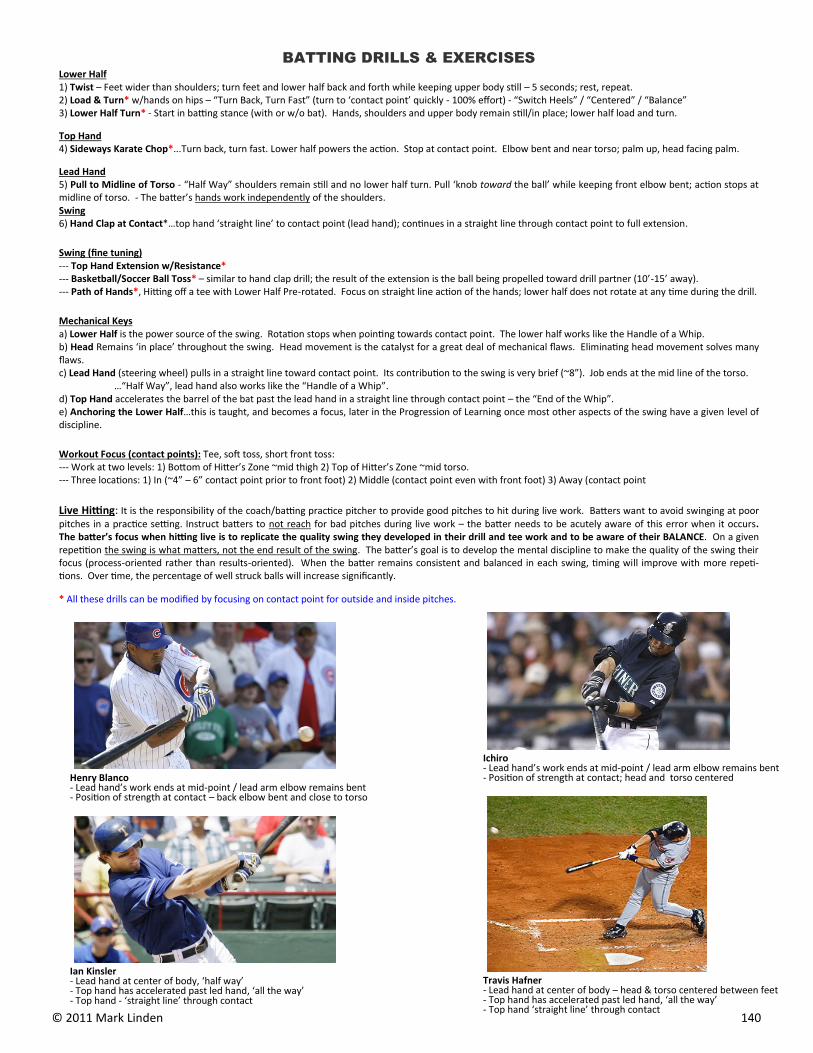
© 2011 Mark Linden 140
BATTING DRILLS & EXERCISES
Lower Half 1) Twist – Feet wider than shoulders; turn feet and lower half back and forth while keeping upper body still – 5 seconds; rest, repeat. 2) Load & Turn* w/hands on hips – “Turn Back, Turn Fast” (turn to ‘contact point’ quickly - 100% effort) - “Switch Heels” / “Centered” / “Balance” 3) Lower Half Turn* - Start in batting stance (with or w/o bat). Hands, shoulders and upper body remain still/in place; lower half load and turn.
Top Hand 4) Sideways Karate Chop*...Turn back, turn fast. Lower half powers the action. Stop at contact point. Elbow bent and near torso; palm up, head facing palm.
Lead Hand 5) Pull to Midline of Torso - “Half Way” shoulders remain still and no lower half turn. Pull ‘knob toward the ball’ while keeping front elbow bent; action stops at midline of torso. - The batter’s hands work independently of the shoulders. Swing 6) Hand Clap at Contact*…top hand ‘straight line’ to contact point (lead hand); continues in a straight line through contact point to full extension.
Swing (fine tuning) --- Top Hand Extension w/Resistance* --- Basketball/Soccer Ball Toss* – similar to hand clap drill; the result of the extension is the ball being propelled toward drill partner (10’-15’ away). --- Path of Hands*, Hitting off a tee with Lower Half Pre-rotated. Focus on straight line action of the hands; lower half does not rotate at any time during the drill.
Mechanical Keys a) Lower Half is the power source of the swing. Rotation stops when pointing towards contact point. The lower half works like the Handle of a Whip. b) Head Remains ‘in place’ throughout the swing. Head movement is the catalyst for a great deal of mechanical flaws. Eliminating head movement solves many flaws. c) Lead Hand (steering wheel) pulls in a straight line toward contact point. Its contribution to the swing is very brief (~8”). Job ends at the mid line of the torso. …“Half Way”, lead hand also works like the “Handle of a Whip”. d) Top Hand accelerates the barrel of the bat past the lead hand in a straight line through contact point – the “End of the Whip”. e) Anchoring the Lower Half…this is taught, and becomes a focus, later in the Progression of Learning once most other aspects of the swing have a given level of discipline.
Workout Focus (contact points): Tee, soft toss, short front toss: --- Work at two levels: 1) Bottom of Hitter’s Zone ~mid thigh 2) Top of Hitter’s Zone ~mid torso. --- Three locations: 1) In (~4” – 6” contact point prior to front foot) 2) Middle (contact point even with front foot) 3) Away (contact point
Live Hitting: It is the responsibility of the coach/batting practice pitcher to provide good pitches to hit during live work. Batters want to avoid swinging at poor pitches in a practice setting. Instruct batters to not reach for bad pitches during live work – the batter needs to be acutely aware of this error when it occurs. The batter’s focus when hitting live is to replicate the quality swing they developed in their drill and tee work and to be aware of their BALANCE. On a given repetition the swing is what matters, not the end result of the swing. The batter’s goal is to develop the mental discipline to make the quality of the swing their focus (process-oriented rather than results-oriented). When the batter remains consistent and balanced in each swing, timing will improve with more repeti-tions. Over time, the percentage of well struck balls will increase significantly.
* All these drills can be modified by focusing on contact point for outside and inside pitches.
Henry Blanco - Lead hand’s work ends at mid-point / lead arm elbow remains bent - Position of strength at contact – back elbow bent and close to torso
Ian Kinsler - Lead hand at center of body, ‘half way’ - Top hand has accelerated past led hand, ‘all the way’ - Top hand - ‘straight line’ through contact
Ichiro - Lead hand’s work ends at mid-point / lead arm elbow remains bent - Position of strength at contact; head and torso centered
Travis Hafner - Lead hand at center of body – head & torso centered between feet - Top hand has accelerated past led hand, ‘all the way’ - Top hand ‘straight line’ through contact

© 2011 Mark Linden 141
Basic Teaching Points for Hitting Live Pitches
1. Training Players When to “Turn Back” DRILL (to be done daily)
Line up your team and get them in their batting stance.
With a ball in your hand, go through the pitching motion stopping at release point.
Have your kids “Turn Back” when ‘they see the ball’.
After they turn back the drill is complete (They do not turn and swing). Have them go back to their starting stance, then repeat
the drill. Do this ten times each day before batting and before each game.
This routine will create a Pavlov’s Dog effect where each time, and any time, “the pitcher shows them the ball” they will ‘Turn Back’. This
daily routine will ensure that your players use their legs every time they swing the bat. This drill will also create greater awareness of
‘picking up the ball’ before it is thrown.
NOTE: The duration of the pitcher ‘showing the ball’ is an arc of approximately two feet, NOT a specific point in time. This is important to
understand as a coach. Every player’s internal timing mechanism is different and each player will Turn Back at a slightly different time.
NOTE II: Many young kids will START in the ‘front heel up’ position. We want them to start with their feet flat on the ground and their
bodies relaxed. They are to wait to ‘Turn Back’ (and lift the front heel) only when “the pitcher shows them the ball”.
2. Live Hitting It is the responsibility of the coach/batting practice pitcher to provide strikes during live work (this includes soft toss and short front toss).
A batter should not swing at poorly located pitches in practice. Instruct batters to never reach for bad pitches during live work – the batter
needs to be made aware of this error (reaching) when it occurs.
The batter’s focus when hitting live is to replicate the quality swing they developed in their drill and tee work and to maintain BALANCE at
all times. On a given repetition, the swing is what matters not the quality of contact. The batter’s goal is to develop the mental discipline
to make the quality of the swing their focus (process-oriented rather than results-oriented) and judgment of what is ‘Success’.
When the batter remains consistent and balanced in each swing (and refrains from reaching for the ball), their timing will improve as the
number of repetitions increase. Over time, the percentage of well struck balls will increase significantly.
3. “Let the Ball Get to Your Feet” A very common error made by young hitters is to swing BEFORE the ball gets to the hitting zone. Generally speaking, contact is made
when the ball reaches the front foot. We want to train our players to make contact at this point and not swing too early and/or reach
forward to make contact.
NOTE: When facing hard throwing pitchers we see kids swinging late. In most cases these kids are not getting
‘loaded’ (“Turn Back”) and fail to get much help from their legs to generate power for bat speed. Also, without the “Turn
Back” phase, it is difficult to develop timing.
The simple teaching phrase, “Let the ball get to your feet” will help you help batters learn to wait longer before they swing. The reference
to “feet” will resonate with them because they are hearing “feet” from you in all your teaching:
- Catch the ball with your feet’
- Throw the ball with your feet’
- ‘Swing the bat with your feet (and legs)’
…..”Let the (pitched) Ball Get to Your Feet”

© 2011 Mark Linden 142
Batting Instruction - Links Supporting Teaching Content
1---Front Heel
http://stlouis.cardinals.mlb.com/media/video.jsp?content_id=3069661
Albert Pujols Front Heel / Switching Heels Up to load (Turn Back) Down and back (Turn Fast) Front heel (foot) initiates lower half turn Four good examples at: 0:26 0:34 0:44 0:53 Note that he has little or no stride; and minimal upper body movement until after lower half rotation.
‘About Face’
http://www.youtube.com/watch?v=-bGvnMxPyJY&feature=related
Example of a soldier using the same technique as Pujols to turn the lower half: Heel up, then pressed ‘down and
back’ resulting in the soldier’s hips/lower half turning.
…only need to watch the first 10 seconds of the vide
2---Swing is the same for all batters
http://www.rightviewpro.com/how-rvp-works/concept/mantle
Ichiro vs Mantle

© 2011 Mark Linden 143
3---Rotation Stops at Midpoint of Swing
http://mlb.mlb.com/video/play.jsp?c_id=mlb&content_id=24810441&query=game_pk%3D319911
Three videos that demonstrate:
Endpoint of Hip Rotation in mid swing
Video #1 – this is the feature video showing a Justin Smoak HR. (first video on the left, below the main video)
Pretty good example of hip/lower half rotation stopping at ‘contact point’…while hands/bat accelerate through
contact point. This demonstrates the transition of energy from lower half to hands. Note: this is not unique. If you
find a the right video, you will see the same sequence in any batter’s swing.
KEY: go to 0:37 in the video (enlarge to ‘Full Screen’ if possible). At this point, ‘Pause’/’Start’ the video throughout
the swing (you’ll be able to do this 4-5 times). You will clearly see his hip/lower half rotation stop.
Additional Points
- Head remains ‘in place’ throughout the action, the result of which gives him tremendous body control and
allows him to drive all his power/energy to contact point (the ball).
- Stride/Step is very subtle and he remains ‘Centered throughout this action with no forward body
movement (he doesn’t “Step into it”).
- Front heel is ‘up’ at the end of his stride/step; then, while subtle, he drives that heel ‘down and back’
- ‘Feet in Place’ …the muscles in his right leg are clearly working very hard to keep his ‘Feet in Place’
- Great example of transferring power/energy from ‘Legs to Hands’.
Video #2 – Michael Saunders hitting a triple to right (pulling the ball). (third to last video, scroll to the right)
A very good example of of hip/lower half rotation stopping at ‘contact point’…while hands/bat accelerate through
contact point.
To find this video, go to the series of video boxes below the feature video box (Smoak swing), click the arrow to the
right of the series of video boxes and scroll to the third to last video,
In addition to the ‘Endpoint in Rotation (which is the focal point for viewing), this video Also shows more hip/lower
half rotation in order to take his power/energy to contact on an Inside Pitch. An inside pitch is contacted slightly
Before the ball gets to the front foot.
As I note in the presentation his hips/lower half Do Not turn all the way toward the pitcher. His rotation stops at
‘contact point’
This is b/c he recognizes he has a chance to get extra bases. This is Not the best example of “Feet in Place”. What
we are seeing is a world class athlete with great instincts who transitions from contact to running in a millisecond.
KEY: go to 0:37 in the video (enlarge to ‘Full Screen’ if possible). At this point, ‘Pause’/’Start’ the video throughout
the swing (you’ll be able to do this 4-5 times). You will clearly see his hip/lower half rotation stop.
Additional Points:
- ‘Head in Place’.
- Front heel …less pronounced than Pujols, but same concept
- bottom hand ‘half way’
- top hand accelerating past the bottom hand / energy transferring from ‘Legs to Hands’

© 2011 Mark Linden 144
Video #3 – Michael Saunders hitting a single to left (hitting the ball to the opposite field).
(last video, scroll to the right)
Same guy, same swing, same game --- except the amount of rotation in the hips/lower half is different based on
pitch location.
The Hips/lower half rotate Less to hit the outside pitch. A pitch in an Outside Location is contacted a little later
(after the pitch as gone past his front foot).
KEY: go to 0:21 in the video (enlarge to ‘Full Screen’ if possible). At this point, ‘Pause’/’Start’ the video throughout
the swing (you’ll be able to do this 4-5 times). You will clearly see his hip/lower half rotation stop.
Additional Points:
- bottom hand ‘half way’
- This is not the best example of the top hand accelerating past the bottom hand.
If you listen to the commentators you’ll catch them pointing out that the Texas pitcher had been working Saunders
inside, then on this pitch goes outside. The result is that Saunders had to ‘reach’ a bit for this ball. Near the end of
his swing his head moves, he loses his ‘stacked’ and ‘centered’ torso alignment resulting in him losing a lot of the
power in his legs….he is then unable to drive the ball as well.
The flip side of this observation is that Saunders, while fooled some, maintains pretty solid fundamentals allowing
him to hit the ball pretty well given the circumstances.
Watching each of these videos reinforces the concept of ‘Endpoint in Rotation’ discussed in the clinic.
The videos of Michael Saunders, demonstrating different endpoints in rotation, are for Coaches to gain a better under-
stand the swing, so to teach the core concept of ‘Endpoint of Rotation’ with greater confidence.
Teaching rotation to different contact points is not something I would recommend teaching to 11U players. If you have
a few Majors Level kids who have very sound swings and a clear understanding of the swing, the concept of the end-
point of rotation to different pitch locations can then be taught. If you feel you have a couple of kids are ready for this
level of instruction, please give me a call. I can give you some direction over the phone on steps to training those kids.
Endpoint of hip rotation is different depending on pitch location (inside, middle, outside)
In conclusion, keep in mind, these are big strong dudes with tremendous leg strength (you can see the muscles in Smoak’s
right leg ‘balloon’ as his rotation stops). We can however, train our kids to get more out of their legs by constantly preach-
ing ‘Feet in Place’ and making them Aware of their feet in their swings.

© 2011 Mark Linden 145
Pitching Drills and Exercises
Do these exercises in sets of 10. The three primary exercises are, Turn and Pull, Teeter-Totter and Snap. When training and maintaining mechan-ics use the Rocking action (Turn and Pull & Pull and Snap); the Rocking action can also be an exercise on its own in addition to the other three. Doing these three exercises 10 times each requires about 2-3 minutes. It doesn’t seem like much, and it isn’t, but investing these few minutes per day (or 3-4 days per week) will greatly improve muscle memory and will carry over to success when pitching.
The pitching action can be trained, developed and mastered by repeating the mechanical movements of the delivery. These exercises can be performed anytime, anywhere. The exercises below focus on the three phases of the delivery: Control, Power, Acceleration. Note that the Pow-er Phase is trained first, it is the cornerstone of pitching success.
Power - Phase II
Lower Half Rotation (from power position)
Turn and Pull (from power position) Turn toward mirror
Pull w/Resistance* Start in power position with hips rotated to target; front shoulder pointing at target
Snap (Acceleration) - Phase III
Release Point—Resistance*
Teeter-Totter* Facing Mirror
Snap* ...simulating the acceleration phase of the delivery Facing Mirror
Wrist & Fingers up and down*; four seam grip; simulating wrist snap at release; repeat slowly for 5 seconds
Control - Phase I
Stride to Power Position (feet wider than shoulders; elbows as high as shoulders) Stride Perpendicular to Mirror
Leg Lift
Leg Lift, then Stride to Power Position (foot going down a slide….down and reach out at the bottom) Stride Perpendicular to Mirror
90-45: Exercises to train shoulder muscles to consistently get elbows up to the Power Position Facing Mirror for Both - Use a couple of items that are approximately two pounds, and hold in each hand.
Arms in a ‘goal post’ position with elbows even with the height of shoulders; raise elbows up to 45 degrees and back down to 90 degrees.
Elbows at shoulder height, 90 degree bend in elbows with forearms/hands parallel to the ground. Lower elbows/forearms down to 45 de-grees, then raise them back up to 90 degrees.
Rocking: Use the Rocking Action when training mechanics. Also use this action when preparing to pitch before a game.
Keys Head remains still and centered Keep movements in a straight line toward target Four seam grip Palms facing away from body when in Power Position Three phases of the delivery: 1) Control 2) Power 3) Snap (Acceleration) / 4 - 8 - 10 / “Slow - Medium - Fast”
* Begin in an ‘Out Front’ (Release Point) Position. NOTE: be sure to maintain distance between feet when turning to an Out Front Position
Stride (Centered) Power Position Release Point / Snap (Acceleration)

© 2011 Mark Linden 146
Pre-Game Throwing Routine
Get Body Warm
Side Shuffle 20’, back and forth three times
Stretch
Drills 1. Rocking x3
2. Turn and Pull x5
3. Wrist x5
4. Teeter-totter x5
5. Snap x2
Rocking Routine (throwing from 35’)
1. Turn and Pull: 4-5 Pitches Objective: Big muscles getting hand to release point
2. Anchor Lead Arm: 4-5 Pitches Objective: Transfer energy from big muscles to throwing hand
3. Pull and Snap: 4-5 Pitches Objectives:
Focus on wrist snap
Fingers evenly down through top of the ball
Arm energy is DOWN; arm accelerates down
Stride Focus (throwing from 35’)
Five or six pitches focusing on a ‘Controlled’ stride and ‘Reach’ at end of stride Pitch from Full Distance Following this routine, as few as eight to 12 pitches from full distance can get the pitcher ready. Note: the pitcher gets 6-8 additional pitches when entering the game.

© 2011 Mark Linden 147
Catcher’s Training, Teaching Points and Basic Drills
STANCE
Feet hip width apart or slightly wider (a couple inches)
Toes pointed slightly out; some players will point the toes out more
Heels remain on the ground when the catcher is in the squatting position
Weight distributed along the full length of the inside of the feet; weight is off the outside of the feet
Glove (when arm is extended) is only a couple inches behind the batter’s rear foot
TEST – the catcher should be able to rock side to side a few inches and remain balanced.
Stand & Squat
Adjust width of feet and direction of toes to find a comfortable stance
Shifting side to side each time the catcher is in their stance to confirm balance
NOTE: It will take a week or two for the catcher’s muscles and joints to become comfortable with a proper stance. Initially, the catcher should only remain in the squatting position for about 15 seconds.
NOTE: Instruct catchers to work on their stance daily at home. 10x = 2 minutes.
TARGET
Key Point: Most young catchers allow their glove elbow to drop directly below their glove. The result is the elbow between the knees. They also hold the glove too close to their body when receiving a pitch. The coach will have to constantly monitor and cor-rect these two points. The younger the catcher, the more frequent the need for correction.
Drill: Glove and Elbow Arc (1x, ~20 seconds per day…work in when practicing Stance)
Move the glove and elbow side to side in front of the body, so that the glove and elbow follow the path of the arc. The ends of the arc should be slightly outside the torso.
Do not allow the elbow to drop down out of the arc
Do not allow the glove to come out of the arc and go outside the elbow when arcing to the glove side
Giving a target prior to the pitch (kids age 9-10 and younger): Rest elbows on the knees with throwing hand behind the glove; when the pitcher begins their stride move glove into a standard receiving position (see next point).
Standard Target: Glove arm almost fully extended in front of the body; the glove elbow points out to the side, glove hand thumb pointing down. Glove is held at knee level of the batter.
RECEIVING
Glove arm remains nearly 100% extended when receiving a pitch - ‘Stick’ the pitch -
Elbow stays outside of knee when receiving on glove side of zone
Elbow stays above knees when receiving pitches that are up in the zone, down or on the throwing hand side
Minimal arm movement on pitches within 6-8 inches of the strike zone
Primary movement is rotating glove to the framing position
Over time, have catchers become more aware of arm movement and work to minimize
Framing:
Fingers pointed forward towards pitcher; palm in toward strike zone. (On low pitches, fingers cannot comfortably point to-wards pitcher. Fingers point slightly down and slightly towards pitcher/throwing hand side. Ideally, the ball is caught be-tween thumb and finger, at the bottom of the webbing – palms side of webbing.
Collapse wrist
the wrist gives (not the arm or glove) when receiving the pitch
when the wrist collapses, allow the glove to fold slightly in towards the strike zone
…receive 20 balls per day = 3-4 minutes.

© 2011 Mark Linden 148
BLOCKING
Blocking Position - Center
Knees wide, hips between heels
Glove fingers in the dirt, throwing hand behind glove…cover the “5-hole”
Chin down against chest
Slight lean forward with body
“C” position
“Catch the ball with your body” (not with your glove or hand)
Develop a Sense of Security
(Use whiffle balls or a type of ball that will not hurt the player):
Toss balls firmly against the catcher’s mask (release ball from ~12” to be sure to not to hit and unprotected part of the body). The purpose is for the catcher to gain confidence that their face is not in danger of injury and to learn to not flinch when the ball comes in contact with their body/equipment/mask.
Blocking Phase I
Catcher starts in blocking position
Bounce balls 12” in front of the catcher; throw from 10’-15’ away
Catcher has eyes on the ball when it is thrown; chin goes down to chest as ball hits the ground
Objective: catcher keeps glove/hands down and does not flinch (tighten up their body), but keep muscles as relaxed as possible.
Blocking Phase II
Catcher starts in stance
Same routine as Phase I, except the catcher drops into blocking position when ball is tossed. Throw from 15’-20’, so catcher has time to react to the ball.
Catcher’s primary focus should be on blocking technique, less so on actually blocking the ball. Often the coach will not throw the ball accurately. We don’t want the catcher to get away from good technique b/c of poor throws by the coach.
Coach continues to remind the catcher to keep body relaxed and not flinch…or move glove/hands from “5-hole”
To initiate movement to the blocking position
The hips are pushed back firmly a couple of inches. This takes the weight off the feet allowing the catcher move feet out from under their body. As soon as feet move the catcher relaxes entire body while dropping into blocking position.
Blocking Phase III
Balls to the left and right:
Note: the catcher’s goal is to cover 8-12” on each side of the plate. Balls further than a foot off the plate, while we would like to block them, catchers should not put pressure on themselves to feel responsible for those balls.
A quick shift of the hips across their heel, from center, then relaxes and drops into “C” position.
Important: the hips lead the body (& feet) to the blocking position.
Catcher wants to turn their body slightly in towards home plate – only 10-15 degrees.
Note: Before each session of blocking balls, have the catcher take 5-10 reps of moving to a technically sound blocking position without a ball being tossed to them.
“Catch the ball with your body” (glove and throwing hand stay down)
…Daily: move from stance to blocking position, 5x each: Center, Left, Right = 2 minutes
…Block 15 balls, 3-4x week; 5x each: Center, Left, Right = 3-4 minutes

© 2011 Mark Linden 149
THROWING
Hips lead body to throwing position, much like they lead body to blocking position
Hips lift up and out over glove side heel
Throwing hand foot moves to a point directly under hips. The glove side of the body should now be pointing towards the target (second or third base).
Glove side foot steps toward target.
The above movements are a quick sequence, ‘Hips, Right (foot), Left (foot)’ (opposite for LH catcher)
Hands: “Bow and arrow” action, pulling the throwing hand elbow straight back and up to shoulder level as right foot lands. At the completion of the footwork action above, the catcher should be in a ‘Power Position”
Work at moving from Stance to Power Position repeatedly without a ball. Work at 60-70% to ensure the movements are done well. Once the catcher has some mastery of the movement, maintenance work should be at approximately 85%.
Throwing workout (4-5 minutes, 3-4x week):
5x, with no ball…stance to Power position (75%-85% of full speed…maintain good mechanics)
5x, receive pitch, move to power position (75%-85% of full speed…maintain good mechanics)
5x, throw to a point midway between the rubber and second base – focus on good throwing mechanics
Footwork 75%-85% of full speed…maintain good mechanics, throw 100%
5x, throw full distance to bag (advanced catchers may choose to throw to a point 10’ beyond the bag).
Footwork 75%-85% of full speed…maintain good mechanics, throw 100%
RECOVERING BALLS IN FRONT of the PLATE
(Blocked balls, bunts, etc.)
Sequence of movements:
Quick to the ball
Slow down, come under control, to field the ball;
Body Position
Glove side of body pointing towards target
Ball centered between feet
Feet as wide apart as is comfortable
“Pick up both sides of the ball”
Make one shuffle toward target; finish is a balanced Power Position
The CATCHER’S ‘POSITION’
Is one step in FRONT of the plate
Communicate to defense during the play
Receive throws, make tags
Communicate to defense prior to each new batter
Prior to each new batter – Call out to defense: 1) the number of outs, 2) location of runners
No further info i.e. where a play might be made if the next batter puts the ball in play
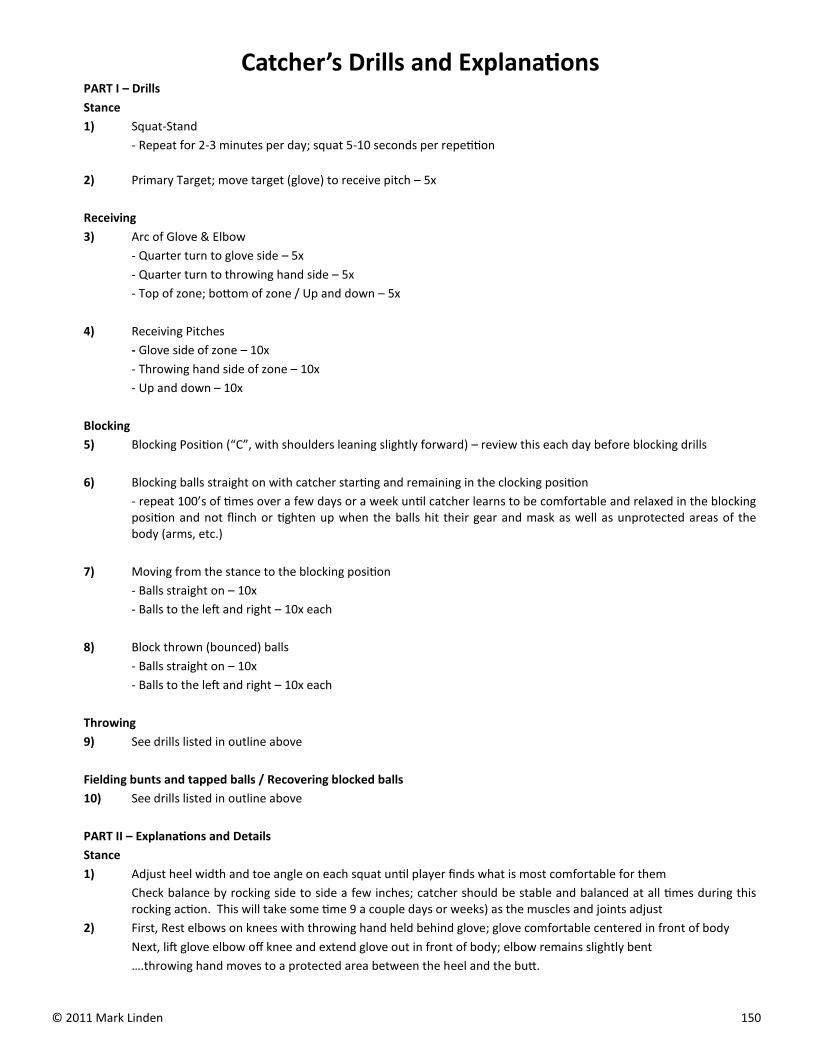
© 2011 Mark Linden 150
Catcher’s Drills and Explanations
PART I – Drills
Stance
1) Squat-Stand
- Repeat for 2-3 minutes per day; squat 5-10 seconds per repetition
2) Primary Target; move target (glove) to receive pitch – 5x
Receiving
3) Arc of Glove & Elbow
- Quarter turn to glove side – 5x
- Quarter turn to throwing hand side – 5x
- Top of zone; bottom of zone / Up and down – 5x
4) Receiving Pitches
- Glove side of zone – 10x
- Throwing hand side of zone – 10x
- Up and down – 10x
Blocking
5) Blocking Position (“C”, with shoulders leaning slightly forward) – review this each day before blocking drills
6) Blocking balls straight on with catcher starting and remaining in the clocking position
- repeat 100’s of times over a few days or a week until catcher learns to be comfortable and relaxed in the blocking position and not flinch or tighten up when the balls hit their gear and mask as well as unprotected areas of the body (arms, etc.)
7) Moving from the stance to the blocking position
- Balls straight on – 10x
- Balls to the left and right – 10x each
8) Block thrown (bounced) balls
- Balls straight on – 10x
- Balls to the left and right – 10x each
Throwing
9) See drills listed in outline above
Fielding bunts and tapped balls / Recovering blocked balls
10) See drills listed in outline above
PART II – Explanations and Details
Stance
1) Adjust heel width and toe angle on each squat until player finds what is most comfortable for them
Check balance by rocking side to side a few inches; catcher should be stable and balanced at all times during this rocking action. This will take some time 9 a couple days or weeks) as the muscles and joints adjust
2) First, Rest elbows on knees with throwing hand held behind glove; glove comfortable centered in front of body
Next, lift glove elbow off knee and extend glove out in front of body; elbow remains slightly bent
….throwing hand moves to a protected area between the heel and the butt.
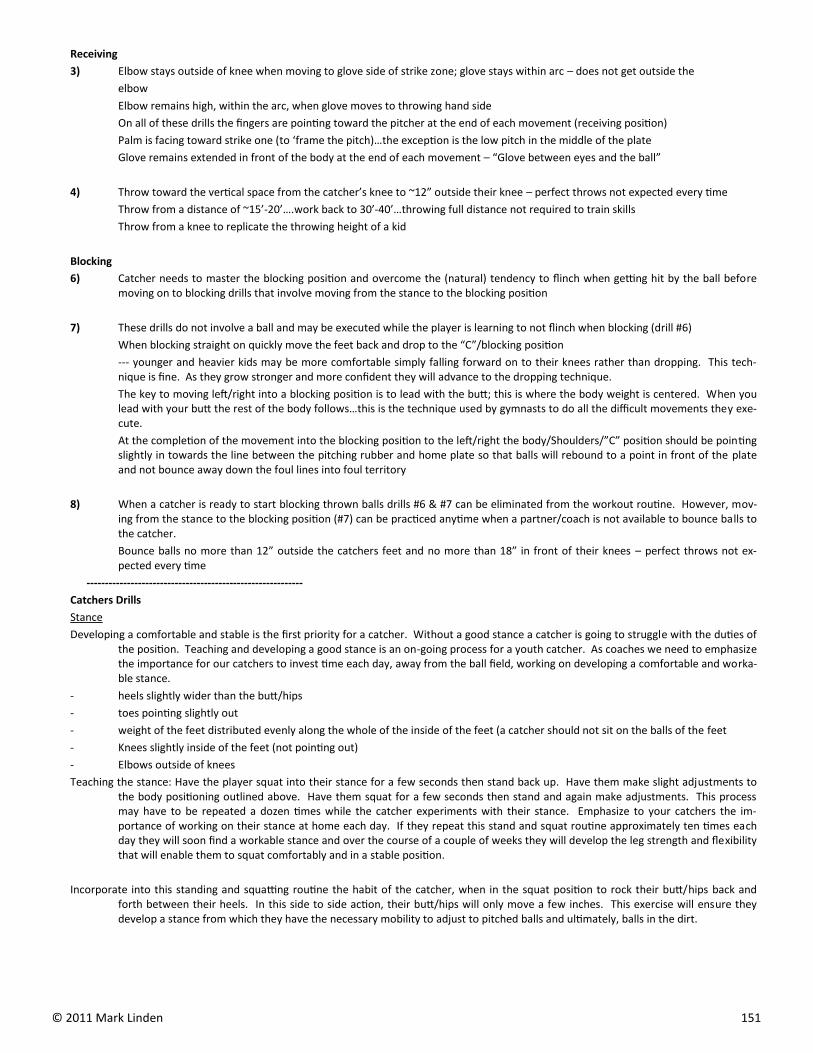
© 2011 Mark Linden 151
Receiving
3) Elbow stays outside of knee when moving to glove side of strike zone; glove stays within arc – does not get outside the
elbow
Elbow remains high, within the arc, when glove moves to throwing hand side
On all of these drills the fingers are pointing toward the pitcher at the end of each movement (receiving position)
Palm is facing toward strike one (to ‘frame the pitch)…the exception is the low pitch in the middle of the plate
Glove remains extended in front of the body at the end of each movement – “Glove between eyes and the ball”
4) Throw toward the vertical space from the catcher’s knee to ~12” outside their knee – perfect throws not expected every time
Throw from a distance of ~15’-20’….work back to 30’-40’…throwing full distance not required to train skills
Throw from a knee to replicate the throwing height of a kid
Blocking
6) Catcher needs to master the blocking position and overcome the (natural) tendency to flinch when getting hit by the ball before moving on to blocking drills that involve moving from the stance to the blocking position
7) These drills do not involve a ball and may be executed while the player is learning to not flinch when blocking (drill #6)
When blocking straight on quickly move the feet back and drop to the “C”/blocking position
--- younger and heavier kids may be more comfortable simply falling forward on to their knees rather than dropping. This tech-nique is fine. As they grow stronger and more confident they will advance to the dropping technique.
The key to moving left/right into a blocking position is to lead with the butt; this is where the body weight is centered. When you lead with your butt the rest of the body follows…this is the technique used by gymnasts to do all the difficult movements they exe-cute.
At the completion of the movement into the blocking position to the left/right the body/Shoulders/”C” position should be pointing slightly in towards the line between the pitching rubber and home plate so that balls will rebound to a point in front of the plate and not bounce away down the foul lines into foul territory
8) When a catcher is ready to start blocking thrown balls drills #6 & #7 can be eliminated from the workout routine. However, mov-ing from the stance to the blocking position (#7) can be practiced anytime when a partner/coach is not available to bounce balls to the catcher.
Bounce balls no more than 12” outside the catchers feet and no more than 18” in front of their knees – perfect throws not ex-pected every time
-----------------------------------------------------------
Catchers Drills
Stance
Developing a comfortable and stable is the first priority for a catcher. Without a good stance a catcher is going to struggle with the duties of the position. Teaching and developing a good stance is an on-going process for a youth catcher. As coaches we need to emphasize the importance for our catchers to invest time each day, away from the ball field, working on developing a comfortable and worka-ble stance.
- heels slightly wider than the butt/hips
- toes pointing slightly out
- weight of the feet distributed evenly along the whole of the inside of the feet (a catcher should not sit on the balls of the feet
- Knees slightly inside of the feet (not pointing out)
- Elbows outside of knees
Teaching the stance: Have the player squat into their stance for a few seconds then stand back up. Have them make slight adjustments to the body positioning outlined above. Have them squat for a few seconds then stand and again make adjustments. This process may have to be repeated a dozen times while the catcher experiments with their stance. Emphasize to your catchers the im-portance of working on their stance at home each day. If they repeat this stand and squat routine approximately ten times each day they will soon find a workable stance and over the course of a couple of weeks they will develop the leg strength and flexibility that will enable them to squat comfortably and in a stable position.
Incorporate into this standing and squatting routine the habit of the catcher, when in the squat position to rock their butt/hips back and forth between their heels. In this side to side action, their butt/hips will only move a few inches. This exercise will ensure they develop a stance from which they have the necessary mobility to adjust to pitched balls and ultimately, balls in the dirt.
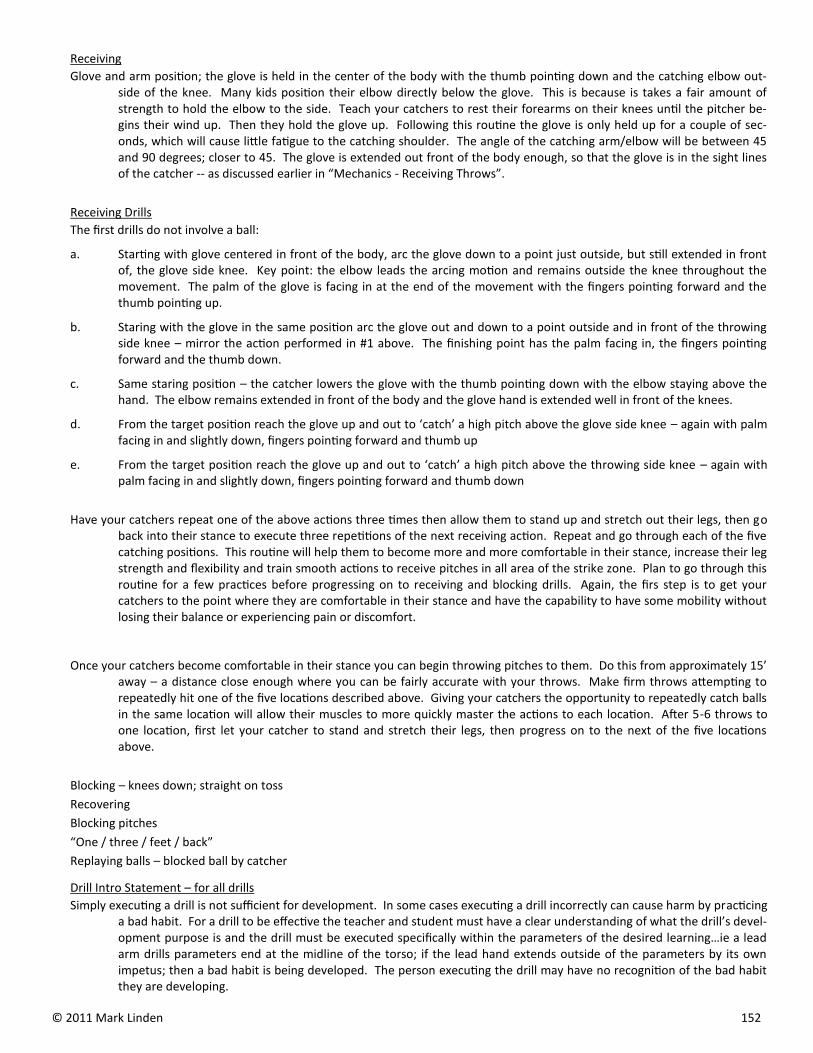
© 2011 Mark Linden 152
Receiving
Glove and arm position; the glove is held in the center of the body with the thumb pointing down and the catching elbow out-side of the knee. Many kids position their elbow directly below the glove. This is because is takes a fair amount of strength to hold the elbow to the side. Teach your catchers to rest their forearms on their knees until the pitcher be-gins their wind up. Then they hold the glove up. Following this routine the glove is only held up for a couple of sec-onds, which will cause little fatigue to the catching shoulder. The angle of the catching arm/elbow will be between 45 and 90 degrees; closer to 45. The glove is extended out front of the body enough, so that the glove is in the sight lines of the catcher -- as discussed earlier in “Mechanics - Receiving Throws”.
Receiving Drills
The first drills do not involve a ball:
a. Starting with glove centered in front of the body, arc the glove down to a point just outside, but still extended in front of, the glove side knee. Key point: the elbow leads the arcing motion and remains outside the knee throughout the movement. The palm of the glove is facing in at the end of the movement with the fingers pointing forward and the thumb pointing up.
b. Staring with the glove in the same position arc the glove out and down to a point outside and in front of the throwing side knee – mirror the action performed in #1 above. The finishing point has the palm facing in, the fingers pointing forward and the thumb down.
c. Same staring position – the catcher lowers the glove with the thumb pointing down with the elbow staying above the hand. The elbow remains extended in front of the body and the glove hand is extended well in front of the knees.
d. From the target position reach the glove up and out to ‘catch’ a high pitch above the glove side knee – again with palm facing in and slightly down, fingers pointing forward and thumb up
e. From the target position reach the glove up and out to ‘catch’ a high pitch above the throwing side knee – again with palm facing in and slightly down, fingers pointing forward and thumb down
Have your catchers repeat one of the above actions three times then allow them to stand up and stretch out their legs, then go back into their stance to execute three repetitions of the next receiving action. Repeat and go through each of the five catching positions. This routine will help them to become more and more comfortable in their stance, increase their leg strength and flexibility and train smooth actions to receive pitches in all area of the strike zone. Plan to go through this routine for a few practices before progressing on to receiving and blocking drills. Again, the firs step is to get your catchers to the point where they are comfortable in their stance and have the capability to have some mobility without losing their balance or experiencing pain or discomfort.
Once your catchers become comfortable in their stance you can begin throwing pitches to them. Do this from approximately 15’ away – a distance close enough where you can be fairly accurate with your throws. Make firm throws attempting to repeatedly hit one of the five locations described above. Giving your catchers the opportunity to repeatedly catch balls in the same location will allow their muscles to more quickly master the actions to each location. After 5-6 throws to one location, first let your catcher to stand and stretch their legs, then progress on to the next of the five locations above.
Blocking – knees down; straight on toss
Recovering
Blocking pitches
“One / three / feet / back”
Replaying balls – blocked ball by catcher
Drill Intro Statement – for all drills
Simply executing a drill is not sufficient for development. In some cases executing a drill incorrectly can cause harm by practicing a bad habit. For a drill to be effective the teacher and student must have a clear understanding of what the drill’s devel-opment purpose is and the drill must be executed specifically within the parameters of the desired learning…ie a lead arm drills parameters end at the midline of the torso; if the lead hand extends outside of the parameters by its own impetus; then a bad habit is being developed. The person executing the drill may have no recognition of the bad habit they are developing.

© 2011 Mark Linden 153
The content in this manual is for the exclusive use of the league membership. If you desire to print, present, or use this material for any use other than your team practices and games contact Mark Linden of Baseball Positive for permission:
Mark Linden
Director, Baseball Positive
Seattle, WA 98103
206 783 1604
206 714 5276 cell

© 2011 Mark Linden 154