Baldric Strap Braid - Welcome to Old Jimbo's Site · Braiding usually requires about 50% more lace...
32
Baldric Strap Braid Outdoors-Magazine.com http://outdoors-magazine.com Baldric Strap Braid Schwert - Skills and guides - DYI, Making things. - Publication: Friday 27 April 2007 Description : A relatively simple braided baldric strap using 1/8" kangaroo lace. Combining 4-plait round with 8-plait flat braid with transitions. Copyright (c) Outdoors-Magazine.com under a Creative Commons Attribution-Non-Commercial-Share Alike License Copyright © Outdoors-Magazine.com Page 1/32
-
Upload
phungduong -
Category
Documents
-
view
219 -
download
0
Transcript of Baldric Strap Braid - Welcome to Old Jimbo's Site · Braiding usually requires about 50% more lace...
Baldric Strap Braid
Outdoors-Magazine.com
http://outdoors-magazine.com
Baldric Strap Braid
Schwert
- Skills and guides - DYI, Making things. -
Publication: Friday 27 April 2007
Description :A relatively simple braided baldric strap using 1/8" kangaroo lace. Combining 4-plait round with 8-plait flat braid with transitions.
Copyright (c) Outdoors-Magazine.com under a Creative Commons
Attribution-Non-Commercial-Share Alike License
Copyright © Outdoors-Magazine.com Page 1/32

Baldric Strap Braid
This Baldric has about the simplest braiding that can be done. Round 4-plait is the easiest round, flat 8-plait is veryeasy and the transitions I use are as straightforward as can be done.
This was my orginal braiding plan. I decided to use a maximum of 8-plait braiding for this article however.
My first plan Simplified for this article by going to 8-plait instead of 12-plait.
You will need 1/8" kangaroo lace, a blunt awl, a sharp knife, brading soap and a few hours. I use a portable vise inthe photos primarily to keep things organized while I try to take photographs, it is nice but not necessary.
This baldric was braided to carry a knife either at my left side or as a neck braid. It is completely adjustable in lengthto fit different clothing sets. The long tail is simply reef knotted to the loop on the front. I purposely left a long tail toallow for heavier clothes, but may shorten this at a later date. I also needed to terminate the tail in something thatwould easily thread through two holes in the knife sheath, so the crown and wall knot as shown in the sketch wouldnot work. I decided to use a simple back braid termination.
Once I had the plan sketched out I estimated the amount of leather lace that I would need. Most braid requires about50% more material than the finished length. I usually add a couple of feet to any of my estimates. This is how I didthis one:
I took a string from the front of my left hip, over my right shoulder and back to my left hip. This was about 5 feet long.Braiding usually requires about 50% more lace then the final length, so to make a strap that would go completelyaround...hip to hip, I would need 7.5 feet of lace. Since this did not include any tail to tie to the loop I needed to add agenerous portion for that. If the tail was going to be 3 feet long I decided to add 5 more feet of lace. And since I wasdoubling back the lace to make the 8-plait flat shoulder set which I estimated to be about 2' long I needed to add 3'more. That is 15.5' total, I cut my strings about 16' long....Actually I did not use a tape measure...I cut my strings 2and 3/4 fathoms long. I trimmed about 1 foot off the strings at the end and my tail turned out 2' longer than planned
Copyright © Outdoors-Magazine.com Page 2/32

Baldric Strap Braid
so this was more than generous. I could easily have used four 14' strings and done well.
First I cut 4 strings of 1/8" kangaroo lace 16 feet long. I inspected them and then generously greased them withbraiding soap. Then I lined the 4 strings of kangaroo, skin side up.
I start braiding about 4' from one end of the set of strings. I am going to bend this set back on itself to make a widershoulder strap. I do not start in the middle of the set though as that would waste leather. Clamp the strings in aportable desk vise about 4 feet into the set, skin side up.
We want some 4-plait round braid in this part of the string set. The easiest way to start is to get the strings going with4-plait flat then go to round.
Cross the center two strings.
Copyright © Outdoors-Magazine.com Page 3/32
Baldric Strap Braid
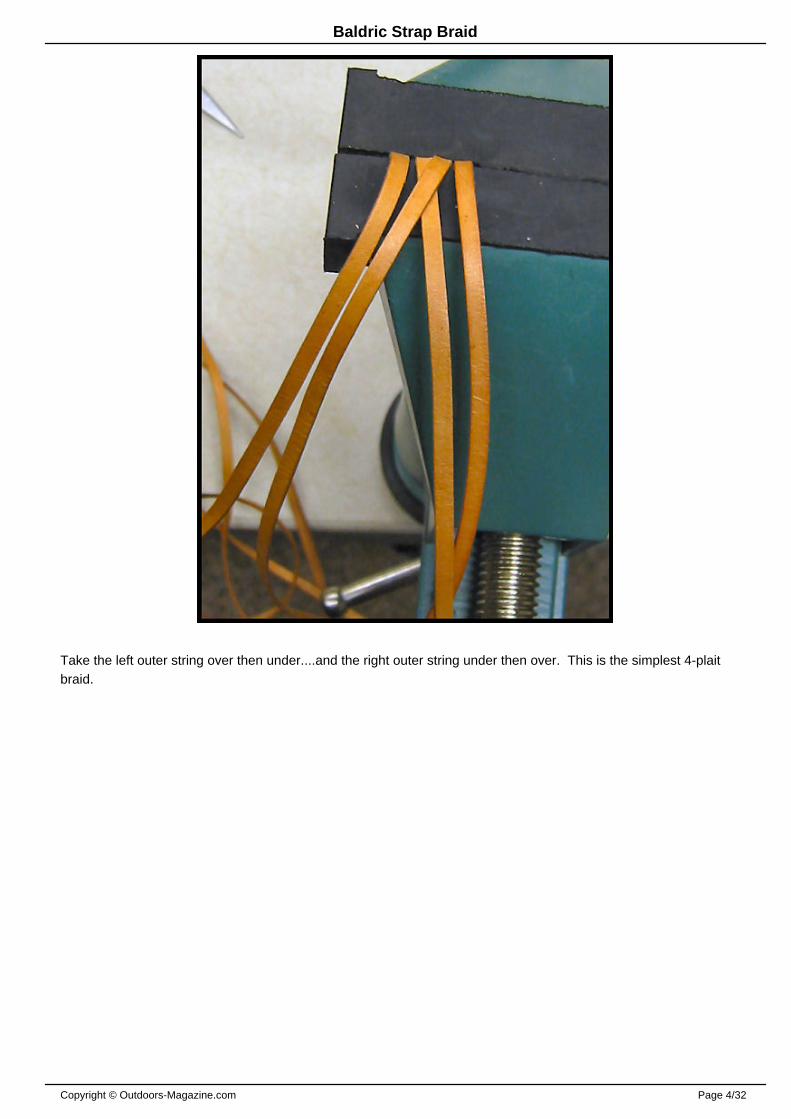
Take the left outer string over then under....and the right outer string under then over. This is the simplest 4-plaitbraid.
Copyright © Outdoors-Magazine.com Page 4/32

Baldric Strap Braid
Do two times....notice how the strings are essentially set up for 4-plait braiding. These 2 flat sets will be removedlater, so do not worry about them being perfect...they are just done to get the round braid start right.
Copyright © Outdoors-Magazine.com Page 5/32

Baldric Strap Braid
Take right side outer string BEHIND the braid, between the two strings on the left and bend it over.
Copyright © Outdoors-Magazine.com Page 6/32

Baldric Strap Braid
Take left side outer string BEHIND the braid, between the two strings on the left and bend it over.
This is 4-plait braiding.
Copyright © Outdoors-Magazine.com Page 7/32

Baldric Strap Braid
Keep going for about 2".
Copyright © Outdoors-Magazine.com Page 8/32

Baldric Strap Braid
Remove from vise, remove the 2 flat braid starts.
Copyright © Outdoors-Magazine.com Page 9/32

Baldric Strap Braid
Loop around and begin to weave the loops together...follow the natural over under pattern. This is the beginning of8-plait FLAT braiding.
Weave this diamond flat 2 times
Copyright © Outdoors-Magazine.com Page 10/32

Baldric Strap Braid
Back to the vise to start doing 8-plait ROUND.
Take the left outer string BEHIND the braid, between the outer strings on the right then over, under, over the otherstrings as you bend this to the left.
Copyright © Outdoors-Magazine.com Page 11/32

Baldric Strap Braid
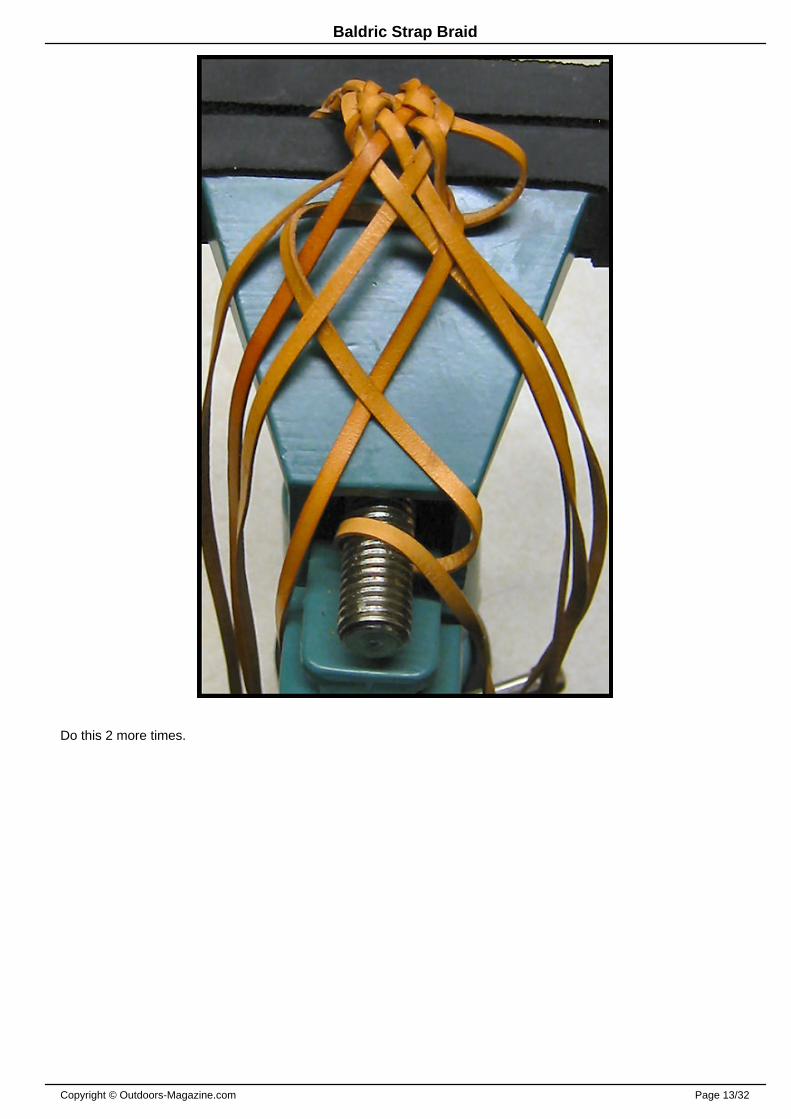
Take the right outer string BEHIND the braid, between the outer strings on the left then over, under, over the otherstrings as you bend this to the right.
This is going to be 8-plait round single diamond braid.
Copyright © Outdoors-Magazine.com Page 12/32
Baldric Strap Braid
Do this 2 more times.
Copyright © Outdoors-Magazine.com Page 13/32

Baldric Strap Braid
Then out of the vise to tighten it all up. Work all the strings from the join to the round transition.
Copyright © Outdoors-Magazine.com Page 14/32

Baldric Strap Braid
Now go back to the vise and start 8-plait FLAT.
Take the outer strings on each side and work them over under over their neighbor strings...cross properly with thestings coming into the center. You are NOT going behind the braid like for round but bending those outer strings intowards the center of the braid.
Copyright © Outdoors-Magazine.com Page 15/32
Baldric Strap Braid
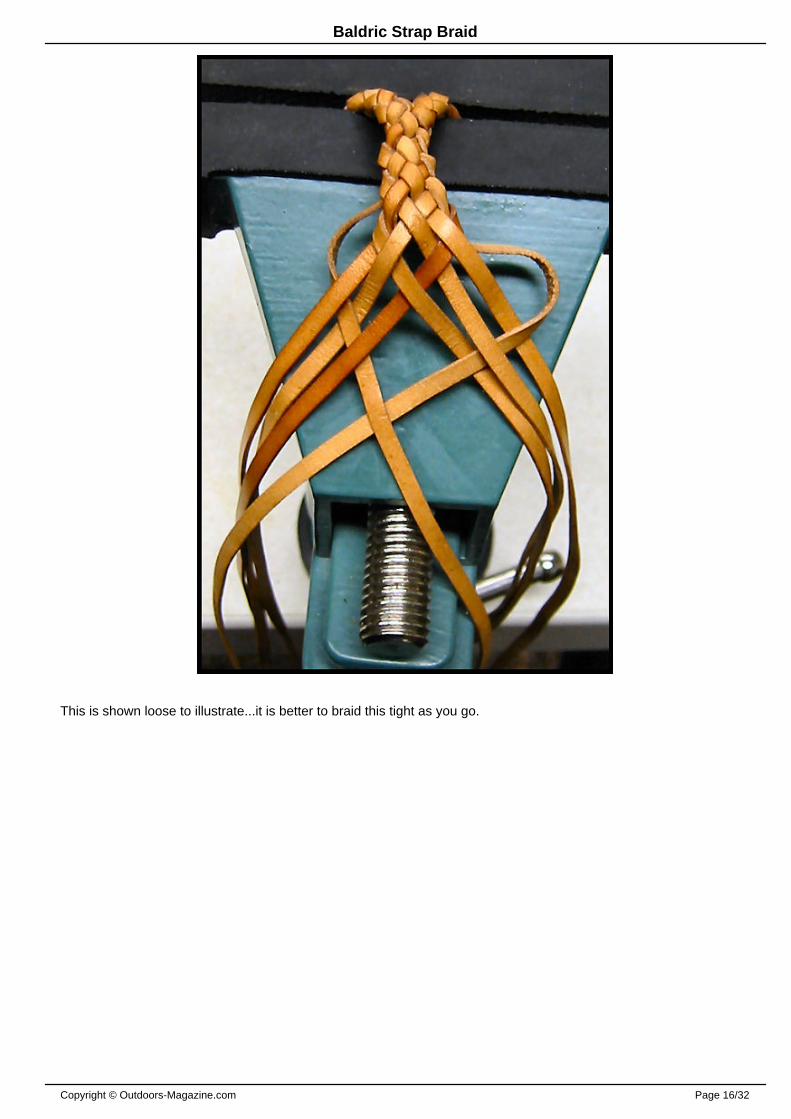
This is shown loose to illustrate...it is better to braid this tight as you go.
Copyright © Outdoors-Magazine.com Page 16/32

Baldric Strap Braid
Tighten and make sure of your pattern.
Copyright © Outdoors-Magazine.com Page 17/32

Baldric Strap Braid
Keep working for about 2'
Copyright © Outdoors-Magazine.com Page 18/32

Baldric Strap Braid
I braided about 25" of 8-plait flat. The shorter strings had about 6 inches of material left. So now it was time totransition to round braid for the rest of this baldric.
I braided until I had two of the short strings just about in the middle (with the awl on top of them). There is actually
Copyright © Outdoors-Magazine.com Page 19/32

Baldric Strap Braid
one long string between the two short strings in the middle, but so it goes. These two short strings are going to bedropped, so sort them carefully out and get your 3 strings on each side sorted.
Back to the vise. Again sorted 3 to the left and 3 to the right with the drop strings in the middle.
Copyright © Outdoors-Magazine.com Page 20/32

Baldric Strap Braid
Take the right outer string UNDER and BEHIND the group and then between the two outer strings and OVER theother string.
Copyright © Outdoors-Magazine.com Page 21/32
Baldric Strap Braid
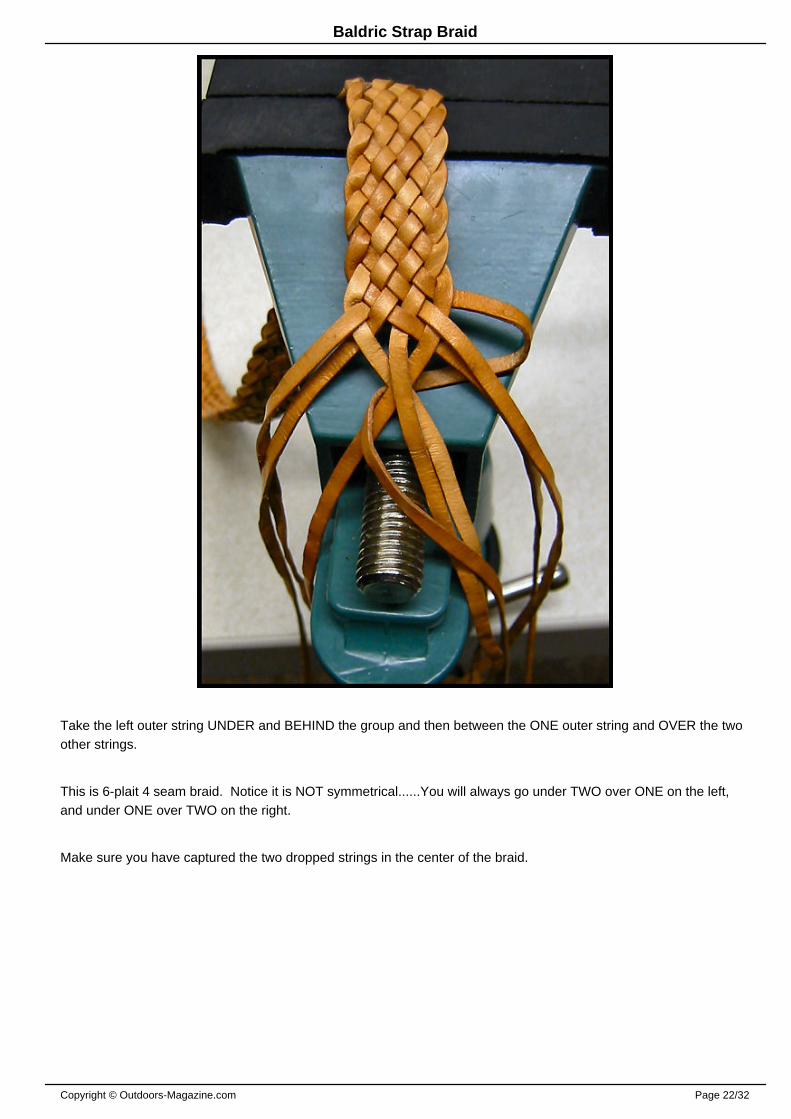
Take the left outer string UNDER and BEHIND the group and then between the ONE outer string and OVER the twoother strings.
This is 6-plait 4 seam braid. Notice it is NOT symmetrical......You will always go under TWO over ONE on the left,and under ONE over TWO on the right.
Make sure you have captured the two dropped strings in the center of the braid.
Copyright © Outdoors-Magazine.com Page 22/32

Baldric Strap Braid
Repeat a string on each side following the pattern.
Copyright © Outdoors-Magazine.com Page 23/32

Baldric Strap Braid
Repeat again. Verify the capture of the 2 dropped strings.
Now my some miracle the two center strings are short ones....these are going to be dropped into the center also.
Copyright © Outdoors-Magazine.com Page 24/32

Baldric Strap Braid
Trim all the drop strings....do not cut your long strings. Taper and thin these to make for a nice transition.
Copyright © Outdoors-Magazine.com Page 25/32
Baldric Strap Braid
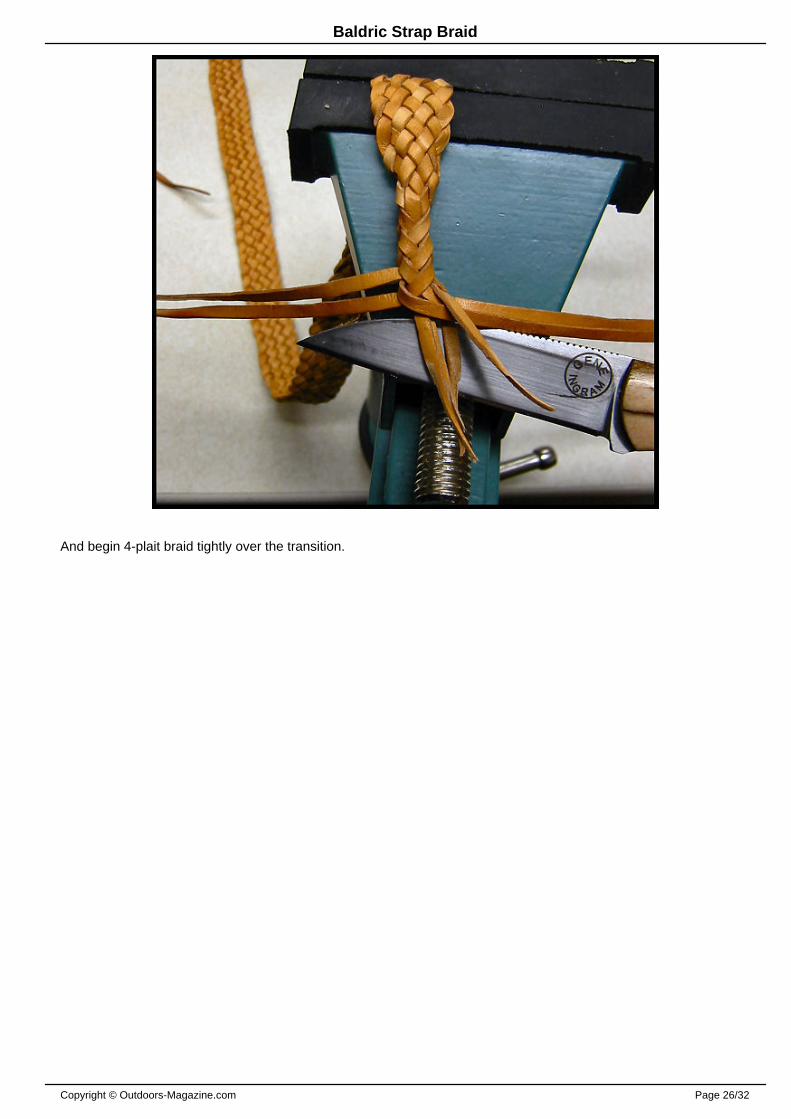
And begin 4-plait braid tightly over the transition.
Copyright © Outdoors-Magazine.com Page 26/32

Baldric Strap Braid
Just keep going with 4-plait until you have enough baldric to work. I braided about 5 feet which is about 1.5 to 2 feetmore than enough. This image was shot while braiding so a bit blurry....
Copyright © Outdoors-Magazine.com Page 27/32
Baldric Strap Braid
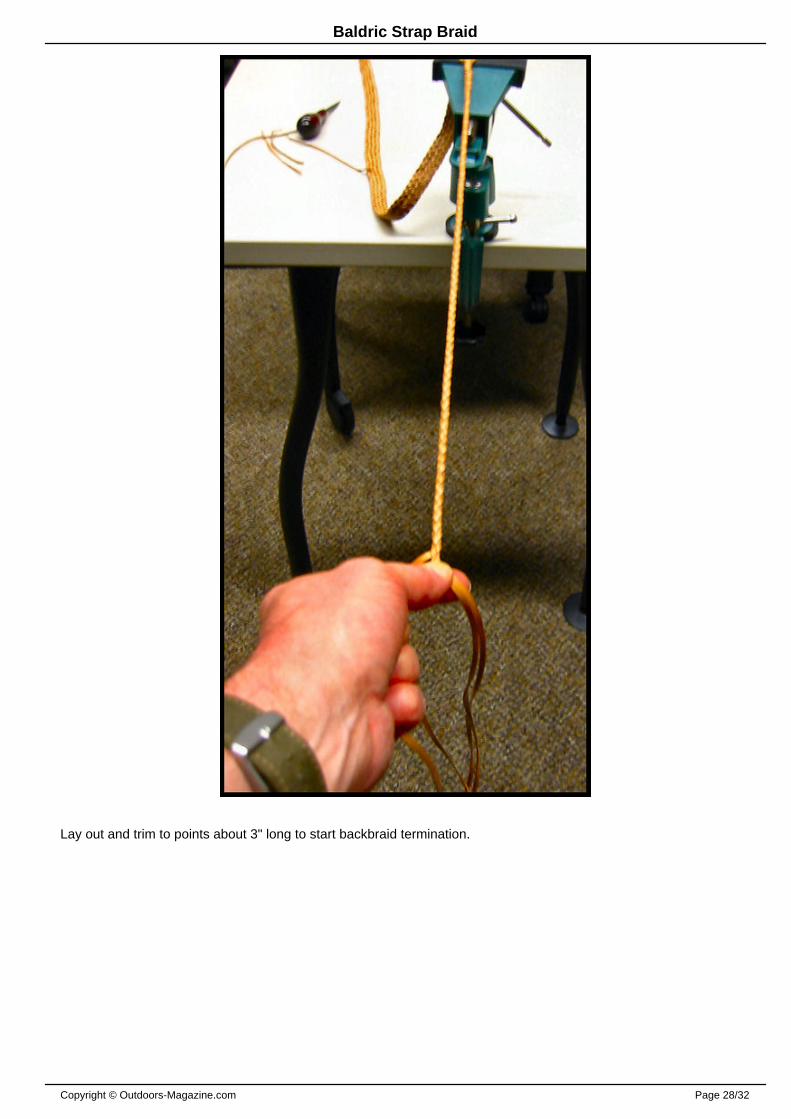
Lay out and trim to points about 3" long to start backbraid termination.
Copyright © Outdoors-Magazine.com Page 28/32
Baldric Strap Braid
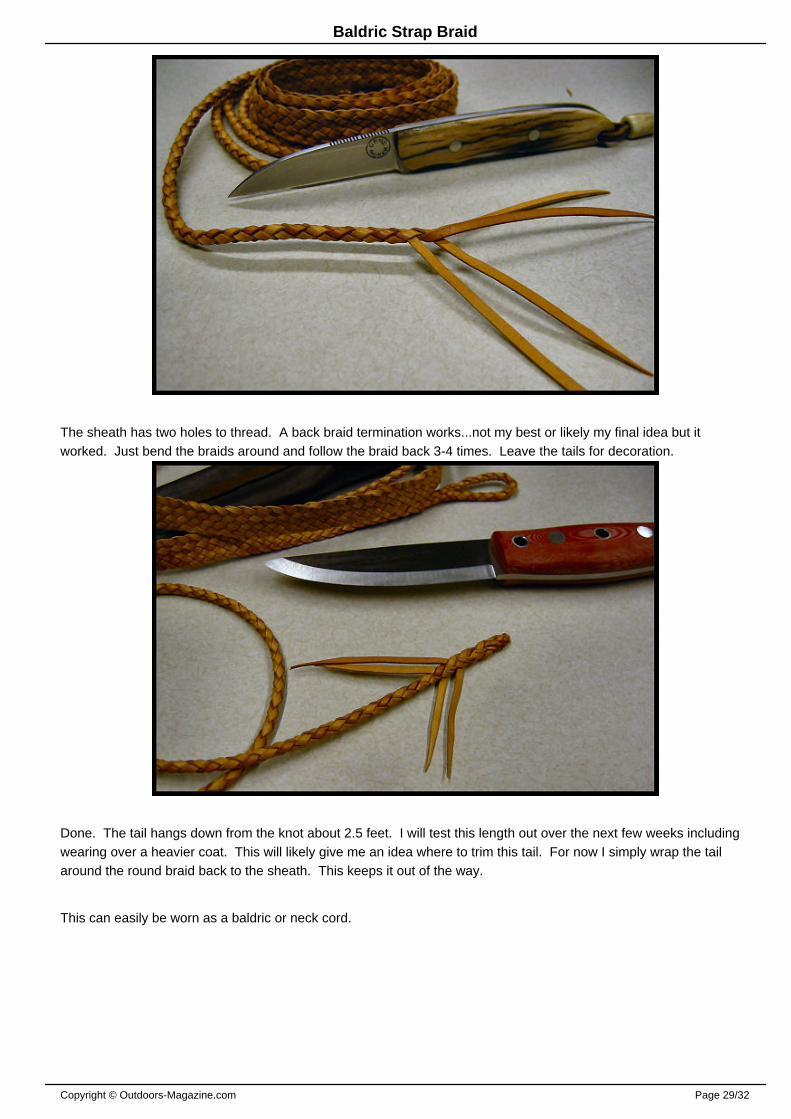
The sheath has two holes to thread. A back braid termination works...not my best or likely my final idea but itworked. Just bend the braids around and follow the braid back 3-4 times. Leave the tails for decoration.
Done. The tail hangs down from the knot about 2.5 feet. I will test this length out over the next few weeks includingwearing over a heavier coat. This will likely give me an idea where to trim this tail. For now I simply wrap the tailaround the round braid back to the sheath. This keeps it out of the way.
This can easily be worn as a baldric or neck cord.
Copyright © Outdoors-Magazine.com Page 29/32

Baldric Strap Braid
Essentially this same braid design could be modified for use as a hat band or belt.
Addenda
For an excellent alternative three-color baldric braid with permanent attachment to a knife sheath see Buckshot'sarticles over at BushCraft UK. Part 1 and Part 2. He has also done a very good turks head article following the BruceGrant method. Well worth a review.
Resources
David Morgan out here in Woodinville Washington not only carries braiding supplies, but has written definative textson the skill. His most recent book is essential, and I exclusively use his hand-cut lace for my most important projectsand his machine cut Australian imported kangaroo lace for projects like this baldric strap and knife lanyards.
Essential David Morgan Book
Copyright © Outdoors-Magazine.com Page 30/32

Baldric Strap Braid
David Morgan, Braiding Fine Leather Really a must have text with a number of simple projects that demonstrate theskills well.
Bruce Grants Advanced Manual
Bruce Grant's Encylopedia Another classic tome that really is a must have for the dying art of leather work.
David Morgan Hand cut Kangaroo Leather The best.
Very nice machine cut Kangaroo Leather 90% of my projects use this lace. It is generally quite even and with few orno joins in a spool. Go ahead and order the 3 spools, you will be glad you did.
Other Tools
Gene Ingram #4 wharncliffe, (see more in my Ingram article) my most used knife. Specifically made for my leatherwork but used daily. The thin wharncliffe allows me to trim close and trim bundles. I would not want to braid withoutthis knife.
Belting Awl or fid. This is an essential awl for lace work as it is not sharp nor does it have any sharp edges. Lacecan be stretched and manipulated with it easily. Mine from a local leather store made by C.S. Osborne.
Braiding Soap as made by David Morgan.
1 pound lard 4 oz ivory bar soap 1.5 cups water
Heat water and shave soap into it. Once soap is dissolved, cut in lard. Stir over gentle heat till a creamy paste iscreated. Pour off to a plastic tub and cool. Lasts for years.
Post-scriptum :
Version 1.0 Images and text 4/26/2007
Version 1.5 Fini 4/27/2007
Copyright © Outdoors-Magazine.com Page 31/32
http://www.davidmorgan.com/proddetail.html?product_number=1593&ticket=194678-3864018&sequence=233581
http://www.davidmorgan.com/proddetail.html?product_number=1209&ticket=194678-3864018&sequence=233581
http://www.davidmorgan.com/proddetail.html?product_number=1593&ticket=194678-3864018&sequence=233581

Baldric Strap Braid
Version 1.6 Buckshot's Braid links added...really worth a visit 5/22/2007
Copyright © Outdoors-Magazine.com Page 32/32