Balance Walking in Active Aging Intro Instructional July 27 2013
21
BALANCE WALKING changes the way we age… Let’s take your Walking to the Next Level of Health and Fitness… Just 15 minutes day uses 90% muscle to improve; cardio function, calorie burn, balance, increased mobility and your independence…
-
Upload
ibodywalk-founder -
Category
Documents
-
view
44 -
download
2
Transcript of Balance Walking in Active Aging Intro Instructional July 27 2013
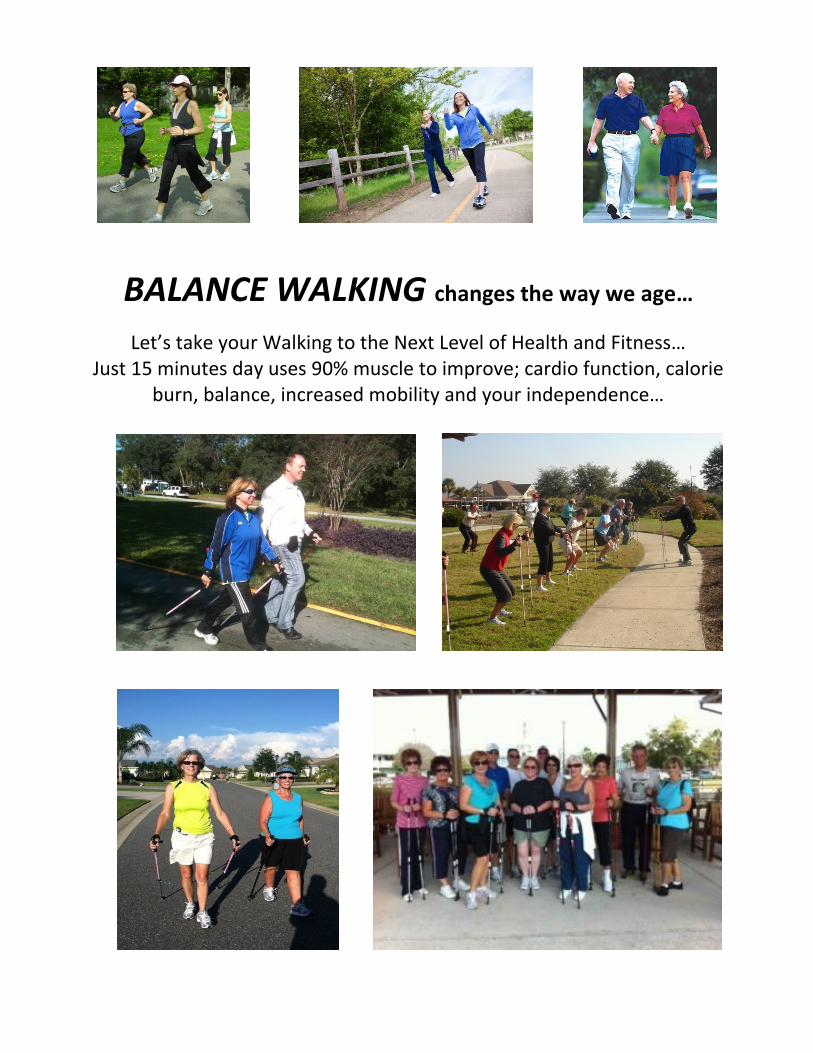
BALANCE WALKING changes the way we age…
Let’s take your Walking to the Next Level of Health and Fitness… Just 15 minutes day uses 90% muscle to improve; cardio function, calorie
burn, balance, increased mobility and your independence…

Benefits experienced by the participants’ in our 8 week Balance Walking Study published in the October 2012 Prevention Magazine issue.
Increases my strength and core
Activates my neglected muscles
I feel overall better, and with that, sleep better
Improves my endurance
Feels less strenuous than other cardio workouts
Tones and strengthens the feet, legs, buttocks, abs and back
Keeps my tendons, ligaments and muscles supple
I feel more muscles working comfortably harder and, therefore, burn more calories
Helps give me more relaxed, upright posture and with that better alignment
Improves my balance
Improves on my natural walking and jogging gait
Absorbs shock to the feet, knees, hips and back
Relieves the pain in my neck, shoulders, back and knees
Relieves pressure on the my spine
Increases my circulation in the feet and legs
There are many more that are continuing to be sent to our office each week.
Stay in touch as you venture with the Balance Walking program and share the benefits you experience. Always remember when beginning any exercise program one should always consider first consulting their physician should they be new to exercise and or has health and fitness risk factors before beginning the Balance Walking Program of instruction.

Active Aging Population To begin the Balance Walking program and in conjunction with advise from ones physician or engaged health professional for the Active Aging Population (age 55 plus), we know that the Balance Walking Poles can become a versatile walking tool. Without addressing proper recommendations you risk the safety while walking. We know as well that there are creative methods of instruction in delivering modified exercise programming. Those who are considering the program using the poles in a traditional way that cannot walk unassisted (uses walkers, canes or motorized chairs) are not advised to use poles without medical professionals advise.
Instructor and Participants Notes
1. Instructors when leading should prequalify your participants by noting that the following special populations below with balance challenges and altered gait should begin using walking poles to improve stability before addressing mobility, and should always get the approval from their healthcare provider before beginning:
• Less ambulatory older adults • Multiple sclerosis • Parkinson’s disease • Peripheral neuropathy • Neuropathy Issues of Lower Extremity • Stroke • Hip and knee replacement • Post polio syndrome • Essential Tremors • Closed Head injury • Lumbar Stenosis • Neuromuscular Issues
2. Those instructing participants should note the following important safety tips and of course make additional recommendations when coming upon a unique safety concern. See videos which show the tips below at www.balancewalkingblog.com.
• Always pick poles up off the ground when going from standing still to turning in
another direction. Then when you are facing the direction you intend to move you can place tips on the ground and move in that direction.
• Never walk backwards using walking poles. • Always keep walking pole tips outside your stride path. I like to say stay wide, or keep
a space between the underside of the arms and the torso. • Avoid walking side-by-side in hallways and on narrow sidewalks. Maintain a safe
distance from others, both side-to-side and front-to back, when walking with poles. Remember your gait and consequentially pace is different, so position those with similar pace together.
• Add the zip-ties (in blog video) to lower section of poles to act as sensors as poles may swing to close to legs.
• Poles tips in front only when stability is the priority, such as walking up or down hills.

Balance Walking Instructional Advice
Basic Pole Set-Up, Walking Technique and Toning View videos at www.balancewalkingblog.com or www.prevention.com/nordic
To adjust pole twist lower shaft counter clockwise – once loose, slide lower shaft to proper height for your level. Then tighten pole by twisting lower shaft clockwise. Note: Shaft will lock in place without a lot of pressure. Next adjust second pole to the same length as first pole.
SPORT LEVEL Adjustment for the
experienced pole walker 1” to 2” higher than 90 degrees
ADVANCED
Ready Position/Adjust Pole Parts
Simple adjustment to lengthen or shorten pole
FITNESS LEVEL 90 degrees at elbow
NORMAL
Start Here - HEALTH LEVEL
1” to 2” lower than 90 degrees BEGINNER
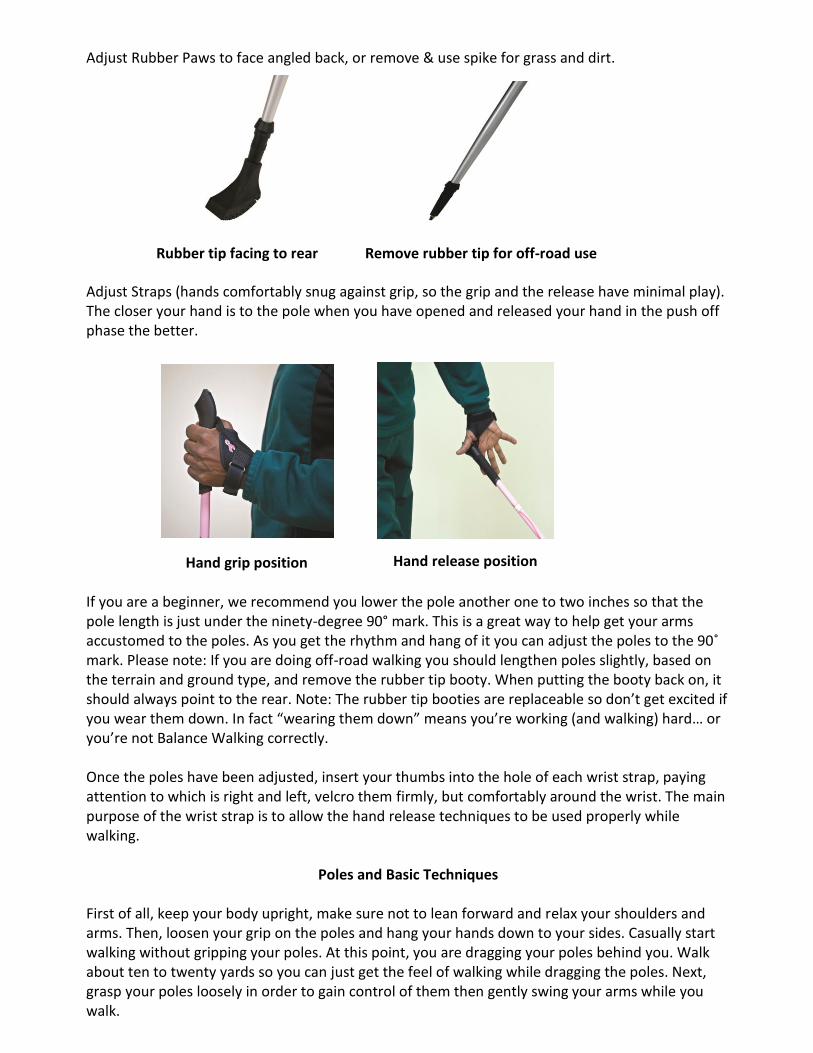
Adjust Rubber Paws to face angled back, or remove & use spike for grass and dirt.
Adjust Straps (hands comfortably snug against grip, so the grip and the release have minimal play). The closer your hand is to the pole when you have opened and released your hand in the push off phase the better.
If you are a beginner, we recommend you lower the pole another one to two inches so that the pole length is just under the ninety-degree 90° mark. This is a great way to help get your arms accustomed to the poles. As you get the rhythm and hang of it you can adjust the poles to the 90˚ mark. Please note: If you are doing off-road walking you should lengthen poles slightly, based on the terrain and ground type, and remove the rubber tip booty. When putting the booty back on, it should always point to the rear. Note: The rubber tip booties are replaceable so don’t get excited if you wear them down. In fact “wearing them down” means you’re working (and walking) hard… or you’re not Balance Walking correctly. Once the poles have been adjusted, insert your thumbs into the hole of each wrist strap, paying attention to which is right and left, velcro them firmly, but comfortably around the wrist. The main purpose of the wrist strap is to allow the hand release techniques to be used properly while walking.
Poles and Basic Techniques
First of all, keep your body upright, make sure not to lean forward and relax your shoulders and arms. Then, loosen your grip on the poles and hang your hands down to your sides. Casually start walking without gripping your poles. At this point, you are dragging your poles behind you. Walk about ten to twenty yards so you can just get the feel of walking while dragging the poles. Next, grasp your poles loosely in order to gain control of them then gently swing your arms while you walk.
Rubber tip facing to rear Remove rubber tip for off-road use
Hand grip position Hand release position
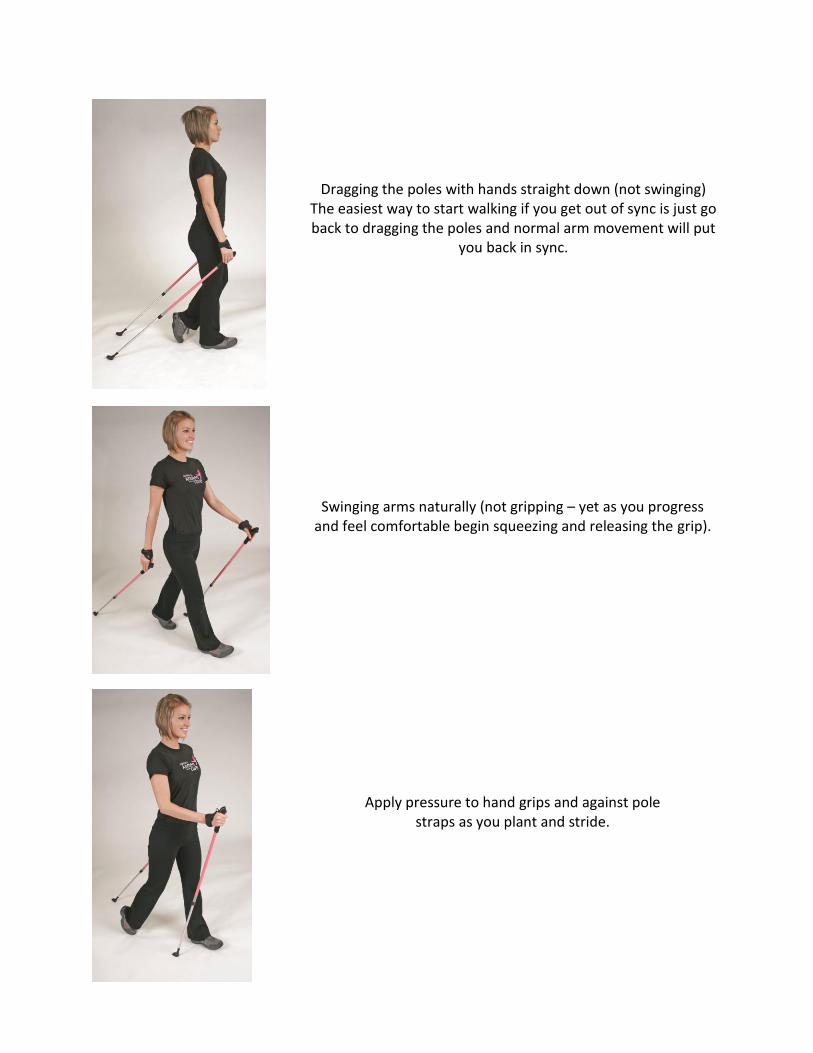
Dragging the poles with hands straight down (not swinging) The easiest way to start walking if you get out of sync is just go back to dragging the poles and normal arm movement will put
you back in sync.
Swinging arms naturally (not gripping – yet as you progress and feel comfortable begin squeezing and releasing the grip).
Apply pressure to hand grips and against pole
straps as you plant and stride.
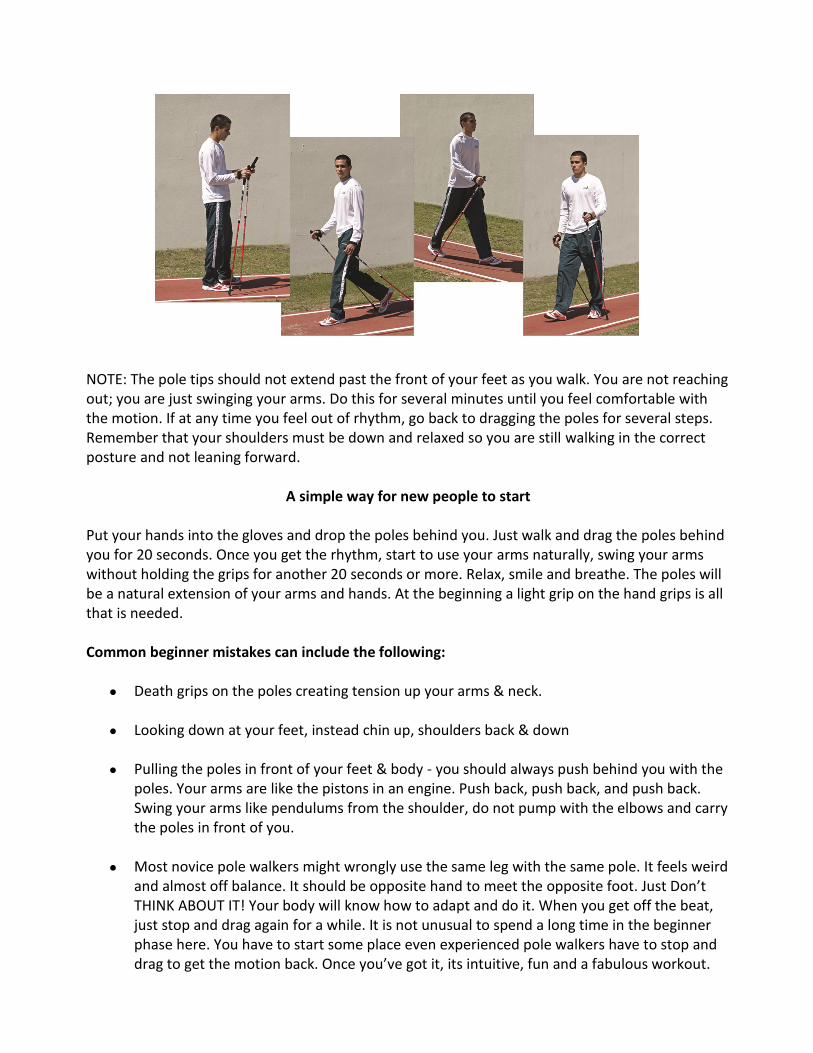
NOTE: The pole tips should not extend past the front of your feet as you walk. You are not reaching out; you are just swinging your arms. Do this for several minutes until you feel comfortable with the motion. If at any time you feel out of rhythm, go back to dragging the poles for several steps. Remember that your shoulders must be down and relaxed so you are still walking in the correct posture and not leaning forward.
A simple way for new people to start Put your hands into the gloves and drop the poles behind you. Just walk and drag the poles behind you for 20 seconds. Once you get the rhythm, start to use your arms naturally, swing your arms without holding the grips for another 20 seconds or more. Relax, smile and breathe. The poles will be a natural extension of your arms and hands. At the beginning a light grip on the hand grips is all that is needed. Common beginner mistakes can include the following:
Death grips on the poles creating tension up your arms & neck.
Looking down at your feet, instead chin up, shoulders back & down
Pulling the poles in front of your feet & body - you should always push behind you with the poles. Your arms are like the pistons in an engine. Push back, push back, and push back. Swing your arms like pendulums from the shoulder, do not pump with the elbows and carry the poles in front of you.
Most novice pole walkers might wrongly use the same leg with the same pole. It feels weird and almost off balance. It should be opposite hand to meet the opposite foot. Just Don’t THINK ABOUT IT! Your body will know how to adapt and do it. When you get off the beat, just stop and drag again for a while. It is not unusual to spend a long time in the beginner phase here. You have to start some place even experienced pole walkers have to stop and drag to get the motion back. Once you’ve got it, its intuitive, fun and a fabulous workout.

1 – 2 – 3 Sequential Technique
1. Swing – Reach – Squeeze (like holding a baby bird) 2. Plant – Press – Propel 3. Stride – Push – Release (like holding baby bird)
Fine Tuning Correcting Your Technique
Pole presses back 45 degrees while leaning slightly forward (this creates a straight line with arm and pole shaft).
Pole tip at forward most point of swing is between feet (not in front of feet).
Close and Open grip with each step which is attained with more experience.
Elbows should swing close to body (like train tracks) without inside of arms touching torso. Double Poling Technique
Is virtually same as alternate swinging of pole in all ways except one.
Swing poles together looking to plant poles at the exact same time.
You can take as many steps as you like (comfortable rhythm) as both arms move forward.
Poles could touch in forward position every 3, 5 or 7, etc. foot strike. Never ever 1st or 2nd foot strike as this is much too fast.
Uphill Technique
Lean forward slightly
Reach out longer with poles
Push back strong to power up the hill Downhill Technique
Softer knees
Feet flatter on the ground
Lean slightly back (apply more downward pressure to pole straps) Advanced Technique
Hands Close at Plant and Open at Push
Double Poles
Zig Zag or Skating
Jogging
Running
Jumping Strides

BALANCE WALKING TONING EXERCISES
Lower Body & Core Starter Program - Less Aggressive Toning
Lower Body & Core
Exercise 1
Front Squat
Main muscles worked:
- Quadriceps
- Gluteals
Other muscles worked:
- Erector Spinae
- Piriformis
- Adductors
- Psoas Major
- Hamstrings
- Soleus
Instructions:
Stand with feet wider than shoulder width apart and Walking Poles slightly wider than your shoulders for balance. Note: imagine tightening and flexing your thighs and glutes, making sure to keep the heels flat on the ground. Push the bottom outwards and keep the back straight and head up. Carefully and gently move downward anywhere from 45 – 90degrees (this exercise is best to minimize knee bend when getting started). Extend at the knees to stand and return to start position.

Lower Body & Core
Exercise 2
Rear Step Lunge
Main muscles worked:
- Quadriceps
- Gluteals
Other muscles worked:
- Adductors
- Hamstrings
- Internal and External Oblique
- Erector Spinae
- Gastroc / Soleus
Instructions:
Stand with feet a few inches apart and Walking Poles placed and arms length away at slightly wider than
your shoulders. Note: imagine tightening and flexing your thighs and glutes as you step one leg back and
flex the knees until the back leg almost reaches the ground. Carefully and gently move downward anywhere
from 45 – 90degrees (this exercise is best to minimize knee bend when getting started). Ensure that the
front knee remains behind the toes and the upper body is in neutral. Alternating legs is one rep.

Lower Body & Core
Exercise 3
Abduction
Main muscles worked:
- Gluteus Maximus
- Sartorius
- External Oblique
Other muscles worked
- Gluteus Medius
- Tensor Fascia Latae
- Gluteus Minimus
Instructions:
Stand with feet shoulder width apart with Walking Poles placed at arm’s length away, slightly wider than
your shoulders. Note: imagine tightening and flexing your thigh and outer hip area. Ensuring that the core is
engaged and the pelvis does not shift, abduct one leg making sure to keep the upper body vertical then
return to the starting position.

Lower Body & Core
Exercise 4
Standing Crunch
Main muscles worked:
- Rectus Abdominus
Other muscles worked:
- Psoas Major
- Internal Oblique
- External Oblique
Instructions:
Stand with feet shoulder width apart with Walking Poles placed at arm’s length away, slightly wider than
your shoulders. Note: imagine tightening and flexing your core. Pressing poles in to the ground to create a
foundation, to then lift knee up towards the opposite pole handle. Then lower your leg and alternate the
same movement with the opposite leg.

BALANCE WALKING TONING EXERCISES
continued Upper Body & Core Starter Program - Less Aggressive Toning
Upper Body & Core
Exercise 5
Standing Chest Flys
Main muscles worked:
- Pectoralis Major
- Deltoids
Other muscles worked:
- Coraco-brachialis
Instructions:
Stand with feet wider than shoulder width apart and Walking Poles planted no more than 1 foot wider than
your shoulders for balance. Note: imagine tightening and flexing upper torso as you begin movement.
Pressing poles in to the ground to create a foundation, keep back flat as you bend at waist, allowing poles to
move slightly outward (careful not to straighten arms, leave slight bend, to avoid strain) as you feel your
“arms and chest supporting you.” Note: careful to begin slowly if only bending forward a few inches. Raise
yourself up and pause to then repeat.
STAND SIDE SIDE LOWER USING ARMS STAND

Upper Body & Core
Exercise 6
Standing Chest Press
Other muscles worked
- Pectoralis Major
- Deltoids
- Triceps
Main muscles worked:
- Coraco-brachialis
Instructions:
Stand with feet wider than shoulder width apart and Walking Poles slightly wider than your shoulders for
balance. Note: imagine tightening and flexing upper torso as you begin movement. Begin by pressing poles
in to the ground to create a foundation, keep back flat as you bend at waist, bend at your waist keep back
flat and lower no more than head to pole handle height. You will feel your “arms and chest supporting you.”
Note: careful to begin slowly if only bending forward a few inches. Raise yourself up and pause to then
repeat.
STAND FRONT LOWER USING ARMS FRONT STAND

Upper Body & Core
Exercise 7
Shoulder / Tricep Extension
Main muscles worked:
- Triceps
- Subscapularis
- Latissimus Dorsi
Other muscles worked:
- Teres Major
- Posterior Deltoid
Instructions:
Stand with feet shoulder width apart and hold the Walking Poles behind the back resting on the glutes,
palms facing to the front. Note: imagine tightening and flexing your triceps and upper arms. Keeping the
arms straight, extend the shoulders fully to the rear, and then control the movement eccentrically to the
starting position.

BALANCE WALKING TONING EXERCISES
More strenuous exercises used by the Prevention Magazine participants
1. Single Leg Squat. Standing with feet hip-width apart, shift weight onto right foot. Rest toe of left
foot on floor next to right foot, lightly holding top of walking pole in right hand. Bend knees and lower body into a squat position as if sitting back into an imaginary chair. Stop when knees are at 90 degrees. Pause; slowly return to starting position. 12-15 reps. Switch legs and repeat. 3 sets.
2. Rear Lunge with Knee Up. Stand with feet together, right hand on hip and left hand gently balancing on pole. Lunge back with right leg, lowering right knee toward floor. Press into left foot to stand back up, bring right knee forward and lift it to hip level. Hold a moment, then slowly swing right leg back, plant foot on floor with heel lifted, and lower into another lunge. 12-15 reps on each leg, 3 sets.

2. Single-Leg Romanian Dead Lift. Stand with feet shoulder-width apart, knees slightly bent, holding pole horizontally in front of thighs with hands shoulder distance apart. Lift right leg behind you as you hinge forward from hips, bringing pole toward floor directly under shoulders; keep abs tight and head in line with spine. Return to standing, keeping right foot lifted. Do 12-15 reps; switch sides and repeat; do 3 sets total.
4. Pole Burpee. Stand with feet shoulder width apart, knees slightly bent, holding pole horizontally at chest level. Squat down while bringing the pole to ground in front of feet. Walk or hop back into a plank. Lower your body for 1 pushup (can be done with bent knees if needed). Walk or hop back to hands. Grab pole,
stand up, and option to press pole overhead. 8 to 10 reps. 3 sets. Note: Overhead movement not shown in video
and of course can be added.
5. Crunch with pole. Lie on floor and extend legs straight up. Hold pole horizontally, hands shoulder-width distance apart. Contract abs while shoulder blades are being lifted off floor, reaching pole towards feet. 15 to 20 reps, 3 sets.

6. Side leg lift. Stand with feet hip-distance apart, lightly holding top of pole in front of left leg. Lift right leg out as far as possible to right side while keeping hips facing forward; pulse up and down 20-25 times; switch sides and repeat. [or they could do this holding pole in front of them for balance instead of on ground).
7. Kayak crunch. Sit with knees bent, heels on floor, holding pole horizontally with elbows bent near sides. Lift feet and lean back slightly, engaging abs. Tip pole so one end points toward floor, and slowly “row” pole behind you while twisting to left side. Keeping feet lifted, turn torso to right side and “row” pole behind you (like you’re padding a kayak). Continue for 12-15 reps per side. 3 sets.
8. Double-Leg Stretch . Lie face up on mat, knees bent and feet flat on floor, holding pole horizontally at chest. Contracting abs, lift knees so that shins are parallel to floor. Lift head and shoulders off floor, extending arms so pole is directly over knees. Inhale, extending arms by ears while extending legs 45 degrees from mat. Exhaling, bend knees back to 90 degrees and reach pole toward knees. Do 12 to 15 reps. 3 sets
The Video Links (give each time to load) below correspond to the above advanced BALANCE WALKING ADVANCED TONING EXERCISES- intermediate/advanced descriptions. Note: These Hyperlinks are best opened in your browser after you receive this document via an email request. We also included photos of a beginner series option as well in the first section of BALANCE WALING TONING EXERCISES Lower Body & Upper Body Core Starter Program - Less Aggressive Toning .

The Advanced Video Hyper Links
1. http://videos.balancewalking.com/1_Single_Leg_Squat.MOV
2. http://videos.balancewalking.com/2_Rear_Lunge_with_Knee_Up.MOV
3. http://videos.balancewalking.com/3_Single_Leg_Romanian_Dead_Lift.MOV
4. http://videos.balancewalking.com/4_Pole_Burpee_without_Overhead.MOV
5. http://videos.balancewalking.com/5_Crunch_with_Pole.MOV
6. http://videos.balancewalking.com/6_Side_Leg_Lift.MOV
7. http://videos.balancewalking.com/7_Kayak_Crunch.MOV
8. http://videos.balancewalking.com/8_Double_Leg_Stretch.MOV

Warm Up & Warm Down Pole Stretching
Wa
rm U
p &
Co
ol D
ow
n
Quadriceps Stretch Hold both or one pole in one hand in front for support. While one hand is holding the pole(s), use your other hand to
pull your ankle gently bending your knee and feel a slight pull on your quadriceps.
Then switch hands holding pole(s) and leg. Hold till the count of two, repeat two times on each leg.
Wa
rm U
p
Gluteus Stand and Lunge
Poles planted just beyond arms length, shoulder width. Take a generous step forward, firmly planting foot and kneeling
on back leg. The lead leg is the gauge of up to a 90 degree knee bend.
Comfortable range. Pushing away from lead foot while using your poles to come
back to starting position. Repeat each leg five times.
Wa
rm U
p &
Co
ol D
ow
n
Calf and Hamstring Stretch
Poles planted at arms length, shoulder width. Place one heel just behind pole plant, keep leg straight in front
with toes pointing up. You can use the pole to press against for a greater stretch.
Bend the other knee while leaning forward with a straight back. Be careful and gentle.
Hold till the count of two, repeat two times on each leg.

Co
ol
Do
wn
& W
arm
Up
Lateral Side Stretch
Stand straight while holding poles with grip a bit wider than shoulders above your head.
Bend sideways, till upper hand is over your head.
Switch to the other side and stretch, and then come back to neutral.
Repeat five times in each direction.
Wa
rm U
p
Upper Torso Twist
Stand straight while holding poles on your shoulders. Twist towards the full length of the poles.
Keep your eyes focused straight ahead.
Repeat five times in each direction.
Co
ol
Do
wn
Back Stretch
Plant poles just past arms length at a shoulder width.
Keep arms straight lean on poles.
Bend at the waist keeping your back straight. Avoid hyper-extending.
Breath easy in and out through motion. Hold to count of two.
Repeat three times.
Co
ol
Do
wn
Triceps Stretch
Grab the top of the pole grip with one arm.
Bring pole over head slowly and down your back slowly
Grasp the bottom with other hand palm against your back with your thumb up.
Pull down on lower part until you feel the stretch slightly.
Hold till the count of two.
Repeat three times.
Info Contact: Terry D. Kennedy - Executive Director of Balance Walking / July 2013
[email protected] or 770-653-5995