Backup to a Dynamic Volume using USB /ATA/SATA drives with Open-E DSS V6 - EN
29
Software Version: DSS ver. 6.00 up35 Presentation updated: June 2010 Backup to a Dynamic Volume using USB /ATA/SATA drives with Open-E DSS V6
description
A presentation of Backup to a Dynamic Volume using USB/ATA/SATA drivers with open-E DSS V6
Transcript of Backup to a Dynamic Volume using USB /ATA/SATA drives with Open-E DSS V6 - EN
Software Version: DSS ver. 6.00 up35
Presentation updated: June 2010
Backup to a Dynamic Volumeusing USB /ATA/SATA drives
with Open-E DSS V6

2www.open-e.com
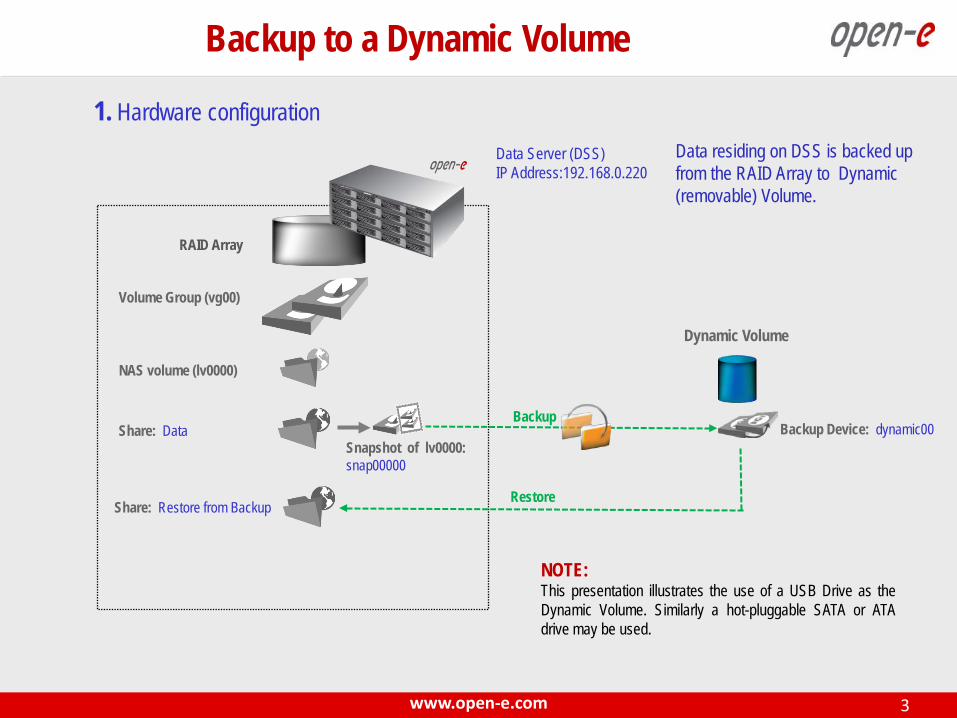
1. Hardware configuration
2. Create Volume Group, NAS Volume and snapshot
3. Connect Dynamic Volume (USB Drive) to a DSS V6 server
4. Configure the Backup to use with the Dynamic Volume (NAS Shares, Pools, Backup Device and Backup Task)
5. Create the Restore from Backup
TO SET UP A BACKUP TO A DYNAMIC VOLUME ON A USB/ATA/SATA DRIVE, WE WILL PERFORM THE FOLLOWING STEPS:
Backup to a Dynamic Volume
3www.open-e.com
Data Server (DSS)IP Address:192.168.0.220
Volume Group (vg00)
RAID Array
NAS volume (lv0000)
Share: Data
Restore
BackupBackup Device: dynamic00
Share: Restore from Backup
1. Hardware configuration
Dynamic Volume
Data residing on DSS is backed up from the RAID Array to Dynamic (removable) Volume.
Backup to a Dynamic Volume
NOTE:This presentation illustrates the use of a USB Drive as theDynamic Volume. Similarly a hot-pluggable SATA or ATAdrive may be used.
Snapshot of lv0000: snap00000
4www.open-e.com
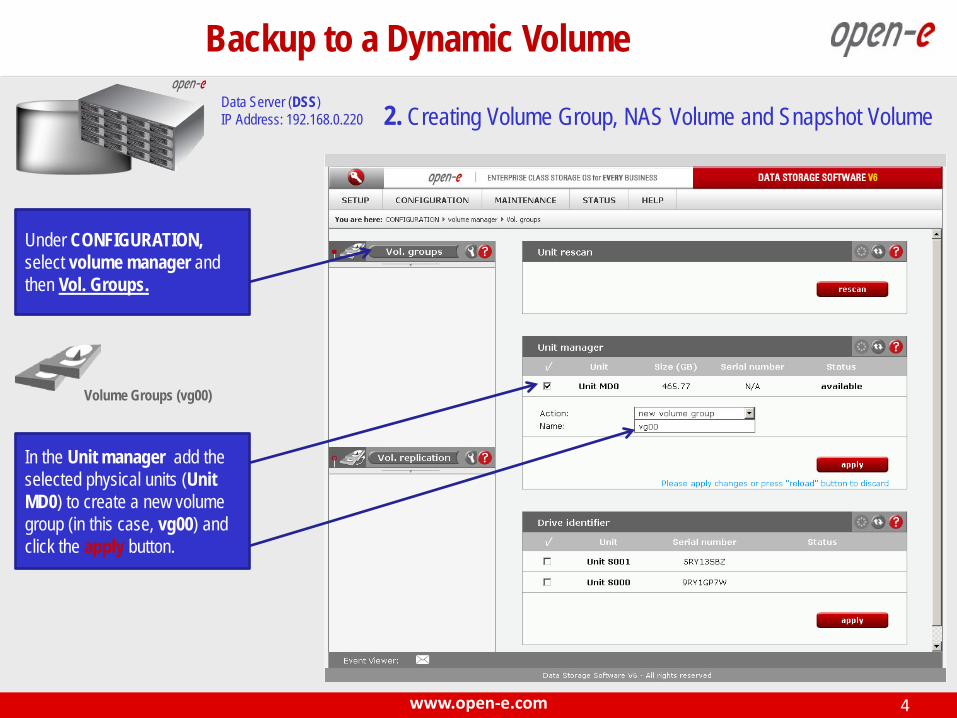
Data Server (DSS)IP Address: 192.168.0.220
Volume Groups (vg00)
In the Unit manager add the selected physical units (Unit MD0) to create a new volume group (in this case, vg00) and click the apply button.
Under CONFIGURATION, select volume manager and then Vol. Groups.
2. Creating Volume Group, NAS Volume and Snapshot Volume
Backup to a Dynamic Volume

5www.open-e.com
Backup to a Dynamic Volume
Select the appropriate volume group (vg00) from the list on the left and create a new NAS volume of the required size. This logical volume lv0000 will be the source of the localbackup.
Volume Groups (vg00)
NAS volume (lv0000)
2. … ContinueData Server (DSS)IP Address: 192.168.0.220
After assigning an appropriate amount of space for the NAS volume, click the apply button.

6www.open-e.com
Backup to a Dynamic Volume
2. … ContinueData Server (DSS)IP Address: 192.168.0.220
To run the local backupprocess, you must first define a new snapshot volume in the Volume manager for the volume to be backed up.
After assigning the appropriate amount of space (10-15% of the LV) for the Snapshot volume,click the apply button.
Snapshot
Option:You may create a snapshot volume and assign it to the appropriate volume in just one step. Instead of selecting: “Just create snapshot volume”, select: “Assign to volume lv0000”. If so - skip the next slide.

7www.open-e.com
Backup to a Dynamic Volume
NAS volume(lv0000)
Snapshot(snap00000)
Assign snap00000 to the logical volume to be backed up (in this example - lv0000) and click the apply button.
2. … ContinueData Server (DSS)IP Address: 192.168.0.220

8www.open-e.com
Under the CONFIGURATIONtab, select the NAS settingsmenu.
Local Backup
Check to Use local backupbox. Also select, Default shareon LV as lv0000, and click the apply button.
Data Server (DSS)IP Address: 192.168.0.220
Backup to a Dynamic Volume
2. … Continue
NOTE:In order to increase backup robustness, placing the backup database on another volume (e.g. lv0001 at 40GB will be enough to last for years) is recommended.

9www.open-e.com
Under CONFIGURATION, select NAS resources and Shares.
Shares: Data
A tree listing of the NAS shared volumes (Shares) will appear on the left side of the DSS V6 web GUI. In the example, a shared volume named Data has been created on lv0000.
2. … ContinueData Server (DSS)IP Address: 192.168.0.220
Backup to a Dynamic Volume

10www.open-e.com
After the Web GUI refreshes, you will see a new unit (S003). Select new dynamic volumein the Action field. Check the box for Unit S003 and click on the apply button.
Under the CONFIGURATION tab, select volume manager and Vol. groups. Connect the USB drive to the server and click on the rescan button.
Data Server (DSS)IP Address: 192.168.0.220 3. Connect the Dynamic Volume to the DSS V6 server
Backup to a Dynamic Volume
11www.open-e.com
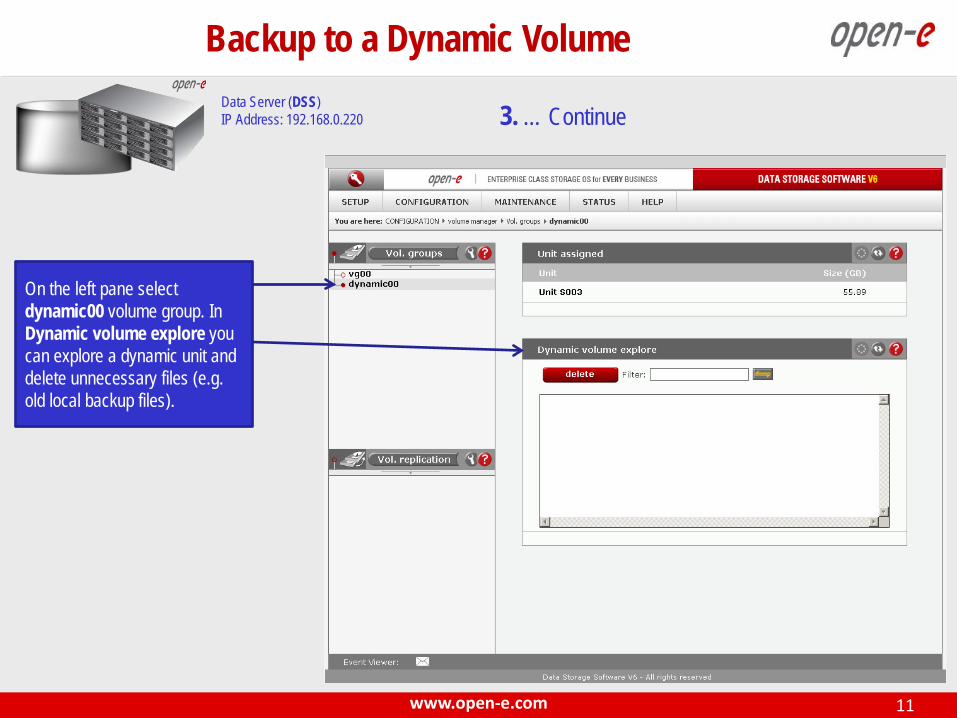
Data Server (DSS)IP Address: 192.168.0.220 3. … Continue
Backup to a Dynamic Volume
On the left pane select dynamic00 volume group. In Dynamic volume explore you can explore a dynamic unit and delete unnecessary files (e.g. old local backup files).

12www.open-e.com
In Create new pool, enter a Name for the pool, and select Tape retention after. In thisexample enter week and click the apply button.
Under the MAINTENANCE tab select backup and Backup pools.
Data Server (DSS)IP Address: 192.168.0.220 4. Configure the Backup to use the Dynamic Volume
Backup to a Dynamic Volume
Backup pools: Pool01Week

13www.open-e.com
Backup devices: dynamic00
In Create new virtual backup device, select the Dynamic volume, and below that select Use as device (dynamic00 in this example) and click the apply button.
Next, choose the Backup devices.
Data Server (DSS)IP Address: 192.168.0.220 4. … Continue
Backup to a Dynamic Volume

14www.open-e.com
Backup devices: Tape01
After the DSS WEB pagereloads, the new Backup device should appear. Next, click dynamic00, in the Backup devices tree.
In the Label new tape box enter a name for the new tape(Tape01) and select the Poolname. In this example, choosePool01Week. Next, check theLimit tape size box, and choose the appropriatecapacity for the new tape. Click the apply button. In thisexample, 4 tapes will be created.
Data Server (DSS)IP Address: 192.168.0.220 4. … Continue
Backup to a Dynamic Volume

15www.open-e.com
Backup devices: Tape02, Tape03, Tape04
Now create the next 3 tapes accordingly
Data Server (DSS)IP Address: 192.168.0.220 4. … Continue
Backup to a Dynamic Volume

16www.open-e.com
Backup devices: dynamic00
After creating tapes in Backup device tapes, four tapes are present.
Data Server (DSS)IP Address: 192.168.0.220 4. … Continue
Backup to a Dynamic Volume

17www.open-e.com
Next, you must select the shares for the local backup source. Move the Availableshares to be used for the local backup to the Assignedshares area by clicking the button.
Backup tasks: BackupTask01
Next ,select Backup tasks. In Create new backup task enter a name for the backup tasks and select the Logical volume.In this example choose lv0000 .
Data Server (DSS)IP Address: 192.168.0.220 4. … Continue
Backup to a Dynamic Volume

18www.open-e.com
Backup tasks: BackupTask01
In the Create new backup taskfunction, select the Snapshot volume and select Store on pool. In this example, snap00000 and Pool01Week Next, select the backup Level(e.g. incremental) check box,Compress data, and click the apply button.
Data Server (DSS)IP Address: 192.168.0.220 4. … Continue
Backup to a Dynamic Volume

19www.open-e.com
Backup tasks: BackupTask01
If you want manually start the backup task, click button in the Backup tasks function.
Data Server (DSS)IP Address: 192.168.0.220 4. … Continue
Backup to a Dynamic Volume

20www.open-e.com
Backup tasks: BackupTask01
After clicking button in the Backup tasks the status of the backup tasks appears.
Data Server (DSS)IP Address: 192.168.0.220 4. … Continue
Backup to a Dynamic Volume

21www.open-e.com
Backup tasks: BackupTask01
Click on the Runnings taskstab to display detailed information on the current Backup task.
Under the STATUS tab, select tasks, next click Backup in the Tasks tree.
Data Server (DSS)IP Address: 192.168.0.220 4. … Continue
Backup to a Dynamic Volume

22www.open-e.com
Backup device: Tape01
The configuration of Backup is now complete.
After the end of the Backup all data from Data share is located in Tape01. Showing us that2.85 Gb has been backed up.
Data Server (DSS)IP Address: 192.168.0.220 4. … Continue
Backup to a Dynamic Volume

23www.open-e.com
Shares: Restore from Backup
Under the CONFIGURATIONtab, select the NAS resources tab and then Shares.
In order to execute the Restore, you must create a new share. In this example, a shared volume named Restore fromBackup has been created on lv0000.
5. Create a Restore from the BackupData Server (DSS)IP Address: 192.168.0.220
Backup to a Dynamic Volume

24www.open-e.com
Under the MAINTENANCE tab, select the restore menu.
In the Create new restore task, check the box for BackupTask01. Enter a name for the Restore tasks name(e.g. RestoreTask), and select the destination share in the Restore to field. In thisexample, choose Restore from Backup share. Next, click the apply button.
Restore task: RestoreTask
Data Server (DSS)IP Address: 192.168.0.220 5. … Continue
Backup to a Dynamic Volume

25www.open-e.com
Detailed information on the current restore task will be displayed under Restore task.
Next, click RestoreTask, in the Restore tasks tree.
Restore task: RestoreTask
Data Server (DSS)IP Address: 192.168.0.220 5. … Continue
Backup to a Dynamic Volume
26www.open-e.com
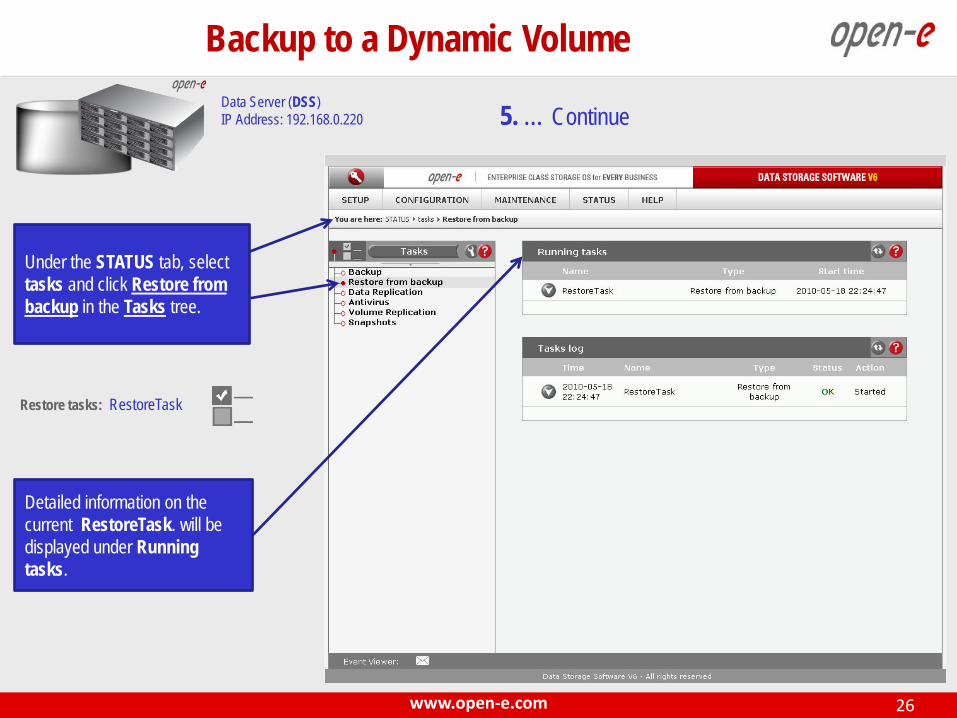
Restore tasks: RestoreTask
Detailed information on the current RestoreTask. will be displayed under Running tasks.
Under the STATUS tab, select tasks and click Restore from backup in the Tasks tree.
Data Server (DSS)IP Address: 192.168.0.220 5. … Continue
Backup to a Dynamic Volume

27www.open-e.com
Restore task: RestoreTask
You can start the task again from the Backup Restore tasks box.
5. … ContinueData Server (DSS)IP Address: 192.168.0.220
Backup to a Dynamic Volume

28www.open-e.com
After the Restore from Backup all data from the Data share is available on the Restore from Backup share.
The configuration of the Restorefrom Backup is now complete.
Share: Restore from Backup
Data Server (DSS)IP Address: 192.168.0.220 5. … Continue
Backup to a Dynamic Volume

29www.open-e.com
Thank you!
Follow Open-E: