BACKUP AND DISK IMAGING IN "WINDOWS 8.." AND "WINDOWS
245
1 BACKUP AND DISK IMAGING IN "WINDOWS 8.." AND "WINDOWS 8.1"
Transcript of BACKUP AND DISK IMAGING IN "WINDOWS 8.." AND "WINDOWS

2
Web location for this
presentation:
http://aztcs.orgClick on
“Meeting Notes”

3
SUMMARY
"Windows 8" and "Windows 8.1"
provides you with some new bundled
applications for backing up data files,
mirroring hard drives, and creating
images of hard drives.

4
TOPICS
• "Windows 7 File Recovery"
• "File History"
• "Storage Spaces"
• "Refresh" and "recimg"
• Third party utilities such as "Acronis
True Image" and Macrium Reflect
Free

5
"WINDOWS 7 FILE RECOVERY"
• "Windows 7 File Recovery" is
the new name for "Windows
Backup and Restore" in
"Windows 8".
• Not available in "Windows 8.1"

6
"WINDOWS 7 FILE RECOVERY"
(continued)• "8.1" does not have "Windows 7 File
Recovery" while "8" has it.
In "8", "Windows 7 File Recovery" is
the deprecated name for "Windows
Backup and Restore" which is
capable of created a bootable
restore DVD and a "restorable
system image" onto an external
hard drive.

7
"WINDOWS 7 FILE RECOVERY"
(continued)
• Despite this strange name, it is still
the same as the great "Windows
Backup and Restore" that is
available in "Windows 7".
• Microsoft has decided to "deprecate"
"Windows Backup" which means
that it will probably disappear in
"Windows 8.1" and "Windows 9".

8
"WINDOWS 7 FILE RECOVERY"
(continued)
• See
http://allanjsmithie.wordpress.com/2
012/05/11/back-up-restore-
deprecated-in-windows-8/

9
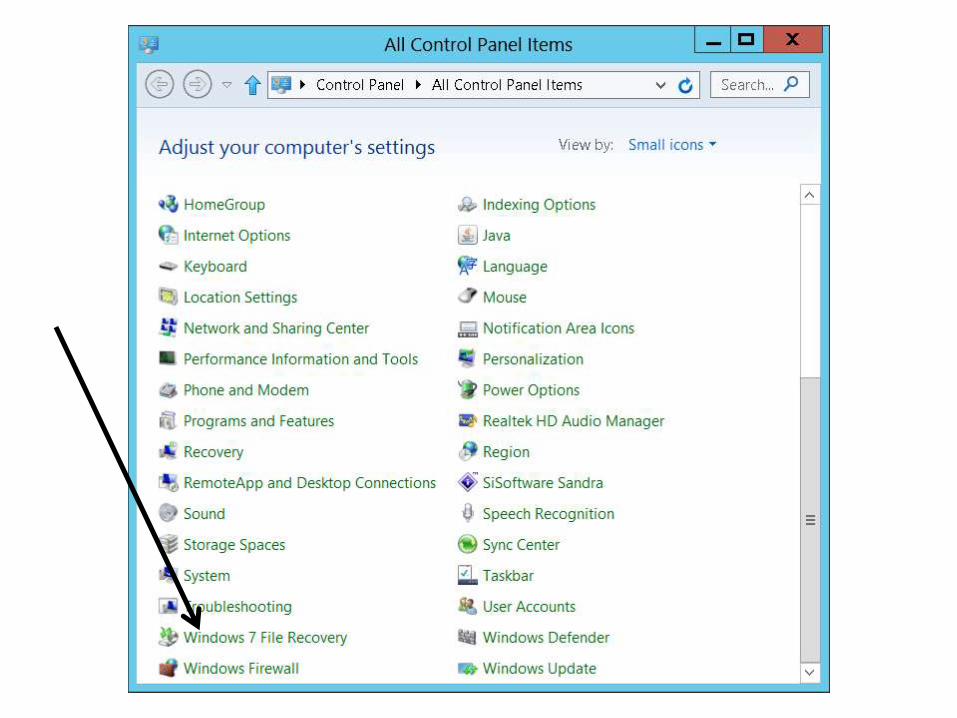
"Windows 7 File Recovery"
(continued)• "Windows 7 File Recovery" is an icon in
the "Control Panel" of the "Desktop" in
"Windows 8:
o Hover the mouse cursor over the
lower-left corner of the monitor screen.
o When a thumbnail pops up, use the
RIGHT mouse button to click once.
o When a "Power Users Menu" pops up,
click on "Control Panel".

10
"Windows 7 File Recovery"
(continued)o Double-click on the "Windows 7 File
Recovery" icon inside the "All Control
Panel Items" window.
11

12

13
"STORAGE SPACES"
• "Storage Spaces" feature of
"Windows 8" and "Windows 8.1" lets
you mirror two hard drives for
redundancy
(= "software RAID 1").

14
"FILE HISTORY"
• "File History" feature of "Windows 8"
and "Windows 8.1" automatically
stores copies of changed data files at
designated intervals of time.

15
"FILE HISTORY" (continued)
• According to many blogs and
magazine articles, "File
History" in "Windows 8" is
(somewhat) analogous to
"Time Machine" in Apple's
"OS X" operating systems.

16
"FILE HISTORY" (continued)
• However, in Apple's "Time Machine"
process, the recovery procedure
restores the "OS X" operating
system (from the Apple "installation
media DVD") in addition to all of your
application software programs and
all of your data files and folders.
• In contrast, "File History" in
"Windows 8" only backs up "data
files and folders".
17
"FILE HISTORY" AUTOMATED BACKUP
• If you turn on "File History", it
maintains, by default, a "FileHistory"
folder on the first external hard drive
that you attach to a "Windows 8.."
computer; however, you can tell it to
back up to any external hard drive
(USB/Firewire/eSATA), server
location, or Network Attached
Storage (NAS) device.

18
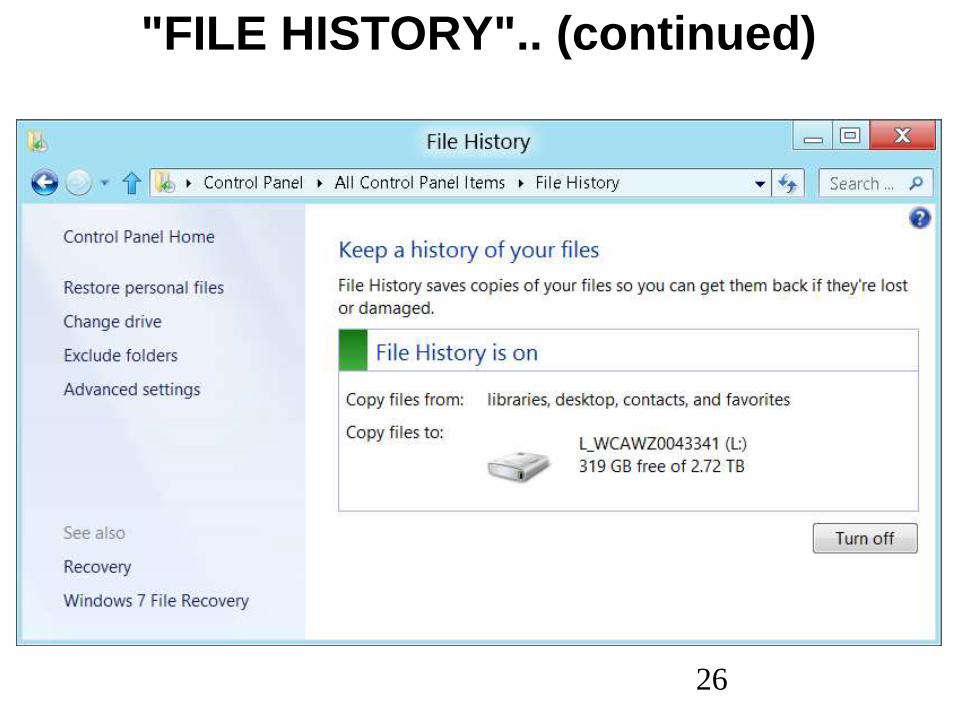
"FILE HISTORY".. (continued)
• The "File History" feature is
configured from inside the "Control
Panel":

19
"FILE HISTORY".. (continued)

20
"FILE HISTORY".. (continued)
• When you double-click on the "File
History" icon, the "File History"
window is displayed:

21
"FILE HISTORY".. (continued)

22
"FILE HISTORY".. (continued)
• By default, the "File History" backs
up all files and folders in the
following locations:
Libraries,
Desktop,
Contacts,
and
Favorites.

23
"FILE HISTORY".. (continued)
• By default, the Documents, Music,
Pictures, and Videos folders of all
Windows "user profiles" belong to
the Libraries by the same name.
Therefore, when you turn it on, the
"File History" process automatically
backs up all Documents, Music,
Pictures, and Videos folders for all
Windows "user profiles" at regular
intervals.

24
"FILE HISTORY".. (continued)
• If you have a folder of data files or a
separate hard drive that contains
data files, you can add them to the
"File History" process by adding the
folder or separate hard drive to any
existing or new "library".

25
"FILE HISTORY".. (continued)
• To add a folder or a hard drive to a
library:
Start "File Explorer".
Locate the library.
Use the RIGHT mouse button to click on
it.
A pop-up context menu will be displayed.
Click on "Properties".
Click on the "Add" button in the
"..Properties" dialog box.
26
"FILE HISTORY".. (continued)

27
"FILE HISTORY".. (continued)
• By default, the "File History" feature
is turned off, so click on the "Turn
on" button to start the "File History"
process.
• Once you turn it on, it will stay on
and automatically start up whenever
you power up your "Windows 8"
computer.

28
"FILE HISTORY".. (continued)

29
"FILE HISTORY".. (continued)
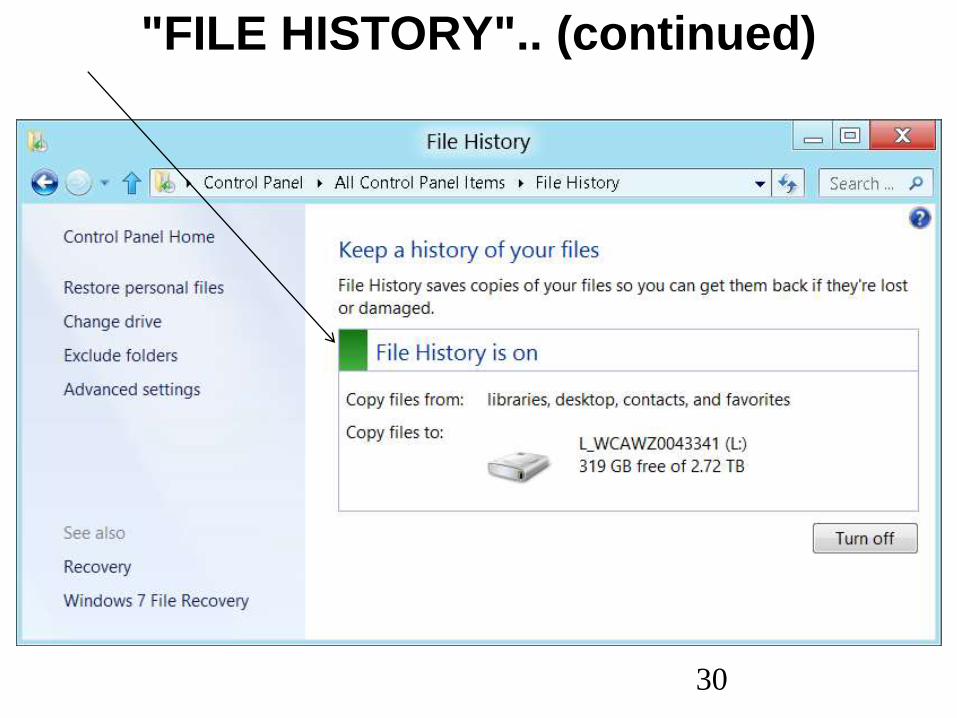
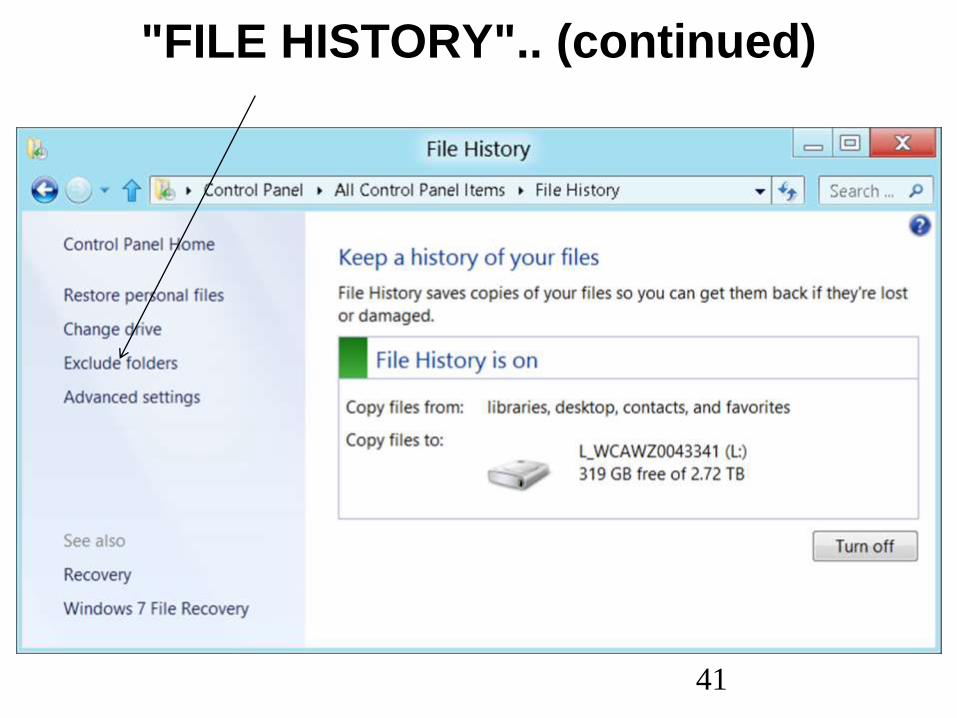
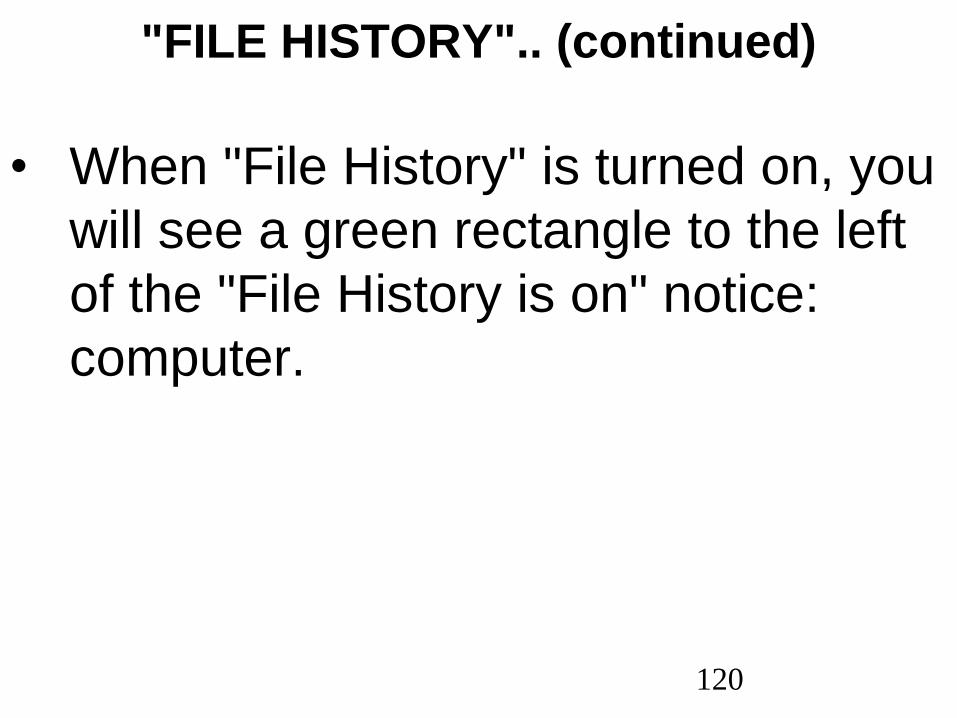
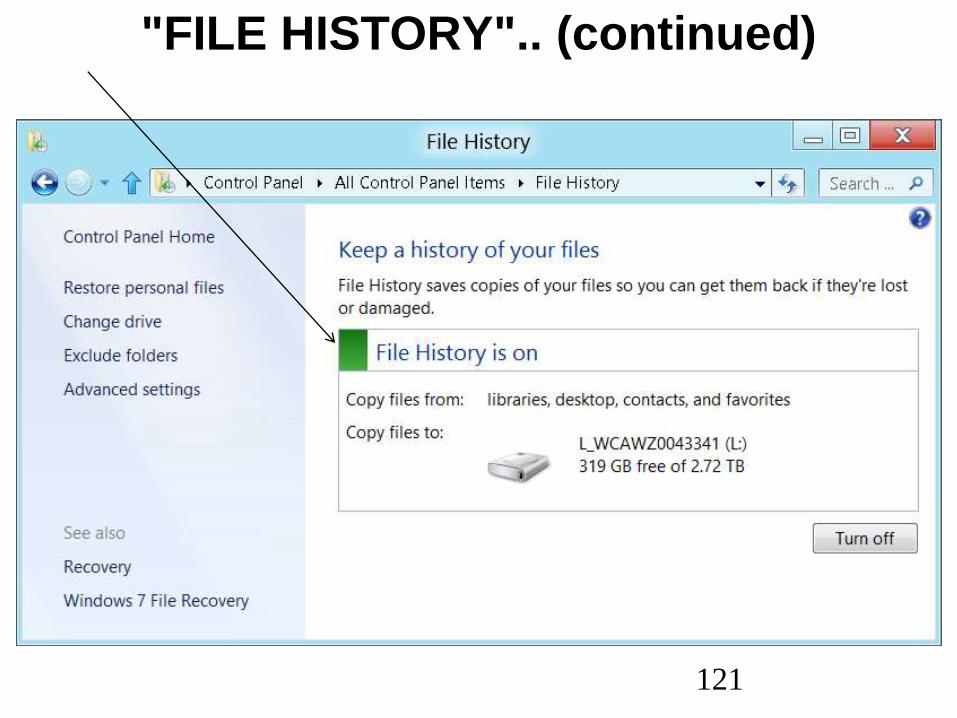
• When "File History" is turned on, you
will see a green rectangle to the left
of the "File History is on" notice:
computer.
30
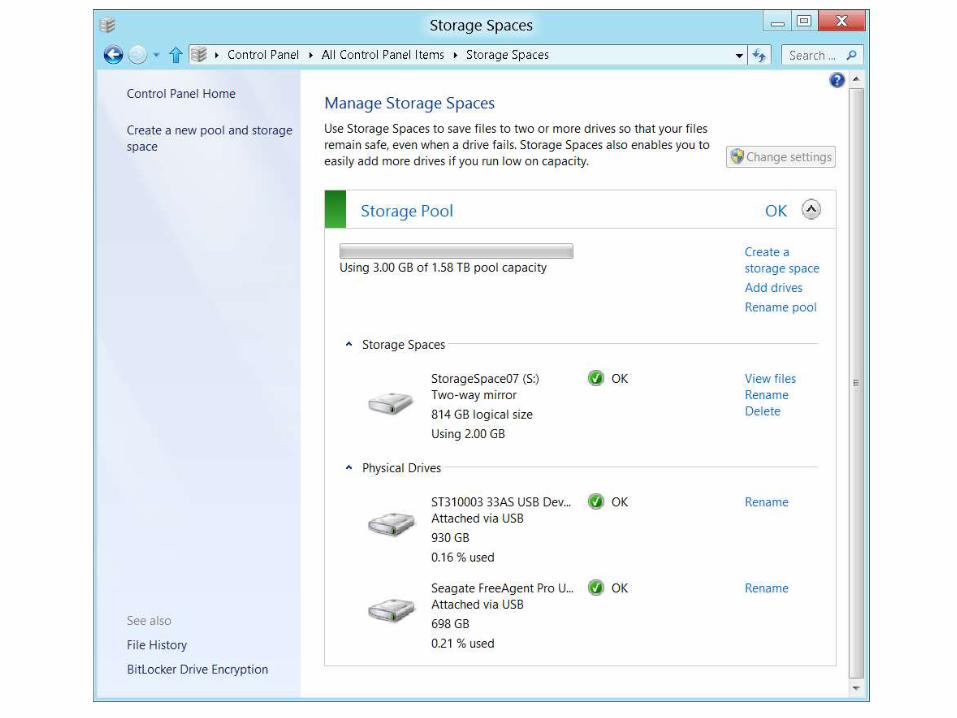
"FILE HISTORY".. (continued)

31
"FILE HISTORY".. (continued)
• Click on "Change drive" to select the
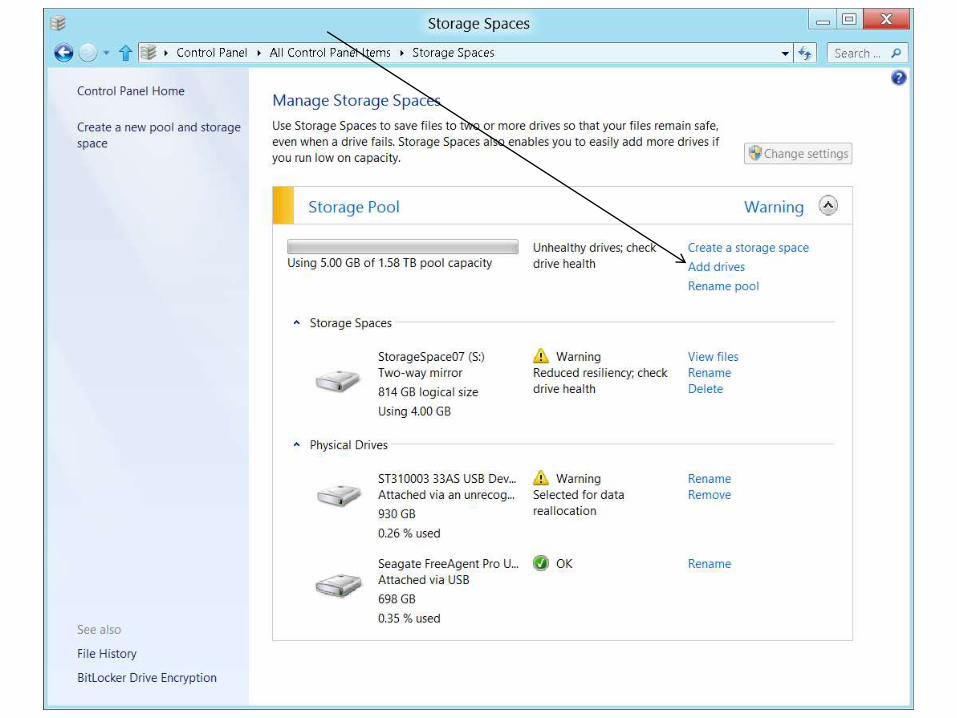
drive that is used for your
"FileHistory" folder:

32
"FILE HISTORY".. (continued)

33
"FILE HISTORY".. (continued)
• Then click on the desired external
USB or eSATA hard drive in order to
highlight it:

34
"FILE HISTORY".. (continued)

35
"FILE HISTORY".. (continued)
• If you click on the "Add network
location" button, you can store your
computer's "FileHistory" folder on a
"Windows" server or a "Network-
Attached Storage" device:

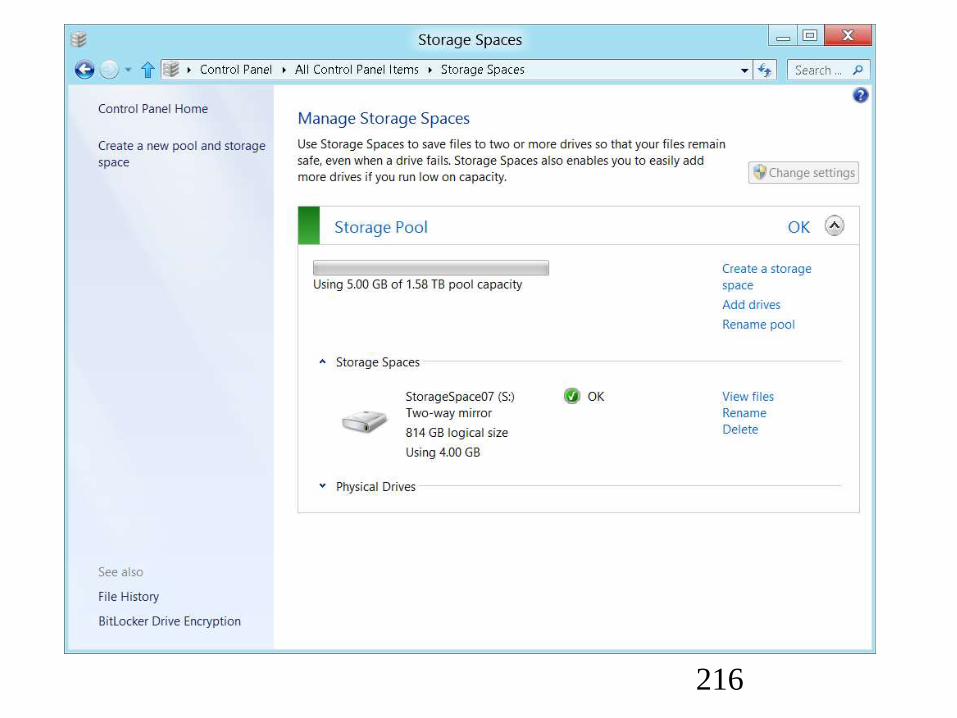
36
"FILE HISTORY".. (continued)

37
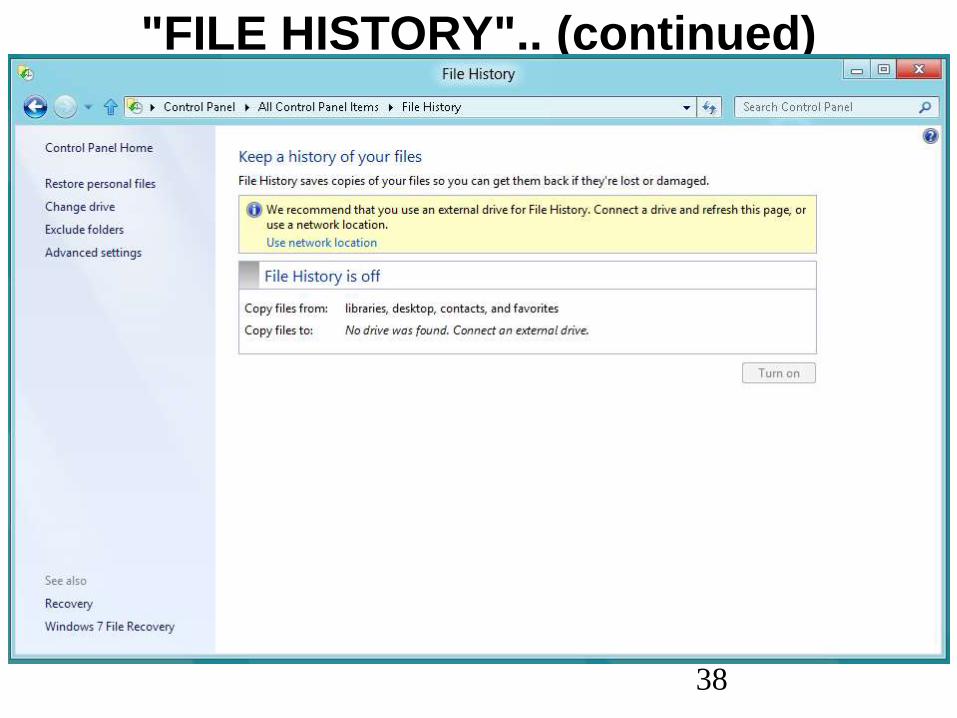
"FILE HISTORY".. (continued)
• If you do not have an external hard
drive connected to your computer,
you will get a yellow message box
that recommends that you use an
external drive for "File History":
38
"FILE HISTORY".. (continued)

39
"FILE HISTORY".. (continued)

40
"FILE HISTORY".. (continued)
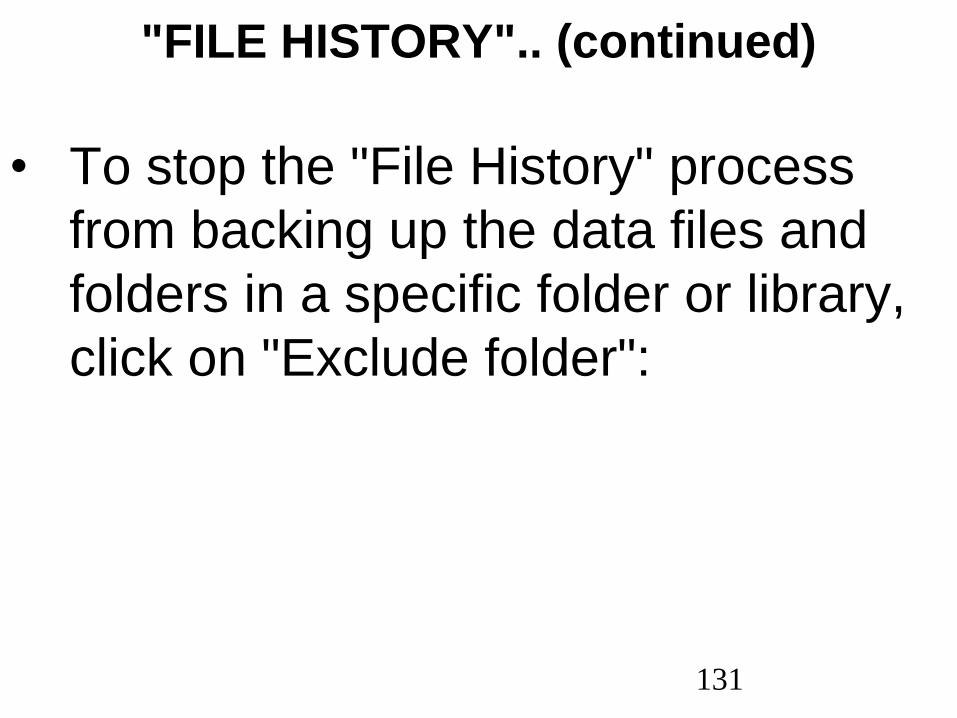
• To stop the "File History" process
from backing up the data files and
folders in a specific folder or library,
click on "Exclude folder":
41
"FILE HISTORY".. (continued)

42
"FILE HISTORY".. (continued)
• Next, click on the "Add" button:
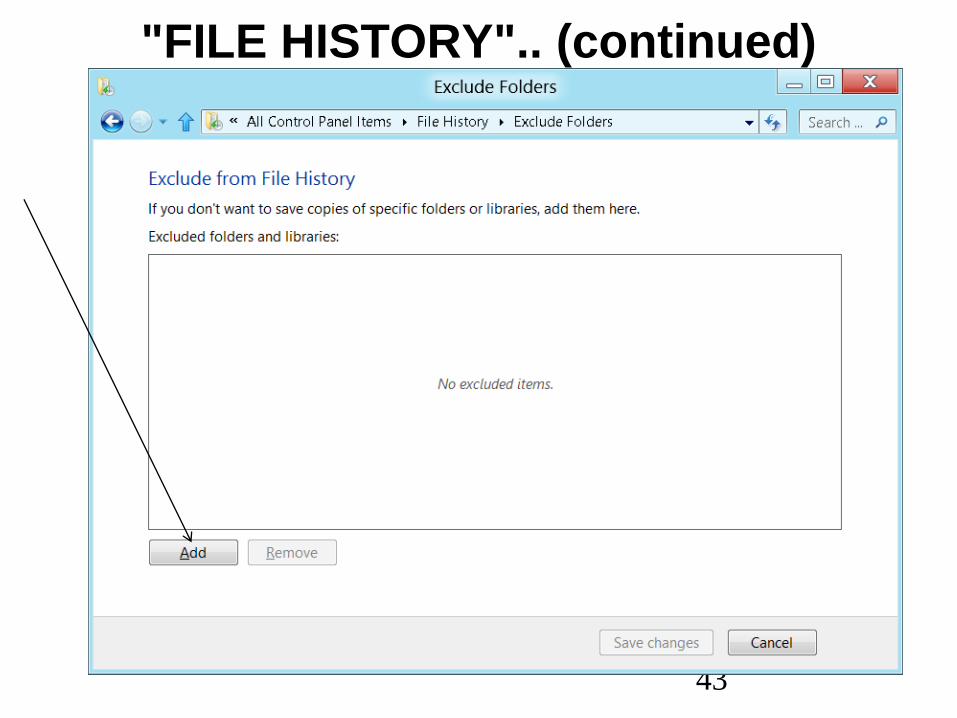
43
"FILE HISTORY".. (continued)

44
"FILE HISTORY".. (continued)
• Then locate the folder or library that
you wish to exclude and click on it to
select it:

45
"FILE HISTORY".. (continued)

46
"FILE HISTORY".. (continued)
• In this example, we clicked on the
"Pictures" library to exclude the
picture files inside it from the "File
History" process:

47
"FILE HISTORY".. (continued)

48
"FILE HISTORY".. (continued)
• Then click on the "Select folder"
button:

49
"FILE HISTORY".. (continued)

50
"FILE HISTORY".. (continued)
• An icon representing the "Pictures"
library will now be displayed inside
the "Exclude from File History" box:

51
"FILE HISTORY".. (continued)

52
"FILE HISTORY".. (continued)
• Finally, click on the "Save changes"
button:

53
"FILE HISTORY".. (continued)

54
"FILE HISTORY".. (continued)
• Click on "Advanced Settings" to
configure various settings for the
"File History" process:

55
"FILE HISTORY".. (continued)

56
"FILE HISTORY".. (continued)
• The "Advanced Settings" dialog box
looks like this:

57
"FILE HISTORY".. (continued)

58
"FILE HISTORY".. (continued)

59
"FILE HISTORY".. (continued)

60
"FILE HISTORY".. (continued)

61
"FILE HISTORY".. (continued)
• The "File History" process stores
copies of your data files and folders
inside a "FileHistory" folder on an
external hard drive:
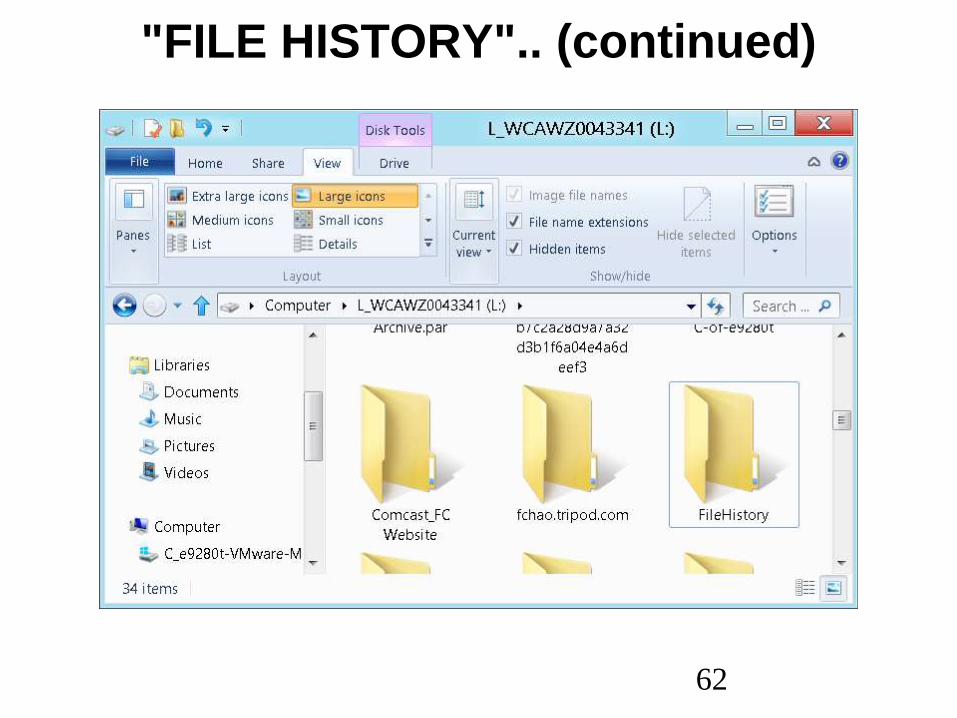
62
"FILE HISTORY".. (continued)

63
"FILE HISTORY".. (continued)
• If you open up the "File History"
folder, you will find that each copy of
a data file that is stored has a unique
name that details the exact date and
time that the file was backed up:

64
"FILE HISTORY".. (continued)

65
"FILE HISTORY".. (continued)
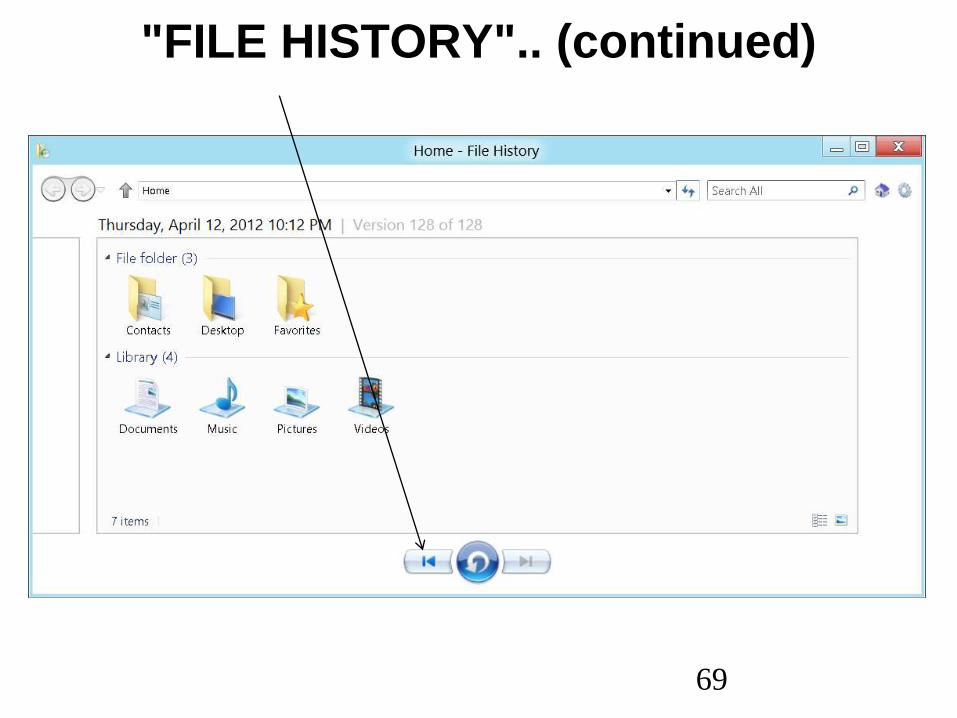
• Three methods to restore files that
have been backed up by the "File
History" folder:
o Method 1:
Click on "Restore personal files" inside
the "File History" applet
o Method 2:
Click on the "History" button in the
"Home" tab of "File Explorer"

66
"FILE HISTORY".. (continued)
o Method 3:
Use "File Explorer" and copy from
the "FileHistory" folder

67
"FILE HISTORY".. (continued)
• Method 1 details:
Click on "Restore personal files"
inside the "File History" applet:

68
"FILE HISTORY".. (continued)
69
"FILE HISTORY".. (continued)

70
"FILE HISTORY".. (continued)

71
"FILE HISTORY".. (continued)
• Method 1 details (continued):
When you find a specific file or folder
at a specific date and time that you
wish to restore, use the RIGHT
mouse button to click on it.
Then click on "Restore" or "Restore
to" in the pop-up context menu:

72
"FILE HISTORY".. (continued)
• Method 2 details:
Click on the "History" button in the
"Home" tab of "File Explorer", after
locating and clicking on the desired
folder or file to highlight it.

73
"FILE HISTORY".. (continued)

74
"FILE HISTORY".. (continued)
• Method 3 details:
Use "File Explorer" and copy
backed-up files and/or folders from
the "FileHistory" folder.
Then rename the files and/or folders
back to their desired original names.

75
"FILE HISTORY".. (continued)

76
"FILE HISTORY".. (continued)
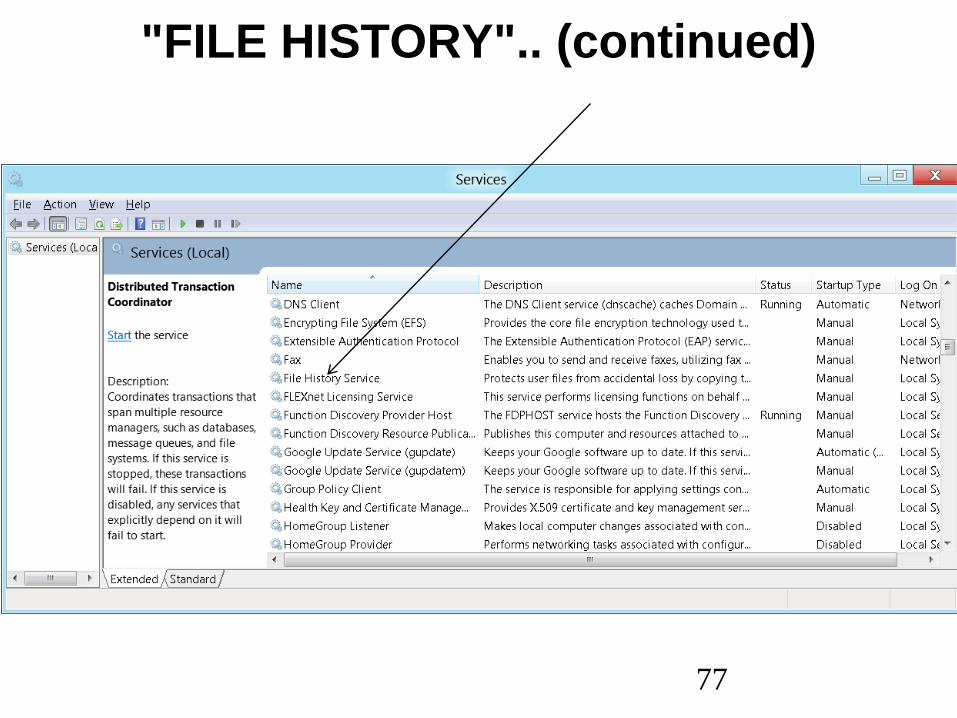
• The "File History" process depends on
the "File History" service.
To make sure that the "File History"
service is "Manual" or "Automatic", run
services.msc
from either a "Run" box or a "Search"
box.
Then use the RIGHT mouse button to
click on "File History".
Finally, click on "Properties" in the pop-
up context menu:
77
"FILE HISTORY".. (continued)

78
"FILE HISTORY.." (continued)
• "See
http://www.winsupersite.com/article/wind
ows8/windows-8-feature-focus-file-
history-142602
and
http://techblog.ginktage.com/2011/09/ho
w-to-enable-file-history-backup-feature-
on-windows-8/
and

79
"FILE HISTORY.." (continued)
• and
http://www.techfeb.com/2012/03/how-to-
use-file-history-feature-on-windows-8-
complete-guide/
and
http://www.thewindowsclub.com/file-
history-windows-8
and
http://apcmag.com/windows-8-in-depth-
inside-the-new-file-history-features.htm
80
"FILE HISTORY" (continued)
• and
http://www.eightforums.com/tutorials/248
4-file-history-how-use-windows-8-a.html
and
http://www.winrumors.com/hands-on-
windows-8-file-history-backup/
and
http://www.addictivetips.com/windows-
tips/the-complete-guide-to-windows-8-
file-history-backup/

81
"FILE HISTORY" (continued)
• and
http://www.howtogeek.com/74623/how-
to-use-the-new-file-history-feature-in-
windows-8/
and
http://pureinfotech.com/2012/03/28/wind
ows-8-file-history-backup-data/

82
"STORAGE SPACES"
AUTOMATED BACKUP
• "Storage Spaces" is a feature of
"Windows 8" that is used set up a pair of
hard drives that mirror each other in real
time.
• If one of the hard drives in the pair of
mirrored hard drives fails, the remaining
hard drive has a complete copy of your
data files and folders.
83
"STORAGE SPACES" AUTOMATED
BACKUP (continued)
• Using "Storage Spaces For Real-Time
Mirroring of Two Hard Drives in
"Windows 8.."
• Storage Spaces" Successes and
Failures
• Replacing A Hard Drive In A Two-
Way-Mirrored "Storage Space"

84
"STORAGE SPACES" AUTOMATED
BACKUP (continued)
• Using "Storage Spaces" For Backing
Up and Moving Your Data Files
• Using "Storage Spaces" With External
Hard Drive Enclosures

85
"REFRESH" AND "recimg"
• The "Refresh" and "recimg"
features of "Windows 8" and
"Windows 8.1" work together to
let you back up and restore your
"Windows" operating system files
and your Desktop applications.

86
"REFRESH" AND "recimg"
• When your "Windows 8" or
"Windows 8.1" computer acts
funny, you can always start the
"Refresh" and "Reset" features
by booting up with an "installation
media DVD":

87
"REFRESH" AND "recimg" (continued)
• Both 8.1 and 8 have the command
line utility called "recimg.exe" which
can be used to make a "custom
recovery image" of your C: drive
onto an external hard drive. This
"custom recovery image" has a
backup of your Desktop programs
and your Windows system files.

88
"REFRESH" AND "recimg" (continued)
• This "custom recovery image" does
NOT have a backup of your
documents, personal settings, user
profiles, or your "Windows
Store"/"Metro Style" apps.

89

90

91
92

93

94

95

96
"REFRESH" AND "recimg"(continued)
o If your Windows 8 or Windows 8.1
computer is not acting overly
crazy, you can reach the "Refresh"
or "Reset" features from inside "PC
Settings":
Charms bar > Settings > More PC
settings > General, and scroll
down to the "Refresh" or "Reset"
sections.

97

98
"REFRESH" AND "recimg" (continued)
o For both "Windows 8" and
"Windows 8.1", you can use a
command prompt command called
"recimg" to create a "Refresh
Point". See
http://www.addictivetips.com/windows-
tips/create-custom-refresh-point-in-
windows-8-with-recimg-tool/

99
"REFRESH" AND "recimg" (continued)
• When you run the "Refresh"
applet of "Windows 8", you go
back to the selected "Refresh
Point" without losing any data
files.

100
"REFRESH" AND "recimg" (continued)
• See
http://www.addictivetips.com/window
s-tips/how-to-refresh-or-reset-your-
windows-8-pc-complete-guide/

101
"REFRESH" AND "recimg" (continued)
• See
http://www.pcworld.com/businessce
nter/article/251527/windows_8_refre
sh_feature_makes_it_easy_to_start
_with_a_clean_slate.html

102
"REFRESH" AND "recimg" (continued)
• See
http://howto.cnet.com/8301-
11310_39-57391104-285/how-to-
use-the-new-refresh-and-reset-
features-in-windows-8/

103
AUTOMATED FILE BACKUP
ENHANCEMENTS IN "WINDOWS 8.."
• In "Windows 8", we have a
new pair of data file backup
capabilities as follows:
o "File History"
o Hard drive synchronization in
"Storage Spaces"

104
o "File History" to back up and restore
multiple "snapshots" of data files
and folders.
o Synchronization in "Storage
Spaces" to automatically
synchronize entire drives and
partitions that contain data files and
folders. (Not for the C: drive.)
AUTOMATED FILE BACKUP
ENHANCEMENTS..(continued)

105
"FILE HISTORY" AUTOMATED BACKUP
• The "File History" feature of
"Windows 8" automatically backs
up changed data files and folders
at regular time intervals.

106
"FILE HISTORY" (continued)
• According to many blogs and
magazine articles, "File
History" in "Windows 8" is
(somewhat) analogous to
"Time Machine" in Apple's
"OS X" operating systems.

107
"FILE HISTORY" (continued)
• However, in Apple's "Time Machine"
process, the recovery procedure
restores the "OS X" operating
system (from the Apple "installation
media DVD") in addition to all of your
application software programs and
all of your data files and folders.
• In contrast, "File History" in
"Windows 8" only backs up "data
files and folders".

108
"FILE HISTORY" AUTOMATED BACKUP
• If you turn on "File History", it
maintains, by default, a "FileHistory"
folder on the first external hard drive
that you attach to a "Windows 8.."
computer; however, you can tell it to
back up to any external hard drive
(USB/Firewire/eSATA), server
location, or Network Attached
Storage (NAS) device.

109
"FILE HISTORY".. (continued)
• The "File History" feature is
configured from inside the "Control
Panel":

110
"FILE HISTORY".. (continued)

111
"FILE HISTORY".. (continued)
• When you double-click on the "File
History" icon, the "File History"
window is displayed:

112
"FILE HISTORY".. (continued)

113
"FILE HISTORY".. (continued)
• By default, the "File History" backs
up all files and folders in the
following locations:
Libraries,
Desktop,
Contacts,
and
Favorites.

114
"FILE HISTORY".. (continued)
• By default, the Documents, Music,
Pictures, and Videos folders of all
Windows "user profiles" belong to
the Libraries by the same name.
Therefore, when you turn it on, the
"File History" process automatically
backs up all Documents, Music,
Pictures, and Videos folders for all
Windows "user profiles" at regular
intervals.

115
"FILE HISTORY".. (continued)
• If you have a folder of data files or a
separate hard drive that contains
data files, you can add them to the
"File History" process by adding the
folder or separate hard drive to any
existing or new "library".

116
"FILE HISTORY".. (continued)
• To add a folder or a hard drive to a
library:
Start "File Explorer".
Locate the library.
Use the RIGHT mouse button to click on
it.
A pop-up context menu will be displayed.
Click on "Properties".
Click on the "Add" button in the
"..Properties" dialog box.

117
"FILE HISTORY".. (continued)

118
"FILE HISTORY".. (continued)
• By default, the "File History" feature
is turned off, so click on the "Turn
on" button to start the "File History"
process.
• Once you turn it on, it will stay on
and automatically start up whenever
you power up your "Windows 8"
computer.

119
"FILE HISTORY".. (continued)
120
"FILE HISTORY".. (continued)
• When "File History" is turned on, you
will see a green rectangle to the left
of the "File History is on" notice:
computer.
121
"FILE HISTORY".. (continued)

122
"FILE HISTORY".. (continued)
• Click on "Change drive" to select the
drive that is used for your
"FileHistory" folder:

123
"FILE HISTORY".. (continued)

124
"FILE HISTORY".. (continued)
• Then click on the desired external
USB or eSATA hard drive in order to
highlight it:

125
"FILE HISTORY".. (continued)

126
"FILE HISTORY".. (continued)
• If you click on the "Add network
location" button, you can store your
computer's "FileHistory" folder on a
"Windows" server or a "Network-
Attached Storage" device:

127
"FILE HISTORY".. (continued)

128
"FILE HISTORY".. (continued)
• If you do not have an external hard
drive connected to your computer,
you will get a yellow message box
that recommends that you use an
external drive for "File History":

129
"FILE HISTORY".. (continued)

130
"FILE HISTORY".. (continued)
131
"FILE HISTORY".. (continued)
• To stop the "File History" process
from backing up the data files and
folders in a specific folder or library,
click on "Exclude folder":

132
"FILE HISTORY".. (continued)

133
"FILE HISTORY".. (continued)
• Next, click on the "Add" button:

134
"FILE HISTORY".. (continued)

135
"FILE HISTORY".. (continued)
• Then locate the folder or library that
you wish to exclude and click on it to
select it:

136
"FILE HISTORY".. (continued)
137
"FILE HISTORY".. (continued)
• In this example, we clicked on the
"Pictures" library to exclude the
picture files inside it from the "File
History" process:

138
"FILE HISTORY".. (continued)

139
"FILE HISTORY".. (continued)
• Then click on the "Select folder"
button:

140
"FILE HISTORY".. (continued)

141
"FILE HISTORY".. (continued)
• An icon representing the "Pictures"
library will now be displayed inside
the "Exclude from File History" box:

142
"FILE HISTORY".. (continued)

143
"FILE HISTORY".. (continued)
• Finally, click on the "Save changes"
button:

144
"FILE HISTORY".. (continued)
145
"FILE HISTORY".. (continued)
• Click on "Advanced Settings" to
configure various settings for the
"File History" process:

146
"FILE HISTORY".. (continued)

147
"FILE HISTORY".. (continued)
• The "Advanced Settings" dialog box
looks like this:

148
"FILE HISTORY".. (continued)

149
"FILE HISTORY".. (continued)

150
"FILE HISTORY".. (continued)

151
"FILE HISTORY".. (continued)
152
"FILE HISTORY".. (continued)
• The "File History" process stores
copies of your data files and folders
inside a "FileHistory" folder on an
external hard drive:

153
"FILE HISTORY".. (continued)
154
"FILE HISTORY".. (continued)
• If you open up the "File History"
folder, you will find that each copy of
a data file that is stored has a unique
name that details the exact date and
time that the file was backed up:
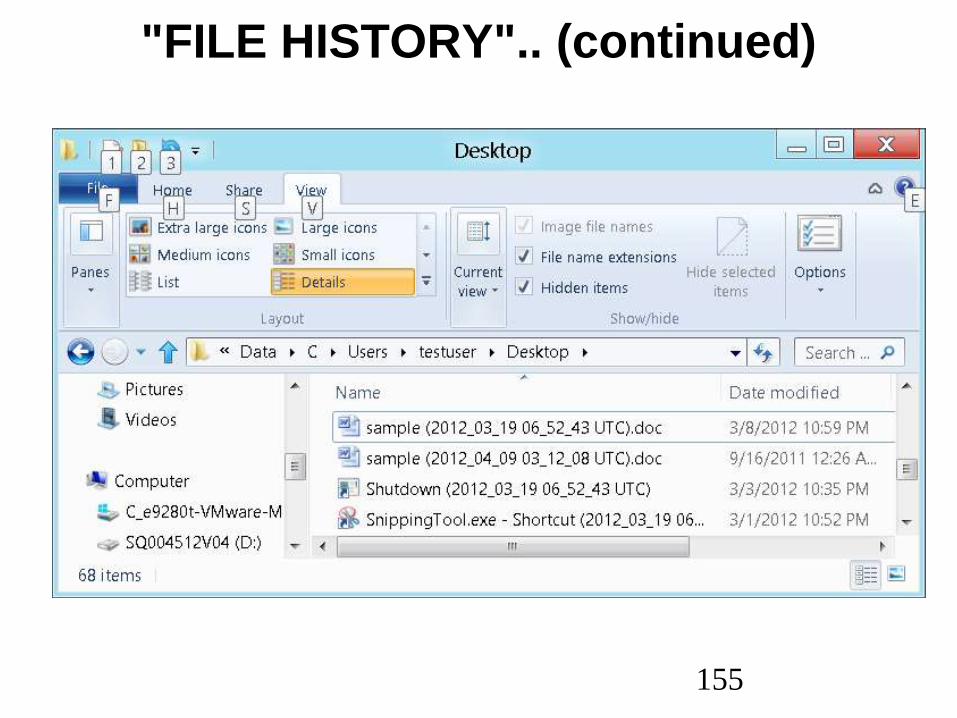
155
"FILE HISTORY".. (continued)

156
"FILE HISTORY".. (continued)
• Three methods to restore files that
have been backed up by the "File
History" folder:
o Method 1:
Click on "Restore personal files" inside
the "File History" applet
o Method 2:
Click on the "History" button in the
"Home" tab of "File Explorer"

157
"FILE HISTORY".. (continued)
o Method 3:
Use "File Explorer" and copy from
the "FileHistory" folder

158
"FILE HISTORY".. (continued)
• Method 1 details:
Click on "Restore personal files"
inside the "File History" applet:

159
"FILE HISTORY".. (continued)

160
"FILE HISTORY".. (continued)

161
"FILE HISTORY".. (continued)

162
"FILE HISTORY".. (continued)
• Method 1 details (continued):
When you find a specific file or folder
at a specific date and time that you
wish to restore, use the RIGHT
mouse button to click on it.
Then click on "Restore" or "Restore
to" in the pop-up context menu:

163
"FILE HISTORY".. (continued)
• Method 2 details:
Click on the "History" button in the
"Home" tab of "File Explorer", after
locating and clicking on the desired
folder or file to highlight it.

164
"FILE HISTORY".. (continued)
165
"FILE HISTORY".. (continued)
• Method 3 details:
Use "File Explorer" and copy
backed-up files and/or folders from
the "FileHistory" folder.
Then rename the files and/or folders
back to their desired original names.

166
"FILE HISTORY".. (continued)

167
"FILE HISTORY".. (continued)
• The "File History" process depends on
the "File History" service.
To make sure that the "File History"
service is "Manual" or "Automatic", run
services.msc
from either a "Run" box or a "Search"
box.
Then use the RIGHT mouse button to
click on "File History".
Finally, click on "Properties" in the pop-
up context menu:

168
"FILE HISTORY".. (continued)

169
"FILE HISTORY.." (continued)
• "See
http://www.winsupersite.com/article/wind
ows8/windows-8-feature-focus-file-
history-142602
and
http://techblog.ginktage.com/2011/09/ho
w-to-enable-file-history-backup-feature-
on-windows-8/
and

170
"FILE HISTORY.." (continued)
• and
http://www.techfeb.com/2012/03/how-to-
use-file-history-feature-on-windows-8-
complete-guide/
and
http://www.thewindowsclub.com/file-
history-windows-8
and
http://apcmag.com/windows-8-in-depth-
inside-the-new-file-history-features.htm

171
"FILE HISTORY" (continued)
• and
http://www.eightforums.com/tutorials/248
4-file-history-how-use-windows-8-a.html
and
http://www.winrumors.com/hands-on-
windows-8-file-history-backup/
and
http://www.addictivetips.com/windows-
tips/the-complete-guide-to-windows-8-
file-history-backup/
172
"FILE HISTORY" (continued)
• and
http://www.howtogeek.com/74623/how-
to-use-the-new-file-history-feature-in-
windows-8/
and
http://pureinfotech.com/2012/03/28/wind
ows-8-file-history-backup-data/
173
"STORAGE SPACES"
AUTOMATED BACKUP
• "Storage Spaces" is a feature of
"Windows 8" that is used to group
physical hard drives into single logical
"Storage Pool".
• A "Windows 8" computer can have more
than one "Storage Pool".
• "Storage Spaces" can be used to
synchronize hard drives.

174
"STORAGE SPACES" AUTOMATED
BACKUP (continued)
• Using the "Storage Spaces"
applet in the Windows
"Control Panel", you can
create logical "Storage
Spaces" from real NTFS-
formatted hard drives.

175
"STORAGE SPACES" AUTOMATED
BACKUP (continued)
• A "Storage Space" is a
logical NTFS hard drive or
a logical NTFS hard drive
partition that is under the
control of the "Storage
Spaces" process.

176

177
"STORAGE SPACES" AUTOMATED
BACKUP (continued)
• When you create a logical "Storage
Space", it gets a drive letter and it shows
up in "Disk Management" in the "Control
Panel" as a hard drive with a "GUID
Partition Table" ("GPT").
It also shows up in "File Explorer". It
does not show up in "Device Manager"
nor does it show up in "Devices and
Printers".

178
"STORAGE SPACES" AUTOMATED
BACKUP (continued)
• The physical hard drives that are
added to a "Storage Pool"
disappear from "Disk
Management" in the "Control
Panel".
• Instead, you see a new local
"Storage Pool" drive in "Disk
Management":

179

180
"STORAGE SPACES" AUTOMATED
BACKUP (continued)
• You can create a logical
"Storage Space" for any
letter of the alphabet
that is not already
assigned.

181
"STORAGE SPACES" AUTOMATED
BACKUP (continued)
• When a physical hard drive is added to a
"Storage Pool":
o The physical hard drive no longer has
a drive letter
o The physical hard drive no longer
shows up in "File Explorer
o The physical hard drive no longer
shows up in "Disk Management" in the
"Control Panel".

182
"STORAGE SPACES" AUTOMATED
BACKUP (continued)
o The main place where the physical
hard drive shows up will be the
"Storage Spaces" list of "Physical
Drives".
o The physical hard drive still shows
up in the "Device Manager".
o The physical hard drive still shows
up in "Devices and Printers".

183
"STORAGE SPACES" AUTOMATED
BACKUP (continued)
• The C: hard drive or hard
drive partition where
"Windows 8.." resides
cannot be used for one of
the physical hard drives in
a "Storage Pool".
184
"STORAGE SPACES" AUTOMATED
BACKUP (continued)
• At some point in the future,
"Storage Spaces" will be able to
utilize both NTFS and ReFS
(Resilient File System) hard
drives: At the present time, the
new ReFS file system is only
available on Windows servers.

185
"STORAGE SPACES" AUTOMATED
BACKUP (continued)

186
"STORAGE SPACES" AUTOMATED
BACKUP (continued)

187

188
189

190

191

192

193

194
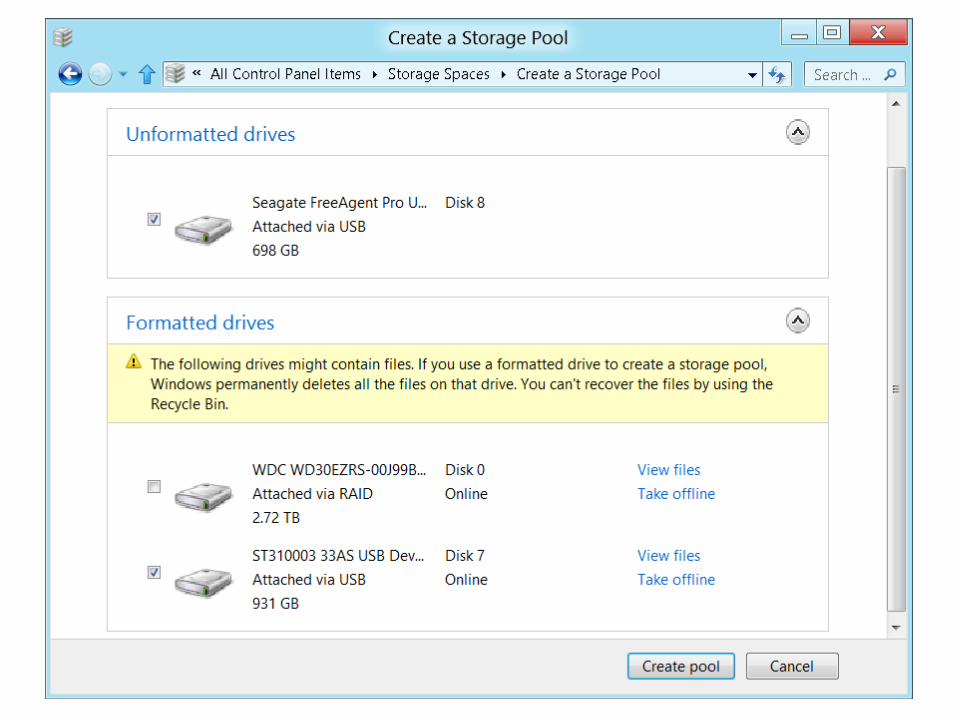
"STORAGE SPACES" AUTOMATED
BACKUP (continued)
• If you select "Two-way mirror", the
"Storage Pool" has to have at least two
physical drives. (Otherwise, the "Create
storage space" button will be grayed
out.)
• If you select "Three-way mirror", the
"Storage Pool" has to have at least five
physical drives. (Otherwise, the "Create
storage space" button will be grayed
out.)

195

196
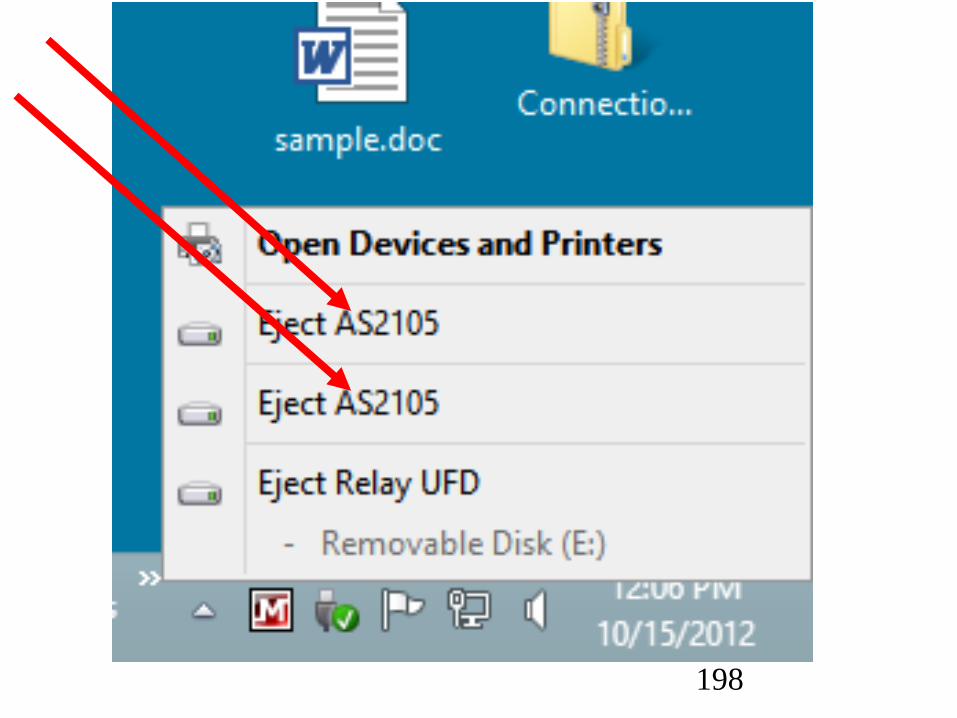
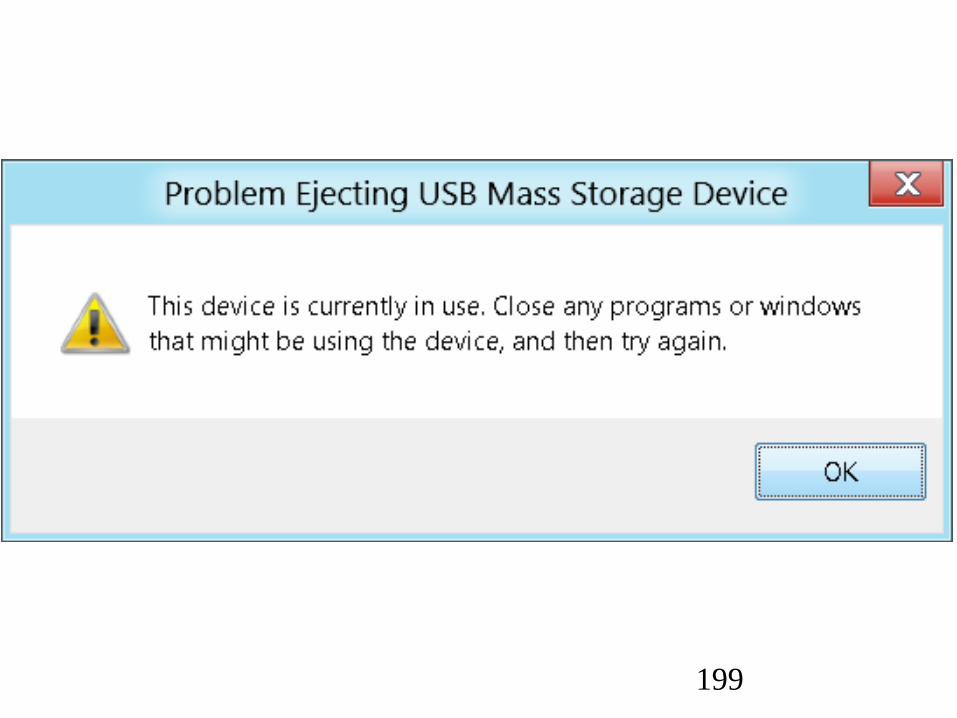
"STORAGE SPACES" AUTOMATED
BACKUP (continued)
• After a hard drive is placed
into "Storage Pool", you
cannot use the "Safely
Remove Hardware and
Eject Media" icon in the
"Notification Area" to eject
the hard drive.

197
198
199

200
"STORAGE SPACES" AUTOMATED
BACKUP (continued)
• A healthy "Storage
Pool" looks like this:
201

202
"STORAGE SPACES" AUTOMATED
BACKUP (continued)
• To make a change to a
"Storage Pool", you first
have to click on the
"Change Settings"
button:

203

204
"STORAGE SPACES" AUTOMATED
BACKUP (continued)
• When a physical hard
drive in a "Storage Pool"
fails:

205

206

207
"STORAGE SPACES" AUTOMATED
BACKUP (continued)
• You cannot remove a
physical hard drive from
the "Storage Pool" unless
you first add in another
hard drive to the "Storage
Pool".

208
209

210

211

212

213

214

215
216

217

218
"STORAGE SPACES" AUTOMATED
BACKUP (continued)
• Once a "Storage Space" is
created, you cannot change
its "synchronization" option.
Instead, you have to delete
the "Storage Space" and use
the freed up hard drives to
make a new "Storage Space".

219
"STORAGE SPACES" AUTOMATED
BACKUP (continued)
• The physical hard drives that
are part of a "Storage Pool"
are formatted in a "Space
Protective Partition" format
that only "Windows 8.."
computers can access:

220
221
"STORAGE SPACES" AUTOMATED
BACKUP (continued)
• If any single drive fails in a "Storage
Pool" that has "redundancy", the
"Storage Pool" logical drive will not
disappear from "File Explorer".
• If all drives fail, the "Storage Pool"
logical drive will disappear from "File
Explorer".
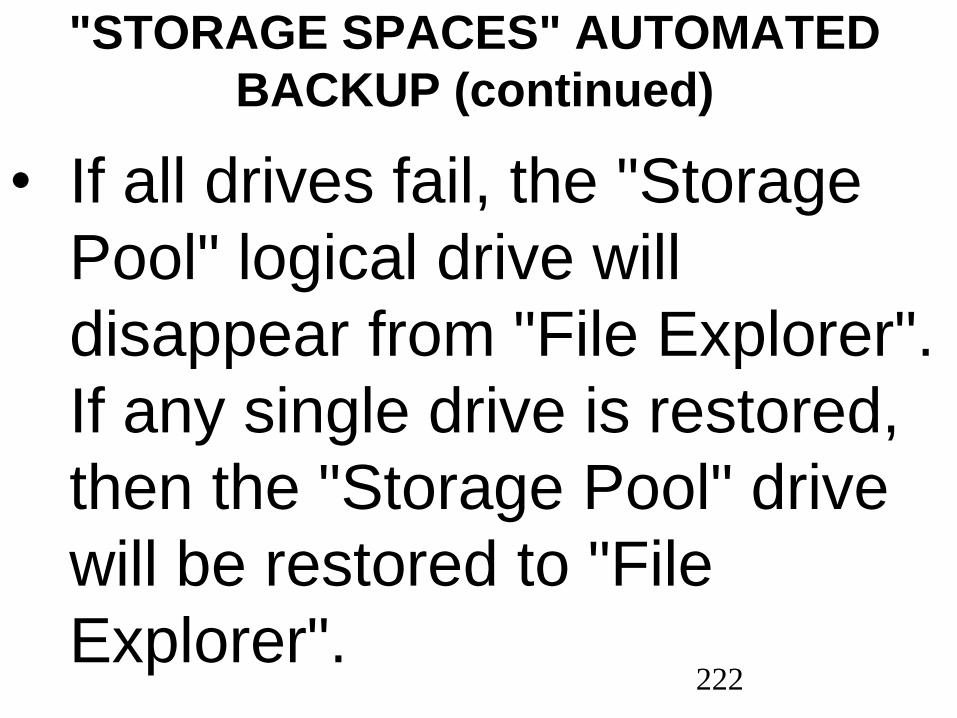
222
"STORAGE SPACES" AUTOMATED
BACKUP (continued)
• If all drives fail, the "Storage
Pool" logical drive will
disappear from "File Explorer".
If any single drive is restored,
then the "Storage Pool" drive
will be restored to "File
Explorer".

223
"STORAGE SPACES" AUTOMATED
BACKUP (continued)
• You can move one or more of the
real hard drives in a two-way
mirrored "Storage Pool" to another
"Windows 8" computer. The second
"Windows 8" computer will show the
Storage Pool's logical drive(s) in its
"File Explorer".

224
"STORAGE SPACES" AUTOMATED
BACKUP (continued)
• The physical hard drives that are
part of a "Storage Pool" are
formatted in a format that only
"Windows 8.." computers can
access:
Do not use third-party (non-
Microsoft) hard drive software
utilities on hard drives that belong to
a "Storage Pool":

225
"STORAGE SPACES" AUTOMATED
BACKUP (continued)
• The second "Windows 8"
computer will expect you to
eventually move the other
hard drive(s) in the "Storage
Pool" to it or add a new hard
drive to the "Storage Pool".

226
"STORAGE SPACES" AUTOMATED
BACKUP (continued)
• Until you remove it from
participation in a "Storage Pool",
you cannot use "Disk
Management" or "Properties" in
"File Explorer" to modify any hard
drive that is part of a "Storage
Pool".

227
"STORAGE SPACES" AUTOMATED
BACKUP (continued)
• The physical hard drives that are
part of a "Storage Pool" are
formatted in a format that only
"Windows 8.." computers can
access:
Do not attempt to use computers
running earlier versions of
"Windows.." to access a "Storage
Space" drive:

228
"STORAGE SPACES" AUTOMATED
BACKUP (continued)
• For example, if you
attempt to access a
"Storage Spaces" hard
drive with "Windows
7..":

229
"STORAGE SPACES" AUTOMATED
BACKUP (continued)
• "Storage Spaces" virtual hard
drive(s) shows up in "Disk
Management" of a "Windows
7" computer as a partition of
unknown format that you
cannot assign a drive letter to:

230

231
"STORAGE SPACES" AUTOMATED
BACKUP (continued)
• "Storage Spaces" virtual
hard drive(s) do not
show up in "Windows
Explorer" of a "Windows
7" computer:

232

233
"STORAGE SPACES" AUTOMATED
BACKUP (continued)
• "Storage Spaces" physical
hard drive(s) shows up in
"Device Manager" of a
"Windows 7" computer as
broken USB controller(s):
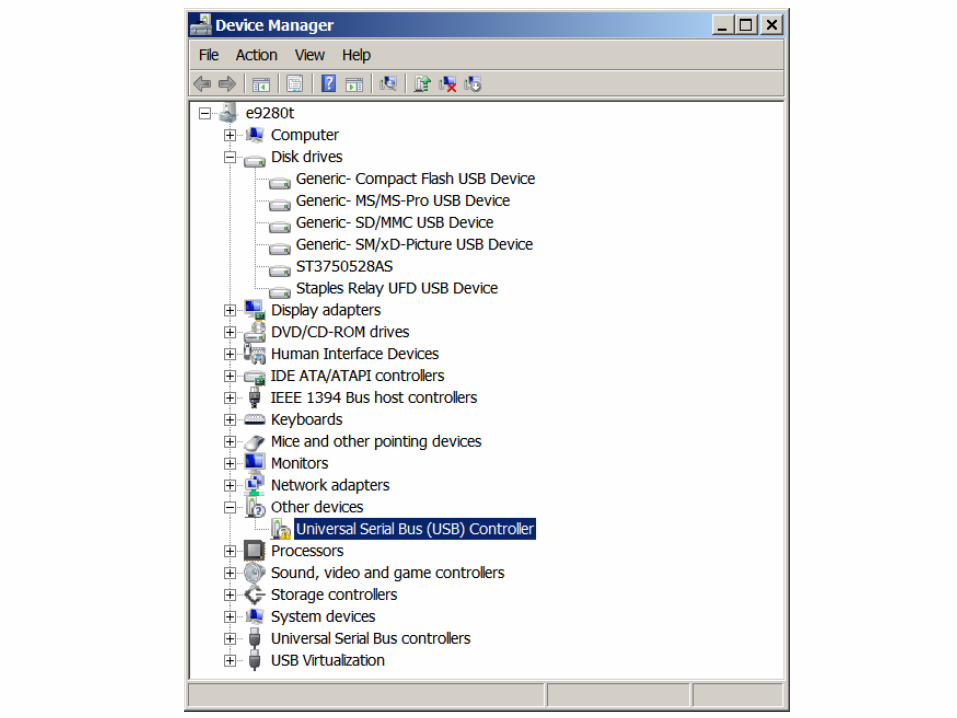
234

235
"STORAGE SPACES" AUTOMATED
BACKUP (continued)
• See
http://blogs.msdn.com/b/b8/archive/2012
/01/05/virtualizing-storage-for-scale-
resiliency-and-efficiency.aspx
and
http://helgeklein.com/blog/2012/03/windo
ws-8-storage-spaces-bugs-and-design-
flaws/

236
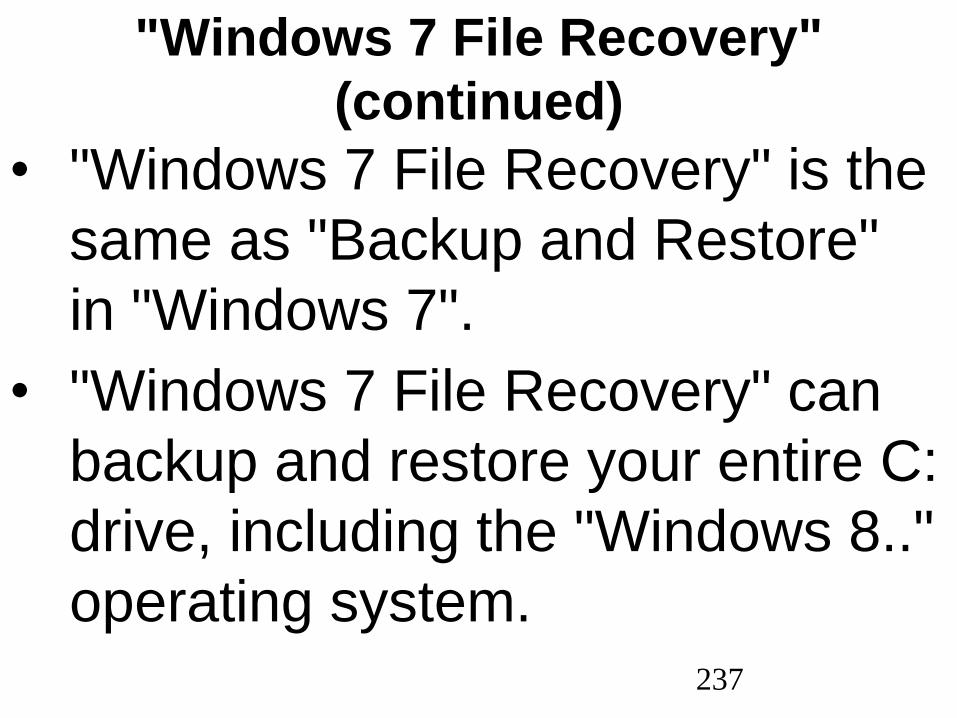
"Windows 7 File Recovery"
• "Windows 7 File Recovery" is the
same as "Backup and Restore"
in "Windows 7".
• "Windows 7 File Recovery" can
backup and restore your entire C:
drive, including the "Windows 8.."
operating system.
237
"Windows 7 File Recovery"
(continued)
• "Windows 7 File Recovery" is the
same as "Backup and Restore"
in "Windows 7".
• "Windows 7 File Recovery" can
backup and restore your entire C:
drive, including the "Windows 8.."
operating system.

238
"Windows 7 File Recovery"
(continued)
• Despite this strange name, it is still
the same as the great "Windows
Backup and Restore" that is
available in "Windows 7".
• Microsoft has decided to "deprecate"
"Windows Backup" which means
that it will probably disappear in
"Windows 9".

239
"Windows 7 File Recovery"
(continued)
• See
http://allanjsmithie.wordpress.com/2
012/05/11/back-up-restore-
deprecated-in-windows-8/

240
"Windows 7 File Recovery"
(continued)• "Windows 7 File Recovery" is an icon in
the "Control Panel" of the "Desktop" in
"Windows 8:
o Hover the mouse cursor over the
lower-left corner of the monitor screen.
o When a thumbnail pops up, use the
RIGHT mouse button to click once.
o When a "Power Users Menu" pops up,
click on "Control Panel".

241
"Windows 7 File Recovery"
(continued)o Double-click on the "Windows 7 File
Recovery" icon inside the "All Control
Panel Items" window.

242

243

244
THIRD-PARTY UTILITIES FOR BACKING
UP AN ENTIRE C: HARD DRIVE
• If you wish to back up and restore
an entire C: hard drive, you can still
use "Windows 7 File Recovery" in
"Windows 8".
• Since "Windows 7 File Recovery" is
missing from "Windows 8.1", you
have to use a third party utility such
as Acronis or Macrium Reflect to
back up an entire hard drive in

245
THIRD-PARTY UTILITIES.. (continued)
• Since "Windows 7 File Recovery" is
missing from "Windows 8.1", you
have to use a third party utility such
as Acronis or Macrium Reflect Free
to back up an entire hard drive in
"Windows 8.1".