BACKTRACK ALKTHROUGH - cyberburn.files.wordpress.com · GETTING BACKTRACK 5 R3 There are two ways...
46
-
Upload
phungthuan -
Category
Documents
-
view
228 -
download
0
Transcript of BACKTRACK ALKTHROUGH - cyberburn.files.wordpress.com · GETTING BACKTRACK 5 R3 There are two ways...


BACKTRACK 5 R3 WALKTHROUGH

CONTENTS
PART 1: BT 5 R3 INTRODUCTION ............................................................................ 4
GETTING BACKTRACK 5 R3 .................................................................................................................... 4
FERN-WIFI-CRACKER ............................................................................................................................ 5
DNMAP .................................................................................................................................................. 10
PART 2: NEW TOOLS ................................................................................................. 14
WIFITE .................................................................................................................................................. 14
IPHONE ANALYZER ..............................................................................................................................20
PART 3: A CLOSER LOOK AT THE MAIN TOOLS ............................................... 26
HTEXPLOIT ..........................................................................................................................................26
WIFI HONEY .........................................................................................................................................29
URLCRAZY ............................................................................................................................................ 31
PART 4: DHCPIG & MITMPROXY ........................................................................... 34
DHCPIG................................................................................................................................................34
MITMPROXY .........................................................................................................................................37
RELATED TRAINING ............................................................................................... 45
ABOUT THE AUTHOR .............................................................................................. 46
www.infosecinstitute.com
866-471-0059
4
PART 1: BT 5 R3 INTRODUCTION
Backtrack is one of the most popular Linux distributions used for Penetration testing and
Security Auditing. The Backtrack development team is sponsored by Offensive Security. On
13th August 2012, Backtrack 5 R3 was released. This included the addition of about 60 new
tools, most of which were released during the Defcon and Blackhat conference held in Las
Vegas in July 2012. In this series of articles, we will look at most of the new tools that were
introduced with Backtrack 5 R3 and look at their usage. Some of the notable changes included
tools for mobile penetration testing, GUI tools for Wi-fi cracking and a whole new category
of tools called Physical Exploitation.
GETTING BACKTRACK 5 R3
There are two ways to get up and running quickly with Backtrack 5 R3. If you are already
running Backtrack 5 R2, you can upgrade to Backtrack 5 R3 by following the steps described
on this page. Or you can do a fresh install of Backtrack 5 R3 from the downloads section on
Backtrack’s official website.
I had is an Excellent Instructor with Superior knowledge in his profession; A Jedi
Master. His appearance, conduct and tutelage were always professional. He provided
Proof of Concept for every exploit or task by demonstrating how and why they worked.
The course was taught in a way where all students could comprehend and digest the
information without issue. He kept the course interesting, fun and challenging. What
I most appreciated was that he left no student behind.
Andrew Jones
www.infosecinstitute.com
866-471-0059
5
A list of the new tools released with Backtrack 5 R3 according to Backtrack’s official website
are libcrafter, blueranger, dbd, inundator, intersect, mercury, cutycapt, trixd00r, artemisa,
rifiuti2, netgear-telnetenable, jboss-autopwn, deblaze, sakis3g, voiphoney, apache-users,
phrasendrescher, kautilya, manglefizz, rainbowcrack, rainbowcrack-mt, lynis-audit,
spooftooph, wifihoney, twofi, truecrack, uberharvest, acccheck, statsprocessor,
iphoneanalyzer, jad, javasnoop, mitmproxy, ewizard, multimac, netsniff-ng, smbexec,
websploit, dnmap, johnny, unix-privesc-check, sslcaudit, dhcpig, intercepter-ng, u3-pwn,
binwalk, laudanum, wifite, tnscmd10g bluepot, dotdotpwn, subterfuge, jigsaw, urlcrazy,
creddump, android-sdk, apktool, ded, dex2jar, droidbox, smali, termineter, bbqsql, htexploit,
smartphone-pentest-framework, fern-wifi-cracker, powersploit, and webhandler. We will be
discussing most of these tools in this series.
FERN-WIFI-CRACKER
Fern Wi-fi cracker is a program written in python that provides a GUI for cracking wireless
networks. Normally, you need to run aireplay-ng, airodump-ng and aircrack-ng separately in
order to crack wireless networks, but Fern-Wifi-cracker makes this job very simple for us by
acting as a facade over these tools and hiding all the intricate details from us. It also comes
with a bunch of tools that helps you perform attacks like Session Hijacking, locate a particular
system’s geolocation based on its Mac address etc.
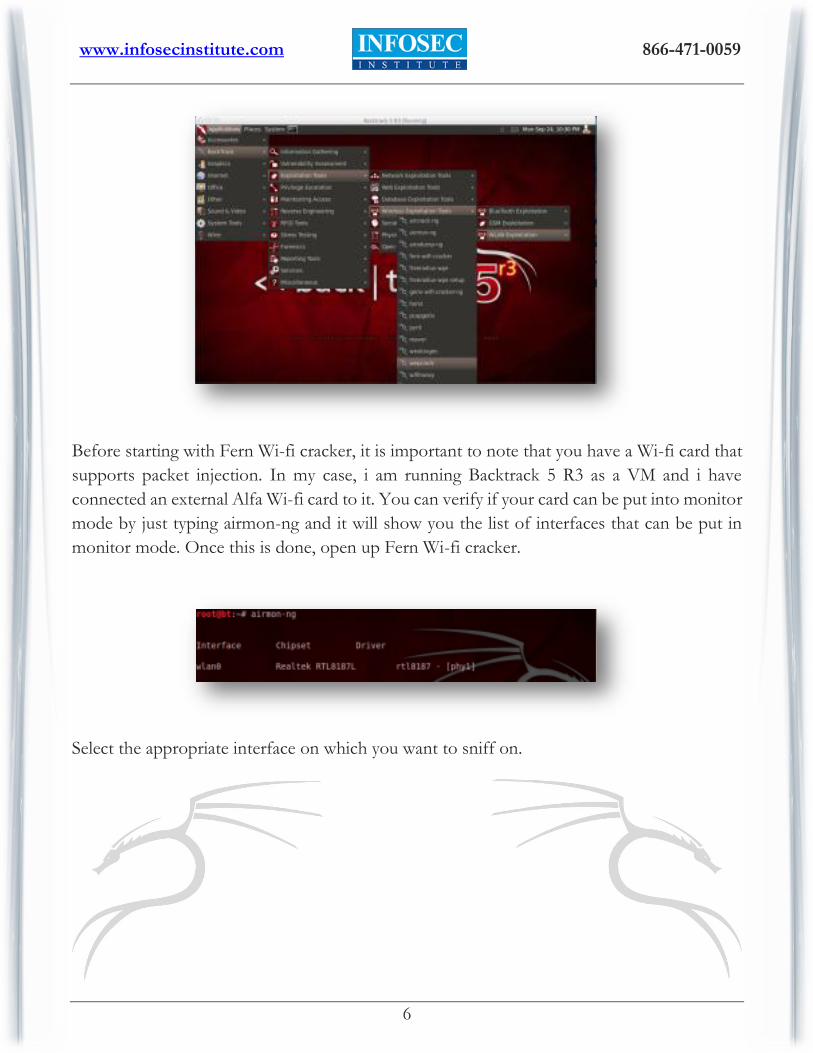
Fern Wi-fi cracker can be found under the category Wireless Exploitation tools as shown in
the figure below.
Instructor is truly an Information Technology guru. The high degree of knowledge,
experties, and his ability to successfully train others in this highly complexed area of
IT, Hacking Penatration is astounding. With very few exception, any participant to
this class will easily able to compare it to "Alice" being exposed to Wonderland;
extremely enlightening and minboggling.
Frank Hogan Jr.
www.infosecinstitute.com
866-471-0059
6
Before starting with Fern Wi-fi cracker, it is important to note that you have a Wi-fi card that
supports packet injection. In my case, i am running Backtrack 5 R3 as a VM and i have
connected an external Alfa Wi-fi card to it. You can verify if your card can be put into monitor
mode by just typing airmon-ng and it will show you the list of interfaces that can be put in
monitor mode. Once this is done, open up Fern Wi-fi cracker.
Select the appropriate interface on which you want to sniff on.
www.infosecinstitute.com
866-471-0059
7
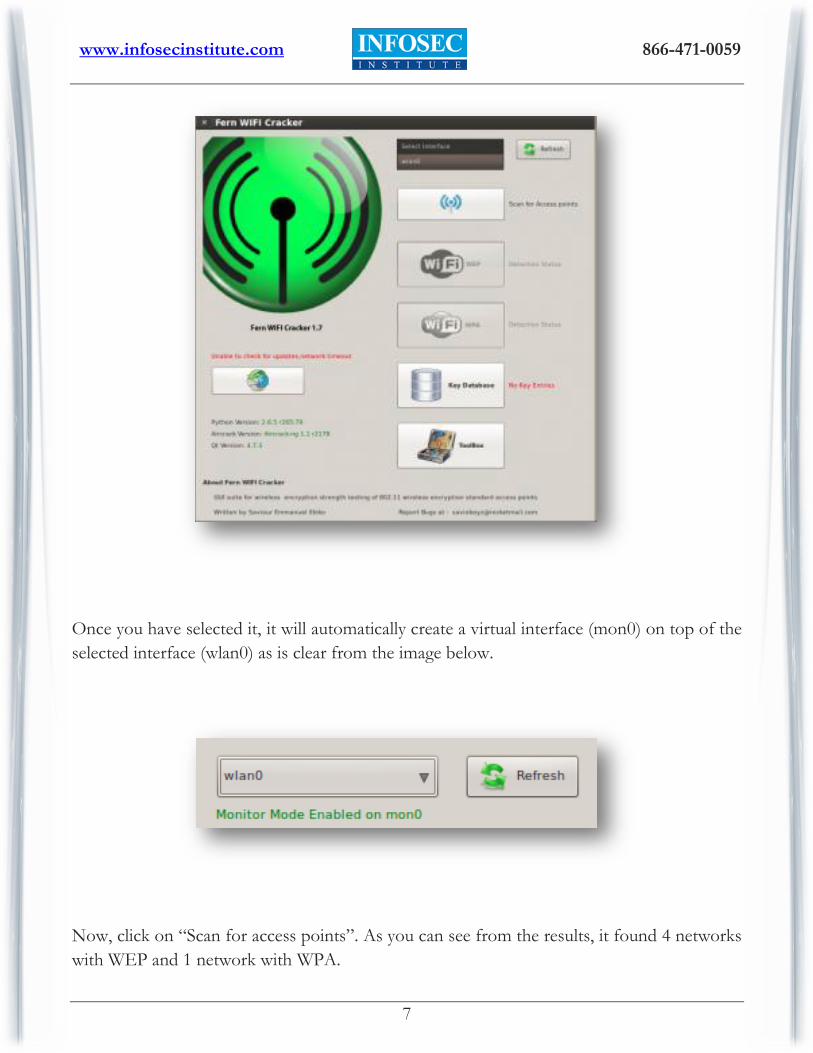
Once you have selected it, it will automatically create a virtual interface (mon0) on top of the
selected interface (wlan0) as is clear from the image below.
Now, click on “Scan for access points”. As you can see from the results, it found 4 networks
with WEP and 1 network with WPA.
www.infosecinstitute.com
866-471-0059
8
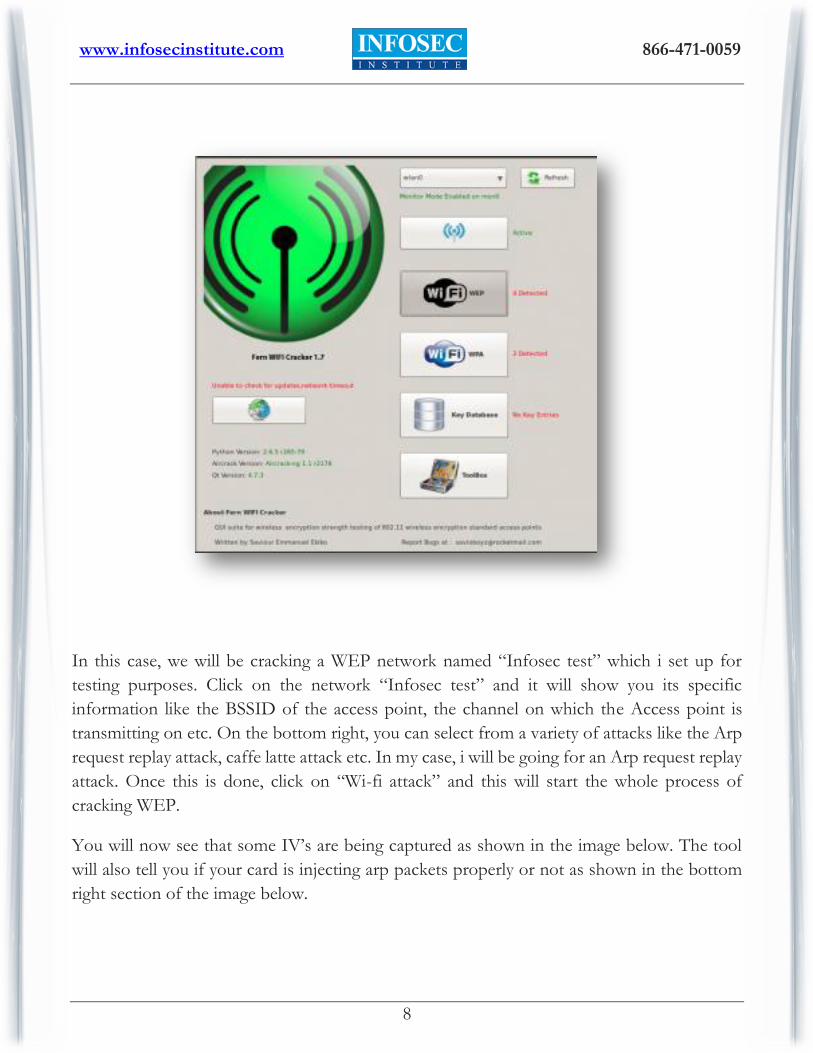
In this case, we will be cracking a WEP network named “Infosec test” which i set up for
testing purposes. Click on the network “Infosec test” and it will show you its specific
information like the BSSID of the access point, the channel on which the Access point is
transmitting on etc. On the bottom right, you can select from a variety of attacks like the Arp
request replay attack, caffe latte attack etc. In my case, i will be going for an Arp request replay
attack. Once this is done, click on “Wi-fi attack” and this will start the whole process of
cracking WEP.
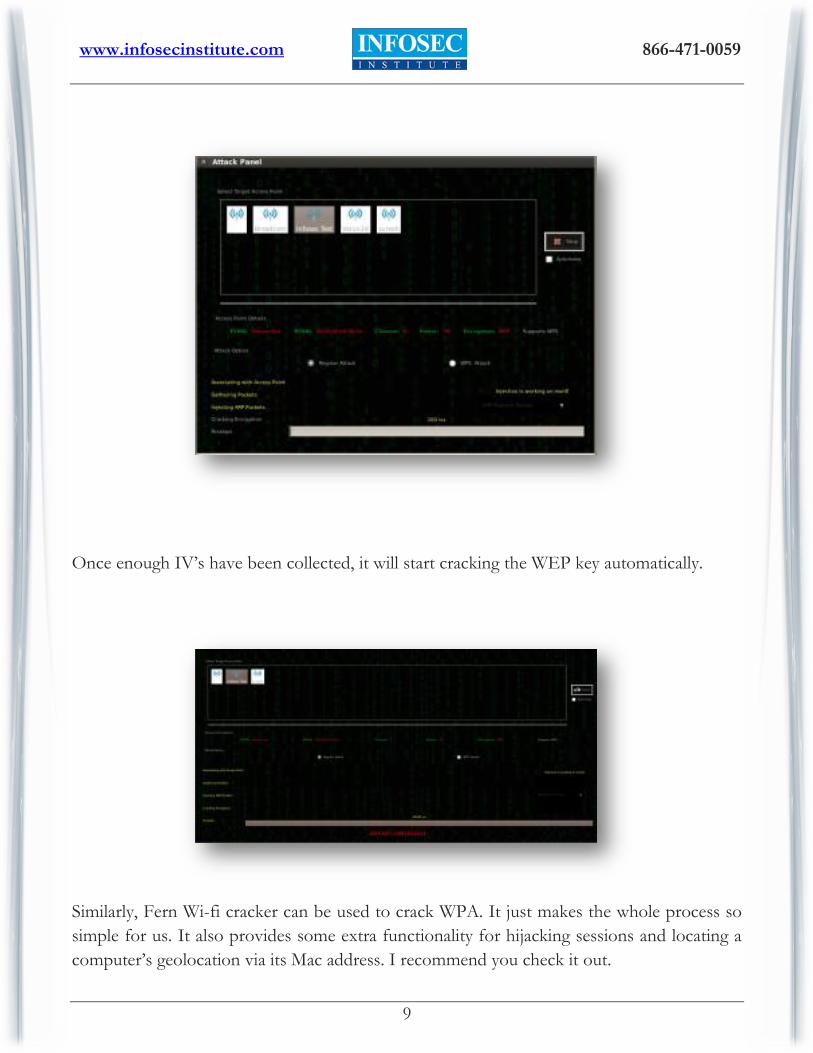
You will now see that some IV’s are being captured as shown in the image below. The tool
will also tell you if your card is injecting arp packets properly or not as shown in the bottom
right section of the image below.
www.infosecinstitute.com
866-471-0059
9
Once enough IV’s have been collected, it will start cracking the WEP key automatically.
Similarly, Fern Wi-fi cracker can be used to crack WPA. It just makes the whole process so
simple for us. It also provides some extra functionality for hijacking sessions and locating a
computer’s geolocation via its Mac address. I recommend you check it out.
www.infosecinstitute.com
866-471-0059
10
DNMAP
Imagine you have to scan a huge network containing thousands of computers. Scanning via
nmap from a single computer will take quite a long time. In order to solve this problem,
Dnmap was created. Dnmap is a framework which follows a client/server architecture. The
server issues nmap commands to the clients and the clients execute it. In this way, the load of
performing such a large scan is distributed among the clients. The commands that the server
gives to its clients are put in a command file. The results are stored in a log file which are saved
on both the server and the client. The whole process of running Dnmap follows these steps.
1. Create a list of commands that you want to run and store it in a file, say commands.txt.
Note the IP address of the server.
2. Run the dnmap server and give the commands file as an argument.
3. Connect the clients to the server. Note that the server should be reachable from the
client.
Let’s do the demo now. I have 2 virtual machines both running Backtrack 5 R3. I am going to
run the Dnmap server on one of the virtual machines and a client on the second one.
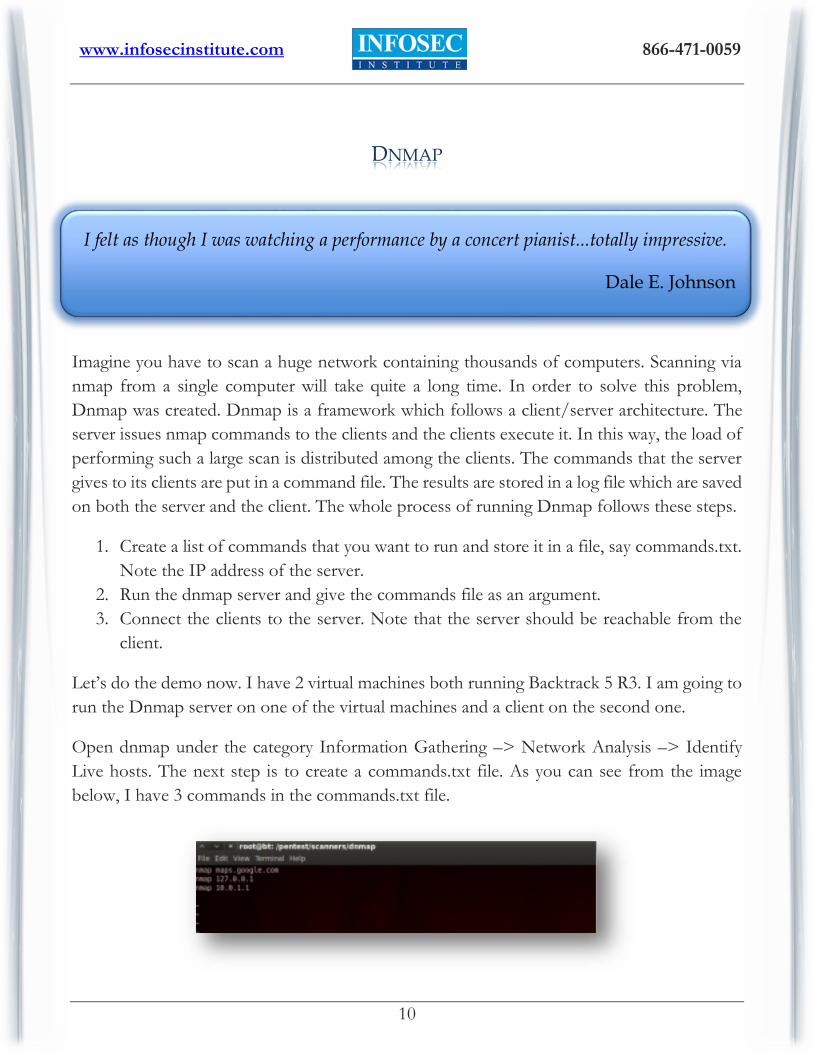
Open dnmap under the category Information Gathering –> Network Analysis –> Identify
Live hosts. The next step is to create a commands.txt file. As you can see from the image
below, I have 3 commands in the commands.txt file.
I felt as though I was watching a performance by a concert pianist...totally impressive.
Dale E. Johnson

www.infosecinstitute.com
866-471-0059
11
Now type the command as shown in the image below to start the dnmap server. I have started
the dnmap server to listen on port 800. As you can see, it currently detects no clients. Hence
the next step is to get some clients to connect to this dnmap server. Also, it is better to specify
the location of the log file that will be holding all the results.
On my other BT machine, i run the following command to connect the client to the server.
Note that the internal IP address of my dnmap server is 10.0.2.15 and since my other virtual
machine is also in the same internal network, it is able to reach to the server. You also need to
specify the port to which you are connecting to on the server. Also, it is optional to specify an
alias for the client.
Once the client establishes connection with the server, you will see that the client starts
executing the commands that it is getting from the server.
www.infosecinstitute.com
866-471-0059
12
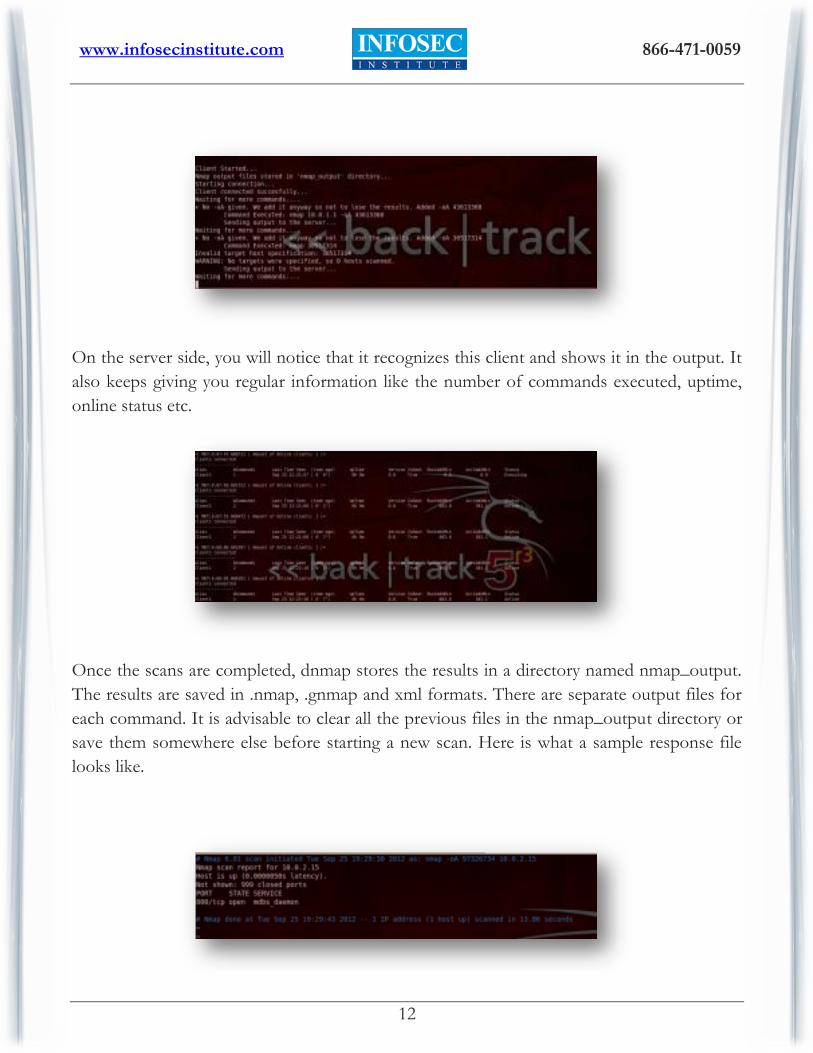
On the server side, you will notice that it recognizes this client and shows it in the output. It
also keeps giving you regular information like the number of commands executed, uptime,
online status etc.
Once the scans are completed, dnmap stores the results in a directory named nmap_output.
The results are saved in .nmap, .gnmap and xml formats. There are separate output files for
each command. It is advisable to clear all the previous files in the nmap_output directory or
save them somewhere else before starting a new scan. Here is what a sample response file
looks like.
www.infosecinstitute.com
866-471-0059
13
In this article, we looked at a couple of the most popular tools that were introduced with
Backtrack 5 R3. In further articles in this series, we will be discussing about many other new
tools that were shipped with Backtrack 5 R3. If there is a particular tool that you want me to
write about or if you have any questions, comments, suggestions regarding this series, please
write them down in the comments below.
References:
Upgrade from Backtrack 5 R2 to R3http://www.backtrack-linux.org/backtrack/upgrade-
from-backtrack-5-r2-to-backtrack-5-r3/
Fern-Wifi-Crackerhttp://code.google.com/p/fern-wifi-cracker/
Dnmap framework official pagehttp://sourceforge.net/projects/dnmap/
www.infosecinstitute.com
866-471-0059
14
PART 2: NEW TOOLS
Now lets take a look at some of the other new tools that were added into Backtrack 5 with the
release of its latest version R3.
WIFITE
Wifite is probably one of the best tools out there for cracking wireless networks. It just makes
the whole task so simple for you by hiding all the intricate details of cracking a wireless network
and making the whole process automated. It can crack WEP/WPA/WPS encrypted networks
in a row. Some of the features of Wifite are.
Automates the whole process of cracking wireless networks. Just run the python file
wifite.py and it will start scanning for wireless networks nearby and will ask you to select
which targets to attack.
Automatically detects hidden Essid’s by deauthenticating the connected client and
checking the association and authentication packets to figure out the Essid.
I have been in technology for several years and have met some great people throughout
my career. However this experience was ABOVE AND BEYOND ANY
EXPECTATION I HAD. I believe if that every teacher held 50% of the knowledge of
their course material and ability to interact with students this instructor did I believe
it would solve many of our educational problems this society faces. My experience has
been much more than I could ask for. This is the Harvard of Boot Camps.Dale E.
Waleed Haddad
www.infosecinstitute.com
866-471-0059
15
Backs up all the cracked passwords as well as the WPA handshakes so you can use them
later.
You can customize the attack by selecting the type of attack (for e.g arp request replay
for cracking WEP), select the pps (packets per second), set the channel to sniff on, etc.
Gives you options in the middle of an attack. Just press Ctrl+C and it will ask you
whether you want to quit, move on to the next target, or start cracking (if you think
enough info has been collected) etc.
Very easy to upgrade. Just type ./wifite.py -upgrade to upgrade.
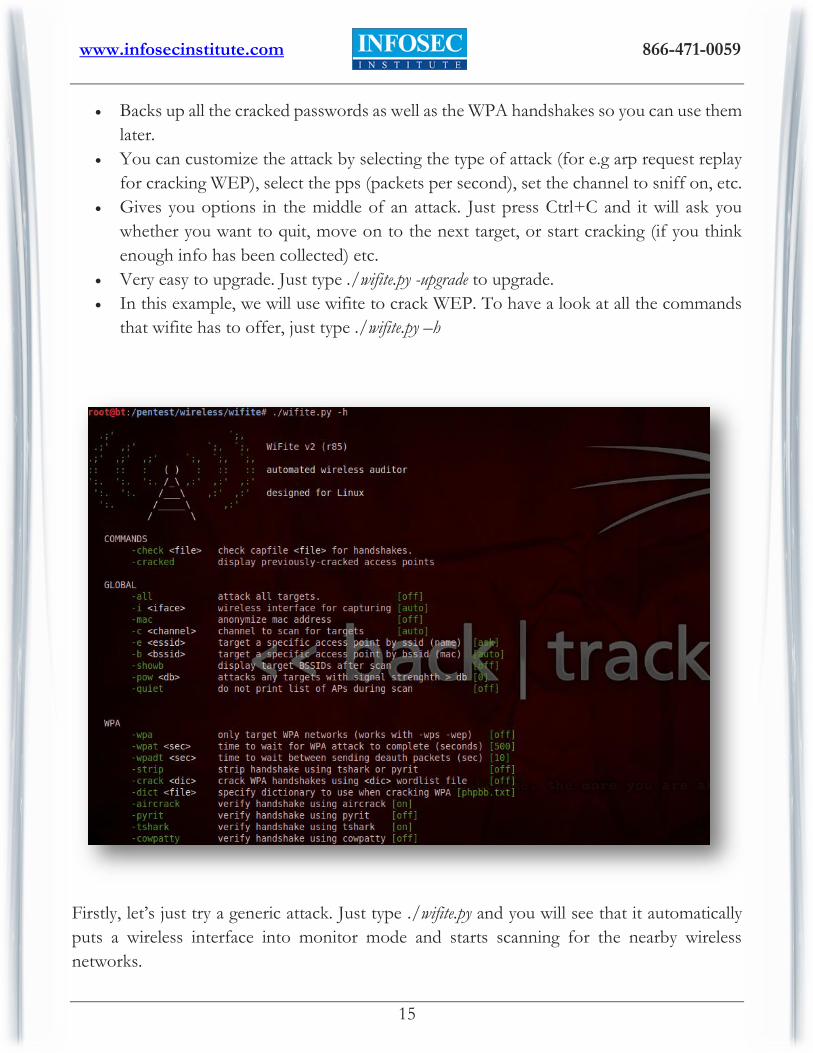
In this example, we will use wifite to crack WEP. To have a look at all the commands
that wifite has to offer, just type ./wifite.py –h
Firstly, let’s just try a generic attack. Just type ./wifite.py and you will see that it automatically
puts a wireless interface into monitor mode and starts scanning for the nearby wireless
networks.
www.infosecinstitute.com
866-471-0059
16
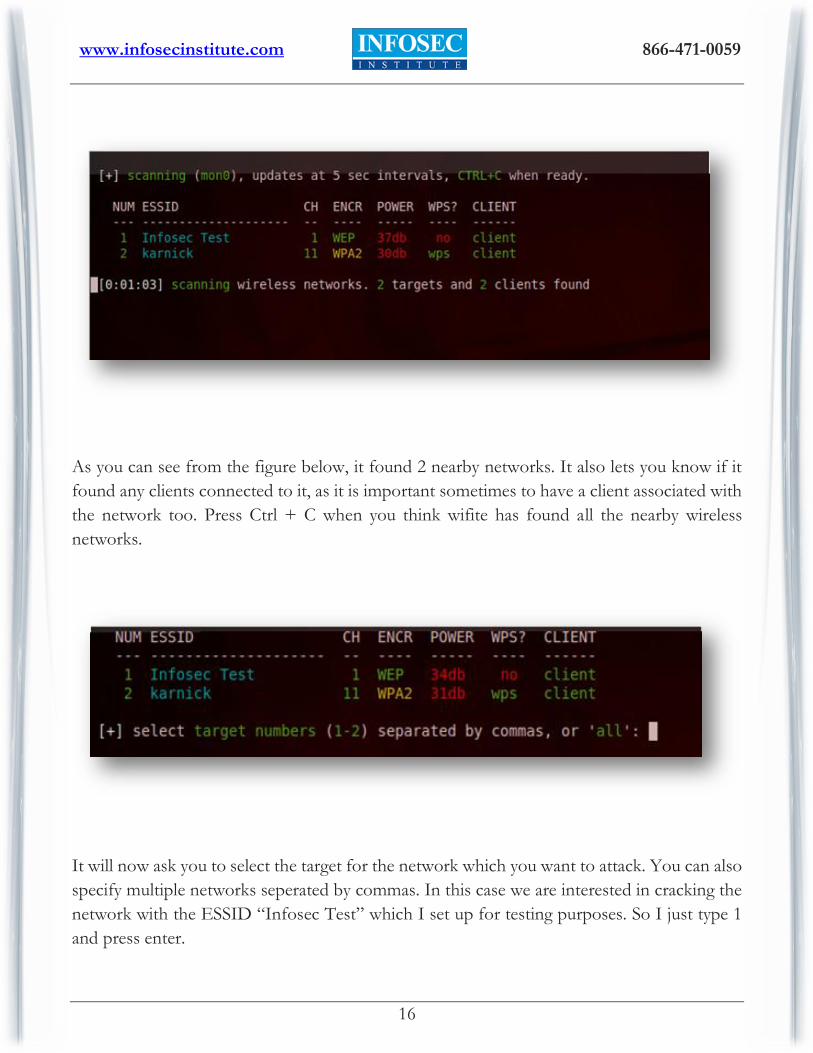
As you can see from the figure below, it found 2 nearby networks. It also lets you know if it
found any clients connected to it, as it is important sometimes to have a client associated with
the network too. Press Ctrl + C when you think wifite has found all the nearby wireless
networks.
It will now ask you to select the target for the network which you want to attack. You can also
specify multiple networks seperated by commas. In this case we are interested in cracking the
network with the ESSID “Infosec Test” which I set up for testing purposes. So I just type 1
and press enter.
www.infosecinstitute.com
866-471-0059
17
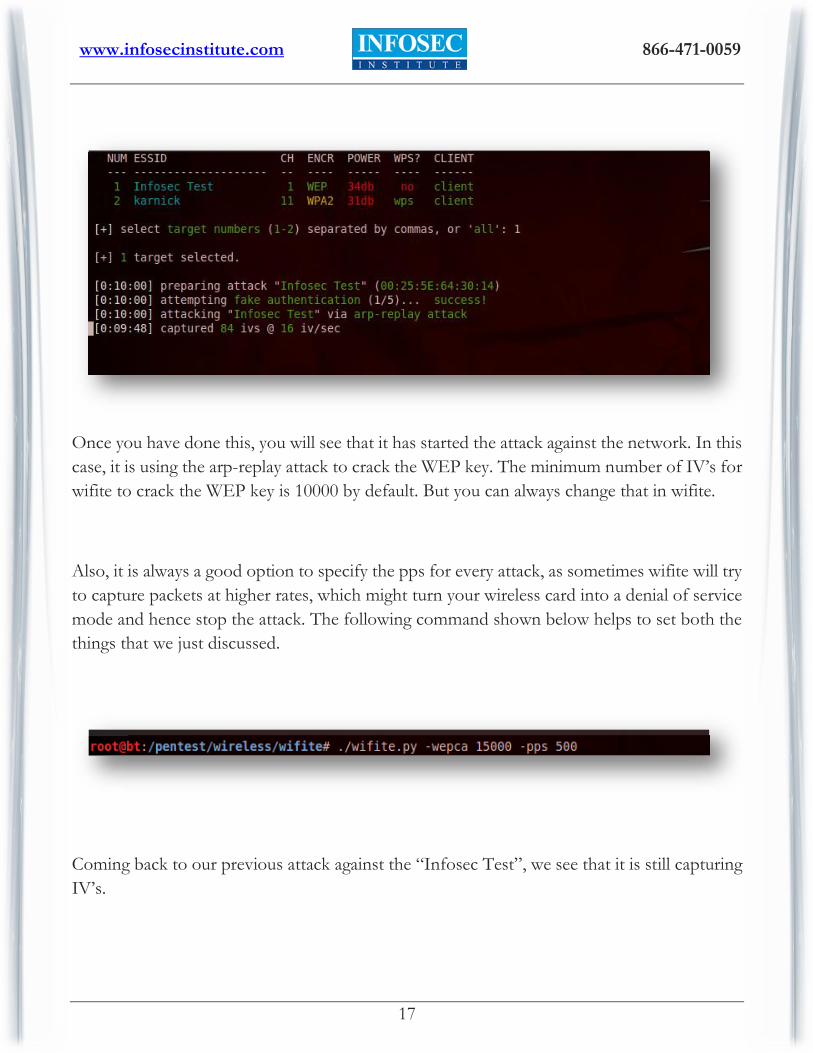
Once you have done this, you will see that it has started the attack against the network. In this
case, it is using the arp-replay attack to crack the WEP key. The minimum number of IV’s for
wifite to crack the WEP key is 10000 by default. But you can always change that in wifite.
Also, it is always a good option to specify the pps for every attack, as sometimes wifite will try
to capture packets at higher rates, which might turn your wireless card into a denial of service
mode and hence stop the attack. The following command shown below helps to set both the
things that we just discussed.
Coming back to our previous attack against the “Infosec Test”, we see that it is still capturing
IV’s.
www.infosecinstitute.com
866-471-0059
18
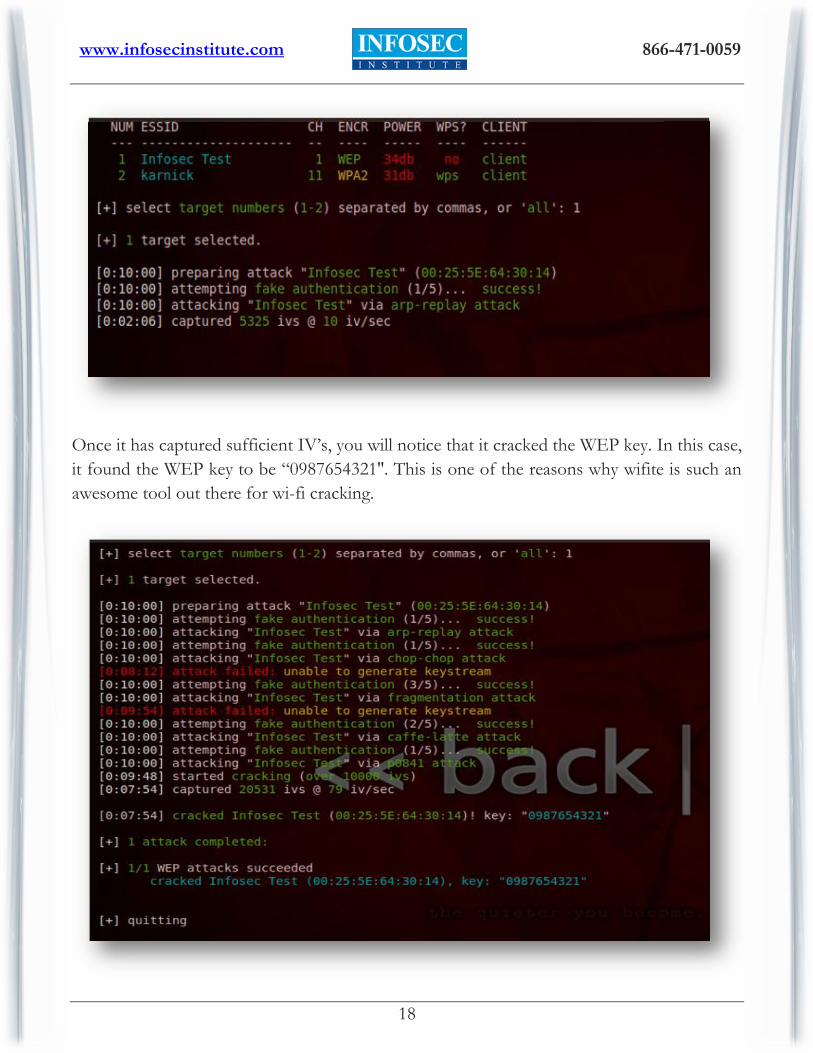
Once it has captured sufficient IV’s, you will notice that it cracked the WEP key. In this case,
it found the WEP key to be “0987654321″. This is one of the reasons why wifite is such an
awesome tool out there for wi-fi cracking.
www.infosecinstitute.com
866-471-0059
19
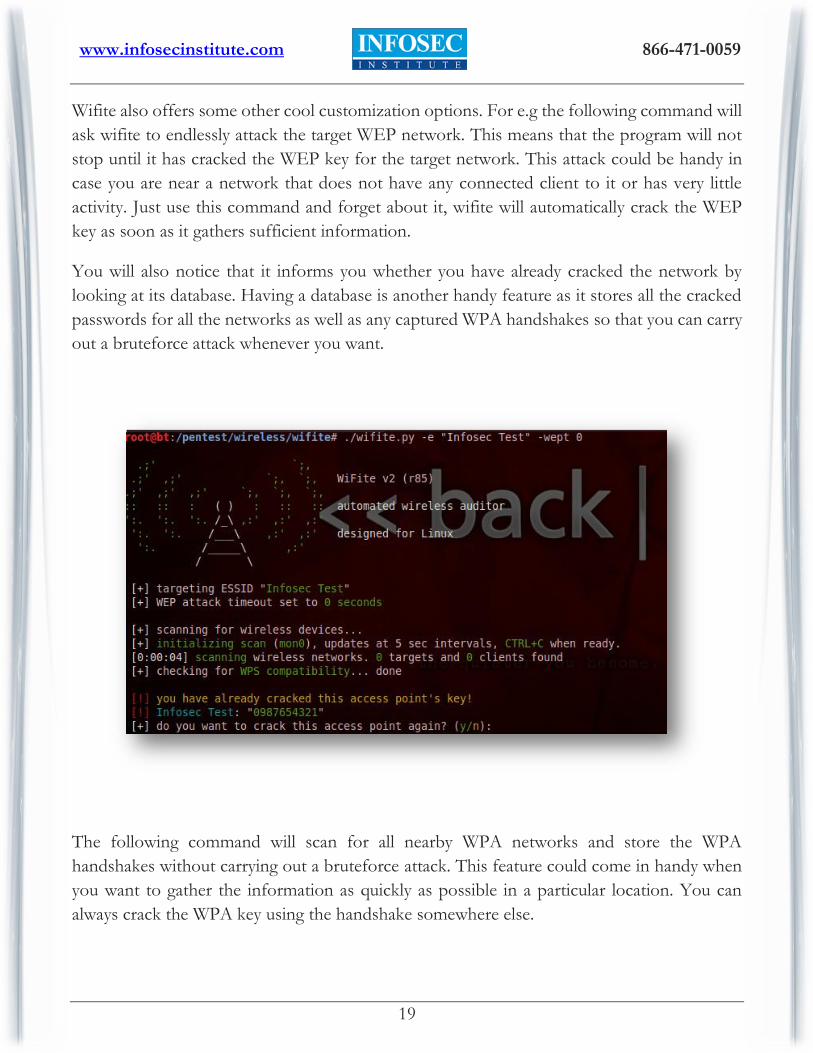
Wifite also offers some other cool customization options. For e.g the following command will
ask wifite to endlessly attack the target WEP network. This means that the program will not
stop until it has cracked the WEP key for the target network. This attack could be handy in
case you are near a network that does not have any connected client to it or has very little
activity. Just use this command and forget about it, wifite will automatically crack the WEP
key as soon as it gathers sufficient information.
You will also notice that it informs you whether you have already cracked the network by
looking at its database. Having a database is another handy feature as it stores all the cracked
passwords for all the networks as well as any captured WPA handshakes so that you can carry
out a bruteforce attack whenever you want.
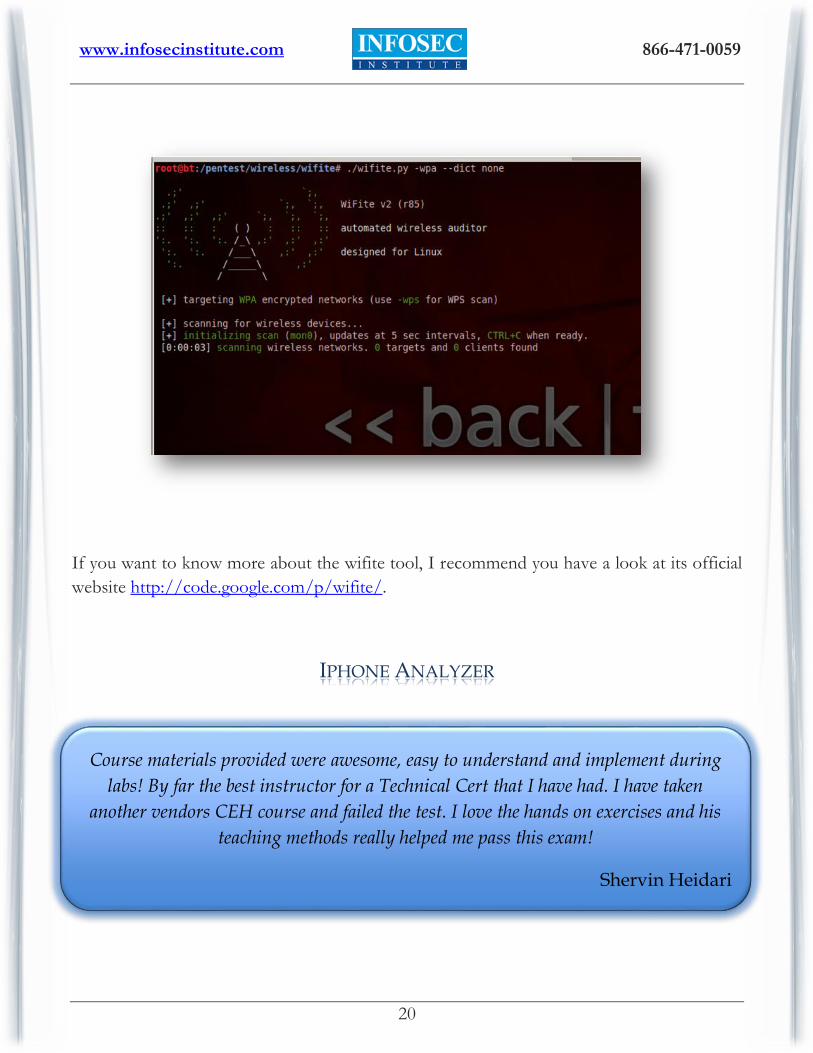
The following command will scan for all nearby WPA networks and store the WPA
handshakes without carrying out a bruteforce attack. This feature could come in handy when
you want to gather the information as quickly as possible in a particular location. You can
always crack the WPA key using the handshake somewhere else.
www.infosecinstitute.com
866-471-0059
20
If you want to know more about the wifite tool, I recommend you have a look at its official
website http://code.google.com/p/wifite/.
IPHONE ANALYZER
Course materials provided were awesome, easy to understand and implement during
labs! By far the best instructor for a Technical Cert that I have had. I have taken
another vendors CEH course and failed the test. I love the hands on exercises and his
teaching methods really helped me pass this exam!
Shervin Heidari
www.infosecinstitute.com
866-471-0059
21
Iphone Analyzer is an IOS device forensics tool. Unlike its name, Iphone Analyzer works for
all IOS devices. It is used to analyze data from iTunes backups and provides a rich interface
to explore the contents of the device as well as recover them. In the case of Mac OS X, Iphone
Analyzer automatically detects the location of the backup file. However, while using it with
Backtrack 5 R3, you will have to provide it with the location of the backup file. It also allows
you to analyze your IOS device over SSH, which is a very handy feature. Though this feature
of Iphone Analyzer is still in the beta version, this feature can be very useful, especially when
performing penetration tests on jailbroken IOS devices. Iphone Analyzer allows you to see
your text messages, photos, call records etc. IOS uses sqlite for managing its database. Iphone
Analyzer also allows you to analyze the various sqlite files, the schema which is used to enter
data into the database as well as the contents of the file. It also allows you to browse the file
structure like you would normally do via a terminal on a jailbroken device.
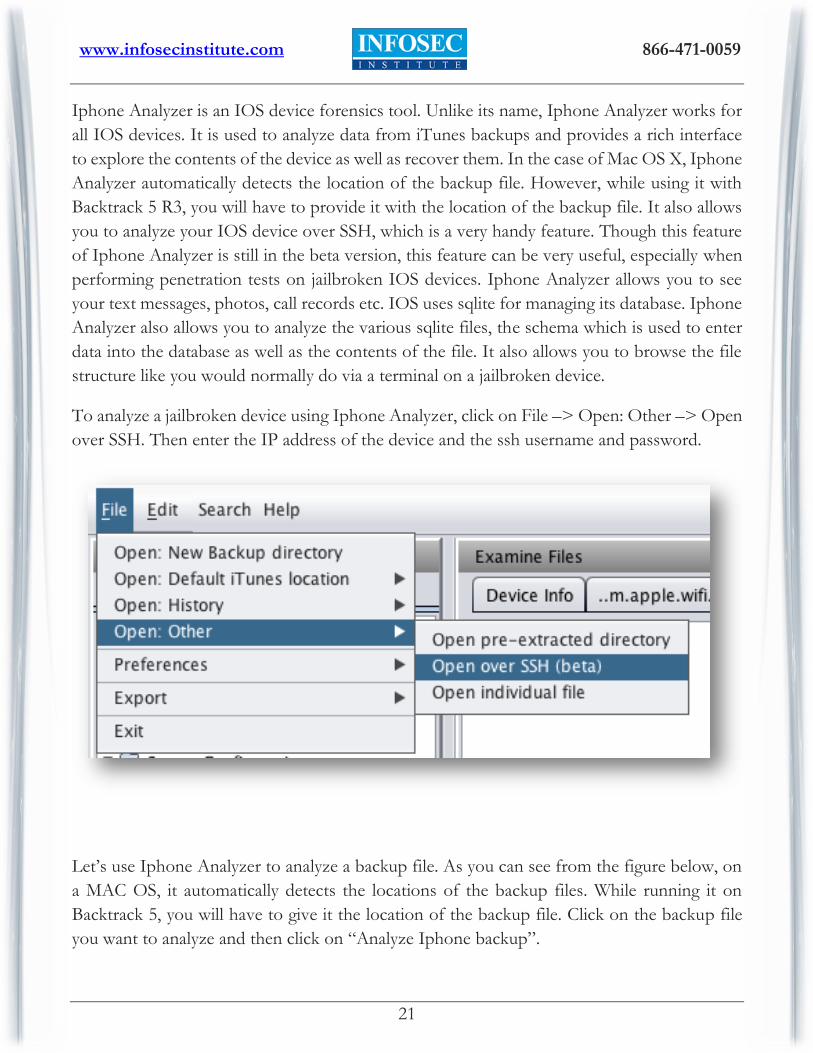
To analyze a jailbroken device using Iphone Analyzer, click on File –> Open: Other –> Open
over SSH. Then enter the IP address of the device and the ssh username and password.
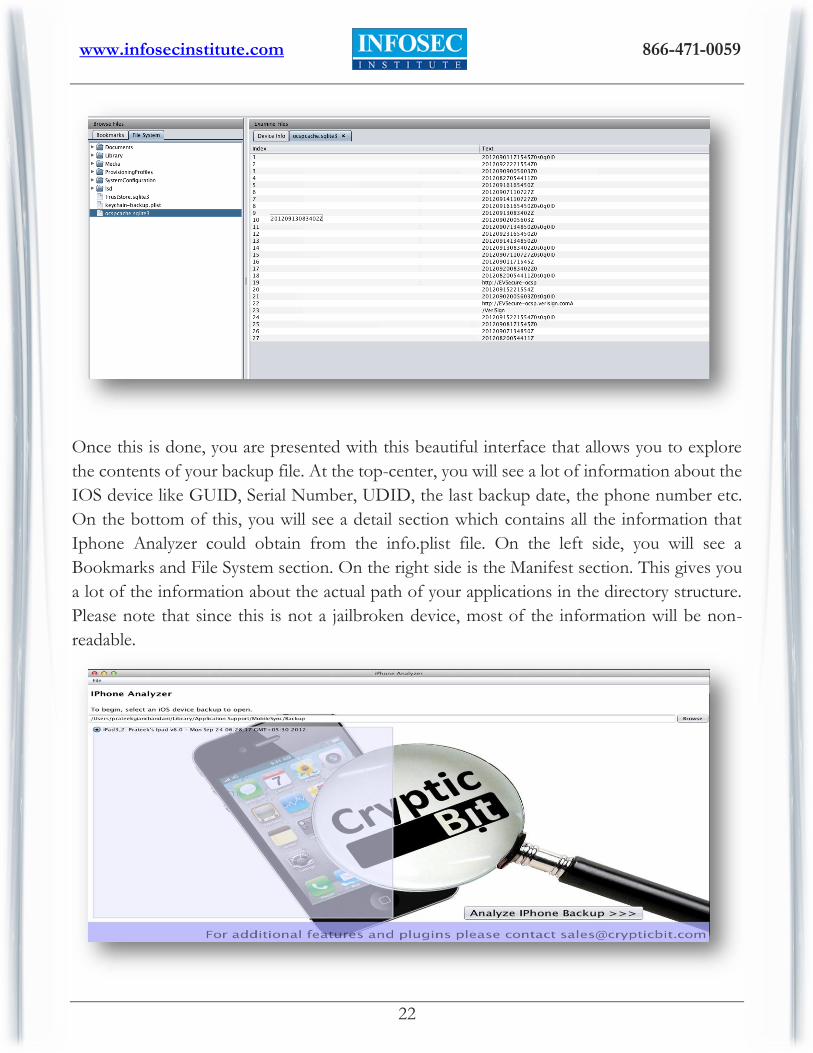
Let’s use Iphone Analyzer to analyze a backup file. As you can see from the figure below, on
a MAC OS, it automatically detects the locations of the backup files. While running it on
Backtrack 5, you will have to give it the location of the backup file. Click on the backup file
you want to analyze and then click on “Analyze Iphone backup”.
www.infosecinstitute.com
866-471-0059
22
Once this is done, you are presented with this beautiful interface that allows you to explore
the contents of your backup file. At the top-center, you will see a lot of information about the
IOS device like GUID, Serial Number, UDID, the last backup date, the phone number etc.
On the bottom of this, you will see a detail section which contains all the information that
Iphone Analyzer could obtain from the info.plist file. On the left side, you will see a
Bookmarks and File System section. On the right side is the Manifest section. This gives you
a lot of the information about the actual path of your applications in the directory structure.
Please note that since this is not a jailbroken device, most of the information will be non-
readable.
www.infosecinstitute.com
866-471-0059
23
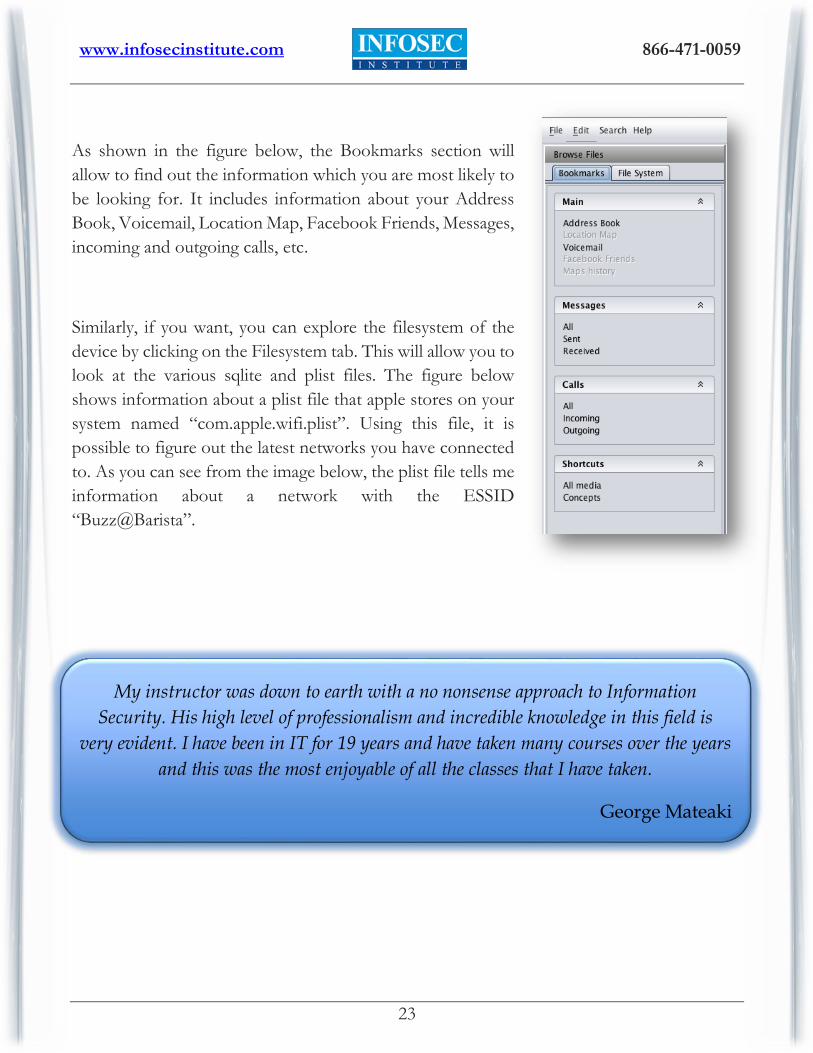
As shown in the figure below, the Bookmarks section will
allow to find out the information which you are most likely to
be looking for. It includes information about your Address
Book, Voicemail, Location Map, Facebook Friends, Messages,
incoming and outgoing calls, etc.
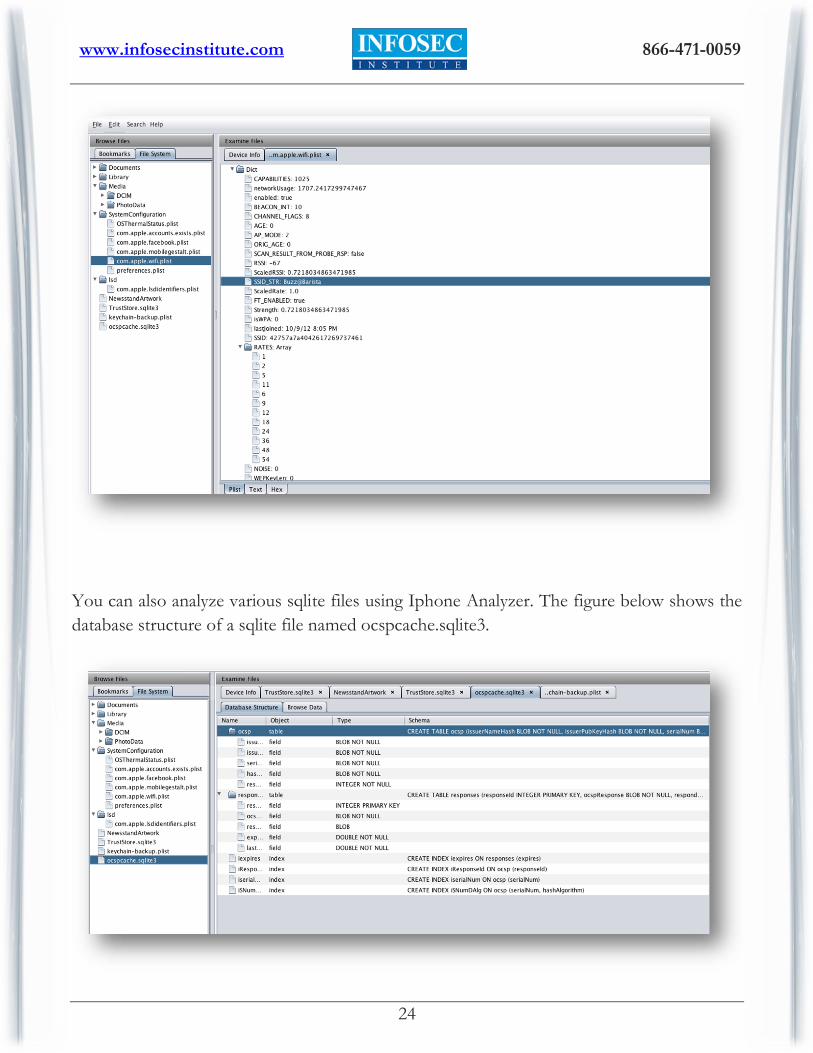
Similarly, if you want, you can explore the filesystem of the
device by clicking on the Filesystem tab. This will allow you to
look at the various sqlite and plist files. The figure below
shows information about a plist file that apple stores on your
system named “com.apple.wifi.plist”. Using this file, it is
possible to figure out the latest networks you have connected
to. As you can see from the image below, the plist file tells me
information about a network with the ESSID
“Buzz@Barista”.
My instructor was down to earth with a no nonsense approach to Information
Security. His high level of professionalism and incredible knowledge in this field is
very evident. I have been in IT for 19 years and have taken many courses over the years
and this was the most enjoyable of all the classes that I have taken.
George Mateaki
www.infosecinstitute.com
866-471-0059
24
You can also analyze various sqlite files using Iphone Analyzer. The figure below shows the
database structure of a sqlite file named ocspcache.sqlite3.
www.infosecinstitute.com
866-471-0059
25
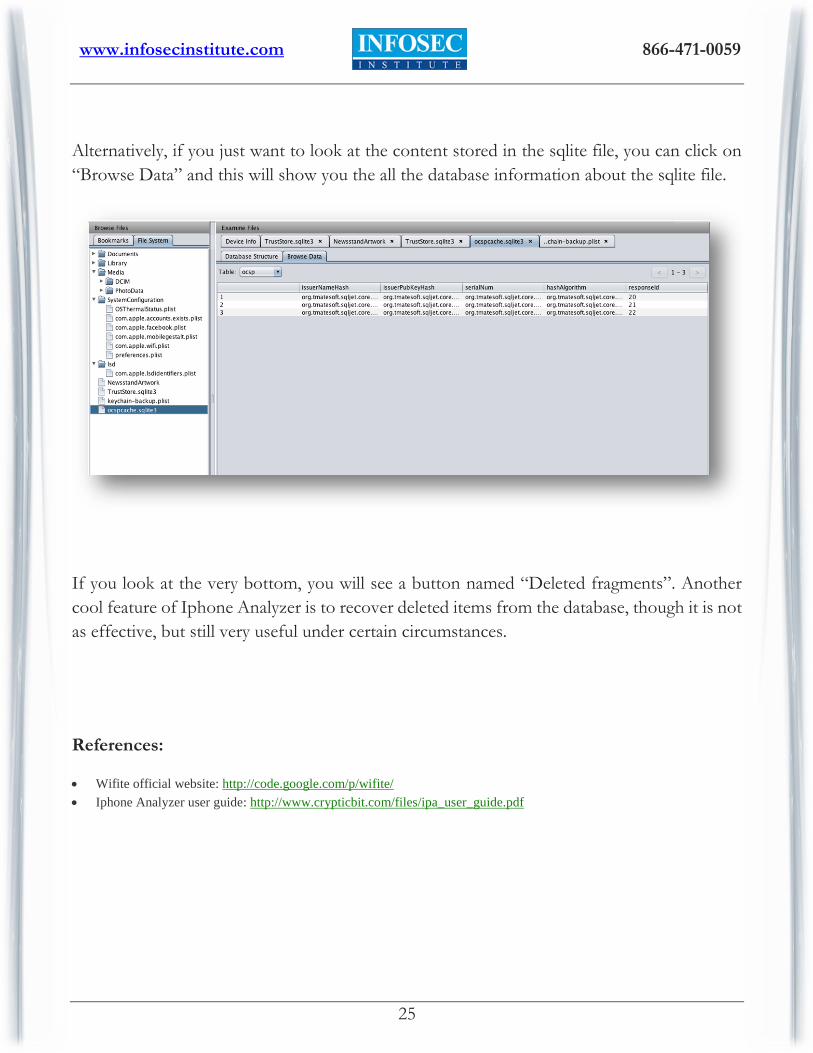
Alternatively, if you just want to look at the content stored in the sqlite file, you can click on
“Browse Data” and this will show you the all the database information about the sqlite file.
If you look at the very bottom, you will see a button named “Deleted fragments”. Another
cool feature of Iphone Analyzer is to recover deleted items from the database, though it is not
as effective, but still very useful under certain circumstances.
References:
Wifite official website: http://code.google.com/p/wifite/
Iphone Analyzer user guide: http://www.crypticbit.com/files/ipa_user_guide.pdf
www.infosecinstitute.com
866-471-0059
26
PART 3: A CLOSER LOOK AT THE MAIN TOOLS
In this article we will look at some of the other main tools added in Backtrack 5 R3.
HTEXPLOIT
HTExploit was released at Blackhat 2012 by Matias KATZ and Maximiliano SOLER.
HTExploit (HiperText access Exploit) is a tool that is used to bypass authentication
mechanisms which is deployed on websites using .htaccess files. The tool is written in Python.
Once the restriction is bypassed, it will be possible to figure out the contents of a directory
and even download those files. The tool works in a recursive manner,i.e once it downloads
the first chunk of files, it looks for links inside those files and downloads those files as well.
This process keeps on going until it has downloaded the entire content of the directory. It
then generates an html report informing us about all the files that it has downloaded.
The tool has 2 modules that can be executed.
1. Detect- This module only informs the user if the target is vulnerable to the exploit or not.
2. Full – This module runs the attack on the directory using a dictionary that contains a list
of the common file names. If those file names are found and if the directory is vulnerable,
it is possible to download that file from the server.
The instructor was probably the most knowlegeable technical computer specialist I
have ever encountered. His teaching style and expertise were effective and
encouraging. I only wish there was a way to hack into his knowledge stores and
populate my mental hard drive. Great instructor.
Anthony Ford
www.infosecinstitute.com
866-471-0059
27
In a recent chat session with Maximiliano Soler, one of the 2 people behind this tool, he
informed us about how the actual vulnerability is exploited.
Maximilano Soler:The main problem is that sometimes the restrictions are based in the
directive by using “Limit GET POST”.So the problem is that they only put these well known
methods for authentication checking. But what happens when we create a different method?
for eg. “POTATO”.Apache will proceed with the request and pass this “unknown” method
to PHP. PHP says…ok, I will use this method like “GET”. Voila! If you have the exact name
of the file, you will be able to download it. This is not a bruteforce attack as we are able to
figure out the contents of your directory without knowing your password. There are some
ways in which you can protect yourself. Remove the methods from “Limit”. Use Limit with
GET and POST, but also with LimitExcept. Alternatively, you can use a module from Apache
Mod_AllowMethods. If you are a developer you could also validate the typical variables:
$PHP_AUTH_USER, $_SERVER["REQUEST_METHOD"]. If something else is found
that GET or POST, then disallow it.
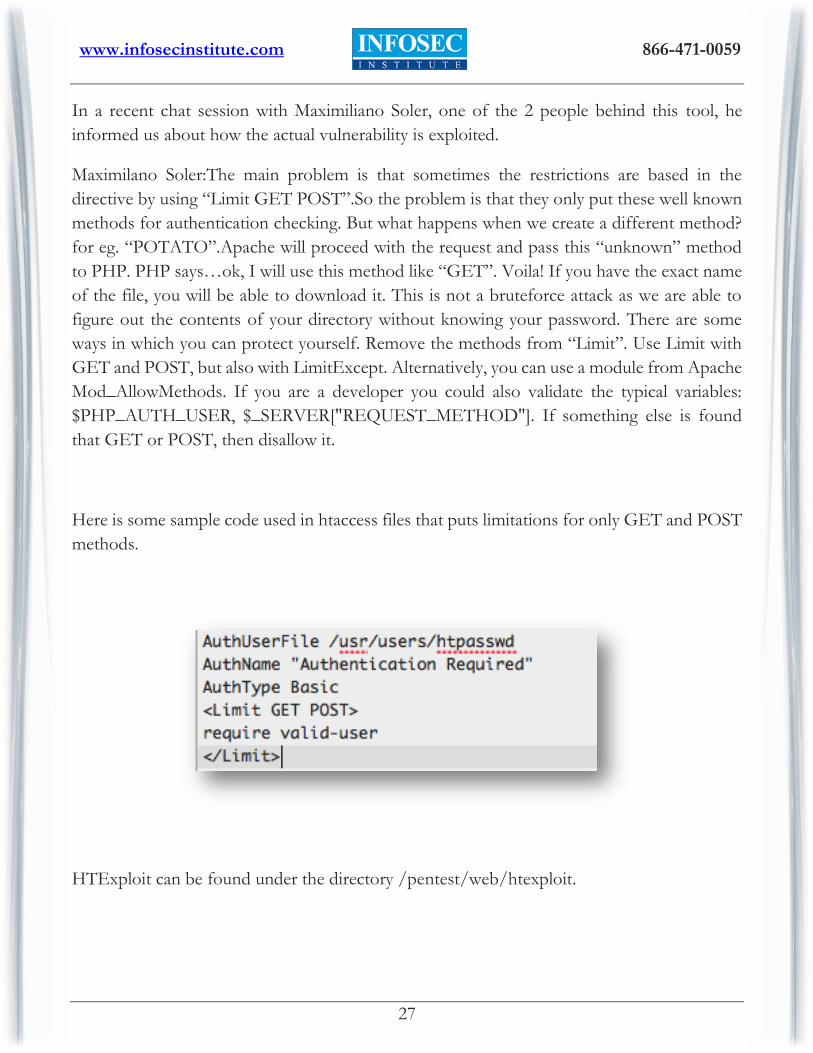
Here is some sample code used in htaccess files that puts limitations for only GET and POST
methods.
HTExploit can be found under the directory /pentest/web/htexploit.
www.infosecinstitute.com
866-471-0059
28
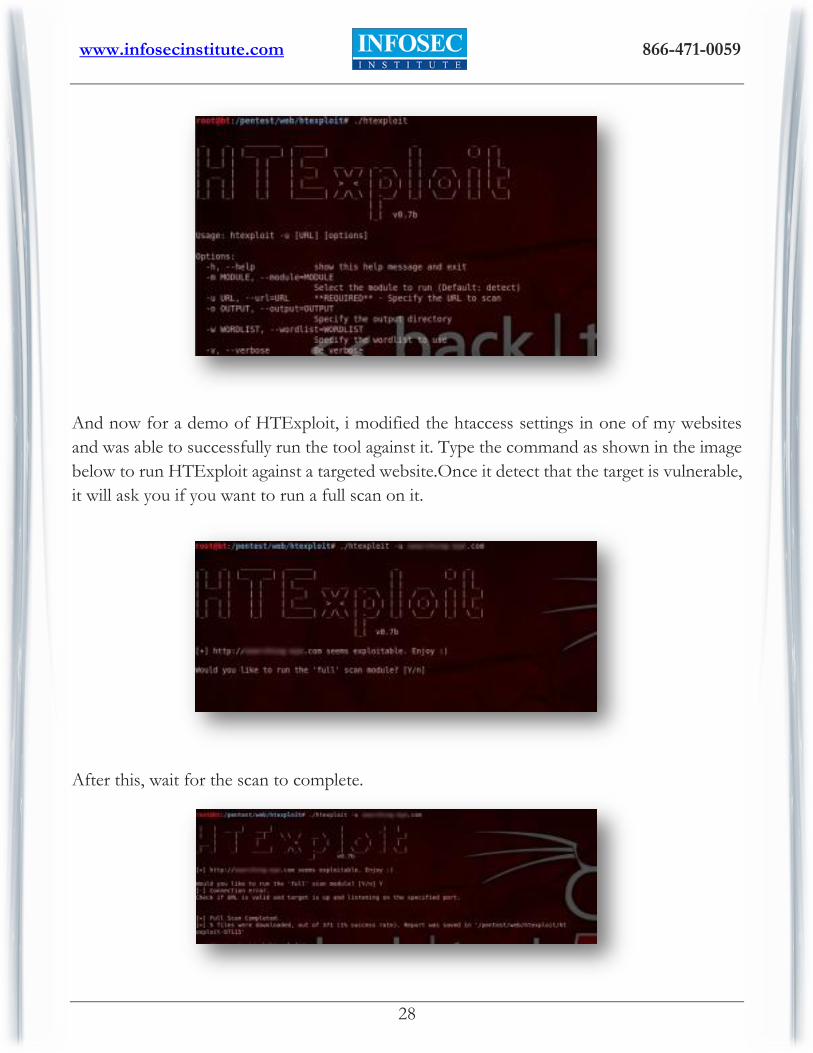
And now for a demo of HTExploit, i modified the htaccess settings in one of my websites
and was able to successfully run the tool against it. Type the command as shown in the image
below to run HTExploit against a targeted website.Once it detect that the target is vulnerable,
it will ask you if you want to run a full scan on it.
After this, wait for the scan to complete.
www.infosecinstitute.com
866-471-0059
29
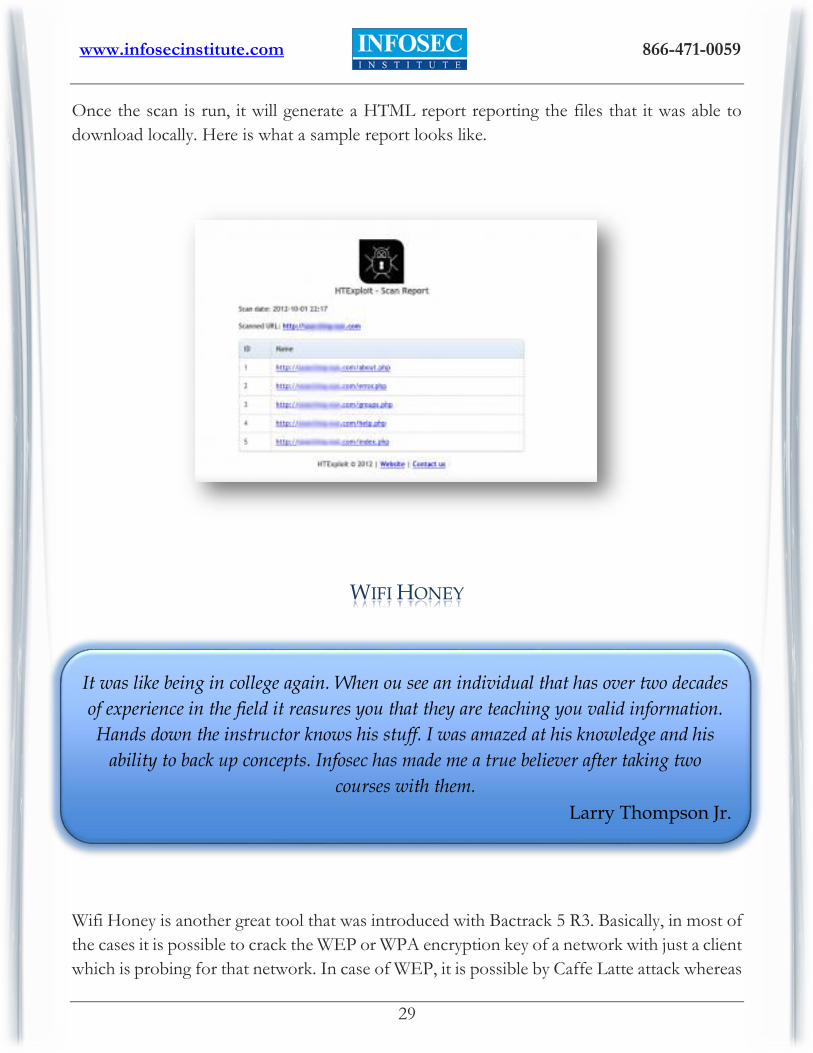
Once the scan is run, it will generate a HTML report reporting the files that it was able to
download locally. Here is what a sample report looks like.
WIFI HONEY
Wifi Honey is another great tool that was introduced with Bactrack 5 R3. Basically, in most of
the cases it is possible to crack the WEP or WPA encryption key of a network with just a client
which is probing for that network. In case of WEP, it is possible by Caffe Latte attack whereas
It was like being in college again. When ou see an individual that has over two decades
of experience in the field it reasures you that they are teaching you valid information.
Hands down the instructor knows his stuff. I was amazed at his knowledge and his
ability to back up concepts. Infosec has made me a true believer after taking two
courses with them.
Larry Thompson Jr.
www.infosecinstitute.com
866-471-0059
30
in WPA, it is possible to capture the first 2 packets of the WPA handshake by using just the
probing client and that gives us sufficient information in order to crack the WPA key for that
network. Using airodump-ng, it is very easy to figure out which network (ESSID) the client is
probing for. However, what is not clear by figuring out the ESSID of the probed network is
the encryption that network is using. Only by knowing the kind of encryption will we be able
to figure out how to crack the encryption. A general technique used to figure this out is by
creating four different access points with encryption such as None, WEP, WPA, and WPA 2
using airbase-ng. The probing client will then connect to one of these networks and hence the
kind of encryption being used is figured out. At the same time, airodump-ng could also be
used to capture the traffic and hence later used to crack WPA. What Wifi Honey does is
automate this whole process of creating fake Access points. It create 5 virtual interfaces, 4 of
them for creating 4 AP’s with same ESSID but different encryption and another 5th interface
for airodump-ng to monitor the traffic on. Hence, at the time the probing client connects to
our fake Access point, airodump-ng is being used to capture the traffic.
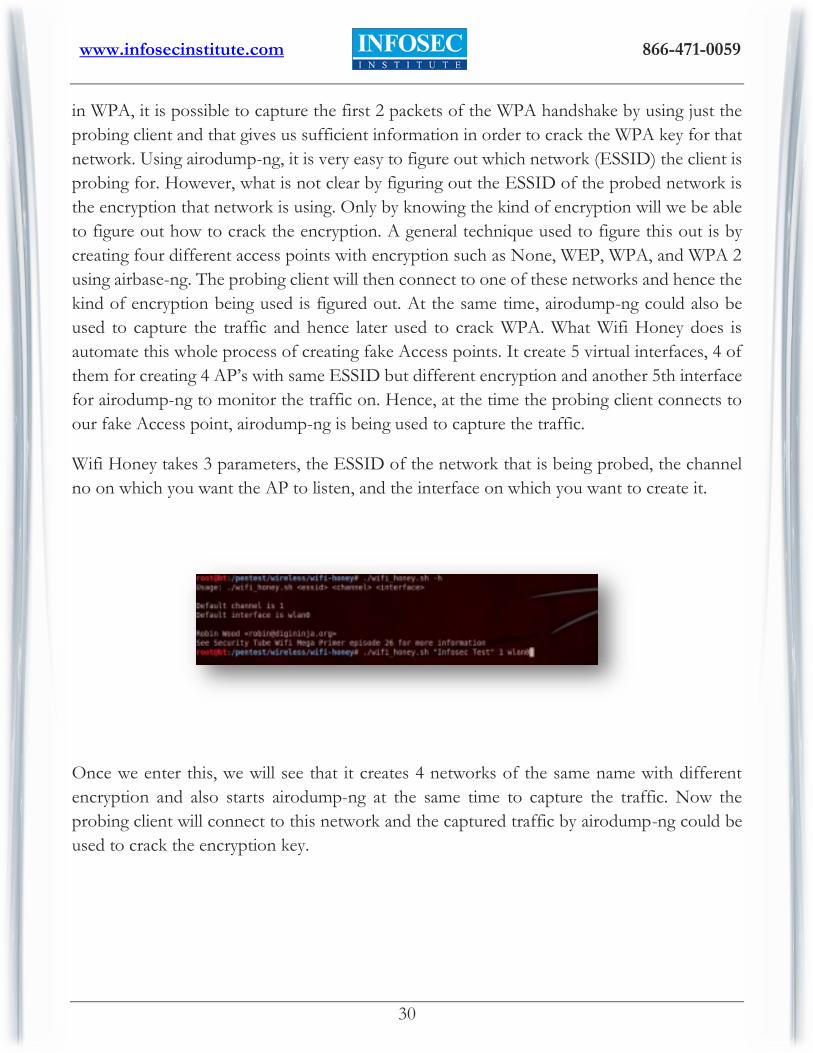
Wifi Honey takes 3 parameters, the ESSID of the network that is being probed, the channel
no on which you want the AP to listen, and the interface on which you want to create it.
Once we enter this, we will see that it creates 4 networks of the same name with different
encryption and also starts airodump-ng at the same time to capture the traffic. Now the
probing client will connect to this network and the captured traffic by airodump-ng could be
used to crack the encryption key.

www.infosecinstitute.com
866-471-0059
31
URLCRAZY
URLCrazy is a tool to determine if a domain name is being abused or not by looking at
different examples of domain names caused by typos in the original domain name. For e.g a
phishing attack can be carried out very easily by changing just one character in a domain name
and then redirecting the user to that domain name, mainly because the user will not be able to
recognize the change. What Urlcrazy does is use typos in your domain names to generate new
domain names and figure out if those domain names exist or not. If they exist, it fetches out
info like A and MX records for that particular domain name.
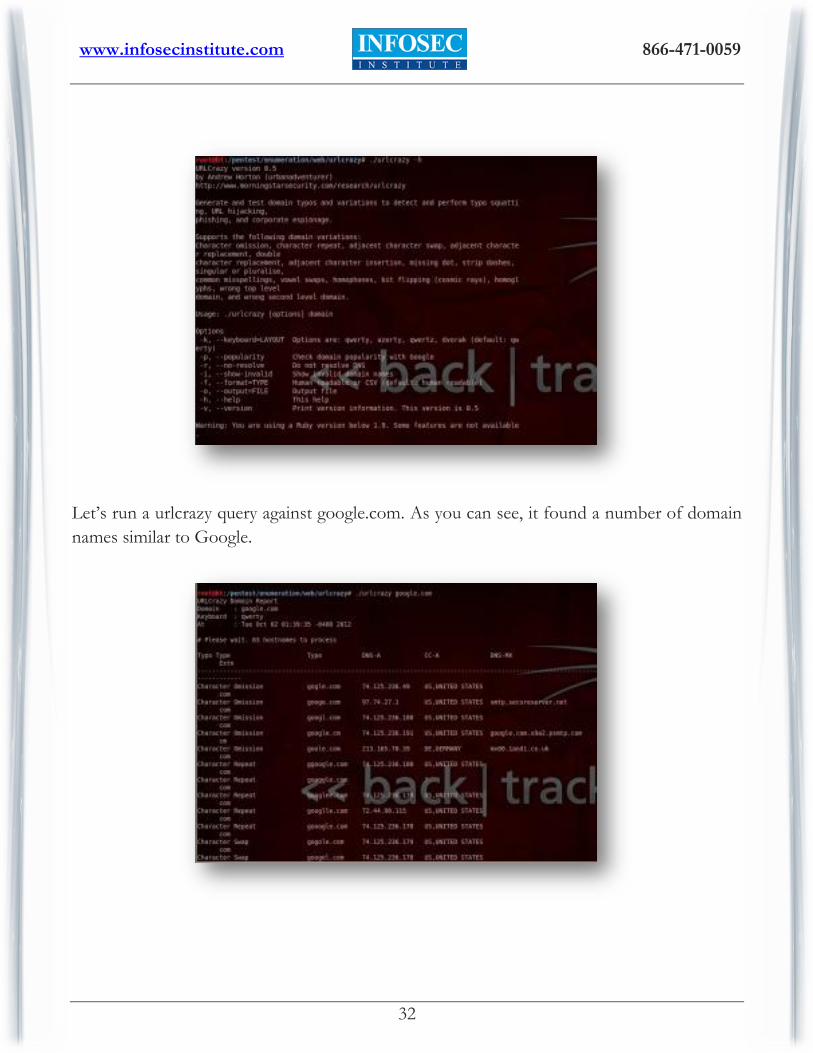
Here are the different options available in urlcrazy.
The material will allow me to review and refresh at anytime and the instructor was
extremely knowledgeable and engaging. I am so glad I had him. I was so impressed
that I am encouraging everyone I know to sign up for the class. I have such a high
respect for infosecinstitute. Any company that can get instructors like him is an
excellent source of education.
Catherine Potts
www.infosecinstitute.com
866-471-0059
32
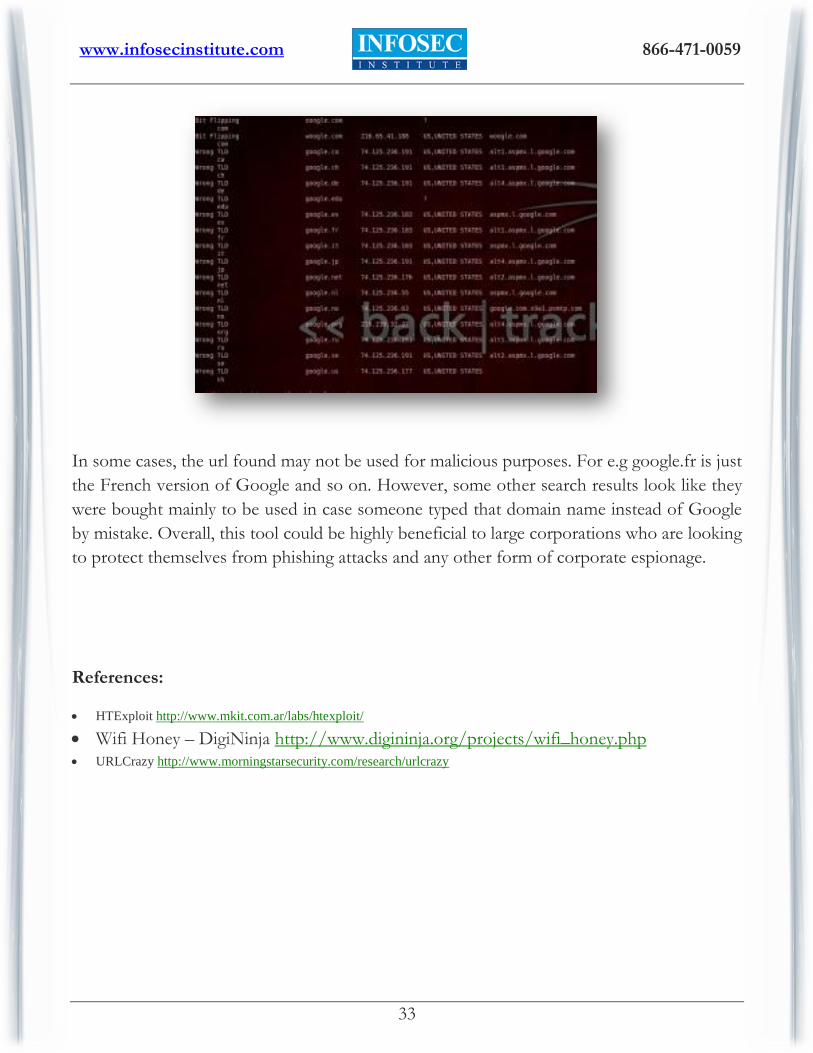
Let’s run a urlcrazy query against google.com. As you can see, it found a number of domain
names similar to Google.
www.infosecinstitute.com
866-471-0059
33
In some cases, the url found may not be used for malicious purposes. For e.g google.fr is just
the French version of Google and so on. However, some other search results look like they
were bought mainly to be used in case someone typed that domain name instead of Google
by mistake. Overall, this tool could be highly beneficial to large corporations who are looking
to protect themselves from phishing attacks and any other form of corporate espionage.
References:
HTExploit http://www.mkit.com.ar/labs/htexploit/
Wifi Honey – DigiNinja http://www.digininja.org/projects/wifi_honey.php URLCrazy http://www.morningstarsecurity.com/research/urlcrazy
www.infosecinstitute.com
866-471-0059
34
PART 4: DHCPIG & MITMPROXY
DHCPIG
DHCPig is a very nice and handy little tool used to carry out an advanced DHCP exhaustion
attack. It does this by grabbing all the IP addresses in its subnet by sending different DHCP
requests for those IP addresses. It also finds out its neighbor’s IP addresses in its vicinity and
releases their IP addresses by sending DHCP releases to the server. It then waits for a specific
timeout on its sent packets, and if the timeout is reached, it means all the IP addresses in the
network are now used up.
However, some neighbors may still have IP addresses on the network that will conflict with
the IP addresses taken up by the attacking machine. In this case, DHCpig can also knock all
the Windows systems offline by sending gratuitous ARP requests from all the IP address in
the network. A gratuitous ARP request is used to check for duplicate IP addresses. If there is
another device on the network using the same IP address (our attacking machine), the
windows machine will receive an ARP reply from the attacker’s machine. This way, the
Windows machine will know that it has an IP address conflict with another system on the
network. As a result, it will try to obtain another IP address, but since all the IP addresses are
now exhausted, it won’t be able to get a new IP address.
Awesome class, outstanding material. One of the best I have ever taken in my fourteen
years of taking Information Security classes. Previous classes I have taken in this topic
area are out of date, require numerous corrections and additional hand outs. The
documentation was perfect and additional tools were quickly made available to the
students to advance their study.
Dan Farrell
www.infosecinstitute.com
866-471-0059
35
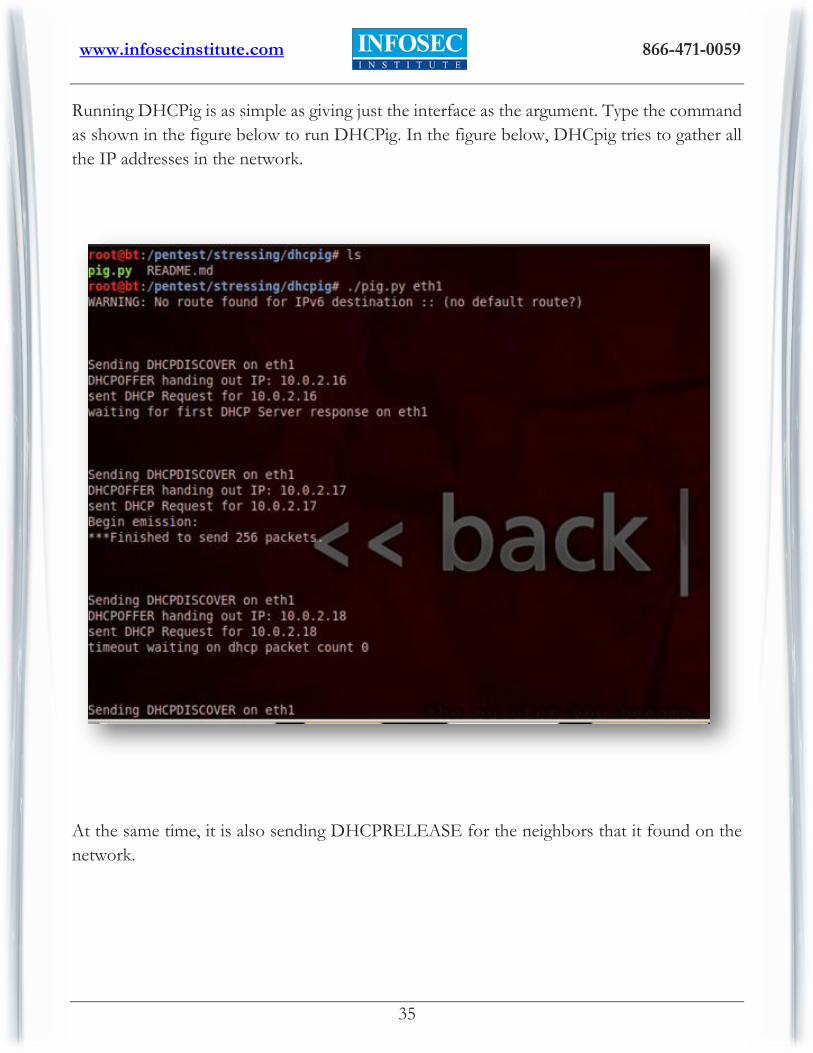
Running DHCPig is as simple as giving just the interface as the argument. Type the command
as shown in the figure below to run DHCPig. In the figure below, DHCpig tries to gather all
the IP addresses in the network.
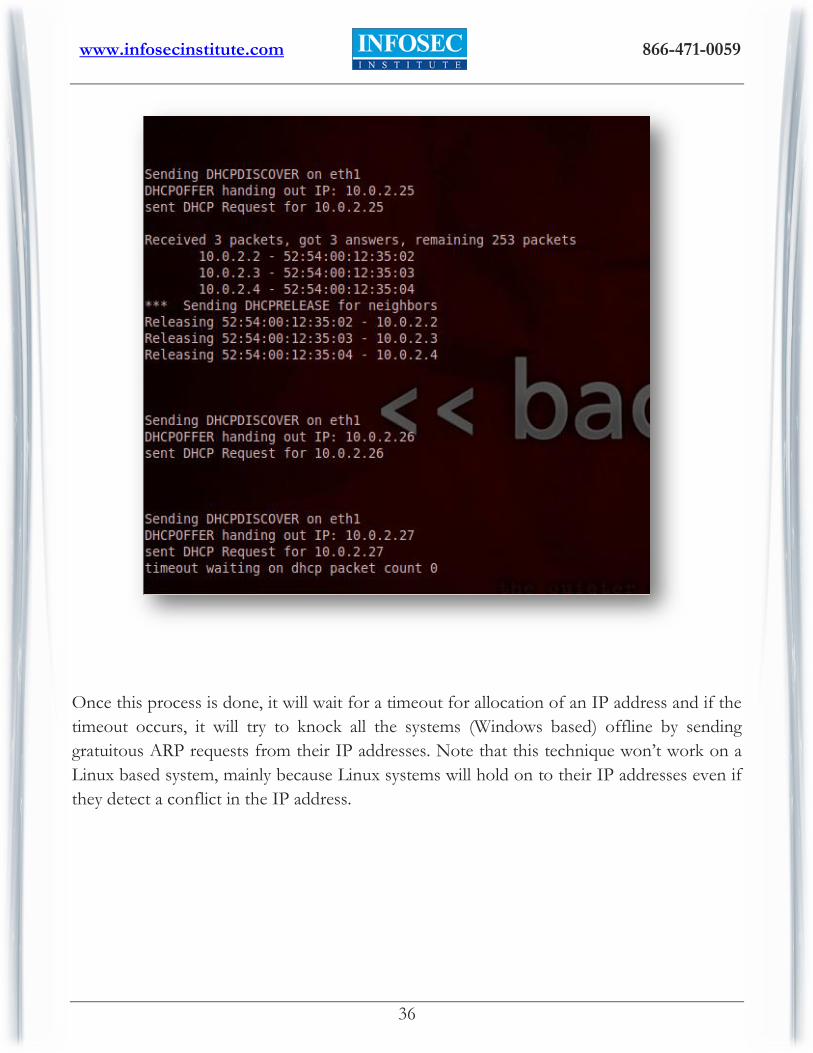
At the same time, it is also sending DHCPRELEASE for the neighbors that it found on the
network.
www.infosecinstitute.com
866-471-0059
36
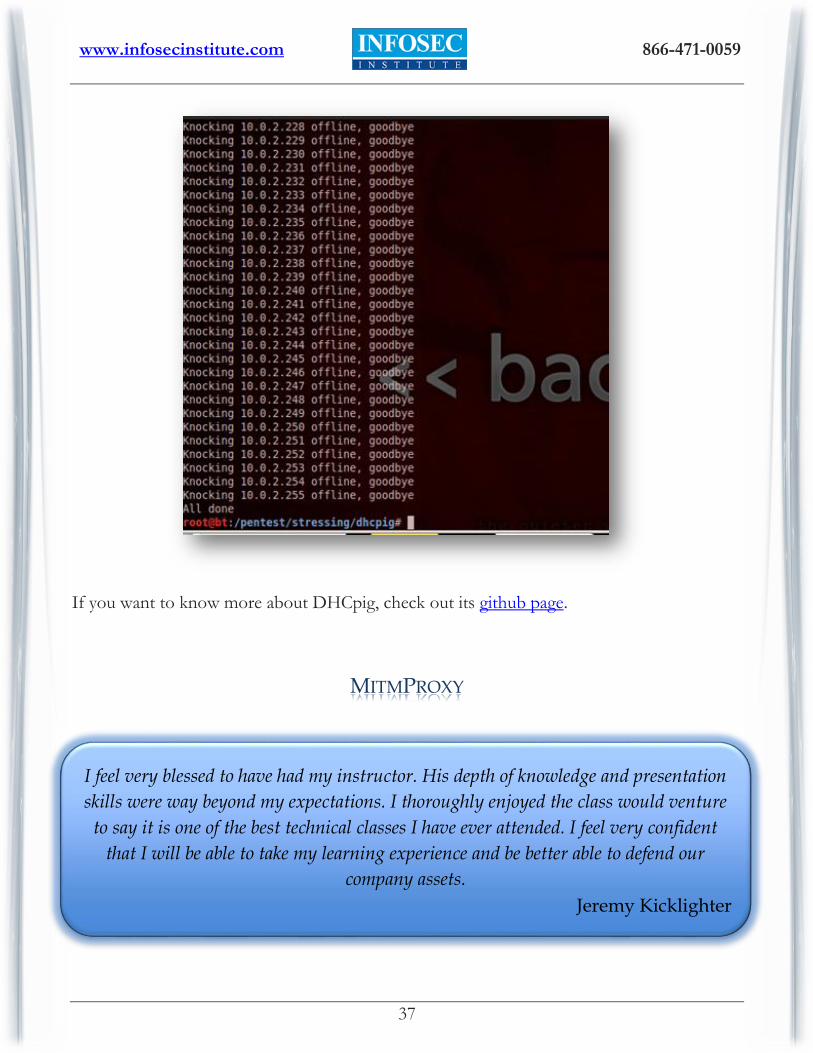
Once this process is done, it will wait for a timeout for allocation of an IP address and if the
timeout occurs, it will try to knock all the systems (Windows based) offline by sending
gratuitous ARP requests from their IP addresses. Note that this technique won’t work on a
Linux based system, mainly because Linux systems will hold on to their IP addresses even if
they detect a conflict in the IP address.
www.infosecinstitute.com
866-471-0059
37
If you want to know more about DHCpig, check out its github page.
MITMPROXY
I feel very blessed to have had my instructor. His depth of knowledge and presentation
skills were way beyond my expectations. I thoroughly enjoyed the class would venture
to say it is one of the best technical classes I have ever attended. I feel very confident
that I will be able to take my learning experience and be better able to defend our
company assets.
Jeremy Kicklighter
www.infosecinstitute.com
866-471-0059
38
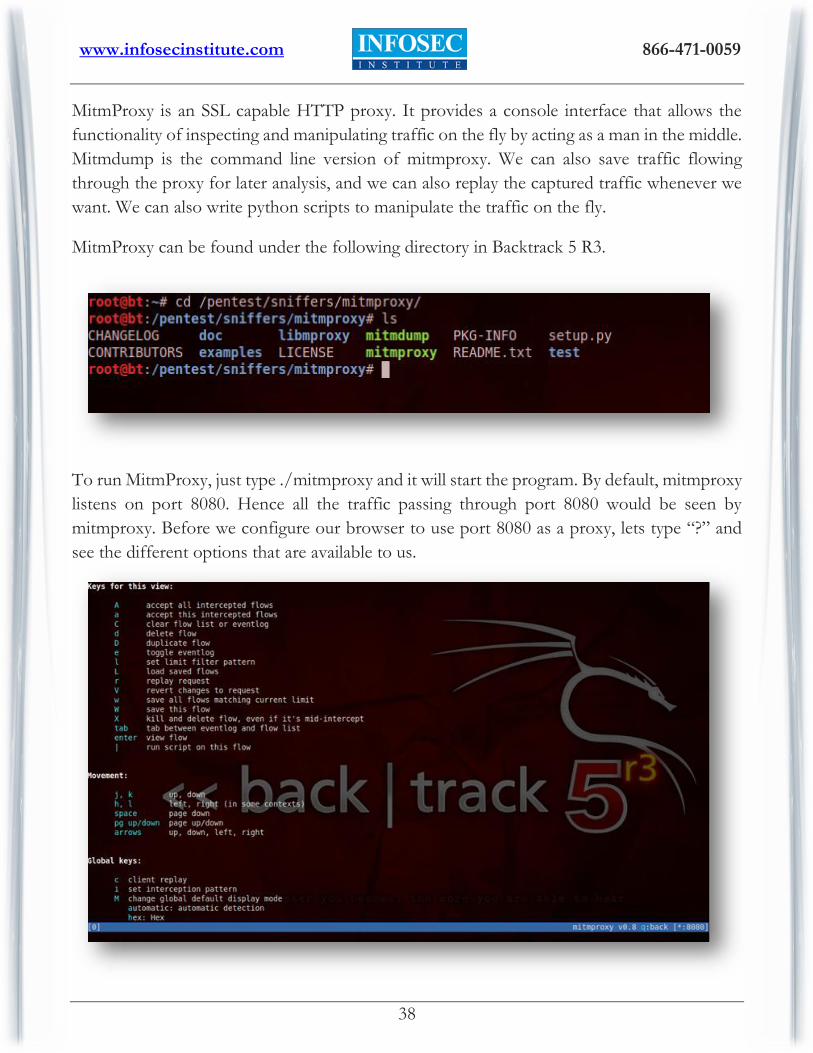
MitmProxy is an SSL capable HTTP proxy. It provides a console interface that allows the
functionality of inspecting and manipulating traffic on the fly by acting as a man in the middle.
Mitmdump is the command line version of mitmproxy. We can also save traffic flowing
through the proxy for later analysis, and we can also replay the captured traffic whenever we
want. We can also write python scripts to manipulate the traffic on the fly.
MitmProxy can be found under the following directory in Backtrack 5 R3.
To run MitmProxy, just type ./mitmproxy and it will start the program. By default, mitmproxy
listens on port 8080. Hence all the traffic passing through port 8080 would be seen by
mitmproxy. Before we configure our browser to use port 8080 as a proxy, lets type “?” and
see the different options that are available to us.

www.infosecinstitute.com
866-471-0059
39
Now, configure your browser to use port 8080 on localhost as a proxy. Using our browser,
lets now browse to a particular website. You will see that all the requests are being seen by
mitmproxy. Notice the 2 arrows “>>”. It shows you to select different request/reponse and
perform actions on them. You can switch between different request/response using the j and
k keys. Intercepted responses will be shown in an orange text. Currently there are no
intercepted responses, mainly because we haven’t configured mitmproxy to intercept any kind
of response. Also, you can see the event log by holding down the “e” key.
We can also select a particular flow and look at the details of it. To select any particular flow
just take the pointer (the double arrows) next to it and press enter.
www.infosecinstitute.com
866-471-0059
40
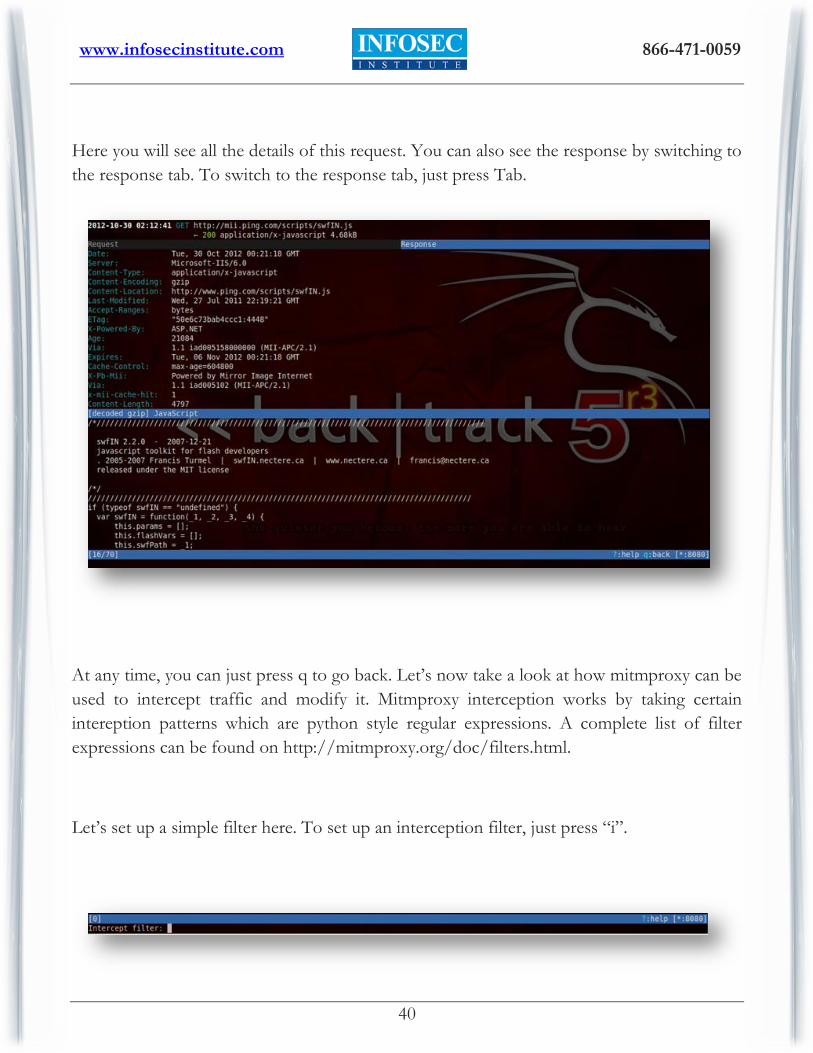
Here you will see all the details of this request. You can also see the response by switching to
the response tab. To switch to the response tab, just press Tab.
At any time, you can just press q to go back. Let’s now take a look at how mitmproxy can be
used to intercept traffic and modify it. Mitmproxy interception works by taking certain
intereption patterns which are python style regular expressions. A complete list of filter
expressions can be found on http://mitmproxy.org/doc/filters.html.
Let’s set up a simple filter here. To set up an interception filter, just press “i”.
www.infosecinstitute.com
866-471-0059
41
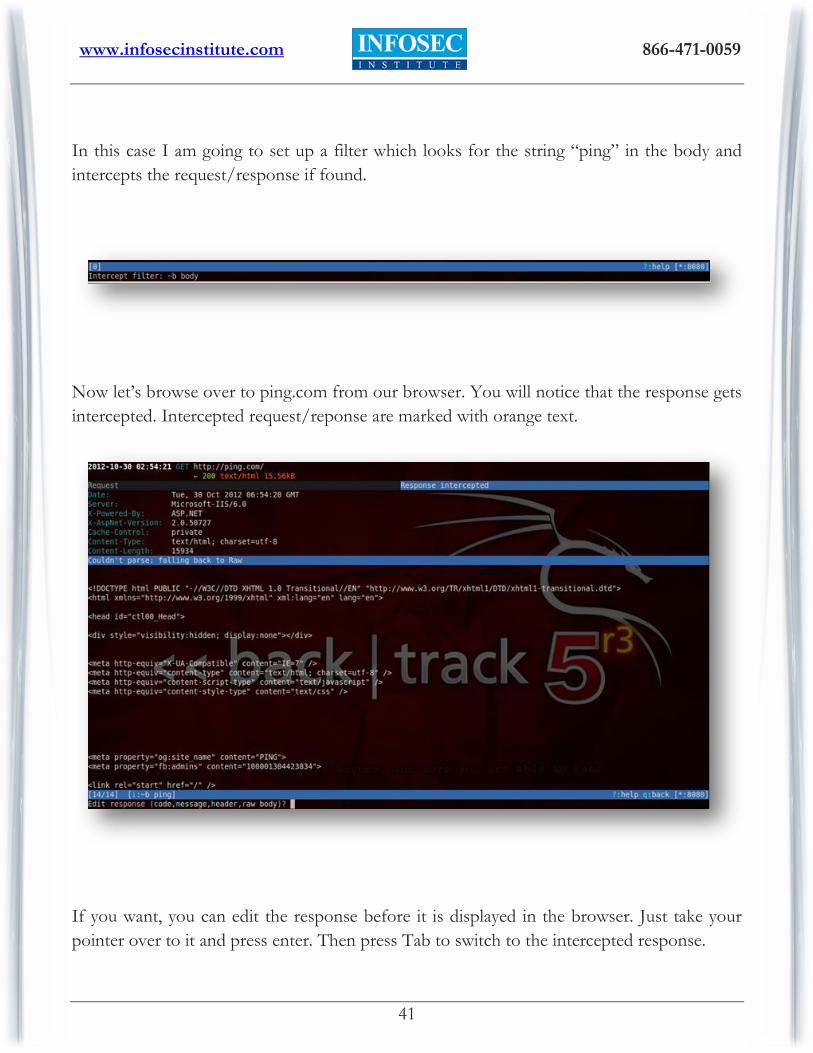
In this case I am going to set up a filter which looks for the string “ping” in the body and
intercepts the request/response if found.
Now let’s browse over to ping.com from our browser. You will notice that the response gets
intercepted. Intercepted request/reponse are marked with orange text.
If you want, you can edit the response before it is displayed in the browser. Just take your
pointer over to it and press enter. Then press Tab to switch to the intercepted response.
www.infosecinstitute.com
866-471-0059
42
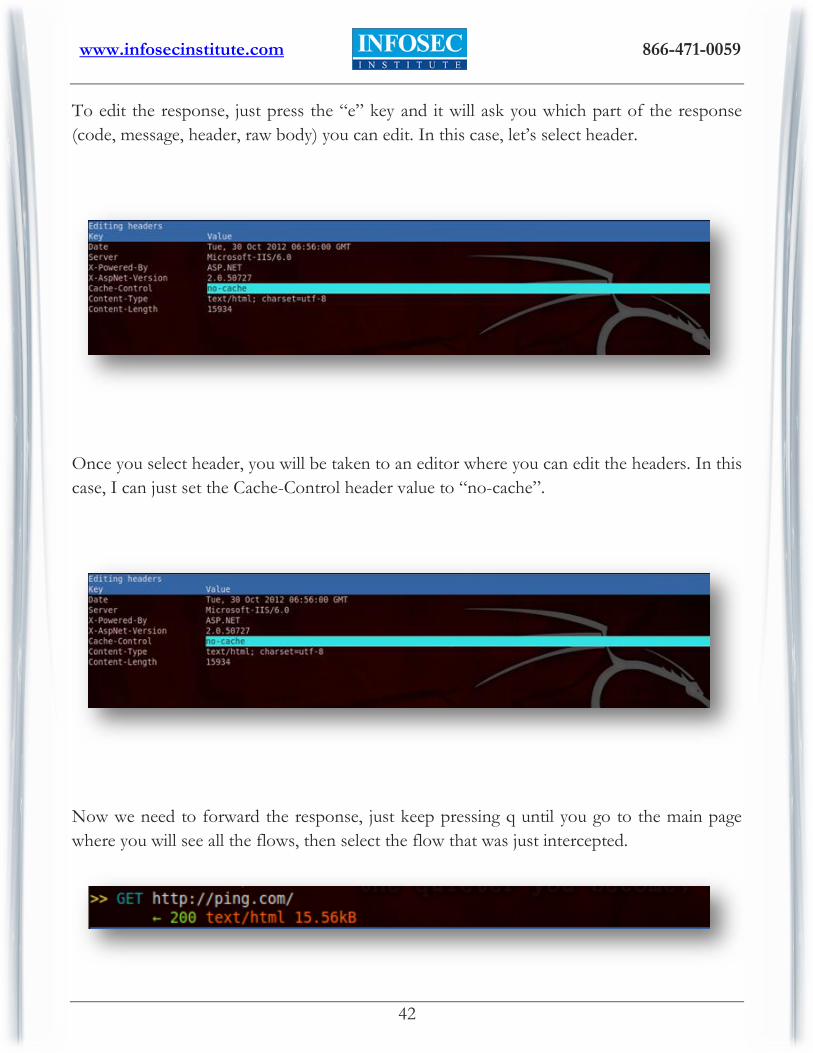
To edit the response, just press the “e” key and it will ask you which part of the response
(code, message, header, raw body) you can edit. In this case, let’s select header.
Once you select header, you will be taken to an editor where you can edit the headers. In this
case, I can just set the Cache-Control header value to “no-cache”.
Now we need to forward the response, just keep pressing q until you go to the main page
where you will see all the flows, then select the flow that was just intercepted.
www.infosecinstitute.com
866-471-0059
43
Now press a to forward this response. You will see that the page will now load up in the
browser and the subsequent requests/responses will now show up.
You can also save all the traffic from mitmproxy to an output file. Just use the -w command
to specify the output file name and mitmproxy will write all the traffic that it sees onto the
output file. In this case, I save all the traffic to a file named capturedTraffic.
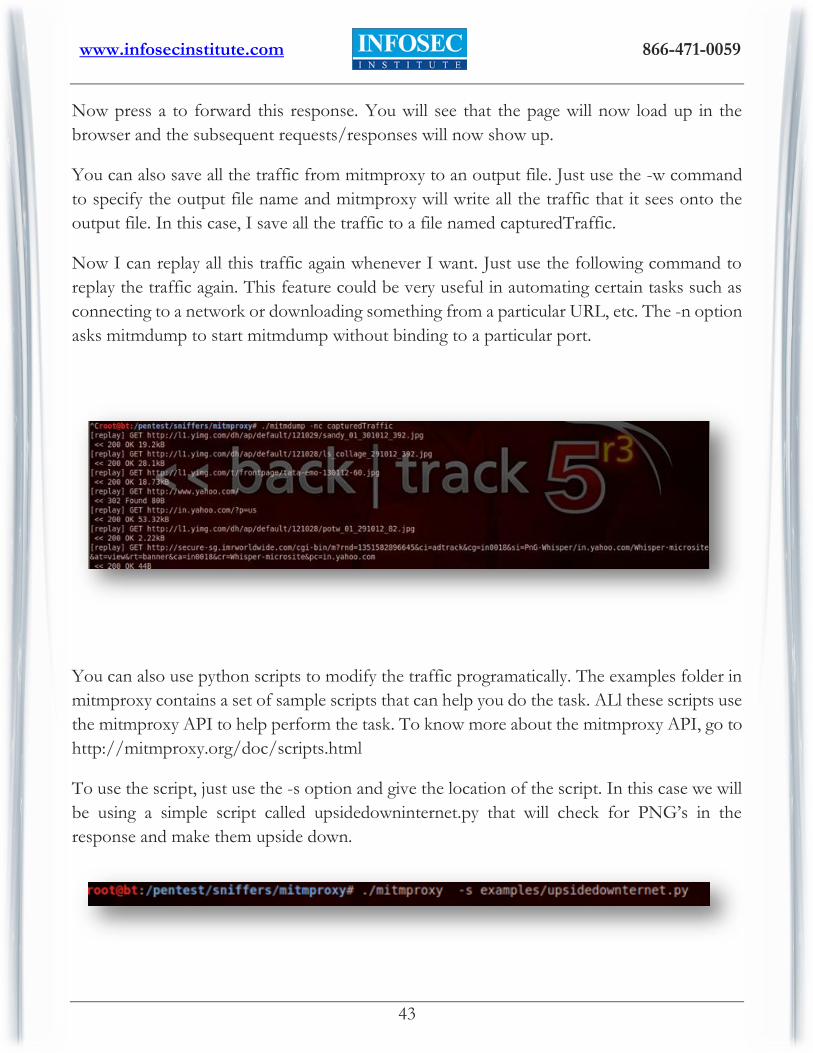
Now I can replay all this traffic again whenever I want. Just use the following command to
replay the traffic again. This feature could be very useful in automating certain tasks such as
connecting to a network or downloading something from a particular URL, etc. The -n option
asks mitmdump to start mitmdump without binding to a particular port.
You can also use python scripts to modify the traffic programatically. The examples folder in
mitmproxy contains a set of sample scripts that can help you do the task. ALl these scripts use
the mitmproxy API to help perform the task. To know more about the mitmproxy API, go to
http://mitmproxy.org/doc/scripts.html
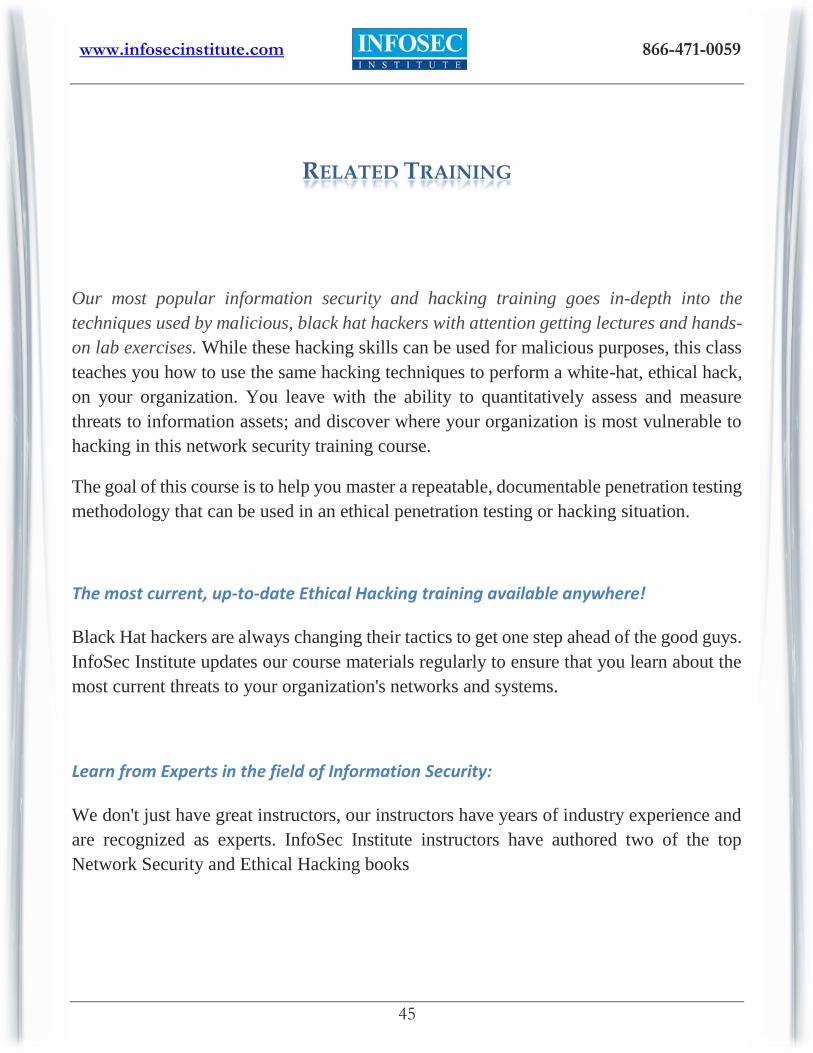
To use the script, just use the -s option and give the location of the script. In this case we will
be using a simple script called upsidedowninternet.py that will check for PNG’s in the
response and make them upside down.

www.infosecinstitute.com
866-471-0059
44
And the result is images upside down. :). In later articles, we will learn about how we can use
Mitmproxy to intercept SSL requests.
References:
DHCPig: https://github.com/kamorin/DHCPig
MitmProxy official website: http://mitmproxy.org
www.infosecinstitute.com
866-471-0059
45
RELATED TRAINING
Our most popular information security and hacking training goes in-depth into the
techniques used by malicious, black hat hackers with attention getting lectures and hands-
on lab exercises. While these hacking skills can be used for malicious purposes, this class
teaches you how to use the same hacking techniques to perform a white-hat, ethical hack,
on your organization. You leave with the ability to quantitatively assess and measure
threats to information assets; and discover where your organization is most vulnerable to
hacking in this network security training course.
The goal of this course is to help you master a repeatable, documentable penetration testing
methodology that can be used in an ethical penetration testing or hacking situation.
The most current, up-to-date Ethical Hacking training available anywhere!
Black Hat hackers are always changing their tactics to get one step ahead of the good guys.
InfoSec Institute updates our course materials regularly to ensure that you learn about the
most current threats to your organization's networks and systems.
Learn from Experts in the field of Information Security:
We don't just have great instructors, our instructors have years of industry experience and
are recognized as experts. InfoSec Institute instructors have authored two of the top
Network Security and Ethical Hacking books

www.infosecinstitute.com
866-471-0059
46
ABOUT THE AUTHOR
Prateek Gianchandani, a recent IIT graduate, has interests in the field of
Penetration Testing, Web Application Security and Intrusion Detection. He
is currently a researcher for InfoSec Institute. In the past he has worked for
security-based startups. In his pastime he maintains his website searching-
eye.com.