Avid Technology, Inc. Trouble Shooting Guide David Vatalaro Broadcast Support January...
57
Proprietary and Confidential Avid Technology, Inc. Xdeck-I Trouble Shooting Guide David Vatalaro Broadcast Support January 28, 2004 This Document is Proprietary and Confidential for Avid Technology, Inc. Employees only.
Transcript of Avid Technology, Inc. Trouble Shooting Guide David Vatalaro Broadcast Support January...

Proprietary and Confidential
Avid Technology, Inc. Xdeck-I
Trouble Shooting Guide
David Vatalaro Broadcast Support
January 28, 2004
This Document is Proprietary and Confidential for Avid Technology, Inc. Employees only.

David Vatalaro January 2004 Xdeck-I Broadcast Support Troubleshooting Guide
Avid Technology, Inc. Proprietary and Confidential 2/2
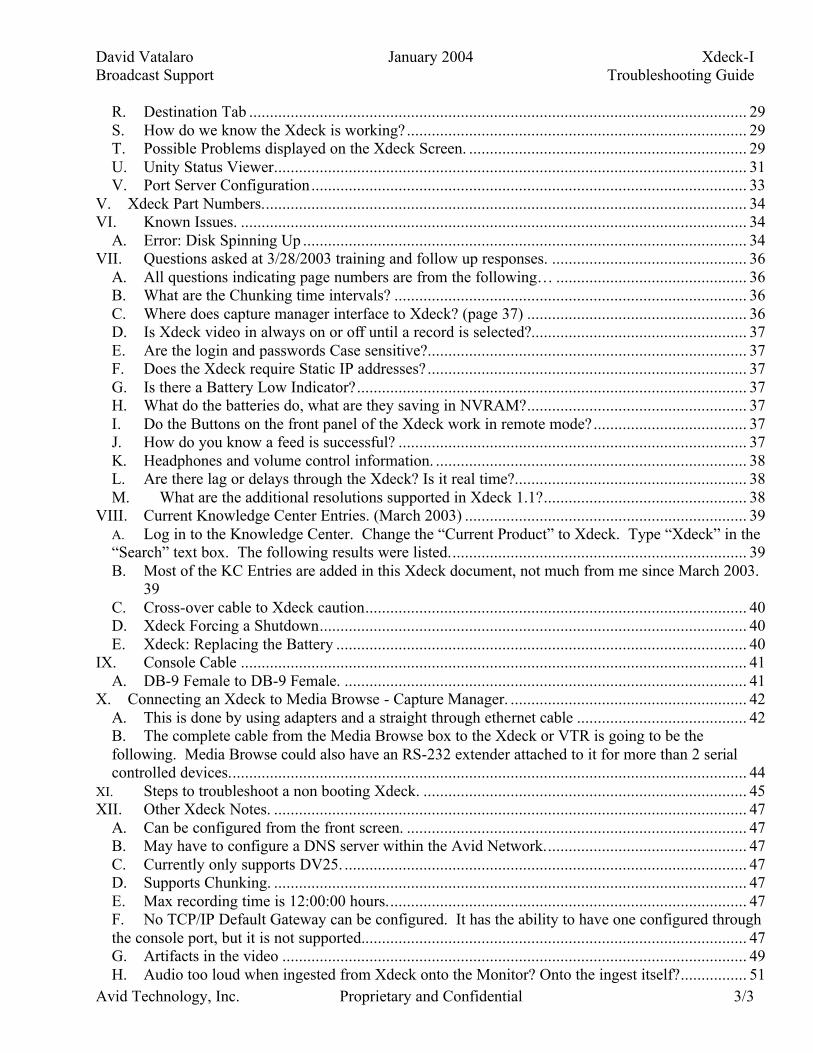
Table of Contents I. General Xdeck Information ............................................................................................................ 7
A. What is Xdeck? .......................................................................................................................... 7 B. What does “Ingest” mean?.......................................................................................................... 7 C. Doesn’t Avid Already have an Ingest Device?............................................................................ 7 D. Airspace ..................................................................................................................................... 7 E. A Redundant Ingest with current Avid Technology using AirSpace ............................................ 7 F. Another Example is a Redundant Ingest with the Xdeck and Unity. ............................................ 8 G. Where does it belong in the Avid Broadcast Network? ............................................................... 8
II. Get information required for configuration of the Xdeck. ............................................................. 12 A. Fill the information required in the "Xdeck Information Sheet" before you begin. .................... 12 B. Configure the File Manager Application for use by the Xdeck. ................................................. 15 C. Configure the Media Manager Application for use by the Xdeck. ............................................. 15 D. Miscellaneous Information….................................................................................................... 15
III. Establishing a Network Connection to the Xdeck...................................................................... 15 A. Connect the Xdeck to a PC. ...................................................................................................... 15 B. Ethernet Crossover Cable ......................................................................................................... 16 C. Ethernet Straight Through Cable.Notice there are no crossover pins. ........................................ 16 D. Configure Xdeck Initial IP Interface ......................................................................................... 17 E. Configure Xdeck Initial IP Interface ......................................................................................... 17 F. Select Properties for the Network Card..................................................................................... 17 G. Select TCP/IP Properties for the Network Card......................................................................... 17 H. Configure your Temporary IP address. ..................................................................................... 17 I. Save TCP/IP Changes. .............................................................................................................. 19 J. PC IP Address Network Information Configured correctly on the same network as the Xdeck default configuration. ....................................................................................................................... 19 K. Select “Run” from the task bar.................................................................................................. 19 L. Ping the Xdeck ......................................................................................................................... 19 M. Connect to Xdeck using Internet Explorer............................................................................. 19
IV. Configuring the Xdeck ............................................................................................................. 21 A. Xdeck Configuration Screen. .................................................................................................... 21 B. Power Cycle the Xdeck............................................................................................................. 23 C. Return the Configuration PC to its original state. ...................................................................... 23 D. Local Area Connection Status................................................................................................... 23 E. Local Area Connection Properties ............................................................................................ 23 F. Internet Protocol (TCP/IP) Properties ....................................................................................... 23 G. Select “OK” at the “Internet Protocol (TCP/IP) Properties” window. ........................................ 23 H. Select “OK” at the “Local Area Connection Properties” window. ............................................. 23 I. Select “Close” at the “Local Area Connection Status” window. ................................................ 23 J. Connect the Xdeck to the Portserver Network Switch. .............................................................. 24 K. Connect to the Xdeck using Internet Explorer using either of the following methods. ............... 25 L. Xdeck “Status” is the default window after power up................................................................ 25 M. Configure the Xdeck Media Manager information. ............................................................... 26 N. Configure Media Manager Information..................................................................................... 27 O. Verify the Changes are Correct by Viewing the Window after Selecting “Configure”. .............. 27 P. Select “Destination” (File Manager) Information...................................................................... 28 Q. Configure “Destination” (File Manager) Information................................................................ 28
David Vatalaro January 2004 Xdeck-I Broadcast Support Troubleshooting Guide
Avid Technology, Inc. Proprietary and Confidential 3/3
R. Destination Tab ........................................................................................................................ 29 S. How do we know the Xdeck is working?.................................................................................. 29 T. Possible Problems displayed on the Xdeck Screen. ................................................................... 29 U. Unity Status Viewer.................................................................................................................. 31 V. Port Server Configuration......................................................................................................... 33
V. Xdeck Part Numbers..................................................................................................................... 34 VI. Known Issues. .......................................................................................................................... 34
A. Error: Disk Spinning Up ........................................................................................................... 34 VII. Questions asked at 3/28/2003 training and follow up responses. ............................................... 36
A. All questions indicating page numbers are from the following… .............................................. 36 B. What are the Chunking time intervals? ..................................................................................... 36 C. Where does capture manager interface to Xdeck? (page 37) ..................................................... 36 D. Is Xdeck video in always on or off until a record is selected?.................................................... 37 E. Are the login and passwords Case sensitive?............................................................................. 37 F. Does the Xdeck require Static IP addresses?............................................................................. 37 G. Is there a Battery Low Indicator?.............................................................................................. 37 H. What do the batteries do, what are they saving in NVRAM?..................................................... 37 I. Do the Buttons on the front panel of the Xdeck work in remote mode?..................................... 37 J. How do you know a feed is successful? .................................................................................... 37 K. Headphones and volume control information. ........................................................................... 38 L. Are there lag or delays through the Xdeck? Is it real time?........................................................ 38 M. What are the additional resolutions supported in Xdeck 1.1?................................................. 38
VIII. Current Knowledge Center Entries. (March 2003) .................................................................... 39 A. Log in to the Knowledge Center. Change the “Current Product” to Xdeck. Type “Xdeck” in the “Search” text box. The following results were listed........................................................................ 39 B. Most of the KC Entries are added in this Xdeck document, not much from me since March 2003. 39 C. Cross-over cable to Xdeck caution............................................................................................ 40 D. Xdeck Forcing a Shutdown....................................................................................................... 40 E. Xdeck: Replacing the Battery ................................................................................................... 40
IX. Console Cable .......................................................................................................................... 41 A. DB-9 Female to DB-9 Female. ................................................................................................. 41
X. Connecting an Xdeck to Media Browse - Capture Manager. ......................................................... 42 A. This is done by using adapters and a straight through ethernet cable ......................................... 42 B. The complete cable from the Media Browse box to the Xdeck or VTR is going to be the following. Media Browse could also have an RS-232 extender attached to it for more than 2 serial controlled devices............................................................................................................................. 44
XI. Steps to troubleshoot a non booting Xdeck. .............................................................................. 45 XII. Other Xdeck Notes. .................................................................................................................. 47
A. Can be configured from the front screen. .................................................................................. 47 B. May have to configure a DNS server within the Avid Network................................................. 47 C. Currently only supports DV25. ................................................................................................. 47 D. Supports Chunking. .................................................................................................................. 47 E. Max recording time is 12:00:00 hours....................................................................................... 47 F. No TCP/IP Default Gateway can be configured. It has the ability to have one configured through the console port, but it is not supported............................................................................................. 47 G. Artifacts in the video ................................................................................................................ 49 H. Audio too loud when ingested from Xdeck onto the Monitor? Onto the ingest itself?................ 51

David Vatalaro January 2004 Xdeck-I Broadcast Support Troubleshooting Guide
Avid Technology, Inc. Proprietary and Confidential 4/4
I. What configurations affect what on the Xdeck? ........................................................................ 51 J. Xdeck Maintenance .................................................................................................................. 52 K. Xdeck Questions from Workgroup Bootcamp Training ............................................................ 53
XIII. PortServer and the Xdeck ......................................................................................................... 54 A. Xdeck and Editing Clients connected to a Port server. .............................................................. 54 B. Data Rate Calculations ............................................................................................................. 55
XIV. Assorted Xdeck Issues. ......................................................................................................... 56 A. Troubleshooting a "Database Failure" message. ........................................................................ 56 B. Audio Issues............................................................................................................................. 56 C. Does the Xdeck us an Editing Client License? .......................................................................... 56 D. Xdeck name will not change after ingesting clip on the LCD panel on the Xdeck. .................... 56 E. "MM2 BUILD OMF2 FAILED" error message ........................................................................ 56 F. No Media was recorded in the Xdeck. The Xdeck only recorded black. ................................... 56 G. Xdeck does not fully reboot...................................................................................................... 56
David Vatalaro January 2004 Xdeck-I Broadcast Support Troubleshooting Guide
Avid Technology, Inc. Proprietary and Confidential 5/5
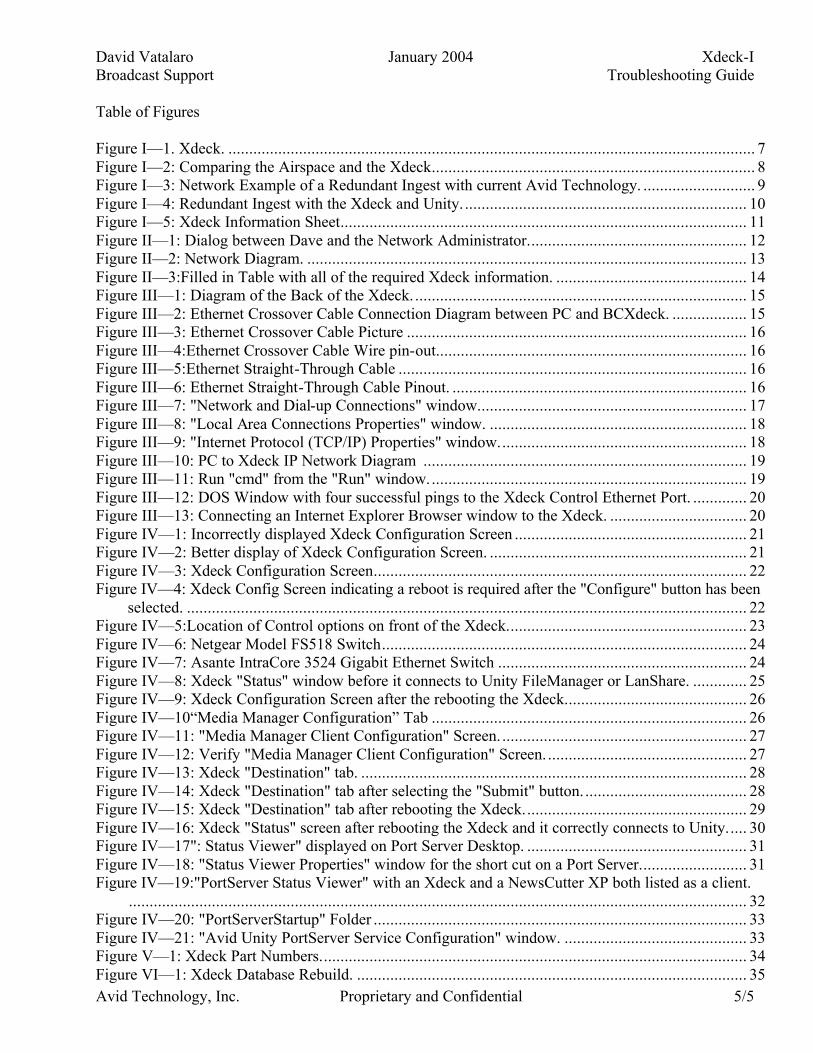
Table of Figures Figure I—1. Xdeck. ............................................................................................................................... 7 Figure I—2: Comparing the Airspace and the Xdeck.............................................................................. 8 Figure I—3: Network Example of a Redundant Ingest with current Avid Technology. ........................... 9 Figure I—4: Redundant Ingest with the Xdeck and Unity. .................................................................... 10 Figure I—5: Xdeck Information Sheet.................................................................................................. 11 Figure II—1: Dialog between Dave and the Network Administrator..................................................... 12 Figure II—2: Network Diagram. .......................................................................................................... 13 Figure II—3:Filled in Table with all of the required Xdeck information. .............................................. 14 Figure III—1: Diagram of the Back of the Xdeck. ................................................................................ 15 Figure III—2: Ethernet Crossover Cable Connection Diagram between PC and BCXdeck. .................. 15 Figure III—3: Ethernet Crossover Cable Picture .................................................................................. 16 Figure III—4:Ethernet Crossover Cable Wire pin-out........................................................................... 16 Figure III—5:Ethernet Straight-Through Cable .................................................................................... 16 Figure III—6: Ethernet Straight-Through Cable Pinout. ....................................................................... 16 Figure III—7: "Network and Dial-up Connections" window................................................................. 17 Figure III—8: "Local Area Connections Properties" window. .............................................................. 18 Figure III—9: "Internet Protocol (TCP/IP) Properties" window............................................................ 18 Figure III—10: PC to Xdeck IP Network Diagram .............................................................................. 19 Figure III—11: Run "cmd" from the "Run" window............................................................................. 19 Figure III—12: DOS Window with four successful pings to the Xdeck Control Ethernet Port. ............. 20 Figure III—13: Connecting an Internet Explorer Browser window to the Xdeck. ................................. 20 Figure IV—1: Incorrectly displayed Xdeck Configuration Screen ........................................................ 21 Figure IV—2: Better display of Xdeck Configuration Screen. .............................................................. 21 Figure IV—3: Xdeck Configuration Screen.......................................................................................... 22 Figure IV—4: Xdeck Config Screen indicating a reboot is required after the "Configure" button has been
selected. ....................................................................................................................................... 22 Figure IV—5:Location of Control options on front of the Xdeck.......................................................... 23 Figure IV—6: Netgear Model FS518 Switch........................................................................................ 24 Figure IV—7: Asante IntraCore 3524 Gigabit Ethernet Switch ............................................................ 24 Figure IV—8: Xdeck "Status" window before it connects to Unity FileManager or LanShare. ............. 25 Figure IV—9: Xdeck Configuration Screen after the rebooting the Xdeck............................................ 26 Figure IV—10“Media Manager Configuration” Tab ............................................................................ 26 Figure IV—11: "Media Manager Client Configuration" Screen. ........................................................... 27 Figure IV—12: Verify "Media Manager Client Configuration" Screen. ................................................ 27 Figure IV—13: Xdeck "Destination" tab. ............................................................................................. 28 Figure IV—14: Xdeck "Destination" tab after selecting the "Submit" button. ....................................... 28 Figure IV—15: Xdeck "Destination" tab after rebooting the Xdeck...................................................... 29 Figure IV—16: Xdeck "Status" screen after rebooting the Xdeck and it correctly connects to Unity..... 30 Figure IV—17": Status Viewer" displayed on Port Server Desktop. ..................................................... 31 Figure IV—18: "Status Viewer Properties" window for the short cut on a Port Server.......................... 31 Figure IV—19:"PortServer Status Viewer" with an Xdeck and a NewsCutter XP both listed as a client.
..................................................................................................................................................... 32 Figure IV—20: "PortServerStartup" Folder .......................................................................................... 33 Figure IV—21: "Avid Unity PortServer Service Configuration" window. ............................................ 33 Figure V—1: Xdeck Part Numbers....................................................................................................... 34 Figure VI—1: Xdeck Database Rebuild. .............................................................................................. 35
David Vatalaro January 2004 Xdeck-I Broadcast Support Troubleshooting Guide
Avid Technology, Inc. Proprietary and Confidential 6/6
Figure VII—1: Xdeck Incremental Chunking times.............................................................................. 36 Figure VII—2: Back of Xdeck. ............................................................................................................ 37 Figure VIII—1: Table of Xdeck Knowledge Center entries before March 2003.................................... 39 Figure IX—1: Xdeck Console Cable picture and pinout. ...................................................................... 41 Figure IX—2: Xdeck Console Cable pinout. ........................................................................................ 41 Figure X—1: Required Adapter Part Numbers to connect to Xdeck for Media Browse Deck Control. .. 42 Figure X—2: DB-25 (Female) to RJ-45 (Male) Wire Pinout. ............................................................... 42 Figure X—3: DB-25 to RJ-45 Signal and Pinout Information.............................................................. 42 Figure X—4: DB-9 (Male) to RJ-45 (Female) Wire Pinout .................................................................. 43 Figure X—5: DB9, RS233 to RJ-45 Signal and Pinout Information. .................................................... 43 Figure X—6: Xdeck Connection to Media Browse / Capture Manager. ................................................ 44 Figure X—7: If there is ever a need for a Digi Octopus connection to a DB-9 Male or Female interface,
it will have this configuration. ...................................................................................................... 44 Figure XI—1: Steps to troubleshoot a non booting Xdeck - part 1. ....................................................... 45 Figure XI—2: Steps to troubleshoot a non booting Xdeck - part 2. ....................................................... 46 Figure XII—1: “Video and Audio” Screen (Top Half).......................................................................... 47 Figure XII—2: “Video and Audio” Screen (Bottom Half). ................................................................... 48 Figure XII—3: “Record Settings” ........................................................................................................ 48 Figure XII—4: Artifacts occuring when colorbars are digitized with a problematic Xdeck ................... 50 Figure XII—5: Audio channel default configuration............................................................................. 51 Figure XII—6: Required Xdeck Maintenance Schedule. ...................................................................... 52 Figure XIII—1: DV Resolution and corresponding DV 25 Streams...................................................... 54 Figure XIII—2: Maximum amount of Xdeck and Editors per Port Server............................................. 54 Figure XIII—3: Amount of time corresponding to the amount of storage allocated for NTSC and PAL.
..................................................................................................................................................... 55 Figure XIII—4: Data Rate required to capture DV-25 and DV-50 Media. ............................................ 55 Figure XIV—1: Xdeck "Video and Audio" Tab used to choose "Composite" or "Component"............ 57
David Vatalaro January 2004 Xdeck-I Broadcast Support Troubleshooting Guide
Avid Technology, Inc. Proprietary and Confidential 7/7
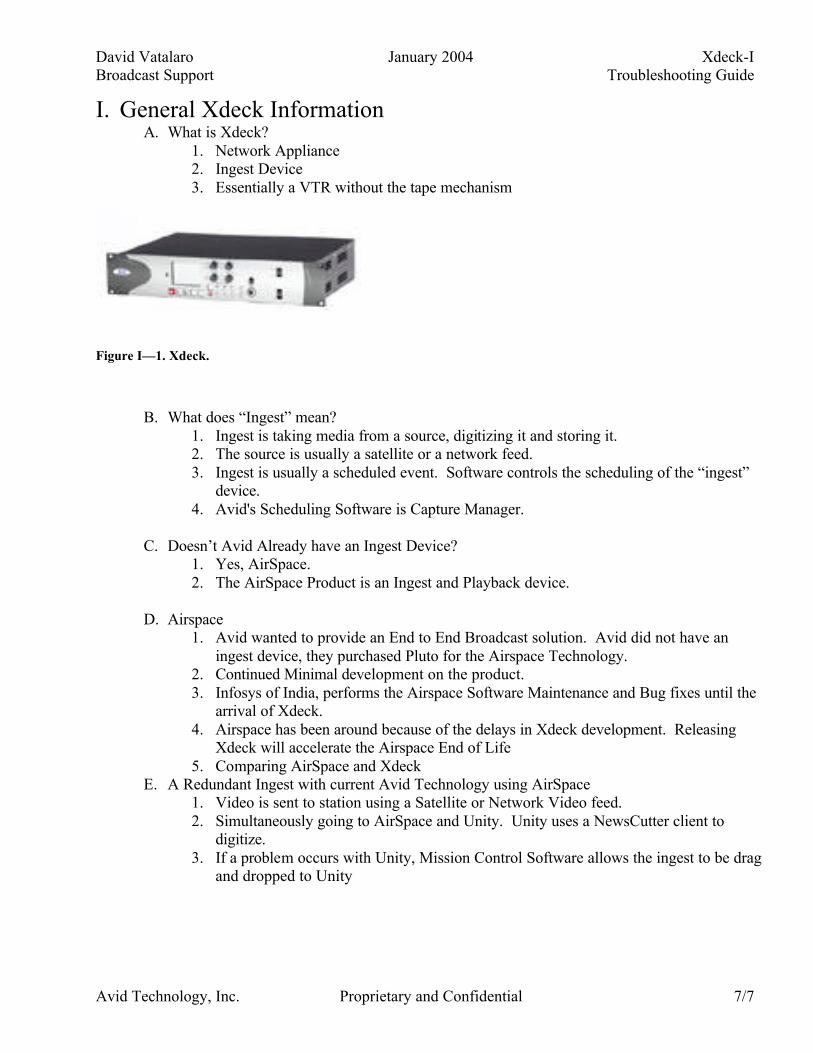
I. General Xdeck Information A. What is Xdeck?
1. Network Appliance 2. Ingest Device 3. Essentially a VTR without the tape mechanism
Figure I—1. Xdeck.
B. What does “Ingest” mean? 1. Ingest is taking media from a source, digitizing it and storing it. 2. The source is usually a satellite or a network feed. 3. Ingest is usually a scheduled event. Software controls the scheduling of the “ingest”
device. 4. Avid's Scheduling Software is Capture Manager.
C. Doesn’t Avid Already have an Ingest Device?
1. Yes, AirSpace. 2. The AirSpace Product is an Ingest and Playback device.
D. Airspace
1. Avid wanted to provide an End to End Broadcast solution. Avid did not have an ingest device, they purchased Pluto for the Airspace Technology.
2. Continued Minimal development on the product. 3. Infosys of India, performs the Airspace Software Maintenance and Bug fixes until the
arrival of Xdeck. 4. Airspace has been around because of the delays in Xdeck development. Releasing
Xdeck will accelerate the Airspace End of Life 5. Comparing AirSpace and Xdeck
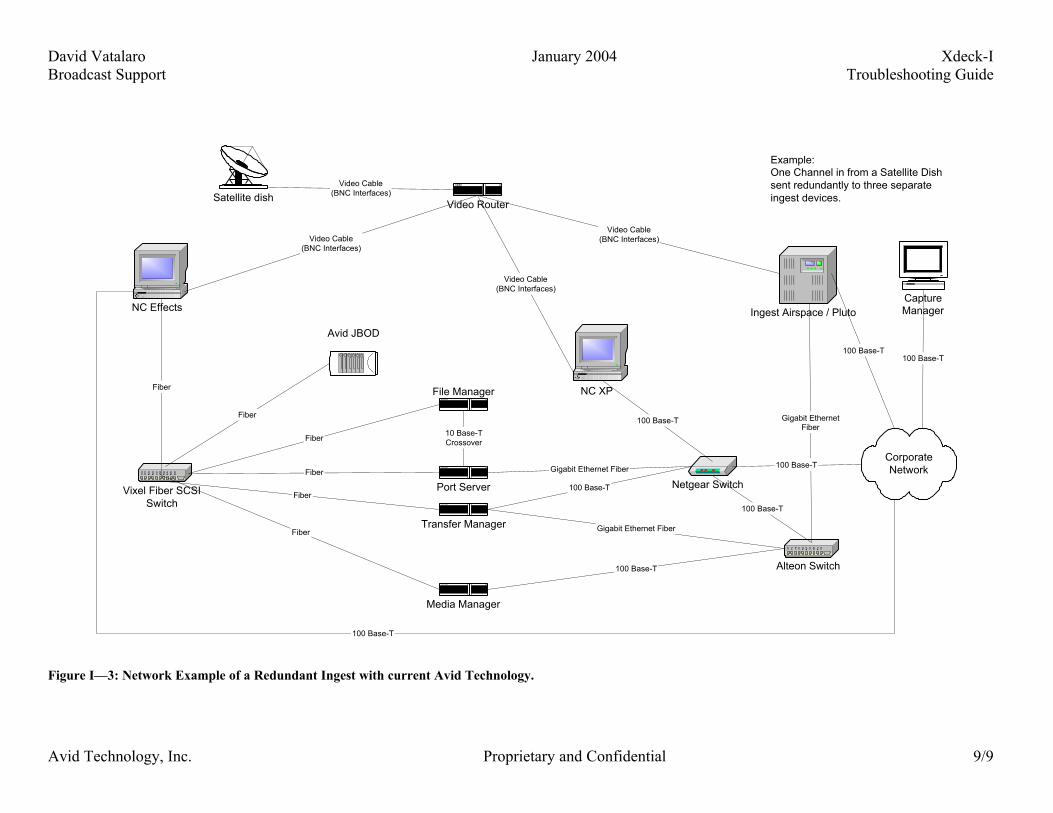
E. A Redundant Ingest with current Avid Technology using AirSpace 1. Video is sent to station using a Satellite or Network Video feed. 2. Simultaneously going to AirSpace and Unity. Unity uses a NewsCutter client to
digitize. 3. If a problem occurs with Unity, Mission Control Software allows the ingest to be drag
and dropped to Unity

David Vatalaro January 2004 Xdeck-I Broadcast Support Troubleshooting Guide
Avid Technology, Inc. Proprietary and Confidential 8/8
Figure I—2: Comparing the Airspace and the Xdeck
F. Another Example is a Redundant Ingest with the Xdeck and Unity. 1. A Network Feed would have to go to two separate Xdecks on two separate Unity
networks.
G. Where does it belong in the Avid Broadcast Network? 1. It connects to PortServer Pro, it is treated like a NewsCutter or ExpressDV client. 2. It requires a 10 MB/s and 100 MB/s Ethernet connection. 3. One for basic network communication and the other is for sending ingest data to
unity. 4. The source media to be ingested is also connected using either composite or
component video and the corresponding audio.
Airspace XdeckCompany Originator Pluto Avid
Primary Design Video On Demand ProductIngest with Unity System and the broadcast environment
Present Design Ingest and Playback Server Ingest productWorkgroup Integrated into this environment Designed for use in this environmentProduct Life Cycle End Of Life New ProductStorage Built In Requires Unity Storage
Software Maintenance Infosys in IndiaLocally by NLTek. Jim McKain, formerly of Avid, started this company.
David Vatalaro January 2004 Xdeck-I Broadcast Support Troubleshooting Guide
Avid Technology, Inc. Proprietary and Confidential 9/9
Figure I—3: Network Example of a Redundant Ingest with current Avid Technology.
File Manager
Port Server
Transfer Manager
Media Manager
Alteon Switch
Vixel Fiber SCSISwitch
NC Effects Ingest Airspace / Pluto
Netgear SwitchFiber
Fiber
Fiber
Fiber
Fiber
Fiber
Gigabit EthernetFiber
Gigabit Ethernet Fiber
100 Base-T
100 Base-T
100 Base-T
10 Base-TCrossover
Avid JBOD
NC XP
100 Base-T
Gigabit Ethernet Fiber
Satellite dishVideo Router
Video Cable(BNC Interfaces)
Video Cable(BNC Interfaces)
Video Cable(BNC Interfaces)
Video Cable(BNC Interfaces)
Example:One Channel in from a Satellite Dishsent redundantly to three separateingest devices.
100 Base-T
100 Base-T
100 Base-T
CorporateNetwork
CaptureManager
100 Base-T

David Vatalaro January 2004 Xdeck-I Broadcast Support Troubleshooting Guide
Avid Technology, Inc. Proprietary and Confidential 10/10
Figure I—4: Redundant Ingest with the Xdeck and Unity.
File Manager
Port Server
Transfer Manager
Media Manager Alteon Switch
Vixel Fiber SCSISwitch
Netgear SwitchFiber
Fiber
Fiber
Fiber
Fiber
10 Base-T
Gigabit Ethernet Fiber
100 Base-T
100 Base-T
100 Base-T
10 Base-TCrossover
Avid JBOD
Gigabit Ethernet Fiber
Satellite dish
Video Router
Video Cable(BNC Interfaces)
Video Cable(BNC Interfaces)
Example:One Channel in from a Satellite Dishsent redundantly to two separateXdeck ingest devices.
100 Base-T
100 Base-T
CorporateNetwork
CaptureManager
100 Base-T
Xdeck A
File Manager
Port Server
Transfer Manager
Media Manager Alteon Switch
Vixel Fiber SCSISwitch
Netgear SwitchFiber
Fiber
Fiber
Fiber
Fiber10 Base-T
Gigabit Ethernet Fiber
100 Base-T
100 Base-T
100 Base-T
10 Base-TCrossover
Gigabit Ethernet Fiber
100 Base-TXdeck B
Video Cable(BNC Interfaces)
100 Base-T
Avid JBOD

David Vatalaro January 2004 Xdeck-I Broadcast Support Troubleshooting Guide
Avid Technology, Inc. Proprietary and Confidential 11/11
Figure I—5: Xdeck Information Sheet
Xdeck / Xdeck Configuration Xdeck IP Address (Lan 1)
Xdeck Subnet Mask (Lan 1)
Xdeck DNS Name (Lan 1)
Data Port IP Address (Lan 2)
Data Port Subnet Mask (Lan 2)
Port Server IP Address
DNS Server IP Address
DNS Domain Name
Xdeck / Media Manager Configuration Xdeck User Name
Xdeck User Password
Media Manager Server (Server DNS Name)
Xdeck / Destination Filemanager Workspace Name
Project Name (Xdeck will configure this on the Workspace)
Bin Name (Xdeck will configure this on the Workspace)
David Vatalaro March 28, 2003 Xdeck Training Broadcast Support Version 1.0.1
Avid Technology, Inc. Proprietary and Confidential 12/12
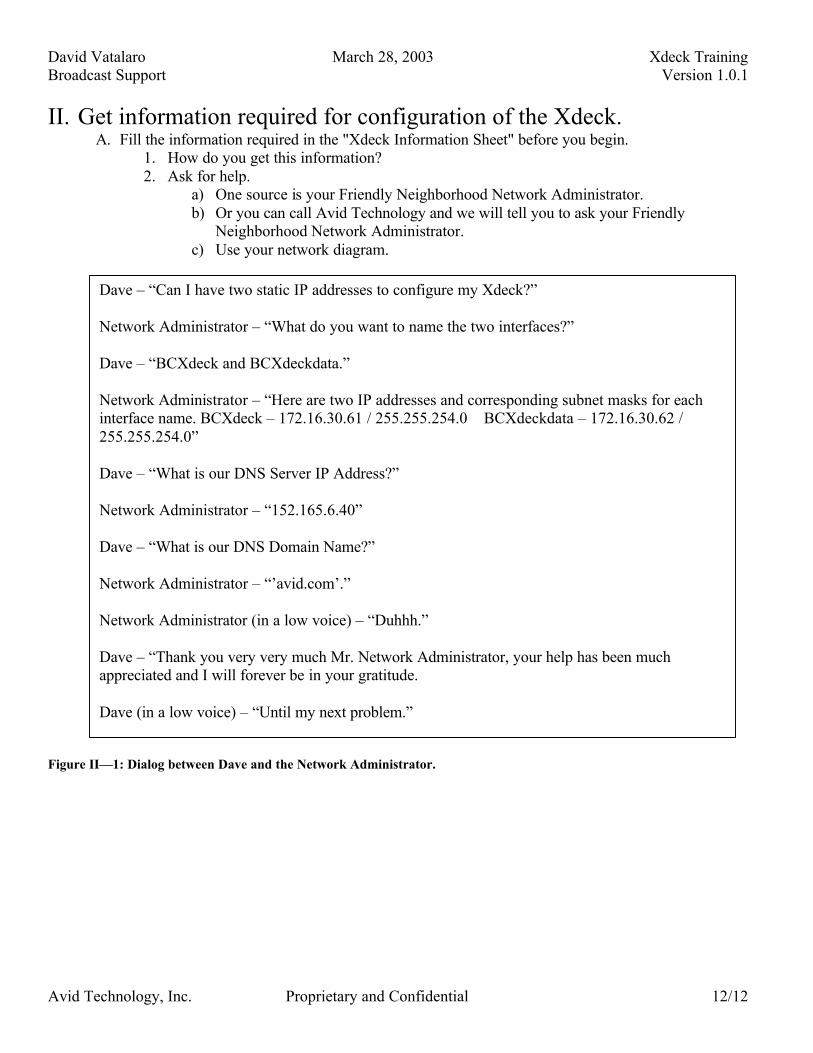
Dave – “Can I have two static IP addresses to configure my Xdeck?” Network Administrator – “What do you want to name the two interfaces?” Dave – “BCXdeck and BCXdeckdata.” Network Administrator – “Here are two IP addresses and corresponding subnet masks for each interface name. BCXdeck – 172.16.30.61 / 255.255.254.0 BCXdeckdata – 172.16.30.62 / 255.255.254.0” Dave – “What is our DNS Server IP Address?” Network Administrator – “152.165.6.40” Dave – “What is our DNS Domain Name?” Network Administrator – “’avid.com’.” Network Administrator (in a low voice) – “Duhhh.” Dave – “Thank you very very much Mr. Network Administrator, your help has been much appreciated and I will forever be in your gratitude. Dave (in a low voice) – “Until my next problem.”
II. Get information required for configuration of the Xdeck. A. Fill the information required in the "Xdeck Information Sheet" before you begin.
1. How do you get this information? 2. Ask for help.
a) One source is your Friendly Neighborhood Network Administrator. b) Or you can call Avid Technology and we will tell you to ask your Friendly
Neighborhood Network Administrator. c) Use your network diagram.
Figure II—1: Dialog between Dave and the Network Administrator.
David Vatalaro March 28, 2003 Xdeck Training Broadcast Support Version 1.0.1
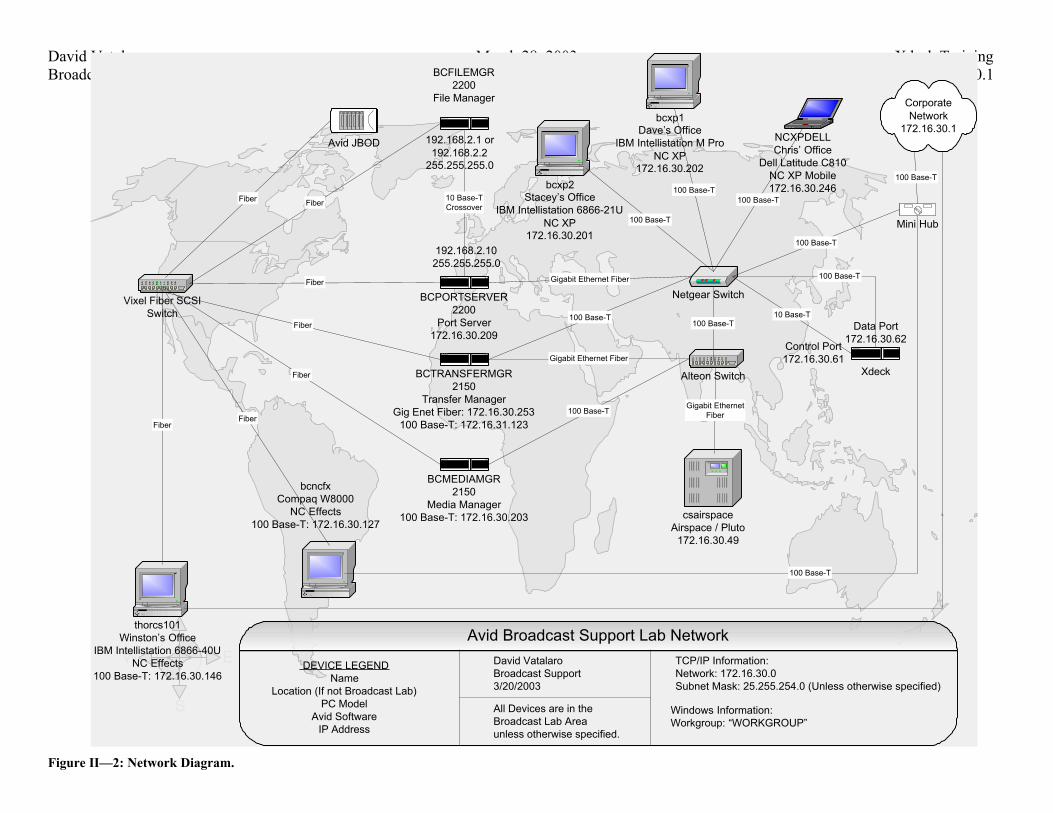
Figure II—2: Network Diagram.
N
S
EW
BCFILEMGR2200
File Manager
BCPORTSERVER2200
Port Server172.16.30.209
BCTRANSFERMGR2150
Transfer ManagerGig Enet Fiber: 172.16.30.253
100 Base-T: 172.16.31.123
BCMEDIAMGR2150
Media Manager100 Base-T: 172.16.30.203
Alteon Switch
Vixel Fiber SCSISwitch
thorcs101Winston’s Office
IBM Intellistation 6866-40UNC Effects
100 Base-T: 172.16.30.146
csairspaceAirspace / Pluto
172.16.30.49
Gigabit Ethernet Fiber
Netgear Switch
bcxp2Stacey’s Office
IBM Intellistation 6866-21UNC XP
172.16.30.201
Fiber
Fiber
Fiber
Fiber
Fiber
Fiber
100 Base-T
Gigabit EthernetFiber
CorporateNetwork
172.16.30.1
Gigabit Ethernet Fiber
100 Base-T
100 Base-T100 Base-T
100 Base-T
10 Base-TCrossover
Xdeck
Data Port172.16.30.62
10 Base-T
100 Base-T
Control Port172.16.30.61
Avid JBOD
bcxp1Dave’s Office
IBM Intellistation M ProNC XP
172.16.30.202
100 Base-T100 Base-T
NCXPDELLChris’ Office
Dell Latitude C810NC XP Mobile172.16.30.246
192.168.2.10255.255.255.0
192.168.2.1 or192.168.2.2
255.255.255.0
bcncfxCompaq W8000
NC Effects100 Base-T: 172.16.30.127
Fiber
100 Base-T
Mini Hub
100 Base-T
TCP/IP Information:Network: 172.16.30.0Subnet Mask: 25.255.254.0 (Unless otherwise specified)
Windows Information:Workgroup: “WORKGROUP”
All Devices are in theBroadcast Lab Areaunless otherwise specified.
Avid Broadcast Support Lab Network
DEVICE LEGENDName
Location (If not Broadcast Lab)PC Model
Avid SoftwareIP Address
David VatalaroBroadcast Support3/20/2003

David Vatalaro January 2004 Xdeck-I Broadcast Support Troubleshooting Guide
Avid Technology, Inc. Proprietary and Confidential 14/14
Figure II—3:Filled in Table with all of the required Xdeck information.
Xdeck / Xdeck Configuration Xdeck IP Address (Lan 1) 172.16.30.61
Xdeck Subnet Mask (Lan 1) 255.255.254.0
Xdeck DNS Name (Lan 1) BCXdeck
Data Port IP Address (Lan 2) 172.16.30.62
Data Port Subnet Mask (Lan 2) 255.255.254.0
Port Server IP Address 172.16.30.209
DNS Server IP Address 152.165.6.40
DNS Domain Name avid.com
Xdeck / Media Manager Configuration Xdeck User Name Xdeck
Xdeck User Password avid
Media Manager Server (Server DNS Name) bcmediamgr
Xdeck / Destination Filemanager Workspace Name Xdeck
Project Name (Xdeck will configure this on the Workspace) Xdeck
Bin Name (Xdeck will configure this on the Workspace) Xdeck
David Vatalaro January 2004 Xdeck-I Broadcast Support Troubleshooting Guide
Avid Technology, Inc. Proprietary and Confidential 15/15
B. Configure the File Manager Application for use by the Xdeck. 1. From our Network Diagram, we know the Transfer Manager IP address and DNS Name. 2. Workspace, any name you want, we will use “Xdeck”. 3. User, any name you want, we will use “Xdeck”. 4. Password for the user “Xdeck”, we will use “avid”.
C. Configure the Media Manager Application for use by the Xdeck.
1. From our Network Diagram, we know the Media Manager IP address and DNS Name. 2. Add the same File Manager User and Password configured for use by the Xdeck to the Media
Manager Application. 3. User is “Xdeck”. 4. Password for the user “Xdeck” is “avid”.
D. Miscellaneous Information… 1. PortServer IP address – From the Network Diagram 2. Project Name – We can pick any valid project name, we chose “Xdeck”. 3. Bin Name – We can pick any valid bin name, we chose “Xdeck”. 4. Note – The Xdeck will configure the Project Name and Bin Name in the workspace. 5. Fill in the Blanks!
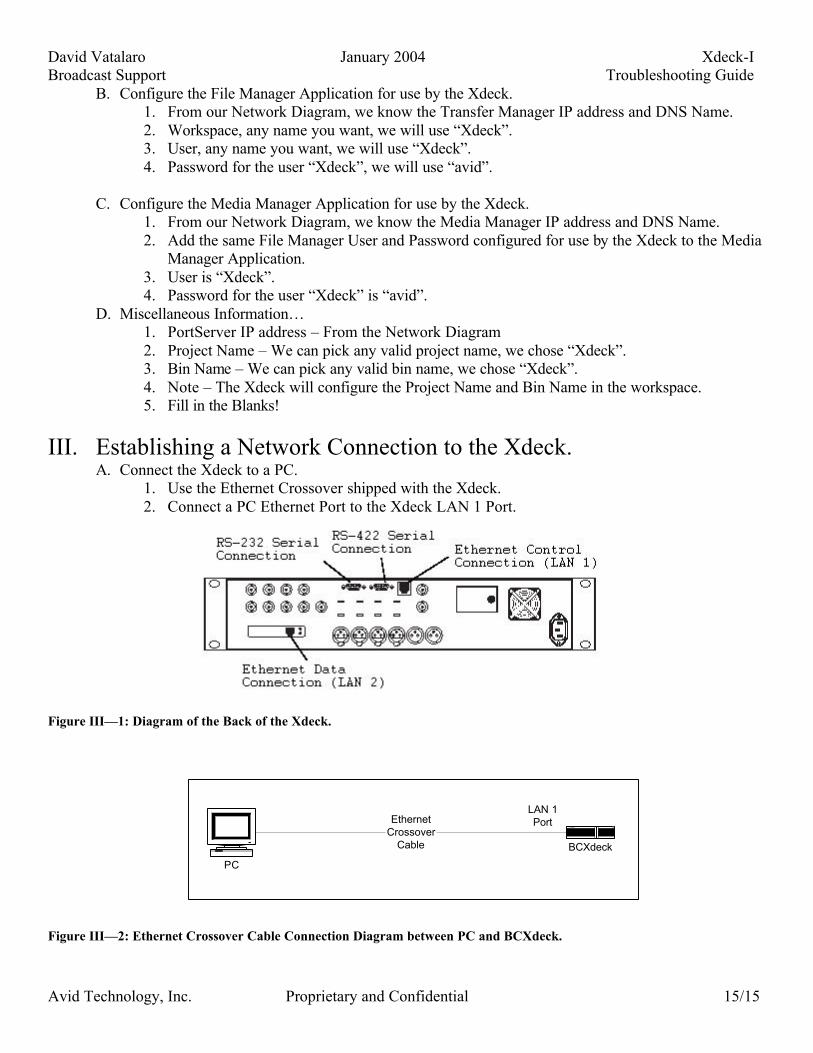
III. Establishing a Network Connection to the Xdeck. A. Connect the Xdeck to a PC.
1. Use the Ethernet Crossover shipped with the Xdeck. 2. Connect a PC Ethernet Port to the Xdeck LAN 1 Port.
Figure III—1: Diagram of the Back of the Xdeck.
Figure III—2: Ethernet Crossover Cable Connection Diagram between PC and BCXdeck.
PC
BCXdeck
EthernetCrossover
Cable
LAN 1Port
David Vatalaro January 2004 Xdeck-I Broadcast Support Troubleshooting Guide
Avid Technology, Inc. Proprietary and Confidential 16/16
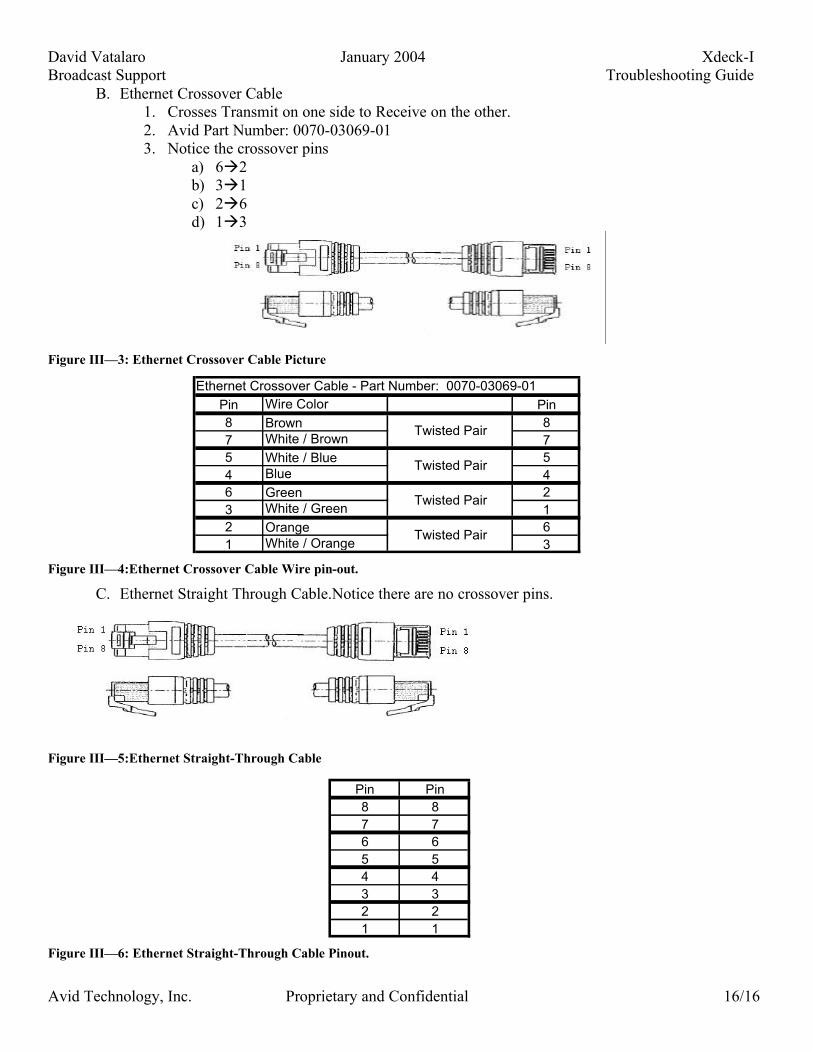
B. Ethernet Crossover Cable 1. Crosses Transmit on one side to Receive on the other. 2. Avid Part Number: 0070-03069-01 3. Notice the crossover pins
a) 6à2 b) 3à1 c) 2à6 d) 1à3
Figure III—3: Ethernet Crossover Cable Picture
Figure III—4:Ethernet Crossover Cable Wire pin-out.
C. Ethernet Straight Through Cable.Notice there are no crossover pins.
Figure III—5:Ethernet Straight-Through Cable
Figure III—6: Ethernet Straight-Through Cable Pinout.
Pin Wire Color Pin8 Brown 87 White / Brown 75 White / Blue 54 Blue 46 Green 23 White / Green 12 Orange 61 White / Orange 3
Twisted Pair
Ethernet Crossover Cable - Part Number: 0070-03069-01
Twisted Pair
Twisted Pair
Twisted Pair
Pin Pin8 87 76 65 54 43 32 21 1

David Vatalaro January 2004 Xdeck-I Broadcast Support Troubleshooting Guide
Avid Technology, Inc. Proprietary and Confidential 17/17
D. Configure Xdeck Initial IP Interface
1. Default Xdeck IP Configuration for LAN 1 is 192.168.0.1 with a subnet mask of 255.255.255.0
2. Default PC configuration to connect to the Xdeck must be on the same network, any address
E. Configure Xdeck Initial IP Interface 1. Default Xdeck IP Configuration for LAN 1 is 192.168.0.1 with a subnet mask of
255.255.255.0 2. Default PC configuration to connect to the Xdeck must be on the same network, any address
from 192.168.0.2 to 192.168.0.254 can be used. 3. Select the Correct Network Interface. There could be several on a PC Client. 4. Select “Right Mouse Button” on “My Network Places”. 5. From the list box, select properties. 6. “Network and Dial-up Connections” window is displayed. 7. Select the “Local Area Connection” connected to the Xdeck.
Figure III—7: "Network and Dial-up Connections" window.
F. Select Properties for the Network Card
1. “Local Area Connection Status” window is displayed. 2. Select “Properties”.
G. Select TCP/IP Properties for the Network Card. 1. Highlight “Internet Protocol (TCP/IP) 2. Select “Properties”
H. Configure your Temporary IP address. 1. Select “Use the following IP address”. 2. Type in an address and a subnet mask. 3. Use the range 192.168.0.2 to 192.168.0.254 and a subnet mask of 255.255.255.0.

David Vatalaro January 2004 Xdeck-I Broadcast Support Troubleshooting Guide
Avid Technology, Inc. Proprietary and Confidential 18/18
Figure III—8: "Local Area Connections Properties" window.
Figure III—9: "Internet Protocol (TCP/IP) Properties" window.
David Vatalaro January 2004 Xdeck-I Broadcast Support Troubleshooting Guide
Avid Technology, Inc. Proprietary and Confidential 19/19
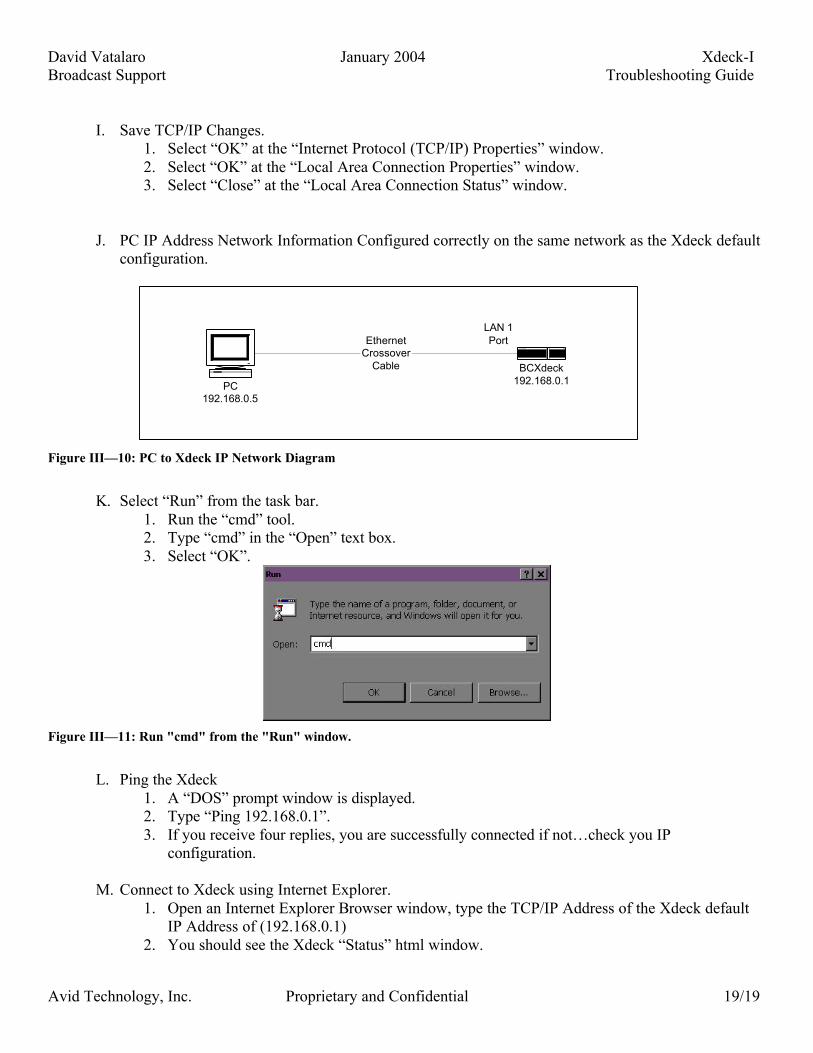
I. Save TCP/IP Changes. 1. Select “OK” at the “Internet Protocol (TCP/IP) Properties” window. 2. Select “OK” at the “Local Area Connection Properties” window. 3. Select “Close” at the “Local Area Connection Status” window.
J. PC IP Address Network Information Configured correctly on the same network as the Xdeck default configuration.
Figure III—10: PC to Xdeck IP Network Diagram
K. Select “Run” from the task bar.
1. Run the “cmd” tool. 2. Type “cmd” in the “Open” text box. 3. Select “OK”.
Figure III—11: Run "cmd" from the "Run" window.
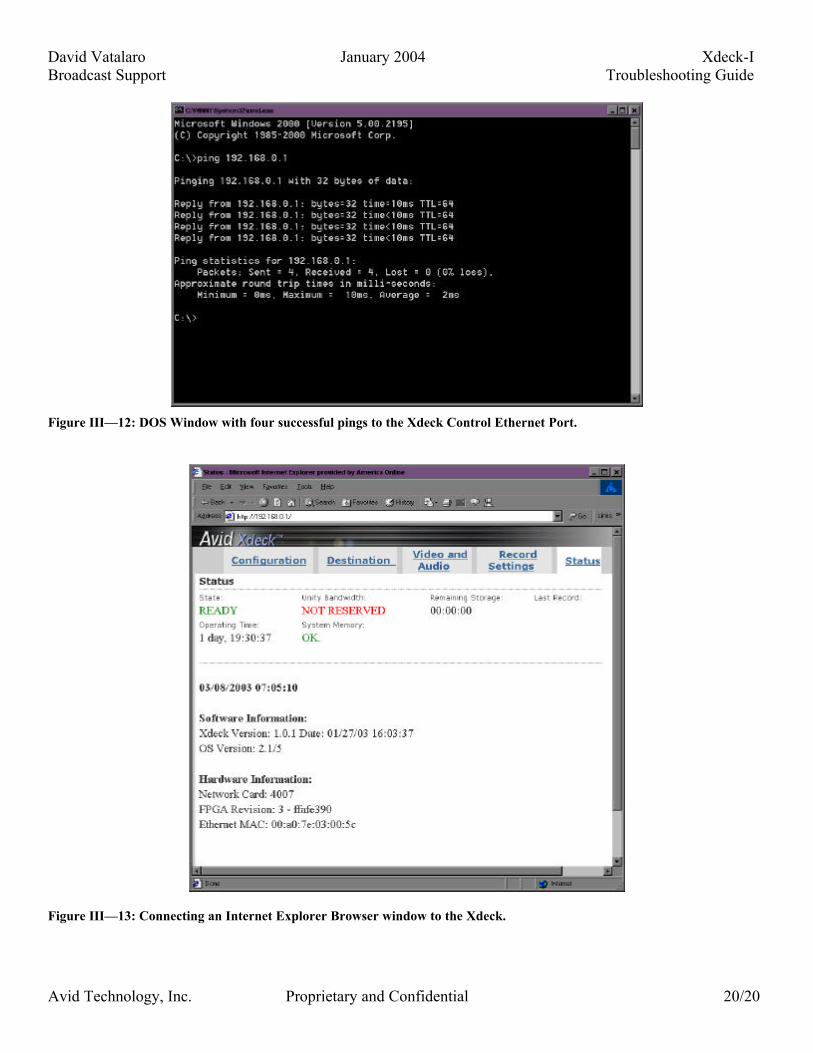
L. Ping the Xdeck
1. A “DOS” prompt window is displayed. 2. Type “Ping 192.168.0.1”. 3. If you receive four replies, you are successfully connected if not…check you IP
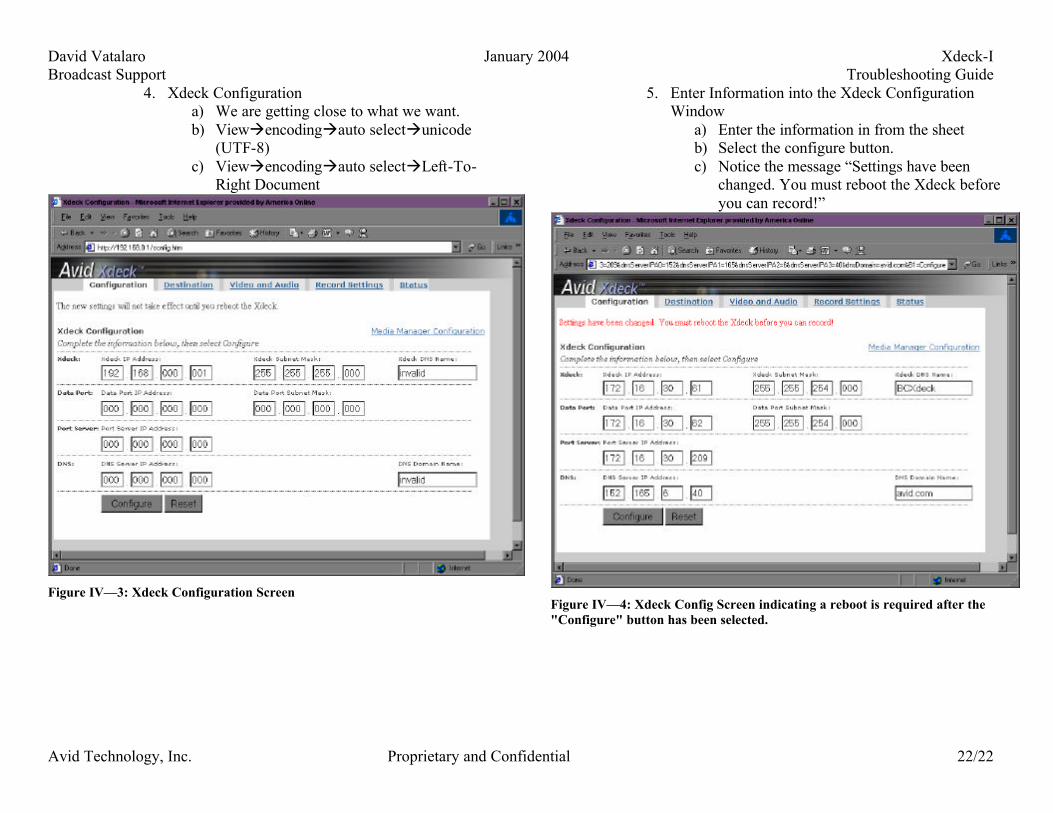
configuration. M. Connect to Xdeck using Internet Explorer.
1. Open an Internet Explorer Browser window, type the TCP/IP Address of the Xdeck default IP Address of (192.168.0.1)
2. You should see the Xdeck “Status” html window.
PC192.168.0.5
BCXdeck192.168.0.1
EthernetCrossover
Cable
LAN 1Port
David Vatalaro January 2004 Xdeck-I Broadcast Support Troubleshooting Guide
Avid Technology, Inc. Proprietary and Confidential 20/20
Figure III—12: DOS Window with four successful pings to the Xdeck Control Ethernet Port.
Figure III—13: Connecting an Internet Explorer Browser window to the Xdeck.

David Vatalaro January 2004 Xdeck-I Broadcast Support Troubleshooting Guide
Avid Technology, Inc. Proprietary and Confidential 21/21
IV. Configuring the Xdeck A. Xdeck Configuration Screen.
1. From the Internet Explorer connection to Xdeck select the “Configuration” tab.
2. The “Configuration” Tab text is not displayed in a clear fashion.
Figure IV—1: Incorrectly displayed Xdeck Configuration Screen
3. From Internet Explorer a) View à text size àmedium is displayed on
previous screen. b) View encoding western European
(windows) c) View -->text sizeàsmallest is on the right
hand side of screen.
Figure IV—2: Better display of Xdeck Configuration Screen.
David Vatalaro January 2004 Xdeck-I Broadcast Support Troubleshooting Guide
Avid Technology, Inc. Proprietary and Confidential 22/22
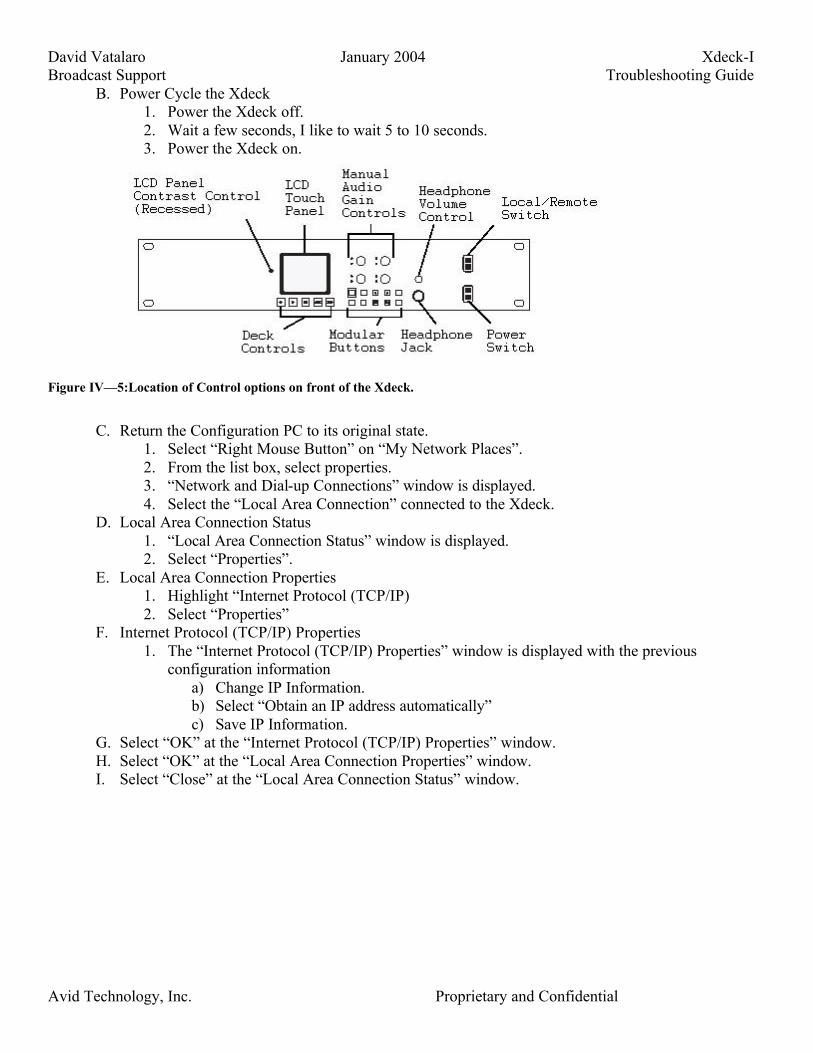
4. Xdeck Configuration a) We are getting close to what we want. b) Viewàencodingàauto selectàunicode
(UTF-8) c) Viewàencodingàauto selectàLeft-To-
Right Document
Figure IV—3: Xdeck Configuration Screen
5. Enter Information into the Xdeck Configuration Window
a) Enter the information in from the sheet b) Select the configure button. c) Notice the message “Settings have been
changed. You must reboot the Xdeck before you can record!”
Figure IV—4: Xdeck Config Screen indicating a reboot is required after the "Configure" button has been selected.
David Vatalaro January 2004 Xdeck-I Broadcast Support Troubleshooting Guide
Avid Technology, Inc. Proprietary and Confidential
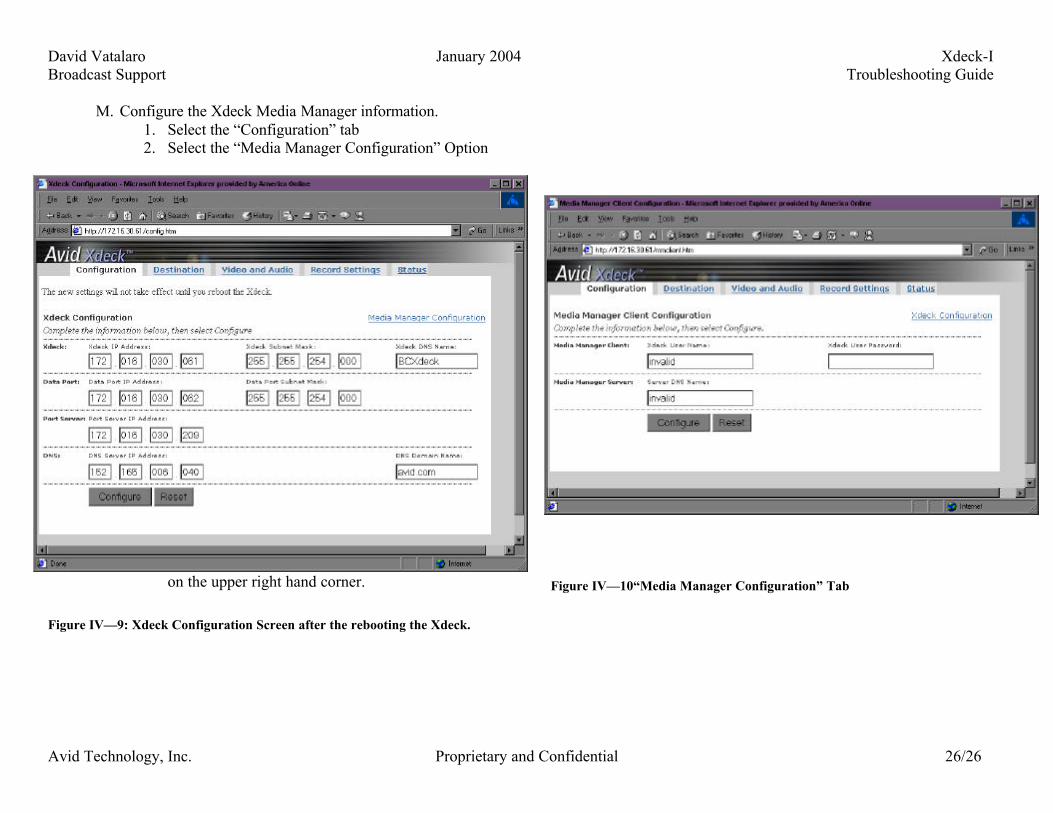
B. Power Cycle the Xdeck 1. Power the Xdeck off. 2. Wait a few seconds, I like to wait 5 to 10 seconds. 3. Power the Xdeck on.
Figure IV—5:Location of Control options on front of the Xdeck.
C. Return the Configuration PC to its original state.
1. Select “Right Mouse Button” on “My Network Places”. 2. From the list box, select properties. 3. “Network and Dial-up Connections” window is displayed. 4. Select the “Local Area Connection” connected to the Xdeck.
D. Local Area Connection Status 1. “Local Area Connection Status” window is displayed. 2. Select “Properties”.
E. Local Area Connection Properties 1. Highlight “Internet Protocol (TCP/IP) 2. Select “Properties”
F. Internet Protocol (TCP/IP) Properties 1. The “Internet Protocol (TCP/IP) Properties” window is displayed with the previous
configuration information a) Change IP Information. b) Select “Obtain an IP address automatically” c) Save IP Information.
G. Select “OK” at the “Internet Protocol (TCP/IP) Properties” window. H. Select “OK” at the “Local Area Connection Properties” window. I. Select “Close” at the “Local Area Connection Status” window.

David Vatalaro January 2004 Xdeck-I Broadcast Support Troubleshooting Guide
Avid Technology, Inc. Proprietary and Confidential
J. Connect the Xdeck to the Portserver Network Switch. 1. Remove the PC client from the Xdeck Lan 1 port. 2. Remove the 100 Base-T crossover cable from the setup and put it aside we will no longer
need this. 3. Connect the Xdeck Lan 1 and Lan 2 Ethernet ports to two separate ports on the portserver
Ethernet Switch (Netgear or Asante) using a 100 Base-T straight-through cable for each port.
Figure IV—6: Netgear Model FS518 Switch
Figure IV—7: Asante IntraCore 3524 Gigabit Ethernet Switch

David Vatalaro January 2004 Xdeck-I Broadcast Support Troubleshooting Guide
Avid Technology, Inc. Proprietary and Confidential
K. Connect to the Xdeck using Internet Explorer using either of the following methods. 1. Use an Internet Explorer Browser window connected to a PC client on the same Ethernet
switch the Xdeck is connected to. 2. Connect the PC client used to configure the Xdeck to the same Ethernet switch the Xdeck is
connected to. Then use it’s Internet Explorer Browser.
L. Xdeck “Status” is the default window after power up. 1. Open or refresh the IE browser and type the address assigned to the Xdeck 172.16.30.61 in
the address bar. 2. This displays the xdeck status window.
Figure IV—8: Xdeck "Status" window before it connects to Unity FileManager or LanShare.
David Vatalaro January 2004 Xdeck-I Broadcast Support Troubleshooting Guide
Avid Technology, Inc. Proprietary and Confidential 26/26
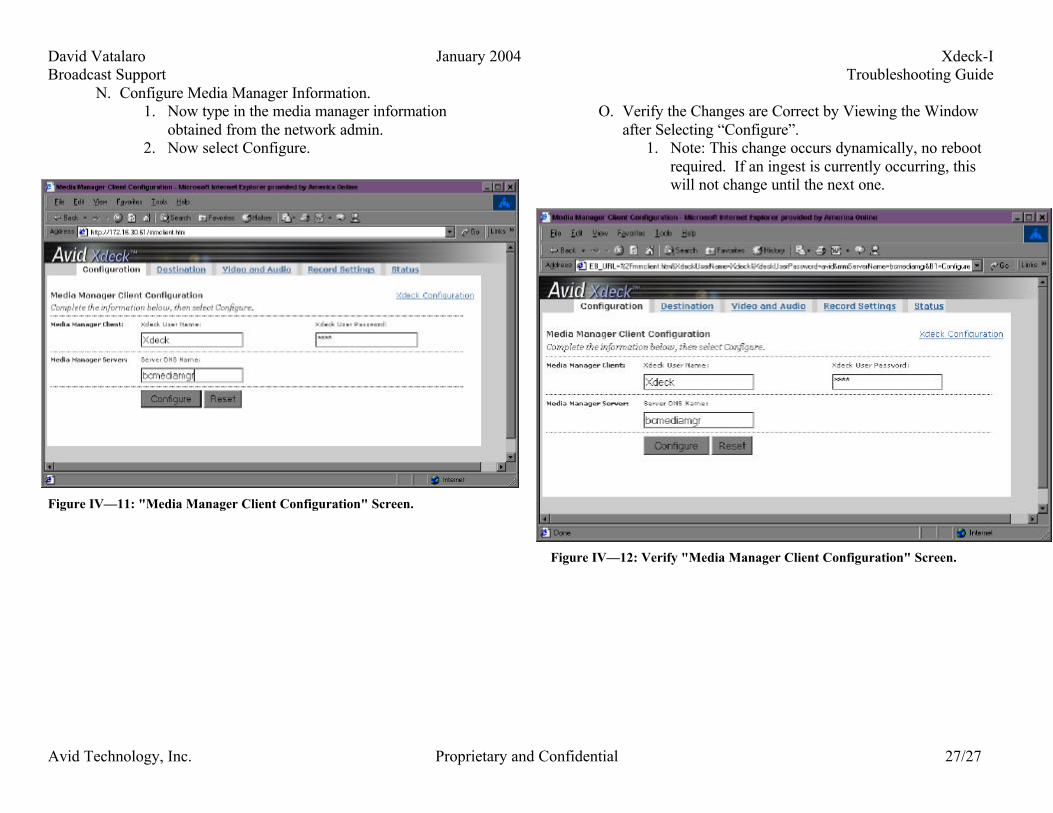
M. Configure the Xdeck Media Manager information.
1. Select the “Configuration” tab 2. Select the “Media Manager Configuration” Option
on the upper right hand corner. Figure IV—9: Xdeck Configuration Screen after the rebooting the Xdeck.
Figure IV—10“Media Manager Configuration” Tab
David Vatalaro January 2004 Xdeck-I Broadcast Support Troubleshooting Guide
Avid Technology, Inc. Proprietary and Confidential 27/27
N. Configure Media Manager Information. 1. Now type in the media manager information
obtained from the network admin. 2. Now select Configure.
Figure IV—11: "Media Manager Client Configuration" Screen.
O. Verify the Changes are Correct by Viewing the Window
after Selecting “Configure”. 1. Note: This change occurs dynamically, no reboot
required. If an ingest is currently occurring, this will not change until the next one.
Figure IV—12: Verify "Media Manager Client Configuration" Screen.
David Vatalaro January 2004 Xdeck-I Broadcast Support Troubleshooting Guide
Avid Technology, Inc. Proprietary and Confidential 28/28
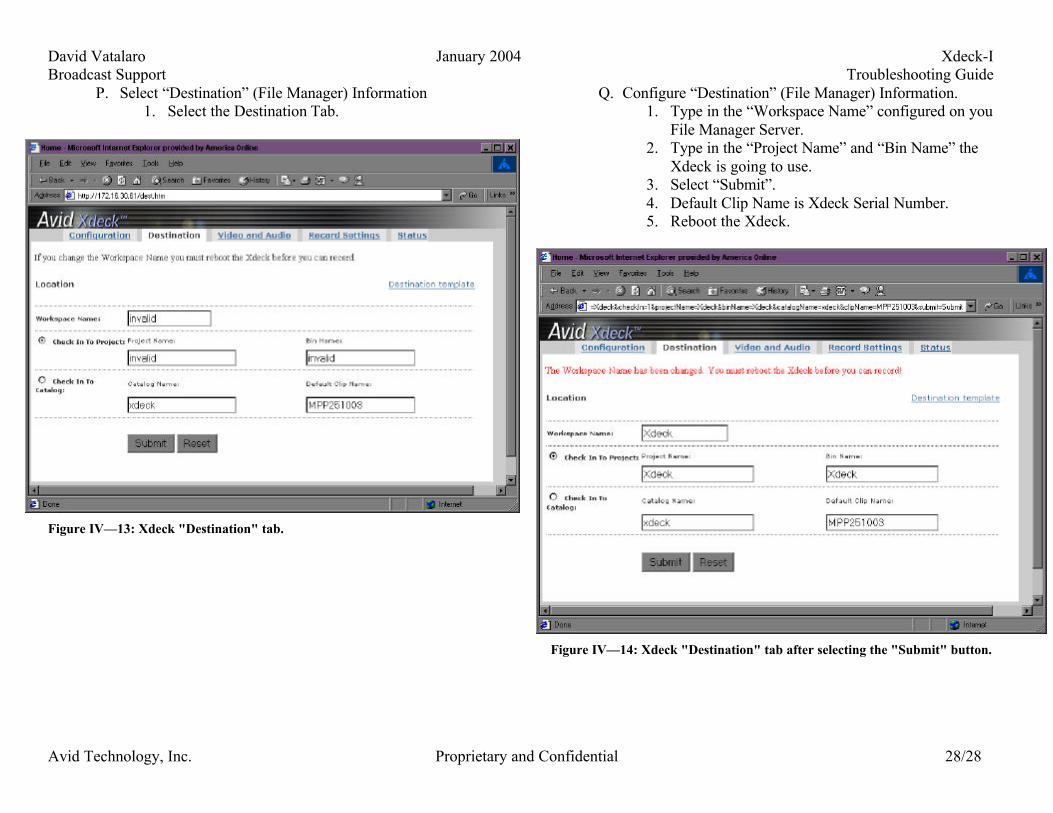
P. Select “Destination” (File Manager) Information 1. Select the Destination Tab.
Figure IV—13: Xdeck "Destination" tab.
Q. Configure “Destination” (File Manager) Information. 1. Type in the “Workspace Name” configured on you
File Manager Server. 2. Type in the “Project Name” and “Bin Name” the
Xdeck is going to use. 3. Select “Submit”. 4. Default Clip Name is Xdeck Serial Number. 5. Reboot the Xdeck.
Figure IV—14: Xdeck "Destination" tab after selecting the "Submit" button.

David Vatalaro January 2004 Xdeck-I Broadcast Support Troubleshooting Guide
Avid Technology, Inc. Proprietary and Confidential 29/29
R. Destination Tab
1. Verify the Destination Information is configured correctly.
Figure IV—15: Xdeck "Destination" tab after rebooting the Xdeck.
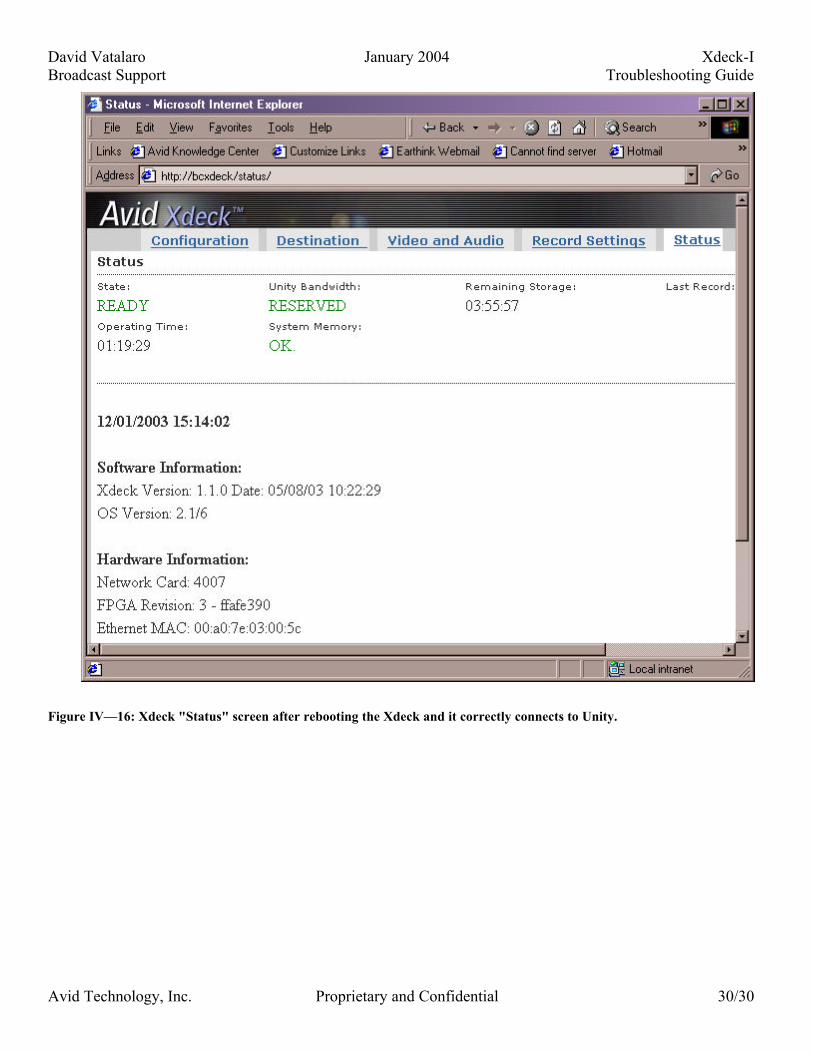
S. How do we know the Xdeck is working? 1. When the Xdeck is connected the "Unity Bandwidth" should indicate "RESERVED" in
green. 2. If there is no feed present and you press the record button. 3. Then after a minute or two, press the stop button. 4. The Xdeck will create the project and the bin. It will also add the media to the bin. 5. The next piece of media added will be in the project and bin.
T. Possible Problems displayed on the Xdeck Screen.
1. “No Unity Connection”. Xdeck cannot connect to the File Manager. It could be a network cabling issue, or it could have the wrong IP address in the configuration.
2. “Can’t Login to Media Manager”. The workspace may not be created. The Xdeck may not have the correct DNS Server information (Name or IP address). Therefore it does not know the IP address of the corresponding Media Manager. Just the DNS Name.
3. You will also see similar messages in the console port as the Xdeck boots.
David Vatalaro January 2004 Xdeck-I Broadcast Support Troubleshooting Guide
Avid Technology, Inc. Proprietary and Confidential 30/30
Figure IV—16: Xdeck "Status" screen after rebooting the Xdeck and it correctly connects to Unity.

David Vatalaro January 2004 Xdeck-I Broadcast Support Troubleshooting Guide
Avid Technology, Inc. Proprietary and Confidential 31/31
U. Unity Status Viewer 1. Shortcut located on the Port Server, File Manager, or LanShare desktop. 2. Target: "C:\Program Files\JavaSoft\JRE\1.3\bin\javaw.exe" -jar "D:\Program Files\Avid Technology\AvidUnity\statusviewer.jar"
Figure IV—17": Status Viewer" displayed on Port Server Desktop.
Figure IV—18: "Status Viewer Properties" window for the short cut on a Port Server.

David Vatalaro January 2004 Xdeck-I Broadcast Support Troubleshooting Guide
Avid Technology, Inc. Proprietary and Confidential 32/32
Figure IV—19:"PortServer Status Viewer" with an Xdeck and a NewsCutter XP both listed as a client.

David Vatalaro January 2004 Xdeck-I Broadcast Support Troubleshooting Guide
Avid Technology, Inc. Proprietary and Confidential 33/33
V. Port Server Configuration 1. Located in " D:\Program Files\Avid Technology\AvidUnity\PortServerStartup" 2. Verify the PortServer Configuration by double clicking "PortServerConfiguration.exe"
a) "Enable network sharing on mounted MediaNetwork workspaces" is checked. b) "Specify the PortServer type:" is "Shared" c) "Specify the Gigabit Ethernet Adapter IP Address" is IP address of the interface to the Switch attaching the clients.
3. If any of these parameters are changed, reboot the PortServer or Lanshare.
Figure IV—20: "PortServerStartup" Folder
Figure IV—21: "Avid Unity PortServer Service Configuration" window.
David Vatalaro January 2004 Xdeck-I Broadcast Support Troubleshooting Guide
Avid Technology, Inc. Proprietary and Confidential 34/34
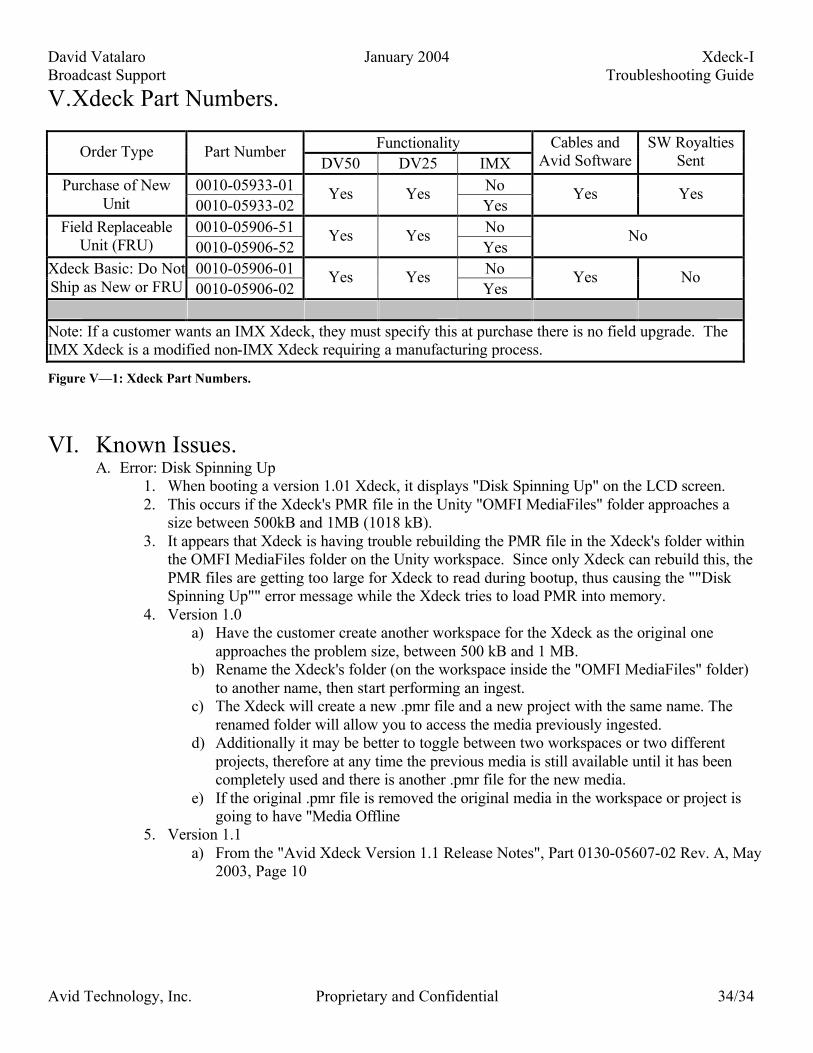
V. Xdeck Part Numbers.
Functionality Order Type Part Number DV50 DV25 IMX
Cables and Avid Software
SW Royalties Sent
0010-05933-01 No Purchase of New Unit 0010-05933-02
Yes Yes Yes
Yes Yes
0010-05906-51 No Field Replaceable Unit (FRU) 0010-05906-52
Yes Yes Yes
No
0010-05906-01 No Xdeck Basic: Do Not Ship as New or FRU 0010-05906-02
Yes Yes Yes
Yes No
Note: If a customer wants an IMX Xdeck, they must specify this at purchase there is no field upgrade. The IMX Xdeck is a modified non-IMX Xdeck requiring a manufacturing process.
Figure V—1: Xdeck Part Numbers.
VI. Known Issues. A. Error: Disk Spinning Up
1. When booting a version 1.01 Xdeck, it displays "Disk Spinning Up" on the LCD screen. 2. This occurs if the Xdeck's PMR file in the Unity "OMFI MediaFiles" folder approaches a
size between 500kB and 1MB (1018 kB). 3. It appears that Xdeck is having trouble rebuilding the PMR file in the Xdeck's folder within
the OMFI MediaFiles folder on the Unity workspace. Since only Xdeck can rebuild this, the PMR files are getting too large for Xdeck to read during bootup, thus causing the ""Disk Spinning Up"" error message while the Xdeck tries to load PMR into memory.
4. Version 1.0 a) Have the customer create another workspace for the Xdeck as the original one
approaches the problem size, between 500 kB and 1 MB. b) Rename the Xdeck's folder (on the workspace inside the "OMFI MediaFiles" folder)
to another name, then start performing an ingest. c) The Xdeck will create a new .pmr file and a new project with the same name. The
renamed folder will allow you to access the media previously ingested. d) Additionally it may be better to toggle between two workspaces or two different
projects, therefore at any time the previous media is still available until it has been completely used and there is another .pmr file for the new media.
e) If the original .pmr file is removed the original media in the workspace or project is going to have "Media Offline
5. Version 1.1 a) From the "Avid Xdeck Version 1.1 Release Notes", Part 0130-05607-02 Rev. A, May
2003, Page 10

David Vatalaro January 2004 Xdeck-I Broadcast Support Troubleshooting Guide
Avid Technology, Inc. Proprietary and Confidential 35/35
Figure VI—1: Xdeck Database Rebuild.
Special Notes This section contains important information about the operation of the Xdeck in your workgroup environment. Power Cycling the Xdeck and Rebuild the Database Once a Week To achieve the best performance from your Xdeck, Avid recommends that you power cycle your Xdeck once a week. Power cycling the Xdeck refreshes the memory. While the Xdeck is recording, a database file (PMR file) is built on the workspace. This PMR file continuously grows as media is recorded. Rebuilding the database removes the excess metadata and prevents the PMR file from growing too large and impacting the performance of the Xdeck. The following two maintenance procedures are time flexible and should be performed when it is convenient to your workflow. To power cycle the Xdeck: 1. Turn the Xdeck off and wait until the unit is fully powered down. 2. Turn on the Xdeck again. To rebuild the Xdeck database: Select Disk Operations > Media Tool > Rebuild Database in the LCD touch panel. Xdeck performs a fresh scan of all the media and rebuilds the database (PMR file). Depending on the size of the workspace and number of files in that workspace, rebuilding the database can take a very long time. When you rebuild the database, do not power off or attempt to restart the Xdeck. This corrupts the database and you will need to stat over.

David Vatalaro January 2004 Xdeck-I Broadcast Support Troubleshooting Guide
Avid Technology, Inc. Proprietary and Confidential 36/36
VII. Questions asked at 3/28/2003 training and follow up responses. A. All questions indicating page numbers are from the following…
1. "Avid Xdeck Setup and Users Guide", Part 0130-05419-01, December 2002 2. If the questions indicating page numbers are not from this document, the document will be
indicated. B. What are the Chunking time intervals?
1. INCORRECTLY referenced in "Avid Xdeck Setup and User's Guide", Draft Version, 11/11/02, Page 67-69.
a) There is a 2-hour maximum record time when chunking. b) It incorrectly states the chunking time increases until a 2 minute interval.
2. Chunks begin at intervals of 15 seconds and increment until reaching the 4-minute interval time.
3. Xdeck chunk time is not selectable by the user.
Chunks are available at the following Intervals Seconds HH:MM:SS:FF
15 00:00:15:00 30 00:00:30:00 60 00:01:00:00 90 00:01:30:00
120 00:02:00:00 180 00:03:00:00 240 00:04:00:00 480 00:08:00:00 720 00:12:00:00
Successive 240-second intervals.
Successive 4-minute intervals.
Figure VII—1: Xdeck Incremental Chunking times.
C. Where does capture manager interface to Xdeck? (page 37) 1. The RS-422 Port on the Back of the Xdeck (It is labeled “Remote Control”) 2. The MediaBrowse Server Machine would require Capture manager and VTR Server software
modules installed and an RS422 interface card.

David Vatalaro January 2004 Xdeck-I Broadcast Support Troubleshooting Guide
Avid Technology, Inc. Proprietary and Confidential 37/37
Figure VII—2: Back of Xdeck.
D. Is Xdeck video in always on or off until a record is selected?
1. I am interpreting the question as follows. 2. If you had a monitor attached to it, would it display the feed even though you are not
recording? 3. The feed is passed through to the composite outputs, weather you are recording or not. There
is a (super) composite output with an overlay and video signal and a composite output, displaying just the video signal.
E. Are the login and passwords Case sensitive? 1. Yes.
F. Does the Xdeck require Static IP addresses? 1. Yes.
G. Is there a Battery Low Indicator? 1. (pp 87-89) 2. “BACKUP BATTERY LOW” Message appears on the front LCD panel.
H. What do the batteries do, what are they saving in NVRAM? 1. (page 87) 2. Maintains power to the nonvolatile memory, powers the time-of-day (TOD) clock and user
settings. The nonvolatile memory stores: a) IP information and project information b) Video Calibration settings c) User site preferences.
I. Do the Buttons on the front panel of the Xdeck work in remote mode? 1. The short answer is No. 2. The long answer is below.
a) (page 25) b) This (Local/Remote) switch is used to change the Xdeck between Local mode and
Remote mode. Remote mode enables you to control the Xdeck remotely, using the Xdeck REMOTE serial interface connector.
c) When Local/Remote switch is in Remote mode, the deck control buttons are ignored. A deck controller connected to the serial input controls when recording starts and stops. After a deck controller has started a recording in Remote mode, you can switch the Local/Remote switch to Local mode and press the Stop button to stop the recording.
J. How do you know a feed is successful? 1. One method is to check your media manager project and bin. 2. The Front LCD Panel will not indicate any problems increment the Default Clip Name
appropriately. There is no message indicating previous capture was successful.

David Vatalaro January 2004 Xdeck-I Broadcast Support Troubleshooting Guide
Avid Technology, Inc. Proprietary and Confidential 38/38
K. Headphones and volume control information.
1. (Page 25) 2. Plug a headphone set into the headphone jack and use the knob above the jack to adjust the
volume. The headphone jack is a mono jack only. 3. If you are using a stereo headphone, you will only hear audio on one output. You need a
mono headphone to hear both sides. L. Are there lag or delays through the Xdeck? Is it real time?
1. The only lag is from the time you hit the record button to the start of recording on the first frame. After the first frame is started, recording is real time.
M. What are the additional resolutions supported in Xdeck 1.1? 1. Xdeck 1.1 is going to support DV50 and MPEG 50 (IMX).
David Vatalaro January 2004 Xdeck-I Broadcast Support Troubleshooting Guide
Avid Technology, Inc. Proprietary and Confidential 39/39
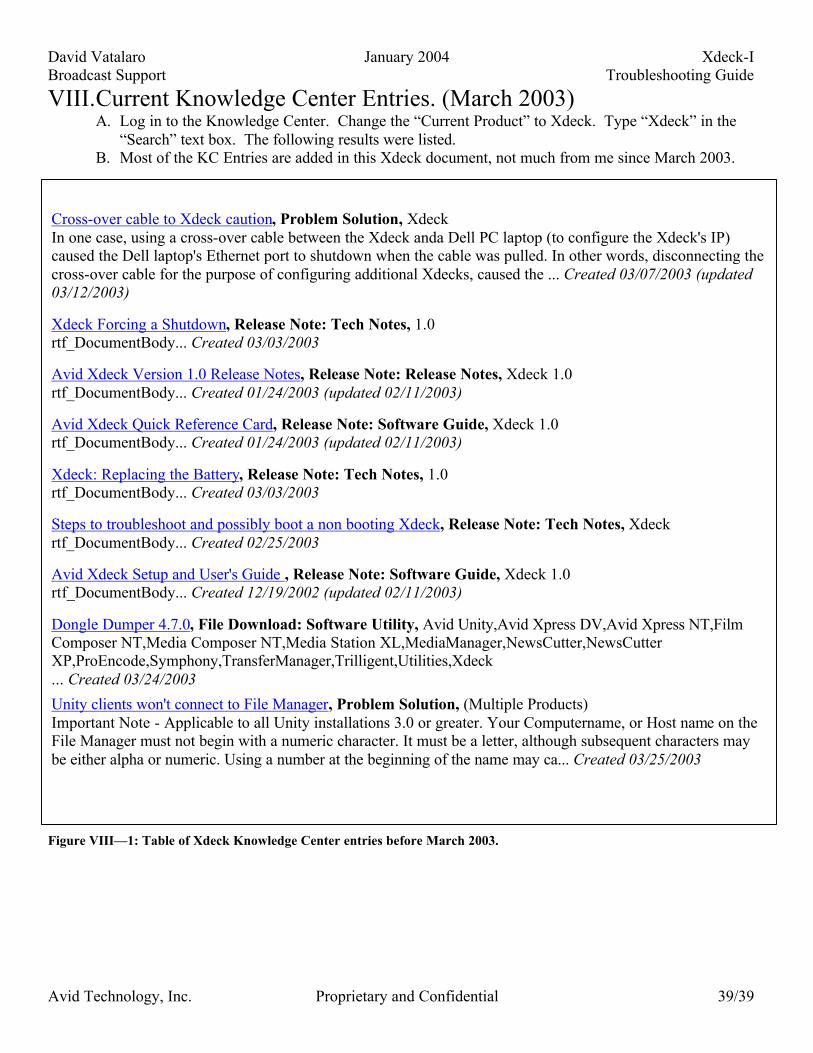
VIII. Current Knowledge Center Entries. (March 2003) A. Log in to the Knowledge Center. Change the “Current Product” to Xdeck. Type “Xdeck” in the
“Search” text box. The following results were listed. B. Most of the KC Entries are added in this Xdeck document, not much from me since March 2003.
Figure VIII—1: Table of Xdeck Knowledge Center entries before March 2003.
Cross-over cable to Xdeck caution, Problem Solution, Xdeck In one case, using a cross-over cable between the Xdeck anda Dell PC laptop (to configure the Xdeck's IP) caused the Dell laptop's Ethernet port to shutdown when the cable was pulled. In other words, disconnecting the cross-over cable for the purpose of configuring additional Xdecks, caused the ... Created 03/07/2003 (updated 03/12/2003)
Xdeck Forcing a Shutdown, Release Note: Tech Notes, 1.0 rtf_DocumentBody... Created 03/03/2003
Avid Xdeck Version 1.0 Release Notes, Release Note: Release Notes, Xdeck 1.0 rtf_DocumentBody... Created 01/24/2003 (updated 02/11/2003)
Avid Xdeck Quick Reference Card, Release Note: Software Guide, Xdeck 1.0 rtf_DocumentBody... Created 01/24/2003 (updated 02/11/2003)
Xdeck: Replacing the Battery, Release Note: Tech Notes, 1.0 rtf_DocumentBody... Created 03/03/2003
Steps to troubleshoot and possibly boot a non booting Xdeck, Release Note: Tech Notes, Xdeck rtf_DocumentBody... Created 02/25/2003
Avid Xdeck Setup and User's Guide , Release Note: Software Guide, Xdeck 1.0 rtf_DocumentBody... Created 12/19/2002 (updated 02/11/2003)
Dongle Dumper 4.7.0, File Download: Software Utility, Avid Unity,Avid Xpress DV,Avid Xpress NT,Film Composer NT,Media Composer NT,Media Station XL,MediaManager,NewsCutter,NewsCutter XP,ProEncode,Symphony,TransferManager,Trilligent,Utilities,Xdeck ... Created 03/24/2003
Unity clients won't connect to File Manager, Problem Solution, (Multiple Products) Important Note - Applicable to all Unity installations 3.0 or greater. Your Computername, or Host name on the File Manager must not begin with a numeric character. It must be a letter, although subsequent characters may be either alpha or numeric. Using a number at the beginning of the name may ca... Created 03/25/2003

David Vatalaro January 2004 Xdeck-I Broadcast Support Troubleshooting Guide
Avid Technology, Inc. Proprietary and Confidential 40/40
C. Cross-over cable to Xdeck caution 1. In one case, using a cross-over cable between the Xdeck and Dell PC laptop (to configure the
Xdeck's IP) caused the Dell laptop's Ethernet port to shutdown when the cable was pulled. 2. In other words, disconnecting the cross-over cable for the purpose of configuring additional
Xdecks, caused the port on the Ethernet card of the Dell PC (not our product) to shutdown or be temporarily disabled.
3. A reboot of the customer's laptop, cleared the problem. But this should be referenced as a possible issue if the customer is configuring multiple Xdecks using one PC and a cross-over cable. This would be a standard way to configure them.
D. Xdeck Forcing a Shutdown
1. When you turn off the Xdeck, the system can take a few minutes to completely shut down. Before the Xdeck turns off, internal information is updated and user settings are saved to the internal drive. The Xdeck is off only when the LCD panel is blank and none of the front Xdeck buttons are lit.
2. If the power switch does not turn off the Xdeck, you can force the Xdeck to restart by pressing a combination of front panel buttons. Two conditions might occur that would require you to force a restart:
a) If you turn off the power switch and the Xdeck does not turn off after waiting 5 minutes
b) If the Xdeck appears to stop functioning and none of the controls work 3. To force a shutdown:
a) Put the power switch in the off position. b) Simultaneously press the Stop, Shift, and RetroLoop buttons until you see the Xdeck
LCD panel turn off. c) Do not use this process to restart the Xdeck unless you cannot get the Xdeck to turn
off.
E. Xdeck: Replacing the Battery 1. Once the "BACKUP BATTERY LOW" message appears in the LCD touch panel, Xdeck no
longer automatically saves your settings. You must replace the batteries as soon as possible. You will require two AAA alkaline batteries to replace the backup batteries that have failed. Once new batteries are available, turn off the Xdeck and replace the batteries as described in the following procedure.
a) Turn off the Xdeck. b) Open the battery compartment by loosening the thumbscrew. c) Remove the two batteries from the compartment. d) Insert the new batteries in the same position as the ones you removed. e) Replace the battery compartment cover and tighten the thumbscrew. f) Turn on the Xdeck. g) Check that the BACKUP BATTERY LOW message does not appear. h) Restore the last saved settings
2. The circuit is designed to drain the batteries if the batteries are installed in the reverse polarity. You will continue to see the "BACKUP BATTERY LOW" message if the batteries are in backward and the batteries will drain rapidly. Reinstall the batteries in the correct polarity position.
David Vatalaro January 2004 Xdeck-I Broadcast Support Troubleshooting Guide
Avid Technology, Inc. Proprietary and Confidential 41/41
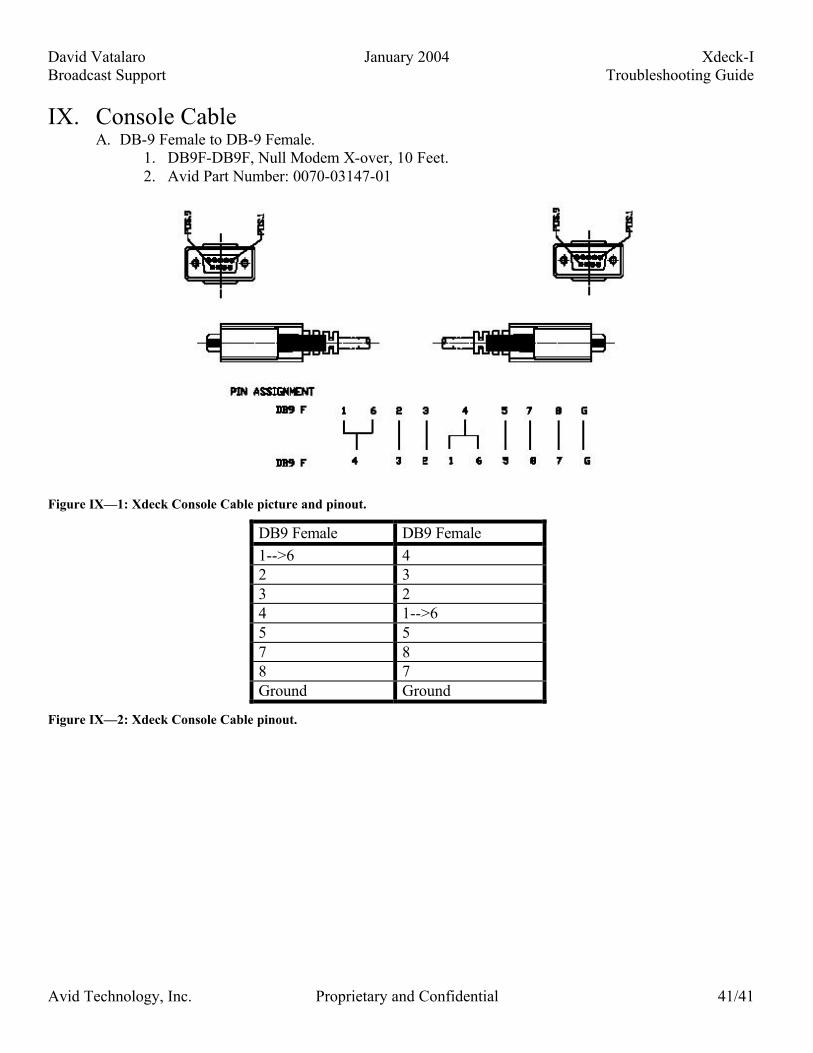
IX. Console Cable A. DB-9 Female to DB-9 Female.
1. DB9F-DB9F, Null Modem X-over, 10 Feet. 2. Avid Part Number: 0070-03147-01
Figure IX—1: Xdeck Console Cable picture and pinout.
DB9 Female DB9 Female 1-->6 4 2 3 3 2 4 1-->6 5 5 7 8 8 7 Ground Ground
Figure IX—2: Xdeck Console Cable pinout.
David Vatalaro January 2004 Xdeck-I Broadcast Support Troubleshooting Guide
Avid Technology, Inc. Proprietary and Confidential 42/42
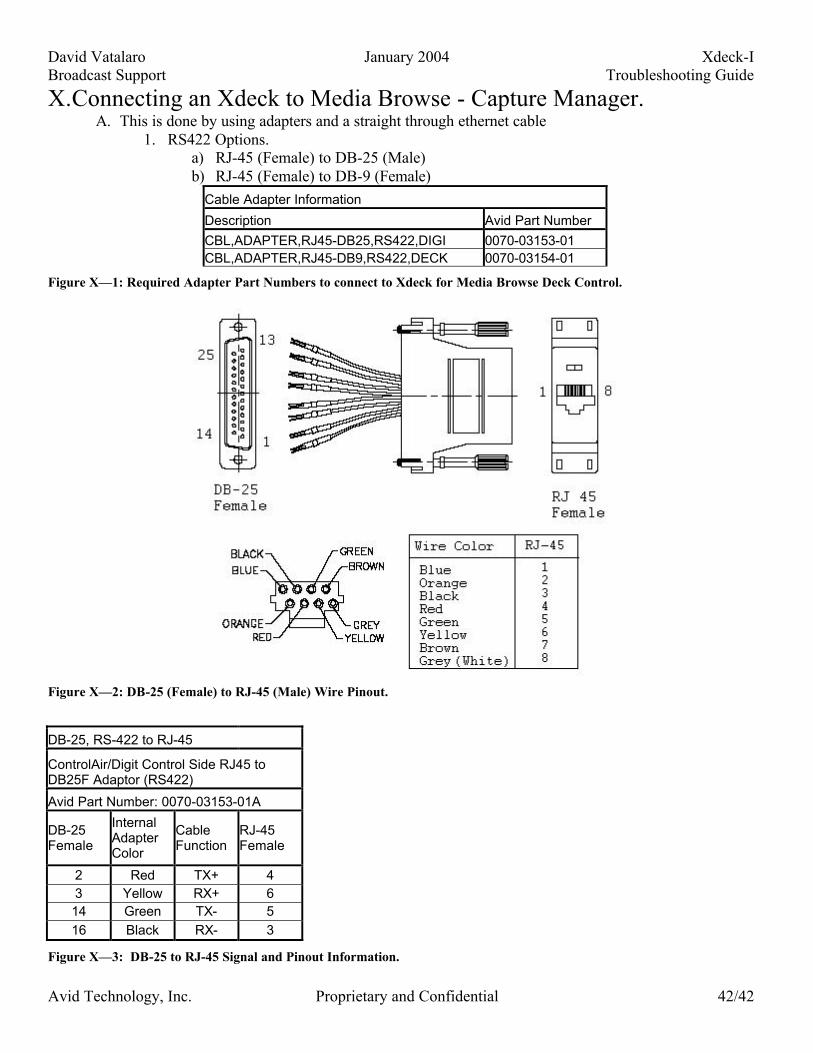
X. Connecting an Xdeck to Media Browse - Capture Manager. A. This is done by using adapters and a straight through ethernet cable
1. RS422 Options. a) RJ-45 (Female) to DB-25 (Male) b) RJ-45 (Female) to DB-9 (Female)
Cable Adapter Information
Description Avid Part Number CBL,ADAPTER,RJ45-DB25,RS422,DIGI 0070-03153-01 CBL,ADAPTER,RJ45-DB9,RS422,DECK 0070-03154-01
Figure X—1: Required Adapter Part Numbers to connect to Xdeck for Media Browse Deck Control.
Figure X—2: DB-25 (Female) to RJ-45 (Male) Wire Pinout.
DB-25, RS-422 to RJ-45
ControlAir/Digit Control Side RJ45 to DB25F Adaptor (RS422)
Avid Part Number: 0070-03153-01A
DB-25 Female
Internal Adapter Color
Cable Function
RJ-45 Female
2 Red TX+ 4 3 Yellow RX+ 6 14 Green TX- 5 16 Black RX- 3
Figure X—3: DB-25 to RJ-45 Signal and Pinout Information.
David Vatalaro January 2004 Xdeck-I Broadcast Support Troubleshooting Guide
Avid Technology, Inc. Proprietary and Confidential 43/43
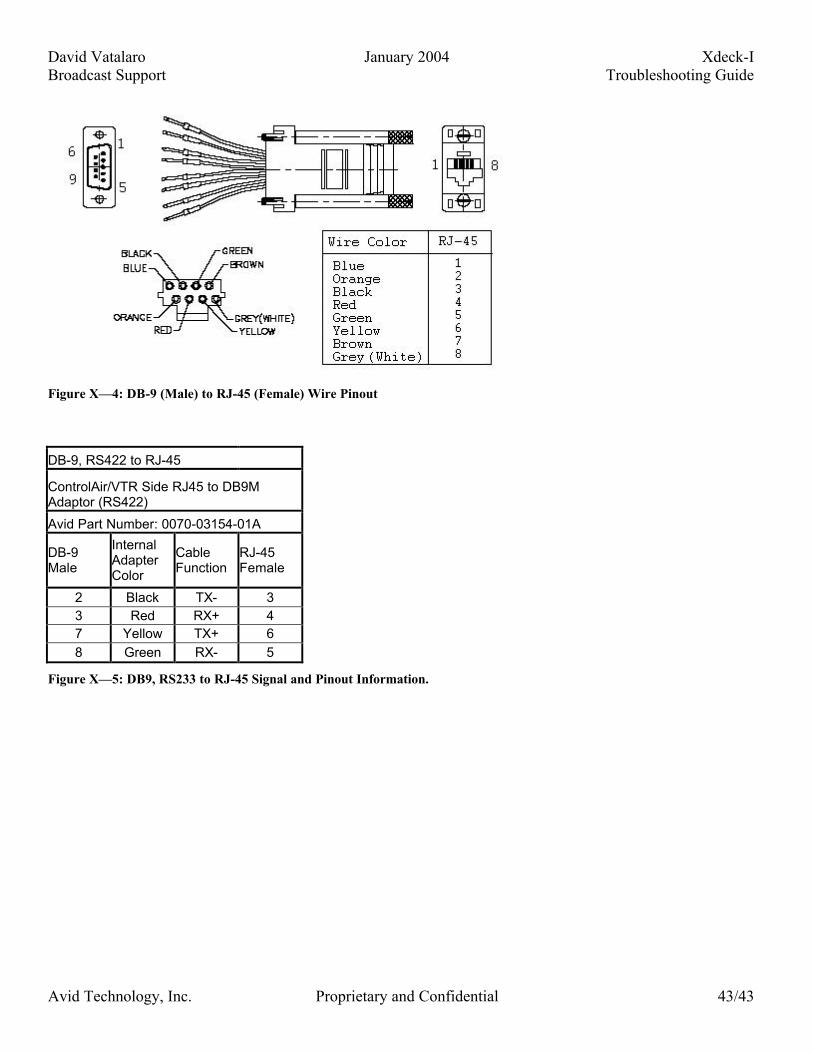
Figure X—4: DB-9 (Male) to RJ-45 (Female) Wire Pinout
DB-9, RS422 to RJ-45
ControlAir/VTR Side RJ45 to DB9M Adaptor (RS422)
Avid Part Number: 0070-03154-01A
DB-9 Male
Internal Adapter Color
Cable Function
RJ-45 Female
2 Black TX- 3 3 Red RX+ 4 7 Yellow TX+ 6 8 Green RX- 5
Figure X—5: DB9, RS233 to RJ-45 Signal and Pinout Information.

David Vatalaro January 2004 Xdeck-I Broadcast Support Troubleshooting Guide
Avid Technology, Inc. Proprietary and Confidential 44/44
B. The complete cable from the Media Browse box to the Xdeck or VTR is going to be the following.
Media Browse could also have an RS-232 extender attached to it for more than 2 serial controlled devices.
RS-422DB-25 (F) to RJ-45 (F)
RS-422DB-9 (M) to RJ-45 (F)
RJ-45 Straight Through CableUp to 1000 feet.
Media Browse -Capture Manager PC
Digi Multiport Serial Adapter
Single Cable Interface of OctopusCable Attached to Digi Multiport
Serial Adapter
Xdeck Remote PortOR
VTR Remote Control Port
RS-422 DB-9 (F)
DirectlyConnected
Figure X—6: Xdeck Connection to Media Browse / Capture Manager.
DB-9, RS-422 to RJ-45
ControlAir/Control Side RJ45 to DB9 Male/Female Adaptor (RS422)
Avid Part Number:n/a
DB-9 Female
Internal Adapter Color
Cable Function
RJ-45 Female
7 BLK RXD- 3 6 YEL RXD+ 6 9 GRN TXD- 5 8 RED TXD+ 4
Figure X—7: If there is ever a need for a Digi Octopus connection to a DB-9 Male or Female interface, it will have this configuration.
David Vatalaro January 2004 Xdeck-I Broadcast Support Troubleshooting Guide
Avid Technology, Inc. Proprietary and Confidential 45/45
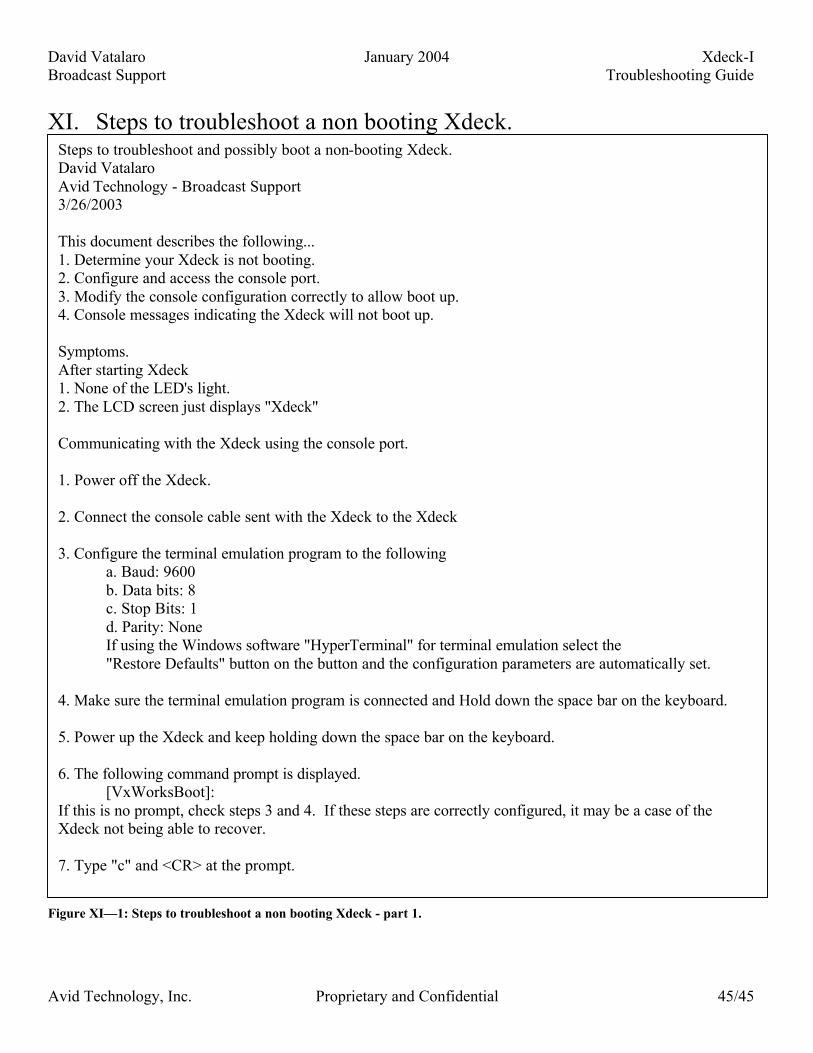
XI. Steps to troubleshoot a non booting Xdeck.
Figure XI—1: Steps to troubleshoot a non booting Xdeck - part 1.
Steps to troubleshoot and possibly boot a non-booting Xdeck. David Vatalaro Avid Technology - Broadcast Support 3/26/2003 This document describes the following... 1. Determine your Xdeck is not booting. 2. Configure and access the console port. 3. Modify the console configuration correctly to allow boot up. 4. Console messages indicating the Xdeck will not boot up. Symptoms. After starting Xdeck 1. None of the LED's light. 2. The LCD screen just displays "Xdeck" Communicating with the Xdeck using the console port. 1. Power off the Xdeck. 2. Connect the console cable sent with the Xdeck to the Xdeck 3. Configure the terminal emulation program to the following a. Baud: 9600 b. Data bits: 8 c. Stop Bits: 1 d. Parity: None If using the Windows software "HyperTerminal" for terminal emulation select the "Restore Defaults" button on the button and the configuration parameters are automatically set. 4. Make sure the terminal emulation program is connected and Hold down the space bar on the keyboard. 5. Power up the Xdeck and keep holding down the space bar on the keyboard. 6. The following command prompt is displayed. [VxWorksBoot]: If this is no prompt, check steps 3 and 4. If these steps are correctly configured, it may be a case of the Xdeck not being able to recover. 7. Type "c" and <CR> at the prompt.
David Vatalaro January 2004 Xdeck-I Broadcast Support Troubleshooting Guide
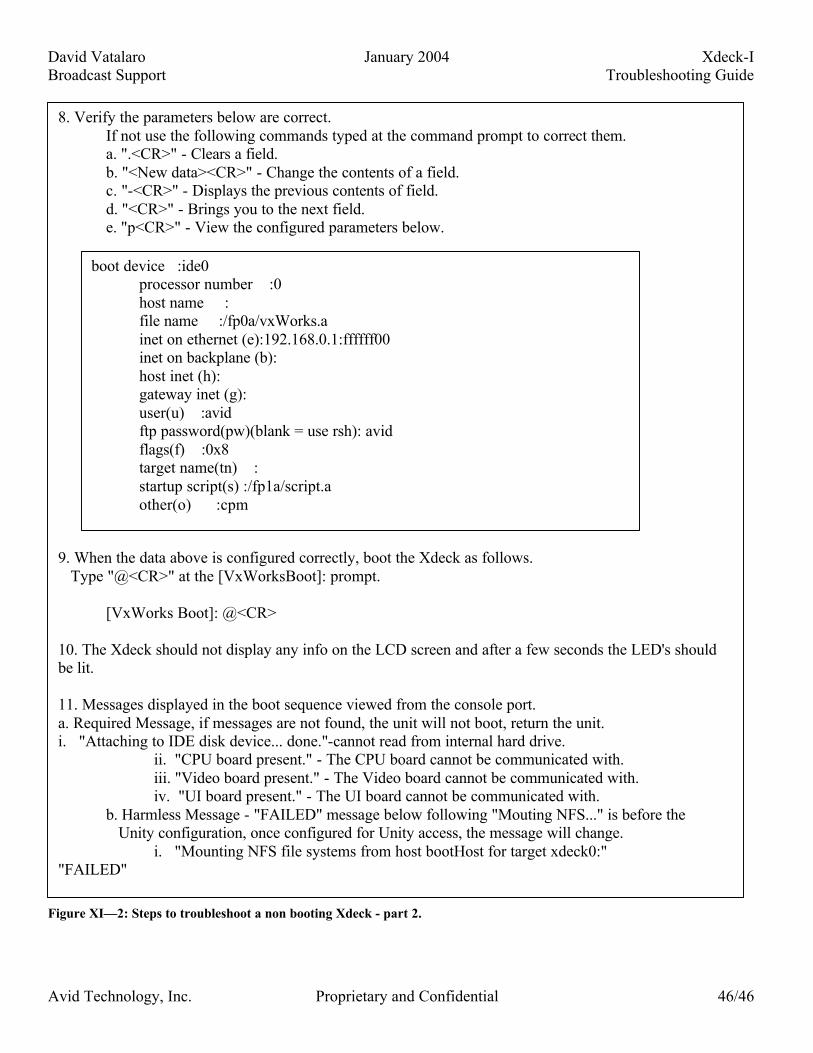
Avid Technology, Inc. Proprietary and Confidential 46/46
Figure XI—2: Steps to troubleshoot a non booting Xdeck - part 2.
8. Verify the parameters below are correct. If not use the following commands typed at the command prompt to correct them. a. ".<CR>" - Clears a field. b. "<New data><CR>" - Change the contents of a field. c. "-<CR>" - Displays the previous contents of field. d. "<CR>" - Brings you to the next field. e. "p<CR>" - View the configured parameters below. 9. When the data above is configured correctly, boot the Xdeck as follows. Type "@<CR>" at the [VxWorksBoot]: prompt. [VxWorks Boot]: @<CR> 10. The Xdeck should not display any info on the LCD screen and after a few seconds the LED's should be lit. 11. Messages displayed in the boot sequence viewed from the console port. a. Required Message, if messages are not found, the unit will not boot, return the unit. i. "Attaching to IDE disk device... done."-cannot read from internal hard drive. ii. "CPU board present." - The CPU board cannot be communicated with. iii. "Video board present." - The Video board cannot be communicated with. iv. "UI board present." - The UI board cannot be communicated with. b. Harmless Message - "FAILED" message below following "Mouting NFS..." is before the Unity configuration, once configured for Unity access, the message will change. i. "Mounting NFS file systems from host bootHost for target xdeck0:" "FAILED"
boot device :ide0 processor number :0 host name : file name :/fp0a/vxWorks.a inet on ethernet (e):192.168.0.1:ffffff00 inet on backplane (b): host inet (h): gateway inet (g): user(u) :avid ftp password(pw)(blank = use rsh): avid flags(f) :0x8 target name(tn) : startup script(s) :/fp1a/script.a other(o) :cpm
David Vatalaro January 2004 Xdeck-I Broadcast Support Troubleshooting Guide
Avid Technology, Inc. Proprietary and Confidential 47/47
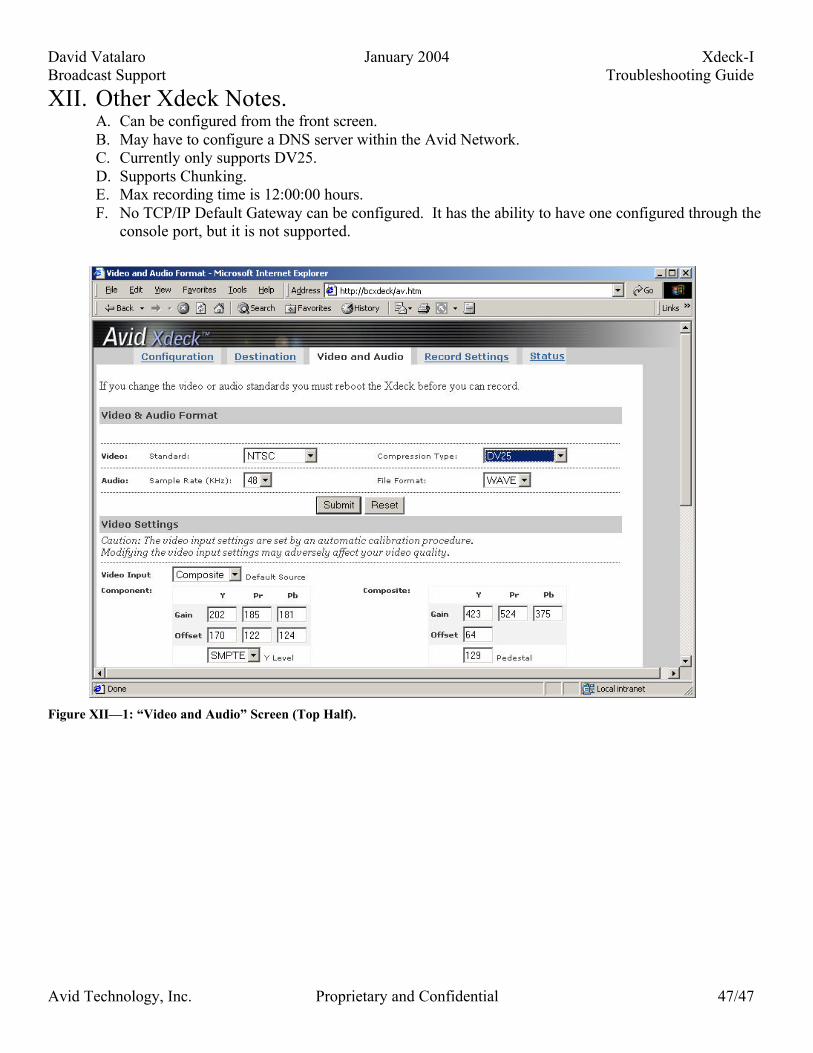
XII. Other Xdeck Notes. A. Can be configured from the front screen. B. May have to configure a DNS server within the Avid Network. C. Currently only supports DV25. D. Supports Chunking. E. Max recording time is 12:00:00 hours. F. No TCP/IP Default Gateway can be configured. It has the ability to have one configured through the
console port, but it is not supported.
Figure XII—1: “Video and Audio” Screen (Top Half).
David Vatalaro January 2004 Xdeck-I Broadcast Support Troubleshooting Guide
Avid Technology, Inc. Proprietary and Confidential 48/48
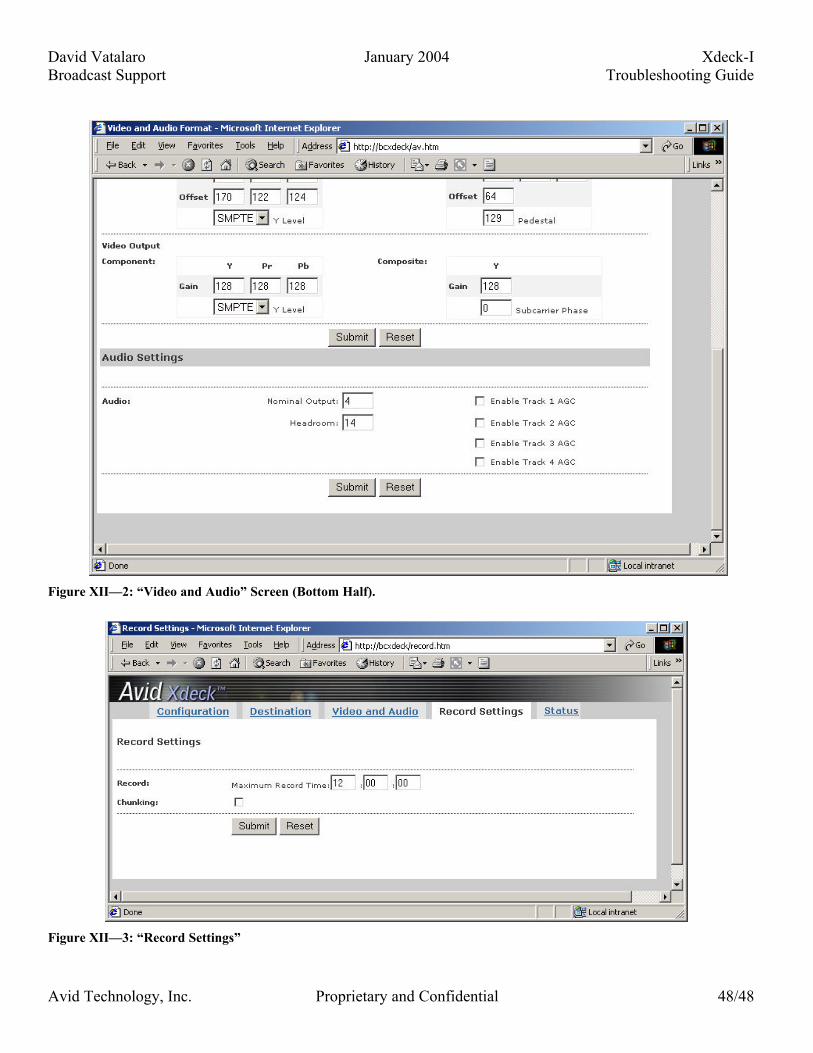
Figure XII—2: “Video and Audio” Screen (Bottom Half).
Figure XII—3: “Record Settings”
David Vatalaro January 2004 Xdeck-I Broadcast Support Troubleshooting Guide
Avid Technology, Inc. Proprietary and Confidential 49/49
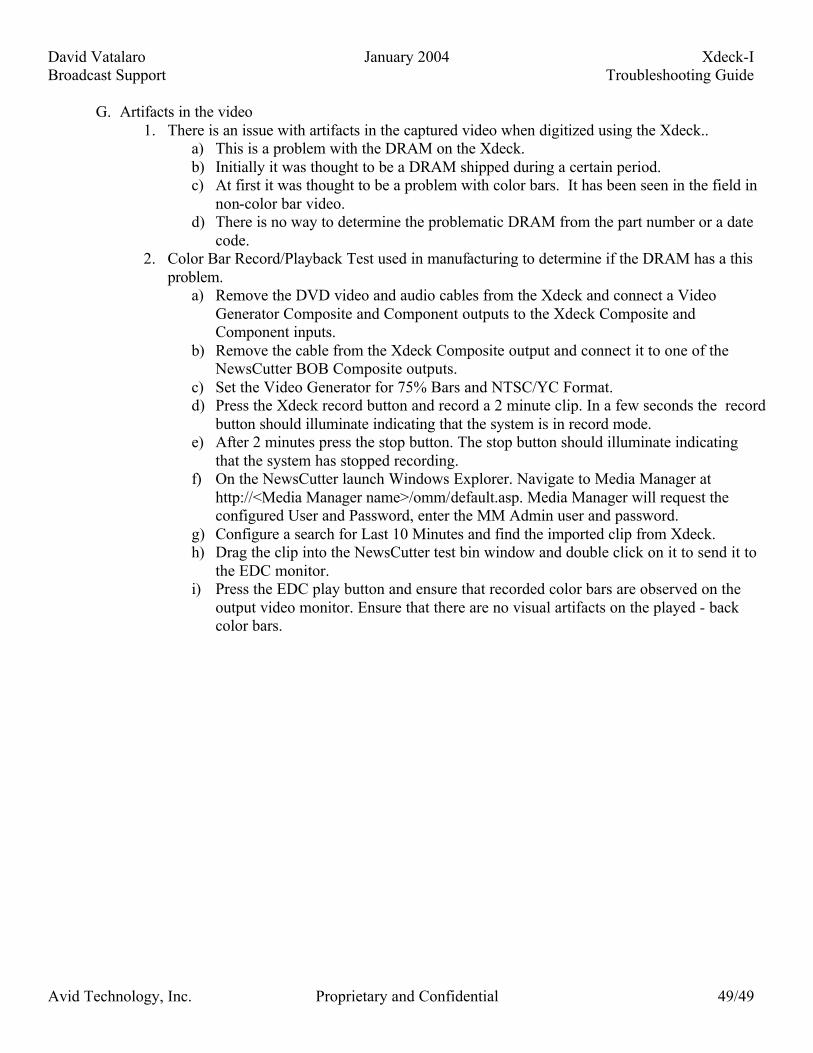
G. Artifacts in the video
1. There is an issue with artifacts in the captured video when digitized using the Xdeck.. a) This is a problem with the DRAM on the Xdeck. b) Initially it was thought to be a DRAM shipped during a certain period. c) At first it was thought to be a problem with color bars. It has been seen in the field in
non-color bar video. d) There is no way to determine the problematic DRAM from the part number or a date
code. 2. Color Bar Record/Playback Test used in manufacturing to determine if the DRAM has a this
problem. a) Remove the DVD video and audio cables from the Xdeck and connect a Video
Generator Composite and Component outputs to the Xdeck Composite and Component inputs.
b) Remove the cable from the Xdeck Composite output and connect it to one of the NewsCutter BOB Composite outputs.
c) Set the Video Generator for 75% Bars and NTSC/YC Format. d) Press the Xdeck record button and record a 2 minute clip. In a few seconds the record
button should illuminate indicating that the system is in record mode. e) After 2 minutes press the stop button. The stop button should illuminate indicating
that the system has stopped recording. f) On the NewsCutter launch Windows Explorer. Navigate to Media Manager at
http://<Media Manager name>/omm/default.asp. Media Manager will request the configured User and Password, enter the MM Admin user and password.
g) Configure a search for Last 10 Minutes and find the imported clip from Xdeck. h) Drag the clip into the NewsCutter test bin window and double click on it to send it to
the EDC monitor. i) Press the EDC play button and ensure that recorded color bars are observed on the
output video monitor. Ensure that there are no visual artifacts on the played - back color bars.

David Vatalaro January 2004 Xdeck-I Broadcast Support Troubleshooting Guide
Avid Technology, Inc. Proprietary and Confidential 50/50
Figure XII—4: Artifacts occuring when colorbars are digitized with a problematic Xdeck
David Vatalaro January 2004 Xdeck-I Broadcast Support Troubleshooting Guide
Avid Technology, Inc. Proprietary and Confidential 51/51
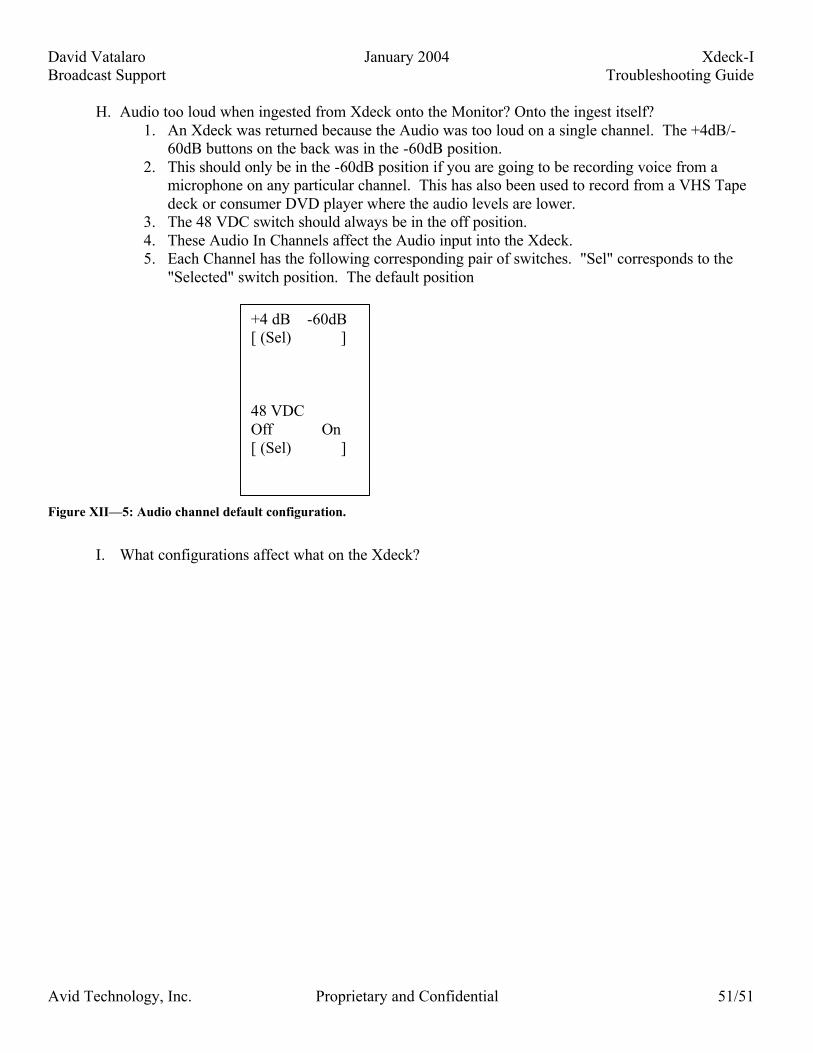
H. Audio too loud when ingested from Xdeck onto the Monitor? Onto the ingest itself?
1. An Xdeck was returned because the Audio was too loud on a single channel. The +4dB/-60dB buttons on the back was in the -60dB position.
2. This should only be in the -60dB position if you are going to be recording voice from a microphone on any particular channel. This has also been used to record from a VHS Tape deck or consumer DVD player where the audio levels are lower.
3. The 48 VDC switch should always be in the off position. 4. These Audio In Channels affect the Audio input into the Xdeck. 5. Each Channel has the following corresponding pair of switches. "Sel" corresponds to the
"Selected" switch position. The default position
Figure XII—5: Audio channel default configuration.
I. What configurations affect what on the Xdeck?
+4 dB -60dB [ (Sel) ] 48 VDC Off On [ (Sel) ]

David Vatalaro January 2004 Xdeck-I Broadcast Support Troubleshooting Guide
Avid Technology, Inc. Proprietary and Confidential 52/52
J. Xdeck Maintenance
Non-Chunking Chunking File Size Limit (GB) 2, will stop and start when
continually recording.
Xdeck Max Recording time (Hours) per ingest.
12, should only use 3 since this is editors max time.
3
Editor Max Recording time (Hours)
3 3
Manual Database Rebuild (Hours)
Every time multiple master clips (max of 3 hours per clip) have been ingested for a total of 168 hours (once per week). Easier to do once a week so you don't have to keep track of the amount of time for each ingest. Two times a week is better.
Every time multiple master clips (max of 3 hours per clip) have been ingested for a total of 24 Hours of ingest (once per day). Easier to do one time per day, so you don't have to keep track of amount of time for each ingest.
Manual Reboot Maintenance Every 168 Hours of ingest. Easier to do once a week so you don't have to keep track of the amount of time for each ingest. Two times a week is better.
Every 24 Hours of ingest. Easier to do one time per day, so you don't have to keep track of amount of time for each ingest.
Figure XII—6: Required Xdeck Maintenance Schedule.
1. Why does the xdeck require rebooting?
a) Because of the 32 MB memory size of the Xdeck and not having functionality to recover used memory it requires a reboot for maintenance.
2. Why does an Xdeck configured for chunking ingest require a more frequent reboot than a non-chunking ingest?
a) Chunking uses memory quicker because each piece of media ingested and chunked utilizes memory. Non-Chunked media uses much less memory for each piece of media ingested.
3. Why does a Manual Database rebuild have to occur? a) Because the Xdeck does not have the ability to correctly update the .pmr file. If you
will there is file residue or leftovers in the .pmr file making it much larger than it needs to be. As Xdeck clips are deleted in Media Manager, the .pmr links do not get updated on the fly, such as a NewsCutter editing client would update. Try to not let the file get over 300 kB, it is quicker to perform the database rebuild under 300 kB, over 300 kB takes a much longer time. When the file gets too large it can cause a "Disk Spinning Up" Error to be displayed on the Xdeck and inhibits functionality. The Manual Database rebuild prevents this problem from occurring.
4. Why does an Xdeck configured for chunking ingest require a more frequent database rebuild than a non-Chunking ingest?
a) Chunking modifies the .pmr file more frequently for each piece of media ingested. A non-Chunked media use modifies the .pmr file much less frequently for each piece of media ingested.
David Vatalaro January 2004 Xdeck-I Broadcast Support Troubleshooting Guide
Avid Technology, Inc. Proprietary and Confidential 53/53
K. Xdeck Questions from Workgroup Bootcamp Training 1. Deleting media ingested from an Xdeck.
a) Make sure you give the Xdeck an appropriate amount of time after ingesting media before attempting to delete the media. Not giving it an appropriate amount of time can cause a message to be displayed indicating the media is in use.
2. Is case sensitivity important to maintain in the Workspace and Project Bin? a) Yes.
3. Devices needed to be included in the DNS Table. a) PortServer, if not the "No Unity Connection" Error will occur when rebooting Xdeck. b) Media Manager, if not the "MM Login Failed" error occurs when rebooting Xdeck. c) Xdecks do not need to be included in the Xdeck configuration.
4. Possible Issue - When entering information on the Xdeck and using the "Tab" key, then saving the information and rebooting and returning to the Xdeck configuration screen, the places where tab was used has non alpha numeric characters entered into the information box.
5. Are there any issues with shorter clip names vs. longer clip names on the Xdeck and how the editor is able to work with the longer clip name?
a) If the name is more than 15 characters, the name is truncated to 14 characters with a "~" in character position 10 or 11.
6. What is the battery life? a) Unknown at this time.
7. What happens if performing an ingest and you run out of memory or the time limit is reached of the clip, up to Maximum record time (Can be up to 12 Hours)?
a) The message "RECORD STOPPED MAX TIME" error is displayed on the LCD Display or the Overlay Video Output.
b) There is no corrective action, this is not an error, just a status message. 8. What happens when trying to edit a 12 hour recording made from Xdeck?
a) The first 3 hours are ok to edit, the last 9 hours will cause exception errors. b) The Maximum recording time should be set to 3 Hours.
9. Is there a record time clock to keep track of the amount of recording? a) No. b) Use MM to view workspace containing the Xdeck feeds.
10. Is there a time clock to keep track of the current recording? a) Yes, the time starts at zero on the front LCD display or the Overlay Video Output and
increments as the video plays. b) This does not begin until you start the recording.
11. The Xdeck can have trouble sharing workspaces with each other. a) The computation of the space is not accurate when multiple Xdecks share a
workspace. b) The Xdecks calculate the amount of available recording time based on the recording
resolution and available space in the workspace, it does not acknowledge other Xdecks or editing clients in the same workspace.
c) The Xdeck assumes it has the entire workspace all to itself. d) An editing client will calculate available workspace and allocate a certain amount. e) If you have multiple Xdecks in the same workspace recording simultaneously they
will all think they have a certain amount of time available to them, at some point earlier than the amount of time expected by them the recording will end.
f) If you have two Xdecks sharing a workspace with the same resolution and then both have calculated one hour of recording time, you will actually have a half of an hour of

David Vatalaro January 2004 Xdeck-I Broadcast Support Troubleshooting Guide
Avid Technology, Inc. Proprietary and Confidential 54/54
recording time. 12. How do you configure the DNS server?
a) See page 101, Appendix B in "Avid Xdeck Setup and User’s Guide, Part 0130-05419-01,December 2002"
XIII. PortServer and the Xdeck A. Xdeck and Editing Clients connected to a Port server.
1. Avid Xdeck Version 1.1 Release Notes (page 9) a) Part 0130-05607-02 Rev. A b) May 2003
2. The Xdeck records a single stream to mirrored workspaces, the Avid Editing system uses true dual-stream.from page 9 in the 1.1 xdeck release notes.
Port Server Client Resolution
Equivalent Amount of
DV 25 Streams
DV 25 2 Xdeck
DV 50 4 DV 25 2
Avid Editing Client DV 50 4
Figure XIII—1: DV Resolution and corresponding DV 25 Streams.
Amout of Xdeck
Approximate Equivalent DV
25 Single Streams per
Xdeck
Amount Avid
Editing System
Approximate Equivalent
DV 25 Single Streams per Avid Editing
System
Approximate Total of Xdeck
and Avid Editing Systems DV 25 single Streams
DV 25 8 16 1 2 18 DV 50 or MPEG 50 4 16 1 4 20
DV 25 6 12 2 4 16 DV 50 or MPEG 50 3 12 2 8 20
DV 25 4 8 3 6 14 DV 50 or MPEG 50 2 8 3 12 20
DV 25 1 2 4 8 10 DV 50 or MPEG 50 0 0 4 16 16
Figure XIII—2: Maximum amount of Xdeck and Editors per Port Server.
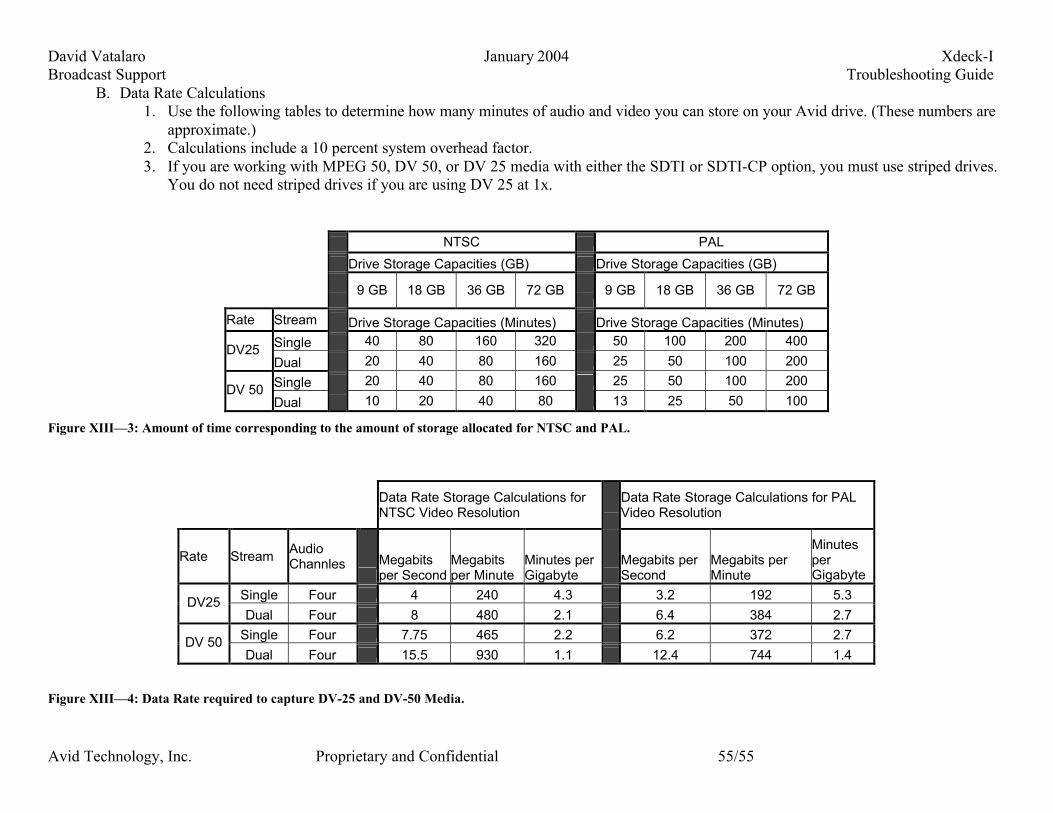
David Vatalaro January 2004 Xdeck-I Broadcast Support Troubleshooting Guide
Avid Technology, Inc. Proprietary and Confidential 55/55
B. Data Rate Calculations 1. Use the following tables to determine how many minutes of audio and video you can store on your Avid drive. (These numbers are
approximate.) 2. Calculations include a 10 percent system overhead factor. 3. If you are working with MPEG 50, DV 50, or DV 25 media with either the SDTI or SDTI-CP option, you must use striped drives.
You do not need striped drives if you are using DV 25 at 1x.
NTSC PAL
Drive Storage Capacities (GB) Drive Storage Capacities (GB)
9 GB 18 GB 36 GB 72 GB
9 GB 18 GB 36 GB 72 GB
Rate Stream Drive Storage Capacities (Minutes) Drive Storage Capacities (Minutes) Single 40 80 160 320 50 100 200 400
DV25 Dual 20 40 80 160 25 50 100 200
Single 20 40 80 160 25 50 100 200 DV 50
Dual 10 20 40 80 13 25 50 100
Figure XIII—3: Amount of time corresponding to the amount of storage allocated for NTSC and PAL.
Data Rate Storage Calculations for NTSC Video Resolution
Data Rate Storage Calculations for PAL Video Resolution
Rate Stream Audio Channles
Megabits per Second
Megabits per Minute
Minutes per Gigabyte
Megabits per Second
Megabits per Minute
Minutes per Gigabyte
Single Four 4 240 4.3 3.2 192 5.3 DV25 Dual Four 8 480 2.1 6.4 384 2.7
Single Four 7.75 465 2.2 6.2 372 2.7 DV 50 Dual Four 15.5 930 1.1 12.4 744 1.4
Figure XIII—4: Data Rate required to capture DV-25 and DV-50 Media.
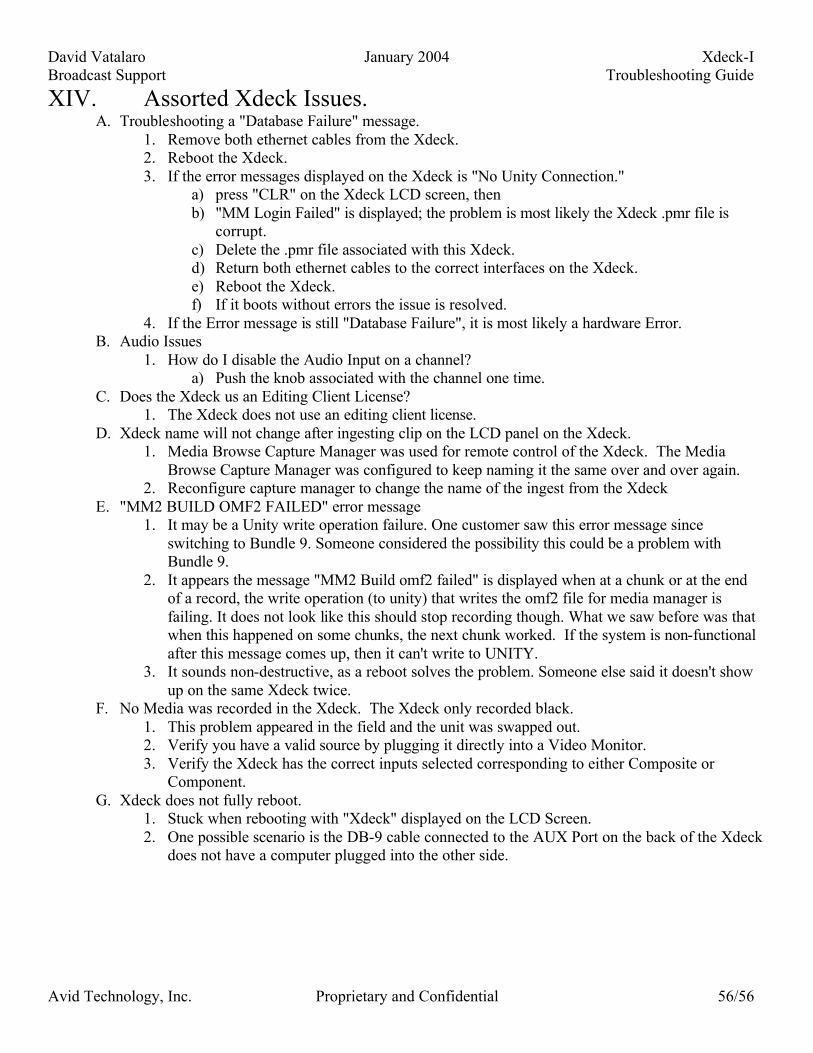
David Vatalaro January 2004 Xdeck-I Broadcast Support Troubleshooting Guide
Avid Technology, Inc. Proprietary and Confidential 56/56
XIV. Assorted Xdeck Issues. A. Troubleshooting a "Database Failure" message.
1. Remove both ethernet cables from the Xdeck. 2. Reboot the Xdeck. 3. If the error messages displayed on the Xdeck is "No Unity Connection."
a) press "CLR" on the Xdeck LCD screen, then b) "MM Login Failed" is displayed; the problem is most likely the Xdeck .pmr file is
corrupt. c) Delete the .pmr file associated with this Xdeck. d) Return both ethernet cables to the correct interfaces on the Xdeck. e) Reboot the Xdeck. f) If it boots without errors the issue is resolved.
4. If the Error message is still "Database Failure", it is most likely a hardware Error. B. Audio Issues
1. How do I disable the Audio Input on a channel? a) Push the knob associated with the channel one time.
C. Does the Xdeck us an Editing Client License? 1. The Xdeck does not use an editing client license.
D. Xdeck name will not change after ingesting clip on the LCD panel on the Xdeck. 1. Media Browse Capture Manager was used for remote control of the Xdeck. The Media
Browse Capture Manager was configured to keep naming it the same over and over again. 2. Reconfigure capture manager to change the name of the ingest from the Xdeck
E. "MM2 BUILD OMF2 FAILED" error message 1. It may be a Unity write operation failure. One customer saw this error message since
switching to Bundle 9. Someone considered the possibility this could be a problem with Bundle 9.
2. It appears the message "MM2 Build omf2 failed" is displayed when at a chunk or at the end of a record, the write operation (to unity) that writes the omf2 file for media manager is failing. It does not look like this should stop recording though. What we saw before was that when this happened on some chunks, the next chunk worked. If the system is non-functional after this message comes up, then it can't write to UNITY.
3. It sounds non-destructive, as a reboot solves the problem. Someone else said it doesn't show up on the same Xdeck twice.
F. No Media was recorded in the Xdeck. The Xdeck only recorded black. 1. This problem appeared in the field and the unit was swapped out. 2. Verify you have a valid source by plugging it directly into a Video Monitor. 3. Verify the Xdeck has the correct inputs selected corresponding to either Composite or
Component. G. Xdeck does not fully reboot.
1. Stuck when rebooting with "Xdeck" displayed on the LCD Screen. 2. One possible scenario is the DB-9 cable connected to the AUX Port on the back of the Xdeck
does not have a computer plugged into the other side.

David Vatalaro January 2004 Xdeck-I Broadcast Support Troubleshooting Guide
Avid Technology, Inc. Proprietary and Confidential 57/57
Figure XIV—1: Xdeck "Video and Audio" Tab used to choose "Composite" or "Component".