PD233: Design of Biomedical Devices and Systems (Lecture-9 ...

TTM - TRANSTELEPHONIC MONITOR
Avery Biomedical Devices, Inc.

1
TRANSTELEPHONIC MONITORING – TTM
Cautions
• Follow procedure carefully.
• Ensure proper connection to patient and normal audio output.
• Room noise should be low.
• No line voltage equipment should be next to patient.
• Use only fresh, silver/silver chloride skin electrodes.
• Ensure that the transmitter is only operating on the one side from which the TTM data is being recorded.
• Always use a standard corded landline telephone. Use of cordless, cellular or VOIP telephones may create interference during transmission and result in an unreadable report.
• Transtelephonic receiving system automatically disconnects after about 30 seconds of silence.
• Remove the battery if the transmitter is not used for extended periods of time.
• The TTM device should not be used in the presence of flammable anesthetics.
• The TTM device should not be immersed in water or any other liquids.
• The TTM device can be cleaned with a soft, dry cloth. Never use thinner, alcohol, benzene or wet dusters.

2
TTM PROCEDURE
The Transtelephonic Monitoring (TTM) provides quantitative data for routine and diagnostic monitoring of the external and implanted diaphragm pacing equipment as well as the patient’s physiological responses. Using an ordinary telephone, a signal can be sent to us twenty-four hours per day from any place in the world. The transmitted signal is recorded on a device similar to an answering machine so that analysis can be done during the business day. A report of every TTM signal with analysis comments is sent to the patient’s personal physician to assist in medical diagnosis and treatment. Send an initial baseline TTM signal a few days after beginning diaphragm pacing. This can serve as a comparison for future transmissions. After diaphragm reconditioning is complete, send a TTM every three months to create a library of normal TTM tracings and to serve as postmarket surveillance of the diaphragm pacing system. Send a follow-up TTM whenever malfunctioning of the pacing system is suspected. A comparison is made with the most recent previous transmission and diagnostic troubleshooting will be made simpler. Complete the TTM Information Sheet (see pages 18 and 19) regarding the health status of the patient. It is necessary for us to have information about the patient’s physical condition at the time of the test in order for an accurate analysis to be completed.

3
1. Items Required
• Transtelephonic Monitoring (TTM) Transmitter • Cable with red and white snap buttons • Supply of self-adhesive, pre-gelled skin electrodes
with snap fittings • Alcohol pads • Safety razor • Telephone Remove the TTM and the patient cable from its case. Take a look at the TTM. It has a graphics display, two Record/Send buttons, a cable socket, a speaker and the battery compartment. See figure 1.
Figure 1. The TTM and its main items
4
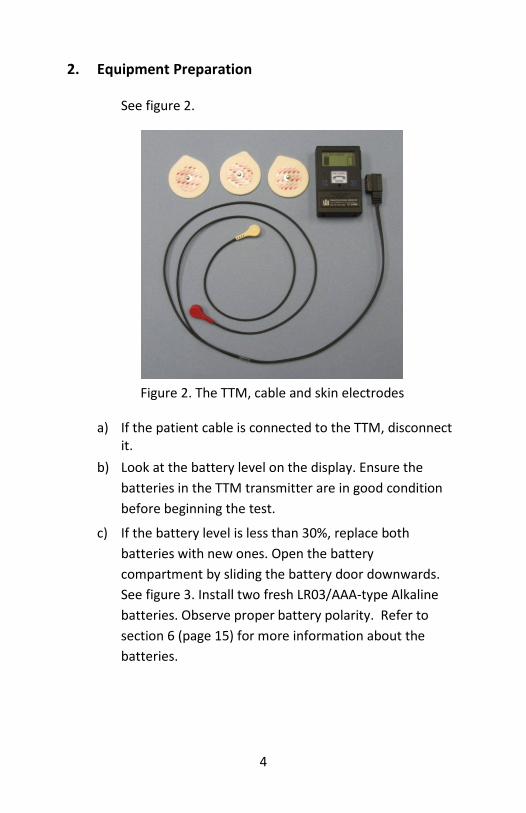
2. Equipment Preparation See figure 2.
Figure 2. The TTM, cable and skin electrodes
a) If the patient cable is connected to the TTM, disconnect
it. b) Look at the battery level on the display. Ensure the
batteries in the TTM transmitter are in good condition before beginning the test.
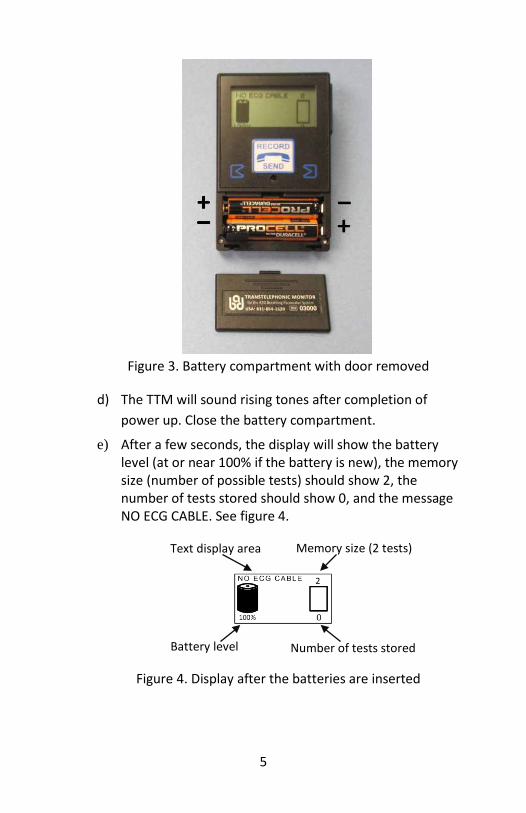
c) If the battery level is less than 30%, replace both batteries with new ones. Open the battery compartment by sliding the battery door downwards. See figure 3. Install two fresh LR03/AAA-type Alkaline batteries. Observe proper battery polarity. Refer to section 6 (page 15) for more information about the batteries.
5
Figure 3. Battery compartment with door removed
d) The TTM will sound rising tones after completion of
power up. Close the battery compartment.
e) After a few seconds, the display will show the battery level (at or near 100% if the battery is new), the memory size (number of possible tests) should show 2, the number of tests stored should show 0, and the message NO ECG CABLE. See figure 4.
Figure 4. Display after the batteries are inserted
Memory size (2 tests) Text display area
Battery level Number of tests stored

6
f) Have your pacemaker transmitter in its normal position with the antenna(s) in place and both sides on (one side on for unilateral pacing).
g) The skin beneath the electrodes must be clean. Shave any hair where the skin electrodes need to be positioned and clean skin thoroughly with alcohol pads.
h) Apply the skin electrodes to the skin as follows (see Figures 5A and 5B): If patient is pacing bilaterally, i.e., stimulating both sides, all three skin electrodes should be in place before recording starts. The “signal” skin electrodes are placed just below the last rib. Use one skin electrode on each side. The third skin electrode (also called “indifferent” electrode) is placed in the middle of the breastbone or sternum. If patient is pacing unilaterally, i.e., stimulating one side only, two skin electrodes should be in place before recording starts. The “signal” skin electrode is placed just below the last rib on the side it’s stimulating. The other skin electrode (also called “indifferent” electrode) is placed in the middle of the breastbone or sternum.
i) Connect the cable white snap button onto the skin electrode located at the center of the breastbone. If patient is pacing bilaterally, connect the cable red snap button onto the left skin electrode. See figure 5A. NOTE: As a norm, the left side is recorded first. After it’s done, the red snap button is disconnected from the left skin electrode and then connected to the right skin electrode so that this side is also recorded. If patient is pacing unilaterally, connect the cable red snap button onto the skin electrode. See figure 5A or 5B.

7
Figure 5A. Left side set-up Figure 5B. Right side set-up
3. TTM Recording
NOTE: At this time, the skin electrodes should be placed on the skin and the snap buttons should be connected to the skin electrodes. The cable must not be connected to the TTM yet.
a) View the display. It should show NO ECG CABLE. See figure 6.
Figure 6
The numbers 2 and 0 mean there is memory space for two tests and no memory has been used. If the batteries are new the display should show a level of 100%. When batteries are not new the level should be above 30%.
b) Plug the cable into the TTM cable socket. NOTE: If the snap buttons and the skin electrodes are well placed and make good contact, the TTM will sound one beep.
White Button White Button
Red Button Red Button
R L

8
c) The TTM is checking electrode connections. View the display right after the cable is connected. For a few seconds, it will show a square wave. See Figure 7.
Figure 7
d) A few seconds later, the heart waveform is displayed.
See figure 8.
Figure 8
NOTE: While the heart waveform is displayed, the TTM will not respond to any button presses.
NOTE: If there is not a good connection to the patient or the skin electrodes don’t make a good contact, there will be no beep and the square wave will continue to be displayed. See figure 7. A good heart waveform must be detected before the TTM is ready to record.
e) When MONITORING flashes on the display, recording of the left side signals can begin. Refer to figure 9.
Figure 9

9
f) If patient is pacing bilaterally, turn off the right side of the pacemaker transmitter and keep the left side on. If patient is pacing unilaterally, keep the stimulating side on.
g) Press one of the RECORD/SEND buttons for two seconds until a continuous audible tone is heard, then release it. At this time, electrical signals from the diaphragm activity are being recorded into the TTM.
NOTE: The patient should remain still while recording.
IMPORTANT: If the sound changes tone, there is not a good connection to the patient. Recheck the skin electrodes and snap button connections.
h) The display flashes RECORDING on the top left. See figure 10.
Figure 10
The recording takes 30 seconds. During recording, a continuous sound will be heard. NOTE: To stop a recording, press one of the RECORD/SEND buttons for two seconds. Pressing one of the RECORD/SEND buttons again for two seconds will force the test to restart recording from the beginning.
i) At the end of the recording, a warble (phone ring) beep
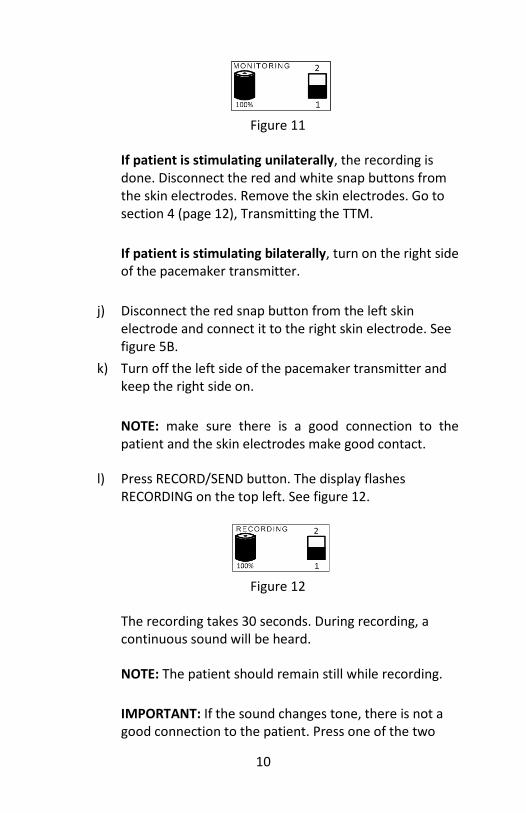
is heard. The used memory switches from 0 to 1, the icon shows one memory filled and MONITORING flashes. See figure 11.
10
Figure 11
If patient is stimulating unilaterally, the recording is done. Disconnect the red and white snap buttons from the skin electrodes. Remove the skin electrodes. Go to section 4 (page 12), Transmitting the TTM.
If patient is stimulating bilaterally, turn on the right side of the pacemaker transmitter.
j) Disconnect the red snap button from the left skin
electrode and connect it to the right skin electrode. See figure 5B.
k) Turn off the left side of the pacemaker transmitter and keep the right side on.
NOTE: make sure there is a good connection to the patient and the skin electrodes make good contact.
l) Press RECORD/SEND button. The display flashes
RECORDING on the top left. See figure 12.
Figure 12
The recording takes 30 seconds. During recording, a continuous sound will be heard.
NOTE: The patient should remain still while recording. IMPORTANT: If the sound changes tone, there is not a good connection to the patient. Press one of the two

11
RECORD/SEND buttons to stop recording. Recheck the skin electrodes and snap button connections. Pressing one of the RECORD/SEND buttons again for two seconds, the test will restart recording from the beginning.
m) At the end of the recording, a warble (phone ring) beep
is heard. The used memory switches from 1 to 2, the icon shows both memory slots full and the message shows MEMORY FULL. See figure 13.
Figure 13
n) Turn on the left side of the pacemaker transmitter.
Disconnect the red and white snap buttons from the skin electrodes. Remove the skin electrodes. The test is done.
o) At this time no more recordings are possible unless the stored data is sent to Avery Biomedical. The memory can be erased only after the data is sent to Avery Biomedical.
NOTE: Until the data is sent, the TTM will remind that the memory is full by sounding a warble (phone ring) warning every 2 minutes for the first 10 minutes. NOTE: If there is a problem with transmission over the phone line, the data can be resent as many times as needed for proper reception.

12
4. Transmitting the TTM a) Disconnect the patient cable from the TTM. Data cannot
be sent over the telephone line if the cable is connected to the TTM.
b) Place the TTM on a flat surface with the speaker hole facing up.
c) Have the TTM Information Sheet ready (pages 18 and 19).
d) Dial the telephone number for the Transtelephonic Receiving Station, using USA Country Code as required: 631-864-1620 IMPORTANT: Cordless, cellular and VOIP telephones do not work for TTM transmission. Use a corded landline telephone only.
e) After several rings you will hear the following message indicating that you are connected to the TTM receiving station and that you may begin the transmitting procedure:
This is the transtelephonic monitoring receiving center at Avery Biomedical Devices. Please begin by providing the information requested on the TTM information sheet. Spell the patient’s last name. Please tell us on what side you are starting the TTM. If you get cut off and call back, state the patient’s name and tell us on what side you are resuming the TTM. The TTM analysis results will be reported to your physician. Thank You.
f) Give as much information as possible from your TTM Information Sheet. Speak into the telephone mouthpiece slowly and clearly. Please spell the patient’s last name.

13
g) The telephone mouthpiece should now be placed over the TTM speaker hole. See figure 14.
Figure 14
h) Push the RECORD/SEND button on the side of the TTM
for two seconds. You will now hear the recorded transmission being sent while the display shows SENDING and the TTM/telephone symbol. See figure 15.
Figure 15
NOTE: Pressing RECORD/SEND button for two seconds during transmission will abort the transmission. Pressing RECORD/SEND button again will re-send the entire recording.
i) A falling tone will sound when the transmission is complete. The display will show MEMORY FULL. See figure 16.
Figure 16

14
j) After both recordings have been sent, hang up the
telephone.
5. Resetting the TTM
IMPORTANT: When re-inserting the cable into the TTM, all stored data will be erased. Therefore, before the cable is connected, contact our Customer Service Department to make sure the TTM data was properly sent over the telephone line. If transmission was not successfully sent, it can be repeated. After transmitting the data by telephone, the TTM memory must be cleared in order to record new data.
a) Make sure the TTM was successfully sent. b) Insert the cable. The TTM erases the memory, restarts
and emits a rising tone. c) The TTM displays the square wave signal continuously
until the cable is disconnected. See figure 17.
Figure 17
d) Disconnect the cable. The display will show the number
of available memory slots as 2 and the number of stored memory slots as 0. See figure 18.
Figure 18
e) The TTM is now reset and ready to store new data.
15
NOTE: If you don’t expect to run another test in a short period of time, remove the batteries.
6. Batteries
The TTM device uses two 1.5V size AAA (LR03) alkaline batteries such as: Duracell MN2400, Energizer E92, Panasonic LR03XWA, Eveready 1212 or Rayovac RAY824.
When inserting the batteries, observe proper polarity. Check the battery level on the display. If it’s lower than 30%, replace them with fresh batteries.
Remove the batteries if the TTM is not expected to be used for extended periods of time. Damage from corrosion can result. NOTE: Removal of the batteries from the TTM will not reset the device or erase its memory.

16
7. TTM Troubleshooting
Symptom Recommended Solution
No display Ensure batteries are inserted with correct polarity.
No beep when inserting patient cable
Ensure patient electrodes and leads are connected to patient properly. Check if the patient cable is damaged in some way. Ensure patient cable is inserted completely.
Will not record
Memory full (phone ring alarm). Follow instructions to send and erase recordings. Ensure patient cable is inserted completely. Ensure RECORD/SEND button is held for two seconds.
TTM stops recording
Holding any button for two seconds while recording will cause the TTM to stop recording.
Siren (alternating) tone while recording
There is not a good connection. Check that electrodes and leads have a good connection to patient and cable is plugged into the TTM.
Phone ring sound every minute for 10 minutes
Memory is full. Follow instructions to send and erase recordings.
Phone ring sound when RECORD/SEND button is pushed
Memory is full. Follow instructions To send and erase recordings.
Phone ring sounds once
A recording is already stored in memory at start up, also heard at the end of a recorded event. Follow instructions To send and erase recordings.

17
Symptom Recommended Solution
Three beeps every five minutes with cable inserted
Batteries are low. Replace batteries and/or clean battery contacts.
No information received by receiving center at Avery Biomedical
Make sure mouthpiece of phone is directly over the TTM speaker. Ensure RECORD/SEND button is held for two seconds.
Noise artifact on recorded ECG at receiving center
Mouthpiece of phone must be close to the TTM speaker hole. Check telephone connection. Listen to phone line before sending recordings to ensure there is no noise. Call back and send recordings again. Try another phone.
Noise artifact on recorded ECG at patient location
Electrodes must be securely attached to patient. Patient should remain still while recording. Replace patient cable. Pulling on lead wires may damage cable. Verify the recording did not take place near a source of electromagnetic interference (fluorescent lights, computer monitors, or household appliances). Move electrodes slightly to the right or left of the original location.
Falling tone Transmission complete. Rising tone Ready to record.
If the TTM fails to sound or a buzzing signal is heard, check your skin electrodes and lead connections for good contact. If after thorough checking, you still do not get rhythmic sounds, call us at (USA) 631-864-1620. Leave a message that there is a problem with the TTM system along with a phone number where you can be reached.

18
TTM INFORMATION SHEET
1
This is __________________ calling for ________________________ Your Name Patient’s Name if sent by someone else Please spell last name
2
Today is _____________ Local time is _____________ Date Time
3
I am calling from _________________________________ City, State, Country
My phone number is ___________________________ Complete phone number
4
The serial number of my transmitter is _____________ Located on the side of the transmitter
5
My transmitter batteries are changed every _______ � hours � days � weeks
6
My pacing schedule is _____ � hours � minutes per � day � night
7
When on the pacer, breathing is � adequate � not adequate If inadequate, describe any symptoms
8
The diaphragm pacing equipment � is � is not working properly If you feel something is wrong, please describe
9
There � is � is not any pain and/or discomfort during stimulation If yes, please describe location and sensation
10
There � is � is not any swelling, redness, or pain near the implanted components If yes, please describe location and condition
11
Since the last TTM, the dials of the transmitter � have � have not been adjusted If yes, please state reason for adjustment and who performed the adjustment
12
The amplitude settings are ______ on the left side and ______ on the right side.

19
Please provide as much of the following as possible
13
My tidal volume is ______ on the left side, ______ on the right side, and ______ on both sides
14
My blood pressure is ______ over ______ My temperature is _____ � ᵒF � ᵒC
15
I � have � have not had any headaches recently If yes, please state how often and at what times
16
My CO2 level is_______ My O2 level is _______
17
My lips, fingernail, and face coloring is � normal � abnormal If abnormal please describe
18
My bowels and bladder function are � normal � abnormal If abnormal please describe
19
My last visit with a physician was with Dr.__________ on __________ date
20
Please send the results of this TTM to Dr. _____________________ Phone number _______________ Fax number _________________ Complete phone number Complete fax number
NOTES
20
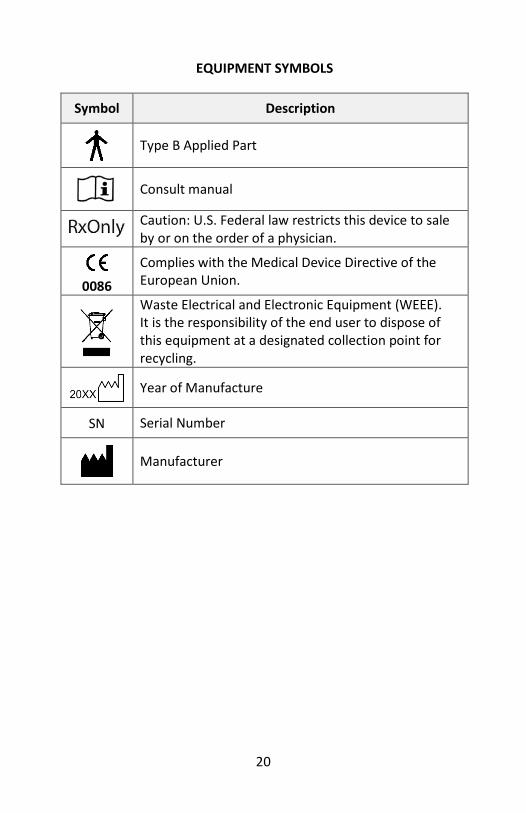
EQUIPMENT SYMBOLS
Symbol Description
Type B Applied Part
Consult manual
Caution: U.S. Federal law restricts this device to sale by or on the order of a physician.
0086
Complies with the Medical Device Directive of the European Union.
Waste Electrical and Electronic Equipment (WEEE). It is the responsibility of the end user to dispose of this equipment at a designated collection point for recycling.
Year of Manufacture
SN Serial Number
Manufacturer

Avery Biomedical Devices, Inc. 61 Mall Drive, Commack NY 11725 USA Telephone: (631) 864-1600 Fax: (631) 864-1610 Website: www.averybiomedical.com Email: [email protected]
6056-A 12-2014