AVC-2210 QSG.book Page 1 Friday, April 4, 2003 1:54 PM...
14
VideOh! DVD AVC-2210 Getting Started DISCLAIMER: This product may be designed to assist you in reproducing materials. In doing so, you must have permission from the copyright owner of the materials to avoid violating copyright law and being subject to payment of damages and other remedies. R
Transcript of AVC-2210 QSG.book Page 1 Friday, April 4, 2003 1:54 PM...
VideOh! DVDAVC-2210
Getting Started
DISCLAIMER: This product may be designed to assist you in reproducing materials. In doing so, you must have permission from the copyright owner of the materials to avoid violating copyright law and being subject to payment of damages and other remedies.
R
AVC-2210 QSG.book Page 1 Friday, April 4, 2003 1:54 PM

AVC-2210 QSG.book Page 1 Friday, April 4, 2003 1:54 PM
OverviewCongratulations on the purchase of your Adaptec VideOh!™ DVD Video Converter Kit. With this kit, you can convert your analog videos into digital format and create your own DVDs and VCDs (Video CDs). Using the AVC-2210 and the Sonic® MyDVD® software, you can capture your favorite video footage, organize and customize them to suit your imagination, and then burn them onto your DVD or CD. Then they’re ready to share.
VideOh! DVD lets you be creative. You can add backgrounds to your videos, and menus for easy navigation. And if you want to perform even more sophisticated editing, like adding music, transitions, and titles, you can use MyDVD’s companion software, ArcSoft® ShowBiz™.
What’s in the KitYour Adaptec VideOh! DVD Video Converter Kit includes:
VideOh! AVC-2310
AVC-2210
This Guide
AVC-2210 stand
Standard 6-foot A/V Cable
Installation CD, including drivers and software
External power adapter with cord
6-foot USB cable
1
AVC-2210 QSG.book Page 2 Friday, April 4, 2003 1:54 PM
Three Simple StepsGetting up and running with VideOh! involves three simple steps:
❏ Connect - install your hardware and software
❏ Create - capture your video, customize it a bit, then burn it
❏ Share! Your video can be played on any compatible DVD player. Recordable media playback compatibility varies between DVD player models. Consult your DVD player manual for more information.
These steps are described in the rest of this document. For more details, see the User’s Guide included on the CD or go to the online help system when you’re using the software.
ConnectFollow these steps to install your VideOh! hardware and software:
1 Insert the VideOh! Installation CD into your CD-ROM drive.
If the VideOh! Installation screen appears, click Exit.
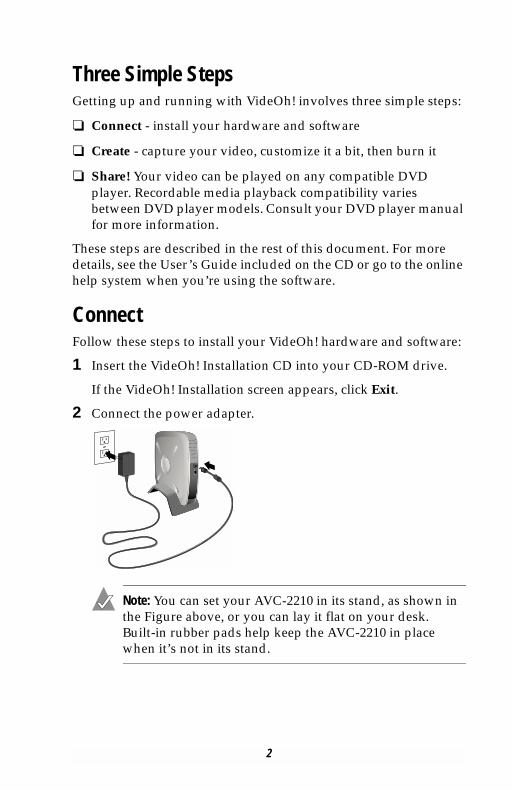
2 Connect the power adapter.
Note: You can set your AVC-2210 in its stand, as shown in the Figure above, or you can lay it flat on your desk. Built-in rubber pads help keep the AVC-2210 in place when it’s not in its stand.
2

AVC-2210 QSG.book Page 3 Friday, April 4, 2003 1:54 PM
3 Connect your video device to your AVC-2210 using the included A/V cable. Your device may need a proprietary cable.
4 Connect the AVC-2210 to your computer using the provided USB cable.
5 Turn on the AVC-2210 by pressing the Power button. The LED on the front of the AVC-2210 will light up orange when first powered on.
Windows detects the AVC-2210 and starts the Found New Hardware wizard. This wizard steps you through the process of installing the necessary driver.
6 Follow the on-screen instructions.
■ If you are using Windows 98SE, you may need your Windows 98SE CD to complete the installation.
■ If you are using Windows 98SE and the driver file being installed from the VideOh installation CD is older than the existing driver file, you may get a version conflict message. Select to keep the newer driver file.
Connect red audio plug to red audio port and white audio plug to white audio port
Connect yellow video plug to yellow video input port
3

AVC-2210 QSG.book Page 4 Friday, April 4, 2003 1:54 PM
■ If you are using Windows XP or Windows 2000 and you have plugged your device into a USB 1.1 port, you will see a message indicating that a high-speed USB device is plugged into a non-high-speed USB port. This means your AVC-2210 will run at the slower USB 1.1 speed. To increase your speed you may want to upgrade to USB 2.0. Go to www.adaptec.com for more information on USB 2.0 adapters.
■ If you are using Windows XP, you may see a warning message about Microsoft Windows logo certification. Click Continue Anyway.
7 When the driver installation is complete and you’ve clicked Finish, you may see a message asking you to restart your computer. Click Yes. The LED on the front of the AVC-2210 becomes green after you finish the driver installation.
You are now ready to install the Sonic MyDVD Software.
Note: Windows 98SE only—Before it begins the MyDVD and Showbiz installation, your system may automatically install an updated version of Windows Installer, then prompt you to restart your computer. Follow the onscreen instructions to continue the installation.
8 From the main VideOh! Installation screen, click Install Software, then click MyDVD.
If the VideOh! Installation screen doesn’t appear, use Windows Explorer to display the CD contents, then click autorun.exe.
9 Follow the on-screen instructions.
Sonic MyDVD and ArcSoft ShowBiz software will install on your system. Now you’re ready to CREATE.
Note: If an older version of MyDVD is installed on your system, uninstall it before installing the newer version.
CreateThese instructions give you the basic steps for capturing your video, trimming it, and then burning it to DVD or CD.
4

AVC-2210 QSG.book Page 5 Friday, April 4, 2003 1:54 PM
To get more information, refer to the online tutorial included with Sonic MyDVD. Or, at any time while you’re using this software, click ? or Help, to display detailed information about any step you want to perform.
Before you begin creating:
■ Make sure your analog video device (such as a camcorder or VCR) is connected to the AVC-2210 and switched on.
■ If you have an external DVD/CD recorder, make sure it is connected to your computer and switched on. You need a DVD-Recordable drive and appropriate media to burn DVDs. DVD-ROM, CD-R, and CD-RW drives do not have the capability to burn DVD discs. However, a CD-Recordable drive can burn a Video CD that you can play back on most DVD players.
Capture Your VideoTo successfully capture your video, make sure you complete each step in the order given.
1 Start MyDVD by clicking the Sonic MyDVD icon on your desktop. The Welcome window appears.
Click here for more information
5

AVC-2210 QSG.book Page 6 Friday, April 4, 2003 1:54 PM
2 Move the mouse pointer over either DVD-Video or Video CD, then click Create or Modify a ... Project. The Main project window appears.
3 On the Main project window (shown in Step 2), click Capture. The Capture window appears.
4 Press the Play button on your analog video device. The video image appears in the Capture window (as shown in Step 3).
These buttons won’t operate your analog video device. Use the Play, Stop, and other control buttons on your device to control your analog video tape.
6

AVC-2210 QSG.book Page 7 Friday, April 4, 2003 1:54 PM
5 To begin transferring your video to your computer, click Start Capturing.
MyDVD captures your video, including the audio.
Note: If you get any error messages at this point in your video capturing, stop your analog video device and refer to Need Help Capturing Your Video? on page 11.
6 When you want to stop transferring your video to your computer, click Stop Capturing, then stop or pause your analog video device.
7 On the Save As screen, enter the filename of your video clip and click Save. The filename you choose, becomes the title of your video clip and is displayed on the Main project window.
8 Click Done when finished.
Your video clip is saved and you will see a thumbnail picture on your Main project window.
Note: If you plan to do multiple video captures in the same session, save your project, then close and relaunch MyDVD every six captures (or sooner, if prompted by a system resource message).
The layout shown in the MyDVD Main project window is what your DVD menu will look like on your TV
7

AVC-2210 QSG.book Page 8 Friday, April 4, 2003 1:54 PM
Trim Your VideoNow that you’ve captured some video footage, you can trim it. For example, you can change your Start and End points. You can also choose the specific video frame that you want to use as the thumbnail picture that is displayed in your Main project window.
1 From the Main project window, double-click the thumbnail for the video clip you want to trim.
2 Use the controls in the Trimming window to trim your video.
3 Click OK when finished.
Preview Your ProjectIt’s a good idea to see how your DVD/VCD project will look before you burn it to disc. To preview your project, press Preview at the bottom of your Main project window, then double-click the thumbnail clip you want to look at.
When you have previewed your project, press Stop.
■ If playback appears fuzzy and unclear (for example, the edges of objects, especially objects in motion, are feathered) it is because of a difference between how televisions and computer monitors display video. This effect is not noticeable when you play back the finished DVD or VCD disc on your TV.
Drag the green bracket to choose a Start FrameDrag the thumb to choose a Thumbnail image
Drag the red bracket to choose an End Frame
You can trim out unwanted video footage
8

AVC-2210 QSG.book Page 9 Friday, April 4, 2003 1:54 PM
■ If your computer ’s processing speed is less than 800 MHz or if you are using a slower video card, your preview video in the MyDVD capture window may appear choppy. However, the finished DVD or VCD, played back on your TV, will be fine. Updating the drivers for your computer’s video and/or audio card may minimize this problem. Check your video or sound card manufacturer ’s Web site for driver updates.
Burn Your DVD or VCDWhen you are satisfied with how your DVD or VCD project looks, you are ready to burn it onto a recordable DVD or CD.
1 Insert a recordable DVD or CD into your computer’s DVD or CD recorder.
2 On the Main project window, click Burn.
3 Follow the on-screen instructions.
You will be notified when your DVD or VCD is successfully completed. On average, a 30 minute DVD or VCD can take from 1 to 2 hours to burn (depending on the speed of your computer and burner).
SHARE!Now that you’ve captured your video and burned it to a DVD or CD, you’re ready to share it. You can play your newly created DVD on most compatible DVD players and your VCD on most compatible DVD players or CD-ROM drives.
You can play your DVDs the way you play any standard DVD, using the controls on your DVD player or remote control.
To play a VCD, you need to select the video clip you want to view by using the number pad on the video player remote control. If you have more than 6 video clips, you can navigate between menu screens by using the skip forward and back controls.
9

AVC-2210 QSG.book Page 10 Friday, April 4, 2003 1:54 PM
Finding More InformationTo learn more about how to use Sonic MyDVD and ArcSoft ShowBiz:
■ In the MyDVD Welcome window, click the Help button or Tutorial button.
In the Main project window, click the Help menu and select MyDVD Help or Tutorial.
■ In Showbiz, click on the question mark icon on the ShowBiz Main screen to open the online Help and Learn the Basics tutorial. Right-click on any screen item to open context-sensitive Help.
Registering Your VideOh! DVD Video Converter KitTo make sure that you’re eligible for support and upgrades, and to qualify for future promotions, please register your VideOh! DVD Video Converter Kit by going to the Adaptec Web site at register.adaptec.com.
Need Help with Your AVC-2210?
Note: See the Readme file on the VideOh! Installation CD for the latest information.
■ Ensure that your analog video device (like a VCR or camcorder) is connected and powered on.
■ Double-check all cable connections.
■ Try connecting to a different USB port on your computer. In doing so, you may need to reinstall the drivers.
■ If your AVC-2210 is connected to a USB hub, try connecting it directly to your computer’s USB port. You may also need to reinstall the drivers.
■ Ensure that the AVC-2210 is properly connected and that the drivers are correctly installed. This will be indicated when the green power LED on the AVC-2210 is solid on.
10

AVC-2210 QSG.book Page 11 Friday, April 4, 2003 1:54 PM
■ If the LED is blinking orange, save your work, close MyDVD, then power your AVC-2210 off, then on again.
Need Help Capturing Your Video?■ If your analog video device, such as a VCR or camcorder, is not
powered on, after about 1 minute, you will get an error message.
To allow MyDVD to recognize and capture the video:
a Click OK to close the error message.
b Click Done to close the Capture window.
c Press the Power on button on your video device.
d Click Capture.
■ For optimum quality when creating DVDs, use the Best setting (in the MyDVD Capture window) when capturing video clips. However, if you have limited disk space, Adaptec recommends that you choose the Better or Good capture setting. (See the VideOh! DVD AVC-2210 User’s Guide for more information on determining disk space.)
Note: Due to Microsoft Windows FAT file system limitations, the maximum file size you can use is 4 Gigabytes (GB). If possible, use NTSF formatted hard disk.
■ If you are capturing video using the Best quality setting and see choppy images on the preview window, make sure you’re connected to a USB 2.0 port, because Best quality capturing may exceed the bandwidth of USB 1.1.
■ MyDVD may not be able to recognize footage from a damaged or degraded video tape.
11

AVC-2210 QSG.book Page 12 Friday, April 4, 2003 1:54 PM
■ If there are large gaps in your analog video tape of about 5 minutes, MyDVD stops capturing. To continue, forward to a new clip and start capturing. Gaps in video footage are often caused by stops, pauses, static, or unrecorded space in the original recording. They can also be caused by old, damaged, or deteriorated video tapes.
■ Set your computer monitor’s screen resolution to 1024 x 768 or higher for optimum viewing.
■ If you are playing your video and it is not appearing on the MyDVD Main project window, make sure MyDVD is capturing from the correct device. To check your device, go to the Capture Window (as shown in Step 3 of Capture Your Video) and under Record Settings, click Change. Make sure Adaptec USB Capture Device is selected.
■ To avoid choppy video in a captured file, especially a long video clip, users should disable any background programs such as virus software or any CPU-loaded software.
Need Help Burning Your Video?■ In rare instances, while burning your video to DVD, an error
message may appear, such as bit rate too high. If this happens, double-click the thumbnail in MyDVD’s Main project window. Select the End Frame on the Trimming window and remove about 5 to 10 seconds of video from the end. Close the Trimming window, save the project and try again. If the message persists, open the Trimming window again and check the video for static. If the static exists on the video, trim back to a point on the video where static does not exist.
12

© 2003 Adaptec, Inc. All rights reserved. Adaptec and the Adaptec logo are trademarks of Adaptec, Inc., which may be registered in some jurisdictions. Microsoft, Windows 98SE, Windows Me, Windows 2000, and Windows XP are registered trademarks of Microsoft Corporation in the U.S. and other countries, used under license.
Sonic and MyDVD are registered trademarks of Sonic Solutions in the U.S. and other countries, used under license.
All other trademarks are the property of their respective owners.
Adaptec, Inc.691 South Milpitas BoulevardMilpitas, CA 95035 USA
R
Part Number: 513544-06, Ver. AA JG 04/03
Getting Help from AdaptecIf you have questions about installing or using your Adaptec product, check this document first—you will find answers to most of your questions here. If you need further assistance:
■ Search the Adaptec Support Knowledgebase (ASK) at ask.adaptec.com for articles, troubleshooting tips, and frequently asked questions for your product.
■ For support via Email, submit your question to Adaptec's Technical Support Specialists at ask.adaptec.com.
■ To order Adaptec products, including accessories and cables, call +1 408-957-7274.
Before contacting Technical Support, you need your unique 12-digit TSID number. The TSID number is included in your package on two white, bar-coded labels, like the example below. Affix a TSID label to your AVC-2210 for safe-keeping.
AVC-2210 QSG.book Page 13 Friday, April 4, 2003 1:54 PM