Avatar Supervisor Guide - Santa Cruz Health Supervisor...Santa Cruz Avatar 3 | P a g e Avatar...
39
Santa Cruz Avatar 1 | Page Avatar Supervisor Guide Updated: 4/28/2017 Avatar Supervisor Guide
Transcript of Avatar Supervisor Guide - Santa Cruz Health Supervisor...Santa Cruz Avatar 3 | P a g e Avatar...
Santa Cruz Avatar
1 | P a g e Avatar Supervisor Guide Updated: 4/28/2017
Avatar Supervisor Guide

Santa Cruz Avatar
2 | P a g e Avatar Supervisor Guide Updated: 4/28/2017
Table of Contents
Logging In to Avatar ................................................................................................................ 3
How to Create a New Temporary Password for a User with the Quick User Update Form . 4
Use the Deactivate Button When Employees Are Not Active in the Avatar System ........ 4
Is My Staff Member Set Up Correctly? Use of the Practitioner Enrollment Form ................ 5
Check Program Associations .............................................................................................. 5
Notification Users Form: How to Set Up Staff Messaging .................................................... 6
Document Routing, Review and Approval ............................................................................11
Signing and Approving Documents ...................................................................................13
Editing Progress Notes by Staff Members ............................................................................15
If I cannot edit notes written by a staff member, what can I do? .............................................15
If a staff person has left your agency and there are outstanding draft notes. .........................15
If a supervisor has left your agency and there are outstanding documents for co-signature. .15
Use of the Append Progress Notes Form .............................................................................16
Use of Scheduling Calendar to Review Staff Schedules and Team Schedules ..................18
Scheduling an Individual Appointment for a Psychiatric Provider......................................19
Staff Members Hours and Exceptions Form .........................................................................23
Service Activity Report ...........................................................................................................29
Non Caseload Access Report ................................................................................................33
Delete/Re-Assign To Do Items Form: Managing To Do Items When Someone is on Vacation or Leave ...................................................................................................................33
Reports ....................................................................................................................................35
Detail of Admissions by Program and Detail of Discharges by Program ........................35
Admits by Program, Zip Code and Ethnicity .....................................................................36
Clients Active in Multiple Programs ...................................................................................36
Executive Reporting System (ERS) Reports .....................................................................37
ERS Earned Income Report ................................................................................................38
ERS Program Statistics Visit Report ..................................................................................39
Santa Cruz Avatar
3 | P a g e Avatar Supervisor Guide Updated: 4/28/2017
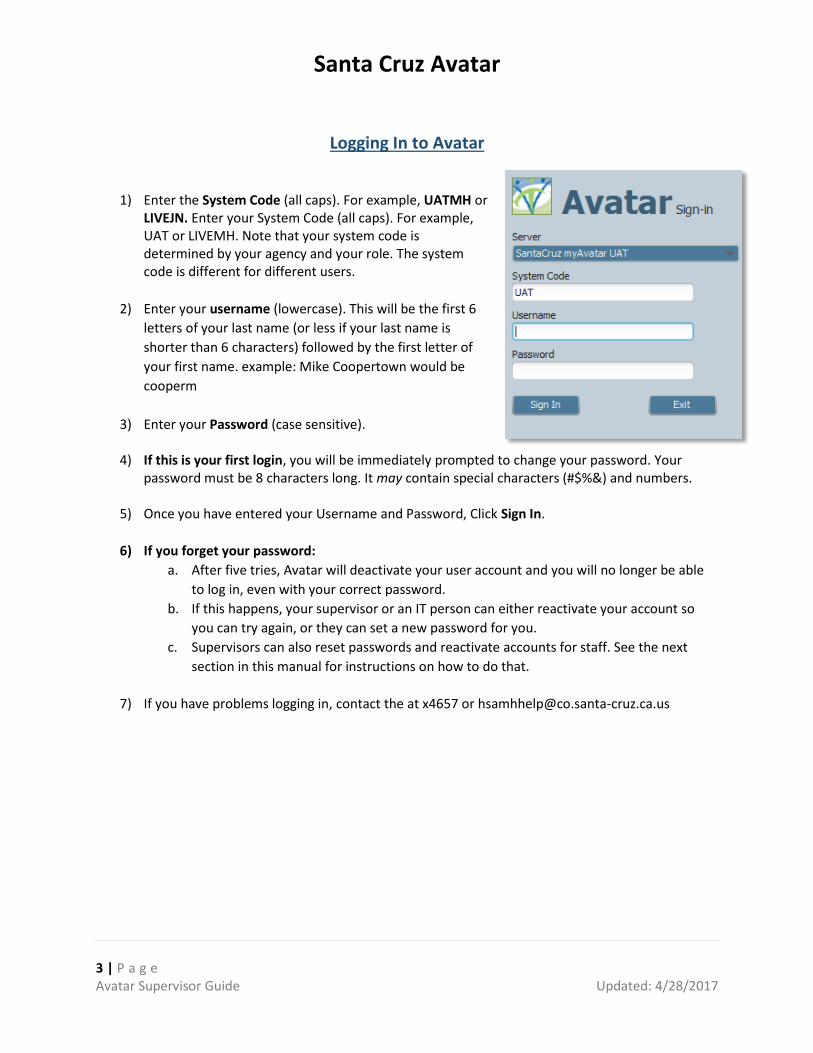
Logging In to Avatar
1) Enter the System Code (all caps). For example, UATMH or
LIVEJN. Enter your System Code (all caps). For example, UAT or LIVEMH. Note that your system code is determined by your agency and your role. The system code is different for different users.
2) Enter your username (lowercase). This will be the first 6
letters of your last name (or less if your last name is
shorter than 6 characters) followed by the first letter of
your first name. example: Mike Coopertown would be
cooperm
3) Enter your Password (case sensitive).
4) If this is your first login, you will be immediately prompted to change your password. Your password must be 8 characters long. It may contain special characters (#$%&) and numbers.
5) Once you have entered your Username and Password, Click Sign In.
6) If you forget your password:
a. After five tries, Avatar will deactivate your user account and you will no longer be able
to log in, even with your correct password.
b. If this happens, your supervisor or an IT person can either reactivate your account so
you can try again, or they can set a new password for you.
c. Supervisors can also reset passwords and reactivate accounts for staff. See the next
section in this manual for instructions on how to do that.
7) If you have problems logging in, contact the at x4657 or [email protected]

Santa Cruz Avatar
4 | P a g e Avatar Supervisor Guide Updated: 4/28/2017
How to Create a New Temporary Password for a User with the Quick User Update Form
This form allows you to create a new, temporary password for a staff member who has forgotten theirs. Once you create the new password, when your staff logs on, they will be prompted to create their own password. STEPS:
1. Go to your Forms & Data Widget on your Home Console and search for the Quick User Update form. Double click on the form when it appears on the list.
2. FIRST, fill in the Select User blank by typing the staff member’s last name. (It’s the blank at the end, not at the top.) The other blanks on the form will fill in.
3. Click Generate New Password. Avatar will create a new system generated password for your user. Let the user know that once they log in with the new system generated password, Avatar will prompt them to create a new one. (HINT: Copy the System Generated Password and paste it into an e-mail to send to your staff person to avoid any miscommunication about the password.)
4. When your staff person logs on and types in their new System Generated Password, they will immediately be prompted to create a password. The Deactivate User Button: Sometimes you will get asked to change a password and when you open the form, you will see the deactivate user button clicked. This is because the user has tried to log in 5 or more times. Avatar will lock out any user who has done this. If this is the case, you can simply click off the Deactivate User button and your staff member will be able to log in normally. As long as your staff member knows their password, you do not have to change it. Use the Deactivate Button When Employees Are Not Active in the Avatar System There are a couple of reasons why you might want to deactivate an employee.

Santa Cruz Avatar
5 | P a g e Avatar Supervisor Guide Updated: 4/28/2017
First, if a supervisor leaves, is on vacation, or is out on leave, you want to deactivate their account to prevent employees from routing documents to this person. You don't want documents waiting for weeks or indefinitely for a co-signature. When the employee returns, you can reactivate the account. If an employee leaves your agency permanently, after clicking the "Deactivate" button in the Click User Update form, you still want to let the computer helpdesk know so that we can permanently disable the account.
Is My Staff Member Set Up Correctly? Use of the Practitioner Enrollment Form
Check Program Associations Program Associations identify which Service Programs and Admission Programs for which your staff member can write documents. Why is this important? If not set up correctly, your staff member not be able to write a progress note. Alternately, with too many programs in a profile a user might end up writing notes under the wrong Admission Program or Service Program. There is a form called Practitioner Enrollment where you can do some troubleshooting to identify these problems. As a supervisor, you only have “read only” access to this form, but if you find errors, you can contact the helpdesk at x4657 or [email protected] to make the changes for you. When you open the Practitioner Enrollment form you will first have to select a staff member. Type in the last name of your staff member and select the name to open the Practitioner Enrollment form.
Once the form is opened, at the bottom of the first tab of the form, in the field labeled Program Association, look to see that your staff member has the appropriate associations. These items will have checkmarks next to them.

Santa Cruz Avatar
6 | P a g e Avatar Supervisor Guide Updated: 4/28/2017
For example, for a County Mental Health clinician, these should be: LE-00044 MH County Outpatient, Client Registration & Financial as well as the associations for the service programs in which they work. Typically, to allow maximum flexibility in work assignment, County Adult MH staff have all adult programs checked and County Childrens MH staff have all children’s programs checked. Look to see that your staff person has all of the program associations they need to write a note. If not, this may prevent completion of a progress note. For example, to write a note for a client on the MOST team, County – Adult MOST and LE – 00044 MH COUNTY OUTPATIENT must be checked. If you aren’t sure which programs should be checked, contact the computer help desk. Too Many Programs: You might see a whole bunch of programs that your staff shouldn’t have. This is because of how users were set up originally with information from Sharecare. Why is this important? When your staff member has programs checked that they don’t need, then it’s possible that your staff member could write a progress note with incorrect information that will have to be deleted or corrected later. Notes and other documents could be filed under the wrong episode or have the wrong service program information. To prevent this, let us know if programs need to be removed from practitioner enrollment. Contact the helpdesk at x4657 or [email protected] to make the changes for you.
Notification Users Form: How to Set Up Staff Messaging This form is used to set up Staff Messaging. Without this set up, your staff members will not be able to send messages. Avatar requires that users have identified recipients, which is what this form allows you to create. Although Notification Users allows adding individual recipients to a users’ profile, Santa Cruz

Santa Cruz Avatar
7 | P a g e Avatar Supervisor Guide Updated: 4/28/2017
Avatar has a convenient list that contains all users. In this way, you will not have to add individual users for your staff, but simply add the list. Below are directions on how to add this list.
Menu Path (Location in Avatar): Avatar CWS> Radplus Utilities > Workflow Management > Notification Users
1. Search for Notification Users from the Search Form field in the Forms & Data Widget and select it.
2. Select a user from the Workflow Notification Users pull down menu.
3. The Notification Users will opens. You won't need to do anything on this first tab or page, Workflow Notification Users.
4. Skip to the tab titled Lists. Click on the word Lists on the left to get this tab.

Santa Cruz Avatar
8 | P a g e Avatar Supervisor Guide Updated: 4/28/2017
5. Once you are on the List tab, click Add New Item to create a new row in the list. 6. Then click, Select List to open up a menu of lists.

Santa Cruz Avatar
9 | P a g e Avatar Supervisor Guide Updated: 4/28/2017
This pull down list box will appear.
7. Click in the pull down menu and then highlight and select (Everyone) All staff in all roles. There may be only one list, but if not, make sure you select the list titled “All staff in all roles."
You will now see the list, All Staff in all Roles added to the table.
8. Select Submit.
IMPORTANT – Now that you have added a list using Notification Users, these steps automatically add the members of the list to the “Send Notification To” field in the Staff Messaging form.
9. To verify the operation was successful, you or the person you set up, should search for and open Staff Messaging from the Search Forms Widget (see Step 1).

Santa Cruz Avatar
10 | P a g e Avatar Supervisor Guide Updated: 4/28/2017
10. Select user from the search field.
11. Users from the list (Everyone) All staff in all roles which was added with the Notification Users form will appear here.

Santa Cruz Avatar
11 | P a g e Avatar Supervisor Guide Updated: 4/28/2017
Document Routing, Review and Approval Staff may send documents to a supervisor and/or other approvers for sign off. This is done through Document Routing. In this example, a staff member has written a progress note and will now route the document to her supervisor for approval. (You have already seen how to write a progress note in previous trainings. If you need a review, see the section titled: “Progress Notes” in the Avatar Clinicians Manual.)
1. Draft/Final and File Note: Once the note has been written, staff select Final to file the note. A picture of the note is launched for staff to proofread and sign.
2. After proofreading, there are three options:
a. Accept: accepts the note as final and files it. b. Reject: rejects the note and returns it to draft status for editing by the staff person
writing the note. c. Accept and Route: accepts the note and routes the note to a supervisor for approval.
When staff choose Accept and Route, a window pops up that allows them to route to a supervisor and/or an approver. Both a Supervisor and Approver can cosign. Having two fields for review roles allows someone other than the staff member’s supervisor to approve documents.
To Route to a Supervisor: The staff member enters the supervisor’s name in the blank. Then clicks Add. Note that there can only be one Supervisor.

Santa Cruz Avatar
12 | P a g e Avatar Supervisor Guide Updated: 4/28/2017
To Route to one or more Approvers: The staff member enters the Approver’s name(s) in the blank. Then clicks Add.
3. Once routing has been set up, the staff member clicks Submit, which routes the document to the Supervisor and any Approvers. The document will appear in the Supervisor’s My To Do’s Widget first. Once the Supervisor approves the document and signs, the document will appear in the Approver(s) My To Do’s.

Santa Cruz Avatar
13 | P a g e Avatar Supervisor Guide Updated: 4/28/2017
Signing and Approving Documents
Avatar has a special tab, titled Sign, in your My To Do’s that is for signing and approving documents. This tab shows a list of documents that need approval as well as a list of the documents you have already approved during your session, so that you can keep track. The tab also shows a picture of the documents for approval, one at a time, so you can review and approve. After you are done, the last step is to sign. You only have to sign once for all of the documents you have approved. The My To Do’s Widget is located on the home screen. When reviewing documents, it is generally more convenient to pop out or undock the widget to full-screen, in order to more easily read the documents.
1. Click on the curved arrow in the very upper right of the widget.
You might have to drag the widget over so it is in the middle of your screen, and not cut off on the right of the screen.
2. Click on the square in the upper right of the widget to enlarge it to full-screen.

Santa Cruz Avatar
14 | P a g e Avatar Supervisor Guide Updated: 4/28/2017
In order to sign and approve documents:
1) Open the Sign tab by clicking on it. 2) Review the document(s). Click on a document from the list in the top left section of the tab
page. The picture of the document will show on the right. 3) Once you have reviewed each document, you may click Accept or Reject.
a. Accept sends the document to the Accepted Documents area (lower left) to await your signature. Note that your staff member will not receive any type of notification that the document has been approved. The documents you sign simply get filed.

Santa Cruz Avatar
15 | P a g e Avatar Supervisor Guide Updated: 4/28/2017
b. Reject sets a document back to draft and returns it to your staff member for editing. When you click Reject, a window pops up with a short field for comments. Write your comment and click OK. The document will then be sent back to the staff member, appearing in their My To Do’s as a draft. The comment you wrote will be viewable in the comments column.
Editing Progress Notes by Staff Members Supervisors will sometimes ask what they can do to edit information entered by one of their staff members. For example, you may find a progress note that is incorrect and you want to change it. The simple answer is that Avatar will not allow you to do this. This is because altering notes or other data entered by other staff people, even people you supervise, is fraud. One clinician cannot change documentation created by another.
If I cannot edit notes written by a staff member, what can I do?
Since you cannot edit another person’s notes, send a request to [email protected] and request that the note be deleted or reverted to draft. Then, the clinician can rewrite the note correctly.
If a staff person has left your agency and there are outstanding draft notes. The notes must remain in the chart. They cannot be finalized or deleted.
If a supervisor has left your agency and there are outstanding documents for co-signature. First, use Quick User Update to deactivate the account. Once you do this, no one will be able to send the account messages or route documents to that supervisor for co-signature. Then, contact the computer helpdesk ASAP so that this staff person's account can be permanently deactivated.

Santa Cruz Avatar
16 | P a g e Avatar Supervisor Guide Updated: 4/28/2017
Any pending documents for co-signature can be re-routed from one supervisor's account to another. Contact [email protected] to have this done.
Use of the Append Progress Notes Form If you have already filed and signed a note, Avatar does provide an opportunity to add to the text of the note using the Append Progress Notes form. This way, you won’t have to send a message to the computer help desk to have the document reverted to draft or deleted. When you use the Append Progress Note form, you may add to the text of the note only. Service information, the date and the client name cannot be corrected this way. Once the Append form has been completed, the added information will appear as an addendum at the end of the Progress Note in Avatar. To avoid having to add to or make changes to services, it is important to encourage your staff to take time to look over their notes before finalizing them. To Use the Append Progress Notes Form:
1. Open the form either in the client's chart or using your My Forms Widget.
2. You may see a pre-display of the client episodes. If so, select the appropriate episode.
3. You will be asked to select the Note Type. As you recall, this information is added in the Progress Note Tab of the SC General Purpose Progress Notes. If you do not know what the note type is, look at the Inquiry View of the note, just above main text of the note.
4. Select the Note Type or
category of your note.
Santa Cruz Avatar
17 | P a g e Avatar Supervisor Guide Updated: 4/28/2017
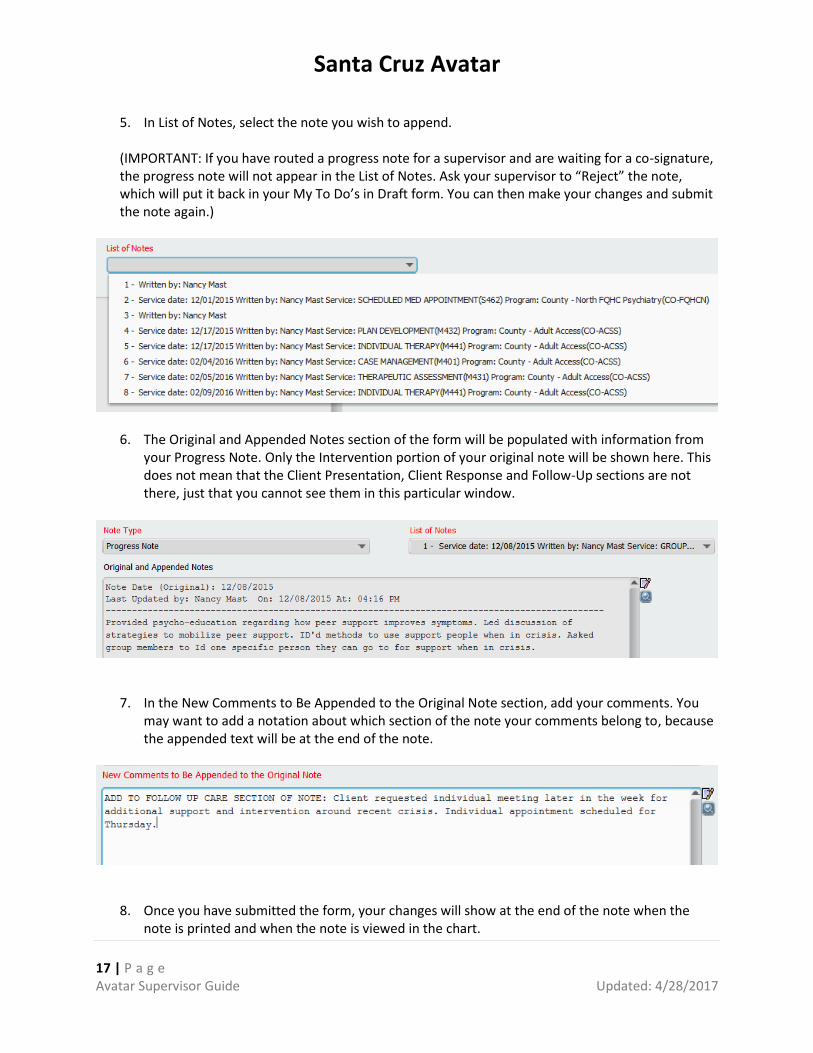
5. In List of Notes, select the note you wish to append. (IMPORTANT: If you have routed a progress note for a supervisor and are waiting for a co-signature, the progress note will not appear in the List of Notes. Ask your supervisor to “Reject” the note, which will put it back in your My To Do’s in Draft form. You can then make your changes and submit the note again.)
6. The Original and Appended Notes section of the form will be populated with information from your Progress Note. Only the Intervention portion of your original note will be shown here. This does not mean that the Client Presentation, Client Response and Follow-Up sections are not there, just that you cannot see them in this particular window.
7. In the New Comments to Be Appended to the Original Note section, add your comments. You may want to add a notation about which section of the note your comments belong to, because the appended text will be at the end of the note.
8. Once you have submitted the form, your changes will show at the end of the note when the note is printed and when the note is viewed in the chart.

Santa Cruz Avatar
18 | P a g e Avatar Supervisor Guide Updated: 4/28/2017
Use of Scheduling Calendar to Review Staff Schedules and Team Schedules
The Avatar Scheduling Calendar gives the user the ability to manage appointments at multiple sites for staff members, clients, and groups. In the Scheduling Calendar, you can create appointments, check clients in and out for their appointments, and set up individual appointments or group appointments. You can also assign multiple practitioners to an appointment. Progress notes can be opened and written directly from the Scheduling Calendar. You have already seen how to add appointments to your own schedule. If you need a review, see the section titled: “Scheduling an Appointment in the Scheduling Calendar” in the Avatar Clinicians Manual. The staff you supervise will only be able to see their own calendars. You will be able to see calendars for

Santa Cruz Avatar
19 | P a g e Avatar Supervisor Guide Updated: 4/28/2017
your staff and for other scheduling groups. You will be able to add appointments to calendars, reschedule appointments and even move appointments from one staff member’s calendar to another. In addition to client appointments, Avatar has the ability for staff to note other types of time such as meetings, off site hours, vacation and administrative time. Below is an example of a daily schedule for the Access Intake Group which has various types of appointments.
Note that there are two clients used as placeholders, BLOCKED, TIME and RESERVED, TIME. The BLOCKED, TIME client is used for certain non-appointment times, such as time off, meetings and shift work. RESEVED, TIME is used as a placeholder for available appointments that have not yet been scheduled with an actual client.
Scheduling an Individual Appointment for a Psychiatric Provider
In Avatar, only Supervisors, Access staff and certain clerical staff are able to schedule an appointment in a psychiatric calendar. Using the Scheduling Calendar and Appointment Scheduling form, you will now schedule a psychiatric appointment for a client.
1. First, open up the Scheduling Calendar.
2. Pick the week view.

Santa Cruz Avatar
20 | P a g e Avatar Supervisor Guide Updated: 4/28/2017
3. You will need to pick a site. For example, to view calendars for all psychiatry providers working at Childrens North County Mental Health, pick No. Co. Child Psychiatry.
4. You will see a list of doctors who are part of that “Site”. (Note that a Site is not necessarily a location. It is more like a workgroup, e.g. Access Intake, North County Adults.) On the left side of the calendar, click the boxes next to the names of the Clinicians whose calendars you wish to view. You will then see a comparison view of calendars. In this way, you can see where there are openings across several doctors’ calendars. The view below shows three days, Monday, Tuesday and Wednesday, for three providers.

Santa Cruz Avatar
21 | P a g e Avatar Supervisor Guide Updated: 4/28/2017
5. The TIME RESERVED placeholder client: Santa Cruz County Behavioral Health uses a convention to reserve time in a calendar for open appointments (vs. just having a blank space for appointments). Because Avatar requires a client for each appointment, a “placeholder” client, TIME RESERVED (client #2), has been created for scheduling open, but yet unscheduled appointment times. Typically, you will add in your client information into an open appointment and not into a blank spot on the calendar.
6. Right click onto an open appointment that has been scheduled with the client TIME RESERVED. Then click Details/Edit.
7. When you first open the
appointment, the client name will be disabled (greyed out, you cannot write in it). However, if you delete the Service Code and type it back in, the client name field will be enabled and you can replace the TIME RESERVED placeholder client name with the name of your client.
8. The Client field will clear and you
can now type in your client’s name.

Santa Cruz Avatar
22 | P a g e Avatar Supervisor Guide Updated: 4/28/2017
9. Then Select appropriate EPISODE. This is usually LE – 00044 MH County Outpatient for county Mental Health clients.
10. Click the Submit button on the left side of the screen to
save your appointment and return to the Scheduling Calendar.
11. Notice that the appointment is now listed on the doctor’s Calendar with your client’s name.
Santa Cruz Avatar
23 | P a g e Avatar Supervisor Guide Updated: 4/28/2017
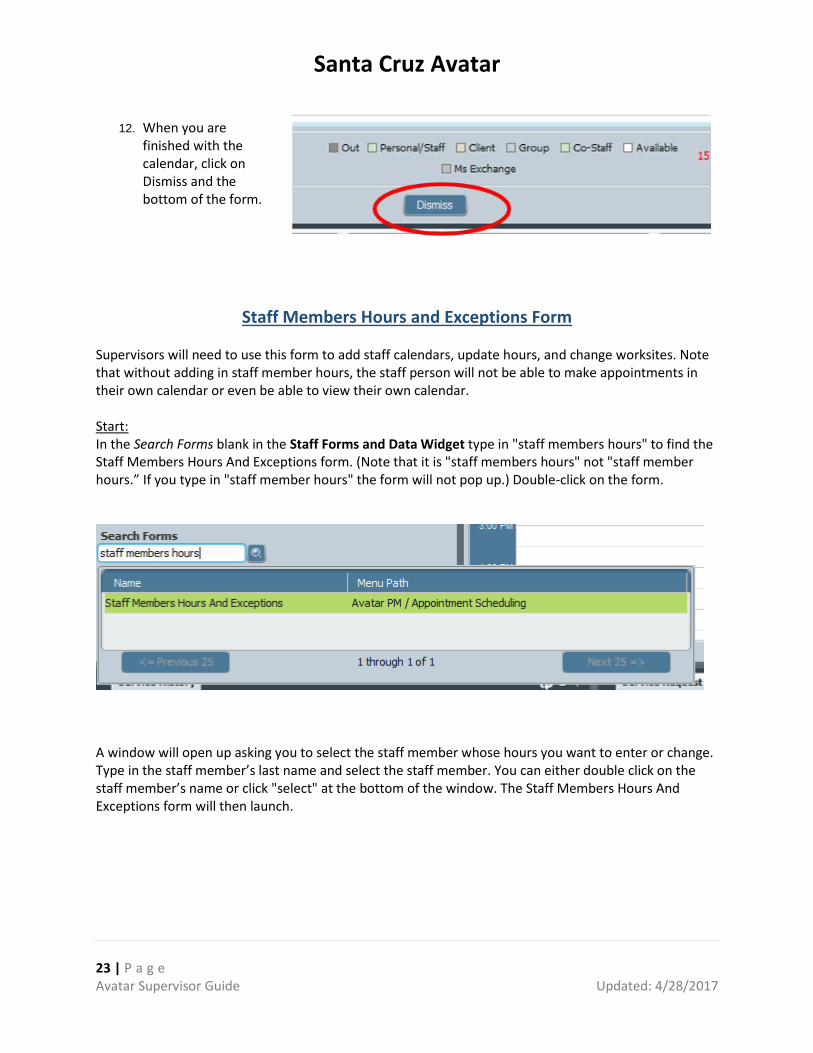
12. When you are finished with the calendar, click on Dismiss and the bottom of the form.
Staff Members Hours and Exceptions Form Supervisors will need to use this form to add staff calendars, update hours, and change worksites. Note that without adding in staff member hours, the staff person will not be able to make appointments in their own calendar or even be able to view their own calendar. Start: In the Search Forms blank in the Staff Forms and Data Widget type in "staff members hours" to find the Staff Members Hours And Exceptions form. (Note that it is "staff members hours" not "staff member hours.” If you type in "staff member hours" the form will not pop up.) Double-click on the form.
A window will open up asking you to select the staff member whose hours you want to enter or change. Type in the staff member’s last name and select the staff member. You can either double click on the staff member’s name or click "select" at the bottom of the window. The Staff Members Hours And Exceptions form will then launch.

Santa Cruz Avatar
24 | P a g e Avatar Supervisor Guide Updated: 4/28/2017
You won’t need to add anything to this next part of the form. Click “Staff Member Hours” to open the part of the form where you add the staff hours and days worked.
This next part of the Staff Members Hours And Exceptions form is a multi-iteration table. You will have to add the days of the week one at a time, one row for each day of the week. For this example, assume your staff person works from Monday through Friday, 8:00 am to 5:00 pm. Start with Monday by clicking "New Row" in the lower left-hand corner of the form.

Santa Cruz Avatar
25 | P a g e Avatar Supervisor Guide Updated: 4/28/2017
The first row in the form will show up. Type in the following for the blanks in the table. You can tab from blank to blank.

Santa Cruz Avatar
26 | P a g e Avatar Supervisor Guide Updated: 4/28/2017
For this example, you would enter the following information. Effective Date: 01/01/15 (staff member start date) End Date: leave blank Day: Type “2” (numeral 2), then press tab, to enter “Monday.” Site: Double-click on the blank and pick the site for your staff person. Start Time: Enter “0800” End Time: Enter "1700" Service Code: leave blank
The first line in the table should now look like this:
You have now completed the first line in your table. Click Copy/Paste Row four times to add the other days of the week. (If the staff person works on call or weekends, you will have to add six more rows for a seven day work week.)
Notice everything in your table will be copied over to the new lines in your table, except for the days of the week. You can add those by double clicking on each blank, or type in the numbers 3,4, etc….in each line, clicking tab and then the down arrow key. This is handy to learn if you are adding several staff members at a time.

Santa Cruz Avatar
27 | P a g e Avatar Supervisor Guide Updated: 4/28/2017
Your table should now be complete.
Click "Save" at the bottom of the page. You will be asked if you want to exit the grid. Click Yes. For staff who work at multiple locations, or who have multiple roles, staff can be added at more than one site. Example:

Santa Cruz Avatar
28 | P a g e Avatar Supervisor Guide Updated: 4/28/2017
Click Save to exit the grid. You should now be back at the first page of the form. Click “Submit” to save.
Your staff member should now be able to view their calendar and make appointments in their calendar.
If your staff member’s hours change, you can go back to the form to adjust hours. Add days by making new rows. If your staff member leaves, discontinue their calendar by going back into the form and adding in an end date to each of the days worked.
Santa Cruz Avatar
29 | P a g e Avatar Supervisor Guide Updated: 4/28/2017
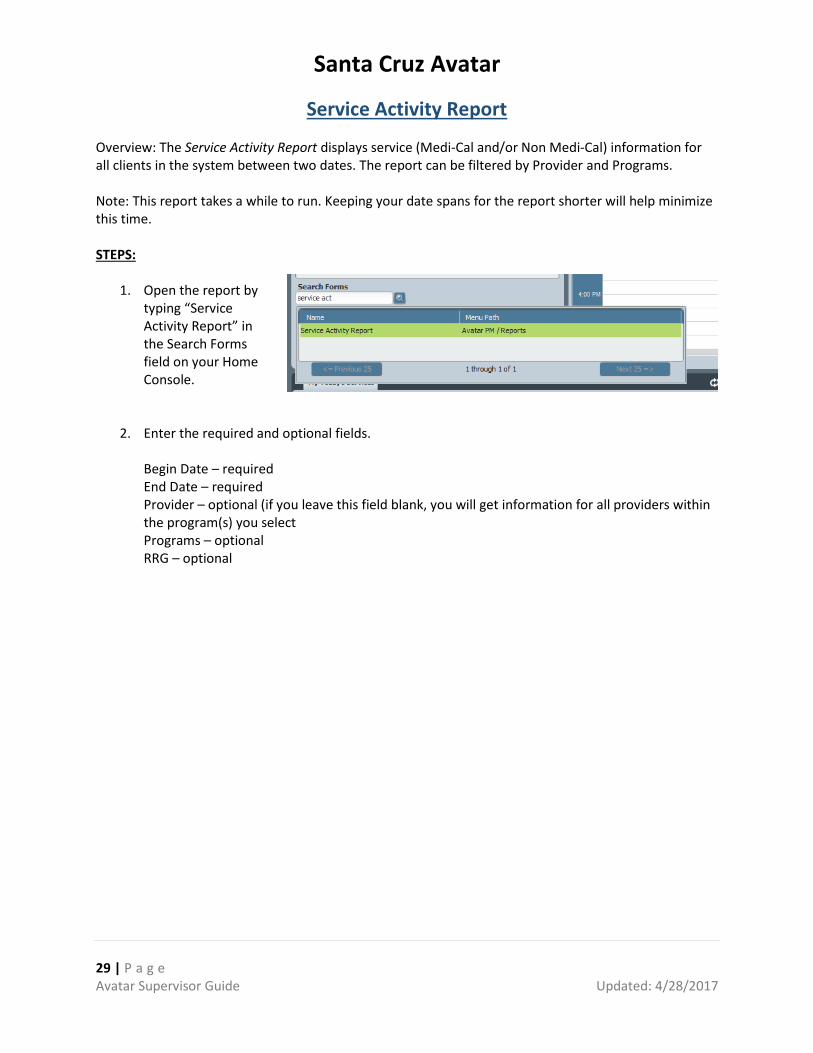
Service Activity Report Overview: The Service Activity Report displays service (Medi-Cal and/or Non Medi-Cal) information for all clients in the system between two dates. The report can be filtered by Provider and Programs. Note: This report takes a while to run. Keeping your date spans for the report shorter will help minimize this time. STEPS:
1. Open the report by typing “Service Activity Report” in the Search Forms field on your Home Console.
2. Enter the required and optional fields.
Begin Date – required End Date – required Provider – optional (if you leave this field blank, you will get information for all providers within the program(s) you select Programs – optional RRG – optional

Santa Cruz Avatar
30 | P a g e Avatar Supervisor Guide Updated: 4/28/2017
What is an RRG? An RRG is a grouping of programs that you might find helpful in writing this report. For example, if you select the RRG, ADP Contract Methadone," the report will generate information for the four Janus methadone programs.
3. Click “Process” in upper left corner to launch the report. Remember that you may have to wait several minutes for your data to process into a report.
Looking at the Service Activity Report
Below is an example of a report generated for County Adult Case Management Teams. Data for County – Adult MOST and County – Adult Recovery North is shown.
Click on the blue link(s) to see the detail information for that summary category. The tab “Detail” will appear on the top left corner on the screen. On this tab, you can see individual information for specific progress notes or services.

Santa Cruz Avatar
31 | P a g e Avatar Supervisor Guide Updated: 4/28/2017
You can flip through the pages by clicking on the side arrows. Change the size of magnification with drop down arrow. Click on top right corner, where it says "BusinessObjects,” to close the “Detail” section.

Santa Cruz Avatar
32 | P a g e Avatar Supervisor Guide Updated: 4/28/2017
If you need to export the report to Excel, click on the top left corner. The icon you need to click is above the word, "Preview." It looks like a little floppy disk sitting on top of the piece of paper. Then pick “Microsoft Excel” in the “Format” list, and click OK. When finished, click on the large "X" at top right to close the report.
You can run another report or close the form altogether.

Santa Cruz Avatar
33 | P a g e Avatar Supervisor Guide Updated: 4/28/2017
Non Caseload Access Report This report allows you to see who has accessed charts over a date span. When opening the form, you will be asked to type in the date range, then click “Process” to see the report.
Delete/Re-Assign To Do Items Form: Managing To Do Items When Someone is on Vacation or Leave
When someone is on vacation or leave, that person’s supervisor can reroute messages from the My To Do’s list to another user. Note that this only works for items that are already on the To Do List, so whoever is doing the re-assigning will need to check the list on a regular basis to route new items. (i.e. this doesn’t work like call forwarding). Also, this only works for messages. This does not work for routed documents awaiting co-signature. If a staff member is on an extended leave, their account should be temporarily deactivated which will stop people from sending items to their My To Do’s. See the section, “Use the Deactivate Button When Employees Are Not Active in the Avatar System,” for more information about this.
If you there are pending items that need co-signature, you won’t be able to reroute these. Contact the QA help desk at at 454-4468 or [email protected] if you need routed documents rerouted to a different supervisor. Steps:
1. Once the form is opened, in the Delete/Re-Assign field, click Re-Assign. 2. Select User: This is the name of the staff person whose To Do items you wish to re-assign. When
you do this, a list of all the items in their To Do List will show in the field below. 3. Select Target User: This is the person to whom you wish to re-assign the items. 4. Select the items you wish to reroute in the field labeled To-Do’s.

Santa Cruz Avatar
34 | P a g e Avatar Supervisor Guide Updated: 4/28/2017
5. Click Submit. 6. Similarly, you may also delete items in your staff member’s To Do list by clicking Delete in the
Delete/Re-Assign field.
Santa Cruz Avatar
35 | P a g e Avatar Supervisor Guide Updated: 4/28/2017
Reports
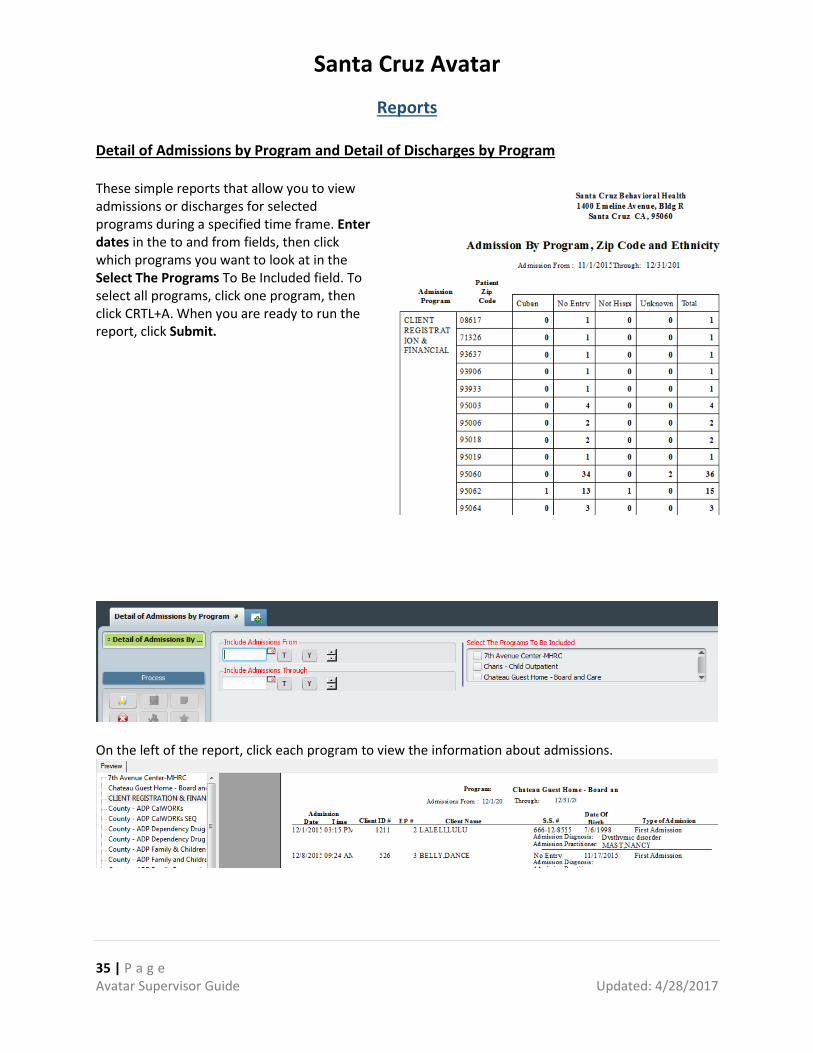
Detail of Admissions by Program and Detail of Discharges by Program These simple reports that allow you to view admissions or discharges for selected programs during a specified time frame. Enter dates in the to and from fields, then click which programs you want to look at in the Select The Programs To Be Included field. To select all programs, click one program, then click CRTL+A. When you are ready to run the report, click Submit.
On the left of the report, click each program to view the information about admissions.

Santa Cruz Avatar
36 | P a g e Avatar Supervisor Guide Updated: 4/28/2017
Admits by Program, Zip Code and Ethnicity This report shows a breakdown of client admissions by program, then by zip code cross referenced with ethnicity.
Clients Active in Multiple Programs This report shows all clients active in more than one program.
Financial Eligibility Report This report shows a picture of financial eligibility information for a single client. It is based on information from the Financial Eligibility form.

Santa Cruz Avatar
37 | P a g e Avatar Supervisor Guide Updated: 4/28/2017
Executive Reporting System (ERS) Reports These reports provide various types of enrollment and service utilization information. You can set up your own compiles (questions about data or queries) and then run various reports off of your compile.
ERS Daily Statistics Report This report shows statistics for today only. You may select which programs to view in your report. In the example below two programs were selected. Note the "drill downs" at the bottom of the report that allow further detail into specific activities including client movement, visit data and collections data.
ERS Client Subset Index This compile allows you to identify various subsets of clients that you wish to explore in reports. There are three sections that allow you to organize your subset by either: 1) Active clients 2) Inactive clients 3) Service based.
ERS Quality of Care Report This report provides information about certain key demographics served.

Santa Cruz Avatar
38 | P a g e Avatar Supervisor Guide Updated: 4/28/2017
ERS Earned Income Report This report shows earned income by program.

Santa Cruz Avatar
39 | P a g e Avatar Supervisor Guide Updated: 4/28/2017
ERS Program Statistics Visit Report This has a sub report that shows visits by practitioner. This provides information about the number of visits by a specific practitioner.