AV RECEIVER - ONKYO Asia and Oceania Website TX-SR444 AV RECEIVER The Basic Manual includes...
88
En TX-SR444 AV RECEIVER The Basic Manual includes information needed when starting up and also instructions for frequently used operations. The Advanced Manual has more detailed information and advanced settings. Basic Manual CONTENTS Front Panel ......................................................................... 3 Rear Panel.......................................................................... 4 Step 1: Connections ����������������������������������������������5 1 Connecting the TV and Players....................................... 5 ・ Connection to TV ......................................................... 5 ・ Connection with a player that has a HDMI jack ........... 6 ・ Connection with a player that does not have a HDMI jack..................................................................... 6 2 Connecting the AM/FM Antenna...................................... 6 3 Connecting Speakers ...................................................... 7 ・ ZONE A Connection ..................................................... 7 ・ Height speaker types ................................................... 7 ・ ZONE B Connection..................................................... 9 ・ Instructions on how to connect speakers ..................... 9 Step 2: Setting Up������������������������������������������������10 1 Turning the Power On ................................................... 10 2 Making Automatic Speaker Setting ............................... 10 3 HDMI Setup ....................................................................11 ・ HDMI CEC (RIHD) .........................................................11 ・ HDMI Standby Through ..............................................11 ・ ARC (Audio Return Channel) ......................................11 Step 3: Playing Back �������������������������������������������12 1 Basic Operations ........................................................... 12 ・ Part names and functions of the remote controller .... 12 ・ Display ....................................................................... 13 2 Bluetooth ....................................................................... 13 3 AM/FM Radio ................................................................ 13 4 Multi-zone ...................................................................... 14 5 Quick Setup Menu ......................................................... 14 6 Other useful functions ................................................... 15 Troubleshooting ................................................................ 16 Specifications ................................................................... 17 Table of display resolutions .............................................. 18 Resolutions supported by HDMI ....................................... 18 Supplied Accessories ..........................................Back cover
-
Upload
truongkhanh -
Category
Documents
-
view
216 -
download
0
Transcript of AV RECEIVER - ONKYO Asia and Oceania Website TX-SR444 AV RECEIVER The Basic Manual includes...

En
TX-SR444AV RECEIVER
The Basic Manual includes information needed when starting up and also instructions for frequently used operations. The Advanced Manual has more detailed information and advanced settings.
Basic Manual
CONTENTS
Front Panel ......................................................................... 3Rear Panel.......................................................................... 4
Step 1: Connections ����������������������������������������������51 Connecting the TV and Players ....................................... 5
・ Connection to TV ......................................................... 5 ・ Connection with a player that has a HDMI jack ........... 6 ・ Connection with a player that does not have a HDMI jack ..................................................................... 6
2 Connecting the AM/FM Antenna...................................... 63 Connecting Speakers ...................................................... 7
・ ZONE A Connection ..................................................... 7 ・ Height speaker types ................................................... 7 ・ ZONE B Connection ..................................................... 9 ・ Instructions on how to connect speakers ..................... 9
Step 2: Setting Up ������������������������������������������������101 Turning the Power On ................................................... 102 Making Automatic Speaker Setting ............................... 103 HDMI Setup ....................................................................11
・ HDMI CEC (RIHD) .........................................................11 ・ HDMI Standby Through ..............................................11 ・ ARC (Audio Return Channel) ......................................11
Step 3: Playing Back �������������������������������������������121 Basic Operations ........................................................... 12
・ Part names and functions of the remote controller .... 12 ・ Display ....................................................................... 13
2 Bluetooth ....................................................................... 133 AM/FM Radio ................................................................ 134 Multi-zone ...................................................................... 14
5 Quick Setup Menu ......................................................... 146 Other useful functions ................................................... 15
Troubleshooting ................................................................ 16Specifications ................................................................... 17Table of display resolutions .............................................. 18Resolutions supported by HDMI ....................................... 18Supplied Accessories ..........................................Back cover

En-2
Features ● Equipped with 7 ch amplifier ● Supports playback in Dolby Atmos format which provides 360-degree placement and movement of sounds including overhead sound
● Dolby Surround listening mode expands 2 ch, 5.1 ch or 7.1 ch source to available speaker configurations
● Equipped with 4K compatible HDMI IN/OUT jacks (To play 4K or 1080p video, use a high speed HDMI cable or high speed HDMI with Ethernet cable)
● Supports the HDMI Standby Through function which allows signal transmission from players to the TV in standby state
● Supports HDCP2.2, a strict copy-protection for providing high quality content
● Supports ARC (Audio Return Channel) ● Supports Bluetooth connection ● A/V Sync Function to correct deviation of audio and video
● Multi-zone function which allows you to play the same audio in another room as the main room
● 32 bit DSP (Digital Signal Processor) with excellent calculation performance
● Music Optimizer™ for compressed digital music files ● Phase Matching Bass System ● Automatic speaker setup available using supplied calibrated microphone (AccuEQ Room Calibration)
● Supports multi-language on-screen displays English, German, French, Spanish, Italian, Dutch, Swedish, Russian1, Chinese21 European, Australian and Asian models only2 European, Australian, Taiwanese and Asian models only
OSD is not displayed when the input selector is "BLUETOOTH". Use the display on the main unit when operating the unit.
Refer to the back cover for supplied accessories.

En-3
1 23 8 9 F G
H J
4
K
5 6 7
I ML N
(European, Australian and Asian models)
Front Panel
1 zON/STANDBY button: Turns the unit on or into standby mode.
2 BLUETOOTH indicator: Flashes while pairing with a Bluetooth-enabled device is in progress and stays lit when pairing is completed.
3 DOLBY ATMOS indicator: Lights when playing Dolby Atmos.
4 ZONE A and ZONE B buttons: Control the multi-zone function.
5 Remote control sensor: Receives signals from the remote controller.
6 DIMMER button (North American and Taiwanese models): Switches the brightness of the display.RT/PTY/TP button (European, Australian and Asian models): Can be used when receiving the station transmitting text information.
7 Display: Refer to page 13 for details.8 SETUP button: Used when making settings.
9 Cursor buttons, lTUNINGj button, dPRESETc button and ENTER button: Move the cursor and confirms the selection. When listening to AM/FM broadcasting, tune in to the station with lTUNINGj or select the registered station with dPRESETc.
F RETURN button: Returns the display to the previous state.
G MASTER VOLUME: Allows you to adjust the volume.H MUSIC OPTIMIZER button: Turns on/off the MUSIC
OPTIMIZER function that improves the quality of the compressed audio.
I PHONES jack: Stereo headphones with a standard plug are connected.
J TONE and Tone Level buttons: Adjust the high tone and low tone.
K Input selector buttons: Switch the input to be played.L LISTENING MODE buttons: Allow you to select the
listening mode.
M AUX INPUT VIDEO/AUDIO jacks: A video camera or such other device is connected.
N SETUP MIC jack: The supplied speaker setup microphone is connected.
En-4
1 2 3 4 5 6 7
8 9 F G H I J K
(Taiwanese models)
Rear Panel
1 TUNER AM/FM (75Ω) terminal: The supplied antennas are connected.
2 to TV jack: Connect to a TV using a HDMI cable. Change the input selector to "TV" to hear audio from the TV.¼ If your TV does not support ARC, you need connection F in addition to this connection.
3 BD/DVD jacks: Connect to a Blu-ray Disc Player or DVD Player using a HDMI cable. This corresponds with the "BD/DVD" input selector.
4 CBL/SAT jack: Connect to a Cable Set-top box using a HDMI cable. This corresponds with the "CBL/SAT" input selector.
5 GAME 1 jack: Connect to a Game console using a HDMI cable. This corresponds with the "GAME 1" input selector.
6 STRM BOX jack: Connect to a Streaming Media Player. When a power supply is required, connect using a USB
cable to the POWER OUT port. This corresponds with the "STRM BOX" input selector.
7 Power cord (North American, European, Australian and Asian models)AC INLET (Taiwanese models): The supplied power cord is connected.
8 RI REMOTE CONTROL jack: An Onkyo product with RI jack can be connected and synchronized with this unit.
9 CD jack: Connect to audio equipment such as a CD Player using a digital optical cable. This corresponds with the "CD" input selector.
F TV jack: If your TV does not support ARC, you need to connect this jack to the audio output jack on the TV, in addition to connection 2. This corresponds with the "TV" input selector.
G GAME 2 jack: Connect a game console that has component video jacks. This corresponds with the "GAME 2" input selector.
H VCR jacks: Connect to a Video Cassette Recorder. This corresponds with the "VCR" input selector.
I SUBWOOFER jacks (ZONE A): A subwoofer with built-in amplifier placed in ZONE A is connected.
J SPEAKERS jacks (ZONE A): Speakers placed in ZONE A are connected. Up to 7 channels of speakers can be connected.
K SPEAKERS jacks (ZONE B): Speakers placed in ZONE B are connected. 2 channels of speakers can be connected.
Step 1: Connections
En-5
HDMIIN
HDMIOUT
AV OUT
Connection example
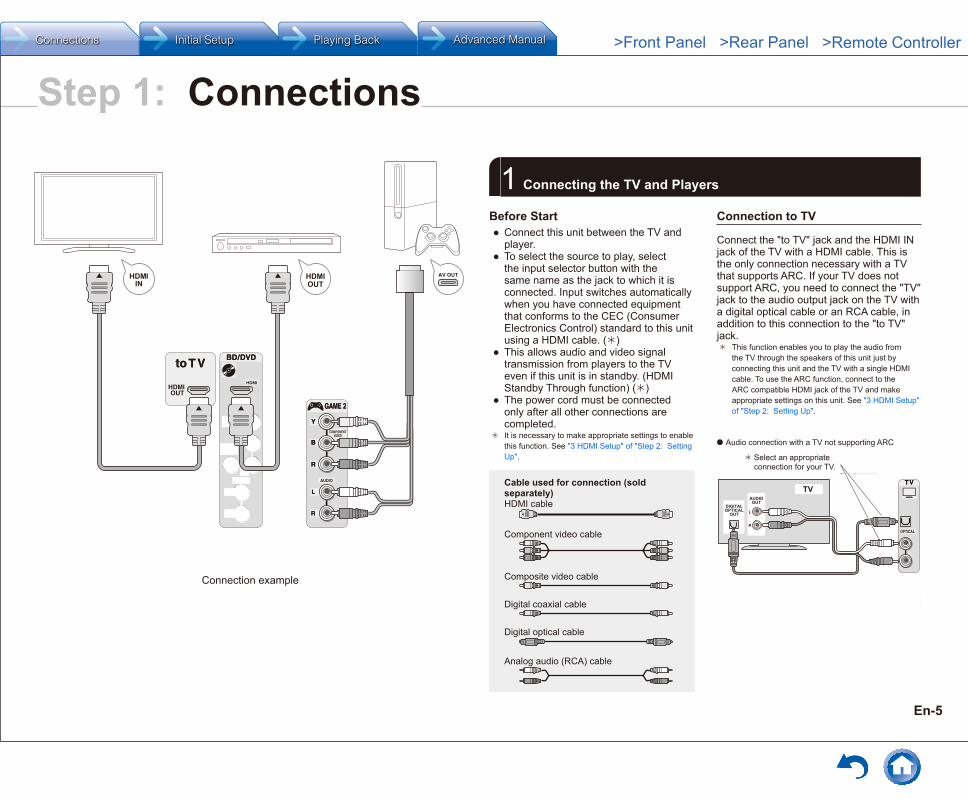
1 Connecting the TV and Players
Before Start ● Connect this unit between the TV and player.
● To select the source to play, select the input selector button with the same name as the jack to which it is connected. Input switches automatically when you have connected equipment that conforms to the CEC (Consumer Electronics Control) standard to this unit using a HDMI cable. ()
● This allows audio and video signal transmission from players to the TV even if this unit is in standby. (HDMI Standby Through function) ()
● The power cord must be connected only after all other connections are completed.
¼ It is necessary to make appropriate settings to enable this function. See "3 HDMI Setup" of "Step 2: Setting Up".
Cable used for connection (sold separately)HDMI cable
Component video cable
Composite video cable
Digital coaxial cable
Digital optical cable
Analog audio (RCA) cable
Connection to TV
Connect the "to TV" jack and the HDMI IN jack of the TV with a HDMI cable. This is the only connection necessary with a TV that supports ARC. If your TV does not support ARC, you need to connect the "TV" jack to the audio output jack on the TV with a digital optical cable or an RCA cable, in addition to this connection to the "to TV" jack.¼ This function enables you to play the audio from
the TV through the speakers of this unit just by connecting this unit and the TV with a single HDMI cable. To use the ARC function, connect to the ARC compatible HDMI jack of the TV and make appropriate settings on this unit. See "3 HDMI Setup" of "Step 2: Setting Up".
DIGITALOPTICAL
OUT
AUDIOOUT
TV
¼z Audio connection with a TV not supporting ARC
¼ Select an appropriate connection for your TV.

Step 1: Connections
En-6
2 Connecting the AM/FM Antenna
Connect the antennas to listen to AM/FM broadcast. When listening to the broadcast for the first time, adjust the antenna position and orientation to get the best reception.
AM loop antenna (supplied)
Indoor FM antenna (supplied)
Fix with a tack on the wall.
(North American and Taiwanese models)
(European, Australian and Asian models)
Assemble the AM loop antenna (supplied).
Connection with a player that has a HDMI jack
Connect to the "BD/DVD", "CBL/SAT", "GAME 1", and "STRM BOX" jacks using a HDMI cable. Connect the equipment to the corresponding jack, for example a Blu-ray Disc Player to "BD/DVD", so that it is easy for you when selecting with the input selector. Connect a Streaming Media Player to the "STRM BOX" jack. When a power supply is required, connect using a USB cable to the POWER OUT port. ()¼ The POWER OUT jack supports a 5V/1A power supply.
Connection with a player that does not have a HDMI jack
Connect equipment with video output jacks to the "BD/DVD", "CBL/SAT", "GAME 2", and "VCR" jacks. Connect with component video cable or composite video cable for video signals and digital coaxial cable or RCA cable for audio signals.Connect audio equipment such as a CD Player using a digital optical cable or an RCA cable to the "CD" jack.
● Video signals input to the component video input or the composite video input will be upconverted to HDMI signals and then output from the "to TV" jack. When upconverting video signals input to the component video input for output from the HDMI OUT jack, set the output resolution of the player to 480i or 576i. If the input has 480p/576p or higher resolution, a message prompting you to change the resolution setting will appear. If your player does not support 480i or 576i output, use the composite video jack.
● Connection with a digital coaxial cable or digital optical cable is necessary for playback of digital surround sources such as Dolby Digital. The digital in optical jack of the unit has a cover, push in the cable against the cover as it is turned inside.

Step 1: Connections
En-7
Characteristics of speaker types"# output front stereo sound and $ outputs center sound such as dialogs and vocals. %& create back sound field. ' reproduces bass sounds and creates rich sound field.Connecting 78 speakers, 9F, or GH speakers enables playback in 7.1 ch configuration. 78 (back) speakers improve sense of envelopment created by back sound field as well as seamlessness of back sounds, providing more natural sound experiences in the sound field. 9F and GH (height) speakers produce surround effects on a height plane. Note that this unit can perform optimal sound field processing for the type of height speakers actually installed and registered in automatic speaker settings.
Height speaker types
Installing speakers in ceiling
a b
f
d
e
c
a b Top Frontc d Top Middlee f Top Rear
Ceiling speakers, etc. are used for maximizing effects in Dolby Atmos or Dolby Surround listening mode. Install Top Front speakers so that they are positioned at a point between directly above the listening position and directly above the front speakers. Install Top Middle speakers so they are directly above the listening position. Install Top Rear speakers so they are positioned at a point between directly above the listening position and directly above the back speakers. You can select ab, cd, or ef on the unit. For connection with the unit, use the SPEAKERS BACK/HEIGHT terminals.
● Dolby Laboratories recommends placing the speakers as described in "Installing speakers in ceiling" to obtain the best Dolby Atmos effect.
3 Connecting Speakers
ZONE A Connection
#
$
%
&'
7
8
9
G
H
F
"
" # Front speakers$ Center speaker% & Surround speakers' Subwoofer7 8 Back speakers9 F Height speakers (Front High)G H Height speakers (Rear High)
● 5.1 ch: "#$%&'
● 7.1 ch: "#$%&'+78, or "#$%&'+9F, or "#$%&'+GH
78, 9F speakers and GH speakers share the same speaker terminals. Select one and make the connection. ● To enjoy the Dolby Atmos listening mode, height speakers or back speakers need to be installed. There are a variety of height speakers apart from this type. see the next section for details.
Important:Connect speakers with 6 Ω to 16 Ω impedance. Using a speaker with less impedance than the supported value may result in failure.
Step 1: Connections
En-8
'Subwoofer with built-in power amplifier
&Surround R
8FHRight back
Or right height
79GLeft back
Or left height
%Surround L
$ Center
1/2˝-5/8˝(12-15 mm)
3/8˝-1/2˝(10-12 mm)
#Front R
" Front L
A speaker configuration where only one back speaker is connected is not supported.
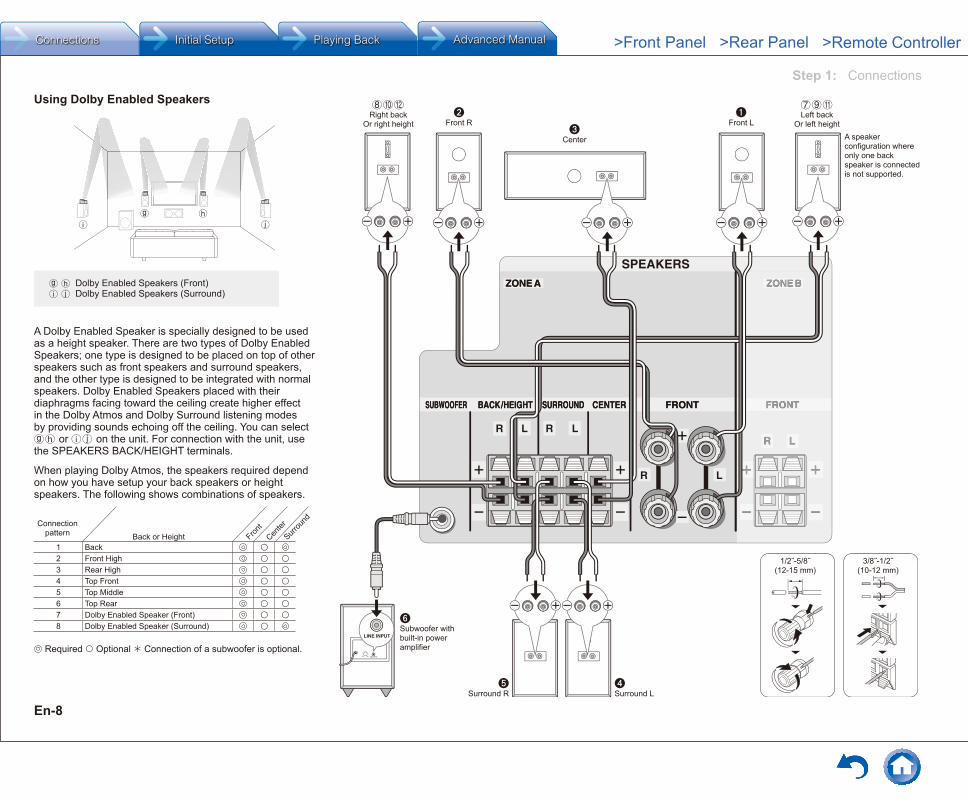
Using Dolby Enabled Speakers
g
i
h
j
g h Dolby Enabled Speakers (Front)i j Dolby Enabled Speakers (Surround)
A Dolby Enabled Speaker is specially designed to be used as a height speaker. There are two types of Dolby Enabled Speakers; one type is designed to be placed on top of other speakers such as front speakers and surround speakers, and the other type is designed to be integrated with normal speakers. Dolby Enabled Speakers placed with their diaphragms facing toward the ceiling create higher effect in the Dolby Atmos and Dolby Surround listening modes by providing sounds echoing off the ceiling. You can select gh or ij on the unit. For connection with the unit, use the SPEAKERS BACK/HEIGHT terminals.
When playing Dolby Atmos, the speakers required depend on how you have setup your back speakers or height speakers. The following shows combinations of speakers.
1 Back 2 Front High 3 Rear High 4 Top Front 5 Top Middle 6 Top Rear 7 Dolby Enabled Speaker (Front) 8 Dolby Enabled Speaker (Surround)
Connection pattern Fron
tCen
ter
Surrou
nd
Back or Height
Required Optional Connection of a subwoofer is optional.
Step 1: Connections
En-9
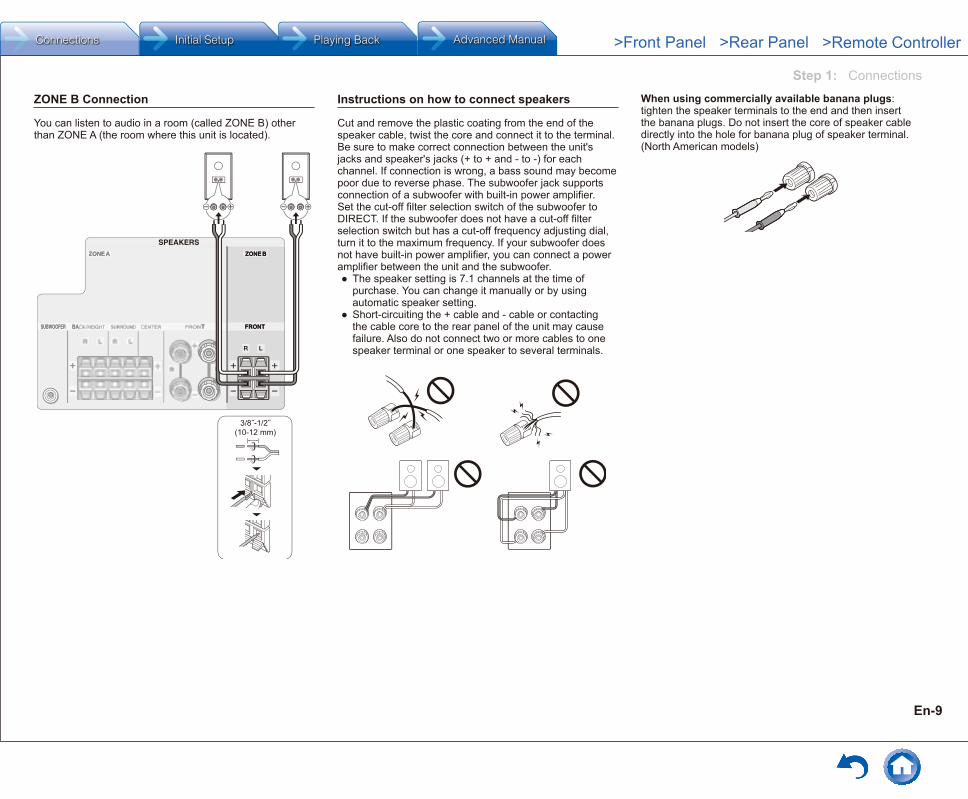
ZONE B Connection
You can listen to audio in a room (called ZONE B) other than ZONE A (the room where this unit is located).
3/8˝-1/2˝(10-12 mm)
Instructions on how to connect speakers
Cut and remove the plastic coating from the end of the speaker cable, twist the core and connect it to the terminal. Be sure to make correct connection between the unit's jacks and speaker's jacks (+ to + and - to -) for each channel. If connection is wrong, a bass sound may become poor due to reverse phase. The subwoofer jack supports connection of a subwoofer with built-in power amplifier. Set the cut-off filter selection switch of the subwoofer to DIRECT. If the subwoofer does not have a cut-off filter selection switch but has a cut-off frequency adjusting dial, turn it to the maximum frequency. If your subwoofer does not have built-in power amplifier, you can connect a power amplifier between the unit and the subwoofer.
● The speaker setting is 7.1 channels at the time of purchase. You can change it manually or by using automatic speaker setting.
● Short-circuiting the + cable and - cable or contacting the cable core to the rear panel of the unit may cause failure. Also do not connect two or more cables to one speaker terminal or one speaker to several terminals.
When using commercially available banana plugs: tighten the speaker terminals to the end and then insert the banana plugs. Do not insert the core of speaker cable directly into the hole for banana plug of speaker terminal. (North American models)

Step 2: Setting Up
En-10
z Operation: Use the remote controller of this unit to operate the menus shown on the TV screen. To display the guidance, you need to make HDMI connection between the unit and TV. Select the item with the cursor buttons of the remote controller and press ENTER to confirm your selection. To return to the previous screen, press RETURN.
1 Turning the Power On
Connect the power cord to the outlet (). Press z ON/STANDBY on the main unit or z RECEIVER on the remote controller to turn the unit on or to standby mode.
● When the unit is turned on, a large instantaneous current may flow affecting functionality of the computer and other devices. It is recommended to use a separate outlet from that for the computer or such other sensitive devices.
¼ Taiwanese models include removable power cords. Connect the power cord to AC INLET of the unit and then connect to the outlet. Always disconnect the outlet side first when disconnecting the power cord.
2 Making Automatic Speaker Setting
The AccuEQ Room Calibration function, our proprietary technology, measures the test tone coming from each speaker with the supplied speaker setup microphone, setting of the number of speakers, volume level, each speaker's optimum crossover frequencies, and distance from the primary listening position, and also enables correction of distortion caused by the acoustic environment of the room.
● You cannot return to the previous screen during speaker setup, even if you press RETURN.
1� Place the speaker setup microphone�Before starting the procedure, refer to the figure and place the supplied speaker setup microphone at the measurement position .
Listening area Measurement position with microphone
¼ Correct measurement will not be possible if the microphone is held by hand. Measurement is not possible if headphones are being used.¼ The subwoofer sound may not be detected since it is extremely low frequencies. Set the subwoofer volume to around the half of its maximum volume and make its frequency to the maximum level.¼ Measurement may be interrupted if there is ambient noise or radio frequency interference. Close the window and turn off the home appliance and fluorescent light.
2� Connect the speaker setup microphone to the SETUP MIC jack of the unit�
SETUP MIC jack
Speaker setup microphone

Step 2: Setting UpStep 2: Setting Up
En-11
3� Select the settings for the connected speakers, the type of the height speakers, and other appropriate settings�
AccuEQ Room Calibration
Select how many speakers you have.NextENTER
Speaker Channels
Subwoofer
Height Speaker
7.1ch
Yes
---
When the screen above is displayed, set the items with the cursor buttons on the remote controller. Refer to the on-screen diagram for "Speaker Channels", which changes each time a different number of channels is selected. When all the items have been set, press ENTER on the remote controller. After that, follow the guidance displayed on the TV screen to operate the unit.
● Refer to the content of an item, which appears on the lower left of the screen when the cursor is on the item.
4� The test tones sound from the connected speakers and automatic speaker setting starts�Measurement will be made three times or more for each speaker. It takes several minutes to be completed. Keep the room as quiet as possible during measurement. If any of the speakers do not produce the test tone, check for disconnection.
● During measurement, each speaker outputs the test tones at a high volume. Be careful of sound leak that may disturb your neighbors, or be careful not to frighten young children.
● To cancel measurement on the way, disconnect the microphone plug.
5� When the measurement is completed, the measurement result is displayed�Press t/u on the remote controller to check the settings. Press ENTER with "Save" selected. Select "On" in the next screen and press ENTER on the remote controller.
● You should normally select "On (All Channels)", and to disable just the front speakers, you should select "On (Except Front Left/Right)".
● If there is an error message, follow the on-screen instruction to remove the error cause.
6� When "Please unplug setup microphone�" is displayed, disconnect the microphone�
3 HDMI Setup
The unit supports the linked system function such as power on/off link when connected via HDMI cable with a CEC (Consumer Electronics Control) compliant TV or player. You need to change the default setting to use the linked system function, HDMI Standby Through function and ARC (Audio Return Channel) function.
HDMI CEC (RIHD)
The following linked operations are possible with connected equipment when the CEC function is enabled.
● Turning the TV to standby mode will turn the unit to standby mode.
● On the TV side, it is possible to set whether to output audio from the speakers connected to the unit or from the TV's speakers.
● Starting playback of a CEC compliant player/recorder will automatically switch the unit's input to the HDMI input of the player/recorder. If the unit is in standby mode, it will automatically be turned on.
It is also possible to control the connected CEC compliant equipment with the remote controller of the unit. For details, see the Advanced Manual.¼ RIHD is a name for the linked system function of Onkyo's CEC compliant
products.
1� After pressing RECEIVER, press SETUP on the remote controller�
2� Select "5� Hardware" with the cursor and press ENTER�
3� Select "HDMI" with the cursor and press ENTER�4� Select "HDMI CEC (RIHD)" with the cursor and
select "On"� ● When setting is complete, press SETUP to close the menu screen.
HDMI Standby Through
The function allows transmission from players to the TV even if the unit is in standby. Setting the HDMI CEC (RIHD) setting mentioned above to "On" enables this setting automatically.
● Power consumption in standby mode increases when the HDMI Standby Through function is enabled.
ARC (Audio Return Channel)
Simple connection to the ARC compatible TV using a single HDMI cable allows to listen to the TV audio signals from the speakers connected to the unit. Setting the HDMI CEC (RIHD) setting mentioned above to "On" enables the "Audio Return Channel" setting automatically.
Audio output of connected playersTo enjoy digital surround sound including Dolby Digital and DTS, audio output should be set to "Bitstream output" on the connected Blu-ray Disc Player or other device. Depending on the settings on the Blu-ray Disc Player, there may be cases when Dolby TrueHD, Dolby Atmos, and DTS-HD Master Audio is not output according to the format of the source. In this case, in the Blu-ray Disc Player settings try setting "BD video supplementary sound" (or secondary sound) to "Off". Change the listening mode after changing the setting to confirm.

Step 3: Playing Back
En-12
1 Basic Operations
z When using the remote controller to operate the AV receiver: The remote controller of this unit has the remote mode function for controlling other devices. You cannot control this unit when the remote controller is in the remote mode other than RECEIVER mode (for controlling this unit). Be sure to press G RECEIVER to select the RECEIVER mode before starting operation.
1� Turning the power on�Press 1 z RECEIVER on the remote controller to turn the power on.
● Switch the input on the TV to that assigned to the unit. Use the TV's remote controller.
2� Select the input on the unit�Press the 2 INPUT SELECTOR for the player you want to listen to. Press TV to listen to the TV's sound. You can also use the input selector buttons on the main unit.
● Input will automatically be selected if the TV or player is CEC compliant and connected to the unit with HDMI cable.
3� Select the desired listening mode�After pressing G RECEIVER, press the 7 listening mode buttons to switch the mode so that you can enjoy different listening modes.
4� Adjust the volume with I VOL�
Part names and functions of the remote controller
1
3
J
I
K
L
7
F
5
6
8
2
4
9
H
G
1 z RECEIVER button: Turns the unit on or into standby mode.
2 REMOTE MODE/INPUT SELECTOR buttons: Switch the input to be played. Furthermore, by registering a particular remote control code to a button, you can switch the remote control mode to operate other equipment by pressing that button.
3 MEMORY button: Registers a radio station.4 TUN MODE button: Switches the tuning mode.5 Cursor buttons and ENTER button: Move the cursor
and confirms the selection.6 SETUP button: Displays the screen for making various
settings for this unit.7 Listening mode buttons: Allow you to select the
listening mode.MOVIE/TV button: You can select a listening mode suitable for movies and TV programs.MUSIC button: You can select a listening mode suitable for music.GAME button: You can select a listening mode suitable for games.STEREO button: You can select a listening mode for stereo and all channel stereo sources.
● For details on the listening modes, see the Advanced Manual.
8 DIMMER button: Switches the brightness of the display.9 ZONE A/B button: For use when the unit is connected
with speakers in a separate room and sound is played there.
F MUSIC OPT button: Turns on/off the MUSIC OPTIMIZER function that improves the quality of the compressed audio.
G RECEIVER button: Switches the remote controller to the mode for operating this unit.
H MUTING button: Temporarily mutes audio. Press again to cancel muting.
I VOLUME buttons: Allow you to adjust the volume. This button also cancels the muting.
J RETURN button: Returns the display to the previous state.
K Q button: Displays the Quick Setup menu that allows you to quickly access the frequently used setting items including sound quality adjustment.
L DISPLAY button: Switches the information on the display.

Step 3: Playing Back
En-13
Display
1 3 52 64
8 7
1 Lights in the following conditions. "A": Output to ZONE A / "B": Output to ZONE B / "HDMI": HDMI signals are input and HDMI input selector is selected. This lights faintly when the HDMI Standby Through function is enabled and the unit is in standby. / "ARC": Audio signals are input from ARC compatible TV and TV input selector is selected. / "3D": Input signals are 3D. / "DIGITAL": Digital signals are input and selected.
2 Stays lit when headphones are connected.3 Lights according to the type of input digital signals and
the listening mode.4 Stays lit when Music Optimizer is enabled.5 Lights in the following conditions. "AUTO": Tuning mode
is auto. / "TUNED": Receiving AM/FM radio. flashes while tuning is automatically performed. / "FM STEREO": Receiving FM stereo. / "RDS" (European, Australian and Asian models): Receiving RDS broadcasting.
6 "MUTING": Flashes when muting is on.7 Lights in the following conditions. "SLEEP": Sleep timer
has been set. This lights faintly when the Power Out at Standby for STRM BOX function is enabled and the unit is in standby. / "ASb" (Auto Standby): Auto Standby is on. / "ch": Channel is being set. / "Hz": Crossover frequencies are being set. / "m/ft": Speaker distances are being set. / "dB": Speaker volume is being set.
8 Displays various information of the input signals. Pressing DISPLAY displays the type of input digital signals and the listening mode.
2 Bluetooth
You can wirelessly enjoy music files stored in a smartphone or other Bluetooth-enabled device. The coverage area is 48 feet (15 meters).
● The Bluetooth-enabled device needs to support the A2DP profile.
● Note that connection is not always guaranteed with all Bluetooth-enabled devices.
PairingPairing is necessary when connecting the Bluetooth-enabled device for the first time. Before starting the procedure, learn how to enable the Bluetooth setting function and to connect with other devices on the Bluetooth-enabled device.
1� Press BLUETOOTH on the remote controller�The unit begins pairing and "Now Pairing..." is displayed.
2� While "Now Pairing���" is on the display, complete connection on the Bluetooth-enabled device in the nearby area within about 1 minute�If the name of this unit is displayed on the Bluetooth-enabled device's display, select this unit. Paring will end after a short time.
● If a password is requested, enter "0000". ● You can pair with another Bluetooth-enabled device by pressing and holding the BLUETOOTH button until "Now Pairing..." is on the display. This unit can store the data of up to 8 paired devices.
Playing Bluetooth-enabled devicesIf the unit is on and the Bluetooth-enabled device is connected, the input will be automatically switched to BLUETOOTH. Play music in this state.For details on using the remote controller for these operations, see the Advanced Manual.
● If the volume setting on the Bluetooth-enabled device is low, the sound will not be output from this unit.
● Due to the characteristics of Bluetooth wireless technology, the sound produced on this unit may slightly be behind the sound played on the Bluetooth-enabled device.
● The on-screen displays are not displayed when the OSD language is set to Chinese. Operate by confirming the display on the main unit. (European, Australian, Taiwanese and Asian models)
3 AM/FM Radio
The Basic Manual explains the method using automatic tuning. For manual tuning, see the Advanced Manual.
1� Press TUNER on the remote controller several times to select either "AM" or "FM"�
2� Press TUN MODE so that the "AUTO" indicator on the display lights�
3� Press the / cursor buttons�The automatic tuning to a radio station starts. Searching stops when one is tuned. When tuned into a radio station, the "uTUNEDt" indicator on the display lights. The "FM STEREO" indicator lights if the radio station is an FM radio station.
● Alternatively you can press TUNING on the main unit.
Actual display varies depending on the country
TUNED
FM STEREO
AUTO
Registering a radio station: You can register up to 40 of your favorite AM/FM radio stations.
1. Tune into the AM/FM radio station you want to register.2. Press MEMORY on the remote controller so that the
preset number on the display flashes.3. Press CH +/- several times to select a number between
1 and 40 while the preset number is flashing (about 8 seconds).
● Alternatively you can press tPRESETu on the main unit.
4. Press MEMORY again to register the station.When registered, the preset number stops flashing. To

Step 3: Playing Back
En-14
select a preset radio station, press tPRESETu on the main unit or CH +/− on the remote controller.
● To delete a preset station, after selecting the preset station you want to delete, press MEMORY on the remote controller, and with the preset number flashing on the display, press CLR on the remote controller.
AM/FM frequency step settingIt may be necessary for you to change the frequency step to tune the radio in your area. Change the step with the following procedure. Note that when this setting is changed, all radio presets are deleted.
1 After pressing RECEIVER on the remote controller, press SETUP.
2. Select "5. Hardware" with the cursor and press ENTER.
3. Select "Tuner" with the cursor and press ENTER.4. Select "AM / FM Frequency Step" (North
American and Taiwanese models) or "AM Frequency Step" (European, Australian and Asian models) with the cursor and select the frequency step for your area. (For Taiwanese models only) The setting is "10 kHz / 0.2 MHz" at the time of purchase. Please change it to "9 kHz / 0.05 MHz".
4 Multi-zone
You can listen to audio in a room (called ZONE B) other than ZONE A (the room where this unit is located).You can play in both ZONE A and ZONE B or just in ZONE B.
Press ZONE A/B on the remote controller several times to select the zone�Either "A" or "B" lights on the display of the main unit to indicate which zone is currently selected.
● Alternatively you can press ZONE A or ZONE B on the main unit.
● The volume of ZONE B is the same as the volume set for ZONE A.
● It is not possible to listen to different sources in ZONE A and ZONE B.
● The listening mode is fixed to All Ch Stereo when playing in ZONE B. Furthermore, no sound will be output from the back speakers and height speakers in ZONE A.
5 Quick Setup Menu
You can perform common settings on the TV screen while playing.
1� Press Q on the remote controller�The Quick Setup menu is displayed on the connected TV's screen.
Quick Setup
Listening Mode
Audio
Information
MOVIE/TV
MUSIC
GAME
BD/DVD
2� Select the item with the cursors on the remote controller and then press ENTER�
● To return to the previous screen, press RETURN.
3� Select the setting with the cursors of the remote controller�
Listening Mode: Select the listening mode from the categories of "MOVIE/TV", "MUSIC" and "GAME".After selecting the Listening Mode, press ENTER button to confirm.
● It cannot be set when audio is played from the TV's speakers.
Audio: You can perform various audio settings including audio quality and speaker level adjustment.
● You cannot select this item when audio is output from the TV's speakers.
Bass, Treble: Adjust volume of the front speaker. ● It cannot be set if the listening mode is Direct.
Phase Matching Bass: Suppress phase shift in the midrange to enhance bass sound. Thus smooth and powerful bass sound can be obtained.
● It cannot be set if the listening mode is Direct.
Center Level, Subwoofer Level: Adjust the speaker level while listening to the sound. The adjustment you made will be reset to the previous status when you turn the unit to standby mode.
● Changes may not be possible depending on the speaker settings.

Step 3: Playing Back
En-15
● This setting is not possible during MUTING or when using headphones.
A/V Sync: If the video is behind the audio, you can delay the audio to offset the gap. Different settings can be set for each input selector.
● It cannot be set if the listening mode is Direct.
AccuEQ Room Calibration: Enable or disable the settings made by automatic speaker setting. To enable them, you should normally select "On (All Ch)", and to disable just the front speakers, you should select "On (ex. L/R)". The setting can be separately set to each input selector.
● This setting cannot be selected if the automatic speaker setting has not been performed.
● It cannot be set if headphones are connected or the listening mode is Direct.
Music Optimizer: Improve the quality of the compressed audio. Playback sound of lossy compressed files such as MP3 will be improved. The setting can be separately set to each input selector.
● The setting is effective in the signals of 48 kHz or less. The setting is not effective in the bitstream signals.
● It cannot be set if the listening mode is Direct.
Late Night: Make small sounds to be easily heard. It is useful when you need to reduce the volume while watching a movie late night. You can enjoy the effect only with Dolby Digital, Dolby Digital Plus, and Dolby TrueHD input sources.
● Turning the unit to standby mode will set the setting to "Off". In case of Dolby TrueHD, the setting will be set to "Auto".
● If "Loudness Management" is set to "Off", this function is not available when playing Dolby Digital Plus or Dolby TrueHD.
Cinema Filter: Adjust the soundtrack that was processed to enhance its treble, in order to make it suitable for home theater.
● This function can be used in the following listening modes: Dolby Digital, Dolby Digital Plus, Dolby TrueHD, Multichannel, DSD, DTS, DTS-ES, DTS Neo:6 Cinema, DTS 96/24, DTS-HD High Resolution Audio, DTS-HD Master Audio, DTS Express.
Center Spread: Adjust the width of the sound field of the front channel when playing in the Dolby Surround listening mode.
To spread the width of the sound field to the left and right, set to "On". To concentrate sound in the center, set to "Off".
● Depending on the speaker settings, this becomes "Off".
Information:
Audio: Displays the audio input source, format, number of channels, sampling frequency, listening mode, and number of output channels.
Video: Displays information such as the video input source, resolution, color space, color depth, 3D information, Aspect and output.
Tuner: Displays information such as the band, frequency, and preset number. This is displayed only when "TUNER" is selected as the input source.
6 Other useful functions
To adjust the sound qualityIt is possible to enhance or moderate the bass and treble of front speakers. Press TONE on the main unit several times to select the desired setting from "Bass", "Treble" and "Phase Matching Bass", and adjust with +/-.
● It cannot be set if the listening mode is Direct."Bass": Allows you to enhance or moderate the bass."Treble": Allows you to enhance or moderate the treble."Phase Matching Bass": Allows you to keep the clear midrange and effectively enhance the bass.
Checking the Input FormatPress DISPLAY on the remote controller several times to switch the display of the main unit in order of:
Input source & volume
Listening mode
Signal format
Sampling frequency
Input signal resolution
● If "Dolby D 5.1" is displayed in Signal format, the Dolby Digital 5.1 ch signals are being input. When listening to AM/FM radio, the band, frequency and preset number are displayed.
Playing Audio and Video from Separate SourcesIt is possible to play audio and video from different sources. For example, you can play audio from the CD player and video from the BD/DVD player. In this case, press BD/DVD and then CD. Then start playback on the BD/DVD player and CD player. This function is effective when an input with audio only has been selected (CD, TUNER or BLUETOOTH). ()¼ When BLUETOOTH is selected, press MODE on the remote controller.

En-16
OthersTroubleshooting
Before starting the procedureProblems may be solved by simply turning the power on/off or disconnecting/connecting the power cord, which is easier than working on the connection, setting and operating procedure. Try the simple measures on both the unit and the connected device. If the problem is that the video or audio is not output or the HDMI linked operation does not work, disconnecting/connecting the HDMI cable may solve it. When reconnecting, be careful not to wind the HDMI cable since if wound the HDMI cable may not fit well. After reconnecting, turn off and on the unit and the connected device.
The AV receiver turns off unexpectedly� ● The AV receiver will automatically enter standby mode when Auto Standby or Sleep Timer is set and launched.
● The protection circuit may have been activated. If this is the case, when you turn the unit on again, "AMP Diag Mode" will appear on the main unit’s display. The unit will then enter a mode that detects abnormal conditions. If no problems are detected, "AMP Diag Mode" will disappear and the unit will return to a normal state. If "CHECK SP WIRE" appears on the display, the speaker cables may be short-circuited. Turn the unit off, and check to see if the cable core of any of the speaker cables is in contact with that of another speaker cable or with the rear panel. After that, turn the unit on again. If "NG" appears, unplug the power cord immediately and contact your Onkyo dealer.
There’s no sound, or it’s very quiet� ● A wrong input selector button has been selected. Select a correct input for the player. Also check that muting is not on.
● Not all listening modes use all speakers.
There’s no picture� ● A wrong input selector button has been selected. ● To display video from the connected player on the TV screen while the unit is in standby, you need to enable HDMI Standby Through function.
● When the TV image is blurry or unclear, power cord or connection cables of the unit may have interfered. In that case, keep distance between TV antenna cable and cables of the unit.
Video and audio are out of synch� ● Video may be delayed relative to audio depending on the settings and connections with your TV. Adjust in "Step 3: Playing Back", "5 Quick Setup Menu", "A/V Sync".
Cannot play digital surround� ● To enjoy digital surround sound including Dolby Digital and DTS, audio output should be set to "Bitstream output" on the connected Blu-ray Disc Player or other device.
Cannot output audio such as Dolby Atmos according to the format of the source�
● If you cannot output audio according to the format of the source (Dolby TrueHD, Dolby Atmos, DTS-HD Master Audio, etc.), in the Blu-ray Disc Player settings try setting "BD video supplementary sound" (or secondary sound) to "Off". Change the listening mode for each source after changing the setting to confirm.
HDMI control does not function correctly� ● Set the CEC link function of the unit to on. It is also necessary to make the HDMI linked system setting on the TV. See the TV's instruction manual for details.
Resetting the unitResetting the unit to the status at the time of shipment may solve the problem. If the measures above do not solve the problem, reset the unit with the following procedure. If you reset the unit status, your preferences will be reset to the defaults. Note them down before starting reset.
z How to reset:
1� While holding down CBL/SAT on the main unit (note that step 2 must be performed with this button pressed down)
2� Press zON/STANDBY on the main unit� ("Clear" appears on the display and the unit returns to standby�)
● Do not unplug the power cord until "Clear" disappears from the display.
C l e a r
1. While holding down CBL/SAT,
2. Press zON/STANDBY�
z How to reset the remote controller:
1� While holding down RECEIVER on the remote controller, press Q until the remote indicator stays lit (about 3 seconds)�
2� Within 30 seconds, press RECEIVER again�
Remote indicator
RECEIVER
Q

Others
En-17
Specifications
Amplifier SectionRated Output Power (North American) With 8 ohm loads, both channels driven, from 20-20,000 Hz; rated 65
watts per channel minimum RMS power, with no more than 0.7% total harmonic distortion from 250 milliwatts to rated output.
Surround Mode Output Power () (6 ohms, 1 kHz THD 0.9%) 115 W per channel
¼ Reference output for each speakers. Depending on the source and the listening mode settings, there may be no sound output.
Rated Output Power (Others) 7 ch × 100 W at 6 ohms, 1 kHz, 1 ch driven of 1% (IEC)Maximum Effective Output Power 7 ch × 120 W at 6 ohms, 1 kHz, 1 ch driven (JEITA) (Asian)Dynamic Power ()
¼ IEC60268-Short-term maximum output power 160 W (3 Ω, Front) 125 W (4 Ω, Front) 85 W (8 Ω, Front)THD+N (Total Harmonic Distortion+Noise) 0.08% (20 Hz - 20 kHz, half power)Input Sensitivity and Impedance (Unbalance) 200 mV/47 kΩ (LINE, 1 kHz 100 W/8 Ω)Rated RCA Output Level and Impedance 1 V/470 Ω (SUBWOOFER PRE OUT)Frequency Response 10 Hz - 100 kHz/+1 dB, –3 dB (Direct mode)Tone Control Characteristics ±10 dB, 20 Hz (BASS) ±10 dB, 20 kHz (TREBLE)Signal to Noise Ratio 100 dB (LINE, IHF-A)Speaker Impedance 6 Ω - 16 Ω
Video SectionSignal level 1.0 Vp-p/75 Ω (Component Y) 0.7 Vp-p/75 Ω (Component Pb/Cb, Pr/Cr) 1.0 Vp-p/75 Ω (Composite)Maximum resolution supported by component video 480i/576i
Tuner SectionFM Tuning Frequency Range 87.5 MHz - 107.9 MHz (North American and Taiwanese) 87.5 MHz - 108.0 MHz, RDS (Others)AM Tuning Frequency Range 522/530 kHz - 1611/1710 kHzPreset Channel 40
Bluetooth SectionCommunication system Bluetooth Specification version 2.1 +EDR (Enhanced Data Rate)Maximum communication range Line of sight approx. 15 m ()Frequency band 2.4 GHz bandModulation method FHSS (Freq Hopping Spread Spectrum)Compatible Bluetooth profiles A2DP 1.3 (Advanced Audio Distribution Profile) AVRCP 1.5 (Audio Video Remote Control Profile)Supported Codecs SBCTransmission range (A2DP) 20 Hz - 20,000 Hz (Sampling frequency 44.1 kHz)¼ The actual range will vary depending on factors such as obstacles between
devices, magnetic fields around a microwave oven, static electricity, cordless phone, reception sensitivity, antenna’s performance, operating system, software application, etc.
GeneralPower Supply AC 120 V, 60 Hz (North American and Taiwanese) AC 220 - 240 V, 50/60 Hz (Others)Power Consumption 4.3 A (North American and Taiwanese) 420 W (Others) 0.15 W (Stand-by, North American and Taiwanese) 0.3 W (Stand-by, Others) 55 W (No-sound)Dimensions (W × H × D) 435 mm × 160 mm × 328 mm 17-1/8" × 6-5/16" × 12-15/16"Weight 7.8 kg (17.2 lbs.) (North American and Taiwanese) 8.0 kg (17.6 lbs.) (Others)
● HDMIInput BD/DVD, CBL/SAT, GAME 1, STRM BOXOutput HDMI OUT (to TV)Video Resolution 4K 60 Hz (RGB/YCbCr 4:4:4/YCbCr 4:2:2, 24 bit)Audio Format Dolby Atmos, Dolby TrueHD, Dolby Digital Plus, Dolby Digital,
DTS-HD Master Audio, DTS-HD High Resolution Audio, DTS 96/24, DTS-ES, DTS, DTS Express, DSD, Multichannel PCM (up to 8ch)
Supported 3D, Audio Return Channel, Deep Color, x.v.Color™, LipSync, CEC, 4K,
Extended Colorimetry (sYCC601, Adobe RGB, Adobe YCC601), Content Type, 3D Dual View, 21:9 Aspect Ratio Video Format
● Video InputsComponent COMPONENT VIDEO (BD/DVD, GAME 2)Composite VIDEO (CBL/SAT, VCR), AUX INPUT VIDEO (front)
● Audio InputsDigital OPTICAL (CD, TV) DIGITAL AUDIO (BD/DVD)Analog AUDIO (BD/DVD, CBL/SAT, GAME 2, VCR, CD, TV) AUX INPUT (front)
● Audio OutputsAnalog Pre Out (ZONE A SUBWOOFER)Speaker Outputs ZONE A (FRONT L/R, CENTER, SURROUND L/R, BACK/HEIGHT L/R),
ZONE B (FRONT L/R)Phones PHONES (Front, ø 6.3)
● OthersSetup Mic 1 (Front)RI REMOTE CONTROL 1STRM BOX POWER OUT 1 (5 V/1 A)
Specifications and features are subject to change without notice.

Others
En-18
Table of display resolutions
Refer to the following table for information about the image formats and resolutions output by this unit in response to input signals.
OutputInput
HDMI4K 1080p/24 1080p 1080i 720p 480p/576p 480i/576i
HDMI
4K ○1080p/24 ○1080p ○1080i ○720p ○480p/576p ○480i/576i ○
Component
1080p1080i720p480p/576p480i/576i ○
Composite 480i/576i ○
Resolutions supported by HDMI
Input supportContent
protection technology
Display resolution Frame rate Color space Color Depth Remarks
HDMI input(BD/DVD, CBL/SAT, GAME1,
STRM BOX)
HDCP1.4 HDCP2.2
720×480i 60Hz
RGB/YCbCr4:4:4/YCbCr4:2:2 8/10/12/16bit
With YCbCr4:2:2, Color Depth supported is up to 8/10/12bit.
720×576i 50Hz720×480p 60Hz720×576p 50Hz
1920×1080i 50/60Hz1280×720p 24/25/30/50/60Hz1680×720p 24/25/30/50/60Hz
1920×1080p 24/25/30/50/60Hz2560×1080p 24/25/30/50/60Hz
4K(3840×2160p)
24/25/30Hz RGB/YCbCr4:4:4/YCbCr4:2:2 8/10/12/16bit
With YCbCr4:2:2, Color Depth supported is up to 8/10/12bit.
50/60HzRGB/YCbCr4:4:4 8bit
YCbCr4:2:2 8/10/12bitYCbCr4:2:0 8/10/12/16bit
4K SMPTE(4096×2160p)
24/25/30Hz RGB/YCbCr4:4:4/YCbCr4:2:2 8/10/12/16bit
With YCbCr4:2:2, Color Depth supported is up to 8/10/12bit.
50/60HzRGB/YCbCr4:4:4 8bit
YCbCr4:2:2 8/10/12bitYCbCr4:2:0 8/10/12/16bit

Others
En-19
Precautions
For European ModelsDeclaration of ConformityWe declare, under our sole responsibility, that this product complies with the standards:
– Safety – Limits and methods of measurement of
radio disturbance characteristics – Limits for harmonic current emissions – Limitation of voltage changes, voltage
fluctuations and flicker – RoHS Directive, 2011/65/EU
– Hereby, Onkyo Corporation, declares that this TX-SR444 is in compliance with the essential requirements and other relevant provisions of Directive 1999/5/EC.
– С настоящето, Onkyo Corporation, декларира, че TX-SR444 е в съответствие със съществените изисквания и другитеприложими разпоредби на Директива 1999/5/EC.
– Onkyo Corporation tímto prohlašuje, že TX-SR444 splňuje základní požadavky a všechna příslušná ustanoveni Směrnice 1999/5/ES.
– Undertegnede Onkyo Corporation erklærer herved, at følgende udstyr TX-SR444 overholder de væsentlige krav og øvrige relevante krav i direktiv 1999/5/EF.
– Hiermit erklärt Onkyo Corporation, dass sich das Gerät TX-SR444 in Übereinstimmung mit den grundlegenden Anforderungen und den übrigen einschlägigen Bestimmungen der Richtlinie 1999/5/EG befindet.
– Käesolevaga kinnitab Onkyo Corporation seadme TX-SR444 vastavust direktiivi 1999/5/EÜ põhinõuetele ja nimetatud direktiivist tulenevatele teistele asjakohastele sätetele.
– ΜΕ ΤΗΝ ΠΑΡΟΥΣΑ Ο ΚΑΤΑΣΚΕΥΑΣΤΗΣ Onkyo Corporation ΔΗΛΩΝΕΙ ΟΤΙ TX-SR444 ΣΥΜΜΟΡΦΩΝΕΤΑΙ ΠΡΟΣ ΤΙΣ ΟΥΣΙΩΔΕΙΣ ΑΠΑΙΤΗΣΕΙΣ ΚΑΙ ΤΙΣ ΛΟΙΠΕΣ ΣΧΕΤΙΚΕΣ ΔΙΑΤΑΞΕΙΣ ΤΗΣ ΟΔΗΓΙΑΣ 1999/5/ΕΚ
– Por la presente, Onkyo Corporation, declara que este TX-SR444 cumple con los requisitos esenciales y otras exigencias relevantes de la Directiva 1999/5/EC.
– Par la présente, Onkyo Corporation déclare que l’appareil TX-SR444 est conforme aux exigences essentielles et aux autres dispositions pertinentes de la directive 1999/5/CE.
– Con la presente Onkyo Corporation dichiara che questo TX-SR444 è conforme ai requisiti essenziali ed alle altre disposizioni pertinenti stabilite dalla direttiva 1999/5/CE.
– Ar šo Onkyo Corporation deklarē, ka TX-SR444 atbilst Direktīvas 1999/5/EK būtiskajām prasībām un citiem ar to saistītajiem noteikumiem.
– Šiuo Onkyo Corporation deklaruoja, kad šis TX-SR444 atitinka esminius reikalavimus ir kitas 1999/5/EB Direktyvos nuostatas.
– A Onkyo Corporation ezzennel kijelenti, hogy a TX-SR444 típusú beren-dezés teljesíti az alapvető követelményeket és más 1999/5/EK irányelvben meghatározott vonatkozó rendelkezéseket.
– Hierbij verklaart Onkyo Corporation dat het toestel l TX-SR444 in overeenstemming is met de essentiële eisen en de andere relevante bepalingen van richtlijn 1999/5/EG.
– Niniejszym Onkyo Corporation deklaruje że TX-SR444 jest zgodny z zasadniczymi wymaganiami i innymi właściwymi postanowieniami Dyrektywy 1999/5/EC.
– Eu, Onkyo Corporation, declaro que o TX-SR444 cumpre os requisitos essenciais e outras provisões relevantes da Directiva 1999/5/EC.
– Prin prezenta, Onkyo Corporation, declară că aparatul TX-SR444 este în conformitate cu cerinţele esenţiale şi cu alte prevederi pertinente ale Directivei 1999/5/CE.
– Onkyo Corporation týmto vyhlasuje, že TX-SR444 a spĺňa základné požiadavky a všetky príslušné ustanovenia Smernice 1999/5/ES.
– Onkyo Corporation izjavlja, da je ta TX-SR444 v skladu z bistvenimi zahtevami in drugimi relevantnimi določili direktive 1999/5/ES.
– Onkyo Corporation vakuuttaa täten että TX-SR444 tyyppinen laite on direktiivin 1999/5/EY oleellisten vaatimusten ja sitä koskevien direktiivin muiden ehtojen mukainen.
– Härmed förklarar Onkyo Corporation att denna TX-SR444 följer de väsentliga kraven och andra relevanta stadgar i Direktiv 1999/5/EC.
– Hér með lýsir Onkyo Corporation því yfir að varan TX-SR444 er í samræmi við grunnkröfur og aðrar kröfur sem gerðar eru í tilskipun 1999/5/EC.
– Onkyo Corporation erklærer herved at denne TX-SR444 er i overensstemmelse med vesentlige krav og andre relevante bestemmelser i direktiv 1999/5/EC.
– Ovime Onkyo Corporation, potvrđuje da je TX-SR444 u suglasnosti sa osnovnim zahtjevima i ostalim relevantnim odredbama Direktive 1999/5/EC.
License and Trademark Information
Manufactured under license from Dolby Laboratories. Dolby, Dolby Atmos, Dolby Surround, and the double-D symbol are trademarks of Dolby Laboratories.
For DTS patents, see http://patents.dts.com. Manufactured under license from DTS, Inc. DTS, the Symbol, DTS in combination with the Symbol, the DTS-HD logo, and DTS-HD Master Audio are registered trademarks or trademarks of DTS, Inc. in the United States and/or other countries. © DTS, Inc. All Rights Reserved.
"CINEMA FILTER" and "CINEMA FILTER (logo)" are trademarks of Onkyo Corporation.
®
The terms HDMI and HDMI High-Definition Multimedia Interface, and the HDMI Logo are trademarks or registered trademarks of HDMI Licensing LLC in the United States and other countries.
The Bluetooth® word mark and logos are registered trademarks owned by Bluetooth SIG, Inc. and any use of such marks by Onkyo is under license. Other trademarks and trade names are those of their respective owners.Onkyo does not guarantee Bluetooth compatibility between the AV receiver and all Bluetooth-enabled devices.For compatibility between the AV receiver and another device with Bluetooth technology, consult the device’s documentation and dealer. In some countries, there may be restrictions on using Bluetooth devices. Check with your local authorities.
Apple, iPod and iPhone are trademarks of Apple Inc., registered in the U.S. and other countries.Apple TV is a trademark of Apple Inc., registered in the U.S. and other countries.
QR Code is a registered trademark of DENSO WAVE INCORPORATED."x.v.Color" is a trademark of Sony Corporation.AccuEQ, Music Optimizer, RIHD and WRAT are trademarks of Onkyo Corporation."RIHD" and "RIHD (logo)" are trademarks of Onkyo Corporation.
"All other trademarks are the property of their respective owners."

* 2 9 4 0 1 9 6 5 A *
F1504-1
SN 29401965A(C) Copyright 2015 Onkyo Corporation Japan. All rights reserved. Onkyo has the Privacy Policy. You can review it at [http://www.onkyo.com/privacy/].
Kitahama Chuo Bldg, 2-2-22 Kitahama, Chuo-ku, OSAKA 541-0041, JAPANhttp://www.onkyo.com/
18 Park Way, Upper Saddle River, N.J. 07458, U.S.A.For Dealer, Service, Order and all other Business Inquiries: Tel: 201-785-2600 Fax: 201-785-2650 http://www.us.onkyo.com/For Product Support Team Only:1-800-229-1687http://www.us.onkyo.com/
Liegnitzerstrasse 6, 82194 Groebenzell, GERMANYTel: +49-8142-4401-0 Fax: +49-8142-4208-213 http://www.eu.onkyo.com/
Unit 1033, 10/F, Star House, No 3, Salisbury Road, Tsim Sha Tsui Kowloon, Hong Kong.Tel: 852-2429-3118 Fax: 852-2428-9039http://www.hk.onkyo.com/
1301, 555 Tower, No.555 West NanJing Road, Jing’an District, Shanghai, China 200041, Tel: 86-21-52131366 Fax: 86-21-52130396http://www.cn.onkyo.com/The Americas
China
Europe
Asia, Oceania, Middle East, AfricaPlease contact an Onkyo distributor referring to Onkyo SUPPORT site.http://www.intl.onkyo.com/support/The above-mentioned information is subject to change without prior notice. Visit the Onkyo web site for the latest update.
(Mainland)
(Hong Kong)
Meridien House, Ground floor, 69 - 71 Clarendon Road, Watford, Hertfordshire, WD17 1DS, United Kingdom Tel: +44 (0)8712-00-19-96 Fax: +44 (0)8712-00-19-95
Supplied Accessories
Indoor FM antenna --- (1)
AM loop antenna --- (1)
Remote controller (RC-896M) --- (1)Batteries (AA/R6) --- (2)
Power cord (Taiwanese models) --- (1)
Speaker setup microphone --- (1)
¼ The number in parenthesis indicates the quantity. On packaging, the letter at the end of the product name indicates the color.
How to use the remote controller
Batteries (AA/R6)
Remote control sensor
Approx. 16 ft. (5 m)
AV Receiver
¼ If you do not use the remote controller for a long time, remove the batteries to prevent leakage.¼ Note that keeping consumed batteries inside may cause corrosion resulting in damage of the remote controller.

TX-SR444AV RECEIVER
Advanced Manual
CONTENTS
Details on AM/FM reception 2Tuning into a Radio Station 2Presetting a Radio Station 3Using RDS (European, Australian and Asian models) 3
Operating Music Files with the Remote Controller 5About the Remote Controller 5Remote Controller Buttons 5
Using the Listening Modes 6Selecting Listening Mode 6Listening Mode Types 6Selectable Listening Modes 8Checking the Input Format 15
Advanced Settings (Setup Menu) 16How to Set 161. TV Out 172. Speaker 17
3. Audio Adjust 204. Source 215. Hardware 226. Remote Controller 25
Operating Other Components with the Remote Controller 26
Functions of REMOTE MODE Buttons 26Programming Remote Control Codes 26TV operation 27Blu-ray Disc player/DVD player/DVD recorder operation 28VCR/PVR operation 28Satellite receiver / Cable receiver operation 29CD player operation 30Cassette tape deck operation 30To operate CEC-compatible components 30
Connecting and Operating Onkyo RI Components 31About RI Function 31RI Connection and Setting 31iPodR/iPhoneR Operation 32
Troubleshooting 33Reference Information 38
En
The Basic Manual includes information needed when starting up and also instructions for frequently used operations. The Advanced Manual has more detailed information and advanced settings.

Details on AM/FM reception
En-2
Details on AM/FM reception
Tuning into a Radio Station
¼ Tuning Automatically1. Press TUNER on the remote controller several times to
select either "AM" or "FM".
2. Press TUN MODE so that the "AUTO" indicator on the display lights.
3. Press the cursors / to start automatic tuning. ● Alternatively you can press TUNING on the main unit to start tuning automatically.
● Searching automatically stops when a station is found. When tuned into a radio station, the " TUNED " indicator on the display lights. When tuned into an FM radio station, the "FM STEREO" indicator lights.
● No sound is output while the " TUNED " indicator is off.
When the signal from an FM radio station is weak: Radio wave may be weak depending on the building structure and environmental conditions. In that case, perform the procedure as explained below in "Tuning Manually" to manually select the desired station.
¼ Tuning Manually1. Press TUNER on the remote controller several times to
select either "AM" or "FM".
2. Press TUN MODE so that the "AUTO" indicator on the display goes off.
3. While pressing the cursors / , select the desired radio station.
● Alternatively you can press TUNING on the main unit.
● The frequency changes by 1 step each time you press the button. The frequency changes continuously if the button is held down and stops when the button is released. Tune by looking at the display.
To return to automatic tuning: Press TUN MODE on the remote controller again. The unit tunes automatically into a radio station. Normally "AUTO" should be displayed.
¼ Directly inputting the frequencyIt allows you to directly enter the frequency of the radio station you want to listen to.1. Press TUNER on the remote controller several times to
select either "AM" or "FM".
2. Press D.TUN.
3. Using the number buttons, enter the frequency of the radio station within 8 seconds.
● To enter 87.5 (FM), for example, press 8, 7, 5, or 8, 7, 5, 0. If you entered a wrong number, press D.TUN and enter a correct one.

Details on AM/FM reception
En-3
Presetting a Radio Station
It allows you to register up to 40 of your favorite AM/FM radio stations. Registering radio stations in advance allows you to tune into your radio station of choice directly.
¼ Registration Procedure1. Tune into the AM/FM radio station you want to register.2. Press MEMORY on the remote controller so that the
preset number on the display flashes.
3. Press CH +/- several times to select a number between 1 and 40 while the preset number is flashing (about 8 seconds).
● Alternatively you can press PRESET on the main unit.
4. Press MEMORY again to register the station. ● When the station is registered, the preset number stops flashing.
● Repeat this procedure for all of your favorite AM/FM radio stations.
¼ Selecting a Preset Radio Station1. Press CH +/- on the remote controller to select a preset
number. ● Alternatively you can press PRESET on the main unit. You can also select by directly entering the preset number with the number buttons on the remote controller.
¼ Deleting a Preset Radio Station1. Press CH +/- on the remote controller to select the
preset number to delete.
2. Press MEMORY so that the preset number on the display flashes.
3. Press CLR while the preset number is flashing (about 8 seconds) to delete the preset number.
● When deleted, the number on the display goes off.
Using RDS (European, Australian and Asian models)
RDS stands for Radio Data System and is a method of transmitting data in FM radio signals.
● RDS works only in areas where RDS broadcasts are available.
● In some cases, the text information appeared on the display is not identical to the content transmitted by the RDS station. Furthermore, unexpected characters may be displayed when the unit receives unsupported characters. However, this is not a malfunction.
● If the signal from an RDS station is weak, the RDS data may be displayed continuously or not at all.PS (Program Service): Tuning into a radio station distributing Program Service information displays the radio station name. Pressing DISPLAY displays the frequency for 3 seconds.RT (Radio Text): Tuning into a radio station transmitting Radio Text information displays text on the display of the unit.PTY (Program Type): Allows you to search for RDS stations by program type.TP (Traffic Program): Allows you to search for radio stations transmitting traffic information.
¼ Displaying Radio Text (RT)1. Press RT/PTY/TP on the main unit once.
● The Radio Text (RT) is displayed scrolling across the display. "No Text Data" is displayed when no text information is available.
¼ Searching by Type (PTY)1. Press RT/PTY/TP on the main unit twice.
● The current program type appears on the display.
2. Press PRESET to select the type of program to search for.

Details on AM/FM reception
En-4
● The following RDS station types are displayed: None News (News reports) Affairs (Current affairs) Info (Information) Sport Educate (Education) Drama Culture Science (Science and technology) Varied Pop M (Pop music) Rock M (Rock music) Easy M (Middle of the road music) Light M (Light classics) Classics (Serious classics) Other M (Other music) Weather Finance Children (Children's programmes) Social (Social affairs) Religion Phone In Travel Leisure Jazz (Jazz music) Country (Country music) Nation M (National music) Oldies (Oldies music) Folk M (Folk music) Document (Documentary)
3. Press ENTER to search the radio stations of the selected type.
4. When such a radio station is found, the indication on the display flashes. Then, press ENTER again.
● If no stations are found, the message "Not Found" is displayed.
¼ Listening to Traffic Information (TP)1. Press RT/PTY/TP on the main unit three times.
● "[TP]" will be displayed if traffic information is transmitted by the radio station you are tuned in. "TP" only is displayed if no traffic information is available.
2. Press ENTER to search a radio station distributing traffic information.
3. When a radio station is found, searching stops and traffic information starts.
● "Not Found" is displayed if no radio station distributing traffic information is found.

Operating Music Files with the Remote Controller
En-5
Operating Music Files with the Remote Controller
About the Remote Controller
Use the remote controller of this unit to play music files stored on a Bluetooth-enabled device.
● The Bluetooth-enabled devices must support the AVRCP profile. Some devices may not be operated, even when they support AVRCP profile.
Remote Controller Buttons
1. Press BLUETOOTH on the remote controller.
2. Operate the remote controller by referring to the name and function of each of the buttons.
3
5
4
8
9
2 7
1 6
F
1 : This button fast-reverses the current track.2 : This button plays the current track from the
beginning. Pressing this button twice plays the previous track.
3 : This button pauses the playback.4 REPEAT: This button replays the track (or tracks).
Pressing this button repeatedly cycles through the repeat modes.
5 : This button starts the playback.6 : This button fast-forwards the current track.
7 : This button plays the next track.8 : This button stops the playback.9 MODE: This button displays the video from the input
selected in "Video Select". Each press of the button displays or turns off the video. You can change the display position of the OSD by pressing ENTER while the video is displayed on the screen.
● These buttons are disabled when the OSD language is set to Chinese. (European, Australian, Taiwanese and Asian models)
F RANDOM: This button performs random playback.
Using the Listening Modes
En-6
Using the Listening Modes
Selecting Listening Mode
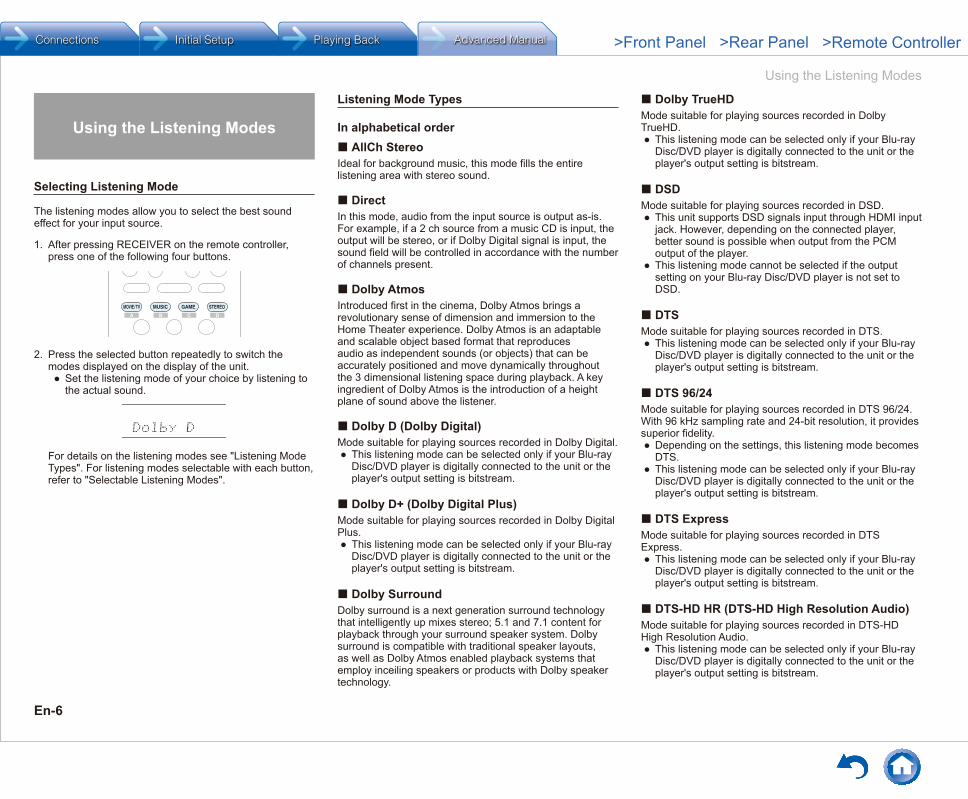
The listening modes allow you to select the best sound effect for your input source.
1. After pressing RECEIVER on the remote controller, press one of the following four buttons.
2. Press the selected button repeatedly to switch the modes displayed on the display of the unit.
● Set the listening mode of your choice by listening to the actual sound.
For details on the listening modes see "Listening Mode Types". For listening modes selectable with each button, refer to "Selectable Listening Modes".
Listening Mode Types
In alphabetical order¼ AllCh Stereo
Ideal for background music, this mode fills the entire listening area with stereo sound.
¼ DirectIn this mode, audio from the input source is output as-is. For example, if a 2 ch source from a music CD is input, the output will be stereo, or if Dolby Digital signal is input, the sound field will be controlled in accordance with the number of channels present.
¼ Dolby AtmosIntroduced first in the cinema, Dolby Atmos brings a revolutionary sense of dimension and immersion to the Home Theater experience. Dolby Atmos is an adaptable and scalable object based format that reproduces audio as independent sounds (or objects) that can be accurately positioned and move dynamically throughout the 3 dimensional listening space during playback. A key ingredient of Dolby Atmos is the introduction of a height plane of sound above the listener.
¼ Dolby D (Dolby Digital)Mode suitable for playing sources recorded in Dolby Digital.
● This listening mode can be selected only if your Blu-ray Disc/DVD player is digitally connected to the unit or the player's output setting is bitstream.
¼ Dolby D+ (Dolby Digital Plus)Mode suitable for playing sources recorded in Dolby Digital Plus.
● This listening mode can be selected only if your Blu-ray Disc/DVD player is digitally connected to the unit or the player's output setting is bitstream.
¼ Dolby SurroundDolby surround is a next generation surround technology that intelligently up mixes stereo; 5.1 and 7.1 content for playback through your surround speaker system. Dolby surround is compatible with traditional speaker layouts, as well as Dolby Atmos enabled playback systems that employ inceiling speakers or products with Dolby speaker technology.
¼ Dolby TrueHDMode suitable for playing sources recorded in Dolby TrueHD.
● This listening mode can be selected only if your Blu-ray Disc/DVD player is digitally connected to the unit or the player's output setting is bitstream.
¼ DSDMode suitable for playing sources recorded in DSD.
● This unit supports DSD signals input through HDMI input jack. However, depending on the connected player, better sound is possible when output from the PCM output of the player.
● This listening mode cannot be selected if the output setting on your Blu-ray Disc/DVD player is not set to DSD.
¼ DTSMode suitable for playing sources recorded in DTS.
● This listening mode can be selected only if your Blu-ray Disc/DVD player is digitally connected to the unit or the player's output setting is bitstream.
¼ DTS 96/24Mode suitable for playing sources recorded in DTS 96/24. With 96 kHz sampling rate and 24-bit resolution, it provides superior fidelity.
● Depending on the settings, this listening mode becomes DTS.
● This listening mode can be selected only if your Blu-ray Disc/DVD player is digitally connected to the unit or the player's output setting is bitstream.
¼ DTS ExpressMode suitable for playing sources recorded in DTS Express.
● This listening mode can be selected only if your Blu-ray Disc/DVD player is digitally connected to the unit or the player's output setting is bitstream.
¼ DTS-HD HR (DTS-HD High Resolution Audio)Mode suitable for playing sources recorded in DTS-HD High Resolution Audio.
● This listening mode can be selected only if your Blu-ray Disc/DVD player is digitally connected to the unit or the player's output setting is bitstream.

Using the Listening Modes
En-7
¼ DTS-HD MSTR (DTS-HD Master Audio)Mode suitable for playing sources recorded in DTS-HD Master Audio.
● This listening mode can be selected only if your Blu-ray Disc/DVD player is digitally connected to the unit or the player's output setting is bitstream.
¼ DTS Neo:6This mode expands any 2 ch source for 5.1 ch multichannel surround playback. It offers full-bandwidth on all channels, with great independence between the channels. There are two variants for this mode: one ideal for movies and another ideal for music.
– Neo:6 Cinema: Use this mode with any 2 ch movie.– Neo:6 Music: Use this mode with any 2 ch music
source.
¼ ES Discrete (DTS-ES Discrete)This mode is for use with DTS-ES Discrete sources and enables 6.1 ch or 7.1 ch playback using back channel. Completely discrete seven channels will improve spatial imaging and enable 360-degree sound localization producing a sound crossing between the surround channels.
● This listening mode can be selected only if your Blu-ray Disc/DVD player is digitally connected to the unit or the player's output setting is bitstream.
● Use on the DVD with DTS ES logo, particularly on the software containing DTS-ES Matrix soundtrack.
¼ ES Matrix (DTS-ES Matrix)This mode is for use with DTS-ES Matrix soundtrack and enables 6.1 ch or 7.1 ch playback using matrix-encoded back channel.
● This listening mode can be selected only if your Blu-ray Disc/DVD player is digitally connected to the unit or the player's output setting is bitstream.
● Use on the CD, DVD or LD with DTS ES logo, particularly on the software containing DTS-ES Matrix soundtrack.
¼ Full MonoIn this mode, all speakers output the same sound in mono, so the sound you hear is the same regardless of where you are within the listening room.
¼ Game-ActionIn this mode, sound localization is distinct with emphasis on bass.
¼ Game-RockIn this mode, sound pressure is emphasized to heighten live feel.
¼ Game-RPGIn this mode, the sound has a dramatic feel with a similar atmosphere to Orchestra mode.
¼ Game-SportsSuitable for audio source with much reverberation.
¼ MonoUse this mode when watching an old movie with a mono soundtrack, or use it to separately reproduce soundtracks in two different languages recorded in the left and right channels of some movies. It is also suitable for DVDs or other sources containing multiplexed audio.
¼ Multich (Multichannel)Mode suitable for playing sources recorded in PCM multichannel.
¼ OrchestraSuitable for classical or operatic music. This mode emphasizes the surround channels in order to widen the stereo image, and simulates the natural reverberation of a large hall.
¼ StereoIn this mode, sound is output from the front left and right speakers and subwoofer.
¼ Studio-MixSuitable for rock or pop music. Listening to music in this mode creates a lively sound field with a powerful acoustic image, like being at a club or rock concert.
¼ T-D (Theater-Dimensional)In this mode, you can enjoy a virtual playback of multichannel surround sound even with only two or three speakers. This works by controlling how sounds reach the
listener's left and right ears.
¼ TV LogicSuitable for TV shows produced in a TV studio. This mode enhances the surround effects to the entire sound to give clarity to voices and create a realistic acoustic image.
¼ UnpluggedSuitable for acoustic instruments, vocals and jazz. This mode emphasizes the front stereo image, giving the impression of being right in front of the stage.

Using the Listening Modes
En-8
Selectable Listening Modes
Listening modes that can be selected with the listening mode buttons will differ depending on the input signal format and actual speaker configuration. Also note that depending on the player settings and content, some listening modes may not be available for selecting.
● Listening modes available when headphones are connected are: Mono, Direct, and Stereo.
¼ MOVIE/TV buttonYou can select a mode suitable for movies and TV programs.
Input Format Listening ModeAnalog Direct
MonoDolby SurroundNeo:6 Cinema1
TV Logic2
AllCh Stereo3
Full Mono3
T-D1 Center speaker or surround speakers need to be installed.2 Surround speakers or height speakers need to be installed.3 Center speaker, surround speakers or height speakers need to be
installed.
Input Format Listening ModePCM Direct
MonoDolby SurroundNeo:6 Cinema1
TV Logic2
AllCh Stereo3
Full Mono3
T-D1 Center speaker or surround speakers need to be installed.2 Surround speakers or height speakers need to be installed.3 Center speaker, surround speakers or height speakers need to be
installed.
Input Format Listening ModeMultich PCM Direct
MonoMultich1
Dolby SurroundTV Logic2
AllCh Stereo3
Full Mono3
T-D1 Center speaker or surround speakers need to be installed.2 Surround speakers or height speakers need to be installed.3 Center speaker, surround speakers or height speakers need to be
installed.
Input Format Listening ModeDSD Direct
MonoDSD1 2
Dolby SurroundNeo:6 Cinema3
TV Logic4
AllCh Stereo5
Full Mono5
T-D1 Cannot be selected when the input format is monaural or 2 ch.2 Center speaker or surround speakers need to be installed.3 Can only be selected when the input format is 2 ch and a center speaker
or surround speakers are installed.4 Surround speakers or height speakers need to be installed.5 Center speaker, surround speakers or height speakers need to be
installed.
Input Format Listening ModeDolby Atmos
● The listening mode of Dolby Digital Plus or Dolby TrueHD can be selected if back speakers or height speakers are not connected.
DirectMonoDolby AtmosTV LogicAllCh StereoFull MonoT-D
Input Format Listening ModeDolby D Direct
MonoDolby D1 2
Dolby SurroundNeo:6 Cinema3
TV Logic4
AllCh Stereo5
Full Mono5
T-D1 Cannot be selected when the input format is monaural or 2 ch.2 Center speaker or surround speakers need to be installed.3 Can only be selected when the input format is 2 ch and a center speaker
or surround speakers are installed.4 Surround speakers or height speakers need to be installed.5 Center speaker, surround speakers or height speakers need to be
installed.

Using the Listening Modes
En-9
Input Format Listening ModeDolby D+ Direct
MonoDolby D+1 2
Dolby SurroundNeo:6 Cinema3
TV Logic4
AllCh Stereo5
Full Mono5
T-D1 Cannot be selected when the input format is monaural or 2 ch.2 Center speaker or surround speakers need to be installed.3 Can only be selected when the input format is 2 ch and a center speaker
or surround speakers are installed.4 Surround speakers or height speakers need to be installed.5 Center speaker, surround speakers or height speakers need to be
installed.
Input Format Listening ModeDolby TrueHD Direct
MonoDolby TrueHD1 2
Dolby SurroundNeo:6 Cinema3
TV Logic4
AllCh Stereo5
Full Mono5
T-D1 Cannot be selected when the input format is monaural or 2 ch.2 Center speaker or surround speakers need to be installed.3 Can only be selected when the input format is 2 ch and a center speaker
or surround speakers are installed.4 Surround speakers or height speakers need to be installed.5 Center speaker, surround speakers or height speakers need to be
installed.
Input Format Listening ModeDTS Direct
MonoDTS1 2
Dolby SurroundNeo:6 Cinema3
TV Logic4
AllCh Stereo5
Full Mono5
T-D1 Cannot be selected when the input format is monaural or 2 ch.2 Center speaker or surround speakers need to be installed.3 Can only be selected when the input format is 2 ch and a center speaker
or surround speakers are installed.4 Surround speakers or height speakers need to be installed.5 Center speaker, surround speakers or height speakers need to be
installed.
Input Format Listening ModeDTS 96/24 Direct
MonoDTS 96/241 2
Dolby SurroundNeo:6 Cinema3
TV Logic4
AllCh Stereo5
Full Mono5
T-D1 Cannot be selected when the input format is monaural or 2 ch.2 Center speaker or surround speakers need to be installed.3 Can only be selected when the input format is 2 ch and a center speaker
or surround speakers are installed.4 Surround speakers or height speakers need to be installed.5 Center speaker, surround speakers or height speakers need to be
installed.
Input Format Listening ModeDTS Express Direct
MonoDTS Express1 2
Dolby SurroundNeo:6 Cinema3
TV Logic4
AllCh Stereo5
Full Mono5
T-D1 Cannot be selected when the input format is monaural or 2 ch.2 Center speaker or surround speakers need to be installed.3 Can only be selected when the input format is 2 ch and a center speaker
or surround speakers are installed.4 Surround speakers or height speakers need to be installed.5 Center speaker, surround speakers or height speakers need to be
installed.
Input Format Listening ModeDTS-HD HR Direct
MonoDTS-HD HR1 2
Dolby SurroundNeo:6 Cinema3
TV Logic4
AllCh Stereo5
Full Mono5
T-D1 Cannot be selected when the input format is monaural or 2 ch.2 Center speaker or surround speakers need to be installed.3 Can only be selected when the input format is 2 ch and a center speaker
or surround speakers are installed.4 Surround speakers or height speakers need to be installed.5 Center speaker, surround speakers or height speakers need to be
installed.

Using the Listening Modes
En-10
Input Format Listening ModeDTS-HD MSTR Direct
MonoDTS-HD MSTR1 2
Dolby SurroundNeo:6 Cinema3
TV Logic4
AllCh Stereo5
Full Mono5
T-D1 Cannot be selected when the input format is monaural or 2 ch.2 Center speaker or surround speakers need to be installed.3 Can only be selected when the input format is 2 ch and a center speaker
or surround speakers are installed.4 Surround speakers or height speakers need to be installed.5 Center speaker, surround speakers or height speakers need to be
installed.
Input Format Listening ModeDTS-ES Direct
MonoDTS1
ES Matrix2
ES Discrete2
Dolby Surround3
TV Logic4
AllCh Stereo5
Full Mono5
T-D1 Can only be selected when the back speakers are not installed.2 Back speakers need to be installed.3 Height speakers need to be installed.4 Surround speakers or height speakers need to be installed.5 Center speaker, surround speakers or height speakers need to be
installed.
¼ MUSIC buttonYou can select a mode suitable for music.
Input Format Listening ModeAnalog Direct
StereoDolby SurroundNeo:6 Music1
Orchestra2
Unplugged2
Studio-Mix2
AllCh Stereo3
Full Mono3
1 Center speaker or surround speakers need to be installed.2 Surround speakers or height speakers need to be installed.3 Center speaker, surround speakers or height speakers need to be
installed.
Input Format Listening ModePCM Direct
StereoDolby SurroundNeo:6 Music1
Orchestra2
Unplugged2
Studio-Mix2
AllCh Stereo3
Full Mono3
1 Center speaker or surround speakers need to be installed.2 Surround speakers or height speakers need to be installed.3 Center speaker, surround speakers or height speakers need to be
installed.
Input Format Listening ModeMultich PCM Direct
StereoMultich1
Dolby SurroundOrchestra2
Unplugged2
Studio-Mix2
AllCh Stereo3
Full Mono3
1 Center speaker or surround speakers need to be installed.2 Surround speakers or height speakers need to be installed.3 Center speaker, surround speakers or height speakers need to be
installed.
Input Format Listening ModeDSD Direct
StereoDSD1 2
Dolby SurroundNeo:6 Music3
Orchestra4
Unplugged4
Studio-Mix4
AllCh Stereo5
Full Mono5
1 Cannot be selected when the input format is monaural or 2 ch.2 Center speaker or surround speakers need to be installed.3 Can only be selected when the input format is 2 ch and a center speaker
or surround speakers are installed.4 Surround speakers or height speakers need to be installed.5 Center speaker, surround speakers or height speakers need to be
installed.

Using the Listening Modes
En-11
Input Format Listening ModeDolby Atmos
● The listening mode of Dolby Digital Plus or Dolby TrueHD can be selected if back speakers or height speakers are not connected.
DirectStereoDolby AtmosOrchestraUnpluggedStudio-MixAllCh StereoFull Mono
Input Format Listening ModeDolby D Direct
StereoDolby D1 2
Dolby SurroundNeo:6 Music3
Orchestra4
Unplugged4
Studio-Mix4
AllCh Stereo5
Full Mono5
1 Cannot be selected when the input format is monaural or 2 ch.2 Center speaker or surround speakers need to be installed.3 Can only be selected when the input format is 2 ch and a center speaker
or surround speakers are installed.4 Surround speakers or height speakers need to be installed.5 Center speaker, surround speakers or height speakers need to be
installed.
Input Format Listening ModeDolby D+ Direct
StereoDolby D+1 2
Dolby SurroundNeo:6 Music3
Orchestra4
Unplugged4
Studio-Mix4
AllCh Stereo5
Full Mono5
1 Cannot be selected when the input format is monaural or 2 ch.2 Center speaker or surround speakers need to be installed.3 Can only be selected when the input format is 2 ch and a center speaker
or surround speakers are installed.4 Surround speakers or height speakers need to be installed.5 Center speaker, surround speakers or height speakers need to be
installed.
Input Format Listening ModeDolby TrueHD Direct
StereoDolby TrueHD1 2
Dolby SurroundNeo:6 Music3
Orchestra4
Unplugged4
Studio-Mix4
AllCh Stereo5
Full Mono5
1 Cannot be selected when the input format is monaural or 2 ch.2 Center speaker or surround speakers need to be installed.3 Can only be selected when the input format is 2 ch and a center speaker
or surround speakers are installed.4 Surround speakers or height speakers need to be installed.5 Center speaker, surround speakers or height speakers need to be
installed.
Input Format Listening ModeDTS Direct
StereoDTS1 2
Dolby SurroundNeo:6 Music3
Orchestra4
Unplugged4
Studio-Mix4
AllCh Stereo5
Full Mono5
1 Cannot be selected when the input format is monaural or 2 ch.2 Center speaker or surround speakers need to be installed.3 Can only be selected when the input format is 2 ch and a center speaker
or surround speakers are installed.4 Surround speakers or height speakers need to be installed.5 Center speaker, surround speakers or height speakers need to be
installed.
Input Format Listening ModeDTS 96/24 Direct
StereoDTS 96/241 2
Dolby SurroundNeo:6 Music3
Orchestra4
Unplugged4
Studio-Mix4
AllCh Stereo5
Full Mono5
1 Cannot be selected when the input format is monaural or 2 ch.2 Center speaker or surround speakers need to be installed.3 Can only be selected when the input format is 2 ch and a center speaker
or surround speakers are installed.4 Surround speakers or height speakers need to be installed.5 Center speaker, surround speakers or height speakers need to be
installed.

Using the Listening Modes
En-12
Input Format Listening ModeDTS Express Direct
StereoDTS Express1 2
Dolby SurroundNeo:6 Music3
Orchestra4
Unplugged4
Studio-Mix4
AllCh Stereo5
Full Mono5
1 Cannot be selected when the input format is monaural or 2 ch.2 Center speaker or surround speakers need to be installed.3 Can only be selected when the input format is 2 ch and a center speaker
or surround speakers are installed.4 Surround speakers or height speakers need to be installed.5 Center speaker, surround speakers or height speakers need to be
installed.
Input Format Listening ModeDTS-HD HR Direct
StereoDTS-HD HR1 2
Dolby SurroundNeo:6 Music3
Orchestra4
Unplugged4
Studio-Mix4
AllCh Stereo5
Full Mono5
1 Cannot be selected when the input format is monaural or 2 ch.2 Center speaker or surround speakers need to be installed.3 Can only be selected when the input format is 2 ch and a center speaker
or surround speakers are installed.4 Surround speakers or height speakers need to be installed.5 Center speaker, surround speakers or height speakers need to be
installed.
Input Format Listening ModeDTS-HD MSTR Direct
StereoDTS-HD MSTR1 2
Dolby SurroundNeo:6 Music3
Orchestra4
Unplugged4
Studio-Mix4
AllCh Stereo5
Full Mono5
1 Cannot be selected when the input format is monaural or 2 ch.2 Center speaker or surround speakers need to be installed.3 Can only be selected when the input format is 2 ch and a center speaker
or surround speakers are installed.4 Surround speakers or height speakers need to be installed.5 Center speaker, surround speakers or height speakers need to be
installed.
Input Format Listening ModeDTS-ES Direct
StereoDTS1
ES Matrix2
ES Discrete2
Dolby Surround3
Orchestra4
Unplugged4
Studio-Mix4
AllCh Stereo5
Full Mono5
1 Can only be selected when the back speakers are not installed.2 Back speakers need to be installed.3 Height speakers need to be installed.4 Surround speakers or height speakers need to be installed.5 Center speaker, surround speakers or height speakers need to be
installed.
¼ GAME buttonYou can select a mode suitable for games.
Input Format Listening ModeAnalog Direct
Dolby SurroundGame-RPG1
Game-Action1
Game-Rock1
Game-Sports1
AllCh Stereo2
Full Mono2
T-D1 Surround speakers or height speakers need to be installed.2 Center speaker, surround speakers or height speakers need to be
installed.
Input Format Listening ModePCM Direct
Dolby SurroundGame-RPG1
Game-Action1
Game-Rock1
Game-Sports1
AllCh Stereo2
Full Mono2
T-D1 Surround speakers or height speakers need to be installed.2 Center speaker, surround speakers or height speakers need to be
installed.

Using the Listening Modes
En-13
Input Format Listening ModeMultich PCM Direct
Multich1
Dolby SurroundGame-RPG2
Game-Action2
Game-Rock2
Game-Sports2
AllCh Stereo3
Full Mono3
T-D1 Center speaker or surround speakers need to be installed.2 Surround speakers or height speakers need to be installed.3 Center speaker, surround speakers or height speakers need to be
installed.
Input Format Listening ModeDSD Direct
DSD1 2
Dolby SurroundGame-RPG3
Game-Action3
Game-Rock3
Game-Sports3
AllCh Stereo4
Full Mono4
T-D1 Cannot be selected when the input format is monaural or 2 ch.2 Center speaker or surround speakers need to be installed.3 Surround speakers or height speakers need to be installed.4 Center speaker, surround speakers or height speakers need to be
installed.
Input Format Listening ModeDolby Atmos
● The listening mode of Dolby Digital Plus or Dolby TrueHD can be selected if back speakers or height speakers are not connected.
DirectDolby AtmosGame-RPGGame-ActionGame-RockGame-SportsAllCh StereoFull MonoT-D
Input Format Listening ModeDolby D Direct
Dolby D1 2
Dolby SurroundGame-RPG3
Game-Action3
Game-Rock3
Game-Sports3
AllCh Stereo4
Full Mono4
T-D1 Cannot be selected when the input format is monaural or 2 ch.2 Center speaker or surround speakers need to be installed.3 Surround speakers or height speakers need to be installed.4 Center speaker, surround speakers or height speakers need to be
installed.
Input Format Listening ModeDolby D+ Direct
Dolby D+1 2
Dolby SurroundGame-RPG3
Game-Action3
Game-Rock3
Game-Sports3
AllCh Stereo4
Full Mono4
T-D1 Cannot be selected when the input format is monaural or 2 ch.2 Center speaker or surround speakers need to be installed.3 Surround speakers or height speakers need to be installed.4 Center speaker, surround speakers or height speakers need to be
installed.
Input Format Listening ModeDolby TrueHD Direct
Dolby TrueHD1 2
Dolby SurroundGame-RPG3
Game-Action3
Game-Rock3
Game-Sports3
AllCh Stereo4
Full Mono4
T-D1 Cannot be selected when the input format is monaural or 2 ch.2 Center speaker or surround speakers need to be installed.3 Surround speakers or height speakers need to be installed.4 Center speaker, surround speakers or height speakers need to be
installed.

Using the Listening Modes
En-14
Input Format Listening ModeDTS Direct
DTS1 2
Dolby SurroundGame-RPG3
Game-Action3
Game-Rock3
Game-Sports3
AllCh Stereo4
Full Mono4
T-D1 Cannot be selected when the input format is monaural or 2 ch.2 Center speaker or surround speakers need to be installed.3 Surround speakers or height speakers need to be installed.4 Center speaker, surround speakers or height speakers need to be
installed.
Input Format Listening ModeDTS 96/24 Direct
DTS 96/241 2
Dolby SurroundGame-RPG3
Game-Action3
Game-Rock3
Game-Sports3
AllCh Stereo4
Full Mono4
T-D1 Cannot be selected when the input format is monaural or 2 ch.2 Center speaker or surround speakers need to be installed.3 Surround speakers or height speakers need to be installed.4 Center speaker, surround speakers or height speakers need to be
installed.
Input Format Listening ModeDTS Express Direct
DTS Express1 2
Dolby SurroundGame-RPG3
Game-Action3
Game-Rock3
Game-Sports3
AllCh Stereo4
Full Mono4
T-D1 Cannot be selected when the input format is monaural or 2 ch.2 Center speaker or surround speakers need to be installed.3 Surround speakers or height speakers need to be installed.4 Center speaker, surround speakers or height speakers need to be
installed.
Input Format Listening ModeDTS-HD HR Direct
DTS-HD HR1 2
Dolby SurroundGame-RPG3
Game-Action3
Game-Rock3
Game-Sports3
AllCh Stereo4
Full Mono4
T-D1 Cannot be selected when the input format is monaural or 2 ch.2 Center speaker or surround speakers need to be installed.3 Surround speakers or height speakers need to be installed.4 Center speaker, surround speakers or height speakers need to be
installed.
Input Format Listening ModeDTS-HD MSTR Direct
DTS-HD MSTR1 2
Dolby SurroundGame-RPG3
Game-Action3
Game-Rock3
Game-Sports3
AllCh Stereo4
Full Mono4
T-D1 Cannot be selected when the input format is monaural or 2 ch.2 Center speaker or surround speakers need to be installed.3 Surround speakers or height speakers need to be installed.4 Center speaker, surround speakers or height speakers need to be
installed.
Input Format Listening ModeDTS-ES Direct
DTS1
ES Matrix2
ES Discrete2
Dolby Surround3
Game-RPG4
Game-Action4
Game-Rock4
Game-Sports4
AllCh Stereo5
Full Mono5
T-D1 Can only be selected when the back speakers are not installed.2 Back speakers need to be installed.3 Height speakers need to be installed.4 Surround speakers or height speakers need to be installed.5 Center speaker, surround speakers or height speakers need to be
installed.

Using the Listening Modes
En-15
¼ STEREO buttonYou can select a listening mode for stereo and all channel stereo sources.
Input Format Listening ModeAll format Stereo
AllCh Stereo1
1 Center speaker, surround speakers or height speakers need to be installed.
Checking the Input Format
While audio from the player is being input, press DISPLAY on the remote controller several times to switch the information shown on the main unit display. For example, if "Dolby D 5.1" is displayed, the Dolby Digital 5.1 ch signals are being input.
● The number of channels is not displayed when the input signal format is "Dolby Atmos".

Advanced Settings (Setup Menu)
En-16
Advanced Settings (Setup Menu)
How to Set
The unit allows you to configure advanced settings in order to provide even better experience. ● Operation: You can set up by viewing the guidance displayed on the TV screen. Select the item with the cursor buttons of the remote controller and press ENTER to confirm your selection. To return to the previous screen, press RETURN.
¼ Operation1. Press RECEIVER on the remote controller.
● Always press RECEIVER first to change the remote controller to RECEIVER mode (the mode to operate this unit) since its mode may be changed to operate another component.
2. Press SETUP to display the Setup menu.
3. Press / to select the desired menu, and then press ENTER.
Setup
1. TV Out
2. Speaker
3. Audio Adjust
4. Source
5. Hardware
6. Remote Controller
1. TV Out
4. Press / to select the item, and then press ENTER.5. With the / / / cursors, select the item to configure
the settings.
1-1. TV Out
OSD Language
Impose OSD
Screen Saver
English
On
3 minutes
Sets the language of the OSD setup menus.
To exit setup: Press SETUP.
Overview of the Setup menu1� TV OutMake settings for the on-screen display function on the TV when you use the setting menu, for example.2� SpeakerMake advanced settings for the speakers.3� Audio AdjustMake a variety of settings for sound.4� SourceMake settings for input sources, such as volume difference adjustments for each input selector for the connected equipment.5� HardwareMake a variety of settings such as for linked operation with connected HDMI equipment and the standby mode for this unit.6� Remote ControllerMake settings related to the remote controller.

Advanced Settings (Setup Menu)
En-17
1� TV Out
TV OutMake settings for the on-screen display function on the TV when you use the setting menu, for example.
Setting Item Default Value Setting DetailsOSD Language English Select the on-screen display language.
Select from English, German, French, Spanish, Italian, Dutch, Swedish, Russian (European, Australian and Asian models), or Chinese (European, Australian, Taiwanese and Asian models).
Impose OSD On Set whether or not to display the information on the TV when the volume is adjusted or input is changed, for example."On": OSD displayed on the TV."Off": OSD not displayed on the TV.
● OSD may not be displayed depending on the input signal even if "On" is selected. If the operation screen is not displayed, change the resolution of the connected device.
Screen Saver 3 minutes Set the time to start the screen saver. Select a value from "3 minutes", "5 minutes", "10 minutes" and "Off".
2� Speaker
Allows you to change the speaker configuration such as presence or not of subwoofer, crossover frequency, and so on. Settings are automatically configured if you use the Automatic Speaker Setup.This setting cannot be selected if headphones are connected or audio is output from the speakers of the TV.
ConfigurationChange speaker settings such as the number of channels connected, and the type of height speakers connected.
Setting Item Default Value Setting DetailsSpeaker Channels 7.1 ch Select "2.1 ch", "3.1 ch", "4.1 ch", "5.1 ch", "6.1 ch",
"7.1 ch", "2.1.2 ch", "3.1.2 ch", "4.1.2 ch", or "5.1.2 ch" to suit the number of speaker channels connected.
Subwoofer Yes Set whether a subwoofer is connected or not."Yes": When subwoofer is connected"No": When subwoofer is not connected
Height Speaker Front High Set the speaker type if height speakers are connected to the BACK/HEIGHT terminals.Select "Front High", "Top Front", "Top Middle", "Top Rear", "Rear High", "Dolby Speaker (Front)", or "Dolby Speaker (Surr)" according to the type and layout of the connected speakers.
● If an item cannot be selected even though connection is correct, check that the settings in "Speaker Channels" matches the number of connected channels.

Advanced Settings (Setup Menu)
En-18
CrossoverChange speaker settings such as the crossover frequency of the speakers. Settings are automatically configured if you use the Automatic Speaker Setup. Audio will not be output while you are making this setting.
Setting Item Default Value Setting DetailsFront Small Set the size for each of the speakers. Use the
diameter of the cone as a guide."Small": When the cone diameter is less than 6-1/2 inches (16 cm)"Large": When the cone diameter is greater than 6-1/2 inches (16 cm)
● The setting is fixed to "Large" if "Configuration" - "Subwoofer" is set to "No".
Center Small Set the size for each of the speakers. Use the diameter of the cone as a guide."Small": When the cone diameter is less than 6-1/2 inches (16 cm)"Large": When the cone diameter is greater than 6-1/2 inches (16 cm)
● "Large" can be selected only when "Front" is set to "Large".
● If an item cannot be selected even though connection is correct, check that the settings in "Configuration" - "Speaker Channels" matches the number of connected channels.
Height Small Set the size for each of the speakers. Use the diameter of the cone as a guide."Small": When the cone diameter is less than 6-1/2 inches (16 cm)"Large": When the cone diameter is greater than 6-1/2 inches (16 cm)
● "Large" can be selected only when "Front" is set to "Large".
● If an item cannot be selected even though connection is correct, check that the settings in "Configuration" - "Speaker Channels" matches the number of connected channels.
Setting Item Default Value Setting DetailsSurround Small Set the size for each of the speakers. Use the
diameter of the cone as a guide."Small": When the cone diameter is less than 6-1/2 inches (16 cm)"Large": When the cone diameter is greater than 6-1/2 inches (16 cm)
● "Large" can be selected only when "Front" is set to "Large".
● If an item cannot be selected even though connection is correct, check that the settings in "Configuration" - "Speaker Channels" matches the number of connected channels.
Back Small Set the size for each of the speakers. Use the diameter of the cone as a guide."Small": When the cone diameter is less than 6-1/2 inches (16 cm)"Large": When the cone diameter is greater than 6-1/2 inches (16 cm)
● "Large" can be selected only when "Surround" is set to "Large".
● If an item cannot be selected even though connection is correct, check that the settings in "Configuration" - "Speaker Channels" matches the number of connected channels.
Crossover 100Hz Set the lowest frequency that each the speakers can output so that frequencies lower than this are output from the subwoofer. Set using the diameter of the speaker with the smallest cone as a guide."40Hz", "50Hz", "60Hz": For cone diameters greater than 8 inches (20 cm)"70Hz", "80Hz", "90Hz": For cone diameters between 6-1/2 inches to 8 inches (16 to 20 cm)"100Hz": For cone diameters 5-1/4 to 6-1/2 inches (13 to 16 cm)"120Hz": For cone diameters 3-1/2 to 5-1/4 inches (9 to 13 cm)"150Hz", "180Hz", "200Hz": For cone diameters less than 3-1/2 inches (9 cm)

Advanced Settings (Setup Menu)
En-19
Setting Item Default Value Setting DetailsDouble Bass On This can be selected only when "Configuration"
- "Subwoofer" is set to "Yes" and "Front" is set to "Large".Boost bass output by feeding bass sounds from the front left and right, and center speakers to the subwoofer."On": Bass output will be boosted."Off": Bass output will not be boosted.
● The setting will not automatically be configured even if you performed the automatic speaker setup.
DistanceSet the distance from each speaker to the listening position. Settings are automatically configured if you use the automatic speaker setup.
Setting Item Default Value Setting DetailsUnit feet/meters Specify the unit of distance for configuring
settings."feet": When setting in feet (0.1ft to 30.0ft, in increments of 0.1ft)"meters": When setting in meters (0.03m to 9.00m, in increments of 0.03m)
Front Left 12.0ft/3.60m Specify the distance between each speaker and the listening position.
Center 12.0ft/3.60m Specify the distance between each speaker and the listening position.
Front Right 12.0ft/3.60m Specify the distance between each speaker and the listening position.
Height Left 9.0ft/2.70m Specify the distance between each speaker and the listening position.
● The setting cannot be changed during ZONE B playback.
Height Right 9.0ft/2.70m Specify the distance between each speaker and the listening position.
● The setting cannot be changed during ZONE B playback.
Surround Right 7.0ft/2.10m Specify the distance between each speaker and the listening position.
Setting Item Default Value Setting DetailsBack Right 7.0ft/2.10m Specify the distance between each speaker and
the listening position. ● The setting cannot be changed during ZONE B playback.
Back Left 7.0ft/2.10m Specify the distance between each speaker and the listening position.
● The setting cannot be changed during ZONE B playback.
Surround Left 7.0ft/2.10m Specify the distance between each speaker and the listening position.
Subwoofer 12.0ft/3.60m Specify the distance between each speaker and the listening position.
● Default values vary depending on the regions. ● The speaker "Distance" may be unable to be changed depending on the settings in "Configuration" -
"Speaker Channels" / "Subwoofer".
Level CalibrationAdjust the level of each speaker with the built-in test tone. Settings are automatically configured if you use the Automatic Speaker Setup.
Setting Item Default Value Setting DetailsFront Left 0dB Select a value between "-12dB" and "+12dB".
A test tone will be output each time you change the value. Select the desired level.
Center 0dB Select a value between "-12dB" and "+12dB". A test tone will be output each time you change the value. Select the desired level.
Front Right 0dB Select a value between "-12dB" and "+12dB". A test tone will be output each time you change the value. Select the desired level.
Height Left 0dB Select a value between "-12dB" and "+12dB". A test tone will be output each time you change the value. Select the desired level.
● The setting cannot be changed during ZONE B playback.
Height Right 0dB Select a value between "-12dB" and "+12dB". A test tone will be output each time you change the value. Select the desired level.
● The setting cannot be changed during ZONE B playback.

Advanced Settings (Setup Menu)
En-20
Setting Item Default Value Setting DetailsSurround Right 0dB Select a value between "-12dB" and "+12dB".
A test tone will be output each time you change the value. Select the desired level.
Back Right 0dB Select a value between "-12dB" and "+12dB". A test tone will be output each time you change the value. Select the desired level.
● The setting cannot be changed during ZONE B playback.
Back Left 0dB Select a value between "-12dB" and "+12dB". A test tone will be output each time you change the value. Select the desired level.
● The setting cannot be changed during ZONE B playback.
Surround Left 0dB Select a value between "-12dB" and "+12dB". A test tone will be output each time you change the value. Select the desired level.
Subwoofer 0dB Select a value between "-15dB" and "+12dB". A test tone will be output each time you change the value. Select the desired level.
● The speaker "Level Calibration" may be unable to be changed depending on the settings in "Configuration" - "Speaker Channels" / "Subwoofer".
● In the following cases, the settings for "Level Calibration" cannot be changed:– While MUTING is on– While audio is not being output from ZONE A
3� Audio Adjust
Configure various settings related to sound, such as settings for listening to multiplex audio or multilingual TV broadcasts and sound field settings for listening modes.
Multiplex/Mono
Setting Item Default Value Setting DetailsMultiplex Input Channel
Main Set the audio channel or language to be output when playing multiplex audio or multilingual TV broadcasts etc."Main": Main channel only"Sub": Sub channel only"Main / Sub": Main and sub channels will be output at the same time.
● If multiplex audio is being played, "1+1" will be displayed when DISPLAY is pressed.
Mono Input Channel
Left + Right Set the input channel to use for playing any 2 ch digital source such as Dolby Digital, or 2-ch analog/PCM source in the Mono listening mode."Left": Left channel only"Right": Right channel only"Left + Right" : Left and right channels
DolbyMake the settings for Dolby listening mode.
Setting Item Default Value Setting DetailsLoudness Management
On Enable the Late Night function that allows you to enjoy surround sound of Dolby TrueHD playback even in low volume."On": Use this function"Off": Do not use this function

Advanced Settings (Setup Menu)
En-21
DTSMake the settings for DTS Neo:6 Music listening mode.
Setting Item Default Value Setting DetailsNeo:6 Music Center Image
2 Adjust the width of the sound field of the front channel when playing in the DTS Neo:6 Music listening mode."0" to "5": Selecting a smaller value brings the sound field of the front channel to the center while selecting a larger value spreads the sound field of the front channel to left and right.
Theater-DimensionalMake the settings for Theater-Dimensional listening mode.
Setting Item Default Value Setting DetailsListening Angle Wide To enhance the effect of Theater-Dimensional,
select the actual angle of the left and right front speakers as it appears from the listening position."Narrow": Less than 30°"Wide": Greater than 30°
● Position the front speakers 20° to the listening position if you have selected "Narrow" in "Listening Angle" and 40° if you have selected "Wide".
4� Source
Make settings for input sources, such as volume difference adjustments for each input selector for the connected equipment. When you select a desired input to check the audio, start playback of the connected device.
IntelliVolume
Setting Item Default Value Setting DetailsIntelliVolume 0dB Adjust the volume level difference between the
devices connected to the unit. Select a value between "-12dB" and "+12dB". Set a negative value if the volume of the target device is larger than the others and a positive value if smaller.
Name EditSet an easy name to each input. The set name will be shown on the main unit display. Select the input selector to configure.
Setting Item Default Value Setting DetailsName --- Select a name registered in the unit and replace
the currently selected input selector name with it.
● The same name cannot be used for more than one input selector.
● This cannot be set if the "TUNER" or "BLUETOOTH" input is selected.

Advanced Settings (Setup Menu)
En-22
Audio SelectMake the audio input setting. The setting can be separately set to each input selector button. Select the input selector to configure.
Setting Item Default Value Setting DetailsAudio Select - Select the priority for input selection when
multiple audio sources are connected to one input selector, such as connections to both the BD/DVD HDMI jack and AUDIO jack. You cannot select a jack that is not associated with the currently selected input.
● The priority is HDMI → DIGITAL AUDIO/OPTICAL → Analog if this setting is not changed.
"ARC": When giving priority to input signal from ARC compatible TV.
● The setting can be selected only when "HDMI" - "Audio Return Channel" is set to "Auto" and also the "TV" input is selected.
"HDMI": When giving priority to input signal from HDMI jacks."DIGITAL AUDIO": When giving priority to input signal from DIGITAL AUDIO (COAXIAL) jack."OPTICAL": When giving priority to input signal from OPTICAL jacks."Analog": When giving priority to input signal from AUDIO jacks.
● The setting cannot be changed when "GAME 1" or "STRM BOX" input is selected.
PCM Fixed Mode Off Select whether to fix input signals to PCM (except multi-channel PCM) when you have selected "HDMI", "DIGITAL AUDIO", or "OPTICAL" in the "Audio Select" setting. Set this item to "On" if noise is produced or truncation occurs at the beginning of a track when playing PCM sources. Select "Off" normally.
● Changing "Audio Select" changes the setting to "Off".
● The setting cannot be changed when "GAME 2", "VCR", "AUX", "TUNER", or "BLUETOOTH" input is selected.
Video Select
Setting Item Default Value Setting DetailsVideo Select Last Select the video input played along with audio
output when either "TUNER" or "BLUETOOTH" is selected."Last": Select the video input played immediately prior."BD/DVD", "CBL/SAT", "GAME 1", "GAME 2", "STRM BOX", "VCR", "AUX": Play the video from the selected input.
● The setting cannot be changed when input other than "TUNER" or "BLUETOOTH" is selected. ● Switch between displaying and not displaying video by pressing MODE on the remote controller
during Bluetooth playback.
5� Hardware
Tuner
Setting Item Default Value Setting DetailsAM / FM Frequency Step (North American and Taiwanese models)
10 kHz / 0.2 MHz Select a frequency step depending on your area of residence.Select "10 kHz / 0.2 MHz" or "9 kHz / 0.05 MHz".
● When this setting is changed, all radio presets are deleted.
AM Frequency Step (European, Australian and Asian models)
9 kHz Select a frequency step depending on your area of residence.Select "10 kHz" or "9 kHz".
● When this setting is changed, all radio presets are deleted.

Advanced Settings (Setup Menu)
En-23
HDMI
Setting Item Default Value Setting DetailsHDMI CEC (RIHD) Off Setting to "On" enables the input selection link
and other link functions with HDMI connected CEC compliant device."On": Use this function"Off": Do not use this functionWhen changing this setting, turn off and then on again the power of all connected components.
● Depending on the TV set, a link may need to be configured on the TV.
● Setting to "On" and closing the on-screen menu displays the name of the CEC-compatible components and "CEC On" on the display.
● Power consumption in standby mode may increase if "On" is set. (Depending on the TV status, the unit will enter the normal standby mode.)
● If you operate the MASTER VOLUME control on the main unit when this setting is "On" and audio is output from the TV speakers, audio will be output also from the speakers connected to the unit. If you want to output from only either of them, change the unit or TV settings, or reduce the volume of the unit.
● If abnormal operation occurs when you set the setting to "On", set it to "Off".
● When connecting a non-CEC compatible component, or when you are not sure whether it is compatible, set the setting to "Off".
Setting Item Default Value Setting DetailsHDMI Standby Through
Off When this is set to anything other than "Off", you can play the video and audio of an HDMI connected player on the TV even if the unit is in standby mode. Only "Auto" and "Auto(Eco)" can be selected if "HDMI CEC (RIHD)" is set to "On". If you select anything else, set "HDMI CEC (RIHD)" to "Off."
● Power consumption in standby mode increases if set to anything other than "Off".
"BD/DVD", "CBL/SAT", "GAME 1", "STRM BOX": For example, if you select "BD/DVD", you can play the equipment connected to the "BD/DVD" terminal on the TV even if the unit is in standby mode. Select this setting if you have decided which player to use with this function."Last": You can play the video and audio of the input selected immediately prior to the unit being switched to standby on the TV. When "Last" is selected, you can switch the input of the unit even in the standby mode with the remote controller."Auto", "Auto (Eco)": Select one of these settings when you have connected equipment that conforms to the CEC standard. You can play the video and audio of the input selected on the TV, irrespective of what input was selected immediately prior to the unit being switched to standby, using the CEC link function.
● To play players on the TV that do not conform to the CEC standard, you will need to turn the unit on and switch to the relevant input.
● When using a TV that conforms to the CEC standard, you can reduce the power consumption in standby mode by selecting "Auto (Eco)".

Advanced Settings (Setup Menu)
En-24
Setting Item Default Value Setting DetailsAudio TV Out Off You can enjoy audio through the speakers of the
HDMI connected TV while this unit is on."On": Use this function"Off": Do not use this function
● If you select "On", set "HDMI CEC (RIHD)" to "Off."
● The setting is fixed to "Auto" if "HDMI CEC (RIHD)" is set to "On".
● Listening mode cannot be changed while "Audio TV Out" is set to "On" and audio is being output through the speakers of the TV.
● Depending on your TV set or input signal of the component, audio may not output through the speakers of the TV even if this setting is set to "On". In such case, audio is output from the speakers of the unit.
● If you operate the MASTER VOLUME control on the main unit when "Audio TV Out" or "HDMI CEC (RIHD)" is "On" and audio is output from the TV speakers, audio will be output from the unit. If you do not want to output audio from the unit, change the unit or TV settings, or reduce the volume of the unit.
Audio Return Channel
Auto You can enjoy sound of the HDMI connected ARC compatible TV through the speakers connected to the unit. To use this function, set "HDMI CEC (RIHD)" to "On" in advance."Auto": When enjoying the TV sound through the speakers connected to the unit"Off": When not using the ARC function
Auto LipSync On This setting automatically corrects any desynchronization between the video and audio signals based on data from the HDMI LipSync compatible TV."On": Automatic correction will be enabled."Off": Automatic correction will be disabled.
Power Management
Setting Item Default Value Setting DetailsSleep Timer Off Allows the unit to enter standby automatically
when the specified time elapses. Select a value between "10 min" to "90 min"."Off": Does not turn the unit to standby automatically.
Auto Standby On/Off This setting places the unit on standby automatically after 20 minutes of inactivity without any video or audio input."On": The unit will automatically enter standby mode ("ASb" will light)."Off": The unit will not automatically enter standby mode.
● "Auto Standby" is appeared on the display and TV screen 30 seconds before the Auto Standby comes on.
● Default values vary depending on the regions.
Auto Standby in HDMI Standby Through
Off Enable or disable "Auto Standby" while "HDMI Standby Through" is on."On": The setting will be enabled."Off": The setting will be disabled.
● This setting cannot be set to "On" if "Auto Standby" is set to "Off".
Power Out at Standby for STRM BOX
Off Devices connected to the USB port are supplied with electricity even when this unit is in standby mode when this function is "On".
● Power consumption in standby mode may increase when this function is being used.
Bluetooth
Setting Item Default Value Setting Details
Bluetooth On Select whether or not to use the Bluetooth function."On": Enables connection with a Bluetooth-enabled device by using the Bluetooth function. Select "On" also when making various Bluetooth settings."Off": When not using the Bluetooth function

Advanced Settings (Setup Menu)
En-25
Setting Item Default Value Setting Details
Auto Input Change On The input of the unit will automatically be switched to "BLUETOOTH" when connection is made from a Bluetooth-enabled device to the unit."On": The input will automatically become "BLUETOOTH" when a Bluetooth-enabled device is connected."Off": The function is disabled.
● If the input is not switched automatically, set to "Off" and change the input manually.
Auto Reconnect On This function automatically reconnects to the Bluetooth-enabled device connected last when you change the input to "BLUETOOTH"."On": Use this function"Off": Do not use this function
● This may not work with some Bluetooth-enabled devices.
Pairing Information - The information of the previous pairing stored in this unit will be initialized.Pressing ENTER when "Clear" is displayed initializes the pairing information stored in this unit.
● This function does not initialize the pairing information on the Bluetooth-enabled device. When pairing the unit again with the device, be sure to clear the pairing information on the Bluetooth-enabled device in advance. For information on how to clear the pairing information, refer to the Bluetooth-enabled device's instruction manual.
Device - Displays the name of the Bluetooth-enabled device connected to the unit.
● The name is not displayed when "Status" is "Ready" or "Pairing".
Status - Displays the status of the Bluetooth-enabled device connected to the unit."Ready": Not paired"Pairing": Pairing"Connected": Successfully connected
6� Remote Controller
Remote ID
Setting Item Default Value Setting DetailsRemote ID 1 Select an ID for the unit's remote controller
from "1", "2", and "3" to prevent interference between the unit and other Onkyo components that are installed in the same room. After changing the ID on the main unit, change the ID on the remote controller accordingly with the following procedure.1. While holding down RECEIVER, press and
hold SETUP for about 3 seconds until the remote indicator lights.
2. With the number buttons, press one of 1, 2, and 3. The remote indicator flashes twice.

Operating Other Components with the Remote Controller
En-26
Operating Other Components with the Remote Controller
Functions of REMOTE MODE Buttons
You can control any other device than this unit by programming a specified remote control code to a REMOTE MODE button of the remote controller. Register a remote control code to a desired REMOTE MODE button and press it to enter the remote mode that allows you to operate the corresponding device.
REMOTE MODE
RECEIVER
Programming Remote Control Codes
¼ Consulting the Remote Control Code List1. Look up the Remote Control Codes for the
corresponding remote control code. ● The codes in the Remote Control Code List are those known as of the date of publication and may be changed.
● The following REMOTE MODE buttons are preprogrammed with remote control codes. BD/DVD: Onkyo Blu-ray Disc/DVD player CD: Onkyo CD player STRM BOX: Apple TV
● Only TV remote control codes can be entered for TV. ● Program a remote control code in accordance with the input since each button also works as the input selector. (For example, when the CD player is connected to the CD jack, program the remote control code for the CD player to CD)
2. Press and hold DISPLAY for 3 or more seconds while holding down the REMOTE MODE button to which you want to program the remote control code.
● The remote indicator lights in the input mode.
3. With the number buttons, enter the 5-digit remote control code within 30 seconds.
● Programming is complete when the remote indicator flashes twice. The remote indicator flashes once slowly when programming the remote control code fails. Try programming again.
¼ Remapping the Colored ButtonsThe colored button assignment on the AV receiver's remote controller can be remapped to match that on the remote controller of the component whose remote control code you programmed to REMOTE MODE.1. Hold down the REMOTE MODE button to map and A
(Red) simultaneously until the remote indicator lights (about 3 seconds).
● Remapping is possible only for codes included in the categories of the Remote Control Code List (such as DVD player and TV)
2. Within 30 seconds, press the colored buttons from left to right, in the order you want to remap.
● For example, if the colored buttons on the remote controller of the other component are yellow, green, blue, and red from left to right, press the buttons on the AV receiver's remote controller in that order.
● Programming is complete when the remote indicator flashes twice. The remote indicator flashes once slowly when programming the remote control code fails. Try programming again.
● Pressing any other button than a colored button cancels the remap operation.

Operating Other Components with the Remote Controller
En-27
¼ Resetting the REMOTE MODE ButtonsYou can reset the remote control code registered in the REMOTE MODE button to its default status. This operation can be executed on a single REMOTE MODE button.1. Press and hold Q for 3 or more seconds while holding
down the REMOTE MODE button you want to reset. ● The remote indicator will light.
2. Within 30 seconds, press the REMOTE MODE button again.
● Resetting is complete when the remote indicator flashes twice.
To reset all the remote controller settings: While holding down RECEIVER, press and hold Q for 3 or more seconds until the remote indicator stays lit. Within 30 seconds, press RECEIVER again. Resetting is complete when the remote indicator flashes twice.
TV operation
Press the REMOTE MODE button programmed with the remote control code for the relevant AV component to switch the remote controller mode to that for the AV component. Then, operate by using the corresponding buttons. Available buttons vary depending on the product category of the component. Operation may be incorrect or impossible depending on the product.
1
2 4
3
1 REMOTE MODE2 , INPUT, VOL /3 MUTING4 CH +/–
5 8
9
6
7
5 GUIDE6 / / / , ENTER7 HOME8 PREV CH9 RETURN
F
G
H
I
F , , , , , , ()G A (Red), B (Green), C (Yellow), D (Blue)H Number 1 to 9, 0, +10I CLR, DISPLAY
¼½ Not CEC compatible.
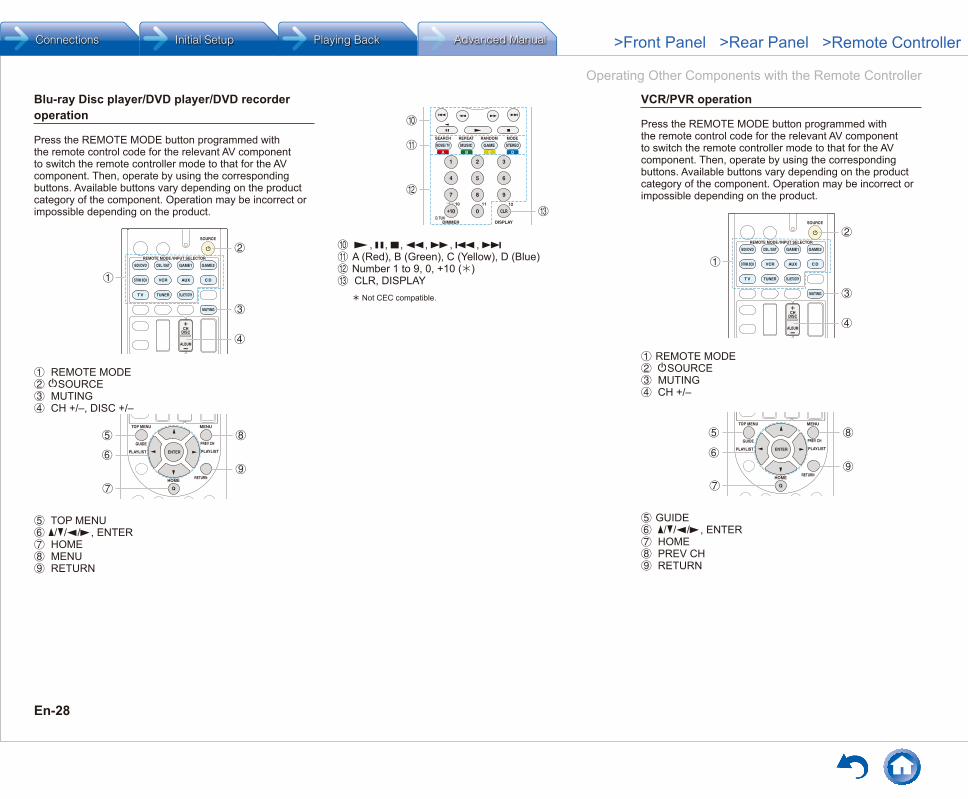
Operating Other Components with the Remote Controller
En-28
Blu-ray Disc player/DVD player/DVD recorder operation
Press the REMOTE MODE button programmed with the remote control code for the relevant AV component to switch the remote controller mode to that for the AV component. Then, operate by using the corresponding buttons. Available buttons vary depending on the product category of the component. Operation may be incorrect or impossible depending on the product.
1
4
3
2
1 REMOTE MODE2 SOURCE3 MUTING4 CH +/–, DISC +/–
7
5 8
9
6
5 TOP MENU6 / / / , ENTER7 HOME8 MENU9 RETURN
F
G
H
I
F , , , , , , G A (Red), B (Green), C (Yellow), D (Blue)H Number 1 to 9, 0, +10 ()I CLR, DISPLAY
¼½ Not CEC compatible.
VCR/PVR operation
Press the REMOTE MODE button programmed with the remote control code for the relevant AV component to switch the remote controller mode to that for the AV component. Then, operate by using the corresponding buttons. Available buttons vary depending on the product category of the component. Operation may be incorrect or impossible depending on the product.
1
4
3
2
1 REMOTE MODE2 SOURCE3 MUTING4 CH +/–
7
5 8
9
6
5 GUIDE6 / / / , ENTER7 HOME8 PREV CH9 RETURN

Operating Other Components with the Remote Controller
En-29
F
G
H
F , , , , , , G Number 1 to 9, 0, +10H CLR, DISPLAY
Satellite receiver / Cable receiver operation
Press the REMOTE MODE button programmed with the remote control code for the relevant AV component to switch the remote controller mode to that for the AV component. Then, operate by using the corresponding buttons. Available buttons vary depending on the product category of the component. Operation may be incorrect or impossible depending on the product.
1
4
3
2
1 REMOTE MODE2 SOURCE3 MUTING4 CH +/–
7
5
6
8
9
5 GUIDE6 / / / , ENTER7 HOME8 PREV CH9 RETURN
F
G
H
I
F , , , , , , G A (Red), B (Green), C (Yellow), D (Blue)H Number 1 to 9, 0, +10I CLR, DISPLAY
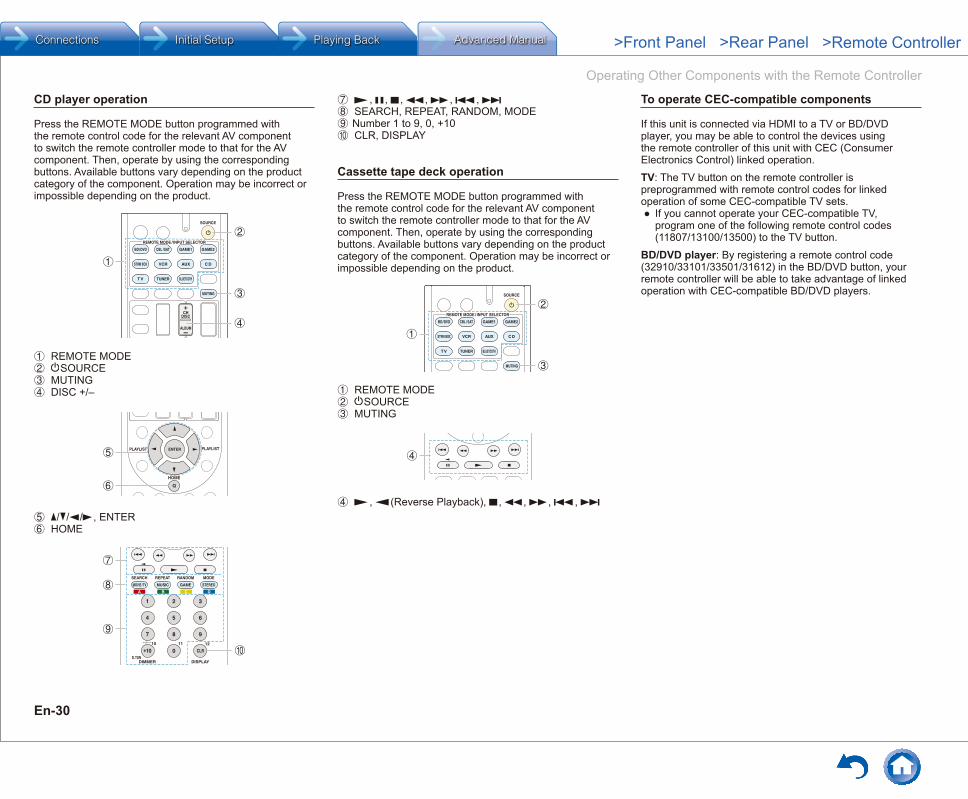
Operating Other Components with the Remote Controller
En-30
CD player operation
Press the REMOTE MODE button programmed with the remote control code for the relevant AV component to switch the remote controller mode to that for the AV component. Then, operate by using the corresponding buttons. Available buttons vary depending on the product category of the component. Operation may be incorrect or impossible depending on the product.
1
4
3
2
1 REMOTE MODE2 SOURCE3 MUTING4 DISC +/–
6
5
5 / / / , ENTER6 HOME
7
8
9
F
7 , , , , , , 8 SEARCH, REPEAT, RANDOM, MODE9 Number 1 to 9, 0, +10F CLR, DISPLAY
Cassette tape deck operation
Press the REMOTE MODE button programmed with the remote control code for the relevant AV component to switch the remote controller mode to that for the AV component. Then, operate by using the corresponding buttons. Available buttons vary depending on the product category of the component. Operation may be incorrect or impossible depending on the product.
1
3
2
1 REMOTE MODE2 SOURCE3 MUTING
4
4 , (Reverse Playback), , , , ,
To operate CEC-compatible components
If this unit is connected via HDMI to a TV or BD/DVD player, you may be able to control the devices using the remote controller of this unit with CEC (Consumer Electronics Control) linked operation.TV: The TV button on the remote controller is preprogrammed with remote control codes for linked operation of some CEC-compatible TV sets.
● If you cannot operate your CEC-compatible TV, program one of the following remote control codes (11807/13100/13500) to the TV button.
BD/DVD player: By registering a remote control code (32910/33101/33501/31612) in the BD/DVD button, your remote controller will be able to take advantage of linked operation with CEC-compatible BD/DVD players.
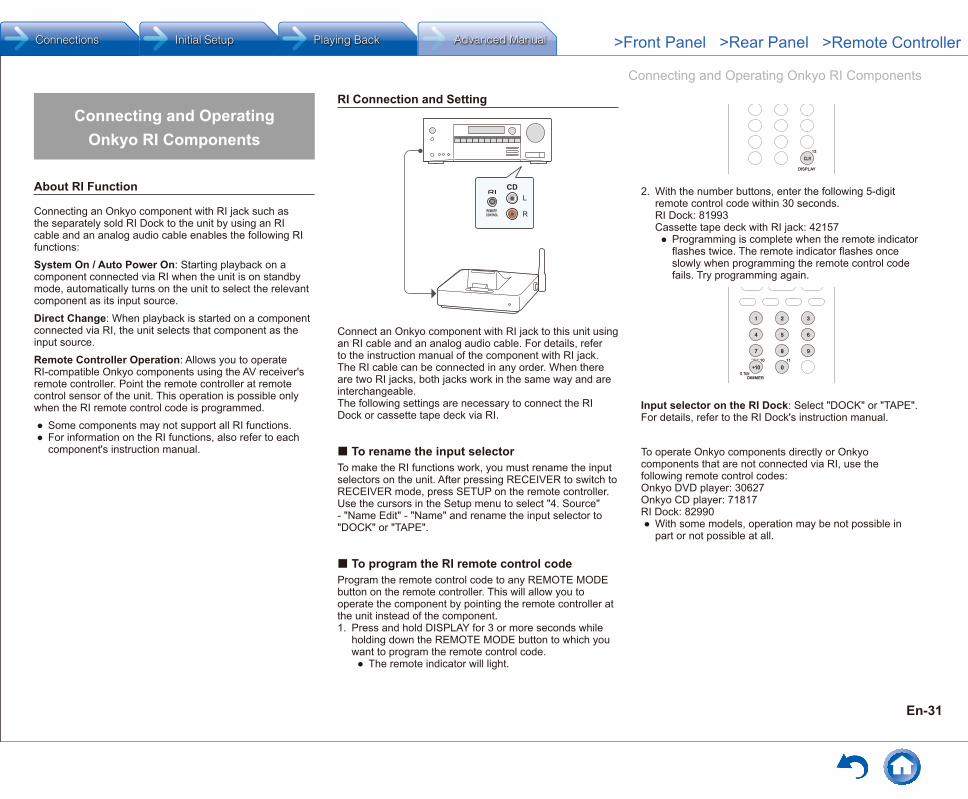
Connecting and Operating Onkyo RI Components
En-31
Connecting and Operating Onkyo RI Components
About RI Function
Connecting an Onkyo component with RI jack such as the separately sold RI Dock to the unit by using an RI cable and an analog audio cable enables the following RI functions:System On / Auto Power On: Starting playback on a component connected via RI when the unit is on standby mode, automatically turns on the unit to select the relevant component as its input source.Direct Change: When playback is started on a component connected via RI, the unit selects that component as the input source.Remote Controller Operation: Allows you to operate RI-compatible Onkyo components using the AV receiver's remote controller. Point the remote controller at remote control sensor of the unit. This operation is possible only when the RI remote control code is programmed.
● Some components may not support all RI functions. ● For information on the RI functions, also refer to each component's instruction manual.
RI Connection and Setting
R
L
Connect an Onkyo component with RI jack to this unit using an RI cable and an analog audio cable. For details, refer to the instruction manual of the component with RI jack. The RI cable can be connected in any order. When there are two RI jacks, both jacks work in the same way and are interchangeable.The following settings are necessary to connect the RI Dock or cassette tape deck via RI.
¼ To rename the input selectorTo make the RI functions work, you must rename the input selectors on the unit. After pressing RECEIVER to switch to RECEIVER mode, press SETUP on the remote controller. Use the cursors in the Setup menu to select "4. Source" - "Name Edit" - "Name" and rename the input selector to "DOCK" or "TAPE".
¼ To program the RI remote control codeProgram the remote control code to any REMOTE MODE button on the remote controller. This will allow you to operate the component by pointing the remote controller at the unit instead of the component.1. Press and hold DISPLAY for 3 or more seconds while
holding down the REMOTE MODE button to which you want to program the remote control code.
● The remote indicator will light.
2. With the number buttons, enter the following 5-digit remote control code within 30 seconds.RI Dock: 81993Cassette tape deck with RI jack: 42157
● Programming is complete when the remote indicator flashes twice. The remote indicator flashes once slowly when programming the remote control code fails. Try programming again.
Input selector on the RI Dock: Select "DOCK" or "TAPE". For details, refer to the RI Dock's instruction manual.
To operate Onkyo components directly or Onkyo components that are not connected via RI, use the following remote control codes:Onkyo DVD player: 30627Onkyo CD player: 71817RI Dock: 82990
● With some models, operation may be not possible in part or not possible at all.

Connecting and Operating Onkyo RI Components
En-32
iPodR/iPhoneR Operation
The RI Dock allows you to use the AV receiver's remote controller to operate and play music on your iPod/iPhone. Moreover, it also allows you to view videos on your iPod/iPhone on the screen of your TV, as well as perform RI operations if connected via RI. This operation is possible only when the RI remote control code is programmed.
Before performing any operation: Update the OS on your iPod/iPhone to the latest version. Certain buttons may not work for some iPod/iPhone models and generations, or RI Dock. For details on the operation, refer to the RI Dock's instruction manual.
Switch the remote controller mode by pressing the REMOTE MODE button programmed with the remote control code for the iPod/iPhone, and operate by using the corresponding buttons. Point the remote controller at the unit.
1
54
3
2
1 REMOTE MODE2 SOURCE3 MUTING4 VOL /5 ALBUM +/–
6
7
8
6 TOP MENU7 / / / , ENTER, PLAYLIST /8 MENU
9
FG
H
9 , , , , , , F REPEAT, RANDOMG MODEH DISPLAY
● Pressing DISPLAY turns on the backlight for a few seconds.
● MODE allows you to use the Resume function.

Troubleshooting
En-33
Troubleshooting
Before starting the procedure
Problems may be solved by simply turning the power on/off or disconnecting/connecting the power cord, which is easier than working on the connection, setting and operating procedure. Try the simple measures on both the unit and the connected device. If the problem is that the video or audio is not output or the HDMI linked operation does not work, disconnecting/connecting the HDMI cable may solve it. When reconnecting, be careful not to wind the HDMI cable since if wound the HDMI cable may not fit well. After reconnecting, turn off and on the unit and the connected device.
● The AV receiver contains a microPC for signal processing and control functions. In very rare situations, severe interference, noise from an external source, or static electricity may cause it to lockup. In the unlikely event that this happens, unplug the power cord from the wall outlet, wait at least 5 seconds, and then plug it back in.
● Onkyo is not responsible for damages (such as CD rental fees) due to unsuccessful recordings caused by the unit's malfunction. Before you record important data, make sure that the material will be recorded correctly.
Resetting the unit
Resetting the unit to the status at the time of shipment may solve the problem. If the measures mentioned in the troubleshooting do not solve the problem, reset the unit with the following procedure. If you reset the unit status, your preferences will be reset to the defaults. Note them down before starting reset.
¼ How to reset1. While holding down CBL/SAT on the main unit (note
that step 2 must be performed with this button pressed down)
2. Press ON/STANDBY on the main unit. "Clear" is appeared on the display and the unit will enter standby mode.
2
1
C l e a r
¼ How to reset the remote controller1. While holding down 1 RECEIVER on the remote
controller (note that step 2 must be performed with this button pressed down)
2. Press and hold 2 Q for 3 or more seconds until the 3 remote indicator stays lit. Within 30 seconds, press 1 RECEIVER again to reset.
2
1
3
Power
¼ Cannot turn on the unit ● Make sure that the power cord is properly plugged into the wall outlet.
● Unplug the power cord from the wall outlet, wait 5 seconds or more, then plug it in again.
¼ The unit turns off unexpectedly ● The AV receiver will automatically enter standby mode when Auto Standby or Sleep Timer is set and launched.
● The protection circuit may have been activated. If this is the case, when you turn the unit on again, "AMP Diag Mode" will appear on the main unit's display. The unit will then enter a mode that detects abnormal conditions. If no problems are detected, "AMP Diag Mode" will disappear and the unit will return to a normal state. If "CHECK SP WIRE" appears on the display, the speaker cables may be short-circuited. Turn the unit off, and check to see if the cable core of any of the speaker cables is in contact with that of another speaker cable or with the rear panel. After that, turn the unit on again. If "NG" appears, unplug the power cord immediately and contact your Onkyo dealer.
WARNING: If smoke, smell or abnormal noise is produced by the unit, unplug the power cord from the wall outlet immediately and contact the dealer or Onkyo Support.

Troubleshooting
En-34
Audio
● Make sure that the speaker setup microphone is not still connected.
● Confirm that the connection between the output jack on the device and the input jack on this unit is correct.
● Make sure that none of the connecting cables are bent, twisted, or damaged.
● If the MUTING indicator on the display flashes, press MUTING on the remote controller to unmute the unit.
● While headphones are connected to the PHONES jack, no sound is output from the speakers.
● Set to "Off" if "Audio Select" - "PCM Fixed Mode" is set to "On".
Check the following if the above does not fix the problem:
¼ There is no sound from the TV ● The input selector on this unit needs to be switched to TV.
● If your TV does not support ARC, you need, in addition to the HDMI OUT jack connection, a digital optical cable connection between the digital audio out optical jack of the TV and the TV OPTICAL input jack of the unit, or an analog audio cable connection between the audio output jack of the TV and the analog audio input jack for TV of the unit.
¼ No sound from a connected player ● Change the input selector on this unit to the position of the terminal to which the player is connected.
● Check the digital audio output setting on the connected component. On some game consoles, such as those that support DVD, the default setting is off.
● With some DVD-Video discs, you need to select an audio output format from a menu.
¼ A speaker produces no sound ● Make sure that the polarity of the speaker cables (+/-) is correct, and that no bare wires are in contact with the metal part of speaker terminals.
● Make sure that the speaker cables are not shorting. ● Make sure the speakers are configured correctly.
¼ Only the front speakers produce sound ● When the Stereo or Mono listening mode is selected, only the front speakers and subwoofer produce sound.
¼ Only the center speaker produces sound ● If you use the Dolby Surround listening mode with a mono source, such as an AM radio station or mono TV program, the sound is concentrated in the center
speaker.
¼ The surround speakers produce no sound ● When the T-D (Theater-Dimensional), Stereo or Mono listening mode is selected, the surround speakers produce no sound.
● Depending on the source and current listening mode, not much sound may be produced by the surround speakers. Try selecting another listening mode.
¼ The center speaker produces no sound ● When the Stereo or Mono listening mode is selected, the center speaker produces no sound.
¼ No sound from the back speakers or height speakers
● Depending on the source and current listening mode, not much sound may be produced by the speakers. Try selecting another listening mode.
¼ The subwoofer produces no sound ● When you play source material that contains no information in the LFE channel, the subwoofer produces no sound.
¼ Volume is low ● Check the volume. The volume level is adjustable between Min, 1 to 79, Max (80). It is normal that the unit volume level is set up to 40 or around.
¼ Noise can be heard ● Using cable ties to bundle audio cables with power cords, speaker cables, etc. may degrade the audio performance, so refrain from doing it.
● An audio cable may be picking up interference. Try repositioning your cables.
¼ The sound changes when I connect my headphones ● When a listening mode other than Direct or Mono is selected, connecting a headphone automatically selects Stereo.
¼ About DTS signals ● When DTS program material ends and the DTS bitstream stops, the unit remains in DTS listening mode and the dts indicator remains on. This is to prevent noise when you use the pause, fast forward, or fast reverse function on your player. If you switch your player from DTS to PCM, you may not hear any sound because the unit does not switch formats immediately. In such case, you should stop your player for about 3 or more seconds and then resume playback.
● With some CD and LD players, you will not be able
to playback DTS material properly even though your player is connected to a digital input on the unit. This is usually because the DTS bitstream has been processed (e.g., output level, sampling rate, or frequency response changed) and the unit does not recognize it as a genuine DTS signal. In such cases, you may hear noise.
● Playing DTS program material, using the pause, fast forward, or fast reverse function on your player may produce a short audible noise. This is not a malfunction.
¼ The beginning of audio received by an HDMI input jack cannot be heard
● Since it takes longer to identify the format of an HDMI signal than it does for other digital audio signals, audio output may not start immediately.

Troubleshooting
En-35
Listening Mode
● When listening to Dolby Digital and/or DTS sound, digital connection is necessary.
● Check the digital audio output setting on the connected component. On some game consoles, such as those that support DVD, the default setting is off.
● After pressing RECEIVER on the remote controller, repeatedly press DISPLAY to switch the display on the main unit. You can see the input format.
Check the following if the above does not fix the problem:
¼ Cannot select a desired listening mode ● Depending on the connecting status of the speaker, some listening modes may not be selected. Check the details in "Selectable Listening Modes" section.
¼ There is no sound with Dolby Atmos ● Back speakers or height speakers need to be installed. After connecting the speakers, check that the connection settings in "Configuration" - "Speaker Channels" are made correctly.
● Dolby Atmos signals need to be input for Dolby Atmos playback to be possible.
Video
● Confirm that the connection between the output jack on the device and the input jack on this unit is correct.
● Make sure that none of the connecting cables are bent, twisted, or damaged.
● Make sure the switching of input screens is proper at the monitor side such as a TV.
Check the following if the above does not fix the problem:
¼ There is no picture from a source connected to an HDMI input terminal
● Change the input selector on this unit to the position of the terminal to which the player is connected.
● Check if "Resolution Error" is displayed on the main unit display when video input via HDMI input jack is not displayed. In this case, the TV does not support the resolution of the video input from the player. Change the setting on the player.
● Reliable operation with an HDMI-to-DVI adapter is not guaranteed. In addition, video signals from a PC are not supported.
● Turn the Deep Color function off. To turn off the Deep Color function, simultaneously press the STRM BOX and ON/STANDBY buttons on the main unit. While holding down STRM BOX, press ON/STANDBY repeatedly until "Deep Color:Off" appears on the display. To reactivate the Deep Color function, repeat the above described step until "Deep Color:On" appears on the display.
¼ Images flicker ● It is possible that the resolution of the player is not compatible with the TV's resolution. If you have connected the player to this unit with an HDMI cable, try changing the output resolution on the player. There also may be an improvement if you change the screen mode on the TV.
Linked operation
¼ There is no linked operation with CEC compliant devices, such as a TV
● Set the HDMI CEC (RIHD) setting of the unit to "On". After pressing RECEIVER on the remote controller, press the SETUP button, select "5. Hardware" - "HDMI" - "HDMI CEC (RIHD)" and turn it on.
● It is also necessary to set HDMI linking on the CEC compliant device. Check the instruction manual.
¼ The RI functions do not work ● To use RI, you must make an RI connection and an analog audio connection (RCA) between the component and AV receiver.
Tuner
¼ Reception is noisy, FM stereo reception is noisy, or the "FM STEREO" indicator does not stay lit
● Re-check the antenna connection. ● Relocate your antenna. ● Move the unit away from your TV or PC. ● Passing cars and airplanes can cause interference. ● Concrete walls weaken radio signals. ● Listen to the station in mono. ● When listening to an AM station, operating the remote controller may cause noise.

Troubleshooting
En-36
Bluetooth
● Try plugging/unplugging the power of the unit and try turning on/off the Bluetooth-enabled device. Re-startup of the Bluetooth-enabled device may be effective.
● The Bluetooth-enabled devices must support the A2DP profile.
● Near components such as microwave oven or cordless phone, which use the radio wave in the 2.4 GHz range, a radio wave interference may occur, which disables the use of this unit.
● If there is a metallic object near the unit, Bluetooth connection may not be possible as the metal can effect on the radio wave.
Check the following if the above does not fix the problem:
¼ Cannot connect with this unit ● The Bluetooth function of the Bluetooth-enabled device is not enabled. Refer to the user manual of the Bluetooth-enabled device for how to enable the Bluetooth function.
● When Bluetooth connection fails the first time, select "5.Hardware" - "Bluetooth" - "Pairing Information", select "Clear". Turn your Bluetooth-enabled device off and then on again to clear the device name, and try to connect again.
¼ Music playback is unavailable on the unit even after successful Bluetooth connection
● When the audio volume of your Bluetooth-enabled device is set low, the playback of audio may be unavailable. Increase the volume of the Bluetooth-enabled device.
● Depending on the Bluetooth-enabled device, Send/Receive selector switch may be provided. Select Send mode.
● Depending on the characteristics or specifications of your Bluetooth-enabled device, playback on the unit is not guaranteed.
¼ Sound is interrupted ● Problem may be occurring at the Bluetooth-enabled device. Check the information on a web page.
¼ The audio quality is poor after connection with a Bluetooth-enabled device
● The Bluetooth reception is poor. Move the Bluetooth-enabled device closer to the unit or remove any obstacle between the Bluetooth-enabled device and this unit.
¼ The Auto Reconnect function of Bluetooth does not
work ● This may not work with some Bluetooth-enabled devices. In that case, pair the unit and the Bluetooth-enabled device and then play again.
Remote Controller
● Make sure that the batteries are installed with the correct polarity.
● Install new batteries. Do not mix different types of batteries, or old and new batteries.
● Make sure that the remote controller is not too far away from the unit, and that there is no obstruction between the remote controller and the remote control sensor of the unit.
● Make sure that the unit is not subjected to direct sunshine or inverter-type fluorescent lights. Relocate if necessary.
● If the unit is installed in a rack or cabinet with colored-glass doors or if the doors are closed, the remote controller may not work reliably.
Check the following if the above does not fix the problem:
¼ The remote controller does not work ● Before operating this unit with the remote controller, be sure to first press RECEIVER.
¼ Operating other Onkyo component by using a RI remote control code is not available
● Make sure that the Onkyo component is properly connected with RI cable. When RI cable is used for connection, make sure to connect analog audio cable as well. (Connecting only an RI cable will not be enough.)
● Make sure you have selected the correct remote controller mode.
● When the RI remote control code is input, point the remote controller at remote control sensor of the unit.
● Make sure that the input display is correctly set. ● Input the RI remote control code again.
¼ Cannot operate Onkyo components (ones without RI connection) and components of other makers
● Operate the remote controller by setting toward the light receiving section of each component.
● When using the remote controller to control other manufacturers' AV components, some buttons may not work as expected. Some components may not start the operation.
● Make sure you have selected the correct remote
controller mode. ● Make sure you have entered the correct remote control code.
● Make sure to set the same ID on both the unit and remote controller.
● Input a correct remote control code again. If there are several codes, try each code.
Display, OSD
¼ The display does not light ● Make sure that Dimmer function is not working. Press DIMMER button and change the brightness level of the display.
¼ The on-screen menus do not appear ● On your TV, make sure that the video input to which this unit is connected is selected.
● Set "TV Out" - "Impose OSD" to "On". ● The on-screen display are not displayed when the OSD language is set to Chinese if the input selector is "BLUETOOTH". Operate by confirming the display on the main unit. (European, Australian, Taiwanese and Asian models)

Troubleshooting
En-37
RI Dock
● Make sure the unit is turned on, the correct input source is selected, and the volume is turned up.
● Make sure the plugs are pushed in all the way. ● Make sure your iPod/iPhone is properly inserted in the Dock. If your iPod/iPhone is in a case, it may not connect properly to the Dock. Always remove your iPod/iPhone from the case before inserting it into the Dock. Try reconnecting your iPod/iPhone.
● Make sure your iPod/iPhone is actually playing.Check the following if the above does not fix the problem:
¼ There is no sound ● Try resetting your iPod/iPhone.
¼ There is no video ● Make sure the correct input is selected on your TV or the unit.
● Make sure that your iPod/iPhone model's TV OUT setting is set to On.
● Some versions of the iPod/iPhone do not output video.
¼ The AV receiver's remote controller does not control your iPod/iPhone
● The iPod/iPhone cannot be operated while it is displaying the Apple logo.
● Make sure you have selected the correct remote controller mode.
● When you use the AV receiver's remote controller, point it toward this unit.
● Before operating with the remote controller, you may need to play on your iPod/iPhone to make the input selector be recognized.
● Depending on your iPod/iPhone model and generation, some buttons may not work as expected.
● Try resetting your iPod/iPhone.
¼ The unit unexpectedly selects your iPod/iPhone as the input source
● Always pause iPod/iPhone playback before selecting a different input source. If playback is not paused, the Direct Change function may select your iPod/iPhone as the input source by mistake during the transition between tracks.
Others
¼ Strange noises can be heard from the unit ● If you have connected another unit to the same wall outlet as this unit, this noise may be an effect from the other unit. If the symptoms improve by unplugging the power cord of the other unit, use different wall outlets for this unit and the other unit.
¼ When performing Automatic Speaker Setup, the measurement fails and the message "Ambient noise is too high�" is displayed
● This can be caused by a malfunction in your speaker unit. Check if the unit produces normal sounds.
¼ The Late Night function does not work ● Make sure the source material is Dolby Digital, Dolby Digital Plus or Dolby TrueHD.
¼ The Cinema Filter function does not work ● This function can be used in the following listening modes: Dolby Digital, Dolby Digital Plus, Dolby TrueHD, Multichannel, DSD, DTS, DTS-ES, DTS Neo:6 Cinema, DTS 96/24, DTS-HD High Resolution Audio, DTS-HD Master Audio, DTS Express.
¼ How do I change the language of a multiplex source ● Select "Main" or "Sub" for "Multiplex Input Channel" in "3. Audio Adjust" -"Multiplex/Mono".
¼ Power consumption in standby mode ● In the following cases, the power consumption in standby mode may reach up to a maximum of 33 W:– When "HDMI CEC (RIHD)" is set to "On". (Depending
on the TV status, the AV receiver will enter normal standby mode.)
– The "HDMI Standby Through" setting is set to other than "Off".
– The "Power Out at Standby for STRM BOX" setting is "On".

Reference Information
En-38
Reference Information
Linked Operation with CEC-compatible Components
Link operation with a product conforming to the CEC of the HDMI standard. Note that linked operation is not always guaranteed with all CEC devices.
Operation has been confirmed on the following devices (as of February 2015)�TV (Random order):
● Toshiba TV sets ● Sharp TV sets
Players/Recorders (Random order): ● Onkyo and Integra RIHD-compatible players ● Toshiba players and recorders ● Sharp players and recorders (only when used together with
Sharp TV sets)
Caution: For linking functions to work properly, do not connect more RIHD-compatible components than the quantities specified below, to the HDMI jacks. Linking functions are not guaranteed when more RIHD-compatible components than the below mentioned quantities are connected. Furthermore, do not connect the AV receiver to another AV receiver/AV amplifier via HDMI.
● Blu-ray Disc/DVD players: up to 3. ● Blu-ray Disc/DVD recorders: up to 3. ● Cable TV tuner, terrestrial digital tuner, and satellite broadcasting
tuner: up to 4 units.
Checking whether the HDMI Linked Operation Settings Are Enabled
1. Turn on the power of all connected components.2. Turn off the power of the TV, and confirm that the power
of the connected components is turned off automatically with the link operation.
3. Turn on the power of the Blu-ray Disc/DVD player/recorder.
4. Start playback on the Blu-ray Disc/DVD player/recorder, and verify the following:
● The AV receiver automatically turns on, and selects the input to which the Blu-ray Disc/DVD player/recorder is connected.
● The TV automatically turns on, and selects the input to which the AV receiver is connected.
5. Following the operating instructions of the TV, select "Use the TV speakers" from the menu screen of the TV, and confirm that the audio is output from the speakers of the TV, and not from the speakers connected to the AV receiver.
6. Select "Use the speakers connected from the AV receiver" from the menu screen of the TV, and confirm that the audio is output from the speakers connected to the AV receiver, and not from the TV speakers.
Caution: ● Even if you set to output audio on the TV speakers, audio will
be output from the speakers connected to the AV receiver when you adjust the volume or switch the input on the AV receiver. To output audio from the TV speakers, redo the corresponding operations on the TV.
● In case of an RIHD connection with RI and RI EX audio control compatible components, do not connect the RI cable at the same time.
● On the TV, when you select anything other than the HDMI jack to which the AV receiver is connected, the input on the AV receiver will be switched to "TV".
● The AV receiver will automatically power on in conjunction when it determines it to be necessary. Even if the AV receiver is connected to an RIHD compatible TV or player/recorder, it will not power on if it is not necessary. It may not power on in conjunction when the TV is set to output audio from the TV.
● Linked system functions with the AV receiver may not work depending on the component model connected. In such cases, operate the AV receiver directly.
● When the player/recorder cannot be operated with the remote controller of the AV receiver, the corresponding component may not be programmed to support the remote controller operation of CEC. Program the remote control code of the component maker to the remote controller for using.

Reference Information
En-39
About HDMI
HDMI (High-Definition Multimedia Interface) is a digital interface standard for connecting TVs, projectors, Blu-ray Disc/DVD players, set-top boxes, and other video components. Until now, several separate video and audio cables have been required to connect AV components. With HDMI, a single cable can carry control signals, digital video and digital audio (2-channel PCM, multichannel digital audio, and multichannel PCM).The HDMI video stream (i.e., video signal) is compatible with DVI (Digital Visual Interface) (*1), so TVs and displays with a DVI input can be connected by using an HDMI-to-DVI adapter cable. (This may not work with some TVs and displays, resulting in no picture.)This unit supports HDCP (High-bandwidth Digital Content Protection) (*2), so it can display picture only on HDCP-compatible components.HDMI of the unit supports the following functions.Audio Return Channel, 3D, x.v.Color, Deep Color, LipSync, 4K (Passthrough)
Audio Formats Supported by The Unit: ● 2-channel linear PCM (32 - 192 kHz, 16/20/24 bit) ● Multichannel linear PCM (up to 7.1 ch, 32 - 192 kHz, 16/20/24 bit)
● Bitstream (Dolby Atmos, Dolby Digital, Dolby Digital Plus, Dolby TrueHD, DTS, DTS-HD High Resolution Audio, DTS-HD Master Audio)
● DSDYour Blu-ray Disc/DVD player must also support HDMI output of the above audio formats.
About Copyright Protection: The HDMI jacks on this unit support Revision 1.4 and Revision 2.2 of the HDCP (High-bandwidth Digital Content Protection) (*2), a copy-protection system for digital video signals. Other devices connected to the unit must also support HDCP.
*1 DVI (Digital Visual Interface): The digital display interface standard set by the DDWG (*3) in 1999.
*2 HDCP (High-bandwidth Digital Content Protection): The video encryption technology developed by Intel for HDMI/DVI. It is designed to protect video content and requires a HDCP-compatible HDMI/DVI receiver to display the encrypted video.
*3 DDWG (Digital Display Working Group): Lead by Intel, Compaq, Fujitsu, Hewlett Packard, IBM, NEC, and Silicon Image, this open industry group's objective is to address the industry's requirements for a digital connectivity specification for high-performance PC and digital displays.
Caution: ● There are some content that can be played only with HDCP Rev.
2.2 compatible devices. To play such content, connect an HDCP Rev.2.2 compatible TV or player to a HDMI jack of the unit.
● The HDMI video stream (i.e., video signal) is compatible with DVI (Digital Visual Interface), so TVs and displays with a DVI input can be connected by using an HDMI-to-DVI adapter cable. (Note that DVI connections only carry video, so you will need to make a separate connection for audio.) However, reliable operation with such an adapter is not guaranteed. In addition, video signals from a PC are not supported.
● The HDMI audio signal (sampling rate, bit length, etc.) may be restricted by the connected source component. If the picture is poor or there is no sound from a component connected via HDMI, check its setup. Refer to the connected component's instruction manual for details.

Reference Information
En-40
Remote Control Codes
¼ Television (A to E)A.R. Systems 10037, 10556ACCENT 10037Acoustic Solutions 11667, 11585,
11523, 11037Action 10650Adcom 10625Addison 10653, 11150Admiral 10093AEG 12197, 11037,
12239Affinity 13717, 13870,
13577Aftron 13478Aiko 10037Aim 10037Akai 12676, 10812,
10037, 10672, 10208, 10714, 11523, 13067, 12414, 13183, 10178, 10556, 12197
Akiba 10037Akito 10037Akura 12289, 10037,
11667, 10714, 10668, 11585, 10171, 11037, 11498, 11687, 11983, 12239
Alba 12676, 11037, 10037, 10668, 10714, 11585, 13005, 13067, 13790, 11667, 12104, 12561
Alfide 10672Alien 11037Allstar 10037
Amstrad 10037, 10171, 11037
Anam 10037, 10650Andersson 12676, 11585Anitech 10037Ansonic 10668, 10037AOC 11589, 12769,
11365, 13720, 12014, 12087, 13790, 10093, 10178, 10625, 11150
Apex Digital 12397Apollo 12239Ardem 10714, 10037Arena 10037Ario 12397Aristona 10556, 10037ART 11037Art Mito 11585, 11667AS 11667, 11585,
11523, 11037Asberg 10037Astra 10037ATD 10698Atlantic 10037Atvio 13636Audiosonic 10714, 12104,
10037, 13067, 11983
Audio-Technica 10000, 10093, 10150, 11150
Audiovox 11769Audioworld 10698Auria 12087, 12014Autovox 12676Aventura 10171Axxon 10714Azuki 12239B & O 10620Baier 12239Baird 10208
Bang & Olufsen 10620Barco 10556Base 10698Basic Line 10037, 10668,
11037, 10556Bauer 12197Baur 10037, 10512,
10195BBK 12098, 11523Beaumark 10178Beijing 10208, 10812Beko 10714, 12125,
10037, 12239Bell & Howell 10017Belson 10698, 11667Belstar 11037BenQ 12563, 11562,
11523Beon 10037Berthen 10556, 10668Bestar 10037Bexa 12493BGH 14070, 14029,
10898, 12414, 12098
Black Diamond 11037Blaupunkt 10195, 12426Blue Sky 10714, 10037,
11037, 10668, 10556, 10625
BlueDiamond 12426Bluetech 12561bogo 12561BPL 10208, 10037Brandt 10625, 11585,
10714Brinkmann 10037, 10668Brionvega 10037Britania 12414BuBuGao 12098, 11523
Bush 11037, 10037, 12676, 10668, 10714, 13790, 13005, 11667, 11687, 11983, 10556, 12125, 10208, 11585, 12104, 10698, 11589, 12673, 12964
Byd:sign 12209Cameron 11523Camper 10037Carad 11037, 10668Carena 10037Carrefour 10037Cascade 10037Casio 10037Cathay 10037CCE 13782, 14091,
10037Celcus 12676, 11585Celebrity 10000cello 12673Centrum 11037Centurion 10037Changhong 13434, 12769,
11498, 10508, 10208
Chiawin 10810Chimei 12769CHL 13067Chung Hsin 11150Chunyun 10000, 11150,
11687Cinema 10672Clarivox 10037Clatronic 10037, 10714Clayton 11037CME 10037, 10512CMX 13332, 13067
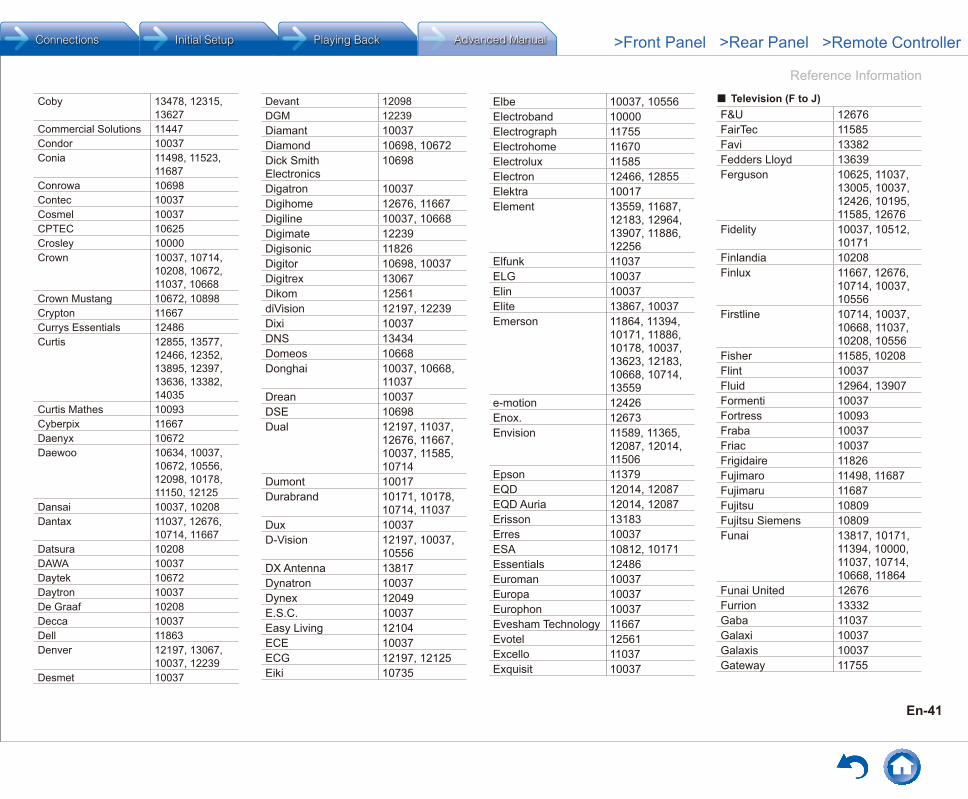
Reference Information
En-41
Coby 13478, 12315, 13627
Commercial Solutions 11447Condor 10037Conia 11498, 11523,
11687Conrowa 10698Contec 10037Cosmel 10037CPTEC 10625Crosley 10000Crown 10037, 10714,
10208, 10672, 11037, 10668
Crown Mustang 10672, 10898Crypton 11667Currys Essentials 12486Curtis 12855, 13577,
12466, 12352, 13895, 12397, 13636, 13382, 14035
Curtis Mathes 10093Cyberpix 11667Daenyx 10672Daewoo 10634, 10037,
10672, 10556, 12098, 10178, 11150, 12125
Dansai 10037, 10208Dantax 11037, 12676,
10714, 11667Datsura 10208DAWA 10037Daytek 10672Daytron 10037De Graaf 10208Decca 10037Dell 11863Denver 12197, 13067,
10037, 12239Desmet 10037
Devant 12098DGM 12239Diamant 10037Diamond 10698, 10672Dick Smith Electronics
10698
Digatron 10037Digihome 12676, 11667Digiline 10037, 10668Digimate 12239Digisonic 11826Digitor 10698, 10037Digitrex 13067Dikom 12561diVision 12197, 12239Dixi 10037DNS 13434Domeos 10668Donghai 10037, 10668,
11037Drean 10037DSE 10698Dual 12197, 11037,
12676, 11667, 10037, 11585, 10714
Dumont 10017Durabrand 10171, 10178,
10714, 11037Dux 10037D-Vision 12197, 10037,
10556DX Antenna 13817Dynatron 10037Dynex 12049E.S.C. 10037Easy Living 12104ECE 10037ECG 12197, 12125Eiki 10735
Elbe 10037, 10556Electroband 10000Electrograph 11755Electrohome 11670Electrolux 11585Electron 12466, 12855Elektra 10017Element 13559, 11687,
12183, 12964, 13907, 11886, 12256
Elfunk 11037ELG 10037Elin 10037Elite 13867, 10037Emerson 11864, 11394,
10171, 11886, 10178, 10037, 13623, 12183, 10668, 10714, 13559
e-motion 12426Enox. 12673Envision 11589, 11365,
12087, 12014, 11506
Epson 11379EQD 12014, 12087EQD Auria 12014, 12087Erisson 13183Erres 10037ESA 10812, 10171Essentials 12486Euroman 10037Europa 10037Europhon 10037Evesham Technology 11667Evotel 12561Excello 11037Exquisit 10037
¼ Television (F to J)F&U 12676FairTec 11585Favi 13382Fedders Lloyd 13639Ferguson 10625, 11037,
13005, 10037, 12426, 10195, 11585, 12676
Fidelity 10037, 10512, 10171
Finlandia 10208Finlux 11667, 12676,
10714, 10037, 10556
Firstline 10714, 10037, 10668, 11037, 10208, 10556
Fisher 11585, 10208Flint 10037Fluid 12964, 13907Formenti 10037Fortress 10093Fraba 10037Friac 10037Frigidaire 11826Fujimaro 11498, 11687Fujimaru 11687Fujitsu 10809Fujitsu Siemens 10809Funai 13817, 10171,
11394, 10000, 11037, 10714, 10668, 11864
Funai United 12676Furrion 13332Gaba 11037Galaxi 10037Galaxis 10037Gateway 11755

Reference Information
En-42
GE 11447, 10178, 10735, 10625, 10093, 11454
GEC 10037General Electric 11447, 10178,
10735, 10625, 10093, 11454
Genesis 10037Genexxa 10037GFM 10171, 11864,
11886Gibralter 10017Gibson 11826Gintai 11150Godrej 11585GoGen 12676, 11585Goldfunk 10668GoldStar 10178, 10037,
10714, 13183, 11150
Goodmans 10037, 11037, 10634, 11667, 10668, 11523, 11585, 11687, 11983, 10714, 10556, 10625, 12426, 12676
Gorenje 11585, 12676Gradiente 10037Graetz 10714Gran Prix 12197Granada 10037, 10208Grandin 10037, 10714,
10668, 11037, 10556, 12125
Grundig 10195, 11223, 12125, 12239, 10556, 10037, 11523, 11667, 13067, 10672, 12561, 12676
Grunkel 11523
GVA 12098, 13067Haier 12876, 11749,
12309, 13382, 11753, 13620, 13613, 13429, 10698, 11983, 12293, 13790, 13987, 10037, 10508
Hallmark 10178Handic 12676Hankook 10178Hannspree 11826Hanseatic 10037, 10634,
10714, 10625, 10556
Hantarex 12197, 10037Hantor 10037Harwood 10037Hauppauge 10037Havermy 10093HB 10714HB Ingelen 10714H-Buster 13620, 13419HCM 10037Heran 11826Herosonic 11826Highline 10037Hikona 11983Hinari 10037, 10208HiPlus 11826Hisawa 10714Hisense 12846, 12098,
13519, 12183, 10556, 13123, 10508, 14029, 10208, 13382
Hitachi 11643, 12676, 11576, 11585, 11037, 11691, 13317, 11667, 10634, 13639, 10037, 10679, 12170, 12846, 10150, 10178, 10508, 11150
Hitachi Fujian 10150Hitec 10698Hiteker 13118Hoher 10714, 13434Hongmei 10093Hornyphon 10037Hua Tun 11150Hypson 10037, 10714,
10556, 10668, 11037
Hyundai 10698, 12414, 12676, 11037, 11523
Iberia 10037ICE 10037iLo 11394Imperial 10037Indiana 10037Ingelen 10714Ingo Devices 12239Inno Hit 11585, 11037Innova 10037Insignia 12049, 11423,
10171Integra 11807, 13100,
13500Inteq 10017Interbuy 10037Interfunk 10037, 10512Internal 10556Intervision 10037Irradio 10037
IRT 10698Isis 12676Isukai 10037iSymphony 13429, 13382,
13118ITS 10037ITT 12675, 12125,
12676, 10208, 11523
ITT Nokia 10208ITV 10037James 13183Jay-tech 13067JC Penney 10178JCB 10000JCM 12256Jinfeng 10208Jinxing 10556, 10037,
10698JMB 12676, 10634,
10556, 12426JTC 13067Jubilee 10556JVC 11774, 11653,
11601, 11818, 10653, 12321, 12271, 11428, 13650, 11670, 12676, 14070, 10650, 10093, 10508
¼ Television (K to N)Kaisui 10037Karcher 12125, 10714Kathrein 10556KDS 11498, 11687Kendo 11037, 11585,
12676, 10037Kennex 11037

Reference Information
En-43
Kioto 10556Kiton 10037, 10668KLL 10037Kneissel 10037, 10556Kolin 11610, 10150,
11755, 10037, 11150
Kolster 10037Konig 10037, 10512Konka 12881, 13419,
10037, 10714Korpel 10037Kosmos 10037Kunlun 10208Kuppersbusch 12676L&S Electronic 10714Lavis 11037Leader 12876Lecson 10037Legend 12397, 12309Lenco 12676, 11983,
10037, 11037Leyco 10037LG 11840, 11860,
11423, 12731, 12182, 12358, 10178, 12362, 13941, 12424, 10037, 10714, 10017, 10556, 10698, 11753
Liberton 13183Liesenkotter 10037Lifetec 10668, 10037,
11037, 10714Linetech 12676Linsar 12676, 11667,
11585Lloyd 13639Lodos 11037
Loewe 10512, 10633, 10037
Logic 11585Logik 13432, 13005,
12486, 11037, 10698, 11585, 11687
Logix 10668Luma 10037, 11037Lumatron 10037, 10668Lumenio 10037Lux May 10037Luxor 12676, 11037,
10208LXI 10178, 10017Madison 10037MAG 11687, 11498Magnavox 13623, 11866,
12372, 11454, 11506, 10171, 11365, 11755, 11867
Magnum 10714, 10037Manesth 10037Manhattan 10037, 11037,
10668Marantz 10037, 10556,
11454Mark 10037, 10714Marks & Spencer 12673Mascom 12197, 12125Masters 10037Mastro 10698Masuda 10037Matsui 10037, 10195,
10208, 12486, 11037, 10714, 11667, 12676, 10556, 12561
Matsushita 10650Maxent 11755
Maxess 12493Meck 10698Mediator 10037, 10556Medion 12676, 10714,
10037, 10668, 11037, 11585, 11667, 10512, 12239, 13067, 10556, 10698, 12563
Megatron 10178MEI 11037Melectronic 10037, 10195,
10634, 10512, 10714
Memorex 11687, 11037, 11670, 10178, 10150
Memory 11983Mercury 10037Mermaid 10037Metronic 10625Metz 11037, 10668,
10195MGA 10150, 10178Micromaxx 10037, 10668,
10714, 11037Microsonic 13419Midland 10017Mikomi 11585, 11667Minato 10037Minerva 10195Ministry Of Sound 11667Minoka 10037Miray 12414, 13183,
10898Misakai 10171
Mitsubishi Electric 11250, 12313, 10150, 10178, 10512, 11797, 10093, 10556, 10037, 11150, 11037, 11171
Mivar 10609Moree 10037Morgan's 10037Moserbaer 11585Motorola 10093MTC 10512MTlogic 10714, 12104Mudan 10208Multitec 11037, 10037,
10668Multitech 10037Murphy 12673Mx Onda 11983, 11498,
11687Myryad 10556Mystery 13047NAD 10037, 10178Naiko 10037Nakimura 10037National 10208, 10508Naxa 12104, 13382NEC 11797, 13257,
12293, 12461, 11585, 10037, 10178, 10508, 10653, 11150
Neckermann 10037, 10556NEI 10037, 11037Neoka 11826Neon 12673Netsat 10037NetTV 11755Neufunk 10037, 10556,
10714Nevir 12676

Reference Information
En-44
New Acoustic Dimension
10037, 10178
New Sonic 11826New Tech 10037, 10556Newave 10093, 10178,
11150NEX 13861Nexus Electronics 12183Nikkai 10037Nikkei 12197, 10714Nikko 10178, 10017Nimbro 12104Noblex 14029Nokia 10208Norcent 11365, 11589Nordmende 13419, 13861,
10037, 10195, 11585, 13835, 10714, 11667
Normerel 10037Nortek 10668Novatronic 10037Novex 11523Novita 11585NPG 13434
¼ Television (O to S)O.K.Line 11037Oceanic 10208OK Line 11037OK. 13434, 12676,
13047Okano 10037OKI 11667, 12676,
12125, 13434, 11585
Olevia 11610Omni 10698Onei 11667Onida 10653, 12414
Onimax 10714Onix 10698Onkyo 11807, 13100,
13500Onn 12125, 11667Opera 10037, 10714Optimus 10650, 10679Optoma 12796Optonica 10093Orava 11037Orbit 10037Orion 12108, 10037,
12676, 10556, 10714, 11037, 11667, 13540, 13650
Orline 10037Ormond 10668, 11037Osaki 10037, 10556Osio 10037Osume 10037Otic 11983, 11498,
11687Otto Versand 10037, 10512,
10093, 10556, 10195
Pacific 10714, 11037, 10556
Palladium 10037, 10714, 10556
Palsonic 12461, 10698, 13067, 10037
Panama 10037Panasonic 11636, 11480,
11291, 10650, 11650, 13825, 12170, 10037, 10093, 10150, 10178, 10208, 10508
Panavideo 13825
Panavision 10037Panavox 13835Panda 10698, 10208,
10508PARK 12104Penney 10178Peony 10208Perdio 10037Perfekt 10037Philco 10171, 13426,
12414, 11394, 10037, 10178, 13639
Philips 11887, 11867, 10037, 12372, 12800, 10556, 13614, 11506, 11744, 12768, 12680, 11454, 10639, 11866, 10017, 10512, 13623, 10171, 12769, 11365, 11394, 10000, 10178, 11589
Phocus 10714Phoenix 10037PHOENIX Apollo 12239Phonola 10037, 10556Pioneer 10679, 11457,
10037, 10698, 11636, 10512, 12171
PJ 11506Planar 10679, 14247,
11589Plantron 10037Playsonic 10714, 10037
Polaroid 11523, 11769, 11498, 11687, 11767, 12676, 14035, 12125, 11826
Powerpoint 10037, 10698Premier 13419, 13183,
13793Prestiz 13419Prima 11753, 10037,
11749, 12461, 10698
Prinston 11037Pro Vision 10037, 10556,
10714, 12197Profitronic 10037ProLine 10625, 10634,
10037, 11037, 12676
Proscan 11447, 12183, 12256, 13577, 13382, 13332, 13717, 13895, 12746, 13636, 14035
Prosonic 10714, 12676, 12125, 10668, 12197, 10037, 11523, 11585, 11667
Protech 10037, 10668, 11037
Proton 10178Proview 11687, 11498Proxima 10735Pulsar 10017Pye 10037, 10556Q.Bell 12561Quadro 11667QuantumFX 12337Quasar 11291, 13899,
10650

Reference Information
En-45
Quelle 10037, 10512, 11037, 10195, 10668
Radiola 10037, 10556Radiomarelli 10037Radionette 10714RadioShack 10178, 10037Radiotone 10037, 10668,
11037RCA 12746, 12434,
12932, 11447, 12247, 13577, 11781, 10625, 12187, 13382, 10679, 13332, 13717, 10093, 13793, 12183, 12855, 13419, 10000, 10178, 10618, 11454, 13426, 13636
Realistic 10178Recco 10898, 13183Reconnect 13183Recor 10037Rectiligne 10037Red Star 10037Reflex 10037, 10668,
11037RefleXion 12239Relisys 11585Relon 11826Remotec 10037, 10093,
10171, 11150Reoc 10714, 12197Revox 10037RFT 10037R-Line 10037Roadstar 11037, 10037,
10714, 10668
Rolsen 12098, 13067, 13434
Rowa 10898, 13047, 10698, 11038, 13001, 10037
RTF 10037Runco 10017Saba 10625, 12676,
10714Saga 12197Sagem 10618Saivod 10668, 11037,
10037, 11667Salora 12197, 12676,
12239, 12125, 13067, 10208
Sampo 11755, 10898, 13419, 10093, 10171, 10178, 10650
Samsung 12051, 10812, 11632, 10618, 11458, 11630, 12953, 10037, 10556, 10650, 10178, 10208, 11150
Sandstrom 12197, 13047Sansui 13540, 11670,
13564, 10037, 10898, 10171, 10714, 13559
Sanyo 11142, 10208, 11585, 12676, 12461, 12994, 10735, 11974, 12881, 12769, 13488, 11498, 11365, 10508, 11037, 11150, 11667, 13861
Sanyuan 10093
Save 10037SBR 10037, 10556Sceptre 13899, 12528,
12337Schaub Lorenz 10714, 12676,
12125, 12197, 11667, 12289
Schneider 10037, 10714, 10556, 11037, 10668, 11585, 12676
Schontech 11037Scotch 10178Scott 10178, 11983Sears 10171, 10178Seaway 10634Seelver 10556, 11037SEG 12673, 11037,
10037, 10668, 12125, 11523, 10634, 13434
SEI 10037Seiki 13953, 12964,
13559, 10178Seiko Epson 11379Sei-Sinudyne 10037Semp 11743, 13793Semp Toshiba 11743, 13793Sencor 13067, 12197,
10714Senzu 12493Serie Dorada 10178Serino 10093Shanghai 10208Sharp 12360, 11659,
10818, 10093, 12951, 11393, 12676, 13867, 10650, 11165, 11423
Sheng Chia 10093, 11150
Shinelco 12104Shintoshi 10037Shivaki 12197, 10178,
10037Siam 10037Siemens 10195, 10037Siera 10556, 10037Silva 10037Silva Schneider 12197, 10037,
12125SilverCrest 12676, 11037Sinudyne 10037SKY 10037Sky Brasil 10037Skyworth 12899, 12963,
12889, 12769, 10037, 10698
SLX 10668Sogo 13067Solavox 10037Soniko 10037Soniq 12493, 13005Sonitron 10208Sonneclair 10037Sonoko 10037Sonolor 10208Sontec 10037Sontech 11983Sony 12778, 10810,
11825, 10000, 11651, 11551, 11625, 11505, 11317, 10150, 11150, 10093, 11167
Soundesign 10178Soundwave 10037, 11037,
12673SOVOS 12239Sowa 10178, 11150Soyea 10698, 11743

Reference Information
En-46
Soyo 11826Spectroniq 11498, 11687Squareview 10171SR Standard 10037, 11037Starion 11037Starlite 10037STI 13793Strato 10037SunBriteTV 12337, 12528,
11610Sunic Line 10037Sunkai 10037, 11523Sunny 10037Sunstar 10037Sunstech 12676Sunwood 10037Superior 11585Superscan 10093, 10171Supersonic 10208, 11753,
12104SuperTech 10037, 10556Supra 10178Supreme 10000SVA 11498Svasa 10208Swisstec 12106, 12104Sylvania 10171, 11864,
11886, 11394Symphonic 10171, 11394Synco 11755, 11826,
10000, 10093, 10178
Syntax 11610Sysline 10037
¼ Television (T to Z)Tacico 10178, 11150Tai Yi 11150Talent 10178
Tandy 10093Tashiko 10650, 11150Tatung 10037, 11150,
11687Tauras 12197TCL 13047, 13183,
12434, 13001, 10898, 11038, 12414, 13426, 12675, 10698
TCM 10714Teac 10037, 11037,
10698, 10714, 11755, 10898, 10178, 10668, 10171, 10512, 11983, 13005
Tec 10037Tech Line 10037, 10668,
11585Technica 11037, 12106,
12426Technical 12676, 11667Technics 10017, 10556,
10650Technika 12426, 12106,
12197, 11667, 11983, 12676, 13005, 12125, 13067
TechniSat 10556Technisson 10714Techno 11585Technosonic 10556, 10625Techwood 12676, 11667,
11037Tecnimagen 10556Teco 10093, 10178,
10653, 11523, 11687
Tedelex 10208Teknika 10150
TELE System 11585, 12125Telecor 10037Telefunken 10625, 12676,
12414, 10698, 12239, 11585, 11667, 10037, 10714
Telefusion 10037Telegazi 10037Telemagic 10735Telemeister 10037Telesonic 10037Telestar 10037, 10556Teletech 10037, 10668,
11037Teleview 10037Tennessee 10037Tensai 10037, 11037Terris 11667Tesco 12426Tesla 11037, 10037,
10556, 10714Tevion 10714, 12426,
10668, 11037, 12125, 10037, 10556, 11498, 11585, 11667, 11687, 12197, 12289
ThemeScene 12796Thomas 10625Thomas America 10625Thomson 10625, 13047,
12675, 11447, 10037
Thorn 10037, 10512Tiane 10093TMK 10178TNCi 10017Tokai 10037, 10668,
11037
Tokaido 11037Tophouse 10672, 10698Topline 10668, 11037Toshiba 11508, 11524,
11656, 13323, 12676, 12598, 10508, 12724, 13570, 11743, 10650, 10618, 12108, 11037, 10093, 10195, 11150, 11169
Tosonic 11508TRANS-continents 10037, 10556,
10668, 11037Transonic 10037, 10698,
10512Triad 10556Trio 11498, 11687Triumph 10037, 10556Tucson 12676TVE 12239TVTEXT 95 10556Uher 10037Ultravox 10037UMC 12106, 12426Unic Line 10037Uniden 12122, 12676,
11667United 10714, 11037,
10037, 10556, 11523, 11983, 12125, 13434
Universal 10037, 10714Universum 10037, 11037,
10512, 10668, 10618, 10195
Univox 10037V7 Videoseven 11755Vanguard 10037VD-Tech 13067, 13332

Reference Information
En-47
Venturer 13005Vestel 11037, 11585,
10037, 12676, 10668, 11667
Vexa 10037Victor 11428, 10000,
10093, 10150, 11150, 10650, 10653
Videocon 10508, 10037Videoseven 11755VideoSystem 10037Vidikron 10735Vidtech 10178Viewsonic 12014, 12745,
12087, 13706, 11755, 11627, 12049, 11365
Viore 12352, 13382, 13118, 13429, 12104
Visa 10037Vision 11826, 10037VisionPlus 12426, 12106Visual Innovations 12106VIZIO 11758, 13758,
12707, 12757, 13415, 12512, 13174, 12209
Vortec 10037Voxson 12197, 10178,
10037, 11667VU 12098, 11365Walker 12676, 11667,
11585Waltham 10037, 11037,
10668Wansa 12098Wards 10178, 10017,
10000
Watson 11037, 10037, 10668, 10714
WeCube 11860Wega 10037Welltech 10714Weltstar 11037Westinghouse 11712, 13579,
13382, 13949, 11826, 12293, 11755, 12397
Westwood 11585Wharfedale 11983, 11667,
10037, 10556White Westinghouse 10037Wilson 10556Windsor 11037, 10668Windy Sam 10556Wintel 10714Wyse 11365Xenius 11667, 10634,
11585, 12676Xiahua 11753, 10037,
11749, 12461, 10698
Xiron 11983, 11037XLogic 10698Xoceco 11753, 10037,
11749, 12461, 10698
Xogego 11753, 10037, 11749, 12461, 10698
Xoro 13067Xpeer 12051XRYPTON 10037Yamaha 11576, 10650Yamishi 10037Yokan 10037Yoko 10037YU-MA-TU 10037
Zenith 10017, 10178, 11423, 10000, 12731, 11365, 12358, 12362
Zepto 11585Ziggo 11818Zonda 10698
¼ TV DVD CombinationAkai 32966Alba 32966Black Diamond 30713Blue Sky 30713Bush 30713, 32966Celcus 32966Centrum 30713Crown 30713Dantax 32966Digihome 32966Dual 32966, 30713Elfunk 30713Emerson 30675Ferguson 30713, 32966Finlux 32966Funai 30675Goodmans 30713, 32966Grandin 30713Grundig 30539, 32966Hitachi 32966, 30713Hyundai 32966Insignia 32095JMB 32966JVC 32966Kuppersbusch 32966Linetech 32966Linsar 32966Logik 30713Luxor 32966, 30713Matsui 30713, 32966Medion 32966
Mitsubishi Electric 34004OK. 32966OKI 32966Orava 30713Orion 30713Panasonic 32859Philips 30539Polaroid 32966ProLine 32966Prosonic 32966Saba 32966Salora 32966Sanyo 32966SEG 30713Sharp 32966, 30630Sony 30864Soundwave 30713Sylvania 30675, 30630Symphonic 30675Technica 30713Technical 32966Techwood 32966Telefunken 32966Teletech 30713Thomson 30551Toshiba 32966United 30713Universum 30713Walker 32966Waltham 30713Weltstar 30713Xiron 30713
¼ DVD3D LAB 30539Accurian 30675Acoustic Solutions 30730, 30713AEG 30675, 31643,
30770, 31233Aitro 32095

Reference Information
En-48
Aiwa 30533Akai 32966, 30770,
31233, 30675Akura 31233Alba 32966, 30713,
30539, 30730Amitech 30770Amphion MediaWorks 30872Amstrad 30713, 30770,
32139AMW 30872Ansonic 30831Anthem 32820Anthem Statement 32820Aristona 30539, 30646Arrgo 31023AS 30730, 30713ASDA 32213Audio Authority 32555Audix 30713Autovox 30713Awa 30730, 30872Axion 30730Basic Line 30713Beko 30831Bel Canto Design 31571Belson 32139Berthen 31643Best Buy 32139Black Diamond 30713Blu:sens 31233Blue Parade 30571Blue Sky 30713Brainwave 30770Brandt 30551, 30503Bush 30713, 30730,
30831, 32966Byd:sign 30872California Audio Labs 30490Cambridge Audio 32808CCE 30730
Celcus 32966Centrum 30713, 30675Changhong 30627Cinea 30831Cineral 30730Cinetec 30713, 30872CJ Digital 31643Classic 30730Clatronic 30675, 31233Clayton 30713CMX 31643Coby 32494, 30730Codex 31233Continental Edison 30831, 30872Craig 30831Crown 30713, 30770Cybercom 30831CyberHome 31023Daenyx 30872Daewoo 30770, 30872,
30490Dansai 30770Dantax 30713, 30539,
32966Datsun 31233Daytek 30872Dayton Audio 30872DCE 30831Decca 30770Denon 31634, 32258,
30490, 32748, 33851
Denver 31643Dewo 31634Dick Smith Electronics 32095, 30675Digihome 32966, 30713DigiLogic 30713DiK 30831Dikom 32494Disney 30675, 30831
DK Digital 30831, 32095, 31643
Donghai 31233Dragon 30831DSE 32095, 30675Dual 30831, 30730,
30713, 32966, 31023
Durabrand 30713, 30675, 31023, 30831
Dynex 32596E:max 30770, 31233,
31643ECC 30730Electrocompaniet 32545Elfunk 30713Elin 30770Elite 32854Elta 30770, 31643,
31233Eltax 31233Emerson 30675, 30591,
32213Enterprise 30591Epworth 30533EuroLine 30675, 31233,
31643Ferguson 30713, 32966Finlux 32966, 30770,
30591, 30741Firstline 30713Funai 30675GE 30522General Electric 30522GFM 30675G-Hanz 32213G-HanzS 32213Go Video 31044, 30741GoGen 32139GoldStar 30741, 30591Goodmans 30713, 30730,
32966
GoWell 31643GPX 30741Gran Prix 30831Grandin 30713, 31233Grundig 30539, 30551,
30713, 31643, 32966
Grunkel 30770, 30831GVG 30770H & B 30713, 31233Hanseatic 30741Harman/Kardon 30582, 33228,
32927HE 30730Hello Kitty 30831Hen° 30713Hitachi 30573, 32966,
30713, 31664Hoher 30713, 30831,
31643Home Electronics 30770, 30730Home Tech Industries 31643Humax 30646HYD 31233Hyundai 32966Ingersoll 31023Inno Hit 30713Insignia 32095, 32596,
32428, 30675, 30741
Integra 30627, 32147, 31769, 31634, 30571, 30503, 31612
Irradio 31233, 30646ITT 31233Jamo 32358JDB 30730JMB 32966JVC 30623, 31602,
32365, 32612, 32855, 32966
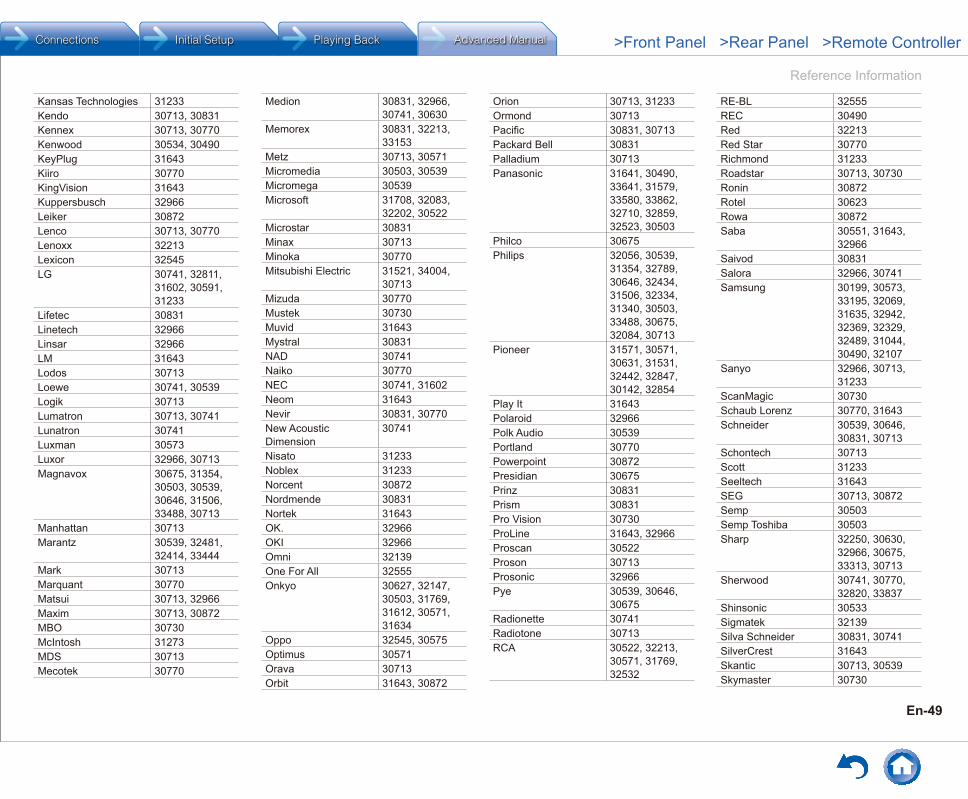
Reference Information
En-49
Kansas Technologies 31233Kendo 30713, 30831Kennex 30713, 30770Kenwood 30534, 30490KeyPlug 31643Kiiro 30770KingVision 31643Kuppersbusch 32966Leiker 30872Lenco 30713, 30770Lenoxx 32213Lexicon 32545LG 30741, 32811,
31602, 30591, 31233
Lifetec 30831Linetech 32966Linsar 32966LM 31643Lodos 30713Loewe 30741, 30539Logik 30713Lumatron 30713, 30741Lunatron 30741Luxman 30573Luxor 32966, 30713Magnavox 30675, 31354,
30503, 30539, 30646, 31506, 33488, 30713
Manhattan 30713Marantz 30539, 32481,
32414, 33444Mark 30713Marquant 30770Matsui 30713, 32966Maxim 30713, 30872MBO 30730McIntosh 31273MDS 30713Mecotek 30770
Medion 30831, 32966, 30741, 30630
Memorex 30831, 32213, 33153
Metz 30713, 30571Micromedia 30503, 30539Micromega 30539Microsoft 31708, 32083,
32202, 30522Microstar 30831Minax 30713Minoka 30770Mitsubishi Electric 31521, 34004,
30713Mizuda 30770Mustek 30730Muvid 31643Mystral 30831NAD 30741Naiko 30770NEC 30741, 31602Neom 31643Nevir 30831, 30770New Acoustic Dimension
30741
Nisato 31233Noblex 31233Norcent 30872Nordmende 30831Nortek 31643OK. 32966OKI 32966Omni 32139One For All 32555Onkyo 30627, 32147,
30503, 31769, 31612, 30571, 31634
Oppo 32545, 30575Optimus 30571Orava 30713Orbit 31643, 30872
Orion 30713, 31233Ormond 30713Pacific 30831, 30713Packard Bell 30831Palladium 30713Panasonic 31641, 30490,
33641, 31579, 33580, 33862, 32710, 32859, 32523, 30503
Philco 30675Philips 32056, 30539,
31354, 32789, 30646, 32434, 31506, 32334, 31340, 30503, 33488, 30675, 32084, 30713
Pioneer 31571, 30571, 30631, 31531, 32442, 32847, 30142, 32854
Play It 31643Polaroid 32966Polk Audio 30539Portland 30770Powerpoint 30872Presidian 30675Prinz 30831Prism 30831Pro Vision 30730ProLine 31643, 32966Proscan 30522Proson 30713Prosonic 32966Pye 30539, 30646,
30675Radionette 30741Radiotone 30713RCA 30522, 32213,
30571, 31769, 32532
RE-BL 32555REC 30490Red 32213Red Star 30770Richmond 31233Roadstar 30713, 30730Ronin 30872Rotel 30623Rowa 30872Saba 30551, 31643,
32966Saivod 30831Salora 32966, 30741Samsung 30199, 30573,
33195, 32069, 31635, 32942, 32369, 32329, 32489, 31044, 30490, 32107
Sanyo 32966, 30713, 31233
ScanMagic 30730Schaub Lorenz 30770, 31643Schneider 30539, 30646,
30831, 30713Schontech 30713Scott 31233Seeltech 31643SEG 30713, 30872Semp 30503Semp Toshiba 30503Sharp 32250, 30630,
32966, 30675, 33313, 30713
Sherwood 30741, 30770, 32820, 33837
Shinsonic 30533Sigmatek 32139Silva Schneider 30831, 30741SilverCrest 31643Skantic 30713, 30539Skymaster 30730

Reference Information
En-50
SM Electronic 30730Smart 30713Sonashi 30831Soniq 30831Sony 31516, 31633,
30533, 31033, 30864, 31070, 31548, 32861, 31536, 32839, 32180, 30772
Sound Color 31233Soundwave 30713Spectra 30872SR Standard 30831Sunkai 30770Sunstech 30831, 32139,
32966Superior 31643Supratech 32139SV2000 30675Sylvania 30675, 30630Symphonic 30675Sytech 30831Tandberg 30713Targa 30741Tascam 31818Tatung 30770TBoston 32139Tchibo 30741TCM 30741Teac 30571, 30675,
30741, 31818, 32139, 34004
Technica 30713Technical 32966Technics 30490Technika 30770, 30831Technosonic 30730TechnoStar 31643Techwood 30713, 32966Telefunken 30551, 32966
Teletech 30713Tensai 30770Theta Digital 30571Thomson 30551, 30522,
30831Thule Audio 30551Tokai 31233Tosaki 32006Toshiba 30503, 33157,
33857, 32006, 32277, 32705, 31769, 32966, 32551
TRANS-continents 30831, 30872, 31233
Transonic 30730Trent 31643Trevi 30831TruTech 30675TVE 30713United 30713, 30675,
30730, 31233, 31643
Universum 30713, 30741, 30591
Urban Concepts 30503Venturer 31769Vestel 30713Vitek 30831VIZIO 32563Voxson 30730, 30831Waitec 30730, 31233Walker 32966Waltham 30713WB Electronics 32555Welkin 30831Wellington 30713Weltstar 30713Wharfedale 30713Wilson 31233, 30831
Windsor 30713Windy Sam 30573Woxter 32139Xbox 32083, 31708,
32202, 30522Xiron 30713XMS 30770X-View 31233Yamada 30872, 32139Yamaha 30497, 32298,
30539, 30817, 30490, 31354, 33871, 30646, 33837
Yamakawa 30872YBA 30872Yukai 30730Zenith 30741, 30591,
30503
¼ Blu-ray DiscAnthem 32820Anthem Statement 32820Cambridge Audio 32808Denon 32258, 32748,
33851Electrocompaniet 32545Elite 32854Funai 30675Harman/Kardon 33228, 32927Insignia 32596, 32428,
30675Integra 32147, 32900,
32910, 33100, 33101, 33500, 33501
JVC 32365, 32612, 32855
Lexicon 32545LG 31602, 32811,
30741
Magnavox 30675Marantz 32414, 33444Mitsubishi Electric 34004Onkyo 32147, 32900,
33101, 33501, 32910, 33100, 33500
Oppo 32545Panasonic 31641, 33862,
33580, 33641, 32859, 32523, 32710
Philips 32789, 32434, 32084
Pioneer 32442, 32847, 32854, 30142
RCA 32532Samsung 30199, 33195Sharp 32250, 33313Sherwood 32820, 33837Sony 31516, 32180,
30772Sylvania 30675Tascam 34004Toshiba 32705, 33157,
33857, 32551VIZIO 32563Yamaha 32298, 33871,
33837
¼ DVD-RAccurian 30675AEG 30675Akai 30675Aristona 30646CyberHome 31023Denon 30490Dick Smith Electronics 30675DSE 30675Emerson 30675Funai 30675

Reference Information
En-51
Go Video 30741GPX 30741Hitachi 31664Humax 30646Insignia 32095Irradio 30646JVC 30623, 32612LG 30741Loewe 30741Magnavox 30675, 30646,
31506Medion 30741NEC 30741Panasonic 30490, 31579,
33580, 32710, 32859, 32523
Philips 30646, 31340, 31506, 32334, 30539, 32056
Pioneer 30631Pye 30646, 30675RCA 30522Samsung 31635, 32942,
33195, 32107, 30490, 32069, 32489
Schneider 30646Sharp 33313, 30630,
30675, 30713Silva Schneider 30741Sony 31070, 31033,
32861, 31516, 31536, 32839, 32180, 31633
Sylvania 30675Targa 30741Tchibo 30741TCM 30741Thomson 30551Toshiba 32277, 32551,
30503Universum 30741
Yamaha 30646Zenith 30741
¼ VCRDirecTV 20739Humax 20739Loewe 21062Metz 21062Optimus 21062Panasonic 21062, 20616Philips 20739Quasar 21062RCN 20739ReplayTV 20616Sonic Blue 20616Sony 20636TiVo 20739, 20636
¼ Cable Set Top Box (A to E)ABN 03322, 02897,
02979, 03340, 03407, 03849
Access Communications
01376, 00476
ACT 02950Adams Cable TV 01376ADB 02586, 01920,
01585, 01927, 01481, 01998, 02254, 02302, 02437, 03028
Akado 02043Aland 02030, 02437Alands Datakommunikation
02030, 02437
Alcom 02030, 02437Alice 01585Allegiance Communications
00476, 01376
Allen TV Cable 00476Altibox 02437, 02030
Amino 01615, 01898, 01481, 02482, 01998, 02302, 03028
Anguang Network 03936Anhui Network 03936Arcadyan 02952Arion 03336Armstrong 01376, 00476Arris 02187, 01982,
01998, 02378Arvig Communication Systems
01376, 01982, 01998, 02345
Astound Broadband 01376, 01877, 00476, 02479, 04079
AT&T 00858AT&T U-verse 00858Atlantic Broadband 01877, 01376ATMC 01376, 01982,
03028Austar 00276B tv 02681, 03442Baja Broadband 00476, 01376BBTV 02980Beijing 04010Belgacom TV 02047, 02132Bell 01998Bell Aliant 01998Bell ExpressVu 01998Bell Fibe TV 01998Bend Broadband 01376, 00476,
02187BesTV 04196Bevcomm 01898, 00476BGCTV 03278, 00476BIG.BOX 03465Blue Ridge Communications
01877
Bluewin 02271Bouygues Telecom 03007Boxer 03607Bright ClouDigital 03961
Bright House 01877, 01376, 00476
British Telecom 02294Broadstripe 00476, 01376BSI 02979BT 02294BT Vision 02294Buckeye Cable System
01376, 00476, 01877, 02187
C&M 03407, 03319, 02962, 02979
Cable America 01376, 01877Cable Axion Digitel 01376, 00476Cable HK 01374Cable One 01376, 00476,
01877Cablecom 01582Cablecom Mexico 00476, 01376Cablemas 01376, 01877Cablevision 01877, 01376,
03336, 00476Cabovisao 02436, 02493Caiway 02015, 03607,
02762, 00660, 02447
Caiyun Digital 03961CalTel Connections 02254, 02586Canal Digital 02030Canby Telcom 01481, 02302Cass Cable 00476, 01376CC9 02703, 02752,
03474CCAP 01877CCS 03322Celrun 03442, 02682CenturyLink 01998Channel Master 03118Charter 01877, 01376,
00476, 02187, 03560
Chengde Guangtong 03936Chengdu Cable 03953Chengdu Telecom 04196

Reference Information
En-52
China Telecom 04196, 02913, 03937
China Unicom 04366, 04196Chongqing Cable 03954Chongqing Cable Networks
03954
CHT 03647, 01917Chunghwa 03647, 01917Cincinnati Bell 01877, 01376Cisco 01877, 00858,
03028, 01982, 02132, 02345, 02589, 01883, 01998, 01582, 02047, 02378, 02563, 02401, 02742, 03265, 02271, 02947, 03452
Citycable 03451, 03477CJ 03322, 02897,
02979, 03340, 03407, 03849
CJ Digital 02979, 02897, 03322, 03340, 03407, 03849
CJ HelloVision 03322, 02897, 02979, 03340, 03407, 03849
Claro 01376, 00476ClubInternet 02132CMA Communications 01376CMB 03389, 02979,
03498CMBTV 03498CNS 02980, 02350Cogeco 01376, 01982,
00476Com Hem 00660, 02447,
02832, 02015Comcast 01982, 01376,
00476, 01877, 03560, 02187
Comporium 01877, 03560, 02187
Consolidated Communications
01877, 01376, 01998, 02302, 03048
Coship 01991, 02950, 03278, 04162, 04408, 04196
Cosmic 02897Cox 01877, 01376,
00476CTS 02703, 03474Daeryung 01877Darty Box 02436DASAN 02683Delta 03607, 02015,
00660, 02447, 02762
DEN 02726Deutsche Telekom 02132Digeo 02187Digi 02762, 03479Digicable 03382, 02479DigitAlb 02493Director 00476Dmg 03835DNA 02832, 00660,
02030Dom.ru TV 02493Dream Satellite TV 02493DSD 03340DST 03389Du 02401DV 02979Eagle Communications 01376, 02187EastLink 01376, 00476Echostar 02955, 03452Elion 03916Entertain 02132Entone 02302, 03048ER Telecom 02493eTb 04281
Evolution 02479, 02746, 04079
Extra TV 02132
¼ Cable Set Top Box (F to J)Fastway 03382FCTV 01782, 02703Fidelity Communications
01376
Finnet 02030, 02832First Media 03783Freebox 01976Frontier Communications
02378
Fujian Broadcast & TV Network Group
04195
Fujian Broadcast and TV
04195
Gangwon Broadcasting Network
03407
Gansu Cable 04236GCI 01376GCS 03322GDCATV 02980, 03131,
03132Gehua 03278, 00476General Communications
01376
General Instrument 00276, 00476Google 03666Gospell 04205Grande Communications
01877, 03560, 01376
Great Plains Communications
01376
Guangdong Cable 02980, 03131, 03132
Guangxi Broadcasting 02897, 03407, 03961
Guangxi Broadcasting Network
02897, 03407, 03961
Guangzhou Cable 02945
Guizhou Broadcasting Network
03946
Hana TV 02681, 03442Hathw@y 02043, 02726Hawaiian Telcom 03028HBC 01376, 01877,
01982, 02979, 03322, 03340, 03849
HCN 02979, 03340HD+ 03607HDT 03465Hebei Broadcasting 04026, 03967Hebei Broadcasting Network
04026, 03967
Hebei Digital TV 04205Hello TV 03322HelloD 02979Henan Cable 04034HickoryTech 01898, 02302Hikari TV 03237Himawari TV 01760Homecast 02977, 02979,
03389Hong Kong Cable 01374Hrvatski Telekom 02132HSHONG 03965, 03937,
04026Huashu 04034Huawei 02994, 03278,
03937, 01991, 02913, 04281, 01982
Humax 03607, 02762, 02043, 02447, 00660, 01981, 01983, 02620, 02832, 03560, 02165, 02683, 02701, 02889, 02715, 02962, 03051, 03053, 03075, 03319, 03849

Reference Information
En-53
Hunan Cable Net 04205HYA 02989Hyroad 02979HyTV 02979, 03340Hyundai Digital Technology
03465
HZRTV 02960I-Cable 01374i-CAN 01585, 02437I-Digital 03319, 02979IMBTVN 04106INESA 03865Innovative Systems 01898Inotel 02437Inter Mountain Cable 01877, 02479,
04079Invitel 02437InviTV 02437iTSCOM 02703ITV 02979, 03389,
04196, 03498J:COM 01760, 02703,
03925, 01782, 02701, 02700, 02715, 02752, 03051, 03053
Jambox 02030JBC 02979, 03322,
03340, 03849JCN North 02703, 01760,
03474Jerrold 00276, 00476Jiangsu Cable Network 04022Jilin Broadcasting 04009Jilin Cable 04009Jinan Radio and Television Network
04206
Jishi Media 04009Jiuzhou 01991JP PTT 01615JXCN 03948
¼ Cable Set Top Box (K to N)
Kabel Deutschland 03514, 01981, 01983, 02165, 03607, 02620
KabelBW 02889, 01981, 01983
KabelNoord 02015Kaon 02493, 02889,
02746, 03407, 04409, 02682, 02979, 03389
kbro 02350, 03139KCN-TV 02703KCT 01760, 02703,
02752, 03474KCTV 02979, 03340,
03389, 03849, 03322
KCTV JEJU 02979, 03340, 03389, 03849
KCTV-KJ 02979, 03340, 03389, 03849
KDMC 03319, 02979Kiryung 03498Kiss 02132, 02271KoolConnect 01481KPN 02952, 02437Kreatel 02030KT 02683, 03478Lattelecom 02030LG 03340, 02682,
03407, 02979, 03389, 03319
LG U+ 02682Linksys 02271Lishui Huashu 04034Longyan Broadcasting Cable & Tv
04195
Lumos Networks 01998, 03028Magio Sat 02132Magnet 01615Maige TV 03937Massillon Cable 00476, 01376Matanuska Telephone Association
01481, 02254, 02482, 02586
Mediacom 01376, 00476, 01982, 01877
Mediastream 01376, 00476Mega 02683Mega TV 02683Megacable 01376, 00476Meo 02401MetroCast Cablevision 01376, 01982,
00476Mi-Connection 01877Midcontinent Communications
01376, 00476, 01982
Mid-Hudson Cable 00476, 01376Minerva Networks 03118MIO 02275, 02802mio TV 02275, 02802Mitsubishi Electric 03274MOD 03647, 01917Motorola 01376, 00476,
02378, 02437, 01998, 02030, 00858, 01982, 02952, 00276, 01562, 02275, 03916, 01585, 04034, 02401
Movistar 01585, 03288Moxi 02187Moyo 03611MTS 01998, 03611,
01615, 01481, 01898
MyLGTV 02682NET 01883NewWave Communications
00476, 01376, 02187
NIB 03322Ningde Cable TV 04195Noos 02436Northland Communications
01376
Novus 01376, 00476Now TV 02009, 02014NTL 01060, 00276
NTT 03237, 03274NTV Plus 02762NU Telecom 01998, 03028Numericable 02436
¼ Cable Set Top Box (O to S)O2 02586OCN 03865Oi TV 03452, 03454,
04165Olleh TV 02683, 03478Olleh-Skylife 02683, 03478Ono 01562Open IPTV 01615Optimum 01877Optimus Clix 02437Optus 00276, 01060Orange 02407Oriental Cable Networks
03865
Pace 01376, 01060, 02620, 01982, 01877, 01998, 00858, 01582, 01883, 03454, 02294, 02401
Panasonic 02703, 02752, 03474, 01760, 01782, 01982
Parasat 03479Paul Bunyan Communications
02254, 02586
PCCW 02009, 02057Philips 01582, 02378,
03560, 02294Pioneer 01782, 01877,
03925, 02700Pioneer Telephone 02254, 02302Portugal Telecom 02401Premiere 02620Primacom 02889Primestar 02030

Reference Information
En-54
PrimeTel 03611, 02030, 02437
PrimeTV 02030PT 02401PTCI 01376PX 03348QooK TV 02683, 03478Qook-Skylife 02683, 03478Qrix 03465, 02979QuickLine 02493Qwerty 01898, 01481,
01615Qwerty.TV 01898RCN 01376, 00476,
03560Reach Broadband 01376, 01877,
01982Reliance 02556RIO Media 02030Rogers 01877, 01376Rostelecom 03611Sagem 02407, 02436,
03288Sagemcom 03514, 02407,
02436, 03007, 03288
Samsung 03322, 02979, 03319, 01877, 02407, 02015, 03340, 03407, 03451, 03442, 03477, 02610, 02955, 01060, 02683, 03514, 03783, 02589, 02889, 02962, 03265, 03849, 03928, 01982, 01987
SaskTel 01998SBN 03965
Scientific Atlanta 01877, 00858, 01982, 02401, 02345, 01987, 02047, 02436, 03028, 02378
SCTV 02493SCV 02950Seokyung 03340Service Electric 01376, 00476,
01982SetaBox 01917Shaanxi Broadcasting 03965Shanghai 03865Shanghai OCN 03865Shanxi Broadcasting Network
03965
Shaw 01376, 01877, 00476, 02187, 01982
Shenzhen Broadcasting
01991, 04162
Shenzhen Digital TV 01991, 04162Shijiazhuang Broadcasting
04026
Shimanto CATV 02752Sichuan Broadcasting 03953SingTel 02275, 01998,
02802Siti Digital 03664SK Broadband 03442, 02681SK Btv 02681, 03442Sky Austria 02620, 02447,
02832Sky Deutschland 02620, 02447,
02832SkyCable 02950, 03521,
03527, 04177SkyLife 02683, 03478Skyworth 03298, 02960,
03278, 01991, 03521, 04177, 03946, 04162
Smartlabs 03611Smile Content 02437
SMT 03527SMtronics 03319Sogetel 01998, 02482Sonaecom 02437Sonera 00660Source Cable 01376, 00476Starcat 02703, 01782StarHub 01927, 00276Stipte 01898Stofa 02015Suddenlink 01877, 01376,
01982, 03560, 00476
Supercable 00276Supercanal 01376, 00476Suwon Cable 03319Suzhou Cable Network 04022SVA 03865Swisscom 02271SXBCTV 03965
¼ Cable Set Top Box (T to Z)TalkTalk 02994Tbaytel 03028Tbroad 03319TCC 04409, 04408TCN 03340, 02703T-Com 02132TDC 02271TDS Telecom 03028Technicolor 01982, 02994,
03288TechniSat 03316Tele2 00660, 02447Telecentro 00476, 01376TeleColumbus 02889Telefonica 01585, 03028,
03288, 02586Telekom Deutschland 02132Telenet 01920, 03451,
03477Telewest 01987
Telia 02030Telmex 01376TELUS 03028TFN 03127, 03139T-Home 02132Thomson 01582, 01981,
01982, 01983, 03007, 02407
T-Hrvatski Telekom 02132Tianjin Broadcast & TV Network
04010
Tianjin Broadcasting 04010Time Warner 01877, 01376,
00476, 02187TiVo 03560, 03265ToongTV 03322Top 03766TopTV 01991TP 02407Trans PX 00276True Visions 03075, 02762TVB 01615TVS Cable 01376, 01877,
01982U+ 02682U+ tvG 02682UCATV 02703, 01760Unitymedia 02955, 02610,
03451, 03477UPC 01582, 03451,
03477, 00660, 01060
UPC Cablecom 01582, 03451, 03477
US Electronics 00276U-verse 00858Vector 02030VeeTV 03231Verizon 02378Viasat 02030Videotron 01877, 02947Viken Fibernett 02030, 02437
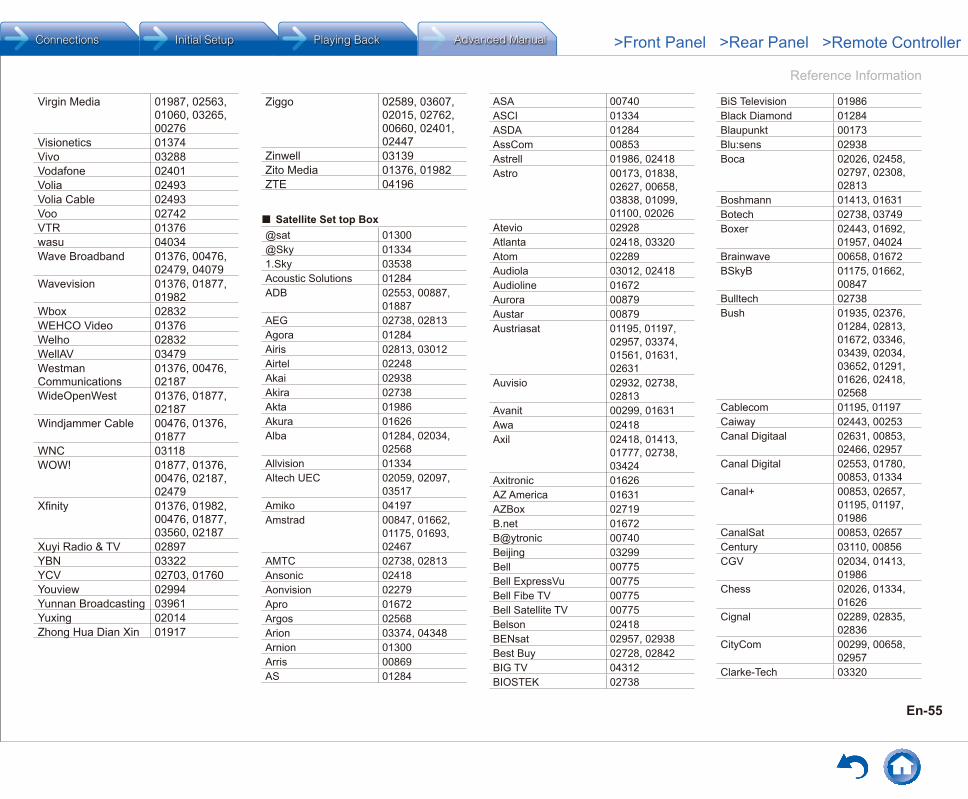
Reference Information
En-55
Virgin Media 01987, 02563, 01060, 03265, 00276
Visionetics 01374Vivo 03288Vodafone 02401Volia 02493Volia Cable 02493Voo 02742VTR 01376wasu 04034Wave Broadband 01376, 00476,
02479, 04079Wavevision 01376, 01877,
01982Wbox 02832WEHCO Video 01376Welho 02832WellAV 03479Westman Communications
01376, 00476, 02187
WideOpenWest 01376, 01877, 02187
Windjammer Cable 00476, 01376, 01877
WNC 03118WOW! 01877, 01376,
00476, 02187, 02479
Xfinity 01376, 01982, 00476, 01877, 03560, 02187
Xuyi Radio & TV 02897YBN 03322YCV 02703, 01760Youview 02994Yunnan Broadcasting 03961Yuxing 02014Zhong Hua Dian Xin 01917
Ziggo 02589, 03607, 02015, 02762, 00660, 02401, 02447
Zinwell 03139Zito Media 01376, 01982ZTE 04196
¼ Satellite Set top Box@sat 01300@Sky 013341.Sky 03538Acoustic Solutions 01284ADB 02553, 00887,
01887AEG 02738, 02813Agora 01284Airis 02813, 03012Airtel 02248Akai 02938Akira 02738Akta 01986Akura 01626Alba 01284, 02034,
02568Allvision 01334Altech UEC 02059, 02097,
03517Amiko 04197Amstrad 00847, 01662,
01175, 01693, 02467
AMTC 02738, 02813Ansonic 02418Aonvision 02279Apro 01672Argos 02568Arion 03374, 04348Arnion 01300Arris 00869AS 01284
ASA 00740ASCI 01334ASDA 01284AssCom 00853Astrell 01986, 02418Astro 00173, 01838,
02627, 00658, 03838, 01099, 01100, 02026
Atevio 02928Atlanta 02418, 03320Atom 02289Audiola 03012, 02418Audioline 01672Aurora 00879Austar 00879Austriasat 01195, 01197,
02957, 03374, 01561, 01631, 02631
Auvisio 02932, 02738, 02813
Avanit 00299, 01631Awa 02418Axil 02418, 01413,
01777, 02738, 03424
Axitronic 01626AZ America 01631AZBox 02719B.net 01672B@ytronic 00740Beijing 03299Bell 00775Bell ExpressVu 00775Bell Fibe TV 00775Bell Satellite TV 00775Belson 02418BENsat 02957, 02938Best Buy 02728, 02842BIG TV 04312BIOSTEK 02738
BiS Television 01986Black Diamond 01284Blaupunkt 00173Blu:sens 02938Boca 02026, 02458,
02797, 02308, 02813
Boshmann 01413, 01631Botech 02738, 03749Boxer 02443, 01692,
01957, 04024Brainwave 00658, 01672BSkyB 01175, 01662,
00847Bulltech 02738Bush 01935, 02376,
01284, 02813, 01672, 03346, 03439, 02034, 03652, 01291, 01626, 02418, 02568
Cablecom 01195, 01197Caiway 02443, 00253Canal Digitaal 02631, 00853,
02466, 02957Canal Digital 02553, 01780,
00853, 01334Canal+ 00853, 02657,
01195, 01197, 01986
CanalSat 00853, 02657Century 03110, 00856CGV 02034, 01413,
01986Chess 02026, 01334,
01626Cignal 02289, 02835,
02836CityCom 00299, 00658,
02957Clarke-Tech 03320
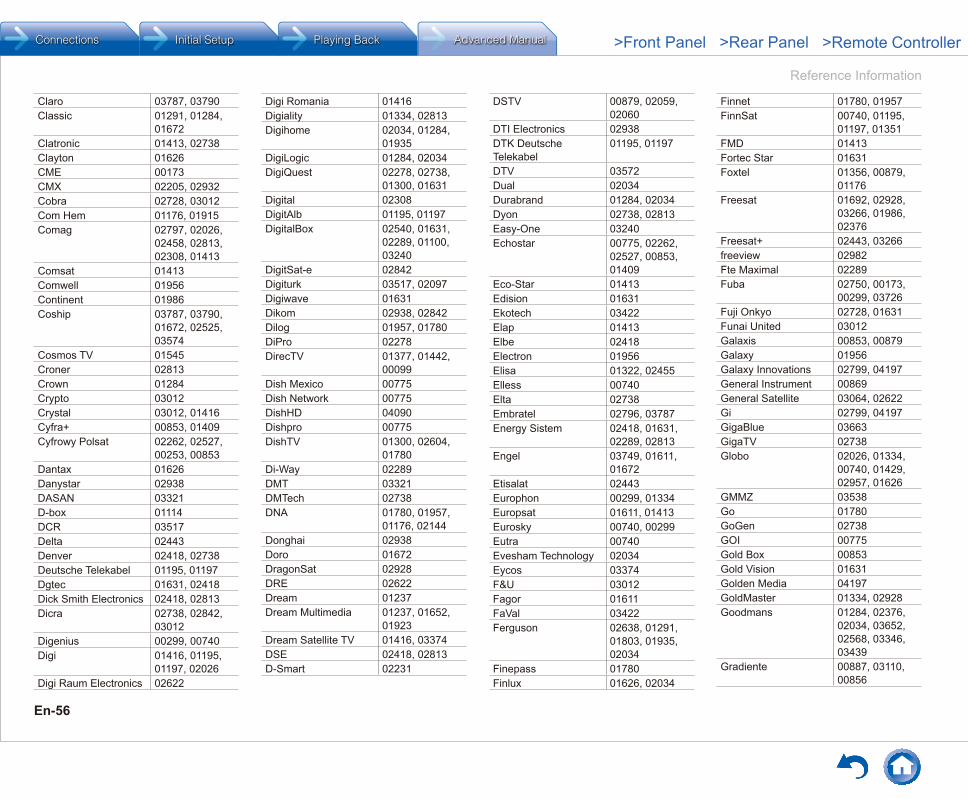
Reference Information
En-56
Claro 03787, 03790Classic 01291, 01284,
01672Clatronic 01413, 02738Clayton 01626CME 00173CMX 02205, 02932Cobra 02728, 03012Com Hem 01176, 01915Comag 02797, 02026,
02458, 02813, 02308, 01413
Comsat 01413Comwell 01956Continent 01986Coship 03787, 03790,
01672, 02525, 03574
Cosmos TV 01545Croner 02813Crown 01284Crypto 03012Crystal 03012, 01416Cyfra+ 00853, 01409Cyfrowy Polsat 02262, 02527,
00253, 00853Dantax 01626Danystar 02938DASAN 03321D-box 01114DCR 03517Delta 02443Denver 02418, 02738Deutsche Telekabel 01195, 01197Dgtec 01631, 02418Dick Smith Electronics 02418, 02813Dicra 02738, 02842,
03012Digenius 00299, 00740Digi 01416, 01195,
01197, 02026Digi Raum Electronics 02622
Digi Romania 01416Digiality 01334, 02813Digihome 02034, 01284,
01935DigiLogic 01284, 02034DigiQuest 02278, 02738,
01300, 01631Digital 02308DigitAlb 01195, 01197DigitalBox 02540, 01631,
02289, 01100, 03240
DigitSat-e 02842Digiturk 03517, 02097Digiwave 01631Dikom 02938, 02842Dilog 01957, 01780DiPro 02278DirecTV 01377, 01442,
00099Dish Mexico 00775Dish Network 00775DishHD 04090Dishpro 00775DishTV 01300, 02604,
01780Di-Way 02289DMT 03321DMTech 02738DNA 01780, 01957,
01176, 02144Donghai 02938Doro 01672DragonSat 02928DRE 02622Dream 01237Dream Multimedia 01237, 01652,
01923Dream Satellite TV 01416, 03374DSE 02418, 02813D-Smart 02231
DSTV 00879, 02059, 02060
DTI Electronics 02938DTK Deutsche Telekabel
01195, 01197
DTV 03572Dual 02034Durabrand 01284, 02034Dyon 02738, 02813Easy-One 03240Echostar 00775, 02262,
02527, 00853, 01409
Eco-Star 01413Edision 01631Ekotech 03422Elap 01413Elbe 02418Electron 01956Elisa 01322, 02455Elless 00740Elta 02738Embratel 02796, 03787Energy Sistem 02418, 01631,
02289, 02813Engel 03749, 01611,
01672Etisalat 02443Europhon 00299, 01334Europsat 01611, 01413Eurosky 00740, 00299Eutra 00740Evesham Technology 02034Eycos 03374F&U 03012Fagor 01611FaVal 03422Ferguson 02638, 01291,
01803, 01935, 02034
Finepass 01780Finlux 01626, 02034
Finnet 01780, 01957FinnSat 00740, 01195,
01197, 01351FMD 01413Fortec Star 01631Foxtel 01356, 00879,
01176Freesat 01692, 02928,
03266, 01986, 02376
Freesat+ 02443, 03266freeview 02982Fte Maximal 02289Fuba 02750, 00173,
00299, 03726Fuji Onkyo 02728, 01631Funai United 03012Galaxis 00853, 00879Galaxy 01956Galaxy Innovations 02799, 04197General Instrument 00869General Satellite 03064, 02622Gi 02799, 04197GigaBlue 03663GigaTV 02738Globo 02026, 01334,
00740, 01429, 02957, 01626
GMMZ 03538Go 01780GoGen 02738GOI 00775Gold Box 00853Gold Vision 01631Golden Media 04197GoldMaster 01334, 02928Goodmans 01284, 02376,
02034, 03652, 02568, 03346, 03439
Gradiente 00887, 03110, 00856
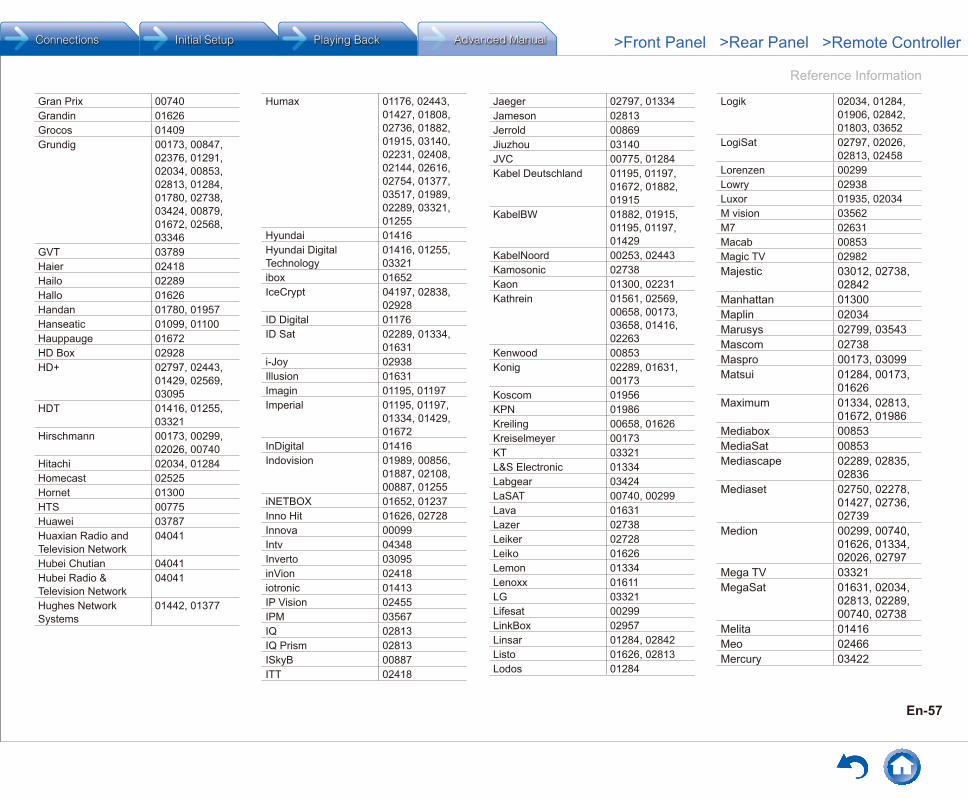
Reference Information
En-57
Gran Prix 00740Grandin 01626Grocos 01409Grundig 00173, 00847,
02376, 01291, 02034, 00853, 02813, 01284, 01780, 02738, 03424, 00879, 01672, 02568, 03346
GVT 03789Haier 02418Hailo 02289Hallo 01626Handan 01780, 01957Hanseatic 01099, 01100Hauppauge 01672HD Box 02928HD+ 02797, 02443,
01429, 02569, 03095
HDT 01416, 01255, 03321
Hirschmann 00173, 00299, 02026, 00740
Hitachi 02034, 01284Homecast 02525Hornet 01300HTS 00775Huawei 03787Huaxian Radio and Television Network
04041
Hubei Chutian 04041Hubei Radio & Television Network
04041
Hughes Network Systems
01442, 01377
Humax 01176, 02443, 01427, 01808, 02736, 01882, 01915, 03140, 02231, 02408, 02144, 02616, 02754, 01377, 03517, 01989, 02289, 03321, 01255
Hyundai 01416Hyundai Digital Technology
01416, 01255, 03321
ibox 01652IceCrypt 04197, 02838,
02928ID Digital 01176ID Sat 02289, 01334,
01631i-Joy 02938Illusion 01631Imagin 01195, 01197Imperial 01195, 01197,
01334, 01429, 01672
InDigital 01416Indovision 01989, 00856,
01887, 02108, 00887, 01255
iNETBOX 01652, 01237Inno Hit 01626, 02728Innova 00099Intv 04348Inverto 03095inVion 02418iotronic 01413IP Vision 02455IPM 03567IQ 02813IQ Prism 02813ISkyB 00887ITT 02418
Jaeger 02797, 01334Jameson 02813Jerrold 00869Jiuzhou 03140JVC 00775, 01284Kabel Deutschland 01195, 01197,
01672, 01882, 01915
KabelBW 01882, 01915, 01195, 01197, 01429
KabelNoord 00253, 02443Kamosonic 02738Kaon 01300, 02231Kathrein 01561, 02569,
00658, 00173, 03658, 01416, 02263
Kenwood 00853Konig 02289, 01631,
00173Koscom 01956KPN 01986Kreiling 00658, 01626Kreiselmeyer 00173KT 03321L&S Electronic 01334Labgear 03424LaSAT 00740, 00299Lava 01631Lazer 02738Leiker 02728Leiko 01626Lemon 01334Lenoxx 01611LG 03321Lifesat 00299LinkBox 02957Linsar 01284, 02842Listo 01626, 02813Lodos 01284
Logik 02034, 01284, 01906, 02842, 01803, 03652
LogiSat 02797, 02026, 02813, 02458
Lorenzen 00299Lowry 02938Luxor 01935, 02034M vision 03562M7 02631Macab 00853Magic TV 02982Majestic 03012, 02738,
02842Manhattan 01300Maplin 02034Marusys 02799, 03543Mascom 02738Maspro 00173, 03099Matsui 01284, 00173,
01626Maximum 01334, 02813,
01672, 01986Mediabox 00853MediaSat 00853Mediascape 02289, 02835,
02836Mediaset 02750, 02278,
01427, 02736, 02739
Medion 00299, 00740, 01626, 01334, 02026, 02797
Mega TV 03321MegaSat 01631, 02034,
02813, 02289, 00740, 02738
Melita 01416Meo 02466Mercury 03422
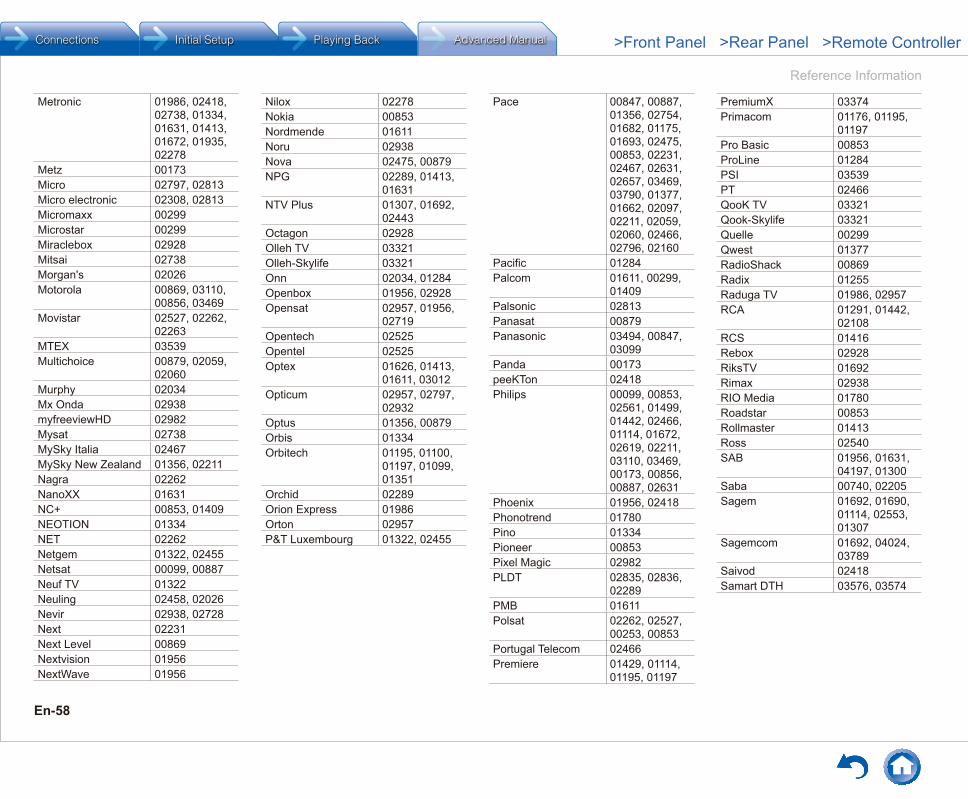
Reference Information
En-58
Metronic 01986, 02418, 02738, 01334, 01631, 01413, 01672, 01935, 02278
Metz 00173Micro 02797, 02813Micro electronic 02308, 02813Micromaxx 00299Microstar 00299Miraclebox 02928Mitsai 02738Morgan's 02026Motorola 00869, 03110,
00856, 03469Movistar 02527, 02262,
02263MTEX 03539Multichoice 00879, 02059,
02060Murphy 02034Mx Onda 02938myfreeviewHD 02982Mysat 02738MySky Italia 02467MySky New Zealand 01356, 02211Nagra 02262NanoXX 01631NC+ 00853, 01409NEOTION 01334NET 02262Netgem 01322, 02455Netsat 00099, 00887Neuf TV 01322Neuling 02458, 02026Nevir 02938, 02728Next 02231Next Level 00869Nextvision 01956NextWave 01956
Nilox 02278Nokia 00853Nordmende 01611Noru 02938Nova 02475, 00879NPG 02289, 01413,
01631NTV Plus 01307, 01692,
02443Octagon 02928Olleh TV 03321Olleh-Skylife 03321Onn 02034, 01284Openbox 01956, 02928Opensat 02957, 01956,
02719Opentech 02525Opentel 02525Optex 01626, 01413,
01611, 03012Opticum 02957, 02797,
02932Optus 01356, 00879Orbis 01334Orbitech 01195, 01100,
01197, 01099, 01351
Orchid 02289Orion Express 01986Orton 02957P&T Luxembourg 01322, 02455
Pace 00847, 00887, 01356, 02754, 01682, 01175, 01693, 02475, 00853, 02231, 02467, 02631, 02657, 03469, 03790, 01377, 01662, 02097, 02211, 02059, 02060, 02466, 02796, 02160
Pacific 01284Palcom 01611, 00299,
01409Palsonic 02813Panasat 00879Panasonic 03494, 00847,
03099Panda 00173peeKTon 02418Philips 00099, 00853,
02561, 01499, 01442, 02466, 01114, 01672, 02619, 02211, 03110, 03469, 00173, 00856, 00887, 02631
Phoenix 01956, 02418Phonotrend 01780Pino 01334Pioneer 00853Pixel Magic 02982PLDT 02835, 02836,
02289PMB 01611Polsat 02262, 02527,
00253, 00853Portugal Telecom 02466Premiere 01429, 01114,
01195, 01197
PremiumX 03374Primacom 01176, 01195,
01197Pro Basic 00853ProLine 01284PSI 03539PT 02466QooK TV 03321Qook-Skylife 03321Quelle 00299Qwest 01377RadioShack 00869Radix 01255Raduga TV 01986, 02957RCA 01291, 01442,
02108RCS 01416Rebox 02928RiksTV 01692Rimax 02938RIO Media 01780Roadstar 00853Rollmaster 01413Ross 02540SAB 01956, 01631,
04197, 01300Saba 00740, 02205Sagem 01692, 01690,
01114, 02553, 01307
Sagemcom 01692, 04024, 03789
Saivod 02418Samart DTH 03576, 03574

Reference Information
En-59
Samsung 03063, 00253, 01442, 01377, 02467, 01682, 01989, 03266, 00853, 01662, 02525, 03321, 03784, 03834, 03838, 01255, 01693
Sansui 01545Sanyo 01626Sat Control 01300Sat Industrie 01611SAT+ 01409SatCatcher 01956Satforce 03374Satplus 01100SatyCon 01631Schaub Lorenz 02034, 02418Schneider 02842Schwaiger 01672, 01429,
02308, 02458, 01631, 02797, 02813, 00740, 01334, 02957
Schwaiger CS 01631Scott 02738SCS 00299, 00740Sedea 01626Sedea Electronique 01626SEG 01626, 01284,
02034Sencor 02813Servimat 01611Set-One 03240, 02728Shark 01631Sharp 01935, 02034Shaw Direct 00869Sherwood 01409Shinelco 02738, 02278,
02938
SHOI 02938Siemens 00173, 01657,
01429, 02418, 01626, 01334, 01672
Sigmatek 02418, 02813, 02738
SignalMAX 01956Silva 00299Silva Schneider 00740SilverCrest 02026, 02308,
02458, 02932SKY 01662Sky Austria 02754, 02443,
01429, 01114, 01915, 01195, 01197
Sky Brasil 01377, 03110, 00887, 00856, 00099, 01499, 02619
Sky Deutschland 02754, 02443, 01429, 01114, 01915, 01195, 01197
Sky Ireland 01175, 01662, 00847
Sky Italia 01693, 02467, 00853
Sky Mexico 00856, 02619, 00887, 01377, 03469
Sky New Zealand 02211, 00887, 00856, 01356
SKY PerfecTV! 03099, 02616, 03049
Sky UK 01175, 01662, 00847
SkyCable 01631, 01957SkyLife 03321, 01255
Skylink 02957, 01545, 02443, 02928, 01195, 01197, 01986
Skymaster 01409, 02205, 01611, 02728, 02932, 01545, 01334
Skymax 01413Skypex 00740Skyplus 01334, 02026,
00740, 01175SkySat 01100Skytec 02928Skyvision 02797, 01334SkyWay 02928Skyworth 01631, 02835,
02836SL 00740, 02026,
00299, 01672SM Electronic 01409Smart 01631, 01413,
03095, 02289, 00740, 00299
Sogo 02842Sonera 01780, 01957Sony 01558, 00847,
00853, 03049Spiderbox 03562Star 00887Star Choice 00869Starmax 02638Steinner 02738Stream System 01300Strong 01409, 02235,
01626, 02278, 02418, 02813, 00879, 03424, 00853, 01300, 03374, 01284, 01682
Sun Box 03571Sun Direct 02525Sunny 01300Sunstech 02738Supernova 00887Supratech 01413Systec 01334Sytech 02418, 02842,
03012S-ZWO 03374TATA Sky 03575TBoston 02418TDS Telecom 00775Teac 01957, 01322,
02813Technical 01626Technicolor 03469, 03790Technika 01284, 01672,
02034TechniSat 01197, 01195,
01100, 01099, 01351, 03440, 02813, 01322
Technoit 02278Technosonic 01672Technotrend 01429, 01672,
02263Techwood 01284, 02034,
01626, 01935Tecsat 01986TEKCOMM 02738Telasat 02466TELE System 02750, 01611,
01409, 02739, 03726, 02813
Tele2 01195, 01197Telefonica 01692, 02262,
02527, 02263TeleSAT 02631, 02466

Reference Information
En-60
Telestar 01100, 01099, 01334, 01197, 02540, 01195, 01351, 01626, 01672
Televes 01300, 01334Televisa 00887TelkomVision 04310Telsey 02738TelSKY 02540Telstra 01356TELUS 00775Tesla 01626Tevion 02205, 01409,
01672, 02026, 02813
Thai 03573, 03539Thomson 01291, 01935,
01662, 00847, 00853, 01175, 02278, 01307, 02160, 02619, 03110, 03469
Tiny 01672Titan 02205Tividi 01429TiVo 01377, 01442TivuSat 02750T-Mobile 02631, 02443,
01545TNT SAT 01692, 01195,
01197, 01986Tokai 02938Tonna 01611, 02458Topfield 01545, 01986,
01208, 02838Toshiba 01803, 01284,
01429TPS 01307Transparent Video Systems
01780, 01957
TrekStor 02738Triax 01291, 01626,
00853, 01099, 01611, 01631
Tricolor TV 02622, 03064True Visions 03140, 01208,
02408, 03784TT-micro 01429TV Cabo 02160TV Star 03012TV Vlaanderen 02631, 00853,
02466TVA Digital 02895, 01692,
02262TVB 01989TVonics 01906, 01803Twinner 01611UEC 00879, 01356UfaNet 01986UNE 01692United 02842, 02278,
03012, 01626, 02418
Unitymedia 01429, 01882, 01915
Universum 00173, 00299, 00740, 01099
Unixbox 01652UPC 01780, 02443UPC Cablecom 01195, 01197UPC Direct 02443Vantage 02797Variosat 00173VEA 02418Vectra 01195, 01197Vestel 01626, 01284,
02231, 02034, 03517
VH Sat 00299Via Embratel 03787, 02796
Viasat 01682, 01197, 01195, 02235, 00253
Videocon 03077Vietnam Television Corporation
03834
Viola Digital 01672Vision 01626VisionNet 01631Visiosat 01413Vistron 00740Vitecom 01413Viva 00856Vivax 02418Vivo 02262, 02895,
01692, 02527Volcasat 02418Voom 00869VTC 03834Vu+ 03458, 02799,
03543Walker 02034Wavelength 01413Wharfedale 01935, 02034,
01284, 01906Winix 02278Wintel 00299Wisi 00740, 00173,
00299, 02957, 01986
Woxter 02418, 02813Xoro 02813, 02738,
03012, 03422Xtreme 01300Xtrend 03320Yakumo 01413Yes 00887, 01887Youview 03140ZapMaster 00740
Zehnder 01777, 03422, 01334, 01413, 02289, 03424, 02034, 00740, 01631
Zenega 02604Zenith 00856, 03110,
03469Ziggo 02443, 01499,
01657, 00253Zircon 02957Zodiac 03726Zon 02160Zon Optimus 02160
¼ Video - AccessoryA.C.Ryan 02709, 03350ABS 01272Acer 01272Alienware 01272Apple 02615ASRock 01272Boxee 03693Ceton 01272Claritas 01272CyberPower 01272Daily Media 01272Dell 01272Digitech 02260D-Link 03671, 03693,
02186Elonex 01272Eminent 03215, 02260Emtec 02709Fantec 03350, 02709Fujitsu Siemens 01272Funai 03339Gateway 01272G-Box Midnight 04440Hewlett Packard 01272

Reference Information
En-61
hFX 01272Howard Computers 01272HP 01272Hush 01272iBUYPOWER 01272iconBIT 03350, 02709ICY Box 03350iNext 03350Iomega 02558ISTAR 02260JadooTV 02260Keedox 04442LG 03373Linksys 01272Magnavox 03339Mede8er 02709Media Center PC 01272Micca 03669Microsoft 01272, 01805,
04000Mind 01272Netgear 03324, 04401,
03292NiveusMedia 01272Northgate 01272Omniverse 04421Packard Bell 01272Panasonic 03760Philips 01272Pivos 04339PopBox 02260Popcorn Hour 02260RCA 03335Ricavision 01272Roku 03061, 02371Seagate 02698Sony 02713, 01272Stack 9 01272Sumvision 04339Systemax 01272
Tagar Systems 01272Toshiba 01272Touch 01272TrekStor 02723Trust 01272VIA Technologies 01272Viewsonic 01272VIZIO 03670Voodoo 01272Western Digital 02558Woxter 02709Xbox 01805, 04000,
01272Xtreamer 02723ZT Group 01272
¼ CDA.V.International 70157ADVANTAGE 70032AH! 70157Aiwa 70157Arcam 70157Atoll 70157Atoll Electronique 70157Audio Research 70157Audiolab 70157Audiomeca 70157Audioton 70157AVI 70157Balanced Audio Technology
70157
BAT 70157Cairn 70157California Audio Labs 70029, 70303Cambridge 70157Cambridge Audio 70157Carver 70157CCE 70157Curtis Mathes 70029
Cyrus 70157Denon 70766DKK 70000DMX Electronics 70157Dynaco 70157Epworth 70157Genexxa 70032, 70000Goldmund 70157Grundig 70157Harman/Kardon 70157, 73044HIFIAkademie 70157Hitachi 70032JVC 70072Integra 71817Kenwood 70036, 70157Krell 70157Linn 70157Loewe 70157Magnavox 70157Marantz 70157, 70029Matsui 70157MCS 70029Memorex 70032Meridian 70157Micromega 70157Miro 70000Mission 70157Myryad 70157NAD 70721, 70000Naim 70157New Acoustic Dimension
70721, 70000
NSM 70157Onkyo 71817Optimus 70032, 70000Panasonic 70303, 70029Philips 70157Pioneer 70032Polk Audio 70157
Primare 70157Proton 70157QED 70157Quad 70157Quasar 70029Radiola 70157RCA 70032Restek 70157Revox 70157Rotel 70157SAE 70157Sansui 70157SAST 70157Siemens 70157Silsonic 70036Simaudio 70157Sonic Frontiers 70157Sony 70000, 70490Sylvania 70157TAG McLaren 70157TAG McLaren Audio 70157Tandy 70032Tascam 73095, 73511,
73533Teac 73095, 73531,
73532, 73551Technics 70303, 70029,
70207Thorens 70157Thule Audio 70157Universum 70157Victor 70072Wards 70032, 70000,
70157Yamaha 70036, 70032,
70490Zonda 70157
¼ Cassette Deck
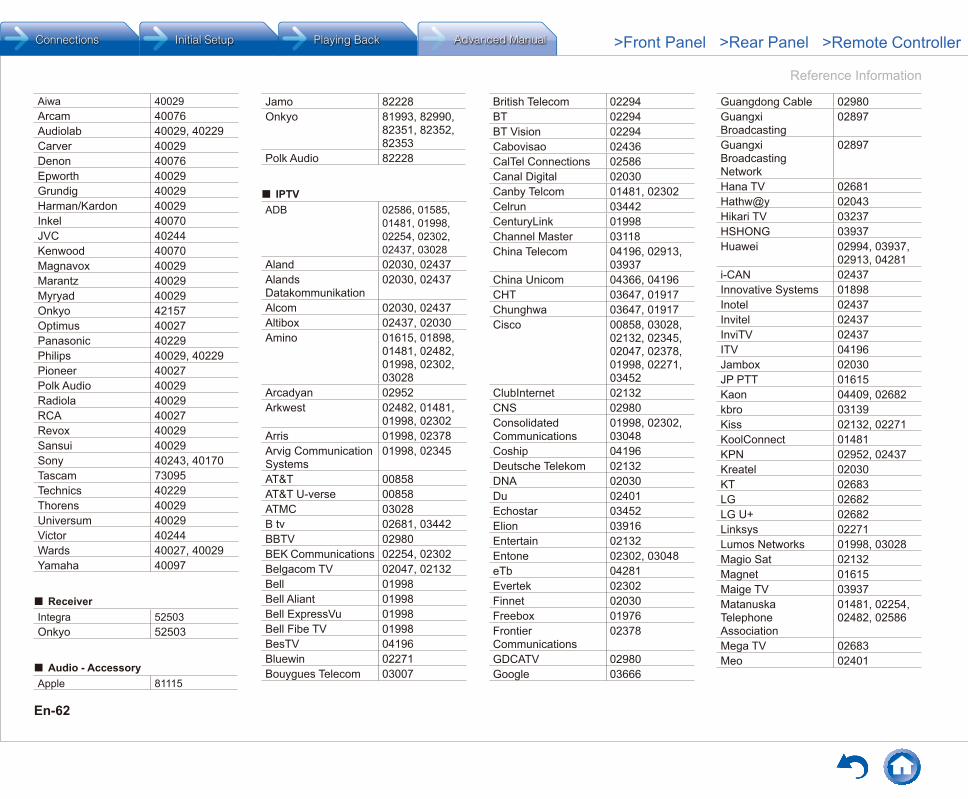
Reference Information
En-62
Aiwa 40029Arcam 40076Audiolab 40029, 40229Carver 40029Denon 40076Epworth 40029Grundig 40029Harman/Kardon 40029Inkel 40070JVC 40244Kenwood 40070Magnavox 40029Marantz 40029Myryad 40029Onkyo 42157Optimus 40027Panasonic 40229Philips 40029, 40229Pioneer 40027Polk Audio 40029Radiola 40029RCA 40027Revox 40029Sansui 40029Sony 40243, 40170Tascam 73095Technics 40229Thorens 40029Universum 40029Victor 40244Wards 40027, 40029Yamaha 40097
¼ ReceiverIntegra 52503Onkyo 52503
¼ Audio - AccessoryApple 81115
Jamo 82228Onkyo 81993, 82990,
82351, 82352, 82353
Polk Audio 82228
¼ IPTVADB 02586, 01585,
01481, 01998, 02254, 02302, 02437, 03028
Aland 02030, 02437Alands Datakommunikation
02030, 02437
Alcom 02030, 02437Altibox 02437, 02030Amino 01615, 01898,
01481, 02482, 01998, 02302, 03028
Arcadyan 02952Arkwest 02482, 01481,
01998, 02302Arris 01998, 02378Arvig Communication Systems
01998, 02345
AT&T 00858AT&T U-verse 00858ATMC 03028B tv 02681, 03442BBTV 02980BEK Communications 02254, 02302Belgacom TV 02047, 02132Bell 01998Bell Aliant 01998Bell ExpressVu 01998Bell Fibe TV 01998BesTV 04196Bluewin 02271Bouygues Telecom 03007
British Telecom 02294BT 02294BT Vision 02294Cabovisao 02436CalTel Connections 02586Canal Digital 02030Canby Telcom 01481, 02302Celrun 03442CenturyLink 01998Channel Master 03118China Telecom 04196, 02913,
03937China Unicom 04366, 04196CHT 03647, 01917Chunghwa 03647, 01917Cisco 00858, 03028,
02132, 02345, 02047, 02378, 01998, 02271, 03452
ClubInternet 02132CNS 02980Consolidated Communications
01998, 02302, 03048
Coship 04196Deutsche Telekom 02132DNA 02030Du 02401Echostar 03452Elion 03916Entertain 02132Entone 02302, 03048eTb 04281Evertek 02302Finnet 02030Freebox 01976Frontier Communications
02378
GDCATV 02980Google 03666
Guangdong Cable 02980Guangxi Broadcasting
02897
Guangxi Broadcasting Network
02897
Hana TV 02681Hathw@y 02043Hikari TV 03237HSHONG 03937Huawei 02994, 03937,
02913, 04281i-CAN 02437Innovative Systems 01898Inotel 02437Invitel 02437InviTV 02437ITV 04196Jambox 02030JP PTT 01615Kaon 04409, 02682kbro 03139Kiss 02132, 02271KoolConnect 01481KPN 02952, 02437Kreatel 02030KT 02683LG 02682LG U+ 02682Linksys 02271Lumos Networks 01998, 03028Magio Sat 02132Magnet 01615Maige TV 03937Matanuska Telephone Association
01481, 02254, 02482, 02586
Mega TV 02683Meo 02401

Reference Information
En-63
MHTC 01481, 01998, 02254, 02302, 02482
Minerva Networks 03118MIO 02275, 02802mio TV 02275, 02802Mitsubishi Electric 03274MM&G Enterprises 01481, 01998,
02302, 02482MOD 03647, 01917Motorola 02378, 02437,
01998, 02030, 00858, 02952, 02275, 03916, 01585, 02401
Movistar 01585, 03288Moyo 03611MTS 01998, 03611,
01615, 01481, 01898
MyLGTV 02682Now TV 02009, 02014NTT 03237, 03274NU Telecom 01998, 03028Numericable 02436Oi TV 03452, 03454,
04165Open IPTV 01615Optimus Clix 02437Orange 02407Pace 01998, 00858,
03454, 02294, 02401
PCCW 02009, 02057Philips 02378Pioneer Telephone 02254, 02302Portugal Telecom 02401Primestar 02030PrimeTel 02030, 02437,
03611PrimeTV 02030
PT 02401Qwerty 01898, 01481,
01615Qwerty.TV 01898Reliance 02556RIO Media 02030Rostelecom 03611Sagem 02407, 03288Sagemcom 02436, 02407,
03007Samsung 02407SaskTel 01998Scientific Atlanta 00858, 02345,
02047, 02401, 03028, 02378
SetaBox 01917SingTel 02275, 01998,
02802SK Broadband 03442, 02681SK Btv 02681, 03442Sky Austria 02620Sky Deutschland 02620Smartlabs 03611Smile Content 02437Sogetel 01998Sonaecom 02437SureWest 01998, 01481,
02254, 02482, 02586
Swisscom 02271TalkTalk 02994TCC 04409TDC 02271Technicolor 02994Telefonica 01585, 03028,
03288Telekom Deutschland 02132Telia 02030TELUS 03028TeNeT 01898
T-Home 02132Thomson 03007, 02407TVB 01615U+ tvG 02682U-verse 00858Verizon 02378Viasat 02030Viken Fibernett 02030, 02437Vivo 03288Vodafone 02401WNC 03118Youview 02994Yuxing 02014Zinwell 03139ZTE 04196
¼ IPTV PVR CombinationADB 01585, 02254,
02437Altibox 02437Amino 01615, 01898Arcadyan 02952Arris 01998, 02378AT&T 00858AT&T U-verse 00858ATMC 03028BBTV 02980Belgacom TV 02047, 02132Bell 01998Bell Aliant 01998Bell ExpressVu 01998Bell Fibe TV 01998Bluewin 02271Bouygues Telecom 03007British Telecom 02294BT 02294BT Vision 02294Cabovisao 02436Canal Digital 02030
CenturyLink 01998CHT 03647Chunghwa 03647Cisco 03028, 02132,
00858, 02047, 02345, 02271, 02378, 03452
ClubInternet 02132CNS 02980Consolidated Communications
01998
Deutsche Telekom 02132Du 02401Echostar 03452Elion 03916Entertain 02132Entone 03048Freebox 01976Frontier Communications
02378
GDCATV 02980Glashart Media 01615, 01898Google 03666Guangdong Cable 02980Hikari TV 03237Huawei 02994i-CAN 02437Innovative Systems 01898Invitel 02437InviTV 02437Kaon 04409kbro 03139Kiss 02132, 02271KPN 02952, 02437Linksys 02271Lumos Networks 01998Magio Sat 02132Magnet 01615Meo 02401MetroNet 01998
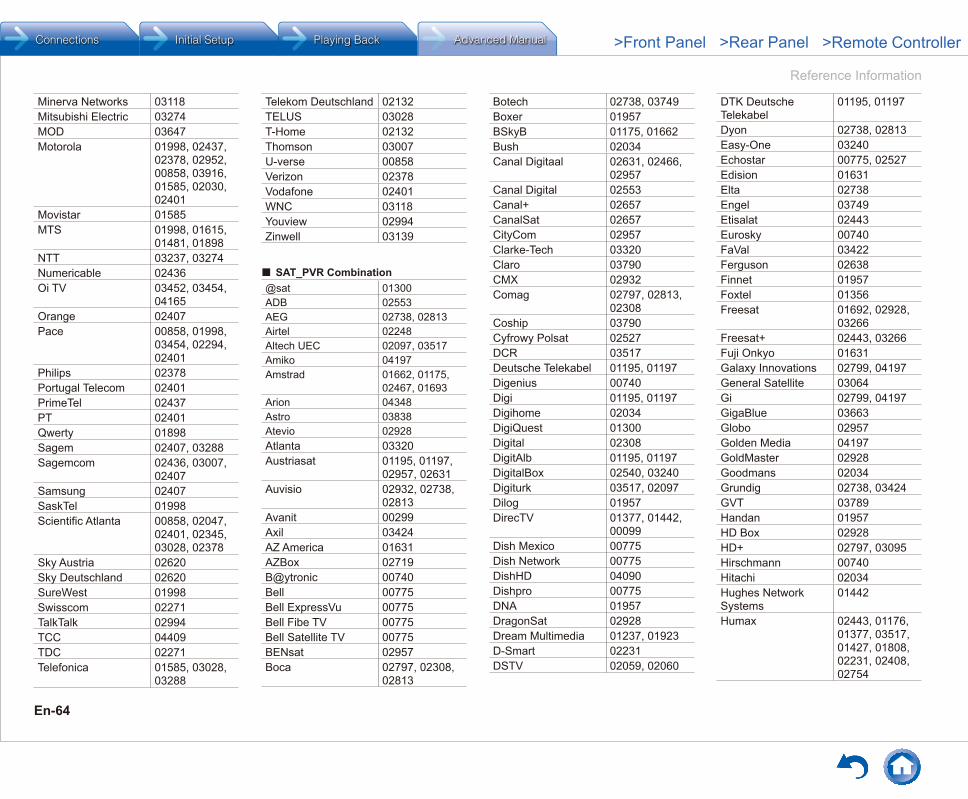
Reference Information
En-64
Minerva Networks 03118Mitsubishi Electric 03274MOD 03647Motorola 01998, 02437,
02378, 02952, 00858, 03916, 01585, 02030, 02401
Movistar 01585MTS 01998, 01615,
01481, 01898NTT 03237, 03274Numericable 02436Oi TV 03452, 03454,
04165Orange 02407Pace 00858, 01998,
03454, 02294, 02401
Philips 02378Portugal Telecom 02401PrimeTel 02437PT 02401Qwerty 01898Sagem 02407, 03288Sagemcom 02436, 03007,
02407Samsung 02407SaskTel 01998Scientific Atlanta 00858, 02047,
02401, 02345, 03028, 02378
Sky Austria 02620Sky Deutschland 02620SureWest 01998Swisscom 02271TalkTalk 02994TCC 04409TDC 02271Telefonica 01585, 03028,
03288
Telekom Deutschland 02132TELUS 03028T-Home 02132Thomson 03007U-verse 00858Verizon 02378Vodafone 02401WNC 03118Youview 02994Zinwell 03139
¼ SAT_PVR Combination@sat 01300ADB 02553AEG 02738, 02813Airtel 02248Altech UEC 02097, 03517Amiko 04197Amstrad 01662, 01175,
02467, 01693Arion 04348Astro 03838Atevio 02928Atlanta 03320Austriasat 01195, 01197,
02957, 02631Auvisio 02932, 02738,
02813Avanit 00299Axil 03424AZ America 01631AZBox 02719B@ytronic 00740Bell 00775Bell ExpressVu 00775Bell Fibe TV 00775Bell Satellite TV 00775BENsat 02957Boca 02797, 02308,
02813
Botech 02738, 03749Boxer 01957BSkyB 01175, 01662Bush 02034Canal Digitaal 02631, 02466,
02957Canal Digital 02553Canal+ 02657CanalSat 02657CityCom 02957Clarke-Tech 03320Claro 03790CMX 02932Comag 02797, 02813,
02308Coship 03790Cyfrowy Polsat 02527DCR 03517Deutsche Telekabel 01195, 01197Digenius 00740Digi 01195, 01197Digihome 02034DigiQuest 01300Digital 02308DigitAlb 01195, 01197DigitalBox 02540, 03240Digiturk 03517, 02097Dilog 01957DirecTV 01377, 01442,
00099Dish Mexico 00775Dish Network 00775DishHD 04090Dishpro 00775DNA 01957DragonSat 02928Dream Multimedia 01237, 01923D-Smart 02231DSTV 02059, 02060
DTK Deutsche Telekabel
01195, 01197
Dyon 02738, 02813Easy-One 03240Echostar 00775, 02527Edision 01631Elta 02738Engel 03749Etisalat 02443Eurosky 00740FaVal 03422Ferguson 02638Finnet 01957Foxtel 01356Freesat 01692, 02928,
03266Freesat+ 02443, 03266Fuji Onkyo 01631Galaxy Innovations 02799, 04197General Satellite 03064Gi 02799, 04197GigaBlue 03663Globo 02957Golden Media 04197GoldMaster 02928Goodmans 02034Grundig 02738, 03424GVT 03789Handan 01957HD Box 02928HD+ 02797, 03095Hirschmann 00740Hitachi 02034Hughes Network Systems
01442
Humax 02443, 01176, 01377, 03517, 01427, 01808, 02231, 02408, 02754

Reference Information
En-65
IceCrypt 04197, 02928ID Sat 01334Indovision 01989iNETBOX 01237Intv 04348Inverto 03095Jaeger 02797JVC 00775Kamosonic 02738Kaon 01300Kathrein 02569, 01561,
03658, 00658Labgear 03424LaSAT 00740LinkBox 02957LogiSat 02797, 02813Luxor 01935M vision 03562M7 02631Marusys 02799, 03543Maspro 03099Maximum 01334, 02813Medion 02797, 00740MegaSat 01631, 02813,
02034, 02738Meo 02466Mercury 03422Micro 02797, 02813Micro electronic 02308Miraclebox 02928Motorola 00869Movistar 02527Multichoice 02059, 02060Mysat 02738MySky Italia 02467MySky New Zealand 01356, 02211NEOTION 01334Nova 02475NTV Plus 01307, 01692,
02443
Octagon 02928Openbox 02928Opensat 02957, 02719Opticum 02957, 02797,
02932Orbitech 01195, 01197Orton 02957Pace 01682, 01175,
02754, 02475, 02231, 01356, 02467, 02631, 02657, 03790, 01662, 02097, 02211, 02059, 02060, 02466, 02895
Panasonic 03099Philips 01442, 02466,
00099, 02631Polsat 02527Portugal Telecom 02466PT 02466Qwest 01377Raduga TV 02957RCA 01442Rebox 02928Ross 02540SAB 04197Sagem 01692, 02553,
01307Sagemcom 03789, 01692Samsung 03063, 01442,
01682, 01989, 02467, 01377, 03266, 01662, 03784, 03838, 01693
Sansui 01545Sat Control 01300Schwaiger 02308, 00740,
02957
SEG 02034Set-One 03240Sharp 02034, 01935Shaw Direct 00869Siemens 01657SilverCrest 02308, 02932Sky Austria 02754, 02443Sky Brasil 01377Sky Deutschland 02754, 02443Sky Ireland 01175, 01662Sky Italia 02467, 01693Sky New Zealand 02211, 01356SKY PerfecTV! 03099Sky UK 01175, 01662SkyCable 01631, 01957Skylink 02957, 01545,
02443, 02928, 01195, 01197
Skymaster 02932, 01545Skypex 00740Skyplus 00740, 01175,
01334Skytec 02928Skyvision 02797SkyWay 02928Skyworth 01631SL 00740Smart 03095, 01631Spiderbox 03562Star Choice 00869Starmax 02638Stream System 01300Strong 03424, 01300,
02813, 01682, 02278
Sunny 01300TDS Telecom 00775Teac 01957Technicolor 03790
TechniSat 01197, 01195, 03440
Technotrend 01429Techwood 02034Telasat 02466Telefonica 01692, 02527TeleSAT 02631, 02466Telestar 02540, 01195,
01197TelkomVision 04310TelSKY 02540Telstra 01356TELUS 00775Thomson 01662, 01175,
01935, 01307, 02160
TiVo 01377, 01442T-Mobile 02631, 02443,
01545TNT SAT 01692Topfield 01545, 02838TPS 01307Tricolor TV 03064True Visions 03784TV Cabo 02160TV Vlaanderen 02631, 02466TVA Digital 02895TVonics 01906UPC 02443UPC Direct 02443Vantage 02797Vestel 02231, 03517Via Embratel 02796Viasat 01682, 01197,
01195Vivo 02895, 01692,
02527Vu+ 03458, 02799,
03543Wisi 00740, 02957

Reference Information
En-66
Xoro 02738, 02813, 03422
Xtreme 01300Xtrend 03320Zehnder 03422, 03424,
01777, 02034, 00740
Ziggo 02443Zircon 02957
¼ TV_DVD CombinationAEG 12197, 12239Affinity 13870, 13717Akai 12676, 13067,
12197Akura 12289, 11983,
12239Alba 12676, 13005,
13067, 12104Apollo 12239Audiosonic 12104, 11983Audiovox 11769Azuki 12239Baier 12239Bauer 12197Beko 12239Black Diamond 11037Blaupunkt 12426Blue Sky 11037BlueDiamond 12426Bush 13005, 12676,
11983, 12104, 10698, 11037
Celcus 12676cello 12673Centrum 11037Coby 13627, 12315Crown 11037Currys Essentials 12486
Curtis 12855, 12466, 13895, 13636, 14035
Dantax 12676Denver 12197, 13067,
12239DGM 12239Digihome 12676Digimate 12239Digitrex 13067diVision 12197, 12239Dual 12197, 12676,
11037Durabrand 10171D-Vision 12197Dynex 12049Easy Living 12104ECG 12197, 12125Electrohome 11670Element 12964Elfunk 11037Emerson 11886, 11864,
11394, 10171e-motion 12426Enox. 12673Essentials 12486Favi 13382Ferguson 13005, 12426,
11037, 12676Finlux 12676Funai 11394Goodmans 11983, 11037,
11687, 12676, 12426
Gran Prix 12197Grundig 12239, 12125,
12676Haier 11753, 12309,
13429, 11749, 11983
Hantarex 12197
Hikona 11983Hisense 13519Hitachi 12676, 11037,
11667Hyundai 12676Ingo Devices 12239Insignia 12049iSymphony 13429Jay-tech 13067JMB 12676JTC 13067JVC 12271, 11670,
11774, 12676, 11601
Kuppersbusch 12676Lenco 12676, 11983LG 11860, 11423Linetech 12676Linsar 12676Logik 13432, 13005,
12486, 11037, 11687
Luxor 12676, 11037Magnavox 12372, 11866,
11454Marks & Spencer 12673Mascom 12197Matsui 12486, 12676,
11037Medion 12676, 12239,
13067Memorex 11670Memory 11983MTlogic 12104Murphy 12673Mx Onda 11983Naxa 12104, 13382Neon 12673Nikkei 12197Nimbro 12104
Nordmende 13835OK. 13434, 12676OKI 12676Orava 11037Orion 11037, 12676Otic 11983Palsonic 13067Panasonic 11291, 12170,
11636, 11480Panavox 13835Philips 13614, 12800,
10556, 11454, 11394, 12372
PHOENIX Apollo 12239Polaroid 11769, 11523,
12676Powerpoint 10698Prima 11753Pro Vision 12197ProLine 12676Proscan 12256, 13895,
13636Prosonic 12676, 12197QuantumFX 12337RCA 12187, 12746,
12932, 11447, 12247, 13382
RefleXion 12239Reoc 12197Saba 12676Saga 12197Salora 12197, 12676,
12239Sandstrom 12197Sansui 11670, 13564Sanyo 12676, 13488Sceptre 12528, 12337Schaub Lorenz 12197, 12289Scott 11983SEG 12673, 11037

Reference Information
En-67
Sencor 12197Sharp 10818, 12676,
12360Shinelco 12104Shivaki 12197Skyworth 12963Soniq 12493, 13005Sontech 11983Sony 12778, 10000Soundwave 11037, 12673SOVOS 12239Supersonic 11753, 12104Swisstec 12106, 12104Sylvania 11886, 11864,
11394, 10171Tauras 12197Teac 10698, 11983,
13005Technica 11037, 12426Technical 12676Technika 12426, 12197,
12106, 11983, 13005
Techwood 12676Telefunken 12239, 10698,
12676Teletech 11037Tesco 12426Tevion 12426Thomson 12675, 10625,
13047Toshiba 13323, 12676,
11524, 11656TVE 12239UMC 12426, 12106United 11037, 11983VD-Tech 13067Venturer 13005Vestel 11037Viewsonic 12049
Viore 13429, 12352, 12104, 13382, 13118
VisionPlus 12426Walker 12676Waltham 11037Weltstar 11037Westinghouse 11712Wharfedale 11983Xiahua 11753Xiron 11983, 11037Xoceco 11753Xogego 11753Xoro 13067Zenith 10000, 10178Xogego 11753Xoro 13067Zenith 10000, 10178

Kitahama Chuo Bldg, 2-2-22 Kitahama, Chuo-ku, OSAKA 541-0041, JAPANhttp://www.onkyo.com/
18 Park Way, Upper Saddle River, N.J. 07458, U.S.A.For Dealer, Service, Order and all other Business Inquiries: Tel: 201-785-2600 Fax: 201-785-2650 http://www.us.onkyo.com/For Product Support Team Only:1-800-229-1687http://www.us.onkyo.com/
Liegnitzerstrasse 6, 82194 Groebenzell, GERMANYTel: +49-8142-4401-0 Fax: +49-8142-4208-213 http://www.eu.onkyo.com/
Unit 1033, 10/F, Star House, No 3, Salisbury Road, Tsim Sha Tsui Kowloon, Hong Kong.Tel: 852-2429-3118 Fax: 852-2428-9039http://www.hk.onkyo.com/
302, Building 1, 20 North Chaling Rd., Xuhui District, Shanghai, China 200032,Tel: 86-21-52131366 Fax: 86-21-52130396http://www.cn.onkyo.com/
The Americas
China
Europe
Asia, Oceania, Middle East, AfricaPlease contact an Onkyo distributor referring to Onkyo SUPPORT site.http://www.intl.onkyo.com/support/The above-mentioned information is subject to change without prior notice. Visit the Onkyo web site for the latest update.
(Mainland)
(Hong Kong)
Meridien House, Ground floor, 69 - 71 Clarendon Road, Watford, Hertfordshire, WD17 1DS, United Kingdom Tel: +44 (0)8712-00-19-96 Fax: +44 (0)8712-00-19-95
F1504-0
SN 29402024PDF_EN(C) Copyright 2015 Onkyo Corporation Japan. All rights reserved. Onkyo has the Privacy Policy. You can review it at [http://www.onkyo.com/privacy/].
* 2 9 4 0 2 0 2 4 *


![MULTI CHANNEL AV RECEIVER STR-DN1080MULTI CHANNEL AV RECEIVER STR-DN1080 Introduction Main features of the AV receiver [1] Parts and Controls Receiver Front panel (upper section) [2]](https://static.fdocuments.us/doc/165x107/5f0595037e708231d413ad23/multi-channel-av-receiver-str-dn1080-multi-channel-av-receiver-str-dn1080-introduction.jpg)