Autosat Control User Manual 130506 - · PDF file5.2.10 Factory settings ... Do not place the...
26
Transcript of Autosat Control User Manual 130506 - · PDF file5.2.10 Factory settings ... Do not place the...


Page 2 U S E R M A N U A L AUTOSAT 2 CONTROL

AUTOSAT 2 CONTROL U S E R M A N U A L PAGE 3
Index
1 Please read this first ...................................................................................................... 5 1.1 Important Note: ...................................................................................................... 5 1.2 Safety considerations ........................................................................................... 6 1.3 Important operating considerations..................................................................... 6 1.4 Disposal considerations ....................................................................................... 7 1.5 General considerations ......................................................................................... 7
2 Figure Control Panel...................................................................................................... 8
3 Sequence of automatic satellite search ....................................................................... 9
4 Operating instructions ................................................................................................ 10 4.1 Quick reference ................................................................................................... 10
5 Handling the operating instructions ........................................................................... 11 5.1 How to select a particular menu ......................................................................... 11 5.2 Menu details......................................................................................................... 12
5.2.1 Main menu ..................................................................................................... 12 5.2.2 Fine positioning .............................................................................................. 12 5.2.3 Satellite .......................................................................................................... 13 5.2.4 Parameter ...................................................................................................... 13 5.2.5 Search mode.................................................................................................. 14 5.2.6 Backlight......................................................................................................... 15 5.2.7 Manual Elevation of the Antenna .................................................................... 15 5.2.8 Manual Azimuth of the Antenna...................................................................... 16 5.2.9 Language ....................................................................................................... 16 5.2.10 Factory settings .............................................................................................. 16
6 Mounting instructions ................................................................................................. 17 6.1 Choice of installation site ................................................................................... 17 6.2 External unit......................................................................................................... 17 6.3 Mounting the external unit .................................................................................. 18 6.4 Cable connection to the Control unit ................................................................. 20
6.4.1 Figure Control unit connectors........................................................................ 20 6.4.2 Sketch of connector housing (rear view!!) ....................................................... 21
6.5 Power supply ....................................................................................................... 21
7 Connection and initial operation ................................................................................ 22 7.1 Mounting the control unit.................................................................................... 22
7.1.1 Satellite aerial connector ............................................................................... 22 7.1.2 Connection external motor unit ....................................................................... 23 7.1.3 Connection power supply ............................................................................... 23 7.1.4 Connection remote control.............................................................................. 23 7.1.5 Initial operation ............................................................................................... 23
8 Fault elimination .......................................................................................................... 24
9 Specification ................................................................................................................ 25

Page 4 U S E R M A N U A L AUTOSAT 2 CONTROL
AutoSat 2 CONTROL Dear Customer, congratulations, that you have decided on a AutoSat 2 CONTROL. This User Manual should help you, to utilise the functions of your new satellite system optimally. We have kept the operational details as understandable as possible, while keeping them short. The functional range of your device will be expanded steadily with software updates. That way there may be additional operational steps, which are not explained in this user manual or the operation of functions already available may change. For this reason you should visit the Crystop homepage www.crystop.de from time to time, to download the current user manual. We wish you much joy with your AutoSat 2 satellite system! Your Crystop Team

AUTOSAT 2 CONTROL U S E R M A N U A L PAGE 5
1 Please read this first Before commencing the installation, check the consignment for completeness. The following items are contained in the shipment: 1 Control unit box 1 External unit and satellite aerial (dish or flat aerial) 1 Connecting cable for power supply, 0.5 m length 1 12-way connector housing 4 Hexagonal screws M6 x 22 A2 4 Washers M6, A2 4 Self-locking nuts M6, A2 12 Self-tapping screws 3,9x25 1 Cable gland feed through for the roof 1 Remote control (optional)
1 Analog or digital receiver (optional) 1 User manual 1 Guarantee card
1.1 Important Note: Before installation and start-up of your AutoSat 2, please read this user manual carefully. Always make sure (even when your AutoSat 2 will be retracted by your starter key) that the system has really retracted when starting your vehicle. In case of interrupted supply voltage, for instance, the aerial can no longer be automatically retracted. Very important: The external unit must be mounted on the vehicle roof with the aerial retracted in a direction opposite to the driving direction, as otherwise one cannot rule out that the aerial will be blown up by wind during high-speed driving. When transporting the vehicle on a train, the aerial must be fixed in the retracted position by additional suitable means (expander belts, etc.), due to railway wagons being turned around when re-coupling. Do not clean your AutoSat 2 external unit with a steam cleaner. The rubber seals used for sealing will be OK for rain and water spray but cannot survive a water jet with a pressure of several bars. The use of drive-in wash stations is deprecated and is entirely at your own risk. A condition for satellite reception is free sight to the satellite, i.e. even trees cannot be penetrated by a satellite signal !!

Page 6 U S E R M A N U A L AUTOSAT 2 CONTROL
1.2 Safety considerations For your protection, read the safety considerations carefully before you start running your new equipment. The manufacturer accepts no liability for damages arising from faulty handling and failure to comply with safety provisions. If the equipment has been modified, Crystop is no longer responsible for ensuring, that the legal requirements (i.e. equipment and product safety laws, electromagnetic compatibility) are complied with. On resale of the modified equipment, the person responsible for the modification becomes the manufacturer and is liable accordingly. Furthermore the Crystop Guarantee becomes inapplicable, which may lead to a loss of warranty rights. AutoSat 2 is designed solely for installation and operation in motor vehicles and caravans. The D+ conductor should always be connected. The screws of the external unit should be checked regularly for tightness.
1.3 Important operating considerations Installation location/ Ventilation Like any electronic device, the AutoSat control unit produces heat. However the heat produced is innocuous and is discharged effectively. Do not place any objects on the device. Maintain a space of 5 cm above the device to allow the heat produced in the device to discharge. Do not place burning objects, i.e. burning candles on the device. The rubber feet of the device may cause a colour change in treated furniture surfaces. If necessary, place the device on an appropriate mat. Supply voltage Operate the control unit with a voltage of 12 to 14.4 V DC only. Never open the device. If repair becomes necessary, it should be carried out be trained personnel. Moisture Protect the device from moisture, drips and splashes and do not place objects containing liquids, i.e. vases on it. Heat/Radiation Do not place the control unit near a heating element or in direct sun light. In the following cases disconnect the device from the power supply and ask an expert for help: > the device was subjected to moisture i.e. liquid got inside. > on major malfunction.
WARNING: In order to prevent damage to your vehicle roof, your AutoSat2 should not be operated in high winds and gusts.

AUTOSAT 2 CONTROL U S E R M A N U A L PAGE 7
> on major external damage.
1.4 Disposal considerations The packaging of your unit consists exclusively of reusable materials which should be recycled. Make sure, that empty batteries from the remote control unit are not disposed in the household rubbish, but are returned for disposal as hazardous waste to a dealer.
1.5 General considerations Always make sure (even when your AutoSat 2 will be retracted by your starter key) that the system has really retracted when starting your vehicle. In case of interrupted supply voltage, for instance, the aerial can no longer be automatically retracted.
A condition for satellite reception is free sight to the satellite, i.e. even trees cannot be penetrated by a satellite signal !! At the edges of the reception area, signal quality may be improved by turning the LNB:
South western Europe (i.e. Agadir, Canaries): turn LNB by approx.35° clockwise (looking from LNB to mirror).
North eastern Europe (i.e. Greece, Western Russia): turn LNB um approx. 15° anti-clockwise.
For Australia consult the Campersat LNBF POLARISATION Satellite Signal Location Map.

Page 8 U S E R M A N U A L AUTOSAT 2 CONTROL
2 Figure Control Panel
Figure Control-Box

AUTOSAT 2 CONTROL U S E R M A N U A L PAGE 9
3 Sequence of automatic satellite search The AutoSat 2 Control satellite system is turned on with the “ On / Off” button on the control unit. After turn on, the satellite to be searched for will be shown in the display (factory setting ASTRA1 or the last received). In the top right of the display 5 seconds are now counted down, during which time you may call up the main menu via the “ Menu” button.
If no button is pressed, the satellite search starts (LED next to the “On / Off” button goes out).Once a satellite has been found, fine positioning is carried out. After this (LED lights up again) the words “SATELLITE FOUND” are shown in the display and the aerial signal is switched to the receiver.
Now 120 seconds of delay are counted down in the display. During this time the main menu may be called or the next satellite may be searched for. If no button is pressed within 120 seconds, the control unit switches itself off.
If the receiver is set to a program of the requested satellite, the program will now be visible on the TV set. Should this not be the case, there is a possibility, that the control unit has found a different satellite. By pressing the “ Sat” button, the search may be continued.
If on the other hand, the satellite system has found the right satellite and you nevertheless press the “ Sat” button, then the requested satellite will not be found, since incorrect positions for further searches are precluded.
Therefore first check for other programs on the satellite by stepping the receiver to other TV stations for that satellite if no program is visible initially.
If you want to change to a different satellite after the control unit has switched itself off, you must switch it on again first.
After switching off the satellite receiver, the LED next to the “ On / Off” button (or on the optional remote control) starts to blink, as a reminder, that the antenna is still extended. To retract the antenna you must activate the control unit by pressing the “ On / Off” button once and then press it again to retract the antenna. On reaching the parking position, the AutoSat 2 Control switches itself off completely.
You will find a detailed description of all functions on the following pages.

Page 10 U S E R M A N U A L AUTOSAT 2 CONTROL
4 Operating instructions
4.1 Quick reference
Function Description Operation
Switch on
“ On / Off“ button
The satellite system is switched on with the ” On / Off“ button on the control unit or on the optional remote control unit.
Retract antenna + Switch off
“ On / Off“ button
If the control unit is switched off (display off) the “ On / Off“ button is pressed twice - once to switch the control unit on and another time to retract the antenna and switch off. If the control unit is already on (display on) the “ On / Off“ button needs to be pressed only once.
Change Satellite
“ Sat“ button
If the currently found satellite is not the one you require, then a search for the next satellite is initiated by pressing the “ Sat“ button.
Menu button
“ Menu“ button
By pressing the “ Menu“ button, the main menu is displayed. All operating functions are called via the main menu. Inputs are saved by pressing the “ Menu“ button again.
Minus button
“ Minus“ button
The “ Minus“ button goes one step back for Menu selection or reduces input values by 1.
Plus button
“ Plus“ button
The “ Minus“ button goes one step forward for Menu selection or increases input values by 1.
Enter
“ Enter“ button
The “ Enter“ button confirms a Menu selection. For inputs the “ Enter“ button steps to the next input field.

AUTOSAT 2 CONTROL U S E R M A N U A L PAGE 11
5 Handling the operating instructions For the button names used in the following operating instructions you will find equivalent symbols in the Quick reference (page 10) which are used on the buttons of the control unit. e.g.:
“ On / Off“ button
In the text buttons are shown bold and in italics. e.g.: “ On / Off“ button The figures in the text are numbered (Fig. 1), to maintain a clear reference to the text. Your display may vary if a different satellite is selected. Menu texts are shown bold. e.g.: “ Fine pos“
5.1 How to select a particular menu
By pressing the “ Menu“ button you enter the Main menu. With the “ Plus“ or “ Minus“ button you move the menu selection arrow (>) up or down until the arrow points to the required function or the corresponding sub menu. After pressing the “ Enter“ button, the selected function is executed or the marked sub menu is called. You leave Main menu by pressing the „ Menu“ button again.
Fig. 1

Page 12 U S E R M A N U A L AUTOSAT 2 CONTROL
5.2 Menu details 5.2.1 Main menu
To reach the Main menu, the system must be turned on. On initial turn on, Fig. 1 will show in the display. The name of the selected satellite will be shown in the middle line. Now you have 5 seconds to press the “ Menu“ button. If no button is pressed within this time, the system automatically returns to stand by mode or starts a satellite search, depending on whether the system has reception or not.
If the “ Menu“ button was pressed, Fig. 2 will show in the display.
The following functions and sub menus are contained in the Main menu:
“ Fine positioning“ “ Satellite“ “ Parameter“ “ Search mode“ “ Backlight“ “ Manual Elevation “ “ Manual Azimuth“ “ Language“ “ Factory setting“
5.2.2 Fine positioning On selection of the function “ Fine positioning“ the control unit optimises the alignment of the antenna to the satellite. As a rule, no “fine positioning” is necessary after a satellite search, since this function is carried out automatically at the end of the search. This function may be useful after manual positioning.
Fig. 2
Fig. 3
Fig. 1

AUTOSAT 2 CONTROL U S E R M A N U A L PAGE 13
5.2.3 Satellite The sub menu “ Satellite“ (Fig. 4) allows the selection of the satellite to be searched. The list of available satellites is shown The list of available satellites is shown (Fig. 5). Using the “ Plus“ or “ Minus“ button you can select the required satellite. Confirm the selected satellite by pressing the “ Enter“ button. Subsequently the system will enter search mode and point the antenna to the selected satellite. If a satellite has been found, select a program on your receiver, which comes from that satellite, to check that the correct satellite has been found. If it is not the correct satellite, you may continue the search by pressing the “ Sat“ button. To be able to find the required satellite a clear view to that satellite is a prerequisite. The following satellites are pre-programmed:
AUS GB
“ OPTUS B3“ 152* East “ Türksat“ 42,0° East „ OPTUS C1“ 156* East “ ASTRA 2“ 28,5° East „ Pas 8“ 166* East “ ASTRA 3a“ 23,5° East “ Intelsat 701“ 180* East “ ASTRA 1“ 19,2° East “ USERSAT1“ ” Hotbird“ 13,0° East “ USERSAT2“ “ Eutelsat W3“ 7,0° East “ USERSAT3“ “ Sirius“ 5,0° East “ USERSAT4“ “ Thor/ Intelsat“ 1,0° West “ USERSAT5“ “ AB3/Telecom 2C“ 5,0° West “ USERSAT6“ “ AB2/Telecom 2D“ 8,0° West “ USERSAT7“ “ Hispasat“ 30,0° West “ USERSAT8“ “ USERSAT“
5.2.4 Parameter The sub menu “ Parameter“ (Fig. 6) allows changing the search parameters of satellites to be located. With the “ Plus“ or “ Minus“ button mark the menu point “ Parameter“ . Press the “ Enter” button to reach the menu (Fig. 7), which allows selection of that satellite, whose parameters you want to change.
Fig. 5
Fig. 6
Fig. 4

Page 14 U S E R M A N U A L AUTOSAT 2 CONTROL
With the “ Plus“ or “ Minus“ button mark the satellite whose parameters are to be changed. To program an unlisted satellite it is recommended that you use the selection „ USERSAT“ . Confirm the selected satellite by pressing the “ Enter“ button, which will open the sub menu (Fig. 8) for changing the parameters “Frequency”, “Polarisation” and “Symbol rate”. When the sub menu (Fig. 8) appears, the value for “Frequency” blinks. This value may be modified using the “ Plus“ or “ Minus“ buttons . To reach the “Polarisation” entry, press the “ Enter“ button. Now “H” for horizontal or “V” for vertical polarisation blinks. The selection can be toggled using the “ Plus“ or “ Minus“ buttons again. Finally press the “ Enter“ button to reach the “Symbol rate” entry “SR”. This entry is also modified using the “ Plus“ or “ Minus“ buttons . To save the modified entries, press the “ Menu“ button, which leaves the entry menu and returns you to the Main menu. (Fig. 6). If you want to search the newly edited satellite, select that satellite in the sub menu “Satellite” (see 5.2.3).
5.2.5 Search mode In the sub menu “ Search mode“ you can change the mode from “ Course“ to “ Fine“ . The standard setting is “ Course“ (Fig. 10). By changing to “ Fine“ , the elevation increments for each rotation is reduced. This means, that the system requires more rotations to cover the whole of the elevation range. Also the sensitivity is increased, which can mean, that the systems stops more often to check a received signal. The setting “ Course“ should only be changed if you have difficulty homing in on a satellite at the edge of the satellites footprint. If you are back to normal reception, well within the satellite footprint, the setting should be restored to “ Course“ , which will reduce the time to find satellites.
Fig. 7
Fig. 8
Fig. 9
Fig. 10

AUTOSAT 2 CONTROL U S E R M A N U A L PAGE 15
5.2.6 Backlight The sub menu “ Backlight“ (Fig. 11) lets you change the background lighting of the LC display. You can select “ OFF“ , “ ON“ or “ AUTO” mode. The standard mode is “ AUTO” . In the backlight mode “ ON“ the display is illuminated, as long as the control unit is switched on. In the backlight mode “ OFF“ the backlight is permanently switched off. In “ AUTO” mode the illumination of the display switches off after approx. 60 sec, but turns on again if any key is pressed. With the “ Plus“ or “ Minus“ button you move the menu selection arrow (>) up or down to one of the modes (Fig. 12). The selection is confirmed by pressing the “ Enter“ button. This returns you to the Main menu (Fig. 11).
5.2.7 Manual Elevation of the Antenna The sub menu “ Man. Ele.“ (Fig. 14) lets you raise and lower the antenna manually. This function is required for installation and service purposes and is not relevant to normal operation.
Fig. 11
Fig. 12
Fig. 13
Fig. 14

Page 16 U S E R M A N U A L AUTOSAT 2 CONTROL
5.2.8 Manual Azimuth of the Antenna The sub menu “ Man. Azi.“ (Fig. 16) lets you turn the antenna manually clockwise or anti-clockwise. This function is required for installation and service purposes and is not relevant to normal operation.
5.2.9 Language The sub menu “ Language“ (Fig. 17) (“Sprache” in german) lets you select the language for all menus. Currently available languages are: Deutsch, English, Francais, Italiano and Nederlands.
5.2.10 Factory settings When executing the sub menu “ Factory settings“ (Fig. 18) all Satellite parameters und variable settings are reset to their original factory settings. Only execute this menu function, if the system exhibits problems, which you cannot correct any other way.
Fig. 16
Fig. 18
Fig. 17
Fig. 15

AUTOSAT 2 CONTROL U S E R M A N U A L PAGE 17
6 Mounting instructions
6.1 Choice of installation site Initially choose sites for positioning the control unit and your receiver. Unless the control unit has a remote control option, it should be mounted, so that its display can be read and the buttons can be operated. The receiver should be as close to your TV set as possible and be seen from where you sit, since the receiver is controlled by an IR remote control. If the receiver has a remote infra red detector, the receiver may be hidden.
6.2 External unit
Flat aerial The AutoSat2F (50 cm-flat aerial) has a base of 41.5 x 41.5 cm and requires a maximum radius of 25 cm for objects up to 15 cm high in search mode. For higher objects, a radius of 45 cm must be kept clear. Dish aerial The AutoSat2S (85 cm dish) has a base of 41.5 x 41.5 cm and requires a free area of 45 cm radius in search mode, because the LNB will be rotating just above the roof in high latitudes. The space requirement in the stationary position is shown in the following sketch: Very important: The external unit must be mounted on the vehicle roof with the aerial retracted in a direction opposite to the driving direction, as otherwise one cannot rule out that the aerial will be blown up by wind during high-speed driving.
!!! Note:
Please read the mounting instructions before starting the installation
Please keep the following in mind:
- ensure sufficient ventilation for the control unit and the receiver - avoid additional sources of heat in the mounting location - ensure that the cables from the roof to the control unit fit. - ensure that the cable from the control unit to the receiver fits. - ensure that the cable from the receiver to the TV set fits.
When choosing the mounting location, keep in mind, that the cables to the external unit are 4 m long and that the external unit must have sufficient free space to turn.

Page 18 U S E R M A N U A L AUTOSAT 2 CONTROL
Now select a suitable free space on your roof. The direct vicinity of the site selected must be free from objects higher than 20 cm, which might shadow the aerial.
When this installation site has been found, once again make sure that the control unit is within a cable length of 4 m. If not, relocate the installation site or the control unit or extend the cable by an additional extension set (obtainable from us).
Please do not extend the cable without consulting us first.
6.3 Mounting the external unit
Proceed in the following sequence:
Use Sikaflex-252 as an adhesive/sealant
1. Position external unit with the outgoing cable pointing towards the rear of the vehicle.
2. Using the base plate of the external unit as a template, drill 2 holes on diagonally opposite corners with a 2.4 mm drill.
3. Temporarily fix the external unit with two 3.9 x 25 self-tapping screws to the roof. Tighten the screws lightly, keeping in mind, that an aluminium roof is usually thin and the screws may easily be over-tightened, stripping the thread. Then drill the remaining 2.4 mm holes.
4. Unscrew and raise the external unit. Clean the underside and edges of the base plate and the matching roof area, removing all dirt and fatty residues. Fully coat the base plate with a 3 mm coating of Sikaflex-252 and position the external unit on the roof in the chosen position, lining up the previously drilled holes.
!!! Note: Mount and secure the external unit with a fastening system, which preclude loosening or detachment of the unit under all circumstances. For sandwich roofs not offering adequate facilities for fastening, through-screws and internal counter-plates are recommended. In case of doubt consult the maker of your vehicle.

AUTOSAT 2 CONTROL U S E R M A N U A L PAGE 19
5. Before turning in the screws, please fill the holes with Sikaflex. Make a sealing joint around edge of the base plate. Now carefully tighten all the screws.
6. For the three outgoing cables drill a hole (min. 15 mm diameter) through the roof.
7. To fix the cables to the roof, it is recommended to use a 20 x 20 mm cable duct. Wrap the cable contacts with adhesive tape to avoid damage. Each of the 3 cables is already fitted with a grey plastic PG-gland. Unscrew the 3 narrow plastic nuts and pull them off the cables. Loosen the sealing caps on the other side of each gland. Carefully push the 3 cables with the glands through the optional 20 x 20 mm cable duct and then through the side into the cable feed through – push the 3 nuts back onto the cables - screw the glands into the holes of the feed through. Now push the cables through the roof. Fix the junction box with Sikaflex-252 and three 3.9 x 25 self tapping screws. Position and fix the cables to the roof. If using a 20 x 20 mm cable duct, attach it to the roof with Sikaflex-252, leaving enough room to reach the sealing caps of the PG-glands. Finally tighten the sealing caps. Figure: Cable gland feed through with cables and PG glands
.
8. The aerial dish can only be fitted after the system has been connected to the power supply and is ready for operation, since the aerial arm has to be raised electrically from the parking position. Switch the AutoSat 2 on - wait until the arm has been raised sufficiently - then interrupt the power supply (remove cable). Fasten the dish with the four nuts and the four washers supplied. Flat aerial: Carefully tighten nut of aerial cable on aerial with an 11mm open ended spanner but not too tightly.
This concludes work on the roof.
Page 20 U S E R M A N U A L AUTOSAT 2 CONTROL
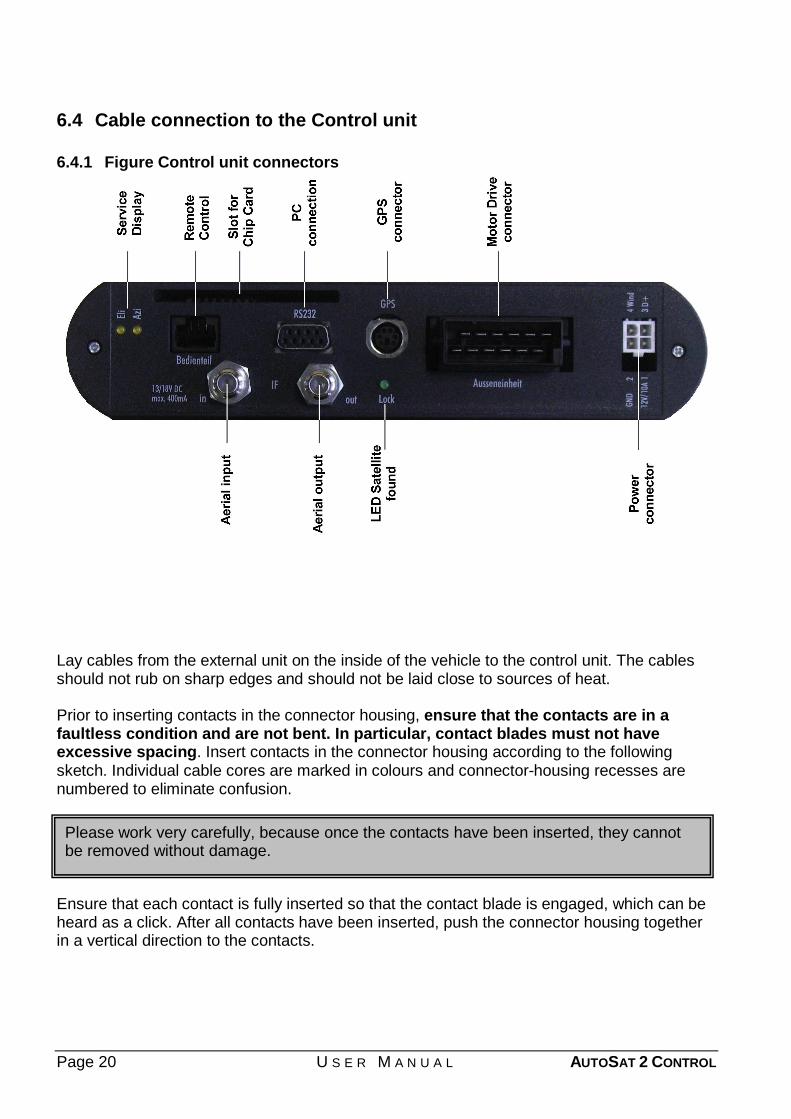
6.4 Cable connection to the Control unit 6.4.1 Figure Control unit connectors
Lay cables from the external unit on the inside of the vehicle to the control unit. The cables should not rub on sharp edges and should not be laid close to sources of heat. Prior to inserting contacts in the connector housing, ensure that the contacts are in a faultless condition and are not bent. In particular, contact blades must not have excessive spacing. Insert contacts in the connector housing according to the following sketch. Individual cable cores are marked in colours and connector-housing recesses are numbered to eliminate confusion.
Ensure that each contact is fully inserted so that the contact blade is engaged, which can be heard as a click. After all contacts have been inserted, push the connector housing together in a vertical direction to the contacts.
Please work very carefully, because once the contacts have been inserted, they cannot be removed without damage.

AUTOSAT 2 CONTROL U S E R M A N U A L PAGE 21
6.4.2 Sketch of connector housing (rear view!!)
6-core cable: 3- core cable:
6.5 Power supply
Run the AutoSat 2 Control only on 12 V batteries or a battery charger or power pack supplying a continuous current of 10 Amps DC.
Warning:
For 24 Volt vehicle mains, a 24 V to 12 V converter will be required.
A 4 pole connector with a short cable is provided. Connect the 4 wires to the vehicle power supply with suitable connectors. To keep cable losses to a minimum. use a cable with a cross section of at least 4 mm² for the voltage supply. The AutoSat 2 should ideally be directly connected to the battery by a dedicated supply cable. Ensure that no other major users are connected to the same cable. If others are connected, the cable cross section must be adjusted to a suitable larger size. Attention! If the power supply cable is altered or a different cable is used, make sure the polarity is correct. If the polarity of the supply voltage is wrong, the control box will be damaged. Connect the thin blue cable (1 mm²) to terminal 15 (ignition on) or to D+ (alternator). This will ensure automatic retraction of the dish to the parking position when starting to drive. Both a 12 V and 24 V signal may be connected (applies ONLY to the D+ control cable).

Page 22 U S E R M A N U A L AUTOSAT 2 CONTROL
7 Connection and initial operation
7.1 Mounting the control unit To fix the control unit or the receiver, it is best to use double-sided adhesive tape Scotch 3M or Tesa Power Strip. If screws are used, always make sure they do not make contact with the electronic circuit or cause any other damage. 7.1.1 Satellite aerial connector The satellite aerial cable is terminated with an F-Connector on delivery. Check the connector for damage and good seating before mounting. The centre conductor must not be bent. If the aerial cable has been shortened or lengthened, a new F-Connector must be fitted. Either a crimp or screw connector may be used. In either case the cable must be prepared as shown in the following figure: Warning! Take care, that no small wires of the outer screen touch the inner conductor when mounting the connector, causing a short circuit. The aerial cable from the external unit is screwed to the left F-connection labelled “ in” . Warning! Do not use any tools to screw up a screw type F-Connector on the cable and to fix the connector at the F-connection. These connections should only be finger tight. The right F-connection labelled “ out” is the connection to the receiver.
AUTOSAT 2 CONTROL U S E R M A N U A L PAGE 23
7.1.2 Connection external motor unit Prior to plugging in the connector to the external motor unit, check it again for correct seating of the contacts. If all contacts are fully inserted and in the correct positions (see page 21) the connector may be plugged in. 7.1.3 Connection power supply Prior to connecting the control unit with the vehicle power supply, check the supply connector again, to avoid possible damage due to incorrect connections. 7.1.4 Connection remote control If the control unit is mounted in a hidden position, an optional external remote control may be connected to the control unit. The cable connecting the remote control is 2.5 m long. Extensions to 10 m are possible. Plug the cable to the Western Socket labelled “ Remote” . Make sure the Western Plug is engaged fully in its socket. 7.1.5 Initial operation If all the steps described have been carried out, the system may be operated. If you are not yet familiar with the details of operation, please read the Operating Instructions (page 9 – 16) first.

Page 24 U S E R M A N U A L AUTOSAT 2 CONTROL
8 Fault elimination
Fault Remedy
No Satellite found
1) Check, that there is a free line of sight to the Satellite. Trees will block reception!
2) Make sure, that the required Satellite can be received with your size aerial at your current location.
3) At the fringe of the Satellite footprint, change the Search mode from “ Course” to “ Fine” and repeat the search.
4) The Satellite search parameters have changed. Check with us, whether there are new parameters or order a current Flash card.
5) Check the Aerial cable to the external unit (tight fit of the connectors – break in the cable).
No picture, although the aerial is in a receiving orientation
1) Try other programs at the receiver. 2) Maybe the wrong satellite was found -, push the “ SAT“ button. 3) Check the connection to the TV set. If the connection is by coax
cable check the TV settings (channel). If the connection is by SCART cable, the TV set must set to AV or channel 0.
Wrong Satellite found
1) Repeat the Satellite search: press “ SAT“ .
Bad picture quality
1) Execute the “ Fine positioning” function. 2) You are in the fringe zone of the Satellite footprint. 3) if 2) does not apply, check the aerial cable to the receiver. (tight fit of
the connectors – break in the cable) 4) LNB has been turned – polarity incorrect.
Motor does not turn
1) Check that the Aerial is free to move. 2) Check the conductors of the motor cable: all contacts must be
engaged tightly in the holes of the plug housing. 3) There is an obstacle between the Aerial and the roof (e.g. snow)!
Motor over current protection has tripped
1) Check that the Aerial is free to move. 2) There is an obstacle between the Aerial and the roof (e.g. snow)!
System shuts down immediately
1) Check the battery voltage. 2) Your vehicle was started.
Inexplicable error condition
1) Switch your AutoSat 2 Control off and then on again
AUTOSAT 2 CONTROL U S E R M A N U A L PAGE 25
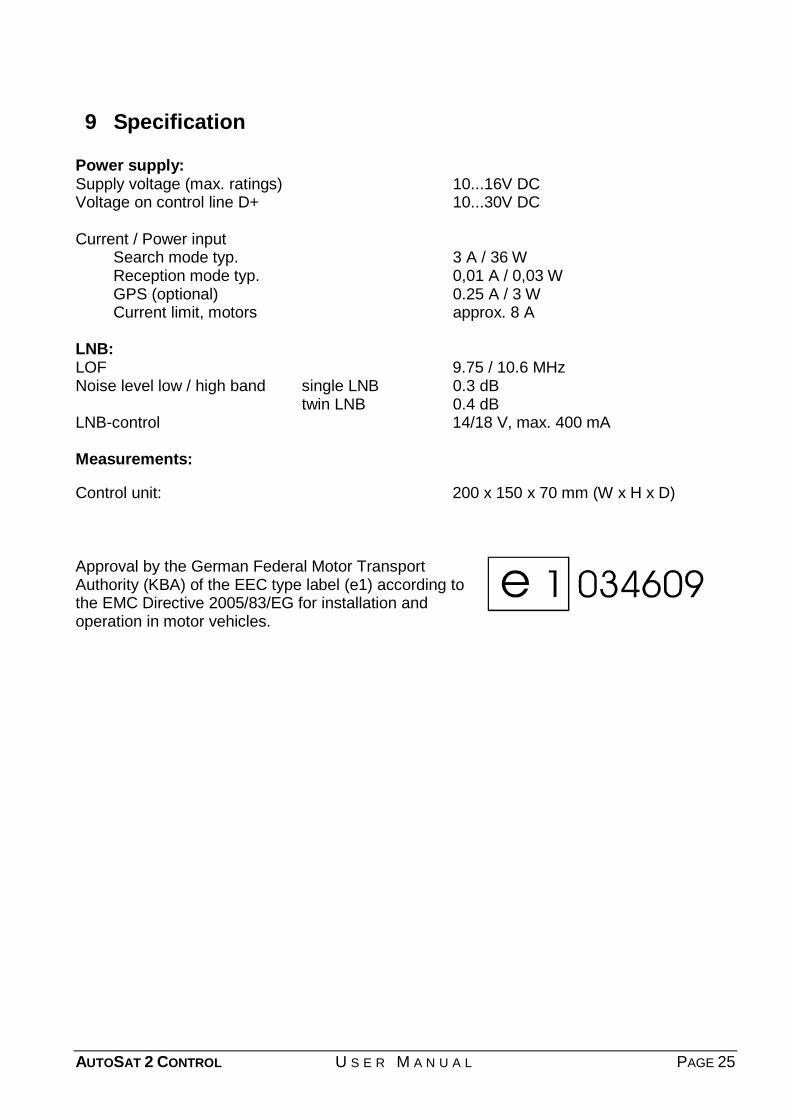
9 Specification Power supply: Supply voltage (max. ratings) 10...16V DC Voltage on control line D+ 10...30V DC Current / Power input
Search mode typ. 3 A / 36 W Reception mode typ. 0,01 A / 0,03 W GPS (optional) 0.25 A / 3 W Current limit, motors approx. 8 A
LNB: LOF 9.75 / 10.6 MHz Noise level low / high band single LNB 0.3 dB twin LNB 0.4 dB LNB-control 14/18 V, max. 400 mA Measurements: Control unit: 200 x 150 x 70 mm (W x H x D) Approval by the German Federal Motor Transport Authority (KBA) of the EEC type label (e1) according to the EMC Directive 2005/83/EG for installation and operation in motor vehicles.

Page 26 U S E R M A N U A L AUTOSAT 2 CONTROL
No warranty for information in this manual Subject to alteration without notice 03/06
Gesellschaft für Anzeigesysteme mbH
Durlacher Allee 47 76131 Karlsruhe
�: +49 (0)721 / 61 10 71
�: +49 (0)721 / 62 27 57
www.crystop.de