
German WWII Tank, Pak, Flak, Artillery Weapons and Ammunition.

3 445b 0425070 B
d ORNUTM-13112
OAK RIDGE NATIONAL LABORATORY Automated Artillery Ammunition Fuzing
Using a Passive Compliance Device
V. K. Varma P. D. Lloyd
J. B. Chesser J. F. Jansen C. T. Kring
MANAGED BY MARTIN MARIETTA ENERliY SYSTEMS, INC. FOR THE UlYITEO STATES DEPARTMENT OF ENERGY

This report has been reproduced directly from the best available copy.
Available to DOE and DOE contractors from the Office of Scientific and Techni- cal Information, P.O. Box 62, Oak Ridge, TN 37831; prices available from (615) 576-6401, FTS 626-8401.
Available to the public from the National Technical Information Service, U.S. Department of Commerce, 5285 Port Royal Rd., Springfield, VA 22161.
~~ ~~~~~
This report was prepared as an account of work sponsored by an agency of the United States Government. Neither the United States Government nor any agency thereof, nor any of their employees. makes any warranty, express or implied, or assumes any legal liability or responsibility for the accuracy, com- pleteness, or usefulness of any information, apparatus, product. of process dis- closed, or represents that its use would not infringe privately owned rights. Reference herein to any specific commercial product, process. or service by trade name, trademark, manufacturer, or otherwise, does not necessarily consti- tute or imply its endorsement, recommendation, or favoring by the United State8 Government 01 any agency thereof. The views and opinions of authors expressed herein do not necessarily state or reflect those of the United States Government or any agency thereof.

ORNL/TM-13112
Ammunition Logistics Program
AUTOMATED ARTILLERY AMMUNITION FUZING USING A PASSIVE COMPLIANCE DEVICE
V. K. Varma P. D. Lloyd J. B. Chesser J. F. Jansen C. T. Kring
Robotics and Process Systems Division
Date Published-November 1995
Research sponsored by the Army's Project Manager, Crusader
under the Interagency Agreement 1892-AO78-Al between the Department of Energy and the
Armament Research, Development, and Engineering Center at the Picatinny Arsenal
Prepared by the OAK RIDGE NATIONAL LABORATORY
Oak Ridge, Tennessee 37831 managed by
LOCKREED MARTIN ENERGY SYSTEMS, INC. for the
DEPARTMENT OF ENERGY under contract DE-AC05-840R21400
3 4Y5b 0425030 8

CONTENTS
LIST OF FIGURES ................................................................................................................ v
LIST OF TABLES ............................................................................................................... v11
ABSTRACT ......................................................................................................................... ix
..
1 .
2 .
3 .
4 .
5 .
6 .
BACKGROUND .............................................................................................................. 1
INITIAL TESTING ........................................................................................................ 3
APPLICABLE THEORY ................................................................................................ 7 3.1 EXPECTED FORCES DURING FUZE INSERTION .............................................. 13 3.2 PRELIMINARY DESIGN CONCEPTS .................................................................. 15 3.3 DESIGN IMPLEMENTATION ............................................................................. 15
3.3.1 Test Stand Design ........................................................................................ 15
RESULTS ...................................................................................................................... 19
CONTROL SYSTEM .................................................................................................... 21 5.1 INTRODUCTION ................................................................................................. 21 5.2 CONTROL SYSTEM HARDWARE DESIGN ........................................................ 21 5.3 CONTROL SYSTEM SOFTWARE DESIGN .......................................................... 2 1 5.4 CONTROL STRATEGY ....................................................................................... -24
5.4.1 Quick Move ................................................................................................ 24 5.4.2 Contact Projectile ....................................................................................... 24 5.4.3 Align Threads .............................................................................................. 24 5.4.4 Thread ........................................................................................................ 24 5.4.5 Retract ........................................................................................................ 25
5 . 5 CONTROL SYSTEM DEVELOPMENT ................................................................ 25
CONCLUSIONS ............................................................................................................ 31
REFERENCES ..................................................................................................................... 3 3
APPENDIXES APPENDIX A CUMULATIVE TOLERANCE STACICUP ON HORIZONTAL
FUZING ASSEMBLY .......................................................................... 35
APPENDIX B RCC COMPENSATOR SELECTION ................................................... 37
APPENDIX C SHAFT DESIGN .................................................................................. 49
APPENDIX D MOTOR SIZING AND SELECTION ................................................... 5 5
iii


LIST OF FIGURES
Fig . 1 . Schematic of the FARV showing processing and handling equipment ......................... 1
Fig . 2 . Selected fuzing head concept
Fig . 3 . Fuze removal using the fuze wrench and torque wrench combination ......................... 4
Fig . 4 . Resultant torque as a function of axial load ................................................................ 5
..................................................................................... 3
Fig . 5 . Two-dimensional RCC ............................................................................................... 8
9
10
Fig . 8 . Peg insertion geometry and forces during chamfer crossing and one-point contact .. 12
. .......................................................................................... Fig 6 . RCC variable definitions.,
Fig . 7 . Peg insertion variable definition ..............................................................................
Fig . 9 . Insertion force as a function of insertion depth ....................................................... 14
Fig . 10 . Schematic of fixing test stand ................................................................................ 15
Fig . 12 . Fuzing test stand .................................................................................................... 1 7
Fig . 13 . Misalignment definitions ....................................................................................... 19
Fig . 14 . Suinmary of results from fuzing test stand .............................................................. 20
Fig . 15 . Control hierarchy .................................................................................................. 22
Fig . 16 . Low-level interface with subsystem hardware
Fig . 17 . 8, command velocity as a function of insertion depth
Fig . 18 . Basic closed-loop control system
Fig . 19 . Z axis current bode plot
Fig . 20 . Nichols chart of uncompensated Z axis, current control plants .............................. 28
Fig . 21 . Nichols chart of compensated Z axis, current control plants .................................. 29
. . ....................................................................... Fig 11 Fuzing test stand alignment fixtures 16
......................................................... 23
25
26
27
............................................
...........................................................................
.........................................................................................
V
v1
Fig . B.l RCC loads ............................................................................................................. 37
Fig . H.2 RCC, fuze holder, and fuze geometry .................................................................... 39
Fig . H.3 Compliance center geometry ................................................................................ 41
Fig . B.4 Peg insertion geometry ........................................................................................ 43
II . Fig . C.1 Sketch of firzing shaft ........................................................................................... 50
Fig . C.2 Fuzing shaft free-body diagram ............................................................................. 51
Fig . (2.3 Stress diagram ....................................................................................................... 53

LIST OF TABLES
Table 1 . Summary of fuze and projectile combinations to be fuzed ....................................... 2
Table B.l Approximate vertical displacement of RCC due to weight of fuze and fuze holder ................................................................................................................ 40
Table B.2 Change in vertical displacement of RCC due to difference in weight between heaviest and lightest fuzes ................................................................................. 40
Table B.3 F3max .................................................................................................................. 44
Table B.4 F3max contact ..................................................................................................... 45
Table B.5 Shear pad specifications ..................................................................................... 45
Table B.6 Summary of calculations .................................................................................... 45
Table B.7 Specifications by series ...................................................................................... 46
Table B.8 Specifications for compensator (sorted by C of C) ............................................. 46
vii


ABSTRACT
The U.S. Army is developing the next generation howitzer and a companion ammunition resupply vehicle which may have the capability to resupply and process ammunition automatically without human intervention. Oak Ridge National Laboratory was tasked to study the feasibility of this project and develop a proof-of-principle demonstration for its evaluation and feasibility. One aspect of the automatic processing task is to fuze projectiles. The insertion of the fuze and the subsequent threading is a precision job. Automation of this process requires careful alignment of the mating threaded parts. This report addresses the various aspects of alignment of the different parts and the resultant contact forces developed during assembly. This report also discusses the selection procedure for a remote compIiance center device to enable mating and test values of the observed forces during fuzing. Successful fuzing was possible with the setup developed in the laboratory and was later adapted for the overall process automation in the proof-of-principle demonstration system.
ix

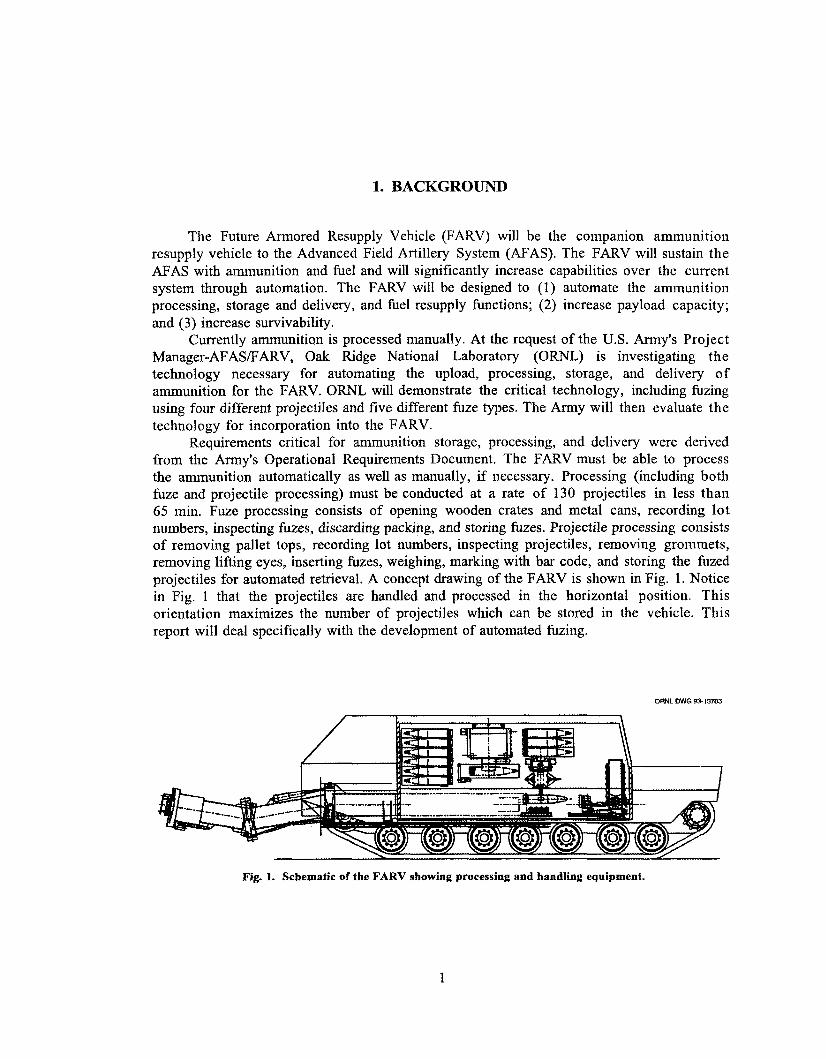
1. BACKGROUND
The Future Armored Resupply Vehicle (FARV) will be the companion ammunition resupply vehicle to the Advanced Field Artillery System (AFAS). The FARV will sustain the AFAS with ammunition and fuel and will significantly increase capabilities over the current system through automation. The FARV will be designed to (1) automate the ammunition processing, storage and delivery, and fuel resupply functions; (2) increase payload capacity; and (3) increase survivability.
Currently ammunition is processed manually. At the request of the U.S. Army's Project Manager-AFASRARV, Oak Ridge National Laboratory (ORNL) is investigating the technology necessary for automating the upload, processing, storage, and delivery of ammunition for the FARV. ORNL will demonstrate the critical technology, including fuzing using four different projectiles and five different fuze types. The Army will then evaluate the technology for incorporation into the FARV.
Requirements critical for ammunition storage, processing, and delivery were derived from the Army's Operational Requirements Document. The FARV must be able to process the ammunition automatically as well as manually, if necessary. Processing (including both fuze and projectile processing) must be conducted at a rate of 130 projectiles in less than 65 min. Fuze processing consists of opening wooden crates and metal cans, recording lot numbers, inspecting fuzes, discarding packing, and storing fuzes. Projectile processing consists of removing pallet tops, recording lot numbers, inspecting projectiles, removing grommets, removing lifting eyes, inserting fuzes, weighing, marking with bar code, and storing the fuzed projectiles for automated retrieval. A concept drawing of the FARV is shown in Fig. 1. Notice in Fig. 1 that the projectiles are handled and processed in the horizontal position. This orientation maximizes the number of projectiles which can be stored in the vehicle. This report will deal specifically with the development of automated fuzing.
ORNL DWG 93137E3
Fig. 1. Schematic of the FARV showing processing and handling equipment.
1

2
When a process is automated, the parts to be assembled are typically modified for ease of assembly. Design changes to simplify assembly of threaded members include coarser threads and larger chamfers. Due to the large inventory of existing ammunition stocks, however, neither fuzes nor projectiles could be modified. Additionally, the fuzing system had to accoinmodate four existing types of projectiles and five different types of fuzes. The different fuze and projectile combinations to be handled by the system are listed in Table 1 . Fuzes have a rotational safety that arms when they are spun faster than 1000 rpm, and an administrative control limits it to 300 rpm.
Table 1. Summary of fuze and projectile combinations to be fuzed
Fuze
Projectile MK3 99 M739A1 M762 M767 XM773
MI07 J J J J
M549 J J J J
M864 J
M483A1 J
The key requirements for fuzing are summarized as follows:
The projectiles must be fuzed in a horizontal position.
The fuzing station must support a processing rate of at least 2 rounddmin.
The fuzing station must support the projectile and fuze combinations listed in Table 1.
The rotational speed of the fuzes during fuzing should be less than 300 rpm.
Although the design of the lifting eye removal mechanism is not mentioned in this report, an alternative lifting eye removal mechanism was designed and tested as part of the test stand. A fuze conveyor (also not part of this report) was designed to allow automatic selection and retrieval of fuzes.

2. INITIAL TESTING
Before designing the fuzing and lifting eye removal test stand, initial testing was performed to determine whether the fuzing head concept would work. Early verification of the fuzing head concept was required before test stand design began.
The selected fuzing head concept is shown in Fig. 2. The fuzing head is a rubber-lined cone with an opening cut out to accept a fuze. The fuze is turned by the friction between it and the holder. The amount of torque possible is a function of the axial load applied. The general operating principle is similar to that of a cone clutch. A positive method of grasping the fuzes, such as mechanical fingers, was not possible because of the differences in shape between fuzes. The basic conical shape is similar for all fuzes, however, the different fuzes have different shapes of openings for fuze wrenches and setters.
---E
ORNL-DWG 93-4697
Rubber insert
I
View A-A Fig. 2. Selected fuzing head concept.
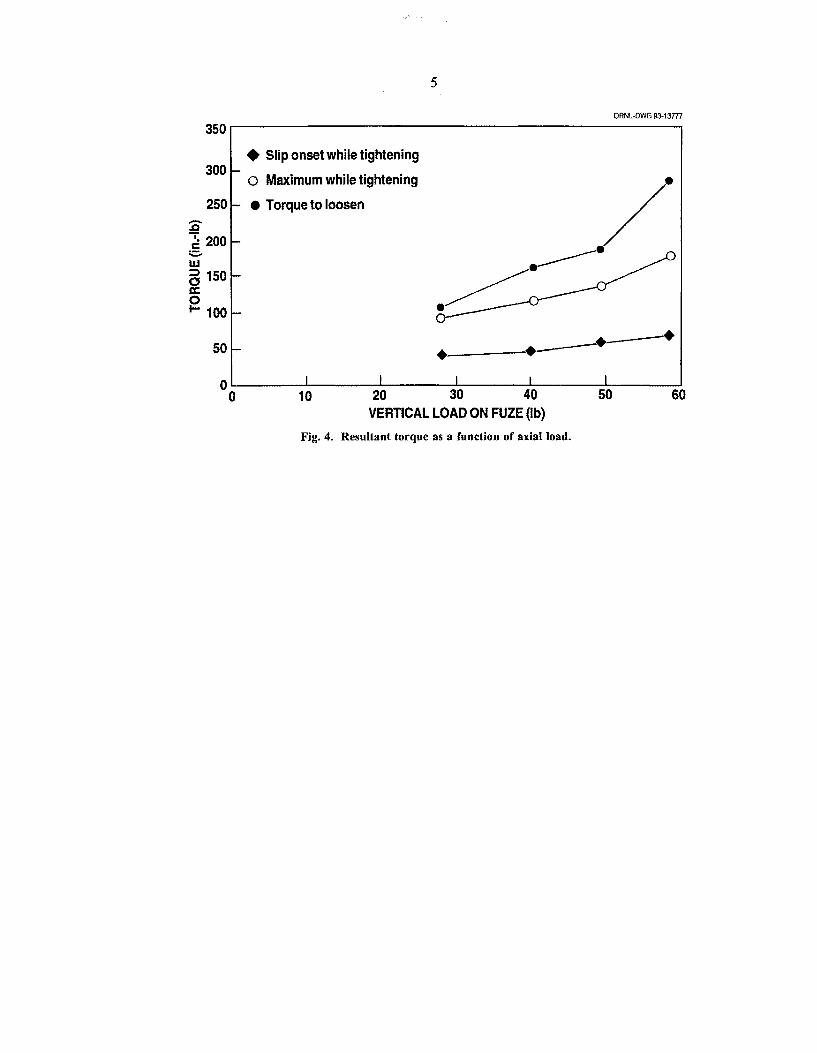
Torques achieved using the fuze wrench ranged from 15 to 20 ft-lb (180 to 240 in.-lb). The fuze was then removed using the fuze wrench and torque wrench combination, as shown in Fig. 3, and the maximum torque on removal was recorded.
3

€6-8666 OlOHd 1NUO
P
5
J3V
300
250 A
-0 2 200 a W
U 150
E? 100
ORNL-DWG 9.313777
+ - 0
- -
-
-
Slip onset while tightening Maximum while tightening Torque to loosen
I I I I I 0 10 20 30 40 50 E
VERTICAL LOAD ON FUZE (Ib) Fig. 4. Resultant torque as a function of axial load.

3. APPLICABLE THEORY
Assembly of mechanical components is difficult when the clearance between parts is small and no compliance is provided. Compliance allows correct positioning of parts when misalignment is present during assembly. There are two possible ways to remove the misalignment: passive compliance and active compliance. In passive compliance, a remote center compliance (RCC) device is used which changes position based on the forces and moments applied at the contact points. In active compliance, the forces and moments sensed by the contacts are translated into signals that drive the position of the end effector directly. An active compliance is required when the same equipment performs different assembly operations with different part sizes and clearances. A passive compliance is preferred due to its speed and simplicity of implementation and is sufficient when part geometries of mating components do not differ greatly. Although the fuzing study considered four different projectiles and five different fuzes, the geometries and dimensions of each were “similar enough” to permit the use of a passive RCC device. The related theory and selection criteria’ are described in the following paragraphs.
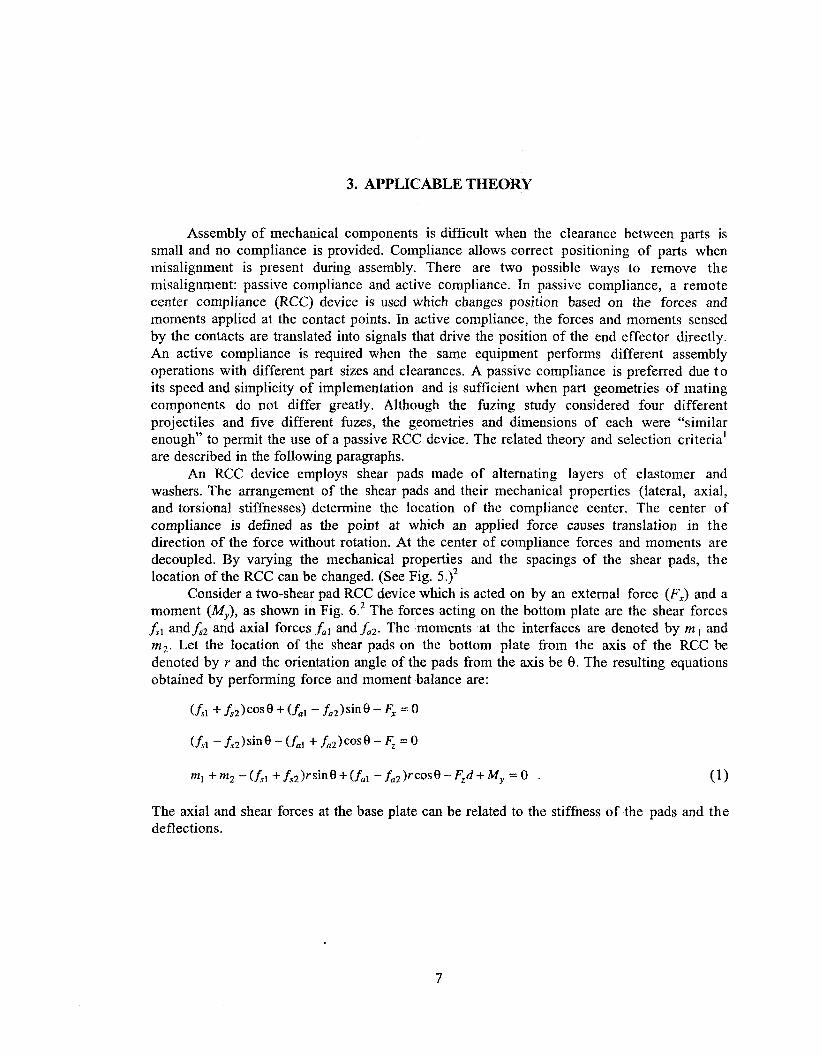
An RCC device employs shear pads made of alternating layers of elastomer and washers. The arrangement of the shear pads and their mechanical properties (lateral, axial, and torsional stiffnesses) determine the location of the compliance center. The center of compliance is defined as the point at which an applied force causes translation in the direction of the force without rotation. At the center of compliance forces and moments are decoupled. By varying the mechanical properties and the spacings of the shear pads, the location of the RCC can be changed. (See Fig. 5.)2
Consider a two-shear pad RCC device which is acted on by an external force (FJ and a moment (My), as shown in Fig. 6.’ The forces acting on the bottom plate are the shear forces fsl andhz and axial forces fnl and&. The moments at the interfaces are denoted by rn I and 1n2. Let the location of the shear pads on the bottom plate from the axis of the RCC be denoted by Y and the orientation angle of the pads from the axis be 0. The resulting equations obtained by performing force and moment balance are:
( f s l + f , ) ~ O S Q + ( f , ’ - f z ) s inQ-F , = o
ml +m2 -(fsl +fs2)rsinO+(ful - f ,2 )rcos0-F‘d+M, = O . (1)
The axial and shear forces at the base plate can be related to the stiffness of the pads and the deflections.
7

8
Fig. 5. Two-dimensional RCC’ (redrawn with minor modification and permission from the American Society of Mechanical Engineers).
f, = K,l, ; f, = K,,s + K,oI; m = K,s + K,,a
where
f, is the axial force
fs is the shear force
m is the moment acting at the pad/base plate interface
K,, Kss, K,, and K,, are the axial, lateral, lateralhending coupled, and bending stiffness,
lo, s, and a are the linear, lateral, and angular displacement, respectively, of the pad.
respectively, of the pad
9
Shear
Center of Compliance
Pads
Fig. 6. RCC variable definitions' (redrawn with minor modi- fication and permission from the American Society of Mechanical Engineers).
When no moment (my = 0) is applied at the RCC, the angle a is 0. Solving Eqs. (1) and (2) and substituting
where x is the displacement of the RCC in the X direction and using constraints from compatibility equations' yields:
K, = 2(K,, cos2 8 - K, sin2 e ) (3)

10
and solving for the location of the RCC, namely d , is given by:
2[ K, cos 0 + r sin 8 cos e (K , - Ks,y)] d = (4)
Similarly, K, can be solved by substituting F, = 0. This results in x =I z = 0 and K, is given by:
K, =2K, ,+2r (K , rcos28+K, , r s in28-2K, , s in8) -d2K, . (51
Equation (4) shows clearly that many variables influence the location of an RCC. By varying different parameters, the location of the compliance center (4 can be adjusted t o meet the user's requirements. In essence, the RCC device decouples the influence of force and moment at RCC (i.e., pure lateral force applied at the center of compliance causes only lateral translation, and a pure moment causes only an angular displacement without lateral movement). This allows for alignment correction in either position or orientation independently without incurring misalignment in the other.
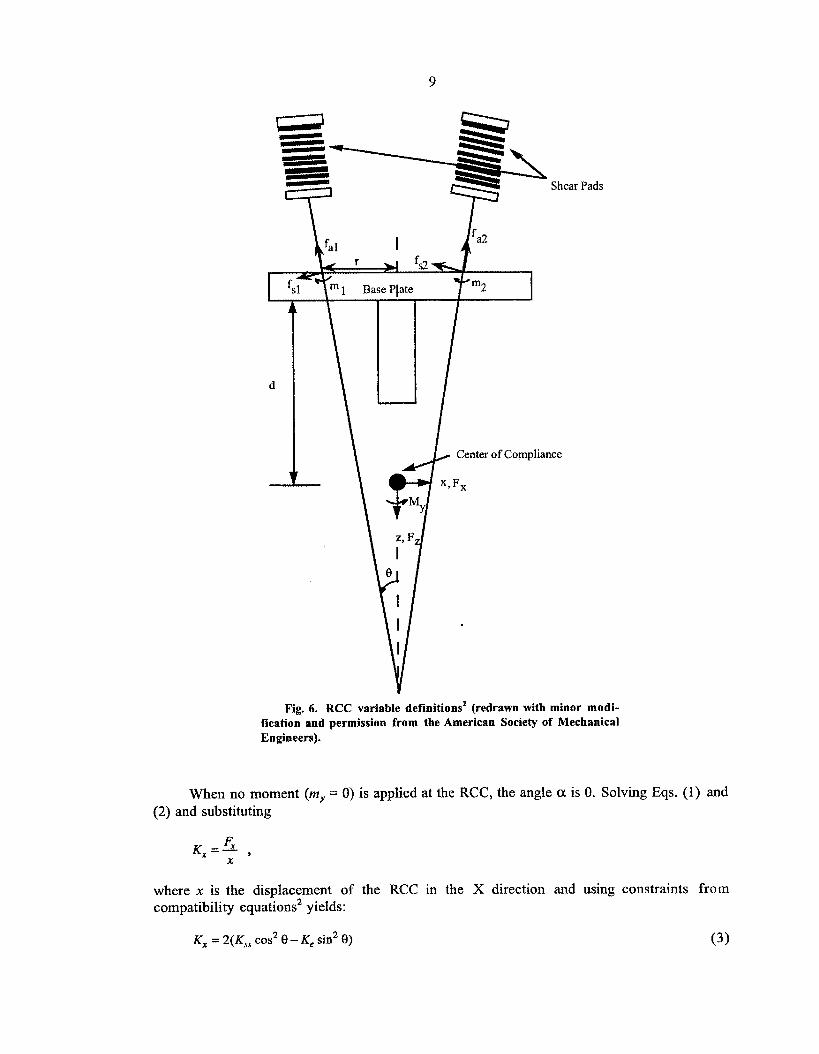
Given an RCC device, it is important to find out the forces that act on the object during the insertion process. Consider the peg insertion problem shown in Fig. 7. ' The object to be inserted is attached to an RCC device. When misalignment exists between the two mating objects, the RCC acts to correct this misalignment. In the diagram, the hole is shown with chamfers. During the insertion process, the peg is translated in the 2 direction. If the peg makes contact with the hole outside the chamfer, there is no possible way of generating a force in the X axis to correct for this misalignment.
Fig. 7. Peg insertion variable definition' (redrawn with minor modification and permission from the American Society of Mechanical Engineers).

During the peg-in-hole insertion process, the three different stages of insertion (chamfer crossing, one-point contact, and two-point contact) depend upon the number of contact locations and the type of force applied on the peg. During the initial stage, when misalignment causes the peg to rest on the chamfer of the hole, a component of the reaction force on the chamfer surface acts in the lateral direction. This causes the peg to move toward the axis of the hole. Figure 7 shows a peg being inserted with initial misalignments. The parameters in the insertion process are defined as follows:
E, is the initial positional offset o f the object being inserted
8, is the initial angular offset of the object being inserted
Kx is the RCC device stiffness in the x direction
KB is the RCC device torsional spring stiffness in the 8 direction
L, is the distance from the compliance center to the tip of the object being inserted
A4 is the equivalent moment at the tip of the object being inserted
F, is the equivalent force in the z direction at the tip of the object being inserted
F, is the equivalent force in the x direction at the tip of the object being inserted
D , is the diameter of the hole
D2 is the diameter of the peg
1 is the insertion depth of the peg, measured from the bottom edge of the chamfer
a is the angle of the chamfer
p is the contact friction, assumed to be 0.1
P is the radius of the peg
w is the chamfer width.
The maximum axial forces exerted during the peg-in-hole assembly for each of the three different phases are given as follows:
For chamfer crossing (see Fig. 8):'
cosa + psina sin a - p cos a 4 = KXEO
For one-point contact:
For two-point contact:
12
where c = (9 - 4) 4
Chamfer Crossing One Point Contact
Fig. 8. Peg insertion geometry and forces during chamfer crossing and one-point contact' (redrawn with minor modification and permission from the American Society of Mechanical Engineers),
During the two-point contact, wedging or jamming can cause the peg to fail during assembly. Wedging of the peg is caused when two-point contact occurs very early in the insertion process (i.e., 1 5 pd). The cause of this type of failure is geometric, where the resultant forces at the two contacts are pointing directly at each other. A condition to avoid this is given in Eq. (9):
4 where s = - 2 Kt3 , Lg -E-
&
Janming is caused by ill-proportioned forces and mopents applied through the supports and can be avoided by maintaining an acceptable ratio of applied forces and moments. The equations that guarantee the feasibility of insertion without jamming are given in Eq. (lo).

13
1 where h=- .
D2P
3.1 EXPECTED FORCES DURING FUZE INSERTION
This fuzing study considered four different projectiles and five fuzes. Some fuzes did not have a chamfer (e.g., the M739Al), and the chamfers in the projectiles varied from 0.0861 to 0.091 in. The clearances between the projectiles and the fuzes varied from 0.0018 in. (for the M762 fuze) to 0.0095 in. (for the MK399 fuze). For the chamfer crossing phase, the chamfers of the projectile and fuze and the clearances (the differences between the two major diameters) between the projectile and fuze are added to obtain the maximum allowable misalignment. The M864 projectile with the M762 fuze combination yielded the worst-case lateral misalignment of 0.0879 in., and the M107 projectile with the M739A1 fuze had the worst-case angular misalignment of 1.33" (see Appendix A).
The test bed constructed for the fuzing study involved many components (linear slide, fuze holder, optical bench, projectile cradle, etc.). These individual components have machining tolerances, and the assembly of these components should ensure that the cumulative tolerances (including projectile and fuze tolerances) do not exceed the maximum allowable lateral misalignment of 0.0879 in. The probability of fuzing failure due to these component tolerances is given in Appendix A.
The RCC device is placed between the shaft and the fuze holder to compensate for misalignment. Due to the design of the fuze holder, the distance from the base plate of the RCC device to the end of the fuze is 5.5 in. The weight of the fuze and the fuze holder is 4.14 Ib. The design procedure described in Appendix B was used to select AT1 Model No. 9115-211-C RCC for the fuzing test stand.
The stiffhess values for the 91 15-21 l-C RCC device are
K, = 130 lb/in.
K, = 9100 in.-lb/rad
K, = 185 in.-lb/rad
Position of the center of compliance = 5.8 in.
The chamfer angle for the projectile is 30". For the insertion of the fuze into the
E, = 0.0879 in.
projectile, the values of various parameters are as follows:
D1= 2.0 in.
D2 = 1.9982 in.

14
/.l = 0.1
€lo = 1.5"
Substituting the values, the insertion forces for the three phases of firze insertion are:
F,, 25.3 Ib
Fz2 = 1.1427 Ib
FZ3 = '820(o.02618 - - 1 1
The maximum insertion force during two-point contact occurs when
2cD, lr- ,
e o yielding
or = 19.5 Ib for 0.5" initial angular misalignment and 308. lb for 2" angular misalignment. The 2" misalignment was the helical angle of the threads of the fuze/projectile. The maximum misalignment capability of the RCC device is 1.7". Hence, for 1.7", the maximum force F,, z 200 Ib. The system was therefore designed for 200 Ib of axial force during threading (see Fig. 9).
ORNL-DWG 94-4758
250 8 200 .
rr e
150 .
0 c 0 K
c
w-.
.- : 100. L
50 .
eo = I .70 r eo = 0.5" _---------..----
# - - *) I 0 -0.1 0 0.1 0.2 0.3 0.4 0.5 0.6 0.7
Insertion depth (in.)
I I I
Fig. 9. Insertion force as a function of insertion depth.

1 5
Forces Fzl , Fzz, and F,, are the forces encountered if the fuze and projectile could be simulated as a peg-in-hole problem. The fuze and projectiles have threads and, hence, the peg-in-hole analogy does not hold completely. The first two stages, the chamfer crossing and the one-point contact, will occur during the threading operation; however, two-point contact will not occur since the threads start immediately after the chamfer in the projectiles.
3.2 PRELIMINARY DESIGN CONCEPTS
A test platform was built to verify the algorithms for fuzing. The testing was conducted on an optical bench to ensure flatness of the mounting surface. The test platform was designed to introduce various misalignments between the fuze and the projectile axes (both angular and lateral) to verify the ability to fuze. A coordinate reference frame was chosen so that the Z axis was parallel to the fuze axis and that the X axis was parallel to the plane of the optical table and perpendicular to the fuze axis. The RCC device and the fuze holder were mounted to a shaft which rotated to enable threading. A shaft size of 0.5 in. diam was assumed, and Appendix C explains the calculations to show that 0.5 in. diam was sufficient for the load conditions experienced during fuzing.
The size of the motor required to drive the linear slide and the fuze shaft was determined by finding the torque capacity and speed required. Calculations in Appendix I) show the process of selecting the motor. PMI U12M4H motor and PMI Ul2M4H motor with GH 12-20 gear head was selected for the fuzing shaft.
3.3 DESIGN IMPLEMENTATION
3.3.1 Test Stand Design
The tolerance study determined that the selected design concept, horizontal fuzing using an RCC, would have a good success rate, potentially better than 99%, based on the best- case result of the Monte Carlo analysis. Therefore, a test stand was designed (see Fig. 10).
ORNL-DWG 94-4642 Fuze holder
Fig. 10. Schematic of fuzing test stand.
16
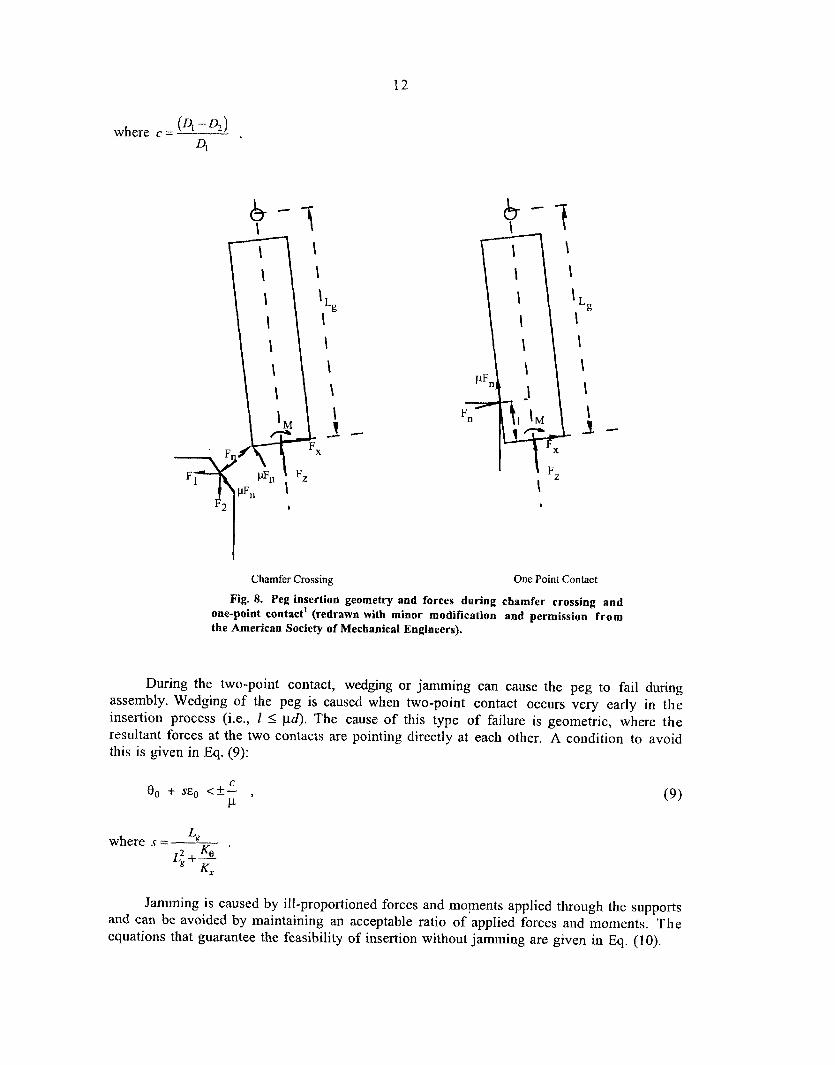
The test stand was designed to hold the projectiles horizontally in cradles. The projectile cradles are mounted on top of fixtures which allow fine alignment of the vertical position and pitch orientation of the projectile. A linear slide brings the fuze and fuze holder into contact with the projectile. The fuze holder is mounted on the end of an RCC which, in turn, is mounted to a motor shaft. The test stand features a milling table with both rotary and linear motions. The milling table was mounted between the motor driving the fuze holder and the linear slide to allow known misalignments to be introduced between the fuze axis and the projectile axis.
All of this equipment was mounted onto an optical table. This mounting scheme was selected to simplify assembly and to establish a datum to which all components could be rigidly mounted and referenced. A set of alignment fixtures was built to align the projectile and the RCC with respect to each other. A schematic is shown in Fig. 11.
female alignment guide
ce
compensator I male alignment guide
Fig. 11. Fuzing test stand alignment fixtures.
During alignment, the female alignment guide is threaded into the projectile and the male guide is mounted on the RCC. The fixtures holding the projectile and the milling table are adjusted so that the male guide can be slid into the female guide without binding.
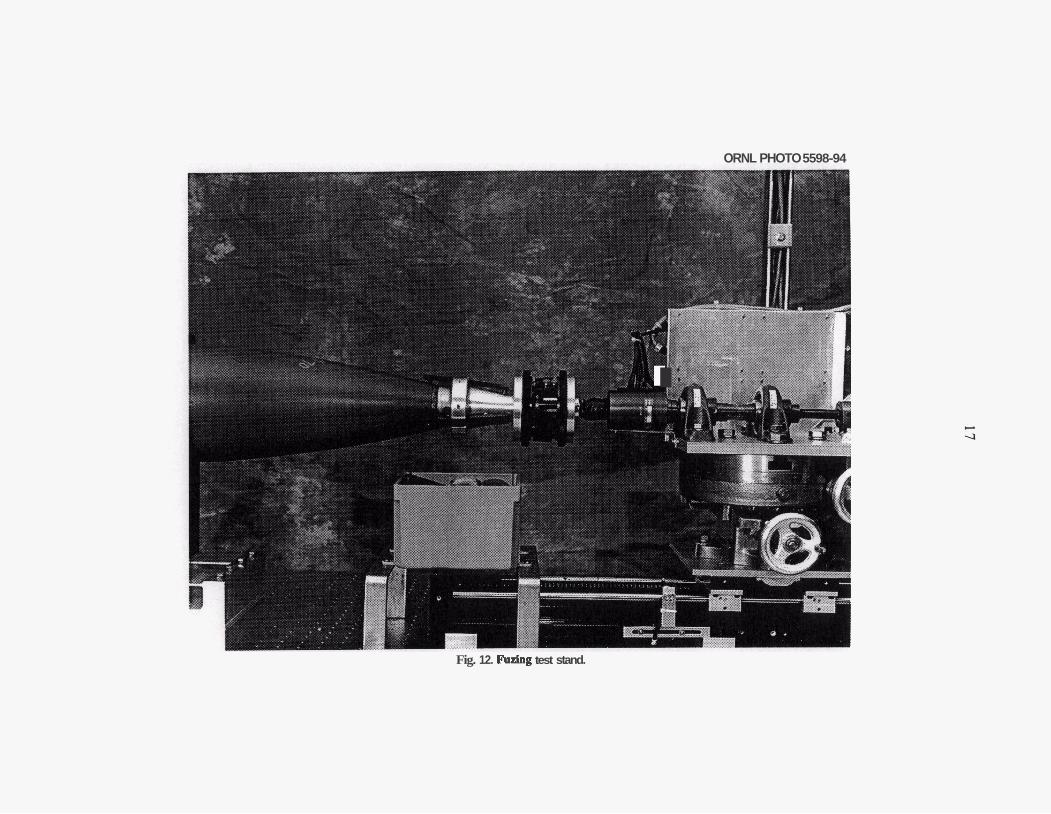
The fuze holder receives fuzes from a fuze conveyor. Fingers provided on the fuze holder enable it to remove a h z e presented by a fuze conveyor. Operation of the fuze holder is shown in Fig. 12. The fuze holder applies torque to the fuze to rotate it by a friction interface. The inner surface of the fuze holder i s rubber lined. The fingers on the fuze holder are designed to ride up on the projectile and release the fuze as the fuze is threaded into the projectile.
The motor shaft was necked down to 0.5 in. diam, where the RCC attaches. Strain gages were applied at that location. The motor shaft was necked down to allow adequate resolution of the strain gages. Strain gages were applied to measure both axial force and torque. Feedback for the fuzing operation was provided by sensing motor current. The strain gages were wed for measuring insertion forces.
ORNL PHOTO 5598-94
i. - .. ?,
.. . . .
I
Fig. 12. Fuzing test stand.


4. RESULTS
Two phases of testing were conducted. The first phase was to determine peak forces generated during the chamfer crossing phase of fuzing. Only lateral misalignment was introduced for this phase. The second phase was to determine the allowable range of lateral and angular misalignment for successful fuzing. The introduced misalignment is measured between the fuze and projectile centerlines at the point where the first thread of the b e passes the top plane of the projectile, as shown in Fig. 13.
Top plene of projectile
Projectile centerline _._._._.-.-.-.-.-. .-.-.-.-. .-.-.
'. '.
Fig. 13. Misalignment definitions.
Only lateral misalignment was introduced when measuring chamfer crossing forces because angular misalignment does not affect the chamfer crossing forces. For this test the lateral misalignment was gradually increased until chamfer crossing could not be performed. The typical peak force was on the order of 40 lb for a misalignment of 0.08 in. Occasionally a transient exceeding this, reaching up to 80 lb was observed. Although the source of the transients was not determined, it is possible that they could have been caused by slipping in some of the mechanical connections.
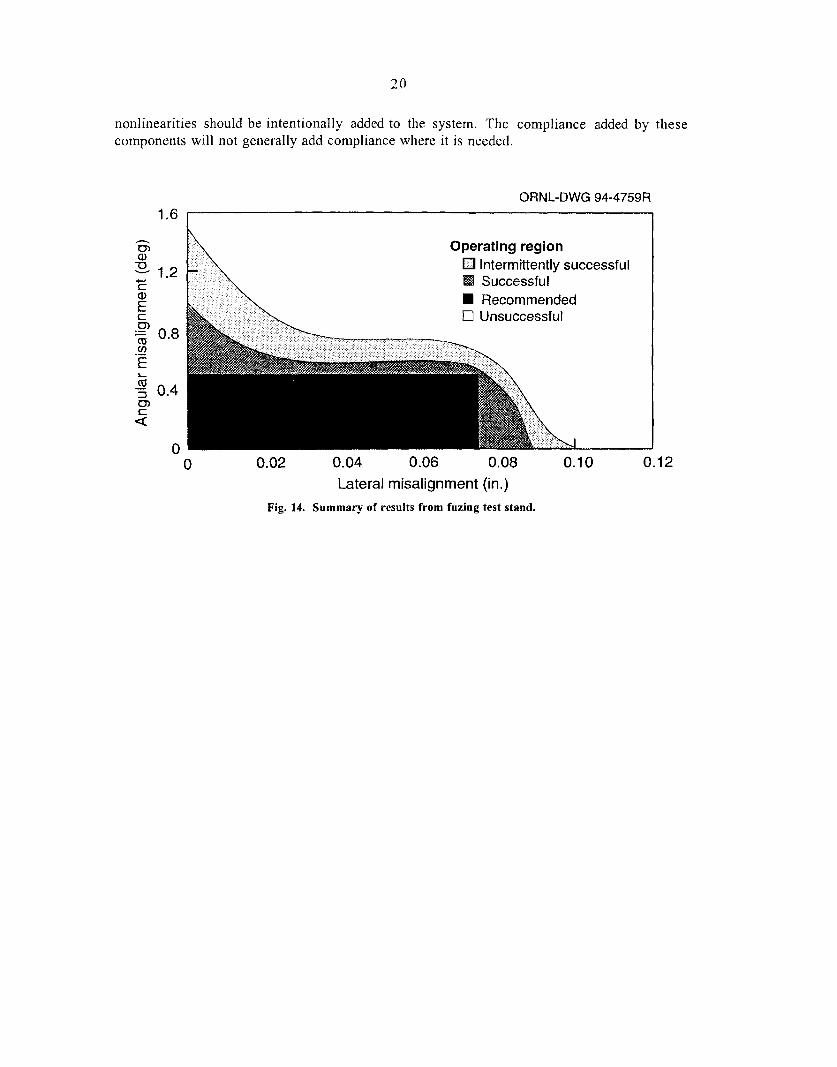
Following this initial testing, artillery projectiles were successfidly fuzed. Combinations of lateral and angular misalignments were tested to determine the misalignment range over which fuzing could be successful. These results are summarized in Fig. 14. The range over which fuzing was successful was somewhat larger than that predicted by theory. This was probably due to mechanical backlash in the milling table and between the RCC and motor shaft. This backlash introduced additional nondeterministic compliance not accounted for in the analysis. This should not be extrapolated to mean that backlash or other mechanical
19
20
nonlinearities should be intentionally added to the system. The compliance added by these components will not generally add compliance where it is needed.
ORNL-DWG 94-4759R
Operating region h zn a Intermittently successful 1.2 +-. c Recommended
0 Unsuccessful E c cn (u v)
= 0.8
E
5 0.4
.-
L a 0)
2 0
0 0.02 0.04 0.06 0.08 0.10 0.12 Lateral misalignment (in.)
Fig. 14. Summary of results from fuzing test stand.

5. CONTROL SYSTEM
5.1 INTRODUCTION
Development of the control system for the fuzing test platform was guided by the fact that fuzing was only one aspect of the larger Advanced Integrated Robotic Rearm SystedModular Artillery Ammunition Delivery System (AIRRS/MAADS) demonstration system. Therefore, a key goal in the development of the test platform control system was to work within the architecture that was planned for the final system. This approach provided an initial development and testing platform for the controls architecture as well as a test platform for the fuzing concept and hardware design.
The AIRRS/MAADS control system was designed as a hierarchical system built on a multiprocessor, network-based architecture intended to provide significant benefits in the development, implementation, and integration of the control system. The modular and hierarchical nature of the hardwarekoftware architecture permitted development of certain portions of the control system in the absence of accurate or complete information on the hardware to be controlled. It also provided a convenient method to integrate, test, and demonstrate the system as various hardware components are completed.
5.2 CONTROL SYSTEM HARDWARE DESIGN
A single MVME162-22 CPU board was used to implement the test stand control software. Digital input/output (UO), analog-to-digital ( N D ) input, and digital-to-analog (D/A) output were performed via Green Spring IP-Digital 24, IP-ADIO, and IP-DAC boards respectively. Position input from the resolvers on each motor was input via a four-channel VMIC 4942 resolver-to-digital (R/D) board. The CPU board, the IUD board, and a Green Spring carrier board, which was used to mount the I/O boards, shared a five-slot VME backplane.
A PMI U12M4H motor was selected for driving a Daedal 5061218 linear slide (Z axis), and a PMI U12M4H motor with a PMI GH12-20 gear head was selected for the fuzing shaft (0, axis); see Appendix D. Each motor was driven by an Advanced Motion Controls (AMC) 25A20 servo amplifier, and the amplifiers were powered by an AMC PS 1200-W-8OV power supply. Because of the extremely low armature inductance of the PMI motors ( 4 0 0 pH), an AMC FC15030 filter card was also required for each axis in order to satisfy the 250-yH minimum load inductance requirements of the servo amplifier. Position information for each axis was obtained from a Litton 1 l-BHW-28-FS/AOOl resolver mounted to the motor.
Two single-pole double-throw micro switches provided over-travel protection for the Z axis, and a double-pole double-throw mushroom switch was used as an E-Kill button for both axes.
5.3 CONTROL SYSTEM SOFTWARE DESIGN
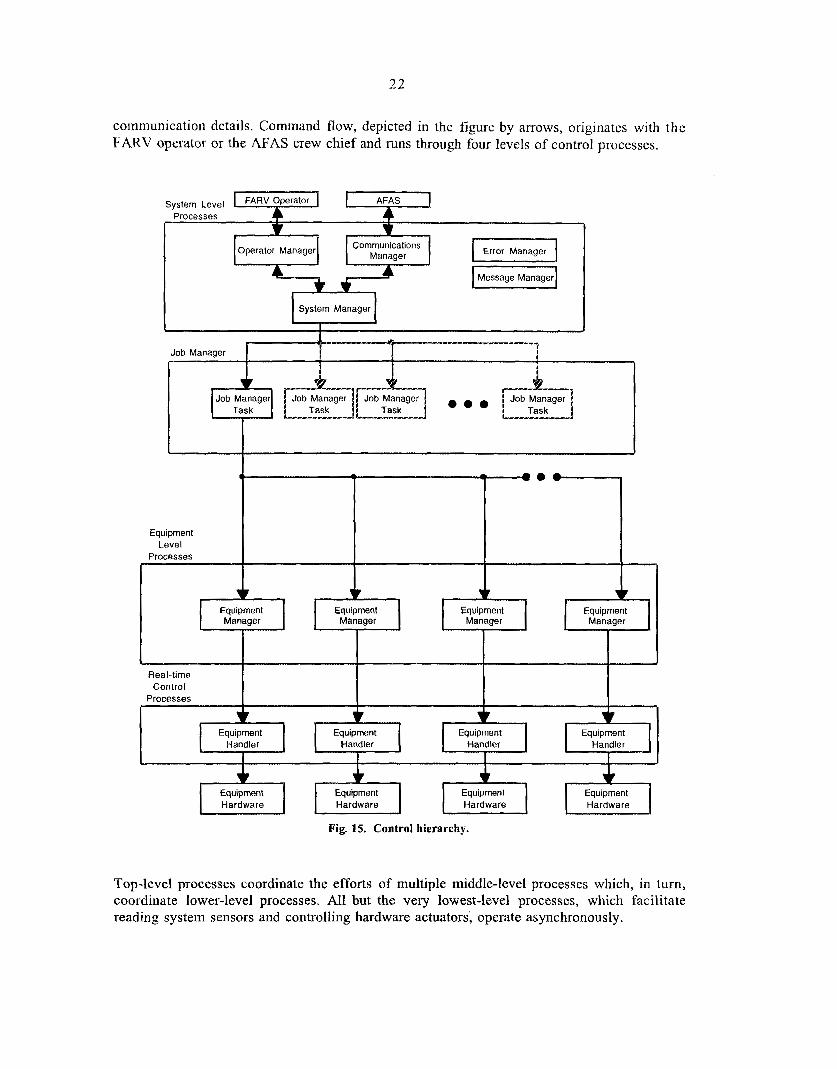
Figure 15 depicts the basic control system hierarchy and is intended to show the “command structure” of the control system without showing all of the interprocess
21
22
coinmunication details. Command flow, depicted in the figure by arrows, originates with the FARV operator or the AFAS crew chief and runs through four levels of control processes.
Operator Manager Communications
1 ~ 1 I M a T e r I I A
System Manager U I Message Manager]
Fig. 15. Control hierarchy.
Top-level processes coordinate the efforts of multiple middle-level processes which, in turn, coordinate lower-level processes. All but the very lowest-level processes, which facilitate reading system sensors and controlling hardware actuators: operate asynchronously.
2 3
The highest-level control processes, collectively known as the system level processes, support global system requirements such as the operator interface, communications with the MAS, error management, interprocess communications, and coordination of operational tasks. Additionally, each of the systems' operational requirements (e.g., ammunition processing, ammunition transfer, docking to the AFAS or another FAKV, undocking, etc .) has a separate task, called a Job Manager task, that controls and coordinates the activities of lower-level equipment managers. Collectively the Job Manager tasks make up the Job Manager. The System Level Managers and the Job Manager were not implemented for the fuzing test stand.
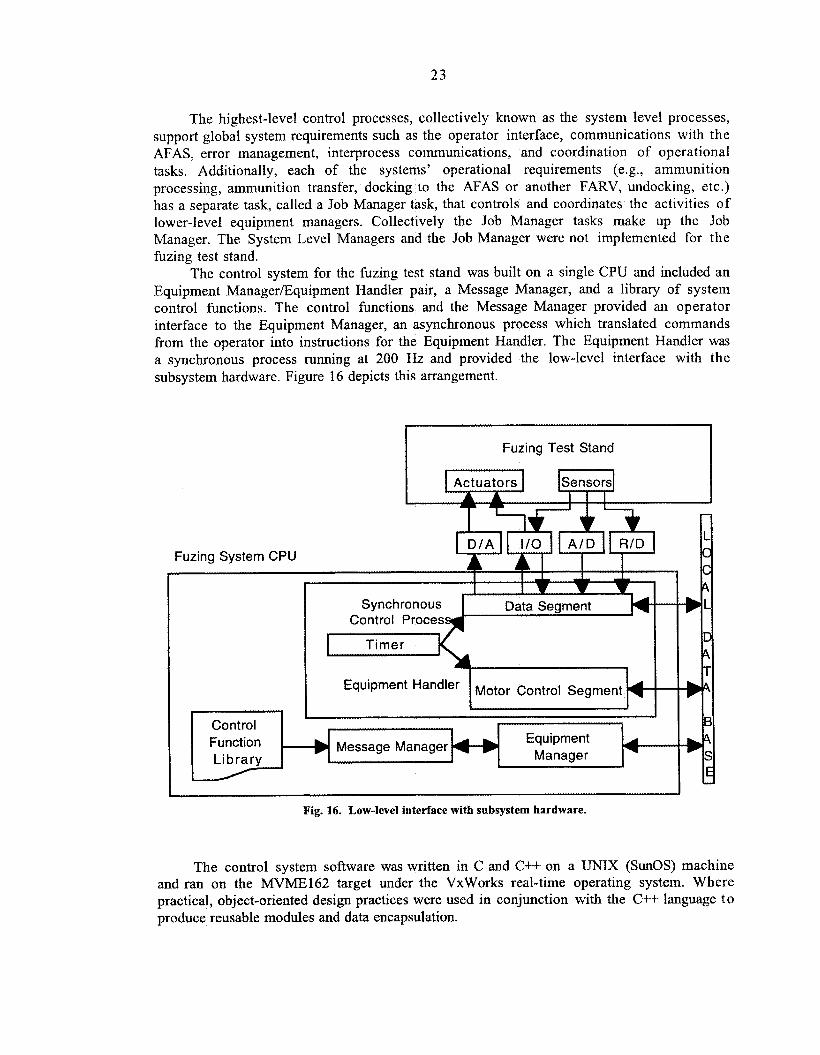
The control system for the fuzing test stand was built on a single CPU and included an Equipment ManagerEquipment Handler pair, a Message Manager, and a library of system control functions. The control functions and the Message Manager provided an operator interface to the Equipment Manager, an asynchronous process which translated commands from the operator into instructions for the Equipment Handler. The Equipment Handler was a synchronous process running at 200 Hz and provided the low-level interface with the subsystem hardware. Figure 16 depicts this arrangement.
I Fuzing Test Stand I
Fuzing System CPU
Control Proces
I 1
Timer
Equipment Hand'er 1 Motor Control Segment
- L 0 C 4
4 T 4
B 4 S E -.II
Fig. 16. Low-level interface with subsystem hardware.
The control system software was written in C and Ct+ on a UNIX (SunOS) machine and ran on the MVME162 target under the VxWorks real-time operating system. Where practical, object-oriented design practices were used in conjunction with the C t t language t o produce reusable modules and data encapsulation.

24
5.4 CONTROL STRATEGY
Inserting a fuze into an artillery projectile requires a series of movements on both the Z and 0,axes. The following paragraphs briefly describe the control strategy for each of these movements. Although control strategies for other moves such as extracting the fuze from a cup on the fuze conveyor, replacing the fuze in the fuze conveyor, and removing the lifting eye from a projectile were developed and tested on the test stand, they are not described here as they are outside the scope of this report.
5.4.1 Quick Move
The quick move was used to rapidly position the fuze “close” to the threaded opening on the projectile. During this move the 8, axis was servoed on zero velocity and a position controlled tnove of the 2 axis was used to place the end of the fuze within 0.25 in. of the end of the projectile (the Ready Position). The move was complete when the fuze reached the commanded final position.
5.4.2 Contact Projectile
During this move the fuze was moved from the Ready Position toward the projectile by controlling the current to the Z axis motor. When the effect of drive train friction is ignored, this has the effect of controlling the force with which the fuze contacts the projectile. Again, during this move the 0, axis was servoed on zero velocity. The move was complete when the velocity along the Z axis went to zero.
5.4.3 Align Threads
Once the fuze was inserted into the fuze well of the projectile, a counterclockwise velocity was commanded on the 0, axis. At the same time the Z axis current was controlled so that the fuze remained in contact with the projectile. In this manner the sudden advancement of the fuze into the fuze well indicated the alignment of the fuze and projectile threads. Per the warning by Nevins and W h i t n e ~ , ~ an additional rotation of approximately rc14 radians on the 0, axis was applied to ensure that the chamfered peaks of the threads were adequately separated.
5.4.4 Thread
Due to the coupling of the Z and 0, axes during the actual threading operation,
where p is the thread pitch in inchedrevolution, the control system was required to control both axes, Z and 0,, while only a single degree of freedom was available. This was accomplished by controlling the current to the Z motor and controlling the velocity of the 0, motor. The 8, axis velocity profile, shown in Fig. 17, was used on the test stand to ensure that if cross threading did occur it would occur at low velocity and thread damage would be minimized. As with the Z axis, when the effects of drive train friction are ignored, the

2 5
current to the 9, motor is proportional to the torque applied to the end effector. When the current on the 8, axis reached a predetermined limit, the threading move was determined to be complete as long as the fuze had translated at least 0.55 in. into the projectile. If the predetermined 8, current was reached prior to a 2 translation of 0.55 in, the control code returned an error indicating that cross threading had possibly occurred. Nevins and Whitney3 describe a more elaborate method of ensuring that threaded fixtures are properly tightened, but the simple method described here was adequate for the purposes of the testing conducted in this study
18
16
14
12
10
8
6
Theta 2 Command Velocity vs. Insertion Depth 1
......................................................................,....
r I :
....
. .
..
..
..
..
................
...............
................
...............
................
........................
........................
...........
...........
...........
....
....
. \ . !;. ...
............
............
............
............ .. ..
0 0.1 0.2 0.3 0.4 0.5 0.6 0.7 0.8
Insertion Depth (inches)
Fig. 17. 0, command velocity as a function of insertion depth.
5.4.5 Retract
Mechanical design of the fingers on the fuze cup ensured that as the fuze was threaded into the projectile, the fingers released their grasp on the fuze. This permitted the fuze cup to be retracted from the projectile once the threading operation was successfully completed. At that time, the 8, axis was servoed on zero velocity and a position controlled move of the Z axis was used to return the assembly to its “home” position. The move was complete when the fuzing assembly reached the commanded final Z position.
5.5 CONTROL SYSTEM DEVELOPMENT
Once the control strategy had been determined, a straightforward approach was followed in the development of the control system. Each control mode (Le., position, velocity, and current) for a given axis was considered as a separate plant; frequency response models for each plant, G(s), were determined experimentally; and an appropriate control filter, H(s), was designed for each plant (see Fig. 18). The following section provides an example of the development of a control system for a specific plant.
26
-+
I
Fig. 18. Basic closed-loop control system.
The procedure described by Lin/Wu4 for linear system identification was used to determine an approximate model of the open-loop frequency response for each plant. Because the significance of nonlinearities in the actual plants was unknown, models of each plant were made using a range of plant input magnitudes (lo%, 30%, and 50% of the D/A full-scale output) and used collectively to describe the system. For the Z axis Current Control Plant, the following transfer functions describe the plant:
1.038
(0.0007278~~ + 0.03183s + 1) Go.sv(s) =
0.6703
(0.0004839~~ + 0.01079s + 1) G, .5v (s) =
0.5542
(0.0004267s2 + 0.007098s + 1) G,.,, (s) =
The data used to determine these transfer functions and the resulting models are plotted in Fig. 19. The effect of the nonlinearities in the system can be seen in the plots, Also note the difference in the plant poles and natural frequencies determined from each model:
Po,sv = -21.8707 5 j 29.9285; w, = 37.1 rad/s
e , sv -1 1.1471 f j 44.0692; w, = 45.5 rad/s
P2,5v = -8.3163 k j 47.6893; 0, = 48.4 ra&s .
Given the plant models, a controller was designed using techniques for shaping the forward path transfer function, H(s)G(s), on the Nichols chart as described in Horowitz/Sidi.’ The open-loop plant models, G(s), are first plotted to determine the closed-loop response of the uncompensated plant. The results for the Z Axis Current Control Plant are shown in Fig. 20.

27
Current Bode Plot for Fuzing Test Stand (Linear Slide)
. . . . . . . . . . . . . . . . . . . . . . . . . . . . . . . .
% c rp (!s .-
. . . . . . . . . . . . . . . . . . . . . . . . . . . . . . . .
-L"
lo-' 1 oo 10' 1 o2 Frequency (radlsec)
100
0 0 a, -0 8 -100 m .c Q -200
-300 lo-'
. . . . . . . . . . . . . . . . . . . . . . . . . . . . . . . . . . . . . . . . . . . . . . . . . . . . . . . . . . . . . . . . . . . . . . . . . . . . . . . . . . . . . . . . . . .
. . . . . . . . . . . . . . . . . . . . . . . . . . . . . . . . . .x - .0.5.v. a:- 3 i5.V.. .+.-. 2.5.v i
. . . . . . . . . . . .
. . . . .
. . . . . . .
. . . . . . . . . . . . . . . . . . . . . . . . . . . . . . . . . . . . . . . . . . . . . . . .
. . . . . . . . . . . . . . . . . . . . . . . . . . . . . . . . . . . . . . . . . . . . . . . . . . . . . . . . . . . . . . . . . . . . . . . . . . .
1 oo 10' Frequency (radlsec)
Fig. 19. Z axis current bode plot.
The compensator is then designed to give the desired performance. In this case,
1 o2
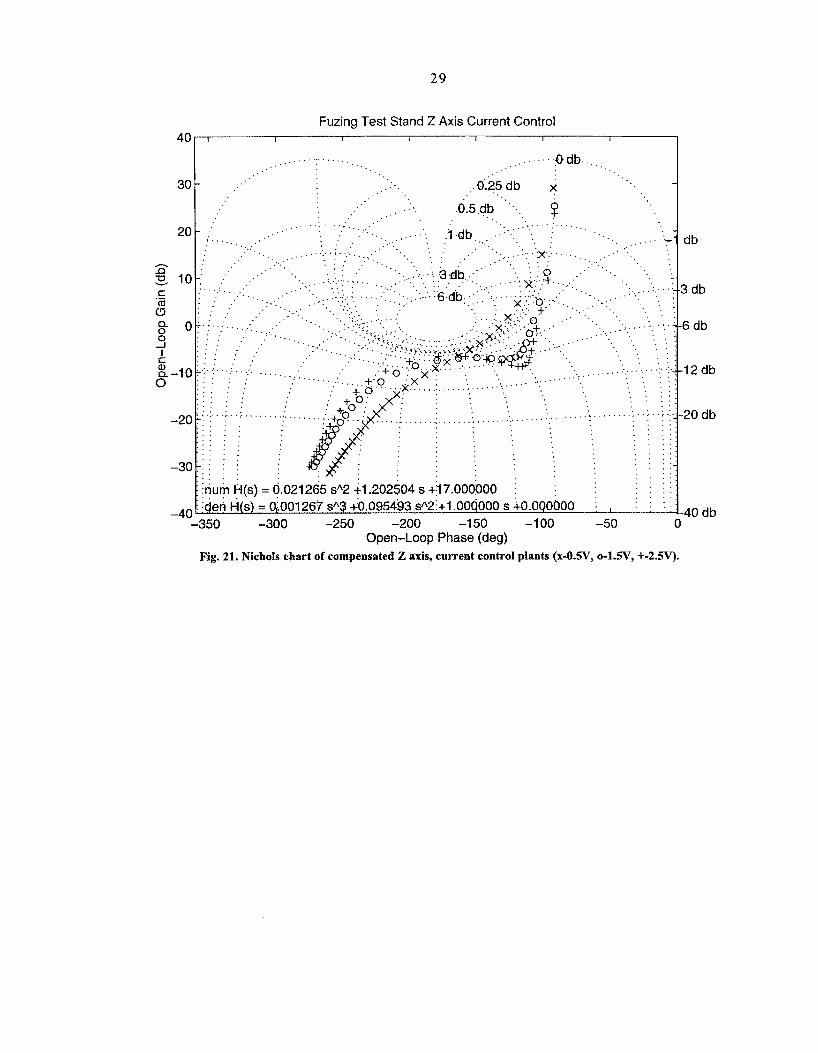
which has a dc gain of 17.0, two zeros at 4.5 Hz, and poles at the origin, 2.0 Hz and 10.0 Hz. The resulting frequency response for the compensated plant(s) is shown in Fig. 21.

28
Fig. 20. Nichols chart of uncompensated Z axis, current control plants (x-0.5V, o-l.W, +-2.5v).
29
Fuzing Test Stand Z Axis Current Control
. . . ..
-350 -300 -250 -200 -1 50 -1 00 -50 0 Open-Loop Phase (deg)
Fig. 21. Nichols chart of compensated Z axis, current control plants ( w - O S V , o-l.W, +-2.5V).

6 . CONCLUSIONS
A fuzing test stand incorporating an RCC device was developed at the Robotics and Process Systems Division at OWL. A passive RCC device was used for this design because the dimensional and geometric variations of the four projectiles and five fuzes resulted in sufficiently small variation in the projectile/fuze clearances during fuzing performed in the horizontal direction. The measured values of the forces during fuze insertion suggest that two-point contact did not occur prior to threading. Experimental results show that automated fuzing using unmodified fuzes and projectiles from current inventory was possible with an angular misalignment of up to 1.5" or linear misalignment of up to 0.1 in. However, with both angular and lateral misalignment present, the values reduced to 0.5" and 0.075 in. The fuzing test stand with the fuze holder and the RCC was able to successfully perform automated fuzing in a laboratory setup.
3 1


1. D. E. Whitney, “Quasi-Static Assembly of Compliantly Supported Rigid Parts,” .I Uyn. Syst. Meas. and Control 104, 65-77 (March 1982).
2. D. E. Whitney and J. M. Rourke, “Mechanical Behavior and Design Equations for Elastomer Shear Pad Remote Center Compliances,” J. Dyn. Syst. Meas. and Control, 108, 223-32 (September 1986).
3. J. L. Nevins and D. E. Whitney, eds., Concurrent Design of Products and Processes, A Strategy for the Next Generation in Manufacturing, McGraw, New York, 1989.
4. P. L. Lin and Y. E. Wu, “Identification of Multi-Input Multi-Output Linear Systems From Frequency Response Data,” Trans. ASME, 104, 58-64 (March 1992).
5 . I. M. Horowitz and M. Sidi, “Synthesis of Feedback Systems With Large Plant Ignorance for Prescribed Time-Domain Tolerances,” Int. J. Cont. 16, 287-309 (February 1972).
6 . Compensator Description and Selection Guide, Assurance Technol., Garner, N.C., 1992.
7. E. J. Nicholson and R. S . Fearing, “Compliant Control of Threaded Fastener Insertion,” pp. 484-90 in Proceedings of IEEE International Conference on Robotics and Automation, May 1993, IEEE Comput. SOC. Press, Los Alamitos, Calif.
33


APPENDMA CUMULATIVE TOLERANCE STACKUP ON
HORIZONTAL FUZING ASSEMBLY
35

AIRRSf94-3
Department of the Army Office of the Project Manager for the Future Armored Resupply Vehicle
CUMULATIVE TOLERANCE STACKUP ON HORIZONTAL FUZING ASSEMBLY
April 1994
Prepared by V. K. Varma
A. C. Williamson
Ammunition Logistics Program OAK RIDGE NATIONAL LABORATORY
Oak Ridge, Tennessee 378314304

Cumulative Tolerance Stackup on Horizontal Fuzing Assemblv
CONTENTS
LIST OF TABLES .......................................................................................... ............................................ 111
INTRODUCTION ................................................................................................................................... 1
TYPES OF MISALIGNMENT ............................................................................................................... 2 2.1 ACCURACY OF THE COMPONENTS ........................................................................................ 2
2.1.1 Projectile Assembly Tolerances .......................................................................................... 2 2.1.2 Fuze Assembly Tolerance ................................................................................................... 4 ACCURACY OF THE ASSEMBLY .............................................................................................. 6 2.2
STACK-UP mswrs ........................................................................................................................... 7
STATISTICAL ANALYSIS ................................................................................................................... 8
CONCLUSIONS ................................................................................................................................... 10
APPENDIX COMPENSATOR ............................................................................................................... 11
Oak Ridge National Laboratory c April 1994

Cumulative Tolerance Stackup on Horizontal Fuzing Assembly
LIST OF TABLES
Table 1 . Inaccuracy due to variation in projectile diameters ....................................................................... 3
Table 2 . Inaccuracy due to cradle machining tolerances ............................................................................. 4 Table 3 . Inaccuracy due to PCD runout ...................................................................................................... 4 Table 4 . Inaccuracy due to projectile diameter run-out tolerance ............................................................... 5
Table 5 . Tolerances on the components used in the fuze assembly ............................................................ 5
Table 6 . Cumulative tolerances using uniform and normal distributions ................................................... 8
Oak Ridge National Laboratory iii ~
April 1994


Cumulative Tolerance Stackup on Horizontal Fuzing Assembly
1. INTRODUCTION
Oak Ridge National Laboratory has been tasked by the U S . Army's Project Manager for the Future Armored Resupply Vehicle to develop an automated fuzing process as part of its Advanced Integrated Robotics Rearm System (AIRRS) Project. After conducting a concept evaluation, looking at multiple configurations for the Future Armored Resupply Vehicle, the AIRRS team decided to perform the fuzing operation with the projectile axis horizontal. One concern about horizontal fuzing, however, is the ability to automatically fuze with potential misalignments inherent with the cumulative tolerance stackup of the projectile and fuze assemblies.
During fuzing, the threaded fuze is inserted into the projectile. When this operation (i.e., threading) is performed by a soldier, it is a fairly easy job because the compliance of the soldier's wrist correctly positions the h z e in relation to the projectile. Automating this operation is more difficult due to the rigid parts that go into its construction. Many parts are associated with the design of an automated fuzing assembly. The tolerances of these different components can add up and cause problems in aligning the projectile and fuze axes.
There are, however, two ways a robot can circumvent this problem: (1) active compliance and (2) passive compliance. In active compliance, the robot's different degrees of freedom are used to give compliance at the end effector. To enable compliance at the end effector, sensory torque/force feedback is used to guide the tip motion of the end effector. In passive compliance, the spring arrangement between the two plates of the compensator guides the tip motion of the end effector. No sensing is required, but according to the application, the compensator must be selected based on the desired location of the compliance center and the necessary misalignment capability (see Appendix).
The objective of this study is to determine whether the tolerances of the various fuzing components are within ranges that make fuzing possible. If misalignment between the fuze and projectile centerline is more than what can be accommodated by the passive compliance design used in the current design, an active sensing mechanism may be required to perform fuzing. This study investigates fuzing with the axis of the projectile in the horizontal orientation.
Apart from the capabilities of the compensator, alignment correction of the projectile and fuze centers can be affected by the positioning tolerances during machining and assembly. A fuze can be inserted into a projectile only when the end of the fuze is positioned at the chamfer of the projectile. The maximum angular misalignment is also governed by the probability of the fuze/projectile threads either jamming or cross threading, The maximum misalignment values due to these factors can be as low as 0.5" (predicted fiom theory) and will be verified with the test stand.
This report (1) identifies the different tolerances considered in this study and (2) combines these tolerances to determine if the compensator can accommodate worst-case conditions. This report also presents a statistical analysis to show the percentages of cases in which the fuzing operation will encounter problems.
Oak Ridge National Laboratory 1 April 1994

Cirmulative Tolerance Stackup on Horizontal Firzing Assembly
2. TYPES OF MISALIGNMENT
Fuzing assembly misalignment can occur from various sources such as (1) the accuracy of the components and (2) the accuracy of the assembly. A schematic of the fuzing test stand setup is shown in Fig. 1.
ORNL-DWG 94-4642 Fuze holder
...... l___.__l_.
Fig. 1. Schematic of the fuzing test stand setup.
2.1 ACCURACY OF THE COMPONENTS
Tolerances of the fuzes, projectiles, and machined components used to perform automated fuzing are addressed in this section. The tolerances that relate to the projectile and its positioning mechanism and those related to the fuze and its mounting mechanism are discussed separately. All misalignments are recorded as two-sided tolerances.
2.1.1 Projectile Assembly Tolerances
There are four possible causes of inaccuracy from the projectile positioning assembly. Each cause is described in the following subsections.
Inaccuracy Due to Projectile Diameter Variation
A schematic of a projectile is shown in Fig. 2. The diameter of the projectile changes along its length. During horizontal processing, when the projectile is resting on its side on the cradle at A and B and is
Oak Ridge National Laboratory 2 April 1994

Cumulative Tolerance Stackup on Horizontal Fuzing Assembly
held in position by external grippers, the axis of the projectile is not parallel to the horizontal plane due to the diameter variation. The amount of axis misalignment varies with the type of projectile used.
ORNL-DWG 94-4654
Table 1 gives the values of the design diameters of the various projectiles and their respective positions. The axial misalignment can be corrected by making provisions for tilting the projectile. The end point of the projectile (P) from the centerline that is parallel to the cradle is given by the relation,
where V i s the amount the cradle is mechanically adjusted at point B vertically and L1 , L2, D1, and D2 are the dimensions of the projectile (see Fig. 1). Since there are four projectiles used for this study, the value of V will depend on the projectile used. With a value of Y = 0.01 1229 in., the end point of the projectile (P) will have a minimum deviation of Dd. Table 1 also gives the values of Dd and the angular misalignment in the pitch direction (Dq). There is no misalignment in the yaw or the lateral directions due to the variation of the projectile diameters.
Table 1. Inaccuracy due to variation in projectile diameters
L2 Ad m (in.) (in.) (deg)
D1 D2 L1 Projectile (in.) (in.) (in.)
M864 6.0895 6.05 5.86 19.17 0.028 0.084 M107 6.0895 6.06 5.55 12.28 0.008 0.037
M549A1 6.0895 6.0795 4.61 20.75 -0.028 -0.077
M483 6.0925 6.066 5.00 19.04 0.008 0.023
Oak Ridge National Laboratory 3 April 1994

Cumulative Tolerance Stackup on Horizontal Fuzing Assembly
Cradle Dimension Tolerance
The cradle mechanism that is used to position the projectile for fuzing has geometric tolerances associated with it. There can be centerline misalignment and inaccuracy in the cradle diameters. Table 2 shows for different projectiles the end point misalignments due to these inaccuracies.
Table 2. Inaccuracy due to cradle machining tolerances
Vertical Lateral Yaw Pitch
Projectile (in.) (in.) (deg) (d%)
M864 0.04268 0.04268 0.0977 0.0977
M107 0.032 1 0.032 1 0.1032 0.1032
M549A1 0.055 0.055 0.12428 0.12428
M483 0.048 0.048 0.1 1459 0.11459
Projectile Thread Runout Tolerance
The pitch circle diameter (PCD) of the projectile is machined with a run-out tolerance of 0.03 in. With a gauge threaded into the fuze well, the runout is determined using a dial gauge placed at 0.25 and 3.75 in. from the projectile face. The resulting misalignment is illustrated in Table 3.
Table 3. Inaccuracy due to PCD runout
Vertical Lateral Yaw Pitch Projectile (in.) (in.) (deg) (deg)
All 0.015 0.015 0.49 0.49
Projectile External Diameter Runout Tolerance
The diameters of the projectiles also have dimensional tolerances and run-out tolerances, which result in inaccuracy of the projectile's end position (see Table 4).
Oak Ridge National Laboratory 4 April 1994

Cumulative Tolerance Stackup on Horizontal Fuzing Assemblv
Table 4. Inaccuracy due to projectile diameter run-out tolerance
Vertical Lateral Yaw Pitch Projectile (in.) (in.) (ded (deg)
M864 0.03664 0.0 0.0 0.1095
M107 0.02478 0.0 0.0 0.1156
M549Al 0.01 125 0.0 0.0 0.031
M483 0.04283 0.0 0.0 0.1289
2.1.2 Fuze Assembly Tolerance
Figure 1 shows the assembly for testing the fuze on the fuze holder. The fuze is mounted on the fuze holder to allow quick replacement of the fuzes. The assembly should provide linear and rotational motion to access the fuze conveyor. The entire assembly is mounted on an optical bench to provide a datum plane, and the fuze holder is mounted to the shaft with a compensator to allow misalignment correction. To account for misalignment at the threaded end of the fuze, the tolerances of various assembly components should be considered. All misalignments are calculated at the tip of the fuze threads. Table 5 lists the seven individual components in the fuze test stand assembly and gives their respective inaccuracies.
Table 5. Tolerances on the components used in the fuze assembly
Vertical Lateral Yaw Pitch Part (in.) (in.) (deg) (deg)
Optical bench 0.00125 0.0 0.0 0.007 16
Linear slide 0.0084 0.0 0.0 0.034
Rotary table 0.0084 0.0 0.0 0.034
Shaft 0.0042 0.0 0.0 0.0172
Compensator a 0.0 0.0 0.0
Fuze holder 0.003 0.003 0.09 0.09
Fuze 0.005 0.005 b h
aFuze values: M762 = 0.00555 in. bFuze values: M762 = 0.238" M739 = 0.403" MK399 = 0.3 18"
M739 = 0.00097 in. MK399 = 0.01208 in.
Xh4733 = 0.00555 in.
Oak Ridge National Laboratory 5 April 1994
Cumdative Tolerance Stackup 011 Horizontal Fuzing Assembly
Optical Bench
The optical bench was chosen to give a good reference plane. In reality the misalignment due to the mounting surface in the vehicle is greater than the flatness of the bench. Only the optical bench tolerance is considered in this study.
Linear Slidernotary Table
Misalignment in the linear slide and rotary table is due to the flatness of its surface, which is specified by the manufacturers.
Compensator
Due to the weight of the fuze, the compensator will be shifted down from the center. The fuzing assembly will be compensated for the average weight of the fuze. The deviation from this mean will result in vertical misalignment, and its values for the various fuzes are listed in Table 5 .
Shaft
The misalignment in the shaft is due to the run-out tolerance at the compensator end. The runout is measured with respect to the bearing diameters.
Fuze Holder
Misalignment in the fuze holder can occur due to the machining accuracy of the contact surface with the fuze and the center position alignment of the conic section.
Fuze
Misalignment in the fuze refers to the run-out tolerance on the PCD. The axes of the threads may not coincide with the nominal axis of the fuze.
2.2 ACCURACY OF THE ASSEMBLY
When different parts of the fuzing assembly are put together, not only should the individual tolerances be taken into account but also the assembly-induced inaccuracies. In this study assembly-induced inaccuracies were not considered.
Oak Ridge National Laboratory 6 April 1994

Cumulative Tolerance Stackup on Horizontal Fuzing Assembly
3. STACK-UP RESWTS
The stackup of the different tolerances affects the final accuracy of the fuzing. To determine the probability of failure during fuzing, all the tolerances should be combined. The M864 projectile with the M762 fuze has the worst cumulative tolerance band for chamfer crossing (vertical misalignment), while the M107 projectile with the M739Al fuze has the worst angular misalignment problem. When the cumulative tolerance is greater than 0.0879 in., the end of the fuze thread will miss the chamfer on the projectile. Even though the compensator is capable of aligning up to 0.12 in., alignment is not possible when the threads are outside the chamfer. Figure 3 shows the shell cross section with the PCD and chamfer edge diameter. The PCD of the fuze is superimposed with the maximum cumulative misalignment in the vertical direction. The figure shows interference between the chamfer diameter and the fuze PCD which will result in possible failure during assembly.
The compensator selected for the fuzing assembly is capable of aligning up to an angle of 1.7". To avoid cross threading (which is dependent on the fuze thread pitch), the angular misalignment should be less than 2". Even when the misalignment is less than 2", there is the potential for jamming. The theoretical results, when applied to the threading assembly, show that jamming occurs when the misalignment between the fuze and projectile thread axes is greater than 0.5". Although the capability of the compensator i s greater than 0.5", if two-point contact does not occur before the misalignment is greater than 0.5", the possibility of jamming exists. An experimental study on fuzing will verify jamming conditions more accurately.
ORNL-DWG 94-4656
1.95 in. PCD of thread-shell
1.95 in. PCD of thread-fuze ( max. center line misalignment)
Fig. 3. Fuze thread position with respect to shell PCD for maximum misalignment.
- ~~
Oak Wdge National Laboratory 7 April 1994

Cunt ulative Tolerance Stackup on Horizontal Fuzing Assembly
4. STATISTICAL ANALYSIS
The absolute worst-case linear misalignment for the M864 projectile is 0.162298 in. This is greater than 0.0879 in., and therefore fuzing could become infeasible. To better understand the probability of failure during fuzing, a statistical analysis was undertaken.
Lacking actual manufacturing data, dimensional variances had to be assumed. A uniform distribution of the tolerances give equal probability for the part dimensions to lie in the bandwidth of the tolerance zone, With a normal distribution, the probability of the dimension being at the center of the tolerance band is greater. In the numerical simulation, the tolerance band was assumed to be 3s wide. Any point outside the 3s limit was ignored, and a new value was generated using the random value generator. Table 6 gives the percentages of cases in which the cumulative tolerances make hzing infeasible.
Table 6. Cumulative tolerances using uniform and normal distributions
Distribution
Uniform Normal Tolerance (%) (%)
Angular 0.13 (21)' 0.016 (6.3)"
Linear 1.59 0.0 _ _ ~~~~ ~
Values obtained when the maximum a
allowed angular misalignment is 0.5".
For any linear misalignment (vertical) greater than 0.0879 in., fuzing was considered infeasible. The percentages of time fuzing was infeasible were 1.59% and 0.0% for uniform and normal distribution respectively. Without a compensator the linear misalignment cannot be corrected and fuzing is infeasible, With the maximum aligning capability of the compensator being 1.7", this number was uscd in the statistical analysis for angular misalignment. Table 6 shows that the probability of the cumulative tolerance stackup being greater than 1.7" is 0.13% and 0.016% for uniform and normal distribution respectively. An angular misalignment of greater than 0.5" can cause jamming. The values in parentheses denote the percentages of time this can occur when misalignment is greater than 0.5" and two-point contact has not taken place. The compensator can correct misalignment only after a two-point contact occurs during fuze insertion.
During manufacturing, the objective is to make the part within the given tolerance band. Consider a machinist turning a cylindrical part. The maximum material condition will be used to make the part,
Oak Ridge National Laboratory 8 April 1994
Cumulative Tolerance Stackup on Horizontal Fuzing Assembtv
rather than the nominal diameter, since it gives greater lee way for future corrections. This causes the distribution of the parts produced not to have a normal distribution centered around the nominal diameter of the part. A modified distribution is therefore more appropriate for these production parts. However, because the aim of this study was to get a better insight into the design and to use this information for future design changes and stricter tolerance specifications for custom-designed parts, a modified distribution was not used.
Oak Ridge National Laboratory 9 April 1994

Cuniulative Tolerance Stackup on Horizontal Fuzing Assembly
5. CONCLUSIONS
Tolerances for the projectile and fuzing assembly were determined, and the cumulative stackup was determined for the entire assembly. The study determined the critical nature of the tolerances on the fuzing assembly. The importance of a compensator and how it can correct misalignment is highlighted. With the current design, there is little likelihood of encountering problems (except for the possibility of jatmning) during fuzing. Data gathered during the experiments will further clarify the tolerances required to be maintained for the final test stand to ensure successful fuzing.
Oak Ridge National Laboratory 10 April 1994
Cumulative Tolerance Stackup on Horizontal Fuzing Assembly
APPENDIX COMPENSATOR
The compensator (remote compliance center device) is made of elastic elements that aid in the assembly of close clearance components (see Fig. A. 1) . The compensator automatically corrects for lateral misalignment and angular misalignment during assembly. Due to the orientation of the elastic pads used in the construction of the device, the motion due to lateral forces and angular moments applied at the center of compliance are decoupled. Hence, these devices correct for lateral misalignment without incurring any angular misalignment and vice versa.
ORNL-DWG 94-4655
Elastic pads Base n ri // End-effector
mount b-1 Object being I I I I inserted
+ u Direction of compliance Fig. A.l. Schematic of the Compensator.
Oak Ridge National Laboratory 11 April 1994

APPENDIX B RCC COMPENSATOR SELECTION
The following selection procedure follows the basic format suggested by Assurance Technologies, Jnc. (ATI).6 Parameter specifications for an RCC compensator include the following:
Restricted misalignment: The maximum misalignment that the RCC compensator will accommodate. The restricted misalignment on AT1 compensators is a result of three overload pins that protect the shear pads from excessive loads/displacements.
Center of compliance (C of C): The distance ( L ) from the base of the compensator to the RCC.
Load capacity: Maximum forces/mornents the compensator can handle.
Tension (lb): FT Lateral (lb): FL Compression (lb): Fc
Cocking (in.-lb): MC
Stiffness: Spring constants that describe the forces/moments that result from displacement
Lateral (lb/in.): Whitney’s K,
Cocking (in.-lb/rad): Whitney’s KO
Torsion (in.-lb/rad)-Ky
-mp-
t
Fig. B.1. RCC loads.
37

38
Worst case inaccuracy: CwI = 1 TolF I + 1 Tal, 1 + I RF I + 1 RP I = 0.060 in., based on a.ssumptions stated above.
Step 1 : Compare assembly inaccuracy with restricted misalignment.
@.I)
a. Tolerance to which fuze can be positioned (Tol,) Unknown-Assume k0.015 in.
Available clearance:C, = 0.0 in. + 0.0861 in. t 0.0018 in. = 0.0879 in.
b. Tolerance to which projectile can be positioned (Tol,) Unknown- Assume It0.015 in.
(B.2)
c. Repeatability of fuze positioning (RF) Unknown- Assume k0.015 in.
d. Repeatability of projectile positioning (Rp) Unknown- Assume _+0.015 in.
e. Determine total available clearance (C,)
c, = WF + w p t- c,,
where
wF = width of chamfer on fuze
wp = width of chamfer on projectile
CFp = clearance between fuze and projectile
wF = 0.0 in.
w p z 0.0861 in.
Worst case: MOFA fuze has a “sharp” edge just below first thread.
CFp = 2.0 - 1.9982 = 1.8 x
However, available clearance in downward direction will be reduced because the weight of the fuze and fuze holder will cause some initial deflection. The amount of the deflection will vary depending on the weight of the fuze, weight of fuze holder, K,, K,, and C.G. of fuzehze holder.

7'"' 1 Ax
t sin<=- z kke = Zsinr
Fig. B.2. RCC, fuze holder, and fuze geometry.
Assume K, >> K , and y = 90"
40
Table B.1. Approximate vertical dis- placement of RCC due to weight
of fuze and fuze holder
9115-213-C 91 15-21 I-C
KO (in.-lb/rad) 15,400 9100
Kx (Ibhn.) 300 130 W F (lb) 2.64 2.64 wFH 1.5 1.5 hF (in.) 4.425 4.425 ~ F H (in.) 2 2 Ax (in.) 0.01 475 0.03346
T . J W determine the ifference in displacement due to the difference in weight between the heaviest and the lightest fuzes, Cm, and add to the worst-case inaccuracy, Cw,, so from Eq. (B.1):
and from Eq. (R.3):
so that
Table B.2. Change in vertical displace- ment of RCC due to difference in weight
between heaviest and lightest fuzes
91 15-213-C 91 15-21 l-C ~ ~ _ _
KO (in.-lb/rad) 15,400 9100 K,(lb/in.) 300 I30
(A%( (lb) 1.54 1.54
LF (in.) 4.425 4.425 C W T (in.) 8.23 x loe3 17.09 x C W , (in.) 0.0682 0.077 1
Z (in.) 7 7
4 1
Therefore, as long as assumed tolerances and repeatabilities can be met, either RCC should be ok.
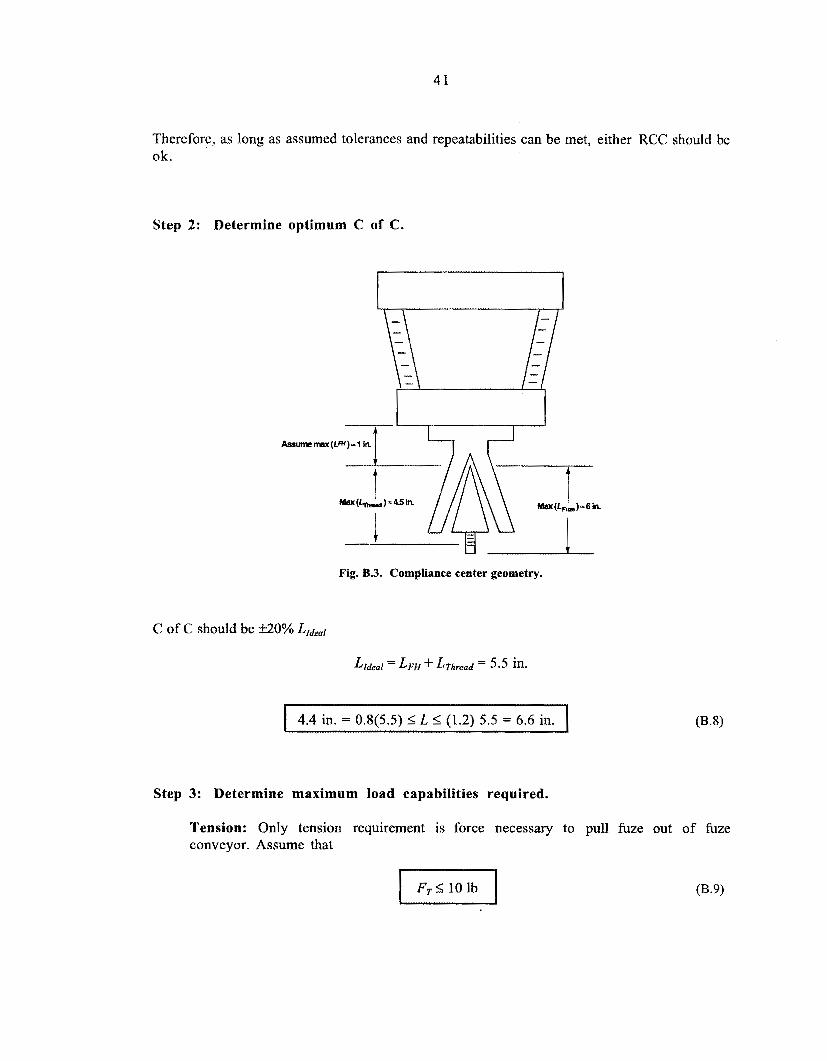
Step 2: Determine optimum C of C.
U t
Fig. B.3. Compliance center geometry.
C of C should be &20% &deal
4.4 in. = 0.8(5.5) I L I (1.2) 5.5 = 6.6 in.
Step 3: Determine maximum load capabilities required.
Tension: Only tension requirement is force necessary to pull fuze out of fuze conveyor. Assume that

42
Lateral: Compensator must be able to support weight of fuze holder and fuze as well as lateral loads during insertion. AT1 lateral load specifications are concerned only with weight of part (fuze) and part holder (fuze holder). Assume WFH I 1.5 lb
(B.10)
Cocking: Cocking torque = M,- (W, hF + WFH hFf,) sin y (See Fig. B.2.)
For y = 90"
M, = w,c hF -1- WFH hFH
Assume + hF E 4.425 in. = 3.425 + 1.0 (from drawing of M739 assumed)
Assume -+ hFH E 2.0 in.
Assume -+ WF = 2.64 lb
Assume -+ WFH G 1.5 lb
(MK 399)
M , 2 (2.64) (4.425) + (1.5) (2.0)
tI.zIIl M , E 14.7 in.-lb (B. 1 1)
Step 4: Determine maximum insertion force.
Compression: Compression forces will be incurred during fuze insertion and will vary depending 011 the phase (Le., chamfer crossing, one-point contact, two-point contact) of the insertion.
During chamfer crossing, the insertion force, F,, is given by
cosa+psina
* - XXsincx-pcosa F - K
where IJ- = coefficient of friction and K, = lateral stiffness of RCC device.
a and x are shown in Fig. B.4.

43
I
Assume p = 0.1 p = 0.09967 rad = 5.71 1"
Assume 8 z 0 andR G r
X,, = W,= 0.09 in.
From projectile drawings, a = 30"
During two-point contact, the insertion force, F3, is given by

44
from which,
For our problem,
Assume p = 0.1
c . = 10-3 min -
D 2 in.
Table B.3. F3mnx 15,400 9100
KO+ (in. -lb/rad) (in.-lbhad)
e0J 469.1 lb 277.2 lb t 30.46 x KO
0.5" 29.3 lb 17.3 lb t 1.904 x 2"
1 However, the maximum "contact force" can be - times this force.' For
p=O.l; -!--=5.0.
21-1
2Y
45
Table 3.4. F3max contact
KO+ (in.-lb/rad) (in.-lb/rad) 15,400 9100
e d 1386 Ib
0.5” 146.5 lb 86.5 lb
2 2345 lb
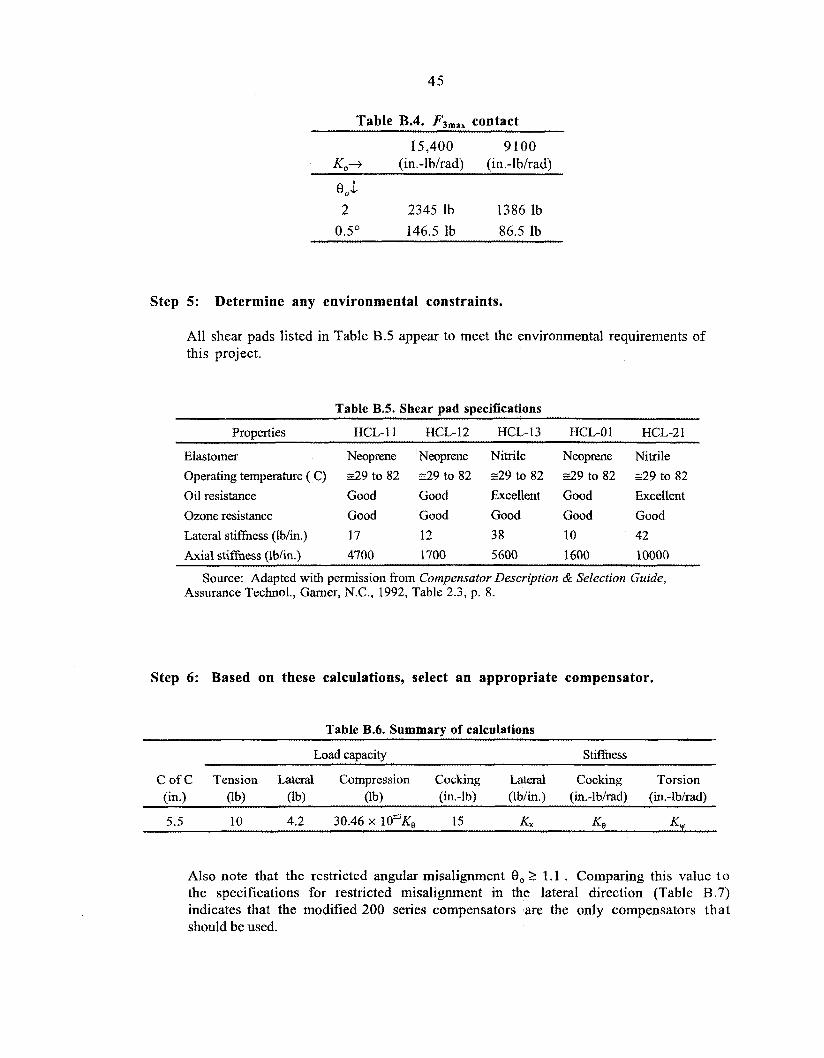
Step 5: Determine any environmental constraints.
All shear pads listed in Table B.5 appear to meet the environmental requirements of this project.
Table B.5. Shear pad specifications
Properties HCL-11 HCL-12 HCL-13 HCL-01 HCL-21 ~~~ ~ - -
Elastomer Neoprene Neoprene Nitrile Neoprene Nitrile Operating temperature ( C ) a 9 to 82 d 9 to 82 ~ 2 9 to 82 9 9 to 82 9 9 to 82
Oil resistance Good Good Excellent Good Excellent
Ozone resistance Good Good Good Good Good
Lateral stiffness (Ibh.) 17 12 38 10 42
Axial stifiness (lb/in.) 4700 1700 5600 1600 10000
Source: Adapted with permission from Compensator Description & Selection Guide, Assurance Technol., Garner, N.C., 1992, Table 2.3, p. 8.
Step 6: Based on these calculations, select an appropriate compensator.
Table B.6. Summary of calculations
Load capacity Stfiess
C of C Tension Lateral Compression Cocking Lateral Cocking Torsion (in.) Ob) Ob) (in.-lb) (lb/in.) (in.-lbhad) (in.-lbhad)
5.5 10 4.2 30.46 x IO”&, 15 KX KO Kv
Also note that the restricted angular misalignment e,? 1.1 . Comparing this value t o the specifications for restricted misalignment in the lateral direction (Table B .7) indicates that the modified 200 series compensators are the only compensators that should be used.
46
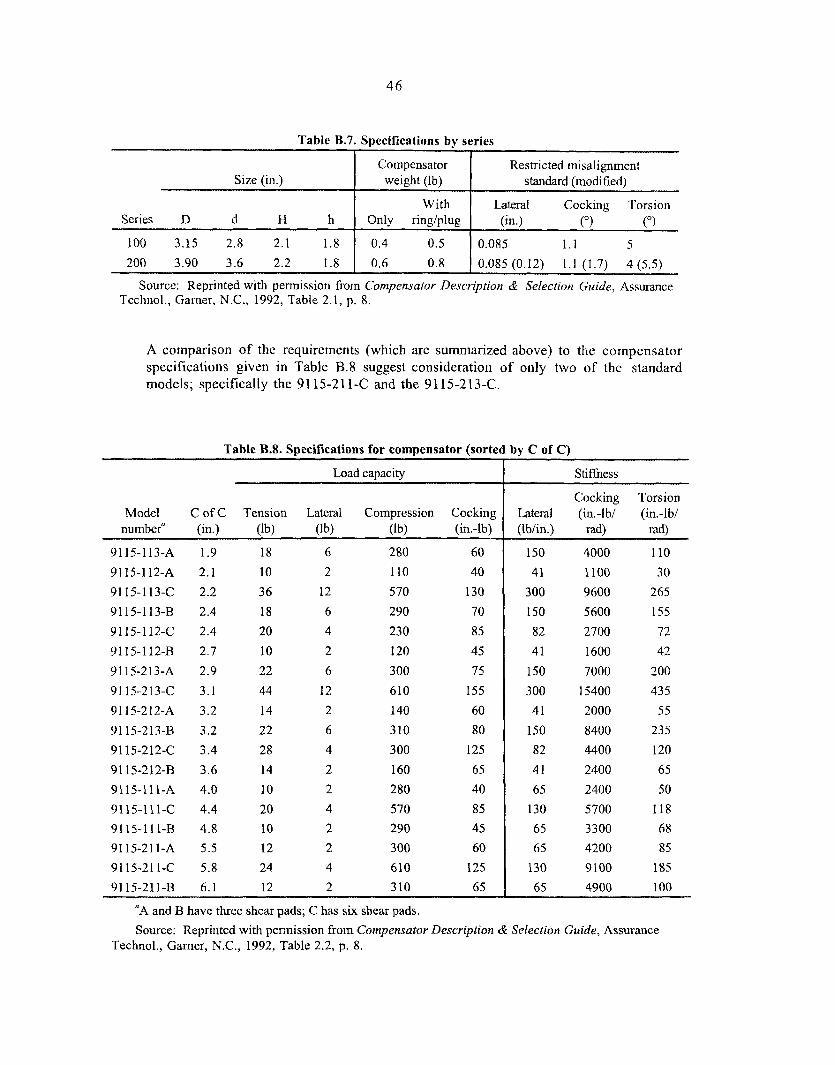
Table B.7. Specifications by series
100 3.15 2.8 2.1
Source: Reprinted with permission f?om Compensator Description & Selection Guide, Assurance Technol., Garner, N.C., 1992, Table 2.1, p. 8.
A comparison of the requirements (which are summarized above) to the compensator specifications given in Table B.8 suggest consideration of only two of the standard models; specifically the 91 15-21 1-C and the 91 15-213-C.
Table B.8. Specifications for compensator (sorted bv C of Cl
Load caoacitv
Model C of C Tension Lateral Compression Cocking number" (in.) (lb) (lb) (Ib) (in.-lb)
91 15-1 13-A
91 15-1 12-A
9 1 1 5 - 1 13-C
91 15-1 13-R
91 IS-1 12-C
91 15-112-R
91 15-213-A
9115-213-C
9115-212-A
91 15-213-R
91 15-212-C
91 15-212-R
91 15-1 11-A
9115-111-C
91 15-1 11-R
91 15-21 1-A
91 15-21 1-C
91 15-21 1-B
1.9
2.1
2.2
2.4
2.4
2.7
2.9
3.1
3.2
3.2
3.4
3.6
4.0
4.4
4.8
5.5
5.8
6.1
18
10
36
18 20
10
22
44
14
22
28
14
10 20
10
12
24
12
6
2
12
6
4
2
6
12
2
6
4
2
2
4
2
2
4
2
280
110
570
290
230
120
300
610
140
310
300
160
280
570
290
300
610
3 10
60
40
130
70
85
45
75
155
60
80
125
65
40
85
45
60
125
65
S tifhess
Cocking Torsion Lateral (in.-lb/ (in.-lb/ (Ibhn.) rad) rad)
150 4000 110
41 1100 30
300 9600 265
150 5600 155
82 2700 72
41 1600 42
150 7000 200
300 15400 43 5
41 2000 55
150 8400 235
82 4400 120
41 2400 65
65 2400 50
130 5700 118
65 3300 68
65 4200 85
130 9100 185
65 4900 100
"A and B have three shear pads; C has six shear pads.
Source: Reprinted with permission from Carripensator Description & Selection Guide, Assurance Technol., Gamer, N.C., 1992, Table 2.2, p. 8.
47
Comparison of the 9115-211-C and the 9115-213C:
Both compensators have a tension load capacity > the 10-lb requirement. Both compensators have a cocking load capacity > the 15-in.-lb requirement.
9 11 5-21 l - C
K, = 130 lblin.
KB = 9100 in.-lblrad
Kv = 185 in.-lb./rad
Load capacity, compression = F, = 610 lb
Load capacity, lateral = F,= 4 lb
C of C = L = 5.8 in.
(+) :. F, = 6 1 0 1 b > 3 0 . 4 6 ~ 1 0 - ~ K ~ =2771b L 5.8 - = - 1.055
Lrded 5-5 (+I
(f> qmx = 0.199 X, = 25.91b
Displacement due to weight differences between fuzes
(-1 C,. = 17.09 x loA3 in.
Note+ Modified version which allows for 0.12 in. lateral and 1.7" cocking misalignment should be used on the test platform.
9115-213-C
K, = 300 lb/in.
KO = 15,400 in.-lb/rad
Kv = 435 in.-lb./rad
Load capacity, compression = F, = 610 lb
Load capacity, lateral = F,= 12 lb
C o f C = L = 3 . 1 in.
(+> F, = 6101b > 30.46 x low3 KO = 4691b
48
(-1 4 rnax = 0.199KX = 59.7
Displacement due to weight differences between fuzes
C , = 8.23 x 10-~
8.23 x = 0.482 -- c I n 2 1 3 -
C,n2,1 17.09 x (+>
(+I
Note-+
W, -t WFH = 4.14 < FL = 121b
Modified version is still recommended
Conclusions/Recommendations
If we can keep the weight of the fuze holder under 1.36 lb, ATI’s 21 1-C model should be adequate.
If the weight of the fuze holder exceeds 1.36 Ib, we may need to look at other alternatives (e.g., use of the lock-up device to provide “variable compliance,” selection of the 213-C model, a hybrid design, or other special design).
A lock-up device similar to the pneumatic lock-up option available from AT1 should be considered in any fielded application where the RCC is not oriented vertically or where large accelerations are present.

APPENDIX C SHAFT DESIGN
This appendix determines the diameter of the shaft for the forces encountered during fuzing. Instead of determining the shaft diameter directly, the analysis assumes a shaft diameter of 0.5 in. and demonstrates how it will be able to accept the loads encountered during fuzing. The free-body diagrams of the peg during chamfer crossing and one-point contact are shown in Fig. 8 (in Sect. 3 ) .
From the force diagram it can be shown that for chamfer crossing,
F, = F, tan(@ - a)
and
M = F , r ,
where
@ is the friction angle (tan-'p)
Y is the radius of the shaft
F,, F,, and M are the representation of the contact forces to the center of the fuze.
Substituting the values of Fz calculated in Sect. 3.1,
F, =11.411b
and
M = L FD2 = 25.2 lb - in. 2
Similarly, for one-point contact the forces F, and M are given by:
and
where I is the insertion depth.
49
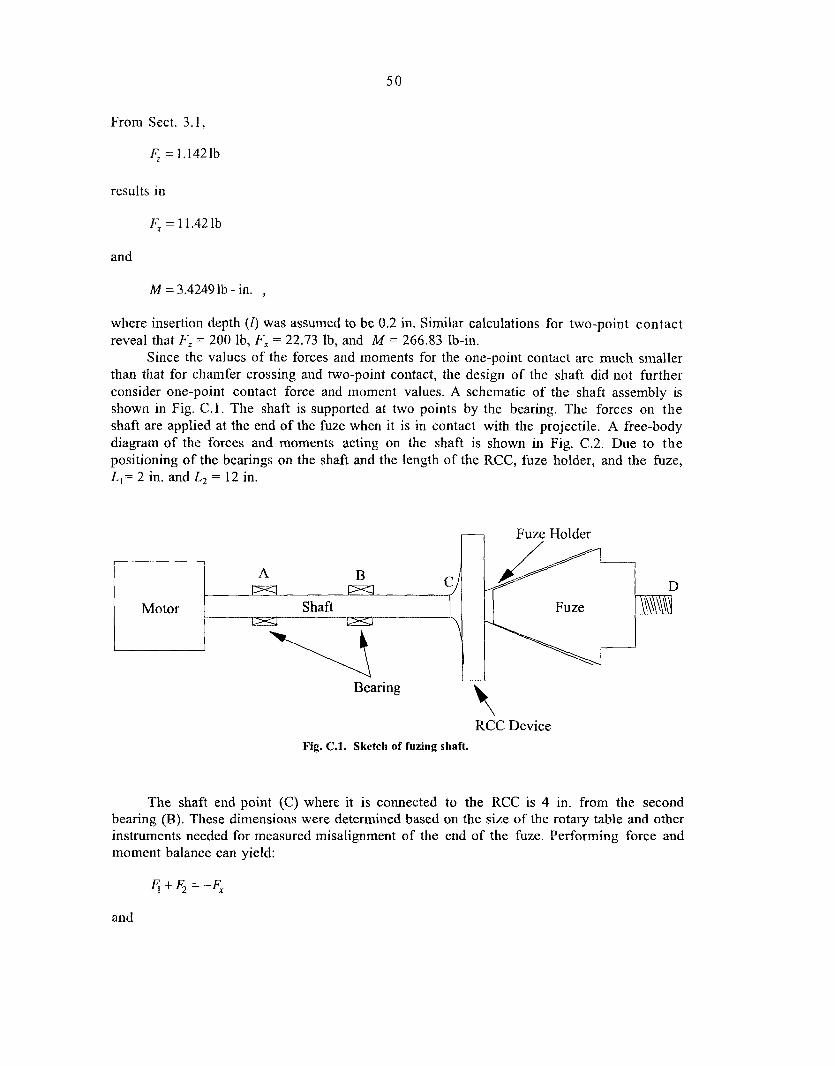
50
From Sect. 3.1,
F, = 1.1421b
results in
Fx = 11.42 lb
and
M = 3.42491b - in. ,
where insertion depth (4 was assumed to be 0.2 in. Similar calculations for two-point contact reveal that Fz = 200 Ib, F, = 22.73 Ib, and M = 266.83 lb-in.
Since the values of the forces and moments for the one-point contact are much smaller than that for chamfer crossing and two-point contact, the design of the shaft did not further consider one-point contact force and moment values. A schematic of the shaft assembly is shown in Fig. C.l. The shaft is supported at two points by the bearing. The forces on the shaft are applied at the end of the fuze when it is in contact with the projectile. A free-body diagram of the forces and moments acting on the shaft is shown in Fig. C.2. Due to the positioning of the bearings on the shaft and the length of the RCC, fuze holder, and the fuze, L,= 2 in. and L, = 12 in.
Fuze Holder
A B
Shaft _ - Motor -- ww- Bearing
Fuze Holder / 1
7
Fuze
RCC Device Fig. C.1. Sketch of fuzing shaft.
The shaft end point (C) where it is connected to the RCC is 4 in. from the second bearing (€3). These dimensions were determined based on the size of the rotary table and other instruments needed for measured misalignment of the end of the fuze. Performing force and moment balance can yield:
and
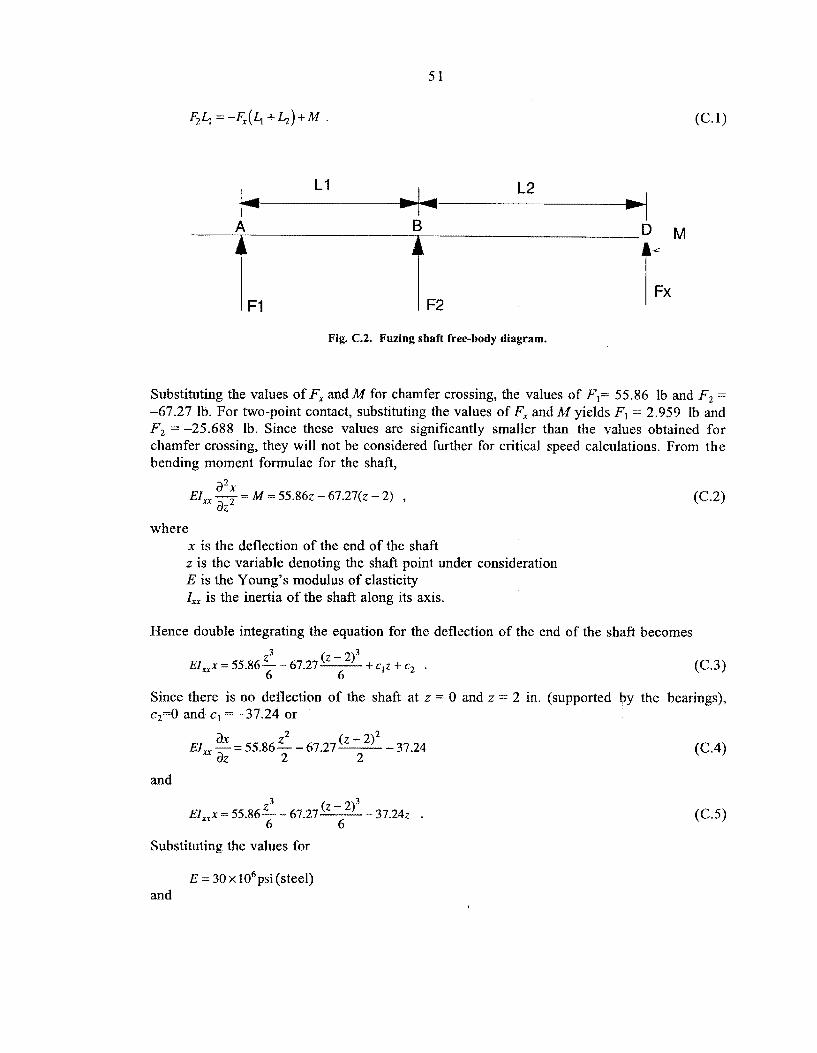
5 1
F1 F2
Fig. C.2. Fuzing shaft free-hody diagram.
Substituting the values of F, and M for chamfer crossing, the values of Fl= 55.86 Ib and F2 = -67.27 lb. For two-point contact, substituting the values of F, and M yields F , = 2.959 lb and F2 = -25.688 lb. Since these values are significantly smaller than the values obtained for chamfer crossing, they will not be considered further for critical speed calculations. From the bending moment formulae for the shaft,
aZx az
EI, 7 = M = 55.862 - 67.27(~ - 2) ,
where x is the deflection of the end of the shaft z is the variable denoting the shaft point under consideration B is the Young’s modulus of elasticity Z, is the inertia of the shaft along its axis.
Hence double integrating the equation for the deflection of the end of the shaft becomes
+ c , z +e2 . z3 ( z - EI,X = 55.86- - 67.27-
6 6
Since there is no deflection of the shaft at z = 0 and z = 2 in. (supported by the bearings), c,=O and c1 = -37.24 or
ax Z2 (z - 212 EIn-=5S.86--61.27--37.24 az 2 2
and
z3 ( z - 2)3 E ~ , , x = 55.86- - 67.27- -
6 6
Substituting the values for
E = 30 x 106psi (steel) and

5 2
I, 71- = 0.003068 in.4 ,
the deflection at the end of the shaft (point c) is
x = 0.01 1625 in.
and
ax az slope = - = 4.67 x ;
hence total deflection at the end of the fuze (the contact location where the forcc is applied) is
ax aZ x+-8 , or = 0.0490 in.
Using this to calculate the critical speed of the shaft (to avoid natural frequency of the system),
where
g is acceleration due to gravity
W denotes the point load applied to the shafts
xStat refers to the static deflection due to each load.
For our case this translates to n, = 847.93 rpm. Because the shaft speed required for the fuzing operation was determined to be around 60 rpm, the speed of operation is sufficiently below the critical speed.
The maximum stress on the shaft is then determined by calculating the stress due to bending moment, axial load, shear force, and torsion. The stresses due to these forces are given by oz, ox, and ‘t, (see Fig. C.3).
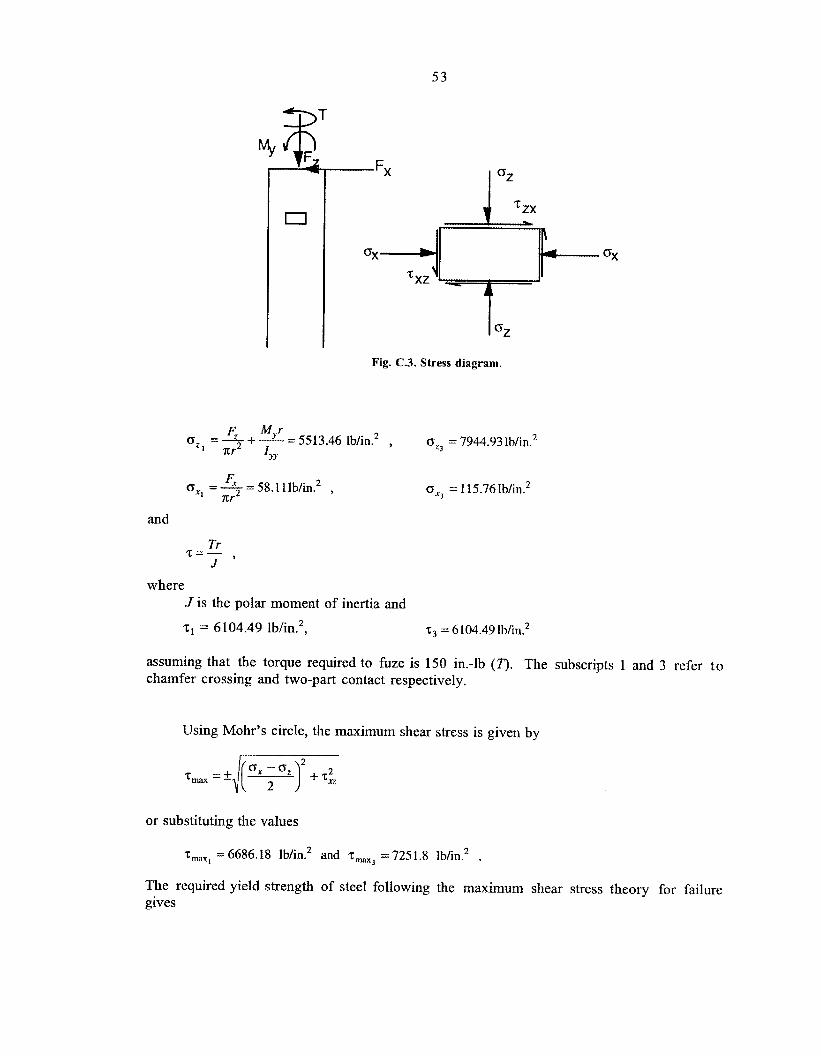
5 3
Fig. C.3. Stress diagram.
M r O Z I - -7 F, +‘=5513.46 lblin? ,
I,,
OX1 - --= 58.111b/in? , nr2
Dz3 = 7944.93 Ib/in.2
oX3 = 115.76 Ib/h2
and
Tr J ’
Tt=-
where J is the polar moment of inertia and
T~ = 6104.49 Ib/in.2, T~ = 6104.491b/in.2
assuming that the torque required to fuze is 150 in.-lb (r). The subscripts 1 and 3 refer to chamfer crossing and two-part contact respectively.
Using Mohr’s circle, the maximum shear stress is given by
or substituting the values
T,,, = 6686.18 1 b h 2 and zwj = 7251.8 I b h 2 .
The required yield strength of steel following the maximum shear stress theory for failure gives

54
- - 0.5S,
F.S. = m a ’ -_
where F.S. is the factor of safety. Using F.S. = 2, the required yield strength of the material S,, should be greater than 29,007.24 Ib/in.2 Since there is high-quality steel whose yield strength far exceeds 30,000 Win.*, the shaft diameter should be sufficient.

APPENDIX D MOTOR SIZING AND SELECTION
The test setup required two motors: one to drive the linear slide for the insertion of the fuze into the projectile and the other to give the necessary rotation for threading.
The linear slide will carry a vertical load of 60 lb (weight of the rotary table, shaft, fuze holder, fuze, etc.). The Daedal linear slide (Model 5061218) was chosen for its rated capacity of 100 lb, inertia of 0.0038 oz-in.-s2, and lead of 0.2 in. Since the linear slide moves 1 in. in 5 revolutions, the ratio of torque and force can be given by
Torque Ax 1 -....--=-=-in Force A8 10z L a d
For the maximum capacity of the linear slide of 100 lb, the torque required will be 3.185 in.-Ib. Considering the efficiency of the ball screw of 0.9, the torque capacity of the motor to drive the linear slide is 3.18Y0.90, or 3.54 in.-lb.
Assuming a linear travel speed of the motor to be 5 in./s, the rotary speed of the motor will be
-?%!- (or 25 r p s or 1500 rpm). 2nAx
For a load of 100 Ib, the reflected inertia on the motor side can be calculated as
JLoad = Force(g)2 or = 0.0041 oz-in.-s2.
Hence the total
J = Jhad f Jslide = 0.0041 + 0.0038 = 0.0079 oz - in. - s2 ,
For the rotary motor (for rotation of the fuze), the torque necessary for fuzing is 150 in.-lb. Using a design factor of 1.5, the design torque requirement for motor sizing becomes 225 in.-lb. If a gear reduction of 2O:l is employed with an efficiency of q = 0.9, the torque requirement of the motor reduces to 12.5 in.-lb. The fuzing is assumed to be performed at the rate of 1 rps, or this relates to 20 r p s at the motor side due to the gear ratio. Hence the required motor rpm is 1200.
The reflected inertia at the motor was determined by calculating the inertia of the RCC, fuze holder, and fuze.
mr 2 (The RCC device is cylindrical in cross-section with a diameter of 3.9 in. and weight of 0.8 Ib) or JRcc 2 -
2
JRcc = 0.06296 oz - in. - s2
JFuze = 0.027 oz - in. - s2 (From military specifications)
5 5

5 6
- 3mr2 (Fuze Holder can be approximated to have a conical shape which is 3 in. diam, 3.5 in. high, and 2 Ib) JFuzc Holder - -
10
2 JFuzetIolder = 0.00953 oz - in. - s
Hence,
Total inertia = JRcc + J,, + .IFuzeHolder = 0.099490~ - in. - s 2 .
The reflected inertia at the motor due to the gear ratio hence is
2 J~~~~~ = JTotal= 0.000248 oz - in. - s . 202
Since it would be advantageous to buy two similar motors rather than to procure power supply and amplifiers for two different motors, the requirements for the two motors (linear and rotational) were combined. The motor should hence satisfy the following criteria:
TContinuous = 12.5 in. - lb (from rotary motor requirement)
Rotational speed = 1500 rpm (from linear motor requirement)
1 .IMotor 2 -(Reflected Inertia) or
10
JMotor 2 0.00079 oz - in. - s2 (from linear motor).
A PMI U12M4H dc servo motor was selected for this application. The following specifications apply:
Rated torque: 11.59 in.-lb
Rated speed: 3000 rpm
Rated inertia: 0.021 oz-in.-?
Since the rated torque is less than the required torque, the design factor reduces to 1.39.

ORNLRM-13 1 12
INTERNAL DISTRIBUTION
38.
39.
40.
41.
42.
43.
44.
45.
1-3. 4. 5 .
6.
7-9.
10. 11. 12.
13-15.
16-18.
19.
20-22.
J. B. Chesser
J. H. Clift
D. C. Cunningham
R. M. Davis
J. F. Jansen
D. C. Haley
W. R. Hamel
J. H. Hannah
J. N. Herndon
C . T. Kring
L. M. Kyker
P. D. Lloyd
23.
24.
25. 26.
27. 28-30.
31-32.
33. 34.
35. 36.
37.
E. D. Miller
K. E. Plummer
S. L. Schrock
D. M. Speaks
C. E. Oliver
V. K. Varma
Laboratory Records
Laboratory Records ( O W - R C )
RPSD Publications Office
ORNL Patent Section
Central Research Library
Document Reference Section
EXTERNAI, DISTRIBUTION
C. M. Bloomhardt, Lockheed Martin Armament Systems, Lakeside Avenue, Burlington, Vermont 05401-4985.
K. Brown, ASME International, 345 East 47th Street, New York, New York 10017-2392.
M. Dolecki, Commander, USA TACOM, Attention: AMSTA-ZED (Mr. Matt Dolecki), Warren, Michigan 48397-5000.
J. Fedewitz, PM-AMMOLOG, HQ ARDEC, AMCPM-AL Picatinny Arsenal, New Jersey 0780 1-500 1.
T. Fitzgerald, Project Manager, FARV, Attention: SFAE-ASM-FR, Picatinny Arsenal, New Jersey 07806-5000.
N. F. Gravenstede, PM-AMMOLOG, HQ ARDEC, AMCPM-AL Picatinny Arsenal, New Jersey 0780 1-5001.
G. L. Kent, PM-AMMOLOG, HQ ARDEC AMCPM-AL Picatinny Arsenal, New Jersey 07801- 5001.
A. Simon, U.S. Army, SIMCAR-FSS-DF, Attention: Alex Simon, Building 3 159, Picatinny Arsenal, New Jersey 07806-5000.
57

5 8
46. Office of Assistant Manager for Energy Research and Development, Oak Ridge Operatioris Office, Department of Energy, P.O. Box 2008, Oak Ridge, Tennessee 3783 1-6269.
47-48. Office of Scientific and Technical Information, P.O. Box 62, Oak Ridge, Tennessee 3783 1 .


![The Severest and Bloodiest Artillery Fight I Ever Sa · 2014-07-19 · The Severest and Bloodiest Artillery Fight I Ever Saw 62 …[O]ur artillery ammunition was inferior, especially](https://static.fdocuments.us/doc/165x107/5f4576c19d69343d43799b15/the-severest-and-bloodiest-artillery-fight-i-ever-2014-07-19-the-severest-and.jpg)


