AUTO PARTSBRIDGE · PDF fileGetting started . Getting started . Auto PartsBridge is an online...
18
AUTO PARTSBRIDGE Body Shop User Guide
-
Upload
truonghanh -
Category
Documents
-
view
223 -
download
2
Transcript of AUTO PARTSBRIDGE · PDF fileGetting started . Getting started . Auto PartsBridge is an online...
AUTO PARTSBRIDGE
Body Shop User Guide

Contents
Getting started 2
Log in and out 2
Configure settings 3
Change settings 4
Process an estimate: send direct to dealer 5
Access the list of estimates 5
Send an estimate direct to the dealer 6
Process an estimate: open and modify an estimate 7
Open an estimate and send to the dealer 7
View or add labour items 8
Add a note 9
Validate parts 10
Process an estimate: add parts 11
Use the Graphic Index 11
Search for parts 12
Access and manage orders 13
Accept a quote 14
Print an order 15
Save an order 15
Search for an order 16
Complete an order 16
1 | © Infomedia Ltd 2014

Getting started
Getting started Auto PartsBridge is an online ordering and parts validation system for dealerships and their body shops.
Some of the benefits for body shops are:
Access to the full Electronic Parts Catalogue (EPC)
Send online estimates direct to your dealer
Validate part and VIN information to ensure accurate orders
Receive quotes on Original Equipment Manufacturer (OEM) parts
Log in and out Auto PartsBridge is an online application that is accessed from the Auto PartsBridge website.
To log in to Auto PartsBridge:
1 Go to the Auto PartsBridge website.
2 Select your manufacturer.
3 Type your user name into the User name field.
4 Type your password into the Password field.
5 Click Log In or press Enter on the keyboard.
6 When prompted, install the ActiveX Control which allows Auto PartsBridge to read your estimates.
Ensure you are using Internet Explorer which supports the ActiveX Control.
To log out from Auto PartsBridge, click Log Out.
© Infomedia Ltd 2014 | 2

Getting started
Configure settings When you log in to Auto PartsBridge for the first time, you must configure the settings for your body shop. Administrators must complete all steps of the Configuration Wizard.
Non-Administrators complete the End-User Licence Agreement (EULA) and the Estimating Systems steps only.
The steps of the Configuration Wizard include:
1 Introduction: View the Welcome window.
2 End-User Licence Agreement: Read and select the required checkboxes to accept the EULA and privacy policy.
3 Estimating Systems: Select the checkboxes for your estimating systems and confirm the location where your estimates are exported.
Auto PartsBridge will automatically locate where your estimates are exported or you
can click the icon to navigate to the export location.
4 Company Details: Confirm or change your company name, address and shipping
details.
5 User Accounts: Create additional user accounts within the body shop (if required). Type the user details into the corresponding fields and click Create.
6 Additional Makes: Select the checkbox for a manufacturer and add dealer information to order parts for different vehicle makes.
7 Add-Ons: Install add-ons, such as the Auto PartsBridge Desktop Notifier.
The Auto PartsBridge Desktop Notifier displays pop-up notifications when you receive orders from your dealer.
8 Finish: Click Finish.
3 | © Infomedia Ltd 2014
Getting started
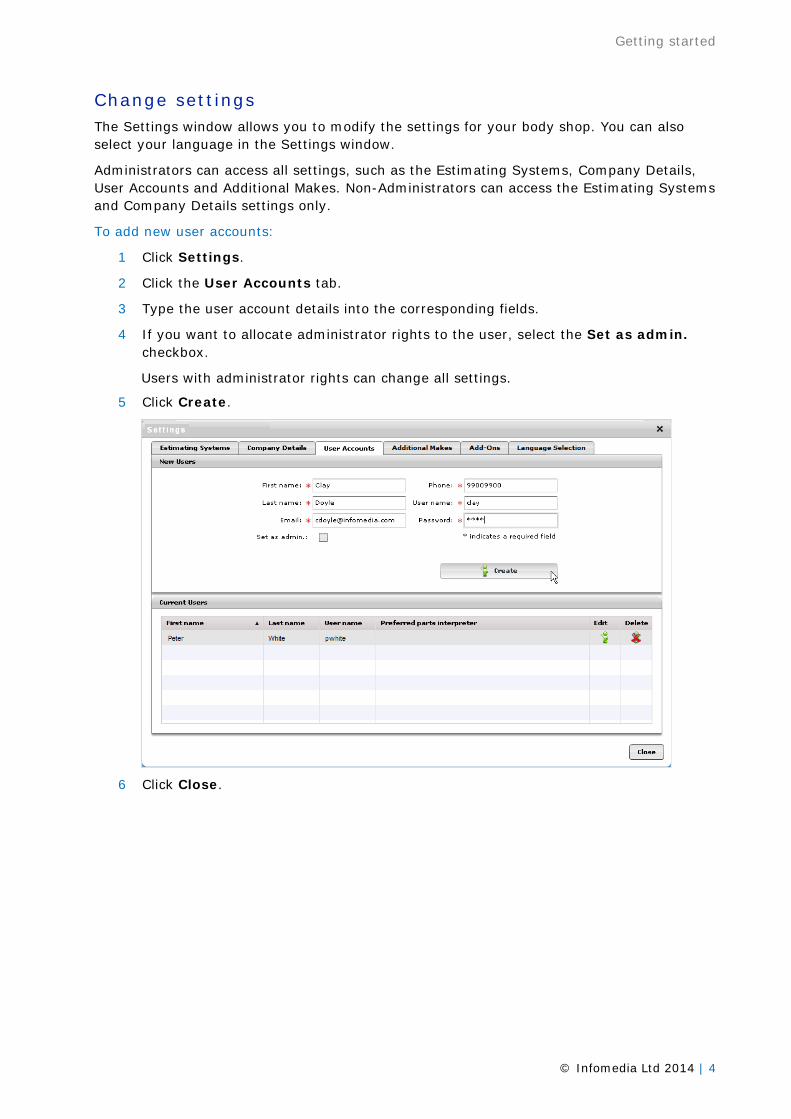
Change settings The Settings window allows you to modify the settings for your body shop. You can also select your language in the Settings window.
Administrators can access all settings, such as the Estimating Systems, Company Details, User Accounts and Additional Makes. Non-Administrators can access the Estimating Systems and Company Details settings only.
To add new user accounts:
1 Click Settings.
2 Click the User Accounts tab.
3 Type the user account details into the corresponding fields.
4 If you want to allocate administrator rights to the user, select the Set as admin. checkbox.
Users with administrator rights can change all settings.
5 Click Create.
6 Click Close.
© Infomedia Ltd 2014 | 4

Process an estimate: send direct to dealer
Process an estimate: send direct to dealer Auto PartsBridge works with four estimating systems: Audatex, Comp-Est, Mitchell and Pathways. The estimates from your estimating system are displayed in the Estimates for Processing panel.
Access the list of estimates You can view all your estimates or you can filter the estimates by timeframe or manufacturer.
Ensure the date range selected is based on when the estimates were created in the estimating system and not when they werer exported.
To view all estimates:
1 Select an estimating system from the drop-down list.
2 View the list of estimates. The following information is displayed:
Estimate No.: The number assigned to the estimate.
Date: The date the estimate was created.
Insurer: The name of the insurance company.
Claim No.: The number of the claim (if available).
Customer: The name of the customer.
VIN: The Vehicle Identification Number.
Make/Vehicle: The make and model of the vehicle.
3 Click a column heading and select the icon to sort the column data.
To filter the estimates, select a timeframe from the drop-down list or select dates from the calendar.
5 | © Infomedia Ltd 2014

Process an estimate: send direct to dealer
Send an estimate direct to the dealer Body shops can send estimates direct to the dealer. The dealer automatically orders the OEM parts and provides a quote for the OEM equivalent of the aftermarket parts.
To send an estimate directly to the dealer:
1 Click the icon on the required estimate.
2 Type the Purchase Order number into the PO No. field (if required), and click OK.
3 Click OK.
The estimate and an email notification will be sent to the dealer.
To view estimates for a different manufacturer, select the manufacturer from the drop-down list.
© Infomedia Ltd 2014 | 6

Process an estimate: open and modify an estimate
Process an estimate: open and modify an estimate Prior to sending an estimate to the dealer you can open and modify the estimate. In addition, you can validate the parts against the manufacturer data and add additional parts to the estimate.
Open an estimate and send to the dealer The estimate consists of the vehicle details and the parts list.
To view an estimate and send to the dealer:
1 Click the icon on the required estimate.
2 View the vehicle details from the estimate and the EPC.
3 View the parts list. The information for each part includes:
OEM P/N and Non-OEM P/N: The OEM and non-OEM part numbers (if available).
Lookup: The additional lookup information includes supersession data, selective fit options or fitment instructions.
Description: A description of the part. Part Type: The two types of parts are OEM or aftermarket (AM). The aftermarket
type includes parts such as salvage parts, sublet parts and remanufactured parts. Qty: The number of parts required. This field can be modified. MSRP: The Manufacturer Suggested Retail Price. Est. Price: The price of the part from the estimate. Purchase Price: The purchase price fixed by the dealer includes your normal
dealer discount. Action: The OEM parts are labelled as Order and the aftermarket parts as Get Quote.
4 Click the icon to display additional vehicle details.
5 Click Send.
6 Click OK.
7 | © Infomedia Ltd 2014

Process an estimate: open and modify an estimate
View or add labour items Auto PartsBridge allows you to display the entire estimate and view labour items. The labour items can be added to an estimate.
When a labour item is added to the estimate the action changes to Get Quote. Labour items are displayed as aftermarket (AM) parts and the dealer can provide a quote for a part in place of a repair.
To add labour items to an estimate:
1 Select the Show entire estimate checkbox.
The entire estimate including the labour items will be displayed.
2 Click Add to Order.
3 Confirm Get Quote is displayed in the Action column.
4 Continue to add labour items to the estimate (if required).
5 Click the Show entire estimate checkbox again to deselect it.
The estimate including the labour items that you have added will be displayed.
To allow the dealer to add parts to your estimate, select the Allow Additional Parts checkbox.
© Infomedia Ltd 2014 | 8

Process an estimate: open and modify an estimate
Add a note You can add a note to an estimate prior to sending the estimate to the dealer.
To add a note to an estimate:
1 Click the icon on the required estimate.
2 Click Order Options.
3 Type the note into the Notes box.
4 Select the delivery options from the drop-down lists or calendar.
5 Select the payment information from the drop-down list.
6 Click OK.
9 | © Infomedia Ltd 2014
Process an estimate: open and modify an estimate
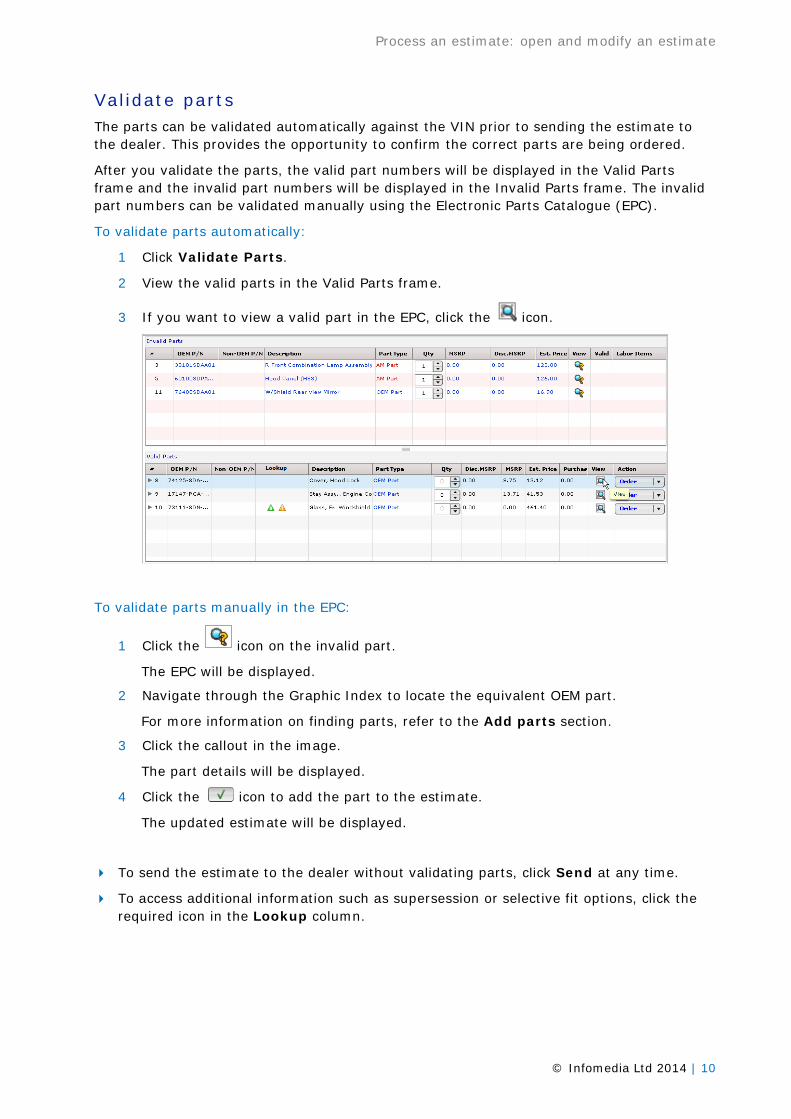
Validate parts The parts can be validated automatically against the VIN prior to sending the estimate to the dealer. This provides the opportunity to confirm the correct parts are being ordered.
After you validate the parts, the valid part numbers will be displayed in the Valid Parts frame and the invalid part numbers will be displayed in the Invalid Parts frame. The invalid part numbers can be validated manually using the Electronic Parts Catalogue (EPC).
To validate parts automatically:
1 Click Validate Parts.
2 View the valid parts in the Valid Parts frame.
3 If you want to view a valid part in the EPC, click the icon.
To validate parts manually in the EPC:
1 Click the icon on the invalid part.
The EPC will be displayed.
2 Navigate through the Graphic Index to locate the equivalent OEM part.
For more information on finding parts, refer to the Add parts section.
3 Click the callout in the image.
The part details will be displayed.
4 Click the icon to add the part to the estimate.
The updated estimate will be displayed.
To send the estimate to the dealer without validating parts, click Send at any time.
To access additional information such as supersession or selective fit options, click the required icon in the Lookup column.
© Infomedia Ltd 2014 | 10

Process an estimate: add parts
Process an estimate: add parts The Electronic Parts Catalogue (EPC) allows you to add additional parts to the estimate prior to sending the estimate to the dealer. Only OEM parts can be added using the EPC. The EPC is exactly the same as the EPC used by your dealer.
To display the EPC, click Add Parts in the Order List screen.
Use the Graphic Index The Graphic Index is a pictorial index of the major and minor sections of a vehicle.
To use the Graphic Index:
1 Click Add Parts in the Order List screen.
2 Click the required major section.
3 Click the required minor section.
4 Click the callout in the image.
The part details will be displayed.
If more than one part is displayed, click on the required part.
5 Click the icon to add the part to the estimate.
The OEM part will be added to the estimate and the dealer will be able to order the part.
6 To return to the start of the Graphic Index, click the icon.
To return to the estimate, click the icon.
To navigate the index, you can also use the drop-down lists at the top of the screen.
11 | © Infomedia Ltd 2014

Process an estimate: add parts
Search for parts The Parts Search panel allows you to search for parts by description or part number. You can enter the full or partial part number.
To search for parts:
1 Select the search type. For example, description.
2 Type the search criteria and click Search.
The search results will be displayed.
3 Click on the required part.
The image will be displayed with the callout of the part highlighted.
The part details will be displayed. If more than one part is displayed, click on the required part.
4 Click the icon to add the part to the estimate.
5 To return to the estimate, click the icon.
To close the screen at any time, click the icon.
If a part has been superseded, click the supersession icon in the Lookup column or Part Details panel and select the required part.
© Infomedia Ltd 2014 | 12

Access and manage orders
Access and manage orders Orders can be viewed, saved, printed and completed in the Orders in Progress panel.
Orders are organised based on their status.
Status Description Modified An order that has been modified by the dealer. Sent An order or quote request that has been sent to the dealer. Saved An order that has been saved. External An order that has been sent to another dealer. Completed An order that has been completed.
Orders can be accessed from the following folders:
Modified: Displays quotes sent by the dealer.
Sent: Displays orders and quote requests sent to the dealer.
Saved: Displays saved orders.
Completed: Displays closed orders.
All: Displays all types of orders.
13 | © Infomedia Ltd 2014
Access and manage orders
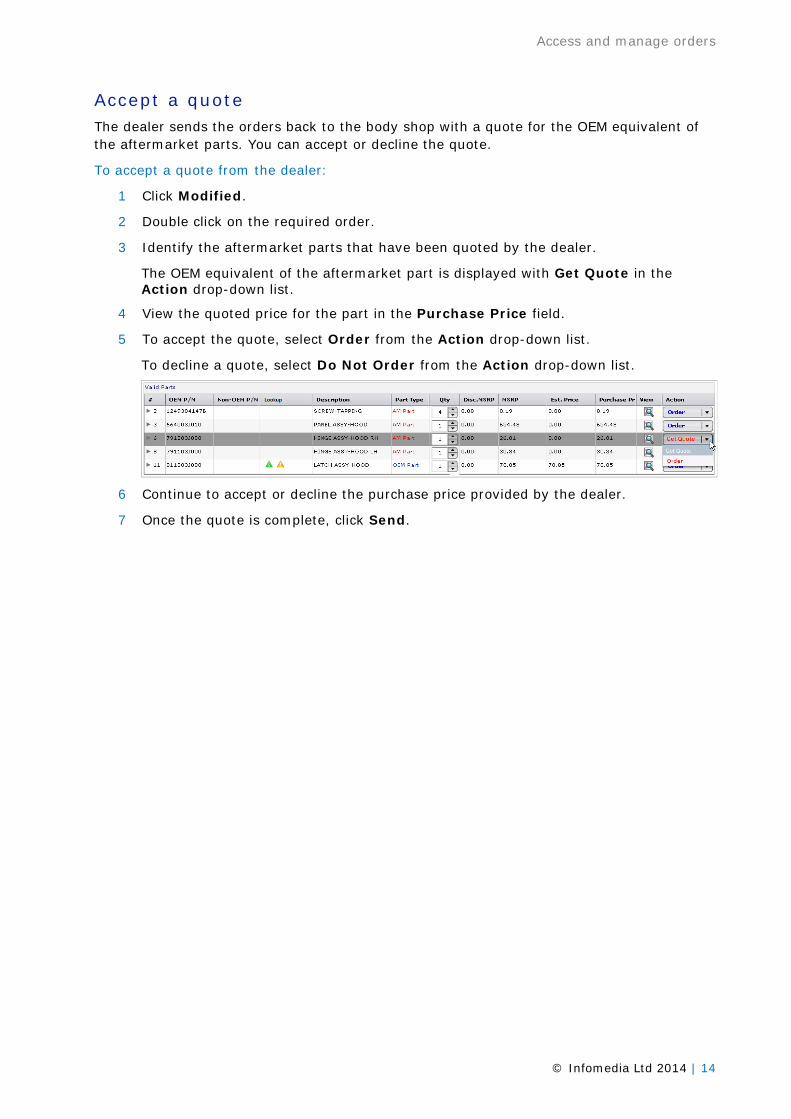
Accept a quote The dealer sends the orders back to the body shop with a quote for the OEM equivalent of the aftermarket parts. You can accept or decline the quote.
To accept a quote from the dealer:
1 Click Modified.
2 Double click on the required order.
3 Identify the aftermarket parts that have been quoted by the dealer.
The OEM equivalent of the aftermarket part is displayed with Get Quote in the Action drop-down list.
4 View the quoted price for the part in the Purchase Price field.
5 To accept the quote, select Order from the Action drop-down list.
To decline a quote, select Do Not Order from the Action drop-down list.
6 Continue to accept or decline the purchase price provided by the dealer.
7 Once the quote is complete, click Send.
© Infomedia Ltd 2014 | 14

Access and manage orders
Print an order Orders can be printed from the Order List screen.
To print an order:
1 Double click on the required order.
2 View the order.
3 Click Print.
Save an order Orders can be saved from the Order List screen.
To save an order:
1 Double click on the required order.
2 View the order.
3 Click Save.
15 | © Infomedia Ltd 2014

Access and manage orders
Search for an order You can search for a particular order in the Orders in Progress panel.
To search for an order:
1 Type the search criteria into the Search for field.
2 Select the search type from the Search by drop-down list. For example, estimate number.
3 Click Search.
Complete an order Orders can be completed in the Orders in Progress panel.
To complete an order:
1 Confirm the order is finalised.
2 Click on the required order.
3 Click Mark as Complete.
The status will be updated from Sent to Completed and the order will be moved to the Completed folder.
Disclaimer © Infomedia Ltd 2014. All rights reserved worldwide. Infomedia™ and Auto PartsBridge™ are registered trademarks and trademarks of Infomedia Ltd. All other brand names or trademarks are the properties of their respective holders. No warranty of any kind is given regarding the information contained herein, which is provided on an “as is” basis. Any warranties as to merchantability and fitness for a specific purpose are, to the fullest extent, excluded. Infomedia Ltd shall in no way be liable to the reader of this document for any direct, consequential, indirect, incidental, punitive, special or other damages whatsoever arising from the reader’s reliance on the contents provided herein. The receipt of this document shall not be construed as conferring any rights to the recipient in the information provided, nor in the patents, trademarks or copyrights of Infomedia Ltd or any of its subsidiaries.
APB_UserGuide_BodyShop_EN
© Infomedia Ltd 2014 | 16