Austria ACP gazebo 10’ x 10’
22
1 Austria ACP gazebo 10’ x 10’ E101006- (2019)
Transcript of Austria ACP gazebo 10’ x 10’

1
Austria ACP gazebo 10’ x 10’
E101006- (2019)

2
IMPORTANT:
Please read and follow all safety statements, warnings, assembly instructions, use & caredirections before attempting to assemble. Each of the recommendations must be followed to ensure the utmost solidity.
Security Rules
Warning:
Keep flame and heat sources away from the gazebo fabric. The fabric may burn if it is exposed to prolonged contact with a source of heat. The application of any foreign substance to the gazebo fabric may render the flame-resistant properties ineffective.
Regulation:
It is the responsibility of the consumer being in accordance with city regulation, construction code, zoning or any limitations and obtaining permit prior assembling gazebo.
Recommendation :• When assembling and using this product, basic safety precautions should always be followed to reduce the risk of personal injury and damage to parts. • Do not use the gazebo during extreme weather conditions.• Before beginning assembly of product, make sure all parts are present. Compare parts with package contents list. If any part is missing or damaged, do not attempt to assemble the product.• Some parts may contain sharp edges. Use of protective gloves is always recommended.• When installing and assembling your gazebo, it is recommended that 2 or more adults are involved. • Considering at least five hours to complete installation, even well anchored, a gazebo unit that is not fini shed assembly can get or create damages to nearby environment.• Verify that all nuts and bolts are tightly secured before and during use.• Use proper tools and equipment for a safe and compliant installation. Never climb, sit or stand on struc ture while assembling.• Even if this gazebo is built for all year round, the snow must be removed from the roof at all time.• Mosquito net and curtains (optional) must be removed from the unit in freezing period.• Anchoring bolts or other anchoring devices are not supplied.• Keep away from any electric installation or transportation device.• Always recommended to keep assembly manual for further reference.

3
Care :
Avoid using a pressure washer. The use of a mild soap with warm water is the best solution for the frame only. A clear water rinse is necessary then. Never use soap on fabric, this will reduce their durability, consequently their lifespan and general look. The use of a soft brush and warm water are an excellent solution for cleaning the fabric.
Warranty
Covered
We warrant the frame and fabric to be free of manufacturing defects to the original purchaser for one year.
Not covered
This warranty does not cover commercial use, improper care, neglected storage, vandalism, chemical, acts of nature, fire, oxidation, stains, freeze damage, improper packaging for return and unreasonable or abusive use. Normal discoloration and build-up snow are not covered either.
Customer service:
Consumer
For each part request, please contact your retailer with a description of the problem, pictures and consumer invoice copy, to ensure the proper information to be proceed.
Seller:
In addition to all the information already provided by the consumer, any parts requested must mention the per-son responsible for the client’s file, the retailer name, address, branch if applicable, e-mail address, fax and phone number.

4
NO. Description Drawing QTY
A Post 4
B Crossbar 4
C Crossbar 4
D Braces 8
E Corner Roof Tube 4
F Roof Tube 4
G Roof Tube 4
H Roof Tube 4
I Roof Tube 4
J Roof Tube 4
K Roof Edge 4

5
NO. Description Drawing QTY
L Small Support Crossbar 4
M Roof Edge 20
N Small Support Crossbar 12
O Base Flange 4
P Connector 4
Q Corner Moulding 4
R Central Connector 2
S Roof Cap 1
T Hook 1
U Roof Spacer 1
V Roof Spacer Bracket 4

6
NO. Description Drawing QTY
W Bracket 8
X Bracket 8
Y Roof Panel 4
Z Roof Panel 4
AA Roof Panel 4
BB Roof Panel 4
CC Roof Panel 4
DD Roof Panel 4
EE Curtain Hook 80
FF Hook Stopper 8
GG Small Mosquito Net 1
7
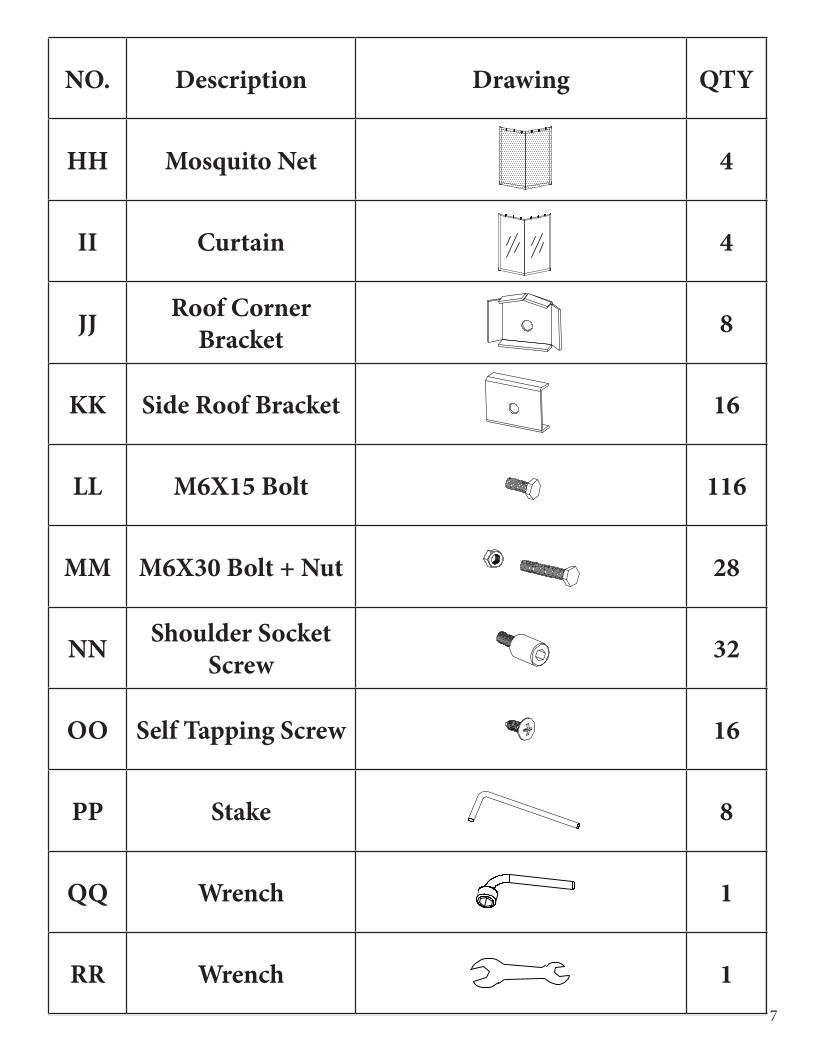
NO. Description Drawing QTY
HH Mosquito Net 4
II Curtain 4
JJ Roof Corner Bracket 8
KK Side Roof Bracket 16
LL M6X15 Bolt 116
MM M6X30 Bolt + Nut 28
NN Shoulder Socket Screw 32
OO Self Tapping Screw 16
PP Stake 8
QQ Wrench 1
RR Wrench 1
8
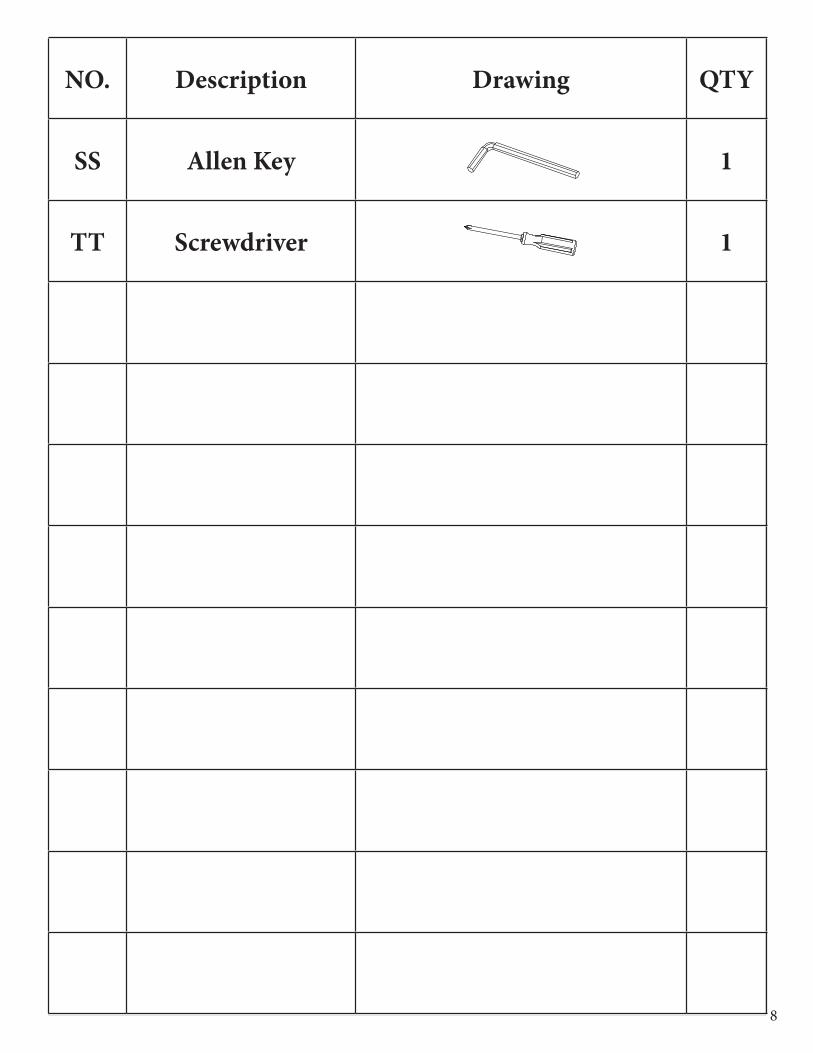
NO. Description Drawing QTY
SS Allen Key 1
TT Screwdriver 1

9
Step 1:Install a base flange (O) to the bottom of a post (A) using bolts (LL). Repeat the step for all other posts.
Step 2:Using bolts (LL) and connectors (P) put together all crossbars (B) and (C).

10
Step 3:As shown, using bolts (NN) fix the crossbar assembly (B)/(C) to posts (A).
Step 4:Using (LL) bolts, fix (D) braces to posts (A) and crossbars assembly (B)/(C).

11
Step 5:As shown, using self tapping screws (OO) fix corner mouldings (Q) at appropriates locations.
Step 6:Fix the corner roof tubes (E) to the central connector (R). Just push tubes until spring pins makes a click sound.

12
Step 7:Lay down the assembly of corner roof tubes (E)/(R) on crossbars four corners previously assembled and fix at each corner by the use of bolts and nuts (MM).
Step 8:As shown, fix roof tubes (F), (G), (H) and (I) to corner roof tubes (E) using (W) brackets and bolts (LL). Pay attention to locate brackets (W) pins toward up. Fix other ends to crossbars assembly (B)/(C) using bolts and nuts (MM).

13
Step 9:As shown, fix the roof tubes (J) to a central connector (R) by pushing tubes on until spring pins makes a click sound.
Step 10:Fix the roof spacer (U) under this last assembly by covering and screwing the roof cap (S) on. Lay down this assembly over the first central connector (R) fitted with (E) corner roof tubes. Fix by using the hook (T) as shown.Fix other ends of the roof tubes (J) to the roof corner tubes (E) by using the roof spacer brackets (V) and bolts and nuts (MM).

14
Step 11:As shown, insert the small support crossbars (L) for the small roof onto the pins of the (W) brackets.

15
Step 12:Insert the roof panels (Y) into the grooves of the roof tubes (J).
**Fixing the roof panels :
To avoid the roof panels
to slide down, follow
these 3 steps combined
for each panel.**

16
Step 13:At ends of roof panels (Y), insert the roof edges (K).
Step 14:Secure the roof panels (Y) in each corner by using the roof corner brackets (JJ) and bolts (LL). In order not to damage inserts, do not over tighten the bolts.

17
Step 15:As shown, fix the (X) bracket to roof tubes (F) and (G) by using bolts (LL).
Step 16:As shown, insert the small support crossbars (N) on the pins of the (W) brackets of the main roof.
18
**Fixing the roof panels :
To avoid the roof panels
to slide down, follow
these 3 steps combined
for each panel.**
19
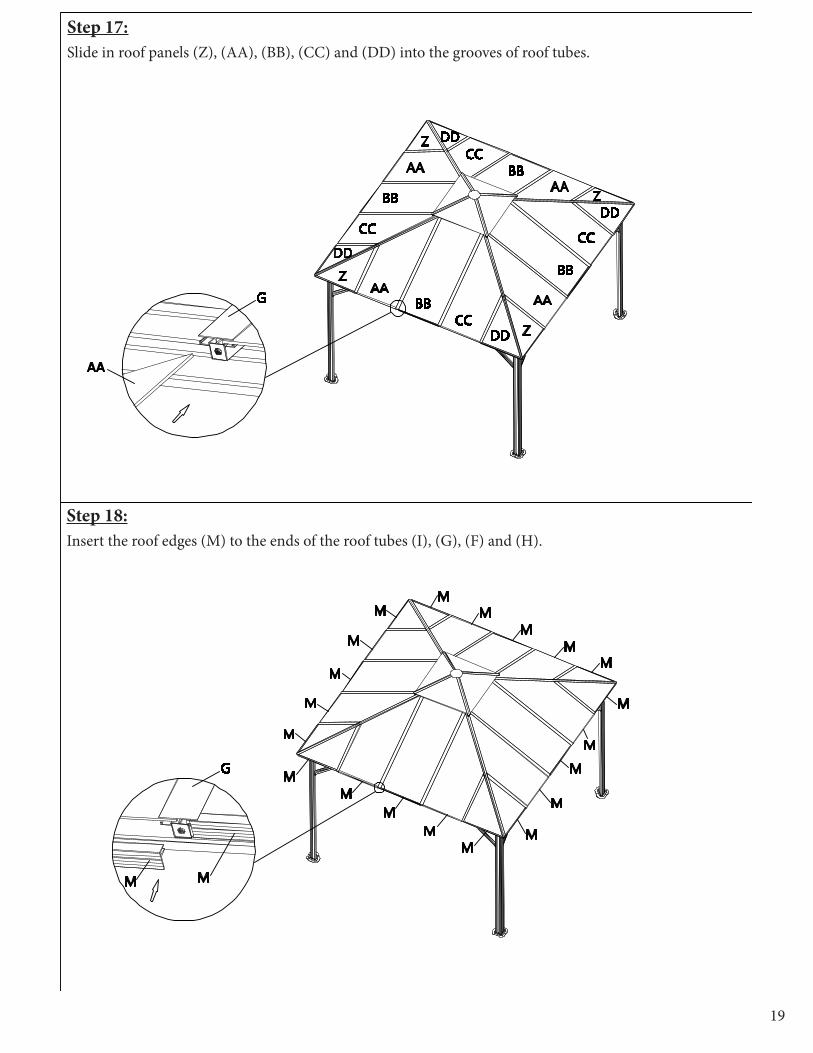
Step 17:Slide in roof panels (Z), (AA), (BB), (CC) and (DD) into the grooves of roof tubes.
Step 18:Insert the roof edges (M) to the ends of the roof tubes (I), (G), (F) and (H).
20
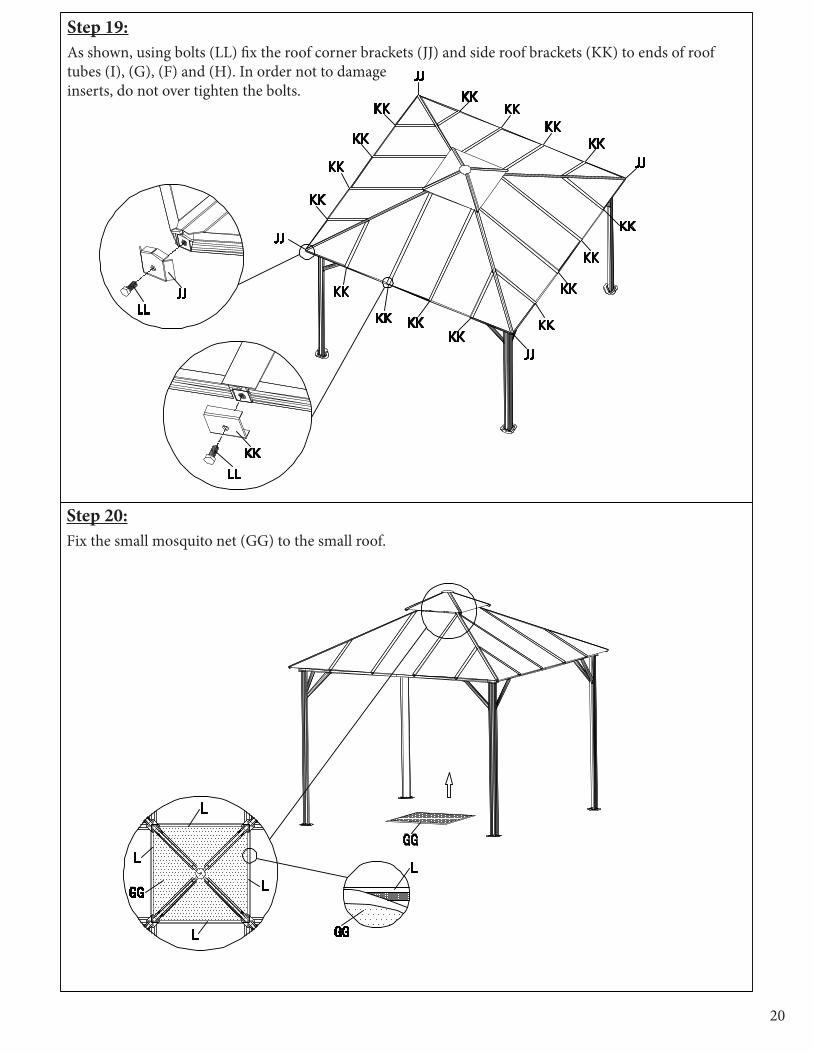
Step 19:As shown, using bolts (LL) fix the roof corner brackets (JJ) and side roof brackets (KK) to ends of roof tubes (I), (G), (F) and (H). In order not to damage inserts, do not over tighten the bolts.
Step 20:Fix the small mosquito net (GG) to the small roof.

21
Step 21:Hang up the curtain hooks (EE) into the loops of the curtain (II) and slide the hooks into the external rail of the (B)/(C) crossbars
Step 22:Hang up the curtains hooks (EE) into the mosquito net loops (HH) and insert these hooks into the inside rail of the (B)/(C) crossbars.
22
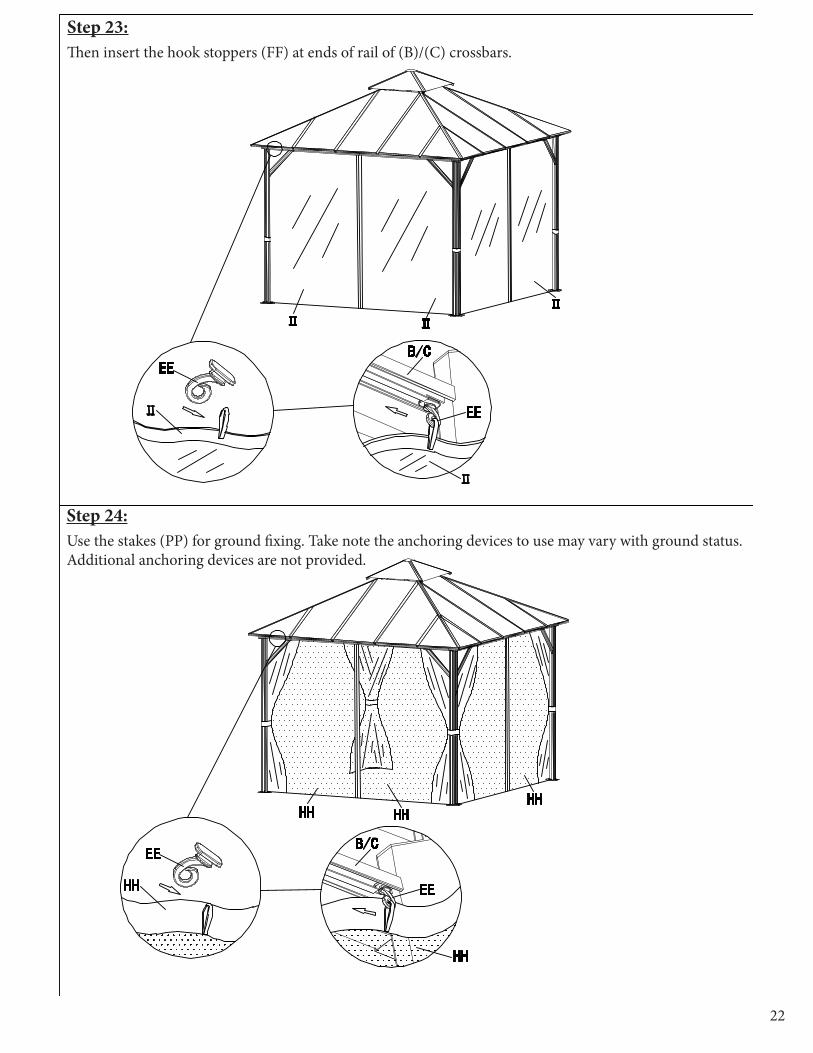
Step 23:Then insert the hook stoppers (FF) at ends of rail of (B)/(C) crossbars.
Step 24:Use the stakes (PP) for ground fixing. Take note the anchoring devices to use may vary with ground status. Additional anchoring devices are not provided.