Aunt Gracie's Gardenchallenging Quilt by Cynthia LeBlanc Regone.Machine Quilted by Jane Plisga.Aunt...
7
CHALLENGING ⁕⁕⁕ QUILT BY Cynthia LeBlanc Regone. MACHINE QUILTED BY Jane Plisga. Aunt Gracie's Garden An interlocking circle pattern emerges when combining 54-40 or Fight blocks and Shoo Fly blocks. Adorn the borders with appliqué before or after attaching them to the quilt center. Size: 85" × 103" Blocks: 63 (9") blocks MATERIALS 16 fat quarters* assorted 1930s prints 7 yards white solid 2 yards green print for border and binding Assorted print and solid fat quarters* for applique 12 yards green rickrack Tri-Recs™ Tools (optional) Fons & Porter Half & Quarter Ruler (optional) Paper-backed fusible web 7 7 ⁄8 yards backing fabric Queen-size quilt batting *fat quarter = 18" × 20" 1 Fons k Porter’s Love of Quilting May/June 2013 www.FonsandPorter.com
Transcript of Aunt Gracie's Gardenchallenging Quilt by Cynthia LeBlanc Regone.Machine Quilted by Jane Plisga.Aunt...

challenging ⁕⁕⁕
Quilt by Cynthia LeBlanc Regone. Machine Quilted by Jane Plisga.
Aunt Gracie's Gardenan interlocking circle pattern emerges when combining 54-40 or Fight blocks and
Shoo Fly blocks. adorn the borders with appliqué before or after
attaching them to the quilt center.
Size: 85" × 103"
Blocks: 63 (9") blocks
Materials
16 fat quarters* assorted 1930s prints
7 yards white solid
2 yards green print for border and binding
assorted print and solid fat quarters* for applique
12 yards green rickrack
tri-Recs™ tools (optional)
Fons & Porter half & Quarter Ruler (optional)
Paper-backed fusible web
77⁄8 yards backing fabric
Queen-size quilt batting
*fat quarter = 18" × 20"
1 Fons k Porter’s Love of Quilting May/June 2013 www.FonsandPorter.com

CuttingMeasurements include ¼" seam
allowances. Patterns for C and D
triangles are on page 5. Patterns for
appliqué shapes are on pages 5-7.
Follow manufacturer's instructions
for using fusible web.
Sew SmartTM
Use the Tri-Recs™ Tools to make quick work of cutting C and D triangles. —Marianne
From fat quarters, cut a total of:
• 32(2"-wide)stripsforstripsets.
• 47(3½"-wide)strips.Fromstrips,
cut63(3½")Asquares,124half-
squareBtriangles,and128C
triangles.
Note: if not using Fons & Porter half & Quarter Ruler to cut b triangles, cut:
•16 (37⁄8"-wide) strips. From strips, cut 62 (37⁄8") squares. cut squares in half diagonally to make 124 half-square b triangles.
•28 (3½"-wide) strips. From strips, cut 63 (3½") a squares and 128 c triangles.
From white solid, cut:
• 16(2"-wide)strips.Cutstripsin
halftomake32(2"×20")strips
for strip sets.
• 29(3½"-wide)strips.Fromstrips,
cut124(3½")Asquares,124half-
squareBtriangles,128Dtriangles,
and128Dtrianglesreversed.
Sew SmartTM
Stack strips with wrong sides facing to cut D and D reversed triangles at the same time. —Liz
Note: if not using Fons & Porter half & Quarter Ruler to cut b triangles, cut:
•7 (37⁄8"-wide) strips. From strips,
cut 62 (37⁄8") squares. cut squares in half diagonally to make 124 half-square b triangles.
•22 (3½"-wide) strips. From strips, cut 124 (3½") a squares, 128 d triangles, and 128 d triangles reversed.
From remainder of white solid,
cut:
• 4(8½"-wide)lengthwise strips.
Fromstrips,cut2(8½"×108")
sideborderstripsand2
(8½"×90")topandbottom
border strips.
From green print, cut:
• 11(2¼"-wide)stripsforbinding.
• 20(2"-wide)strips.Piecestripsto
make4(2"×108")sideborder
stripsand4(2"×90")topand
bottom border strips.
From solid fabrics and remainders
of prints, cut:
• 2Birdsand2Birdsreversed.
• 2BirdWingsand2BirdWings
reversed.
• 4ButterflyBodiesand4Butterfly
Bodiesreversed.
• 4LargeButterflyWingsand4
LargeButterflyWingsreversed.
• 4MediumButterflyWingsand4
MediumButterflyWingsreversed.
• 4SmallButterflyWingsand4
SmallButterflyWingsreversed.
• 4LargeFlowers.
• 4LargeFlowerCenters.
• 12MediumFlowers.
• 12MediumFlowerCenters.
• 12SmallFlowers.
• 12SmallFlowerCenters.
• 4LargeLeavesand4LargeLeaves
reversed.
• 34SmallLeavesand34Small
leavesreversed.
54-40 or Fight bloCk asseMbly1. Join1printCtriangle,1white
Dtriangle,and1whiteDtriangle
reversedasshowninStar Point
Unit Diagrams.Make128Star
Point Units.
2. Join 1 print strip and 1 white
strip as shown in Strip Set
Diagram.Make32stripsets.From
stripsets,cut256(2"-wide)
segments.
3. Referring to Four Patch Unit
Diagrams,join2segmentstomake
1FourPatchUnit.Make128
Four Patch Units.
CD Dr
Star Point Unit Diagrams
2"
Strip Set Diagram
Four Patch Unit Diagrams
Fight Block Assembly DiagramFight Block Diagram
B
B
Triangle-Square Diagrams
A
A
Shoo Fly Block Assembly Diagram
Shoo Fly Block Diagram
Quilting Diagram
Star Point Unit Diagrams
CD Dr
Star Point Unit Diagrams
2"
Strip Set Diagram
Four Patch Unit Diagrams
Fight Block Assembly DiagramFight Block Diagram
B
B
Triangle-Square Diagrams
A
A
Shoo Fly Block Assembly Diagram
Shoo Fly Block Diagram
Quilting Diagram
Strip Set Diagram
CD Dr
Star Point Unit Diagrams
2"
Strip Set Diagram
Four Patch Unit Diagrams
Fight Block Assembly DiagramFight Block Diagram
B
B
Triangle-Square Diagrams
A
A
Shoo Fly Block Assembly Diagram
Shoo Fly Block Diagram
Quilting Diagram
Four Patch Unit Diagrams
2 Fons k Porter’s Love of Quilting May/June 2013 www.FonsandPorter.com

Web extRa
Get the free mobile app for your phonehttp:/ /gettag.mobi
4. Layout4StarPointUnits,4Four
PatchUnits,and1printAsquare
as shown in 54-40 or Fight Block
Assembly Diagram. Join into rows;
joinrowstocomplete1block
(54-40 or Fight Block Diagram).
Make3254-40orFightblocks.
shoo Fly bloCk asseMbly1. Join 1 print B triangle and 1
white B triangle as shown in
Triangle-Square Diagrams. Make
124triangle-squares.
2. Layout4triangle-squares,
4whiteAsquares,and1printA
square as shown in Shoo Fly Block
Assembly Diagram. Join into rows;
joinrowstocomplete1block
(Shoo Fly Block Diagram).Make31
ShooFlyblocks.
CD Dr
Star Point Unit Diagrams
2"
Strip Set Diagram
Four Patch Unit Diagrams
Fight Block Assembly DiagramFight Block Diagram
B
B
Triangle-Square Diagrams
A
A
Shoo Fly Block Assembly Diagram
Shoo Fly Block Diagram
Quilting Diagram
54-40 or Fight Block Assembly Diagram
CD Dr
Star Point Unit Diagrams
2"
Strip Set Diagram
Four Patch Unit Diagrams
Fight Block Assembly DiagramFight Block Diagram
B
B
Triangle-Square Diagrams
A
A
Shoo Fly Block Assembly Diagram
Shoo Fly Block Diagram
Quilting Diagram
54-40 or Fight Block DiagramC
D Dr
Star Point Unit Diagrams
2"
Strip Set Diagram
Four Patch Unit Diagrams
Fight Block Assembly DiagramFight Block Diagram
B
B
Triangle-Square Diagrams
A
A
Shoo Fly Block Assembly Diagram
Shoo Fly Block Diagram
Quilting Diagram
Triangle-Square Diagrams
CD Dr
Star Point Unit Diagrams
2"
Strip Set Diagram
Four Patch Unit Diagrams
Fight Block Assembly DiagramFight Block Diagram
B
B
Triangle-Square Diagrams
A
A
Shoo Fly Block Assembly Diagram
Shoo Fly Block Diagram
Quilting Diagram
Shoo Fly Block Assembly Diagram
CD Dr
Star Point Unit Diagrams
2"
Strip Set Diagram
Four Patch Unit Diagrams
Fight Block Assembly DiagramFight Block Diagram
B
B
Triangle-Square Diagrams
A
A
Shoo Fly Block Assembly Diagram
Shoo Fly Block Diagram
Quilting Diagram
Shoo Fly Block Diagram
Quilt asseMbly1. LayoutblocksasshowninQuilt
Top Assembly Diagramonpage4.
Joinblocksintorows;joinrowsto
complete quilt center.
2. Join2greenprintsideborder
strips and 1 white side border
strip to make 1 side border. Make
2sideborders.
3. Inthesamemanner,make
top and bottom borders using
remaining green print and white
border strips.
Sew SmartTM
If you wish to appliqué borders before joining them to quilt, arrange pieces atop borders, leaving corner appliqué pieces unstitched. After adding borders to quilt, complete appliqué in corners. —Liz
4. Addborderstoquiltcenter,
mitering corners.
For instructions on mitering borders, visit our Web site at: www.FonsandPorter.com/mborders.
5. Referring to photo on page
1,arrangeappliquépiecesand
rickrack atop quilt border.
6. Stitchrickrackinplacethrough
center of rickrack using matching
thread.Stitchappliquépieces
using a blanket stitch and
matching thread.
7. Stitchembroiderydetails—
antennaeonbutterfliesandeyes
on birds.
Finishing1. Dividebackinginto3(25⁄8-yard)
lengths. Join panels lengthwise.
Seamswillrunhorizontally.
2. Layerbacking,batting,andquilt
top; baste. Quilt as desired. Quilt
shownwasquiltedintheditch,
outlinequiltedintheblocks,
and echo quilted in the borders
(Quilting Diagramonpage4).
3. Join2¼"-wide green print
strips into 1 continuous piece
for straight-grain French-fold
binding.Addbindingtoquilt.
3 Fons k Porter’s Love of Quilting May/June 2013 www.FonsandPorter.com

Quilt Top Assembly DiagramQuilt Top Assembly Diagram
CD Dr
Star Point Unit Diagrams
2"
Strip Set Diagram
Four Patch Unit Diagrams
Fight Block Assembly DiagramFight Block Diagram
B
B
Triangle-Square Diagrams
A
A
Shoo Fly Block Assembly Diagram
Shoo Fly Block Diagram
Quilting DiagramQuilting Diagram
4 Fons k Porter’s Love of Quilting May/June 2013 www.FonsandPorter.com
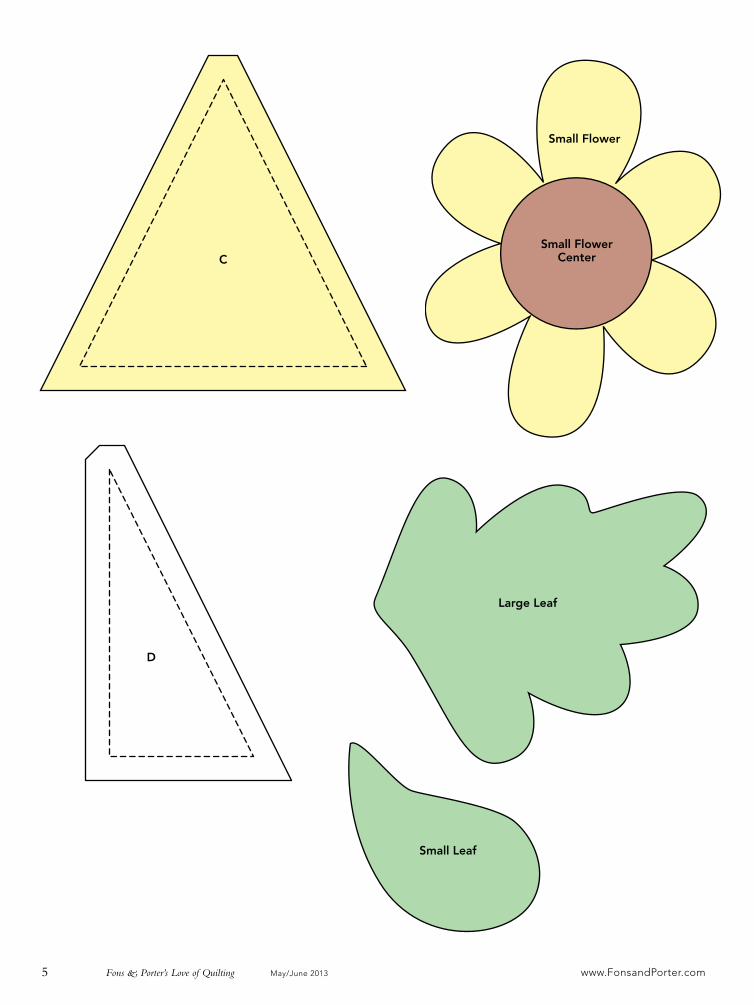
C
D
Large Leaf
Small Leaf
Small FlowerCenter
Small Flower
5 Fons k Porter’s Love of Quilting May/June 2013 www.FonsandPorter.com

Large FlowerCenter
Medium FlowerCenter
Butterfly Body
Large Flower
Medium Flower
Large Butterfly
Wing
MediumButterfly
Wing
SmallButterfly
Wing
6 Fons k Porter’s Love of Quilting May/June 2013 www.FonsandPorter.com

Bird
Wing
7 Fons k Porter’s Love of Quilting May/June 2013 www.FonsandPorter.com