Audit Rules User’s Guide -...
44
ACTIVE Governance TM Audit Rules User’s Guide Software Version 7.2
Transcript of Audit Rules User’s Guide -...

ACTIVE GovernanceTM
Audit Rules User’s Guide
Software Version 7.2

© 2007 LogicalApps
All rights reserved. Printed in USA.
Restricted Rights Legend
This software and associated documentation contain proprietary information of LogicalApps. It is provided under a license agreement containing restrictions on use and disclosure and it is also protected by copyright law. Reverse engineering of this software is prohibited.
The information contained in this document is subject to change without notice. LogicalApps does not warrant that this document is error free. No part of this docu-ment may be reproduced or transmitted in any form or by any means, electronic or mechanical, for any purpose, without the express written permission of LogicalApps.
LogicalApps Provides on-site support as well as remote phone and web support to ensure quick and effective product implementation. To request support, to suggest product enhancements, or to comment on LogicalApps software or documentation, send email to [email protected], or contact us at the address or phone num-ber given below.
ACTIVE Governance, ACTIVE Access Governor, ACTIVE Data Governor, ACTIVE Policy Governor, Audit Rules, Form Rules, and Flow Rules are trademarks of LogicalApps. All trademarks and registered trademarks are the property of their respective owners.
Document Version AR002-720D
11/15/07
LogicalApps 15420 Laguna Canyon, Suite 150 Irvine, CA 92618 949.453.9101
User’s Guide: Audit Rules 7.2 iii
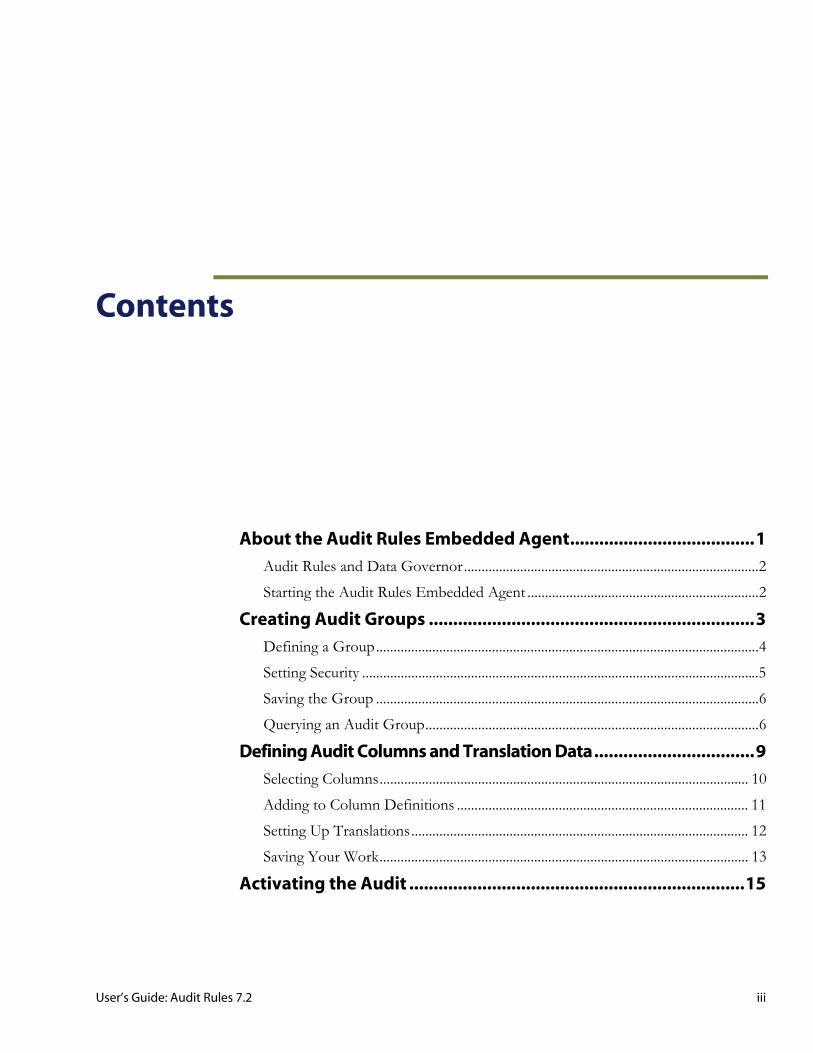
Contents
About the Audit Rules Embedded Agent......................................1
Audit Rules and Data Governor....................................................................................2 Starting the Audit Rules Embedded Agent ..................................................................2
Creating Audit Groups ...................................................................3
Defining a Group.............................................................................................................4 Setting Security .................................................................................................................5 Saving the Group .............................................................................................................6 Querying an Audit Group...............................................................................................6
Defining Audit Columns and Translation Data.................................9
Selecting Columns......................................................................................................... 10 Adding to Column Definitions ................................................................................... 11 Setting Up Translations................................................................................................ 12 Saving Your Work......................................................................................................... 13
Activating the Audit .....................................................................15

Contents
iv User’s Guide: Audit Rules 7.2
Reporting ......................................................................................17
Defining Reports............................................................................................................17 Audit Report Header ..............................................................................................18 Audit Report Detail ................................................................................................19 Resubmission Options ...........................................................................................20 Saving a Report .......................................................................................................20
Submitting and Viewing Reports.................................................................................21 Changes to Audit Setup ................................................................................................22 Querying a Report .........................................................................................................23
The Online Audit Form.................................................................25
Creating the Form Rule ................................................................................................26 Parameter Values ...........................................................................................................27 Adding Online Audit to a Responsibility ...................................................................28 Viewing the Online Audit.............................................................................................29 Security ............................................................................................................................31
Audit Migration ............................................................................33
Preparing for Migration ................................................................................................33 Dependencies .................................................................................................................35 Migrating or Exporting a Group or Table .................................................................35 Migrating or Exporting an Audit Report ...................................................................37 Importing a Group, Table, or Report File .................................................................39

User’s Guide: Audit Rules 7.2 1
Chapter 1
About the Audit Rules Embedded Agent
LogicalApps provides a set of three “embedded agents” — software applications that run within Oracle Applications. One of them is Audit Rules, which enables us-ers to track changes to the values of fields in database tables. Users can review those changes in reports, which can be run as concurrent requests in Oracle Applications or in the Reports browser of the ACTIVE Governance Platform. For each database row in which a column value has changed, either type of report includes the column name and its display name, the old and new data values, the transaction type (insert, update, or delete), the username of the user who made the change, and the date on which the change was made.
You select the tables you want to include in an audit by assigning them to a group. You refine the audit further by selecting columns from the tables that belong to the group. You can also link audited columns to translations — meaningful values that correspond to the values held in audited tables. For example, a person’s actual name might be the translation value when an audited table column holds a numeric ID for the person.
In addition to the audit report, Audit Rules can present audit data in an Online Audit form. Each field on an Oracle form corresponds to a database-table column; for fields on any given Oracle form, the Online Audit form can be configured to display changes to the underlying database columns. The Online Audit form opens from a menu op-tion in the Oracle form.
Moreover, once configured in an Oracle Applications instance, Audit groups and rules can be migrated to other Oracle Applications instances.

Chapter 1: About the Audit Rules Embedded Agent
2 User’s Guide: Audit Rules 7.2
Audit Rules and Data Governor ACTIVE Data GovernorTM is a LogicalApps application that monitors and regulates changes to fields in Oracle Applications forms. Its users create rules — one for each form field — that apply any of three “control types.” These subject field-value changes to increasing degrees of review.
An Audit control type, as its name suggests, tracks field-value changes. The two others — Reason Code and Approval — do more, but also audit changes to the fields they govern. To carry out its auditing requirements, Data Governor uses Audit Rules. Every form field corresponds to a database column; for each form field subject to a Data Governor rule, the Audit Rules application monitors the corresponding data-base column.
As a result, Data Governor creates audit groups in Audit Rules for its own use. Al-though you can work with these groups in Audit Rules, there are limits to what you can do. Specifically, when you create your own audit groups you can add database columns to them. Within Audit Rules, you cannot add columns directly for groups created by Data Governor. You can add columns only indirectly by opening Data Governor and modifying its rules.
For information on using Data Governor, see the ACTIVE Data Governor User’s Guide.
Starting the Audit Rules Embedded Agent To open Audit Rules:
1 Select the LogicalApps responsibility in the Oracle Applications list. (Ensure first that the LogicalApps responsibility is available to you.)
2 Under the heading Oracle Embedded Agent, click on the Audit Rules link.
3 A LogicalApps — Oracle Rules form appears. It provides access to all three of the embedded agents; make sure that the Audit Rules tab is selected. If you move to one of the other embedded agents, you can return to Form Rules by clicking on its tab.
If you close the Oracle Rules form, you can reopen Audit Rules:
1 In the LogicalApps Navigator, expand the Oracle Embedded Agent option (click on its plus sign).
2 Under the expanded Oracle Embedded Agent option, click on the Audit Rules option, and then the Open button. (Or double-click on the Audit Rules option.)

User’s Guide: Audit Rules 7.2 3
Chapter 2
Creating Audit Groups
To be audited, a table must belong to an audit group, and so an essential step in the auditing process is to create (or modify) groups. When you start Audit Rules, it opens by default to the form in which you complete this step.
Creating an audit group involves the following:
• Giving the group a name.
• Selecting the database tables that are to belong to the group. Once you add a table to a group (and save the addition), it cannot be removed.
• Engaging security by determining the Oracle responsibilities that are allowed to view audit results in Oracle-based reports and the Online Audit form.
• Saving the group.
For a table to belong to a group, its entire schema must be defined as audit-enabled. Audit Rules performs this setup step automatically as you add tables to a group
Note Be sure the AuditTrail:Activate profile option has been set to Yes.
After a group is defined and saved, you need to select columns for auditing from each of the group’s tables. This process is competed in a distinct form (see Chapter 3).
Chapter 2: Creating Audit Groups
4 User’s Guide: Audit Rules 7.2
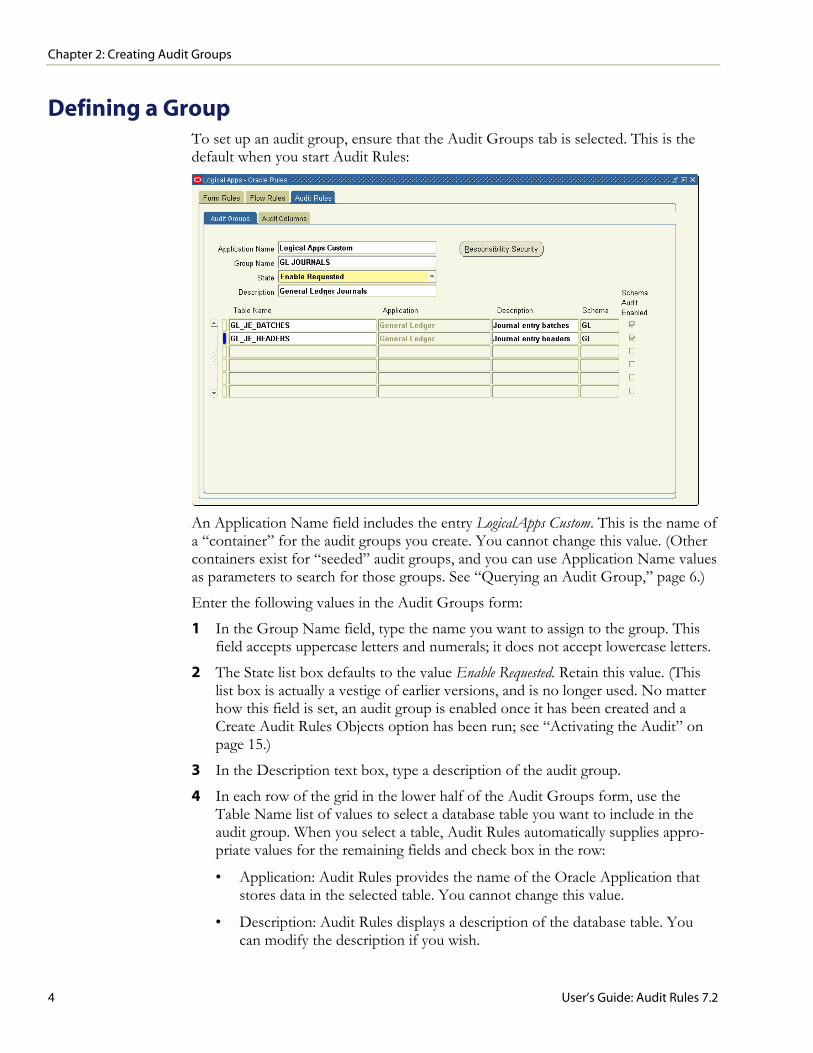
Defining a Group To set up an audit group, ensure that the Audit Groups tab is selected. This is the default when you start Audit Rules:
An Application Name field includes the entry LogicalApps Custom. This is the name of a “container” for the audit groups you create. You cannot change this value. (Other containers exist for “seeded” audit groups, and you can use Application Name values as parameters to search for those groups. See “Querying an Audit Group,” page 6.)
Enter the following values in the Audit Groups form:
1 In the Group Name field, type the name you want to assign to the group. This field accepts uppercase letters and numerals; it does not accept lowercase letters.
2 The State list box defaults to the value Enable Requested. Retain this value. (This list box is actually a vestige of earlier versions, and is no longer used. No matter how this field is set, an audit group is enabled once it has been created and a Create Audit Rules Objects option has been run; see “Activating the Audit” on page 15.)
3 In the Description text box, type a description of the audit group.
4 In each row of the grid in the lower half of the Audit Groups form, use the Table Name list of values to select a database table you want to include in the audit group. When you select a table, Audit Rules automatically supplies appro-priate values for the remaining fields and check box in the row:
• Application: Audit Rules provides the name of the Oracle Application that stores data in the selected table. You cannot change this value.
• Description: Audit Rules displays a description of the database table. You can modify the description if you wish.
Chapter 2: Creating Audit Groups
User’s Guide: Audit Rules 7.2 5
• Schema: Audit Rules supplies the name of the schema (database organiza-tional structure) of which this table forms a part. You cannot change this value.
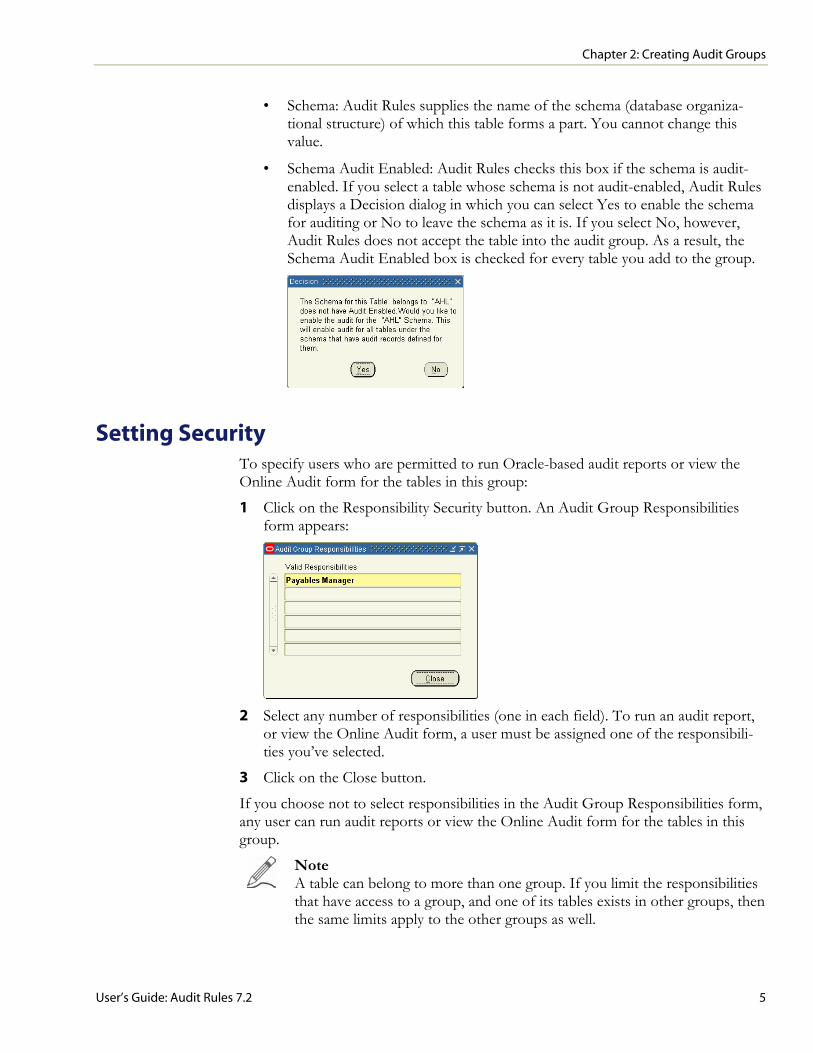
• Schema Audit Enabled: Audit Rules checks this box if the schema is audit-enabled. If you select a table whose schema is not audit-enabled, Audit Rules displays a Decision dialog in which you can select Yes to enable the schema for auditing or No to leave the schema as it is. If you select No, however, Audit Rules does not accept the table into the audit group. As a result, the Schema Audit Enabled box is checked for every table you add to the group.
Setting Security To specify users who are permitted to run Oracle-based audit reports or view the Online Audit form for the tables in this group:
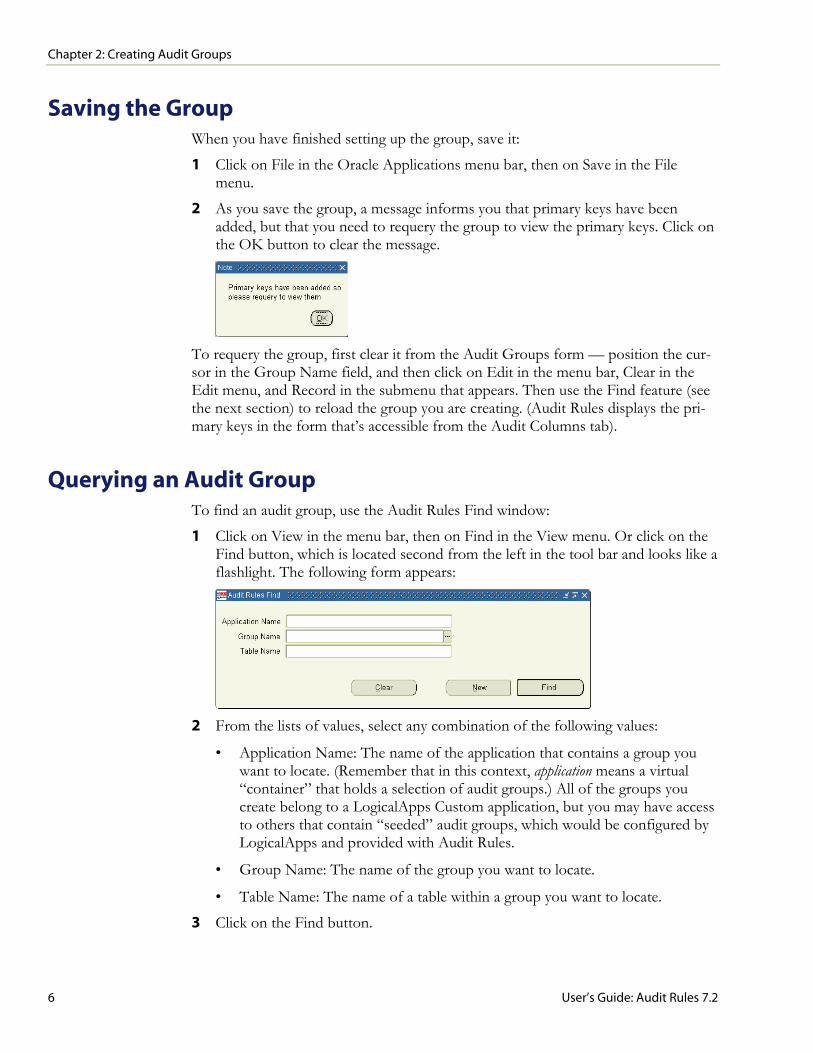
1 Click on the Responsibility Security button. An Audit Group Responsibilities form appears:
2 Select any number of responsibilities (one in each field). To run an audit report,
or view the Online Audit form, a user must be assigned one of the responsibili-ties you’ve selected.
3 Click on the Close button.
If you choose not to select responsibilities in the Audit Group Responsibilities form, any user can run audit reports or view the Online Audit form for the tables in this group.
Note A table can belong to more than one group. If you limit the responsibilities that have access to a group, and one of its tables exists in other groups, then the same limits apply to the other groups as well.
Chapter 2: Creating Audit Groups
6 User’s Guide: Audit Rules 7.2
Saving the Group When you have finished setting up the group, save it:
1 Click on File in the Oracle Applications menu bar, then on Save in the File menu.
2 As you save the group, a message informs you that primary keys have been added, but that you need to requery the group to view the primary keys. Click on the OK button to clear the message.
To requery the group, first clear it from the Audit Groups form — position the cur-sor in the Group Name field, and then click on Edit in the menu bar, Clear in the Edit menu, and Record in the submenu that appears. Then use the Find feature (see the next section) to reload the group you are creating. (Audit Rules displays the pri-mary keys in the form that’s accessible from the Audit Columns tab).
Querying an Audit Group To find an audit group, use the Audit Rules Find window:
1 Click on View in the menu bar, then on Find in the View menu. Or click on the Find button, which is located second from the left in the tool bar and looks like a flashlight. The following form appears:
2 From the lists of values, select any combination of the following values:
• Application Name: The name of the application that contains a group you want to locate. (Remember that in this context, application means a virtual “container” that holds a selection of audit groups.) All of the groups you create belong to a LogicalApps Custom application, but you may have access to others that contain “seeded” audit groups, which would be configured by LogicalApps and provided with Audit Rules.
• Group Name: The name of the group you want to locate.
• Table Name: The name of a table within a group you want to locate.
3 Click on the Find button.

Chapter 2: Creating Audit Groups
User’s Guide: Audit Rules 7.2 7
Depending on the parameters you specify, the search may uncover more than one group. For example, if you provide only a table name and the table belongs to more than one group, the search returns all the groups to which the table belongs. In such a case, ensure that the cursor is positioned in the Group Name field of the Audit Groups form (this is the default after you use the Find tool) and press the up- or down-arrow button to move from one group to another.
The Find form also contains a New button. If you click on it rather than the Find button, any values entered in the Audit Groups form are cleared and you can create a new group.

Chapter 2: Creating Audit Groups
8 User’s Guide: Audit Rules 7.2
User’s Guide: Audit Rules 7.2 9
Chapter 3
Defining Audit Columns and Translation Data
After you specify the tables that belong to a group, you need to select columns from each table. For a given column in an audit table, you can also specify a translation value — a corresponding column in a lookup table. This lookup column would contain meaningful values that match up with values in the audited tables, such as a person’s actual name in place of a numeric identifier.
A table can belong to more than one audit group, and the selection of columns for a table is identical in all the groups to which it belongs. If you add columns for a table in one group, the same columns are added for that table in its other groups. If you add a table to a group, any column selections made earlier in other groups apply in the new group by default. Translation-value settings configured for a table in one group apply in all the groups to which the table belongs. Once you add columns for a table (and save the addition), the columns cannot be deleted.
You select columns and specify translation values in the form available when you click the Audit Columns tab in Audit Rules. First, though, click on the Audit Groups tab and ensure the following:
• You have saved the audit group with which you want to work, and then reloaded it. (See “Querying an Audit Group,” page 6)
• You have selected the table whose columns you want to prepare for auditing. (In the grid that lists tables, click on the small rectangle to the extreme left of a table row. Doing so turns the rectangle blue, an indicator that the table is selected.)

Chapter 3: Defining Audit Columns and Translation Data
10 User’s Guide: Audit Rules 7.2
Selecting Columns Click on the Audit Columns tab. The following Audit Columns form appears, dis-playing the names of the audit group and audit table that you selected in the Audit Groups form.
If the name of the audit group begins with the prefix LA_AC, then the group has been created automatically in support of Data Governor rules. In this case, the Audit Columns form lists database columns, each of which corresponds to an Oracle Appli-cations form field that is subject to a Data Governor rule. You cannot add columns to those already displayed; the Column Name LOVs do not accept input and the Import Columns button is inactive.
If, however, the audit group has been created directly in Audit Rules, the Audit Col-umns form displays, at minimum, values for the following columns from the table you selected: • If the table has never before been included in a group, the form displays values
for the table’s primary-key columns. • If the table belongs to other groups, the form shows values for the columns
selected in those groups.
You can add columns, one by one, by selecting each in the next available list-of-values box under Column Name. Alternatively, you can select a number of columns at once. To do so, complete these steps:
1 Click on the Import Columns button. The Audit Columns form appears (as shown at the top of the next page), listing columns in the table you’ve selected.

Chapter 3: Defining Audit Columns and Translation Data
User’s Guide: Audit Rules 7.2 11
2 Click the Include Flag checkbox for each of the columns you want to audit. Or,
click on the Select All button to include all columns. (You can also click on a selected check box to clear it, or the De-Select All button to clear all check boxes.)
3 Click on the Accept button.
Once columns have been selected and the group has been saved, the columns cannot be deleted from the group definition.
For key information to be used, tables must be registered to the Applications. Oracle seeds this information for its E-Business Suite tables. Mappings that use custom data-base tables should be registered, through the use of Oracle APIs.
Adding to Column Definitions Regardless of the method you use to select columns, Audit Rules automatically fills in a description for each column and selects No Lookup in the Translation Type field by default. To modify the description for a column (if you wish), type a new value in its Description field. See the next section, “Setting Up Translations,” for more on translation type selections.
Moreover, if a column is a primary key, Audit Rules has already selected the Primary Key check box; you need not alter the default selections for this check box.
For each column (regardless of whether the audit group supports Data Governor rules), select or clear a Reporting Key check box:
• Select the Reporting Key check box if you want information about fields in the column to appear in reports even if field values have not changed.
• Clear the Reporting Key check box if you want information about column fields to appear in reports only for field values that have changed.
Chapter 3: Defining Audit Columns and Translation Data
12 User’s Guide: Audit Rules 7.2
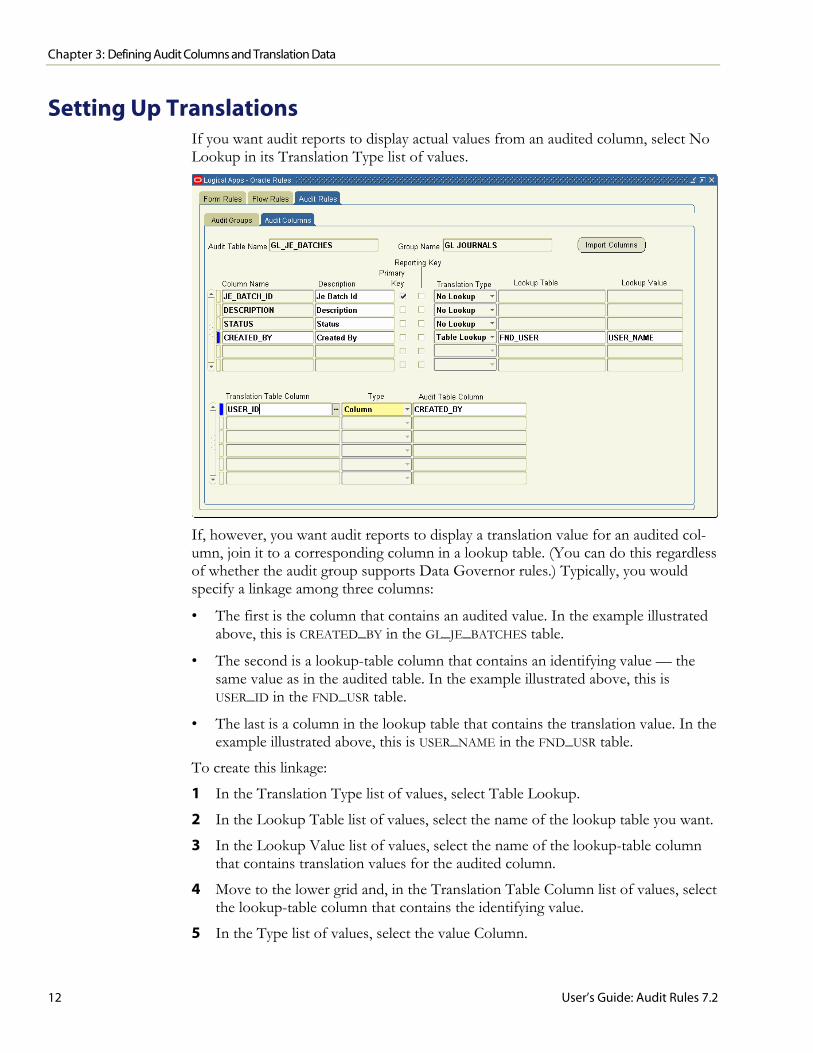
Setting Up Translations If you want audit reports to display actual values from an audited column, select No Lookup in its Translation Type list of values.
If, however, you want audit reports to display a translation value for an audited col-umn, join it to a corresponding column in a lookup table. (You can do this regardless of whether the audit group supports Data Governor rules.) Typically, you would specify a linkage among three columns:
• The first is the column that contains an audited value. In the example illustrated above, this is CREATED_BY in the GL_JE_BATCHES table.
• The second is a lookup-table column that contains an identifying value — the same value as in the audited table. In the example illustrated above, this is USER_ID in the FND_USR table.
• The last is a column in the lookup table that contains the translation value. In the example illustrated above, this is USER_NAME in the FND_USR table.
To create this linkage:
1 In the Translation Type list of values, select Table Lookup.
2 In the Lookup Table list of values, select the name of the lookup table you want.
3 In the Lookup Value list of values, select the name of the lookup-table column that contains translation values for the audited column.
4 Move to the lower grid and, in the Translation Table Column list of values, select the lookup-table column that contains the identifying value.
5 In the Type list of values, select the value Column.

Chapter 3: Defining Audit Columns and Translation Data
User’s Guide: Audit Rules 7.2 13
6 In the Audit Table Column list of values, select once again the column from the audited table that contains the audited value.
In the lower grid, you can complete as many rows as you like to create a translation value as complex as you like. The rows have an AND relationship — all must be true for a value to be returned.
To change translation values (once they’ve been saved), you must delete the existing values and then save the audit group before selecting new values. If you attempt to replace old translation values directly with new values, Audit Rules presents a mes-sage stating that you must first delete the old values and save the deletion.
Saving Your Work Once you’ve finished selecting columns and defining translation values, save the new configuration: click on File in the menu bar, then on Save in the File menu. Or, click on the Save icon, located first on the left in the toolbar.

Chapter 3: Defining Audit Columns and Translation Data
14 User’s Guide: Audit Rules 7.2

User’s Guide: Audit Rules 7.2 15
Chapter 4
Activating the Audit
To enable Audit Rules to begin auditing the group you have defined, click on LogicalApps Utilities in the menu bar, then on Create Audit Rules Objects in the LogicalApps Utilities menu. At this point, two concurrent programs run: • An AuditTrail Update Tables program updates any changes made to existing
audit groups and creates new audit objects required by new audit groups. • An Audit Rules Update Audit Objects program optimizes the triggers to include
When clauses for the selected columns. You must select the Create Audit Rules Objects menu option in the following circumstances: • You have created a new group. • You have added a table to an existing group. • You have added a column (or changed the setting of the Enabled check box for
a column) in an existing group. You need not select the Create Audit Rules Objects menu option in the following circumstances: • You have added or changed a lookup table or a lookup value. • You have added or changed lookup join information. • You have changed a description.

Chapter 4: Activating the Audit
16 User’s Guide: Audit Rules 7.2
Moreover, when you wish to view audit results, either in a report or in the Online Audit form, first run a concurrent-request program called Audit: Dequeue Process. This updates audit results; if the program has not been run recently, you will miss audit data reflecting changes to database values made since the last time it was run.
Typically, this concurrent request is scheduled during installation to be run periodi-cally. Even if this is the case for your instance, however, you may wish to run the re-quest before viewing reports and would typically run it before viewing audit results in the Online Audit form, to ensure that those results are as current as can be.
To run the Audit: Dequeue Process concurrent request:
1 With the Audit Rules application running (or from any Embedded Agent appli-cation in the LogicalApps responsibility), click on View in the menu bar, and Requests in the View menu. A Find Requests form opens.
2 Click on the Submit a New Request button. A Submit a New Request dialog opens. In it, select Single Request and click on the OK button.
3 A Submit Request form opens. In it, select Audit: Dequeue Process in the Name field. The program takes no parameters.
4 In the Submit Request form, click on the Submit button.

User’s Guide: Audit Rules 7.2 17
Chapter 5
Reporting
Users can run audit reports in either of two environments:
• In the ACTIVE Governance Platform, the Reports browser displays an OracleAudit Report, which presents old and new values from database columns included in one or more audit groups. For more on this report, see the “Reports” chapter of the ACTIVE Governance Platform User’s Guide.
• Within the Oracle Applications environment, you can define reports — select a group or table and the columns about which you want to see change data, set filtering values, and schedule report runs. You can the use concurrent requests to view results in formatted or CSV output. The remainder of this chapter docu-ments the audit reporting capabilities that exist within the Oracle environment.
Before running a report in either environment, run the Audit: Dequeue Process con-current request to ensure that results are current. (See page 16.)
Defining Reports Before running an Oracle-based report, you must define it. This involves selecting an audit group or table, selecting columns from those available in the group or table, setting a time period the report should cover, setting a variety of filtering and display options, and scheduling when the report should be run.
To define a report, click on LogicalApps Utilities in the menu bar, and then on LogicalApps Oracle Audit Report in the Utilities menu.

Chapter 5: Reporting
18 User’s Guide: Audit Rules 7.2
The following Audit Report form appears:
Audit Report Header To create a new report definition, begin by completing entries in the header area of the Audit Report form:
1 In the Report Name field, type a name for the report.
2 Make selections in either or both of the Group Name and Table Name lists of values. (These fields provide access to groups, and tables within groups, that are either associated with responsibilities you have been assigned, or not associated with responsibilities at all.)
• If you make a selection in the Group Name field, the Table Name field displays only tables belonging to the group you’ve chosen. You can select one of those tables to report only on auditing for it, or you can leave the Table Name field blank to report on auditing for all the tables in the group.
• If you leave the Group Name field blank, the Table Name field displays tables belonging to all audit groups to which you have access. Select one of the tables to report on auditing for it.
3 Specify a span of time the report should cover. Do one of the following:
• Type or select starting and ending dates in the Start Date and End Date fields. Use the format configured for your instance of Oracle Applications. (Note that the Start Date and End Date fields default to the current date.)
• Type a value in the Num of Days field. The Audit Rules application subtracts this value from the date the report is run and uses the resulting date as the start of a date range. The end date is the date the report is run.
4 In the User Name list of values, select a user to report only on data changes made by that user. Or leave the field blank to report on data changes by all users.

Chapter 5: Reporting
User’s Guide: Audit Rules 7.2 19
5 In the Report Style list box, determine the format of the report output by selecting either of the following:
• Master Detail presents report information as blocks of data, each of which lists a table, information about its primary keys, and then a row of data about each of the audited fields that has changed.
• Delimited File presents report information as records of data changes, each using a tilde to separate the individual values that make up a record.
6 In the Debug Level list box, select High or Low. The Audit Rules application maintains data about both report generation and the audit “package” — the core generation of audit data from which a report gathers information. It places this data in a log table, where it may be reviewed if problems need to be resolved. The High debug-level value produces more detail and retains the data in the table. The Low value produces less detail and allows log data to be purged. Typically, select Low. (This setting does not alter the information presented in an audit report.)
7 Select the Display IDs check box if you want the report to identify primary keys, or clear the check box if not.
Audit Report Detail Once the header information is in place, click the Refresh button to select tables and columns for inclusion in the report. In response, the grid in the Audit Report form is filled with entries for all columns selected for auditing:
• If you selected a table name as you completed the report header, the grid displays all the audit columns from that table.
• If you selected a group name as you completed the report header, the grid displays all the audit columns from all the tables of the group.
For each, the Table Name, Column Name, and User Column Name are displayed, and an Include in Report check box is selected. In a Column Type list box, the data type for the column is also provided; however, if the report is to present data from a lookup table, the data type shown here reflects the lookup value. For instance, if the audited column is VENDOR_ID but a lookup table is to provide VENDOR_NAME in the report, the data type is given as Character, not Number.
You can refine this automatically generated selection of columns:
• Choose the columns you want in the report. For each column, click on the Include in Report check box to remove the check mark and therefore exclude the column from the report. Or click on the check box again to reinsert the check mark and place the column back in the report.
Alternatively, click the Select All button to include all the columns or the De-Select All button to exclude all the columns. Note, however, that you cannot exclude columns defined as primary keys.
Chapter 5: Reporting
20 User’s Guide: Audit Rules 7.2
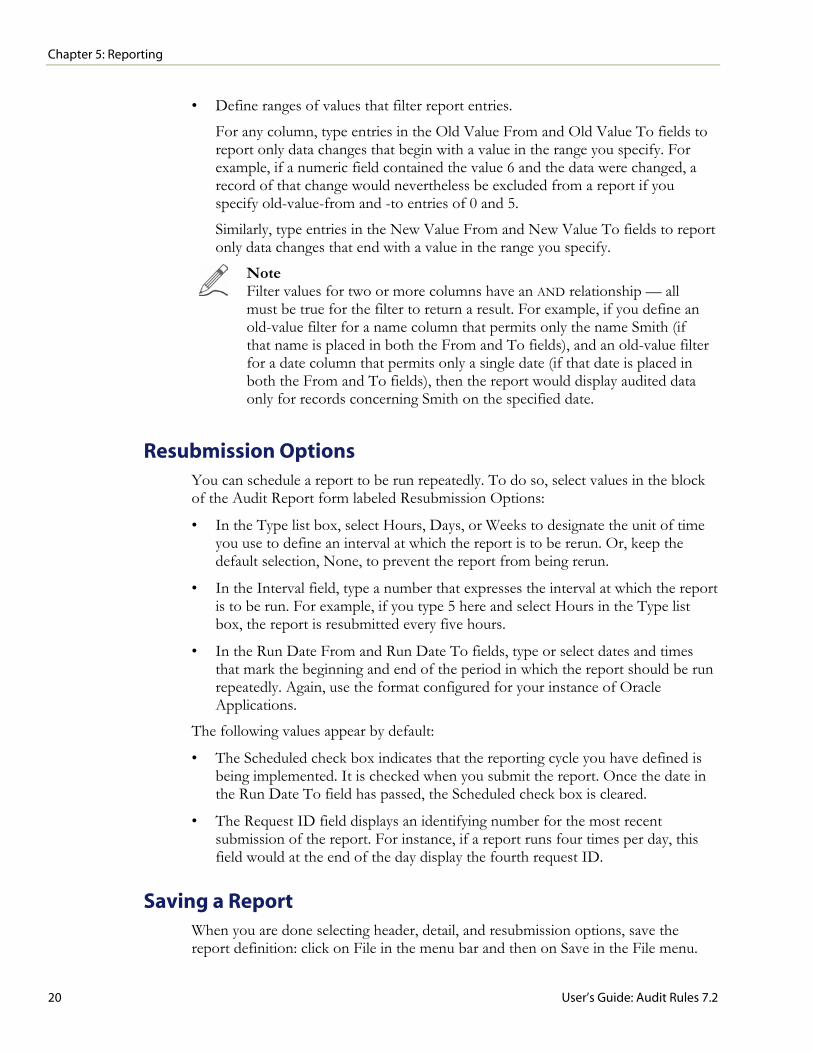
• Define ranges of values that filter report entries.
For any column, type entries in the Old Value From and Old Value To fields to report only data changes that begin with a value in the range you specify. For example, if a numeric field contained the value 6 and the data were changed, a record of that change would nevertheless be excluded from a report if you specify old-value-from and -to entries of 0 and 5.
Similarly, type entries in the New Value From and New Value To fields to report only data changes that end with a value in the range you specify.
Note Filter values for two or more columns have an AND relationship — all must be true for the filter to return a result. For example, if you define an old-value filter for a name column that permits only the name Smith (if that name is placed in both the From and To fields), and an old-value filter for a date column that permits only a single date (if that date is placed in both the From and To fields), then the report would display audited data only for records concerning Smith on the specified date.
Resubmission Options You can schedule a report to be run repeatedly. To do so, select values in the block of the Audit Report form labeled Resubmission Options:
• In the Type list box, select Hours, Days, or Weeks to designate the unit of time you use to define an interval at which the report is to be rerun. Or, keep the default selection, None, to prevent the report from being rerun.
• In the Interval field, type a number that expresses the interval at which the report is to be run. For example, if you type 5 here and select Hours in the Type list box, the report is resubmitted every five hours.
• In the Run Date From and Run Date To fields, type or select dates and times that mark the beginning and end of the period in which the report should be run repeatedly. Again, use the format configured for your instance of Oracle Applications.
The following values appear by default:
• The Scheduled check box indicates that the reporting cycle you have defined is being implemented. It is checked when you submit the report. Once the date in the Run Date To field has passed, the Scheduled check box is cleared.
• The Request ID field displays an identifying number for the most recent submission of the report. For instance, if a report runs four times per day, this field would at the end of the day display the fourth request ID.
Saving a Report When you are done selecting header, detail, and resubmission options, save the report definition: click on File in the menu bar and then on Save in the File menu.

Chapter 5: Reporting
User’s Guide: Audit Rules 7.2 21
Submitting and Viewing Reports Once you have defined and saved a report, click on the Submit Report button in the Audit Report form. When you do, a message indicates that the report is being gener-ated. Click on the OK button to close the message.
Note If two reports are submitted, the second does not begin until the first has finished running. This is because audit data is placed in a temporary table until it is no longer needed for generating the report, then purged; a second report must wait so that it does not overwrite temporary-table for the first.
To view the report:
1 Click on View in the Oracle Applications menu bar, then on Requests on the View menu. The Find Requests form appears:
2 Select the All My Requests radio button and click on the Find button. A
Requests form opens. Depending on how recently you submitted the report, its entry may be among the first few in this form. If so, select the entry (click on it).
If not, query for the report. Press F11; position the cursor in the Name field; type enough of the report name to distinguish it from other reports, followed by the % symbol; and press Ctrl+F11. An entry for your report appears.
Chapter 5: Reporting
22 User’s Guide: Audit Rules 7.2
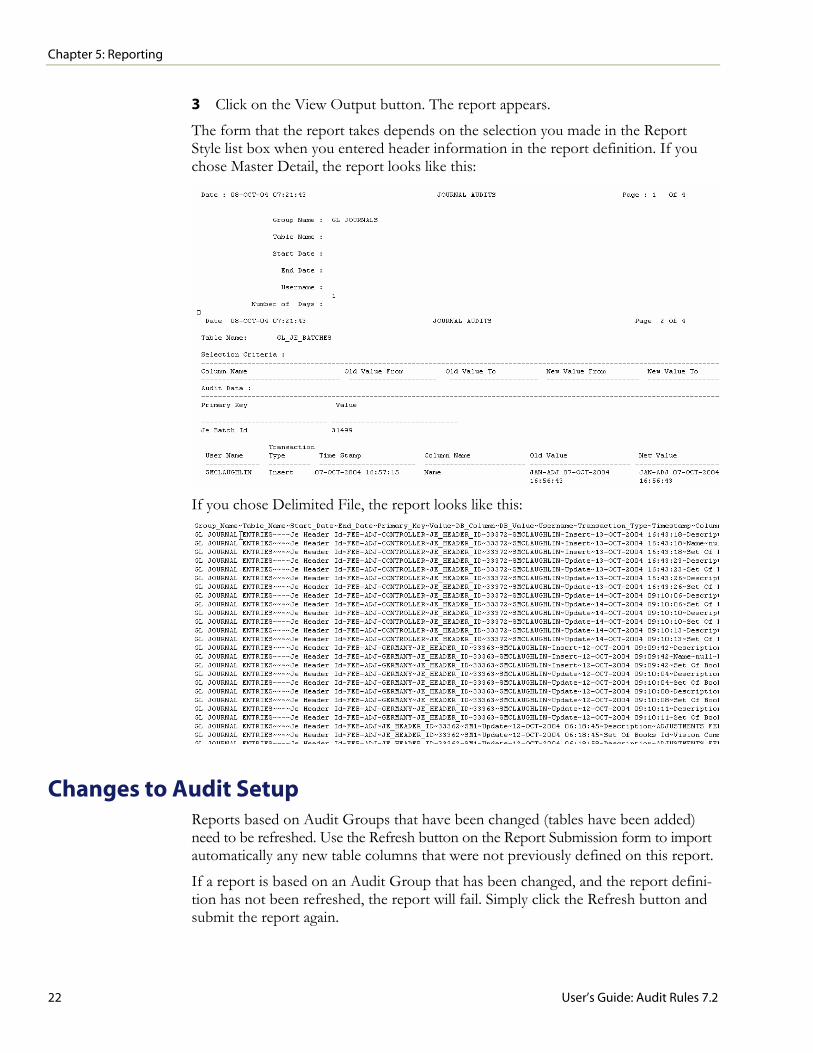
3 Click on the View Output button. The report appears.
The form that the report takes depends on the selection you made in the Report Style list box when you entered header information in the report definition. If you chose Master Detail, the report looks like this:
If you chose Delimited File, the report looks like this:
Changes to Audit Setup Reports based on Audit Groups that have been changed (tables have been added) need to be refreshed. Use the Refresh button on the Report Submission form to import automatically any new table columns that were not previously defined on this report.
If a report is based on an Audit Group that has been changed, and the report defini-tion has not been refreshed, the report will fail. Simply click the Refresh button and submit the report again.
Chapter 5: Reporting
User’s Guide: Audit Rules 7.2 23
Querying a Report To find an existing report:
1 Ensure that the Audit Report form is open.
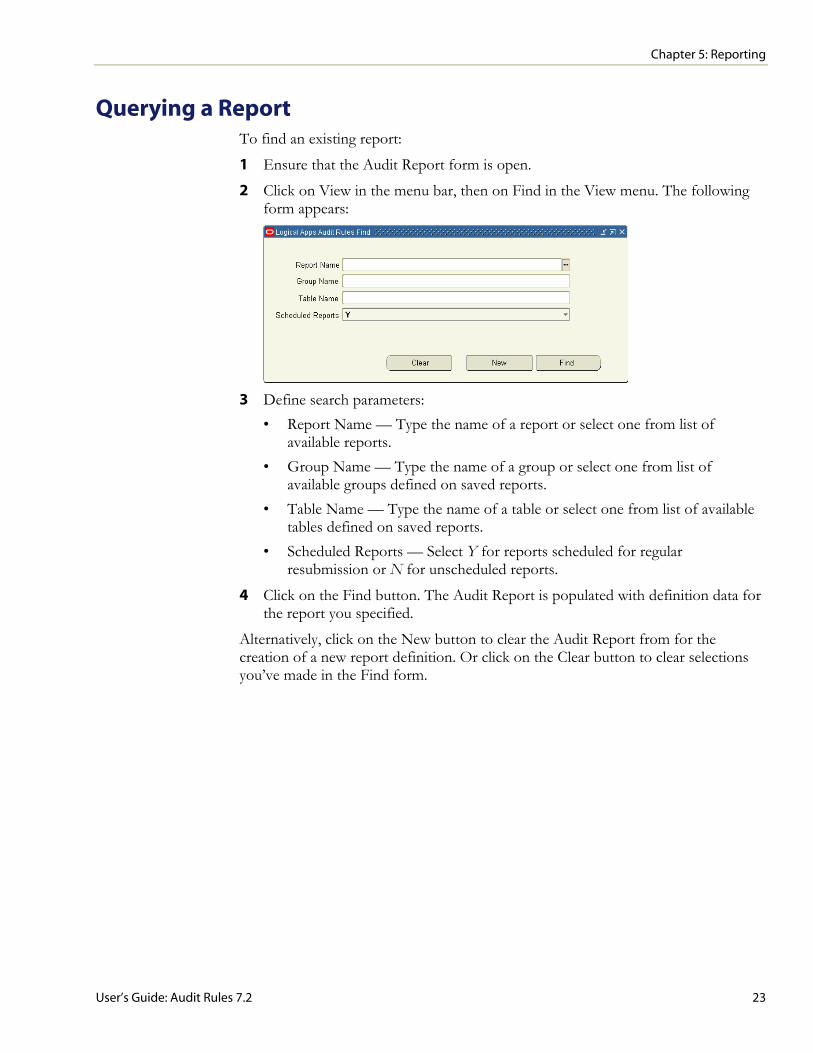
2 Click on View in the menu bar, then on Find in the View menu. The following form appears:
3 Define search parameters:
• Report Name — Type the name of a report or select one from list of available reports.
• Group Name — Type the name of a group or select one from list of available groups defined on saved reports.
• Table Name — Type the name of a table or select one from list of available tables defined on saved reports.
• Scheduled Reports — Select Y for reports scheduled for regular resubmission or N for unscheduled reports.
4 Click on the Find button. The Audit Report is populated with definition data for the report you specified.
Alternatively, click on the New button to clear the Audit Report from for the creation of a new report definition. Or click on the Clear button to clear selections you’ve made in the Find form.

Chapter 5: Reporting
24 User’s Guide: Audit Rules 7.2

User’s Guide: Audit Rules 7.2 25
Chapter 6
The Online Audit Form
An Online Audit form can display audit data about a record currently selected in an Oracle Applications form. To use it, complete two tasks:
• Using the Form Rules embedded agent, create a rule that establishes a navigation link from the form you are auditing to the Online Audit form.
• Add a LogicalApps Online Audit function to the menu structure of the responsi-bility that is to have access to the Online Audit form.
To complete the process, you need the following information:
• The name of the form you are auditing and the application in which it runs.
This information is available in the Form Functions form of the System Admin-istrator responsibility: the form name you want is in the Function field (no matter what tab you’ve selected) and the application name is in the Application field on the Form tab. For example, if you query on the Enter Vendor user form name (in the Form field, Form tab), you obtain the values APXVDMVD in the Function field and Payables in the Application field.
• The name of the responsibility that both has access to the applications and is assigned to a user who needs to view the Online Audit form.
This information is available in the Responsibilities form of the System Admin-istrator responsibility. You can use the application value (for example, Payables) to query on the Application field and obtain all the responsibilities with access to that application. (One of those responsibilities, for instance, is Payables Manager.)

Chapter 6: The Online Audit Form
26 User’s Guide: Audit Rules 7.2
• The name of the menu associated with the responsibility. When the responsi-bility is loaded in the Responsibilities form, the menu name is displayed in the Menu field on that form — for example, AP_NAVIGATE_GUI12 for Payables Manager.
• The name of the database table that supports the form, and its primary keys. One way to obtain the table name is to open the form in question, query a record, select Record History from the Help tool, and view the table name in the About This Record dialog. If the dialog provides the name of a database view (if the name ends in _V), you’ll need to obtain the database name elsewhere. For the APXVDMVD form, the database table is PO_VENDORS and the primary key is VENDOR_ID.
• The application ID for the application that runs the audited form. (For example, the ID for the Payables application is 201.) To find the value, run this SQL query: SELECT APPLICATION_ID FROM FND_TABLES WHERE TABLE_NAME = 'table name'
Creating the Form Rule Open the Form Rules embedded agent to create a link from the audited form to the Online Audit form. (For detailed information on using the Form Rules embedded agent, see its User’s Guide.)
Chapter 6: The Online Audit Form
User’s Guide: Audit Rules 7.2 27
After entering a name and description for the rule, enter the following in the Rule Elements block: • Sequence: Enter a number that reflects the order in which you want this element
to be performed with respect to any other elements. • Element Name: Type a name for the rule element. • Form Name: From the list of values, select the name of the form you are auditing
— for example, APXVDMVD if you are auditing the Enter Vendor form. • User Form Name: Accept the value supplied by the Form Rules embedded
agent. • Event: Select the value When New Form. Once these values are selected, click on the Details button and, in the Business Rule Details form, click on the Navigation tab. Then enter these values: • Sequence: Select a sequence number with a Tools prefix to place the link on the
Tools menu. (Select a high value to avoid the possibility of overwriting existing Tools-menu options.)
• Label: Type a name for the link. This name will appear as an option on the Tools menu.
• To Function: Select the value LogicalApps Online Audit from the list of values. • Parameters: Supply the name of the database table that supports the audited form;
the names of its primary key columns and, for each, the corresponding block and field in the audited form; and the application ID for the application that runs the audited form. Optionally, specify a number of days of audited data to display, or select columns for display. See the following discussion for more on these values.
Parameter Values When you select LogicalApps Online Audit as the To Function, the following tem-plate appears automatically in the Parameters field: P_TABLE_NAME=<AUDIT TABLENAME> P_PRIMARY_KEYS=!*!<KEY_COLUMN1>=#<BLOCK.FIELD1>#!~!<KEY_COLUMN2>= #<BLOCK.FIELD2>#!~!!*! P_APPLICATION_ID=<APPLICATION_ID>
If the table has one primary key, delete this block from the template: <KEY_COLUMN2>= #<BLOCK.FIELD2>#!~!
If the table has two primary keys, leave the template as it is; if the table has three or more primary keys, add in a new block for each key. In any case, replace the place-holder names — the text enclosed by angle brackets (and the angle brackets them-selves) — with appropriate values. For example, the parameter statement for the Enter Vendors form (whose appro-priate values are discussed above) would be: P_TABLE_NAME=PO_VENDORS P_PRIMARY_KEYS=!*!VENDOR_ID= #VNDR.VENDOR_ID#!~!!*! P_APPLICATION_ID=201
Chapter 6: The Online Audit Form
28 User’s Guide: Audit Rules 7.2
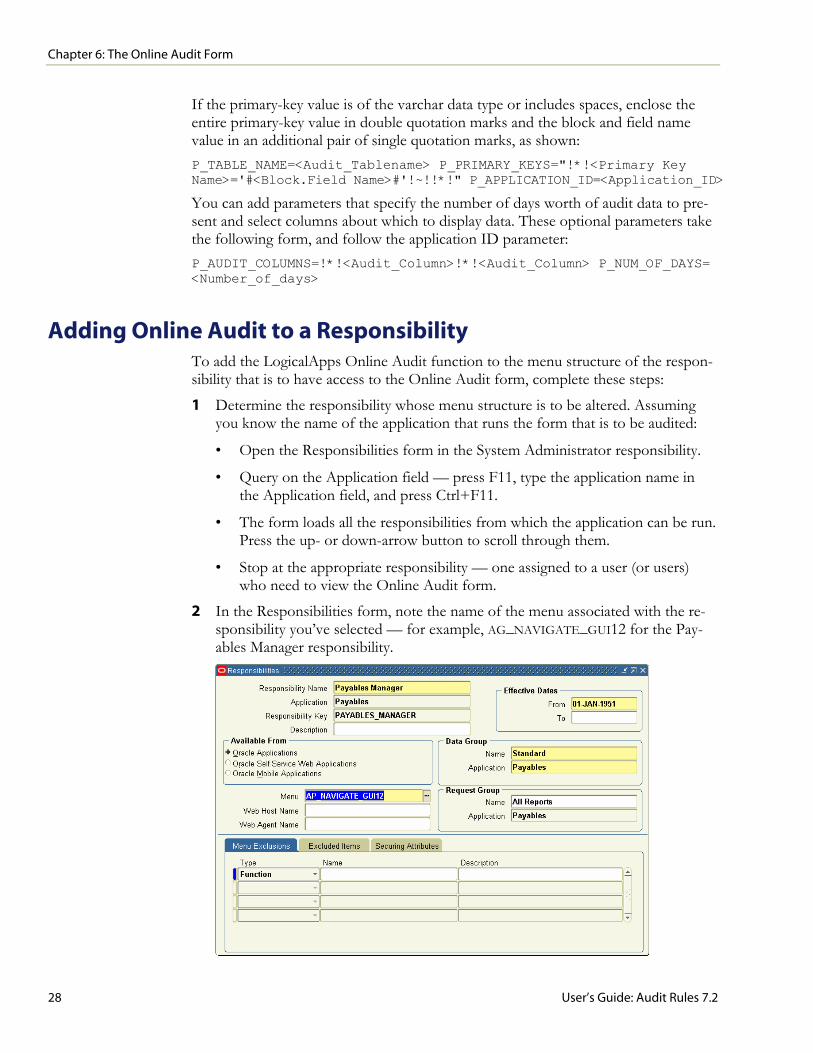
If the primary-key value is of the varchar data type or includes spaces, enclose the entire primary-key value in double quotation marks and the block and field name value in an additional pair of single quotation marks, as shown: P_TABLE_NAME=<Audit_Tablename> P_PRIMARY_KEYS="!*!<Primary Key Name>='#<Block.Field Name>#'!~!!*!" P_APPLICATION_ID=<Application_ID>
You can add parameters that specify the number of days worth of audit data to pre-sent and select columns about which to display data. These optional parameters take the following form, and follow the application ID parameter: P_AUDIT_COLUMNS=!*!<Audit_Column>!*!<Audit_Column> P_NUM_OF_DAYS= <Number_of_days>
Adding Online Audit to a Responsibility To add the LogicalApps Online Audit function to the menu structure of the respon-sibility that is to have access to the Online Audit form, complete these steps:
1 Determine the responsibility whose menu structure is to be altered. Assuming you know the name of the application that runs the form that is to be audited:
• Open the Responsibilities form in the System Administrator responsibility.
• Query on the Application field — press F11, type the application name in the Application field, and press Ctrl+F11.
• The form loads all the responsibilities from which the application can be run. Press the up- or down-arrow button to scroll through them.
• Stop at the appropriate responsibility — one assigned to a user (or users) who need to view the Online Audit form.
2 In the Responsibilities form, note the name of the menu associated with the re-sponsibility you’ve selected — for example, AG_NAVIGATE_GUI12 for the Pay-ables Manager responsibility.

Chapter 6: The Online Audit Form
User’s Guide: Audit Rules 7.2 29
3 Close the Responsibilities form and open the Menus form. Query for the menu whose name you’ve just identified:
4 Add a row to the grid (click on File in the menu bar, then on New in the File
menu). Add a sequence number in the Seq field, and select LogicalApps Online Audit in the Function list of values. (Do not enter a value for Prompt or Submenu.)
5 Click on File in the menu bar, then on Save in the File menu.
Viewing the Online Audit Ensure that the table supporting the form for which you’ve created the link is included in an audit group. Run the Audit: Dequeue Process concurrent request to make cer-tain that results are current (see page 16). Then navigate to the form and click on the Tools menu. It should include the link you’ve created:
Chapter 6: The Online Audit Form
30 User’s Guide: Audit Rules 7.2
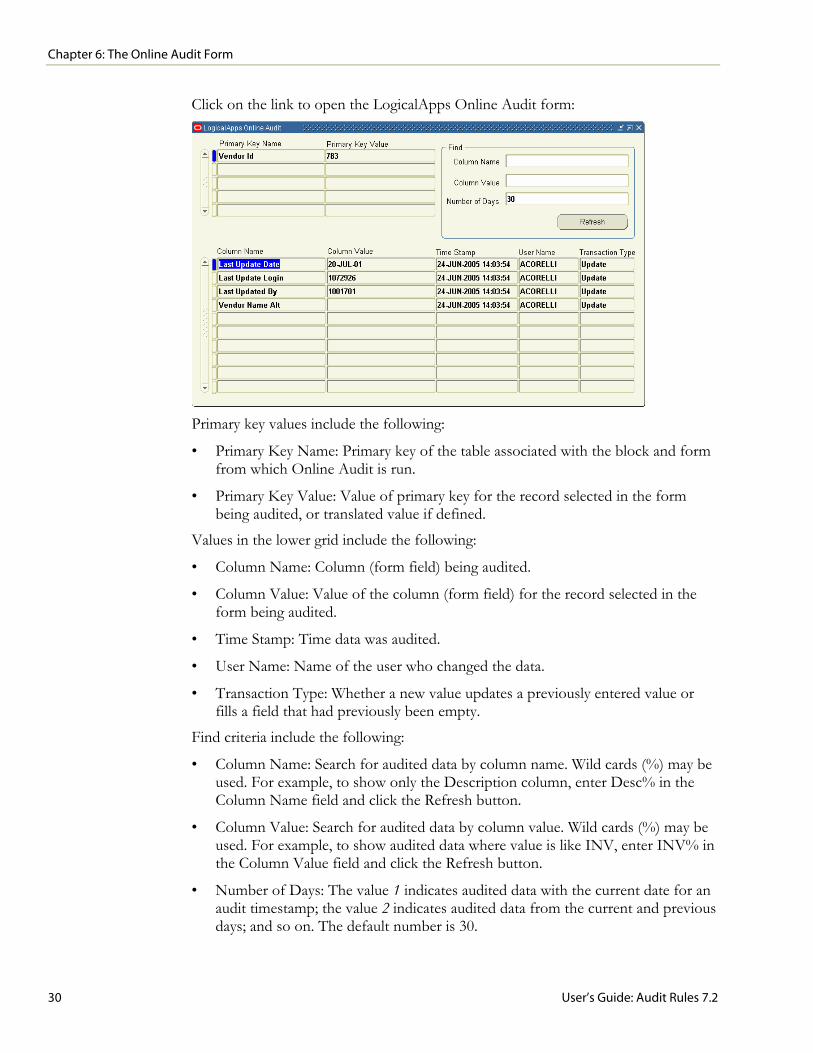
Click on the link to open the LogicalApps Online Audit form:
Primary key values include the following:
• Primary Key Name: Primary key of the table associated with the block and form from which Online Audit is run.
• Primary Key Value: Value of primary key for the record selected in the form being audited, or translated value if defined.
Values in the lower grid include the following:
• Column Name: Column (form field) being audited.
• Column Value: Value of the column (form field) for the record selected in the form being audited.
• Time Stamp: Time data was audited.
• User Name: Name of the user who changed the data.
• Transaction Type: Whether a new value updates a previously entered value or fills a field that had previously been empty.
Find criteria include the following:
• Column Name: Search for audited data by column name. Wild cards (%) may be used. For example, to show only the Description column, enter Desc% in the Column Name field and click the Refresh button.
• Column Value: Search for audited data by column value. Wild cards (%) may be used. For example, to show audited data where value is like INV, enter INV% in the Column Value field and click the Refresh button.
• Number of Days: The value 1 indicates audited data with the current date for an audit timestamp; the value 2 indicates audited data from the current and previous days; and so on. The default number is 30.

Chapter 6: The Online Audit Form
User’s Guide: Audit Rules 7.2 31
Note that translated values are displayed if they have been defined in the Audit setup.
Security The Online Audit form opens only if the user is currently in a responsibility to which the audited table has been restricted through use of the Audit Group Responsibilities feature (see page 5). The following message appears if the current responsibility does not have access to view audited data for the table:
If a table exists in more than one group, all secured responsibilities are considered. The Online Audit form shows data only if the user is currently in one of the respon-sibilities for which security has been configured.

Chapter 6: The Online Audit Form
32 User’s Guide: Audit Rules 7.2

User’s Guide: Audit Rules 7.2 33
Chapter 7
Audit Migration
Once you have created audit groups for an instance of Oracle Applications, you can “migrate” them — copy an audit group, the auditing instructions for an individual table within a group, or a report directly to another Oracle Applications instance. You can also export groups and tables to, or import them from, XML files.
Preparing for Migration Before you can migrate audit groups and tables, you need to specify connection information in all the environments to and from which you plan to transmit data. You need to know the host name, instance SID, and database instance port for each environment. This information is found in the TNSNAMES.ora file, which is located in ORACLE_HOME/network/admin.
Once you’ve gathered this information, use the Logical Apps Migration Utility to perform the connectivity configuration:
1 With Audit Rules open, click on LogicalApps utilities in the menu bar, then on Migration Setup in the Utilities menu. A Migration Utility form appears (as shown at the top of the next page).
2 Ensure that the Setup Host Names tab is selected.
3 In the Host Name column enter the host name (machine name) for each of the machines hosting the database and involved in audit migration.
Chapter 7: Audit Migration
34 User’s Guide: Audit Rules 7.2
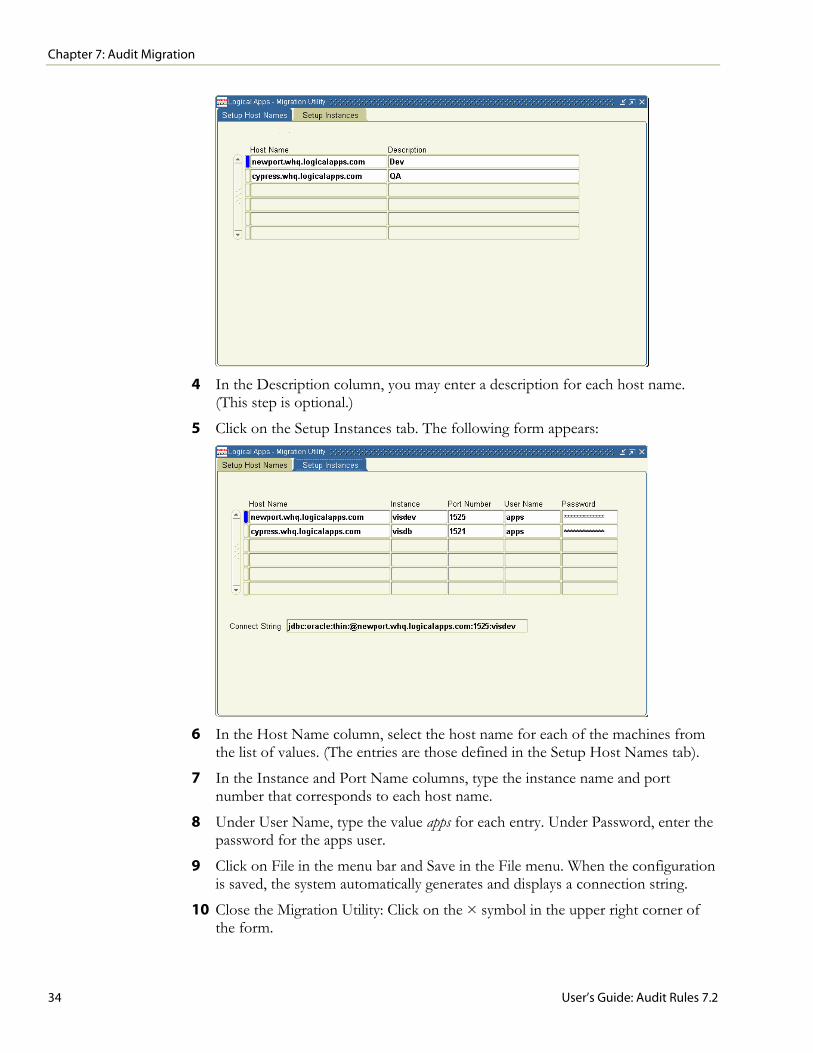
4 In the Description column, you may enter a description for each host name.
(This step is optional.)
5 Click on the Setup Instances tab. The following form appears:
6 In the Host Name column, select the host name for each of the machines from
the list of values. (The entries are those defined in the Setup Host Names tab).
7 In the Instance and Port Name columns, type the instance name and port number that corresponds to each host name.
8 Under User Name, type the value apps for each entry. Under Password, enter the password for the apps user.
9 Click on File in the menu bar and Save in the File menu. When the configuration is saved, the system automatically generates and displays a connection string.
10 Close the Migration Utility: Click on the × symbol in the upper right corner of the form.

Chapter 7: Audit Migration
User’s Guide: Audit Rules 7.2 35
Dependencies The following conditions apply to migration, export, and import operations:
• For a table or a report to be migrated, its audit group must already exist on the destination instance.
• For an instance-to-instance online migration, the ID of the person who created an audit group, table, or report in the source instance must exist in the destina-tion instance. (However, the user’s status on the destination instance may be active or inactive. Audit migration does not validate whether the user is active.)
• For an XML file import, the user ID of the person who created an audit group, table, or report need not exist in the destination instance. The CREATED_BY and LAST_UPDATED_BY fields are updated with the ID of the person who performs the file import.
• A log file gathers information about a migration, export, or import operation. If an operation fails and you are unable to determine why, rerun the operation with the debug level changed from low to high and evaluate the log data.
• Commonly, problems with migration result from missing translations. In such cases, the audit log shows errors as INVALID. For instance, if a table or a respon-sibility does not exist in the destination, a migration error occurs.
Migrating or Exporting a Group or Table To migrate an audit group, or a table from the group, to another instance, or to export a group or table to an XML file, complete the following steps:
1 With Audit Rules open, click on LogicalApps Utilities in the menu bar, then on Migrate Rules in the Utilities menu. The Migrate Audit Rules form appears:
Chapter 7: Audit Migration
36 User’s Guide: Audit Rules 7.2
2 In the Action Type list box, select the operation you want to perform:
• Migrate to Another Instance (the default) if you want to migrate a group or table.
• Export to File if you want to export a group or table to an XML file.
3 In the Audit Group list of values, select the group you want to migrate or export.
If a group has been opened in the Audit Groups form, that group appears here by default when you open the Migrate form.
4 If you want to migrate or export the group you selected in step 3, leave the Audit Table list of values blank. If you want to migrate or export a table from that group, select the table in the Audit Table list of values.
If a group has been opened in the Audit Groups form and the cursor is focused on a table listed in its Table Name column, that table appears here by default when you open the Migrate form.
5 If you are performing a migration, make entries in the Destination Instance block:
• In the Instance list of values, select a destination instance for the migration.
• In the Apps Passwd text box, type the apps password for the destination in-stance if you are prompted to do so. (This prompt appears if the XXLAAPPS: Enable for Migration Security profile option is set to Yes on the source in-stance. If the option is set to No, the prompt does not appear and a password need not be entered.)
If you are performing a file export, fields in the Destination Instance block do not apply and do not accept input.
6 In the Debug Level list box, select a level of detail for error reporting to a log. Ordinarily, select Low; select High instead if you need to uncover the cause of a failed migration or export.
7 In the Directory text box, type the path that designates a temporary staging file location for XML files to be generated and, in the case of migration, copied to the destination instance.
8 Click on a button that launches the process. Its label varies depending on the selection you made in step 2: Migrate if you chose Migrate to Another Instance or Export if you chose Export to File.
9 Review several messages:
• Depending on the parameters you have specified, the system may launch one or two concurrent programs to implement the migration or export. For each concurrent program, a message provides an ID number. Click on the OK button in each to clear each message.
• If you have performed a file export, the system may create one or two files (again depending on the parameters you have specified). Audit Rules generates the name for these files, and a message similar to the following one

Chapter 7: Audit Migration
User’s Guide: Audit Rules 7.2 37
displays the names of the files you have generated. In each file name, the term xmlout designates XML output, a number (22109 in this example) serves as a unique identifier for an export operation, the term audit identifies the Logical Apps component involved in the export operation, and a last phrase (GLJOURNALS in this example) identifies the audit group (or group and table, if appropriate) that is being exported.
Make a note of file names and locations, and click the OK button to clear the message.
• Finally, a dialog prompts you to perform another migration. Click Yes to do so or No to close the Migration form.
Migrating or Exporting an Audit Report Follow a similar process to migrate a report or export it to an XML file:
1 With Audit Rules running, open the Audit Reports form. Click on Actions in the menu bar, then on Migrate Report Definitions in the Actions menu. The Migrate Audit Reports Definitions form appears:
2 In the Action Type list box, select the operation you want to perform:
• Migrate to Another Instance (the default) if you want to migrate a report.
• Export to File if you want to export a report to an XML file.
• Copy within the Same Instance if you want to copy the report under a new or modified name on the source instance.

Chapter 7: Audit Migration
38 User’s Guide: Audit Rules 7.2
3 In the Report Name list of values, select the report you want to migrate or export.
If a report has been opened in the Audit Reports form, that report appears here by default when you open the Migrate Reports form.
4 If you are performing a migration, make entries in the Destination block:
• In the Instance list of values, select a destination instance for the migration.
• In the Apps Passwd text box, type the apps password for the destination in-stance if you are prompted to do so. (This prompt appears if the XXLAAPPS: Enable for Migration Security profile option is set to Yes on the source in-stance. If the option is set to No, the prompt does not appear and a password need not be entered.)
If you are performing a file export or copying a report to the source instance, fields in the Destination block do not apply and do not accept input.
5 If you are copying the report to the source instance, make entries in the Copy Options block:
• In the Type list box, select Copy as a New Report if you want to assign a completely new name to the copy, or select Prefix or Suffix if you want to assign a name to the copy that consists of the original report name with text added at the beginning or end.
• In the second box (labeled New Report Name, Prefix, or Suffix, depending on the selection you made in the Type list box), type the text you want to use as a new report name or as a prefix or suffix to the existing name.
• The Final Rule box does not accept input.
If you are performing a migration or a file export, fields in the Copy Options block do not apply and do not accept input.
6 In the Debug Level list box, select a level of detail for error reporting to a log. Ordinarily, select Low; select High instead if you need to uncover the cause of a failed migration or export.
7 In the Directory text box, type the path that designates a temporary staging file location for XML files to be generated and, in the case of migration, copied to the destination instance.
8 Click on a button that launches the process. Its label varies depending on the selec-tion you made in step 2: Migrate if you chose Migrate to Another Instance, Export if you chose Export to File, or Copy if you chose Copy within the same Instance.
9 Review several messages:
• The system launches a concurrent program to implement the migration, export, or copy. The first message provides an ID number. Click on the OK button to clear the message.
• If you have performed a file export, a message similar to the following one displays the name of the export file you have generated. In the file name, the

Chapter 7: Audit Migration
User’s Guide: Audit Rules 7.2 39
term xmlout designates XML output, a number (22115 in this example) serves as a unique identifier for an export operation, the term reports identifies the Logical Apps component involved in the export operation, and a last phrase (JOURNALAUDITS in this example) gives the report name.
Make a note of file name and location, and click the OK button to clear the message.
• Finally, a dialog prompts you to perform another migration. Click Yes to do so or No to close the Migration form.
Importing a Group, Table, or Report File To import an XML file containing any of the audit components — a group, a table, or a report — complete these steps. Remember that in some cases an export opera-tion prepares more than one file, and in such cases you would need to import all of the files prepared in an export.
1 Transmit exported files via FTP to the destination OS for import.
2 With Audit Rules open, click on LogicalApps Utilities in the menu bar, then on Import from File in the Utilities menu. An Import From File form appears:
3 In the Directory box, type the path to the folder that contains the import file or
files.
4 In the File Name box, type the name of a file you want to import. This would be a name displayed by a message at the culmination of a file export.

Chapter 7: Audit Migration
40 User’s Guide: Audit Rules 7.2
5 Select a value for Debug Level. Ordinarily, select Low; select High instead if you need to uncover the cause of a failed import.
6 Click on the Import button. A concurrent request message displays the ID number of the concurrent program that implements the import. Click on the OK button to clear the message.
7 If you need to import more than one file, repeat this process as necessary.