COMPUTER ORGANIZATION: Architecture - UC Davis Department of

AT&T Unified Communications Federation UC Federation Portal Guide For Customer Administrators
V2.8 – May, 2014
Disclaimer The contents of the document may be revised by AT&T at any time without notice. Please consult the Service Guide for details of the service and features available with the product. The AT&T UC Service Guide can be found at http://serviceguidenew.att.com. This document is provided as a reference document only and is not intended to modify the agreement between the parties. In the event of a conflict between this document and the Customer agreement (including the Service Guide), the Customer agreement takes priority.
© 2014 AT&T Intellectual Property All rights reserved. AT&T, the AT&T logo, and all other AT&T marks contained herein are trademarks of AT&T Intellectual Property and/or AT&T affiliated companies. All other marks contained herein are the property of their respective owners. AT&T Proprietary.

© 2013 AT&T Intellectual Property. All rights reserved. AT&T and the AT&T logo are trademarks of AT&T Intellectual Property. ii
© 2014 AT&T Intellectual Property
Published by: AT&T Intellectual Property
Product: AT&T Unified Communications Federation
Title: UC Federation Portal Guide
Product version: V8.6.2
Publication date: May, 2014
Reference number: <UCS><FP><0414>
Revision number: 2.8

© 2014 AT&T Intellectual Property. All rights reserved. AT&T and the AT&T logo are trademarks of AT&T Intellectual Property. iii
Welcome
AT&T Unified Communications (UC) Federation allows companies to interconnect supported UC services. These can be services provided by the same or different vendors, and can support communications within the company or with other companies using AT&T UC Federation.
The UC Federation portal offers a convenient method of managing AT&T UC Federation. This manual describes how to use the portal. It is organized in the same manner as the portal’s menu.

© 2014 AT&T Intellectual Property. All rights reserved. AT&T and the AT&T logo are trademarks of AT&T Intellectual Property. iv
Table of Contents
Introduction .................................................................................................................................... 1
Prerequisites ........................................................................................................................................ 1 Logging into the Portal ........................................................................................................................ 1 Passwords ............................................................................................................................................ 2 License Agreement .............................................................................................................................. 3 Menu ................................................................................................................................................... 4 Identification Information ................................................................................................................... 4 Organizing Information ........................................................................................................................ 5
Organization .................................................................................................................................... 6
Organization Settings .......................................................................................................................... 6 Notifications Window ...................................................................................................................... 8 Subscriptions Window ...................................................................................................................... 9 Domains Window ........................................................................................................................... 10 Operators Window ......................................................................................................................... 11 Global Policies Window .................................................................................................................. 12 Contact Information ....................................................................................................................... 13
New Federation Request ................................................................................................................... 13 Manage Federations .......................................................................................................................... 15
Organization Domains ................................................................................................................... 16
Create New Sub‐Domain ................................................................................................................... 16 Manage Domains ............................................................................................................................... 21
Organization Structure .................................................................................................................. 22
Create New Group ......................................................................................................................... 2322 Manage Groups ................................................................................................................................. 30
Organization Users ........................................................................................................................ 31
Create New User ................................................................................................................................ 33 Manage Users ................................................................................................................................... 40 Upload Users ..................................................................................................................................... 41
Check Policies ................................................................................................................................ 43
Reports ......................................................................................................................................... 45
Reports .............................................................................................................................................. 45 Emailing the Reports ......................................................................................................................... 48
Contact Us ..................................................................................................................................... 49
Help .......................................................................................................................................... 5051

© 2014 AT&T Intellectual Property. All rights reserved. AT&T and the AT&T logo are trademarks of AT&T Intellectual Property. v
Appendix. Uploading User Data ................................................................................................. 5152
Format of .csv Files ........................................................................................................................ 5152 Format of Files for Incremental Uploads .................................................................................... 5152 Format of Files for Full Uploads ................................................................................................. 5253

© 2014 AT&T Intellectual Property. All rights reserved. AT&T and the AT&T logo are trademarks of AT&T Intellectual Property. 1
Introduction
Use the Unified Communications (UC) Federation portal to manage AT&T UC Federation. With the portal, you can:
Add companies that your users can communicate with over AT&T UC Federation
Add and remove users allowed to use AT&T UC Federation
Specify which services and features each user is permitted to use
Organize the users into groups for easier management
Prerequisites
To use the UC Federation portal, you must have Java Runtime Environment (JRE) version 6 or above installed on your computer. You must also have one of the following browsers:
Microsoft® Internet Explorer® version 9 or above
Mozilla® Firefox® version 18 or above
Google Chrome™ version 24 or above
Logging into the Portal
The default address of the UC Federation portal is www.ucfederation.att.com. When you go to this web site, the Login page displays (see Figure 1).
To login, enter your user name and password, then click on the Login button. If you are logging in for the first time, your administrator can supply you with these.
NOTE: After logging in, first‐time users are presented with a portal administrator wizard that will guide them step by step through the federation provisioning process. After going through these steps, the user will have completed the setup to federate with one of your federation partners.

© 2014 AT&T Intellectual Property. All rights reserved. AT&T and the AT&T logo are trademarks of AT&T Intellectual Property. 2
© 2014. AT&T Intellectual Property. All rights reserved.
Figure 1. Login page
Passwords
When your password expires or when you log in for the first time, you will be asked to change the password. See Figure 2.
A password must be between 5 and 12 characters long, and can be a combination upper‐ and lower‐case alphanumeric characters and special characters.
© 2014. AT&T Intellectual Property. All rights reserved.
Figure 2. Change Password page

© 2014 AT&T Intellectual Property. All rights reserved. AT&T and the AT&T logo are trademarks of AT&T Intellectual Property. 3
License Agreement
After you login for the first time, the License agreement displays (Figure 3). Read the License agreement. If you accept the terms, select the Accept button. You cannot proceed to the portal without accepting the license agreement.
NOTE: License agreements may be updated. If yours is updated, it will display after you login. Read the License agreement before clicking on the Accept button.
© 2014. AT&T Intellectual Property. All rights reserved.
Figure 3. License Agreement page

© 2014 AT&T Intellectual Property. All rights reserved. AT&T and the AT&T logo are trademarks of AT&T Intellectual Property. 4
Menu
In the left column of each page in the UC Federation portal is the menu shown in Figure 4. Under each heading (Organization, Organization Domains, Organization Structure, etc.) is a list of links that allow you to view and perhaps modify information.
Each chapter in this manual discusses the links under a specific menu header.
© 2014. AT&T Intellectual Property. All rights reserved.
Figure 4. Menu seen on each page
Identification Information
In the top right corner of each page, the following is displayed:
Date
Operator name
Company name

© 2014 AT&T Intellectual Property. All rights reserved. AT&T and the AT&T logo are trademarks of AT&T Intellectual Property. 5
Organizing Information
If a table contains more than one entry, the headings will contain arrows (see Figure 5). Clicking on a column heading will reorganize the information in the table so that the information under the selected heading will display in alphanumeric order. Clicking a down arrow causes the information to be listed from the smallest to the largest alphanumeric sequence; selecting an up arrow in a heading will cause the list to display from the largest to the smallest alphanumeric sequence.
© 2014. AT&T Intellectual Property. All rights reserved.
Figure 5. Example table

© 2014 AT&T Intellectual Property. All rights reserved. AT&T and the AT&T logo are trademarks of AT&T Intellectual Property. 6
Organization
This chapter discusses the first group of links in the menu of the UC Federation portal. See Figure 6. The Organization Settings link allows you see an overview of the information in the portal. The other two links allow you to establish or end activities with other companies.
© 2014. AT&T Intellectual Property. All rights reserved.
Figure 6. Links under Organization header
Organization Settings
After you login or when you select the Organization Settings link in the menu, the Organization Setting page displays (Figure 7). This page provides an overview of the information and settings in the UC Federation portal. It also allows you to change some settings.
From this page, you can:
Read and delete federation notifications received by your company
Activate and deactivate subscriptions
See all domains in your company
View and change operator information
Add, modify, and remove policies
The windows in the Organization Settings page are described in detail below.

© 2014 AT&T Intellectual Property. All rights reserved. AT&T and the AT&T logo are trademarks of AT&T Intellectual Property. 7
© 2014. AT&T Intellectual Property. All rights reserved.
Figure 7. Example Organization Settings page

© 2014 AT&T Intellectual Property. All rights reserved. AT&T and the AT&T logo are trademarks of AT&T Intellectual Property. 8
Notifications Window
The Notifications window (Figure 8) lists the status of federation requests sent to you by another company’s administrator wanting to federate with your company. It also lists the federation requests you sent. You can read the messages or delete them. If an entry is in bold letters, then the message has not been read.
To read a message, click on the Read link located at the end of the entry. The message will remain in the list until it is deleted.
To delete a message, click on the Delete link.
© 2014. AT&T Intellectual Property. All rights reserved.
Figure 8. Example Notifications window

© 2014 AT&T Intellectual Property. All rights reserved. AT&T and the AT&T logo are trademarks of AT&T Intellectual Property. 9
Subscriptions Window
The Subscriptions window in the Organization Settings page is illustrated in Figure 9. It is described in Table 1. It lists all subscriptions available to your company. You should have the ability to change the status of a subscription by clicking “Active” or “Inactive” located at the end of the entry.
Subscriptions allow AT&T to customize the various UC Federation services and their features.
© 2014. AT&T Intellectual Property. All rights reserved.
Figure 9. Example Subscriptions window
Table 1. Information in Subscriptions window
Column Description
Service UC services available to your company
Feature A service can provide many functions. This column shows which functions are currently being supported.
Account Type This is always set to "websphere."
Status Specifies if the subscription is active or inactive (can or cannot be used). This is an active switch.
If you click on “Active,” it will be changed to “Inactive” and the feature will no longer be supported.
If you click on “Inactive,” it will change to “Active” and the feature will be supported.

© 2014 AT&T Intellectual Property. All rights reserved. AT&T and the AT&T logo are trademarks of AT&T Intellectual Property. 10
Domains Window
The Domains window lists the domains and subdomains of your company. They are listed by the Uniform Resource Identifier (URI) used by your UC solution.
The main domain of your company is created by AT&T when you sign up for A&T UC Federation. You can create and manage subdomains using the links under Organization Domains in the menu. See the Organization Domains chapter in this manual for information about creating and managing subdomains.
© 2014. AT&T Intellectual Property. All rights reserved.
Figure 10. Example Domains window

© 2014 AT&T Intellectual Property. All rights reserved. AT&T and the AT&T logo are trademarks of AT&T Intellectual Property. 11
Operators Window
The Operators window in the Organization Settings page is shown in Figure 11 and described in Table 2. This window lists all operators in your company that have access to the UC Federation portal.
From this window you can add operators using the Add New Operator link at the bottom of the window. You can also delete operators as well as change the information about them by clicking on the Modify or Delete buttons at the end of the entry.
© 2014. AT&T Intellectual Property. All rights reserved.
Figure 11. Example Operators window
Table 2. Information in Operators window
Column Description
Name Operator’s name
Login Login name of the operator
Expiration Date When the password will expire. The operator will be prompted to enter a new password when logging in on or after this date.
Max Wrong Pwd Number of times the operator incorrectly entered the password. When the limit set for this field is reached, the operator will be deactivated (blocked from signing in). Contact AT&T to reactivate the operator.
Email Email address of the operator
Status Specifies if the operator is allowed to use the UC Federation portal
Modify Allows you to change the information about an operator
Delete Removes the operator from the portal

© 2014 AT&T Intellectual Property. All rights reserved. AT&T and the AT&T logo are trademarks of AT&T Intellectual Property. 12
Global Policies Window
A policy states which services and functions are supported between users in your company and between your company and another company or organization that is also using AT&T UC Federation. The Global Policies window in the Organization Settings page (Figure 12) allows you to see and modify existing policies as well as add new policies. For example, you can:
Change the status of existing policies by clicking on the Allowed or Not Allowed link at the end of the entry
Remove existing policies by clicking on the Delete link
Add new policies by clicking the Add New Policy link.
© 2014. AT&T Intellectual Property. All rights reserved.
Figure 12. Example Global Policies window
Table 3. Information in Global Policies window
Column Definition
Action Function that can be performed between users in your company or between your company and another company or organization (that is also using AT&T UC Federation)
Remote Organization Name of the company or organization
Remote Contact A particular user in the remote organization (the company you are federated with). If no name is entered in this field, the default will be used, which is the organization’s name.
Status Specifies if the action is allowed. If it is not allowed, it could be that the company has not yet acknowledged a request for this function.
Related Policies The policies of this communication.
Delete Deletes the policy

© 2014 AT&T Intellectual Property. All rights reserved. AT&T and the AT&T logo are trademarks of AT&T Intellectual Property. 13
Contact Information
The Contact Information window contains the contact information about your company. This is provided to AT&T when you sign up for AT&T UC Federation.
If the information needs to be changed, contact AT&T.
© 2014. AT&T Intellectual Property. All rights reserved.
Figure 13. Organization’s Contact Information
New Federation Request
Use the New Federation Request link to setup federation relationships with partners you want to communicate with. This link allows you to add new companies or organizations to the list of companies you can federate with through AT&T UC Federation. When you select this link, Figure 14 displays.
To look for a company to federate with:
1. Enter the first few letters of the name to cause a drop‐down list to display.
2. Select the company you want to federate with from the drop‐down list. The Send Federation Request button appears.
If the company you want to federate with is not in the list, they are not using AT&T UC Federation.
3. Select the Send Federation Request button.
4. A federation request is automatically sent to the company. Until the request is accepted, the status of this new company will be “pending.” Click on the Manage Federations link to see the current status.

© 2014 AT&T Intellectual Property. All rights reserved. AT&T and the AT&T logo are trademarks of AT&T Intellectual Property. 14
© 2014. AT&T Intellectual Property. All rights reserved.
Figure 14. New Federation Request page

© 2014 AT&T Intellectual Property. All rights reserved. AT&T and the AT&T logo are trademarks of AT&T Intellectual Property. 15
Manage Federations
When this link is selected, the Manage Federations page displays (Figure 15). It lists all the companies you can currently federate with through AT&T UC Federation.
Next to each company is its status along with what actions you can take.
If the company sent you a federation request, you can either accept or decline the request.
If you sent a company a federation request that has not yet been accepted or declined, that status shows “Pending” and you can cancel the request.
If the status of a company is “Active,” you can select “Block.” This will stop any federation between you and the company through AT&T UC Federation.
If the status of a company is “Blocked,” you can select “Active.” This allows federation between the two companies through AT&T UC Federation.
© 2014. AT&T Intellectual Property. All rights reserved.
Figure 15. Example Manage Federations page

© 2014 AT&T Intellectual Property. All rights reserved. AT&T and the AT&T logo are trademarks of AT&T Intellectual Property. 16
Organization Domains
Your main domain is created by AT&T; however, you can create subdomains.
The links under Organization Domains allow you to create subdomains and change the information about subdomains.
© 2014. AT&T Intellectual Property. All rights reserved.
Figure 16. Links under Organization Domains header
Create New Sub‐Domain
You can create subdomains, but not the main domain. The main domain was configured at the time your service was created by AT&T.
To create a subdomain:
Step 1. Select the Create New Sub‐Domain link in the menu. The Create New Domain page displays (Figure 17).

© 2014 AT&T Intellectual Property. All rights reserved. AT&T and the AT&T logo are trademarks of AT&T Intellectual Property. 17
© 2014. AT&T Intellectual Property. All rights reserved.
Figure 17. Create New Domain page
Step 2. Enter the subdomain’s URI and any comments that would be helpful to identify this subdomain. Click on the Create button. The Manage Accounts page, shown in Figure 18, displays.
© 2014. AT&T Intellectual Property. All rights reserved.
Figure 18. Manage Accounts page

© 2014 AT&T Intellectual Property. All rights reserved. AT&T and the AT&T logo are trademarks of AT&T Intellectual Property. 18
Step 3. Select the Add New Account link. The Accounts window displays.
© 2014. AT&T Intellectual Property. All rights reserved.
Figure 19. Accounts window
Step 4. Select one or more service/feature combinations that apply to the subdomain. The Create button will display. Select the Create button. The Manage Accounts page displays again, but it now includes the newly created account.
NOTE: The account type should always be set to websphere.
© 2014. AT&T Intellectual Property. All rights reserved.
Figure 20. Manage Accounts page with newly created account
Step 5. Select the Next button. The Manage Policies page displays.

© 2014 AT&T Intellectual Property. All rights reserved. AT&T and the AT&T logo are trademarks of AT&T Intellectual Property. 19
© 2014. AT&T Intellectual Property. All rights reserved.
Figure 21. Manage Policies page
Step 6. To add a new policy, select the Add New Policy link. The Policy window displays.
© 2014. AT&T Intellectual Property. All rights reserved.
Figure 22. Policy window
Step 7. Enter the name of the organization that will federate with the new subdomain. After you do this, more fields will display in the Policy window. See Figure 23.

© 2014 AT&T Intellectual Property. All rights reserved. AT&T and the AT&T logo are trademarks of AT&T Intellectual Property. 20
© 2014. AT&T Intellectual Property. All rights reserved.
Figure 23. Extended Policy window
Table 4. Information in Extended Policy window
Item Description
Remote organization Company that the subdomain will federate with
Scope of policy What portion of the remote organization this policy applies to (all or a specific domain, group, or user)
Domain / Group / User
Identifies the specific part of the remote organization this policy applies to
Action The type of activity that will be allowed. Currently, the options are:
Setup Chat Session With: Outgoing Chatability to send your federated users IM messages
Accept Chat Session From: Incoming Chatability to receive IM messages from your federated users
Monitor presence of: Receive Presence status from your federated contacts
Share presence with: Send Presence update to your federated contacts
Status Specifies if the activity is allowed
Step 8. Enter the information in the Extended Policy window (see Figure 23 and Table 4), then select the Create button. The Manage Policies page displays. Select the Done button. The creation of the subdomain is complete.

© 2014 AT&T Intellectual Property. All rights reserved. AT&T and the AT&T logo are trademarks of AT&T Intellectual Property. 21
Manage Domains
You can change all the information about a subdomain, except its URI. To change the information, select the Manage Domains link in the menu. The page shown in Figure 24 displays. Enter the URI of the subdomain you want to change, then select the Search button. The Domain Info page displays. It is similar to Figure 17. From here you can change all the account and policy information for that subdomain.
© 2014. AT&T Intellectual Property. All rights reserved.
Figure 24. Manage Domains page

© 2014 AT&T Intellectual Property. All rights reserved. AT&T and the AT&T logo are trademarks of AT&T Intellectual Property. 22
Organization Structure
You can divide your end users into groups, for example: Sales, Marketing, Research, etc. This makes it easier to apply specific federation policies to specific users in the UC Federation portal. With the links under “Organization Structure,” you can add groups, select the users that belong to each group, and change the information and users in the group.
The benefit to using groups within the organizational structure is to ease the creation of policy
definitions. A group can be identified as either shared or unshared each provides different advantages. Unshared groups presents your company with the ability to deny requests from a federated partner; shared groups eases the policy definitions for your partnering organizations. For example:
Company A has a group (unshared) with ten users. Company A can create a policy for this group that denies IM from Company B. Once applied, if an IM request is received from Company B to users in the unshared group within Company A, IM is not allowed. If an IM request is received from Company B to users of Company A, but outside that unshared group, then IM is allowed.
From the partnering organization vantage point, if Company A has another group with 20 users that is a shared group, then it is possible for Company B to create a policy to deny IM requests from the Company A shared group. Once applied, all IM requests from Company A to company B are allowed, except for requests from users in that shared group.
© 2014. AT&T Intellectual Property. All rights reserved.
Figure 25. Links under Organization Structure header

© 2014 AT&T Intellectual Property. All rights reserved. AT&T and the AT&T logo are trademarks of AT&T Intellectual Property. 23
Create New Group
To create a new group:
Step 1. Select the Create New Group link in the menu. The page in Figure 26 displays.
© 2014. AT&T Intellectual Property. All rights reserved.
Figure 26. Create New Group page
Table 5. Information in Create New Group page
Field Description
Name Name of the group. This name can be up to 40 characters.
Shared Place a checkmark in this box if the group is shared.
Comments A description of the group or any other information that may be helpful to the administrators of this group. Up to 250 characters can be entered.
Step 2. Fill in the fields, which are described in Table 5, then select the Create button located at the bottom of the page. The Manage Parents page, shown in Figure 27 displays.
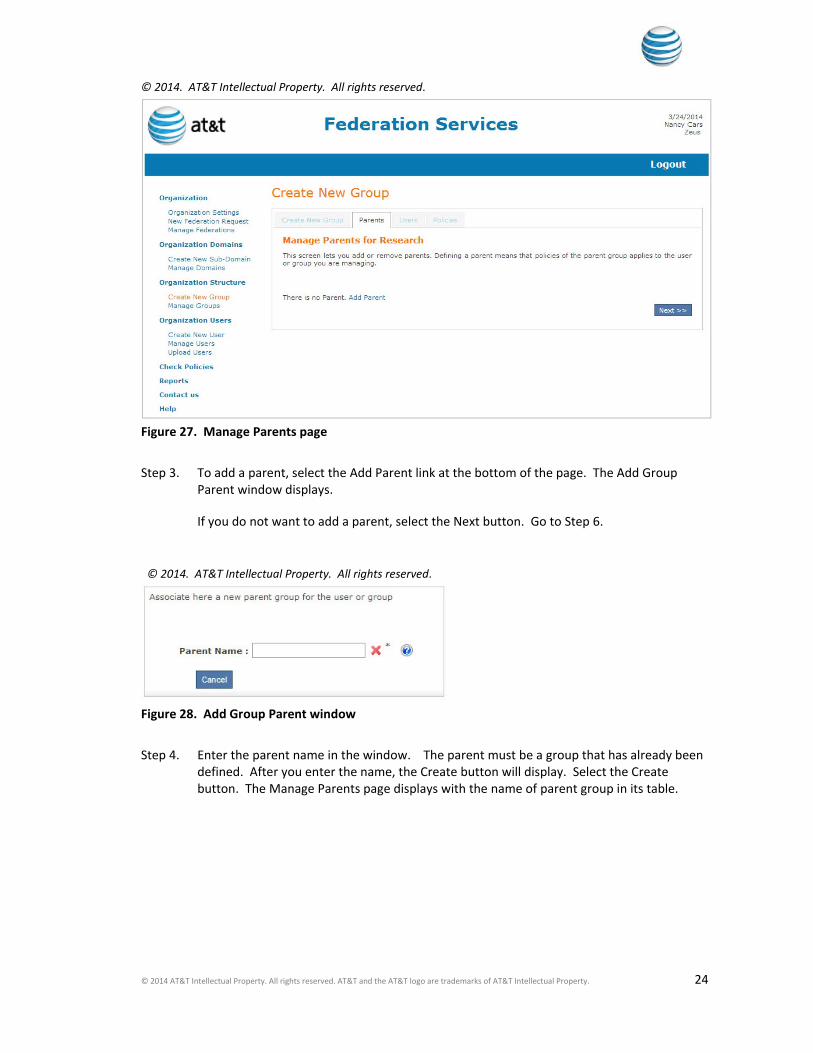
© 2014 AT&T Intellectual Property. All rights reserved. AT&T and the AT&T logo are trademarks of AT&T Intellectual Property. 24
© 2014. AT&T Intellectual Property. All rights reserved.
Figure 27. Manage Parents page
Step 3. To add a parent, select the Add Parent link at the bottom of the page. The Add Group Parent window displays.
If you do not want to add a parent, select the Next button. Go to Step 6.
© 2014. AT&T Intellectual Property. All rights reserved.
Figure 28. Add Group Parent window
Step 4. Enter the parent name in the window. The parent must be a group that has already been defined. After you enter the name, the Create button will display. Select the Create button. The Manage Parents page displays with the name of parent group in its table.

© 2014 AT&T Intellectual Property. All rights reserved. AT&T and the AT&T logo are trademarks of AT&T Intellectual Property. 25
© 2014. AT&T Intellectual Property. All rights reserved.
Figure 29. Manage Parents page with newly added parent
Step 5. Select the Next button. The Manage Users page displays.

© 2014 AT&T Intellectual Property. All rights reserved. AT&T and the AT&T logo are trademarks of AT&T Intellectual Property. 26
© 2014. AT&T Intellectual Property. All rights reserved.
Figure 30. Manage Users page
Table 6. Information in Manage Users page
Item Description
Main URI The user’s online username. The formatting of this depends on how the company’s UC solution was configured.
User Information
First Name First name of the user
Last Name Last name of the user
ID How the user is identified by the company’s UC solution (that is using AT&T UC Federation). This might be the user’s email address, Session Initiation Protocol (SIP) URI, or something else.
Organization Code Code of the organization the user belongs to
Title Job title of the user
Category Is this user an employee, contractor, volunteer, vendor, etc.
User Contact Information
Mobile Phone number of the user’s mobile device
Phone Primary phone number of the user
E‐Mail E‐mail address of the user

© 2014 AT&T Intellectual Property. All rights reserved. AT&T and the AT&T logo are trademarks of AT&T Intellectual Property. 27
Office Room The room or laboratory the user works in
Address The address where the user works
City The city where the user works
Zip Code The zip code where the user works
State The state the user works
Country The country the user works
Step 6. Enter the as much information as you know about a user, then select the Search button at the bottom of the page. The page becomes populated with the information of that user. The page is shown in Figure 30 and described in Table 6.
Select the Next button in the bottom right corner to add the user in the group. The Manage Policies page displays.
© 2014. AT&T Intellectual Property. All rights reserved.
Figure 31. Manage Policies page
Step 7. If you want to add a policy, select the Add New Policy link. The Policy window displays.

© 2014 AT&T Intellectual Property. All rights reserved. AT&T and the AT&T logo are trademarks of AT&T Intellectual Property. 28
© 2014. AT&T Intellectual Property. All rights reserved.
Figure 32. Policy window
8. Enter the name of the company that will federate with the new group. After you do this, more fields will display in the Policy window. See Figure 33.
© 2014. AT&T Intellectual Property. All rights reserved.
Figure 33. Extended Policy window
Table 7. Information in Extended Policy window
Item Description
Remote organization Company that the group will federate with
Scope of policy What portion of the remote organization this policy applies to (all or a specific domain, group, or user)
Domain / Group / User
Identifies the specific part of the remote organization this policy applies to

© 2014 AT&T Intellectual Property. All rights reserved. AT&T and the AT&T logo are trademarks of AT&T Intellectual Property. 29
Action The type of activity that will be allowed. Currently, the options are:
Setup Chat Session With: Outgoing Chatability to send your federated users IM messages
Accept Chat Session From: Incoming Chatability to receive IM messages from your federated users
Monitor presence of: Receive Presence status from your federated contacts
Share presence with: Send Presence update to your federated contacts
Status Specifies if the activity is allowed
Step 9. Enter the information in the Extended Policy window (see Figure 33 and Table 7), then select the Create button. The Manage Policies page displays. Select the Done button. The creation of the group is complete.
To add another group, go to Step 1.

© 2014 AT&T Intellectual Property. All rights reserved. AT&T and the AT&T logo are trademarks of AT&T Intellectual Property. 30
Manage Groups
You can change all the information about a group, except its name. To change the information, select the Manage Groups link in the menu. The page shown in Figure 34 displays. Enter the name of the group you want to change, then select the Search button. The Group Info page displays. It is similar to Figure 26. From here you can change the parent, user, and policy information for that group.
© 2014. AT&T Intellectual Property. All rights reserved.
Figure 34. Manage Groups page

© 2014 AT&T Intellectual Property. All rights reserved. AT&T and the AT&T logo are trademarks of AT&T Intellectual Property. 31
Organization Users
You can add users and change the information about users with the links under “Organization Users” in the menu (Figure 35).
There are two ways to add new users to the UC Federation portal:
Manually, using the Create New User link
Uploading a file, using the Upload Users link
Use the Manage Users link to change information about a user.
The links are described below.
NOTE: If a user is not defined in the portal, that user may still be able to federate. When companies are federated, users within the companies can federate with one another. The portal allows companies to limit how specific users can federate by defining the users and applying policies to those users. However, all other users in the companies are still able to federate with one another assuming no other policy is applied.

© 2014 AT&T Intellectual Property. All rights reserved. AT&T and the AT&T logo are trademarks of AT&T Intellectual Property. 32
© 2014. AT&T Intellectual Property. All rights reserved.
Figure 35. Links under Organization Users header

© 2014 AT&T Intellectual Property. All rights reserved. AT&T and the AT&T logo are trademarks of AT&T Intellectual Property. 33
Create New User
Users are typically added to the UC Federation portal by using the Upload Users link. Use the Create New User link when adding only a few users. See Figure 36 for the Create New User page and Table 8 for descriptions of the fields in the page.
© 2014. AT&T Intellectual Property. All rights reserved.
Figure 36. Create New User page
Table 8. Information in Create New User page
Item Description
Main URI The user’s online username. The formatting of this depends on how the company’s UC solution was configured.
VIP Select this checkbox if the user is a VIP (Very Important Person)
Aggregation Indicates if aggregation of presence (IM forking) is required for this user. This is not relevant if there is always a single account for the user’s presence subscription.

© 2014 AT&T Intellectual Property. All rights reserved. AT&T and the AT&T logo are trademarks of AT&T Intellectual Property. 34
Comments General information about the user. The information in this field can be a maximum of 250 characters.
User Information
First Name First name of the user
Last Name Last name of the user
ID How the user is identified by the company’s UC solution (that is using AT&T UC Federation). This might be the user’s email address, Session Initiation Protocol (SIP) URI, or something else.
Organization Code Code of the organization the user belongs to
Title Job title of the user
Category Indicates if this user is an employee, contractor, vendor, etc.
User Contact Information
Mobile Phone number of the user’s mobile device
Phone Primary work telephone number of the user
E‐Mail E‐mail address of the user
Office Room The room or laboratory the user works in
Address The address where the user works
City The city where the user works
Zip Code The zip code where the user works
State The state the user works
Country The country the user works
To add a user:
Step 1. Select the Create New User link. The Create New User page displays (Figure 36). Fill in the information about the user, which is described in Table 8. When done, click on the Create button on the bottom of the page. The Manage Parents page displays (Figure 37).

© 2014 AT&T Intellectual Property. All rights reserved. AT&T and the AT&T logo are trademarks of AT&T Intellectual Property. 35
© 2014. AT&T Intellectual Property. All rights reserved.
Figure 37. Manage Parents page
Step 2. If you want to add a parent, select the Add Parent link. The Add Group Parent window displays (Figure 38).
If you don’t want to add a parent, select the Next button. Go to Step 6.
© 2014. AT&T Intellectual Property. All rights reserved.
Figure 38. Add Group Parent window
Step 3. Enter the parent name in the window. The parent must be a group that has already been defined. After you enter the name, the Create button will display. Select the Create button. The Manage Parents page displays with the name of the parent group in its table.

© 2014 AT&T Intellectual Property. All rights reserved. AT&T and the AT&T logo are trademarks of AT&T Intellectual Property. 36
© 2014. AT&T Intellectual Property. All rights reserved.
Figure 39. Manage Parents page with newly added parent
Step 4. Select the Next button. The Manage Accounts page displays.
© 2014. AT&T Intellectual Property. All rights reserved.
Figure 40. Manage Accounts page
Step 5. Select the Add New Account link. The Accounts window displays.

© 2014 AT&T Intellectual Property. All rights reserved. AT&T and the AT&T logo are trademarks of AT&T Intellectual Property. 37
© 2014. AT&T Intellectual Property. All rights reserved.
Figure 41. Accounts window
Step 6. Select one or more service/feature combinations that apply to the user. A Create button will display. Select the Create button. The Manage Accounts page displays again, but it now includes the newly created account.
© 2014. AT&T Intellectual Property. All rights reserved.
Figure 42. Manage Accounts page with newly created account
Step 7. Select the Next button. The Manage Policies page displays.

© 2014 AT&T Intellectual Property. All rights reserved. AT&T and the AT&T logo are trademarks of AT&T Intellectual Property. 38
© 2014. AT&T Intellectual Property. All rights reserved.
Figure 43. Manage Policies page
Step 8. To add a new policy, select the Add New Policy link. The Policy window displays.
© 2014. AT&T Intellectual Property. All rights reserved.
Figure 44. Policy window
Step 9. Enter the name of the company that will federate with the new user. After you do this, more fields will display in the Policy window. See Figure 45.

© 2014 AT&T Intellectual Property. All rights reserved. AT&T and the AT&T logo are trademarks of AT&T Intellectual Property. 39
© 2014. AT&T Intellectual Property. All rights reserved.
Figure 45. Extended Policy window
Table 9. Information in Extended Policy window
Item Description
Remote organization Company that the user will federate with
Scope of policy Which of the following options you want the policy to apply to:
Full Organization: The policy will apply to the entire company
Specific Domain: The policy will only apply to the domain you specify
Specific Group: The policy will only apply to a specific group
Specific User: The policy will only apply to a specific user
Domain / Group / User
Identifies the specific part of your company this policy applies to
Action The type of activity that will be allowed. Currently, the options are:
Setup Chat Session With: Outgoing Chatability to send your federated users IM messages
Accept Chat Session From: Incoming Chatability to receive IM messages from your federated users
Monitor presence of: Receive Presence status from your federated contacts
Share presence with: Send Presence update to your federated contacts
Status Specifies if the this policy is active (allowed) at this time
Step 10. Enter the information in the Extended Policy window (see Figure 45 and Table 9), then select the Create button. The Manage Policies page displays. Select the Done button. The creation of the user is complete. The new user is immediately added to the portal.

© 2014 AT&T Intellectual Property. All rights reserved. AT&T and the AT&T logo are trademarks of AT&T Intellectual Property. 40
Manage Users
You can change all the information about a user, except the main URI. To change the information, select the Manage Users link in the menu. The page shown in Figure 46 displays. Enter the Main URI of the user you want to change (or enter information in other fields), then select the Search button. The User Info page displays. It is similar to Figure 36. From here you can change all the user, parent, account, and policy information for the user.
© 2014. AT&T Intellectual Property. All rights reserved.
Figure 46. Manage Users page

© 2014 AT&T Intellectual Property. All rights reserved. AT&T and the AT&T logo are trademarks of AT&T Intellectual Property. 41
Upload Users
If you have more than one or two users to add to the UC Federation portal, create a .csv file and upload the user information with the Upload Users link. See the appendix at the end of this manual for information about formatting .csv files. See Figure 47 and Table 10 for information about uploading .csv files.
You can upload two types of files.
Incremental Contains commands (add, remove, and modify) that tells the portal how to manage the information in the file.
Full Contains information about all users. When you upload this type of file, all user information currently in the UC Federation portal will be destroyed and replaced with the data in the file.
© 2014. AT&T Intellectual Property. All rights reserved.
Figure 47. Upload Users page
Table 10. Information in Upload Users pages
Item Description
Type The type of file being uploaded:
Incremental This type of file contains commands that tell the UC Federation portal how to update the user information in the portal. The commands can include: add, modify, or remove users.
Full This file deletes all user information currently in the UC Federation portal and updates the portal with only the information in this file.
Mode How the file will be managed when there is an error during the upload process:
Stop on error Stop processing immediately when an error is detected

© 2014 AT&T Intellectual Property. All rights reserved. AT&T and the AT&T logo are trademarks of AT&T Intellectual Property. 42
Never stop Continue processing even when errors occur
If there are errors, they will be listed at the bottom of this page and include the line numbers of the .csv file where the errors occurred.
File Clicking on the Select File button next to this field opens a browser that allows you to select the .csv file to be uploaded.

© 2014 AT&T Intellectual Property. All rights reserved. AT&T and the AT&T logo are trademarks of AT&T Intellectual Property. 43
Check Policies
To verify if a user of your organization can communicate with another organization using AT&T UC Federation or between users in your organization, select the Check Policies link in the menu (Figure 48), which opens the Check Policies page. From this page, you can select the action and the participants of the action. Then, select the Check button to verify if the action has been allowed. This is often used as a debugging tool if your users report that they cannot communicate with a federated partner. See Figure 49 and Table 11 for more information.
© 2014. AT&T Intellectual Property. All rights reserved.
Figure 48. Check Policies link

© 2014 AT&T Intellectual Property. All rights reserved. AT&T and the AT&T logo are trademarks of AT&T Intellectual Property. 44
© 2014. AT&T Intellectual Property. All rights reserved.
Figure 49. Check Policies page
Table 11. Information in Check Policies page
Item Description
Action The type of action you wish to verify. Currently, the options are:
Setup Chat Session With: Outgoing Chatability to send your federated users IM messages
Accept Chat Session From: Incoming Chatability to receive IM messages from your federated users
Monitor presence of: Receive Presence status from your federated contacts
Share presence with: Send Presence update to your federated
contacts
Local Account Type This is always set to “WebSphere.” Please do not change.
Local Account URI The URI of the local user who participated in the action you are checking
Remote Organization Name of the remote organization that participated in the action you are checking
Check button Selecting this button verifies if the action has been performed. If an error message displays, incorrect data was entered in the fields.

© 2014 AT&T Intellectual Property. All rights reserved. AT&T and the AT&T logo are trademarks of AT&T Intellectual Property. 45
Reports
To have one or more Federation reports sent to you or to someone else, select the Reports link in the menu (Figure 50). The reports provide statistics that describe your company’s usage of AT&T UC Federation. You must select the time frame of the data to be processed for the report(s).
Reports
The Reports page that displays when you select the Reports link is shown in Figure 51. The page in Figure 52 displays if the Period Selection type “Advanced” is selected. The pages are described in Table 12. When you select the Send Report button, the process of creating and emailing the report begins immediately.
© 2014. AT&T Intellectual Property. All rights reserved.
Figure 50. Reports link

© 2014 AT&T Intellectual Property. All rights reserved. AT&T and the AT&T logo are trademarks of AT&T Intellectual Property. 46
© 2014. AT&T Intellectual Property. All rights reserved.
Figure 51. Example request for a simple report
© 2014. AT&T Intellectual Property. All rights reserved.
Figure 52. Example request for an advanced report
© 2014 AT&T Intellectual Property. All rights reserved. AT&T and the AT&T logo are trademarks of AT&T Intellectual Property. 47
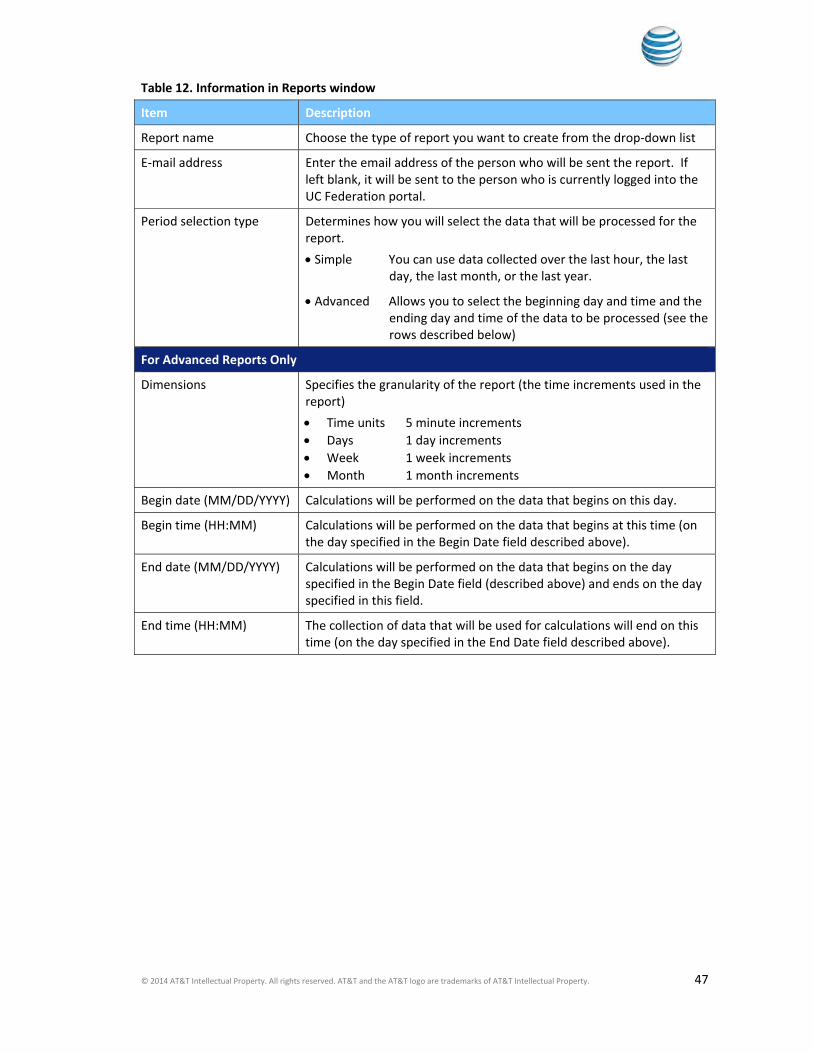
Table 12. Information in Reports window
Item Description
Report name Choose the type of report you want to create from the drop‐down list
E‐mail address Enter the email address of the person who will be sent the report. If left blank, it will be sent to the person who is currently logged into the UC Federation portal.
Period selection type Determines how you will select the data that will be processed for the report.
Simple You can use data collected over the last hour, the last day, the last month, or the last year.
Advanced Allows you to select the beginning day and time and the ending day and time of the data to be processed (see the rows described below)
For Advanced Reports Only
Dimensions Specifies the granularity of the report (the time increments used in the report)
Time units 5 minute increments
Days 1 day increments
Week 1 week increments
Month 1 month increments
Begin date (MM/DD/YYYY) Calculations will be performed on the data that begins on this day.
Begin time (HH:MM) Calculations will be performed on the data that begins at this time (on the day specified in the Begin Date field described above).
End date (MM/DD/YYYY) Calculations will be performed on the data that begins on the day specified in the Begin Date field (described above) and ends on the day specified in this field.
End time (HH:MM) The collection of data that will be used for calculations will end on this time (on the day specified in the End Date field described above).

© 2014 AT&T Intellectual Property. All rights reserved. AT&T and the AT&T logo are trademarks of AT&T Intellectual Property. 48
Emailing the Reports
Emails sent out with the statistical reports will have a subject line that contains “Statistical results for” and then the name of the report.
Each email will contain the following attachments:
Datas.jpg Graphical representation of the requested data (see Figure 53)
Datas.csv Statistical data for the selected report. Figure 54 is an extract of a datas.ccv file that was opened in Microsoft® Excel® (with separator = TAB) and formatted
Datas.htm HTML version of datas.csv
Selection.htm Filtering selection applied to the data
Figure 53. Example datas.jpg file
Figure 54. Example datas.csv file

© 2014 AT&T Intellectual Property. All rights reserved. AT&T and the AT&T logo are trademarks of AT&T Intellectual Property. 49
Contact Us
IF you have any questions about the UC Federation portal or AT&T UC Federation, click on the Contact Us link in the menu (Figure 55). It will provide you with different methods of contacting AT&T with your questions.
© 2014. AT&T Intellectual Property. All rights reserved.
Figure 55. Contact Us link
© 2014 AT&T Intellectual Property. All rights reserved. AT&T and the AT&T logo are trademarks of AT&T Intellectual Property. 50
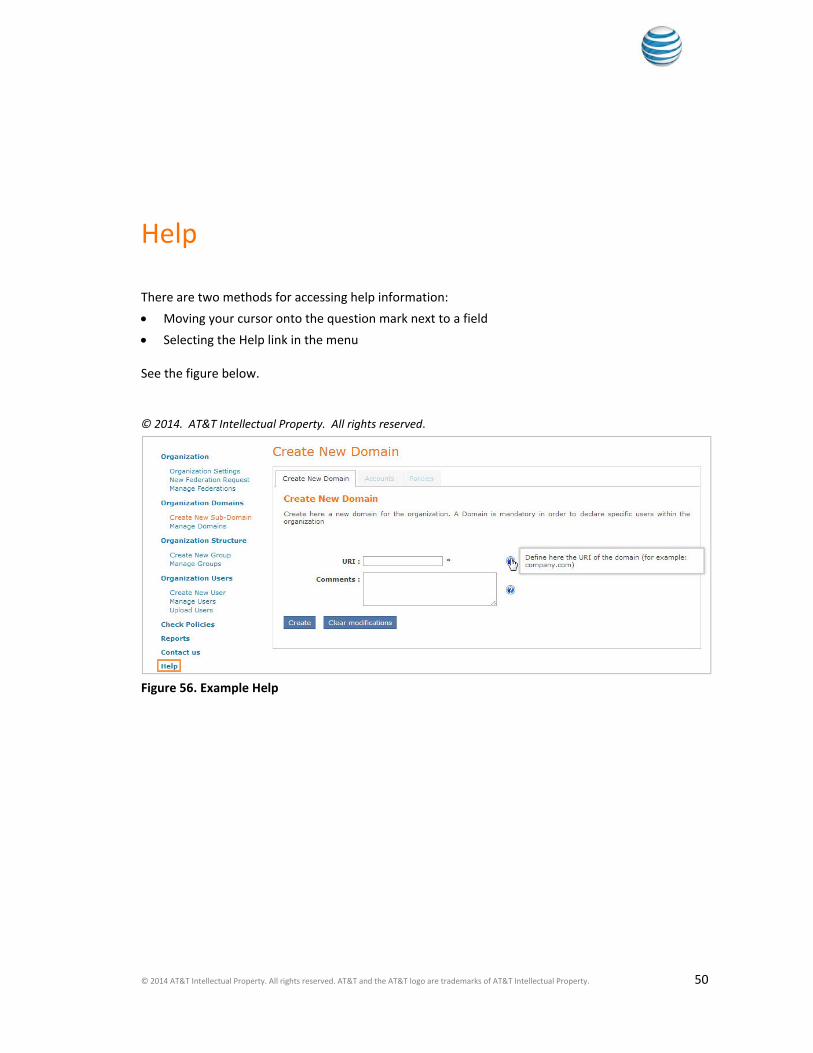
Help
There are two methods for accessing help information:
Moving your cursor onto the question mark next to a field
Selecting the Help link in the menu See the figure below. © 2014. AT&T Intellectual Property. All rights reserved.
Figure 56. Example Help

© 2014 AT&T Intellectual Property. All rights reserved. AT&T and the AT&T logo are trademarks of AT&T Intellectual Property. 51
Appendix. Uploading User Data
When adding more than a few users to the UC Federation portal, upload the information about the users in a .csv file instead of adding each user individually using the UC Federation portal’s GUI interface.
You can upload two types of files.
Incremental Contains commands (add, remove, and modify) that tells the portal how to manage the information in the file.
Full Contains information about all users. When you upload a file of this type, all user information currently in the UC Federation portal will be destroyed and replaced with the data in the file.
Format of .csv Files
These are two examples of .csv files that can be used to perform bulk uploads of users.
incremental_mix.csv full.csv
Format of Files for Incremental Uploads
The following is the format of the .csv file for incremental uploads:
oper OPERATION {add|modify|remove}
uri URI the main URI of this user
name NAME the name of this user
parent PARENTS list of parent group's names separated by ">" or "<unspecified>" value
agg AGGREG_FLAG {0|1} 0 = no aggregation, 1 = aggregation
cmts COMMENTS free text string
fstnm FIRST_NAME the first name of this user
lstnm LAST_NAME the last name of this user
userid USERID the id of the user in the organization
orgcode ORG_CODE the organization code of this user
title JOB_TITLE the job title of this user

© 2014 AT&T Intellectual Property. All rights reserved. AT&T and the AT&T logo are trademarks of AT&T Intellectual Property. 52
ctg CATEGORY the category of this user
vip VIP_FLAG {0|1} 0 = non vip, 1 = vip
mob MOBILE_PHONE the mobile phone of the user
fix PHONE the fix office phone of the user
email EMAIL the email id of the user
room ROOM_NUMBER the office number of the user
add ADDRESS the address where the user is located
city CITY the city where the user is located
zip ZIP_CODE the zip code of the user
state STATE the state where the user is located
ctry COUNTRY the country where the user is located
accnt URI list of account URIs of the user separated by ">"
acctype DEVICE_TYPE_NAME list of corresponding account types separated by ">"
setting SETTINGS list of corresponding account settings separated by ">"
svfe
SERVFEAT list of corresponding service & feature lists separated by ">". The couples of service & feature are separated by "<". Service and feature are separated by --
Format of Files for Full Uploads
The file format for full uploads is the same as the above, except that the first item (operation) is omitted.