
ATS zManager Workshop Hands-on Labs - IBM WWW Page · ATS zManager Workshop Hands-on Labs ... Run...
53
ZMAN1 Workshop Hands-on Labs ATS zManager Workshop Hands-on Labs Lab Version Date: January 9, 2012 1
Transcript of ATS zManager Workshop Hands-on Labs - IBM WWW Page · ATS zManager Workshop Hands-on Labs ... Run...

ZMAN1 Workshop Hands-on Labs
ATS zManager Workshop
Hands-on Labs
Lab Version Date: January 9, 2012
1

ZMAN1 Workshop Hands-on Labs
This page intentionally left blank
2
ZMAN1 Workshop Hands-on Labs
Table of ContentsVirtual Server Creation and Installation of AIX....................................................................................4
Define the IHS virtual server............................................................................................................................... 4Modify the IHS Server's details........................................................................................................................... 7Create the WebSphere virtual server................................................................................................................10Create the JMeter driver virtual server..............................................................................................................11Create the co:Z virtual server............................................................................................................................ 12Visually verify the four virtual servers ... review where you're at........................................................................12Activate your IHS virtual server and install AIX.................................................................................................13Activate the other three virtual servers..............................................................................................................14Enable IPv6 on AIX on all four virtual servers...................................................................................................14Log on to AIX and create a non-root userid on all four virtual servers...............................................................15Status Review................................................................................................................................................... 15
Middleware Enablement......................................................................................................................16Implement GPMP on IHS and WAS virtual servers...........................................................................................16Enable ARM on virtual servers.......................................................................................................................... 18Install the Daytrader application........................................................................................................................ 23Set up JMeter driver on zmgrt#d virtual server..................................................................................................27Status review..................................................................................................................................................... 27
Workload Definition and Performance Management........................................................................28FYI - Overview................................................................................................................................................... 28Create the workload and performance policy in zManager...............................................................................29Set up zManager alerts..................................................................................................................................... 30Status Review................................................................................................................................................... 31Run soaker programs........................................................................................................................................ 31Run the workload and observe z/OS enclave creation......................................................................................32Review the zManager reports............................................................................................................................ 32Stop the JMeter driver....................................................................................................................................... 33Status Review................................................................................................................................................... 33
Usage Scenario -- co:Z........................................................................................................................34FYI - Picture overview....................................................................................................................................... 34Setup activities on z/OS and co:Z AIX...............................................................................................................34Run some simple co:Z job examples................................................................................................................. 36Setup PDF creation JCL and submit................................................................................................................. 39
Team Information Reference..............................................................................................................41Topology Picture................................................................................................................................................ 41Processor allocation values common to all teams.............................................................................................41Team 1.............................................................................................................................................................. 42Team 2.............................................................................................................................................................. 43Team 3.............................................................................................................................................................. 44Team 4.............................................................................................................................................................. 45Team 5.............................................................................................................................................................. 46Team 6.............................................................................................................................................................. 47
Lab Helper Notes.................................................................................................................................48Using the WS-FTP client................................................................................................................................... 48vi editor usage notes......................................................................................................................................... 48Listing of workloads and general access to reports...........................................................................................49Service classes report....................................................................................................................................... 51Service class resource adjustment report.........................................................................................................51Hops Report...................................................................................................................................................... 51Virtual Server Topology Report.......................................................................................................................... 52Virtual servers report......................................................................................................................................... 52Workload resource adjustments report..............................................................................................................53Hypervisor report............................................................................................................................................... 53
3

ZMAN1 Workshop Hands-on Labs
Virtual Server Creation and Installation of AIX1
Define the IHS virtual server
Note: This is the first of four virtual servers.
Open Firefox and point your browser at:https://tsysensa.dmz/hmc/connect
Log on using the ID zmgrt# where # is your team number. Consult the separate passwords sheet.
Then do the following:
Note: In this lab you will build four virtual servers, all on a blade dedicated to your lab team.
At the "Welcome" screen for the wizard, click "Next." Then provide the server name:
1 These procedures developed from the information in the zEnterprise System Ensemble Planning and Configuring Guide, GC27-2608, Chapter 18, "Creating virtual servers."
4
ZMAN1 Workshop Hands-on Labs
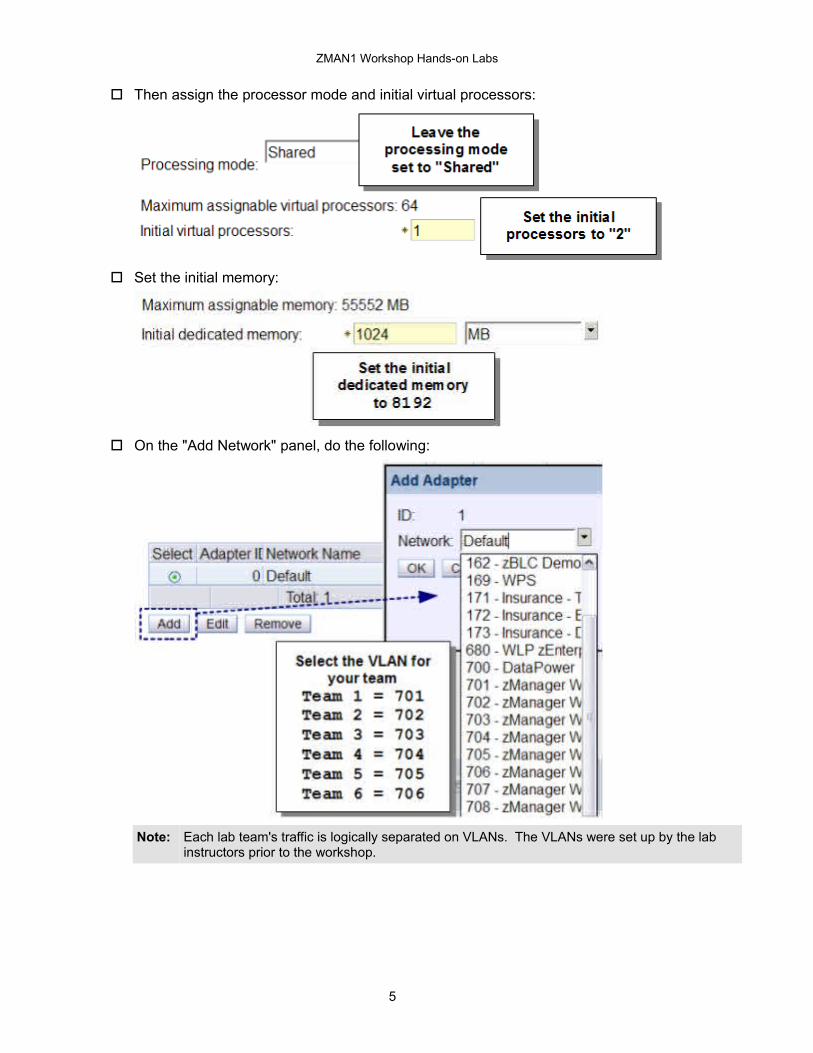
Then assign the processor mode and initial virtual processors:
Set the initial memory:
On the "Add Network" panel, do the following:
Note: Each lab team's traffic is logically separated on VLANs. The VLANs were set up by the lab instructors prior to the workshop.
5

ZMAN1 Workshop Hands-on Labs
On the "Add Storage" panel, do the following:
Note: The virtual storage logical units (LUNs) were set up by the lab instructors prior to the workshop. Here you are assigning one 12GB logical storage drive to the virtual server.
On the "Specify Boot Options" panel, do the following:
Notes: The information on IP addresses provided below is also found in "Team InformationReference" starting on page 41.We are having you set the Boot Source to "Network" because initially we will boot off a network attached NIM server. After AIX is installed this will be changed to the virtual servers storage drive.
Team 1 Team 2 Team 3 Team 4IP 192.168.170.11 192.168.170.19 192.168.170.27 192.168.170.35Subnet 255.255.255.248 255.255.255.248 255.255.255.248 255.255.255.248Gateway 192.168.170.9 192.168.170.17 192.168.170.25 192.168.170.33Boot Srvr 192.168.168.93 192.168.168.93 192.168.168.93 192.168.168.93
Team 5 Team 6IP 192.168.170.43 192.168.170.51Subnet 255.255.255.248 255.255.255.248Gateway 192.168.170.41 192.168.170.49Boot Srvr 192.168.168.93 192.168.168.93
6

ZMAN1 Workshop Hands-on Labs
On the "Select Workloads" panel make sure "Default Workloads" is selected:
On the "Performance Management" panel leave "Processor Management" checked:
On the "Summary" panel take some time to review the settings. Compare what you set against the instructions offered here. When you believe everything is correct, then "Finish."
Modify the IHS Server's details
Note: There's a small handful of things to update once the virtual server definition has been created.
To get to the server details for your IHS server, do the following:
7

ZMAN1 Workshop Hands-on Labs
Next, remove the "Default Virtual LAN" from your IHS server2:
Then, go to the "Options" tab and set the Dynamic LPAR and GPMP support:
2 You could have performed this step when you were creating the virtual server. The other updates required you to first create it, then go back into server details to modify.
8

ZMAN1 Workshop Hands-on Labs
Then on the "Processors" tab set the values to the following3:
3 For a table containing the processor settings for each of the servers, see "Processor allocation values common to allteams" on page 41.
9

ZMAN1 Workshop Hands-on Labs
Create the WebSphere virtual server
Note: This is the second of four virtual servers. The process is the same as done for the IHS virtual server, but some of the values are different.
Using the same procedure you just used to create the IHS server, create the WebSphere virtual server using the following values4:Blade The same blade as your team used for the IHS virtual server.Name zmgrt#w, where # is your team number
Processors Mode of "SHARED," with an initial processor value of 5.Memory 8192 MBNetwork The same VLAN as your team's IHS server:
Team 1 = 701Team 2 = 702Team 3 = 703Team 4 = 704Team 5 = 705Team 6 = 706
Storage Name of HD0, with a LUN being the next from your team's pool of LUNs5
Team 1 = zmgrt01-disk02Team 2 = zmgrt02-disk02Team 3 = zmgrt03-disk02Team 4 = zmgrt04-disk02Team 5 = zmgrt05-disk02Team 6 = zmgrt06-disk02
Boot Source = Network Adapter (ID 0)IP Address =
Team 1 = 192.168.170.12Team 2 = 192.168.170.20Team 3 = 192.168.170.28Team 4 = 192.168.170.36Team 5 = 192.168.170.44Team 6 = 192.168.170.52
Subnet Mask = 255.255.255.248 for all teamsGateway IP =
Team 1 = 192.168.170.9Team 2 = 192.168.170.17Team 3 = 192.168.170.25Team 4 = 192.168.170.33Team 5 = 192.168.170.41Team 6 = 192.168.170.49
Boot IP = 192.168.168.93 for all teams
Workloads For now keep the option of "Use Default Workload"Performance Keep "Processor Management" box checked
4 This information also contained under "Team Information Reference" starting on page 41.5 If for a drive you see a check under "In Use" then do not select that drive. Select the next in the range of available LUNs.
10
ZMAN1 Workshop Hands-on Labs
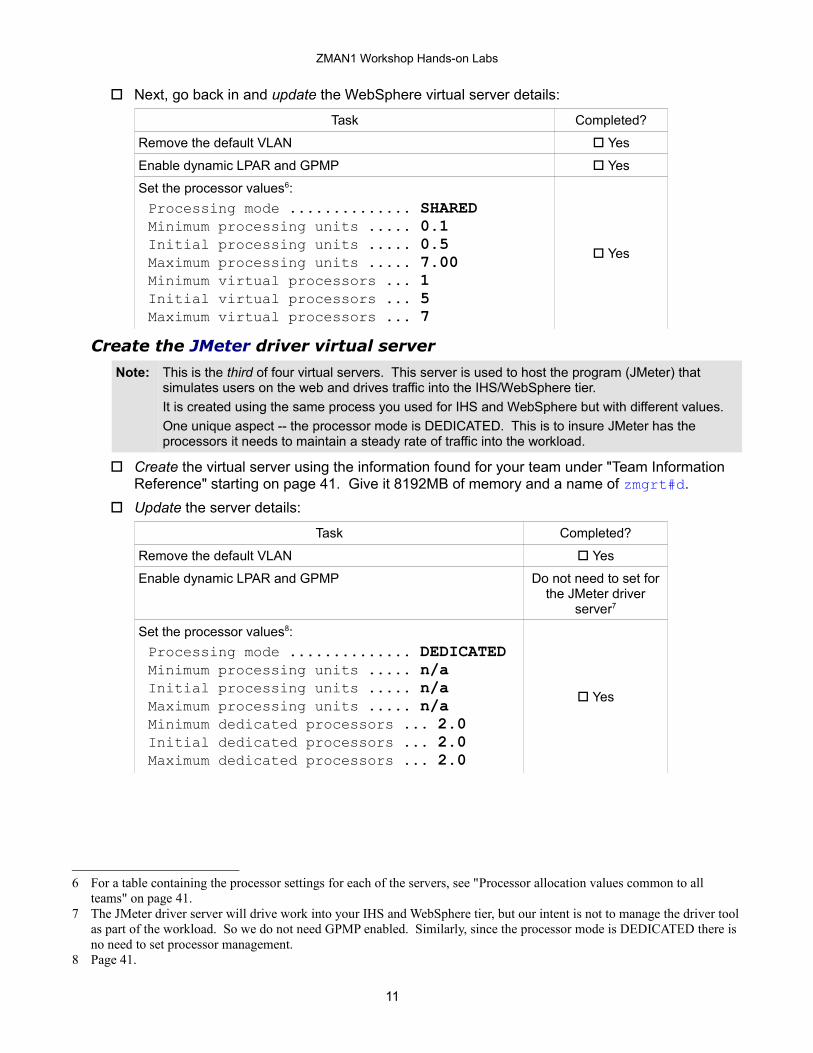
Next, go back in and update the WebSphere virtual server details:
Task Completed?
Remove the default VLAN Yes
Enable dynamic LPAR and GPMP Yes
Set the processor values6:Processing mode .............. SHAREDMinimum processing units ..... 0.1Initial processing units ..... 0.5Maximum processing units ..... 7.00Minimum virtual processors ... 1Initial virtual processors ... 5Maximum virtual processors ... 7
Yes
Create the JMeter driver virtual server
Note: This is the third of four virtual servers. This server is used to host the program (JMeter) that simulates users on the web and drives traffic into the IHS/WebSphere tier.It is created using the same process you used for IHS and WebSphere but with different values.One unique aspect -- the processor mode is DEDICATED. This is to insure JMeter has the processors it needs to maintain a steady rate of traffic into the workload.
Create the virtual server using the information found for your team under "Team InformationReference" starting on page 41. Give it 8192MB of memory and a name of zmgrt#d.
Update the server details:
Task Completed?
Remove the default VLAN Yes
Enable dynamic LPAR and GPMP Do not need to set for the JMeter driver
server7
Set the processor values8:Processing mode .............. DEDICATEDMinimum processing units ..... n/aInitial processing units ..... n/aMaximum processing units ..... n/aMinimum dedicated processors ... 2.0Initial dedicated processors ... 2.0Maximum dedicated processors ... 2.0
Yes
6 For a table containing the processor settings for each of the servers, see "Processor allocation values common to allteams" on page 41.
7 The JMeter driver server will drive work into your IHS and WebSphere tier, but our intent is not to manage the driver tool as part of the workload. So we do not need GPMP enabled. Similarly, since the processor mode is DEDICATED there is no need to set processor management.
8 Page 41.
11
ZMAN1 Workshop Hands-on Labs
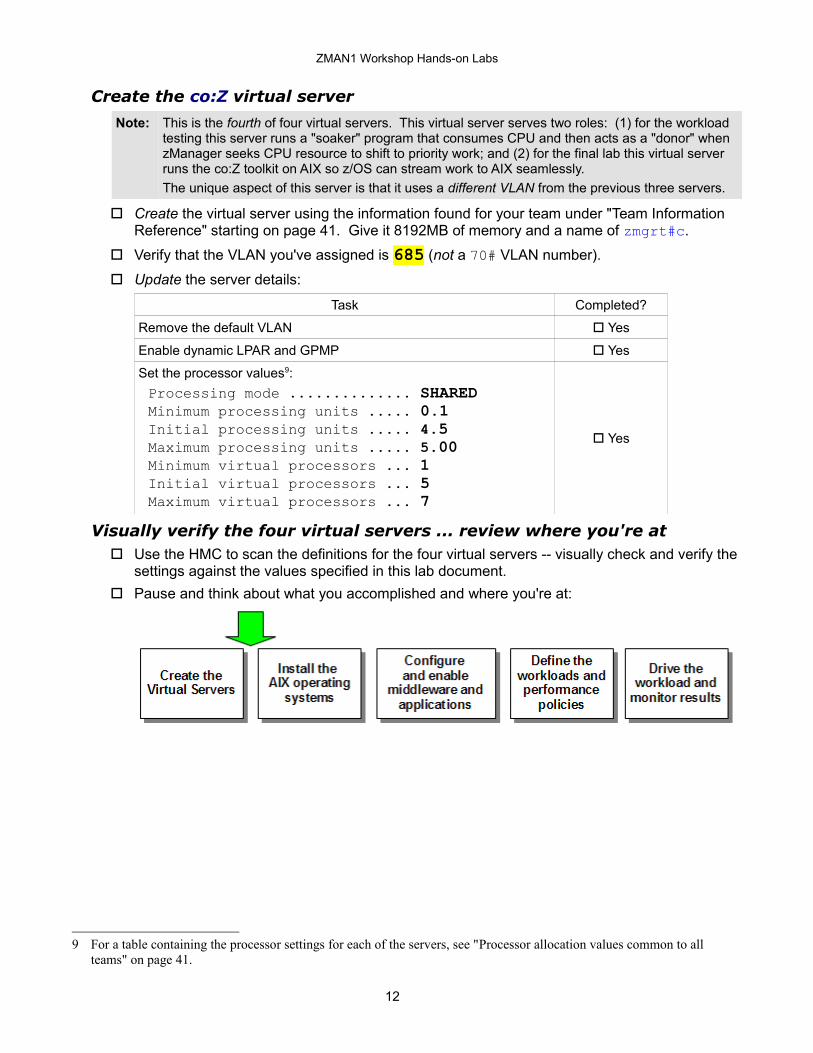
Create the co:Z virtual server
Note: This is the fourth of four virtual servers. This virtual server serves two roles: (1) for the workload testing this server runs a "soaker" program that consumes CPU and then acts as a "donor" when zManager seeks CPU resource to shift to priority work; and (2) for the final lab this virtual server runs the co:Z toolkit on AIX so z/OS can stream work to AIX seamlessly.The unique aspect of this server is that it uses a different VLAN from the previous three servers.
Create the virtual server using the information found for your team under "Team InformationReference" starting on page 41. Give it 8192MB of memory and a name of zmgrt#c.
Verify that the VLAN you've assigned is 685 (not a 70# VLAN number).
Update the server details:
Task Completed?
Remove the default VLAN Yes
Enable dynamic LPAR and GPMP Yes
Set the processor values9:Processing mode .............. SHAREDMinimum processing units ..... 0.1Initial processing units ..... 4.5Maximum processing units ..... 5.00Minimum virtual processors ... 1Initial virtual processors ... 5Maximum virtual processors ... 7
Yes
Visually verify the four virtual servers ... review where you're at Use the HMC to scan the definitions for the four virtual servers -- visually check and verify the
settings against the values specified in this lab document. Pause and think about what you accomplished and where you're at:
9 For a table containing the processor settings for each of the servers, see "Processor allocation values common to allteams" on page 41.
12

ZMAN1 Workshop Hands-on Labs
Activate your IHS virtual server and install AIX
Note: For this workshop we will install AIX from a NIM (Network Installation Manager) server. On the workshop lab topology picture (page 41) this is shown as the "Boot Server." It is listening on IP address 192.168.168.93.
Under "Ensemble Management," locate your team's IHS server, select it and use the popup menu to activate the server:
At the confirmation panel, click on "Yes". The status panel should change to "Activating." Give it a few minutes10, then open a text console:
The text console will show a variety of status and progress messages and eventually get to a point where it indicates success with a "subsystem PID" number. The "Enter" key will take you to a logon prompt.
Logon as root. Consult the separate passwords sheet. Issue the following command to shut down AIX:
shutdown -Fh now When you see "Halt Completed" then close the text console (File Exit) Go back into the virtual server details and change the "Boot Source" to "Storage Drives" 11
Activate again ... it will now boot from storage drive.
10 Two or three minutes then open the text console. Full AIX installation may take up to 10 minutes.11 Hint: Options Panel
13

ZMAN1 Workshop Hands-on Labs
Activate the other three virtual servers
Note: You do not need to wait for one server to complete activation before requesting an activate on the others. They may activate concurrently.
Use the following checklist to track your progress through the three remaining servers:
WASzmgrt#w
JMeterzmgrt#d
co:Zzmgrt#c
Activities: Initial Activate from NIM Logon and Shutdown Change boot option Activate - storage drive
Initial Activate from NIM Logon and Shutdown Change boot option Activate - storage drive
Initial Activate from NIM Logon and Shutdown Change boot option Activate - storage drive
When all four virtual servers are activated the HMC should show the status as something like this:
Enable IPv6 on AIX on all four virtual servers
Note: The INMN management network requires IPv6 to communicate. To give the INMN access into your new virtual servers it is necessary to enable IPv6 on each.
Open a PuTTY session to your IHS server AIX virtual server. (Pre-configured PuTTY icons on your desktop.) Log on as root. Consult the separate passwords sheet.
Issue the following two commands: autoconf6 -i en1 startsrc -s ndpd-host
Edit12 the /etc/rc.tcpip file and do the following:
12 If you're comfortable with the vi editor, use that. Otherwise, the WS-FTP client on your desktop may be used to download the file to the PC where standard editing tools may be used more easily. Then simply FTP the file back to AIX.
14

ZMAN1 Workshop Hands-on Labs
Wait a minute or two then issue the following command to validate the enablement of IPv6:lsrsrc IBM.ManagementServerIn response you should see something like this:Resource Persistent Attributes for IBM.ManagementServerresource 1: Name = "fd36:2eb2:c2eb:2:7039:aeff:fec5:2812" Hostname = "fd36:2eb2:c2eb:2:7039:aeff:fec5:2812" ManagerType = "HMC" LocalHostname = "fd36:2eb2:c2eb:2:f9:aaff:fe8f:2305" ClusterTM = "9078-160" ClusterSNum = "" ActivePeerDomain = "" NodeNameList = {"zmgrt1h.dmz"}
Do the same for the remaining three virtual servers (where # is your team number): zmgrt#w zmgrt#d zmgrt#c
Go back into the "Virtual Server Details" for each of the virtual servers and validate the status of the DLPAR function is active13.
Log on to AIX and create a non-root userid on all four virtual servers
Note: You could go through all the AIX exercises using root, but that's not considered good administrative practice. So here we'll have you create a new AIX userid you may use when root is not required.
Open a PuTTY session to your IHS server AIX virtual server. Log on as root. Issue the following two commands:
Command: Notes:
mkuser zmgrt#where # is your team numberecho "zmgrt#:zmgrt#" | chpasswd -c
Do the same for the remaining three virtual servers (where # is your team number): zmgrt#w zmgrt#d zmgrt#c
Status ReviewYou now have four operational AIX virtual servers on your team's blade in the zBX. Each is enabled for IPv6:
13 Hint: look on the "Options" tab.
15

ZMAN1 Workshop Hands-on Labs
End of the First Lab
Middleware EnablementNote: The copy of AIX you just installed included the IBM HTTP Server (IHS), WebSphere Application
Server and the JMeter driver code. But the steps needed to enable Application Reponse Measurement (ARM) and enable the Guest Platform Management Provider (GPMP) were left for you to do.
Implement GPMP on IHS and WAS virtual servers14
IHS server In the HMC, drill down under Virtual Servers. Select your team's IHS server and then click
on the popup menu icon. Select Configuration Mount Virtual Media:
Select the "GPMP" radio button:
Click through to the summary panel, click "Finish," then "OK" when the status goes to "Success."
Open a PuTTY session to your team's IHS server. Log in as root. Issue the command: smitty ewlm Select the first option, "Change/Show status of EWLM services":
14 These procedures developed from the information in the zEnterprise System Performance Management Guide, GC27-2607, Chapter 8.
16
ZMAN1 Workshop Hands-on Labs
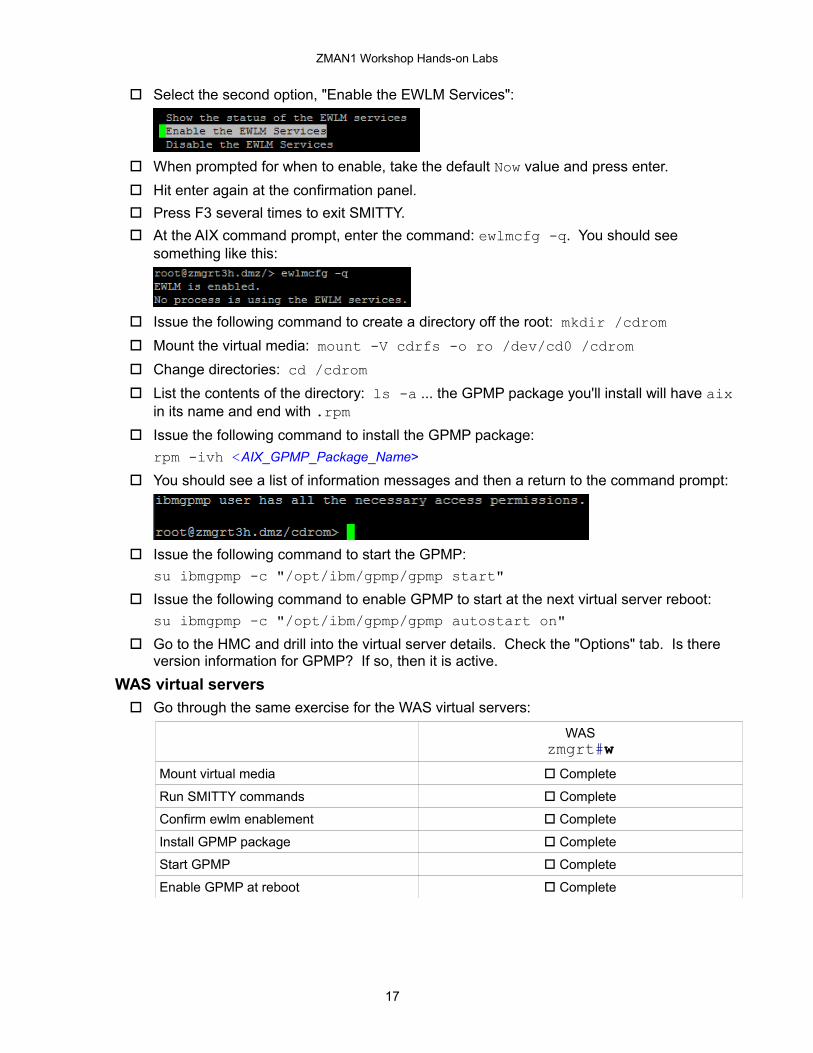
Select the second option, "Enable the EWLM Services":
When prompted for when to enable, take the default Now value and press enter. Hit enter again at the confirmation panel. Press F3 several times to exit SMITTY. At the AIX command prompt, enter the command: ewlmcfg -q. You should see
something like this:
Issue the following command to create a directory off the root: mkdir /cdrom Mount the virtual media: mount -V cdrfs -o ro /dev/cd0 /cdrom Change directories: cd /cdrom List the contents of the directory: ls -a ... the GPMP package you'll install will have aix
in its name and end with .rpm Issue the following command to install the GPMP package:
rpm -ivh <AIX_GPMP_Package_Name>
You should see a list of information messages and then a return to the command prompt:
Issue the following command to start the GPMP:su ibmgpmp -c "/opt/ibm/gpmp/gpmp start"
Issue the following command to enable GPMP to start at the next virtual server reboot:su ibmgpmp -c "/opt/ibm/gpmp/gpmp autostart on"
Go to the HMC and drill into the virtual server details. Check the "Options" tab. Is there version information for GPMP? If so, then it is active.
WAS virtual servers Go through the same exercise for the WAS virtual servers:
WASzmgrt#w
Mount virtual media Complete
Run SMITTY commands Complete
Confirm ewlm enablement Complete
Install GPMP package Complete
Start GPMP Complete
Enable GPMP at reboot Complete
17

ZMAN1 Workshop Hands-on Labs
Confirm GPMP version info Complete
Enable ARM on virtual servers15
IHS ServerNote: The IBM HTTP Server is already installed with the WAS plugin enabled. Your task is to modify
the plugin-cfg.xml so ARM is enabled for the WAS plugin.
Open a PuTTY session to the IHS server and log in as root. Change directories to: /usr/IBM/HTTPServer/Plugins/config/webserver1 Make a backup copy of the plugin-cfg.xml file16: Using either vi or the WS-FTP client on the desktop, edit the plugin-cfg.xml file. You
will make three sets of changes:Enable RequestMetrics and ARM
Note: This update tells the Plugin to make use of ARM and to forward request metrics to WAS.
Change ServerCluster host
Note: This update tells the Plugin where the WAS server is located. Since the WAS server is on a different virtual server from IHS, the value "localhost" is insufficient.
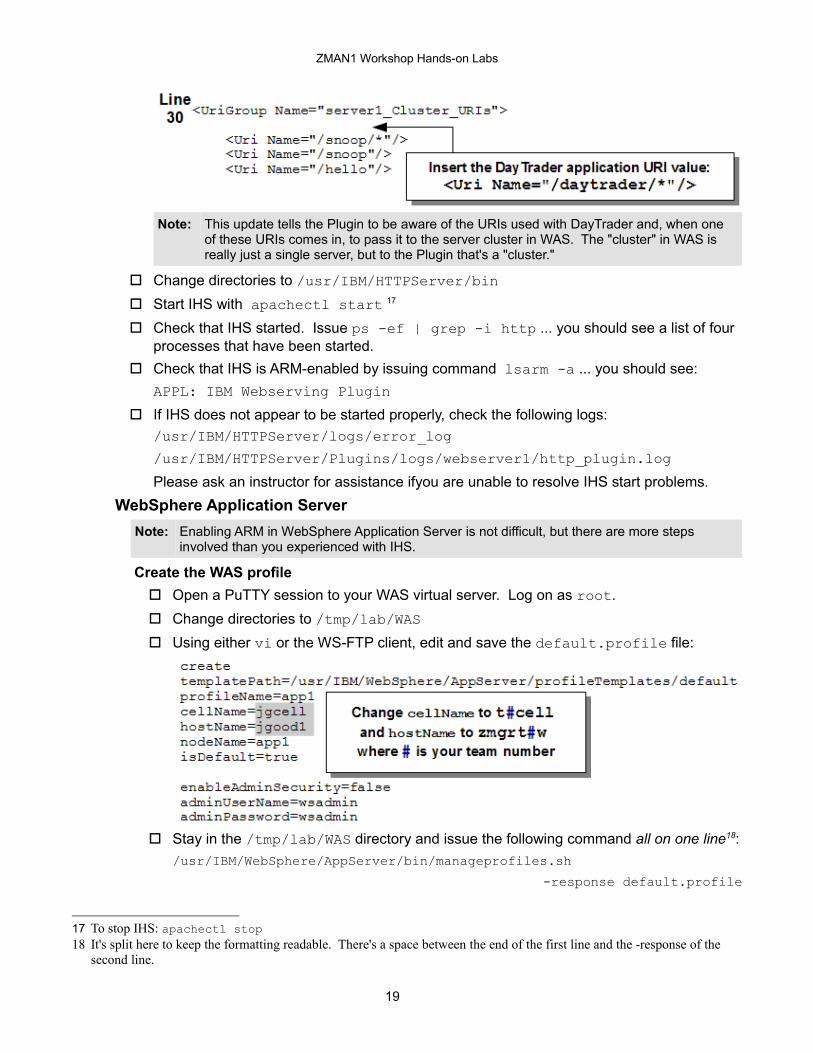
Include DayTrader URI
15 These procedures developed from the information in the zEnterprise System Performance Management Guide, GC27-2607, Chapter 9.
16 AIX command: cp plugin-cfg.xml plugin-cfg.xml.backup
18
ZMAN1 Workshop Hands-on Labs
Note: This update tells the Plugin to be aware of the URIs used with DayTrader and, when one of these URIs comes in, to pass it to the server cluster in WAS. The "cluster" in WAS is really just a single server, but to the Plugin that's a "cluster."
Change directories to /usr/IBM/HTTPServer/bin Start IHS with apachectl start 17
Check that IHS started. Issue ps -ef | grep -i http ... you should see a list of four processes that have been started.
Check that IHS is ARM-enabled by issuing command lsarm -a ... you should see:APPL: IBM Webserving Plugin
If IHS does not appear to be started properly, check the following logs:/usr/IBM/HTTPServer/logs/error_log/usr/IBM/HTTPServer/Plugins/logs/webserver1/http_plugin.logPlease ask an instructor for assistance ifyou are unable to resolve IHS start problems.
WebSphere Application ServerNote: Enabling ARM in WebSphere Application Server is not difficult, but there are more steps
involved than you experienced with IHS.
Create the WAS profile Open a PuTTY session to your WAS virtual server. Log on as root. Change directories to /tmp/lab/WAS Using either vi or the WS-FTP client, edit and save the default.profile file:
Stay in the /tmp/lab/WAS directory and issue the following command all on one line18:/usr/IBM/WebSphere/AppServer/bin/manageprofiles.sh
-response default.profile
17 To stop IHS: apachectl stop18 It's split here to keep the formatting readable. There's a space between the end of the first line and the -response of the
second line.
19
ZMAN1 Workshop Hands-on Labs
Give it a minute or so ... you should eventually see:INSTCONFSUCCESS: Success: Profile app1 now exists. Please consult /usr/IBM/WebSphere/AppServer/profiles/app1/logs/AboutThisProfile.txt for more information about this profile.Note: WAS needs a "profile" before a server can be started. You just created that profile
using a WAS management shell script. The input was default.profile, which you customized with your team number in the cell name and the host name.
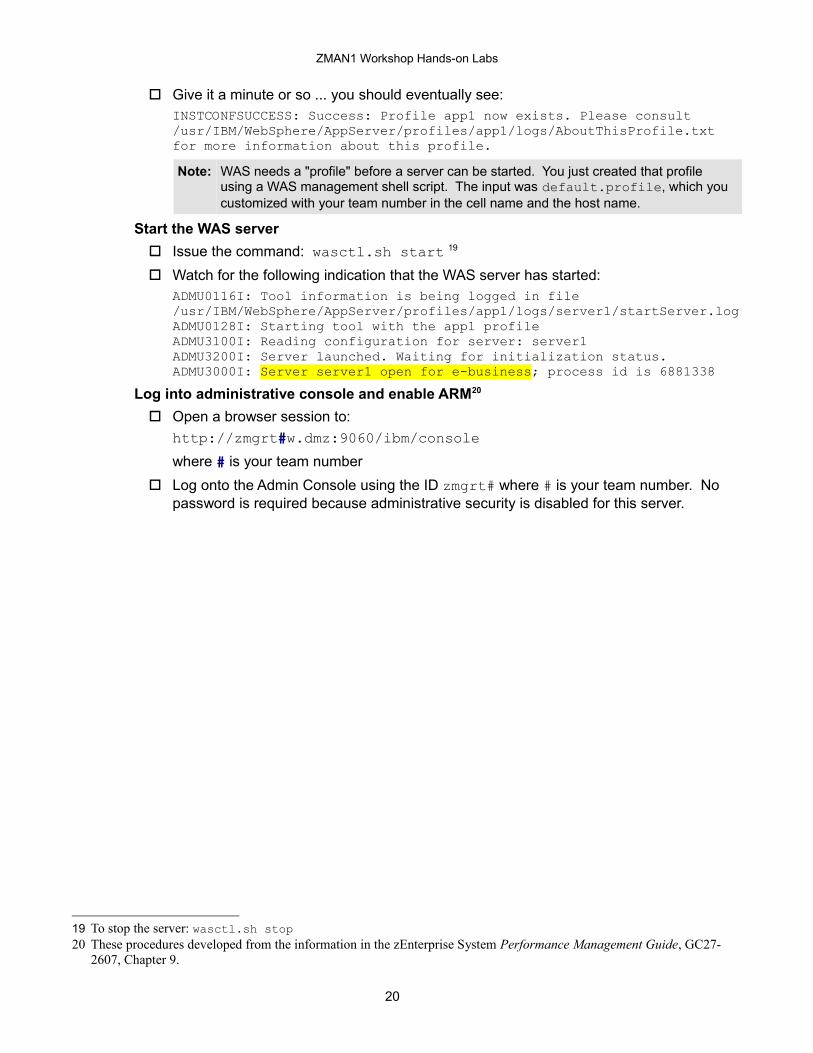
Start the WAS server Issue the command: wasctl.sh start 19
Watch for the following indication that the WAS server has started:ADMU0116I: Tool information is being logged in file/usr/IBM/WebSphere/AppServer/profiles/app1/logs/server1/startServer.logADMU0128I: Starting tool with the app1 profileADMU3100I: Reading configuration for server: server1ADMU3200I: Server launched. Waiting for initialization status.ADMU3000I: Server server1 open for e-business; process id is 6881338
Log into administrative console and enable ARM20
Open a browser session to: http://zmgrt#w.dmz:9060/ibm/consolewhere # is your team number
Log onto the Admin Console using the ID zmgrt# where # is your team number. No password is required because administrative security is disabled for this server.
19 To stop the server: wasctl.sh stop20 These procedures developed from the information in the zEnterprise System Performance Management Guide, GC27-
2607, Chapter 9.
20

ZMAN1 Workshop Hands-on Labs
In the Admin Console go "Request Metrics" and set the values as shown:
Note: ARM transaction factory class name:com.ibm.wlm.arm40SDK.trans.Arm40TransactionFactory
Save the changes made so far.
21

ZMAN1 Workshop Hands-on Labs
Set JVM custom properties You will now drill fairly deep into the Admin Console to create some JVM custom
properties. Follow this diagram to navigate down to that level:
Create three custom properties:Property Name Value
java.library.path /usr/libws.ext.dirs /opt/ibm/gpmp/javacom.ibm.websphere.pmi.reqmetrics.PassCorrelatorToDB true
When you've created all three the custom properties panel should look like this:
Save the changes.
22

ZMAN1 Workshop Hands-on Labs
Stop and restart the WAS server Log off the Admin Console Stop and restart the server:
wasctl.sh stop give it a few moments to stop
wasctl.sh start give it a few moments to start
Issue command wasprocs to validate the server is indeed started.Verify that WAS is enabled for ARM From a PuTTY session, issue command lsarm -a ... you should see:
APPL: WebSphere:APPLICATION_SERVERThis validates that WAS is indeed enabled for ARM
Install the Daytrader application
Note: "Daytrader" is a sample application that runs inside WebSphere Application Server. It simulates a stocktrading environment. We use it in this workshop because it's more "real world" than, say, some simple echo program.The installation of this program is somewhat complex because it requires a lot of WAS infrastructure, such as messaging and data access definitions. All that could be defined by hand, but it would be long and tedious and prone to error.Instead, they developed an automated installation script. It uses the "WSADMIN" administrative interface of WAS. The script is written in Jython. That script creates all that infrastructure, but it needs input from you on certain names and values.So ... in this section you will invoke the script and provide that input. When the dust settles you will have installed Daytrader into your WAS server.
Invoke WSADMIN Open a PuTTY session to your WAS virtual server. Log in as root. Change directories to /usr/daytrader Issue the following command all as one input line21:
Info: you'll see a string of "new jar" messages:*sys-package-mgr*: processing new jar,'/usr/IBM/...ejbdeploy.jar'*sys-package-mgr*: processing new jar,'/usr/IBM/...ejbmapvalidate.jar'
Info: then a message indicating WSADMIN has contacted the server:WASX7209I: Connected to process "server1" on node app1 using SOAP connector; The type of process is: UnManagedProcessdaytrader_singleServer.py
21 It's split here to keep the formatting readable. There's a space between the end of the first line and the -f of the second line.
23
ZMAN1 Workshop Hands-on Labs
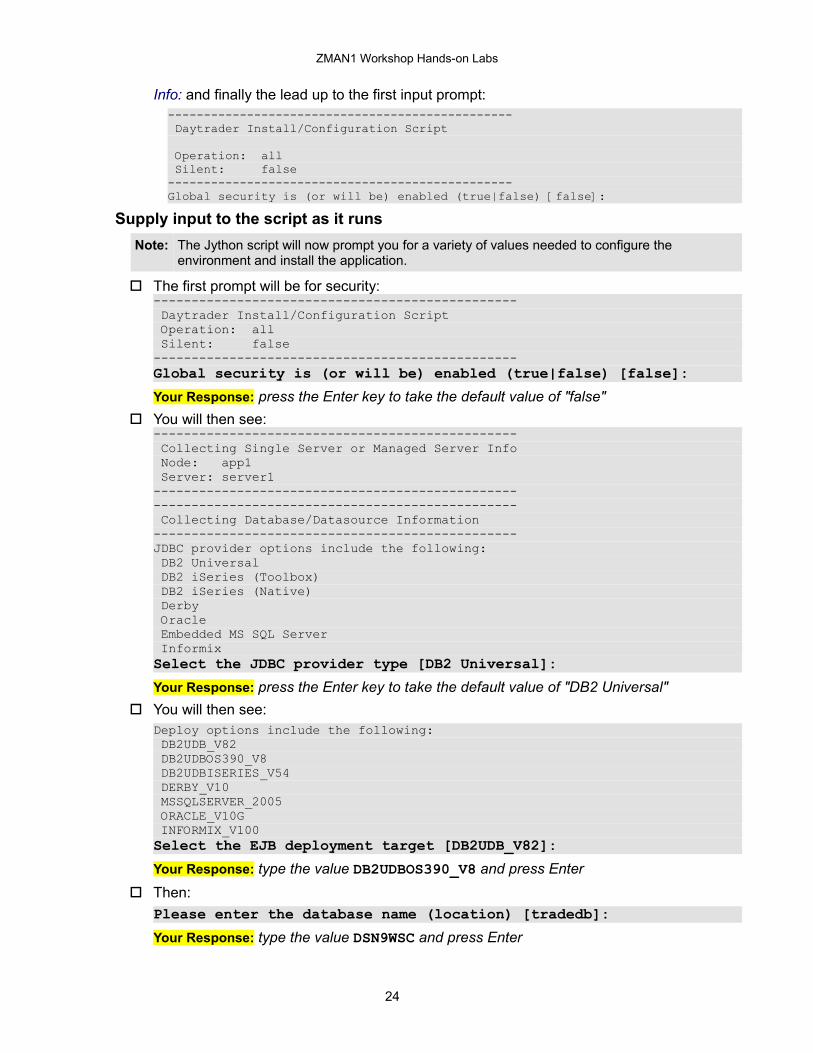
Info: and finally the lead up to the first input prompt:------------------------------------------------ Daytrader Install/Configuration Script
Operation: all Silent: false------------------------------------------------Global security is (or will be) enabled (true|false) [false]:
Supply input to the script as it runsNote: The Jython script will now prompt you for a variety of values needed to configure the
environment and install the application.
The first prompt will be for security:------------------------------------------------ Daytrader Install/Configuration Script Operation: all Silent: false------------------------------------------------Global security is (or will be) enabled (true|false) [false]:Your Response: press the Enter key to take the default value of "false"
You will then see:------------------------------------------------ Collecting Single Server or Managed Server Info Node: app1 Server: server1------------------------------------------------------------------------------------------------ Collecting Database/Datasource Information------------------------------------------------JDBC provider options include the following: DB2 Universal DB2 iSeries (Toolbox) DB2 iSeries (Native) Derby Oracle Embedded MS SQL Server InformixSelect the JDBC provider type [DB2 Universal]:Your Response: press the Enter key to take the default value of "DB2 Universal"
You will then see:Deploy options include the following: DB2UDB_V82 DB2UDBOS390_V8 DB2UDBISERIES_V54 DERBY_V10 MSSQLSERVER_2005 ORACLE_V10G INFORMIX_V100Select the EJB deployment target [DB2UDB_V82]:Your Response: type the value DB2UDBOS390_V8 and press Enter
Then:Please enter the database name (location) [tradedb]:Your Response: type the value DSN9WSC and press Enter
24

ZMAN1 Workshop Hands-on Labs
Then:Please enter the database hostname [localhost]:Your Response: type the value22 ZBLCT#A (where # is your team number) and press Enter
Then:Please enter the database port number [50000]:Your Response: type the value 9446 and press Enter
Then:Please enter the database username [userid]:Your Response: type the value23 ZMGRT# (where # is your team number) and press Enter
Then:Please enter the database password [password]:Your Response: type the value ZMGRT# (where # is your team number) and press Enter
Then:------------------------------------------------ Collecting JMS Provider Information------------------------------------------------Use file store for JMS Provder [true]:Your Response: press the Enter key to take the default value "true"
Then:ME file store location [default]:Your Response: press the Enter key to take the default value for the messaging engine
Be patient and watch as the installation completes: :(considerable amounts of output text removed to save space) :ADMA5013I: Application DayTrader-1.2 installed successfully.Install completed successfully!------------------------------------------------ DayTrader Installation Completed!!!------------------------------------------------Saving...Saving config.../usr/daytrader> The prompt indicates WSADMIN has completed
Your Response: nothing ... you're done with the installation. Stop / restart the WAS server to pick up these changes
22 You'll be accessing DB2 on z/OS from WAS on AIX. That implies a Type 4 JDBC driver, which implies a host and port so WAS knows how to access DB2. The value ZBLCT#A is the host name for the z/OS LPAR we're using.
23 The userid (and password) will create an "user alias" in WAS which will be used to assert identity into DB2 on z/OS.
25
ZMAN1 Workshop Hands-on Labs
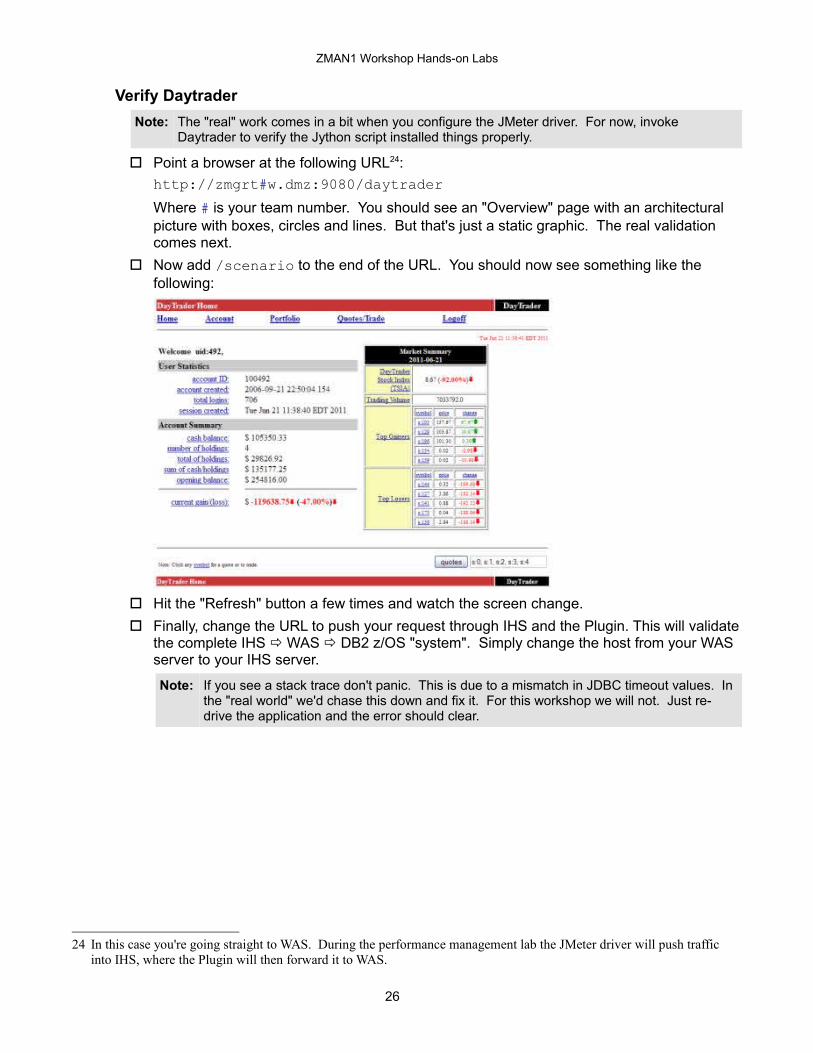
Verify DaytraderNote: The "real" work comes in a bit when you configure the JMeter driver. For now, invoke
Daytrader to verify the Jython script installed things properly.
Point a browser at the following URL24:http://zmgrt#w.dmz:9080/daytraderWhere # is your team number. You should see an "Overview" page with an architectural picture with boxes, circles and lines. But that's just a static graphic. The real validation comes next.
Now add /scenario to the end of the URL. You should now see something like the following:
Hit the "Refresh" button a few times and watch the screen change. Finally, change the URL to push your request through IHS and the Plugin. This will validate
the complete IHS WAS DB2 z/OS "system". Simply change the host from your WAS server to your IHS server.
Note: If you see a stack trace don't panic. This is due to a mismatch in JDBC timeout values. In the "real world" we'd chase this down and fix it. For this workshop we will not. Just re-drive the application and the error should clear.
24 In this case you're going straight to WAS. During the performance management lab the JMeter driver will push traffic into IHS, where the Plugin will then forward it to WAS.
26
ZMAN1 Workshop Hands-on Labs
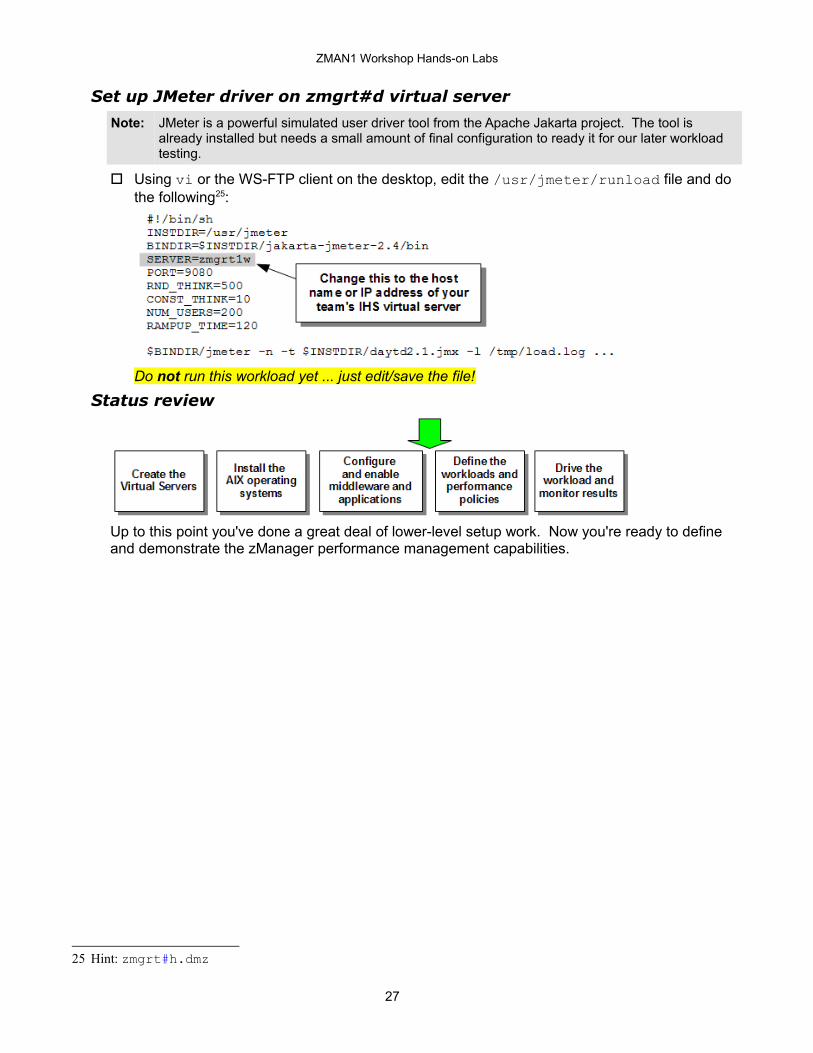
Set up JMeter driver on zmgrt#d virtual server
Note: JMeter is a powerful simulated user driver tool from the Apache Jakarta project. The tool is already installed but needs a small amount of final configuration to ready it for our later workload testing.
Using vi or the WS-FTP client on the desktop, edit the /usr/jmeter/runload file and do the following25:
Do not run this workload yet ... just edit/save the file!
Status review
Up to this point you've done a great deal of lower-level setup work. Now you're ready to define and demonstrate the zManager performance management capabilities.
25 Hint: zmgrt#h.dmz
27

ZMAN1 Workshop Hands-on Labs
Workload Definition and Performance Management26
Note: Now we're to the heart of the matter -- zManager and its ability to monitor and manage to your performance goals. The lab instructions are going to become much less specific so you get an opportunity to explore and learn the zManager function.
FYI - OverviewThe following picture illustrates at a high level what's going on at this point in the labs:
1 The z/OS LPAR was set up and configured prior to the workshop. DB2 on z/OS is where your Daytrader application will store and retrieve its data.DB2 is ARM enabled. That was done prior to the workshop as well. Very simple procedure.z/OS has GPMP enabled. That too was done prior to the workshop. Very simple as well.
2 Each team has a z/OS WLM service class pre-defined. The names are shown on the chart. The details are provided under "Team Information Reference" starting on page 41.
3 These virtual servers and the middleware they contain is what you've done in the lab up to this point.
4 The zManager workload policy and service class definition is what you'll do in this section of the lab.
5 The "soaker" application simply burns CPU. The virtual server will act as a "CPU donor" to the WAS and IHS servers when zManager sees the performance goals not being met.
26 The procedures given here come from the Ensemble Performance Management Guide, GC27-2607, chapter 10.
28
ZMAN1 Workshop Hands-on Labs
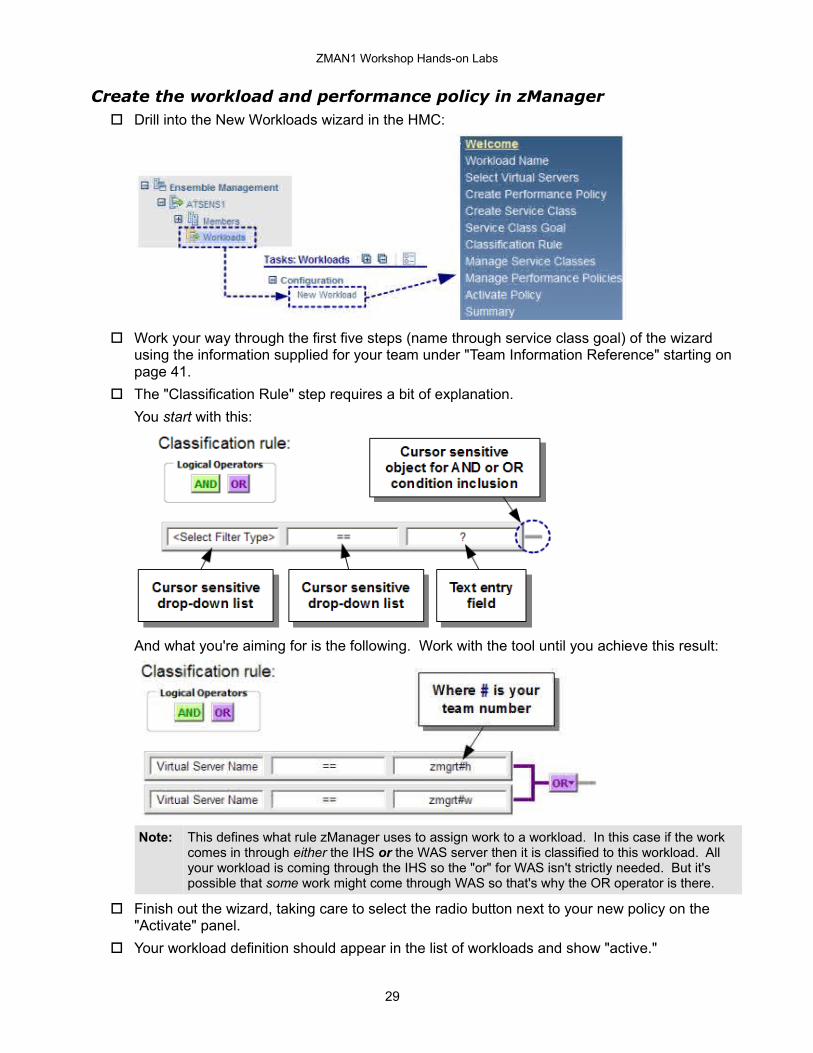
Create the workload and performance policy in zManager Drill into the New Workloads wizard in the HMC:
Work your way through the first five steps (name through service class goal) of the wizard using the information supplied for your team under "Team Information Reference" starting on page 41.
The "Classification Rule" step requires a bit of explanation.You start with this:
And what you're aiming for is the following. Work with the tool until you achieve this result:
Note: This defines what rule zManager uses to assign work to a workload. In this case if the work comes in through either the IHS or the WAS server then it is classified to this workload. All your workload is coming through the IHS so the "or" for WAS isn't strictly needed. But it's possible that some work might come through WAS so that's why the OR operator is there.
Finish out the wizard, taking care to select the radio button next to your new policy on the "Activate" panel.
Your workload definition should appear in the list of workloads and show "active."
29
ZMAN1 Workshop Hands-on Labs
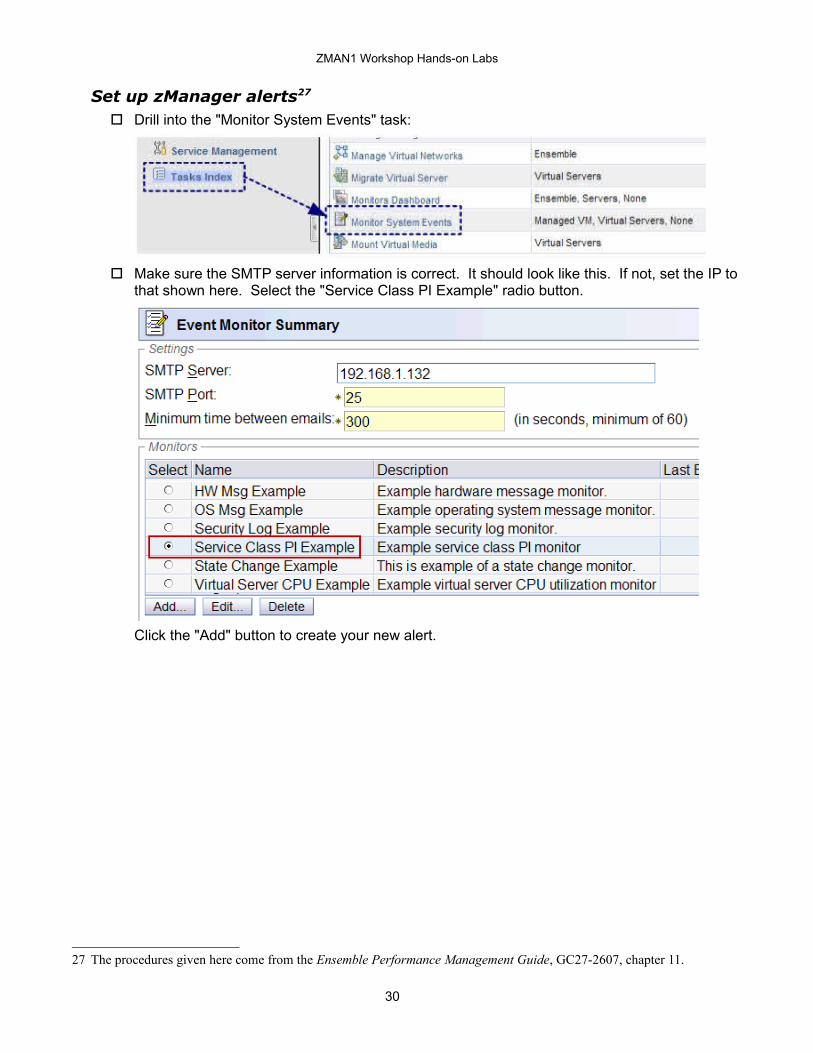
Set up zManager alerts27
Drill into the "Monitor System Events" task:
Make sure the SMTP server information is correct. It should look like this. If not, set the IP to that shown here. Select the "Service Class PI Example" radio button.
Click the "Add" button to create your new alert.
27 The procedures given here come from the Ensemble Performance Management Guide, GC27-2607, chapter 11.
30

ZMAN1 Workshop Hands-on Labs
In the resulting "Event Monitor Editor" panel create a new alert with the following properties:
Click "OK" to create your new alert.
Note: You may or may not see alerts coming to your e-mail inbox. It depends on whether your workload service classes experience a period of time where the PI is greater than 1.0 for the period of time specified. Whether that happens depends on many factors.
Status ReviewYou have the workload definitions in place and you're ready to drive the workload:
Run soaker programs
Note: The soaker programs consume CPU calculating Pi. This will drive up the CPU allocation for your zmgrt#c server. When you start the JMeter driver and the workload is engaged, zManager will take CPU away from this soaker and give it to your IHS and WAS servers.
Open PuTTY to your co:Z server and log on as root Issue the following command: runsoakers
You should see something like this:
31

ZMAN1 Workshop Hands-on Labs
Issue the following command to see the status of your soakers:ps -e | grep -i soakerYou should see something like this, which indicates eight soakers are running28:3997862 pts/0 0:20 soaker4849884 pts/0 2:51 soaker5898364 pts/0 0:49 soaker7077958 pts/0 0:37 soaker7340160 pts/0 0:13 soaker7471130 pts/0 0:14 soaker7536750 pts/0 0:40 soaker7602290 pts/0 0:05 soaker
Run the workload and observe z/OS enclave creation Open PuTTY to your driver server and log on as root Change to /usr/jmeter directory and issue command ./runload Log onto the z/OS system with and ID of ZMGRT#. Go to =SDSF.ENC and watch as the
enclaves are created by DB2 as work flows in.
Periodically hit the enter key to refresh the screen.
Review the zManager reports29
Note: There's a wealth of information in the performance reports, but it requires a little practice knowing where things are. Consider this section of the lab to be a kind of "quiz" to see if you can locate the named report with just a few hints. Back in "Lab Helper Notes" starting on page 48 we offer more detailed instructions on drilling to the named report.
28 If you wish to kill the soakers you may do so with the killsoakers command29 The procedures given here come from the Ensemble Performance Management Guide, GC27-2607
32

ZMAN1 Workshop Hands-on Labs
Start by displaying the list of workloads. Do you see your workload and is it "Active?" Select the checkbox next to your workload. Then ... Locate and view the "Service Classes" report for your workload. What "PI" value is seen? Locate and view the "Virtual Server Topology" report for your workload. Do you see the three
virtual servers you added to the workload? Locate and view the "Service Class Resource Adjustments" report for your workload. Do you
see that any adjustments have been made? Who was the donor and who was the receiver? Locate and view the "Hops" report for your workload. How many hops are shown? What "PI"
value does this show? Expand the "Service Class Charts" section of the "Service Class" report. What does the PI
chart look like? Locate and view the "Virtual Servers" report for your workload. How many virtual servers do
you see? Which virtual server has the highest percent utilization? The lowest? On the "Virtual Servers" report select either the IHS virtual server or the WebSphere virtual
server, then expand the "Virtual Server Charts" section. What do you see? Locate and view the "Workload Resource Adjustments" report for your workload. Do you see
more adjustments than you viewed on the "Service Class Resource Adjustments" report? What might explain this?
Wait a few minutes and then go back and view all those reports again. Do you see new or updated information?
What is the general trend for your "PI" value? Up, down or even? What explains the change ... how is the system managing to your goal?
Stop the JMeter driver
Go to your driver virtual server and issue Ctrl-C to stop the JMeter driver. Go to your co:Z virtual server and run the command killsoakers to stop all the running
soaker programs.
Status ReviewYou've worked your way through the five activity boxes we laid out earlier:
Congratulations! Job well done!
End of the Second Lab
33
ZMAN1 Workshop Hands-on Labs
Usage Scenario -- co:ZFYI - Picture overview
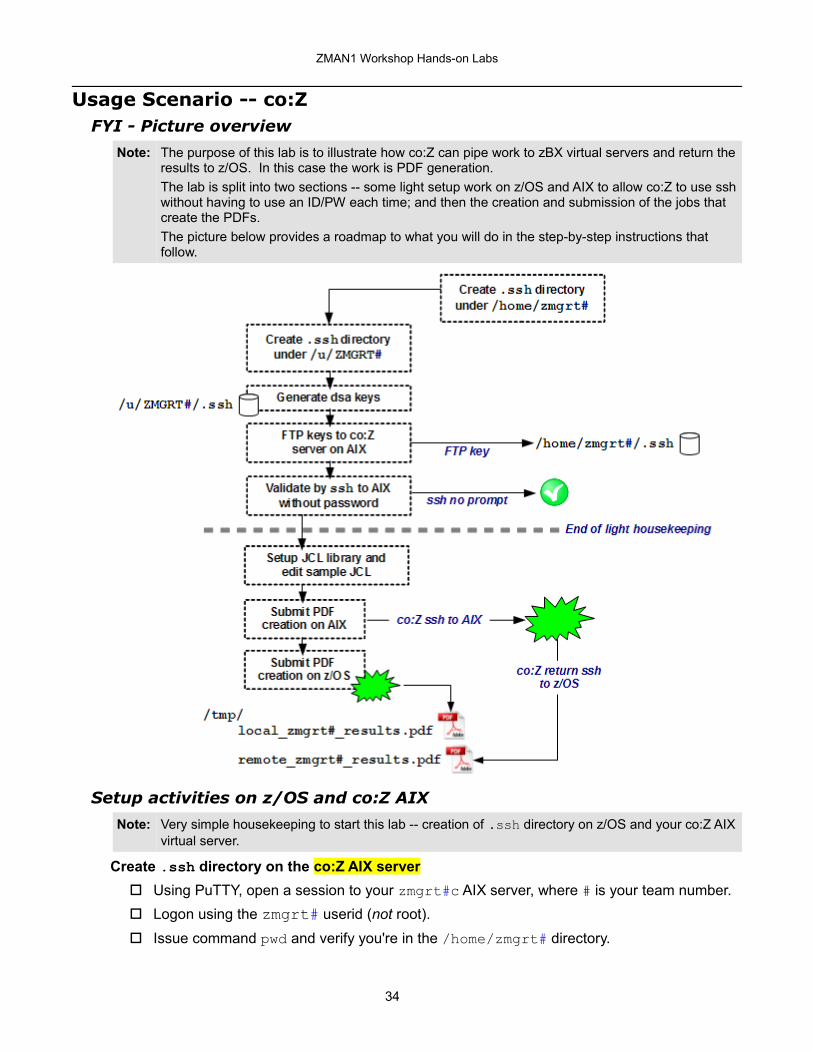
Note: The purpose of this lab is to illustrate how co:Z can pipe work to zBX virtual servers and return the results to z/OS. In this case the work is PDF generation.The lab is split into two sections -- some light setup work on z/OS and AIX to allow co:Z to use ssh without having to use an ID/PW each time; and then the creation and submission of the jobs that create the PDFs.The picture below provides a roadmap to what you will do in the step-by-step instructions that follow.
Setup activities on z/OS and co:Z AIX
Note: Very simple housekeeping to start this lab -- creation of .ssh directory on z/OS and your co:Z AIX virtual server.
Create .ssh directory on the co:Z AIX server Using PuTTY, open a session to your zmgrt#c AIX server, where # is your team number. Logon using the zmgrt# userid (not root). Issue command pwd and verify you're in the /home/zmgrt# directory.
34
ZMAN1 Workshop Hands-on Labs
From the /home/zmgrt# directory issue the following two commands:mkdir .sshchmod 700 .ssh very important!
Close this PuTTY session.Create .ssh directory on the z/OS server
Using PuTTY, open a session to the z/OS system and logon with id ZMGRT# where # is your team number.
Issue command pwd and verify you're in the /u/ZMGRT# directory From the /u/ZMGRT# directory issue the following two commands:
mkdir .sshchmod 700 .ssh very important!
Generate the key pairNote: This dsa key pair is what allows the co:Z launcher on z/OS to establish an ssh pipe to the co:Z
AIX image without having to enter a userid and password. First you generate the keys, then you FTP a set to the AIX server.
In the z/OS PuTTY session make sure you're in the /u/ZMGRT# directory (# = team number) by issuing the pwd command.
Then issue the following command:ssh-keygen -t dsa
You should then see:Generating public/private dsa key pair.Enter file in which to save the key (/u/ZMGRT#/.ssh/id_dsa):Your response: press the Enter key to take the default file name.
Then:Enter passphrase (empty for no passphrase):Your response: press the Enter key to bypass the passphraseIt will respond with:Enter same passphrase again:Your response: press the Enter key
You will then see following output signalling completion of this task:Your identification has been saved in /u/ZMGRT#/.ssh/id_dsa.Your public key has been saved in /u/ZMGRT#/.ssh/id_dsa.pub.The key fingerprint is:60:fd:fa:68:31:5a:1f:be:a6:b5:ad:f5:e9:1c:04:33 ZMGRT#@zblc
FTP the key to the co:Z virtual server Go to the PuTTY session you have open to the z/OS system. Change directories so that you're in the /u/ZMGRT#/.ssh directory (# = team number)
35
ZMAN1 Workshop Hands-on Labs
Then issue the following command30:sftp zmgrt#@zmgrt#c.dmz where # is your team number.
Then provide the password for the zmgrt# ID you created on AIX earlier in the lab. At this point you should have a secure FTP session open to your co:Z AIX virtual server from the z/OS system.
Then issue the following two command in succession:asciicd .ssh
Now you're ready to FTP the keys. Issue the following command:put -p id_dsa.pub authorized_keysYou should then see:Uploading id_dsa.pub to /home/zmgrt3/.ssh/authorized_keysid_dsa.pub 100% 601 0.6KB/s 00:00
Then issue quit to exit the FTP session and return to your PuTTY session.Verify ssh without the need for passwords
Note: The purpose of this setup work was to allow co:Z on z/OS and AIX to open ssh sessions without needing to exchange passwords. The keys you just generated create a "trust" association between the two servers. You're going to test this by manually opening an ssh session.
From the z/OS side, issue:ssh zmgrt#@zmgrt#c.dmzwhere # is your team number.You should see in response something like this:Last login: Wed Jun 22 18:14:58 2011 on ssh from zblct3b.dmz************************************************************************** ** Welcome to AIX Version 6.1! ** ** ** Please see the README file in /usr/lpp/bos for information ** pertinent to this release of the AIX Operating System. ** **************************************************************************zmgrt#@zmgrt#c.dmz/home/zmgrt#>That's your validation -- no password prompt. It's ready for co:Z.
Run some simple co:Z job examples
Note: Before getting to the PDF generation example you'll take a detour and run some very simple co:Z examples against your zmgrt#c AIX server ... just to see the basics of co:Z functionality.
Create a JCL data set and JCL Logon to TSO and edit the ZMGRT#.JCL data set (where # is your team number).
30 If you get a challenge that says, "Are you sure you want to continue connecting (yes/no)?" then answer yes.
36

ZMAN1 Workshop Hands-on Labs
Now create a member and JCL that looks like this:
Note: This is the simplest of co:Z jobs -- using the ID and host info on ARGS= it open an SSH pipe and issues the UNIX command uname -sn (which will return the operating system and user name). By default the output from this comes back to z/OS SYSOUT spool.
Submit the job and take a look at the held output. You should see something like this:Remote system info: AIX zmgrt#cWhich tells you the uname command was run on your co:Z virtual AIX server.
Now create a simple dummy input member named TEXTIN in your JCL library. Populate the file with the following:
Note: The next co:Z process you run on the AIX server will read this member over to AIX, strip out those comment lines and then write the results back to a different member.
37

ZMAN1 Workshop Hands-on Labs
Go back and edit your co:Z job JCL and add what's highlighted in gray:
Notes: (1) - fromdsn and tsodsn are co:Z dataset pipe commands. It allows AIX to get the TEXTIN member from your JCL library on z/OS. In this case they're aliased with a DD statement and resolved lower in the JCL. The sed processing strips any line that starts with the comment character ... then AIX pipes the results back to z/OS using todsn.(2) - The DDs referenced with fromdsn and todsn. The stripped output goes to your JCL data set with member name TEXTOUT.
Submit and compare TEXTIN to TEXTOUT. Think about what took place:
Notes:1 The batch job is started on z/OS. It opens an SSH connection to the named AIX server.2 The job's STDIN DD processing is pushed over the SSH pipe where it runs on AIX3 The co:Z dataset pipe command fromdsn streams the member from z/OS to AIX4 The sed processing interrogates each record, stripping away comment lines5 The co:Z dataset pipe command todsn puts the results back to the named DD, which is
defined in the JCL as a member in your team's PDS6 The batch job's output is written to JES spool
The next lab step will do something similar ... except rather than a simple stripping of comment lines it will generate a large PDF based on a flat file of of input records. All done on AIX.
38

ZMAN1 Workshop Hands-on Labs
Setup PDF creation JCL and submit
Note: Two basic steps here -- create the JCL used to submit the PDF creation, one on z/OS and one on AIX; then run those jobs and compare the time spent generating the PDF files.
Copy the JCL and customize Edit the PDFONP member and do the following:
Edit the PDFONZ member and change: JOB name results PDF name (line 46)You won't have to point to another server because for PDFONZ the generation will take place on z/OS.
Submit the jobs and compare the results Submit your two JCL jobs. When they complete, verify the PDF files reside in the /ZBLC/tmp directory on z/OS:
EUID=111222003 /ZBLC/tmp/ Type Filename _ Dir . _ Dir .. _ File local_zmgrt#_results.pdf _ File remote_zmgrt#_results.pdf _ File sshd.stderr Note: The output for all teams will fall into this directory. This is why we had you qualify the
results PDF file name with your ID. Look carefully to make sure your team's files are there.
39

ZMAN1 Workshop Hands-on Labs
Open the SDSF Output Display for each job and compare the elapsed time and CPU time for each:
Job Elapsed Time CPU Time
PDF on PPDF on Z
Delta
Optional -- download either PDF to your workstation and open with Acrobat reader. It should be a little over 100MB in size.You should see a PDF with 2,000 pages, each populated with a row of data from the input file:
End of the Final Lab
40
ZMAN1 Workshop Hands-on Labs
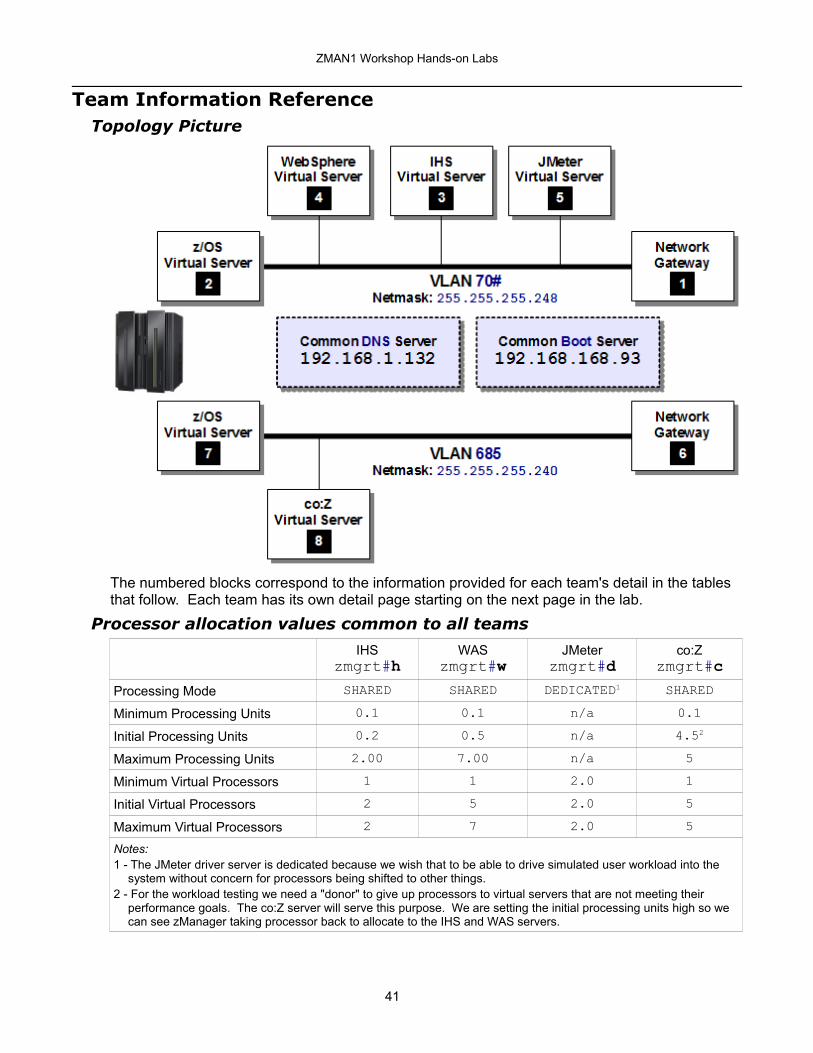
Team Information ReferenceTopology Picture
The numbered blocks correspond to the information provided for each team's detail in the tables that follow. Each team has its own detail page starting on the next page in the lab.
Processor allocation values common to all teams
IHSzmgrt#h
WASzmgrt#w
JMeterzmgrt#d
co:Zzmgrt#c
Processing Mode SHARED SHARED DEDICATED1 SHAREDMinimum Processing Units 0.1 0.1 n/a 0.1Initial Processing Units 0.2 0.5 n/a 4.52
Maximum Processing Units 2.00 7.00 n/a 5Minimum Virtual Processors 1 1 2.0 1Initial Virtual Processors 2 5 2.0 5Maximum Virtual Processors 2 7 2.0 5Notes:1 - The JMeter driver server is dedicated because we wish that to be able to drive simulated user workload into the
system without concern for processors being shifted to other things.2 - For the workload testing we need a "donor" to give up processors to virtual servers that are not meeting their
performance goals. The co:Z server will serve this purpose. We are setting the initial processing units high so we can see zManager taking processor back to allocate to the IHS and WAS servers.
41
ZMAN1 Workshop Hands-on Labs
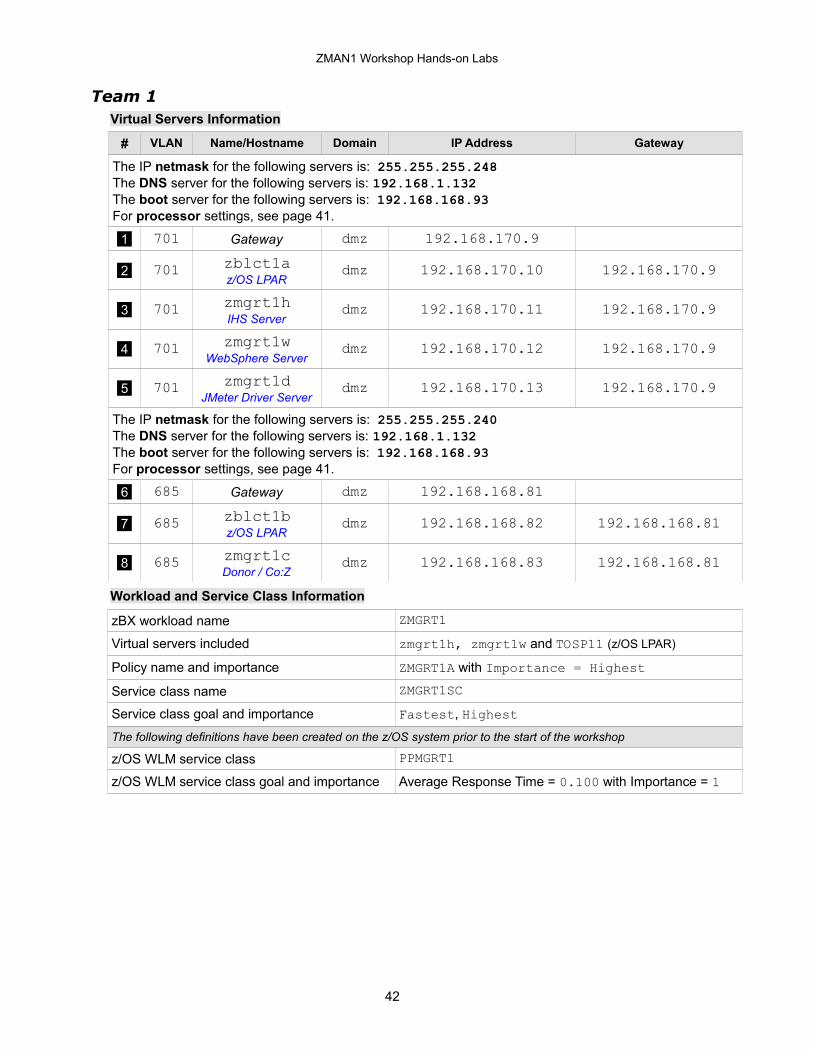
Team 1Virtual Servers Information
# VLAN Name/Hostname Domain IP Address Gateway
The IP netmask for the following servers is: 255.255.255.248The DNS server for the following servers is: 192.168.1.132The boot server for the following servers is: 192.168.168.93For processor settings, see page 41.
1 701 Gateway dmz 192.168.170.9
2 701 zblct1az/OS LPAR
dmz 192.168.170.10 192.168.170.9
3 701 zmgrt1hIHS Server
dmz 192.168.170.11 192.168.170.9
4 701 zmgrt1wWebSphere Server
dmz 192.168.170.12 192.168.170.9
5 701 zmgrt1dJMeter Driver Server
dmz 192.168.170.13 192.168.170.9
The IP netmask for the following servers is: 255.255.255.240The DNS server for the following servers is: 192.168.1.132The boot server for the following servers is: 192.168.168.93For processor settings, see page 41.
6 685 Gateway dmz 192.168.168.81
7 685 zblct1bz/OS LPAR
dmz 192.168.168.82 192.168.168.81
8 685 zmgrt1cDonor / Co:Z
dmz 192.168.168.83 192.168.168.81
Workload and Service Class Information
zBX workload name ZMGRT1Virtual servers included zmgrt1h, zmgrt1w and TOSP11 (z/OS LPAR)
Policy name and importance ZMGRT1A with Importance = HighestService class name ZMGRT1SCService class goal and importance Fastest, HighestThe following definitions have been created on the z/OS system prior to the start of the workshop
z/OS WLM service class PPMGRT1z/OS WLM service class goal and importance Average Response Time = 0.100 with Importance = 1
42

ZMAN1 Workshop Hands-on Labs
Team 2Virtual Servers Information
# VLAN Name/Hostname Domain IP Address Gateway
The IP netmask for the following servers is: 255.255.255.248The DNS server for the following servers is: 192.168.1.132The boot server for the following servers is: 192.168.168.93For processor settings, see page 41.
1 702 Gateway dmz 192.168.170.17
2 702 zblct2az/OS LPAR
dmz 192.168.170.18 192.168.170.17
3 702 zmgrt2hIHS Server
dmz 192.168.170.19 192.168.170.17
4 702 zmgrt2wWebSphere Server
dmz 192.168.170.20 192.168.170.17
5 702 zmgrt2dJMeter Driver Server
dmz 192.168.170.21 192.168.170.17
The IP netmask for the following servers is: 255.255.255.240The DNS server for the following servers is: 192.168.1.132The boot server for the following servers is: 192.168.168.93For processor settings, see page 41.
6 685 Gateway dmz 192.168.168.81
7 685 zblct2bz/OS LPAR
dmz 192.168.168.82 192.168.168.81
8 685 zmgrt2cDonor / Co:Z
dmz 192.168.168.84 192.168.168.81
Workload and Service Class Information
zBX workload ZMGRT2Virtual servers included zmgrt2h, zmgrt2w and TOSP11 (z/OS LPAR)
Policy name and importance ZMGRT2A with Importance = HighService class name ZMGRT2SCService class goal and importance Fast, HighThe following definitions have been created on the z/OS system prior to the start of the workshop
z/OS WLM service class PPMGRT2z/OS WLM service class goal and importance Average Response Time = 0.200 with Importance = 2
43

ZMAN1 Workshop Hands-on Labs
Team 3Virtual Servers Information
# VLAN Name/Hostname Domain IP Address Gateway
The IP netmask for the following servers is: 255.255.255.248The DNS server for the following servers is: 192.168.1.132The boot server for the following servers is: 192.168.168.93For processor settings, see page 41.
1 703 Gateway dmz 192.168.170.25
2 703 zblct3az/OS LPAR
dmz 192.168.170.26 192.168.170.25
3 703 zmgrt3hIHS Server
dmz 192.168.170.27 192.168.170.25
4 703 zmgrt3wWebSphere Server
dmz 192.168.170.28 192.168.170.25
5 703 zmgrt3dJMeter Driver Server
dmz 192.168.170.29 192.168.170.25
The IP netmask for the following servers is: 255.255.255.240The DNS server for the following servers is: 192.168.1.132The boot server for the following servers is: 192.168.168.93For processor settings, see page 41.
6 685 Gateway dmz 192.168.168.81
7 685 zblct3bz/OS LPAR
dmz 192.168.168.82 192.168.168.81
8 685 zmgrt3cDonor / Co:Z
dmz 192.168.168.85 192.168.168.81
Workload and Service Class Information
zBX workload ZMGRT3Virtual servers included zmgrt3h, zmgrt3w and TOSP11 (z/OS LPAR)
Policy name and importance ZMGRT3A with Importance = HighService class name ZMGRT3SCService class goal and importance Moderate, HighThe following definitions have been created on the z/OS system prior to the start of the workshop
z/OS WLM service class PPMGRT3z/OS WLM service class goal and importance Average Response Time = 0.500 with Importance = 3
44

ZMAN1 Workshop Hands-on Labs
Team 4Virtual Servers Information
# VLAN Name/Hostname Domain IP Address Gateway
The IP netmask for the following servers is: 255.255.255.248The DNS server for the following servers is: 192.168.1.132The boot server for the following servers is: 192.168.168.93For processor settings, see page 41.
1 704 Gateway dmz 192.168.170.33
2 704 zblct4az/OS LPAR
dmz 192.168.170.34 192.168.170.33
3 704 zmgrt4hIHS Server
dmz 192.168.170.35 192.168.170.33
4 704 zmgrt4wWebSphere Server
dmz 192.168.170.36 192.168.170.33
5 704 zmgrt4dJMeter Driver Server
dmz 192.168.170.37 192.168.170.33
The IP netmask for the following servers is: 255.255.255.240The DNS server for the following servers is: 192.168.1.132The boot server for the following servers is: 192.168.168.93For processor settings, see page 41.
6 685 Gateway dmz 192.168.168.81
7 685 zblct4bz/OS LPAR
dmz 192.168.168.82 192.168.168.81
8 685 zmgrt4cDonor / Co:Z
dmz 192.168.168.86 192.168.168.81
Workload and Service Class Information
zBX workload ZMGRT4Virtual servers included zmgrt4h, zmgrt4w and TOSP11 (z/OS LPAR)
Policy name and importance ZMGRT4A with Importance = HighService class name ZMGRT4SCService class goal and importance Fast, LowestThe following definitions have been created on the z/OS system prior to the start of the workshop
z/OS WLM service class PPMGRT4z/OS WLM service class goal and importance Average Response Time = 1.000 with Importance = 4
45

ZMAN1 Workshop Hands-on Labs
Team 5Virtual Servers Information
# VLAN Name/Hostname Domain IP Address Gateway
The IP netmask for the following servers is: 255.255.255.248The DNS server for the following servers is: 192.168.1.132The boot server for the following servers is: 192.168.168.93For processor settings, see page 41.
1 705 Gateway dmz 192.168.170.41
2 705 zblct5az/OS LPAR
dmz 192.168.170.42 192.168.170.41
3 705 zmgrt5hIHS Server
dmz 192.168.170.43 192.168.170.41
4 705 zmgrt5wWebSphere Server
dmz 192.168.170.44 192.168.170.41
5 705 zmgrt5dJMeter Driver Server
dmz 192.168.170.45 192.168.170.41
The IP netmask for the following servers is: 255.255.255.240The DNS server for the following servers is: 192.168.1.132The boot server for the following servers is: 192.168.168.93For processor settings, see page 41.
6 685 Gateway dmz 192.168.168.81
7 685 zblct5bz/OS LPAR
dmz 192.168.168.82 192.168.168.81
8 685 zmgrt5cDonor / Co:Z
dmz 192.168.168.87 192.168.168.81
Workload and Service Class Information
zBX workload ZMGRT5Virtual servers included zmgrt5h, zmgrt5w and TOSP11 (z/OS LPAR)
Policy name and importance ZMGRT5A with Importance = HighestService class name ZMGRT5SCService class goal and importance Fast, HighThe following definitions have been created on the z/OS system prior to the start of the workshop
z/OS WLM service class PPMGRT5z/OS WLM service class goal and importance Average Response Time = 0.400 with Importance = 2
46

ZMAN1 Workshop Hands-on Labs
Team 6Virtual Servers Information
# VLAN Name/Hostname Domain IP Address Gateway
The IP netmask for the following servers is: 255.255.255.248The DNS server for the following servers is: 192.168.1.132The boot server for the following servers is: 192.168.168.93For processor settings, see page 41.
1 706 Gateway dmz 192.168.170.49
2 706 zblct6az/OS LPAR
dmz 192.168.170.50 192.168.170.49
3 706 zmgrt6hIHS Server
dmz 192.168.170.51 192.168.170.49
4 706 zmgrt6wWebSphere Server
dmz 192.168.170.52 192.168.170.49
5 706 zmgrt6dJMeter Driver Server
dmz 192.168.170.53 192.168.170.49
The IP netmask for the following servers is: 255.255.255.240The DNS server for the following servers is: 192.168.1.132The boot server for the following servers is: 192.168.168.93For processor settings, see page 41.
6 685 Gateway dmz 192.168.168.81
7 685 zblct6bz/OS LPAR
dmz 192.168.168.82 192.168.168.81
8 685 zmgrt6cDonor / Co:Z
dmz 192.168.168.88 192.168.168.81
Workload and Service Class Information
zBX workload ZMGRT6Virtual servers included zmgrt6h, zmgrt6w and TOSP11 (z/OS LPAR)
Policy name and importance ZMGRT6A with Importance = HighestService class name ZMGRT6SCService class goal and importance Fast, LowThe following definitions have been created on the z/OS system prior to the start of the workshop
z/OS WLM service class PPMGRT6z/OS WLM service class goal and importance Average Response Time = 0.800 with Importance = 3
47

ZMAN1 Workshop Hands-on Labs
Lab Helper NotesUsing the WS-FTP client
Launching the client yields the connect panel:
Provide the host name or IP address, host type and user id.When connected the left side is the workstation and the right side is the UNIX host:
The arrows -- left and right -- in the middle of the panel indicate upload or download.The "View" button on the workstation side31 will launch the configured editor.
vi editor usage notesWhen the vi command edit mode is active, the command prompt can be in either the vi text-input mode or the vi command mode.The command line starts in text-input mode where all typed characters become part of the text on the command line. Pressing the Esc key while in text-input mode switches your screen to the vi command mode. In the command mode, the interpreter recognizes the following standard vi subcommands:l w W e E h b B | ^ $ f F t T ; , k - j + G ? / n N . a i A s S R ~ I C D x X p P Y r y d c u and U.
31 On the mainframe side the "view" function works, but you can't save changes. On the workstation side you can.
48

ZMAN1 Workshop Hands-on Labs
Note: Any vi subcommands that begin with a colon are not supported.A small set of the vi commands are presented here. For more detail, see this link in the AIX Info. Center:http://publib.boulder.ibm.com/infocenter/aix/v6r1/topic/com.ibm.aix.kdb/doc/kdb/kdb_viedit.htm
Enter the following subcommands in command mode. You can cancel an incomplete command by pressing the Esc key. If you need information about the format of vi subcommands, refer to the AIX Info. Center item:http://publib.boulder.ibm.com/infocenter/aix/v6r1/index.jsp? topic=/com.ibm.aix.cmds/doc/aixcmds6/vi.htm
Recalling commandsh Moves the cursor one character to the left in the current commandj Recalls the next more recently issued command.k Recalls the command previous to the current onel Moves the curser one character to the right in the current command
Moving the cursor within a commandw Moves the cursor to the next small word.
b Moves the cursor to the previous small word.
e Moves the cursor to the next end of a small word.
W Moves the cursor to the next big word.
B Moves the cursor to the previous big word.
E Moves the cursor to the next end of a big word.
Modifying text within a commanda text Inserts text specified by the Text parameter after the cursor. End text input mode by pressing the
Esc key.
A text Adds text specified by the Text parameter to the end of the line. End text input mode by pressing the Esc key.
i text Inserts text specified by the Text parameter before the cursor. End text input mode by pressing the Esc key.
I text Inserts text specified by the Text parameter before the first nonblank character in the line. End text input mode by pressing the Esc key.
o Adds an empty line below the current line. End text input mode by pressing the Esc key.
O Adds an empty line above the current line. End text input mode by pressing the Esc key.
Listing of workloads and general access to reports
• In the left navigation panel, click on
• The HMC panel should look like this:
49

ZMAN1 Workshop Hands-on Labs
• There are two paths to the reports for a selected workload:
50

ZMAN1 Workshop Hands-on Labs
Service classes reportThis is a good place to start. The report panel has this format:
From here you can easily get to the:• Service class resource adjustments report• Hops report• Virtual server topology report• The performance index (PI) graph for the service class for the interval
Service class resource adjustment reportAccess this from the "Service Classes Report" drop down list.Provides information about virtual server adjustments made to meet defined goals. In this lab you will see repeated movements of CPU from the zmgrt#c server to either the WAS or IHS virtual server:
Hops ReportAccess this from the "Service Classes Report" drop down list.Provides detailed statics of each "hop" of the workload topology:
51
ZMAN1 Workshop Hands-on Labs
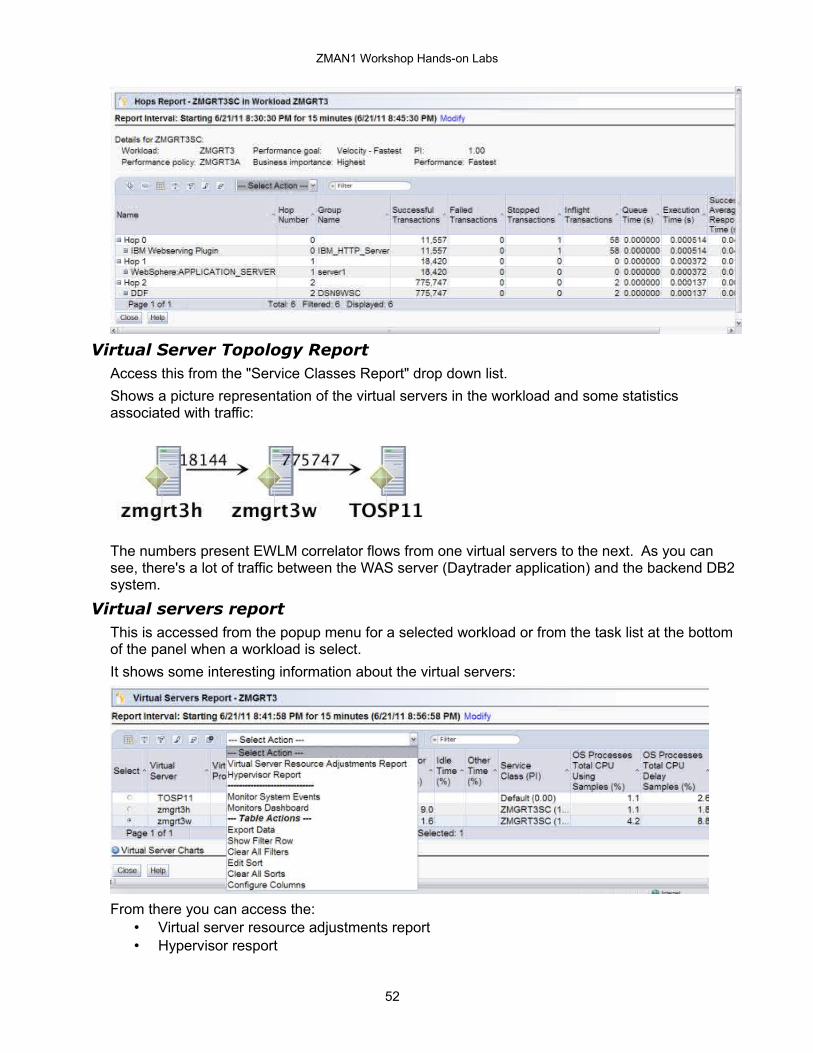
Virtual Server Topology ReportAccess this from the "Service Classes Report" drop down list.Shows a picture representation of the virtual servers in the workload and some statistics associated with traffic:
The numbers present EWLM correlator flows from one virtual servers to the next. As you can see, there's a lot of traffic between the WAS server (Daytrader application) and the backend DB2 system.
Virtual servers reportThis is accessed from the popup menu for a selected workload or from the task list at the bottom of the panel when a workload is select.It shows some interesting information about the virtual servers:
From there you can access the:• Virtual server resource adjustments report• Hypervisor resport
52

ZMAN1 Workshop Hands-on Labs
Workload resource adjustments reportThis is accessed from the popup menu for a selected workload or from the task list at the bottom of the panel when a workload is select. It is similar to the Service Class Resource Adjustments report:
Hypervisor reportThis may be accessed from the "Virtual Servers" drop down list for a selected workload.This provides details on the hypervisors associated with a workload:
End of Document
53