ATLAS.ti Mobile for the iPad - User Manualdownloads.atlasti.com/docs/ATLASti_mobile_iPad.pdf ·...
25
ATLAS.ti Mobile for the iPad User Manual
Transcript of ATLAS.ti Mobile for the iPad - User Manualdownloads.atlasti.com/docs/ATLASti_mobile_iPad.pdf ·...
ATLAS.ti Mobilefor the iPad
User Manual
ATLAS.ti Mobile for the iPad - User ManualCopyright ©2018 by ATLAS.ti Scientific Software Development GmbH, Berlin. All rights reserved. Document version: 635.20180913.
Author: Dr. Susanne Friese (QuaRC)Production: hypertexxt.com/Dr. Thomas G. Ringmayr
Copying or duplicating this document or any part thereof is a violation of applicable law. No part of this manual may be reproduced or transmitted in any form or by any means, electronic or mechanical, including, but not limited to, photocopying, without written permission from ATLAS.ti GmbH.
Trademarks: ATLAS.ti is a registered trademark of ATLAS.ti Scientific Software Development GmbH. Adobe Acrobat is a trademark of Adobe Systems Incorporated; Microsoft, Windows, Excel, and other Microsoft products referenced herein are either trademarks of MicrosoftCorporation in the United States and/or in other countries. Google Earth is a trademark of Google, Inc. All other product names and any registered and unregistered tradem
CONTENTS 3
Contents
Introduction .............................................................................................................................................................................................. 4
Main Concepts And Features .................................................................................................................................................................. 4
Documents ...................................................................................................................................................................................... 4Quotations ....................................................................................................................................................................................... 4Codes ................................................................................................................................................................................................ 5Memos ............................................................................................................................................................................................. 5Project .............................................................................................................................................................................................. 5
Main Steps In Working With ATLAS.ti ................................................................................................................................................... 5
Start A New Mobile Project .................................................................................................................................................................... 6
Creating A New Project .................................................................................................................................................................. 6Adding Documents ......................................................................................................................................................................... 7Collecting Data – Image, Audio And video files .......................................................................................................................... 10Documents With Geo Tags ........................................................................................................................................................... 10Renaming A document Or Your Project ....................................................................................................................................... 11Removing Documents From A Project ......................................................................................................................................... 11Saving The Project ......................................................................................................................................................................... 12
Working With Quotations ...................................................................................................................................................................... 12
Creating Text Quotations .............................................................................................................................................................. 12Writing Quotation Comments ...................................................................................................................................................... 13Creating Image Quotations ........................................................................................................................................................... 13Creating Audio Or Video Quotations ............................................................................................................................................ 14Adjusting The Size Of Quotations ................................................................................................................................................ 15Deleting Quotations ...................................................................................................................................................................... 15Navigating Through Your Quotations .......................................................................................................................................... 15The Quotation Screen ................................................................................................................................................................... 16
Working With Codes ............................................................................................................................................................................... 17
Coding With A New Code .............................................................................................................................................................. 17Coding With An Existing Code / Unlinking Codes ...................................................................................................................... 18Linking Codes to Existing Quotations ......................................................................................................................................... 19Creating New (Free) Codes ........................................................................................................................................................... 19Deleting Codes .............................................................................................................................................................................. 20Setting Code Colors And Writing Code Definitions ................................................................................................................... 20Retrieving Coded Quotations ....................................................................................................................................................... 21The Code Screen ............................................................................................................................................................................ 22
Working With Memos ............................................................................................................................................................................ 22
Difference Between Memos And Codes ..................................................................................................................................... 23How Memos And Comments Differ ............................................................................................................................................ 23Adding Memos .............................................................................................................................................................................. 23Deleting Memos ............................................................................................................................................................................ 24
Project Export ......................................................................................................................................................................................... 24
Exporting A Mobile Project .......................................................................................................................................................... 24
ATLAS.ti Mobile for the iPad - User Manual
INTRODUCTION 4
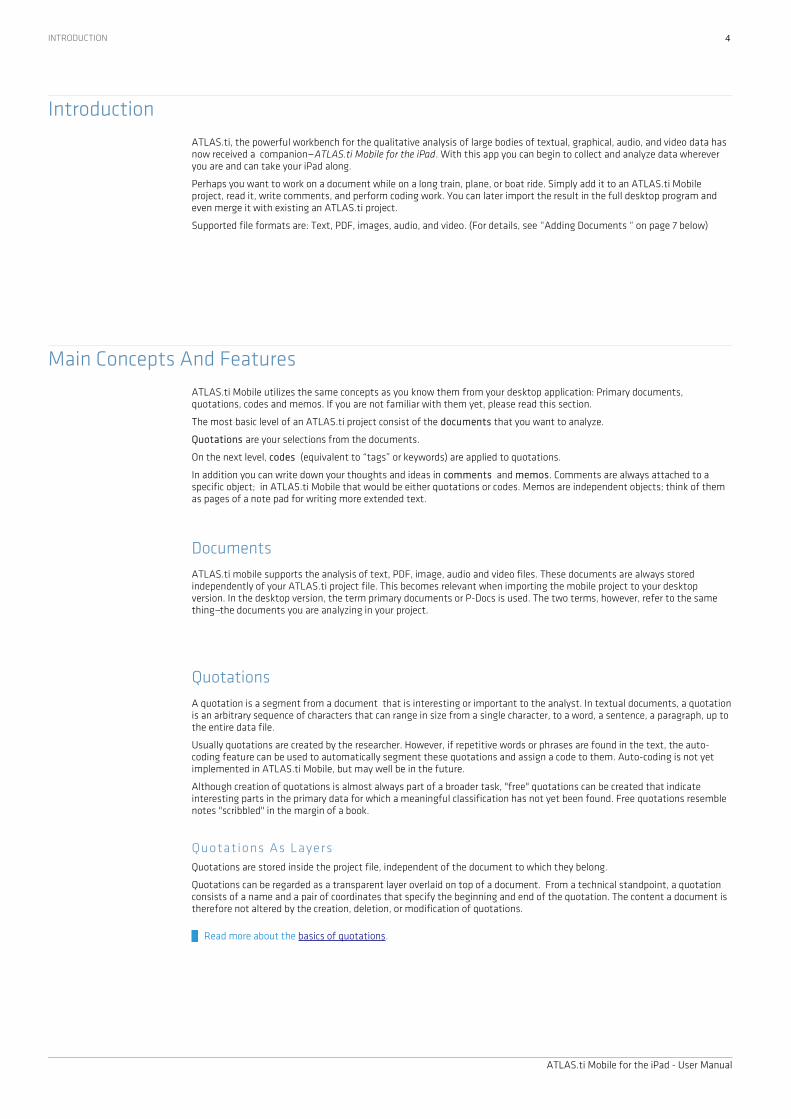
IntroductionATLAS.ti, the powerful workbench for the qualitative analysis of large bodies of textual, graphical, audio, and video data has now received a companion—ATLAS.ti Mobile for the iPad. With this app you can begin to collect and analyze data wherever you are and can take your iPad along.
Perhaps you want to work on a document while on a long train, plane, or boat ride. Simply add it to an ATLAS.ti Mobile project, read it, write comments, and perform coding work. You can later import the result in the full desktop program and even merge it with existing an ATLAS.ti project.
Supported file formats are: Text, PDF, images, audio, and video. (For details, see “Adding Documents “ on page 7 below)
Main Concepts And FeaturesATLAS.ti Mobile utilizes the same concepts as you know them from your desktop application: Primary documents, quotations, codes and memos. If you are not familiar with them yet, please read this section.
The most basic level of an ATLAS.ti project consist of the documents that you want to analyze.
Quotations are your selections from the documents.
On the next level, codes (equivalent to “tags” or keywords) are applied to quotations.
In addition you can write down your thoughts and ideas in comments and memos. Comments are always attached to a specific object; in ATLAS.ti Mobile that would be either quotations or codes. Memos are independent objects; think of them as pages of a note pad for writing more extended text.
DocumentsATLAS.ti mobile supports the analysis of text, PDF, image, audio and video files. These documents are always stored independently of your ATLAS.ti project file. This becomes relevant when importing the mobile project to your desktop version. In the desktop version, the term primary documents or P-Docs is used. The two terms, however, refer to the same thing–the documents you are analyzing in your project.
QuotationsA quotation is a segment from a document that is interesting or important to the analyst. In textual documents, a quotationis an arbitrary sequence of characters that can range in size from a single character, to a word, a sentence, a paragraph, up to the entire data file.
Usually quotations are created by the researcher. However, if repetitive words or phrases are found in the text, the auto-coding feature can be used to automatically segment these quotations and assign a code to them. Auto-coding is not yet implemented in ATLAS.ti Mobile, but may well be in the future.
Although creation of quotations is almost always part of a broader task, "free" quotations can be created that indicate interesting parts in the primary data for which a meaningful classification has not yet been found. Free quotations resemble notes "scribbled" in the margin of a book.
Quotat ions As LayersQuotations are stored inside the project file, independent of the document to which they belong.
Quotations can be regarded as a transparent layer overlaid on top of a document. From a technical standpoint, a quotation consists of a name and a pair of coordinates that specify the beginning and end of the quotation. The content a document is therefore not altered by the creation, deletion, or modification of quotations.
Read more about the basics of quotations.
ATLAS.ti Mobile for the iPad - User Manual
MAIN CONCEPTS AND FEATURES 5
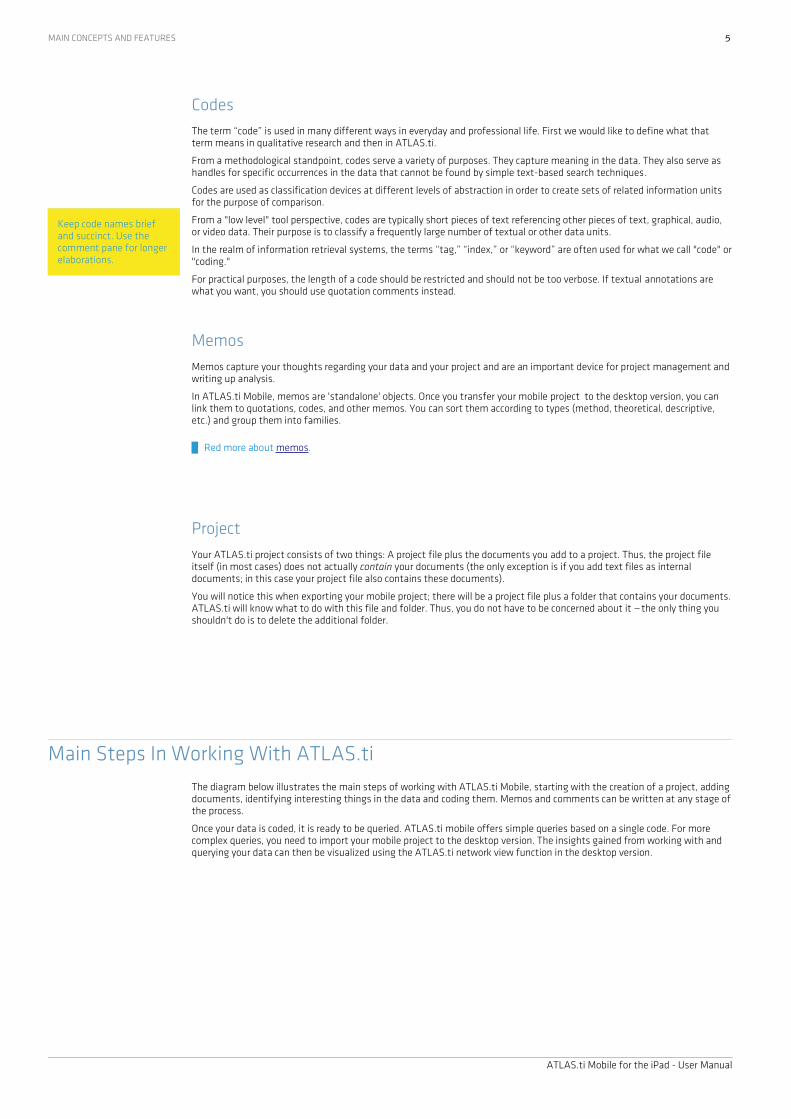
CodesThe term “code” is used in many different ways in everyday and professional life. First we would like to define what that term means in qualitative research and then in ATLAS.ti.
From a methodological standpoint, codes serve a variety of purposes. They capture meaning in the data. They also serve as handles for specific occurrences in the data that cannot be found by simple text-based search techniques.
Codes are used as classification devices at different levels of abstraction in order to create sets of related information units for the purpose of comparison.
From a "low level" tool perspective, codes are typically short pieces of text referencing other pieces of text, graphical, audio, or video data. Their purpose is to classify a frequently large number of textual or other data units.
In the realm of information retrieval systems, the terms “tag,” “index,” or “keyword” are often used for what we call "code" or"coding."
For practical purposes, the length of a code should be restricted and should not be too verbose. If textual annotations are what you want, you should use quotation comments instead.
MemosMemos capture your thoughts regarding your data and your project and are an important device for project management andwriting up analysis.
In ATLAS.ti Mobile, memos are 'standalone' objects. Once you transfer your mobile project to the desktop version, you can link them to quotations, codes, and other memos. You can sort them according to types (method, theoretical, descriptive, etc.) and group them into families.
Red more about memos.
ProjectYour ATLAS.ti project consists of two things: A project file plus the documents you add to a project. Thus, the project file itself (in most cases) does not actually contain your documents (the only exception is if you add text files as internal documents; in this case your project file also contains these documents).
You will notice this when exporting your mobile project; there will be a project file plus a folder that contains your documents.ATLAS.ti will know what to do with this file and folder. Thus, you do not have to be concerned about it – the only thing you shouldn't do is to delete the additional folder.
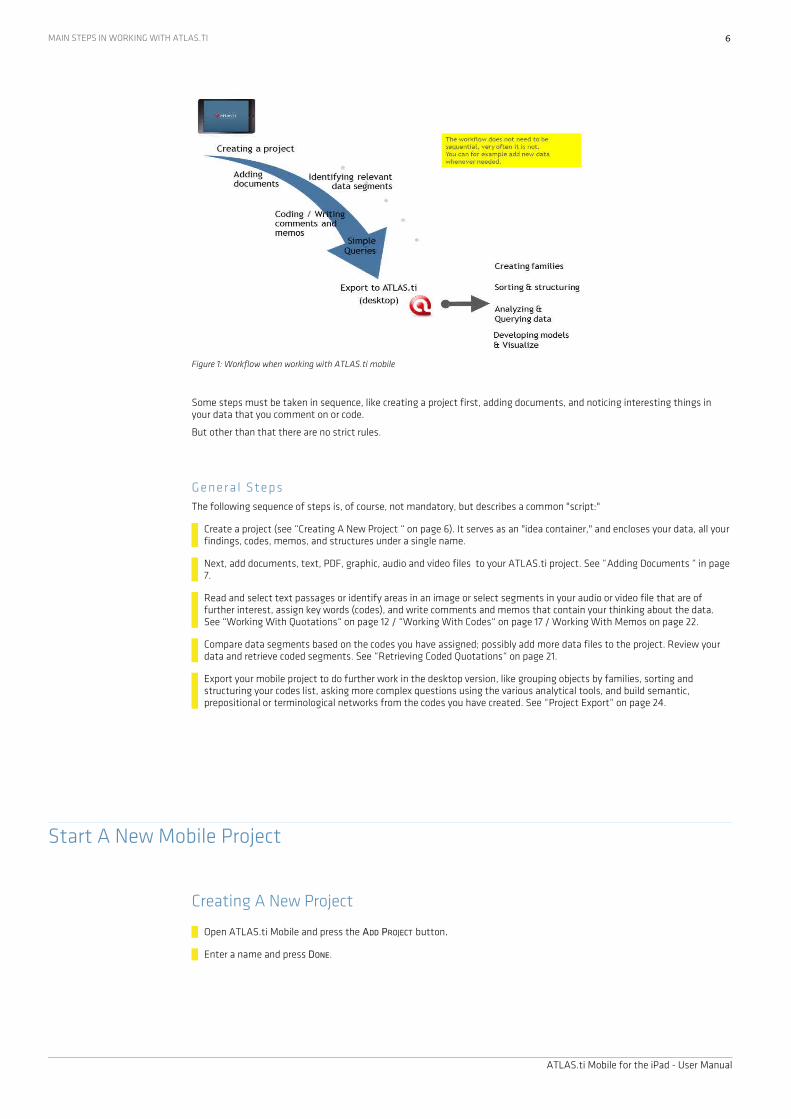
Main Steps In Working With ATLAS.tiThe diagram below illustrates the main steps of working with ATLAS.ti Mobile, starting with the creation of a project, addingdocuments, identifying interesting things in the data and coding them. Memos and comments can be written at any stage ofthe process.
Once your data is coded, it is ready to be queried. ATLAS.ti mobile offers simple queries based on a single code. For more complex queries, you need to import your mobile project to the desktop version. The insights gained from working with and querying your data can then be visualized using the ATLAS.ti network view function in the desktop version.
ATLAS.ti Mobile for the iPad - User Manual
Keep code names brief and succinct. Use the comment pane for longer elaborations.
MAIN STEPS IN WORKING WITH ATLAS.TI 6
Some steps must be taken in sequence, like creating a project first, adding documents, and noticing interesting things in your data that you comment on or code.
But other than that there are no strict rules.
Genera l Steps The following sequence of steps is, of course, not mandatory, but describes a common "script:"
Create a project (see “Creating A New Project “ on page 6). It serves as an "idea container," and encloses your data, all your findings, codes, memos, and structures under a single name.
Next, add documents, text, PDF, graphic, audio and video files to your ATLAS.ti project. See “Adding Documents “ in page7.
Read and select text passages or identify areas in an image or select segments in your audio or video file that are of further interest, assign key words (codes), and write comments and memos that contain your thinking about the data. See “Working With Quotations“ on page 12 / “Working With Codes“ on page 17 / Working With Memos on page 22.
Compare data segments based on the codes you have assigned; possibly add more data files to the project. Review your data and retrieve coded segments. See “Retrieving Coded Quotations“ on page 21.
Export your mobile project to do further work in the desktop version, like grouping objects by families, sorting and structuring your codes list, asking more complex questions using the various analytical tools, and build semantic, prepositional or terminological networks from the codes you have created. See “Project Export“ on page 24.
Start A New Mobile Project
Creating A New Project
Open ATLAS.ti Mobile and press the ADD PROJECT button.
Enter a name and press DONE.
ATLAS.ti Mobile for the iPad - User Manual
Figure 1: Workflow when working with ATLAS.ti mobile
START A NEW MOBILE PROJECT 7
Adding Documents ATLAS.ti Mobile supports the following document formats: Text, PDF, image, audio, and video. There are three ways of adding documents to your ATLAS.ti Mobile projects:
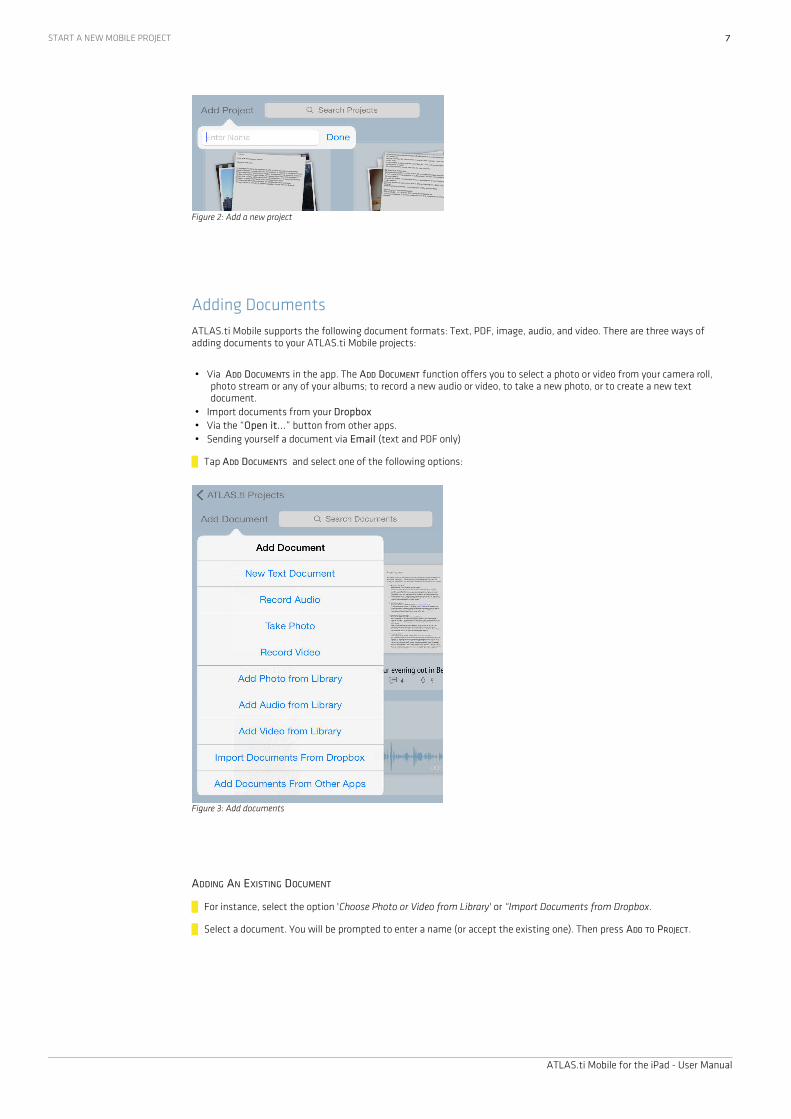
• Via ADD DOCUMENTS in the app. The ADD DOCUMENT function offers you to select a photo or video from your camera roll, photo stream or any of your albums; to record a new audio or video, to take a new photo, or to create a new text document.
• Import documents from your Dropbox• Via the “Open it...” button from other apps.• Sending yourself a document via Email (text and PDF only)
Tap ADD DOCUMENTS and select one of the following options:
ADDING AN EXISTING DOCUMENT
For instance, select the option 'Choose Photo or Video from Library' or “Import Documents from Dropbox.
Select a document. You will be prompted to enter a name (or accept the existing one). Then press ADD TO PROJECT.
ATLAS.ti Mobile for the iPad - User Manual
Figure 3: Add documents
Figure 2: Add a new project
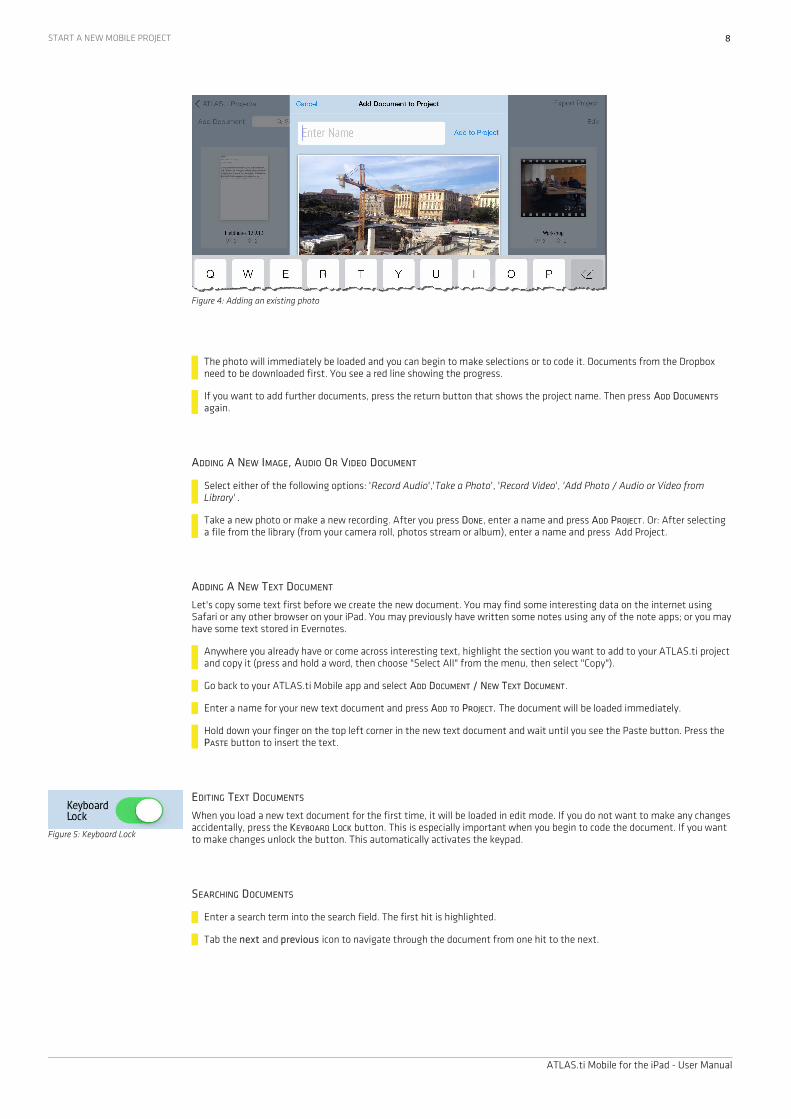
Figure 5: Keyboard Lock
START A NEW MOBILE PROJECT 8
The photo will immediately be loaded and you can begin to make selections or to code it. Documents from the Dropbox need to be downloaded first. You see a red line showing the progress.
If you want to add further documents, press the return button that shows the project name. Then press ADD DOCUMENTS again.
ADDING A NEW IMAGE, AUDIO OR VIDEO DOCUMENT
Select either of the following options: 'Record Audio','Take a Photo', 'Record Video', 'Add Photo / Audio or Video from Library' .
Take a new photo or make a new recording. After you press DONE, enter a name and press ADD PROJECT. Or: After selecting a file from the library (from your camera roll, photos stream or album), enter a name and press Add Project.
ADDING A NEW TEXT DOCUMENT
Let's copy some text first before we create the new document. You may find some interesting data on the internet using Safari or any other browser on your iPad. You may previously have written some notes using any of the note apps; or you mayhave some text stored in Evernotes.
Anywhere you already have or come across interesting text, highlight the section you want to add to your ATLAS.ti projectand copy it (press and hold a word, then choose "Select All" from the menu, then select "Copy").
Go back to your ATLAS.ti Mobile app and select ADD DOCUMENT / NEW TEXT DOCUMENT.
Enter a name for your new text document and press ADD TO PROJECT. The document will be loaded immediately.
Hold down your finger on the top left corner in the new text document and wait until you see the Paste button. Press the PASTE button to insert the text.
EDITING TEXT DOCUMENTS
When you load a new text document for the first time, it will be loaded in edit mode. If you do not want to make any changesaccidentally, press the KEYBOARD LOCK button. This is especially important when you begin to code the document. If you want to make changes unlock the button. This automatically activates the keypad.
SEARCHING DOCUMENTS
Enter a search term into the search field. The first hit is highlighted.
Tab the next and previous icon to navigate through the document from one hit to the next.
ATLAS.ti Mobile for the iPad - User Manual
Figure 4: Adding an existing photo
START A NEW MOBILE PROJECT 9
Adding Documents From Other AppsYou can add PDF, text, audio, video, and image documents from other apps to your ATLAS.ti Mobile projects.
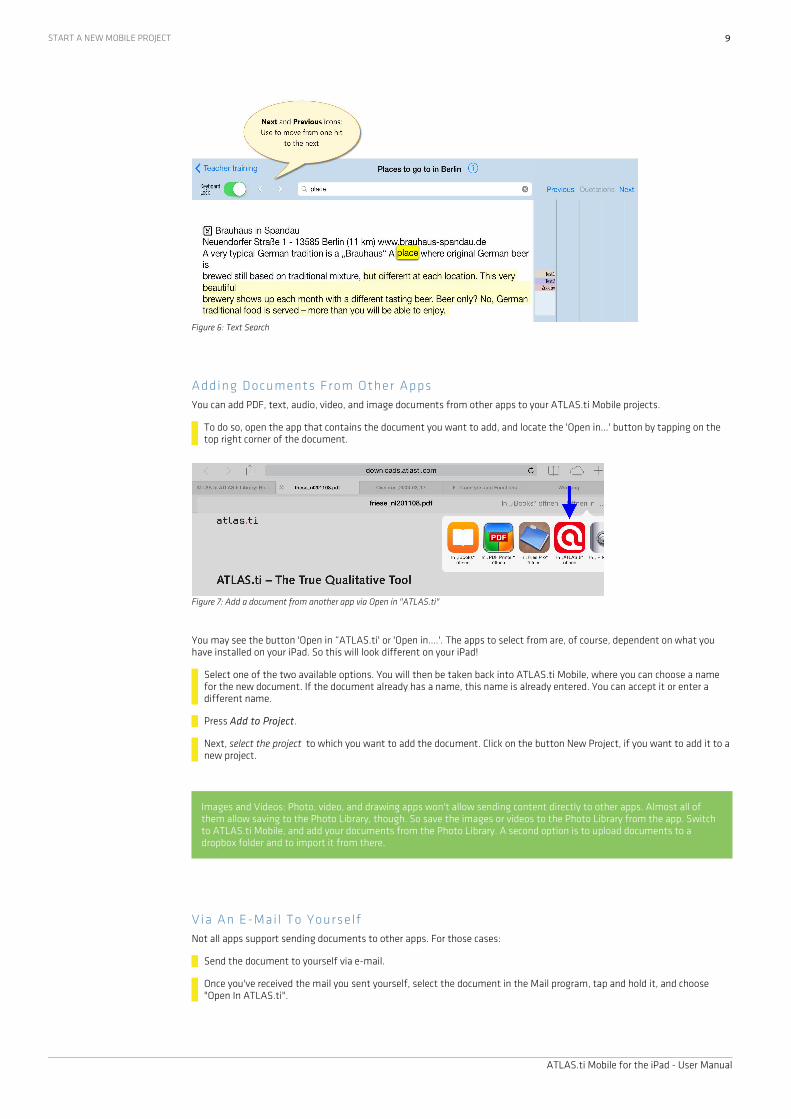
To do so, open the app that contains the document you want to add, and locate the 'Open in...' button by tapping on the top right corner of the document.
You may see the button 'Open in “ATLAS.ti' or 'Open in....'. The apps to select from are, of course, dependent on what you have installed on your iPad. So this will look different on your iPad!
Select one of the two available options. You will then be taken back into ATLAS.ti Mobile, where you can choose a name for the new document. If the document already has a name, this name is already entered. You can accept it or enter a different name.
Press Add to Project.
Next, select the project to which you want to add the document. Click on the button New Project, if you want to add it to anew project.
Images and Videos: Photo, video, and drawing apps won't allow sending content directly to other apps. Almost all of them allow saving to the Photo Library, though. So save the images or videos to the Photo Library from the app. Switch to ATLAS.ti Mobile, and add your documents from the Photo Library. A second option is to upload documents to a dropbox folder and to import it from there.
Via An E-Mail To YourselfNot all apps support sending documents to other apps. For those cases:
Send the document to yourself via e-mail.
Once you've received the mail you sent yourself, select the document in the Mail program, tap and hold it, and choose "Open In ATLAS.ti".
ATLAS.ti Mobile for the iPad - User Manual
Figure 7: Add a document from another app via Open in "ATLAS.ti"
Figure 6: Text Search
START A NEW MOBILE PROJECT 10
The Mail program won't allow this for audio, video, and image documents.
PDF - Some applications may not support sending PDFs to other apps, but may allow mailing the PDFs to yourself or uploading them to a dropbox folder.
Collecting Data – Image, Audio And video files
Take a New Photo
Tap ADD DOCUMENTS and then select TAKE PHOTO. This opens the camera of your Ipad and you can a photo as usual. If you like the photo, tap USE; otherwise tap the Retake button.
If you want to use the photo, you will see the Add Document to Project screen. Enter a name and tap ADD TO PROJECT.
Add a new Video Recording
Tap ADD DOCUMENTS and then select the RECORD VIDEO option. This opens the camera of your iPad and you begin to record a video as usual. If you like the video, tab USE; otherwise tab the Retake button.
If you want to use the video, you will see the Add Document to Project screen. Enter a name and tap ADD TO PROJECT.
Add a new Audio Recording
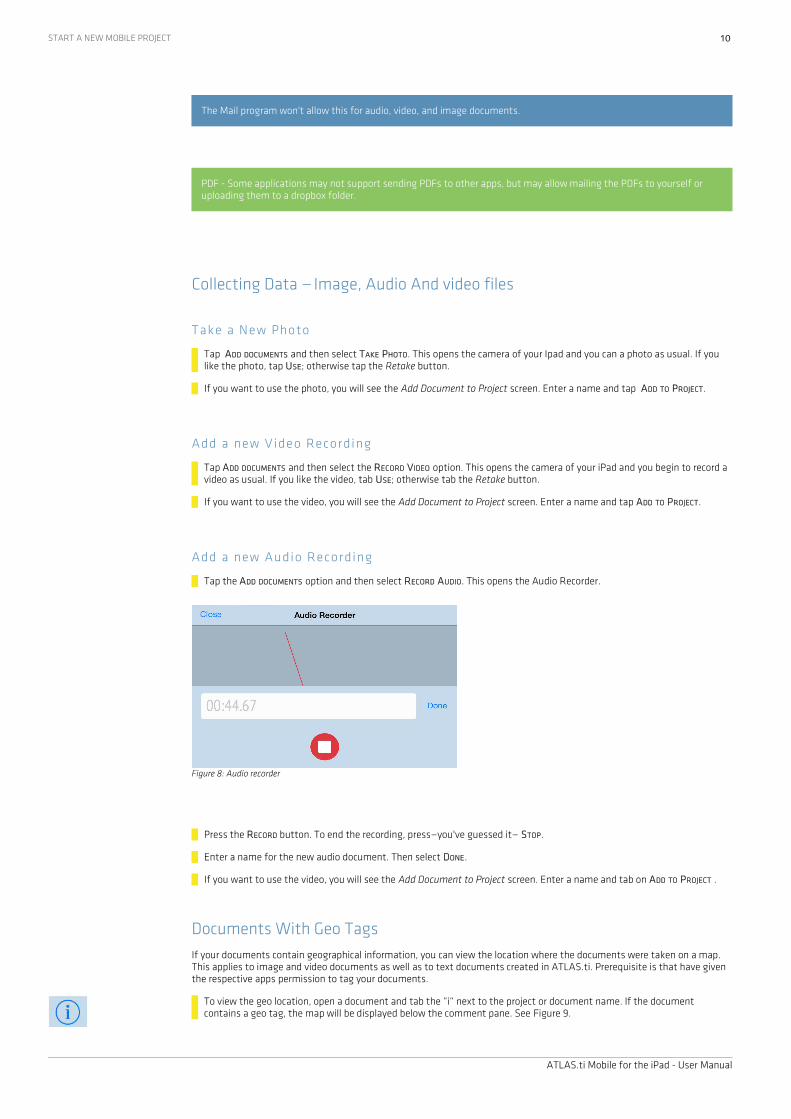
Tap the ADD DOCUMENTS option and then select RECORD AUDIO. This opens the Audio Recorder.
Press the RECORD button. To end the recording, press—you've guessed it— STOP.
Enter a name for the new audio document. Then select DONE.
If you want to use the video, you will see the Add Document to Project screen. Enter a name and tab on ADD TO PROJECT .
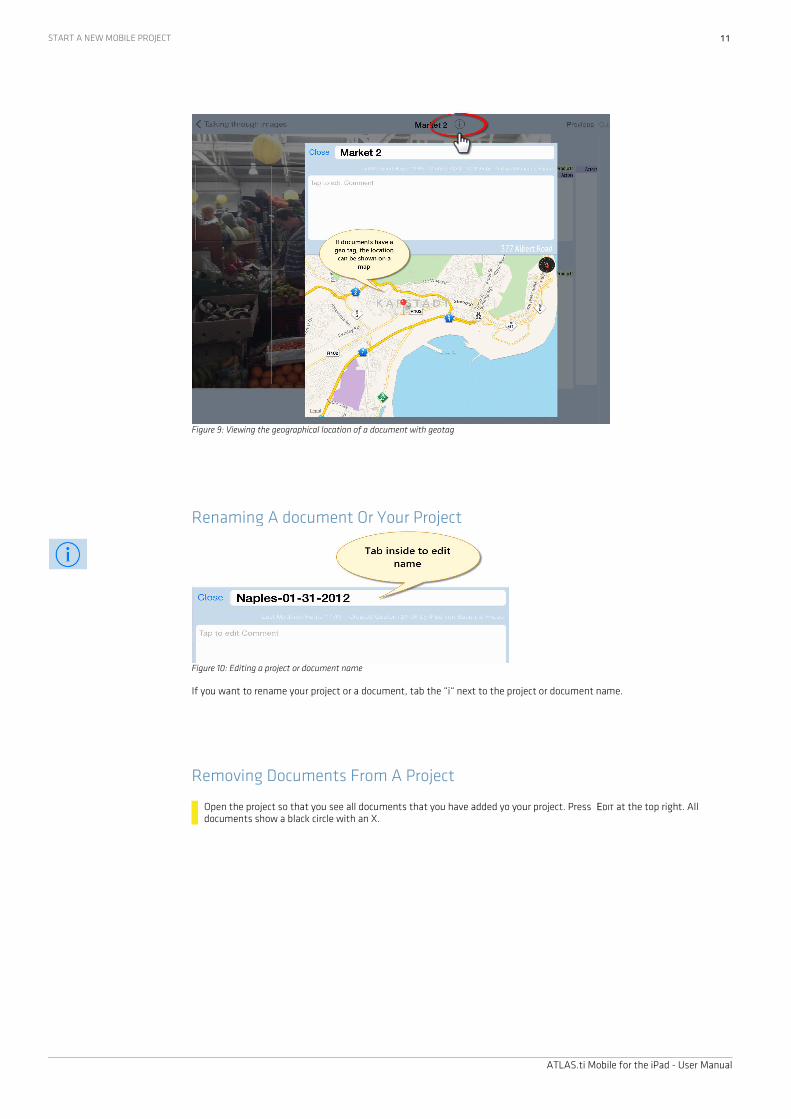
Documents With Geo TagsIf your documents contain geographical information, you can view the location where the documents were taken on a map. This applies to image and video documents as well as to text documents created in ATLAS.ti. Prerequisite is that have given the respective apps permission to tag your documents.
To view the geo location, open a document and tab the “i“ next to the project or document name. If the document contains a geo tag, the map will be displayed below the comment pane. See Figure 9.
ATLAS.ti Mobile for the iPad - User Manual
Figure 8: Audio recorder
START A NEW MOBILE PROJECT 11
Renaming A document Or Your Project
If you want to rename your project or a document, tab the “i“ next to the project or document name.
Removing Documents From A Project
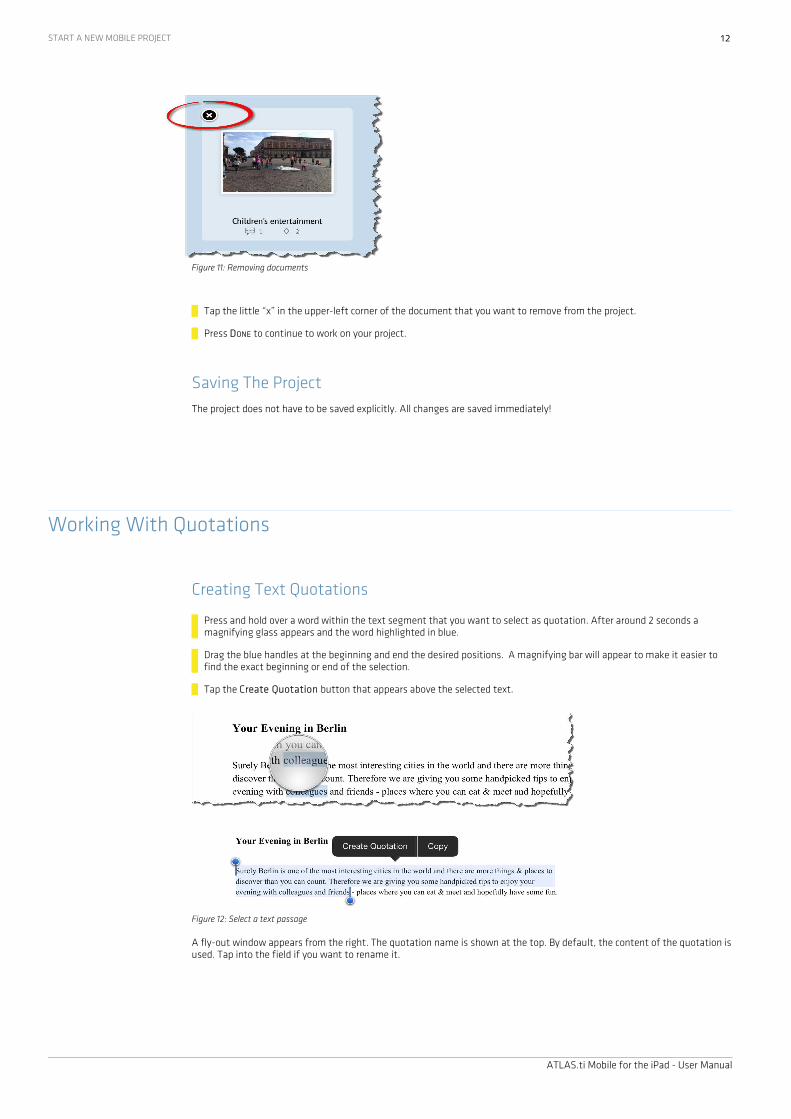
Open the project so that you see all documents that you have added yo your project. Press EDIT at the top right. All documents show a black circle with an X.
ATLAS.ti Mobile for the iPad - User Manual
Figure 9: Viewing the geographical location of a document with geotag
Figure 10: Editing a project or document name
START A NEW MOBILE PROJECT 12
Tap the little “x” in the upper-left corner of the document that you want to remove from the project.
Press DONE to continue to work on your project.
Saving The ProjectThe project does not have to be saved explicitly. All changes are saved immediately!
Working With Quotations
Creating Text Quotations
Press and hold over a word within the text segment that you want to select as quotation. After around 2 seconds a magnifying glass appears and the word highlighted in blue.
Drag the blue handles at the beginning and end the desired positions. A magnifying bar will appear to make it easier to find the exact beginning or end of the selection.
Tap the Create Quotation button that appears above the selected text.
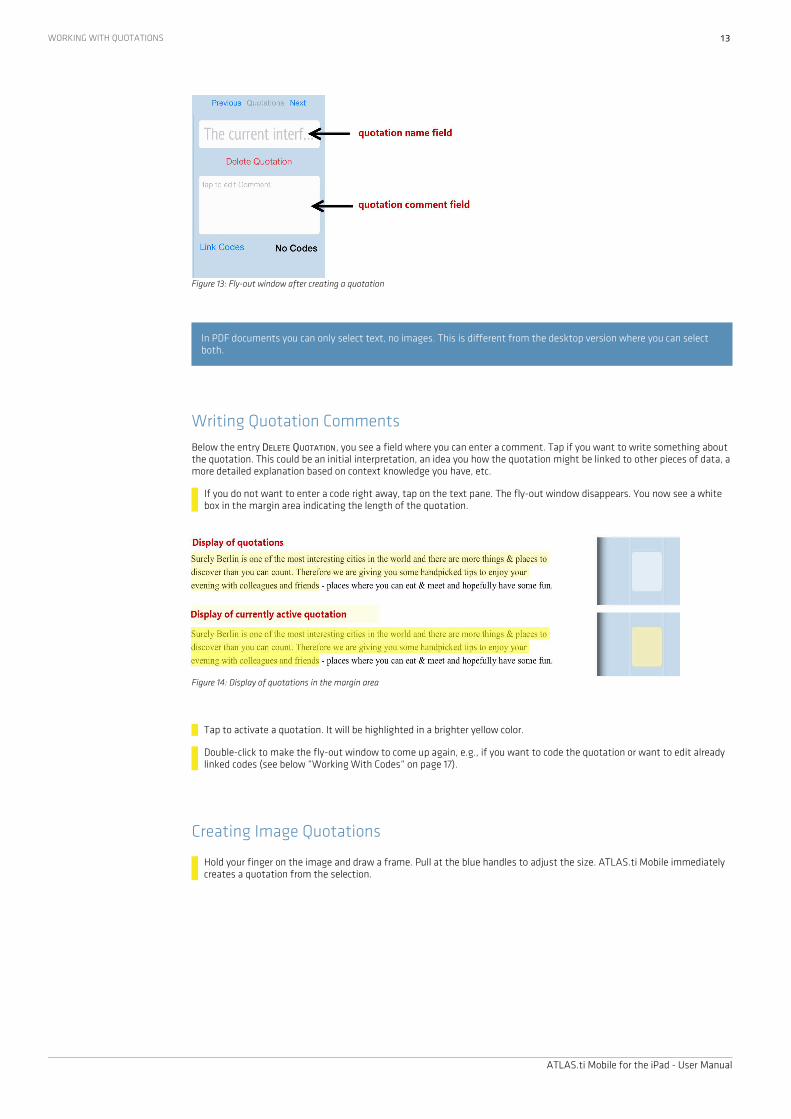
A fly-out window appears from the right. The quotation name is shown at the top. By default, the content of the quotation isused. Tap into the field if you want to rename it.
ATLAS.ti Mobile for the iPad - User Manual
Figure 11: Removing documents
Figure 12: Select a text passage
WORKING WITH QUOTATIONS 13
In PDF documents you can only select text, no images. This is different from the desktop version where you can select both.
Writing Quotation CommentsBelow the entry DELETE QUOTATION, you see a field where you can enter a comment. Tap if you want to write something about the quotation. This could be an initial interpretation, an idea you how the quotation might be linked to other pieces of data, amore detailed explanation based on context knowledge you have, etc.
If you do not want to enter a code right away, tap on the text pane. The fly-out window disappears. You now see a white box in the margin area indicating the length of the quotation.
Tap to activate a quotation. It will be highlighted in a brighter yellow color.
Double-click to make the fly-out window to come up again, e.g., if you want to code the quotation or want to edit already linked codes (see below “Working With Codes“ on page 17).
Creating Image Quotations
Hold your finger on the image and draw a frame. Pull at the blue handles to adjust the size. ATLAS.ti Mobile immediately creates a quotation from the selection.
ATLAS.ti Mobile for the iPad - User Manual
Figure 13: Fly-out window after creating a quotation
Figure 14: Display of quotations in the margin area
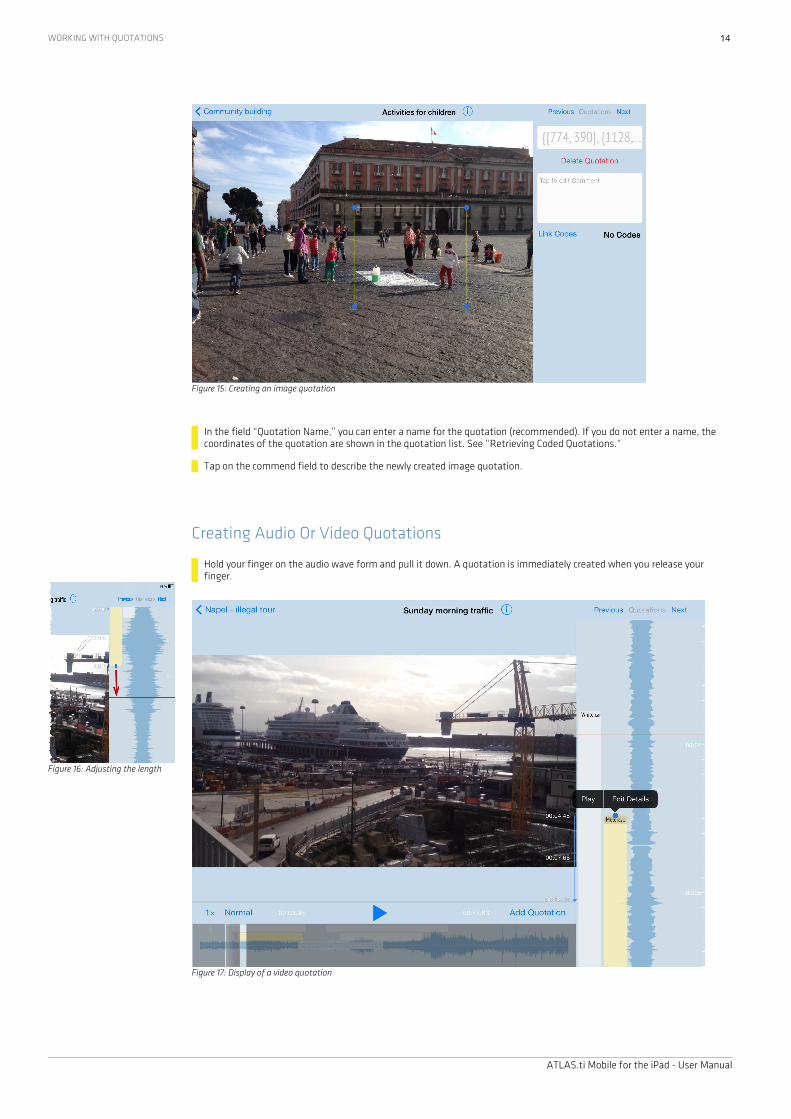
Figure 16: Adjusting the length
WORKING WITH QUOTATIONS 14
In the field “Quotation Name,” you can enter a name for the quotation (recommended). If you do not enter a name, the coordinates of the quotation are shown in the quotation list. See “Retrieving Coded Quotations.“
Tap on the commend field to describe the newly created image quotation.
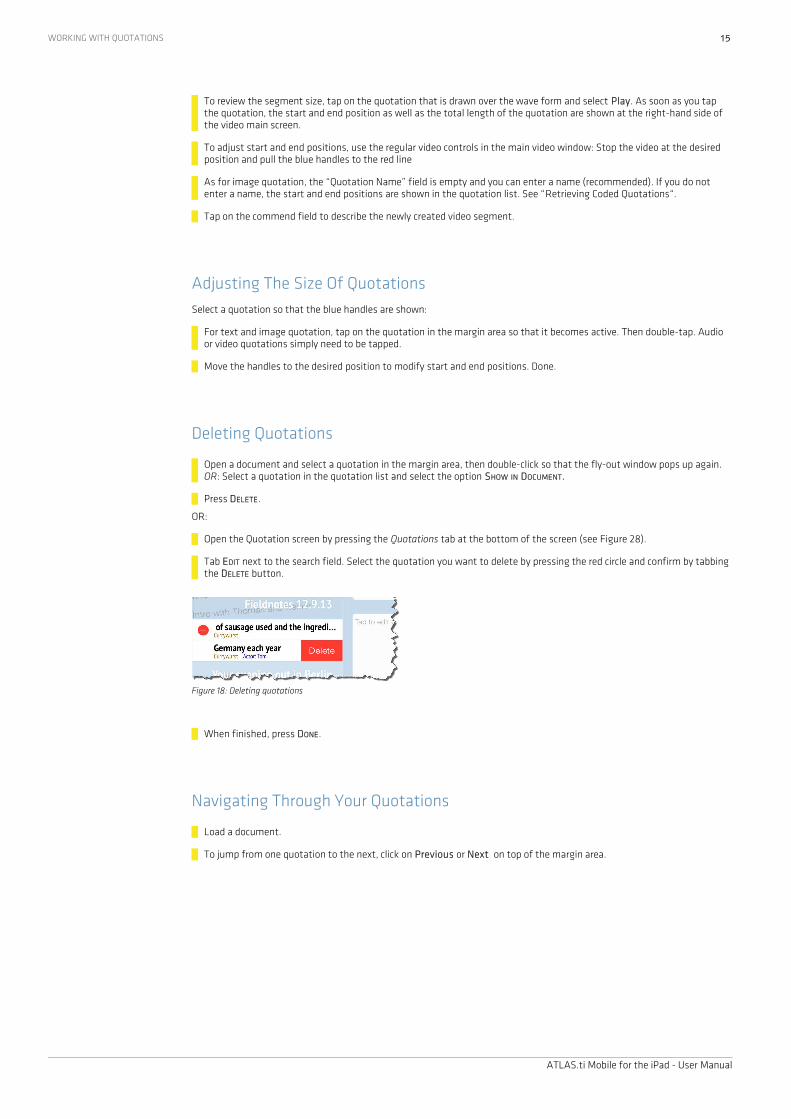
Creating Audio Or Video Quotations
Hold your finger on the audio wave form and pull it down. A quotation is immediately created when you release your finger.
ATLAS.ti Mobile for the iPad - User Manual
Figure 15: Creating an image quotation
Figure 17: Display of a video quotation
WORKING WITH QUOTATIONS 15
To review the segment size, tap on the quotation that is drawn over the wave form and select Play. As soon as you tap the quotation, the start and end position as well as the total length of the quotation are shown at the right-hand side of the video main screen.
To adjust start and end positions, use the regular video controls in the main video window: Stop the video at the desired position and pull the blue handles to the red line
As for image quotation, the “Quotation Name” field is empty and you can enter a name (recommended). If you do not enter a name, the start and end positions are shown in the quotation list. See “Retrieving Coded Quotations“.
Tap on the commend field to describe the newly created video segment.
Adjusting The Size Of QuotationsSelect a quotation so that the blue handles are shown:
For text and image quotation, tap on the quotation in the margin area so that it becomes active. Then double-tap. Audio or video quotations simply need to be tapped.
Move the handles to the desired position to modify start and end positions. Done.
Deleting Quotations
Open a document and select a quotation in the margin area, then double-click so that the fly-out window pops up again. OR: Select a quotation in the quotation list and select the option SHOW IN DOCUMENT.
Press DELETE.
OR:
Open the Quotation screen by pressing the Quotations tab at the bottom of the screen (see Figure 28).
Tab EDIT next to the search field. Select the quotation you want to delete by pressing the red circle and confirm by tabbing the DELETE button.
When finished, press DONE.
Navigating Through Your Quotations
Load a document.
To jump from one quotation to the next, click on Previous or Next on top of the margin area.
ATLAS.ti Mobile for the iPad - User Manual
Figure 18: Deleting quotations
WORKING WITH QUOTATIONS 16
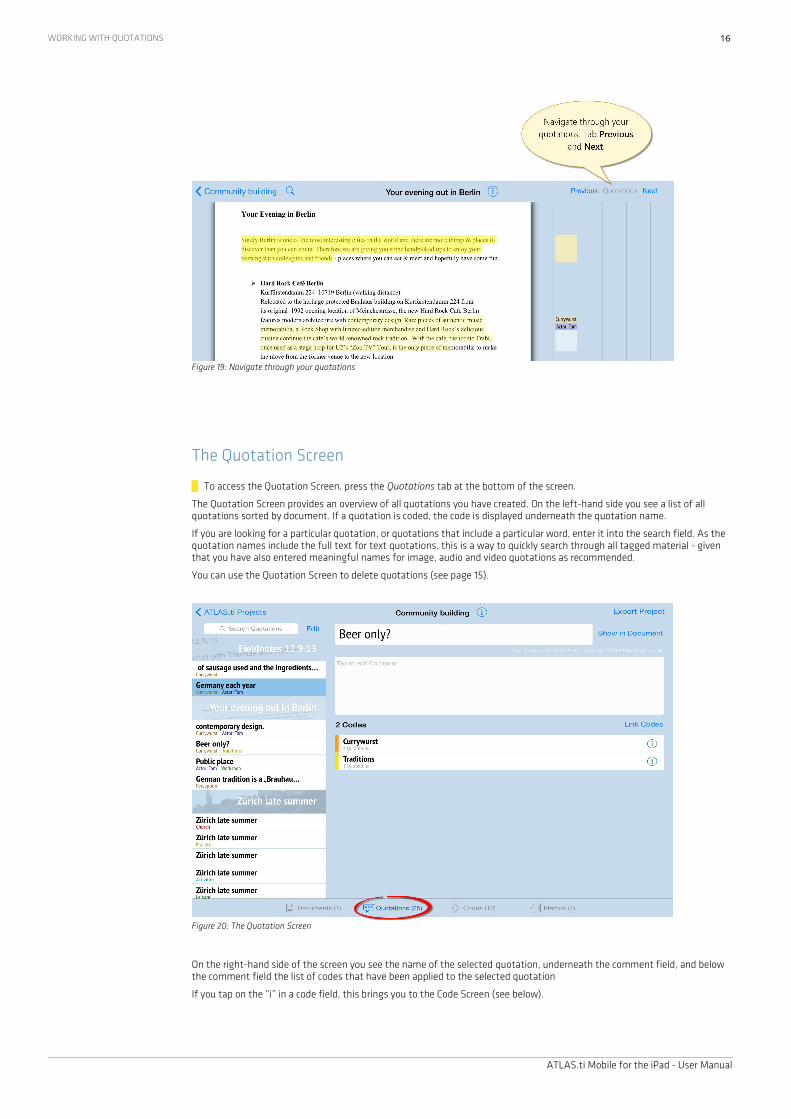
The Quotation Screen
To access the Quotation Screen, press the Quotations tab at the bottom of the screen.
The Quotation Screen provides an overview of all quotations you have created. On the left-hand side you see a list of all quotations sorted by document. If a quotation is coded, the code is displayed underneath the quotation name.
If you are looking for a particular quotation, or quotations that include a particular word, enter it into the search field. As the quotation names include the full text for text quotations, this is a way to quickly search through all tagged material - given that you have also entered meaningful names for image, audio and video quotations as recommended.
You can use the Quotation Screen to delete quotations (see page 15).
On the right-hand side of the screen you see the name of the selected quotation, underneath the comment field, and below the comment field the list of codes that have been applied to the selected quotation
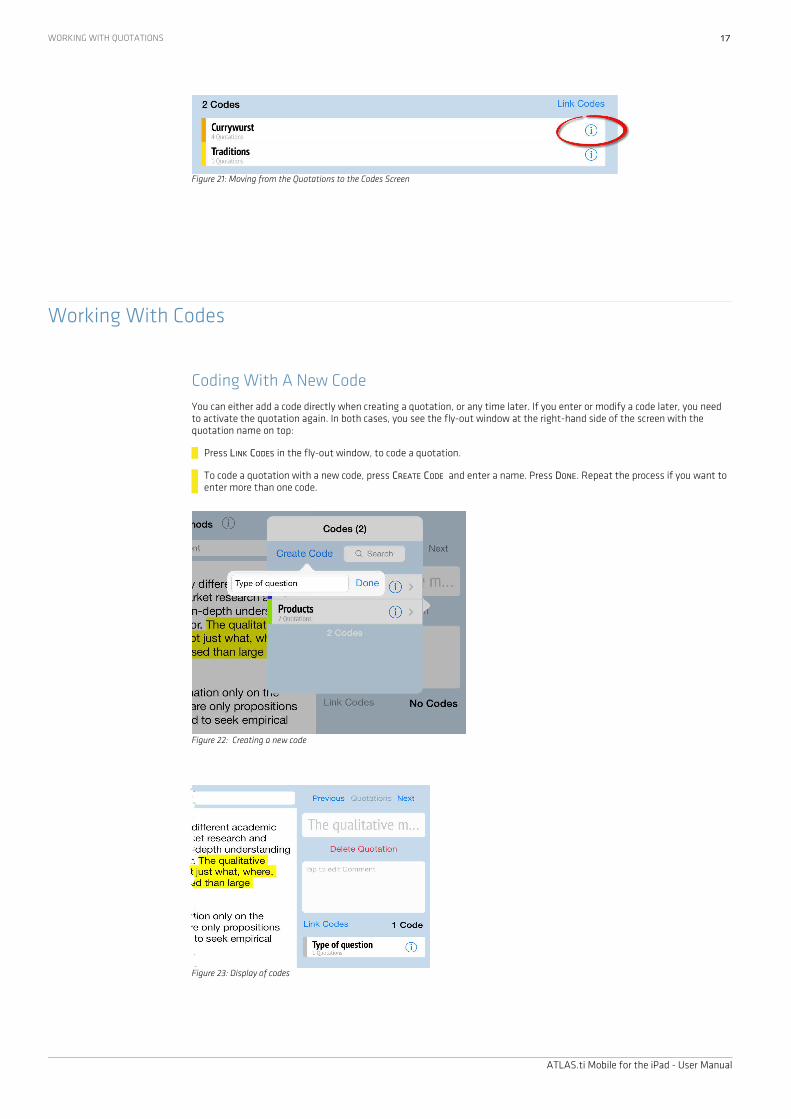
If you tap on the “i” in a code field, this brings you to the Code Screen (see below).
ATLAS.ti Mobile for the iPad - User Manual
Figure 20: The Quotation Screen
Figure 19: Navigate through your quotations
WORKING WITH QUOTATIONS 17
Working With Codes
Coding With A New CodeYou can either add a code directly when creating a quotation, or any time later. If you enter or modify a code later, you need to activate the quotation again. In both cases, you see the fly-out window at the right-hand side of the screen with the quotation name on top:
Press LINK CODES in the fly-out window, to code a quotation.
To code a quotation with a new code, press CREATE CODE and enter a name. Press DONE. Repeat the process if you want to enter more than one code.
ATLAS.ti Mobile for the iPad - User Manual
Figure 22: Creating a new code
Figure 21: Moving from the Quotations to the Codes Screen
Figure 23: Display of codes
WORKING WITH CODES 18
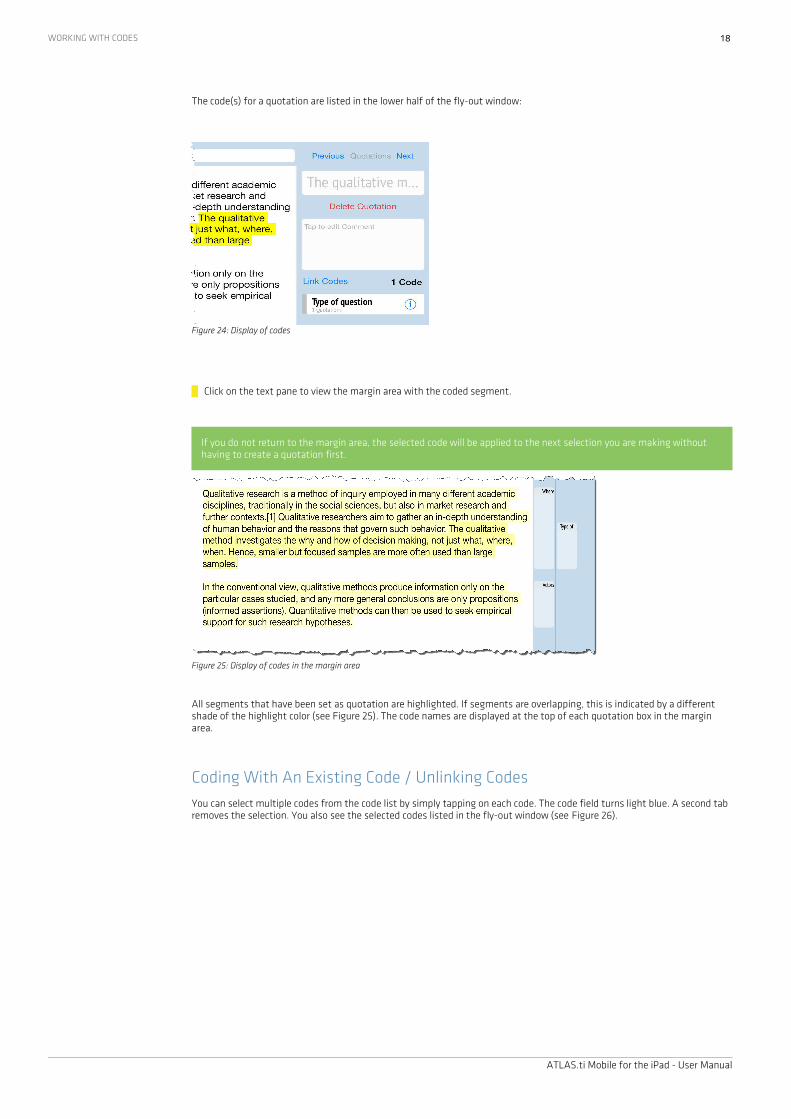
The code(s) for a quotation are listed in the lower half of the fly-out window:
Click on the text pane to view the margin area with the coded segment.
If you do not return to the margin area, the selected code will be applied to the next selection you are making without having to create a quotation first.
All segments that have been set as quotation are highlighted. If segments are overlapping, this is indicated by a different shade of the highlight color (see Figure 25). The code names are displayed at the top of each quotation box in the margin area.
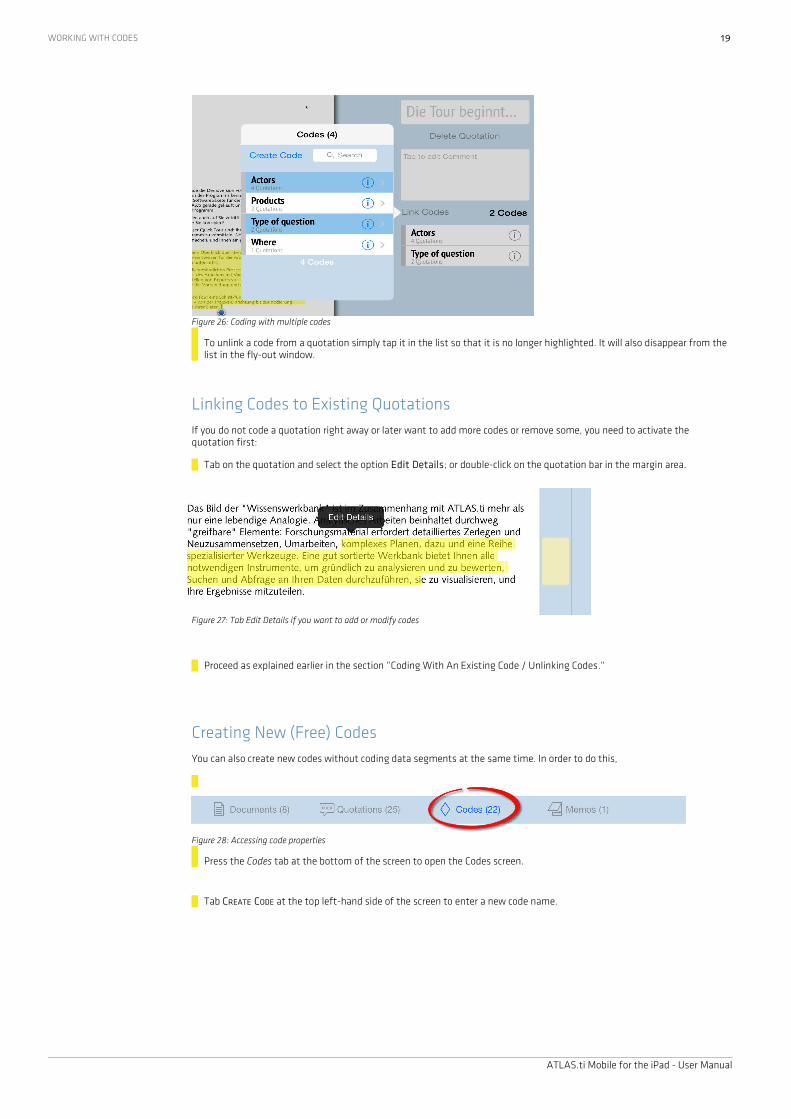
Coding With An Existing Code / Unlinking CodesYou can select multiple codes from the code list by simply tapping on each code. The code field turns light blue. A second tab removes the selection. You also see the selected codes listed in the fly-out window (see Figure 26).
ATLAS.ti Mobile for the iPad - User Manual
Figure 25: Display of codes in the margin area
Figure 24: Display of codes
WORKING WITH CODES 19
To unlink a code from a quotation simply tap it in the list so that it is no longer highlighted. It will also disappear from the list in the fly-out window.
Linking Codes to Existing Quotations If you do not code a quotation right away or later want to add more codes or remove some, you need to activate the quotation first:
Tab on the quotation and select the option Edit Details; or double-click on the quotation bar in the margin area.
Proceed as explained earlier in the section “Coding With An Existing Code / Unlinking Codes.“
Creating New (Free) CodesYou can also create new codes without coding data segments at the same time. In order to do this,
Press the Codes tab at the bottom of the screen to open the Codes screen.
Tab CREATE CODE at the top left-hand side of the screen to enter a new code name.
ATLAS.ti Mobile for the iPad - User Manual
Figure 27: Tab Edit Details if you want to add or modify codes
Figure 28: Accessing code properties
Figure 26: Coding with multiple codes
WORKING WITH CODES 20
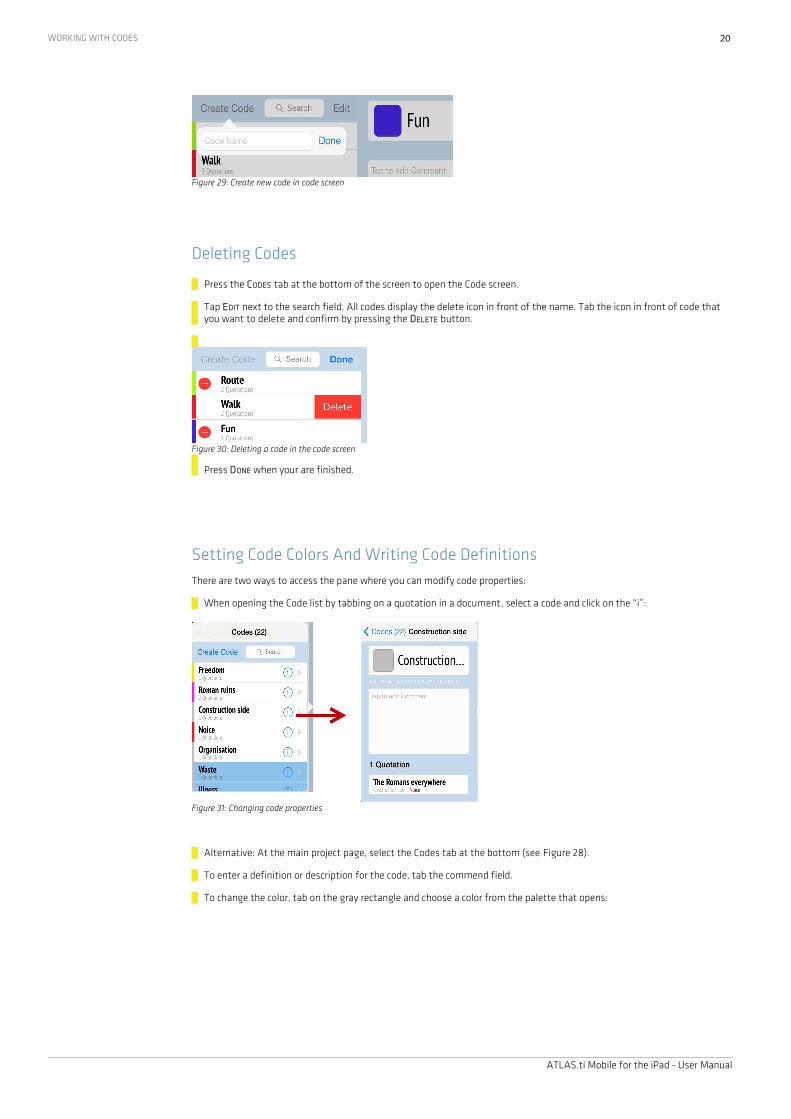
Deleting Codes
Press the CODES tab at the bottom of the screen to open the Code screen.
Tap EDIT next to the search field. All codes display the delete icon in front of the name. Tab the icon in front of code that you want to delete and confirm by pressing the DELETE button.
Press DONE when your are finished.
Setting Code Colors And Writing Code DefinitionsThere are two ways to access the pane where you can modify code properties:
When opening the Code list by tabbing on a quotation in a document, select a code and click on the “i”:
Alternative: At the main project page, select the Codes tab at the bottom (see Figure 28).
To enter a definition or description for the code, tab the commend field.
To change the color, tab on the gray rectangle and choose a color from the palette that opens:
ATLAS.ti Mobile for the iPad - User Manual
Figure 29: Create new code in code screen
Figure 30: Deleting a code in the code screen
Figure 31: Changing code properties
WORKING WITH CODES 21
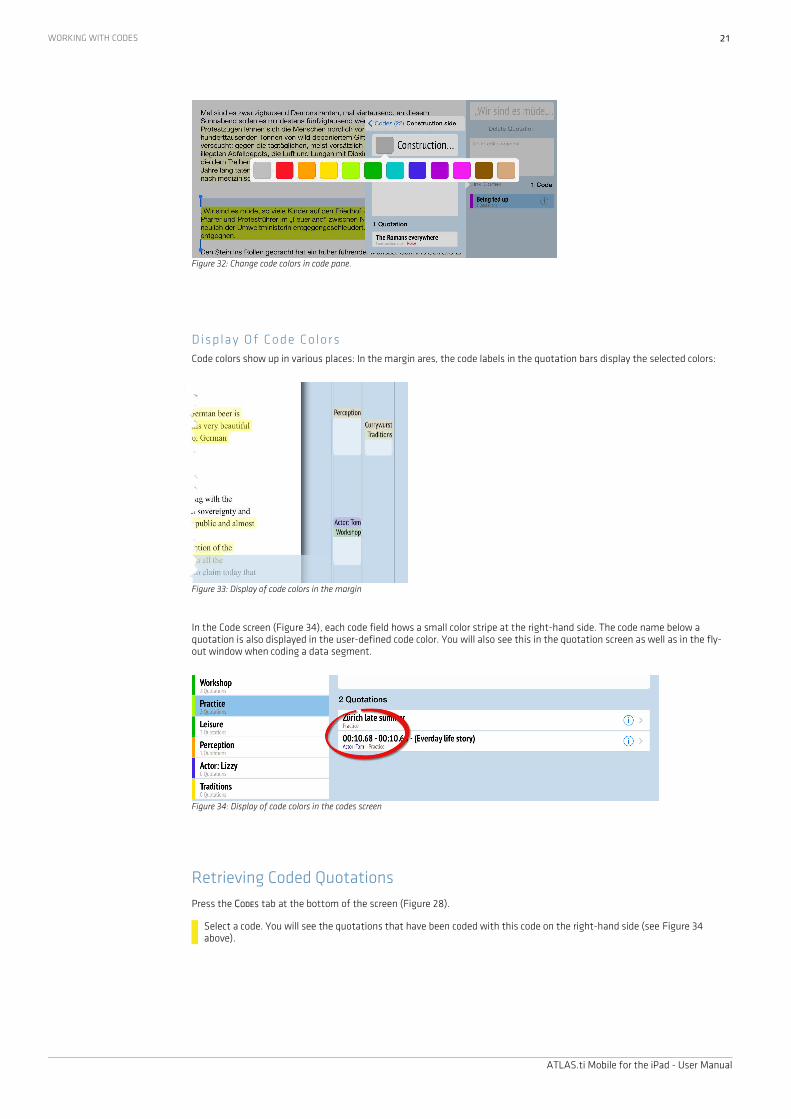
Display Of Code ColorsCode colors show up in various places: In the margin ares, the code labels in the quotation bars display the selected colors:
In the Code screen (Figure 34), each code field hows a small color stripe at the right-hand side. The code name below a quotation is also displayed in the user-defined code color. You will also see this in the quotation screen as well as in the fly-out window when coding a data segment.
Retrieving Coded QuotationsPress the CODES tab at the bottom of the screen (Figure 28).
Select a code. You will see the quotations that have been coded with this code on the right-hand side (see Figure 34 above).
ATLAS.ti Mobile for the iPad - User Manual
Figure 33: Display of code colors in the margin
Figure 34: Display of code colors in the codes screen
Figure 32: Change code colors in code pane.
WORKING WITH CODES 22
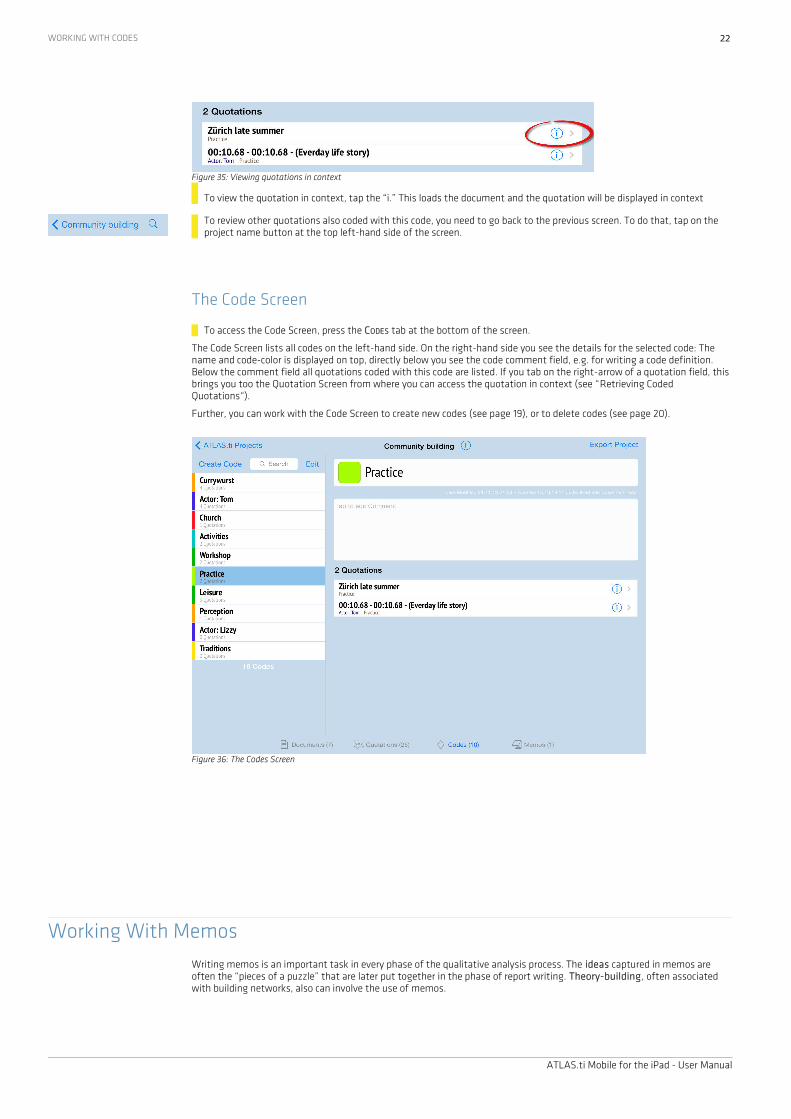
To view the quotation in context, tap the “i.” This loads the document and the quotation will be displayed in context
To review other quotations also coded with this code, you need to go back to the previous screen. To do that, tap on the project name button at the top left-hand side of the screen.
The Code Screen
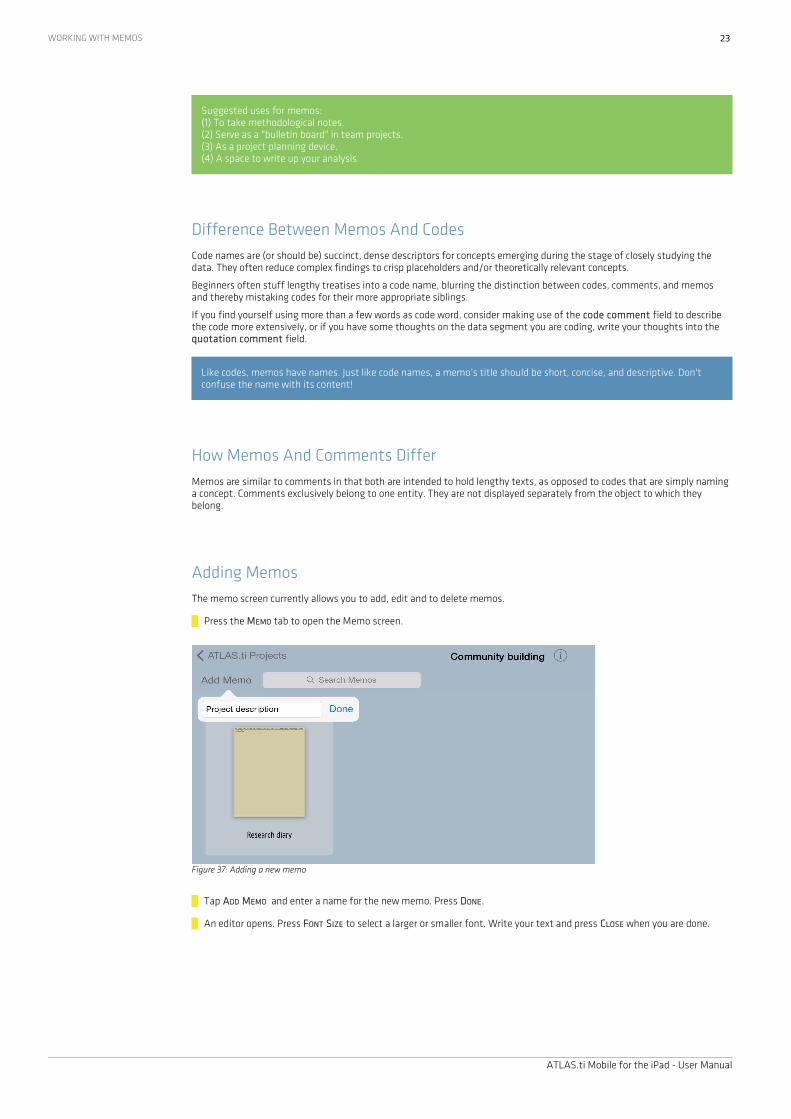
To access the Code Screen, press the CODES tab at the bottom of the screen.
The Code Screen lists all codes on the left-hand side. On the right-hand side you see the details for the selected code: The name and code-color is displayed on top, directly below you see the code comment field, e.g. for writing a code definition. Below the comment field all quotations coded with this code are listed. If you tab on the right-arrow of a quotation field, this brings you too the Quotation Screen from where you can access the quotation in context (see “Retrieving Coded Quotations“).
Further, you can work with the Code Screen to create new codes (see page 19), or to delete codes (see page 20).
Working With MemosWriting memos is an important task in every phase of the qualitative analysis process. The ideas captured in memos are often the “pieces of a puzzle” that are later put together in the phase of report writing. Theory-building, often associated with building networks, also can involve the use of memos.
ATLAS.ti Mobile for the iPad - User Manual
Figure 36: The Codes Screen
Figure 35: Viewing quotations in context
WORKING WITH MEMOS 23
Suggested uses for memos:(1) To take methodological notes.(2) Serve as a "bulletin board" in team projects.(3) As a project planning device.(4) A space to write up your analysis.
Difference Between Memos And CodesCode names are (or should be) succinct, dense descriptors for concepts emerging during the stage of closely studying the data. They often reduce complex findings to crisp placeholders and/or theoretically relevant concepts.
Beginners often stuff lengthy treatises into a code name, blurring the distinction between codes, comments, and memos and thereby mistaking codes for their more appropriate siblings.
If you find yourself using more than a few words as code word, consider making use of the code comment field to describe the code more extensively, or if you have some thoughts on the data segment you are coding, write your thoughts into the quotation comment field.
Like codes, memos have names. Just like code names, a memo’s title should be short, concise, and descriptive. Don't confuse the name with its content!
How Memos And Comments DifferMemos are similar to comments in that both are intended to hold lengthy texts, as opposed to codes that are simply naming a concept. Comments exclusively belong to one entity. They are not displayed separately from the object to which they belong.
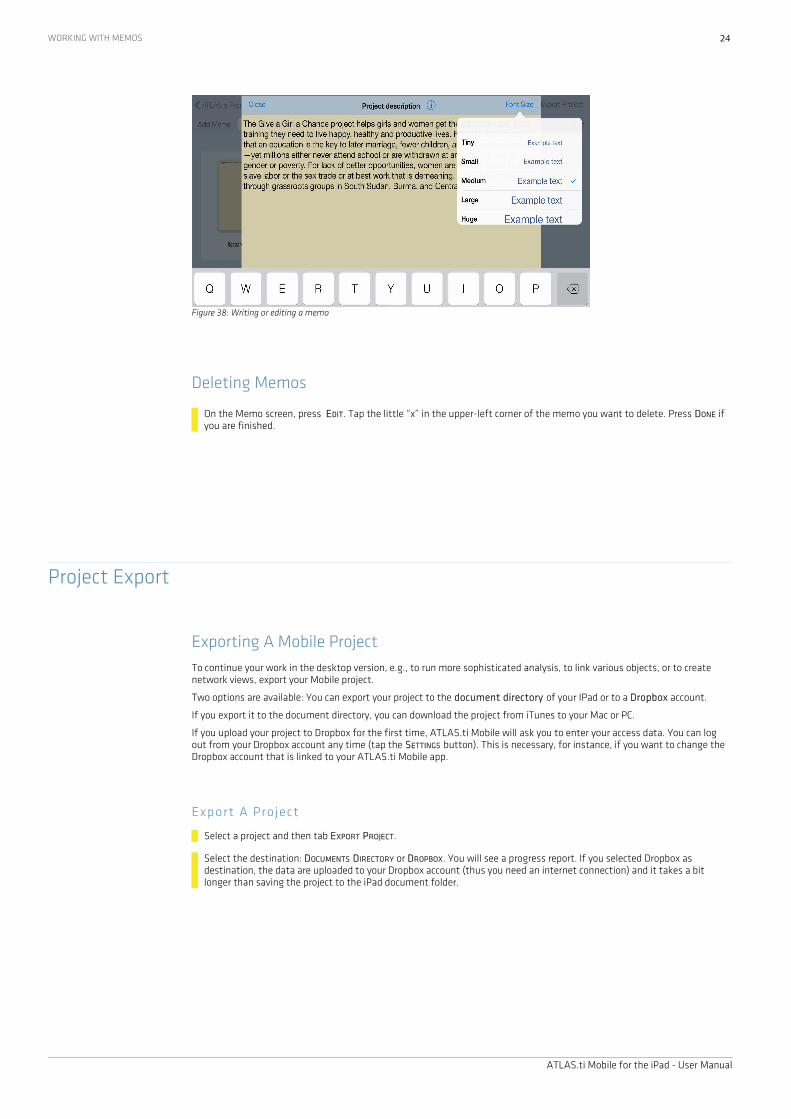
Adding MemosThe memo screen currently allows you to add, edit and to delete memos.
Press the MEMO tab to open the Memo screen.
Tap ADD MEMO and enter a name for the new memo. Press DONE.
An editor opens. Press FONT SIZE to select a larger or smaller font. Write your text and press CLOSE when you are done.
ATLAS.ti Mobile for the iPad - User Manual
Figure 37: Adding a new memo
WORKING WITH MEMOS 24
Deleting Memos
On the Memo screen, press EDIT. Tap the little “x” in the upper-left corner of the memo you want to delete. Press DONE if you are finished.
Project Export
Exporting A Mobile ProjectTo continue your work in the desktop version, e.g., to run more sophisticated analysis, to link various objects, or to create network views, export your Mobile project.
Two options are available: You can export your project to the document directory of your IPad or to a Dropbox account.
If you export it to the document directory, you can download the project from iTunes to your Mac or PC.
If you upload your project to Dropbox for the first time, ATLAS.ti Mobile will ask you to enter your access data. You can log out from your Dropbox account any time (tap the SETTINGS button). This is necessary, for instance, if you want to change the Dropbox account that is linked to your ATLAS.ti Mobile app.
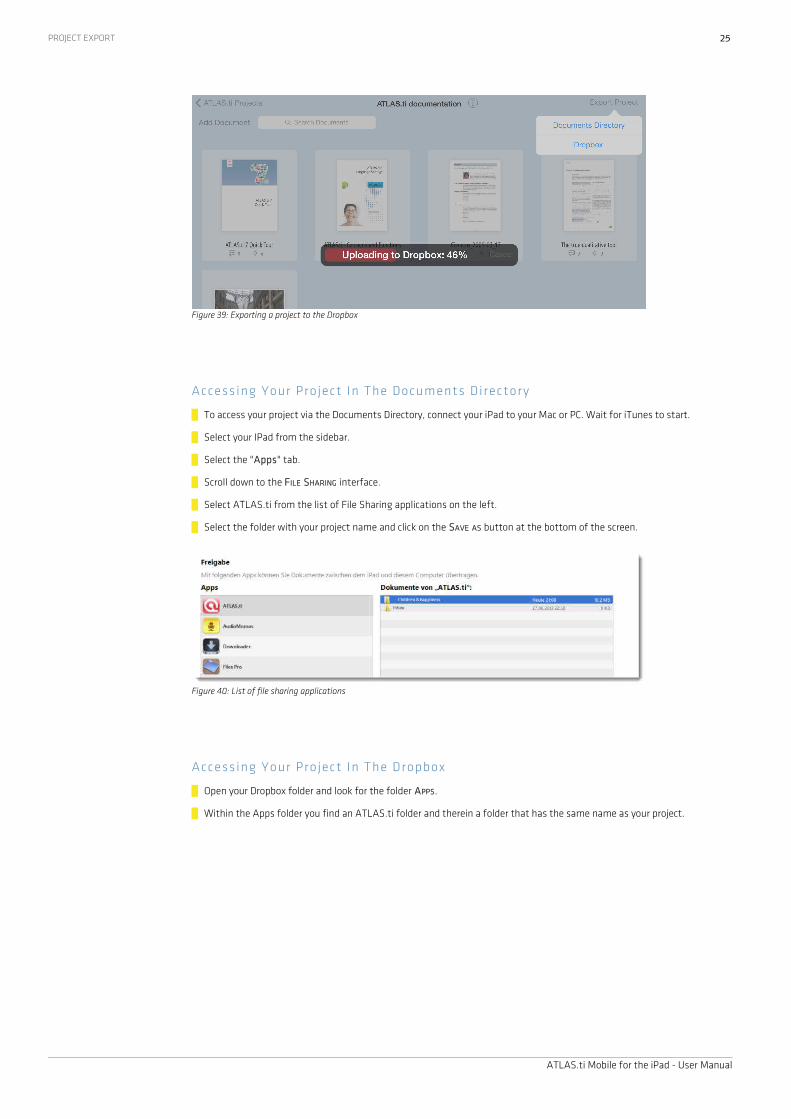
Export A Pro ject
Select a project and then tab EXPORT PROJECT.
Select the destination: DOCUMENTS DIRECTORY or DROPBOX. You will see a progress report. If you selected Dropbox as destination, the data are uploaded to your Dropbox account (thus you need an internet connection) and it takes a bit longer than saving the project to the iPad document folder.
ATLAS.ti Mobile for the iPad - User Manual
Figure 38: Writing or editing a memo
PROJECT EXPORT 25
Access ing Your Pro ject In The Documents Di rectory
To access your project via the Documents Directory, connect your iPad to your Mac or PC. Wait for iTunes to start.
Select your IPad from the sidebar.
Select the "Apps" tab.
Scroll down to the FILE SHARING interface.
Select ATLAS.ti from the list of File Sharing applications on the left.
Select the folder with your project name and click on the SAVE AS button at the bottom of the screen.
Access ing Your Pro ject In The Dropbox
Open your Dropbox folder and look for the folder APPS.
Within the Apps folder you find an ATLAS.ti folder and therein a folder that has the same name as your project.
ATLAS.ti Mobile for the iPad - User Manual
Figure 40: List of file sharing applications
Figure 39: Exporting a project to the Dropbox