
ATAMI Standard Operating Procedure Camco Brazing Furnace ... · down with a wipe that is partially...
16
Camco Brazing Furnace - SOP Page 1 of 16 (back to contents) ATAMI Standard Operating Procedure Camco Brazing Furnace Last saved by Randy Greb on 2/28/2019 7:29 PM Revision Date Description/Change Curator 0 4/12/2019 New document Randy Greb
Transcript of ATAMI Standard Operating Procedure Camco Brazing Furnace ... · down with a wipe that is partially...

Camco Brazing Furnace - SOP
Page 1 of 16 (back to contents)
ATAMI Standard Operating Procedure
Camco Brazing Furnace
Last saved by Randy Greb on 2/28/2019 7:29 PM
Revision Date Description/Change Curator
0 4/12/2019 New document Randy Greb

Camco Brazing Furnace - SOP
Page 2 of 16 (back to contents)
Contents
Scope: ............................................................................................................................................................ 4
System Specifications:................................................................................................................................... 4
Safety ............................................................................................................................................................ 4
General ...................................................................................................................................................... 4
PPE Required ............................................................................................................................................. 4
Hazardous Energies ................................................................................................................................... 4
Electrical ................................................................................................................................................ 4
Mechanical ............................................................................................................................................ 4
Stored/Potential .................................................................................................................................... 4
Thermal ................................................................................................................................................. 4
Materials/Consumables Hazards .............................................................................................................. 4
Interlocks ................................................................................................................................................... 5
Training Requirements .................................................................................................................................. 5
Procedures .................................................................................................................................................... 5
MUST DO if running hydrogen reducing environment: ............................................................................ 5
Diagram of DCP302 Controller and examples of what it is displaying: .................................................... 5
How to Create a New Program: ................................................................................................................ 8
How to Load a Sample and Program: ....................................................................................................... 9
How to collect and analyze data: ............................................................................................................ 10
How to insert a segment: ........................................................................................................................ 11
How to delete all segments greater than the current segment number: .............................................. 12
Standard or Example Recipes ..................................................................................................................... 12
Standard recipes are in the excel spreadsheets on the ATAMI share drive: .......................................... 12
Basic Troubleshooting ................................................................................................................................. 12
General problems with pumpdown, etc…: ............................................................................................. 12
Attachments ................................................................................................................................................ 13
Function keys for programming DCP302 ................................................................................................ 13
Descriptions of EV1-EV3 and T1-T5 functions: ....................................................................................... 13
Setting Gas Flows: ................................................................................................................................... 14
Camco Vacuum Gauge Descriptions: ...................................................................................................... 16

Camco Brazing Furnace - SOP
Page 3 of 16 (back to contents)

Camco Brazing Furnace - SOP
Page 4 of 16 (back to contents)
Scope:
This document describes basic operating procedures for the CAMCO brazing furnace.
System Specifications:
See the System description on the ATAMI WEB site.
Maximum sample size is 18 inches in diameter and 24 inches in height.
Safety
General
The Camco Brazing furnace uses high temperature, H2 gas and has a large chamber body. All safety
protocols must be followed to prevent injury
PPE Required
Safety glasses must be worn at all times when operating the furnace.
Nitrile gloves
Hazardous Energies
Electrical
NA
Mechanical
The large chamber can crush body parts if it is lowered incorrectly. Always ensure all body parts are
out of the path of the chamber when lowering it.
Stored/Potential
NA
Thermal
Conditioned parts may be at high temperature after treatment, even if the control TC has reached a
temperature below which opening the chamber is allowed.
If you suspect that the part is still hot and can cause a burn or melt gloves, contact ATAMI staff for
help.
Materials/Consumables Hazards
Because this is a mutli-user system, there may be contaminants present in the chamber.

Camco Brazing Furnace - SOP
Page 5 of 16 (back to contents)
Always use gloves when handling parts and remove and dispose of them properly when finished.
Do not blow off or try to clean the inner surfaces of the chamber in any way. Only ATAMI staff
are allowed to conduct maintenance or cleaning procedures.
H2 gas is plumbed to the system
Interlocks
The chamber is interlocked so that it will not open until the control TC indicates a temperature less
than 80 deg C.
Training Requirements
1. Pass all ATAMI required safety courses 2. Finish lab tour with qualified ATAMI trainer. 3. Complete all hands on training for this system and signed off by trainer. 4. Verify access to this document for reference.
Procedures
MUST DO if running hydrogen reducing environment:
When programming Segment 1, ALWAYS program at 0o for 1 Hour for pre-purging.
Segment 2 should be programmed at 0o for 15 minutes for Process Gas Fill.
The last segment of the program should ALWAYS be programmed at 0o for 45 minutes for post purge.
Time Event 1 (Process Gas Fill) should ALWAYS be programmed ON at the beginning of Segment 2 and programmed OFF at the beginning of the last segment (The purge segment). See example of Event Relay Function write up in this manual.
Vacuum Purge MUST be programmed ON for the first five minutes of Segment 1.
See Prog#1 Practice Hyd in the brazing recipes spreadsheet for an example.
Diagram of DCP302 Controller and examples of what it is displaying:
Overall display showing buttons that are referenced in the procedures below. This is the baseline
display to start actions described in this SOP:
SP, TM and CH1 LED’s lit. OT1 and OT2 lit. If it doesn’t look like this, press DISP until it does.

Camco Brazing Furnace - SOP
Page 6 of 16 (back to contents)
For running a program:
What the temperature ramp display means: The left bar is the current temperature ramp, the right is
the next program sequence. The direction of the bar indicates cooling, steady, or ramping
temperatures.

Camco Brazing Furnace - SOP
Page 7 of 16 (back to contents)
What programming spreadsheet map positions mean:
Funtion segment item Display Units Values to set What is this
Starting Display SP Upper Display SP (deg C)
Temperature set point in deg C
The temperature that is set for this segment.
Time Lower Display Time (hh.mm)
Time in hrs and minutes for the segment. The time value for this segment.
Not Programable EV1 Upper Display na
Not programmable, just leave blank Not programmable.
Lower Display na
Not programmable, just leave blank Not programmable.
Vacuum enable EV2 Upper Display na
000 to turn it on. Blank when off.
Needs to be on for segments that have heat in vaccuum, or during purge events.
Lower Display na
Just leave as ----
Partial Pressure EV3 Upper Display
000 to turn it on. Blank when off.
Flows N2 gas for partial pressure treatment.
Lower Display set pt
Just leave as ---- to leave on for the whole segment time, or put a value to end
before the end of the segment.
Process Gas T1 Upper Display ON hh.mm
time after start of segment to turn it on.
Flows process gas (N2, Ar or H2). Setpoint is shown on front panel of camco furnace.
Lower Display OFF hh.mm
time after start of segment to turn it off. Leave as ---- if you want it to stay on for the
whole segment.
Bubbler T2 Upper Display ON hh.mm
time after start of segment to turn it on.
Flows the process gas through the bubbler. Be sure that the bubbler has water in it.
Lower Display OFF hh.mm
time after start of segment to turn it off. Leave as ---- if you want it to stay on for the
whole segment.
Vacuum pump/purge T3
Upper Display ON hh.mm
time after start of segment to turn it on.
Turns the vacuum pump on/off. Purges vacuum with N2 when temp is set to 0. Runs vacuum when temp is not 0.
Lower Display OFF hh.mm
time after start of segment to turn it off. Leave as ---- if you want it to stay on for the
whole segment.
Vent (vacuum) T4 Upper Display ON hh.mm
time after start of segment to turn it on.
Vents the chamber. EV2 and T3 should be off when this is enabled.
Lower Display OFF hh.mm
time after start of segment to turn it off. Leave as ---- if you want it to stay on for the
whole segment.
Camco Brazing Furnace - SOP
Page 8 of 16 (back to contents)
Funtion segment item Display Units Values to set What is this
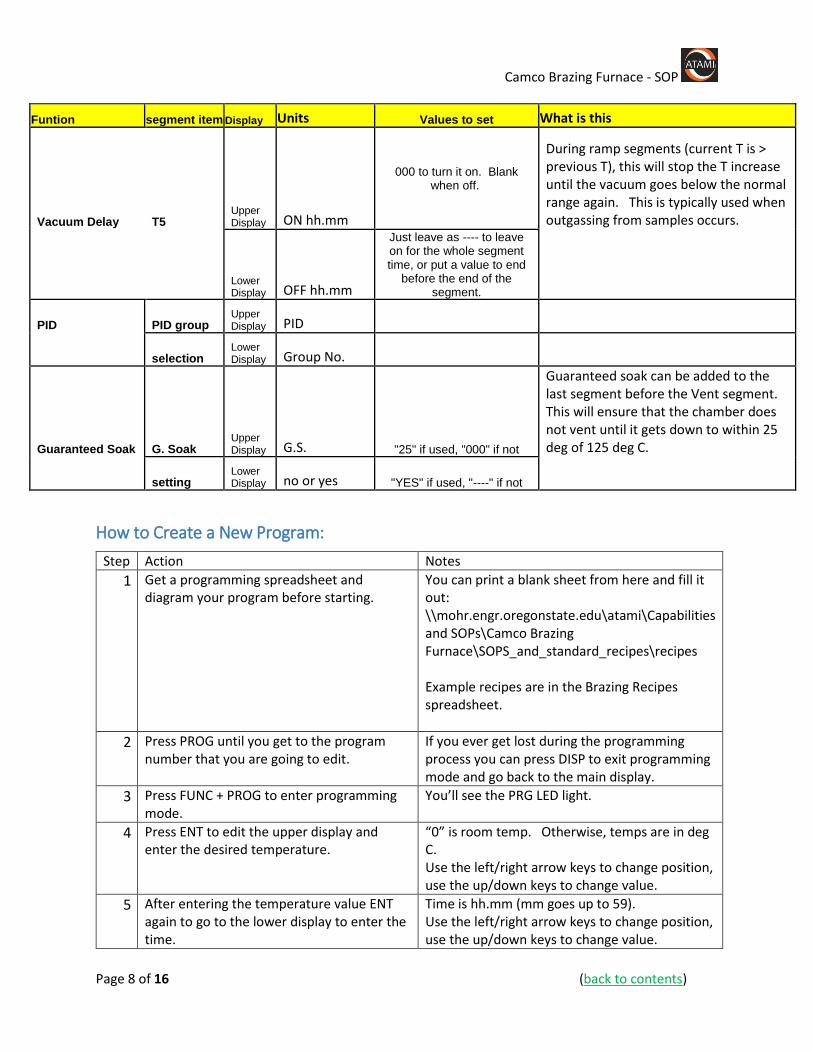
Vacuum Delay T5 Upper Display ON hh.mm
000 to turn it on. Blank when off.
During ramp segments (current T is > previous T), this will stop the T increase until the vacuum goes below the normal range again. This is typically used when outgassing from samples occurs.
Lower Display OFF hh.mm
Just leave as ---- to leave on for the whole segment time, or put a value to end
before the end of the segment.
PID PID group Upper Display PID
selection Lower Display Group No.
Guaranteed Soak G. Soak Upper Display G.S. "25" if used, "000" if not
Guaranteed soak can be added to the last segment before the Vent segment. This will ensure that the chamber does not vent until it gets down to within 25 deg of 125 deg C.
setting Lower Display no or yes "YES" if used, "----" if not
How to Create a New Program:
Step Action Notes
1 Get a programming spreadsheet and diagram your program before starting.
You can print a blank sheet from here and fill it out: \\mohr.engr.oregonstate.edu\atami\Capabilities and SOPs\Camco Brazing Furnace\SOPS_and_standard_recipes\recipes Example recipes are in the Brazing Recipes spreadsheet.
2 Press PROG until you get to the program number that you are going to edit.
If you ever get lost during the programming process you can press DISP to exit programming mode and go back to the main display.
3 Press FUNC + PROG to enter programming mode.
You’ll see the PRG LED light.
4 Press ENT to edit the upper display and enter the desired temperature.
“0” is room temp. Otherwise, temps are in deg C. Use the left/right arrow keys to change position, use the up/down keys to change value.
5 After entering the temperature value ENT again to go to the lower display to enter the time.
Time is hh.mm (mm goes up to 59). Use the left/right arrow keys to change position, use the up/down keys to change value.
Camco Brazing Furnace - SOP
Page 9 of 16 (back to contents)
6 Press ENT to save the time for the lower display.
7 Use the up/down keys to move to each program item and set using the same method (ENT).
To clear an item in the lower display, use FUNC+CLR
8 After saving all of the EVn and Tn events, cycle back to the initial temp/time setting. Then press the right/left keys to go to the next segment.
How to Load a Sample and Program:
Step Action Notes
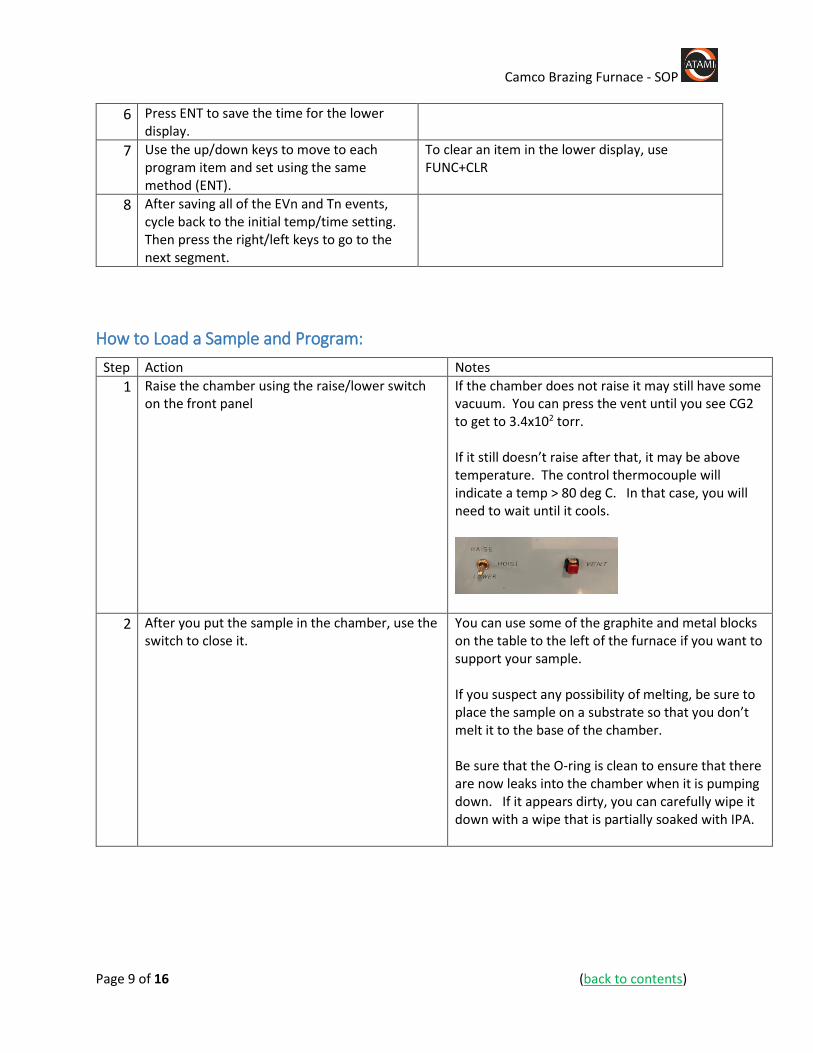
1 Raise the chamber using the raise/lower switch on the front panel
If the chamber does not raise it may still have some vacuum. You can press the vent until you see CG2 to get to 3.4x10² torr. If it still doesn’t raise after that, it may be above temperature. The control thermocouple will indicate a temp > 80 deg C. In that case, you will need to wait until it cools.
2 After you put the sample in the chamber, use the switch to close it.
You can use some of the graphite and metal blocks on the table to the left of the furnace if you want to support your sample. If you suspect any possibility of melting, be sure to place the sample on a substrate so that you don’t melt it to the base of the chamber. Be sure that the O-ring is clean to ensure that there are now leaks into the chamber when it is pumping down. If it appears dirty, you can carefully wipe it down with a wipe that is partially soaked with IPA.

Camco Brazing Furnace - SOP
Page 10 of 16 (back to contents)
3 You can tell that the chamber is closed when you see the clamp close. It will not stay closed.
4 Press PROG to get the program you want. If you have not recently used the program, you may want to check the program using the “How to Create a New Program” steps to verify that each segment matches the program you want to use.
5 Press RUN/HOLD to start the program. If you are running vacuum, you will hear the vacuum system and see CG1 start to drop. After a few minutes, you will see CG2 start to drop and it will match the high vacuum value, which will eventually reach the 10-5 to 10-6 Torr range.
6 If you need to end the program before it is complete, you can press the RUN/HOLD button while holding down the PROG key.
This will re-set the DCP. If the chamber is pumped down, you will have to manually vent or run a vent program to bring it back to atmosphere.
How to collect and analyze data:
Step Action Notes
1 Press the start button on the Yokogawa data DAQ standard data collection module.
Camco Brazing Furnace - SOP
Page 11 of 16 (back to contents)
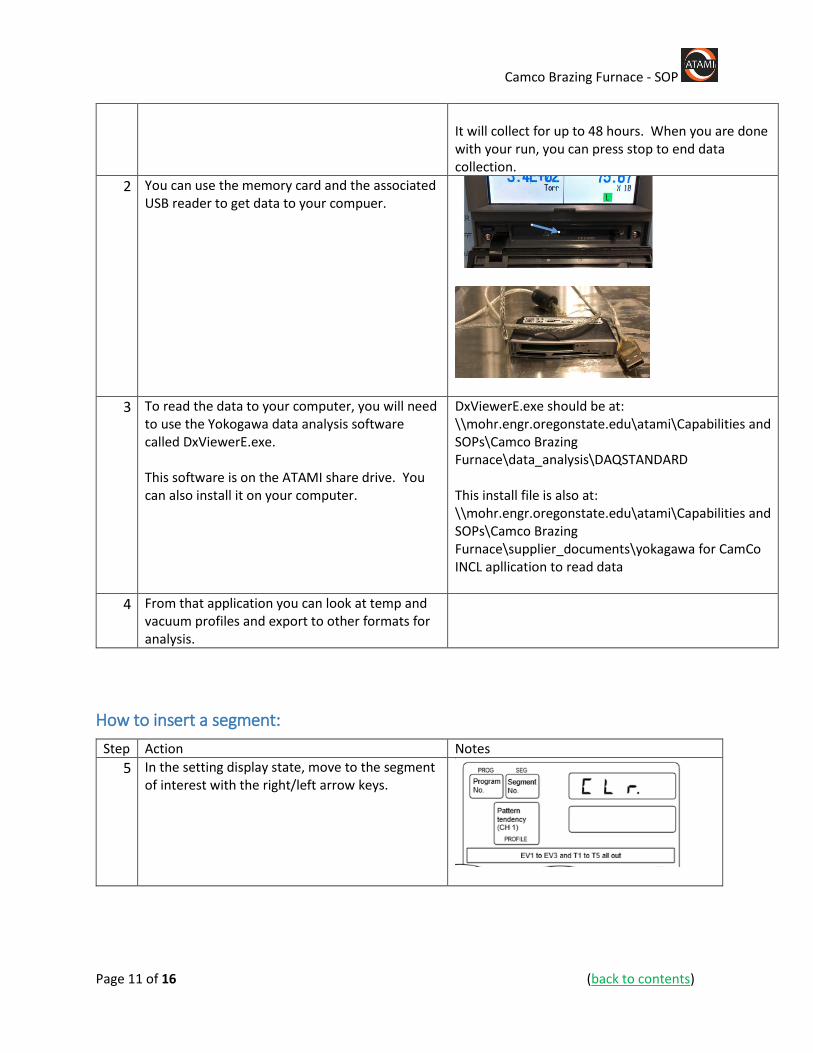
It will collect for up to 48 hours. When you are done with your run, you can press stop to end data collection.
2 You can use the memory card and the associated USB reader to get data to your compuer.
3 To read the data to your computer, you will need to use the Yokogawa data analysis software called DxViewerE.exe. This software is on the ATAMI share drive. You can also install it on your computer.
DxViewerE.exe should be at: \\mohr.engr.oregonstate.edu\atami\Capabilities and SOPs\Camco Brazing Furnace\data_analysis\DAQSTANDARD This install file is also at: \\mohr.engr.oregonstate.edu\atami\Capabilities and SOPs\Camco Brazing Furnace\supplier_documents\yokagawa for CamCo INCL apllication to read data
4 From that application you can look at temp and vacuum profiles and export to other formats for analysis.
How to insert a segment:
Step Action Notes
5 In the setting display state, move to the segment of interest with the right/left arrow keys.

Camco Brazing Furnace - SOP
Page 12 of 16 (back to contents)
6 Press FUNC+ENT, and the display shows InS.
7 Press the up arrow key to see InS blinking and then ENT while Ins is blinking to insert a segment.
When you insert a segment, a new segment is automatically created at the currently displayed segment No., and all segment Nos. onward are incremented by one.
8 Press the down arrow key to see dEL blinking and then ENT to delete that segment.
How to delete all segments greater than the current segment number:
Step Action Notes
9 Press FUNC+PROG to enter programming mode.
10 Use the right/left arrows to choose the segment of interest.
11 Press FUNC+CLR. The display will flash and show the letters, “CLr”.
12 If you press ENT, it will clear all the segments that are greater in number than the current segment.
13
Standard or Example Recipes
Standard recipes are in the excel spreadsheets on the ATAMI share drive:
You can print a blank sheet from here and fill it out: \\mohr.engr.oregonstate.edu\atami\Capabilities
and SOPs\Camco Brazing Furnace\SOPS_and_standard_recipes\recipes
Example recipes are in the Brazing Recipes spreadsheet.
Most commonly used recipes are programs 1,2,8 and 15.
Basic Troubleshooting
General problems with pumpdown, etc…:
Step If Then Notes
Camco Brazing Furnace - SOP
Page 13 of 16 (back to contents)
1 You have issues running or programming.
Contact Atami staff. This is a general use tool, and maintenance and repairs need to be done by Atami staff.
2
3
4
5
Attachments
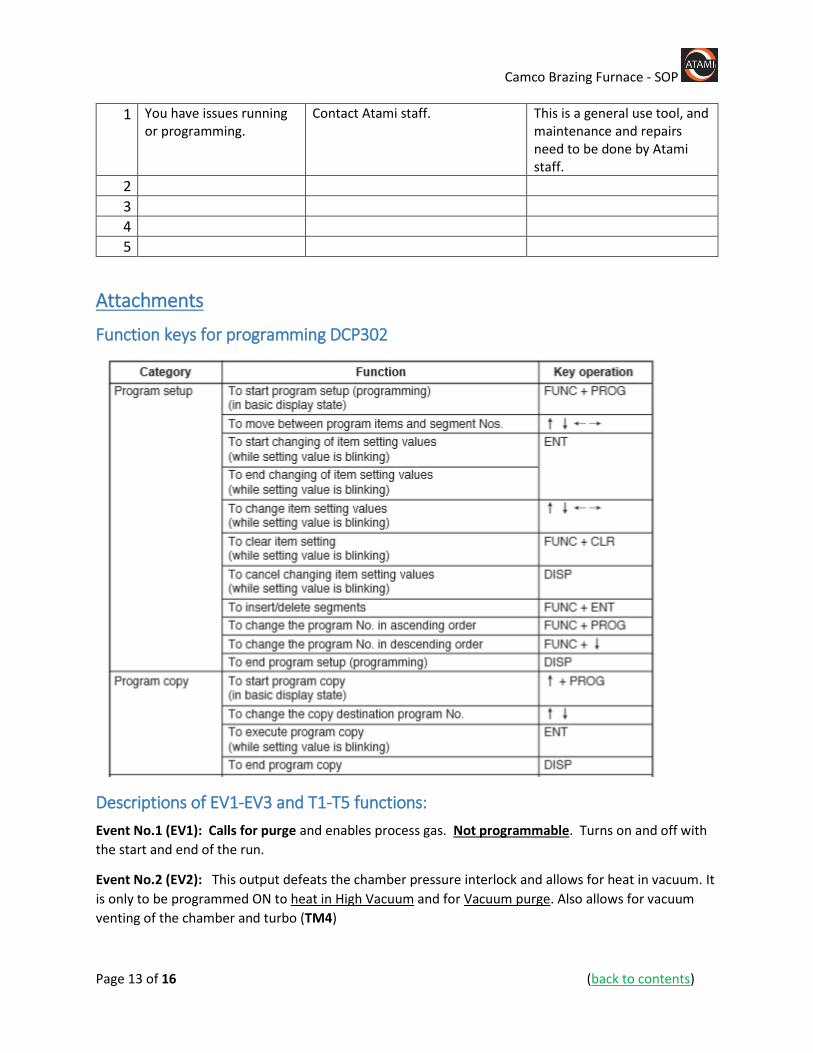
Function keys for programming DCP302
Descriptions of EV1-EV3 and T1-T5 functions:
Event No.1 (EV1): Calls for purge and enables process gas. Not programmable. Turns on and off with
the start and end of the run.
Event No.2 (EV2): This output defeats the chamber pressure interlock and allows for heat in vacuum. It
is only to be programmed ON to heat in High Vacuum and for Vacuum purge. Also allows for vacuum
venting of the chamber and turbo (TM4)

Camco Brazing Furnace - SOP
Page 14 of 16 (back to contents)
This event will not allow Time Event 1 to operate. You cannot pump and have process gas at the same
time.
Event No.3 (EV3): Activates the partial pressure vent solenoid. This fills the chamber with a third gas
and will turn off with an alarm in the recorder. ( The recorder monitors the pressure of the capacitance
manometer and shuts off the partial pressure solenoid with alarm #3)
Time Event No.1 (TM1): Calls for process gas and turns purge gas off.. Must be programmed ON at the
beginning of seg 02 and programmed OFF in the last segment of the run. SEE EXAMPLE!
This event used only for Hydrogen atmosphere runs.
Time Event 1 must be programmed ON for every segment Except the first and last segment.
Example:
Pre-
Purge
Post
Purge
Seg. No. 1 2 3 4 5 6 7
On 0 0 0 0 0 0 0 0 0 0 0 0 0 0 0
Time Event 1 Off
Process gas flows when Time Event is ON.
Time Event No.2 (TM2): Calls for the Bubbler to be active. It is usually programmed ON in segment 3
(the heat ramp segment). It will divert a portion of the process gas through the Bubbler to humidify the
process gas. The Bubbler flowmeter must be open for gas to flow and is manually adjusted.
Time Event No.3 (TM3): Calls for the vacuum pumps to operate. It will open the gate valve and foreline
valve. Used for Vacuum purge and also High Vacuum for the heat cycle. The turbo pump will
automatically turn on when the chamber reaches 9.5E-1 torr on gauge “A” . Turn this OFF when
performing partial pressure runs.
Time Event No.4 (TM4): Calls for venting the Chamber and Turbo after a High Vacuum pump.
EV2 must also be programmed ON for this to operate. The flowmeter labeled “VENT” is active with this
output. You may choose to stop pumping and vent at an elevated temperature. This will not operate
while the furnace is pumping (If TM3 is on). You cannot pump and vent at the same time!
Time Event No.5 (TM5): This output is the Vacuum Delay Enable circuit. It works with setpoint #1 in the
Vacuum Gauge Controller to give hold and run signals in the event of out gassing during a ramp heat up
(see SP1 in the GP discussion). This feature is usually only applied to the ramp segments of a Vacuum
program. It has the effect of extending the ramp. It should always be programmed on at the fist ramp
of a Vacuum program.
Setting Gas Flows:

Camco Brazing Furnace - SOP
Page 15 of 16 (back to contents)
As is convention, the flowmeters used in CAMCo furnaces are calibrated to be direct reading for air. As
the density of Nitrogen is very nearly the same, they can also be directly read for Nitrogen. Hydrogen,
being much less dense, requires a correction to be applied.
For the Hydrogen flowmeter, the observed reading must be multiplied by 3.3 to determine the mass flow
of this gas. Applying this factor allows blending the process gas to virtually any volumetric ratio desired.
The below listed process gas flowmeter settings for example, provide a recommended total process gas
flow of 20-25 SCFH of some commonly used mixtures of Hydrogen and Nitrogen.
100% Hydrogen: Set Hydrogen flow to 7 and Nitrogen to 0.
75% Hydrogen-25% Nitrogen: Set Hydrogen flow to 5 and Nitrogen to 5.
50% Hydrogen-50% Nitrogen: Set Hydrogen flow to 3 and Nitrogen to 10.
25% Hydrogen-75% Nitrogen: Set Hydrogen flow to 2 and Nitrogen to 17.
CAUTION! THE NITROGEN PURGE FLOWMETER IS ALWAYS LEFT SET TO AT LEAST 30
SCFH. PROPER PURGING IS AN IMPORTANT SAFETY FUNCTION!
Note: Over-tightening of flowmeter valves when shutting them off can damage their seats and/or cause a
downward creep of flow when first turning them on. Be sure to check flow frequently if a flowmeter
valve has been turned off.

Camco Brazing Furnace - SOP
Page 16 of 16 (back to contents)
Camco Vacuum Gauge Descriptions:


![Untitled-1 [] · 2019. 7. 20. · Special coating for Arc furnace and induction furnace Weld brazing Weld brazing equipment Soldering with flux grain Equipment and mineral material](https://static.fdocuments.us/doc/165x107/5fc1826e46ec670a790a21fc/untitled-1-2019-7-20-special-coating-for-arc-furnace-and-induction-furnace.jpg)

