ASX Administration and Risk Terminal User Guide€¦ · · 2017-12-26ASX Administration and Risk...
46
ASX Administration and Risk Terminal User Guide Version 3.2 | December 2017 INFORMATION CLASSIFICATION - CONFIDENTIAL
Transcript of ASX Administration and Risk Terminal User Guide€¦ · · 2017-12-26ASX Administration and Risk...

ASX Administration and Risk Terminal User Guide Version 3.2 | December 2017
INFORMATION CLASSIFICATION - CONFIDENTIAL

ASX Administration and Risk Terminal User Guide
© Copyright 2017 ASX Operations Pty Limited ABN 42 004 523 782. All rights reserved 2017. 2/46
Contents
1. Introduction ............................................................................................................................................... 5
1.1. Document information .................................................................................................................... 5
1.1.1. Terms and Acronyms .......................................................................................................... 5
1.2. Before Starting ................................................................................................................................. 5
1.3. Version History ................................................................................................................................ 7
2. Trading Protection Limits ........................................................................................................................... 8
2.1. TPL on Combination Instruments .................................................................................................... 8
2.2. Reference Price Decision Tree ......................................................................................................... 8
2.3. TPL Maintenance ............................................................................................................................. 9
2.3.1. Creating a Settings Group ................................................................................................... 9
2.3.2. Modifying Settings Groups ............................................................................................... 12
2.3.3. Removing a Settings Group .............................................................................................. 13
2.3.4. Filtering Settings Groups .................................................................................................. 13
2.3.5. Exporting TPL .................................................................................................................... 13
3. Member Units (MU) ................................................................................................................................. 14
3.1. Working Example for Member DMC .............................................................................................. 14
3.2. TPL and MU .................................................................................................................................... 14
3.3. Shared Order Groups and MU ....................................................................................................... 14
3.4. Shared Order Group Ownership and Account access .................................................................... 16
3.5. Naming Convention for NTP Users ................................................................................................ 17
4. Shared Order Group ................................................................................................................................ 18
4.1. SOG and Cancel on Connection Loss .............................................................................................. 18
4.2. ASX Trade Terminal Users and SOG ............................................................................................... 18
4.3. Shared Order Group Maintenance ................................................................................................ 18
4.3.1. Creating a Shared Order Group ........................................................................................ 18
4.3.2. Enabling or Disabling a Shared Order Group .................................................................... 22
4.3.3. Modifying a Shared Order Group ..................................................................................... 22
4.3.4. Deleting a Shared Order Group ........................................................................................ 23

ASX Administration and Risk Terminal User Guide
© Copyright 2017 ASX Operations Pty Limited ABN 42 004 523 782. All rights reserved 2017. 3/46
5. Accounts and Limits ................................................................................................................................. 24
5.1. Account Modifications with Active Orders .................................................................................... 25
5.2. Account Position Limit Breach Notifications .................................................................................. 25
5.3. Interaction of product and individual contract limits .................................................................... 25
5.4. Setting limits on multi-leg products ............................................................................................... 27
5.5. Account Limit Types ....................................................................................................................... 27
5.5.1. Long Net Limit ................................................................................................................... 27
5.5.2. Short Net Limit .................................................................................................................. 28
5.5.3. Max Order Volume ........................................................................................................... 28
5.5.4. Delta .................................................................................................................................. 28
5.5.5. Multiplier .......................................................................................................................... 28
5.6. Account Maintenance .................................................................................................................... 28
5.6.1. Creating an Account ......................................................................................................... 28
5.6.2. Adding a Member Unit to an Account .............................................................................. 29
5.6.3. Cloning, Deleting and Disabling or Enabling an Account .................................................. 30
5.7. Account Limit Maintenance ........................................................................................................... 31
5.7.1. Applying Limits to an Account .......................................................................................... 31
5.8. If there are existing limits, these will be displayed and can be modified. If limits have not been set
long net, short net and max order values will be empty. Enter the required values. See 5.4 Setting
limits on multi-leg products ........................................................................................................... 32
5.8.1. Deleting Limits on Accounts ............................................................................................. 33
5.9. Bulk Account and Limit Maintenance ............................................................................................ 34
5.9.1. Overview ........................................................................................................................... 34
5.9.2. File format ........................................................................................................................ 34
5.9.3. Bulk Upload Accounts and Limits Steps ............................................................................ 36
5.9.4. Bulk Export of Account Data ............................................................................................. 37
6. Member and Account Exposure .............................................................................................................. 38
6.1. Open Order and Position Summary Queries .................................................................................. 38
7. User Management ................................................................................................................................... 39
7.1. Changing a user’s password ........................................................................................................... 39
7.2. Disabling a user .............................................................................................................................. 40
ASX Administration and Risk Terminal User Guide
© Copyright 2017 ASX Operations Pty Limited ABN 42 004 523 782. All rights reserved 2017. 4/46
7.3. Export of user data ........................................................................................................................ 41
7.3.1. File format ........................................................................................................................ 41
7.3.2. Exporting user data ........................................................................................................... 42
8. Reference Data Audit ............................................................................................................................... 43
8.1. Reference Data Audit Queries ....................................................................................................... 43
8.2. Exporting Query Data..................................................................................................................... 44
ASX Administration and Risk Terminal User Guide
© Copyright 2017 ASX Operations Pty Limited ABN 42 004 523 782. All rights reserved 2017. 5/46
1. Introduction
The Australian Securities Exchange (ASX) provides market participants with an independent terminal
interface for access to the New Trading Platform for the ASX24 market. The ASX Administration and Risk
Terminal (ART) is designed to provide participants with a greater level of administration and help with
minimising risk exposure for their accounts.
ART provides participants these abilities:
Setup and administration of Accounts and Limits
Shared Order Groups (SOG) management
Trading Protection Limits (TPL) administration across Member Units (MU)
Ability to view exposures at both a member and account level at any time
User ID management – ability to disable/enable and also change the passwords across users.
Note:
Participants are responsible for meeting their Market Integrity Rule (MIR) obligations. While ASX offers functionality that may assist a user in meeting some of their MIR obligations, it is still the ultimate responsibility of the participant.
1.1. Document information
This document describes:
The functionality provided to manage various risk elements such as providing access to orders and
managing account positions
How to use the ART terminal to apply the functionality
1.1.1. Terms and Acronyms
Term / Acronym Description
ART Administration and Risk Terminal
MU Member Unit
SOG Shared Order Group
TPL Trading Protection Limit
PTRM Pre-trade risk management
1.2. Before Starting
To logon to ART, participants need to use the logon details provided by Trading Operations.

ASX Administration and Risk Terminal User Guide
© Copyright 2017 ASX Operations Pty Limited ABN 42 004 523 782. All rights reserved 2017. 6/46
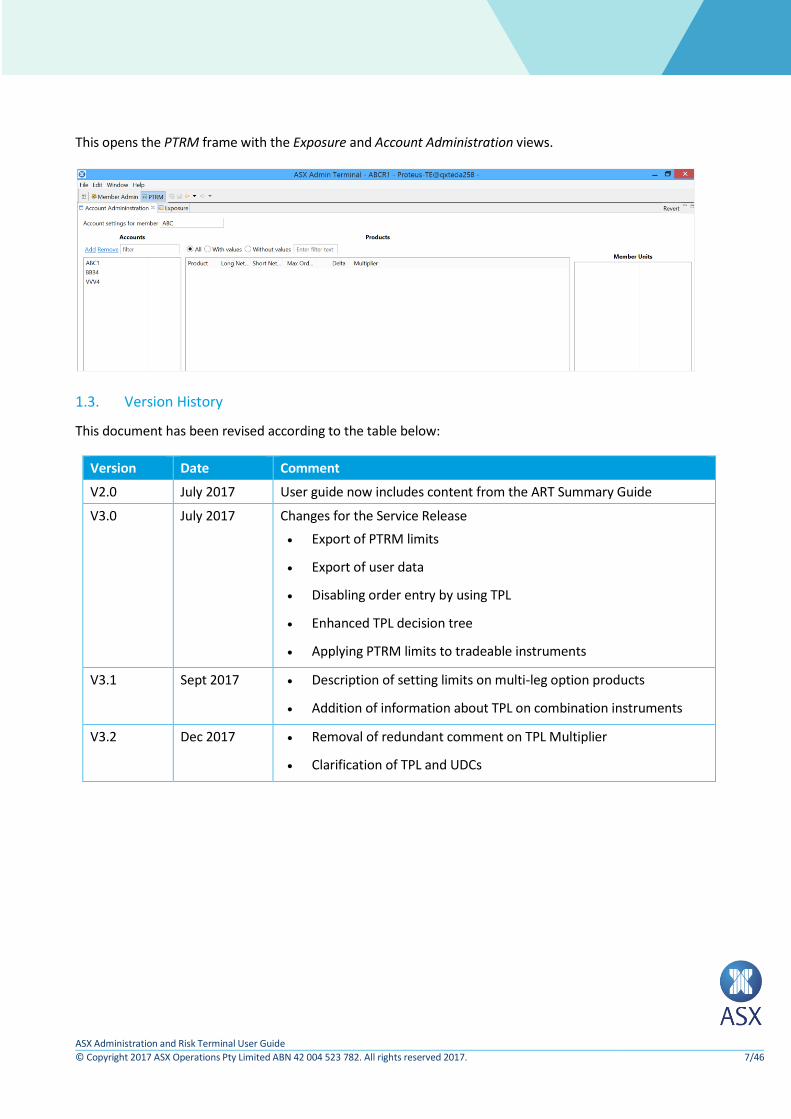
When ART is first opened the Member Admin perspective is displayed. To maintain Pre Trade Risk
Management (PTRM) features such as Accounts and Limits, the PTRM perspective is used. If the PTRM
perspective label is not shown, it can be shown as follows:
1. Click the Open Perspective icon.
This opens the Open Perspective screen.
2. Select PTRM and click OK.
ASX Administration and Risk Terminal User Guide
© Copyright 2017 ASX Operations Pty Limited ABN 42 004 523 782. All rights reserved 2017. 7/46
This opens the PTRM frame with the Exposure and Account Administration views.
1.3. Version History
This document has been revised according to the table below:
Version Date Comment
V2.0 July 2017 User guide now includes content from the ART Summary Guide
V3.0 July 2017 Changes for the Service Release
Export of PTRM limits
Export of user data
Disabling order entry by using TPL
Enhanced TPL decision tree
Applying PTRM limits to tradeable instruments
V3.1 Sept 2017 Description of setting limits on multi-leg option products
Addition of information about TPL on combination instruments
V3.2 Dec 2017 Removal of redundant comment on TPL Multiplier
Clarification of TPL and UDCs
ASX Administration and Risk Terminal User Guide
© Copyright 2017 ASX Operations Pty Limited ABN 42 004 523 782. All rights reserved 2017. 8/46
2. Trading Protection Limits
Trading Protection Limits (TPL) provide a mechanism to limit the distance a new order can be from a
reference price. TPL is checked for orders with a more aggressive price than the reference price i.e. prices
greater than the reference for buy orders, less than the reference for sell orders.
TPL can be used to prevent trading in a product segment by selecting disable order entry. This feature can be
used in conjunction with pre-trade risk management as an additional control over the types of products that
can be traded by users within a Member or Member Unit. For example a risk manager can disable order
entry in Electricity Strip Options, which would override any account limits for Electricity Strip products,
effectively only allowing users to trade Electricity Strip Futures.
Members can choose whether to utilise TPL functionality or not.
TPLs are setup by adding a Settings Group. Each group applies to a list of segments for a particular Member
or Member Unit. See 3.2 TPL and MU for details of how member units affect TPL settings. The single limit
type that can be applied to a Settings Group is “Max Deviation”. This is the limit on the distance a new order
can be away from the reference price.
Please refer to the “Reference Price” decision tree below. This is specified in absolute price units, not ticks.
For example, 0.05 Max Deviation would mean a new buy order price on YTM6 cannot exceed 98.110, when
the last trade price level is 98.060.
2.1. TPL on Combination Instruments
TPL limits are effective for single instruments and exchange defined combinations including Intra and Inter-
Spreads, Packs & Bundles and Butterflies. The reference price for spread instruments and Butterflies is
calculated from the differential of the reference prices of each component leg rather than trading activity in
the spread itself. For Strips, Packs & Bundles the reference price is either the last traded price or prior
settlement price for the combination. The TPL setting is then applied against that reference price.
TPL is not applied to User Defined Combinations (UDC).
2.2. Reference Price Decision Tree
The reference price is the first price that exists in the following list:
1 Equilibrium Price (if available)
2 Last Traded Price
3 Adjusted Closing Price of the night session
4 Prior Settlement Price
ASX Administration and Risk Terminal User Guide
© Copyright 2017 ASX Operations Pty Limited ABN 42 004 523 782. All rights reserved 2017. 9/46
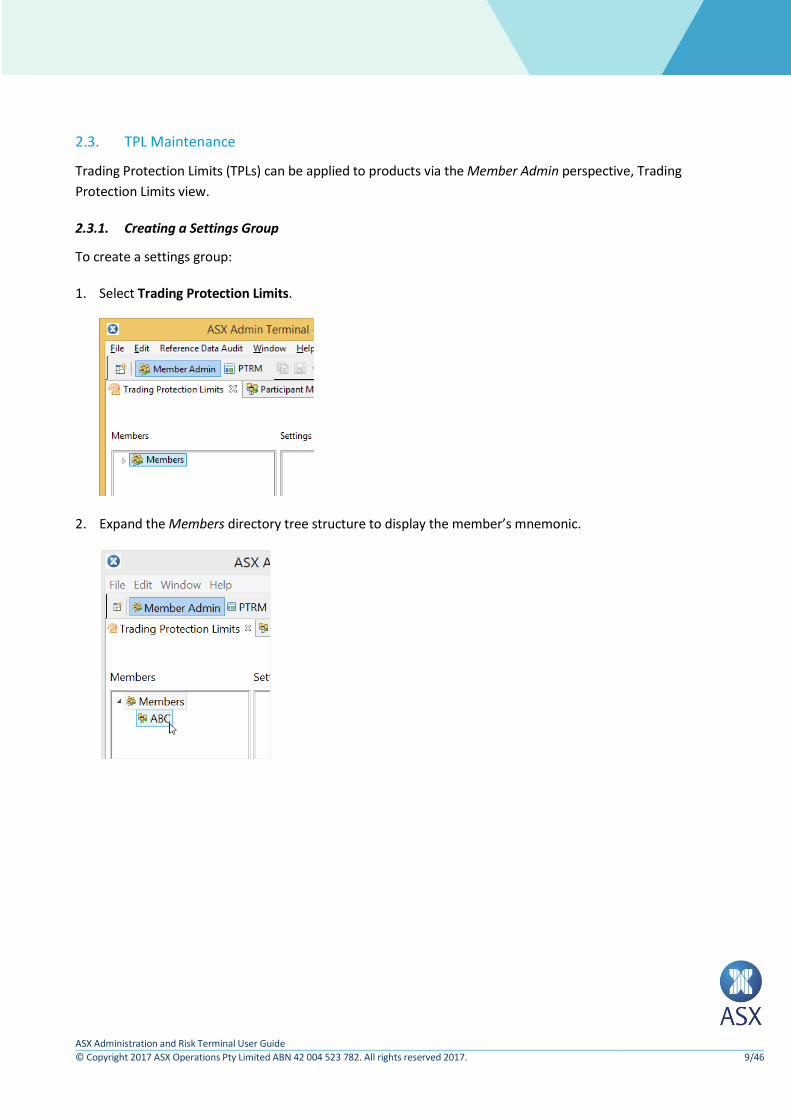
2.3. TPL Maintenance
Trading Protection Limits (TPLs) can be applied to products via the Member Admin perspective, Trading
Protection Limits view.
2.3.1. Creating a Settings Group
To create a settings group:
1. Select Trading Protection Limits.
2. Expand the Members directory tree structure to display the member’s mnemonic.
ASX Administration and Risk Terminal User Guide
© Copyright 2017 ASX Operations Pty Limited ABN 42 004 523 782. All rights reserved 2017. 10/46
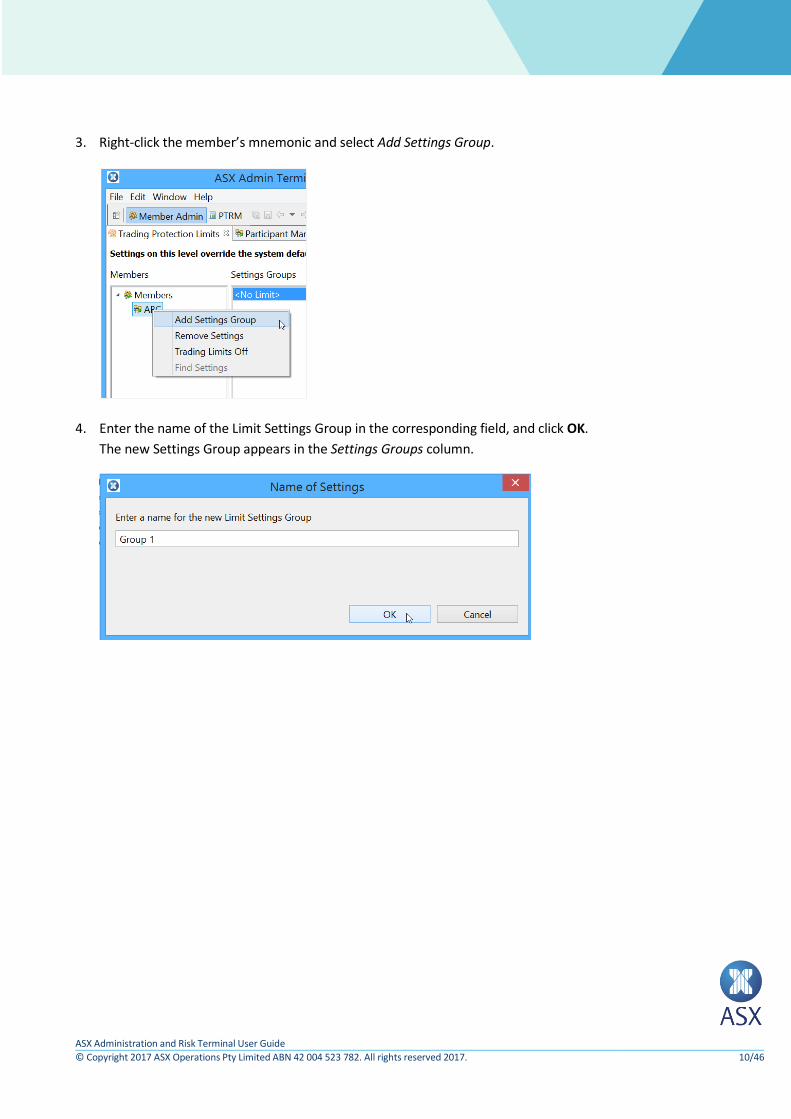
3. Right-click the member’s mnemonic and select Add Settings Group.
4. Enter the name of the Limit Settings Group in the corresponding field, and click OK.
The new Settings Group appears in the Settings Groups column.

ASX Administration and Risk Terminal User Guide
© Copyright 2017 ASX Operations Pty Limited ABN 42 004 523 782. All rights reserved 2017. 11/46
5. Select the required segment from the Segments and Tradeable Instrument frame.
Note:
Limits can be only applied at the segment level.
In the example below, BS_OPTIONS is a segment.
6. Enter a value for the maximum deviation. To prevent order entry in the settings group select Disable
Order Entry. Disabling order entry means that any max deviation entered does not apply.
7. Click Save
Note:
The Max Deviation value is points-based, and there can only be one value per group. However, there can be multiple segments.

ASX Administration and Risk Terminal User Guide
© Copyright 2017 ASX Operations Pty Limited ABN 42 004 523 782. All rights reserved 2017. 12/46
2.3.2. Modifying Settings Groups
To modify an existing Settings group:
1. Select the required Settings Group.
2. Modify the required segments and/or max deviation, and click Save.
Note:
Changing the Max Deviation value changes the value for all segments for the selected Settings Group.

ASX Administration and Risk Terminal User Guide
© Copyright 2017 ASX Operations Pty Limited ABN 42 004 523 782. All rights reserved 2017. 13/46
2.3.3. Removing a Settings Group
To remove a settings group:
1. Right-click the required Settings Group and select Remove.
2. Click Save.
2.3.4. Filtering Settings Groups
To filter settings groups:
1. Select the required group from the Settings Groups column.
2. Select the required filter option.
3. Select Hide None Selected to view only markets that have TPLs applied.
4. Select Hide Empty Segments to view only segments that have TPLs applied.
2.3.5. Exporting TPL
TPL Settings Groups can be bulk copied using ART by going into the File menu and Select All, Copy.
ASX Administration and Risk Terminal User Guide
© Copyright 2017 ASX Operations Pty Limited ABN 42 004 523 782. All rights reserved 2017. 14/46
3. Member Units (MU)
Member Units (MU) sit one level below the member itself, that is, they act as a sub-member. MU can be
used to split out the relevant accounts within the member. TPL can be set at the MU member level and also
at the MU sub-member level. Additionally, Account Limits need to be applied at a Member and/or Member
Unit level. Any user within the same MU will have the same TPLs and Account Limits applied.
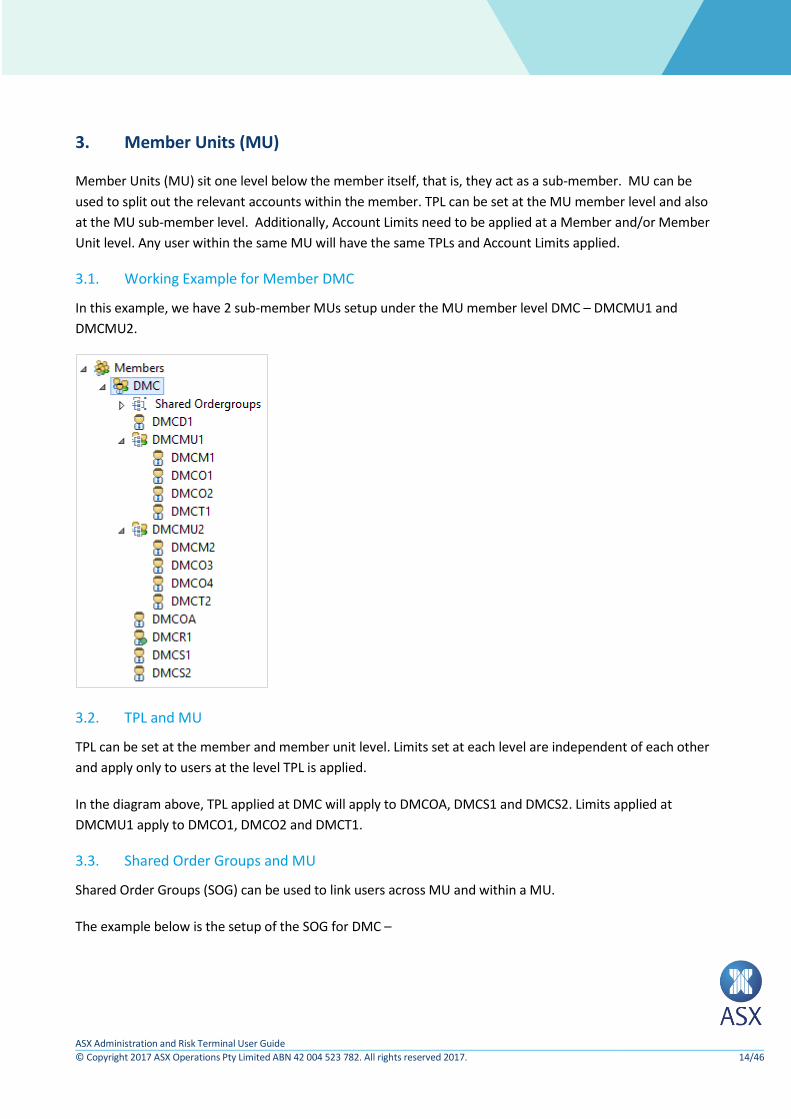
3.1. Working Example for Member DMC
In this example, we have 2 sub-member MUs setup under the MU member level DMC – DMCMU1 and
DMCMU2.
3.2. TPL and MU
TPL can be set at the member and member unit level. Limits set at each level are independent of each other
and apply only to users at the level TPL is applied.
In the diagram above, TPL applied at DMC will apply to DMCOA, DMCS1 and DMCS2. Limits applied at
DMCMU1 apply to DMCO1, DMCO2 and DMCT1.
3.3. Shared Order Groups and MU
Shared Order Groups (SOG) can be used to link users across MU and within a MU.
The example below is the setup of the SOG for DMC –

ASX Administration and Risk Terminal User Guide
© Copyright 2017 ASX Operations Pty Limited ABN 42 004 523 782. All rights reserved 2017. 15/46
The following access has been permissioned based on the SOG setup in the example above:
DMCOA is the same owner across all SOGs. This means DMCOA can see all orders for all users
(assuming the SOG is used).
FIX session users under SOG1 can see and act on each other’s orders. FIX Session users under SOG2 can
see and act on each other’s orders.
As per the figure below, DMCO1 and DMCO3 can see and act on each other’s orders via SOG3 (as can
DMCOA). This illustrates that a SOG can be used across multiple MUs.

ASX Administration and Risk Terminal User Guide
© Copyright 2017 ASX Operations Pty Limited ABN 42 004 523 782. All rights reserved 2017. 16/46
3.4. Shared Order Group Ownership and Account access
The relationship between a member or member unit and a SOG owner creates access considerations that
must be understood to ensure the appropriate access levels are applied.
The owner of a Shared Order Group provides access to all of the accounts it can access to the members of
the SOG. If a SOG owner is in a different member unit to SOG members, this may provide the SOG member
with access to accounts that have not been authorised for the member unit it belongs to. This includes
accounts that are authorised for other members units.
Note: To reduce the risk of unauthorised access to accounts, it is not prudent to make users
outside of a member unit the owner of a SOG.
ASX Administration and Risk Terminal User Guide
© Copyright 2017 ASX Operations Pty Limited ABN 42 004 523 782. All rights reserved 2017. 17/46
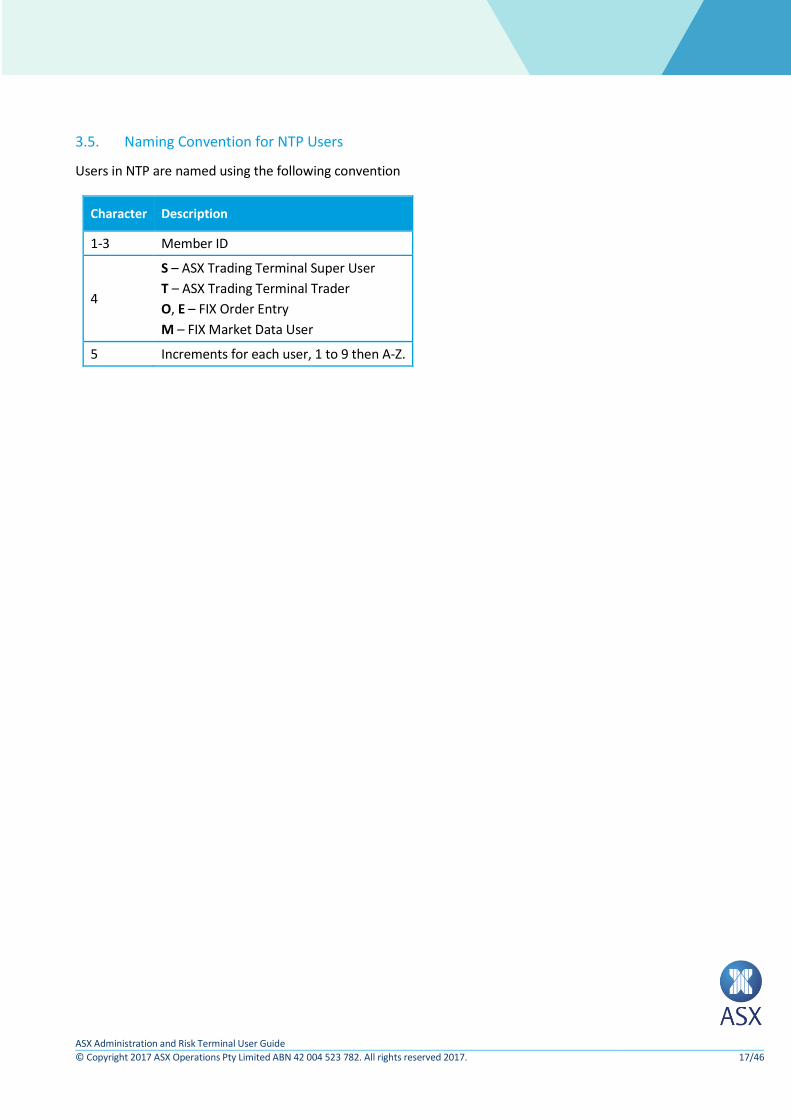
3.5. Naming Convention for NTP Users
Users in NTP are named using the following convention
Character Description
1-3 Member ID
4
S – ASX Trading Terminal Super User
T – ASX Trading Terminal Trader
O, E – FIX Order Entry
M – FIX Market Data User
5 Increments for each user, 1 to 9 then A-Z.

ASX Administration and Risk Terminal User Guide
© Copyright 2017 ASX Operations Pty Limited ABN 42 004 523 782. All rights reserved 2017. 18/46
4. Shared Order Group
Shared Order Group (SOG) functionality provides capabilities for multiple users to view and control orders. A
SOG consists of a several users. These can be both FIX and ASX Terminal users. When an order is placed as a
SOG order by one of the users in the group, information about all actions on the order are disseminated to
all users within the group. Any of the users (with the relevant user role) in the SOG can cancel or replace the
order.
All SOGs require an Owner. If an Owner is disabled, all open orders under the SOG will be purged. If a User ID
(which isn’t an Owner) is removed from a SOG, any open orders which were nominated as part of the SOG
will remain.
Note: Disabling the owner of a SOG will also cause the SOG itself to disabled.
4.1. SOG and Cancel on Connection Loss
If a user within a SOG had the last touch on an order placed with FIX tag 18=o (cancel on connection loss)
disconnects, their order will be cancelled. If any other user disconnects (within the same SOG), the order will
remain.
4.2. ASX Trade Terminal Users and SOG
ASX Trading Terminal Users (Super Users and Trader Users) have a slightly different setup with SOGs
compared to FIX session users. A Super User under the Member can view and cancel all orders for the
member and all its MUs. A Super User under a MU can only view/amend cancel orders within that MU.
Although a Super User can view and cancel other user’s orders within the member, they can only update
shared orders if they are part of the SOG or are their own orders.
As per the user setup in 3.3 Shared Order Groups and MU, DMCS1 and DMCS2 have full access to view and
act on all orders, across all users as they are under the member itself, DMC. Users DMCT1 and DMCT2
(Trader User Roles) however act alone, that is, they cannot amend/cancel orders on behalf of other users.
They can however view orders across FIX user sessions provided they are included in the same SOG and MU
level.
4.3. Shared Order Group Maintenance
4.3.1. Creating a Shared Order Group
A shared order group can be created in the Member Admin perspective.
To create a shared order group (SOG):
1. Open the Member Admin perspective.

ASX Administration and Risk Terminal User Guide
© Copyright 2017 ASX Operations Pty Limited ABN 42 004 523 782. All rights reserved 2017. 19/46
2. Select Members > [Member] to expand the tree structure in the Trading Participants frame.
In the example below, the member would be ABC.
3. Right-click Shared Ordergroups > New > Shared Ordergroup.
The New Shared Ordergroup window is displayed.

ASX Administration and Risk Terminal User Guide
© Copyright 2017 ASX Operations Pty Limited ABN 42 004 523 782. All rights reserved 2017. 20/46
4. Enter the name for the new SOG in the Name field.
5. Enter the owner’s user ID in the Owner field.
The owner’s user ID needs to be an existing ID within the member. Once the first character of the ID has
been entered in the field, all existing IDs beginning with that character are displayed in the drop-down
list.
6. Double-click the required ID, or press Enter to select.
7. Enter the user ID in the Users field.
ASX Administration and Risk Terminal User Guide
© Copyright 2017 ASX Operations Pty Limited ABN 42 004 523 782. All rights reserved 2017. 21/46
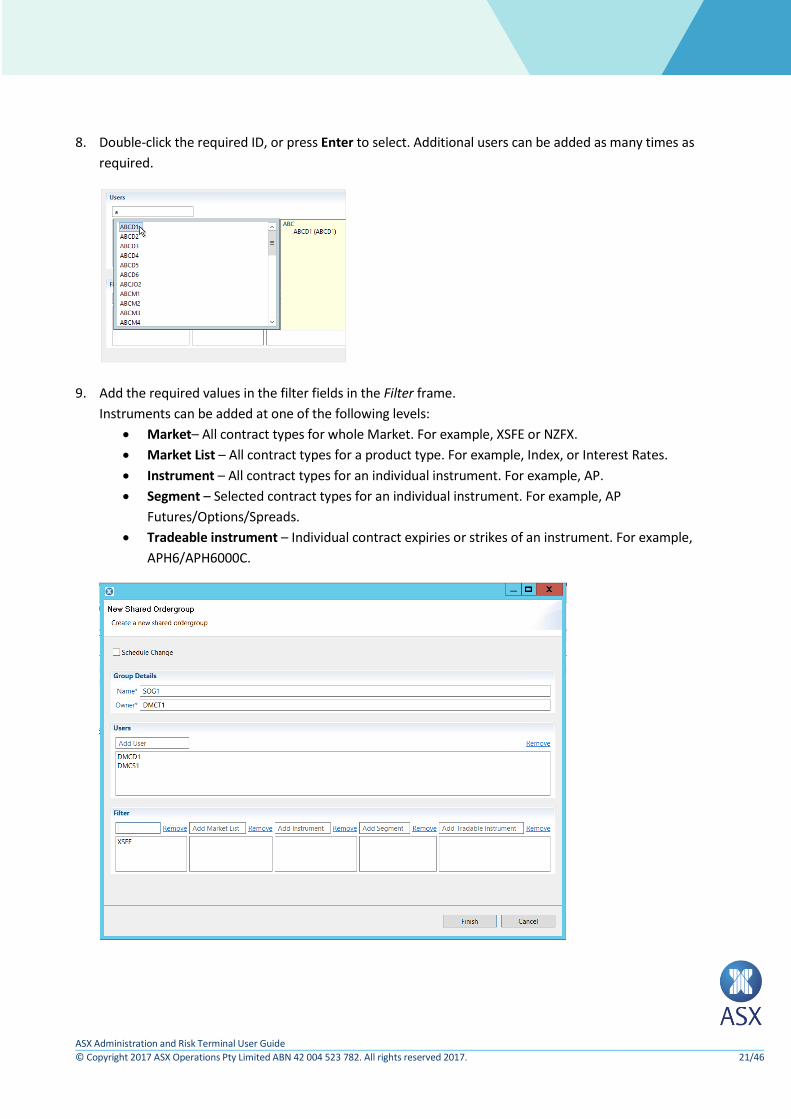
8. Double-click the required ID, or press Enter to select. Additional users can be added as many times as
required.
9. Add the required values in the filter fields in the Filter frame.
Instruments can be added at one of the following levels:
Market– All contract types for whole Market. For example, XSFE or NZFX.
Market List – All contract types for a product type. For example, Index, or Interest Rates.
Instrument – All contract types for an individual instrument. For example, AP.
Segment – Selected contract types for an individual instrument. For example, AP
Futures/Options/Spreads.
Tradeable instrument – Individual contract expiries or strikes of an instrument. For example,
APH6/APH6000C.
ASX Administration and Risk Terminal User Guide
© Copyright 2017 ASX Operations Pty Limited ABN 42 004 523 782. All rights reserved 2017. 22/46
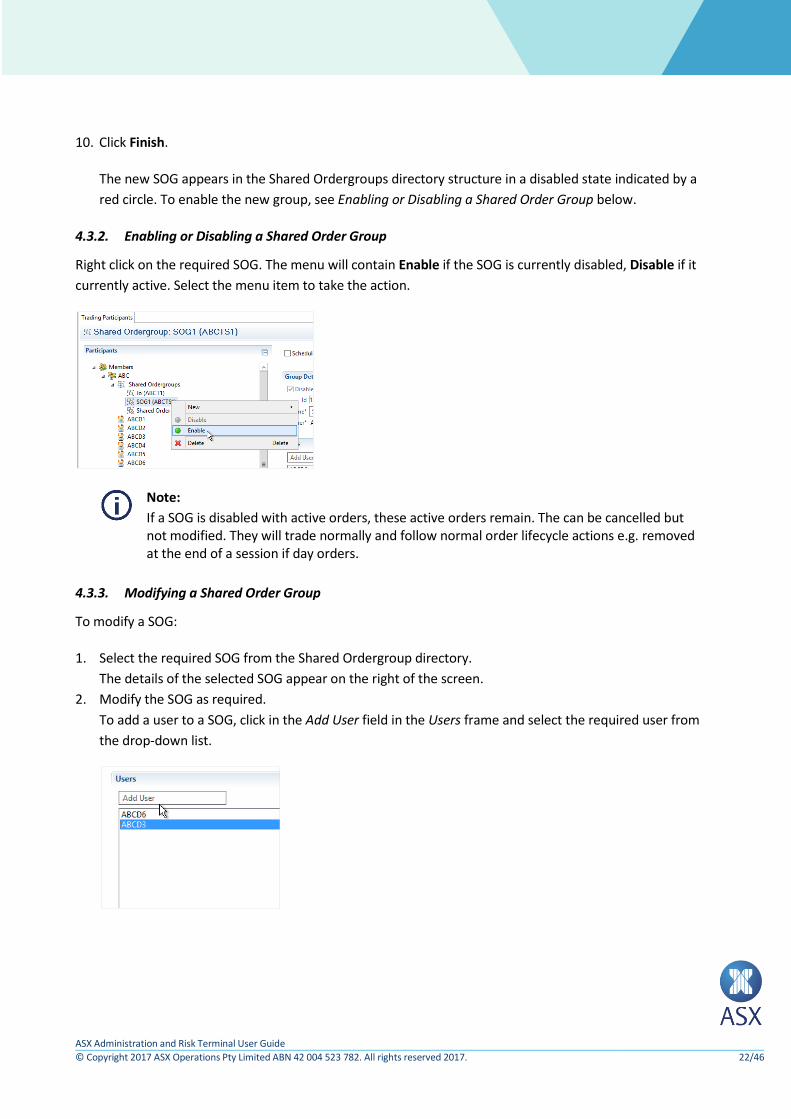
10. Click Finish.
The new SOG appears in the Shared Ordergroups directory structure in a disabled state indicated by a
red circle. To enable the new group, see Enabling or Disabling a Shared Order Group below.
4.3.2. Enabling or Disabling a Shared Order Group
Right click on the required SOG. The menu will contain Enable if the SOG is currently disabled, Disable if it
currently active. Select the menu item to take the action.
Note:
If a SOG is disabled with active orders, these active orders remain. The can be cancelled but not modified. They will trade normally and follow normal order lifecycle actions e.g. removed at the end of a session if day orders.
4.3.3. Modifying a Shared Order Group
To modify a SOG:
1. Select the required SOG from the Shared Ordergroup directory.
The details of the selected SOG appear on the right of the screen.
2. Modify the SOG as required.
To add a user to a SOG, click in the Add User field in the Users frame and select the required user from
the drop-down list.

ASX Administration and Risk Terminal User Guide
© Copyright 2017 ASX Operations Pty Limited ABN 42 004 523 782. All rights reserved 2017. 23/46
3. To remove a user from a SOG, select the required user and click Remove.
4. Click Save.
Note:
Once Remove has been selected the user is permanently removed from the SOG.
4.3.4. Deleting a Shared Order Group
Note:
To delete a SOG, it needs to be in a disabled state.
To delete a shared order group:
1. Right-click the required SOG and select Delete.
2. Click OK. SOG shared order group, click OK.
ASX Administration and Risk Terminal User Guide
© Copyright 2017 ASX Operations Pty Limited ABN 42 004 523 782. All rights reserved 2017. 24/46
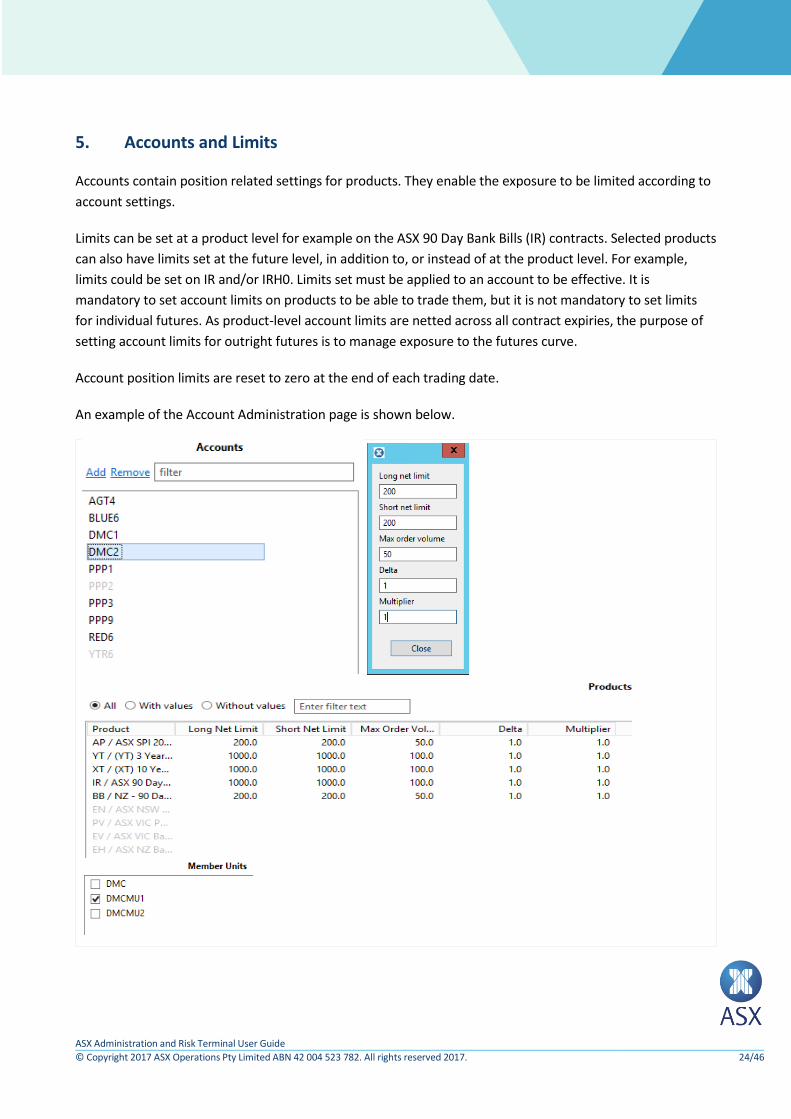
5. Accounts and Limits
Accounts contain position related settings for products. They enable the exposure to be limited according to
account settings.
Limits can be set at a product level for example on the ASX 90 Day Bank Bills (IR) contracts. Selected products
can also have limits set at the future level, in addition to, or instead of at the product level. For example,
limits could be set on IR and/or IRH0. Limits set must be applied to an account to be effective. It is
mandatory to set account limits on products to be able to trade them, but it is not mandatory to set limits
for individual futures. As product-level account limits are netted across all contract expiries, the purpose of
setting account limits for outright futures is to manage exposure to the futures curve.
Account position limits are reset to zero at the end of each trading date.
An example of the Account Administration page is shown below.

ASX Administration and Risk Terminal User Guide
© Copyright 2017 ASX Operations Pty Limited ABN 42 004 523 782. All rights reserved 2017. 25/46
In the example above, we have account DMC2 setup across five products, which are enabled for users under
MU DMCMU1. Items are highlighted in light grey to indicate that they are not enabled/active.
5.1. Account Modifications with Active Orders
The following behaviour applies:
Modification of any account parameter will not apply to any active orders.
Amending an active order’s account will not adjust the position to the new account parameter. The
position will be kept against the original account parameter that was validated on order entry.
It is not recommended to add or delete PTRM limits on individual futures for accounts with existing
positions during the trading session. Account exposure may not reflect the actual position until the next
trading business date.
5.2. Account Position Limit Breach Notifications
A notification will be sent to the sessions who are hitting their 75% and 90% accounts position limits via the
PartyRiskLimitsReport (CM) FIX message and also on the ASX Trading Terminal.
A lower limit warning message will be sent for orders which are within the 75-90% limit range of the account
and a higher limit warning message will be sent for orders within the 90-100% range. A warning message will
be sent to the session placing the order for every order placed within those thresholds (75-100% range), not
just the initial order that moves the account position limit over 75 or 90%.
If an order simultaneously breaches multiple thresholds, only one notification will be sent. Examples of this
are breaching the lower and upper thresholds, or a spread order breaching both long and short limits.
Any order which would breach the account position limit will be rejected.
5.3. Interaction of product and individual contract limits
Long net, short net and max order volume limits can be set at the product level and also at the future level.
The logic for calculating the position is the same in both cases. In the case where limits are set for both a
product and an individual tradeable instrument, the interaction is as follows:
Orders in a future are validated only against the limits set for the outright. They will not affect position
set at the product level
If an outright contract in a spread has a limit set, the system will validate that leg. Any breach of a
position will cause the order to be rejected
Consider the following scenario where limits are set at both the product and outright contract level:

ASX Administration and Risk Terminal User Guide
© Copyright 2017 ASX Operations Pty Limited ABN 42 004 523 782. All rights reserved 2017. 26/46
IR Product
Limit Value
Long Net 10000
Short Net 10000
Max Order Volume 50
Delta 0.1
Multiplier 0.5
IRH7
Limit Value
Long Net 100
Short Net 100
Max Order Volume 75
IRM7
Limit Value
Long Net 100
Short Net 100
Max Order Volume 75
The following orders will be validated solely against product limits
Order in IRH70095000C - Options are validated against product, so even though there is limit for the
underlying (IRH7) this will not be used. One tenth (0.1) of the order volume will be counted against the
relevant long/short limit.
Order in IRH8 - No limits for this outright contract, therefore the product limit is applied
Order in IRH8U8 - no limits for either of the outright legs, therefore the product limit is applied
The following orders be affected by outright contract limits
Order in IRH7 - validated against IRH7 limits. The maximum long and short position is 100, lower than
the product level. Maximum order value is higher, at 75
Order in IRH7M7 - validated against IRH7 and IRM7 limits
ASX Administration and Risk Terminal User Guide
© Copyright 2017 ASX Operations Pty Limited ABN 42 004 523 782. All rights reserved 2017. 27/46
Order in IRH7H8 - IRH7 is validated against contract level. IRH8 is validated against IR product limits, as
no limits defined for IRH8
5.4. Setting limits on multi-leg products
If a combination instrument has options over it (e.g. base load energy strip products) limits must be set on
both the parent level and the individual products. For example NSW Base Load Energy Strip products (HN)
consist of NSW Base Load Quarter Electricity Futures (BN). Limits must be set on both the HN and BN
products.
When trading the option over the strips the strip PTRM limits will apply. When trading the strip the future
PTRM limits will apply.
The list of products is:
Product name Strip Future
Australian Electricity - NSW Base Load Energy HN BN
Australian Electricity - VIC Base Load Energy HV BV
Australian Electricity - QLD Base Load Energy HQ BQ
Australian Electricity - SA Base Load Energy HS BS
NZ Electricity - Benmore Base Load EF EE
NZ Electricity - Otahuhu Base Load EB EA
Note:
Combination products that do not have options listed over them only have limits set on the individual products (i.e. the leg instruments).
5.5. Account Limit Types
A number of different limits can be set on an account. Long net limit, short net limit and max order volume
can be set at both product and future level. Delta and Multiplier only apply to product level. These limits are
described in the following sections.
5.5.1. Long Net Limit
The aggregate sum of quantities on working buy orders and the long position of traded quantity so far at the
current point in time. The traded position is calculated by netting against the sell trades, but the working
buy orders are not netted against working sell orders.

ASX Administration and Risk Terminal User Guide
© Copyright 2017 ASX Operations Pty Limited ABN 42 004 523 782. All rights reserved 2017. 28/46
Example: The Long Net Limit is 50. The user has completed 5 buy trades at quantities 2, 25, 14, 5, 7, sum of 53, and 2 sell trades of 10 and 25, sum of 35. The long position is 18 (53-35). There are 2 buy orders at quantity of 5 each, so the current Long Net Limit calculation is 28. The user can therefore place a further aggregate quantity of 22 in buy orders. Note that any working sell orders were ignored.
5.5.2. Short Net Limit
The aggregate sum of quantities on working sell orders and the short position of traded quantity so far at the
current point in time. The traded position is calculated by netting against the buy trades, but the working
sell orders are not netted against working buy orders.
5.5.3. Max Order Volume
The limit on quantity for a single order, with a system-enforced maximum of 9999.
5.5.4. Delta
The Delta option is a factor that can be applied to reduce the position weighting of option positions. They
reflect the weighting they have on the overall product position. Acceptable values are between 0 and 1 with
a default of 1.
Delta can only be applied to a product, not a future. Any value other than 1 will not be saved.
Example: With a Delta of 0.2 an option order of 100 will add 20 to the position (100 x 0.2 = 20).
5.5.5. Multiplier
The multiplier is a factor that can be applied to overall product positions in 1:1 intra-commodity spreads.
Acceptable values are between 0 and 1, with a default of 1.
Multiplier can only be applied to a product, not a future. Any value other than 1 will not be saved.
Example: With a multiplier of 0.5 an intra-spread order of 10 will add 5 to the position (10 x 0.5 = 5).
5.6. Account Maintenance
5.6.1. Creating an Account
To create an account via the PTRM perspective:
1. Click Add in the Account Administration view.
This opens the Add Account dialog box.

ASX Administration and Risk Terminal User Guide
© Copyright 2017 ASX Operations Pty Limited ABN 42 004 523 782. All rights reserved 2017. 29/46
2. In the Name of the new account field, add the name of the account and click OK.
The new account is now listed in the Accounts column. It is displayed in grey until it has been enabled.
3. Right-click the created account and select Enable/Disable.
Once the account is enabled, it changes from grey to black.
4. Click Save.
The account is now active.
5.6.2. Adding a Member Unit to an Account
To add a member unit to an account:

ASX Administration and Risk Terminal User Guide
© Copyright 2017 ASX Operations Pty Limited ABN 42 004 523 782. All rights reserved 2017. 30/46
1. Select the required new account.
2. Select the required member unit in the Member Units column.
3. Click Save.
5.6.3. Cloning, Deleting and Disabling or Enabling an Account
The right-clicking menu on the account list provides a menu with options to Clone, Delete and
Enable/Disable an account.
To disable/enable an account:
1. Select the required account in the Accounts column.

ASX Administration and Risk Terminal User Guide
© Copyright 2017 ASX Operations Pty Limited ABN 42 004 523 782. All rights reserved 2017. 31/46
2. Right-click and select the action required.
3. Click Save to apply the change performed.
Notes:
A cloned account is automatically active (not greyed out) and does not need to be enabled.
All orders for an account will be deleted as soon as it is disabled.
An account must be disabled before it can be deleted.
5.7. Account Limit Maintenance
Limits can be applied by using the relevant screens within the terminal. They can also be applied by
uploading a file.
5.7.1. Applying Limits to an Account
To apply a limit to an account:
1. Select the required account.

ASX Administration and Risk Terminal User Guide
© Copyright 2017 ASX Operations Pty Limited ABN 42 004 523 782. All rights reserved 2017. 32/46
2. Double-click the required product from the product column.
5.8. If there are existing limits, these will be displayed and can be modified. If limits have not
been set long net, short net and max order values will be empty. Enter the required values.
See 5.4 Setting limits on multi-leg products
If a combination instrument has options over it (e.g. base load energy strip products) limits must be set on
both the parent level and the individual products. For example NSW Base Load Energy Strip products (HN)
consist of NSW Base Load Quarter Electricity Futures (BN). Limits must be set on both the HN and BN
products.
When trading the option over the strips the strip PTRM limits will apply. When trading the strip the future
PTRM limits will apply.
The list of products is:
Product name Strip Future
Australian Electricity - NSW Base Load Energy HN BN
Australian Electricity - VIC Base Load Energy HV BV
Australian Electricity - QLD Base Load Energy HQ BQ
Australian Electricity - SA Base Load Energy HS BS
NZ Electricity - Benmore Base Load EF EE
NZ Electricity - Otahuhu Base Load EB EA
Note:
Combination products that do not have options listed over them only have limits set on the individual products (i.e. the leg instruments).
ASX Administration and Risk Terminal User Guide
© Copyright 2017 ASX Operations Pty Limited ABN 42 004 523 782. All rights reserved 2017. 33/46
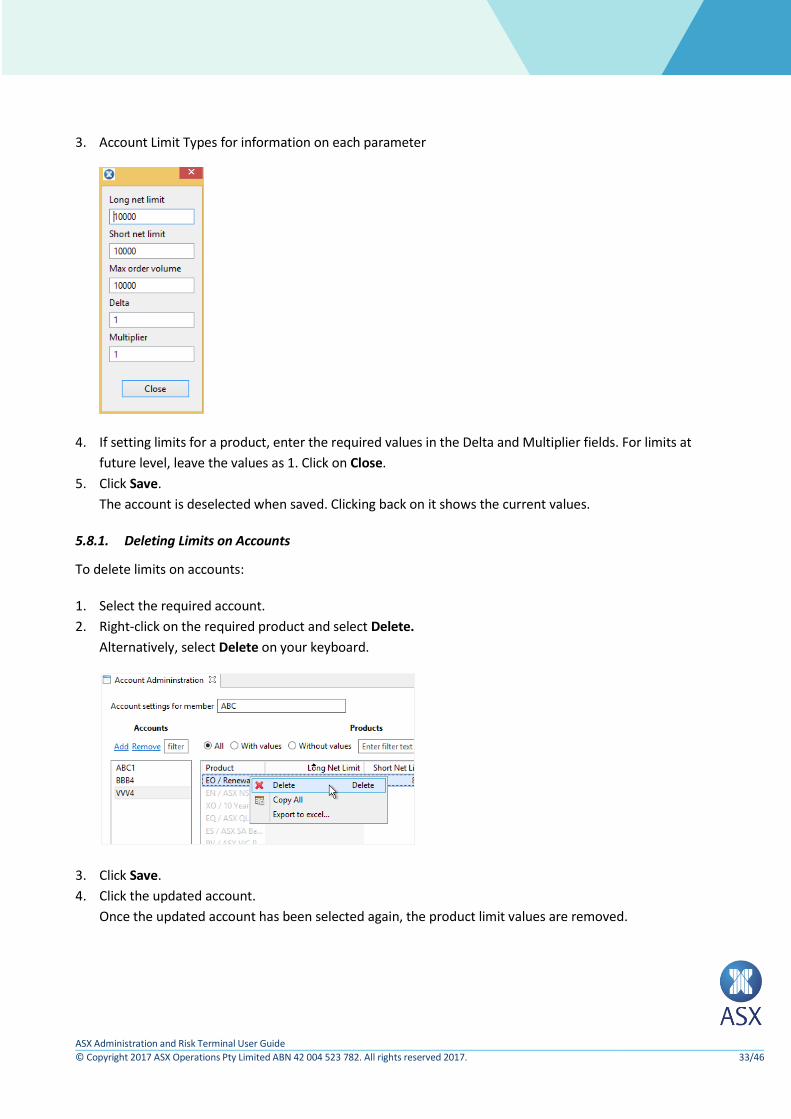
3. Account Limit Types for information on each parameter
4. If setting limits for a product, enter the required values in the Delta and Multiplier fields. For limits at
future level, leave the values as 1. Click on Close.
5. Click Save.
The account is deselected when saved. Clicking back on it shows the current values.
5.8.1. Deleting Limits on Accounts
To delete limits on accounts:
1. Select the required account.
2. Right-click on the required product and select Delete.
Alternatively, select Delete on your keyboard.
3. Click Save.
4. Click the updated account.
Once the updated account has been selected again, the product limit values are removed.
ASX Administration and Risk Terminal User Guide
© Copyright 2017 ASX Operations Pty Limited ABN 42 004 523 782. All rights reserved 2017. 34/46
5.9. Bulk Account and Limit Maintenance
5.9.1. Overview
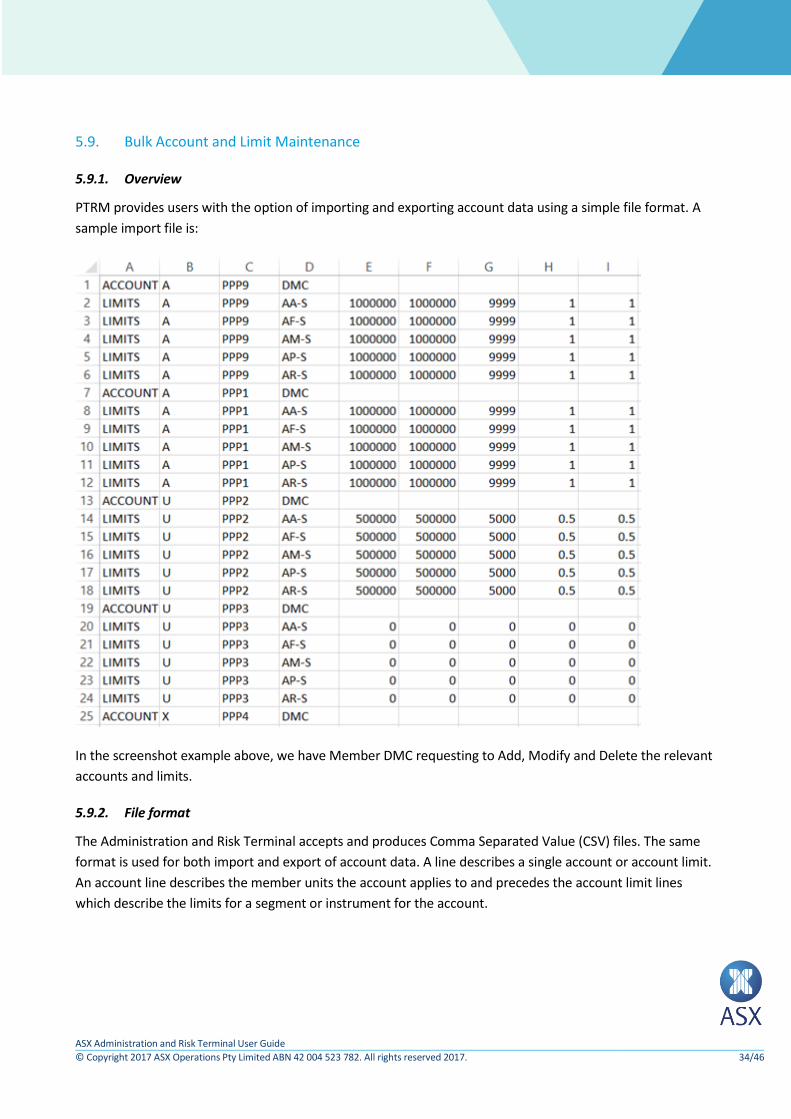
PTRM provides users with the option of importing and exporting account data using a simple file format. A
sample import file is:
In the screenshot example above, we have Member DMC requesting to Add, Modify and Delete the relevant
accounts and limits.
5.9.2. File format
The Administration and Risk Terminal accepts and produces Comma Separated Value (CSV) files. The same
format is used for both import and export of account data. A line describes a single account or account limit.
An account line describes the member units the account applies to and precedes the account limit lines
which describe the limits for a segment or instrument for the account.

ASX Administration and Risk Terminal User Guide
© Copyright 2017 ASX Operations Pty Limited ABN 42 004 523 782. All rights reserved 2017. 35/46
Import files specify an action to take - add, update or delete. An account line will be followed by account
limit lines for additions, updates and deletions. Account deletion lines do not have any account limit lines
following them.
The first three columns for both line types are as follows:
Column No Description Valid values Comments
1 Type of instruction ACCOUNT
LIMITS
2 Action to take A – Addition
U – Update
X – Delete
The action column must be supplied on imported files. It is blank on exported files.
3 Account name Existing account names for updates and deletes, new name for additions
Columns 4 onwards are different for each line type. For ACCOUNT lines, each subsequent column contains
the member unit the account applies to.
For LIMITS lines the columns are as follows
Column No Description Valid values Comments
4 Segment name E.g. AP-S, IB-S
5 Long Net Limit
6 Short Net Limit
7 Max Order Volume
8 Delta
9 Multiplier
Notes:
If adding, updating or deleting account limits from an existing account, the action on the
ACCOUNT line must be U.
ASX Administration and Risk Terminal User Guide
© Copyright 2017 ASX Operations Pty Limited ABN 42 004 523 782. All rights reserved 2017. 36/46
5.9.3. Bulk Upload Accounts and Limits Steps
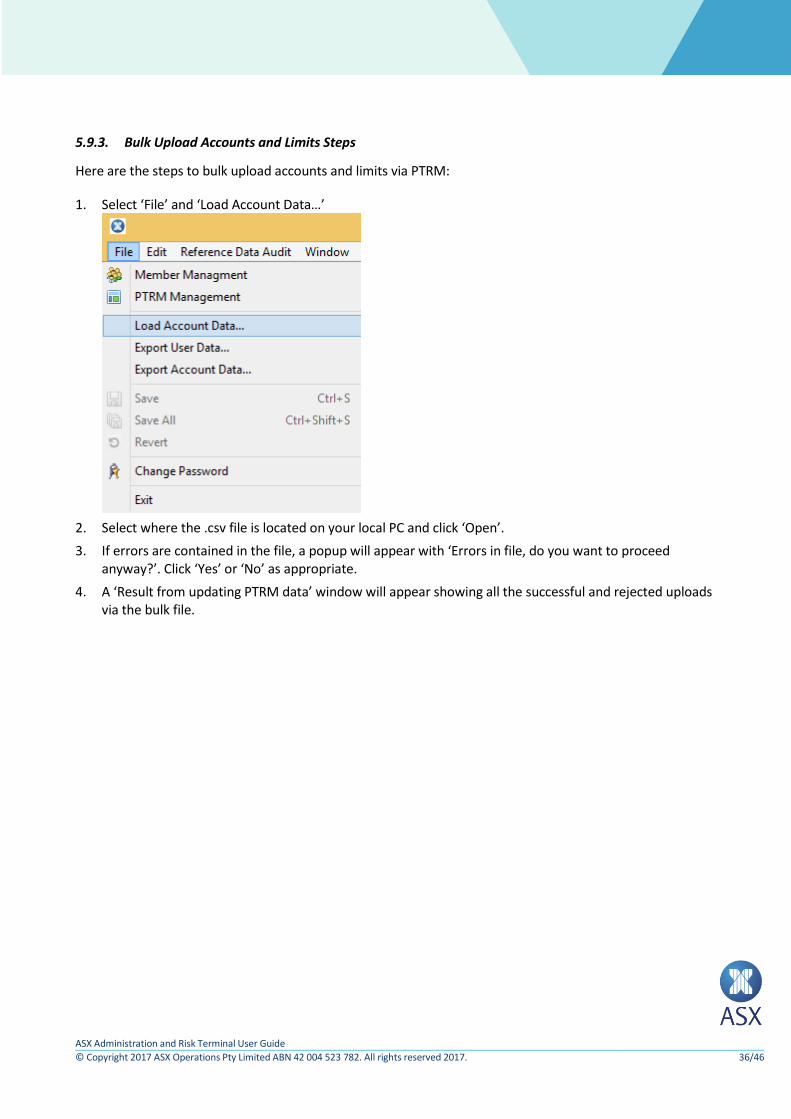
Here are the steps to bulk upload accounts and limits via PTRM:
1. Select ‘File’ and ‘Load Account Data…’
2. Select where the .csv file is located on your local PC and click ‘Open’.
3. If errors are contained in the file, a popup will appear with ‘Errors in file, do you want to proceed anyway?’. Click ‘Yes’ or ‘No’ as appropriate.
4. A ‘Result from updating PTRM data’ window will appear showing all the successful and rejected uploads via the bulk file.
ASX Administration and Risk Terminal User Guide
© Copyright 2017 ASX Operations Pty Limited ABN 42 004 523 782. All rights reserved 2017. 37/46
5.9.4. Bulk Export of Account Data
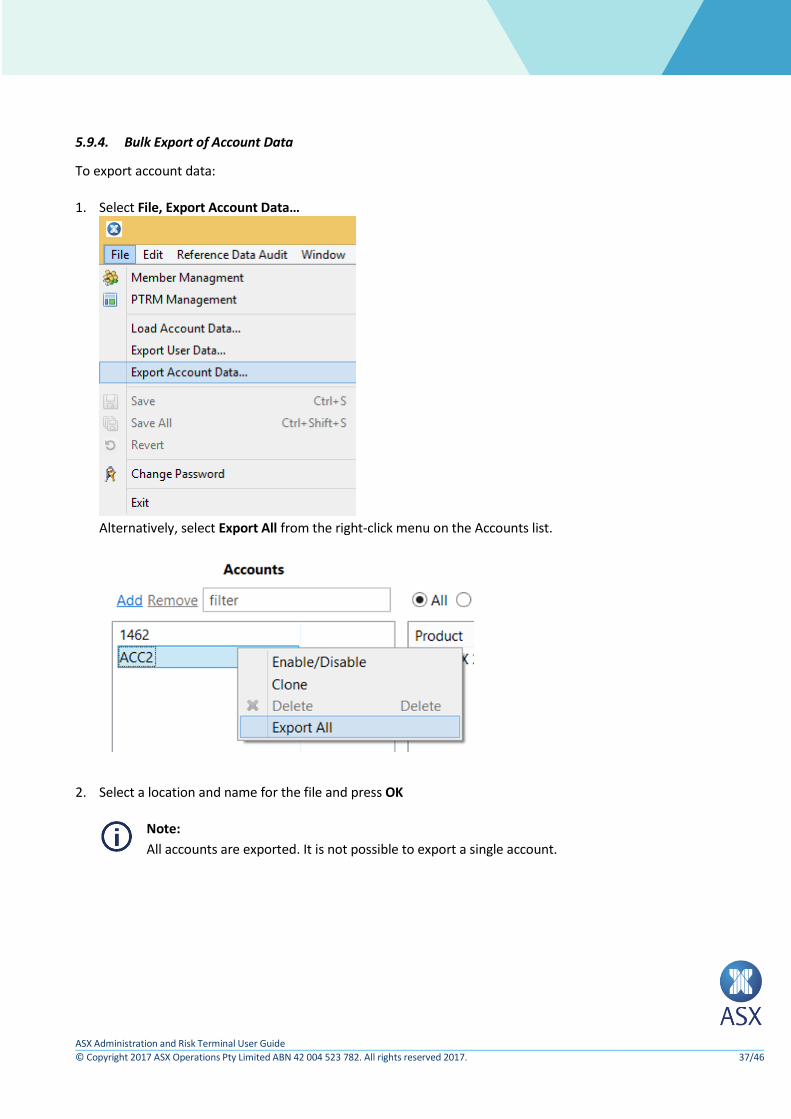
To export account data:
1. Select File, Export Account Data…
Alternatively, select Export All from the right-click menu on the Accounts list.
2. Select a location and name for the file and press OK
Note:
All accounts are exported. It is not possible to export a single account.
ASX Administration and Risk Terminal User Guide
© Copyright 2017 ASX Operations Pty Limited ABN 42 004 523 782. All rights reserved 2017. 38/46
6. Member and Account Exposure
ART allows participants to send requests to see their exposures at a Member or Account level at any time.
This allows participants to work out exactly what exposure they have across all accounts and at the member
level as a whole.
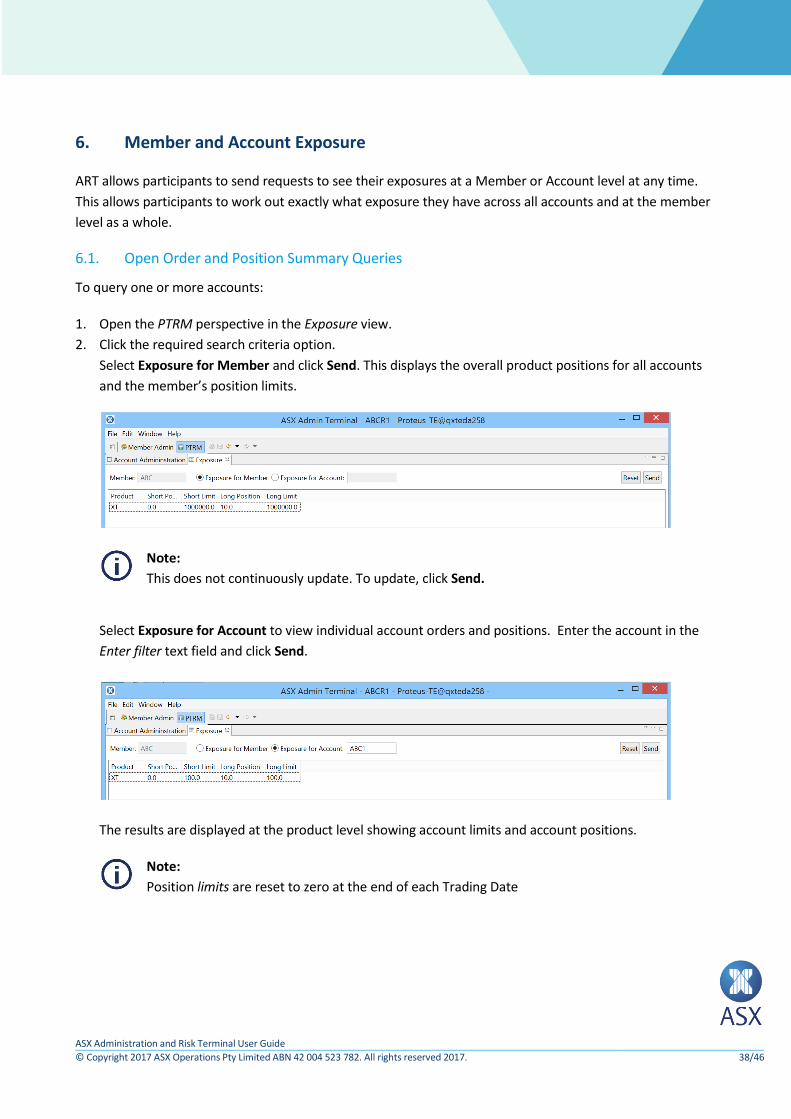
6.1. Open Order and Position Summary Queries
To query one or more accounts:
1. Open the PTRM perspective in the Exposure view.
2. Click the required search criteria option.
Select Exposure for Member and click Send. This displays the overall product positions for all accounts
and the member’s position limits.
Note:
This does not continuously update. To update, click Send.
Select Exposure for Account to view individual account orders and positions. Enter the account in the
Enter filter text field and click Send.
The results are displayed at the product level showing account limits and account positions.
Note:
Position limits are reset to zero at the end of each Trading Date

ASX Administration and Risk Terminal User Guide
© Copyright 2017 ASX Operations Pty Limited ABN 42 004 523 782. All rights reserved 2017. 39/46
7. User Management
The Administration and Risk Terminal provides functionality to manage users. Passwords can be reset and a
user can be disabled if it is no longer required.
7.1. Changing a user’s password
Passwords can be updated for all users under the Member. This function can be used to unlock users who
have entered their password incorrectly too many times and for those with expired passwords. To change a
user’s password:
1. Open the Member Admin perspective.
2. Select Members > [Member] to expand the tree structure in the Trading Participants frame.
3. Locate the required user and right-click on it
4. Select Change Password For User
5. Enter the new password in the New Password and Confirm Password boxes. Select User has to change
Password on next login if required
6. Press OK.
ASX Administration and Risk Terminal User Guide
© Copyright 2017 ASX Operations Pty Limited ABN 42 004 523 782. All rights reserved 2017. 40/46
Notes:
The new password must meet at least three of the following criteria:
Contain an English upper case character (A-Z)
Contain an English lower case character (a-z)
Contain a Hindu Arabic numeral (0-9)
Contain one or more of the following non-alphanumeric, special characters:
!@#$%^&*()_+|~-=\`{}[]:";'<>?,./)
Contain any character that is categorized as an alphabetic character but is not uppercase or
lowercase; this includes characters from Asian languages.
Passwords must be a minimum of 8 characters in length.
Passwords are valid for 90 Days, and when reset must be different to the previous 12 passwords
used.
The account will lock after 6 failed attempts.
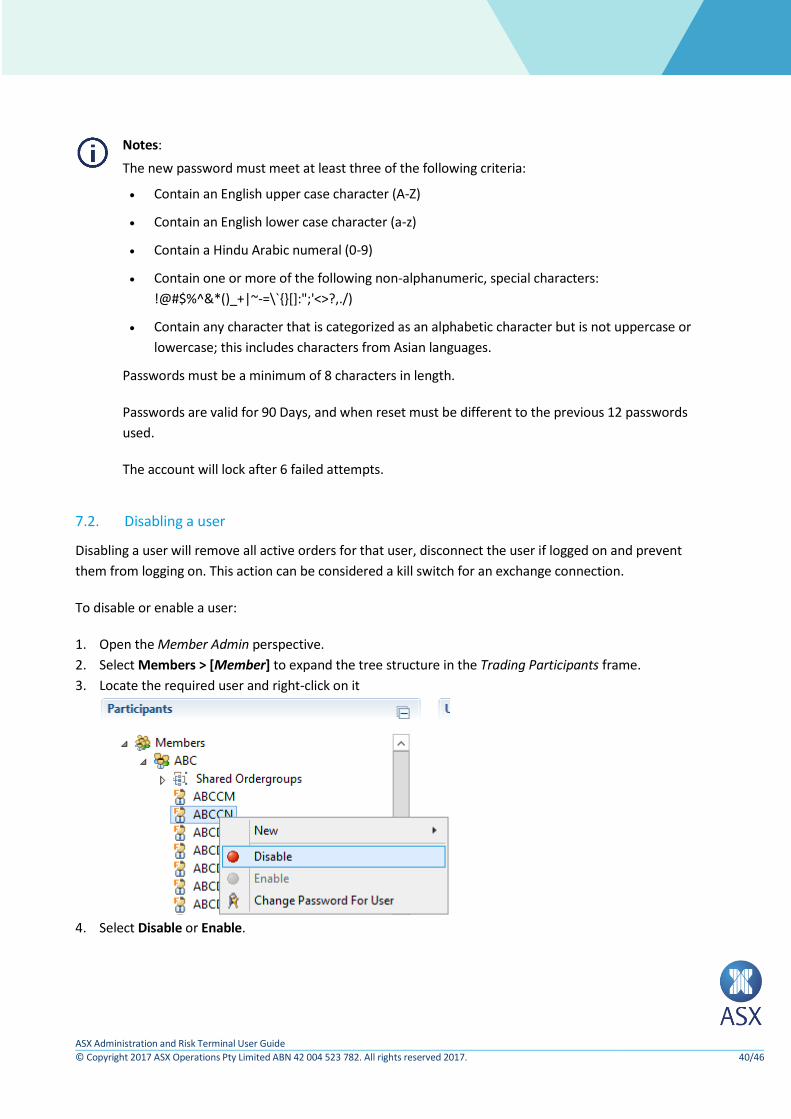
7.2. Disabling a user
Disabling a user will remove all active orders for that user, disconnect the user if logged on and prevent
them from logging on. This action can be considered a kill switch for an exchange connection.
To disable or enable a user:
1. Open the Member Admin perspective.
2. Select Members > [Member] to expand the tree structure in the Trading Participants frame.
3. Locate the required user and right-click on it
4. Select Disable or Enable.
ASX Administration and Risk Terminal User Guide
© Copyright 2017 ASX Operations Pty Limited ABN 42 004 523 782. All rights reserved 2017. 41/46
7.3. Export of user data
Administration and Risk Terminal provides functionality to export the list of all users set up in system.
7.3.1. File format
User data is exported in Comma Separated Value (CSV) files. The format is as follows:
Column No
Column name Comments
1 User User id
2 First name First name of the user
3 Last name Last name of the user
4 E-Mail E-mail address of the user
5 Phone Number Phone number of the user
6 Member Firm Id of the member firm the user belongs to
7 Member Unit Id of the member unit the user belongs to. Same as the member firm if the user does not belong to a member unit
8 SOG Group(s) Comma separated list of SOG group names
9 TAP List Trading access profiles assigned to the user
10 SAP List Subscription access profiles assigned to the user
11 Throttling Limit Number of transactions the user can place in one second
12 User Type Type of service user has access to. One of:
FIX GUI ITCH
The first line of the file is a header line containing the names of each column.
ASX Administration and Risk Terminal User Guide
© Copyright 2017 ASX Operations Pty Limited ABN 42 004 523 782. All rights reserved 2017. 42/46
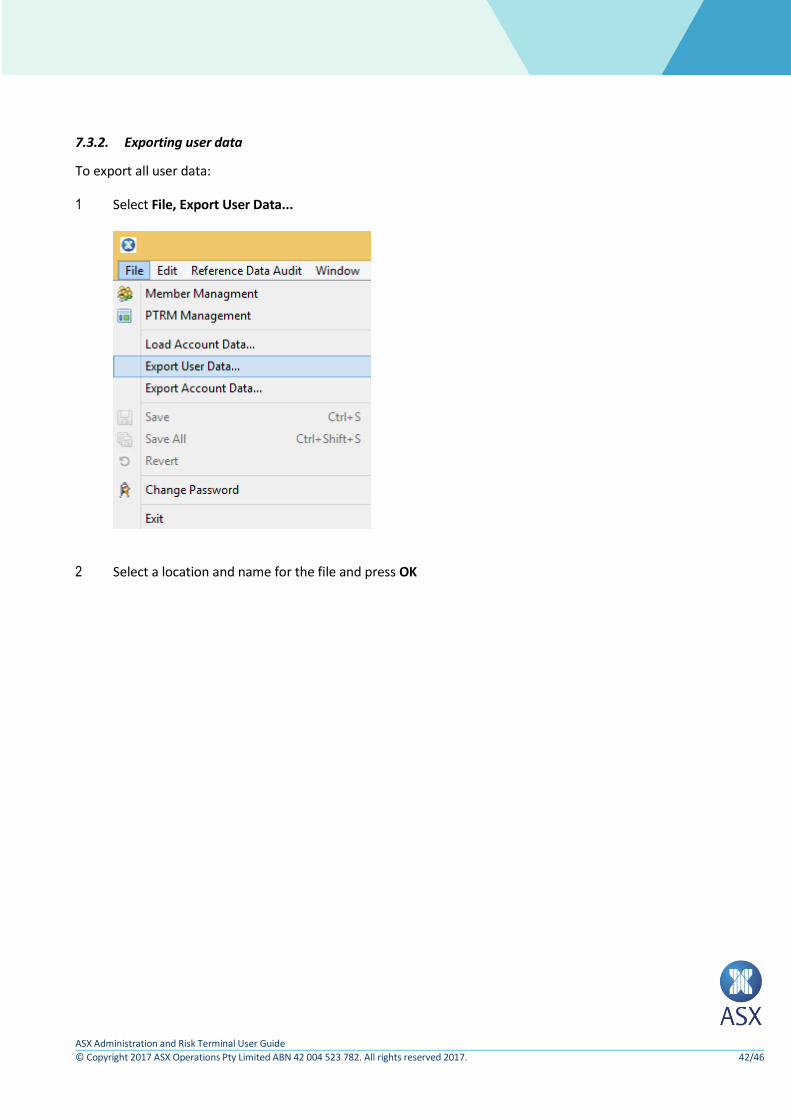
7.3.2. Exporting user data
To export all user data:
1 Select File, Export User Data...
2 Select a location and name for the file and press OK
ASX Administration and Risk Terminal User Guide
© Copyright 2017 ASX Operations Pty Limited ABN 42 004 523 782. All rights reserved 2017. 43/46
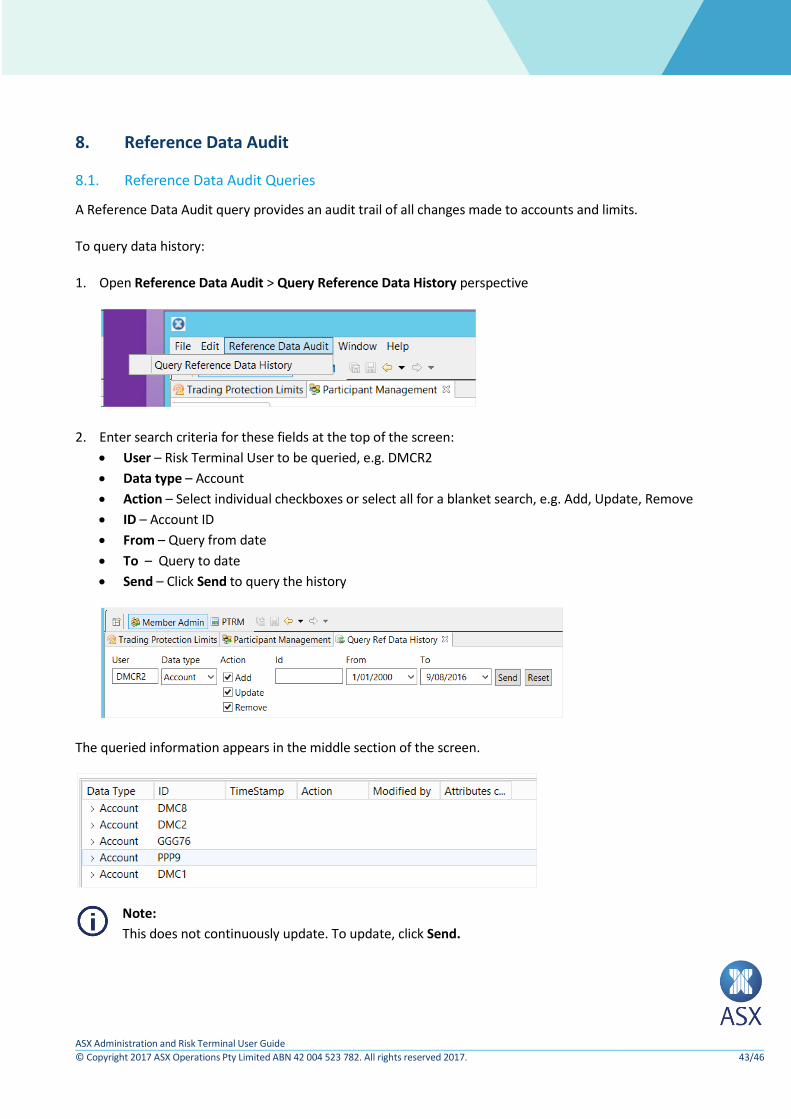
8. Reference Data Audit
8.1. Reference Data Audit Queries
A Reference Data Audit query provides an audit trail of all changes made to accounts and limits.
To query data history:
1. Open Reference Data Audit > Query Reference Data History perspective
2. Enter search criteria for these fields at the top of the screen:
User – Risk Terminal User to be queried, e.g. DMCR2
Data type – Account
Action – Select individual checkboxes or select all for a blanket search, e.g. Add, Update, Remove
ID – Account ID
From – Query from date
To – Query to date
Send – Click Send to query the history
The queried information appears in the middle section of the screen.
Note:
This does not continuously update. To update, click Send.
ASX Administration and Risk Terminal User Guide
© Copyright 2017 ASX Operations Pty Limited ABN 42 004 523 782. All rights reserved 2017. 44/46
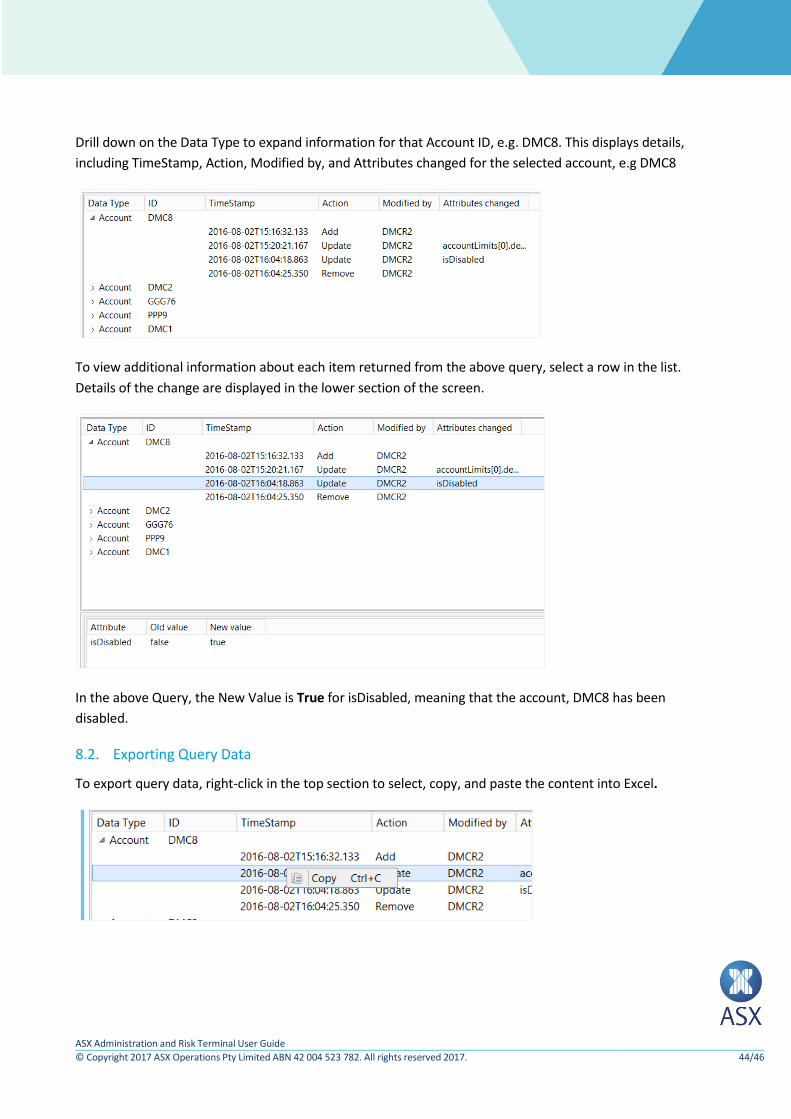
Drill down on the Data Type to expand information for that Account ID, e.g. DMC8. This displays details,
including TimeStamp, Action, Modified by, and Attributes changed for the selected account, e.g DMC8
To view additional information about each item returned from the above query, select a row in the list.
Details of the change are displayed in the lower section of the screen.
In the above Query, the New Value is True for isDisabled, meaning that the account, DMC8 has been
disabled.
8.2. Exporting Query Data
To export query data, right-click in the top section to select, copy, and paste the content into Excel.

ASX Administration and Risk Terminal User Guide
© Copyright 2017 ASX Operations Pty Limited ABN 42 004 523 782. All rights reserved 2017. 45/46
Note: Only content visible in the top half of the screen is copied to Excel.
To export all sections, take a print screen of the entire page.

ASX Administration and Risk Terminal User Guide
© Copyright 2017 ASX Operations Pty Limited ABN 42 004 523 782. All rights reserved 2017. 46/46
Disclaimer
This document provides general information only and may be subject to change at any time without notice. ASX Limited (ABN 98 008 624 691) and its related bodies corporate (“ASX”) makes no representation or warranty with respect to the accuracy, reliability or completeness of this information. To the extent permitted by law, ASX and its employees, officers and contractors shall not be liable for any loss or damage arising in any way, including by way of negligence, from or in connection with any information provided or omitted, or from anyone acting or refraining to act in reliance on this information. The information in this document is not a substitute for any relevant operating rules, and in the event of any inconsistency between this document and the operating rules, the operating rules prevail to the extent of the inconsistency.
ASX Trade Marks
The trade marks listed below are trademarks of ASX. Where a mark is indicated as registered it is registered in Australia and may also be registered in other countries. Nothing contained in this document should be construed as being any licence or right to use of any trade mark contained within the document.
ASX®