ASTRO Digital Spectra and Digital Spectra Plus W4, W5, W7, and W9
174
ASTRO ® Digital Spectra ® and Digital Spectra Plus W4, W5, W7, and W9 Mobile Radios User Guide
Transcript of ASTRO Digital Spectra and Digital Spectra Plus W4, W5, W7, and W9

ASTRO® Digital Spectra® andDigital Spectra PlusW4, W5, W7, and W9 Mobile RadiosUser Guide

6881076C25-D
*6881076C25*
MOTOROLA, the Stylized M Logo, ASTRO and Spectra are registered in the U.S. Patent and Trademark Office. All other product or service names are the property of their respective owners.© Motorola, Inc. 2002.All rights reserved. Printed in U.S.A.
Motorola, Inc.
8000 West Sunrise Boulevard
Ft. Lauderdale, FL 33322

Transmit (Conventional Modes)
Activate Scan
Program a Scan List
Select Scan Mode Priority
s.
e.
1 Press Dir (Direct). The Dir indicator lights.
2 Press Dir again to return to repeater operation.
1 Press Scan to start a scan. If no activity exists, the display shows your selected mode. When a scanned channel or talkgroup becomes active, the display shows the active mode name. The PRI and NPRI indicators show priority.
2 Press Scan again to stop scanning.
1 Hold Scan until a tone sounds and the scan indicator blinks.
2 Turn the Mode knob to select the mode you want to program.
3 Press the Sel button as indicated in the table below to add or remove the displayed mode from the scan list.
4 Repeat the previous steps to continue editing the list.
5 Press Home or Scan to exit.
Press Sel Mode Indicator
One time Non-Priority NPRI lit
Two times Second Priority PRI lit
Three times First Priority PRI blinks
Four times Delete from List No indicator
1 Press the Sel button as indicated in the table above to designate up to two modes as priorities.
2 Press Home or Scan to end scan list selection.
ASTRO® Digital Spectra® and Digital Spectra Plus W4 Mobile Radio
Quick Reference Card
BASIC OPERATION
Turn the Radio On and Off
Set the Volume and Squelch
Change Modes
Transmit
PHONE
PAGEor
SECUREor
EMERGENCY
Page
Emer
CALL DIRECT
XMIT
BUSY
Mode Volume
Pwr
Phon Call SelScan
Mic
Home
Dim
H/L
Dir Mon
SCAN SELECT MONITOR
MODEKNOB
POWER ON/OFF/VOLUME KNOB
HOMEHORN/
LIGHTS
PRIORITY/NON-PRIORITYINDICATORS
DIRECTINDICATOR
Rotate the Vol (Volume) knob clockwise.
1 Turn the Vol knob clockwise to increase volume or counterclockwise to decrease volume as desired.
2 On conventional modes with Private-Line or Digital Private-Line, press Mon or remove the microphone from the hang-up clip to defeat the coded squelch.
3 Press Mon again, or replace the microphone on thehang-up clip to return to coded-squelch operation.
4 To adjust squelch level, hold Mon until a tone sound
5 Turn Mode knob to select squelch level.
6 Press Home.
Turn the Mode knob to select the desired mode
OR
Press Home to access the preprogrammed Home mode.
1 Press and hold the microphone PTT button.
2 When the transmit light comes on solid and no alert tones sound (or a talk-permit tone or ID sidetone sounds), speak into the microphone in a normal voic
3 State your FCC call sign at the beginning of each transmission.

Initiate a Call Alert Page
Answer a Call Alert Page
.
2 If the receiving unit answers, press the PTT button to identify yourself and proceed with your call.
OR
If the called unit does not respond, press Sel or the PTT button again to leave a Call Alert page message and your ID.A single tone followed by four tones sounds if the called unit acknowledges the page.
1 Press the Page button.
2 Follow the instructions for initiating a Private Conversation to select a unit ID.
3 Press Sel or the PTT button to send a Call Alert page to the displayed ID,
OR
To send a Call Alert page following an Enhanced Private Conversation attempt, follow the instructions for sending a direct-entry Enhanced Private Conversation call.
Four tones sound and PAGE RCV flashes on the display. The tone and display repeat every five seconds.
1 Press the PTT button,
OR
Initiate an Enhanced Private Conversation call to the caller.
Send an Emergency Alarm or Call
Send a Status Transmission
Send a Direct-Entry Keyboard Status Transmission
Send a Direct-Entry Enhanced Private Conversation Call
Press the emergency actuator (Emer button, footswitch, hidden pushbutton) to begin an emergency transmission.
For conventional modes, a silent or non-silent emergency alarm data transmission is sent.
For trunked modes, emergency call (priority access to a voice channel), silent or non-silent emergency alarm, or emergency alarm and call is entered.
Depending on your radio’s programming, one of the emergency sequences described in the table below occur.
Alarm Type Indications/Actions
Non-Silent A tone sounds and the display alternates between EMERGNCY and the zone/channel. When acknowledged, four more tones sound and the display shows ACK RCVD, then the radio returns to normal operation.
Silent The audio is muted and no display changes take place during the alarm.
Press the PTT button, or press and hold the emergency switch to stop the emergency condition and unmute the radio.
Call (Trunked Modes only)
A tone sounds and the display alternates between EMERGNCY and the zone/channel.
Press the PTT button and talk.
After completing the call, press and hold the emergency actuator until a tone sounds to return to normal operation.
Alarm and Call After ACK RCVD (see Non-Silent Alarmabove) is displayed, the radio has priority voice-channel access.
Press the PTT button and talk.
After completing the call, press and hold the emergency actuator until a tone sounds to return to normal operation.
1 Press Sts. The last acknowledged status or first status name is displayed.
2 Rotate Mode to select other statuses.
3 Press Sel to send the transmission. The display flashes the selected status/message name until thedispatcher acknowledges, at which time alert tonessound and ACK RCVD is displayed. The radio then returns to normal operation.
Press the appropriate Sts # button you wish to sendThe associated indicator blinks until an acknowledgment is received, then it lights steadily.
1 Press Sel or the PTT button. A single tone sounds and the display changes to PLS WAIT, followed by telephone-type ringing if the receiving unit is in service.
Alarm Type Indications/Actions
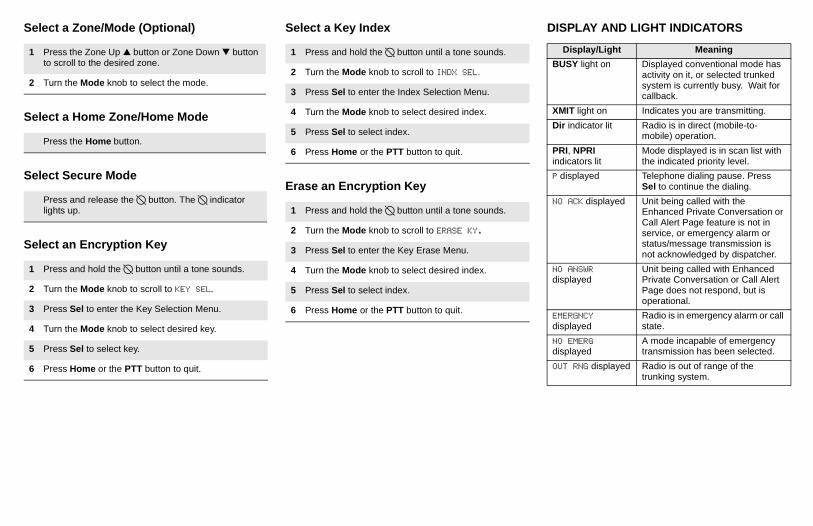
DISPLAY AND LIGHT INDICATORS
Display/Light Meaning
BUSY light on Displayed conventional mode has activity on it, or selected trunked system is currently busy. Wait for callback.
XMIT light on Indicates you are transmitting.
Dir indicator lit Radio is in direct (mobile-to-mobile) operation.
PRI, NPRI indicators lit
Mode displayed is in scan list with the indicated priority level.
P displayed Telephone dialing pause. Press Sel to continue the dialing.
NO ACK displayed Unit being called with the Enhanced Private Conversation or Call Alert Page feature is not in service, or emergency alarm or status/message transmission is not acknowledged by dispatcher.
NO ANSWR displayed
Unit being called with Enhanced Private Conversation or Call Alert Page does not respond, but is operational.
EMERGNCY displayed
Radio is in emergency alarm or call state.
NO EMERG displayed
A mode incapable of emergency transmission has been selected.
OUT RNG displayed Radio is out of range of the trunking system.
Select a Zone/Mode (Optional)
Select a Home Zone/Home Mode
Select Secure Mode
Select an Encryption Key
Select a Key Index
Erase an Encryption Key
1 Press the Zone Up ▲ button or Zone Down ▼ button to scroll to the desired zone.
2 Turn the Mode knob to select the mode.
Press the Home button.
Press and release the D button. The D indicator lights up.
1 Press and hold the D button until a tone sounds.
2 Turn the Mode knob to scroll to KEY SEL.
3 Press Sel to enter the Key Selection Menu.
4 Turn the Mode knob to select desired key.
5 Press Sel to select key.
6 Press Home or the PTT button to quit.
1 Press and hold the D button until a tone sounds.
2 Turn the Mode knob to scroll to INDX SEL.
3 Press Sel to enter the Index Selection Menu.
4 Turn the Mode knob to select desired index.
5 Press Sel to select index.
6 Press Home or the PTT button to quit.
1 Press and hold the D button until a tone sounds.
2 Turn the Mode knob to scroll to ERASE KY.
3 Press Sel to enter the Key Erase Menu.
4 Turn the Mode knob to select desired index.
5 Press Sel to select index.
6 Press Home or the PTT button to quit.

ic
e
g
o
n d. l e
g
e
o a
Examples: Not exiting phone mode after a call (radio cannot receive fleet or subfleet calls), transmitting in receive-only conventional mode, trying to select a dynammode when no dynamic ID assignment has been made.
ALERT TONES
Type of Tone Name Explanation
1 Low-Pitched Tone
Invalid Key Alert
Feature button pressed is not valid in selected mode, or a Call Alert or emergency alarm was not acknowledged.
1 High-Pitched Tone
Central Acknowledge or Valid Key
Central controller has received request for Call Alert or emergency alarm transmission.You pressed a valid key.
4 High-Pitched Tones
Dispatcher or Mobile Unit Acknowledge
Dispatcher is acknowledging your emergency transmission. Mobile unit has received your Call Alert.
5 High-Pitched Tones
The above two acknowledge tones, heard in tandem.
2 High-Pitched Tones
Private Conversation
You have an incoming call. Press Call, then the PTT button, then talk.
4 High-Pitched Tones every 6 seconds
Call Alert Page Call Alert page has been received.
Phone-Type Busy Tone(when pressing the PTT button)
System Busy All system radio channels in use. Release the PTT button, and wait for callback.
3 Short High-Tones (after requesting a busy channel) upon pressing the PTT button)
Automatic Call Back or Talk Permit
Channel is availablfor previously requested transmission.System is acceptinyour transmission.
Low-Pitched Tone (upon pressing the PTT button during Transmit) (Operation Error)
Talk Prohibit/Out-of-Range or Time-Out Timer or Illegal Mode
Out of trunked radisystem range or system is out of service.Present transmissiowill soon be disableYou have entered amode where normasystem traffic will bmissed, or you attempted somethinthat is not allowed.(See examples below.)
High-Pitched Tone every 10 seconds in unmuted receive condition
Failsoft System central controller failure. Thradio reverts from trunked operation toperation similar toconventional repeater.Others may share the channel.
ALERT TONES (Continued)
Type of Tone Name Explanation

Transmit (Conventional Modes)
Activate Scan
Program a Scan List
Select Scan Mode Priority
s.
l.
e.
1 Press Dir (Direct). The Dir indicator lights.
2 Press Dir again to return to repeater operation.
1 Press Scan to start a scan. If no activity exists, the display shows your selected mode. When a scanned channel or talkgroup becomes active, the display shows the active mode name. The PRI and NPRI indicators show priority.
2 Press Scan again to stop scanning.
1 Hold Scan until a tone sounds and the scan indicator blinks.
2 Press the Mode rocker switch to select the mode you want to program.
3 Press the Sel button as indicated in the table below to add or remove the displayed mode from the scan list.
4 Repeat the previous steps to continue editing the list.
5 Press HOME or Scan to exit.
Press Sel Mode Indicator
One time Non-Priority NPRI lit
Two times Second Priority PRI lit
Three times First Priority PRI blinks
Four times Delete from List No indicator
1 Press the Sel button as indicated in the table above to designate up to two modes as priorities.
2 Press HOME or Scan to end scan list selection.
ASTRO® Digital Spectra® and Digital Spectra Plus W5 Mobile Radio
Quick Reference Card
BASIC OPERATION
Turn the Radio On and Off
Set the Volume and Squelch
Change Modes
Transmit
Mode
Vol
Mic
Phon Call Sel
H/L Mon Dir
PWR
Scan
XMIT
BUSYDIM
HOME
MODEPOWERON/OFF
PAGEor
SECUREor
EMERGENCY
Page
Emer
PHONE
SCAN
CALL
SELECT
VOLUME PRIORITY/NON-PRIORITYINDICATORS
DIRECTINDICATOR
HORN/LIGHTS
MONITOR
DIRECTHOME
Press the PWR button once.
1 Hold the Vol rocker switch down to increase or decrease volume as desired, then release.The display shows volume levels from 0 to 15.
2 On conventional modes with Private-Line or Digital Private-Line, press Mon or remove the microphone from the hang-up clip to defeat the coded squelch.
3 Press Mon again, or replace the microphone on thehang-up clip to return to coded-squelch operation.
4 To adjust squelch level, hold Mon until a tone sound
5 Press the Mode rocker switch to select squelch leve
6 Press HOME.
Press the Mode rocker switch to select the desired mode
OR
Press HOME to access the preprogrammed Home mode.
1 Press and hold the microphone PTT button.
2 When the transmit light comes on solid and no alert tones sound (or a talk-permit tone or ID sidetone sounds), speak into the microphone in a normal voic
3 State your FCC call sign at the beginning of each transmission.

Initiate a Call Alert Page
Answer a Call Alert Page
r
2 If the receiving unit answers, press the PTT button to identify yourself and proceed with your call.
OR
If the called unit does not respond, press Sel or the PTT button again to leave a Call Alert page message and your ID.A single tone followed by four tones sounds if the called unit acknowledges the page.
1 Press the Page button.
2 Follow the instructions for initiating a Private Conversation to select a unit ID.
3 Press Sel or the PTT button to send a Call Alert page to the displayed ID,
OR
To send a Call Alert page following an Enhanced Private Conversation attempt, follow the instructions for sending a direct-entry Enhanced Private Conversation call.
Four tones sound and PAGE RCV flashes on the display. The tone and display repeat every five seconds.
1 Press the PTT button,
OR
Initiate an Enhanced Private Conversation call to the caller.
Send an Emergency Alarm or Call
Send a Status Transmission
Send a Direct-Entry Keyboard Status Transmission
Send a Direct-Entry Enhanced Private Conversation Call
Press the emergency actuator (Emer button, footswitch, hidden pushbutton) to begin an emergency transmission.
For conventional modes, a silent or non-silent emergency alarm data transmission is sent.
For trunked modes, emergency call (priority access to a voice channel), silent or non-silent emergency alarm, or emergency alarm and call is entered.
Depending on your radio’s programming, one of the emergency sequences described in the table below occur.
Alarm Type Indications/Actions
Non-Silent A tone sounds and the display flashes EMERGNCY. When acknowledged, four more tones sound and the display shows ACK RCVD, then the radio returns to normal operation.
Silent The audio is muted and no display changes take place during the alarm.
Press the PTT button, or press and hold the emergency switch to stop the emergency condition and unmute the radio.
Call (Trunked Modes only)
A tone sounds and the display flashes EMERGNCY.
Press the PTT button and talk.
After completing the call, press and hold the emergency actuator until a tone sounds to return to normal operation.
Alarm and Call After ACK RCVD (see Non-Silent Alarmabove) is displayed, the radio has priority voice-channel access.
Press the PTT button and talk.
After completing the call, press and hold the emergency actuator until a tone sounds to return to normal operation.
1 Press Sts. The last acknowledged status or first status name is displayed.
2 Press the Mode rocker switch to select other statuses.
3 Press Sel to send the transmission. The display flashes the selected status name until the dispatcheacknowledges, at which time alert tones sound andACK RCVD is displayed. The radio then returns to normal operation.
Press the appropriate Sts # button that you wish to send. The associated indicator blinks until an acknowledgment is received, then it lights steadily.
1 Press Sel or the PTT button. A single tone sounds and the display changes to PLS WAIT, followed by telephone-type ringing if the receiving unit is in service.
Alarm Type Indications/Actions

DISPLAY AND LIGHT INDICATORS
.
.
Display/Light Meaning
BUSY light on Displayed conventional mode has activity on it, or selected trunked system is currently busy. Wait for callback.
XMIT light on Indicates you are transmitting.
Dir indicator lit Radio is in direct (mobile-to-mobile) operation.
PRI, NPRI indicators lit
Mode displayed is in scan list with the indicated priority level.
P displayed Telephone dialing pause. Press Sel to continue the dialing.
NO ACK displayed Unit being called with the Enhanced Private Conversation or Call Alert Page feature is not in service, or emergency alarm or status/message transmission is not acknowledged by dispatcher.
NO ANSWR displayed
Unit being called with Enhanced Private Conversation or Call Alert Page does not respond, but is operational.
EMERGNCY displayed
Radio is in emergency alarm or call state.
NO EMERG displayed
A mode incapable of emergency transmission has been selected.
OUT RNG displayed Radio is out of range of the trunking system.
Select a Zone/Mode (Optional)
Select a Home Zone/Home Mode
Select Secure Mode
Select an Encryption Key
Select a Key Index
Erase an Encryption Key
1 Press the Zone Up ▲ button or Zone Down ▼ button to scroll to the desired zone.
2 Press the Mode rocker switch to select the mode.
Press the HOME button.
Press and release the D button. The D indicator lights up.
1 Press and hold the D button until a tone sounds.
2 Press the Mode rocker switch to scroll to KEY SEL.
3 Press Sel to enter the Key Selection Menu.
4 Press the Mode rocker switch to select the desired key.
5 Press Sel to select the key.
6 Press HOME or the PTT button to quit.
1 Press and hold the D button until a tone sounds.
2 Press the Mode rocker switch to scroll to INDX SEL
3 Press Sel to enter the Index Selection Menu.
4 Press the Mode rocker switch to select the desired index.
5 Press Sel to select the index.
6 Press HOME or the PTT button to quit.
1 Press and hold the D button until a tone sounds.
2 Press the Mode rocker switch to scroll to ERASE KY
3 Press Sel to enter the Key Erase Menu.
4 Press the Mode rocker switch to select the desired index.
5 Press Sel to select the index.
6 Press HOME or the PTT button to quit.

ic
e
g
o
n d. l e
g
e
o a
Examples: Not exiting phone mode after a call (radio cannot receive fleet or subfleet calls), transmitting in receive-only conventional mode, trying to select a dynammode when no dynamic ID assignment has been made.
ALERT TONES
Type of Tone Name Explanation
1 Low-Pitched Tone
Invalid Key Alert
Feature button pressed is not valid in selected mode, or a Call Alert or emergency alarm was not acknowledged.
1 High-Pitched Tone
Central Acknowledge or Valid Key
Central controller has received request for Call Alert or emergency alarm transmission.You pressed a valid key.
4 High-Pitched Tones
Dispatcher or Mobile Unit Acknowledge
Dispatcher is acknowledging your emergency transmission. Mobile unit has received your Call Alert.
5 High-Pitched Tones
The above two acknowledge tones, heard in tandem.
2 High-Pitched Tones
Private Conversation
You have an incoming call. Press Call, then the PTT button, then talk.
4 High-Pitched Tones every 6 seconds
Call Alert Page Call Alert page has been received.
Phone-Type Busy Tone(when pressing the PTT button)
System Busy All system radio channels in use. Release the PTT button, and wait for callback.
3 Short High-Tones (after requesting a busy channel) upon pressing the PTT button)
Automatic Call Back or Talk Permit
Channel is availablfor previously requested transmission.System is acceptinyour transmission.
Low-Pitched Tone (upon pressing the PTT button during Transmit) (Operation Error)
Talk Prohibit/Out-of-Range or Time-Out Timer or Illegal Mode
Out of trunked radisystem range or system is out of service.Present transmissiowill soon be disableYou have entered amode where normasystem traffic will bmissed, or you attempted somethinthat is not allowed.(See examples below.)
High-Pitched Tone every 10 seconds in unmuted receivecondition
Failsoft System central controller failure. Thradio reverts from trunked operation toperation similar toconventional repeater.Others may share the channel.
ALERT TONES (Continued)
Type of Tone Name Explanation

Transmit (Conventional Modes)
Activate Scan
Program a Scan List
s.
l.
e.
1 Press Dir (Direct). The Dir indicator lights.
2 Press Dir again to return to repeater operation.
1 Press Scan to start a scan. If no activity exists, the display shows your selected mode. When a scanned channel or talkgroup becomes active, the display shows the active mode name. The PRI and NPRI indicators show priority.
2 Press Scan again to stop scanning.
1 Hold Scan until a tone sounds and the scan indicator blinks.
2 Press the Mode rocker switch to select the mode you want to program.
OR
Press the Rcl button to scroll through the modes currently in the scan list.
3 Press the Sel button as indicated in the table below to add or remove the displayed mode from the scan list.
4 Repeat the previous steps to continue editing the list.
5 Press HOME or Scan to exit.
Press Sel Mode Indicator
One time Non-Priority NPRI lit
Two times Second Priority PRI lit
Three times First Priority PRI blinks
Four times Delete from List No indicator
ASTRO® Digital Spectra® and Digital Spectra Plus W7 Mobile Radio
Quick Reference Card
BASIC OPERATION
Turn the Radio On and Off
Set the Volume and Squelch
Change Modes
Transmit
POWERON/OFF
2
2Pgeor
SITE
LOCK
MESSAGEREPROGRAM
DIRECTO #Del Rcl
Mode
Vol
Mic
Phon Call SelPWR
Scan
XMIT
BUSYDIM
HOME
1Ste 2 3Lck
4Sts 5Rpg 6Msg
7H/L 8Mon 9Dir
MAEPF 23213 A
MODE
EMERGENCYor
SECURE
Emer
PHONE
SCAN
CALL
SELECT
PAGE
VOLUME
DIRECTINDICATOR
DELETERECALL
MONITOR
STATUS
HORN/LIGHTS
HOME
PRIORITY/NON-PRIORITYINDICATORS
Press the PWR button once.
1 Hold the Vol rocker switch down to increase or decrease volume as desired, then release.The display shows volume levels from 0 to 15.
2 On conventional modes with Private-Line or Digital Private-Line, press Mon or remove the microphone from the hang-up clip to defeat the coded squelch.
3 Press Mon again, or replace the microphone on thehang-up clip to return to coded-squelch operation.
4 To adjust squelch level, hold Mon until a tone sound
5 Press the Mode rocker switch to select squelch leve
6 Press HOME.
Press the Mode rocker switch to select the desired mode
OR
Press HOME to access the preprogrammed Home mode.
1 Press and hold the microphone PTT button.
2 When the transmit light comes on solid and no alert tones sound (or a talk-permit tone or ID sidetone sounds), speak into the microphone in a normal voic
3 State your FCC call sign at the beginning of each transmission.

Send a Direct-Entry Enhanced Private Conversation Call
Initiate a Call Alert Page
r
1 Press Sel or the PTT button. A single tone sounds and the display changes to PLS WAIT, followed by telephone-type ringing if the receiving unit is in service.
2 If the receiving unit answers, press the PTT button to identify yourself and proceed with your call.
OR
If the called unit does not respond, press Sel or the PTT button again to leave a Call Alert page message and your ID.A single tone followed by four tones sounds if the called unit acknowledges the page.
1 Press the Page button.
2 Follow the instructions for initiating a Private Conversation to select a unit ID.
3 Press Sel or the PTT button to send a Call Alert page to the displayed ID,
OR
To send a Call Alert page following an Enhanced Private Conversation attempt, follow the instructions for sending a direct-entry Enhanced Private Conversation call.
Select Scan Mode Priority
Send an Emergency Alarm or Call
Send a Status Transmission
Send a Direct-Entry Keyboard Status Transmission
1 Press the Sel button as indicated in the table above to designate up to two modes as priorities.
2 Press HOME or Scan to end scan list selection.
Press the emergency actuator (Emer button, footswitch, hidden pushbutton) to begin an emergency transmission.
For conventional modes, a silent or non-silent emergency alarm data transmission is sent.
For trunked modes, emergency call (priority access to a voice channel), silent or non-silent emergency alarm, or emergency alarm and call is entered.
Depending on your radio’s programming, one of the emergency sequences described in the table below occur.
Alarm Type Indications/Actions
Non-Silent A tone sounds and the display flashes EMERGNCY. When acknowledged, four more tones sound and the display shows ACK RCVD, then the radio returns to normal operation.
Silent The audio is muted and no display changes take place during the alarm.
Press the PTT button, or press and hold the emergency switch to stop the emergency condition and unmute the radio.
Call (Trunked Modes only)
A tone sounds and the display flashesEMERGNCY.
Press the PTT button and talk.
After completing the call, press and hold the emergency actuator until a tone sounds to return to normal operation.
Alarm and Call After ACK RCVD (see Non-Silent Alarmabove) is displayed, the radio has priority voice-channel access.
Press the PTT button and talk.
After completing the call, press and hold the emergency actuator until a tone sounds to return to normal operation.
1 Press Sts. The last acknowledged status or first status name is displayed.
2 Press the Mode rocker switch to select other statuses.
3 Press Sel to send the transmission. The display flashes the selected status name until the dispatcheacknowledges, at which time alert tones sound andACK RCVD is displayed. The radio then returns to normal operation.
Press the appropriate Sts # button that you wish to send. The associated indicator blinks until an acknowledgment is received, then it lights steadily.
Alarm Type Indications/Actions
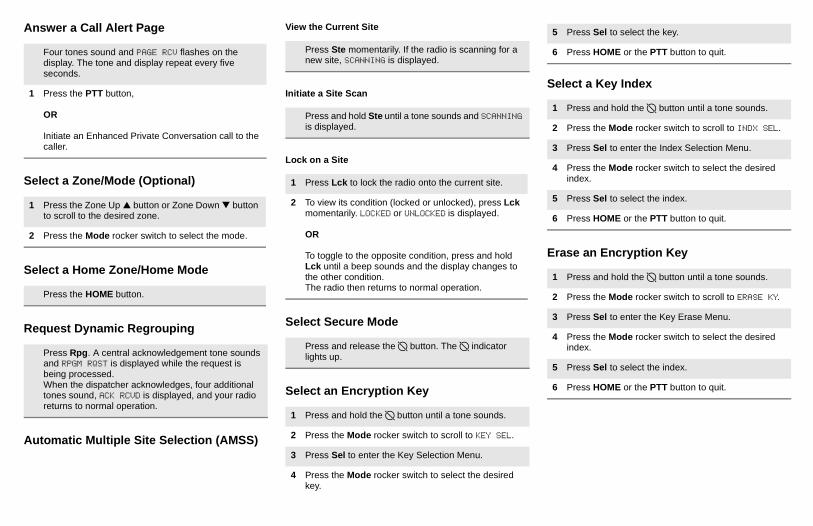
Select a Key Index
Erase an Encryption Key
G
5 Press Sel to select the key.
6 Press HOME or the PTT button to quit.
1 Press and hold the D button until a tone sounds.
2 Press the Mode rocker switch to scroll to INDX SEL.
3 Press Sel to enter the Index Selection Menu.
4 Press the Mode rocker switch to select the desired index.
5 Press Sel to select the index.
6 Press HOME or the PTT button to quit.
1 Press and hold the D button until a tone sounds.
2 Press the Mode rocker switch to scroll to ERASE KY.
3 Press Sel to enter the Key Erase Menu.
4 Press the Mode rocker switch to select the desired index.
5 Press Sel to select the index.
6 Press HOME or the PTT button to quit.
Answer a Call Alert Page
Select a Zone/Mode (Optional)
Select a Home Zone/Home Mode
Request Dynamic Regrouping
Automatic Multiple Site Selection (AMSS)
View the Current Site
Initiate a Site Scan
Lock on a Site
Select Secure Mode
Select an Encryption Key
Four tones sound and PAGE RCV flashes on the display. The tone and display repeat every five seconds.
1 Press the PTT button,
OR
Initiate an Enhanced Private Conversation call to the caller.
1 Press the Zone Up ▲ button or Zone Down ▼ button to scroll to the desired zone.
2 Press the Mode rocker switch to select the mode.
Press the HOME button.
Press Rpg. A central acknowledgement tone sounds and RPGM RQST is displayed while the request is being processed.When the dispatcher acknowledges, four additional tones sound, ACK RCVD is displayed, and your radio returns to normal operation.
Press Ste momentarily. If the radio is scanning for anew site, SCANNING is displayed.
Press and hold Ste until a tone sounds and SCANNINis displayed.
1 Press Lck to lock the radio onto the current site.
2 To view its condition (locked or unlocked), press Lckmomentarily. LOCKED or UNLOCKED is displayed.
OR
To toggle to the opposite condition, press and hold Lck until a beep sounds and the display changes tothe other condition.The radio then returns to normal operation.
Press and release the D button. The D indicator lights up.
1 Press and hold the D button until a tone sounds.
2 Press the Mode rocker switch to scroll to KEY SEL.
3 Press Sel to enter the Key Selection Menu.
4 Press the Mode rocker switch to select the desired key.

Examples: Not exiting phone mode after a call (radio cannot receive fleet or subfleet calls), transmitting in receive-only conventional mode, trying to select a dynamic mode when no dynamic ID assignment has been made.
r
st
r
le
,
s
e
g
Low-Pitched Tone (upon pressing the PTT button during Transmit) (Operation Error)
Talk Prohibit/Out-of-Range, or Time-Out Timer, or Illegal Mode
Out of trunked radio system range or system is out of service.Present transmission will soon be disabled. You have entered a mode where normal system traffic will be missed, or you attempted something that is not allowed. (See examples below.)
High-Pitched Tone every 10 seconds in unmuted receivecondition
Failsoft System central controller failure. The radio reverts from trunked operation to operation similar to a conventional repeater.Others may share the channel.
ALERT TONES (Continued)
Type of Tone Name Explanation
DISPLAY AND LIGHT INDICATORS
Display/Light Meaning
BUSY light on Displayed conventional mode has activity on it, or selected trunked system is currently busy. Wait for callback.
XMIT light on Indicates you are transmitting.
Dir indicator lit Radio is in direct (mobile-to-mobile) operation.
PRI, NPRI indicators lit
Mode displayed is in scan list with the indicated priority level.
P displayed Telephone dialing pause. Press Sel to continue the dialing.
NO ACK displayed Unit being called with the Enhanced Private Conversation or Call Alert Page feature is not in service, or emergency alarm or status/message transmission is not acknowledged by dispatcher.
NO ANSWR displayed
Unit being called with Enhanced Private Conversation or Call Alert Page does not respond, but is operational.
EMERGNCY displayed
Radio is in emergency alarm or call state.
NO EMERG displayed
A mode incapable of emergency transmission has been selected.
OUT RNG displayed Radio is out of range of the trunking system.
ALERT TONES
Type of Tone Name Explanation
1 Low-Pitched Tone
Invalid Key Alert
Feature button pressed is not validin selected mode, oa Call Alert or emergency alarm was not acknowledged.
1 High-Pitched Tone
Central Acknowledge or Valid Key
Central controller has received requefor Call Alert or emergency alarm transmission.You pressed a validkey.
4 High-Pitched Tones
Dispatcher or Mobile Unit Acknowledge
Dispatcher is acknowledging youemergency transmission. Mobiunit has received your Call Alert.
5 High-Pitched Tones
The above two acknowledge tonesheard in tandem.
2 High-Pitched Tones
Private Conversation
You have an incoming call. PresCall, then the PTT button, then talk.
4 High-Pitched Tones every 6 seconds
Call Alert Page Call Alert page hasbeen received.
3 Short High-Tones (after requesting a busy channel) (upon pressing the PTT button)
Automatic Call Back or Talk Permit
Channel is availablfor previously requested transmission.System is acceptinyour transmission.

Transmit (Conventional Modes)
TELEPHONE OPERATION
Make a Phone Call
Dial the Displayed Number
Dial a Number from the Pre-Stored List
Dial or Direct Dial a New Number
n.
.
l.
e.
1 Press Dir (Direct). The Dir indicator lights.
2 Press Dir again to return to repeater operation.
Press Phon to select the phone function. The display shows the last phone number dialed or a series of dashes.
1 Press Sel or the PTT button, and wait for dial tone.
2 Press Sel or the PTT button again to dial the displayed number.
1 Press the Mode rocker switch to scroll to the number or name you want to call.
2 Press Sel or the PTT button, and wait for dial tone.
3 Press Sel or the PTT button again to dial the displayed number.
1 Using the keypad, enter the telephone number.
2 Press Sel or the PTT button, and wait for dial tone.
3 Press Sel or the PTT button again to dial the displayed number.
ASTRO® Digital Spectra® and Digital Spectra Plus W9 Mobile Radio
Quick Reference Card
BASIC OPERATION
Turn the Radio On and Off
Set the Volume and Squelch
Change Modes
Transmit
XMIT BUSY
1 2 3
4 5 6
7 8 9
0
DIM
PriNon
Pri
Emer Dir Scan Call
Mode Vol Sel Home
Page Rpgm Site
Phon H/L Lock
Rcl Sql Del
MODE SELECT HOME
PHONE
DELETE
Sts Msg
Srch
RECALL
SQUELCHNON-PRIORITYINDICATOR
PRIORITYINDICATOR
CALLSCAN
Slide the power switch on the bottom of the control unit to the left.
1 Hold the Vol rocker switch down to increase or decrease volume as desired, then release.The display shows volume levels from 0 to 15.
2 On conventional modes with Private-Line or Digital Private-Line, press Sql or remove the microphone from the hang-up clip to defeat the coded squelch.
3 Press Sql again to return to coded-squelch operatio
4 To adjust squelch level, hold Sql until a tone sounds
5 Press the Mode rocker switch to select squelch leve
6 Press Home.
Press the Mode rocker switch to scroll to the desiredmode
OR
Press Home to access the preprogrammed Home mode.
1 Press and hold the microphone PTT button.
2 When the transmit light comes on solid and no alert tones sound (or a talk-permit tone or ID sidetone sounds), speak into the microphone in a normal voic
3 State your FCC call sign at the beginning of each transmission.

Initiate a Call Alert Page
Answer a Call Alert Page
Answer a Private Conversation Call
rt
o
e
1 Press the Page button.
2 Follow the instructions for initiating an Enhanced Private Conversation to select a unit ID.
3 Press Sel or the PTT button to send a Call Alert page to the displayed ID,
OR
To send a Call Alert page following an Enhanced Private Conversation attempt, follow the instructions for sending an Enhanced Private Conversation call.
Four tones sound and PAGE RCV flashes on the display.
1 Press either the microphone PTT button or the Call button to clear the Call Alert state.
Two tones sound and CALL RCV flashes on the display.
1 Press the Call button.
2 Press the microphone PTT button, and speak into the microphone.
3 Press Home or Call to hang up.
Answer a Phone Call in Trunked Modes
Make a Call (Trunked Modes Only)
Alarm and Call
Send a Status Transmission
Send a Direct-Entry Keyboard Status Transmission
Initiate an Enhanced Private Conversation Call
Initiate a Private Conversation II
When a call is received, ringing tones are heard from the speaker, and PHONE is displayed.
1 Press PHON and begin your conversation.
2 Press Home to hang up.
A tone sounds and the display alternates between EMERGENCY and the zone/channel.
1 Press the PTT button and talk.
2 After completing the call, press and hold the emergency actuator until a tone sounds to return to normal operation.
After ACK RCVD is displayed, your radio has priority voice-channel access.
1 Press the PTT button and talk.
2 After completing the call, press and hold the emergency actuator until a tone sounds to return to normal operation.
1 Press Sts. The last acknowledged status or first status name is displayed.
2 Press the Mode rocker switch or use the keypad to select other statuses.
3 Press Sel or the PTT button to send the transmission. The display flashes the PLEASE WAITuntil the dispatcher acknowledges, at which time aletones sound and ACK RCVD is displayed. The radio then returns to normal operation.
Press the appropriate Sts # button that you wish to send. The associated indicator blinks until an acknowledgment is received, then it lights steadily.
1 Press Sel or the PTT button. A single tone sounds and the display changes to PLEASE WAIT, followed by telephone-type ringing if the receiving unit is in service.
2 If the receiving unit answers, press the PTT button tidentify yourself and proceed with your call.
OR
If the called unit does not respond, press Sel or thePTT button again to leave a Call Alert page messagand your ID.A single tone followed by four tones sounds if the called unit acknowledges the page.
1 Press the PTT button to initiate a Private Conversation I or II call.
2 Pause for a second, then begin the conversation.
3 Press Home or Call to hang up.

Erase an Encryption Key (Single-Key Option Only)
Erase an Encryption Key
.
1 Press and hold the D button until a tone sounds. The display changes to ERASE KY.
2 Press Sel to erase the key.
3 Press HOME or the PTT button to quit.
1 Press and hold the D button until a tone sounds.
2 Press the Mode rocker switch to scroll to ERASE KY.
3 Press Sel to enter the Key Erase Menu.
4 Press the Mode rocker switch to select the desired index.
5 Press Sel to select the index.
6 Press HOME or the PTT button to quit.
Request Dynamic Regrouping
Automatic Multiple Site Selection (AMSS)
View the Current Site
Initiate a Site Scan
Lock on a Site
Select Secure Mode
Select an Encryption Key
Select a Key Index
Press Rpgm. A central acknowledgement tone sounds and RPGM RQST is displayed while the request is being processed.When the dispatcher acknowledges, four additional tones sound, ACK RCVD is displayed, and your radio returns to normal operation.
Press Site momentarily. If the radio is scanning for a new site, SCANNING is displayed.
Press and hold Site until a tone sounds and SCANNING is displayed.
1 Press Lock to lock the radio onto the current site.
2 To view its condition (locked or unlocked), press Lock momentarily. SITE LOCKED or SITE UNLCKD is displayed.
OR
To toggle to the opposite condition, press and hold Lock until a tone sounds and the display changes to the other condition.The radio then returns to normal operation.
Press and release the D button. The D indicator lights up.
1 Press and hold the D button until a tone sounds.
2 Press the Mode rocker switch to scroll to KEY SEL.
3 Press Sel to enter the Key Selection Menu.
4 Press the Mode rocker switch to select the desired key.
5 Press Sel to select the key.
6 Press HOME or the PTT button to quit.
1 Press and hold the D button until a tone sounds.
2 Press the Mode rocker switch to scroll to INDX SEL
3 Press Sel to enter the Index Selection Menu.
4 Press the Mode rocker switch to select the desired index.
5 Press Sel to select the index.
6 Press HOME or the PTT button to quit.

r
st
r
le
,
s
DISPLAY AND LIGHT INDICATORS
Message Meaning
BUSY light on Displayed conventional mode has activity on it, or selected trunked system is currently busy. Wait for callback.
XMIT light on Indicates you are transmitting.
Pri indicator blinks Mode displayed is first priority.
Pri indicator lit Mode displayed is second priority.
Non Pri lit Mode displayed is non-priority.
P displayed Telephone dialing pause. Press Sel to continue the dialing.
NO ACK displayed Unit being called with the Enhanced Private Conversation or Call Alert Page feature is not in service, or emergency alarm or status/message transmission is not acknowledged by dispatcher.
LIST FULL displayed
Scan list full. Delete a mode before adding another.
PHON BSY displayed
Trunked phone interconnect is busy.
NO ANSWER displayed
Unit being called with Enhanced Private Conversation or Call Alert Page does not respond, but is operational.
EMERGENCY displayed
Radio is in emergency alarm or call state.
NO EMERGNCY displayed
A mode incapable of emergency transmission has been selected.
OUT OF RNGE displayed
Radio is out of range of the trunking system.
ALERT TONES
Type of Tone Name Explanation
1 Low-Pitched Tone
Invalid Key Alert
Feature button pressed is not validin selected mode, oa Call emergency alarm was not acknowledged.
1 High-Pitched Tone
Central Acknowledge or Valid Key
Central controller has received requefor Call Alert, emergency alarm, reprogram request,or status/message transmission.You pressed a validkey.
4 High-Pitched Tones
Dispatcher or Mobile Unit Acknowledge
Dispatcher is acknowledging youemergency transmission. Mobiunit has received your Call Alert.
5 High-Pitched Tones
The above two acknowledge tonesheard in tandem.
2 High-Pitched Tones
Private Conversation
You have an incoming call. PresCall, then the PTT button and talk.
4 High-Pitched Tones every 6 seconds
Call Alert Page Call Alert page hasbeen received.
Phone-Type Busy Tone(when pressing the PTT button)
System Busy All system radio channels in use. Release the PTT button, and wait forcallback.
ASTRO®
Digital Spectra®
andDigital Spectra Plus
W4, W5, W7, and W9Mobile Radios
User Guide
6881090C62-C
Motorola, Inc.8000 West Sunrise BoulevardFort Lauderdale, Florida 33322

This declaration is applicable to your radio only if your radio is labeled with the FCC logo shown below.
DECLARATION OF CONFORMITYPer FCC CFR 47 Part 2 Section 2.1077(a)
Responsible Party Name: Motorola, Inc.
Address: 8000 West Sunrise BoulevardPlantation, FL 33322 USAPhone Number: 1-888-567-7347
Hereby declares that the product:
Model Name: ASTRO Digital Spectra and Digital Spectra Plus
conforms to the following regulations:
FCC Part 15, subpart B, section 15.107(a), 15.107(d) and section 15.109(a)
Class B Digital Device
As a personal computer peripheral, this device complies with Part 15 of the FCC Rules. Operation is subject to the following two conditions:
1. this device may not cause harmful interference, and
2. this device must accept any interference received, including interference that may cause undesired operation.
Note: This equipment has been tested and found to comply with the limits for a Class B digital device, pursuant to part 15 of the FCC Rules. These limits are designed to provide reasonable protection against harmful interference in a residential installation. This equipment generates, uses and can radiate radio frequency energy and, if not installed and used in accordance with the instructions, may cause harmful interference to radio communications. However, there is no guarantee that interference will not occur in a particular installation.
If this equipment does cause harmful interference to radio or television reception, which can be determined by turning the equipment off and on, the user is encouraged to try to correct the interference by one or more of the following measures:
• Reorient or relocate the receiving antenna.
• Increase the separation between the equipment and receiver.
• Connect the equipment into an outlet on a circuit different from that to which the receiver is connected.
• Consult the dealer or an experienced radio/TV technician for help.
ii

ForewordThis manual describes how to operate an ASTRO® Digital Spectra® and Digital Spectra Plus W4, W5, W7, and W9 Mobile Radios.
The manual first introduces you to your new radio. Then it covers basic radio operation and commonly used (general) radio features. Next, special radio features (conventional, trunking, and secure) available on an ASTRO Digital Spectra and Digital Spectra Plus radio are described. Finally, the back section of this manual includes field-programming information, a glossary, and an index.
Product Safety and RF Exposure Compliance
ATTENTION!
This radio is restricted to occupational use only to satisfy FCC RF energy exposure requirements. Before using this product, read the RF energy awareness information and operating instructions in the Product Safety and RF Exposure booklet enclosed with your radio (Motorola Publication part number 6881095C99) to ensure compliance with RF energy exposure limits.
Computer Software CopyrightsThe Motorola products described in this manual may include copyrighted Motorola computer programs stored in semiconductor memories or other media. Laws in the United States and other countries preserve for Motorola certain exclusive rights for copyrighted computer programs, including, but not limited to, the exclusive right to copy or reproduce in any form the copyrighted computer program. Accordingly, any copyrighted Motorola computer programs contained in the Motorola products described in this manual may not be copied, reproduced, modified, reverse-engineered, or distributed in
Before using this product, read the operating instructions for safe usage contained in the Product Safety and RF Exposure booklet enclosed with your radio.
Do not jump-start a vehicle with the radio power or ignition cables connected. Damage to the radio and/or accessories might occur.
!C a u t i o n
!C a u t i o n
ASTRO Digital Spectra and Digital Spectra Plus W4, W5, W7, and W9 iii

any manner without the express written permission of Motorola. Furthermore, the purchase of Motorola products shall not be deemed to grant either directly or by implication, estoppel, or otherwise, any license under the copyrights, patents or patent applications of Motorola, except for the normal non-exclusive license to use that arises by operation of law in the sale of a product.
Document CopyrightsNo duplication or distribution of this document or any portion thereof shall take place without the express written permission of Motorola. No part of this manual may be reproduced, distributed, or transmitted in any form or by any means, electronic or mechanical, for any purpose without the express written permission of Motorola.
DisclaimerThe information in this document is carefully examined, and is believed to be entirely reliable. However, no responsibility is assumed for inaccuracies. Furthermore, Motorola reserves the right to make changes to any products herein to improve readability, function, or design. Motorola does not assume any liability arising out of the applications or use of any product or circuit described herein; nor does it cover any license under its patent rights nor the rights of others.
TrademarksMOTOROLA, the Stylized M logo, ASTRO, and Spectra are registered in the US Patent & Trademark Office. All other product or service names are the property of their respective owners.
© Motorola, Inc. 2004.
iv
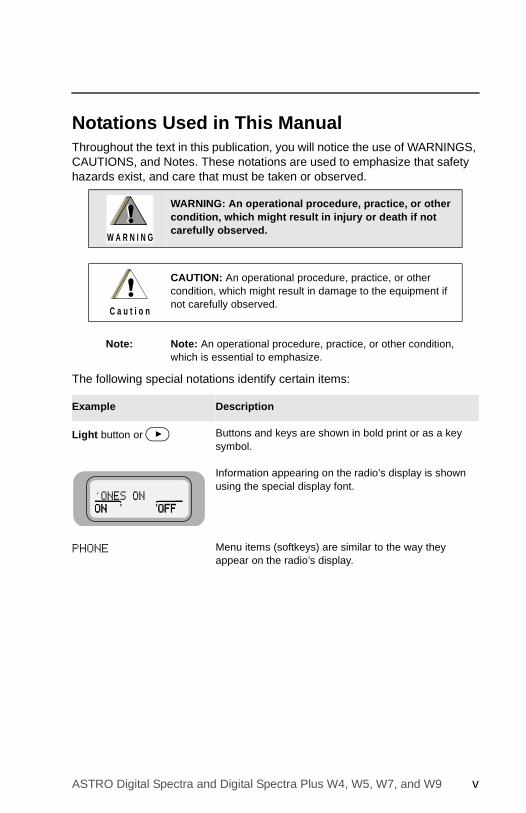
Notations Used in This ManualThroughout the text in this publication, you will notice the use of WARNINGS, CAUTIONS, and Notes. These notations are used to emphasize that safety hazards exist, and care that must be taken or observed.
The following special notations identify certain items:
WARNING: An operational procedure, practice, or other condition, which might result in injury or death if not carefully observed.
CAUTION: An operational procedure, practice, or other condition, which might result in damage to the equipment if not carefully observed.
Note: Note: An operational procedure, practice, or other condition, which is essential to emphasize.
Example Description
Light button or > Buttons and keys are shown in bold print or as a key symbol.
Information appearing on the radio’s display is shown using the special display font.
PHONE Menu items (softkeys) are similar to the way they appear on the radio’s display.
!W A R N I N G
!
!C a u t i o n
ASTRO Digital Spectra and Digital Spectra Plus W4, W5, W7, and W9 v

Notes
vi

Contents
DECLARATION OF CONFORMITY .................................................. ii
Foreword . . . . . . . . . . . . . . . . . . . . . . . . . . . . . . . . . . . iiiProduct Safety and RF Exposure Compliance .................................iiiComputer Software Copyrights .........................................................iiiDocument Copyrights........................................................................ ivDisclaimer ........................................................................................ ivTrademarks ...................................................................................... ivNotations Used in This Manual .......................................................... v
Contents. . . . . . . . . . . . . . . . . . . . . . . . . . . . . . . . . . . . vii
Introduction . . . . . . . . . . . . . . . . . . . . . . . . . . . . . . . . . . 1Identifying Your Radio ....................................................................... 3Control Head Operation .................................................................... 4Status Display ................................................................................... 5Alert Tones ........................................................................................ 5
Basic Operating Procedures . . . . . . . . . . . . . . . . . . . . 9Turn On the Radio ............................................................................. 9Set the Volume ................................................................................ 11Adjust Display Brightness ............................................................... 12Select a Zone or Mode .................................................................... 13
Select or Change a Zone .......................................................... 14Select or Change a Mode in the Current Zone ......................... 15Select or Change to a Mode Not in the Current Zone .............. 16
Select the Home Mode ................................................................... 17Transmit (Conventional Modes Only) .............................................. 18Transmit (Trunked Modes Only) ...................................................... 18Select Transmit Power Level .......................................................... 20Monitor Conventional Mode Activity ................................................ 21Adjust the Squelch Level ................................................................ 22
General Radio Features . . . . . . . . . . . . . . . . . . . . . . . 25Emergency Call and Alarm ............................................................. 25
Emergency Call ........................................................................ 25Initiate an Emergency Alarm .................................................... 26Initiate an Emergency Call ........................................................ 27Initiate an Emergency Call and Alarm ...................................... 29
ASTRO Digital Spectra and Digital Spectra Plus W4, W5, W7, and W9 vii

Contents
Initiate a Silent Emergency Alarm .............................................31Special Considerations for Emergencies ..................................32
Scan Operation ................................................................................33Turn On Scan ............................................................................34Turn Scan On While Disregarding the Squelch Code
(Conventional Modes Only) ...................................................36View a Scan List .......................................................................38Transmit While Scan Is On .......................................................40Temporarily Delete a Nuisance Mode With Scan On
(W7 and W9 Models Only) .....................................................42Restore a Nuisance Mode (W7 and W9 Models Only) .............43Change Mode Priorities While Scan Is On
(W7 and W9 Models Only) .....................................................44Restore Mode Priorities in a Scan List
(W7 and W9 Models Only) .....................................................45Program a Scan List .................................................................46Hang Up Box (HUB) ..................................................................53
Optional External Alarms (Horn and Lights) ....................................53Activate the External Alarm(s) ..................................................54Change the Selected Alarms ....................................................56Receiving a Call While Alarms Are Turned On .........................57
Time-Out Timer ................................................................................60Push-To-Talk Identification (PTT-ID) ................................................60
Conventional Radio Features . . . . . . . . . . . . . . . . . . 61Status Calls (Digital Modes Only) ....................................................61
Send a Status Call (Models W7 and W9 Only) .........................61Send a Direct-Entry Keyboard (DEK) Status
(Digital Modes Only) ..............................................................64Smart PTT .......................................................................................66Conventional Talkgroup Calls ..........................................................66
Digital Modes Only ....................................................................66Select a Conventional Talkgroup ..............................................67
Conventional Talkaround .................................................................69Talk Direct (Mobile-To-Mobile) ..................................................69
Trunking Operation . . . . . . . . . . . . . . . . . . . . . . . . . . 71Telephone Interconnect List .............................................................71
Answer a Phone Call ................................................................72
viii

Contents
Initiate a Telephone Call From the List ..................................... 74Unlimited Telephone Interconnect (Models W7 and W9 Only) ........ 77
Call a Phone Number Not in the List ........................................ 77Store a Number in the List ........................................................ 79Edit a Name in the List (Models W7 and W9 Only) .................. 80
Enhanced Private Conversation (Digital Modes Only) .................... 84Answer an Enhanced Private Conversation Call ...................... 84Initiate an Enhanced Private Conversation Call ....................... 87View Your Unit ID Number ....................................................... 92Store a Unit ID Number in the List
(Models W7 and W9 Only) .................................................... 94Edit a Name in the List (W7 and W9 Models Only) .................. 96
Call Alert Page (Digital Modes Only) ............................................... 99Send a Call Alert Page ........................................................... 100Store a Unit ID Number In the List
(Models W7 and W9 Only) .................................................. 105Edit a Name in the List (Models W7 and W9 Only) ................ 107
Failsoft ........................................................................................... 110Dynamic Regrouping (Digital Modes Only) ................................... 112
Receive a Dynamic Regrouping ID Assignment (ModelsW7 and W9 Only) ................................................................ 112
Select Enable and Disable (Digital Modes Only) .................... 113Request a Dynamic Regrouping
(Models W7 and W9 Only) (Digital Modes Only) ................. 113SmartZone™ (Models W7 and W9 Only) ...................................... 115
Site-Button Operation ............................................................. 116Lock Onto a Site ..................................................................... 117Site Trunking .......................................................................... 118
Out-of-Range Indication ................................................................ 118Trunked Announcement ................................................................ 119
Initiate an Announcement ....................................................... 120
Secure Operation . . . . . . . . . . . . . . . . . . . . . . . . . . . 121Receive a Private Message .......................................................... 121Transmit a Private Message ......................................................... 123System Considerations ................................................................. 123Loss Indication .............................................................................. 124Select an Encryption Key (Conventional Only) ............................. 124Select an Encryption Index (Conventional Only) .......................... 127
ASTRO Digital Spectra and Digital Spectra Plus W4, W5, W7, and W9 ix

Contents
Troubleshooting . . . . . . . . . . . . . . . . . . . . . . . . . . . . 130
Glossary . . . . . . . . . . . . . . . . . . . . . . . . . . . . . . . . . . 131
Commercial Warranty. . . . . . . . . . . . . . . . . . . . . . . . 135Limited Warranty ...........................................................................135
MOTOROLA COMMUNICATION PRODUCTS ......................135
Index . . . . . . . . . . . . . . . . . . . . . . . . . . . . . . . . . . . . . 139
x
Introduction
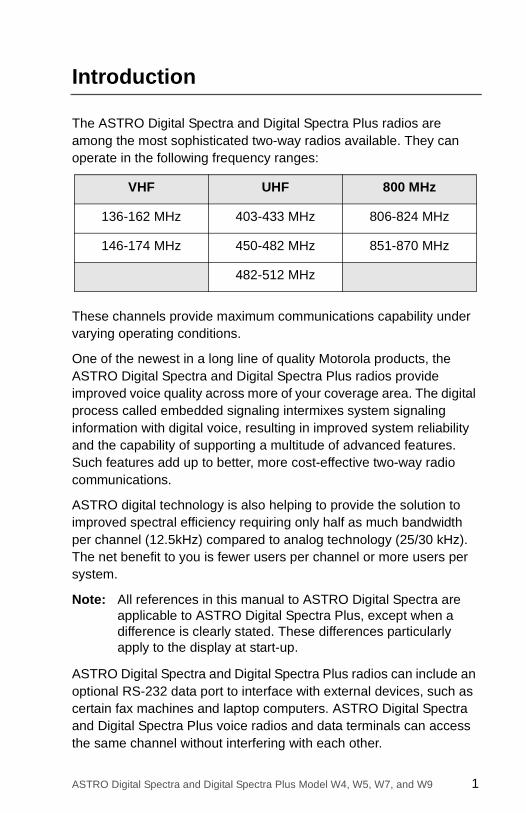
The ASTRO Digital Spectra and Digital Spectra Plus radios are among the most sophisticated two-way radios available. They can operate in the following frequency ranges:
These channels provide maximum communications capability under varying operating conditions.
One of the newest in a long line of quality Motorola products, the ASTRO Digital Spectra and Digital Spectra Plus radios provide improved voice quality across more of your coverage area. The digital process called embedded signaling intermixes system signaling information with digital voice, resulting in improved system reliability and the capability of supporting a multitude of advanced features. Such features add up to better, more cost-effective two-way radio communications.
ASTRO digital technology is also helping to provide the solution to improved spectral efficiency requiring only half as much bandwidth per channel (12.5kHz) compared to analog technology (25/30 kHz). The net benefit to you is fewer users per channel or more users per system.
Note: All references in this manual to ASTRO Digital Spectra are applicable to ASTRO Digital Spectra Plus, except when a difference is clearly stated. These differences particularly apply to the display at start-up.
ASTRO Digital Spectra and Digital Spectra Plus radios can include an optional RS-232 data port to interface with external devices, such as certain fax machines and laptop computers. ASTRO Digital Spectra and Digital Spectra Plus voice radios and data terminals can access the same channel without interfering with each other.
VHF UHF 800 MHz
136-162 MHz 403-433 MHz 806-824 MHz
146-174 MHz 450-482 MHz 851-870 MHz
482-512 MHz
ASTRO Digital Spectra and Digital Spectra Plus Model W4, W5, W7, and W9 1

Introduction
Note: In this manual—
Analog mode refers to a mode that uses traditional, non-ASTRO-digital signaling.
ASTRO mode refers to a mode that uses ASTRO digital signaling.
Your ASTRO Digital Spectra or Digital Spectra Plus radio utilizes Motorola’s revolutionary FLASHport™ technology. This allows your radio’s capabilities to be flexible, because FLASHport makes it possible to add software that drives these capabilities both at the time of purchase and later on. Previously, changing a radio’s features and capabilities meant significant modifications, or buying a new radio. But now, similar to how a computer can be loaded with different software, your radio’s features and capabilities can be upgraded with software.
FLASHport allows you to add software to your radio as your needs change and as technology advances, making your radio investment go further.
FLASHport is the future of radio communications, and it’s yet another example of Motorola’s commitment to your satisfaction.
LOGO BLACK / FLASHport BLACK
2
Introduction
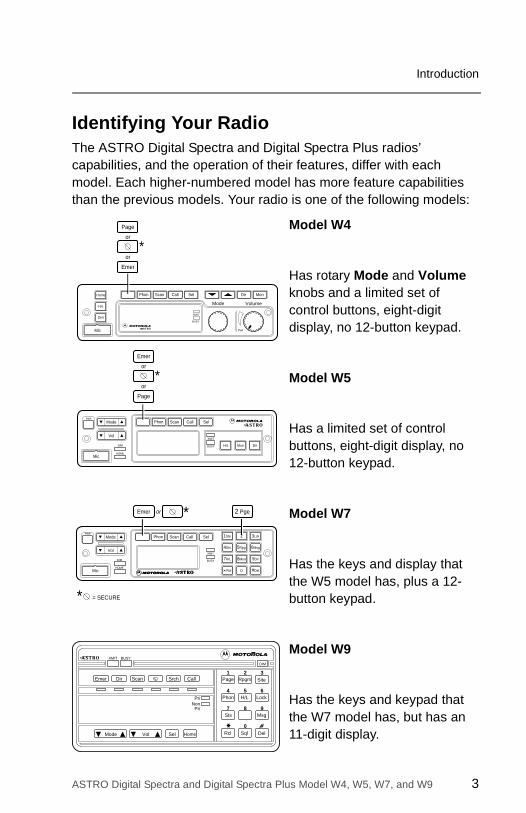
Identifying Your RadioThe ASTRO Digital Spectra and Digital Spectra Plus radios’ capabilities, and the operation of their features, differ with each model. Each higher-numbered model has more feature capabilities than the previous models. Your radio is one of the following models:
Model W4
Has rotary Mode and Volume knobs and a limited set of control buttons, eight-digit display, no 12-button keypad.
Model W5
Has a limited set of control buttons, eight-digit display, no 12-button keypad.
Model W7
Has the keys and display that the W5 model has, plus a 12-button keypad.
Model W9
Has the keys and keypad that the W7 model has, but has an 11-digit display.
XMIT
BUSY
Mode Volume
Pwr
Phon Call SelScan
Mic
Home
Dim
H/L
Dir Mon
Page
or
or
Emer
*
Mode
Vol
Mic
Phon Call Sel
H/L Mon Dir
PWR
Scan
XMIT
BUSYDIM
HOME
Emer
or
or
Page
*
O #Del Rcl
Mode
Vol
Mic
Phon Call SelPWR
Scan
XMIT
BUSYDIM
HOME
1Ste 2 3Lck
4Sts 5Rpg 6Msg
7H/L 8Mon 9Dir
Emer or 2 Pge*
* = SECURE
XMIT BUSY
1 2 3
4 5 6
7 8 9
0
DIM
PriNon
Pri
Emer Dir Scan Call
Mode Vol Sel Home
Page Rpgm Site
Phon H/L Lock
Rcl Sql Del
Sts Msg
Srch
ASTRO Digital Spectra and Digital Spectra Plus Model W4, W5, W7, and W9 3
Introduction
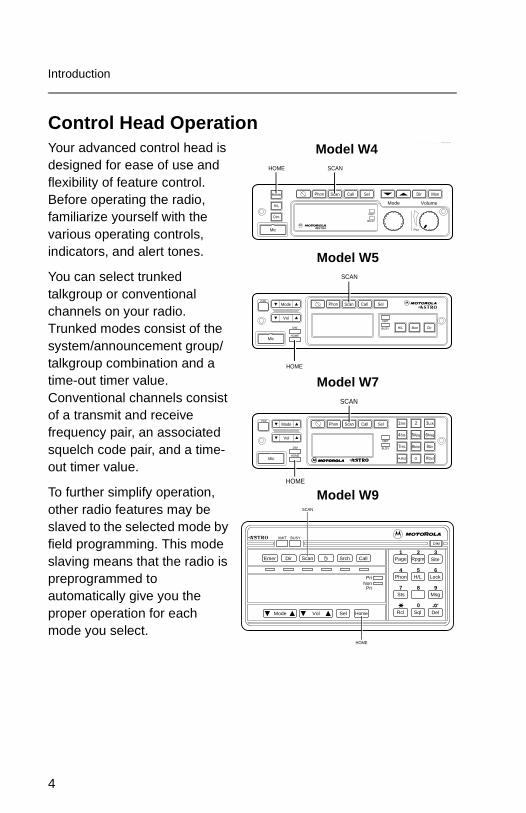
Control Head OperationYour advanced control head is designed for ease of use and flexibility of feature control. Before operating the radio, familiarize yourself with the various operating controls, indicators, and alert tones.
You can select trunked talkgroup or conventional channels on your radio. Trunked modes consist of the system/announcement group/talkgroup combination and a time-out timer value. Conventional channels consist of a transmit and receive frequency pair, an associated squelch code pair, and a time-out timer value.
To further simplify operation, other radio features may be slaved to the selected mode by field programming. This mode slaving means that the radio is preprogrammed to automatically give you the proper operation for each mode you select.
ASTRO MoControl Head
O #Del Rcl
Mode
Vol
Mic
Phon Call SelPWR
Scan
XMIT
BUSYDIM
HOME
1Ste 2 3Lck
4Sts 5Rpg 6Msg
7H/L 8Mon 9Dir
ILLUSTRATOR EDATE
DESCRIPTION
LETTERINREQUIRE
EDITOR CDATE
EH 12/7/92
MAEPF-23160-A
SCAN
HOME
12/15/92PR
Mode
Vol
Mic
Phon Call Sel
H/L Mon Dir
PWR
Scan
XMIT
BUSYDIM
HOME
MAEPF-23159-A
HOME
SCAN
XMIT BUSY
1 2 3
4 5 6
7 8 9
0
DIM
PriNon
Pri
Emer Dir Scan Call
Mode Vol Sel Home
Page Rpgm Site
Phon H/L Lock
Rcl Sql Del
HOME
Sts Msg
Srch
SCAN
MAEPF-23158-A
HOME
XMIT
BUSY
Mode Volume
Pwr
Phon Call SelScan
Mic
Home
Dim
H/L
Dir Mon
SCAN
Model W4
Model W5
Model W7
Model W9
4
Introduction
Through field programming, the control head allows you to program your own mode names. The names you assign are clearly shown in the alphanumeric display. At a glance, you can see all the key operating information, including the mode selected or being scanned, and the on/off status of various features. The operating conditions are shown either by the display or by indicators.
Status DisplayThe control head display indicates your selected mode, or the currently active receive mode when scan is on. You can turn the various radio features on or off, change modes, and adjust volume.
To exit a feature, such as phone, press the HOME button or the feature button (for example, Phon).
Alert Tones
Tone Type Name Description
Two high-pitched tones
Private Conversation™
Indicate that a private call has been received.
Four high-pitched tones every six seconds
Call Alert Indicate that a Call Alert page has been received.
Single, high-pitched tone
Central Acknowledge
Indicates that a Call Alert, emergency alarm, reprogram request, or status/message transmission has been received by the system’s central controller.
ASTRO Digital Spectra and Digital Spectra Plus Model W4, W5, W7, and W9 5

Introduction
Four high-pitched tones
Mobile Unit Acknowledge
Indicate that a Call Alert page has been received by the intended unit, or the emergency alarm, reprogram request, or status/message transmission has been acknowledged by the intended dispatcher.
Sound similar to a telephone busy signal
System Busy Indicates, when you press the microphone push-to-talk (PTT) button, that you cannot transmit because all system radio channels are in use. Release the PTT button and wait for call back.
A series of three short, high-pitched tones
Automatic Call Back
Indicate that a channel is now available for your previously requested transmission.
A series of three short, high-pitched tones (same as automatic call back)
Talk Permit (optional)
Indicate, when you press the microphone PTT button, that the system is accepting your transmission.
Continuous, low-pitched tone
Talk-Prohibit/Out-of-Range
Indicates, when you press the microphone PTT button, that either you are out of the range of the trunked radio system, or the system is out of service, or the channel is busy with the Smart PTT feature enabled.
Tone Type Name Description
6

Introduction
Single, high-pitched tone every ten seconds
Failsoft In an unmuted receive condition, indicates a trunked system central controller failure. The radio reverts from trunked operation to a system similar to conventional radio repeater operation. Other system users can be heard sharing the channel.
Continuous, low-pitched tone
Illegal Mode Indicates that you have entered a mode where normal system traffic will be missed, or you are attempting something which is not allowed. Examples include: forgetting to exit the telephone interconnect mode after a call ends (fleet and subfleet calls cannot be received), attempting to transmit on a receive-only conventional mode, attempting to select a dynamic mode where no dynamic ID assignment has been made.
Brief tone Volume-Set Tone
Indicate the volume level when you press the Vol rocker button on a quiet channel (models W5, W7, and W9 only).
Brief low-pitched tone
Time-Out Timer Warning
Indicates that your present transmission will soon be disabled.
Single, short, high-pitched tone
Valid Key Indicates that you pressed a valid key, or you entered a feature configuration state, or you are receiving or transmitting in the clear mode on secure models (with TX Clear Alert Tones enabled).
Tone Type Name Description
ASTRO Digital Spectra and Digital Spectra Plus Model W4, W5, W7, and W9 7

Introduction
Single, low-pitched tone
Invalid Key Indicates that you tried to make an invalid key press, or that an emergency alarm, reprogram request, or status/message was not acknowledged.
Unique chirping sound
Dynamic Reprogram-ming
Indicates that a dynamic ID is assigned.
Tone Type Name Description
8
Basic Operating Procedures
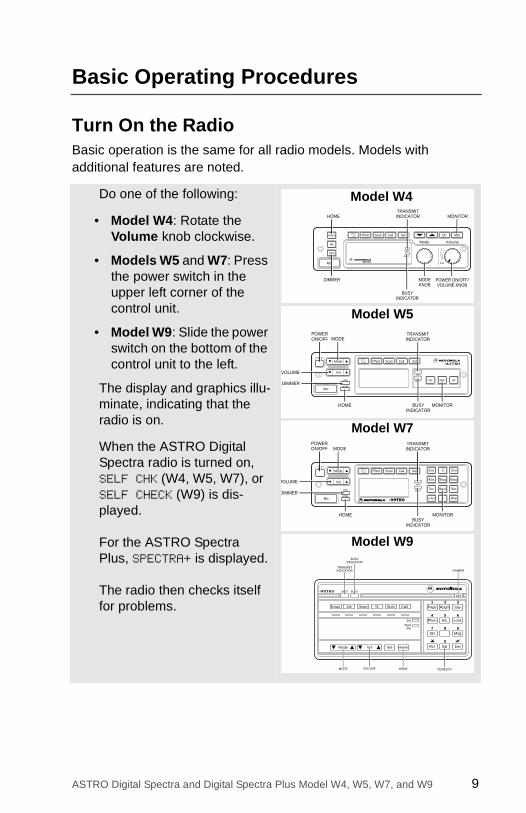
Turn On the RadioBasic operation is the same for all radio models. Models with additional features are noted.
Do one of the following:
• Model W4: Rotate the Volume knob clockwise.
• Models W5 and W7: Press the power switch in the upper left corner of the control unit.
• Model W9: Slide the power switch on the bottom of the control unit to the left.
The display and graphics illu-minate, indicating that the radio is on.
When the ASTRO Digital Spectra radio is turned on, SELF CHK (W4, W5, W7), or SELF CHECK (W9) is dis-played.
For the ASTRO Spectra Plus, SPECTRA+ is displayed.
The radio then checks itself for problems.
HOME
POWER ON/OFF/VOLUME KNOB
MONITOR
MODEKNOB
BUSYINDICATOR
DIMMER
XMIT
BUSY
Mode Volume
Pwr
Phon Call SelScan
Mic
Home
Dim
H/L
Dir Mon
TRANSMITINDICATOR
Model W4
Mode
Vol
Mic
Phon Call Sel
H/L Mon Dir
PWR
Scan
XMIT
BUSYDIM
HOME
BUSYINDICATOR
POWERON/OFF MODE
TRANSMITINDICATOR
MONITOR
VOLUME
DIMMER
HOME
Model W5
TRANSMITINDICATOR
POWERON/OFF MODE
O #Del Rcl
Mode
Vol
Mic
Phon Call SelPWR
Scan
XMIT
BUSYDIM
HOME
1Ste 2 3Lck
4Sts 5Rpg 6Msg
7H/L 8Mon 9Dir
BUSYINDICATOR
VOLUME
MONITORHOME
DIMMER
Model W7
XMIT BUSY
1 2 3
4 5 6
7 8 9
0
DIM
PriNon
Pri
Emer Dir Scan Call
Mode Vol Sel Home
Page Rpgm Site
Phon H/L Lock
Rcl Sql Del
MODE VOLUME HOME
DIMMER
Sts Msg
Srch
SQUELCH
TRANSMITINDICATOR
BUSYINDICATOR
Model W9
ASTRO Digital Spectra and Digital Spectra Plus Model W4, W5, W7, and W9 9
Basic Operating Procedures
Note: If FL##/## (W4,W5,W7) or FAIL ##/## (W9) appears in the display, the radio will not function until the condition has been corrected.
If ER##/## (W4,W5,W7) or ERROR ##/## (W9) appears, some non-critical data has been changed. If either of these displays appear, if the display goes blank, or if the unit appears to be locked up, refer to “Troubleshooting” on page 130.
10
Basic Operating Procedures
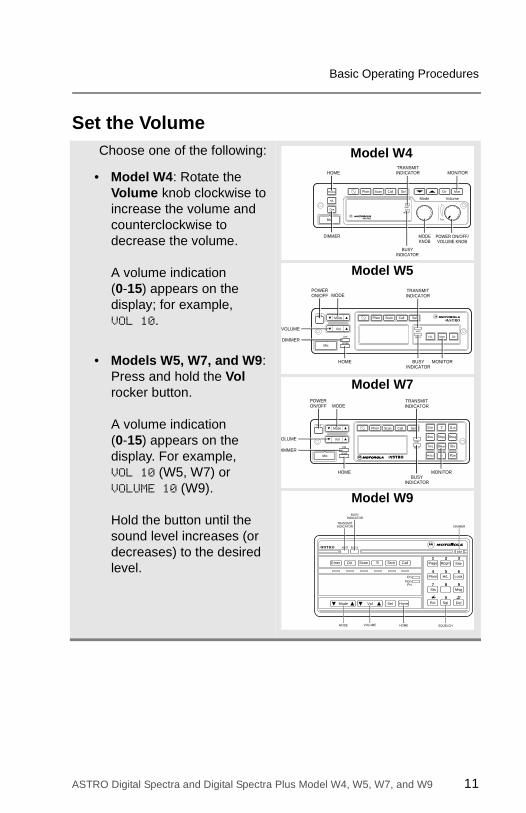
Set the VolumeChoose one of the following:
• Model W4: Rotate the Volume knob clockwise to increase the volume and counterclockwise to decrease the volume.
A volume indication(0-15) appears on the display; for example,VOL 10.
• Models W5, W7, and W9: Press and hold the Vol rocker button.
A volume indication(0-15) appears on the display. For example,VOL 10 (W5, W7) or VOLUME 10 (W9).
Hold the button until the sound level increases (or decreases) to the desired level.
HOME
POWER ON/OFF/VOLUME KNOB
MONITOR
MODEKNOB
BUSYINDICATOR
DIMMER
XMIT
BUSY
Mode Volume
Pwr
Phon Call SelScan
Mic
Home
Dim
H/L
Dir Mon
TRANSMITINDICATOR
Model W4
Mode
Vol
Mic
Phon Call Sel
H/L Mon Dir
PWR
Scan
XMIT
BUSYDIM
HOME
BUSYINDICATOR
POWERON/OFF MODE
TRANSMITINDICATOR
MONITOR
VOLUME
DIMMER
HOME
Model W5
TRANSMITINDICATOR
POWERON/OFF MODE
O #Del Rcl
Mode
Vol
Mic
Phon Call SelPWR
Scan
XMIT
BUSYDIM
HOME
1Ste 2 3Lck
4Sts 5Rpg 6Msg
7H/L 8Mon 9Dir
BUSYINDICATOR
OLUME
MONITORHOME
DIMMER
Model W7
XMIT BUSY
1 2 3
4 5 6
7 8 9
0
DIM
PriNon
Pri
Emer Dir Scan Call
Mode Vol Sel Home
Page Rpgm Site
Phon H/L Lock
Rcl Sql Del
MODE VOLUME HOME
DIMMER
Sts Msg
Srch
SQUELCH
TRANSMITINDICATOR
BUSYINDICATOR
Model W9
ASTRO Digital Spectra and Digital Spectra Plus Model W4, W5, W7, and W9 11
Basic Operating Procedures
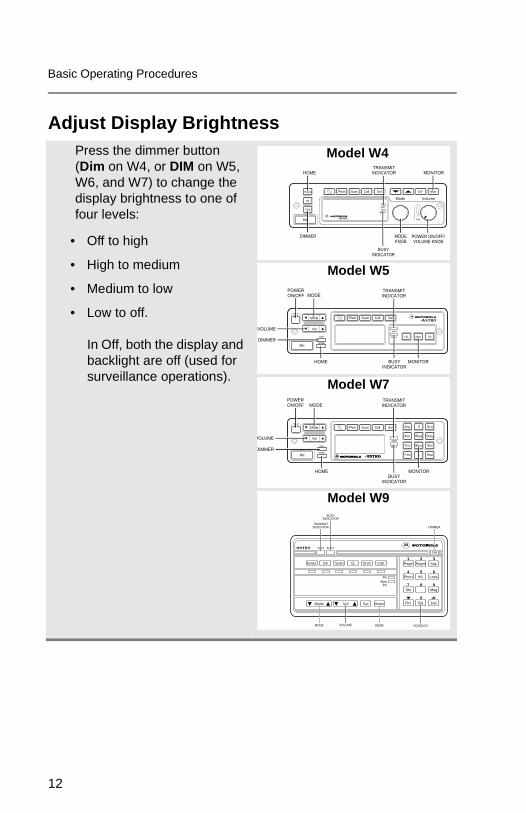
Adjust Display BrightnessPress the dimmer button (Dim on W4, or DIM on W5, W6, and W7) to change the display brightness to one of four levels:
• Off to high
• High to medium
• Medium to low
• Low to off.
In Off, both the display and backlight are off (used for surveillance operations).
HOME
POWER ON/OFF/VOLUME KNOB
MONITOR
MODEKNOB
BUSYINDICATOR
DIMMER
XMIT
BUSY
Mode Volume
Pwr
Phon Call SelScan
Mic
Home
Dim
H/L
Dir Mon
TRANSMITINDICATOR
Model W4
Mode
Vol
Mic
Phon Call Sel
H/L Mon Dir
PWR
Scan
XMIT
BUSYDIM
HOME
BUSYINDICATOR
POWERON/OFF MODE
TRANSMITINDICATOR
MONITOR
VOLUME
DIMMER
HOME
Model W5
TRANSMITINDICATOR
POWERON/OFF MODE
O #Del Rcl
Mode
Vol
Mic
Phon Call SelPWR
Scan
XMIT
BUSYDIM
HOME
1Ste 2 3Lck
4Sts 5Rpg 6Msg
7H/L 8Mon 9Dir
BUSYINDICATOR
VOLUME
MONITORHOME
DIMMER
Model W7
XMIT BUSY
1 2 3
4 5 6
7 8 9
0
DIM
PriNon
Pri
Emer Dir Scan Call
Mode Vol Sel Home
Page Rpgm Site
Phon H/L Lock
Rcl Sql Del
MODE VOLUME HOME
DIMMER
Sts Msg
Srch
SQUELCH
TRANSMITINDICATOR
BUSYINDICATOR
Model W9
12

Basic Operating Procedures
Select a Zone or ModeA zone is a grouping of modes. A mode is a group of characteristics such as transmit/receive frequencies, Private-Line™ codes, radio parameters, and an alphanumeric name.
ASTRO Digital Spectra and Digital Spectra Plus Model W4, W5, W7, and W9 13

Basic Operating Procedures
Select or Change a Zone
Press the ▲ (Zone up) but-ton or ▼ (Zone down) button.
XMIT
BUSY
Mode Volume
Pwr
Phon Call SelScan
Mic
Home
Dim
H/L
Dir Mon
ZONEDOWN
ZONEUP
Model W4
Mode
Vol
Mic
Call Sel
H/L Mon Dir
PWR
Scan
XMIT
BUSYDIM
HOME
ZONE*DOWN
ZONE*UP
Model W5
* Optional button included with radio when Zone/Mode is ordered, but not installed at the factory.
orZONE*UP
ZONE*UP
O #Del Rcl
Mode
Vol
Mic
Call SelPWR
Scan
XMIT
BUSYDIM
HOME
1 2 3Lck
4Sts 5Rpg 6Msg
7H/L 8Mon 9Dir
ZONE*DOWN
ZONE*DOWN
Model W7
Model W9
XMIT BUSY
1 2 3
4 5 6
7 8 9
0
DIM
PriNon
Pri
Scan Call
Mode Vol Sel Home
Site
Phon H/L Lock
Rcl Sql Del
Sts Msg
Srch
ZONEDOWN
*ZONEUP
ZONEDOWN
ZONEUP
** * or
14
Basic Operating Procedures
Select or Change a Mode in the Current Zone
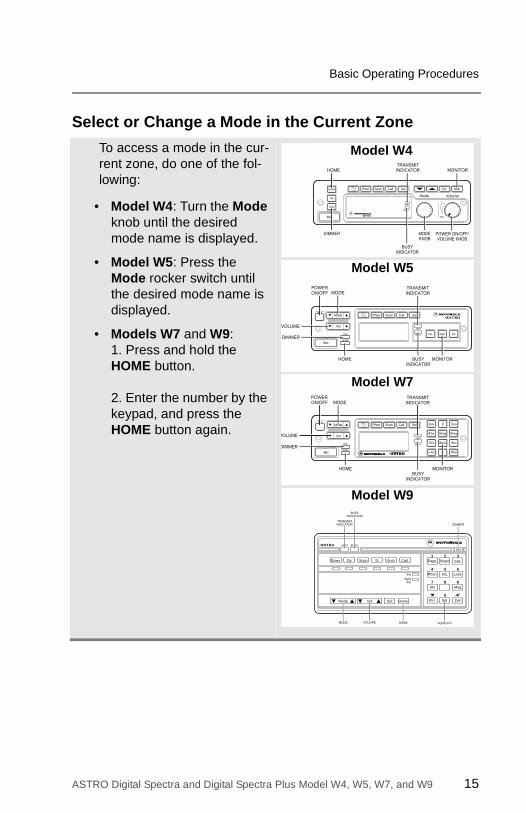
To access a mode in the cur-rent zone, do one of the fol-lowing:
• Model W4: Turn the Mode knob until the desired mode name is displayed.
• Model W5: Press the Mode rocker switch until the desired mode name is displayed.
• Models W7 and W9:1. Press and hold the HOME button.
2. Enter the number by the keypad, and press the HOME button again.
HOME
POWER ON/OFF/VOLUME KNOB
MONITOR
MODEKNOB
BUSYINDICATOR
DIMMER
XMIT
BUSY
Mode Volume
Pwr
Phon Call SelScan
Mic
Home
Dim
H/L
Dir Mon
TRANSMITINDICATOR
Model W4
Mode
Vol
Mic
Phon Call Sel
H/L Mon Dir
PWR
Scan
XMIT
BUSYDIM
HOME
BUSYINDICATOR
POWERON/OFF MODE
TRANSMITINDICATOR
MONITOR
VOLUME
DIMMER
HOME
Model W5
TRANSMITINDICATOR
POWERON/OFF MODE
O #Del Rcl
Mode
Vol
Mic
Phon Call SelPWR
Scan
XMIT
BUSYDIM
HOME
1Ste 2 3Lck
4Sts 5Rpg 6Msg
7H/L 8Mon 9Dir
BUSYINDICATOR
VOLUME
MONITORHOME
DIMMER
Model W7
XMIT BUSY
1 2 3
4 5 6
7 8 9
0
DIM
PriNon
Pri
Emer Dir Scan Call
Mode Vol Sel Home
Page Rpgm Site
Phon H/L Lock
Rcl Sql Del
MODE VOLUME HOME
DIMMER
Sts Msg
Srch
SQUELCH
TRANSMITINDICATOR
BUSYINDICATOR
Model W9
ASTRO Digital Spectra and Digital Spectra Plus Model W4, W5, W7, and W9 15
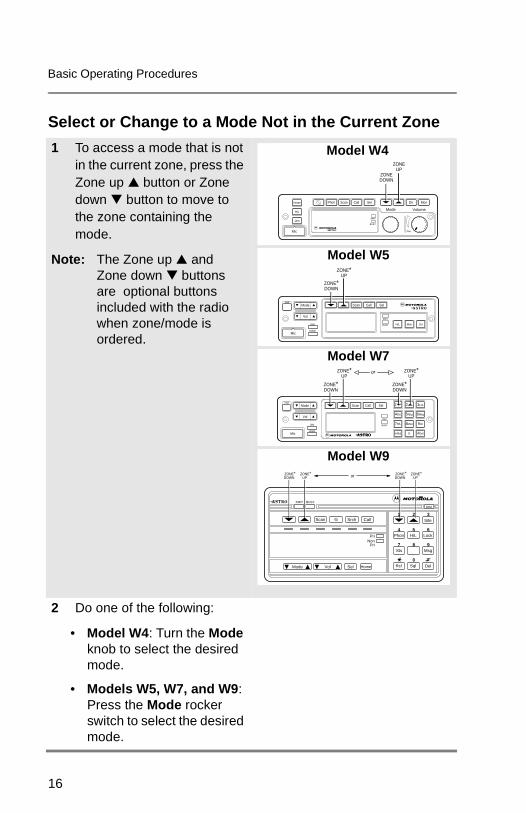
Basic Operating Procedures
Select or Change to a Mode Not in the Current Zone
1 To access a mode that is not in the current zone, press the Zone up ▲ button or Zone down ▼ button to move to the zone containing the mode.
Note: The Zone up ▲ and Zone down ▼ buttons are optional buttons included with the radio when zone/mode is ordered.
2 Do one of the following:
• Model W4: Turn the Mode knob to select the desired mode.
• Models W5, W7, and W9: Press the Mode rocker switch to select the desired mode.
XMIT
BUSY
Mode Volume
Pwr
Phon Call SelScan
Mic
Home
Dim
H/L
Dir Mon
ZONEDOWN
ZONEUP
Model W4
Mode
Vol
Mic
Call Sel
H/L Mon Dir
PWRScan
XMIT
BUSYDIM
HOME
ZONE*DOWN
ZONE*UP
Model W5
orZONE*UP
ZONE*UP
O #Del Rcl
Mode
Vol
Mic
Call SelPWR
Scan
XMIT
BUSYDIM
HOME
1 2 3Lck
4Sts 5Rpg 6Msg
7H/L 8Mon 9Dir
ZONE*DOWN
ZONE*DOWN
Model W7
XMIT BUSY
1 2 3
4 5 6
7 8 9
0
DIM
PriNon
Pri
Scan Call
Mode Vol Sel Home
Site
Phon H/L Lock
Rcl Sql Del
Sts Msg
Srch
ZONEDOWN
*ZONEUP
ZONEDOWN
ZONEUP
** * or
Model W9
16
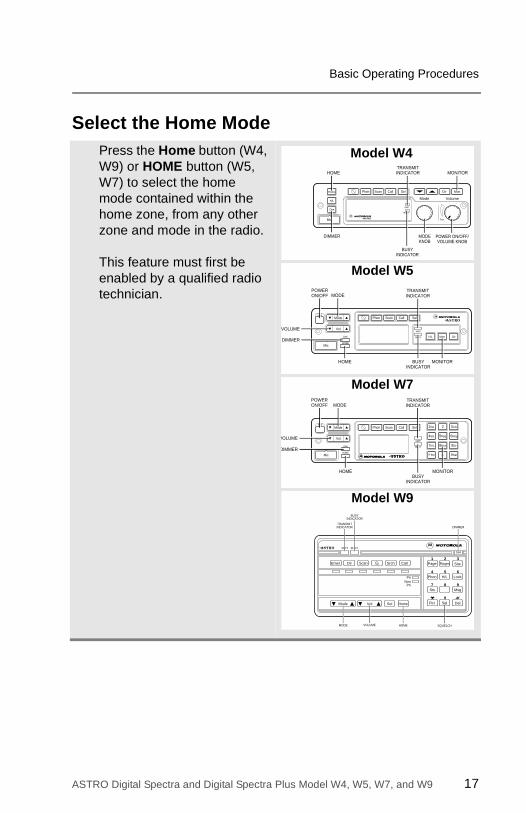
Basic Operating Procedures
Select the Home ModePress the Home button (W4, W9) or HOME button (W5, W7) to select the home mode contained within the home zone, from any other zone and mode in the radio.
This feature must first be enabled by a qualified radio technician.
HOME
POWER ON/OFF/VOLUME KNOB
MONITOR
MODEKNOB
BUSYINDICATOR
DIMMER
XMIT
BUSY
Mode Volume
Pwr
Phon Call SelScan
Mic
Home
Dim
H/L
Dir Mon
TRANSMITINDICATOR
Model W4
Mode
Vol
Mic
Phon Call Sel
H/L Mon Dir
PWR
Scan
XMIT
BUSYDIM
HOME
BUSYINDICATOR
POWERON/OFF MODE
TRANSMITINDICATOR
MONITOR
VOLUME
DIMMER
HOME
Model W5
TRANSMITINDICATOR
POWERON/OFF MODE
O #Del Rcl
Mode
Vol
Mic
Phon Call SelPWR
Scan
XMIT
BUSYDIM
HOME
1Ste 2 3Lck
4Sts 5Rpg 6Msg
7H/L 8Mon 9Dir
BUSYINDICATOR
VOLUME
MONITORHOME
DIMMER
Model W7
XMIT BUSY
1 2 3
4 5 6
7 8 9
0
DIM
PriNon
Pri
Emer Dir Scan Call
Mode Vol Sel Home
Page Rpgm Site
Phon H/L Lock
Rcl Sql Del
MODE VOLUME HOME
DIMMER
Sts Msg
Srch
SQUELCH
TRANSMITINDICATOR
BUSYINDICATOR
Model W9
ASTRO Digital Spectra and Digital Spectra Plus Model W4, W5, W7, and W9 17

Basic Operating Procedures
Transmit (Conventional Modes Only)
Transmit (Trunked Modes Only)
1 Lift the microphone off-hook, and listen for activity on that mode.
2 If you hear no activity, press and hold the microphone PTT button.
1 Lift the microphone off-hook, and press the microphone PTT button.
2 Do one of the following:
• If you hear three quick tones, or if you hear no tone and the red XMIT (transmit) indicator lights steadily, proceed with your message.
Release the PTT button to receive.
OR
18

Basic Operating Procedures
• If you hear a busy tone, all trunked channels are in use.
1. Release the PTT button and wait for three, quick, call-back tones.
When a call back is received, your radio will automatically key up for three seconds so that you can begin talking.
2. During this time, press and hold the PTT button, and proceed with your message.
3. Release the PTT button to receive.
OR
• If you hear a continuous low-pitched tone, you are out of the system's range.
The red XMIT indicator may flash several times as the radio tries to access the system.
Release the PTT button and try again when the vehicle is driven within range of the system.
ASTRO Digital Spectra and Digital Spectra Plus Model W4, W5, W7, and W9 19

Basic Operating Procedures
Select Transmit Power LevelThe L PWR button lets you select (toggle) the transmit power level.
Press the L PWR button.
The display momentarily shows LOW PWR or HIGH PWR (W4, W5, W7), or LOW POWER or HIGH POWER (W9) to indicate the transmit power level selected.
Also, when low-power trans-mission is selected, the L PWR indicator lights.
This feature must first be enabled by a qualified radio technician.
20
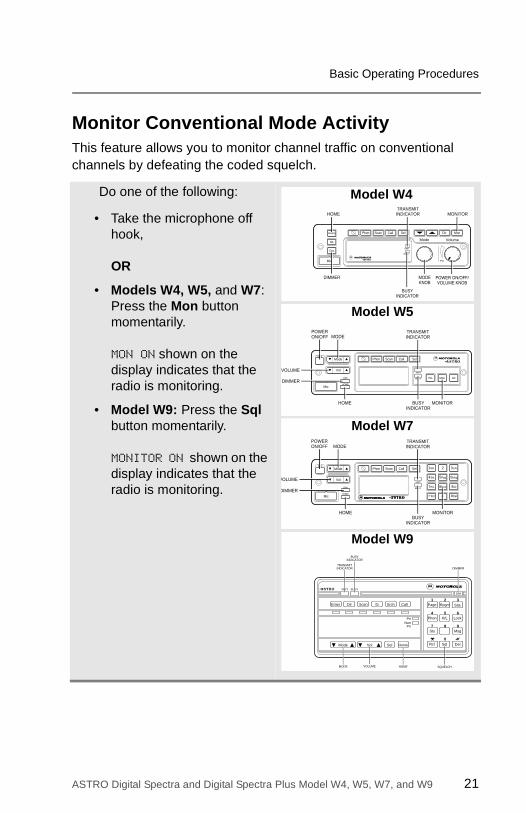
Basic Operating Procedures
Monitor Conventional Mode ActivityThis feature allows you to monitor channel traffic on conventional channels by defeating the coded squelch.
Do one of the following:
• Take the microphone off hook,
OR
• Models W4, W5, and W7: Press the Mon button momentarily.
MON ON shown on the display indicates that the radio is monitoring.
• Model W9: Press the Sql button momentarily.
MONITOR ON shown on the display indicates that the radio is monitoring.
HOME
POWER ON/OFF/VOLUME KNOB
MONITOR
MODEKNOB
BUSYINDICATOR
DIMMER
XMIT
BUSY
Mode Volume
Pwr
Phon Call SelScan
Mic
Home
Dim
H/L
Dir Mon
TRANSMITINDICATOR
Model W4
Mode
Vol
Mic
Phon Call Sel
H/L Mon Dir
PWR
Scan
XMIT
BUSYDIM
HOME
BUSYINDICATOR
POWERON/OFF MODE
TRANSMITINDICATOR
MONITOR
VOLUME
DIMMER
HOME
Model W5
TRANSMITINDICATOR
POWERON/OFF MODE
O #Del Rcl
Mode
Vol
Mic
Phon Call SelPWR
Scan
XMIT
BUSYDIM
HOME
1Ste 2 3Lck
4Sts 5Rpg 6Msg
7H/L 8Mon 9Dir
BUSYINDICATOR
VOLUME
MONITORHOME
DIMMER
Model W7
XMIT BUSY
1 2 3
4 5 6
7 8 9
0
DIM
PriNon
Pri
Emer Dir Scan Call
Mode Vol Sel Home
Page Rpgm Site
Phon H/L Lock
Rcl Sql Del
MODE VOLUME HOME
DIMMER
Sts Msg
Srch
SQUELCH
TRANSMITINDICATOR
BUSYINDICATOR
Model W9
ASTRO Digital Spectra and Digital Spectra Plus Model W4, W5, W7, and W9 21

Basic Operating Procedures
Adjust the Squelch Level1 Choose one of the following:
• Models W4, W5, and W7: Press and hold the Mon button
SQL XX is displayed, where XX is a squelch level setting of 0 to 15.
•Model W9: Press and hold the Sql button momentarily.
SQUELCH XX is displayed, where XX is a squelch level setting of 0 to 15.
2 Adjust the squelch level by turning the Mode knob (W4) or by pressing the Mode rocker switch (W4, W5, W9) to reach the desired squelch level setting.
HOME
POWER ON/OFF/VOLUME KNOB
MONITOR
MODEKNOB
BUSYINDICATOR
DIMMER
XMIT
BUSY
Mode Volume
Pwr
Phon Call SelScan
Mic
Home
Dim
H/L
Dir Mon
TRANSMITINDICATOR
Model W4
Mode
Vol
Mic
Phon Call Sel
H/L Mon Dir
PWR
Scan
XMIT
BUSYDIM
HOME
BUSYINDICATOR
POWERON/OFF MODE
TRANSMITINDICATOR
MONITOR
VOLUME
DIMMER
HOME
Model W5
TRANSMITINDICATOR
POWERON/OFF MODE
O #Del Rcl
Mode
Vol
Mic
Phon Call SelPWR
Scan
XMIT
BUSYDIM
HOME
1Ste 2 3Lck
4Sts 5Rpg 6Msg
7H/L 8Mon 9Dir
BUSYINDICATOR
VOLUME
MONITORHOME
DIMMER
Model W7
XMIT BUSY
1 2 3
4 5 6
7 8 9
0
DIM
PriNon
Pri
Emer Dir Scan Call
Mode Vol Sel Home
Page Rpgm Site
Phon H/L Lock
Rcl Sql Del
MODE VOLUME HOME
DIMMER
Sts Msg
Srch
SQUELCH
TRANSMITINDICATOR
BUSYINDICATOR
Model W9
22

Basic Operating Procedures
3 Press the Home button (W4, W9) or the HOME button (W5, W7) to return to the selected channel.
HOME
POWER ON/OFF/VOLUME KNOB
MONITOR
MODEKNOB
BUSYINDICATOR
DIMMER
XMIT
BUSY
Mode Volume
Pwr
Phon Call SelScan
Mic
Home
Dim
H/L
Dir Mon
TRANSMITINDICATOR
Model W4
Mode
Vol
Mic
Phon Call Sel
H/L Mon Dir
PWR
Scan
XMIT
BUSYDIM
HOME
BUSYINDICATOR
POWERON/OFF MODE
TRANSMITINDICATOR
MONITOR
VOLUME
DIMMER
HOME
Model W5
TRANSMITINDICATOR
POWERON/OFF MODE
O #Del Rcl
Mode
Vol
Mic
Phon Call SelPWR
Scan
XMIT
BUSYDIM
HOME
1Ste 2 3Lck
4Sts 5Rpg 6Msg
7H/L 8Mon 9Dir
BUSYINDICATOR
VOLUME
MONITORHOME
DIMMER
Model W7
XMIT BUSY
1 2 3
4 5 6
7 8 9
0
DIM
PriNon
Pri
Emer Dir Scan Call
Mode Vol Sel Home
Page Rpgm Site
Phon H/L Lock
Rcl Sql Del
MODE VOLUME HOME
DIMMER
Sts Msg
Srch
SQUELCH
TRANSMITINDICATOR
BUSYINDICATOR
Model W9
ASTRO Digital Spectra and Digital Spectra Plus Model W4, W5, W7, and W9 23

Basic Operating Procedures
Notes
24

General Radio Features
Emergency Call and AlarmThe emergency call and alarm features allow you to have priority channel access and/or send an emergency data transmission to the dispatcher in an emergency situation.
The desired type of emergency feature—alarm, call, call and alarm, or silent alarm—can be preprogrammed by a qualified radio technician.
The radio must be turned on to activate any emergency feature.
Emergency CallEmergency call gives you priority access to a voice channel for all subsequent transmissions after you press the emergency button. The level of priority access is determined by the system manager.
SmartZone™ Emergency Call Receive Operation
A radio configured for SmartZone operation displays EMER RCV whenever it receives an emergency call. The display alternates with the selected-mode display as long as the radio is unmuted to the emergency call.
ASTRO Digital Spectra and Digital Spectra Plus Model W4, W5, W7, and W9 25

General Radio Features
Initiate an Emergency AlarmThe emergency alarm feature sends a data transmission to alert the dispatcher of your emergency condition and identify your unit ID.
Press the emergency button.
A tone sounds and the dis-play alternates EMERGNCY (W4, W5, W7) or EMERGENCY (W9) with the current zone/channel.
For trunking modes, a high-pitched tone indicates that the alarm has been received by the trunked system’s cen-tral controller.
A dispatcher acknowledg-ment (four high-pitched tones) and an ACK RCVD dis-play follow.
The radio automatically returns to normal operation. No further action is required.
XMIT
BUSY
Mode Volume
Pwr
Phon Call SelScan
Mic
Home
Dim
H/L
Dir MonEmer
EMERGENCY
Model W4
Mode
Vol
Mic
Phon Call Sel
H/L Mon Dir
PWR
Scan
XMIT
BUSYDIM
HOME
Emer
EMERGENCY
Model W5
O #Del Rcl
Mode
Vol
Mic
Phon Call SelPWR
Scan
XMIT
BUSYDIM
HOME
1Ste 2 3Lck
4Sts 5Rpg 6Msg
7H/L 8Mon 9Dir
MAEPF 23182 A
Emer
EMERGENCY
Model W7
XMIT BUSY
1 2 3
4 5 6
7 8 9
0
DIM
PriNon
Pri
Emer Dir Scan Call
Mode Vol Sel Home
Page Rpgm Site
Phon H/L Lock
Rcl Sql Del
Sts Msg
Srch
EMERGENCY
Model W9
26

General Radio Features
Initiate an Emergency Call
1 Press the emergency button.
A tone sounds and the display alternates EMERGNCY (W4, W5, W7) or EMERGENCY (W9) with the current zone/channel.
2 Press the PTT button and announce your emergency.
XMIT
BUSY
Mode Volume
Pwr
Phon Call SelScan
Mic
Home
Dim
H/L
Dir MonEmer
EMERGENCY
Model W4
Mode
Vol
Mic
Phon Call Sel
H/L Mon Dir
PWR
Scan
XMIT
BUSYDIM
HOME
Emer
EMERGENCY
Model W5
O #Del Rcl
Mode
Vol
Mic
Phon Call SelPWR
Scan
XMIT
BUSYDIM
HOME
1Ste 2 3Lck
4Sts 5Rpg 6Msg
7H/L 8Mon 9Dir
MAEPF 23182 A
Emer
EMERGENCY
Model W7
XMIT BUSY
1 2 3
4 5 6
7 8 9
0
DIM
PriNon
Pri
Emer Dir Scan Call
Mode Vol Sel Home
Page Rpgm Site
Phon H/L Lock
Rcl Sql Del
Sts Msg
Srch
EMERGENCY
Model W9
ASTRO Digital Spectra and Digital Spectra Plus Model W4, W5, W7, and W9 27

General Radio Features
3 After completing the emergency call, press and hold the emergency button until a tone sounds.
The alternating EMERGNCY (W4, W5, W7) or EMERGENCY (W9) display disappears, and the radio returns to normal operation.
28

General Radio Features
Initiate an Emergency Call and AlarmIf the radio has both emergency call and alarm features, it automatically proceeds to the call mode after the alarm is acknowledged.
1 Press the emergency button to activate the emergency call/alarm feature.
The display begins alternating EMERGNCY (W4, W5, W7) or EMERGENCY (W9) with the current zone/channel.
For trunking modes, a high-pitched tone sounds, indicating that the alarm has been received by the trunked system’s central controller.
A dispatcher acknowledgment (four high-pitched tones) follows, accompanied by an ACK RCVD display.
2 Press the PTT button and announce your emergency.
XMIT
BUSY
Mode Volume
Pwr
Phon Call SelScan
Mic
Home
Dim
H/L
Dir MonEmer
EMERGENCY
Model W4
Mode
Vol
Mic
Phon Call Sel
H/L Mon Dir
PWR
Scan
XMIT
BUSYDIM
HOME
Emer
EMERGENCY
Model W5
O #Del Rcl
Mode
Vol
Mic
Phon Call SelPWR
Scan
XMIT
BUSYDIM
HOME
1Ste 2 3Lck
4Sts 5Rpg 6Msg
7H/L 8Mon 9Dir
MAEPF 23182 A
Emer
EMERGENCY
Model W7
XMIT BUSY
1 2 3
4 5 6
7 8 9
0
DIM
PriNon
Pri
Emer Dir Scan Call
Mode Vol Sel Home
Page Rpgm Site
Phon H/L Lock
Rcl Sql Del
Sts Msg
Srch
EMERGENCY
Model W9
ASTRO Digital Spectra and Digital Spectra Plus Model W4, W5, W7, and W9 29
General Radio Features
3 To exit from the emergency state altogether, press and hold the emergency button until a tone sounds.
The alternating EMERGNCY (W4, W5, W7) or EMERGENCY (W9) display disappears, and the radio returns to normal operation.
Note: Turning the radio off also cancels the emergency state.
30

General Radio Features
Initiate a Silent Emergency Alarm
1 Press the emergency button to activate the silent alarm feature.
During a silent emergency alarm, there are no display changes, and the receiver audio mutes so that no indication is given that an emergency alarm has been sent.
2 To exit the silent alarm mode, press and hold the emergency button until a tone sounds.
Note: If silent emergency alarm is used with emergency call, pressing the PTT button exits the silent mode and initiates the emergency call.
XMIT
BUSY
Mode Volume
Pwr
Phon Call SelScan
Mic
Home
Dim
H/L
Dir MonEmer
EMERGENCY
Model W4
Mode
Vol
Mic
Phon Call Sel
H/L Mon Dir
PWR
Scan
XMIT
BUSYDIM
HOME
Emer
EMERGENCY
Model W5
O #Del Rcl
Mode
Vol
Mic
Phon Call SelPWR
Scan
XMIT
BUSYDIM
HOME
1Ste 2 3Lck
4Sts 5Rpg 6Msg
7H/L 8Mon 9Dir
MAEPF 23182 A
Emer
EMERGENCY
Model W7
XMIT BUSY
1 2 3
4 5 6
7 8 9
0
DIM
PriNon
Pri
Emer Dir Scan Call
Mode Vol Sel Home
Page Rpgm Site
Phon H/L Lock
Rcl Sql Del
Sts Msg
Srch
EMERGENCY
Model W9
ASTRO Digital Spectra and Digital Spectra Plus Model W4, W5, W7, and W9 31
General Radio Features
Special Considerations for Emergencies• If you press the emergency button while in a mode that has no
emergency capability, a low-pitched tone sounds.
• If the unit is out of the range of the system and/or the emergency alarm is not acknowledged, a tone sounds and the display shows NO ACK.
• If you press the emergency button, then change to a mode that has no emergency capability, a NO EMERG (W4, W5, W7) or NO EMERGNCY (W9) display alternates with the mode name display, and a continuous low-pitched tone sounds until a valid emergency mode is selected or until the emergency is cancelled.
• When an emergency is active, changing to another mode where emergency is enabled (trunked or conventional) causes an emergency alarm and/or emergency call to be active on the new mode.
32

General Radio Features
Scan OperationThe scan feature allows you to monitor activity on different conventional or trunked modes by scanning a scan list of modes. The modes to be scanned in a scan list are programmed by a qualified radio technician. You can select the modes to be scanned in a scan list if operator-selectable scan is enabled.
There are three types of scan lists available:
• Conventional—Comprises up to 16 different conventional-only modes
• Trunked Priority Monitor—Comprises up to 10 modes that are all from the same trunked system
• Talkgroup Scan—Comprises up to 10 combined conventional modes and modes from one trunking system
The radio supports both priority and non-priority scanning. With priority scanning enabled, a scan list can have one mode assigned as the first-priority mode and a second as the second-priority mode.
All ASTRO Digital Spectra and Digital Spectra Plus radios support automatic scanning (autoscan), which can be programmed into the radio by a qualified radio technician. With this feature, the radio begins scanning whenever you select a mode to which a scan list is assigned.
Note: You cannot turn scan off on a mode that has autoscan enabled.
If multiple scan types are enabled in the radio, the type of scan that is activated depends on the personality of the mode selected when the Scan button is pressed. For all types of scan, the selected mode is, by default, a member of its own scan list.
Scan lists stay in memory when you turn scan off, turn the radio off, or disconnect the radio from the battery.
ASTRO Digital Spectra and Digital Spectra Plus Model W4, W5, W7, and W9 33

General Radio Features
Turn On Scan
Press the Scan button momentarily on a non-autoscan mode to start scan-ning.
The Scan indicator lights and a list of modes is scanned for activity.
When a scanned mode becomes active, the display changes to show the active mode name, the appropriate priority indicator lights, and the radio unmutes.
The radio will not begin scan-ning again for a predeter-mined hang time after the call ends, giving you time to respond. The hang time is typically three seconds (by default), but can be changed by a qualified radio techni-cian.
XMIT
BUSY
Mode Volume
Pwr
Phon Call SelScan
Mic
Home
Dim
H/L
Dir Mon
SCAN
HOME
SELECT
MONITOR
MODEKNOB
PRIORITY/NON-PRIORITYINDICATORS
Model W4
Mode
Vol
Mic
Phon Call Sel
H/L Mon Dir
PWR
Scan
XMIT
BUSYDIM
HOME
SELECT
MODE
PRIORITY/NON-PRIORITYINDICATORS
SCAN
MONITORHOME
Model W5
O #Del Rcl
Mode
Vol
Mic
Phon Call SelPWR
Scan
XMIT
BUSYDIM
HOME
1Ste 2 3Lck
4Sts 5Rpg 6Msg
7H/L 8Mon 9Dir
SCAN
MODE
SELECT
PRIORITY/NON-PRIORITYINDICATORS
DELETERECALLHOME
Model W7
XMIT BUSY
1 2 3
4 5 6
7 8 9
0
DIM
PriNon
Pri
Emer Dir Scan Call
Mode Vol Sel Home
Page Rpgm Site
Phon H/L Lock
Rcl Sql Del
MODE SELECT HOME
PHONE
DELETE
Sts Msg
Srch
RECALL
SQUELCHNON-PRIORITYINDICATOR
PRIORITYINDICATOR
CALLSCAN
Model W9
34
General Radio Features
Note: A lit N PRI (non-priority) indicator means that the active mode is a non-priority member of the scan list (for all scan types).
A solidly-lit PRI (priority) indicator means that the active mode is the priority 2 member of the scan list (Trunking Priority Monitor and Conventional scan types only).
A blinking PRI indicator means that the active mode is the priority 1 member of the scan list (Trunking Priority Monitor and Conventional scan types only).
ASTRO Digital Spectra and Digital Spectra Plus Model W4, W5, W7, and W9 35

General Radio Features
Turn Scan On While Disregarding the Squelch Code (Conventional Modes Only)
Choose one of the following:
• Models W4, W5, and W7: Press the Mon button momentarily. The brief MON ON display indicates that the radio is disregarding the squelch code.
• Model W9: Press the Sql button momentarily. The brief MONITOR ON display indicates that the radio is disregarding the squelch code.
HOME
POWER ON/OFF/VOLUME KNOB
MONITOR
MODEKNOB
BUSYINDICATOR
DIMMER
XMIT
BUSY
Mode Volume
Pwr
Phon Call SelScan
Mic
Home
Dim
H/L
Dir Mon
TRANSMITINDICATOR
Model W4
Mode
Vol
Mic
Phon Call Sel
H/L Mon Dir
PWR
Scan
XMIT
BUSYDIM
HOME
BUSYINDICATOR
POWERON/OFF MODE
TRANSMITINDICATOR
MONITOR
VOLUME
DIMMER
HOME
Model W5
TRANSMITINDICATOR
POWERON/OFF MODE
O #Del Rcl
Mode
Vol
Mic
Phon Call SelPWR
Scan
XMIT
BUSYDIM
HOME
1Ste 2 3Lck
4Sts 5Rpg 6Msg
7H/L 8Mon 9Dir
BUSYINDICATOR
OLUME
MONITORHOME
DIMMER
Model W7
XMIT BUSY
1 2 3
4 5 6
7 8 9
0
DIM
PriNon
Pri
Emer Dir Scan Call
Mode Vol Sel Home
Page Rpgm Site
Phon H/L Lock
Rcl Sql Del
MODE VOLUME HOME
DIMMER
Sts Msg
Srch
SQUELCH
TRANSMITINDICATOR
BUSYINDICATOR
Model W9
36
General Radio Features
Note: While scanning for activity, you can still receive fleetwide, system-wide, dynamic regrouping, incoming telephone interconnect and Private Conversation/Call Alert calls. Respond to these types of calls as you would normally on the selected mode. However, when scanning different modes while in talkgroup scan, incoming Private Conversation/Call Alert calls may be missed.
ASTRO Digital Spectra and Digital Spectra Plus Model W4, W5, W7, and W9 37
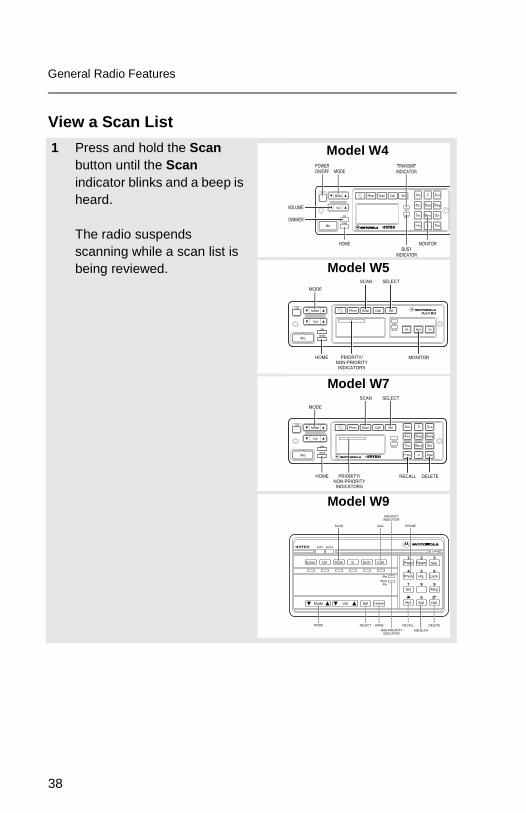
General Radio Features
View a Scan List
1 Press and hold the Scan button until the Scan indicator blinks and a beep is heard.
The radio suspends scanning while a scan list is being reviewed.
TRANSMITINDICATOR
POWERON/OFF MODE
O #Del Rcl
Mode
Vol
Mic
Phon Call SelPWR
Scan
XMIT
BUSYDIM
HOME
1Ste 2 3Lck
4Sts 5Rpg 6Msg
7H/L 8Mon 9Dir
BUSYINDICATOR
VOLUME
MONITORHOME
DIMMER
Model W4
Mode
Vol
Mic
Phon Call Sel
H/L Mon Dir
PWR
Scan
XMIT
BUSYDIM
HOME
SELECT
MODE
PRIORITY/NON-PRIORITYINDICATORS
SCAN
MONITORHOME
Model W5
O #Del Rcl
Mode
Vol
Mic
Phon Call SelPWR
Scan
XMIT
BUSYDIM
HOME
1Ste 2 3Lck
4Sts 5Rpg 6Msg
7H/L 8Mon 9Dir
SCAN
MODE
SELECT
PRIORITY/NON-PRIORITYINDICATORS
DELETERECALLHOME
Model W7
XMIT BUSY
1 2 3
4 5 6
7 8 9
0
DIM
PriNon
Pri
Emer Dir Scan Call
Mode Vol Sel Home
Page Rpgm Site
Phon H/L Lock
Rcl Sql Del
MODE SELECT HOME
PHONE
DELETE
Sts Msg
Srch
RECALL
SQUELCHNON-PRIORITYINDICATOR
PRIORITYINDICATOR
CALLSCAN
Model W9
38

General Radio Features
2 Choose one of the following:
• Models W4 and W5: Turn the Mode knob or press the Mode rocker switch to scroll up or down through the programmed modes. Those modes that are in the scan list are indicated by a N PRI, PRI or blinking PRI indicator (indicating the mode’s assigned priority).
• Models W7 and W9: Press the Mode rocker switch to scroll up or down through the programmed modes. Those modes that are in the scan list are indicated by a N PRI, PRI or blinking PRI indicator (indicating the mode’s assigned priority as previously described). Press the Rcl button to review only the modes that are already in the scan list.
3 Press the HOME or Scan button momentarily to exit the scan list and resume scanning.
XMIT
BUSY
Mode Volume
Pwr
Phon Call SelScan
Mic
Home
Dim
H/L
Dir Mon
SCAN
HOME
SELECT
MONITOR
MODEKNOB
PRIORITY/NON-PRIORITYINDICATORS
Model W4
Mode
Vol
Mic
Phon Call Sel
H/L Mon Dir
PWR
Scan
XMIT
BUSYDIM
HOME
SELECT
MODE
PRIORITY/NON-PRIORITYINDICATORS
SCAN
MONITORHOME
Model W5
O #Del Rcl
Mode
Vol
Mic
Phon Call SelPWR
Scan
XMIT
BUSYDIM
HOME
1Ste 2 3Lck
4Sts 5Rpg 6Msg
7H/L 8Mon 9Dir
SCAN
MODE
SELECT
PRIORITY/NON-PRIORITYINDICATORS
DELETERECALLHOME
Model W7
XMIT BUSY
1 2 3
4 5 6
7 8 9
0
DIM
PriNon
Pri
Emer Dir Scan Call
Mode Vol Sel Home
Page Rpgm Site
Phon H/L Lock
Rcl Sql Del
MODE SELECT HOME
PHONE
DELETE
Sts Msg
Srch
RECALL
SQUELCHNON-PRIORITYINDICATOR
PRIORITYINDICATOR
CALLSCAN
Model W9
ASTRO Digital Spectra and Digital Spectra Plus Model W4, W5, W7, and W9 39
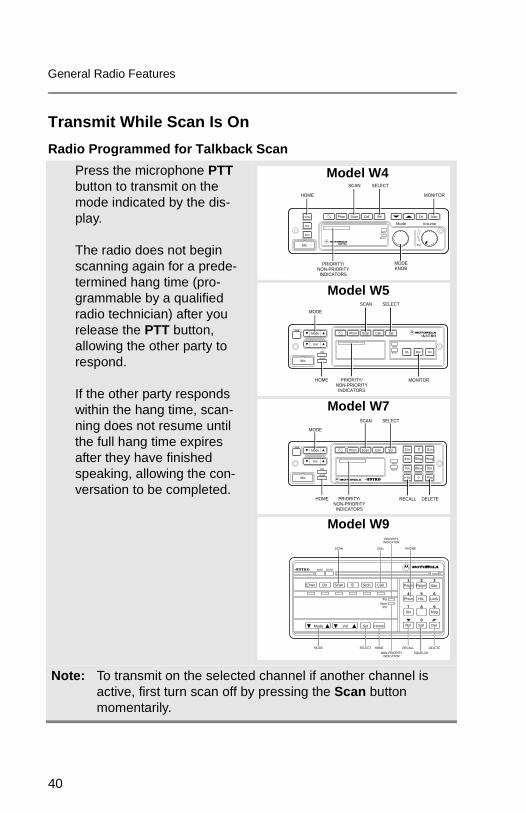
General Radio Features
Transmit While Scan Is On
Radio Programmed for Talkback Scan
Press the microphone PTT button to transmit on the mode indicated by the dis-play.
The radio does not begin scanning again for a prede-termined hang time (pro-grammable by a qualified radio technician) after you release the PTT button, allowing the other party to respond.
If the other party responds within the hang time, scan-ning does not resume until the full hang time expires after they have finished speaking, allowing the con-versation to be completed.
Note: To transmit on the selected channel if another channel is active, first turn scan off by pressing the Scan button momentarily.
XMIT
BUSY
Mode Volume
Pwr
Phon Call SelScan
Mic
Home
Dim
H/L
Dir Mon
SCAN
HOME
SELECT
MONITOR
MODEKNOB
PRIORITY/NON-PRIORITYINDICATORS
Model W4
Mode
Vol
Mic
Phon Call Sel
H/L Mon Dir
PWR
Scan
XMIT
BUSYDIM
HOME
SELECT
MODE
PRIORITY/NON-PRIORITYINDICATORS
SCAN
MONITORHOME
Model W5
O #Del Rcl
Mode
Vol
Mic
Phon Call SelPWR
Scan
XMIT
BUSYDIM
HOME
1Ste 2 3Lck
4Sts 5Rpg 6Msg
7H/L 8Mon 9Dir
SCAN
MODE
SELECT
PRIORITY/NON-PRIORITYINDICATORS
DELETERECALLHOME
Model W7
XMIT BUSY
1 2 3
4 5 6
7 8 9
0
DIM
PriNon
Pri
Emer Dir Scan Call
Mode Vol Sel Home
Page Rpgm Site
Phon H/L Lock
Rcl Sql Del
MODE SELECT HOME
PHONE
DELETE
Sts Msg
Srch
RECALL
SQUELCHNON-PRIORITYINDICATOR
PRIORITYINDICATOR
CALLSCAN
Model W9
40

General Radio Features
Radio Programmed for Non-Talkback Scan
In selected mode or fixed mode, press the microphone PTT button at any time to transmit on the selected mode or fixed mode.
Note: To make a Call Alert page, or Private Conversation call while scanning, press the Page or Call button. The call is entered on the selected mode and scanning is halted until the call is exited by pressing HOME or the feature button, Page or Call.
XMIT
BUSY
Mode Volume
Pwr
Phon Call SelScan
Mic
Home
Dim
H/L
Dir Mon
SCAN
HOME
SELECT
MONITOR
MODEKNOB
PRIORITY/NON-PRIORITYINDICATORS
Model W4
Mode
Vol
Mic
Phon Call Sel
H/L Mon Dir
PWR
Scan
XMIT
BUSYDIM
HOME
SELECT
MODE
PRIORITY/NON-PRIORITYINDICATORS
SCAN
MONITORHOME
Model W5
O #Del Rcl
Mode
Vol
Mic
Phon Call SelPWR
Scan
XMIT
BUSYDIM
HOME
1Ste 2 3Lck
4Sts 5Rpg 6Msg
7H/L 8Mon 9Dir
SCAN
MODE
SELECT
PRIORITY/NON-PRIORITYINDICATORS
DELETERECALLHOME
Model W7
XMIT BUSY
1 2 3
4 5 6
7 8 9
0
DIM
PriNon
Pri
Emer Dir Scan Call
Mode Vol Sel Home
Page Rpgm Site
Phon H/L Lock
Rcl Sql Del
MODE SELECT HOME
PHONE
DELETE
Sts Msg
Srch
RECALL
SQUELCHNON-PRIORITYINDICATOR
PRIORITYINDICATOR
CALLSCAN
Model W9
ASTRO Digital Spectra and Digital Spectra Plus Model W4, W5, W7, and W9 41

General Radio Features
Temporarily Delete a Nuisance Mode With Scan On (W7 and W9 Models Only)
To temporarily delete a mode that you do not wish to hear (nuisance mode), press the Del button once while the mode is active (indicated by the display).
You can delete undesired modes.
Note: Priority modes, the selected mode, and the designated transmit mode cannot be deleted.
O #Del Rcl
Mode
Vol
Mic
Phon Call SelPWR
Scan
XMIT
BUSYDIM
HOME
1Ste 2 3Lck
4Sts 5Rpg 6Msg
7H/L 8Mon 9Dir
SCAN
MODE
SELECT
PRIORITY/NON-PRIORITYINDICATORS
DELETERECALLHOME
Model W7
XMIT BUSY
1 2 3
4 5 6
7 8 9
0
DIM
PriNon
Pri
Emer Dir Scan Call
Mode Vol Sel Home
Page Rpgm Site
Phon H/L Lock
Rcl Sql Del
MODE SELECT HOME
PHONE
DELETE
Sts Msg
Srch
RECALL
SQUELCHNON-PRIORITYINDICATOR
PRIORITYINDICATOR
CALLSCAN
Model W9
42
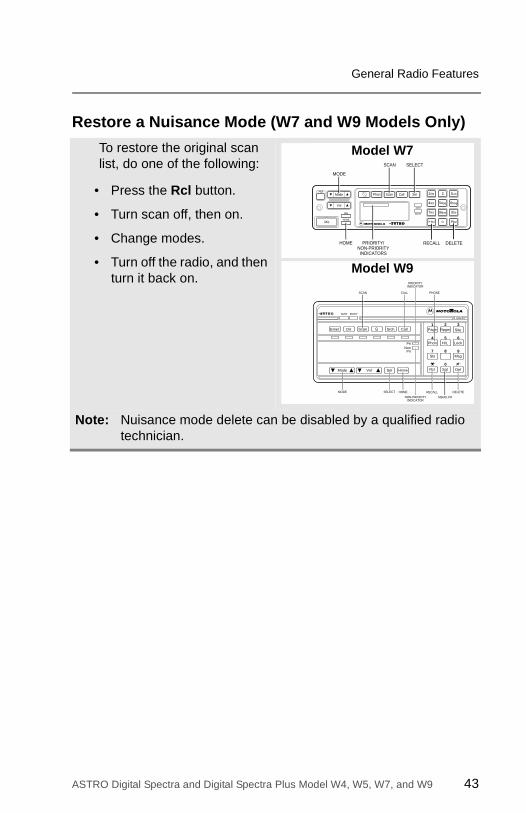
General Radio Features
Restore a Nuisance Mode (W7 and W9 Models Only)
To restore the original scan list, do one of the following:
• Press the Rcl button.
• Turn scan off, then on.
• Change modes.
• Turn off the radio, and then turn it back on.
Note: Nuisance mode delete can be disabled by a qualified radio technician.
O #Del Rcl
Mode
Vol
Mic
Phon Call SelPWR
Scan
XMIT
BUSYDIM
HOME
1Ste 2 3Lck
4Sts 5Rpg 6Msg
7H/L 8Mon 9Dir
SCAN
MODE
SELECT
PRIORITY/NON-PRIORITYINDICATORS
DELETERECALLHOME
Model W7
XMIT BUSY
1 2 3
4 5 6
7 8 9
0
DIM
PriNon
Pri
Emer Dir Scan Call
Mode Vol Sel Home
Page Rpgm Site
Phon H/L Lock
Rcl Sql Del
MODE SELECT HOME
PHONE
DELETE
Sts Msg
Srch
RECALL
SQUELCHNON-PRIORITYINDICATOR
PRIORITYINDICATOR
CALLSCAN
Model W9
ASTRO Digital Spectra and Digital Spectra Plus Model W4, W5, W7, and W9 43

General Radio Features
Change Mode Priorities While Scan Is On(W7 and W9 Models Only)When active, this dynamic priority feature allows you to change the priority of a non-priority mode in the scan list to priority 2,
To change the priority of a non-priority channel in the scan list to priority 2, press the Sel button.
You cannot alter the status of the priority 1 member.
O #Del Rcl
Mode
Vol
Mic
Phon Call SelPWR
Scan
XMIT
BUSYDIM
HOME
1Ste 2 3Lck
4Sts 5Rpg 6Msg
7H/L 8Mon 9Dir
SCAN
MODE
SELECT
PRIORITY/NON-PRIORITYINDICATORS
DELETERECALLHOME
Model W7
XMIT BUSY
1 2 3
4 5 6
7 8 9
0
DIM
PriNon
Pri
Emer Dir Scan Call
Mode Vol Sel Home
Page Rpgm Site
Phon H/L Lock
Rcl Sql Del
MODE SELECT HOME
PHONE
DELETE
Sts Msg
Srch
RECALL
SQUELCHNON-PRIORITYINDICATOR
PRIORITYINDICATOR
CALLSCAN
Model W9
44

General Radio Features
Restore Mode Priorities in a Scan List(W7 and W9 Models Only)
To restore the original mode priorities in a scan list, do one of the following:
• Press the Rcl button.
• Turn scan off, then on.
• Change modes.
• Turn off the radio, and then turn it back on.
O #Del Rcl
Mode
Vol
Mic
Phon Call SelPWR
Scan
XMIT
BUSYDIM
HOME
1Ste 2 3Lck
4Sts 5Rpg 6Msg
7H/L 8Mon 9Dir
SCAN
MODE
SELECT
PRIORITY/NON-PRIORITYINDICATORS
DELETERECALLHOME
Model W7
XMIT BUSY
1 2 3
4 5 6
7 8 9
0
DIM
PriNon
Pri
Emer Dir Scan Call
Mode Vol Sel Home
Page Rpgm Site
Phon H/L Lock
Rcl Sql Del
MODE SELECT HOME
PHONE
DELETE
Sts Msg
Srch
RECALL
SQUELCHNON-PRIORITYINDICATOR
PRIORITYINDICATOR
CALLSCAN
Model W9
ASTRO Digital Spectra and Digital Spectra Plus Model W4, W5, W7, and W9 45

General Radio Features
Program a Scan ListTo program a scan list, operator-selectable scan list members first must be enabled in the radio programming by a qualifed radio technician.
46

General Radio Features
Add a Channel to the Scan List
1 Press and hold the Scan button until the scan indicator blinks and a good-key chirp is heard.
2 Using the Mode knob (W4) or Mode rocker switch (W5, W7, W9), locate the channel to be added.
XMIT
BUSY
Mode Volume
Pwr
Phon Call SelScan
Mic
Home
Dim
H/L
Dir Mon
SCAN
HOME
SELECT
MONITOR
MODEKNOB
PRIORITY/NON-PRIORITYINDICATORS
Model W4
Mode
Vol
Mic
Phon Call Sel
H/L Mon Dir
PWR
Scan
XMIT
BUSYDIM
HOME
SELECT
MODE
PRIORITY/NON-PRIORITYINDICATORS
SCAN
MONITORHOME
Model W5
O #Del Rcl
Mode
Vol
Mic
Phon Call SelPWR
Scan
XMIT
BUSYDIM
HOME
1Ste 2 3Lck
4Sts 5Rpg 6Msg
7H/L 8Mon 9Dir
SCAN
MODE
SELECT
PRIORITY/NON-PRIORITYINDICATORS
DELETERECALLHOME
Model W7
XMIT BUSY
1 2 3
4 5 6
7 8 9
0
DIM
PriNon
Pri
Emer Dir Scan Call
Mode Vol Sel Home
Page Rpgm Site
Phon H/L Lock
Rcl Sql Del
MODE SELECT HOME
PHONE
DELETE
Sts Msg
Srch
RECALL
SQUELCHNON-PRIORITYINDICATOR
PRIORITYINDICATOR
CALLSCAN
Model W9
ASTRO Digital Spectra and Digital Spectra Plus Model W4, W5, W7, and W9 47

General Radio Features
Note: If the desired channel resides in a different zone, press the Zone up ▲ or Zone ▼ down button to change zones, then use the mode changer to find the desired channel.
3 Press the Sel button to add the channel.
XMIT
BUSY
Mode Volume
Pwr
Phon Call SelScan
Mic
Home
Dim
H/L
Dir Mon
ZONEDOWN
ZONEUP
Model W4
Mode
Vol
Mic
Call Sel
H/L Mon Dir
PWR
Scan
XMIT
BUSYDIM
HOME
ZONE*DOWN
ZONE*UP
Model W5
orZONE*UP
ZONE*UP
O #Del Rcl
Mode
Vol
Mic
Call SelPWR
Scan
XMIT
BUSYDIM
HOME
1 2 3Lck
4Sts 5Rpg 6Msg
7H/L 8Mon 9Dir
ZONE*DOWN
ZONE*DOWN
Model W7
XMIT BUSY
1 2 3
4 5 6
7 8 9
0
DIM
PriNon
Pri
Scan Call
Mode Vol Sel Home
Site
Phon H/L Lock
Rcl Sql Del
Sts Msg
Srch
ZONEDOWN
*ZONEUP
ZONEDOWN
ZONEUP
** * or
Model W9
48
General Radio Features
4 Scroll through of the available priority choices, and press the Sel button to choose one.
The new channel becomes a member of the scan list assigned to the selected channel when scan list programming was entered.
Note: If a scan list is full, you will hear a bad-key chirp each time you press the Sel button, and the desired channel will not be assigned to the list.
5 Press either the Scan or HOME button to exit scan list programming and return to normal scan operation.
ASTRO Digital Spectra and Digital Spectra Plus Model W4, W5, W7, and W9 49

General Radio Features
Delete a Channel from the Scan List
1 Press and hold the Scan button until the scan indicator blinks and a good-key chirp is heard.
2 Using the Mode knob (W4) or Mode rocker switch (W5, W7, W9), locate the channel to be deleted.
XMIT
BUSY
Mode Volume
Pwr
Phon Call SelScan
Mic
Home
Dim
H/L
Dir Mon
SCAN
HOME
SELECT
MONITOR
MODEKNOB
PRIORITY/NON-PRIORITYINDICATORS
Model W4
Mode
Vol
Mic
Phon Call Sel
H/L Mon Dir
PWR
Scan
XMIT
BUSYDIM
HOME
SELECT
MODE
PRIORITY/NON-PRIORITYINDICATORS
SCAN
MONITORHOME
Model W5
O #Del Rcl
Mode
Vol
Mic
Phon Call SelPWR
Scan
XMIT
BUSYDIM
HOME
1Ste 2 3Lck
4Sts 5Rpg 6Msg
7H/L 8Mon 9Dir
SCAN
MODE
SELECT
PRIORITY/NON-PRIORITYINDICATORS
DELETERECALLHOME
Model W7
XMIT BUSY
1 2 3
4 5 6
7 8 9
0
DIM
PriNon
Pri
Emer Dir Scan Call
Mode Vol Sel Home
Page Rpgm Site
Phon H/L Lock
Rcl Sql Del
MODE SELECT HOME
PHONE
DELETE
Sts Msg
Srch
RECALL
SQUELCHNON-PRIORITYINDICATOR
PRIORITYINDICATOR
CALLSCAN
Model W9
50

General Radio Features
Note: If the desired channel resides in a different zone, press the Zone up ▲ or Zone ▼ down button to change zones, then use the mode changer to find the desired channel.
XMIT
BUSY
Mode Volume
Pwr
Phon Call SelScan
Mic
Home
Dim
H/L
Dir Mon
ZONEDOWN
ZONEUP
Model W4
Mode
Vol
Mic
Call Sel
H/L Mon Dir
PWR
Scan
XMIT
BUSYDIM
HOME
ZONE*DOWN
ZONE*UP
Model W5
orZONE*UP
ZONE*UP
O #Del Rcl
Mode
Vol
Mic
Call SelPWR
Scan
XMIT
BUSYDIM
HOME
1 2 3Lck
4Sts 5Rpg 6Msg
7H/L 8Mon 9Dir
ZONE*DOWN
ZONE*DOWN
Model W7
XMIT BUSY
1 2 3
4 5 6
7 8 9
0
DIM
PriNon
Pri
Scan Call
Mode Vol Sel Home
Site
Phon H/L Lock
Rcl Sql Del
Sts Msg
Srch
ZONEDOWN
*ZONEUP
ZONEDOWN
ZONEUP
** * or
Model W9
ASTRO Digital Spectra and Digital Spectra Plus Model W4, W5, W7, and W9 51

General Radio Features
3 Press the Sel button to scroll through the available priority choices until the priority choice disappears.
This indicates that the channel is no longer a member of the scan list that was assigned to the selected channel.
(Optionally for Models W7 and W9) Delete a channel from a scan list by pressing the Del button.
Note: If you delete all members of a scan list, and scan is subsequently turned on, you will hear a continuous low-pitched tone, and the display will change to NO LIST (W4, W5, W7) or EMPTY LIST (W9).
You cannot delete the designated transmit mode, the selected mode, or the fixed scan list members. The selected mode, by default, is always scanned when scan is turned on, regardless of whether or not it is explicitly programmed as a scan list member.
4 Press the Scan or HOME button to exit scan list programming and return to normal scan operation.
52
General Radio Features
Hang Up Box (HUB)If the hang up box feature is enabled, scanning of non-priority members is suspended whenever the microphone is removed from the holding clip (hang-up box). This allows the user to complete a conversation while scan is suspended. Scan is resumed once the microphone is returned to the holding clip and the preprogrammed hang time has elapsed.
Note: Priority members continue to be scanned while the microphone is removed from the holding clip only if the Designated Transmit Talkback Channel is selected to be Talkback in the radio programming.
Optional External Alarms (Horn and Lights)All models can be equipped for external alarms (horn and lights) that are activated when a Call Alert page, Private Conversation call, or phone call is received.
These features are useful when you must leave the vehicle, but need to receive any incoming messages.
The radio always powers up with the horn and lights feature enabled.
ASTRO Digital Spectra and Digital Spectra Plus Model W4, W5, W7, and W9 53
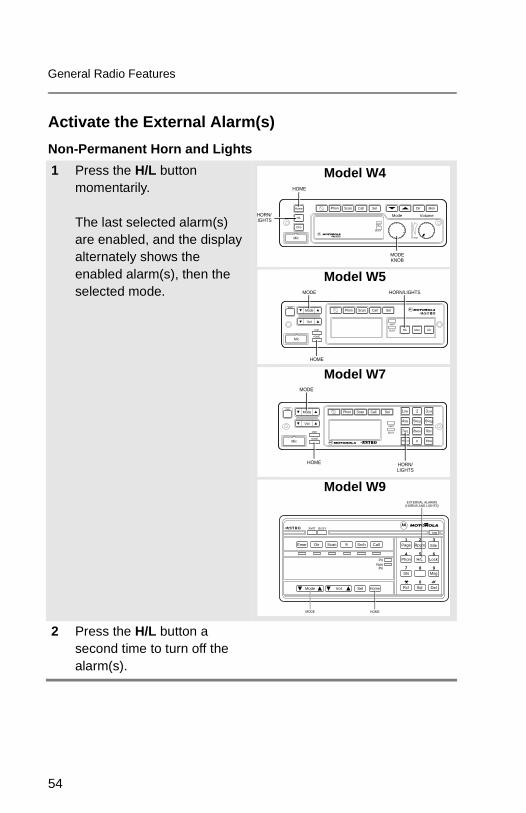
General Radio Features
Activate the External Alarm(s)
Non-Permanent Horn and Lights
1 Press the H/L button momentarily.
The last selected alarm(s) are enabled, and the display alternately shows the enabled alarm(s), then the selected mode.
2 Press the H/L button a second time to turn off the alarm(s).
HOME
XMIT
BUSY
Mode Volume
Pwr
Phon Call SelScan
Mic
Home
Dim
H/L
Dir Mon
MODEKNOB
HORN/LIGHTS
Model W4
Mode
Vol
Mic
Phon Call Sel
H/L Mon Dir
PWRScan
XMIT
BUSYDIM
HOME
HORN/LIGHTSMODE
HOME
Model W5
O #Del Rcl
Mode
Vol
Mic
Phon Call SelPWR
Scan
XMIT
BUSYDIM
HOME
1Ste 2 3Lck
4Sts 5Rpg 6Msg
7H/L 8Mon 9Dir
HOME
MODE
HORN/LIGHTS
Model W7
Model W9
XMIT BUSY
1 2 3
4 5 6
7 8 9
0
DIM
PriNon
Pri
Emer Dir Scan Call
Mode Vol Sel Home
Page Rpgm Site
Phon H/L Lock
Rcl Sql Del
MODE HOME
EXTERNAL ALARMS(HORNS AND LIGHTS)
Sts Msg
Srch
54

General Radio Features
Permanent Horn and Lights
1 Press the H/L button momentarily.
The last selected alarm(s) are enabled.
The display briefly shows the enabled alarms, and then reverts back to the selected mode.
2 Press the H/L button a second time to turn off the alarm(s).
HOME
XMIT
BUSY
Mode Volume
Pwr
Phon Call SelScan
Mic
Home
Dim
H/L
Dir Mon
MODEKNOB
HORN/LIGHTS
Model W4
Mode
Vol
Mic
Phon Call Sel
H/L Mon Dir
PWRScan
XMIT
BUSYDIM
HOME
HORN/LIGHTSMODE
HOME
Model W5
O #Del Rcl
Mode
Vol
Mic
Phon Call SelPWR
Scan
XMIT
BUSYDIM
HOME
1Ste 2 3Lck
4Sts 5Rpg 6Msg
7H/L 8Mon 9Dir
HOME
MODE
HORN/LIGHTS
Model W7
Model W9
XMIT BUSY
1 2 3
4 5 6
7 8 9
0
DIM
PriNon
Pri
Emer Dir Scan Call
Mode Vol Sel Home
Page Rpgm Site
Phon H/L Lock
Rcl Sql Del
MODE HOME
EXTERNAL ALARMS(HORNS AND LIGHTS)
Sts Msg
Srch
ASTRO Digital Spectra and Digital Spectra Plus Model W4, W5, W7, and W9 55

General Radio Features
Change the Selected Alarms
1 Press and hold the H/L button until a tone sounds and the display indicates the currently selected alarm.
HOME
XMIT
BUSY
Mode Volume
Pwr
Phon Call SelScan
Mic
Home
Dim
H/L
Dir Mon
MODEKNOB
HORN/LIGHTS
Model W4
Mode
Vol
Mic
Phon Call Sel
H/L Mon Dir
PWRScan
XMIT
BUSYDIM
HOME
HORN/LIGHTSMODE
HOME
Model W5
O #Del Rcl
Mode
Vol
Mic
Phon Call SelPWR
Scan
XMIT
BUSYDIM
HOME
1Ste 2 3Lck
4Sts 5Rpg 6Msg
7H/L 8Mon 9Dir
HOME
MODE
HORN/LIGHTS
Model W7
Model W9
XMIT BUSY
1 2 3
4 5 6
7 8 9
0
DIM
PriNon
Pri
Emer Dir Scan Call
Mode Vol Sel Home
Page Rpgm Site
Phon H/L Lock
Rcl Sql Del
MODE HOME
EXTERNAL ALARMS(HORNS AND LIGHTS)
Sts Msg
Srch
56

General Radio Features
Receiving a Call While Alarms Are Turned OnWhen a call is received, the vehicle’s horn sounds for four seconds, and/or the car lights turn on for 60 seconds. The time interval can be modified by a qualified radio technician.
The display alternates between the type of call received (CALL, PAGE, or PHONE) and the selected mode name.
2 Turn the Mode knob (W4) or press the Mode rocker switch (W5, W7, W9) to review the choices until the desired alarm is displayed:
• HORN ON
• LITES ON (W4, W5, W7) or LIGHTS ON (W9)
• H/L ON (both horn and lights)
3 Press the HOME or H/L button to select the desired alarm and return to normal operation.
ASTRO Digital Spectra and Digital Spectra Plus Model W4, W5, W7, and W9 57

General Radio Features
Turn Off Non-Rearmable External Alarm
1 To turn off the external alarm(s), press the PTT button or any control-head button.
Note: Pressing the Call, Page, or Phon button will turn off the external alarm(s) and place you directly in that feature.
The Vol rocker switch (or knob) and the Dim button have no effect on the state of the external alarm(s).
2 To rearm the horn and lights feature, press the H/L button momentarily.
HOME
XMIT
BUSY
Mode Volume
Pwr
Phon Call SelScan
Mic
Home
Dim
H/L
Dir Mon
MODEKNOB
HORN/LIGHTS
Model W4
Mode
Vol
Mic
Phon Call Sel
H/L Mon Dir
PWRScan
XMIT
BUSYDIM
HOME
HORN/LIGHTSMODE
HOME
Model W5
O #Del Rcl
Mode
Vol
Mic
Phon Call SelPWR
Scan
XMIT
BUSYDIM
HOME
1Ste 2 3Lck
4Sts 5Rpg 6Msg
7H/L 8Mon 9Dir
HOME
MODE
HORN/LIGHTS
Model W7
Model W9
XMIT BUSY
1 2 3
4 5 6
7 8 9
0
DIM
PriNon
Pri
Emer Dir Scan Call
Mode Vol Sel Home
Page Rpgm Site
Phon H/L Lock
Rcl Sql Del
MODE HOME
EXTERNAL ALARMS(HORNS AND LIGHTS)
Sts Msg
Srch
58

General Radio Features
Turn Off Rearmable External Alarms
To turn off the external alarm(s), press the PTT but-ton or any control head but-ton other than the H/L button.
Pressing the Call, Page, or Phon button turns off the external alarm(s) and places you directly in that feature. When the external alarm(s) are turned off, they will be automatically rearmed.
Note: Pressing the H/L button turns off the external alarm(s) and exits the horn and lights feature. To rearm the feature, press the H/L button momentarily.
The Vol rocker switch (or knob) and the Dim button have no effect on the state of the external alarms.
HOME
XMIT
BUSY
Mode Volume
Pwr
Phon Call SelScan
Mic
Home
Dim
H/L
Dir Mon
MODEKNOB
HORN/LIGHTS
Model W4
Mode
Vol
Mic
Phon Call Sel
H/L Mon Dir
PWRScan
XMIT
BUSYDIM
HOME
HORN/LIGHTSMODE
HOME
Model W5
O #Del Rcl
Mode
Vol
Mic
Phon Call SelPWR
Scan
XMIT
BUSYDIM
HOME
1Ste 2 3Lck
4Sts 5Rpg 6Msg
7H/L 8Mon 9Dir
HOME
MODE
HORN/LIGHTS
Model W7
Model W9
XMIT BUSY
1 2 3
4 5 6
7 8 9
0
DIM
PriNon
Pri
Emer Dir Scan Call
Mode Vol Sel Home
Page Rpgm Site
Phon H/L Lock
Rcl Sql Del
MODE HOME
EXTERNAL ALARMS(HORNS AND LIGHTS)
Sts Msg
Srch
ASTRO Digital Spectra and Digital Spectra Plus Model W4, W5, W7, and W9 59
General Radio Features
Time-Out TimerAll ASTRO Digital Spectra and Digital Spectra Plus models provide a time-out timer function that prevents locking up a repeater or channel by prolonged keying of the transmitter. You cannot transmit longer than the preset timer setting. If you attempt to do so, the radio automatically stops your transmission, and you hear a talk-prohibit tone.
Note: You will hear a brief, low-pitched, warning tone four seconds before the transmission times out.
The timer is set for 60 seconds at the factory, but it can be reprogrammed by a qualifed radio technician for between 15 and 465 seconds, in 15-second intervals, or it can be disabled entirely for each radio mode.
Push-To-Talk Identification (PTT-ID)When you press the PTT button to send a message, your radio ID number is transmitted as part of each voice message. This PTT-ID number is then shown on the receiving radio’s display.
For the ASTRO digital mode, up to eight right-justified digits are displayed.
If the receiving radio is changing channels, the PTT-ID display that indicates activity on the new channel is alternately displayed and inhibited for short periods of time.
Pressing the HOME button erases the PTT-ID from the display.
The display conditions of PTT-ID must be programmed by a qualified radio technician
60

Conventional Radio Features
Status Calls (Digital Modes Only)Radio status calls are used to inform the dispatcher of the present state of the mobile unit. For example, a status might be ENROUTE or AT SITE.
Status names are field programmable. Each radio can have up to 8 separate statuses.
Send a Status Call (Models W7 and W9 Only)
1 Press the Sts button, and the last-acknowledged status name is displayed.
2 Press the Mode rocker switch to review the list of status names, or use the keypad to enter the number of the status you wish to send.
Note: If no button is pressed for a period of time, an inactivity warning will sound.
O #Del Rcl
Mode
Vol
Mic
Phon Call SelPWR
Scan
XMIT
BUSYDIM
HOME
1Ste 2 3Lck
4Sts 5Rpg 6Msg
7H/L 8Mon 9Dir
SELECT
HOME
STATUS
MODE
RECALL DELETE
Sts 1 Sts 8Sts 7Sts 6Sts 3 Sts 4 Sts 5Sts 2
Model W7
Model W9
Sts 1 Sts 8Sts 7Sts 6Sts 3 Sts 4 Sts 5Sts 2
XMIT BUSY
1 2 3
4 5 6
7 8 9
0
DIM
PriNon
Pri
Emer Dir Scan Call
Mode Vol Sel Home
Page Rpgm Site
Phon H/L Lock
Rcl Sql Del
MODE SELECT HOME DELETE
Sts
Srch
RECALLSTATUS
DIRECT ENTRY KEYBOARDFOR STATUS(OPTIONAL)
ASTRO Digital Spectra and Digital Spectra Plus Model W4, W5, W7, and W9 61
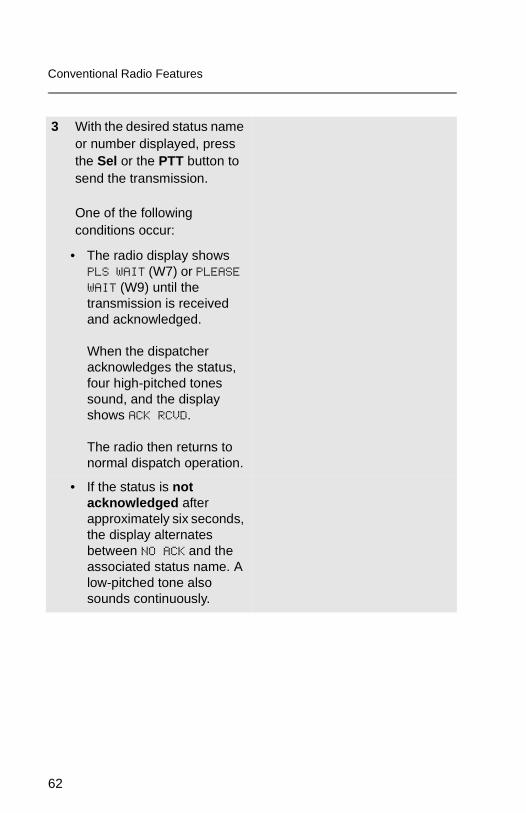
Conventional Radio Features
3 With the desired status name or number displayed, press the Sel or the PTT button to send the transmission.
One of the following conditions occur:
• The radio display shows PLS WAIT (W7) or PLEASE WAIT (W9) until the transmission is received and acknowledged.
When the dispatcher acknowledges the status, four high-pitched tones sound, and the display shows ACK RCVD.
The radio then returns to normal dispatch operation.
• If the status is not acknowledged after approximately six seconds, the display alternates between NO ACK and the associated status name. A low-pitched tone also sounds continuously.
62

Conventional Radio Features
• If there is no acknowledgment, do one of the following:
Press the microphone PTT button or the Sel button to resend the status transmission.
OR
Press the HOME button to return to normal dispatch operation.
ASTRO Digital Spectra and Digital Spectra Plus Model W4, W5, W7, and W9 63
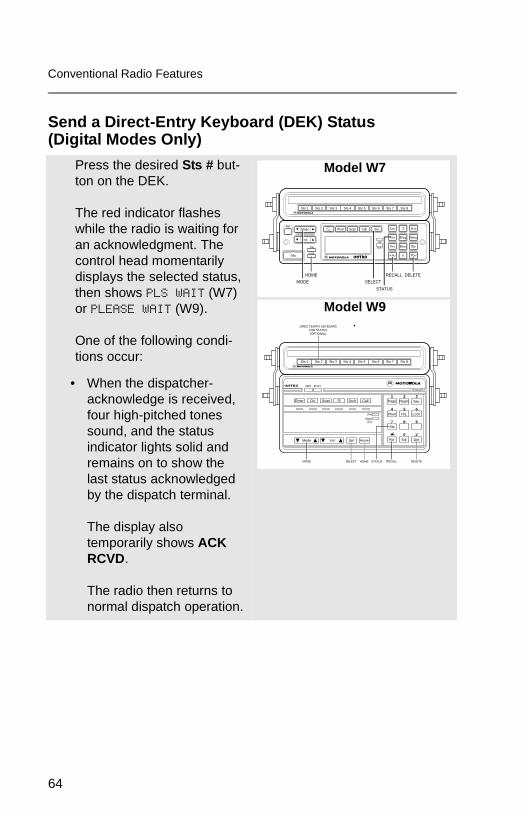
Conventional Radio Features
Send a Direct-Entry Keyboard (DEK) Status(Digital Modes Only)
Press the desired Sts # but-ton on the DEK.
The red indicator flashes while the radio is waiting for an acknowledgment. The control head momentarily displays the selected status, then shows PLS WAIT (W7) or PLEASE WAIT (W9).
One of the following condi-tions occur:
• When the dispatcher-acknowledge is received, four high-pitched tones sound, and the status indicator lights solid and remains on to show the last status acknowledged by the dispatch terminal.
The display also temporarily shows ACK RCVD.
The radio then returns to normal dispatch operation.
O #Del Rcl
Mode
Vol
Mic
Phon Call SelPWR
Scan
XMIT
BUSYDIM
HOME
1Ste 2 3Lck
4Sts 5Rpg 6Msg
7H/L 8Mon 9Dir
SELECT
HOME
STATUS
MODE
RECALL DELETE
Sts 1 Sts 8Sts 7Sts 6Sts 3 Sts 4 Sts 5Sts 2
Model W7
Model W9
Sts 1 Sts 8Sts 7Sts 6Sts 3 Sts 4 Sts 5Sts 2
XMIT BUSY
1 2 3
4 5 6
7 8 9
0
DIM
PriNon
Pri
Emer Dir Scan Call
Mode Vol Sel Home
Page Rpgm Site
Phon H/L Lock
Rcl Sql Del
MODE SELECT HOME DELETE
Sts
Srch
RECALLSTATUS
DIRECT ENTRY KEYBOARDFOR STATUS(OPTIONAL)
64

Conventional Radio Features
• If the dispatcher-acknowledge is not received, the red indicator continues to flash, the display temporarily shows NO ACK, and a low-pitched tone sounds. At the same time, the indicator above the last-acknowledged status lights.
The radio then returns to normal dispatch operation.
Resend the last status.
ASTRO Digital Spectra and Digital Spectra Plus Model W4, W5, W7, and W9 65

Conventional Radio Features
Smart PTTSmart PTT is a per-mode feature that gives the system manager better control of radio operations. When smart PTT is enabled in your radio, you will not be able to transmit on an active mode. If you try to transmit (press the PTT button) on a busy or active smart PTT channel, a continuous tone sounds until you release the PTT switch, and the transmission is inhibited.
The yellow BUSY LED lights when the radio is receiving to indicate that the mode is busy.
Three radio-wide variations of smart PTT can be enabled on your radio:
Conventional Talkgroup Calls
Digital Modes OnlyThis feature allows you to define talkgroups for your conventional system. Talkgroups, combined with selective squelch operation, allow groups of users to transparently share a conventional channel. Talkgroups can be slaved to a personality through programming, or you can select them.
Encryption keys are slaved to talkgroups. When conventional talkgroups are enabled, encryption keys are changed by changing the active talkgroup.
Transmit Inhibit on Busy Mode with Carrier
You will not be able to transmit if any activity is detected on the mode.
Transmit Inhibit on Busy Mode with Wrong Squelch Code
You will not be able to transmit on an active mode that has a squelch code other than your own.
Quick-Key Override You can override either of the two previous transmit-inhibit states by quick-keying the radio (two quick PTT button presses).
66

Conventional Radio Features
Select a Conventional TalkgroupThe Talkgroup Select feature allows you to manually select any one of the available talkgroups.
1 Press the Tgrp button.
The display changes to show the last-selected talkgroup.
2 Turn the Mode knob (W4) or the Mode rocker switch (W5, W7, W9) to choose a different talkgroup.
(Models W7 and W9) Talkgroups can be accessed by direct keypad entry.
3 Press the Sel button to save the talkgroup.
The radio returns to the home display.
Note: To select the default talkgroup, press the Sel button while the radio displays PRESET.
Selecting PRESET causes the radio to return to its preprogrammed talkgroup.
To abort the talkgroup menu, press the HOME button or the PTT button:
– Pressing the HOME button exits the talkgroup select menu without saving the selected talkgroup choice.
– Pressing the PTT button exits the menu without saving the selected talkgroup and allows the radio to transmit.
ASTRO Digital Spectra and Digital Spectra Plus Model W4, W5, W7, and W9 67

Conventional Radio Features
Note: If the encryption key slaved to the new talkgroup is erased, KEY FAIL is displayed and a momentary tone is generated. If the encryption key that is slaved to the new talkgroup is not allowed, ILLEGAL KEY is displayed and a momentary tone is generated.
68

Conventional Radio Features
Conventional Talkaround
Talk Direct (Mobile-To-Mobile)To talk directly to another unit without going through the conventional repeater system:
1 Press the Dir button momentarily.
The Dir indicator lights, indicating that the radio is now transmitting directly to another unit.
XMIT
BUSY
Mode Volume
Pwr
Phon Call SelScan
Mic
Home
Dim
H/L
Dir Mon
DIRECT
DIRECTINDICATOR
Model W4
Mode
Vol
Mic
Phon Call Sel
H/L Mon Dir
PWR
Scan
XMIT
BUSYDIM
HOME
DIRECTINDICATOR
DIRECT
Model W5
O #Del Rcl
Mode
Vol
Mic
Phon Call SelPWR
Scan
XMIT
BUSYDIM
HOME
1Ste 2 3Lck
4Sts 5Rpg 6Msg
7H/L 8Mon 9Dir
DIRECTDIRECTINDICATOR
Model W7
Model W9
XMIT BUSY
1 2 3
4 5 6
7 8 9
0
DIM
PriNon
Pri
Emer Dir Scan Call
Mode Vol Sel Home
Page Rpgm Site
Phon H/L Lock
Rcl Sql Del
Sts Msg
Srch
DIRECT
ASTRO Digital Spectra and Digital Spectra Plus Model W4, W5, W7, and W9 69
Conventional Radio Features
2 To return to repeater operation, press the Dir button again.
The Dir indicator goes out.
Note: A conventional personality can be configured to always transmit on the direct mobile-to-mobile frequency. In this case, the Dir indicator is lit continuously while the mode is selected.
70
Trunking Operation
Telephone Interconnect ListWith any of the models you can initiate and receive telephone calls if the trunked system is properly equipped. All calls between the mobile operator and the land line are private, regardless of who initiates the call.
All models feature a phone list capability of up to 19 preprogrammed phone numbers. The radios can be programmed by a qualified radio technician so that a name can be assigned to each number in the list.
In addition to the 19 preprogrammed phone numbers, the W7 and W9 models feature unlimited dialing capability with their 12-button telephone keypad.
ASTRO Digital Spectra and Digital Spectra Plus Model W4, W5, W7, and W9 71
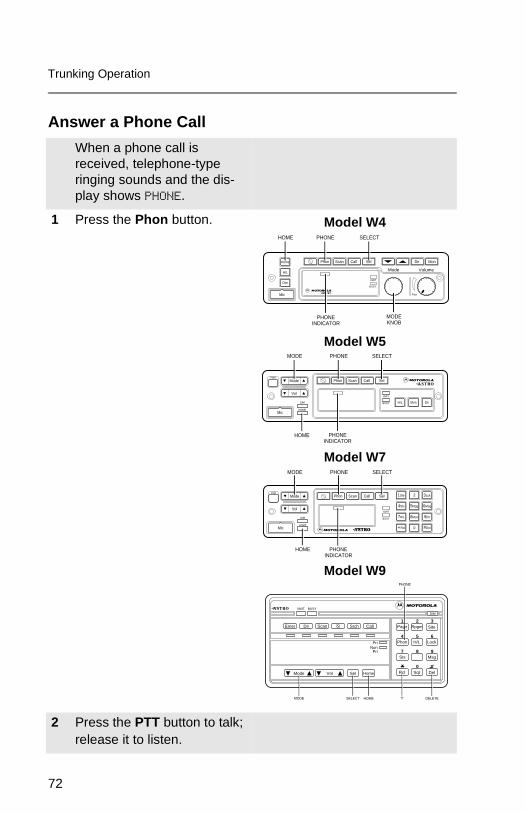
Trunking Operation
Answer a Phone Call
When a phone call is received, telephone-type ringing sounds and the dis-play shows PHONE.
1 Press the Phon button.
2 Press the PTT button to talk; release it to listen.
XMIT
BUSY
Mode Volume
Pwr
Phon Call SelScan
Mic
Home
Dim
H/L
Dir Mon
HOME PHONE SELECT
MODEKNOB
PHONEINDICATOR
Model W4
Mode
Vol
Mic
Phon Call Sel
H/L Mon Dir
PWR
Scan
XMIT
BUSYDIM
HOME
SELECTMODE
HOME PHONEINDICATOR
PHONE
Model W5
O #Del Rcl
Mode
Vol
Mic
Phon Call SelPWR
Scan
XMIT
BUSYDIM
HOME
1Ste 2 3Lck
4Sts 5Rpg 6Msg
7H/L 8Mon 9Dir
SELECTMODE
HOME PHONEINDICATOR
PHONE
Model W7
XMIT BUSY
1 2 3
4 5 6
7 8 9
0
DIM
PriNon
Pri
Emer Dir Scan Call
Mode Vol Sel Home
Page Rpgm Site
Phon H/L Lock
Rcl Sql Del
MODE SELECT HOME
PHONE
DELETE
Sts Msg
Srch
Model W9
72

Trunking Operation
3 When the call is completed, press the HOME or Phon button to hang up and return to normal operation.
ASTRO Digital Spectra and Digital Spectra Plus Model W4, W5, W7, and W9 73

Trunking Operation
Initiate a Telephone Call From the List
1 Press the Phon button momentarily to select the phone function.
(All models) A valid-key chirp is heard.
(Models W4, W5, and W7 Only) The phone indicator lights.
The display shows the last number dialed or a blank scratchpad appearing as a series of dashes.
XMIT
BUSY
Mode Volume
Pwr
Phon Call SelScan
Mic
Home
Dim
H/L
Dir Mon
HOME PHONE SELECT
MODEKNOB
PHONEINDICATOR
Model W4
Mode
Vol
Mic
Phon Call Sel
H/L Mon Dir
PWR
Scan
XMIT
BUSYDIM
HOME
SELECTMODE
HOME PHONEINDICATOR
PHONE
Model W5
O #Del Rcl
Mode
Vol
Mic
Phon Call SelPWR
Scan
XMIT
BUSYDIM
HOME
1Ste 2 3Lck
4Sts 5Rpg 6Msg
7H/L 8Mon 9Dir
SELECTMODE
HOME PHONEINDICATOR
PHONE
Model W7
XMIT BUSY
1 2 3
4 5 6
7 8 9
0
DIM
PriNon
Pri
Emer Dir Scan Call
Mode Vol Sel Home
Page Rpgm Site
Phon H/L Lock
Rcl Sql Del
MODE SELECT HOME
PHONE
DELETE
Sts Msg
Srch
Model W9
74

Trunking Operation
2 Turn the Mode knob (W4), or press the Mode rocker switch (W5, W7, W9) to locate the number you want to call.
The display first shows the name, and then the number.
3 Press the Sel button or the PTT button.
The displayed number is automatically dialed.
Note: If the number contains a programmed pause, the dialing pauses briefly when P is displayed. After the brief pause, the rest of the numbers is dialed.
If you are out of range of the trunked system, NO PHONE is displayed, and a continuous low-pitched tone sounds. Press the HOME or Phon button to resume normal operation.
If the trunked phone interconnect is in use or the phone interconnect is out of service, a telephone-type busy tone sounds, and the display shows PHON BSY (W4, W5, W7) or PHONE BUSY (W9). Your number is automatically dialed when the phone interconnect becomes available. If you hang up, you lose your place in the queue.
If PHON BSY (W4, W5, W7) or PHONE BUSY (W9) is displayed with a low-pitched tone rather than a telephone-type busy tone, the call is not queued. You must hang up and try again.
4 When your party answers, press the PTT button to talk, and release it to listen.
ASTRO Digital Spectra and Digital Spectra Plus Model W4, W5, W7, and W9 75

Trunking Operation
5 When the call is completed, press the HOME or Phon button to hang up and return to normal operation.
76
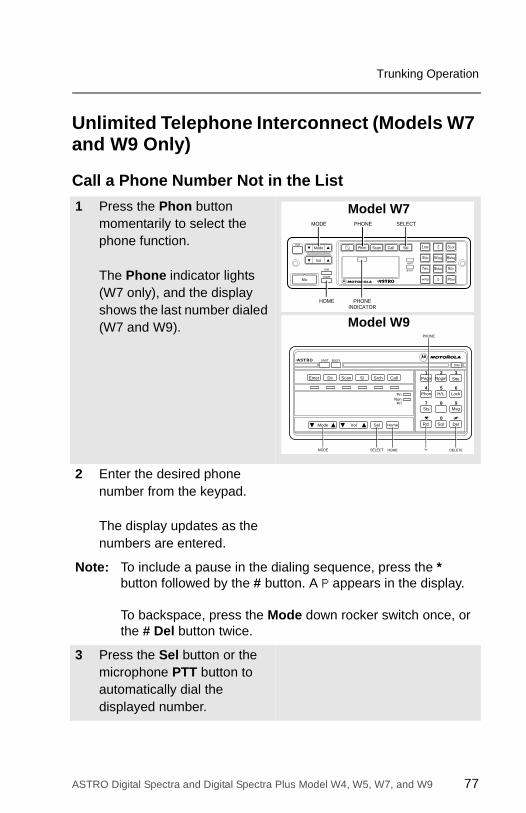
Trunking Operation
Unlimited Telephone Interconnect (Models W7 and W9 Only)
Call a Phone Number Not in the List
1 Press the Phon button momentarily to select the phone function.
The Phone indicator lights (W7 only), and the display shows the last number dialed (W7 and W9).
2 Enter the desired phone number from the keypad.
The display updates as the numbers are entered.
Note: To include a pause in the dialing sequence, press the * button followed by the # button. A P appears in the display.
To backspace, press the Mode down rocker switch once, or the # Del button twice.
3 Press the Sel button or the microphone PTT button to automatically dial the displayed number.
O #Del Rcl
Mode
Vol
Mic
Phon Call SelPWR
Scan
XMIT
BUSYDIM
HOME
1Ste 2 3Lck
4Sts 5Rpg 6Msg
7H/L 8Mon 9Dir
SELECTMODE
HOME PHONEINDICATOR
PHONE
Model W7
XMIT BUSY
1 2 3
4 5 6
7 8 9
0
DIM
PriNon
Pri
Emer Dir Scan Call
Mode Vol Sel Home
Page Rpgm Site
Phon H/L Lock
Rcl Sql Del
MODE SELECT HOME
PHONE
DELETE
Sts Msg
Srch
Model W9
ASTRO Digital Spectra and Digital Spectra Plus Model W4, W5, W7, and W9 77

Trunking Operation
Note: If the number contains a programmed pause, the dialing pauses briefly when P is displayed. After the brief pause, the rest of the numbers are dialed.
4 When your party answers, press the PTT button to talk, and release it to listen.
Note: If you are out of range of the trunked system, NO PHONE is displayed, and a continuous low-pitched tone sounds. Press the HOME or Phon button to resume normal operation.
If the trunked phone interconnect is in use or the phone interconnect is out of service, a telephone-type busy tone sounds, and the display shows PHON BSY (W7) or PHONE BUSY (W9). Your number is automatically dialed when the phone interconnect becomes available. If you hang up, you lose your place in the queue.
If PHON BSY (W7) or PHONE BUSY (W9) is displayed with a low-pitched tone rather than a telephone-type busy tone, the call is not queued. You must hang up and try again.
If your radio is programmed for live overdial, every digit pressed after the phone call is established is sent to the telephone system.
If your radio is programmed for buffered overdial, the digits pressed are entered into the radio’s memory, and they are all sent together when the PTT button is next pressed. You cannot send digits and talk on the same PTT button press. If you press the PTT button to send the digits, you must release the PTT button and press it again to transmit.
5 When the call is completed, press the HOME or Phon button to hang up and return to normal operation.
78
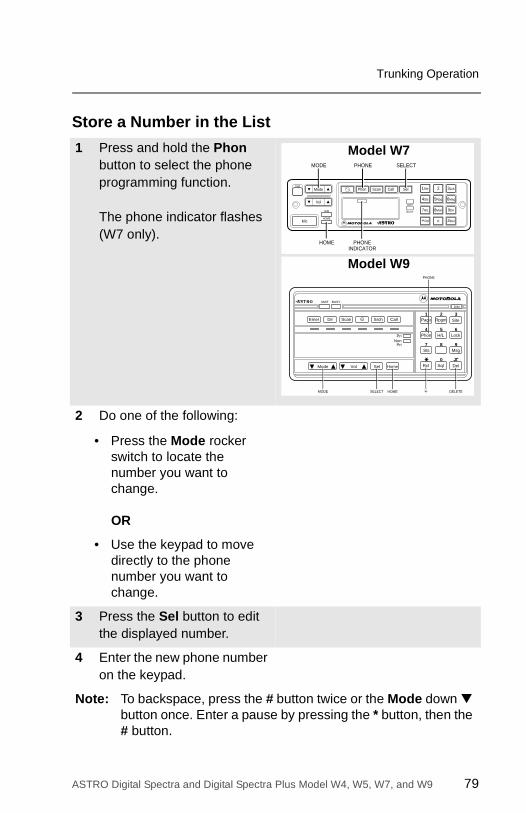
Trunking Operation
Store a Number in the List
1 Press and hold the Phon button to select the phone programming function.
The phone indicator flashes (W7 only).
2 Do one of the following:
• Press the Mode rocker switch to locate the number you want to change.
OR
• Use the keypad to move directly to the phone number you want to change.
3 Press the Sel button to edit the displayed number.
4 Enter the new phone number on the keypad.
Note: To backspace, press the # button twice or the Mode down ▼
button once. Enter a pause by pressing the * button, then the # button.
O #Del Rcl
Mode
Vol
Mic
Phon Call SelPWR
Scan
XMIT
BUSYDIM
HOME
1Ste 2 3Lck
4Sts 5Rpg 6Msg
7H/L 8Mon 9Dir
SELECTMODE
HOME PHONEINDICATOR
PHONE
Model W7
XMIT BUSY
1 2 3
4 5 6
7 8 9
0
DIM
PriNon
Pri
Emer Dir Scan Call
Mode Vol Sel Home
Page Rpgm Site
Phon H/L Lock
Rcl Sql Del
MODE SELECT HOME
PHONE
DELETE
Sts Msg
Srch
Model W9
ASTRO Digital Spectra and Digital Spectra Plus Model W4, W5, W7, and W9 79

Trunking Operation
Edit a Name in the List (Models W7 and W9 Only)
5 Press the Sel button to store the new number.
6 Do one of the following:
• Press the HOME button to return to normal radio operation.
OR
• Press the Phon button to return to normal phone operation.
1 Press and hold the Phon button to enter Phon ID list programming.
The Phon indicator flashes and a high-pitched tone sounds.
2 Press the Mode rocker switch to locate the list member you want to change.
O #Del Rcl
Mode
Vol
Mic
Phon Call SelPWR
Scan
XMIT
BUSYDIM
HOME
1Ste 2 3Lck
4Sts 5Rpg 6Msg
7H/L 8Mon 9Dir
SELECTMODE
HOME PHONEINDICATOR
PHONE
Model W7
XMIT BUSY
1 2 3
4 5 6
7 8 9
0
DIM
PriNon
Pri
Emer Dir Scan Call
Mode Vol Sel Home
Page Rpgm Site
Phon H/L Lock
Rcl Sql Del
MODE SELECT HOME
PHONE
DELETE
Sts Msg
Srch
Model W9
80
Trunking Operation
3 Change the characters or numbers using any of the numeric keys (0 through 9) and special function keys(*, #).
Note: The maximum number of characters permitted in a text line is 8 for Model W7 and 11 for Model W9. If you try to add too many characters, you will hear a low-pitched tone.
To edit, do any or all of the following:
• To enter a character at the blinking cursor, refer to the table on page 83.
Press the key of the desired character the number of times shown in the table. For example, to enter the character C, press the 2 key three times.
• To leave a space in the text, press the Mode up ▲ rocker switch to move the blinking cursor to the next character position, and then enter the character.
ASTRO Digital Spectra and Digital Spectra Plus Model W4, W5, W7, and W9 81

Trunking Operation
• To delete characters, press the Mode down ▼ rocker switch to move backwards over existing characters.
When the last character on the display has been erased, press the Mode down ▼ rocker switch again to leave the name-edit mode, without making any changes, and begin the procedure again at step 2.
4 To save the changes, press and hold the Sel button.
5 Repeat steps 2 through 4 until you have modified all the desired names,
OR
Do one of the following:
• Press the HOME button to return to normal radio operation.
OR
• Press the Phon button to return to normal phone operation.
82

Trunking Operation
Table 1: Entering Characters Using the Keypad
KeyNumber of times the key is pressed
1 2 3 4 5 6 7 8 9
0 0 ( ) < >
1 1 & %
2 A B C 2 a b c
3 D E F 3 d e f
4 G H I 4 g h i
5 J K L 5 j k l
6 M N O 6 m n o
7 P Q R S 7 p q r s
8 T U V 8 t u v
9 W X Y Z 9 w x y z
* * / + - =
# # . ! ? , ;
ASTRO Digital Spectra and Digital Spectra Plus Model W4, W5, W7, and W9 83

Trunking Operation
Enhanced Private Conversation (Digital Modes Only)The enhanced Private Conversation feature not only allows you to carry on a conversation that is heard only by the two parties involved, but also enables you to determine whether the unit you are calling is in service.
All models are capable of responding to a Private Conversation call initiated by another radio. The following further describes each model’s capability:
• All Models: Feature a unique list of preprogrammed ID numbers. A name may be assigned to each ID in the list for your convenience.
• Models W7 and W9: In addition to a list of IDs, these models feature unlimited enhanced Private Conversation capability using a full, 12-button keypad to call any ID in the system.
Answer an Enhanced Private Conversation Call
When a Private Conversa-tion call is received, two high-pitched tones sound and the display alternates between CALL RCV and the home display.
84

Trunking Operation
1 Press the Call button within 20 seconds of receiving the call. (This time is programmable by a qualified radio technician.)
The display shows the ID number of the calling unit.
HOME CALL
SELECT
XMIT
BUSY
Mode Volume
Pwr
Phon Call SelScan
Mic
Home
Dim
H/L
Dir Mon
MODEKNOB
Model W4
Mode
Vol
Mic
Phon Call Sel
H/L Mon Dir
PWR
Scan
XMIT
BUSYDIM
HOME
HOME
SELECT
CALLMODE
Model W5
O #Del Rcl
Mode
Vol
Mic
Phon Call SelPWR
Scan
XMIT
BUSYDIM
HOME
1Ste 2 3Lck
4Sts 5Rpg 6Msg
7H/L 8Mon 9Dir
HOME
SELECT
MODE CALL
Model W7
Model W9
XMIT BUSY
1 2 3
4 5 6
7 8 9
0
DIM
PriNon
Pri
Emer Dir Scan Call
Mode Vol Sel Home
Page Rpgm Site
Phon H/L Lock
Rcl Sql Del
MODE SELECT HOME
Sts Msg
Srch
CALL PAGE
ASTRO Digital Spectra and Digital Spectra Plus Model W4, W5, W7, and W9 85
Trunking Operation
2 To respond to the call, press the PTT button and talk.
If 20 seconds pass before you press the Call button, you will not respond privately to the call just received. Instead, when you press Call, you enter the Private Conversation Call state, as described in “Initiate an Enhanced Private Conversation Call” on page 87.
If the system is busy when you attempt to answer the call, a telephone-type busy tone sounds and your radio’s BUSY indicator lights. When a channel becomes available, you receive a call back, and your radio automatically keys up for three seconds so that you can begin talking.
Note: If you do not press the Call button before pressing the PTT button, your conversation will be heard by all members of the talk group.
86
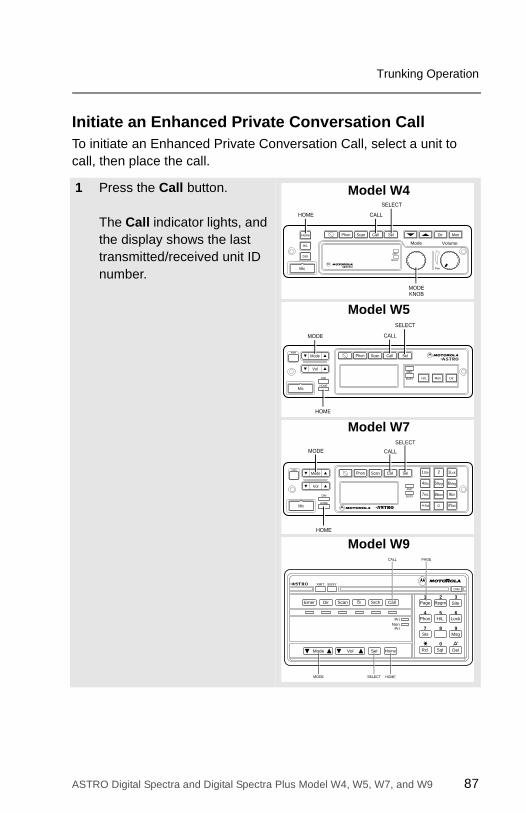
Trunking Operation
Initiate an Enhanced Private Conversation CallTo initiate an Enhanced Private Conversation Call, select a unit to call, then place the call.
1 Press the Call button.
The Call indicator lights, and the display shows the last transmitted/received unit ID number.
HOME CALL
SELECT
XMIT
BUSY
Mode Volume
Pwr
Phon Call SelScan
Mic
Home
Dim
H/L
Dir Mon
MODEKNOB
Model W4
Mode
Vol
Mic
Phon Call Sel
H/L Mon Dir
PWR
Scan
XMIT
BUSYDIM
HOME
HOME
SELECT
CALLMODE
Model W5
O #Del Rcl
Mode
Vol
Mic
Phon Call SelPWR
Scan
XMIT
BUSYDIM
HOME
1Ste 2 3Lck
4Sts 5Rpg 6Msg
7H/L 8Mon 9Dir
HOME
SELECT
MODE CALL
Model W7
Model W9
XMIT BUSY
1 2 3
4 5 6
7 8 9
0
DIM
PriNon
Pri
Emer Dir Scan Call
Mode Vol Sel Home
Page Rpgm Site
Phon H/L Lock
Rcl Sql Del
MODE SELECT HOME
Sts Msg
Srch
CALL PAGE
ASTRO Digital Spectra and Digital Spectra Plus Model W4, W5, W7, and W9 87
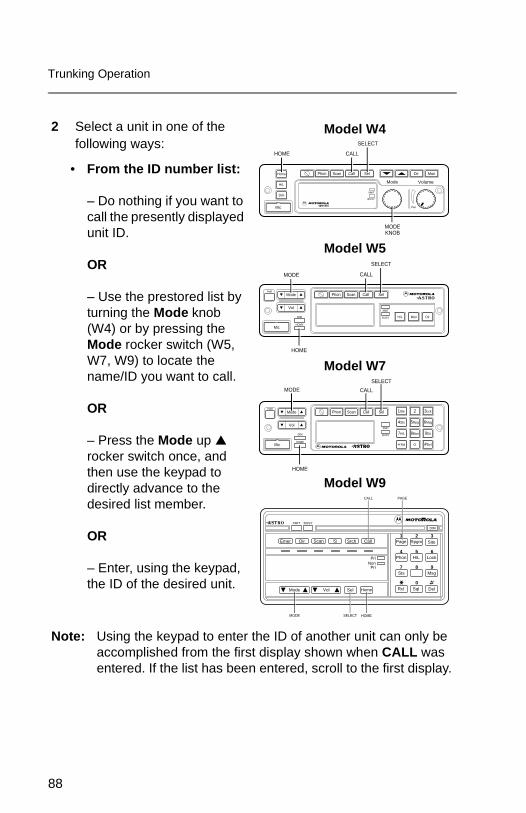
Trunking Operation
2 Select a unit in one of the following ways:
• From the ID number list:
– Do nothing if you want to call the presently displayed unit ID.
OR
– Use the prestored list by turning the Mode knob (W4) or by pressing the Mode rocker switch (W5, W7, W9) to locate the name/ID you want to call.
OR
– Press the Mode up ▲
rocker switch once, and then use the keypad to directly advance to the desired list member.
OR
– Enter, using the keypad, the ID of the desired unit.
Note: Using the keypad to enter the ID of another unit can only be accomplished from the first display shown when CALL was entered. If the list has been entered, scroll to the first display.
HOME CALL
SELECT
XMIT
BUSY
Mode Volume
Pwr
Phon Call SelScan
Mic
Home
Dim
H/L
Dir Mon
MODEKNOB
Model W4
Mode
Vol
Mic
Phon Call Sel
H/L Mon Dir
PWR
Scan
XMIT
BUSYDIM
HOME
HOME
SELECT
CALLMODE
Model W5
O #Del Rcl
Mode
Vol
Mic
Phon Call SelPWR
Scan
XMIT
BUSYDIM
HOME
1Ste 2 3Lck
4Sts 5Rpg 6Msg
7H/L 8Mon 9Dir
HOME
SELECT
MODE CALL
Model W7
Model W9
XMIT BUSY
1 2 3
4 5 6
7 8 9
0
DIM
PriNon
Pri
Emer Dir Scan Call
Mode Vol Sel Home
Page Rpgm Site
Phon H/L Lock
Rcl Sql Del
MODE SELECT HOME
Sts Msg
Srch
CALL PAGE
88

Trunking Operation
3 Press the Sel button or the microphone PTT button.
A telephone-type ringing sounds if the unit you are calling is in service. The display shows PLS WAIT (W4, W5, W7) or PLEASE WAIT (W9).
HOME CALL
SELECT
XMIT
BUSY
Mode Volume
Pwr
Phon Call SelScan
Mic
Home
Dim
H/L
Dir Mon
MODEKNOB
Model W4
Mode
Vol
Mic
Phon Call Sel
H/L Mon Dir
PWR
Scan
XMIT
BUSYDIM
HOME
HOME
SELECT
CALLMODE
Model W5
O #Del Rcl
Mode
Vol
Mic
Phon Call SelPWR
Scan
XMIT
BUSYDIM
HOME
1Ste 2 3Lck
4Sts 5Rpg 6Msg
7H/L 8Mon 9Dir
HOME
SELECT
MODE CALL
Model W7
Model W9
XMIT BUSY
1 2 3
4 5 6
7 8 9
0
DIM
PriNon
Pri
Emer Dir Scan Call
Mode Vol Sel Home
Page Rpgm Site
Phon H/L Lock
Rcl Sql Del
MODE SELECT HOME
Sts Msg
Srch
CALL PAGE
ASTRO Digital Spectra and Digital Spectra Plus Model W4, W5, W7, and W9 89

Trunking Operation
4 Choose one of the following conditions that applies to your current call:
• If the receiving unit answers, identify yourself and begin your Private Conversation.
• If, after a programmable time period, you are not connected, the display shows NO ACK and a momentary, low-pitched tone sounds.
Try again, or press the HOME or Call button to return to normal operation.
• If you are out of the system’s range, a low-pitched tone sounds.
Try again, or press the HOME or Call button to return to normal operation.
• If the system is busy when you attempt to make a call, the radio you are calling hears a telephone-type busy tone. When a channel becomes available, the called radio receives a call back and automatically keys up for three seconds so that conversation can begin.
90

Trunking Operation
5 To return to normal operation, press the HOME or Call button.
Note: If you do not press the HOME or Call button to hang up, your unit will remain in the Private Conversation state with the other unit. You will miss all subfleet traffic and incoming phone calls.
ASTRO Digital Spectra and Digital Spectra Plus Model W4, W5, W7, and W9 91

Trunking Operation
View Your Unit ID Number
1 Press the Call button momentarily to select the Private Conversation feature.
The Call indicator lights.
HOME CALL
SELECT
XMIT
BUSY
Mode Volume
Pwr
Phon Call SelScan
Mic
Home
Dim
H/L
Dir Mon
MODEKNOB
Model W4
Mode
Vol
Mic
Phon Call Sel
H/L Mon Dir
PWR
Scan
XMIT
BUSYDIM
HOME
HOME
SELECT
CALLMODE
Model W5
O #Del Rcl
Mode
Vol
Mic
Phon Call SelPWR
Scan
XMIT
BUSYDIM
HOME
1Ste 2 3Lck
4Sts 5Rpg 6Msg
7H/L 8Mon 9Dir
HOME
SELECT
MODE CALL
Model W7
Model W9
XMIT BUSY
1 2 3
4 5 6
7 8 9
0
DIM
PriNon
Pri
Emer Dir Scan Call
Mode Vol Sel Home
Page Rpgm Site
Phon H/L Lock
Rcl Sql Del
MODE SELECT HOME
Sts Msg
Srch
CALL PAGE
92

Trunking Operation
2 Do one of the following:
• Turn the Mode knob (W4) counterclockwise or press the Mode down ▼ rocker switch (W5, W7, W9) to locate the MY ID display.
OR
• Models W7 and W9 only: When not in the scratchpad, press the * button.
The display will alternate between MY ID and your ID number.
3 To return to normal operation, press the HOME or Call button.
ASTRO Digital Spectra and Digital Spectra Plus Model W4, W5, W7, and W9 93

Trunking Operation
Store a Unit ID Number in the List(Models W7 and W9 Only)The Private Conversation and Call Alert page features share the same prestored list of units’ IDs.
1 Press and hold the Call, Page, or 2Pge button to review the Call ID list.
The Call indicator flashes and a high-pitched tone sounds.
2 Press the Mode rocker switch to locate the list member you want to change.
3 Press the Sel button to select the unit ID store function.
4 Enter the new unit ID number on the keypad.
Note: If you make an error, press the Mode down ▼ rocker switch or #Del to erase each incorrect digit.
5 When all the digits of the ID are entered, press Sel to store the new ID.
* Optional button (included but not installed).
O #Del Rcl
Mode
Vol
Mic
Phon Call SelPWR
Scan
XMIT
BUSYDIM
HOME
1Ste 2 3Lck
4Sts 5Rpg 6Msg
7H/L 8Mon 9Dir
MODE CALL
SELECT2 Pge *
HOME
Model W7
XMIT BUSY
1 2 3
4 5 6
7 8 9
0
DIM
PriNon
Pri
Emer Dir Scan Call
Mode Vol Sel Home
Page Rpgm Site
Phon H/L Lock
Rcl Sql Del
MODE SELECT HOME
Sts Msg
Srch
CALL PAGE
Model W9
94

Trunking Operation
6 Repeat steps 2 through 5 until all the desired IDs have been entered.
OR
Do one of the following:
• Press the HOME button to return to normal radio operation.
OR
• Press the Call button to return to normal Call operation.
ASTRO Digital Spectra and Digital Spectra Plus Model W4, W5, W7, and W9 95
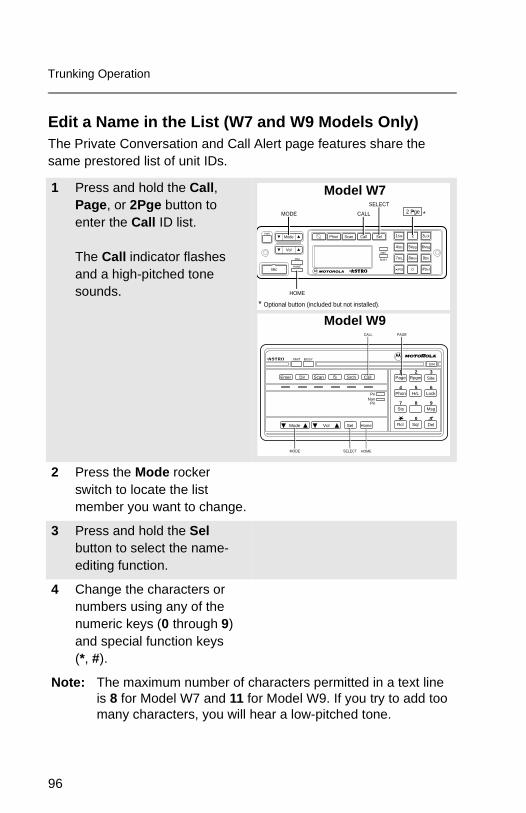
Trunking Operation
Edit a Name in the List (W7 and W9 Models Only)The Private Conversation and Call Alert page features share the same prestored list of unit IDs.
1 Press and hold the Call, Page, or 2Pge button to enter the Call ID list.
The Call indicator flashes and a high-pitched tone sounds.
2 Press the Mode rocker switch to locate the list member you want to change.
3 Press and hold the Sel button to select the name- editing function.
4 Change the characters or numbers using any of the numeric keys (0 through 9) and special function keys(*, #).
Note: The maximum number of characters permitted in a text line is 8 for Model W7 and 11 for Model W9. If you try to add too many characters, you will hear a low-pitched tone.
* Optional button (included but not installed).
O #Del Rcl
Mode
Vol
Mic
Phon Call SelPWR
Scan
XMIT
BUSYDIM
HOME
1Ste 2 3Lck
4Sts 5Rpg 6Msg
7H/L 8Mon 9Dir
MODE CALL
SELECT2 Pge *
HOME
Model W7
XMIT BUSY
1 2 3
4 5 6
7 8 9
0
DIM
PriNon
Pri
Emer Dir Scan Call
Mode Vol Sel Home
Page Rpgm Site
Phon H/L Lock
Rcl Sql Del
MODE SELECT HOME
Sts Msg
Srch
CALL PAGE
Model W9
96

Trunking Operation
To edit, do any or all of the following:
• To enter a character at the blinking cursor, refer to the table on page 98.
Press the key of the desired character the number of times shown in the table. For example, to enter the character C, press the 2 key three times.
• To leave a space in the text, press the Mode up ▲ rocker switch to move the blinking cursor to the next character position, and then enter the next character.
• To delete characters, press the Mode down ▼ rocker switch to move backwards over existing characters.
When the last character on the display has been erased, press the Mode down ▼ rocker switch again to leave the name-edit mode, without making any changes, and begin the procedure again at step 2.
5 To save the changes, press and hold the Sel button.
ASTRO Digital Spectra and Digital Spectra Plus Model W4, W5, W7, and W9 97

Trunking Operation
6 Repeat steps 2 through 6 until you have modified all the desired names.
OR
Do one of the following:
• Press the HOME button to return to normal radio operation.
OR
• Press the Call button to return to normal Call operation.
Table 2: Entering Characters Using the Keypad
KeyNumber of times the key is pressed
1 2 3 4 5 6 7 8 9
0 0 ( ) < >
1 1 & %
2 A B C 2 a b c
3 D E F 3 d e f
4 G H I 4 g h i
5 J K L 5 j k l
6 M N O 6 m n o
7 P Q R S 7 p q r s
8 T U V 8 t u v
9 W X Y Z 9 w x y z
* * / + - =
# # . ! ? , ;
98

Trunking Operation
Call Alert Page (Digital Modes Only)The Call Alert feature allows a unit to selectively alert another unit, and to determine whether or not that unit received the alert. A Call Alert page can be initiated after an unsuccessful Private Conversation call or as a separate feature.
All models are capable of responding to a Call Alert initiated by another radio. The following further describes each model’s capability:
• All Models: Feature a unique list of up to 19 preprogrammed ID numbers. A name can be assigned to each ID in the list for your convenience.
• Models W7 and W9: In addition to a list of 19 IDs, these models feature unlimited Call Alert page capability using a full,12-button keypad.
ASTRO Digital Spectra and Digital Spectra Plus Model W4, W5, W7, and W9 99

Trunking Operation
Send a Call Alert Page
1 Press the Page button.
The Page indicator lights and a valid-key chirp sounds.
The display shows the last transmitted/received unit ID number.
XMIT
BUSY
Mode Volume
Pwr
Phon Call SelScan
Mic
Home
Dim
H/L
Dir Mon
HOME CALL
SELECT
MODEKNOB
Model W4
Mode
Vol
Mic
Phon Call Sel
H/L Mon Dir
PWR
Scan
XMIT
BUSYDIM
HOME
*
SELECT
CALLMODE Page
HOME
Model W5
* Optional button (included but not installed).
O #Del Rcl
Mode
Vol
Mic
Phon Call SelPWR
Scan
XMIT
BUSYDIM
HOME
1Ste 2 3Lck
4Sts 5Rpg 6Msg
7H/L 8Mon 9Dir
MODE CALL
SELECT2 Pge *
HOME
Model W7
XMIT BUSY
1 2 3
4 5 6
7 8 9
0
DIM
PriNon
Pri
Emer Dir Scan Call
Mode Vol Sel Home
Page Rpgm Site
Phon H/L Lock
Rcl Sql Del
MODE SELECT HOME
Sts Msg
Srch
CALL PAGE
Model W9
100

Trunking Operation
2 Select a unit in one of the following ways:
• From the ID number list:
– Do nothing if you want to call the presently displayed unit ID.
OR
– Use the prestored list by turning the Mode knob (W4) or by pressing the Mode rocker switch (W5, W7, W9) to locate the name/ID you want to call.
OR
– Press the Mode up ▲
rocker switch once, and then use the keypad to directly advance to the desired list member.
OR
– Enter, using the keypad, the ID of the desired unit.
Note: Using the keypad to enter the ID of another unit can only be accomplished from the first display shown when Page was entered. If the list has been entered, scroll to the first display.
ASTRO Digital Spectra and Digital Spectra Plus Model W4, W5, W7, and W9 101
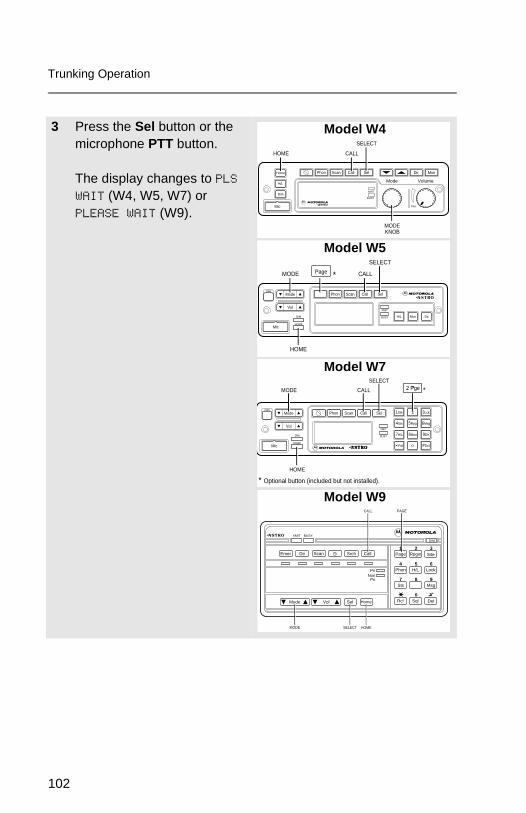
Trunking Operation
3 Press the Sel button or the microphone PTT button.
The display changes to PLS WAIT (W4, W5, W7) or PLEASE WAIT (W9).
XMIT
BUSY
Mode Volume
Pwr
Phon Call SelScan
Mic
Home
Dim
H/L
Dir Mon
HOME CALL
SELECT
MODEKNOB
Model W4
Mode
Vol
Mic
Phon Call Sel
H/L Mon Dir
PWR
Scan
XMIT
BUSYDIM
HOME
*
SELECT
CALLMODE Page
HOME
Model W5
* Optional button (included but not installed).
O #Del Rcl
Mode
Vol
Mic
Phon Call SelPWR
Scan
XMIT
BUSYDIM
HOME
1Ste 2 3Lck
4Sts 5Rpg 6Msg
7H/L 8Mon 9Dir
MODE CALL
SELECT2 Pge *
HOME
Model W7
XMIT BUSY
1 2 3
4 5 6
7 8 9
0
DIM
PriNon
Pri
Emer Dir Scan Call
Mode Vol Sel Home
Page Rpgm Site
Phon H/L Lock
Rcl Sql Del
MODE SELECT HOME
Sts Msg
Srch
CALL PAGE
Model W9
102
Trunking Operation
4 Choose one of the following:
• When the called unit acknowledges the page, four additional tones sound and the display changes to ACK RCVD.
The radio returns to normal operation.
• If you are out of the range of the system, a low-pitched tone sounds.
Try again by pressing the PTT button or Sel button,
OR
Press the HOME or Page button to return to normal operation.
• If, after six seconds, the called unit fails to acknowledge the alert, a low-pitched tone sounds and the display changes to NO ACK.
Try again by pressing the PTT button or Sel button,
OR
Press the HOME button or Page button to exit.
ASTRO Digital Spectra and Digital Spectra Plus Model W4, W5, W7, and W9 103

Trunking Operation
Answer a Call Alert Page
If you are not available when a caller sends you a Call Alert page, a PAGE RCV mes-sage and the caller’s ID are left.
If the page also triggers an external alarm, the display shows PAGE RCV and four tones repeat every five sec-onds.
1 Do one of the following:
• Make a normal dispatch call. Press the PTT button and ask about the page.
OR
• Press Call. The display shows the unit ID of the caller.
Press the Sel button to initiate an enhanced Private Conversation or the PTT button to initiate a Private Conversation call to the caller.
Note: Pressing any button, the PTT button, changing systems, or pressing Call or Page clears the PAGE RCV display. The original unit ID is retained until another Call Alert or Private Conversation call is received.
104
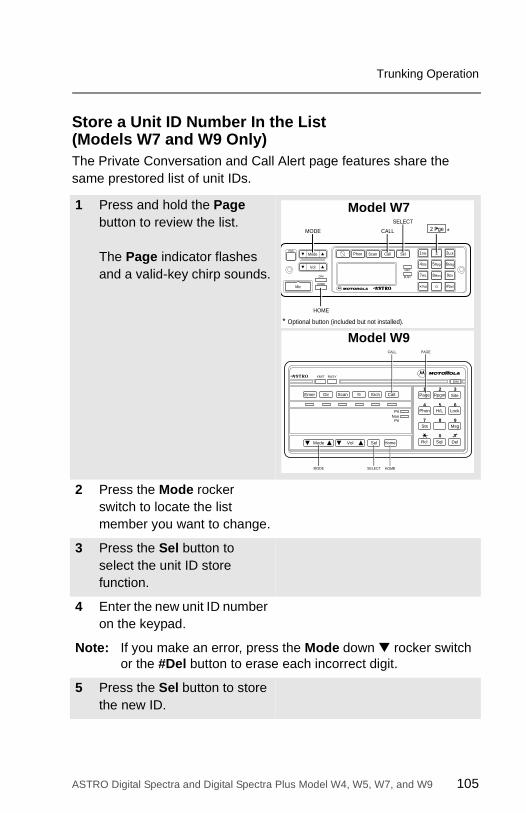
Trunking Operation
Store a Unit ID Number In the List(Models W7 and W9 Only)The Private Conversation and Call Alert page features share the same prestored list of unit IDs.
1 Press and hold the Page button to review the list.
The Page indicator flashes and a valid-key chirp sounds.
2 Press the Mode rocker switch to locate the list member you want to change.
3 Press the Sel button to select the unit ID store function.
4 Enter the new unit ID number on the keypad.
Note: If you make an error, press the Mode down ▼ rocker switch or the #Del button to erase each incorrect digit.
5 Press the Sel button to store the new ID.
* Optional button (included but not installed).
O #Del Rcl
Mode
Vol
Mic
Phon Call SelPWR
Scan
XMIT
BUSYDIM
HOME
1Ste 2 3Lck
4Sts 5Rpg 6Msg
7H/L 8Mon 9Dir
MODE CALL
SELECT2 Pge *
HOME
Model W7
XMIT BUSY
1 2 3
4 5 6
7 8 9
0
DIM
PriNon
Pri
Emer Dir Scan Call
Mode Vol Sel Home
Page Rpgm Site
Phon H/L Lock
Rcl Sql Del
MODE SELECT HOME
Sts Msg
Srch
CALL PAGE
Model W9
ASTRO Digital Spectra and Digital Spectra Plus Model W4, W5, W7, and W9 105
Trunking Operation
6 Repeat steps 2 through 5 until all the desired IDs have been entered.
OR
Do one of the following:
• Press the HOME button to return to normal radio operation.
OR
• Press the Page button to return to normal Call Alert operation.
106

Trunking Operation
Edit a Name in the List (Models W7 and W9 Only)The Private Conversation and Call Alert page features share the same prestored list of unit IDs.
1 Press and hold the Call, Page, or 2Pge button to enter Call ID list programming.
The Call indicator flashes and a high-pitched tone sounds.
2 Press the Mode rocker switch to locate the list member you want to change.
3 Press and hold the Sel button to select the name- editing function.
4 Change the characters or numbers using any of the numeric keys (0 through 9) and special function keys(*, #).
Note: The maximum number of characters permitted in a text line is 8 for Model W7 and 11 for Model W9. If you try to add too many characters, you will hear a low-pitched tone.
* Optional button (included but not installed).
O #Del Rcl
Mode
Vol
Mic
Phon Call SelPWR
Scan
XMIT
BUSYDIM
HOME
1Ste 2 3Lck
4Sts 5Rpg 6Msg
7H/L 8Mon 9Dir
MODE CALL
SELECT2 Pge *
HOME
Model W7
XMIT BUSY
1 2 3
4 5 6
7 8 9
0
DIM
PriNon
Pri
Emer Dir Scan Call
Mode Vol Sel Home
Page Rpgm Site
Phon H/L Lock
Rcl Sql Del
MODE SELECT HOME
Sts Msg
Srch
CALL PAGE
Model W9
ASTRO Digital Spectra and Digital Spectra Plus Model W4, W5, W7, and W9 107

Trunking Operation
To edit, do any or all of the following:
• To enter a character at the blinking cursor, refer to the table on page 109.
Press the key of the desired character the number of times shown in the table. For example, to enter the character C, press the 2 key three times.
• To leave a space in the text, press the Mode up ▲ rocker switch to move the blinking cursor to the next character position, and then enter the next character.
• To delete characters, press the Mode down ▼ rocker switch to move backwards over existing characters.
When the last character on the display has been erased, press the Mode down ▼ rocker switch again to leave the name-edit mode, without making any changes, and begin the procedure again at step 2.
5 To save the changes, press and hold the Sel button.
108

Trunking Operation
6 Repeat steps 2 through 5 until you have modified all the desired names,
OR
Do one of the following:
• Press the HOME button to return to normal radio operation.
OR
• Press the Page button to return to normal Call Alert operation.
Table 3: Entering Characters Using the Keypad
KeyNumber of times the key is pressed
1 2 3 4 5 6 7 8 9
0 0 ( ) < >
1 1 & %
2 A B C 2 a b c
3 D E F 3 d e f
4 G H I 4 g h i
5 J K L 5 j k l
6 M N O 6 m n o
7 P Q R S 7 p q r s
8 T U V 8 t u v
9 W X Y Z 9 w x y z
* * / + - =
# # . ! ? , ;
ASTRO Digital Spectra and Digital Spectra Plus Model W4, W5, W7, and W9 109

Trunking Operation
FailsoftIf the trunked system’s central controller fails for any reason, the radio indicates failsoft. In this condition, the radio transmits and receives on a pre-determined frequency in a conventional mode.
Failsoft ensures that you will have communications capability at all times. Radios can be programmed by a qualified radio technician so that units that normally communicate on the same trunked mode will be assigned to the same failsoft repeater frequency.
Since the normal trunking features do not operate during failsoft, much of the privacy of trunked systems is lost. You must share the channel with other users until the failure is corrected.
To continue, in failsoft, to communicate with other talkgroups:
If a system that is in failsoft is accessed while in scan, the radio freezes scan and remains on the failsoft frequency for a period of six seconds. This time period can be changed by a qualified radio
1 Rotate the Mode knob (W4) or press the Mode (W5, W7, W9) rocker switch to change to a different repeater frequency.
The failsoft condition is indicated by a faint beeping tone every ten seconds (radio unsquelched).
When the trunking system returns to normal operation, the beeping tone stops.
2 Press the PTT button to talk, and release the button to listen.
110
Trunking Operation
technician. This time allows the operator to monitor the failsoft frequency for activity before resuming scanning.
On models W7 and W9, the nuisance-delete feature can be used to temporarily delete the system in failsoft from the scan list, if desired.
ASTRO Digital Spectra and Digital Spectra Plus Model W4, W5, W7, and W9 111
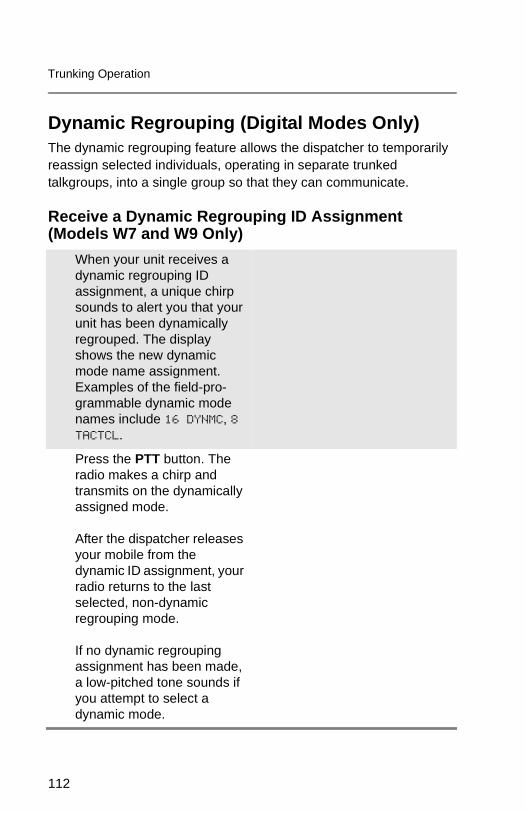
Trunking Operation
Dynamic Regrouping (Digital Modes Only)The dynamic regrouping feature allows the dispatcher to temporarily reassign selected individuals, operating in separate trunked talkgroups, into a single group so that they can communicate.
Receive a Dynamic Regrouping ID Assignment (Models W7 and W9 Only)
When your unit receives a dynamic regrouping ID assignment, a unique chirp sounds to alert you that your unit has been dynamically regrouped. The display shows the new dynamic mode name assignment. Examples of the field-pro-grammable dynamic mode names include 16 DYNMC, 8 TACTCL.
Press the PTT button. The radio makes a chirp and transmits on the dynamically assigned mode.
After the dispatcher releases your mobile from the dynamic ID assignment, your radio returns to the last selected, non-dynamic regrouping mode.
If no dynamic regrouping assignment has been made, a low-pitched tone sounds if you attempt to select a dynamic mode.
112

Trunking Operation
Select Enable and Disable (Digital Modes Only)The dispatcher may classify regrouped units into one of two categories: select-enabled or select-disabled.
Request a Dynamic Regrouping(Models W7 and W9 Only) (Digital Modes Only)
Select-enabled Units are free to make mode changes to any of the available talkgroups, including the dynamic group.
Select-disabled Units cannot change modes because the dispatcher has specifically chosen to force the unit to remain in the dynamic mode.
1 Press the Rpg (W7) or Rpgm (W9) button to request regrouping.
A high-pitched tone sounds, indicating your request was received by the system’s central controller.
The display changes to RPGM (W7) or RPGM RQST (W9) while the request is being processed.
O #Del Rcl
Mode
Vol
Mic
Phon Call SelPWR
Scan
XMIT
BUSYDIM
HOME
1Ste 2 3Lck
4Sts 5Rpg 6Msg
7H/L 8Mon 9Dir
DYNAMICREGROUPING
Model W7
Model W9
XMIT BUSY
1 2 3
4 5 6
7 8 9
0
DIM
PriNon
Pri
Emer Dir Scan Call
Mode Vol Sel Home
Page Rpgm Site
Phon H/L Lock
Rcl Sql Del
Sts Msg
Srch
DYNAMICREGROUPING
ASTRO Digital Spectra and Digital Spectra Plus Model W4, W5, W7, and W9 113

Trunking Operation
If the regrouping request is acknowledged, a dis-patcher-acknowledge signal sounds (four high-pitched tones), and the display shows ACK RCVD.
The radio then returns to nor-mal operation.
If the regrouping request is not acknowledged within six to eight seconds, the dis-play alternates between showing NO ACK and RPGM or (W9 Model) RPGM RQST, and a low-pitched tone sounds.
At this time, do one of the fol-lowing:
• Press the microphone PTT button or the Sel button to resend the regroup request.
OR
• Press the HOME button to return to normal operation.
114
Trunking Operation
SmartZone™ (Models W7 and W9 Only)The SmartZone feature extends communications beyond the reach of a single-trunked site (antenna location) when operating in a SmartZone system. SmartZone units provide expanded wide-area coverage.
SmartZone automatically switches the radio to a different site when the current site signal becomes unacceptable. This usually happens when the vehicle in which the radio is located is driven out of the range of one site, and into the range of another.
Under normal conditions, a SmartZone-enabled radio functions invisibly to the operator. However, the operator does have some manual controls on the W7 and W9 models: the Site and Lock buttons. These buttons can be used to check, or change, the SmartZone operation.
ASTRO Digital Spectra and Digital Spectra Plus Model W4, W5, W7, and W9 115

Trunking Operation
Site-Button OperationTo check which site the radio has currently selected:
Press the Ste (W7) or Site (W9) button momentarily.
The current site name and RSSI (received signal strength indicator) are dis-played momentarily.
One of the following condi-tions can also occur:
• If the radio is not locked onto a site, but is scanning for a new site, SCANNING is displayed.
• If the radio has not yet received site ID information for the current site, the radio displays SITE XX.
Note: You can also initiate scanning to another site by holding down the Ste button until SCANNING is displayed.
SITE LOCK
O #Del Rcl
Mode
Vol
Mic
Phon Call SelPWR
Scan
XMIT
BUSYDIM
HOME
1Ste 2 3Lck
4Sts 5Rpg 6Msg
7H/L 8Mon 9Dir
Model W7
Model W9
XMIT BUSY
1 2 3
4 5 6
7 8 9
0
DIM
PriNon
Pri
Emer Dir Scan Call
Mode Vol Sel Home
Page Rpgm Site
Phon H/L Lock
Rcl Sql Del
Sts Msg
Srch
LOCK
SITE
116

Trunking Operation
Lock Onto a SiteIn areas that commonly have weak signals, use the SmartZone lock function to prevent the radio from automatically scanning for a new site.
1 Press the Lck (W7) or Lock (W9) button momentarily to display the current lock status.
Model W7: Either LOCKED or UNLOCKED is displayed.
Model W9: Either SITE LOCKED or SITE UNLCKD is displayed.
2 To change the locked or unlocked condition, press and hold the Lck (W7) or Lock (W9) button until a tone sounds and the display changes.
After temporarily displaying the new condition, the radio returns to normal operation.
SITE LOCK
O #Del Rcl
Mode
Vol
Mic
Phon Call SelPWR
Scan
XMIT
BUSYDIM
HOME
1Ste 2 3Lck
4Sts 5Rpg 6Msg
7H/L 8Mon 9Dir
Model W7
Model W9
XMIT BUSY
1 2 3
4 5 6
7 8 9
0
DIM
PriNon
Pri
Emer Dir Scan Call
Mode Vol Sel Home
Page Rpgm Site
Phon H/L Lock
Rcl Sql Del
Sts Msg
Srch
LOCK
SITE
ASTRO Digital Spectra and Digital Spectra Plus Model W4, W5, W7, and W9 117

Trunking Operation
Site TrunkingIn a SmartZone system, if the zone controller for a particular site fails, the site enters into a site-trunking operational mode. In this mode of operation, the user can only communicate with other units at the same site.
Radios in a SmartZone system can be programmed by a qualified radio technician to display STE TRNK (W7) or STE TRUNK (W9) when site trunking becomes active. The display alternates with the current mode display as long as the radio remains in site trunking. The radio also sounds a valid-key chirp when it first detects site trunking.
Out-of-Range IndicationThe out-of-range display/audible indication feature can be enabled by a qualified radio technician. OUT OF RANGE and the current selected mode are alternately displayed, and a low-pitched tone sounds every six seconds:
• When the radio is out of range of the system and can no longer lock onto the control channel
OR
• When the radio is in failsoft and cannot lock onto the failsoft channel.
The out-of-range indication remains in effect until one of the following conditions occur:
• The radio locks on a control channel
• The radio locks on a failsoft channel
• The radio is turned off
118
Trunking Operation
Trunked AnnouncementThe announcement capability allows a user to make announcements to the entire user group, as well as monitor talkgroup calls and other announcements.
Announcement calls are handled in two different ways, depending on the trunked central controller configuration. The two types are called ruthless and non-ruthless preemption.
• Ruthless Preemption: When a ruthless preemption announcement call is initiated, the requesting radio begins transmitting immediately. All associated talkgroup calls taking place on other channels are immediately halted, and the radios are steered to the announcement call.
Transmitting radios continue to transmit until the PTT button is released, at which time they also unmute for the announcement call. Individual calls (Private Conversation and telephone interconnect) are not affected.
• Non-Ruthless Preemption: When a non-ruthless preemption announcement is initiated, the initiating unit receives a telephone-type busy tone, followed by a call back when all associated talkgroup conversations end.
Once an announcement call is pending, any attempts by other users to initiate a talkgroup call will result in a telephone-type busy tone. These users will not receive a call back until the announcement call is complete.
ASTRO Digital Spectra and Digital Spectra Plus Model W4, W5, W7, and W9 119
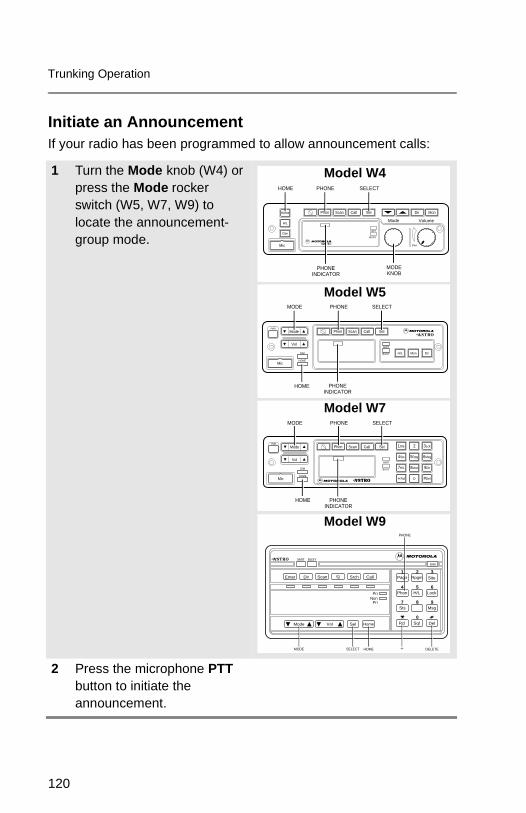
Trunking Operation
Initiate an AnnouncementIf your radio has been programmed to allow announcement calls:
1 Turn the Mode knob (W4) or press the Mode rocker switch (W5, W7, W9) to locate the announcement-group mode.
2 Press the microphone PTT button to initiate the announcement.
XMIT
BUSY
Mode Volume
Pwr
Phon Call SelScan
Mic
Home
Dim
H/L
Dir Mon
HOME PHONE SELECT
MODEKNOB
PHONEINDICATOR
Model W4
Mode
Vol
Mic
Phon Call Sel
H/L Mon Dir
PWR
Scan
XMIT
BUSYDIM
HOME
SELECTMODE
HOME PHONEINDICATOR
PHONE
Model W5
O #Del Rcl
Mode
Vol
Mic
Phon Call SelPWR
Scan
XMIT
BUSYDIM
HOME
1Ste 2 3Lck
4Sts 5Rpg 6Msg
7H/L 8Mon 9Dir
SELECTMODE
HOME PHONEINDICATOR
PHONE
Model W7
XMIT BUSY
1 2 3
4 5 6
7 8 9
0
DIM
PriNon
Pri
Emer Dir Scan Call
Mode Vol Sel Home
Page Rpgm Site
Phon H/L Lock
Rcl Sql Del
MODE SELECT HOME
PHONE
DELETE
Sts Msg
Srch
Model W9
120

Secure Operation
Receive a Private Message1 Select a mode by turning the
Mode knob (W4) or pressing the Mode rocker switch (W5, W7, W9).
XMIT
BUSY
Mode Volume
Pwr
Phon Call SelScan
Mic
Home
Dim
H/L
Dir Mon
SECUREINDICATOR
MODEKNOB
HOME SECURE
Model W4
Mode
Vol
Mic
Phon Call Sel
H/L Mon Dir
PWR
Scan
XMIT
BUSYDIM
HOME
MODE
HOMESECURE
INDICATOR
SECURE
Model W5
O #Del Rcl
Mode
Vol
Mic
Phon Call SelPWR
Scan
XMIT
BUSYDIM
HOME
1Ste 2 3Lck
4Sts 5Rpg 6Msg
7H/L 8Mon 9Dir
MODE
HOMESECURE
INDICATOR
SECURE
Model W7
Model W9
XMIT BUSY
1 2 3
4 5 6
7 8 9
0
DIM
PriNon
Pri
Emer Dir Scan Call
Mode Vol Sel Home
Page Rpgm Site
Phon H/L Lock
Rcl Sql Del
MODE SELECT HOME
Sts Msg
Srch
SECURENETSECURE
ASTRO Digital Spectra and Digital Spectra Plus Model W4, W5, W7, and W9 121
Secure Operation
2 Using the Volume knob (W4) or the Vol rocker switch (W5, W7, W9), adjust the volume to a comfortable listening level.
In conventional modes and, if enabled, in trunking modes, the BUSY light blinks and the radio unmutes when the radio is receiving a private message.
Note: The secure on/off state does not affect received messages. The radio automatically receives coded or clear messages.
122
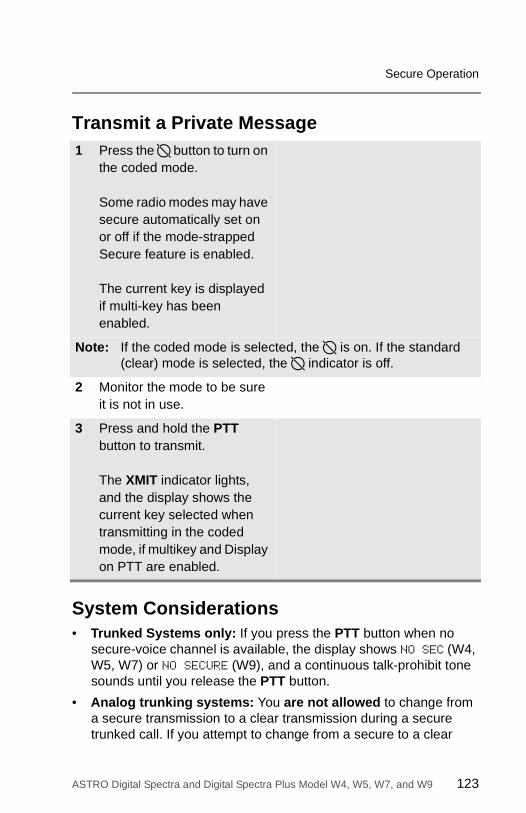
Secure Operation
Transmit a Private Message
System Considerations• Trunked Systems only: If you press the PTT button when no
secure-voice channel is available, the display shows NO SEC (W4, W5, W7) or NO SECURE (W9), and a continuous talk-prohibit tone sounds until you release the PTT button.
• Analog trunking systems: You are not allowed to change from a secure transmission to a clear transmission during a secure trunked call. If you attempt to change from a secure to a clear
1 Press the D button to turn on the coded mode.
Some radio modes may have secure automatically set on or off if the mode-strapped Secure feature is enabled.
The current key is displayed if multi-key has been enabled.
Note: If the coded mode is selected, the D is on. If the standard (clear) mode is selected, the D indicator is off.
2 Monitor the mode to be sure it is not in use.
3 Press and hold the PTT button to transmit.
The XMIT indicator lights, and the display shows the current key selected when transmitting in the coded mode, if multikey and Display on PTT are enabled.
ASTRO Digital Spectra and Digital Spectra Plus Model W4, W5, W7, and W9 123

Secure Operation
transmission during a call, the radio generates a talk-prohibit tone, and the display will show SEC ONLY or SECURE ONLY.
• Digital trunking systems: You are allowed to change from a secure transmission to a clear transmission during a secure trunked call.
Loss IndicationWhen you press the PTT button while in the coded mode and without the encryption module containing a valid key, the speaker generates bursts of alert tones, and the display shows KEY FAIL until you release the PTT button.
When the radio is first turned on, six medium-pitched tones sound and the display momentarily shows KEY FAIL to indicate that the encryption module does not contain a valid key for the current mode.
If the periodic keyfail tone feature is enabled, six medium-pitched tones are generated every five to ten seconds while the radio is not transmitting or receiving to remind you that the radio does not have a valid key for the current mode. The keyfail reminder will not sound when the radio is in clear mode.
Select an Encryption Key (Conventional Only)The Select Key feature allows you to manually select any one of the 16 encryption keys.
If the current mode is programmed with key selection being strapped to force the current mode to use a predetermined key, the Select Key menu will not appear as a Secure menu item.
124
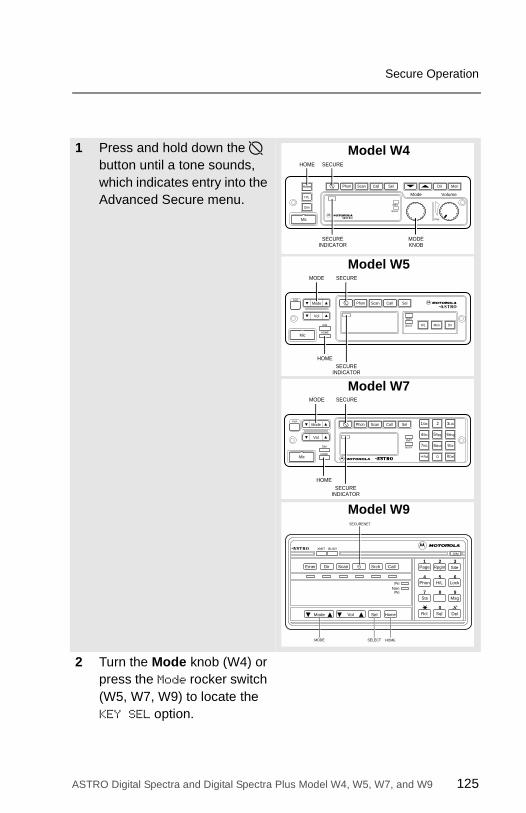
Secure Operation
1 Press and hold down the D button until a tone sounds, which indicates entry into the Advanced Secure menu.
2 Turn the Mode knob (W4) or press the Mode rocker switch (W5, W7, W9) to locate the KEY SEL option.
XMIT
BUSY
Mode Volume
Pwr
Phon Call SelScan
Mic
Home
Dim
H/L
Dir Mon
SECUREINDICATOR
MODEKNOB
HOME SECURE
Model W4
Mode
Vol
Mic
Phon Call Sel
H/L Mon Dir
PWR
Scan
XMIT
BUSYDIM
HOME
MODE
HOMESECURE
INDICATOR
SECURE
Model W5
O #Del Rcl
Mode
Vol
Mic
Phon Call SelPWR
Scan
XMIT
BUSYDIM
HOME
1Ste 2 3Lck
4Sts 5Rpg 6Msg
7H/L 8Mon 9Dir
MODE
HOMESECURE
INDICATOR
SECURE
Model W7
Model W9
XMIT BUSY
1 2 3
4 5 6
7 8 9
0
DIM
PriNon
Pri
Emer Dir Scan Call
Mode Vol Sel Home
Page Rpgm Site
Phon H/L Lock
Rcl Sql Del
MODE SELECT HOME
Sts Msg
Srch
SECURENET
ASTRO Digital Spectra and Digital Spectra Plus Model W4, W5, W7, and W9 125
Secure Operation
3 Press the Sel button to enter the Key Selection menu.
The display changes to show the last user-selected key.
4 Do one of the following:
• Turn the Mode knob (W4) or press the Mode rocker switch (W5, W7, W9) to review the encryption keys,
OR
• Use direct keypad entry to access the encryption keys.
5 Choose one of the following:
• To save a key, press the Sel button.
The radio returns to the home display.
• To select the default encryption keys on a radio-wide basis, press the Sel button while the radio displays PRESET.
Selecting preset causes the radio to return to its preprogrammed keys on a per-zone/-mode basis.
Note: When you scroll to an erased key, the display alternates between the key name and ERASED.
126
Secure Operation
Select an Encryption Index (Conventional Only)The Select an Index feature allows you to select one or more groups of several encryption keys from among the available keys stored in the radio. For example, you could have a group of three keys structured to one index, and another group of three different keys structured to another index. By changing indices, you would automatically switch from one set of keys to the other.
If the mobile does not support indexing, the index menu will not appear as a Secure menu item.
6 To abort this menu, press the HOME button or the PTT button.
Pressing the HOME button exits the key-select menu without saving the selected key choice.
Pressing the PTT button exits the menu without saving the selected key choice and allows the radio to transmit.
When you abort the key-select menu, the radio uses the key that was selected prior to entry into the menu.
ASTRO Digital Spectra and Digital Spectra Plus Model W4, W5, W7, and W9 127

Secure Operation
1 Press and hold down the D button until a tone sounds, which indicates entry into the Advanced Secure menu.
2 Turn the Mode knob (W4) or press the Mode rocker switch (W5, W7, W9) to locate the INDX SEL option.
XMIT
BUSY
Mode Volume
Pwr
Phon Call SelScan
Mic
Home
Dim
H/L
Dir Mon
SECUREINDICATOR
MODEKNOB
HOME SECURE
Model W4
Mode
Vol
Mic
Phon Call Sel
H/L Mon Dir
PWR
Scan
XMIT
BUSYDIM
HOME
MODE
HOMESECURE
INDICATOR
SECURE
Model W5
O #Del Rcl
Mode
Vol
Mic
Phon Call SelPWR
Scan
XMIT
BUSYDIM
HOME
1Ste 2 3Lck
4Sts 5Rpg 6Msg
7H/L 8Mon 9Dir
MODE
HOMESECURE
INDICATOR
SECURE
Model W7
Model W9
XMIT BUSY
1 2 3
4 5 6
7 8 9
0
DIM
PriNon
Pri
Emer Dir Scan Call
Mode Vol Sel Home
Page Rpgm Site
Phon H/L Lock
Rcl Sql Del
MODE SELECT HOME
Sts Msg
Srch
SECURENET
128

Secure Operation
3 Press the Sel button to enter the Index Selection menu.
The display changes to show the last index that was selected and stored after the Index Selection menu was entered.
4 Turn the Mode knob (W4) or press the Mode rocker switch (W5, W7, W9) to locate the desired key index.
5 Choose one of the following:
• To save an index key, press the Sel button. The radio will save the index and return to normal operation,
• To abort from the Index Selection menu, press the HOME button or the PTT button. (Pressing the PTT button allows the radio to transmit.)
ASTRO Digital Spectra and Digital Spectra Plus Model W4, W5, W7, and W9 129
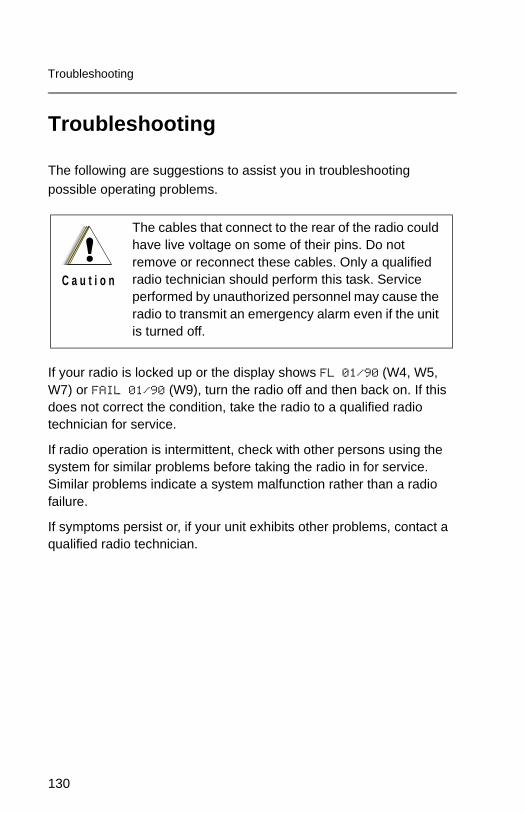
Troubleshooting
Troubleshooting
The following are suggestions to assist you in troubleshooting possible operating problems.
If your radio is locked up or the display shows FL 01/90 (W4, W5, W7) or FAIL 01/90 (W9), turn the radio off and then back on. If this does not correct the condition, take the radio to a qualified radio technician for service.
If radio operation is intermittent, check with other persons using the system for similar problems before taking the radio in for service. Similar problems indicate a system malfunction rather than a radio failure.
If symptoms persist or, if your unit exhibits other problems, contact a qualified radio technician.
The cables that connect to the rear of the radio could have live voltage on some of their pins. Do not remove or reconnect these cables. Only a qualified radio technician should perform this task. Service performed by unauthorized personnel may cause the radio to transmit an emergency alarm even if the unit is turned off.
!C a u t i o n
130

Glossary
ACK Acknowledgment of communication.
Channel A group of characteristics, such as transmit/receive frequency pairs, radio parameters, and encryption encoding.
Coded Squelch Tone Private-Line™ or Digital Private-Line. Used on conventional channels to make sure you hear only the communication meant for you.
Control Channel In a trunking system, one of the channels that is used to provide a continuous, two-way/data communications path between the central controller and all radios on the system.
Conventional Typically refers to radio-to-radio communications, sometimes through a repeater. You share a frequency, or frequencies, with other users without the aid of a central controller to assign communication channels. Therefore, you should monitor each channel before transmitting to avoid interfering with another user who may be transmitting.
Cursor A visual tracking marker (a blinking line) that indicates a location on the display.
Digital Private-Line (DPL) Coded Squelch
A continuous, sub-audible data signal, transmitted with the carrier.
Dispatcher An individual who has radio system management duties.
Failsoft A back-up system allowing you to communicate in a non-trunked, conventional mode should the trunked system fail.
FCC Federal Communications Commission.
ASTRO Digital Spectra and Digital Spectra Plus Model W4, W5, W7, and W9 131

Glossary
Hang Up Disconnect.
Home Display The first display information after the radio completes its self test.
LCD Liquid-Crystal Display.
Mode A programmed combination of operating parameters; for example, a channel or talkgroup.
Mode-Slaving Radio programmed to automatically give the proper operation for a given mode you have selected.
Monitoring (Conventional Operation)
Press a programmed monitor button to listen to another user active on the channel. This way, you may be prevented from talking over someone else’s conversation.
Page A one-way alert, with audio and/or display messages.
Push-To-Talk (PTT) Switch
The PTT switch engages the transmitter and puts the adio in transmit (send) operation when pressed. Press this switch to transmit; release it to receive.
Repeater A conventional radio feature, in which you talk through a receive/transmit facility (repeater) that re-transmits received signals in order to improve communications range and coverage.
RF Radio Frequency. A part of the general frequency spectrum between the audio and infrared light regions (about 10 kHz to 10,000,000 MHz).
RSSI Received Signal Strength Indicator.
132

Glossary
Squelch The muting of audio circuits when received signal levels fall below a pre-determined threshold. With carrier squelch, you hear all channel activity which exceeds the radio’s preset squelch level.
Standby An operating condition whereby the radio’s speaker is muted but still continues to receive data.
Talkgroup An organization (or group) of radio users who communicate with each other, using the same communication path.
Tone Private-Line (PL) Coded Squelch
A continuous sub-audible tone transmitted with the carrier.
Trunking The automatic sharing of communications paths between a large number of users (see Conventional). Allows radio users to share a smaller number of frequencies because a repeater, or communications path, is assigned to a talkgroup for the length of a conversation.
Zone A grouping of channels or talkgroups.
ASTRO Digital Spectra and Digital Spectra Plus Model W4, W5, W7, and W9 133

Glossary
Notes
134

Commercial Warranty
Limited Warranty
MOTOROLA COMMUNICATION PRODUCTS
I. What This Warranty Covers And For How LongMOTOROLA INC. (“MOTOROLA”) warrants the MOTOROLA manufactured Communication Products listed below (“Product”) against defects in material and workmanship under normal use and service for a period of time from the date of purchase as scheduled below:
Motorola, at its option, will at no charge either repair the Product (with new or reconditioned parts), replace it (with a new or reconditioned Product), or refund the purchase price of the Product during the warranty period provided it is returned in accordance with the terms of this warranty. Replaced parts or boards are warranted for the balance of the original applicable warranty period. All replaced parts of Product shall become the property of MOTOROLA.
This express limited warranty is extended by MOTOROLA to the original end user purchaser only and is not assignable or transferable to any other party. This is the complete warranty for the Product manufactured by MOTOROLA. MOTOROLA assumes no obligations or liability for additions or modifications to this warranty unless made in writing and signed by an officer of MOTOROLA. Unless made in a separate agreement between MOTOROLA and the original end user purchaser, MOTOROLA does not warrant the installation, maintenance or service of the Product.
MOTOROLA cannot be responsible in any way for any ancillary equipment not furnished by MOTOROLA which is attached to or used in connection with the Product, or for operation of the Product with any ancillary equipment, and all such equipment is expressly excluded from this warranty. Because each system which may use the Product is unique, MOTOROLA disclaims liability for range, coverage, or operation of the system as a whole under this warranty.
II. General ProvisionsThis warranty sets forth the full extent of MOTOROLA's responsibilities regarding the Product. Repair, replacement or refund of the purchase price, at MOTOROLA's option, is the exclusive remedy. THIS WARRANTY IS GIVEN IN LIEU OF ALL OTHER EXPRESS WARRANTIES. IMPLIED
ASTRO Digital Spectra and Digital Spectra Plus Units
One (1) Year
Product Accessories One (1) Year
ASTRO Digital Spectra and Digital Spectra Plus W4, W5, W7, and W9 135

Commercial Warranty
WARRANTIES, INCLUDING WITHOUT LIMITATION, IMPLIED WARRANTIES OF MERCHANTABILITY AND FITNESS FOR A PARTICULAR PURPOSE, ARE LIMITED TO THE DURATION OF THIS LIMITED WARRANTY. IN NO EVENT SHALL MOTOROLA BE LIABLE FOR DAMAGES IN EXCESS OF THE PURCHASE PRICE OF THE PRODUCT, FOR ANY LOSS OF USE, LOSS OF TIME, INCONVENIENCE, COMMERCIAL LOSS, LOST PROFITS OR SAVINGS OR OTHER INCIDENTAL, SPECIAL OR CONSEQUENTIAL DAMAGES ARISING OUT OF THE USE OR INABILITY TO USE SUCH PRODUCT, TO THE FULL EXTENT SUCH MAY BE DISCLAIMED BY LAW.
III. State Law RightsSOME STATES DO NOT ALLOW THE EXCLUSION OR LIMITATION OF INCIDENTAL OR CONSEQUENTIAL DAMAGES OR LIMITATION ON HOW LONG AN IMPLIED WARRANTY LASTS, SO THE ABOVE LIMITATION OR EXCLUSIONS MAY NOT APPLY.
This warranty gives specific legal rights, and there may be other rights which may vary from state to state.
IV. How To Get Warranty ServiceYou must provide proof of purchase (bearing the date of purchase and Product item serial number) in order to receive warranty service and, also, deliver or send the Product item, transportation and insurance prepaid, to an authorized warranty service location. Warranty service will be provided by Motorola through one of its authorized warranty service locations. If you first contact the company which sold you the Product, it can facilitate your obtaining warranty service. You can also call Motorola at 1-888-567-7347 US/Canada.
V. What This Warranty Does Not CoverDefects or damage resulting from use of the Product in other than its normal and customary manner.
A. Defects or damage from misuse, accident, water, or neglect.
B. Defects or damage from improper testing, operation, maintenance, installation, alteration, modification, or adjustment.
C. Breakage or damage to antennas unless caused directly by defects in material workmanship.
D. A Product subjected to unauthorized Product modifications, disassemblies or repairs (including, without limitation, the addition to the Product of non-Motorola supplied equipment) which adversely affect performance of the Product or interfere with Motorola’s normal
136
Commercial Warranty
warranty inspection and testing of the Product to verify any warranty claim.
E. Product which has had the serial number removed or made illegible.
F. Rechargeable batteries if:
• any of the seals on the battery enclosure of cells are broken or show evidence of tampering.
• the damage or defect is caused by charging or using the battery in equipment or service other than the Product for which it is specified.
G. Freight costs to the repair depot.
H. A Product which, due to illegal or unauthorized alteration of the software/firmware in the Product, does not function in accordance with MOTOROLA's published specifications or the FCC type acceptance labeling in effect for the Product at the time the Product was initially distributed from MOTOROLA.
I. Scratches or other cosmetic damage to Product surfaces that does not affect the operation of the Product.
J. Normal and customary wear and tear.
VI. Patent And Software ProvisionsMOTOROLA will defend, at its own expense, any suit brought against the end user purchaser to the extent that it is based on a claim that the Product or parts infringe a United States patent, and MOTOROLA will pay those costs and damages finally awarded against the end user purchaser in any such suit which are attributable to any such claim, but such defense and payments are conditioned on the following:
A. that MOTOROLA will be notified promptly in writing by such purchaser of any notice of such claim;
B. that MOTOROLA will have sole control of the defense of such suit and all negotiations for its settlement or compromise; and
C. should the Product or parts become, or in MOTOROLA's opinion be likely to become, the subject of a claim of infringement of a United States patent, that such purchaser will permit MOTOROLA, at its option and expense, either to procure for such purchaser the right to continue using the Product or parts or to replace or modify the same so that it becomes noninfringing or to grant such purchaser a credit for the Product or parts as depreciated and accept its return. The depreciation will be an equal amount per year over the lifetime of the Product or parts as established by MOTOROLA.
ASTRO Digital Spectra and Digital Spectra Plus W4, W5, W7, and W9 137
Commercial Warranty
MOTOROLA will have no liability with respect to any claim of patent infringement which is based upon the combination of the Product or parts furnished hereunder with software, apparatus or devices not furnished by MOTOROLA, nor will MOTOROLA have any liability for the use of ancillary equipment or software not furnished by MOTOROLA which is attached to or used in connection with the Product. The foregoing states the entire liability of MOTOROLA with respect to infringement of patents by the Product or any parts thereof.
Laws in the United States and other countries preserve for MOTOROLA certain exclusive rights for copyrighted MOTOROLA software such as the exclusive rights to reproduce in copies and distribute copies of such Motorola software. MOTOROLA software may be used in only the Product in which the software was originally embodied and such software in such Product may not be replaced, copied, distributed, modified in any way, or used to produce any derivative thereof. No other use including, without limitation, alteration, modification, reproduction, distribution, or reverse engineering of such MOTOROLA software or exercise of rights in such MOTOROLA software is permitted. No license is granted by implication, estoppel or otherwise under MOTOROLA patent rights or copyrights.
VII. Governing LawThis Warranty is governed by the laws of the State of Illinois, USA.
138
Index
Symbols800 MHz frequencies ....................1
Aadd scan list channel ..................47adjust
display brightness ...................12squelch level ...........................22volume .....................................11
alarmsactivate non-permanent ..........54activate permanent ..................55change selected ......................56horn and lights .........................53initiate
emergency ...........................26emergency call and alarm ....29silent emergency .................31
non-permanent horn and lights activation ................................54
non-rearmable external ...........58optional external ......................53permanent horn and lights activation ................................55
rearmable external ..................59receiving call when turned on ..57
alert tones .....................................5analog
mode .........................................2trunking system considerations ......................123
answerCall Alert page .......................104Enhanced Private Conversation call .........................................84
phone call ................................72ASTRO mode ...............................2automatic scanning .....................33autoscan .....................................33
Bbasic operation .............................9
box, hang up (HUB) .................... 53buffered overdial ......................... 78button
Call .......................................... 41Del .......................................... 42Dim ......................................... 58H/L (horn and lights) ............... 55Home ...................................... 39Mon (monitor) .......................... 36Page ....................................... 41Phon (phone) .......................... 72PTT ......................................... 40scan ........................................ 34Site ........................................ 116Sql (squelch) ........................... 36Sts (status) .............................. 61Zone down .............................. 48Zone up ................................... 48
Ccall
answer phone ......................... 72conventional talkgroup ............ 66emergency .............................. 25Enhanced PrivateConversation ......................... 87
initiateemergency .......................... 27Enhanced PrivateConversation ....................... 87from phone list ..................... 74
phone number not in list ......... 77receiving when alarms turnedon .......................................... 57
Call Alert pageanswering ............................. 104description .............................. 99placing .................................. 102selecting unit to call .............. 100sending ................................. 100
Call button .................................. 41calls, status ................................. 61change
ASTRO Digital Spectra and Digital Spectra Plus W4, W5, W7, and W9 139
Index
mode .......................................14mode in current zone ...............15mode not in current zone .........16mode priorities .........................44selected alarms .......................56zone .........................................14
channels, conventional ..................4considerations
analog trunking systems ........123digital trunking systems .........124trunked systems ....................123
control headoperation ...................................4status display .............................5
conventionalchannel ......................................4mode .......................................18scan list ...................................33selecting talkgroup ...................67talkaround ................................69talkgroup calls ..........................66
conventional mode, monitoring activity ........................................21
current zonechange mode ...........................15select mode .............................15
DDel button ....................................42delete
nuisance mode ........................42scan list channel ......................50
Designated Transmit Talkback Channel .....................................53
digital trunking systemconsiderations .........................124
Dim (dimmer) button ...................58direct-entry keyboard, sendstatus .........................................64
display, brightness adjustment ....12dynamic regrouping
receiving an ID assignment ...112requesting ..............................113
Eedit name in list ...................80, 107embedded signaling ......................1emergencies, specialconsiderations ...........................32
emergency callinitiating ...................................27trunking ...................................25
emergency call and alarmdescription ...............................25initiating ...................................29
encryption keyindex selection ......................127selecting ................................124
Enhanced Private Conversationanswer a call ...........................84description ...............................84initiate call ...............................87select unit to call ......................87
entering keypad characters.....................................83, 98, 109
external alarms ...........................53activate non-permanent horn and lights ......................................54
activate permanent horn andlights ......................................55
non-rearmable .........................58rearmable ................................59
Ffailsoft .......................................110FLASHport technology ..................2frequency ranges
800 MHz ....................................1UHF ...........................................1VHF ...........................................1
Gglossary ....................................131
HH/L (horn and lights) button ........55
140
Index
hang time ....................................34hang up box (HUB) .....................53Home
button ......................................39mode, selecting .......................17
horn and lights alarms .................53HUB (hang up box) .....................53
Iidentification, radio ........................3identifying models
Model W4 ..................................3Model W5 ..................................3Model W7 ..................................3Model W9 ..................................3
indicatorN PRI (non-priority) .................35Phone ......................................77PRI (priority) ............................35scan .........................................34
initiateemergency alarm .....................26emergency call and alarm .......29Enhanced Private Conversation call .........................................87
phone call from list ..................74silent emergency alarm ...........31trunked announcement .........120
interconnect, unlimited telephone 77introduction to radios ....................1
Kkey, encryption
index selection ......................127selecting ................................124
keypadcharacter selectionsequence .................83, 98, 109
entering characters ...83, 98, 109knob
Mode ...................................3, 39Volume ......................................3
Llist
edit name ................................ 80editing a name ...................... 107phone, place call ..................... 74scan ........................................ 33store phone number ................ 79storing unit ID number ........... 105telephone interconnect ........... 71
live overdial ................................ 78lock on a site, SmartZone ......... 117loss indication, secure operation 124
MMode
knob .................................... 3, 39rocker switch ........................... 39
modeanalog ....................................... 2ASTRO ..................................... 2changing ................................. 15changing outside current zone 16Mode
knob .................................... 39rocker switch ....................... 39
priorities, changing .................. 44selecting .................................. 15selecting Home ....................... 17selecting outside current zone 16selection .................................. 14slaving ....................................... 4transmitting (conventional) ...... 18transmitting (trunked) .............. 18trunked ...................................... 4
Mon (monitor) button .................. 36monitoring
conventional mode activity ...... 21
NN PRI (non-priority) indicator ...... 35non-priority scanning .................. 33non-rearmable exteral alarms ..... 58
ASTRO Digital Spectra and Digital Spectra Plus W4, W5, W7, and W9 141
Index
non-ruthless preemption ...........119non-talkback scan .......................41nuisance mode
deleting ....................................42restoring ..................................43
Ooperation
basic ..........................................9control head ...............................4scan .........................................33secure ....................................121SmartZone site-button ...........116trunking ....................................71
operator-selectable scan .............33out-of-range indication ..............118overdial
buffered ...................................78live ...........................................78
PPage button .................................41Phon (phone) button ...................72Phone indicator ...........................77phone numbers, preprogrammed 71place phone call from list .............74placing Call Alert page ..............102power level selection ...................20powering on radio ..........................9preemption
non-ruthless ...........................119ruthless ..................................119
preprogrammed phone numbers .71PRI (priority) indicator .................35priority scanning ..........................33private message
receive ...................................121transmit ..................................123
programming scan list .................46PTT button ..................................40PTT-ID (Push-to-Talkidentification) .............................60
Push-to-Talk identification
(PTT-ID) ....................................60
Rradio identification .........................3rearmable exteral alarms ............59receive
call with alarms turned on .......57private message ....................121
requesting a dynamicregrouping ...............................113
restoremode priorities .........................45nuisance mode ........................43
rocker switchMode .......................................39Vol (volume) ............................58
ruthless preemption ..................119
Sscan
autoscan .................................33button ......................................34indicator ..................................34non-priority ..............................33non-talkback ............................41operation .................................33operator-selectable .................33priority .....................................33talkback ...................................40transmit while on .....................40turning on ................................34
scan listadd a channel .........................47conventional ............................33delete a channel ......................50modes .....................................33programming ...........................46restore mode priorities ............45talkgroup scan .........................33trunked priority ........................33viewing ....................................38
secure operation .......................121select
142
Index
Call Alert page unit ................100conventional talkgroup ............67encryption key .......................124encryption key index .............127Home mode .............................17mode .......................................14mode in current zone ..............15mode not in current zone ........16power level ..............................20volume level ............................11zone ........................................14
selected-disabled units .............113selected-enabled units ..............113send
Call Alert page .......................100status call ................................61
Site button .................................116site trunking
SmartZone ............................118site-button operation,SmartZone ...............................116
slaved propramming .....................4slaving, mode ................................4smart PTT ...................................66SmartZone
description .............................115lock on a site .........................117site trunking ...........................118site-button operation .............116
Sql (squelch) button ....................36squelch, adjusting level ...............22status calls
description ...............................61sending ....................................61
status display, control head ..........5store phone number in list ...........79Sts (status) button .......................61
Ttalk direct (mobile-to-mobile) .......69talkback scan ..............................40talkgroup scan list .......................33telephone interconnect list ..........71
time-out timer .............................. 60tones, alert .................................... 5transmit
conventional modes ................ 18private message ................... 123trunked modes ........................ 18with scan on ............................ 40
transmitting ................................. 18troubleshooting ......................... 130trunked
announcementcapability ........................... 119initiate ................................ 120
Call Alert page ........................ 99mode ................................... 4, 18priority scan list ....................... 33system considerations .......... 123
trunkinganswer phone call ................... 72emergency call ........................ 25Enhanced PrivateConversation ......................... 84
failsoft ................................... 110initiating emergency call .......... 27operation ................................. 71status calls .............................. 61telephone interconnect list ...... 71unlimited telephoneinterconnect ........................... 77
turn onradio .......................................... 9scan ........................................ 34
UUHF frequencies ........................... 1unit ID number, store in list ....... 105units
select-disabled ...................... 113select-enabled ...................... 113troubleshooting ..................... 130
unlimited telephone interconnect 77
ASTRO Digital Spectra and Digital Spectra Plus W4, W5, W7, and W9 143

Index
VVHF frequencies ...........................1viewing scan list ..........................38Vol (volume) rocker switch ..........58Volume knob .................................3volume, adjusting ........................11
ZZone down button .......................48zone selection .............................14Zone up button ...........................48
144

6881076C25-D
*6881076C25*
MOTOROLA, the Stylized M Logo, ASTRO and Spectra are registered in the U.S. Patent and Trademark Office. All other product or service names are the property of their respective owners.© Motorola, Inc. 2002.All rights reserved. Printed in U.S.A.
Motorola, Inc.
8000 West Sunrise Boulevard
Ft. Lauderdale, FL 33322

6881090C62-C
*6881090C62*
MOTOROLA, the Stylized M Logo, ASTRO, Digital Spectra,and Digital Spectra Plus are registered in the U.S. Patentand Trademark Office. All other product or service names are the property of their respective owners.© Motorola, Inc. 2004.All rights reserved. Printed in U.S.A.
Motorola, Inc.8000 West Sunrise BoulevardFt. Lauderdale, FL 33322