AstralPool Pumps CTX Series, E Series Bolero ND Cleaner BX ...
12
INSTALLATION AND OPERATING INSTRUCTIONS INSTALLATION AND OPERATING INSTRUCTIONS I INSTALLATION AND OPERATING INSTRUCTIONS AstralPool Pumps CTX Series, E Series BX Series & FX Series www.astralpool.com.au [email protected]
Transcript of AstralPool Pumps CTX Series, E Series Bolero ND Cleaner BX ...

22/07/2020
INSTALLATION AND
OPERATING INSTRUCTIONS
Bolero ND Cleaner
INSTALLATION AND OPERATING INSTRUCTIONS I INSTALLATION AND OPERATING INSTRUCTIONS
AstralPool Pumps CTX Series, E Series BX Series & FX Series
www.astralpool.com.au [email protected]

Inst243 AstralPool Pump Instructions V07-20
2

Inst243 AstralPool Pump Instructions V07-20
3
GENERAL A high performance, high head pump ideally suited for the modern pool or spa with extensive equipment such as chlorinators, heaters and in floor cleaning.
Note: The appliance is not intended for use by young children or infirm person without supervision. Please ensure that young children are supervised to ensure that they do not play with the appliance.
FEATURES
- Continuous duty rated motor - Precision reinforced moulded high head impeller, giving extra performance - Single piece moulded body for added strength and longer life - Rapid priming diffuser quickly corrects loss of water flow - Quick and easy disassembly for servicing - Large capacity basket with easily removed lid
FX PUMPS FLOW RATES

Inst243 AstralPool Pump Instructions V07-20
4
E-SERIES PUMPS FLOW RATES
CTX PUMPS FLOW RATES

Inst243 AstralPool Pump Instructions V07-20
5
BX PUMPS FLOW RATE
INSTALLATION OF BX, CTX & E SERIES PUMPS
E-SERIES
CTX SERIES

Inst243 AstralPool Pump Instructions V07-20
6
FX SERIES
BX SERIES

Inst243 AstralPool Pump Instructions V07-20
7
A. Plan position of pump so that it will be:
1. Free of water flooding, such as in a sump, garden hollow, ditch or at the bottom of a bank. 2. On a stable base so that:
a) The pump is not left suspended by its fittings, causing a leak or failure with loss of water. b) Movement through vibration is restricted c) No strain is put on attaching pipe or other expensive equipment
3. Accessible for maintenance and easily removed for service. 4. Breathing space. Pump should not be crowded which will prevent cooling airflow from fan. Overheating due
to lack of cooling voids warranty. 5. Within reach of power point without extension cables as plugs liable to corrosion, shorting, etc.
6. At a minimum height of suction lift of water from pool surface to pump inlet. B. For best pump performance keep suction pipe length as short as possible with minimum number of bends and use
50mm PVC suction pipe for 750W (1.0hp) to 1700W (2.0 hp). On 3.0 hp models a 65mm or 2 x 50mm suctions should be used.
C. Minimum pipe diameters should be used on the following pumps. 40mm - E 140, E190, E230, CTX180 50mm - E 290, CTX280, CTX360, CTX400, CTX610, BX1.0, BX1.5, BX2.0, BX3.0
D. Secure the barrel unions supplied into the attaching pipe work, using approved priming fluid and solvent cement as normal practice, coating both surfaces. NOTE: Always wear protective gloves when handling and using glue and priming fluid. Ensure no excess adhesive runs into the union proper affecting the sealing or removal abilities. Allow 24 hours to dry before starting pump.
E. Install isolation valves before the pump section and after equipment if the pump is below the water level of the pool.
F. For pump installations 500mm above water level, it generally requires a foot valve at the pool or check valve in the suction line. Suction lines must be installed below water level until just in front of pump location and vertical riser used to reach pump inlet. AstralPool pumps are rated to a maximum head of 25 meters however refer to your pump’s data plate for actual achievable pressure.
G. All pumps will operate quieter and perform more efficiently if a straight length of 450mm pipe is plumbed horizontally into the front of the pump.
H. Water temperature not to exceed 45 degrees C.
I. Pumps must be either - supplied by an isolating transformer, or - supplied through a residual current device (RCD) with a rated residual operating current not
exceeding 30mA.
INSTALLATION OF FX SERIES PUMPS
A. Plan position of pump so that it will be: 1. Below the pool or spa water level unless pump is primed to be a secondary pump. 2. Free of water flooding, such as in sump, garden hollow, ditch or at bottom of bank with run off. 3. On a stable base so that:
a) The pump is not left suspended by its fittings, causing a leak or failure with loss of water.
b) Movement through vibration is restricted. c) No strain is put on attaching pipe or other expensive equipment.
4. Accessible for maintenance. 5. Easily removed for service. 6. Breathing space. Pump should not be crowded which will prevent cooling airflow from fan. Overheating
due to lack of cooling voids warranty. 7. Within reach of power point without extension plugs liable to corrosion, shorting, etc.
B. For best pump performance keep suction pipe length as short as possible with minimum number of bends and use 50mm PVC suction pipe for 750W (1hp) or larger pumps.
C. Minimum pipe diameters should be used on the following pumps: 40mm - FX140, FX190, FX 250
50mm - FX290, FX340, FX520 D. Secure the barrel unions supplied into the attaching pipe work, using approved priming fluid and solvent
cement as normal practice, coating both surfaces. NOTE: Always wear protective gloves handling and using glue and priming fluid. Ensure no excess adhesive runs into the union proper affecting the sealing or removal abilities. Allow 24 hours to dry before starting pump.
E. Install isolation valves before the pump section and after equipment.

Inst243 AstralPool Pump Instructions V07-20
8
F. All pumps will operate quieter and perform more efficiently if a straight length of 450mm pipe is plumbed horizontally into the front of the pump.
G. Water temperature not to exceed 45 degrees C. H. AstralPool pumps are rated to a maximum head of 25 meters however refer to you pumps data plate for actual
achievable pressure. I. Pumps must be either
- supplied by an isolating transformer, or - supplied through a residual current device (RCD) with a rated residual operating current not
exceeding 30mA.
3 PHASE PUMP INSTALLATION
Only a qualified Electrician may connect or disconnect this pump to or from a power supply. The Pump must be connected by means of fixed wiring (to AS/NZS 3000:2007) so that the IP rating is maintained when doing so. Electrician must check the direction of rotation of the pump at the time of installation, refer to arrow on the seal plate to confirm correct rotation. Required size Power Cable for Power connection, Minimum 3 x 1.5 sq mm cable 600/1000v with Min 1.5mm Dia conductors and with a Min Outer Diameter of 9.0mm to a Maximum Diameter 10.5mm dia to be used. The Pump is not suitable for flex and plug connection.
1. Connect power to motor. 2. Ensure that pump is empty of all water. 3. Momentarily apply power to motor and check rotation direction of motor matches that of the arrow located on the
rear of the pump seal plate. 4. If motor is rotating in the opposite direction to arrow on pump, correct phase wiring. 5. Once rotation is correct, fill pump with water, prime as described below and test pump operation.
OPERATION OF BX, CTX & E SERIES PUMPS
1. Prime pump if hair and lint pot is dry as follows – Close off valve on suction line if present. Remove lint pot lid. Fill lint pot and chamber with water. Replace and secure lint pot lid and seal.
2. Open all valves, allowing fluid to flow through pump. 3. Switch on power to pump. 4. If some flow of water does not establish within one half minute, switch off and prime pump again. If pump does
not prime within 3 attempts, check all suction connections for sealing. If these are satisfactory, a check or foot valve is required to hold water for prime.
5. If the water flow through pump is always tedious to obtain at start-up after cleaning the lint basket, then an examination of the system to establish a reason and correct the cause is recommended. Eg. Check valve, air leaks, faulty seal, cracked lint pot lid, etc.
6. A non return valve is supplied loose in the basket of the pump (CTX and E Series only). To install, place between the outlet barrel union tail and the discharge of the pump. The non return valve should be located so that the flap can swing upwards into the union tail. The non return valve should be installed on spas equipped with cartridge filters, any time multiple pumps are operating off one suction or return line or any installation where a back flow of water may occur when the pump is shut down. The non return valve will reduce the performance of the pump slightly.
Notes: The pump is not intended for use by young children or infirm persons without supervision. Please ensure that young children are supervised to ensure that they do not play with the pump. To avoid a safety hazard, the supply cord if damaged, must only be replaced by AstralPool, or its service agent or a suitably qualified person.
OPERATION OF FX SERIES PUMP
1. Open all valves, allowing fluid to flow through pump. 2. If an air lock occurs and no water appears to fill pump housing once the valves have been opened, release outlet
barrel union slowly until a small amount of water escapes from the pump then re-tighten. 3. Switch on power to pump. 4. If some flow of water does not establish within one half minute, switch off and repeat procedure 3 again. If pump
does not prime within 3 attempts, check all valves and jets are in the open position. Notes: The pump is not intended for use by young children or infirm persons without supervision. Please ensure that young children are supervised to ensure that they do not play with the pump.
Inst243 AstralPool Pump Instructions V07-20
9
To avoid a safety hazard, the supply cord if damaged, must only be replaced by AstralPool, or its service agent or a suitably qualified person.
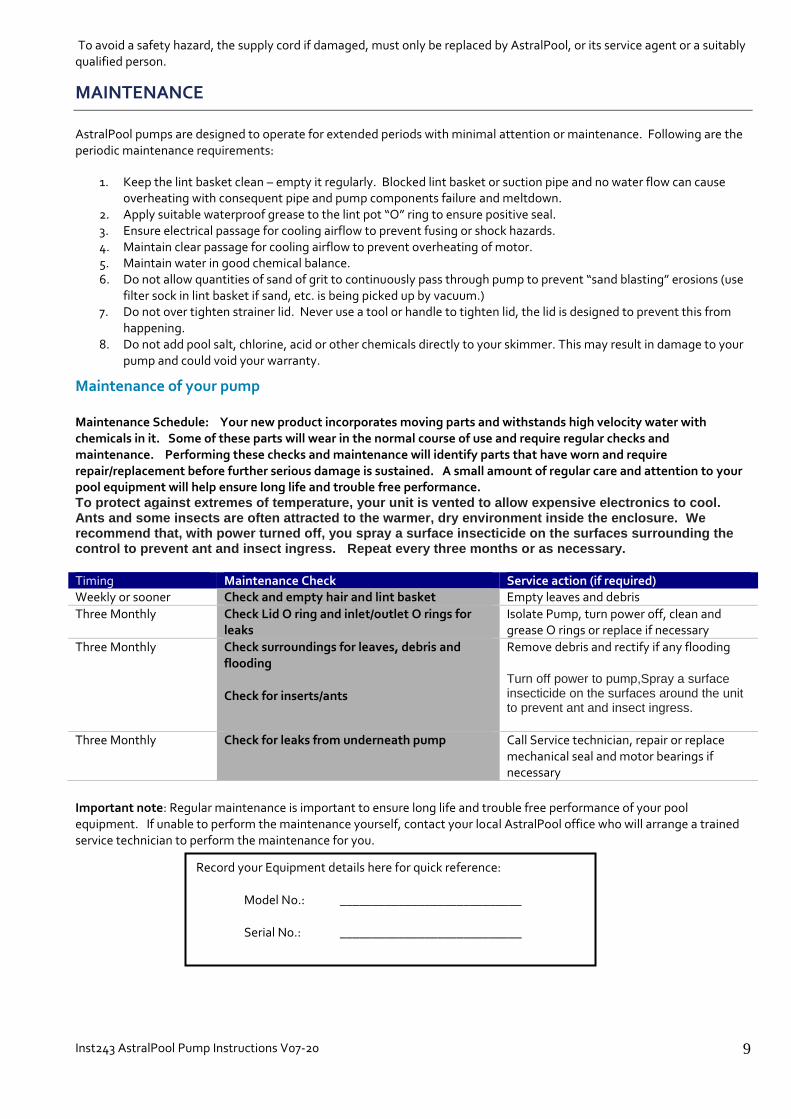
MAINTENANCE
AstralPool pumps are designed to operate for extended periods with minimal attention or maintenance. Following are the periodic maintenance requirements:
1. Keep the lint basket clean – empty it regularly. Blocked lint basket or suction pipe and no water flow can cause overheating with consequent pipe and pump components failure and meltdown.
2. Apply suitable waterproof grease to the lint pot “O” ring to ensure positive seal. 3. Ensure electrical passage for cooling airflow to prevent fusing or shock hazards. 4. Maintain clear passage for cooling airflow to prevent overheating of motor. 5. Maintain water in good chemical balance. 6. Do not allow quantities of sand of grit to continuously pass through pump to prevent “sand blasting” erosions (use
filter sock in lint basket if sand, etc. is being picked up by vacuum.) 7. Do not over tighten strainer lid. Never use a tool or handle to tighten lid, the lid is designed to prevent this from
happening. 8. Do not add pool salt, chlorine, acid or other chemicals directly to your skimmer. This may result in damage to your
pump and could void your warranty.
Maintenance of your pump Maintenance Schedule: Your new product incorporates moving parts and withstands high velocity water with chemicals in it. Some of these parts will wear in the normal course of use and require regular checks and maintenance. Performing these checks and maintenance will identify parts that have worn and require repair/replacement before further serious damage is sustained. A small amount of regular care and attention to your pool equipment will help ensure long life and trouble free performance. To protect against extremes of temperature, your unit is vented to allow expensive electronics to cool. Ants and some insects are often attracted to the warmer, dry environment inside the enclosure. We recommend that, with power turned off, you spray a surface insecticide on the surfaces surrounding the control to prevent ant and insect ingress. Repeat every three months or as necessary. Timing Maintenance Check Service action (if required) Weekly or sooner Check and empty hair and lint basket Empty leaves and debris
Three Monthly Check Lid O ring and inlet/outlet O rings for leaks
Isolate Pump, turn power off, clean and grease O rings or replace if necessary
Three Monthly Check surroundings for leaves, debris and flooding Check for inserts/ants
Remove debris and rectify if any flooding Turn off power to pump,Spray a surface insecticide on the surfaces around the unit to prevent ant and insect ingress.
Three Monthly Check for leaks from underneath pump Call Service technician, repair or replace mechanical seal and motor bearings if necessary
Important note: Regular maintenance is important to ensure long life and trouble free performance of your pool equipment. If unable to perform the maintenance yourself, contact your local AstralPool office who will arrange a trained service technician to perform the maintenance for you.
Record your Equipment details here for quick reference: Model No.: ____________________________ Serial No.: ____________________________

Inst243 AstralPool Pump Instructions V07-20
10
Electrical Specifications
All Astral Pool pumps have double insulation on the water circuit for maximum protection and safety. Pumps manufactured by Astral Pool use P2 rated capacitors for protection against fire.

Inst243 AstralPool Pump Instructions V07-20
11
NOTES:

Inst243 AstralPool Pump Instructions V07-20
12
Fluidra Group Australia PTY LTD
219 Woodpark Road
Smithfield, N.S.W 2164
Australia
ABN 87 002 641 965