Assignment 2 DUE TONIGHT -...
34
Instructor: Craig Duckett Lecture 12 : Tuesday, May 8 th , 2018 Intro to SQL Server, SSMS 1 Assignment 2 DUE TONIGHT
Transcript of Assignment 2 DUE TONIGHT -...
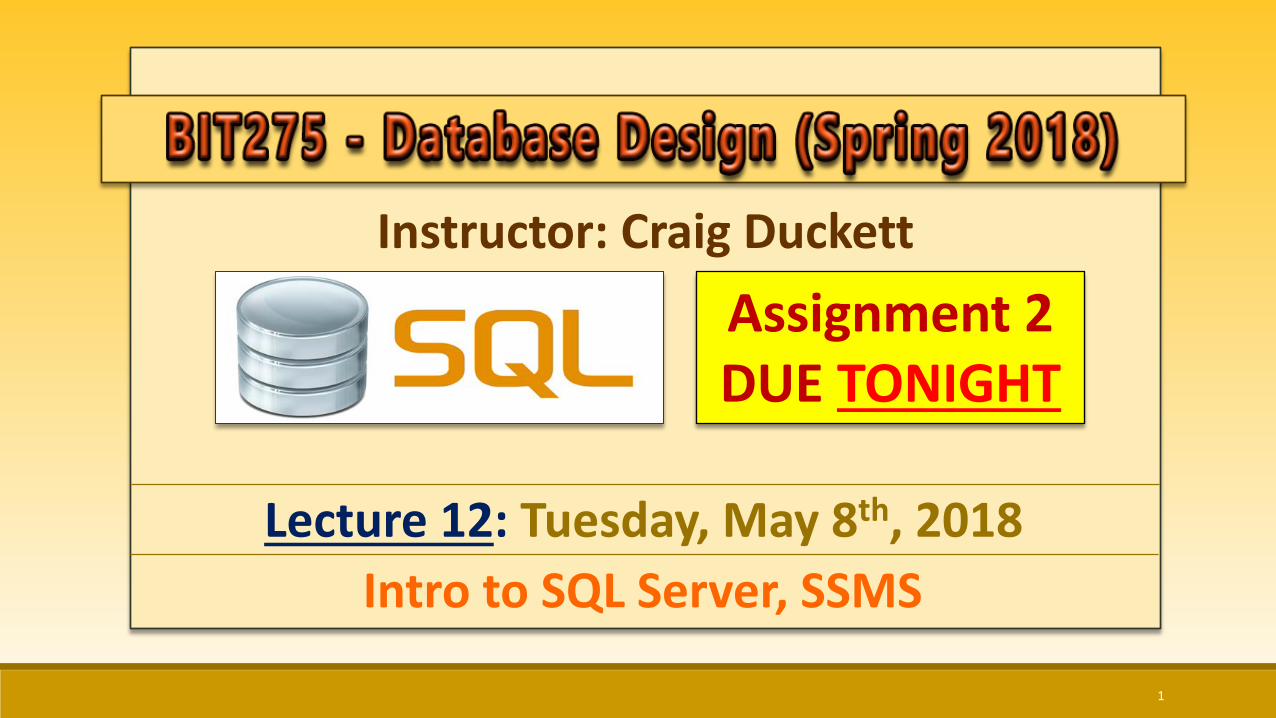
Instructor: Craig Duckett
Lecture 12: Tuesday, May 8th, 2018Intro to SQL Server, SSMS
1
Assignment 2DUE TONIGHT

2
• Assignment 2 is due TONIGHT Tuesday, May 8th
in StudentTracker by MIDNIGHT
• Assignment 3 is due LECTURE 20, Tuesday, June 5th
• Database Presentation is due LECTURE 20, Tuesday, June 5th
• Final Exam is LECTURE 21, Thursday, June 7th

3
3 x 150 Points (450 points Total)
• Assignment 1 GRADED! • Assignment 2 (Stage 2): TONIGHT Thursday, May 8th
• Assignment 3 (Stage 3): DUE LECTURE 20 Tuesday, June 5th
• Database Presentation: DUE LECTURE 20 Tuesday, June 5th
4
Tuesday (LECTURE 12)• Database Design for Mere Mortals: Chapters 8, 9
Thursday (LECTURE 13)• The Language of SQL: Chapters 11, 12
5
• Intro to SQL Server• Installing SQL Server• SQL Server Management Studio (SSMS)
• Transact-SQL (T-SQL)

6
Installing Microsoft SQL Server
• Dreamspark: You can download an ISO and install any version of SQL Server 2012 that matches your operating system (x86/32 bit, or x64/64 bit) although Developer is recommended
• Programajama: Download and unzip the folder copy of SQL Server 2012 Developer• http://www.programajama.com/storage/SQLServer2012.zip
• SQL Server 2014 Express: You can elect to download the free (and smaller footprint) of SQL Server• http://www.microsoft.com/en-us/server-cloud/products/sql-server-editions/sql-server-express.aspx
Select Download SQL Server 2014 Express (you will be prompted to log in to your Microsoft account; you will have to create one if you don't have one already).
• On the download page you will need to select either SQL Server 2014 Express 64 Bit (if you have a 64 bit machine, which most of you should have) or SQL Server 2014 Express 32 Bit (if you have a 32 bit machine). Select Continue to download
• You WILL also need to download SQL Server 2014 Management Studio Express 64 Bit (for 64 bit machines) or SQL Server 2014 Management Studio Express 32 Bit (for 32 bit machines). Select Continue to download
• Once everything is downloaded, install SQL Server 2014 Express FIRST, then install SQL Server 2014 Management Studio Express SECOND.
• VIDEO: https://www.youtube.com/watch?v=E_zFM7mzFUg
7
SQL Server Management Studio (SSMS)
SQL Server provides various tools that are used for different purposes, such as system installation, configuration, auditing, and performance tuning. The administrator’s primary tool for interacting with the system is SQL Server Management Studio. Both administrators and end users can use this tool to administer multiple servers, develop databases, and replicate data, among other things.
This section is dedicated to the activities of the end user. Therefore, only the functionality of SQL ServerManagement Studio with respect to the creation of database objects using the Database Engine is describedin detail.
8
SQL Server Management Studio (SSMS)
To open SQL Server Management Studio, choose:Start > All Programs > Microsoft SQL Server 2012 > SQL Server Management Studio.
SQL Server Management Studio comprises several different components that are used for the authoring, administration, and management of the overall system. The following are the main components used for these tasks:
• Registered Servers• Object Explorer• Query Editor• Solution Explorer
9
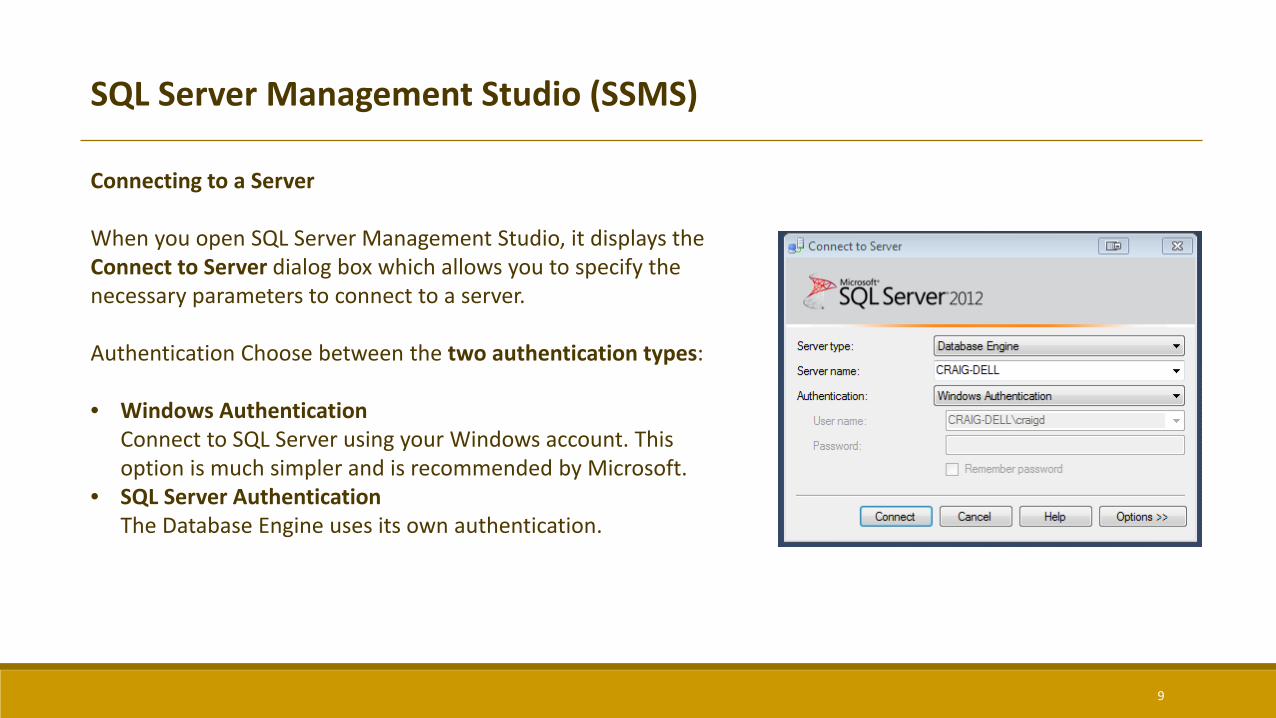
SQL Server Management Studio (SSMS)
Connecting to a Server
When you open SQL Server Management Studio, it displays the Connect to Server dialog box which allows you to specify the necessary parameters to connect to a server.
Authentication Choose between the two authentication types:
• Windows Authentication Connect to SQL Server using your Windows account. This option is much simpler and is recommended by Microsoft.
• SQL Server Authentication The Database Engine uses its own authentication.
10
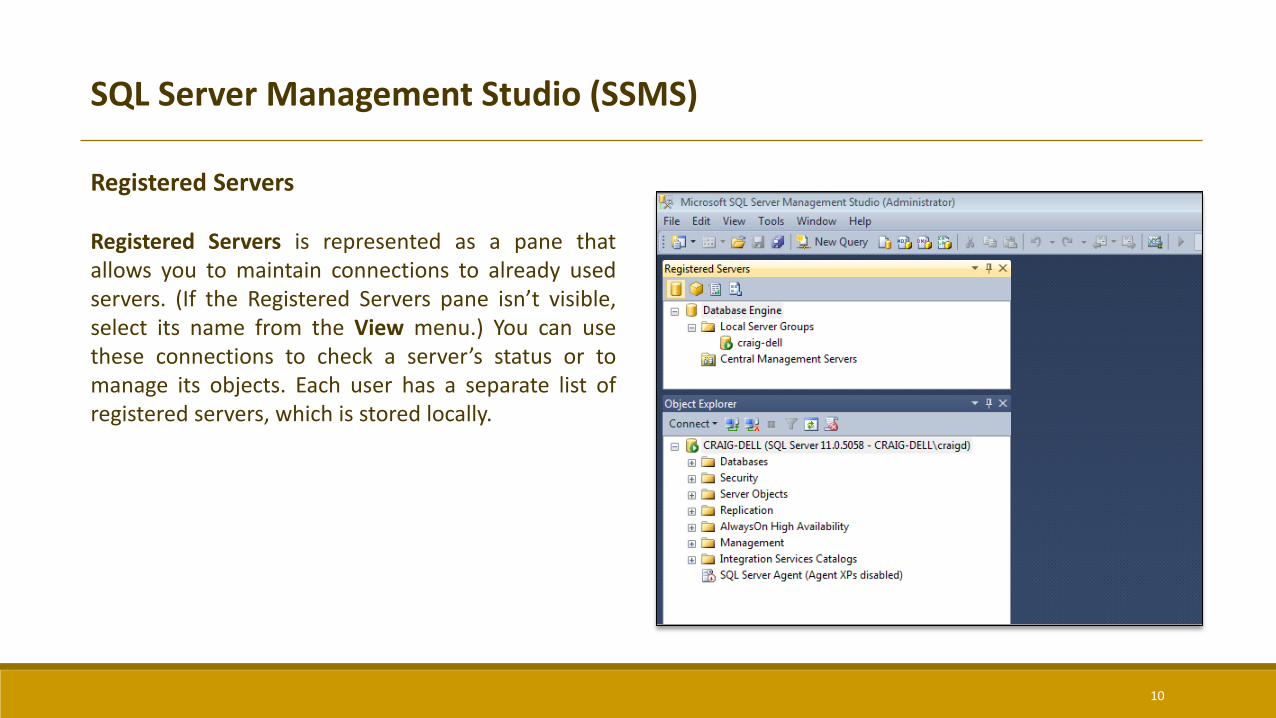
SQL Server Management Studio (SSMS)
Registered Servers
Registered Servers is represented as a pane thatallows you to maintain connections to already usedservers. (If the Registered Servers pane isn’t visible,select its name from the View menu.) You can usethese connections to check a server’s status or tomanage its objects. Each user has a separate list ofregistered servers, which is stored locally.
11
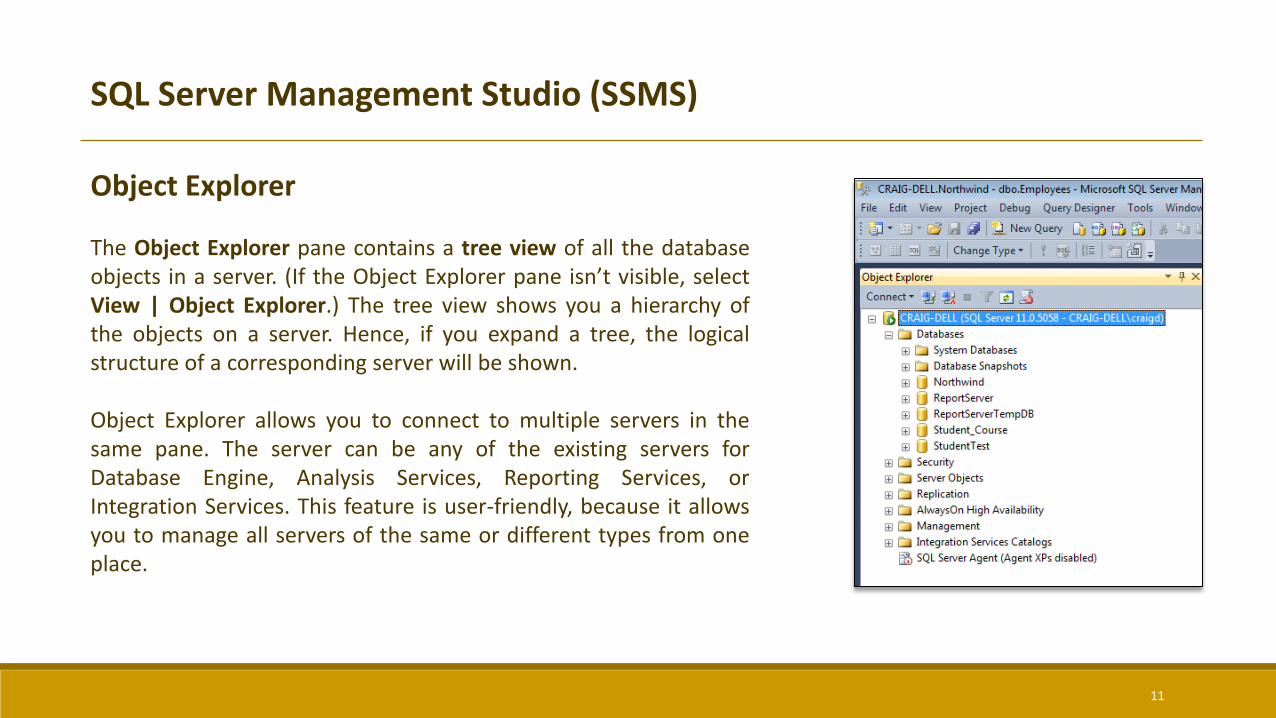
SQL Server Management Studio (SSMS)
Object Explorer
The Object Explorer pane contains a tree view of all the databaseobjects in a server. (If the Object Explorer pane isn’t visible, selectView | Object Explorer.) The tree view shows you a hierarchy ofthe objects on a server. Hence, if you expand a tree, the logicalstructure of a corresponding server will be shown.
Object Explorer allows you to connect to multiple servers in thesame pane. The server can be any of the existing servers forDatabase Engine, Analysis Services, Reporting Services, orIntegration Services. This feature is user-friendly, because it allowsyou to manage all servers of the same or different types from oneplace.
12
SQL Server Management Studio (SSMS)Organizing and navigating SSMS panes
You can dock or hide each of the panes of SQL Server Management Studio. By right-clicking the title bar at the top of the corresponding pane, you can choose between the following presentation possibilities:
• Floating - The pane becomes a separate floating pane on top of the rest of SQL Server Management Studio panes. Such a pane can be moved anywhere around the screen.
• Dockable - Enables you to move and dock the pane in different positions. To move the pane to a different docking position, click and drag its title bar and drop it in the new position.
• Tabbed Document - You can create a tabbed grouping using the Designer window. When this is done, the pane’s state changes from dockable to tabbed document.
• Hide - Closes the pane. (Alternatively, you can click the × in the upper-right corner of the pane.) To display a closed pane, select its name from the View menu.
• Auto Hide - Minimizes the pane and stores it on the left side of the screen. To reopen (maximize) such a pane, move your mouse over the tabs on the left side of the screen and click the push pin to pin the pane in the open position.
The difference between the Hide and Auto Hide options is that the Hide option removes the pane from view inSQL Server Management Studio, while Auto Hide collapses the pane to the side panel.
13
SQL Server Management Studio (SSMS)Organizing and navigating SSMS panes
To restore the default configuration, choose Window > Reset Window Layout.
The Object Explorer pane appears on the left, while the Object Explorer Details tab appears on the right side of SQL Server Management Studio. (The Object Explorer Details tab displays information about the currently selected node of Object Explorer.)
14
SQL Server Management Studio (SSMS)
Managing Databases Using Object Explorer
The following are the management tasks that you can perform by using SQL Server Management Studio:• Create databases without using Transact-SQL• Modify databases without using Transact-SQL• Manage tables without using Transact-SQL• Generate and execute SQL statements (will be described later, in the section “Query Editor”)
Creating Databases Without Using Transact-SQLYou can create a new database by using Object Explorer or the Transact-SQL language. (Database creation using Transact-SQL is discussed later.) As the name suggests, you also use Object Explorer to explore the objects within a server. From the Object Explorer pane, you can inspect all the objects within a server and manage your server and databases.
The existing tree contains, among other folders, the Databases folder. This folder has several subfolders, including one for the system databases and one for each new database that is created by a user.
15
SQL Server Management Studio (SSMS)
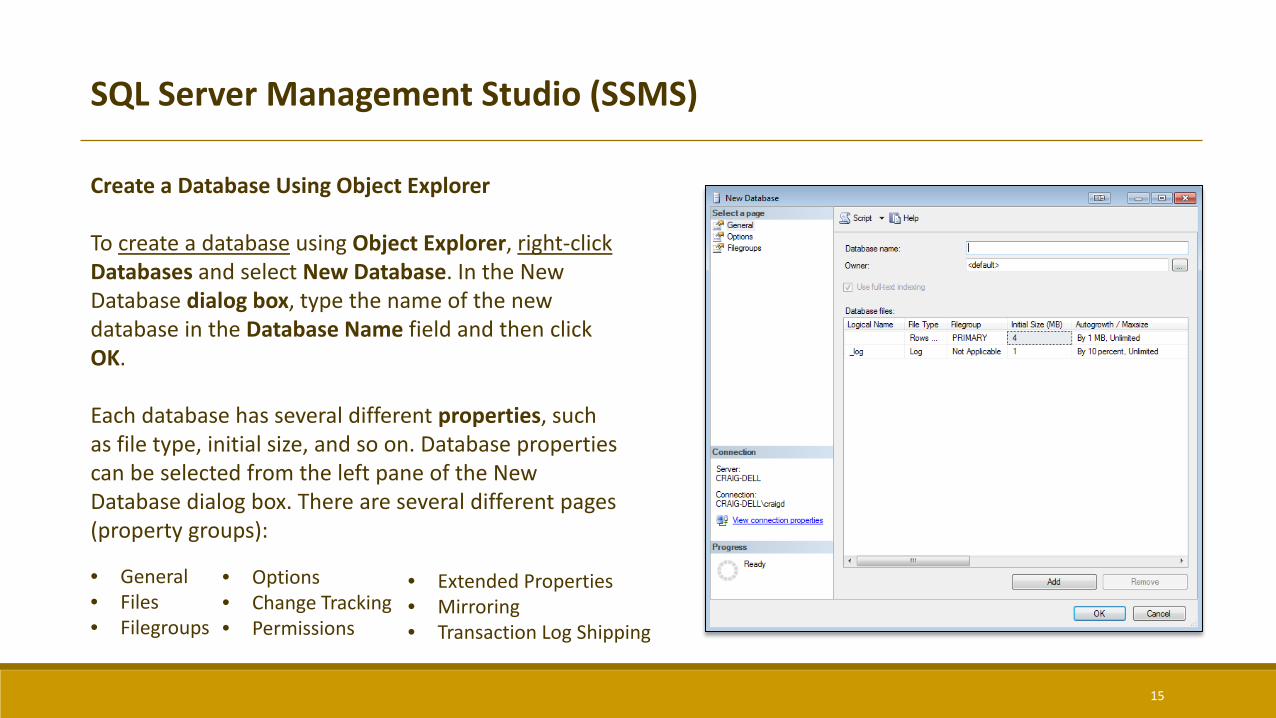
Create a Database Using Object Explorer
To create a database using Object Explorer, right-clickDatabases and select New Database. In the New Database dialog box, type the name of the new database in the Database Name field and then click OK.
Each database has several different properties, such as file type, initial size, and so on. Database properties can be selected from the left pane of the New Database dialog box. There are several different pages (property groups):
• General• Files• Filegroups
• Options• Change Tracking• Permissions
• Extended Properties• Mirroring• Transaction Log Shipping
16
SQL Server Management Studio (SSMS)
Modifying Databases Without Using Transact-SQL
Object Explorer can also be used to modify an existing database. Using this component, you can modify files and filegroups that belong to the database. To add new data files, right-click the database name and choose Properties. In the Database Properties dialog box, select Files, click Add, and type the name of the new file. You can also add a (secondary) filegroup for the database by selecting Filegroups and clicking Add.
Note: Only the system administrator or the database owner can modify the database properties just mentioned.
Work-Around
I like how SSMS takes a stance of displaying warning message and stops user from going further to do operation, thereby preventing the hanging of SSMS. However, this feature can cause inconvenience in a situation when one is required to save changes to a table using SSMS. If such situation arises, then this feature can be turned off by going to:
Menu > Tools > Options > Designers > Uncheck “Prevent Saving changes that require table re-creation”
17
SQL Server Management Studio (SSMS)
To save a database to a SQL script file
In SQL Server Management Studio right-click your database and select Tasks > Generate Scripts. Follow the wizard and you'll get a script that recreates the data structure in the correct order according to foreign keys.
On the wizard step titled "Set Scripting Options" choose "Advanced" and modify the "Types of data to script" option to "Schema and data“.
TIP: In the last step you can select "Script to a New Query Window“ to see the generated SQL scripts, instead of generating directly to a file.
To delete a database using Object Explorer
Right-click the database name and choose Delete.
18
SQL Server Management Studio (SSMS)
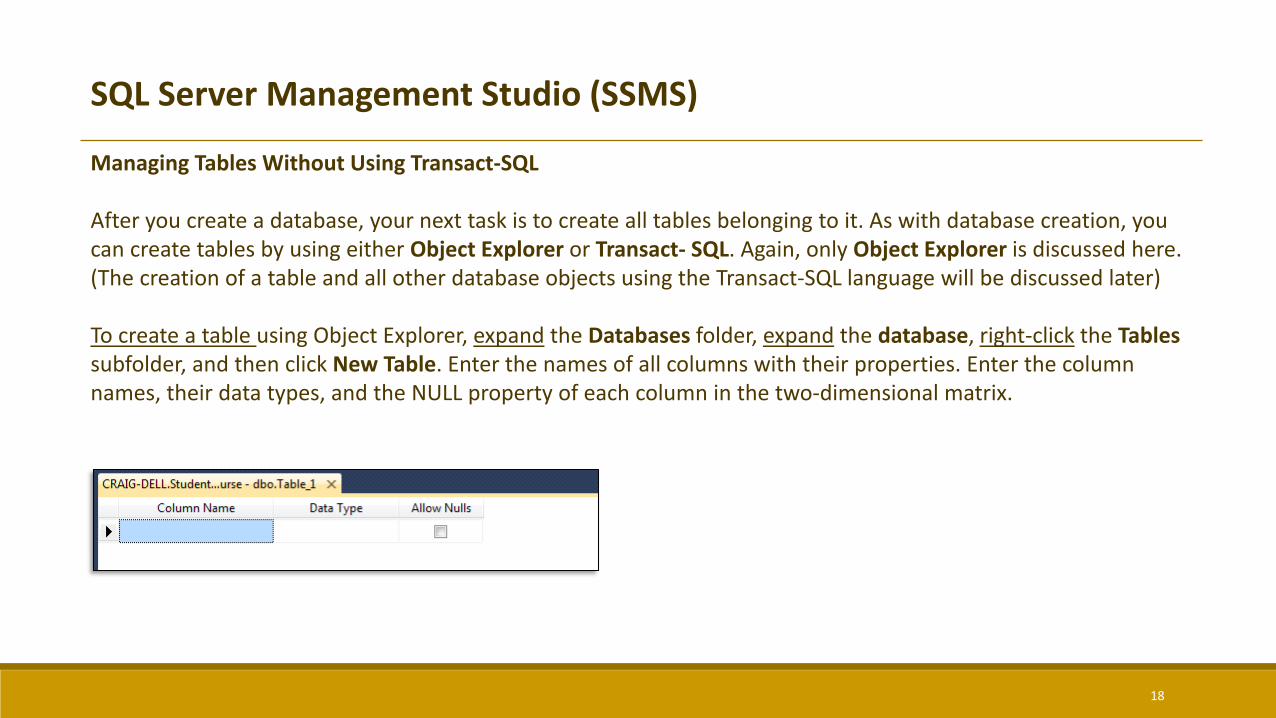
Managing Tables Without Using Transact-SQL
After you create a database, your next task is to create all tables belonging to it. As with database creation, you can create tables by using either Object Explorer or Transact- SQL. Again, only Object Explorer is discussed here. (The creation of a table and all other database objects using the Transact-SQL language will be discussed later)
To create a table using Object Explorer, expand the Databases folder, expand the database, right-click the Tablessubfolder, and then click New Table. Enter the names of all columns with their properties. Enter the column names, their data types, and the NULL property of each column in the two-dimensional matrix.
19
SQL Server Management Studio (SSMS)
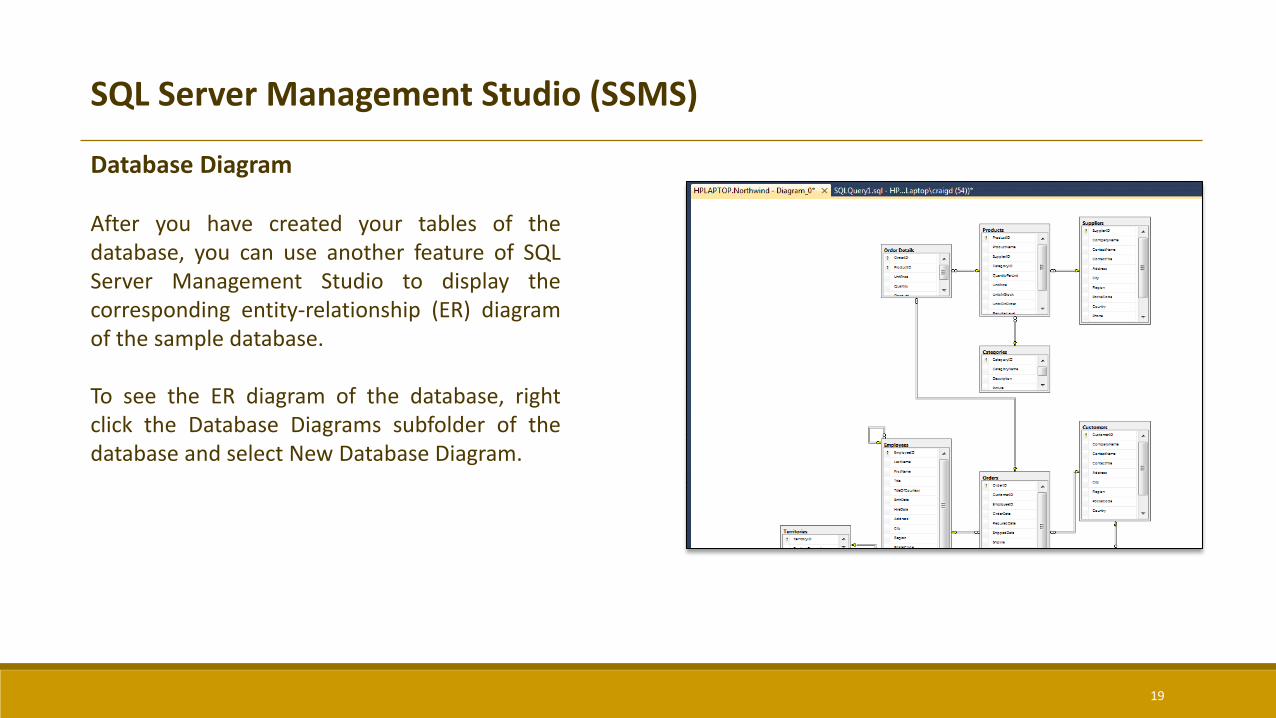
Database Diagram
After you have created your tables of thedatabase, you can use another feature of SQLServer Management Studio to display thecorresponding entity-relationship (ER) diagramof the sample database.
To see the ER diagram of the database, rightclick the Database Diagrams subfolder of thedatabase and select New Database Diagram.
20
Authoring Activities Using SQL Server Management Studio (SSMS)
SQL Server Management Studio gives you a complete authoring environment for all types of queries. You can create, save, load, and edit queries. SQL Server Management Studio allows you to work on queries without being connected to a particular server. This tool also gives you the option of developing your queries with different projects. The authoring capabilities are associated with Query Editor as well as Solution Explorer, both of which are described in this section.
Query Editor
To launch the Query Editor pane, click the New Query button in the toolbar of SQL Server Management Studio. If you expand it to show all the possible queries, it shows more than just a Database Engine query. By default, you get a new Database Engine query, but other queries are possible, such as MDX queries, XMLA queries, and other queries (which we will not be discussing in this class)
Once you open Query Editor, the status bar at the bottom of the pane tells you whether your query is in a connected or disconnected state. If you are not connected automatically to the server, the Connect to SQL Server dialog box appears, where you can type the name of the database server to which you want to connect and select the authentication mode.

21
22
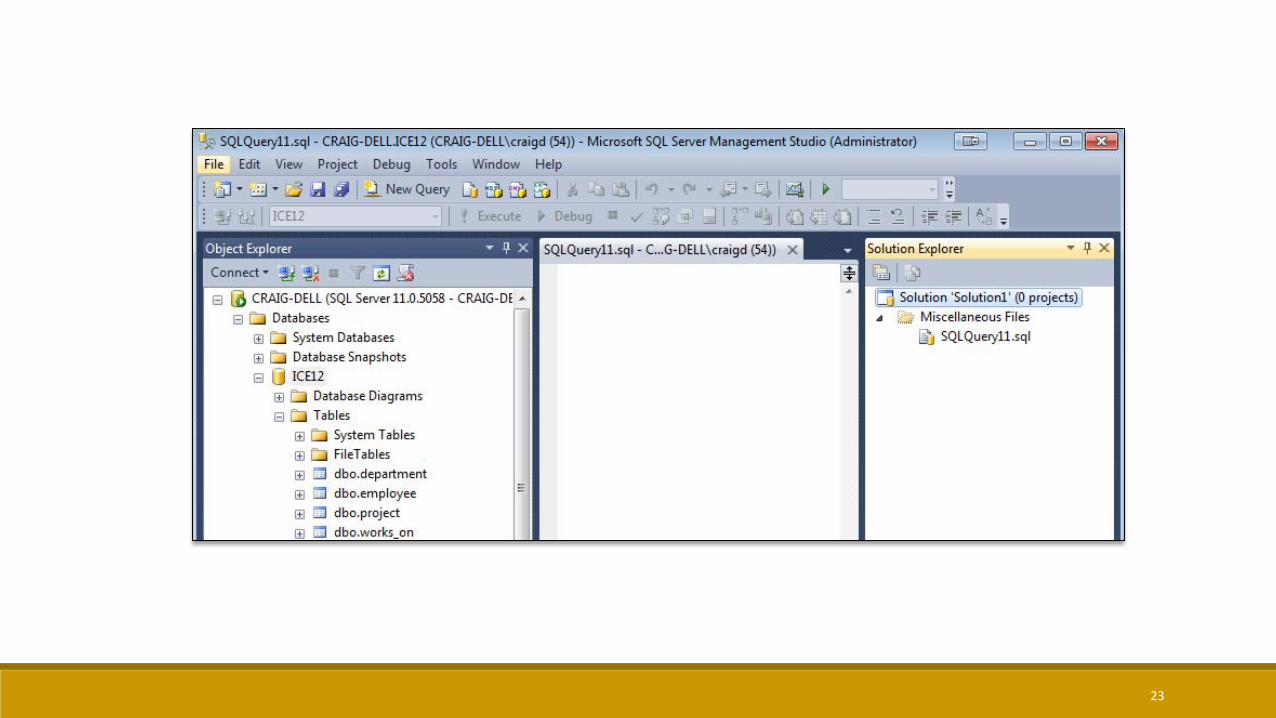
Authoring Activities Using SQL Server Management Studio (SSMS)
Solution Explorer
Query editing in SQL Server Management Studio is solution-based. If you start a blank query using the New Query button, it will still be based on a blank solution. You can see this by choosing View | Solution Explorer right after you open your blank query.
A solution can have zero, one, or more projects associated with it. A blank solution does not contain any project. If you want to associate a project with the solution, close your blank solution, Solution Explorer, and the Query Editor window, and start a new project by choosing File | New | Project. In the New Project window, choose SQL Server Scripts. A project is a method of organizing files in a selected location. You can choose a name for the project and select its location on disk. When you create a new project, by default you start a new solution. You can add a project to an existing solution using Solution Explorer.
23
24
SQL Queries : PK and FK
25
Primary and Foreign Keys
Primary Key
To allow naming of a FOREIGN KEY constraint, and for defining a FOREIGN KEY constraint on multiple columns, use the following SQL syntax:
CREATE TABLE Orders(OrderId int NOT NULL PRIMARY KEY,OrderNo int NOT NULL,PersonId int FOREIGN KEY REFERENCES Persons(PersonId)
)
26
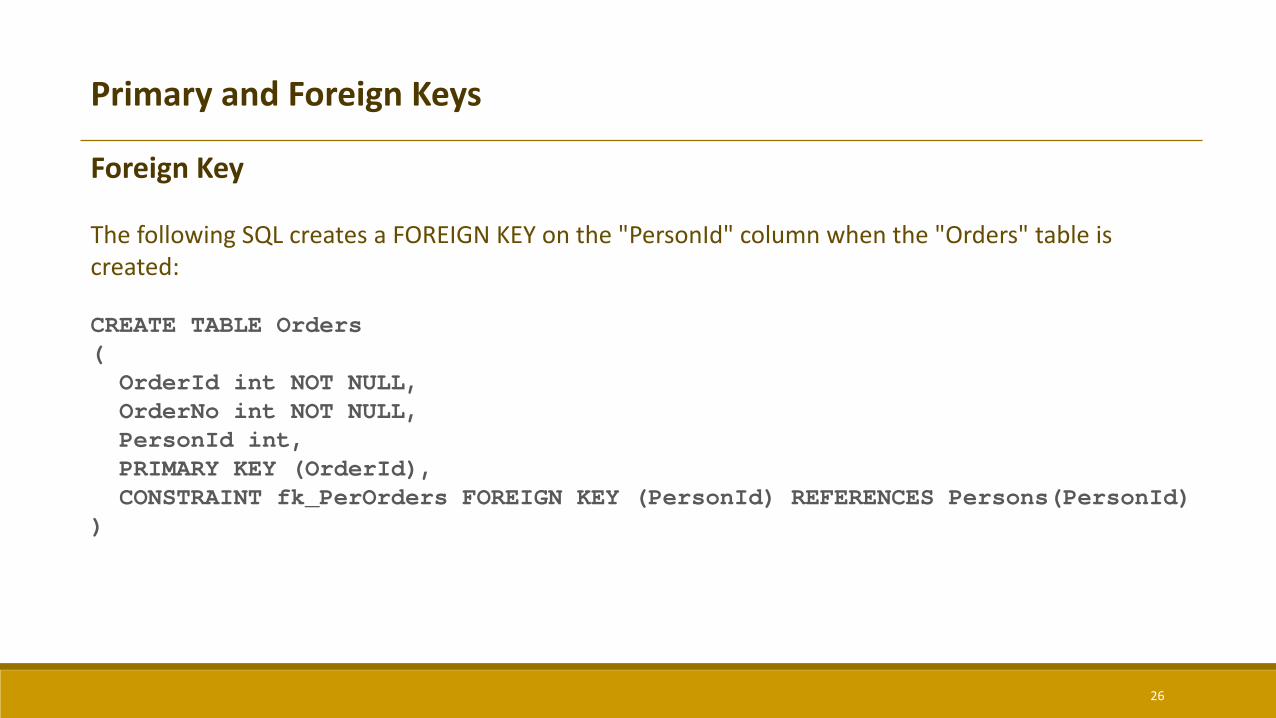
Primary and Foreign Keys
Foreign Key
The following SQL creates a FOREIGN KEY on the "PersonId" column when the "Orders" table is created:
CREATE TABLE Orders(OrderId int NOT NULL,OrderNo int NOT NULL,PersonId int,PRIMARY KEY (OrderId),CONSTRAINT fk_PerOrders FOREIGN KEY (PersonId) REFERENCES Persons(PersonId)
)
27
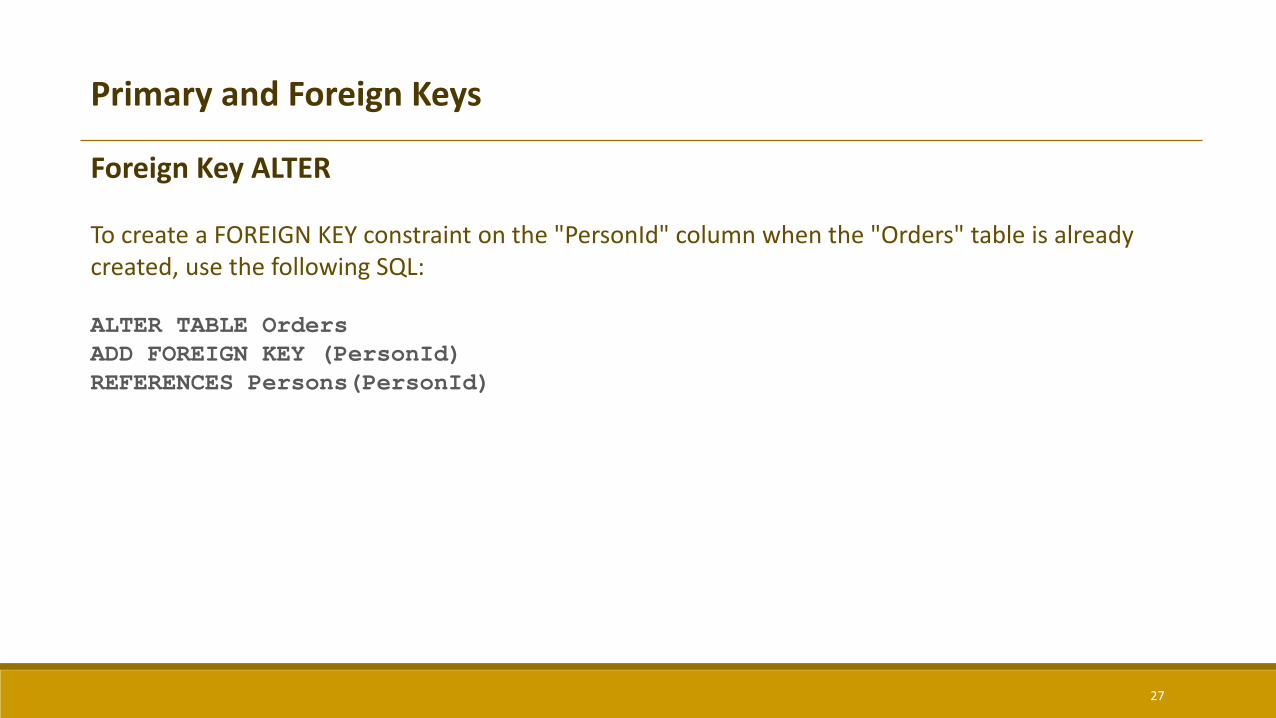
Primary and Foreign Keys
Foreign Key ALTER
To create a FOREIGN KEY constraint on the "PersonId" column when the "Orders" table is already created, use the following SQL:
ALTER TABLE OrdersADD FOREIGN KEY (PersonId)REFERENCES Persons(PersonId)
28
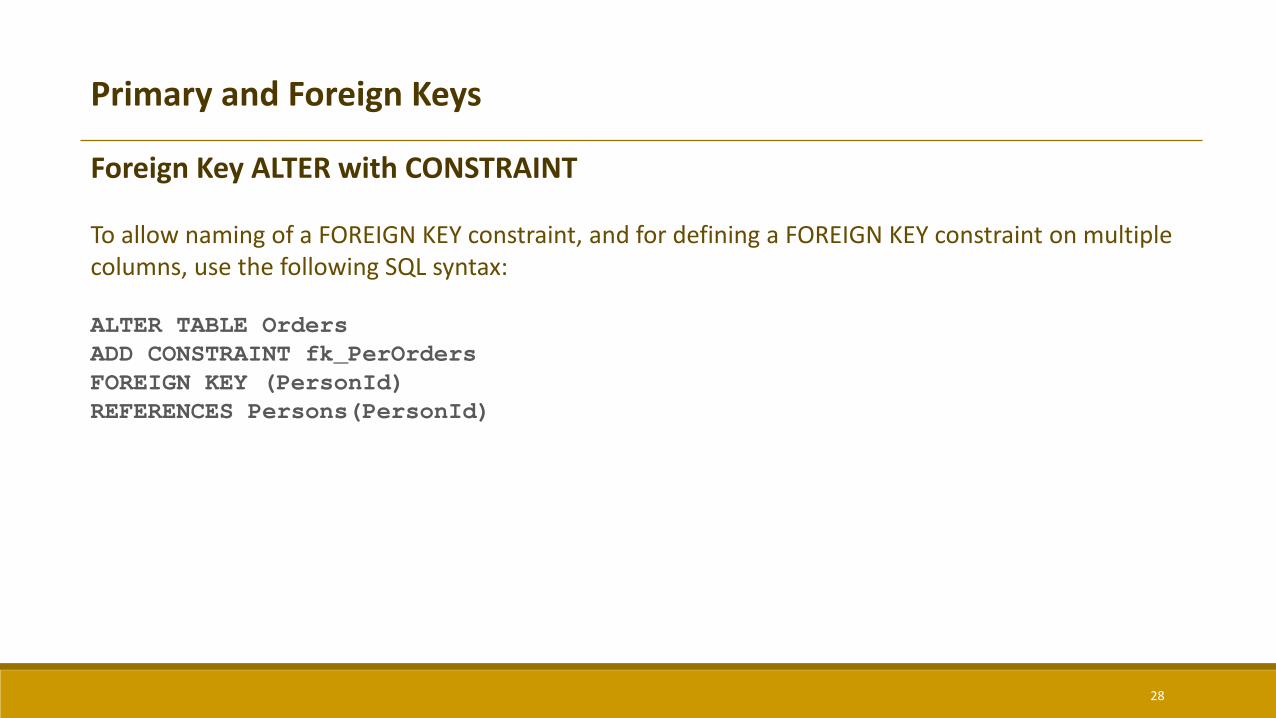
Primary and Foreign Keys
Foreign Key ALTER with CONSTRAINT
To allow naming of a FOREIGN KEY constraint, and for defining a FOREIGN KEY constraint on multiple columns, use the following SQL syntax:
ALTER TABLE OrdersADD CONSTRAINT fk_PerOrdersFOREIGN KEY (PersonId)REFERENCES Persons(PersonId)
29
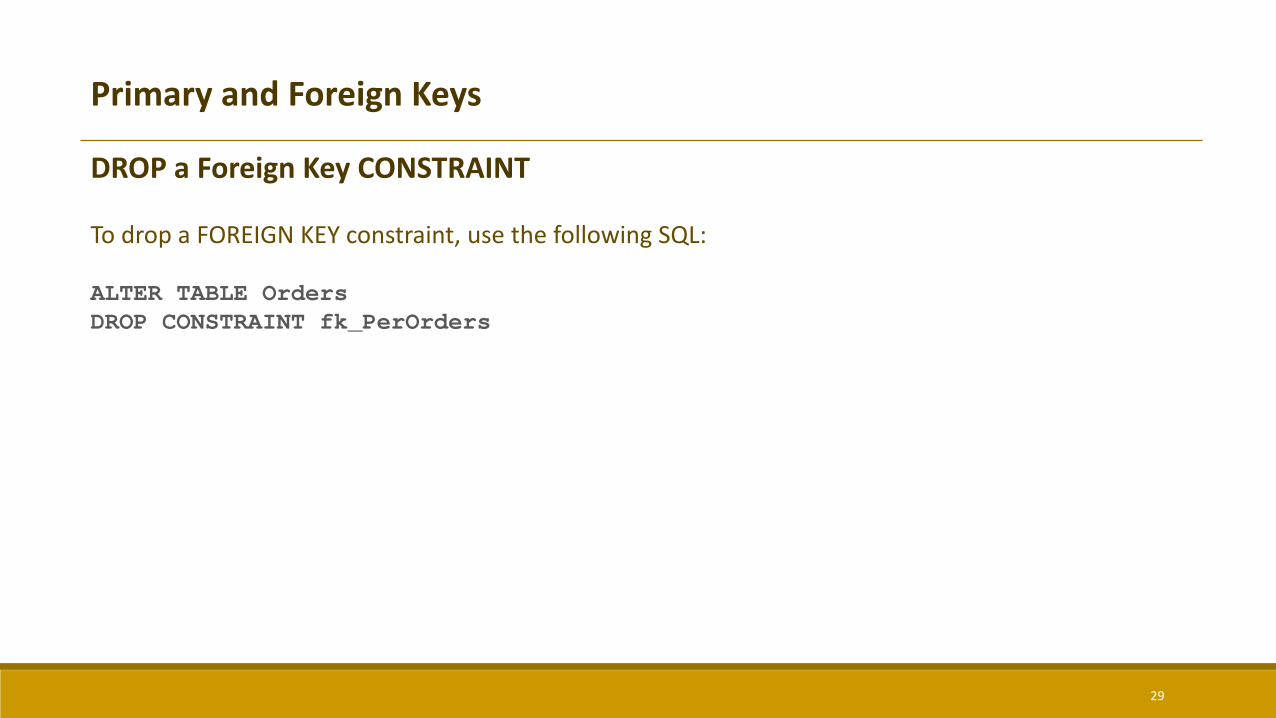
Primary and Foreign Keys
DROP a Foreign Key CONSTRAINT
To drop a FOREIGN KEY constraint, use the following SQL:
ALTER TABLE OrdersDROP CONSTRAINT fk_PerOrders
30
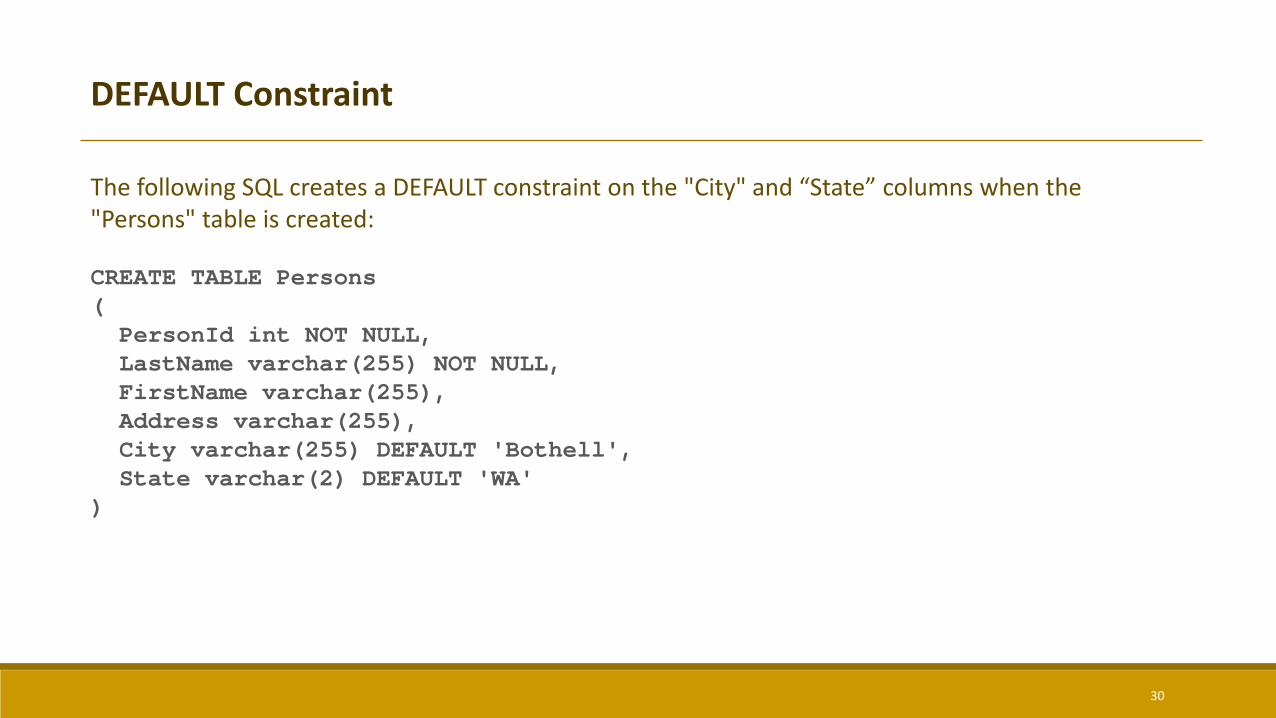
DEFAULT Constraint
The following SQL creates a DEFAULT constraint on the "City" and “State” columns when the "Persons" table is created:
CREATE TABLE Persons(PersonId int NOT NULL,LastName varchar(255) NOT NULL,FirstName varchar(255),Address varchar(255),City varchar(255) DEFAULT 'Bothell',State varchar(2) DEFAULT 'WA'
)
31
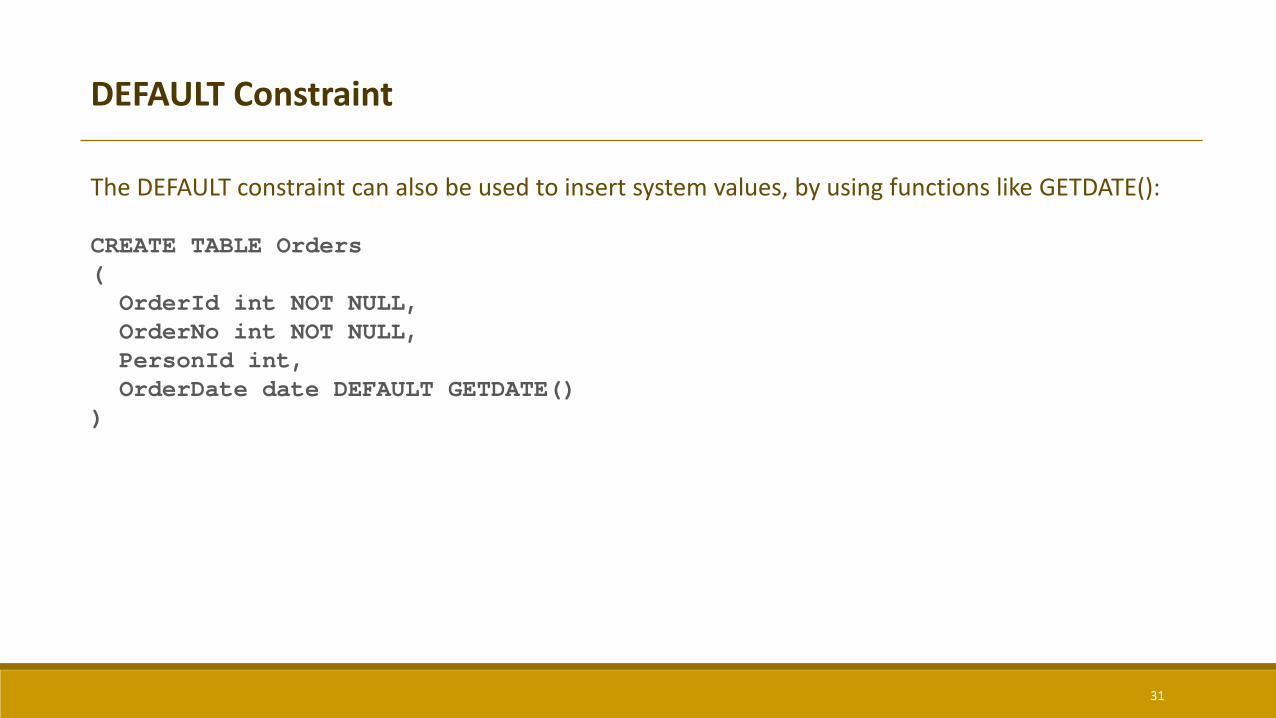
DEFAULT Constraint
The DEFAULT constraint can also be used to insert system values, by using functions like GETDATE():
CREATE TABLE Orders(OrderId int NOT NULL,OrderNo int NOT NULL,PersonId int,OrderDate date DEFAULT GETDATE()
)

32
DEFAULT Constraint with ALTER
To create a DEFAULT constraint on the "City" column when the table is already created, use the following SQL:
ALTER TABLE PersonsALTER COLUMN City SET DEFAULT 'Bothell'
33
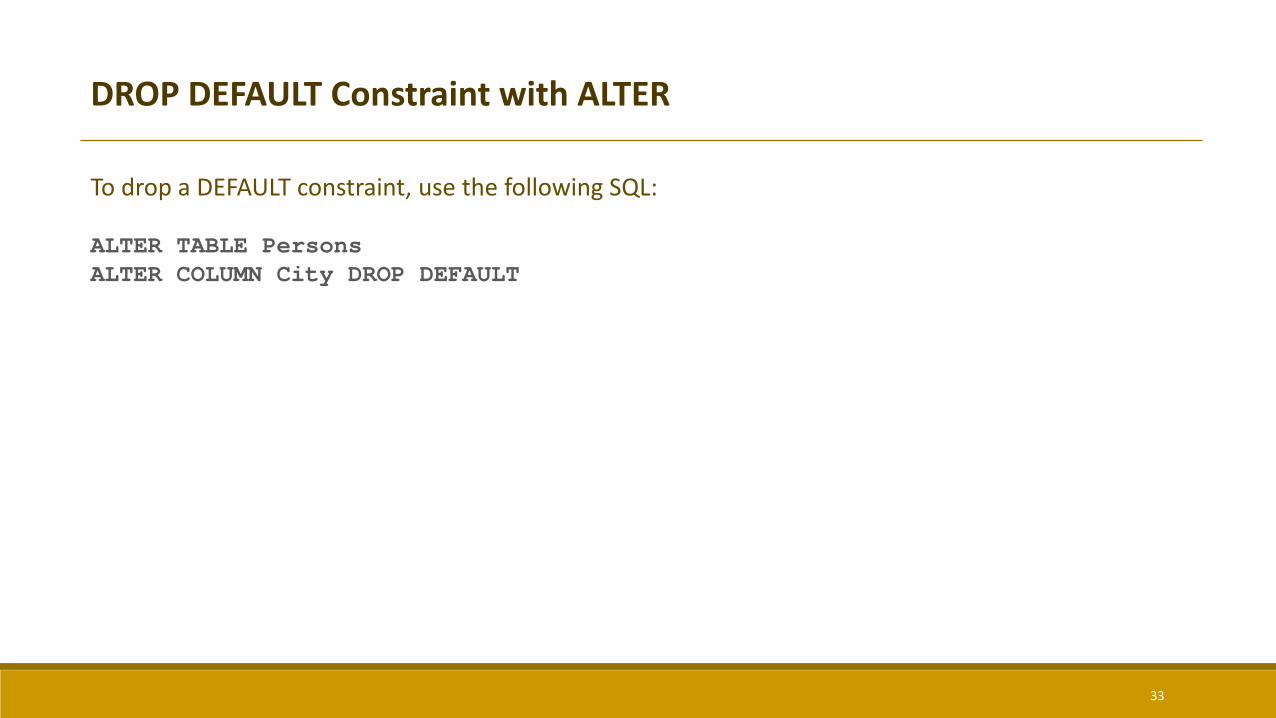
DROP DEFAULT Constraint with ALTER
To drop a DEFAULT constraint, use the following SQL:
ALTER TABLE PersonsALTER COLUMN City DROP DEFAULT
34
BIT 275 ICE 12