Assembly Instructions For 1993-1998 ZJ Jeep Rear Bumper Kit
8
Assembly Instructions For 1993-1998 ZJ Jeep Rear Bumper Kit Thank you for your purchase at DIY Off Road Products! For more great products checkout our website, www.diyoffroadproducts.com or call us at 503-931-7069. If you have any questions or concerns please don’t hesitate to contact us.
Transcript of Assembly Instructions For 1993-1998 ZJ Jeep Rear Bumper Kit

Assembly Instructions For
1993-1998 ZJ Jeep Rear Bumper Kit
Thank you for your purchase at DIY Off Road Products!For more great products checkout our website, www.diyoffroadproducts.com or call us at 503-931-7069. If you have any questions or concerns please don’t hesitate to contact us.

Assembly Instructions For
1993-1998 ZJ Jeep Rear Bumper Kit
TOO
LS N
EED
ED
Thank you for your purchase at DIY Off Road Products!For more great products checkout our website, www.diyoffroadproducts.com or call us at 503-931-7069. If you have any questions or concerns please don’t hesitate to contact us.
• 1/2” Metal Drill Bit• MIG Welder w/ Solid Wire• Grinder• 4 1/2’’ Flapper Disk• 7’’ Sander for Finish
Mounting Bracket Assembly (L/R)• (1) Tube Steel / Shackle Tab Receivers• (2) Tube Steel Cross Member• (3) Pointed Mounting Brace
Center Section Assembly• (4) Center Section Lower Section• (5) Center Section Upper Section• (6) Window Plate• (7) Upper Rear Filler Plate• (8) Lower Rear Filler Plate• (9) Top Square Filler Plate• (10) Shackle Tabs• (11) (Optional) 2” Hitch Receiver
Wing Section Assembly (L/R)• (12) Top Angled Filler Plate• (13) Angled Slotted Filler Plate• (14) Angled Side Face (NOTE: Item 14 is
made from formed 10 gauge (.135) thick steel)
• (15) Triangle Filler Plate• (16) Wing End-cap• (17) Side Hinge Wall• (18) Center Section Wing Plate
Tire Carrier Wing Section Assembly (Passenger Side)• (19) ALT Top Angled Filler Plate• (20) ALT Angled Side Face• (21) ALT Side Hinge Wall• (22) Rear Hinge Wall• (23) Double Shear Hinge Pin• (24) ALT Center Section Wing Plate
93-98 ZJ REAR BUMPER KIT
This precision CNC cut kit is perfect for the “Do It Yourself ” off road enthusiast who want to fabricate their own off road winch bumper for the 1st generation Grand Cherokee. We supply all the pre-cut and bent steel and you supply the welding, grinding and your own finishing touches!This bumper is made from 3/16’’ thick hot rolled steel to withstand the abuse of off road trails and rocks you might encounter.
• 4pcs 1/2-13 x 1.500’’ Grade 5 Bolts• 4pcs 1/2’’ Lock Washers• 4x Flat Washers• 2x Nut Plate
PART
S LI
ST
HARDWARE INCLUDED

ATTENTION: REVIEW INSTRUCTIONS BEFORE INSTALLING 93-98 ZJ REAR BUMPER KIT
STEP
1
STEP
2
STEP
3
Remove the plastic bumper skin from the vehicle and remove stock bumper with hardware.
Take the following peices and place them on a flat surface:
• Tack weld Center Section Upper Section (5),
• Pointed Mounting Braces (3), • Square Brace Window Plate (6), and • Upper Rear Filler Plate (7).
Do not weld the Top Square Filler Plate (9) because that will block access for later steps.
• Center Section Upper Section (5)
• Pointed Mounting Braces (3)
• Square Brace Window Plate (6)
• Top Square Filler Plate (9)
• Flat Surface

STEP
4
STEP
6
STEP
5
STEP
7
Tack weld Tube Steel Cross Member (2) to the Pointed Mounting Brace (3) and Rear Filler Plates (7 & 8).
STEP
8
Tack weld Center Section Lower Section (4) to the Center Section Upper Section (5) and Pointed Mounting Braces (3).
Tack weld Lower Rear Fill-er Plate (8) to the Pointed Mounting Braces (3).
ATTENTION: REVIEW INSTRUCTIONS BEFORE INSTALLING 93-98 ZJ REAR BUMPER KIT
Grind the end of the Tube Steel / Shackle Tab Receivers (1) to fit flush with the skid plate. Tack weld Tube Steel / Shackle Tab Receivers (1) to the Center Section.
Finish stitch welding (2-3 inch welds). The window plate has to be welded on the bottom side only (the cover has to be able to go on top flush).
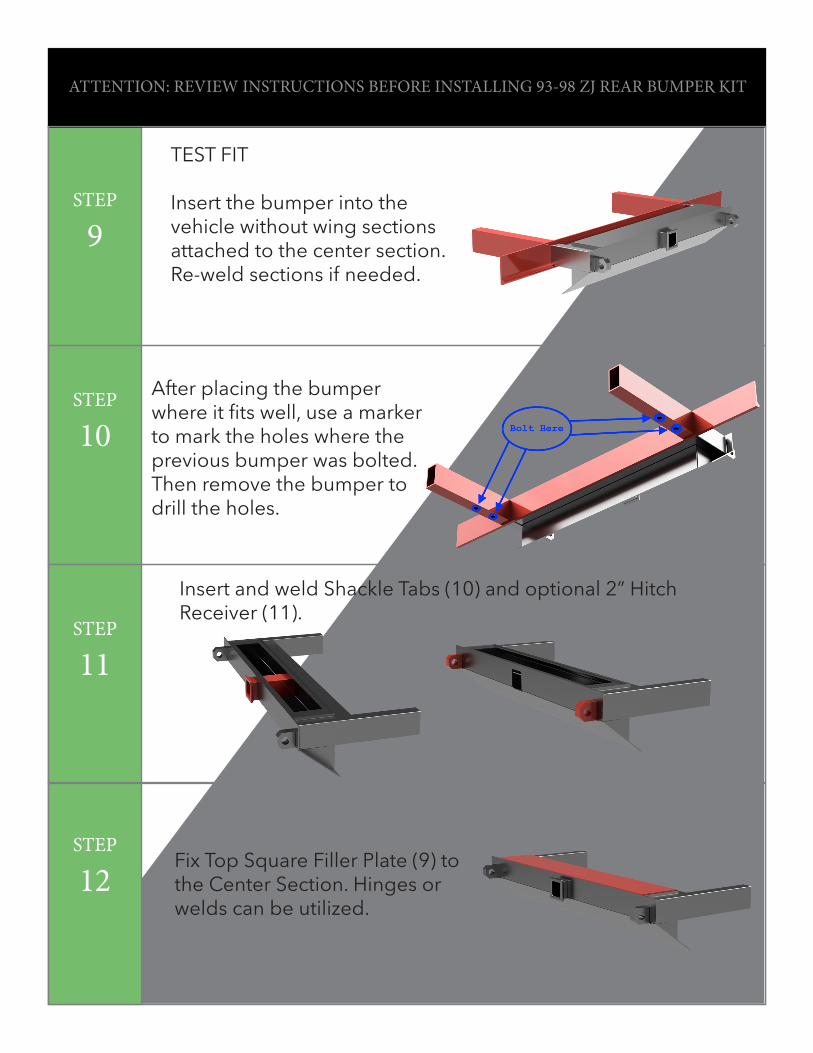
TEST FIT
Insert the bumper into the vehicle without wing sections attached to the center section. Re-weld sections if needed.
STEP
10
STEP
9
STEP
11
Insert and weld Shackle Tabs (10) and optional 2” Hitch Receiver (11).
ATTENTION: REVIEW INSTRUCTIONS BEFORE INSTALLING 93-98 ZJ REAR BUMPER KIT
Fix Top Square Filler Plate (9) to the Center Section. Hinges or welds can be utilized.
STEP
12
After placing the bumper where it fits well, use a marker to mark the holes where the previous bumper was bolted. Then remove the bumper to drill the holes.
STEP
13
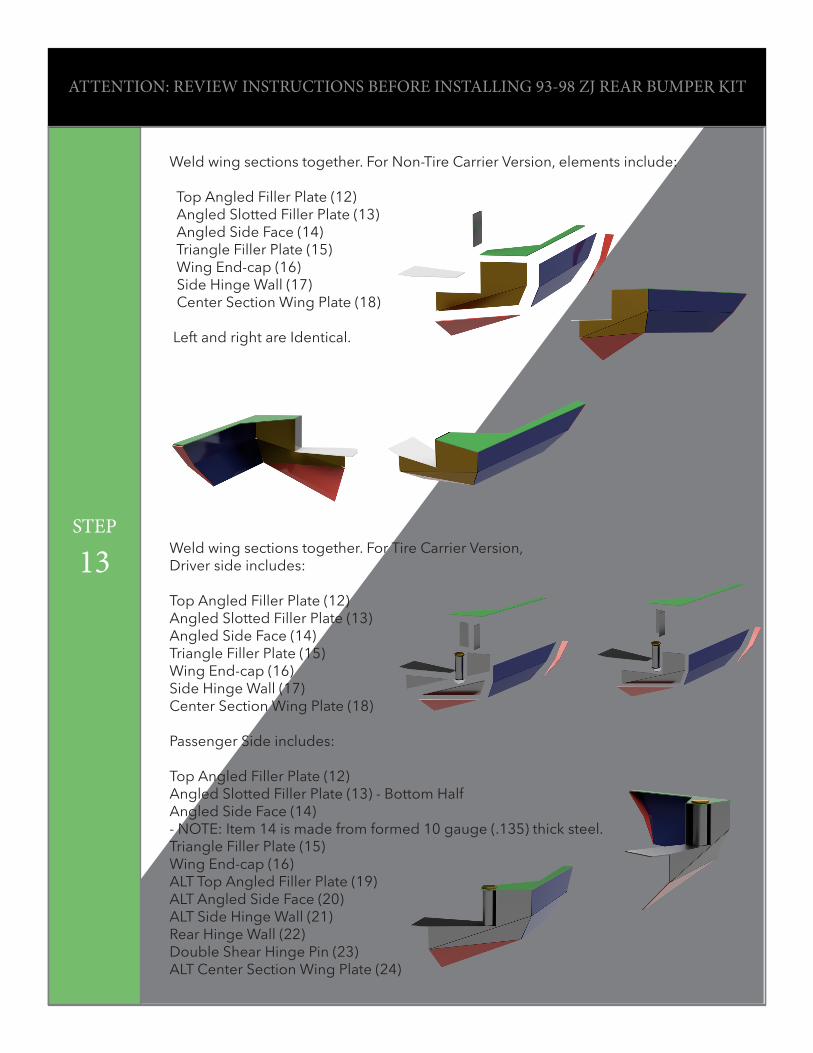
ATTENTION: REVIEW INSTRUCTIONS BEFORE INSTALLING 93-98 ZJ REAR BUMPER KIT
Weld wing sections together. For Non-Tire Carrier Version, elements include:
Top Angled Filler Plate (12) Angled Slotted Filler Plate (13) Angled Side Face (14) Triangle Filler Plate (15) Wing End-cap (16) Side Hinge Wall (17) Center Section Wing Plate (18)
Left and right are Identical.
Weld wing sections together. For Tire Carrier Version, Driver side includes:
Top Angled Filler Plate (12)Angled Slotted Filler Plate (13)Angled Side Face (14)Triangle Filler Plate (15)Wing End-cap (16)Side Hinge Wall (17)Center Section Wing Plate (18)
Passenger Side includes:
Top Angled Filler Plate (12) Angled Slotted Filler Plate (13) - Bottom HalfAngled Side Face (14) - NOTE: Item 14 is made from formed 10 gauge (.135) thick steel. Triangle Filler Plate (15)Wing End-cap (16)ALT Top Angled Filler Plate (19)ALT Angled Side Face (20) ALT Side Hinge Wall (21)Rear Hinge Wall (22)Double Shear Hinge Pin (23)ALT Center Section Wing Plate (24)

STEP
14
Fasten Double Shear Hinge Pin (21) to the Passenger Side Wing Section.
ATTENTION: REVIEW INSTRUCTIONS BEFORE INSTALLING 93-98 ZJ REAR BUMPER KIT
Weld Wing Sections to Center Section. For Non Tire Carrier Versions, proceed to Step 18.
Grind End of Tube to form around Double Shear Hinge Tube (21) and weld pin to Tire Carrier Tube.
STEP
15
STEP
16
STEP
17
Weld Tire Carrier Tube to form Tire Carrier.(not symmetrical)

STEP
18
ATTENTION: REVIEW INSTRUCTIONS BEFORE INSTALLING 93-98 ZJ REAR BUMPER KIT
To attach the bumper to the vehicle: 1. Weld nuts onto square washer plates.2. Place the square washer plates into the tube bumper frame 3. Insert the bumper frame into the vehicle receiving frame. 4. Tighten lock screw with washer into the square washer plates.