Ashley Rengstorf Math Lesson Kindergarten 5 or 6 years...
29
Ashley Rengstorf Math Lesson Kindergarten 5 or 6 years old Parochial School 10 student class 30 minute class
Transcript of Ashley Rengstorf Math Lesson Kindergarten 5 or 6 years...

Ashley Rengstorf
Math Lesson
Kindergarten
5 or 6 years old
Parochial School
10 student class
30 minute class

Lesson Plan Day 1
Student Teacher’s Name Ashley Rengstorf Grade Level: Kindergarten
State Standard: Spatial Modeling: Students will communicate relative positions in space Demonstrate
positional words( e.g” above/below, near/far, over/under, in/out, down/up, around/through)
Subject: Math
Name of Lesson: Top, Middle, Bottom Period/Time: 30 minutes
I. Goal: Students will learn the difference between top, middle, and bottom.
II. Objectives:
1. Students will be able to place objects on top, middle, or bottom of a shelf when asked to place
in a certain place without questioning.
2. Students will be able to describe and demonstrate the meaning of spatial relationships top,
middle, and bottom.
IV. Materials: ~~3 shelved bookcase
~~small classroom objects
~~Crayons
~~ “Head and Shoulders, Knees and Toes”
~~3 Note cards –each reading “top,” “middle,” and “bottom”
~~Teachers Edition Book
~~Worksheets
V. Procedure: A. Set / Hook
Open the class by singing “Head and Shoulders, Knees and Toes”
B. Transition
Transition into explaining how “top,” “middle,” and “bottom” relate to the song “Head and
Shoulders, Knees and Toes”
C. Main lesson
Teach students the difference between top, middle, and bottom. Place objects on a shelf to help
students understand each difference. Have the students place objects on the shelf when told “top,”
“middle,” or “bottom.”
D. Transition
Work together with the children on the worksheet on page 5.

E. Conclusion
We will review Top, Middle, and Bottom; I will hand out the short assignment they will go over with
their parents. We will finish by singing “Head and Shoulders, Knees and Toes” again for repetition.
VI. Assessment:
Participating in the activities with placing the objects on the shelves will assess their knowledge of
the subject.
Doing the take home work sheet, will formally show how well the students understand the subject
matter.
VII. Assignment: The worksheets will help them better understand the differences between top, middle, and bottom. It
will also show me how far they have gotten and how much they understand, and whether we can move on to
the next lesson or not.
Narrative
Before the school year begins, I will send out a letter to all the parents of my students saying,
“Parents,
Each day your students will bring home a worksheet over what they learned that
day. The purpose of the worksheet is to refresh their memory over the subject
taught in class. An important way for your child to learn is for them to teach what
they learned to you. Therefore, in order to help your children, have them do their
worksheet with you by their side. Ask them questions, guiding them to explain it
to you.
This worksheet will not only refresh your child’s memory of what was taught that
day, but it will also delegate bonding time between you and your child.
Thank you for your cooperation and God Bless,
Miss Ashley Rengstorf ”
The math class each day is approximately 30 minutes long. Students will arrive at
school, unpack their backpacks, and play/color with what is given to them until everyone
arrives. We will have circle time and devotion, than afterwards get started with math.

To start of the math lesson for Top, Middle, and Bottom, we will sing “Head and
Shoulders, Knees and Toes” one time through. Once the students are excited and ready to
start, I will explain how the song relates to our lesson. I will point towards my head and
explain how that is at the top; I will point towards the shoulders and knees and explain
how they are in the middle; lastly I will point towards my toes and explain how your toes
are at the bottom. Singing and transitioning will last approximately 5-6 minutes.
To start out the lesson, we will use three different objects in the classroom on
place them on the top, middle, and bottom of a 3 shelved bookcase. As I tell the children
to place one object, such as a teddy bear, on the top shelf, they will progressively learn to
place objects on the correct shelf. Each student will get the opportunity to individually
place the objects in the correct position. First students will place the object after I
delegate top, middle, and bottom. Second students, on their own, will place the objects
and announce what position they placed it in.
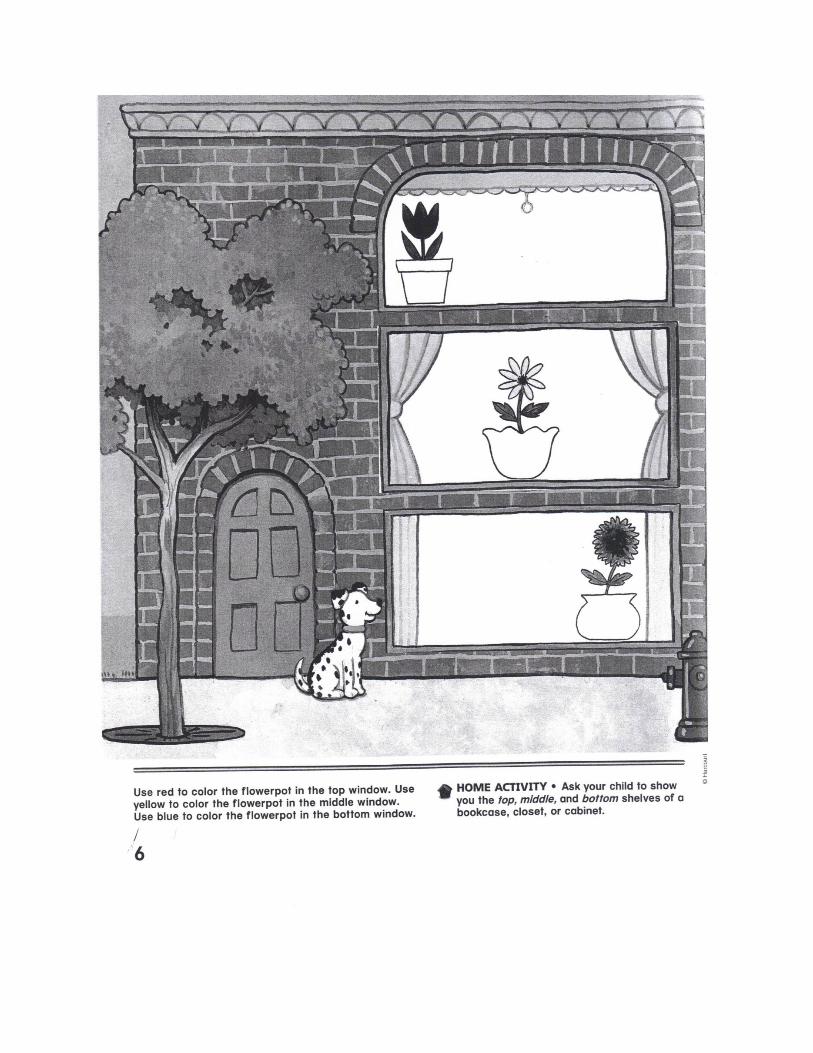
To transition, the class will work together on the worksheet on page 5. We will go
over the instructions and questions together. I will tell the students to circle the top block
and ask them why that is the top block. (Their answer will hopefully be: because it is
above the middle block.) We will proceed to go over the next questions, “Circle the
bottom clown? Why is that the bottom clown? Circle the middle hat as you go from top
to bottom? Why is that the middle hat?” The Main lesson and transition will take
approximately 20-25 minutes.
Lastly I will conclude the class with review top, middle, and bottom by placing
objects on the shelves one last time. I will hand out the students’ worksheet to go home
and explain to them that they need to go home and do it with their parents. To officially
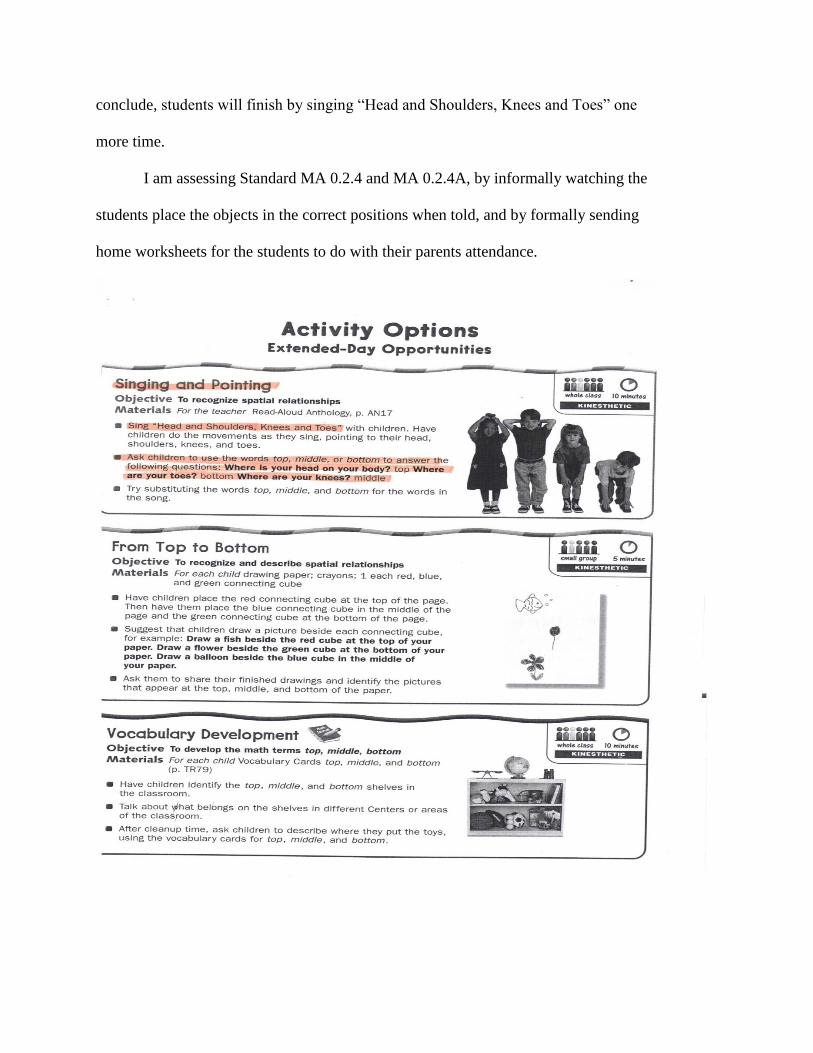
conclude, students will finish by singing “Head and Shoulders, Knees and Toes” one
more time.
I am assessing Standard MA 0.2.4 and MA 0.2.4A, by informally watching the
students place the objects in the correct positions when told, and by formally sending
home worksheets for the students to do with their parents attendance.


Lesson Plan Day 2
Student Teacher’s Name: Ashley Rengstorf Grade Level: Kindergarten
State Standard: Spatial Modeling: Students will communicate relative positions in space
Demonstrate positional words( e.g” above/below, near/far, over/under, in/out, down/up,
around/through) Subject: Math
Name of Lesson: In, Out Period/Time: 30 minutes
I. Goal:
1. Students will review top, middle, and bottom. They will also learn the difference
between in and out.
II. Objectives:
1. Students will be able to correctly know the difference between top, middle, and
bottom without any mistake.
2. Students will be able to describe and demonstrate the meaning of spatial relationships
in and out.
IV. Materials:
~~Box
~~Objects around the room
~~Large chart of paper
~~tape
~~clear plastic cup
~~photographs of objects showing the relationship between in and out.
~~Teachers edition book
V. Procedure:
A. Set / Hook
Dance to the song, “the Hokey Pokey”. Explain how the “Hokey Pokey” relates to the
vocabulary words in and out.
B. Transition
Explain how the “Hokey Pokey” relates to the vocabulary words in and out.
C. Main lesson

Teach students the meaning of in and out. Use objects and place one in a box and one
outside the box.
~~Place objects inside/outside of a rectangle drawn on paper.
~~Use a clear plastic cup in the same manner.
D. Transition
Work on the worksheet on page 7 with the students.
E. Conclusion
Review over the vocabulary words top, middle, bottom, in and out. Explain the worksheet
the students will take home and go over with their parents. End with singing the “Hokey Pokey.”
VI. Assessment:
Place an object inside a box and ask students what that represents. Place object outside of
a box and ask what that represents. Also, I will let students get the hands-on experience and
personally show me when an object is inside or outside of a box.
Worksheet taken home will assess what they had learned that day.
VII. Assignment:
Students are given a worksheet in class to do together to help understand the vocabulary
words, and are also given a take home assignment to
do with their parent
Narrative
Students will arrive at school, unpack their backpacks, and play with objects that are
placed in the crate until everyone arrives. We will have circle time and the devotion, then
afterwards we will get started with math.
To start the math class for the second day, students will do a quick review over top,
middle, and bottom by saying where I place the object on the book shelf.
We will then move into our next lesson and sing/dance together “The Hokey Pokey” one
time through. To transition, after the song is over and the students are excited/ready to begin, I
will demonstrate and explain how “The Hokey Pokey” relates to the vocabulary words today: in,

and out. When you sing/dance everyone stands in a circle, and when the music says “Put your
right arm in” you proceed to put your arm IN the circle, etc. The reviewing, singing, and
transitioning will take approximately ten minutes.
To being the main lesson, I will show the students a box and different objects we have
around the classroom. I will place one object inside the box and ask the children what I did with
the object. I will then take the object out of the box and ask what I did with the object. I will do
the same thing with a square drawn on a piece of paper and taped to the table. I will explain to
them that it is the same concept even though it doesn’t have sides to hold it in. I will place an
object inside the lines on the square and ask what I did to the object, and I will place objects
outside of the lines of the square and ask where those objects are sitting.
Once the students have slight knowledge of the subject, I will split the children up into
groups and let them work together. I will explain to them that when one of them puts something
in the box/cup/square they should all speak the answer together so they remember. Some
students will place objects in a box, some will place objects in a clear plastic cup, and some
students will place objects in a square drawn on a piece of paper and taped to the table. The
students will work together for around 10 minutes.
To transition to the conclusion of the class, the students will work on the worksheet on
page seven together. I will ask the students to circle the bird that is in the cage, circle the fist that
is out of the bowl, circle the car that is out of the box, and circle the bear that is in the balloon.
To conclude, we will review top, middle, bottom, in and out. I will hand out the
worksheet on page eight to the studetns and explain to them that they ned to work on this with
their parents when they get home and bring it back to school the next day. We will end the math
class with singing “The Hokey Pokey” again.
Standards MA 0.2.4 and MA 0.2.4A are being assessed in today’s lesson by using
formative assessment while the children are working together in groups and placing objects in
and out of the box, cup, or square. Observing them play and figure out whether it is in or out one
their own will help me decide if I am teaching to my fullest potential to help them learn the
material or not. I am using a summative assessment by giving the children two worksheets, one
to work on in class together, and one to take home and work on.


Lesson Plan Day 3 Student Teacher’s Name: Ashley Rengstorf Grade Level: Kindergarten
State Standard: Spatial Modeling: Students will communicate relative positions in space
Demonstrate positional words( e.g” above/below, near/far, over/under, in/out, down/up,
around/through) Subject: Math
Name of Lesson: Above, Below, Over, and Under Period/Time: 30 min
I. Goal: Students will review top, middle, bottom, in, and out. They will also learn the
differences between above, below, over, and under.
II. Objectives:
1. Students will be able to correctly distinguish when objects are placed above, below,
over, or under a concrete point without asking questions.
2. Students will be able to describe and demonstrate the meaning of spatial
relationships above, below, over, and under accurately.
IV. Materials: ~~Jump Rope
~~red, blue, and orange connecting cubes
~~Teachers Edition Book
~~Worksheets
~~Colors
~~objects around the room
~~box
~~coloring page
~~Teachers Edition Book
V. Procedure: A. Set / Hook
Students will review in and out. Students will color worksheets of birds in the sky and
fish in the water and a bridge you walk over and trees you walk under.
B. Transition
We will talk about what lives over and underground. I will explain to the students that the
birds live about the ground and the fish live under the ground. I will also explain how you
can walk over a bridge and under the trees.
C. Main lesson
Students will each get the opportunity to jump over the jump rope and walk under the
jump rope and will learn the variation between going over and under. Students will also
build together with cubes and put certain color cubes above or below other cubes.
D. Transition
Students will work on the worksheet on page 9.

E. Conclusion
We will review In, Out, Above, Below, Over, and Under. I will explain the worksheet, on
page 10, the students will do with their parents at home. They will finish coloring their
papers on Above, Below, Over, and Under.
VI. Assessment: Students will be assessed informally when putting together building blocks.
Students will be assessed formally with their take home worksheet to do with their
parents.
VII. Assignment: Students will better understand the difference between Above, Below, Over, and Under
when doing their worksheet.
Narrative
Students will arrive at school, unpack their backpack, and color the coloring sheet, about
above, below, over, and under. They will keep coloring until everyone arrives. Once children
have arrived we will have circle time, our devotion, and then get started with math.
To start the math lesson we will review in and out, by placing an object in a box and
outside of the box. They will talk and review over what each concept is. To start the new lesson,
I will ask the children to hold up their pages they were coloring when they got to school today.
Once they are all up, I will have them put them on the table so they can look at what is on the
page. I will ask them what objects they colored; they will answer birds, fish, a bridge, and a tree.
To transition I will then explain to the students that today we are learning about the words above,
below, over, and under. I will explain how birds fly about the ground and fish swim under the
ground. I will also explain how we can walk over bridges and under trees.
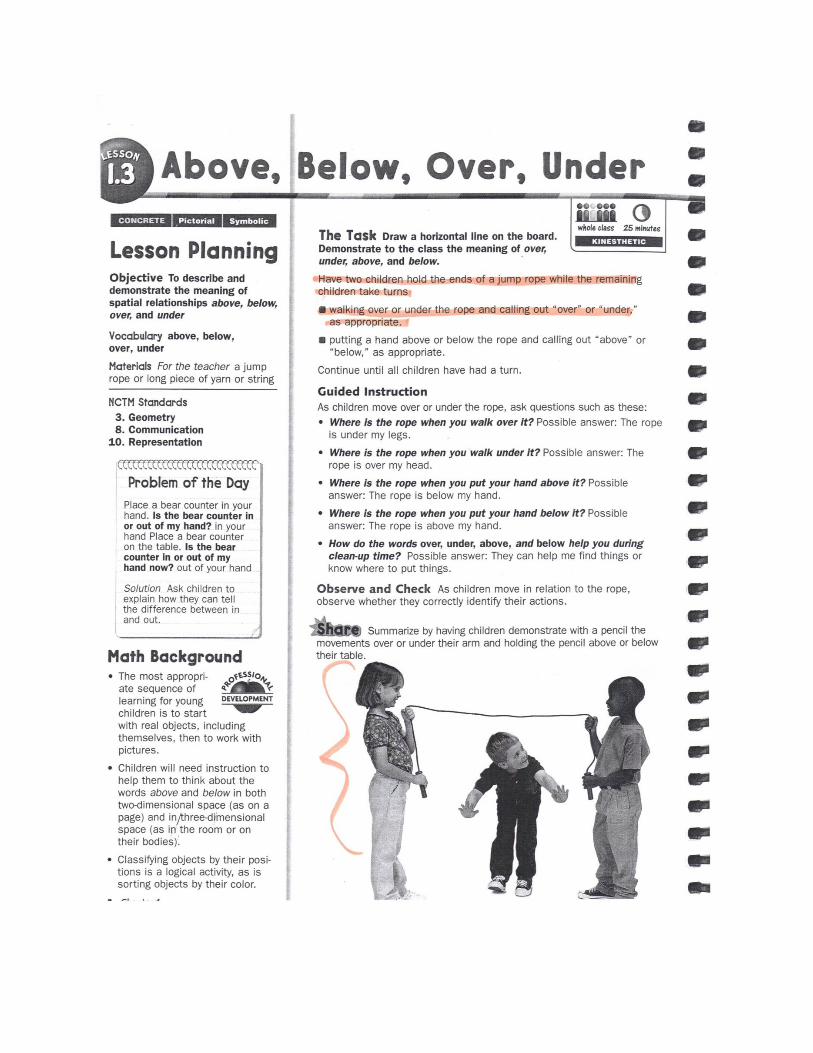
To begin the main lesson, I will have two children hold a jump rope. As I step over the
jump rope I will ask students to say “over” with me. AS I step under the jump rope, I will ask
students to say “under” with me. To help children gain a basic knowledge of over and under, I
will let the students step over and under the jump rope individually and we will all say the

matching word together. Once all students have gotten the opportunity to go we will join at our
tables again and use connecting cubes. Each child will get a red, blue, and orange connecting
cube. I will connect the blue cube above the red cube and teach them the word above; I will also
place the orange cube below the red cube and explain the word below. Together, as I tell the
students where to place the cube, the students will say together the matching word, above or
below.
To transition into the conclusion of the lesson, I will handout the worksheet on page nine,
and we will do it as a class. I will ask the students to Circle the rabbit that is above the table, and
mark an X on the rabbit that is below the table. For the second problem, I will ask the students to
circle the object that is over the boat, and mark an X on the object that is under the boat. If
students have questions we will go over it for a little longer.
To conclude the lesson, we will review in, out, above, below, over, and under. I will
handout the worksheet on page ten and ask the students to take those worksheets home, do them
with their parents, and bring them back the next day. If the students are not done coloring their
picture from the beginning of the lesson, they have time to finish that before we take our first
break.
I am assessing the children of Standard MA 0.2.4 and MA 0.2.4A. to assess the children
informally, we did an activity where each child got to step over/under the jump rope, and place
connecting cubes above/below the other. To formally assess the children, I sent home a
worksheet they could go over with their parents.