ARTISAT 36” JACK-TYPE 8 SHAFTS 1009-0008 · the ratchet pawl affixed to the take-up notion handle...
24
1 1573 Savoie C. P. 4 Plessisville, Qc. G6L 2Y6 TEL: 819-362-7207 FAX: 819-362-2045 www.leclerclooms.com [email protected] Loom Prepared by:_____________ Inspected by:_________________ Date:____________________ On receiving the loom, unpack and lay out the loom components. Do NOT discard any packing material until all parts are inventoried. Check the parts received against the parts list on pages #2 to #6 of the assembly instructions. Report any discrepancies to Leclerc immediately. To assemble this loom, a minimum of 2 people are needed but it is recommended you use 3. ARTISAT 36” JACK-TYPE 8 SHAFTS 1009-0008
Transcript of ARTISAT 36” JACK-TYPE 8 SHAFTS 1009-0008 · the ratchet pawl affixed to the take-up notion handle...

1
1573 SavoieC. P. 4 Plessisville, Qc.G6L 2Y6TEL: 819-362-7207FAX: [email protected]
Loom Prepared by:_____________
Inspected by:_________________
Date:____________________
On receiving the loom, unpack and lay out the loom components.Do NOT discard any packing material until all parts are inventoried. Check the parts received against the parts list on pages #2 to #6 of the assembly instructions. Report any discrepancies to Leclerc immediately.
To assemble this loom, a minimum of 2 people are needed but it is recommended you use 3.
ARTISAT 36” JACK-TYPE 8 SHAFTS 1009-0008

2
PARTS LIST 8 FLOATING LAMS 1 CASTLE TOP COVER 1 LEFT-HAND SIDE 1 RIGHT-HAND SIDE 10 TREADLES
1 FRONT CROSS-MEMBER (TREADLE) 1 MIDDLE LOWER CROSS-MEMBER 1 TREADLE ROD 28 ¾” with one push nut 1 MORE PUSH NUT 7/16” 2 TREADLE set SUPPORTS
39¾"
41½ cc
3
1 PK. 10 YDS FOR BEAM STICK 1 PK 5 YDS FOR BEAMING AND LEASE STICK
1 SHUTTLE 1 DOZ. BOBINES 4"
1 CLOTH BEAM WITH RATCHET WHEEL (wood = 38 1/8")
1 WARP BEAM WITH BRAKE DRUM (wood = 38 7/8") 1 TAKE-UP MOTION HANDLE
1 BATTEN HANDTREE 1 BATTEN SLEY WITH SHUTTLE RACE
2 BREAST BEAMS

4
1 JACK BOX
10 Treadle springs with Loop cord 6” (9½” with spring)
(back part)
5
10.5"
10.5"
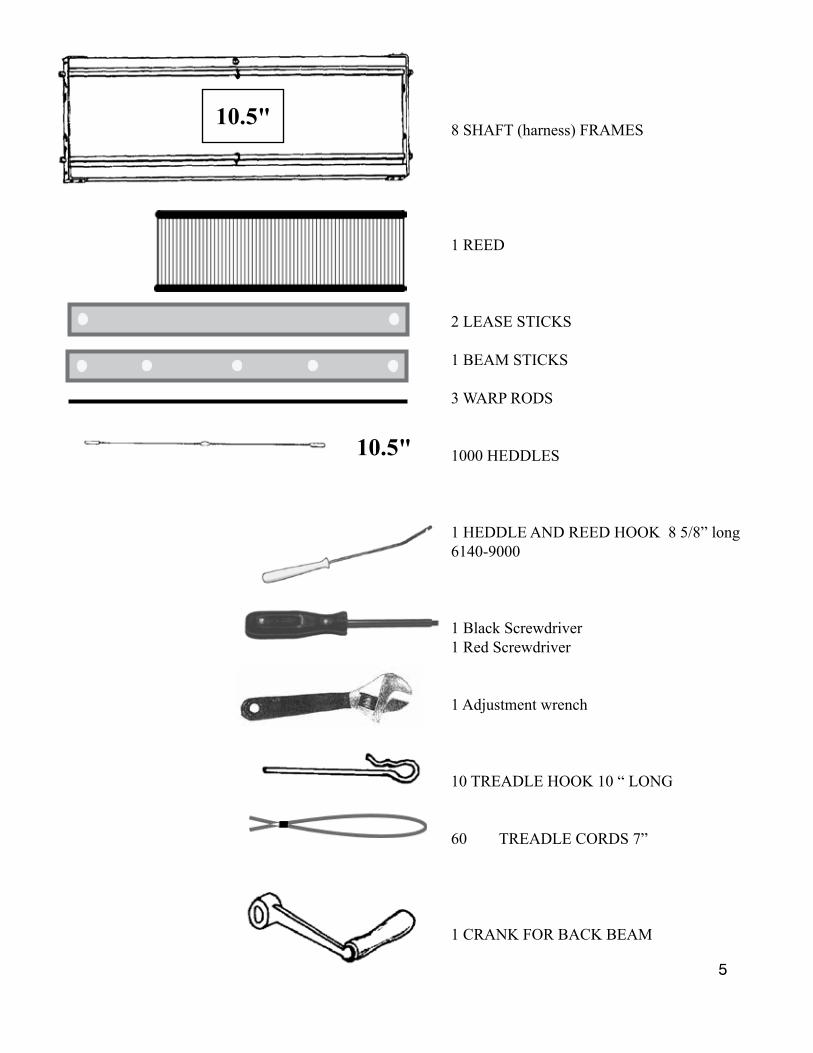
8 SHAFT (harness) FRAMES
1 REED 2 LEASE STICKS 1 BEAM STICKS 3 WARP RODS 1000 HEDDLES
1 HEDDLE AND REED HOOK 8 5/8” long 6140-9000
1 Black Screwdriver 1 Red Screwdriver 1 Adjustment wrench 10 TREADLE HOOK 10 “ LONG 60 TREADLE CORDS 7” 1 CRANK FOR BACK BEAM

6
9x Wooden spacer
0
1"
2"
3"
4"
Machine bolts1X 7/16 X 3½" (12 mm X 90 mm)
3 - 9/16” treadle set 4 - 5/16” (8 mm)5 - ¼" (6 mm)
SQUARE NUTS2 - ¼” (6 mm) 2 - 5/16” (8 mm)
1½”
Wing nuts4 X - ¼” (6 mm)2X - 5/16” (8 mm)
Round head screw6 - #14 X 2” (50 mm) 8 - #12, 1½” (jack box)
Flat head screw4X - #12 X 1½” (38 mm)(castle top)
2X eye screws
Instruction Video showing all
stages of the installation(artisat 4s)
Carriage Bolts2 - ¼ X 3¼” (6 mm x 80 mm) (F. Cross-Member) 2 - ¼” X 3” (6 mm x 75 mm) (Treadle blocs) 2 - ¼” X 1¾” (6 mm x 45 mm) 4 - 5/16 X 2½” (8 mm x 65 mm)
Nylon Wing nut for the Warp beam advance control system
7
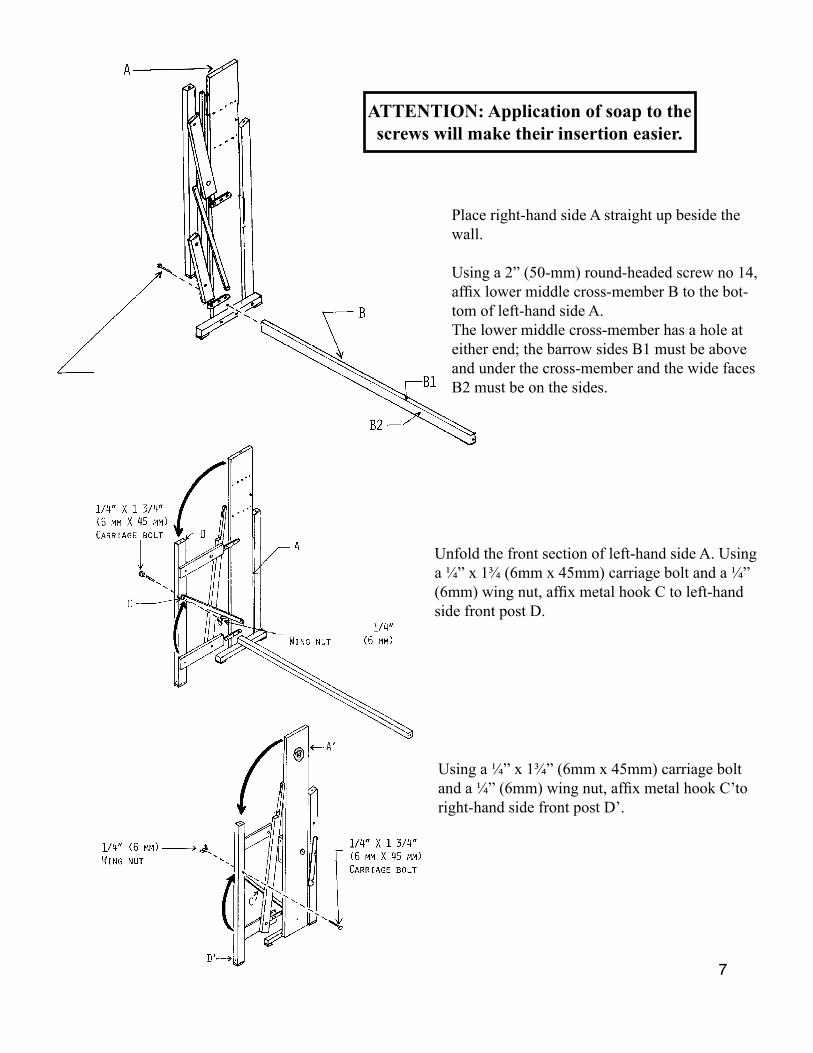
ATTENTION: Application of soap to the screws will make their insertion easier.
Place right-hand side A straight up beside the wall. Using a 2” (50-mm) round-headed screw no 14, affix lower middle cross-member B to the bot-tom of left-hand side A. The lower middle cross-member has a hole at either end; the barrow sides B1 must be above and under the cross-member and the wide faces B2 must be on the sides.
Unfold the front section of left-hand side A. Using a ¼” x 1¾ (6mm x 45mm) carriage bolt and a ¼” (6mm) wing nut, affix metal hook C to left-hand side front post D.
Using a ¼” x 1¾” (6mm x 45mm) carriage bolt and a ¼” (6mm) wing nut, affix metal hook C’to right-hand side front post D’.

8
Place the take-up motion handle E, with a 9/16” steel washer, on the right-hand side end of cloth beam F. note: The ratchet gear is on the right-hand side beam end. the ratchet pawl affixed to the take-up notion handle must be lifted up. Insert the end of cloth beam F into the holes in upper front cross-members G and G` The hole in lower middle cross-member B must be right beside the hole at the bottom of right-hand side A` Using a 2” (50 mm) round-headed screw no. 14, affix right-hand side A` to lower middle cross-member B.

9
Using two 2” (50 mm) round-headed screws no. 14, affix one of the two breast beams to the top of the front posts B and B` The rounded angle must be towards the outside of the loom.

10
Using ¼” x 3¼” (6mm x 80mm) carriage bolts, plus ¼” (6mm) steel washer and square nuts, attach front cross-member A to front posts B and B`
Insert two ¼” x 3” (6 mm x 75 mm) carriage bolts into treadle-set cross-member A. The bolt heads must be to the underside. The 2 center hole are for a 6 treadles set and the 2 outside one are for the 10 treadles set.

11
Push Nut
Washer 9/16"
Insert to the treadle rod (with push nut) D: 1 Washer 9/16”, One treadle and one treadle spacer 9 times, One treadle, One Washer 9/16” and one Push nut.
Put the treadle support in each side and install it in the loom using one ¼” (6 mm) washer and one ¼” (6 mm) wing nut
12
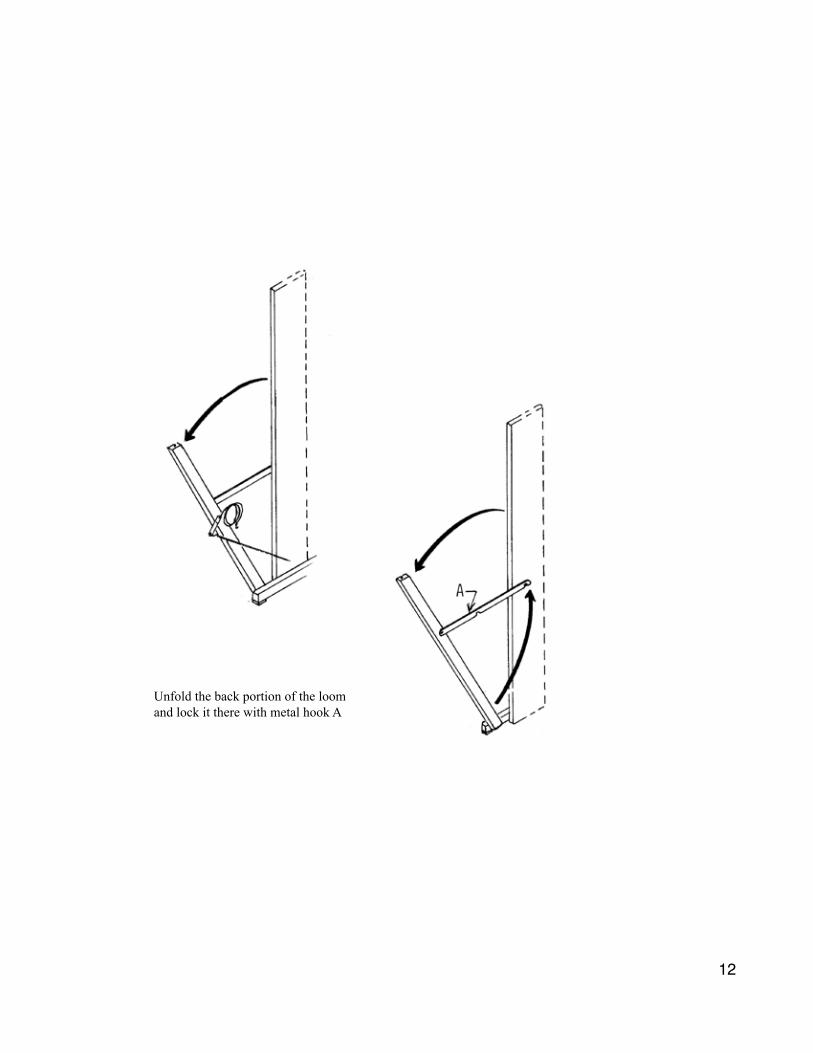
Unfold the back portion of the loom and lock it there with metal hook A
13
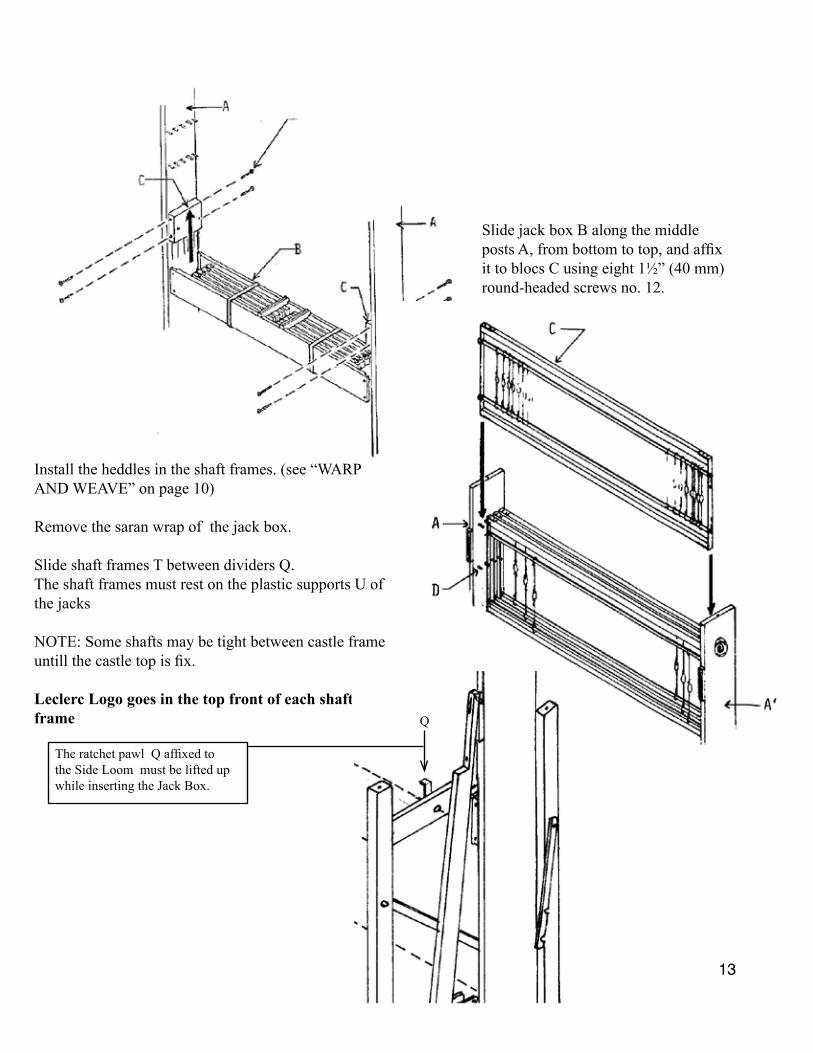
Slide jack box B along the middle posts A, from bottom to top, and affix it to blocs C using eight 1½” (40 mm) round-headed screws no. 12.
Install the heddles in the shaft frames. (see “WARP AND WEAVE” on page 10) Remove the saran wrap of the jack box. Slide shaft frames T between dividers Q. The shaft frames must rest on the plastic supports U of the jacks NOTE: Some shafts may be tight between castle frame untill the castle top is fix.
Leclerc Logo goes in the top front of each shaft frame
The ratchet pawl Q affixed to the Side Loom must be lifted up while inserting the Jack Box.
Q

14
Joint the “S” hook of the jacks D to the eyelet of the FLOATING lam E.
Castle cover
Complete the assembly with securing the Castle cover with 4 #12 1½” flat screws. Make sure to screw in the pre-drill holes of the castle.

15
Castle cover
Complete the assembly with securing the Castle cover with 4 #12 1½” flat screws. Make sure to screw in the pre-drill holes of the castle.
16
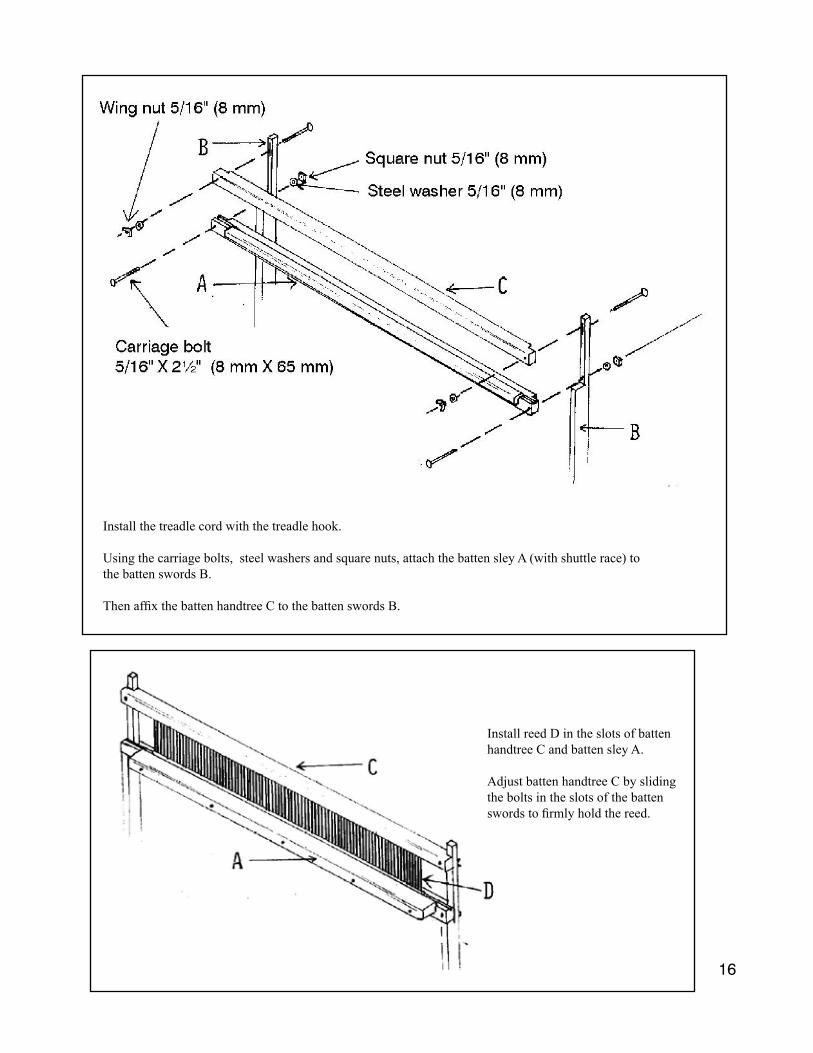
Install the treadle cord with the treadle hook. Using the carriage bolts, steel washers and square nuts, attach the batten sley A (with shuttle race) to the batten swords B. Then affix the batten handtree C to the batten swords B.
Install reed D in the slots of batten handtree C and batten sley A. Adjust batten handtree C by sliding the bolts in the slots of the batten swords to firmly hold the reed.

17
If the batten does not tought the two bumper equally, loosen the bolts of the batten sley and batten handtree and exert pressure on the batten centering it in its proper place. Tighten the bolts again.

18
Unhook brake treadle cord C from the brake realease treadle. Hold circular wire brake shoe D up slightly to the rear of the loom. Insert one end of the warp beam (which has only a metal post) into the left-hand side back post.
Insert the friction brake drum of the warp beam into the circular wire brake shoe D. Do not unroll the brake shoe (brake circle), just slide the warp beam into it

19
Insert the brake end of the warp beam into the hole of the right-hand side back-post.
Install the 7/16” X 3½” machine bolt trough the right-hand side back post and into the warp beam. Using crank E, tighten the machine bolt into the warp beam.

20
Using two 2” round-headed screws no 14, affix the breast back beam to the back posts.
Join the front “S” hook of the brake lever to the brake loop cord so the tension on the spring will be high enough to lock the warp beam while weaving. The warp beam should turn with some friction clockwise (while standing at the right side of the loom near the brake system) and this is the warping rotation. However, you should always release the tension on the friction brake system by disconnecting the spring from the loop cord (S hook) when you are warping the loom. To advance the fabric when weaving, depress the brake treadle just enough to release the warp beam. Depressing the brake treadle too far may cause the brake cable to come off the brake drum.Join the brake treadle to the S Hook in the back of the Brake Lever. Adjust the lenght so the bake treadle is at the confortable height Make a double knot at the brake treadle eye.

21
Using two 2” round-headed screws no 14, affix the FRONT breast beam to the FRONT posts.
New control advance system:This system will eliminate excessive warp yarn advance when releasing the brake system at cloth take-up. This friction system is adjustable and have to be released when winding the warp on. Just screw in the wing screw to increase the friction or unscrew it to release.

22
Threading Hook
FIRST TREADLE TIE-UP
Select any treadle and tie the Lams to the Treadles using the 7” cords supplied with the loom. Take the threading hook to help pass the cord through each hole of the lam.
Slide the Treadle Hook through the Screw Eyes and Cord Loops.
Back jack board box
Before you start weaving, you have to install the treadle spring on the screw anchors and throught the back of the treadle hooks.
In the Treadle rest position (up) there should be no or very little tension on the Spring. However, slack on those spring cord is not desirable. The treadle springs are there to support the weight of the treadle itself only.
23
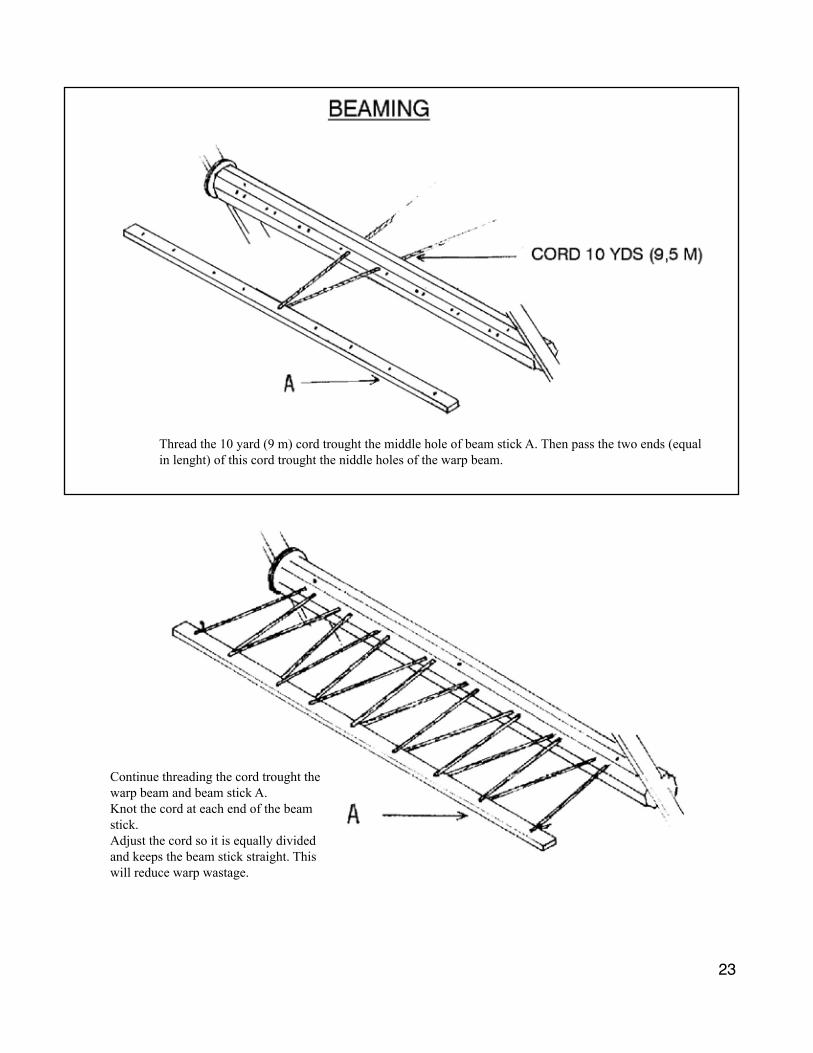
Thread the 10 yard (9 m) cord trought the middle hole of beam stick A. Then pass the two ends (equal in lenght) of this cord trought the niddle holes of the warp beam.
Continue threading the cord trought the warp beam and beam stick A. Knot the cord at each end of the beam stick. Adjust the cord so it is equally divided and keeps the beam stick straight. This will reduce warp wastage.

24
Cut the 5-yard (4.5 m) cord in half. One half of this cord laces beam stick A to warp rod B Insert a metal rod into the apron of the cloth beam. Use the other half of the cord to lace this rod to the third metal rod.
Screw eyes have been affixed in the inner side of main post. After having passed a string trought the holes of the lease sticks, tie the ends of this string to the thread beam and to the screw eye. Do the same operation with the other end of the lease sticks. The lease sticks will then be held at a pratical height for threading
We at Leclerc encourage Weaver feedback on this and all our products. Please
send your comments to Leclerc Loom Co. [email protected]
HAPPY WEAVING