Art Attack. Art Crafting
248
-
Upload
sasho-spasovski -
Category
Documents
-
view
118 -
download
1
Transcript of Art Attack. Art Crafting


Art Attack
If you're bored with drawing flat pictures, it's time you made a 3D Picture Box! You will need:
● Shoe Box ● Pen ● Paint ● Cardbaord Box Card ● Scissors
First, find find yourself an old shoe box.
Draw around the box (not the lid) onto a large piece of paper and think of a theme for your 3D Picture Box.
file:///C|/Documents and Settings/Administrator/Desktop/Art Attack/3dpicturebox.html (1 of 5) [5/27/2009 6:52:42 PM]
copyrig
ht:Aadi
thyar@
gmail.
com

Art Attack
You need to create your design within the rectangle you drew.
The design needs to be in three layers, the background, the middle and the foreground. In this one, the cacti, sign and skull are in the foreground, the mountain scene and road is in the middle, and the background has the sky with birds in the distance.
Copy the background of your design onto the back of the box.
Now copy the middle part of the design onto a piece of card. It has to be the same size as the inside of the box, all the way around.
file:///C|/Documents and Settings/Administrator/Desktop/Art Attack/3dpicturebox.html (2 of 5) [5/27/2009 6:52:42 PM]
copyrig
ht:Aadi
thyar@
gmail.
com

Art Attack
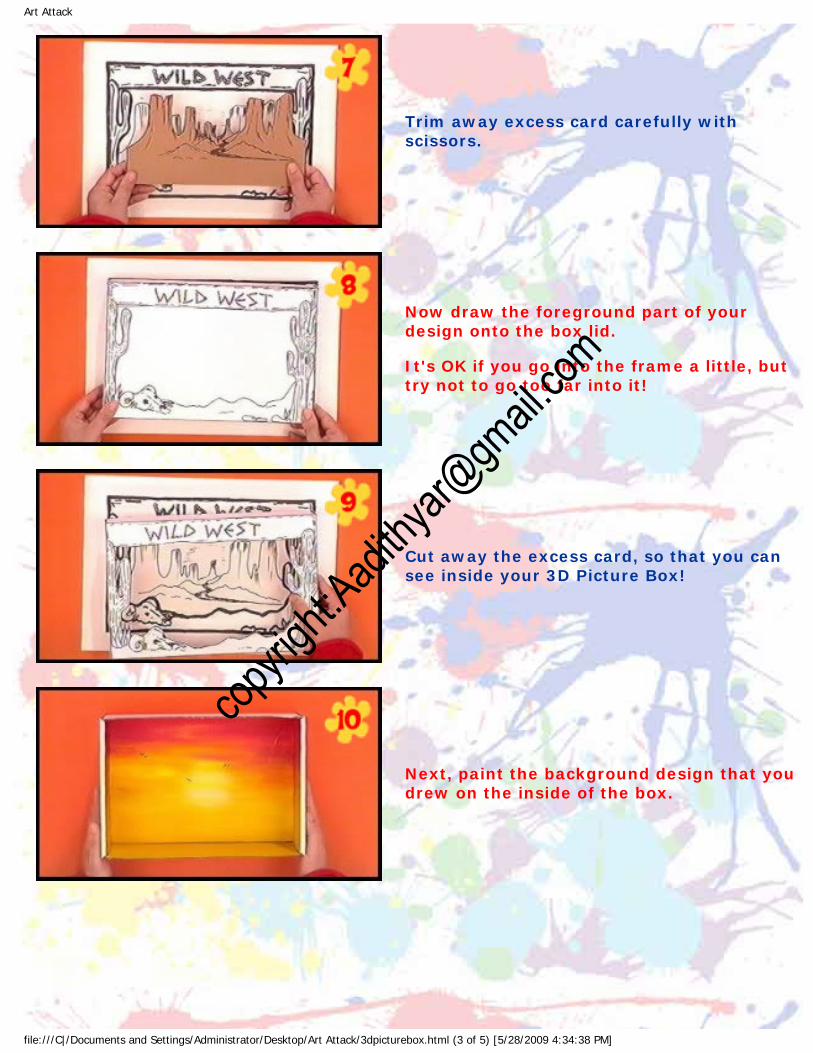
Trim away excess card carefully with scissors.
Now draw the foreground part of your design onto the box lid. It's OK if you go into the frame a little, but try not to go too far into it!
Cut away the excess card, so that you can see inside your 3D Picture Box!
Next, paint the background design that you drew on the inside of the box.
file:///C|/Documents and Settings/Administrator/Desktop/Art Attack/3dpicturebox.html (3 of 5) [5/27/2009 6:52:42 PM]
copyrig
ht:Aadi
thyar@
gmail.
com

Art Attack
Then paint the middle section, let it dry and secure it in place in the middle of the box.
Finally, paint lid of the box, and pop it in place. Finished!
There are lots of possibilities for 3D Picture Boxes using this technique. How about a day at the races?
Or what about an underwater scene, like this? Try it yourself!
file:///C|/Documents and Settings/Administrator/Desktop/Art Attack/3dpicturebox.html (4 of 5) [5/27/2009 6:52:42 PM]
copyrig
ht:Aadi
thyar@
gmail.
com

Art Attack
Pablo Picasso was a master of abstract art. Abstract art is artwork that doesn't seem to show objects the way they normally are, but instead looks for a different way of representing them. Now you can learn this technique too, and what's more, in three dimensions! You will need:
● Teabag box, or other boxes ● Tape ● Scissors ● PVA glue ● Kitchen roll ● Acrylic paint ● Black pen
To begin with, you need to find a box like a teabag box, or biscuit box. The ones in this picture are some examples of the kind that work well for this Art Attack.
Start thinking... but think abstract! Well, this is a boring, ordinary rectangular box right now. So start by breaking up its shape.
file:///C|/Documents and Settings/Administrator/Desktop/Art Attack/3dpicassofaces.html (1 of 5) [5/28/2009 2:04:21 PM]
copyrig
ht:Aadi
thyar@
gmail.
com

Art Attack
You can do this any way you like, but Neil started on one side of his, about half way up. Cut a diagonal to the bottom.
Do the same on the other side but this time continue around the side...
... and down the back, again on the diagonal.
On the first diagonal just cut out a triangular eyehole.
file:///C|/Documents and Settings/Administrator/Desktop/Art Attack/3dpicassofaces.html (2 of 5) [5/28/2009 2:04:21 PM]
copyrig
ht:Aadi
thyar@
gmail.
com

Art Attack
Then lift the lid and just crush the top corner a bit to alter the shape of the box. This doesn't have to be perfect. The idea is to just alter the shape!
When you've done that, tape it all into place. This will be the basic head shape.
Next you need to add some features. Do this using the corners of the other boxes you collected. Here's one for an eye.
One for a nose, slightly off centre.
file:///C|/Documents and Settings/Administrator/Desktop/Art Attack/3dpicassofaces.html (3 of 5) [5/28/2009 2:04:21 PM]
copyrig
ht:Aadi
thyar@
gmail.
com

Art Attack
And another eye in a different place. You could even do it upside down like Neil you can see here. Just keep experimenting and eventually your abstract face will start to appear. When you're happy with your arrangement, tape everything securely down.
Go over everything with some PVA glue mixed half and half with water, adding on a layer of kitchen roll. Make sure you get into all of those nooks and crannies, sealing over all the joins.
When you've covered over all of theface and it has dried, you'll have something that looks like this.
Now you can paint it in an abstract way!
Acrylic paint works really well for this. As you can see here, this one has angular shapes painted all over the face, and every shape is a different colour. Don't forget the eyes, and you can even use a black permanent pen to pick out all the details. This is called a "cubist" style.
file:///C|/Documents and Settings/Administrator/Desktop/Art Attack/3dpicassofaces.html (4 of 5) [5/28/2009 2:04:21 PM]
copyrig
ht:Aadi
thyar@
gmail.
com

Art Attack
If you really want to go crazy, you can even make your own abstract art gallery!
Try it yourself!
© The Media Merchants Television Company Limited 2009.
Privacy Policy Terms and Conditions
HIT Entertainment Limited Registered in England No: 2341947 Registered Office: Maple House, 149 Tottenham Court Road, London W1T 7NF
United Kingdom.
© The Media Merchants Television Company Limited 2009.
Privacy Policy Terms and Conditions
HIT Entertainment Limited Registered in England No: 2341947 Registered Office: Maple House, 149 Tottenham Court Road, London W1T 7NF
United Kingdom.
file:///C|/Documents and Settings/Administrator/Desktop/Art Attack/3dpicassofaces.html (5 of 5) [5/28/2009 2:04:21 PM]
copyrig
ht:Aadi
thyar@
gmail.
com

Art Attack
If you're bored with drawing flat pictures, it's time you made a 3D Picture Box! You will need:
● Shoe Box ● Pen ● Paint ● Cardbaord Box Card ● Scissors
First, find find yourself an old shoe box.
Draw around the box (not the lid) onto a large piece of paper and think of a theme for your 3D Picture Box.
file:///C|/Documents and Settings/Administrator/Desktop/Art Attack/3dpicturebox.html (1 of 5) [5/28/2009 4:34:38 PM]
copyrig
ht:Aadi
thyar@
gmail.
com

Art Attack
You need to create your design within the rectangle you drew.
The design needs to be in three layers, the background, the middle and the foreground. In this one, the cacti, sign and skull are in the foreground, the mountain scene and road is in the middle, and the background has the sky with birds in the distance.
Copy the background of your design onto the back of the box.
Now copy the middle part of the design onto a piece of card. It has to be the same size as the inside of the box, all the way around.
file:///C|/Documents and Settings/Administrator/Desktop/Art Attack/3dpicturebox.html (2 of 5) [5/28/2009 4:34:38 PM]
copyrig
ht:Aadi
thyar@
gmail.
com
Art Attack
Trim away excess card carefully with scissors.
Now draw the foreground part of your design onto the box lid. It's OK if you go into the frame a little, but try not to go too far into it!
Cut away the excess card, so that you can see inside your 3D Picture Box!
Next, paint the background design that you drew on the inside of the box.
file:///C|/Documents and Settings/Administrator/Desktop/Art Attack/3dpicturebox.html (3 of 5) [5/28/2009 4:34:38 PM]
copyrig
ht:Aadi
thyar@
gmail.
com

Art Attack
Then paint the middle section, let it dry and secure it in place in the middle of the box.
Finally, paint lid of the box, and pop it in place. Finished!
There are lots of possibilities for 3D Picture Boxes using this technique. How about a day at the races?
Or what about an underwater scene, like this? Try it yourself!
file:///C|/Documents and Settings/Administrator/Desktop/Art Attack/3dpicturebox.html (4 of 5) [5/28/2009 4:34:38 PM]
copyrig
ht:Aadi
thyar@
gmail.
com

Art Attack
Here's an Art Attack for a still life with a difference! You will need:
● Tissue paper ● Cling film ● PVA glue ● Scissors
First choose an object for a still life, like this bottle, and cover it completely in cling film.
Take care to press the cling film into all the nooks and crannies of whichever object you've chosen.
Next, mix up some PVA glue with water, and paste on some small, torn up pieces of tissue paper.
file:///C|/Documents and Settings/Administrator/Desktop/Art Attack/3dstilllife.html (1 of 4) [5/28/2009 4:37:21 PM]
copyrig
ht:Aadi
thyar@
gmail.
com

Art Attack
Using different shades of tissue paper gives a more interesting effect.
The idea is to do three or four layers, each going right down to the bottom oe the object.
When the tissue paper and PVA glue has dried, insert a pair of scissors at the bottom, and cut the cast off, as neatly as you can...
...then carefully prise the object away from the cast.
file:///C|/Documents and Settings/Administrator/Desktop/Art Attack/3dstilllife.html (2 of 4) [5/28/2009 4:37:21 PM]
copyrig
ht:Aadi
thyar@
gmail.
com

Art Attack
Next, paste on more tissue paper and PVA glue along the seam, to join it up.
When the seam is covered, leave it to dry. When it has dried, you'll have something that looks like this!
You can produce other objects in this way, and arrange them on a plate to produce a 3D still life!
If you like, you can glue them down onto a paper plate - like this - and cover the plate in tissue paper toO! This one is a sort of "bathroom accessories" still life.
file:///C|/Documents and Settings/Administrator/Desktop/Art Attack/3dstilllife.html (3 of 4) [5/28/2009 4:37:21 PM]
copyrig
ht:Aadi
thyar@
gmail.
com

Art Attack
Or how about this? The more objects you add, the more spectacular it looks! Do remember to ask for permission before you start pasting tissue paper on objects around the house! Try it yourself!
© The Media Merchants Television Company Limited 2009.
Privacy Policy Terms and Conditions
HIT Entertainment Limited Registered in England No: 2341947 Registered Office: Maple House, 149 Tottenham Court Road, London W1T 7NF
United Kingdom.
© The Media Merchants Television Company Limited 2009.
Privacy Policy Terms and Conditions
HIT Entertainment Limited Registered in England No: 2341947 Registered Office: Maple House, 149 Tottenham Court Road, London W1T 7NF
United Kingdom.
file:///C|/Documents and Settings/Administrator/Desktop/Art Attack/3dstilllife.html (4 of 4) [5/28/2009 4:37:21 PM]
copyrig
ht:Aadi
thyar@
gmail.
com

Art Attack
Did you know that mythical creatures like the abominable snowman and the yeti are thought to exist because someone has found a strange footprint in the snow or in the mud? Now you can make your own! You will need:
● cereal box ● PVA glue ● tissue paper or kitchen roll ● sand ● paintbrush ● newspaper
Select a cereal box - the bigger, the better!
Draw on a footprint design. You can always research these in books from your local library or school. It's also a good idea to test the designs out on paper first.
file:///C|/Documents and Settings/Administrator/Desktop/Art Attack/abominablefootprint.html (1 of 4) [5/28/2009 4:38:25 PM]
copyrig
ht:Aadi
thyar@
gmail.
com

Art Attack
When you have a design you want, copy it to your cereal box, but don't make it too complicated. It doesn't need to be too neat either - it all adds to the prehistoric effect!
Cut out your design like this.
Carefully pad out your box with some scrunched up newspaper to fatten it out. Tape the ends closed to make it nice and rigid.
Break up all the sharp corners of the box and the straight edges, by scrunching them and pushing the sides in. This reduces the rigidity.
file:///C|/Documents and Settings/Administrator/Desktop/Art Attack/abominablefootprint.html (2 of 4) [5/28/2009 4:38:25 PM]
copyrig
ht:Aadi
thyar@
gmail.
com

Art Attack
It's also a good idea to make sure that your imprint is a decent depth. Use your hand to press or mould the newspaper, to create a good depth.
To strengthen your footprint and make it look more realistic, mix some PVA glue in equal parts with water. Slop it all over your footprint, laying on strips of tissue paper, kitchen roll or loo roll. Cover the whole of the top of the box in one layer of glue and tissue - but make sure you go down into the footprint to the newspaper.
When you've done the whole thing, you'll have something that looks like this.
While it's still wet, turn it into stone by sprinkling sand all over the box. Try not to leave any white exposed. Once the whole thing is covered, leave it a few minutes for the sand to settle.
file:///C|/Documents and Settings/Administrator/Desktop/Art Attack/abominablefootprint.html (3 of 4) [5/28/2009 4:38:25 PM]
copyrig
ht:Aadi
thyar@
gmail.
com

Art Attack
Once it's covered in sand, shake the excess off and you'll have something that looks like this. Try it yourself!
© The Media Merchants Television Company Limited 2009.
Privacy Policy Terms and Conditions
HIT Entertainment Limited Registered in England No: 2341947 Registered Office: Maple House, 149 Tottenham Court Road, London W1T 7NF
United Kingdom.
© The Media Merchants Television Company Limited 2009.
Privacy Policy Terms and Conditions
HIT Entertainment Limited Registered in England No: 2341947 Registered Office: Maple House, 149 Tottenham Court Road, London W1T 7NF
United Kingdom.
file:///C|/Documents and Settings/Administrator/Desktop/Art Attack/abominablefootprint.html (4 of 4) [5/28/2009 4:38:25 PM]
copyrig
ht:Aadi
thyar@
gmail.
com

Art Attack
Need some acrylic paint, but haven't got any? Check out this Art Attack! You will need:
● Poster paint ● PVA glue
Acrylic paint is really versatile and is used a lot on Art Attack. It's great for painting paper mache models, and can even be used to paint fabric and cloth, because when it dries, it becomes waterproof.
If you haven't got any acrylic paint, you can make your own by adding PVA glue to ordinary poster paint.
Give it a mix, and get painting!
file:///C|/Documents and Settings/Administrator/Desktop/Art Attack/acrylicstylepaint.html (1 of 2) [5/28/2009 4:39:16 PM]
copyrig
ht:Aadi
thyar@
gmail.
com

Art Attack
The paint goes really thick, just like acrylic, and it will dry waterproof! Try it yourself!
© The Media Merchants Television Company Limited 2009.
Privacy Policy Terms and Conditions
HIT Entertainment Limited Registered in England No: 2341947 Registered Office: Maple House, 149 Tottenham Court Road, London W1T 7NF
United Kingdom.
© The Media Merchants Television Company Limited 2009.
Privacy Policy Terms and Conditions
HIT Entertainment Limited Registered in England No: 2341947 Registered Office: Maple House, 149 Tottenham Court Road, London W1T 7NF
United Kingdom.
file:///C|/Documents and Settings/Administrator/Desktop/Art Attack/acrylicstylepaint.html (2 of 2) [5/28/2009 4:39:16 PM]
copyrig
ht:Aadi
thyar@
gmail.
com

Art Attack
Here's an Art Attack that's simply out of this world! Take an intergalactic journey through your own imagination by making your own alien planet. You will need:
● Cardboard box card ● Newspaper ● PVA glue ● Tissue paper or kitchen roll ● Aluminium foil ● Paint ● Card ● Tape
First, make the base of your alien planet. For this, cut a large oval shape out of cardboard box card.
Then scrunch up some newspaper into balls, and start to build up a landscape.
file:///C|/Documents and Settings/Administrator/Desktop/Art Attack/alienplanet.html (1 of 9) [5/28/2009 4:40:12 PM]
copyrig
ht:Aadi
thyar@
gmail.
com

Art Attack
Tape all the balls into place as you go. Use lots of tape!
Now build up some higher regions. Make twists of newspaper for mountain tops.
Cover the whole of the base with ridges and valleys.
Next, make some longer twists of newspaper and tape a few of them together in bunches to make stalagmites.
file:///C|/Documents and Settings/Administrator/Desktop/Art Attack/alienplanet.html (2 of 9) [5/28/2009 4:40:12 PM]
copyrig
ht:Aadi
thyar@
gmail.
com

Art Attack
Loop some newspaper into rings and tape them on to make craters.
How about some arches in the rock for intergalactic bridges?
And some rolled up balls of newspaper for boulders!
When you've finished, you should have something that looks like this. Now, to make it a bit more alien...
file:///C|/Documents and Settings/Administrator/Desktop/Art Attack/alienplanet.html (3 of 9) [5/28/2009 4:40:12 PM]
copyrig
ht:Aadi
thyar@
gmail.
com

Art Attack
How about using a piece of aluminium foil, backed on card, and cut into a wobbly shape for a molten metal lake? Paste on some PVA glue and stick it into place.
These weird alien plants are just pieces of sponge stuck onto the ends of curly pipe cleaners!
The plastic barrels of run-out ballpoint pens make fantastic crystal mountains. Press them into the landscape!
When you're happy, take some PVA glue mixed half and half with water, and paste a layer of tissue paper all over the landscape, sealing over the joins. Just make sure you don't put tissue on your crystal mountains and molten lake!
file:///C|/Documents and Settings/Administrator/Desktop/Art Attack/alienplanet.html (4 of 9) [5/28/2009 4:40:12 PM]
copyrig
ht:Aadi
thyar@
gmail.
com
Art Attack
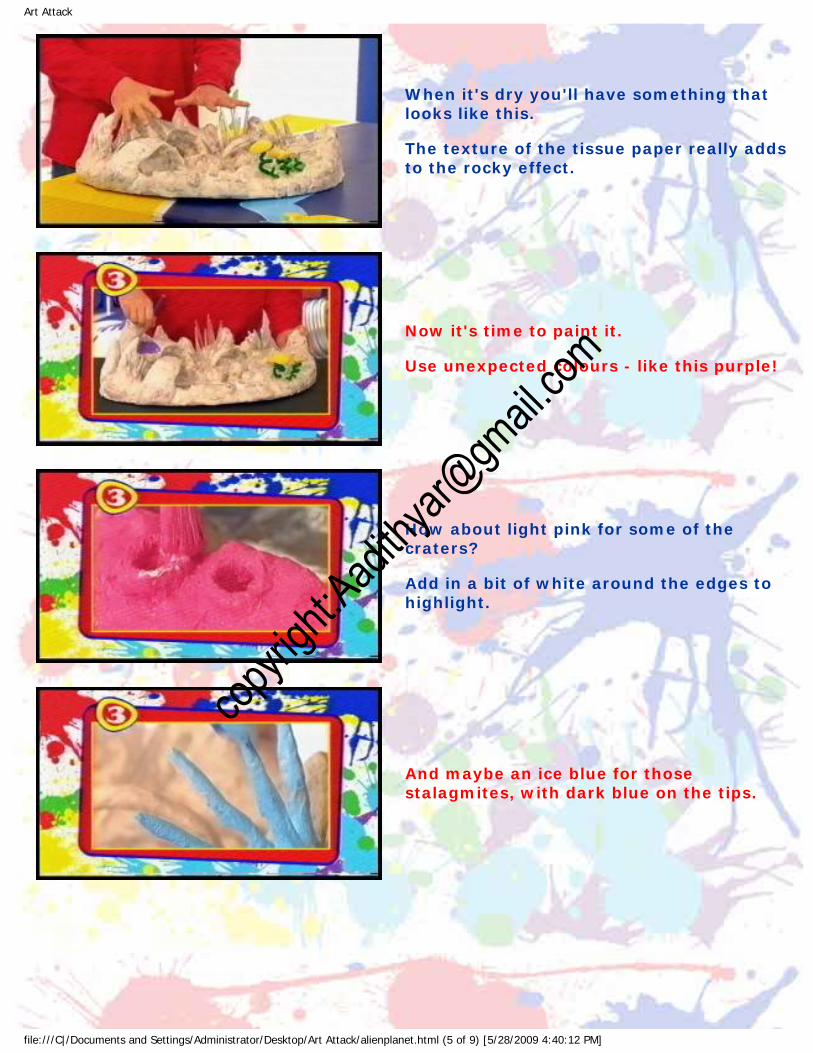
When it's dry you'll have something that looks like this. The texture of the tissue paper really adds to the rocky effect.
Now it's time to paint it. Use unexpected colours - like this purple!
How about light pink for some of the craters? Add in a bit of white around the edges to highlight.
And maybe an ice blue for those stalagmites, with dark blue on the tips.
file:///C|/Documents and Settings/Administrator/Desktop/Art Attack/alienplanet.html (5 of 9) [5/28/2009 4:40:12 PM]
copyrig
ht:Aadi
thyar@
gmail.
com

Art Attack
You could even cut out leaf shapes from some coloured paper to make some dangerous plant life.
Add some wisps of cotton wool for mists and gases.
The best thing about this is that there are no rules. Just make it all up as you go along. You'll end up with something that looks like this, but it's not quite finished yet...
Next, make a background. Take a large piece of card that's big enough to wrap around half of your the base.
file:///C|/Documents and Settings/Administrator/Desktop/Art Attack/alienplanet.html (6 of 9) [5/28/2009 4:40:12 PM]
copyrig
ht:Aadi
thyar@
gmail.
com

Art Attack
Lie it down, and then cut out circles of paper for planets. You can cut them out of coloured paper, or you could paint them. The idea is to make them different sizes, so that it looks like some of them are further away.
When you're happy with the positions, glue the planets down.
Now take a chalk or pastel and add on some gas rings going around the planets. Smudge them slightly with your finger.
You can do the same across the top of the sky too but with a different colour. Smudge that with your fingers too, to make them look misty and mysterious.
file:///C|/Documents and Settings/Administrator/Desktop/Art Attack/alienplanet.html (7 of 9) [5/28/2009 4:40:12 PM]
copyrig
ht:Aadi
thyar@
gmail.
com

Art Attack
Use a black marker to draw a range of pointy mountains, so they look like silhouettes of the distant landscape.
Then fill in the landscape with black paint.
When you've finished the sky, wrap it around the back half of the landscape and tape it into place.
And here it is! A fantastic intergalactic landscape that's as weird as your imagination can make it.
file:///C|/Documents and Settings/Administrator/Desktop/Art Attack/alienplanet.html (8 of 9) [5/28/2009 4:40:12 PM]
copyrig
ht:Aadi
thyar@
gmail.
com

Art Attack
Here's another great intergalactic landscape: this one more of an ice world.
And this one's the view from our moon to the Earth in the background. Try it yourself!
© The Media Merchants Television Company Limited 2009.
Privacy Policy Terms and Conditions
HIT Entertainment Limited Registered in England No: 2341947 Registered Office: Maple House, 149 Tottenham Court Road, London W1T 7NF
United Kingdom.
© The Media Merchants Television Company Limited 2009.
Privacy Policy Terms and Conditions
HIT Entertainment Limited Registered in England No: 2341947 Registered Office: Maple House, 149 Tottenham Court Road, London W1T 7NF
United Kingdom.
file:///C|/Documents and Settings/Administrator/Desktop/Art Attack/alienplanet.html (9 of 9) [5/28/2009 4:40:12 PM]
copyrig
ht:Aadi
thyar@
gmail.
com

Art Attack
Ever wanted your own priceless figurines? Here's your big chance! You will need:
● Sticky Tape ● Newspaper ● Aluminium Foil ● Cardboard Box Card
Start by scrunching up newspaper into a body shape. Use plenty of stciky tape to hold it in shape
Twist some strips of newspaper into arms and legs. Again, use sticky tape to hold them in shape.
Bend the bottom of the legs to make feet.
file:///C|/Documents and Settings/Administrator/Desktop/Art Attack/aluminiumfigures.html (1 of 4) [5/28/2009 4:41:14 PM]
copyrig
ht:Aadi
thyar@
gmail.
com

Art Attack
Then scrunch up a thin ball of newspaper to make a head. Use more sticky tape to hold it in place.
Now that you have all the body parts made, tape them all together. Attach one at a time.
Just use plenty of tape and take your time - don't rush!
To make your figure stand up, you need to make a base. Just cut a piece of cardboard box card to the right shape, and tape a scrunched up pad of newspaper onto it.
file:///C|/Documents and Settings/Administrator/Desktop/Art Attack/aluminiumfigures.html (2 of 4) [5/28/2009 4:41:14 PM]
copyrig
ht:Aadi
thyar@
gmail.
com

Art Attack
Now position your figure on the base. It doesn't have to be in a standing position it can be in any position you like. This one's walking, for example.
To create the effect of a priceless figurine, cover your creation in aluminium foil. You'll need to use some double sided sticky tape or sticky tape loops for this.
Put your sticky tape loops onto the back of your figurine's back, head, chest and so on, then simply cover with pieces of aluminium foil.
Remember, you can do any shape, size or pose of figure that you like. Try it yourself!
file:///C|/Documents and Settings/Administrator/Desktop/Art Attack/aluminiumfigures.html (3 of 4) [5/28/2009 4:41:14 PM]
copyrig
ht:Aadi
thyar@
gmail.
com

Art Attack
Do you like mazes, but can't find one challenging enough? Then make your own! You will need:
● Clay ● Pencil ● Cling Film ● Bead ● Plastic Spoon ● Paint
For this Art Attack you need to get hold of some self-hardening clay. Most art shops sell it, as well as some toy shops and newsagents.
Take a big ball and roll it out flat onto an old tray or board. It needs to be about 1cm to 1.5cm thick.
file:///C|/Documents and Settings/Administrator/Desktop/Art Attack/amazeing.html (1 of 4) [5/28/2009 4:42:30 PM]
copyrig
ht:Aadi
thyar@
gmail.
com

Art Attack
Now design a maze! Take a pencil or paintbrush, and use the end to draw the design into the clay.
Start with the correct path through the maze, but don't make any of the curves too tight. Then to make some false paths, just draw lines coming off of the correct pathway into other areas.
Make sure the lines aren't too close together.
Next dig out the paths using the handle of a plastic spoon. Do a small area at a time and cover the rest of the clay in cling film to prevent it hardening. The paths should be wide enough for a bead or marble to go down.
file:///C|/Documents and Settings/Administrator/Desktop/Art Attack/amazeing.html (2 of 4) [5/28/2009 4:42:30 PM]
copyrig
ht:Aadi
thyar@
gmail.
com

Art Attack
Take your time with this. If you like, use a bead or marble to check the path is wide enough.
You might want to smooth the channels out with your finger as you go along. When you've done one section move the cling film and do another.
Leave your maze to dry and harden. When dry, you can paint it.
The colours are up to you. You could paint it green just like a real garden maze...
file:///C|/Documents and Settings/Administrator/Desktop/Art Attack/amazeing.html (3 of 4) [5/28/2009 4:42:30 PM]
copyrig
ht:Aadi
thyar@
gmail.
com

Art Attack
...or you could do any other design you like, with any colours you like!
Let your imagination go wild! Try it yourself!
© The Media Merchants Television Company Limited 2009.
Privacy Policy Terms and Conditions
HIT Entertainment Limited Registered in England No: 2341947 Registered Office: Maple House, 149 Tottenham Court Road, London W1T 7NF
United Kingdom.
© The Media Merchants Television Company Limited 2009.
Privacy Policy Terms and Conditions
HIT Entertainment Limited Registered in England No: 2341947 Registered Office: Maple House, 149 Tottenham Court Road, London W1T 7NF
United Kingdom.
file:///C|/Documents and Settings/Administrator/Desktop/Art Attack/amazeing.html (4 of 4) [5/28/2009 4:42:30 PM]
copyrig
ht:Aadi
thyar@
gmail.
com
Art Attack
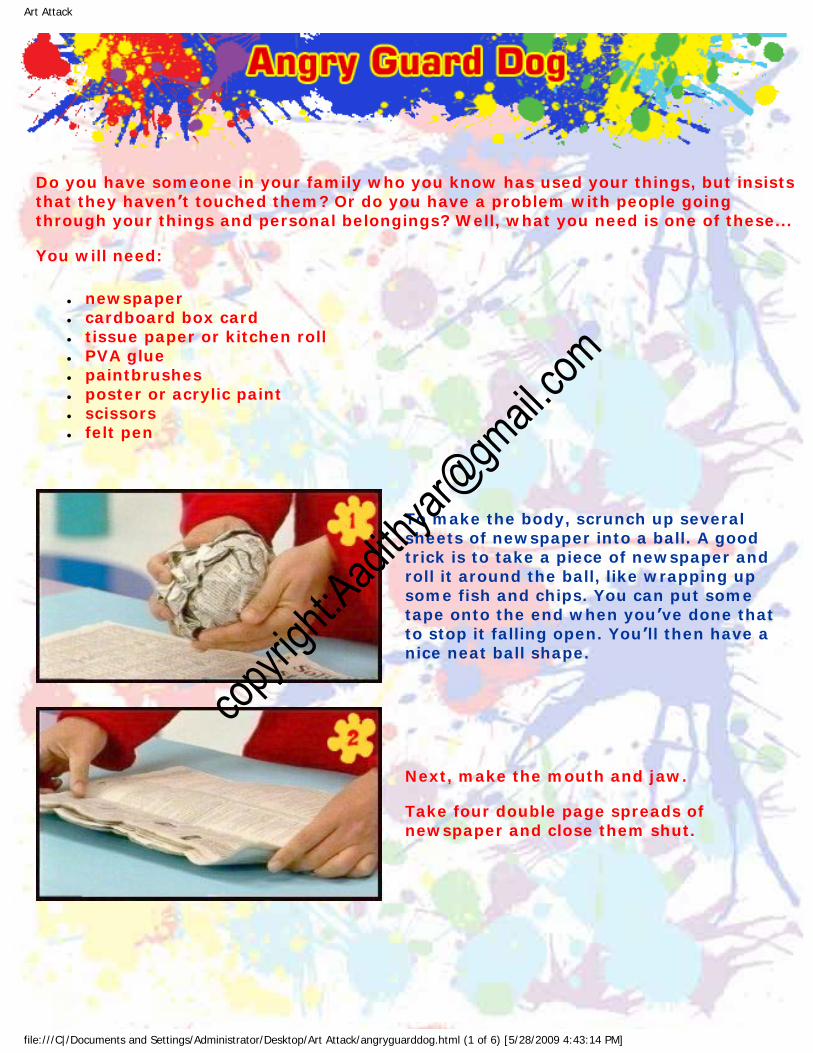
Do you have someone in your family who you know has used your things, but insists that they haven’t touched them? Or do you have a problem with people going through your things and personal belongings? Well, what you need is one of these... You will need:
● newspaper ● cardboard box card ● tissue paper or kitchen roll ● PVA glue ● paintbrushes ● poster or acrylic paint ● scissors ● felt pen
To make the body, scrunch up several sheets of newspaper into a ball. A good trick is to take a piece of newspaper and roll it around the ball, like wrapping up some fish and chips. You can put some tape onto the end when you’ve done that to stop it falling open. You’ll then have a nice neat ball shape.
Next, make the mouth and jaw. Take four double page spreads of newspaper and close them shut.
file:///C|/Documents and Settings/Administrator/Desktop/Art Attack/angryguarddog.html (1 of 6) [5/28/2009 4:43:14 PM]
copyrig
ht:Aadi
thyar@
gmail.
com

Art Attack
Fold the edge with all the loose pages inwards towards the middle, not in half, but just in towards the middle.
When you’ve done that, roll the paper from one of the short sides, into a sort of flattened parcel shape, so it’s about the same size as an envelope.
Bend it a bit so that it’s curved.
Wrap it around the ball and tape it securely into position. Put loads of tape on here, so that it won’t fall off.
file:///C|/Documents and Settings/Administrator/Desktop/Art Attack/angryguarddog.html (2 of 6) [5/28/2009 4:43:14 PM]
copyrig
ht:Aadi
thyar@
gmail.
com

Art Attack
For the eyes, roll up some newspaper into very tight balls, and tape them on top of the head. For the nose, roll up another smaller ball of newspaper, and tape that into position.
For the ears, draw and cut out two ear shapes onto cardboard box card, and tape them to the back of the eyes.
For the feet, cut out four ovals from cardboard box card. Pad them out with more newspaper and put plenty of tape on to secure them.
Pop them underneath, two on each side.
file:///C|/Documents and Settings/Administrator/Desktop/Art Attack/angryguarddog.html (3 of 6) [5/28/2009 4:43:14 PM]
copyrig
ht:Aadi
thyar@
gmail.
com

Art Attack
Next, you need to give your guard dog hind legs. To do this, make balls of newspaper that are slightly bigger than the feet, flatten them slightly, and stick them either side above the feet.
Finally, make a tail for your dog. Cut one out from some card. You can have any tail you like. Stick it to the back of your dog.
Mix some PVA glue with a splash of water, and slosh it onto your dog. Don’t make the mixture too runny, otherwise all the cardboard bits will go floppy. Lay on strips of kitchen roll, loo roll or tissue paper, pressing them into all the nooks and crannies. Kitchen roll is good for this, because it has the right texture.
Make sure that you papier-mâché the rims of the dog’s lip around the front, but don’t close up the inside of the lip, or you’ll have nowhere to put your bones. Cover the whole thing with two or three layers of tissue and leave it to dry.
file:///C|/Documents and Settings/Administrator/Desktop/Art Attack/angryguarddog.html (4 of 6) [5/28/2009 4:43:14 PM]
copyrig
ht:Aadi
thyar@
gmail.
com

Art Attack
To paint your dog, use poster or acrylic paint, using any colours.
When you’ve finished painting and the whole thing is dry, add on some extra detail with felt marker pens.
Next, make the bones. Simply draw a bone shape onto some cardboard box card, cut it out, and paint it white. You also need to pop a hole through the top of the bone, like the one in the picture, and thread some cotton through it, tying a knot at the end.
And now your guard dog is ready to go on
duty. First, decide what you want your guard dog to protect, like a secret drawer. Make sure the bone is in your guard dog’s mouth, and hide it away from the thing you are protecting. Pull the cotton tight and tie it to whatever you’re protecting. Then if someone comes in and disturbs the draw, they will knock the bone out of the dog’s mouth. Try it yourself!
file:///C|/Documents and Settings/Administrator/Desktop/Art Attack/angryguarddog.html (5 of 6) [5/28/2009 4:43:14 PM]
copyrig
ht:Aadi
thyar@
gmail.
com

Art Attack
Be inspired by nature's own patterns... the ones on animals! It's amazing just how many animal patterns there are, and you can use them in your own Art Attacks too. You will need:
● coloured paper ● coloured felt ● felt tips
What's this pattern then? Black streaks on white paper. And what does it remind you of? You guessed it - a zebra!
What about this one? Black streaks again - but this time on orange paper. What do you think? Of course, a tiger. A very recognisable pattern.
Black spots on white this time. Look familiar? That's right - it's a Dalmatian!
file:///C|/Documents and Settings/Administrator/Desktop/Art Attack/animalpatterns.html (1 of 3) [5/28/2009 4:43:58 PM]
copyrig
ht:Aadi
thyar@
gmail.
com

Art Attack
And if you make the spots and blobs bigger, what do you get? Bit more tricky this time... ...a cow!
It doesn't matter what you use to create your patterns either. Black pieces of felt on yellow isn't the only option. Consider brown felt tip on yellow paper, or a pencil crayon. What's this one then? Any idea? Yes - they all belong to a giraffe.
So just take a look at lots of animals, and be inspired. Here are just a few examples of some other animals you could copy the patterns from.
...and when you've been inspired, you can use them for lots of Art Attacks. How about wrapping paper, picture frames, or book covers?
file:///C|/Documents and Settings/Administrator/Desktop/Art Attack/animalpatterns.html (2 of 3) [5/28/2009 4:43:58 PM]
copyrig
ht:Aadi
thyar@
gmail.
com

Art Attack
You could even use fabric paint to create tiger T-shirts, or how about patches on jeans using acrylic paint. Maybe even old strips of material to create these... Neil's underpants ?! Experiment! Try it yourself!
© The Media Merchants Television Company Limited 2009.
Privacy Policy Terms and Conditions
HIT Entertainment Limited Registered in England No: 2341947 Registered Office: Maple House, 149 Tottenham Court Road, London W1T 7NF
United Kingdom.
© The Media Merchants Television Company Limited 2009.
Privacy Policy Terms and Conditions
HIT Entertainment Limited Registered in England No: 2341947 Registered Office: Maple House, 149 Tottenham Court Road, London W1T 7NF
United Kingdom.
file:///C|/Documents and Settings/Administrator/Desktop/Art Attack/animalpatterns.html (3 of 3) [5/28/2009 4:43:58 PM]
copyrig
ht:Aadi
thyar@
gmail.
com

Art Attack
Here's a neat way of making pictures that look great from every angle. You will need:
● A cereal or teabag box, or similar ● A few sheets of A4 paper ● Scissors ● A black pen ● Colours (felt tip pens work best) ● Glue
First cover three sides of a tea bag box. Get the measurements by placing it onto one end of some paper and drawing around it.
Then turn the box over as you go and draw around it again.
file:///C|/Documents and Settings/Administrator/Desktop/Art Attack/aroundtheblockart.html (1 of 5) [5/28/2009 4:45:04 PM]
copyrig
ht:Aadi
thyar@
gmail.
com

Art Attack
When you've done three sides, cut it out.
Then draw your design onto it. Here's a street scene.
Dab some glue on the back, and wrap it around three sides of the box, lining it up, pressing it into place and then wrapping it around.
When you've done that, take another sheet of paper and this time get the measurements of the back and the top of the box. The back is the side that you haven't yet covered with paper. Draw around the back of the box and then roll it over to the get the top.
file:///C|/Documents and Settings/Administrator/Desktop/Art Attack/aroundtheblockart.html (2 of 5) [5/28/2009 4:45:04 PM]
copyrig
ht:Aadi
thyar@
gmail.
com

Art Attack
Cut the paper out and glue it onto the box.
Next, take a pen and continue the design around the back of the box, going all the way around it.
Make sure all the lines join up, and if there's anything half drawn, like this balloon, finish it off around the corners.
When you're happy, colour the design in. You can do this whichever way you like, but felt tip pens work well.
file:///C|/Documents and Settings/Administrator/Desktop/Art Attack/aroundtheblockart.html (3 of 5) [5/28/2009 4:45:04 PM]
copyrig
ht:Aadi
thyar@
gmail.
com

Art Attack
When it's coloured in, it will look something like this. The great thing about Around The Block Art is that they stand up by themselves and look great with no frame at all.
Here are some more ideas for you. How about this cool safari scene? The picture goes all the way around the block!
What about this great underwater scene, this time on a different shaped box?
Or maybe even this alien planet, made up from sticking lots of different boxes together.
file:///C|/Documents and Settings/Administrator/Desktop/Art Attack/aroundtheblockart.html (4 of 5) [5/28/2009 4:45:04 PM]
copyrig
ht:Aadi
thyar@
gmail.
com

Art Attack
You could even make a few of them and have your own round the block exhibition gallery! Try it yourself!
© The Media Merchants Television Company Limited 2009.
Privacy Policy Terms and Conditions
HIT Entertainment Limited Registered in England No: 2341947 Registered Office: Maple House, 149 Tottenham Court Road, London W1T 7NF
United Kingdom.
© The Media Merchants Television Company Limited 2009.
Privacy Policy Terms and Conditions
HIT Entertainment Limited Registered in England No: 2341947 Registered Office: Maple House, 149 Tottenham Court Road, London W1T 7NF
United Kingdom.
file:///C|/Documents and Settings/Administrator/Desktop/Art Attack/aroundtheblockart.html (5 of 5) [5/28/2009 4:45:04 PM]
copyrig
ht:Aadi
thyar@
gmail.
com

Art Attack
Are you fed up with boring and expensive baubles on Christmas trees? Why not try making some Art Attack baubles instead? You will need:
● a balloon ● some wool ● PVA glue ● a cup or mug ● a ruler ● a pair of scissors ● a carrier bag or plastic bin liner ● some glitter
Start by blowing up a round balloon so that it fits roughly into the palm of your hand, like this. Don’t make it too big!
Stand the balloon in an old cup or mug, so
file:///C|/Documents and Settings/Administrator/Desktop/Art Attack/artattackbaubles.html (1 of 7) [5/28/2009 4:46:17 PM]
copyrig
ht:Aadi
thyar@
gmail.
com

Art Attack
that it holds the balloon steady.
Now you need some wool. It doesn’t matter what type or colour you choose - any will do!
The idea is to cut about thirty strips of wool, roughly about the same length as a 30cm ruler. Then put some PVA glue into a bowl, and dip one piece of wool into the glue, pressing it in with a finger.
file:///C|/Documents and Settings/Administrator/Desktop/Art Attack/artattackbaubles.html (2 of 7) [5/28/2009 4:46:17 PM]
copyrig
ht:Aadi
thyar@
gmail.
com

Art Attack
Pull off the excess glue like this.
Lay your wool pieces on a carrier bag or a plastic bin liner, and let it dry off a little - but not too much, because you don’t want it completely dry! It still needs to be sticky for the next step. And don’t let the wool pieces touch, otherwise they’ll stick together!
When you’ve done lots, you’re ready to start wrapping the wool pieces around the top half of the balloon. Take one piece of the sticky wool string, and wrap it around the top of the balloon like this, curling it this way and that way.
file:///C|/Documents and Settings/Administrator/Desktop/Art Attack/artattackbaubles.html (3 of 7) [5/28/2009 4:46:17 PM]
copyrig
ht:Aadi
thyar@
gmail.
com

Art Attack
Now take another length, and do exactly the same, just wrapping it around so that you get a criss-cross pattern with small gaps in between.
When you’ve finished the top, leave it to dry.
Then turn the balloon over and do exactly the same on the other half. It’s very important that the new wool string you put on now touches the already dry string.
file:///C|/Documents and Settings/Administrator/Desktop/Art Attack/artattackbaubles.html (4 of 7) [5/28/2009 4:46:17 PM]
copyrig
ht:Aadi
thyar@
gmail.
com
Art Attack
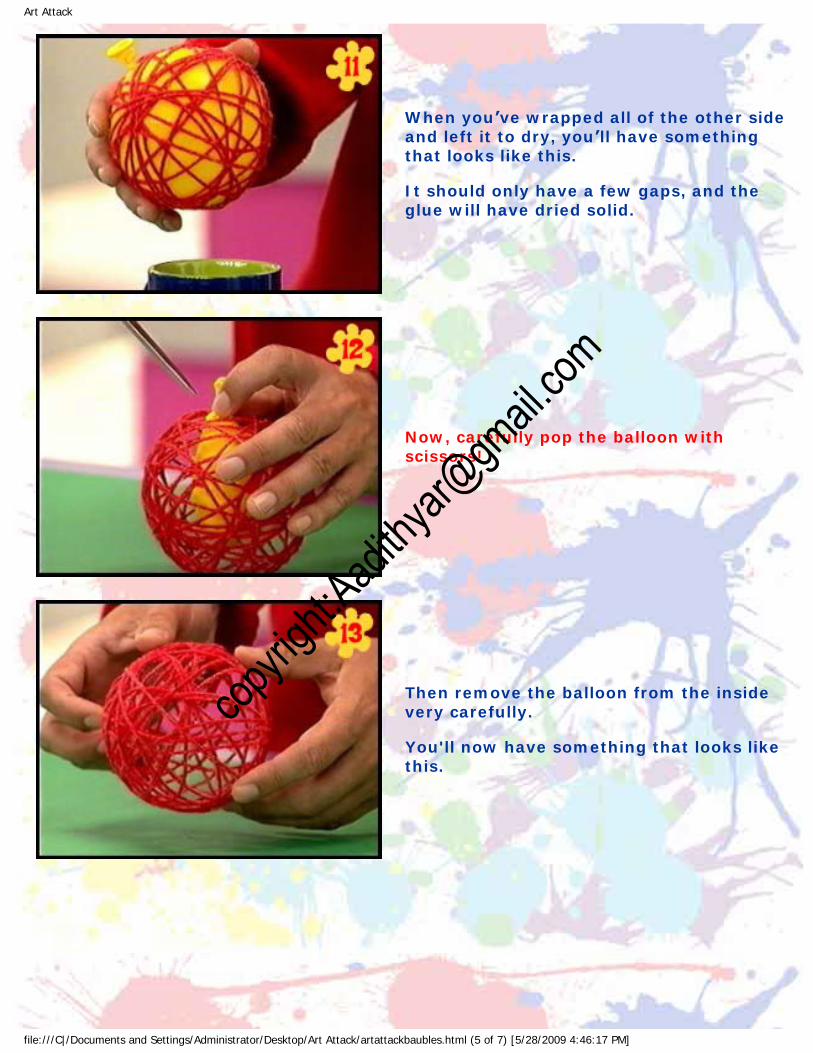
When you’ve wrapped all of the other side and left it to dry, you’ll have something that looks like this. It should only have a few gaps, and the glue will have dried solid.
Now, carefully pop the balloon with scissors!
Then remove the balloon from the inside very carefully. You'll now have something that looks like this.
file:///C|/Documents and Settings/Administrator/Desktop/Art Attack/artattackbaubles.html (5 of 7) [5/28/2009 4:46:17 PM]
copyrig
ht:Aadi
thyar@
gmail.
com

Art Attack
Add some dabs of PVA glue all over the outside, and then roll it in glitter!
When it’s dry, you’ll have something that looks like this. And there you have it - a cheap but brilliant bauble! You'll need to tie on a loop of cotton so that you can hang it on your Christmas tree, of course. You can use lots of other types of wool to get different effects! Try it yourself!
© The Media Merchants Television Company Limited 2009.
Privacy Policy Terms and Conditions
HIT Entertainment Limited Registered in England No: 2341947 Registered Office: Maple House, 149 Tottenham Court Road, London W1T 7NF
United Kingdom.
© The Media Merchants Television Company Limited 2009.
Privacy Policy Terms and Conditions
file:///C|/Documents and Settings/Administrator/Desktop/Art Attack/artattackbaubles.html (6 of 7) [5/28/2009 4:46:17 PM]
copyrig
ht:Aadi
thyar@
gmail.
com

Art Attack
The Attack O Saurus looks like it's been hidden for a few million years - but you can create one today! You will need:
● Cardboard box card ● Pen ● Sticky tape ● PVA glue ● Kitchen roll, loo roll or tissue paper ● Sand
Find a huge piece of cardboard box card, and cut it into a wobbly shape, like this. This will form the base for the skeleton.
The idea is to form a dinosaur skeleton from bits of card. You can make whatever kind you like. Draw a skull on some card, and cut it out.
file:///C|/Documents and Settings/Administrator/Desktop/Art Attack/attackosaurus.html (1 of 5) [5/28/2009 4:49:42 PM]
copyrig
ht:Aadi
thyar@
gmail.
com

Art Attack
To make ribs, draw lines in pen down a rectangular piece of card. The lines should be a few centimetres apart from each other, but don't go all the way to the top of the card.
Cut up the lines to make strips. If your cardboard is too stiff to move the strips around, put a bit of water on it to loosen it up.
Separate the strips alternately, bending every other section backwards and forwards.
Do the same on some triangular card for the creature's tailbone section.
file:///C|/Documents and Settings/Administrator/Desktop/Art Attack/attackosaurus.html (2 of 5) [5/28/2009 4:49:42 PM]
copyrig
ht:Aadi
thyar@
gmail.
com

Art Attack
You could also cut some other random bone shapes out of smaller peieces of card. Try creating legs, arms, claws or feet.
Once you've made all the parts you think you'll need, bend and crush them a bit to make them look old. Remember they're supposed to have been lying around for a few million years!
Scrunch up your backbone and tailbone a bit too - no need to be neat!
Arrange the skeleton bits around the body, and secure with sticky tape once you're happy with the shape.
file:///C|/Documents and Settings/Administrator/Desktop/Art Attack/attackosaurus.html (3 of 5) [5/28/2009 4:49:42 PM]
copyrig
ht:Aadi
thyar@
gmail.
com

Art Attack
Take your PVA mixture and cover the whole creature, sticking on the strips of kitchen roll. Lay it on loosely - you don't want to flatten the skeleton too much.
Cover the whole thing in a couple of layers of kitchen roll and glue. At the end it should look like a gluey, soggy fossil!
Now for the fun bit - turning the fossil to stone! While the glue mixture is still wet, just pour sand all over it. It needs to be completely covered.
Don't leave the sand too long before carefully tipping off the excess. You'll be left with a pile of sand to clear away at the bottom!
file:///C|/Documents and Settings/Administrator/Desktop/Art Attack/attackosaurus.html (4 of 5) [5/28/2009 4:49:42 PM]
copyrig
ht:Aadi
thyar@
gmail.
com

Art Attack
If the fossil doesn't look completely covered at first, you can always add a bit more glue and sand later! Leave it to dry - and you're left with your own fossilised attack o saurus!
If you haven't got much card you could make a smaller creature like this one. Try it yourself!
© The Media Merchants Television Company Limited 2009.
Privacy Policy Terms and Conditions
HIT Entertainment Limited Registered in England No: 2341947 Registered Office: Maple House, 149 Tottenham Court Road, London W1T 7NF
United Kingdom.
© The Media Merchants Television Company Limited 2009.
Privacy Policy Terms and Conditions
HIT Entertainment Limited Registered in England No: 2341947 Registered Office: Maple House, 149 Tottenham Court Road, London W1T 7NF
United Kingdom.
file:///C|/Documents and Settings/Administrator/Desktop/Art Attack/attackosaurus.html (5 of 5) [5/28/2009 4:49:42 PM]
copyrig
ht:Aadi
thyar@
gmail.
com

Art Attack
Ever heard of the Aztecs? They were a civilisation in Mexico hundreds of years ago. They carved beautiful masks, statues and trinkets in wood and stone. And now you can try it yourself - using soap! You will need:
● Bar of Soap ● Pencils ● Lolly Sticks ● Scissors ● Paintbrush ● Water
Start by choosing a bar of soap that will be big enough for the design you have in mind. There are lots of types, colours and shapes of soap available, creating lots of possibilities!
Use a sharp pencil or cocktail stick to sketch a rough design into the soap. Keep it simple to begin with.
file:///C|/Documents and Settings/Administrator/Desktop/Art Attack/aztecsoapcarving.html (1 of 3) [5/28/2009 4:50:26 PM]
copyrig
ht:Aadi
thyar@
gmail.
com

Art Attack
Once you have a design that you're happy with, you need something that you can carve the soap with. The best tool for this is a lolly stick! Just cut one down, at an angle - like this one here. Take care when doing this and do ask for help if you need it.
You'll also need some sharp pencils to help you carve really fine detail. Use the angled edge of the lolly stick to carve the soap. Drag the soap away from the lines you've already drawn. Brush excess bits of soap away as you go.
Take your time with this - it's really enjoyable to do. Remember to wipe the end of your lolly stick occasionally so you get the same depth of carving all over the soap.
When you've finished, you can add some final decorative touches. Use a paintbrush to add a dab of water to the centre of each eye, to make it sticky. Then add in sequins or tiny beads to make eyes.
file:///C|/Documents and Settings/Administrator/Desktop/Art Attack/aztecsoapcarving.html (2 of 3) [5/28/2009 4:50:26 PM]
copyrig
ht:Aadi
thyar@
gmail.
com

Art Attack
There are lots of different design possibilities - a scary skull, perhaps?
Or how about carving an animal? Try it yourself!
© The Media Merchants Television Company Limited 2009.
Privacy Policy Terms and Conditions
HIT Entertainment Limited Registered in England No: 2341947 Registered Office: Maple House, 149 Tottenham Court Road, London W1T 7NF
United Kingdom.
© The Media Merchants Television Company Limited 2009.
Privacy Policy Terms and Conditions
HIT Entertainment Limited Registered in England No: 2341947 Registered Office: Maple House, 149 Tottenham Court Road, London W1T 7NF
United Kingdom.
file:///C|/Documents and Settings/Administrator/Desktop/Art Attack/aztecsoapcarving.html (3 of 3) [5/28/2009 4:50:26 PM]
copyrig
ht:Aadi
thyar@
gmail.
com

Art Attack
Make a hot air balloon from coloured card and a split pin! You will need:
● Coloured card ● Scissors ● Pen ● Pencil ● Modelling clay ● Split pin (paper fastener) ● Thread or cotton ● Small box ● Paint
Take a piece of thin, coloured card and use a pen to draw a long, thin oval.
Cut the shape out - to give you something that looks like this.
file:///C|/Documents and Settings/Administrator/Desktop/Art Attack/balloonmobile.html (1 of 7) [5/28/2009 4:51:12 PM]
copyrig
ht:Aadi
thyar@
gmail.
com

Art Attack
Snip off a few centimetres at one end with a pair of scissors.
Use the piece of card as a template to draw round, and cut out five more, so that you have six in total.
Make a hole in the curved end of each piece of card by pushing a sharp pencil through into a ball of modelling clay.
When you've done this to all the pieces, join them together using a split pin (also known as a paper fastener).
file:///C|/Documents and Settings/Administrator/Desktop/Art Attack/balloonmobile.html (2 of 7) [5/28/2009 4:51:12 PM]
copyrig
ht:Aadi
thyar@
gmail.
com

Art Attack
This can be quite fiddly, so take your time! Make sure that the pin goes through all the holes.
When all the pieces are threaded onto the split pin, open the ends out.
Now fan the card pieces out into a circle, like this.
Turn the whole thing over. Take any two of the sections that are next to each other, curl them up...
file:///C|/Documents and Settings/Administrator/Desktop/Art Attack/balloonmobile.html (3 of 7) [5/28/2009 4:51:12 PM]
copyrig
ht:Aadi
thyar@
gmail.
com

Art Attack
...and tape the ends together at an angle, like this.
Take the next adjoining section, curl it round, and tape it in place too.
Go round all the pieces until a balloon shape emerges.
Next, cut six equal lengths of thread...
file:///C|/Documents and Settings/Administrator/Desktop/Art Attack/balloonmobile.html (4 of 7) [5/28/2009 4:51:12 PM]
copyrig
ht:Aadi
thyar@
gmail.
com

Art Attack
...and tape them inside the hole where each of the sections join.
Find a small box, or cut the end off a larger box...
...and tape the ends of the thread to the inside of the box at equal distances.
And once you've done that, you'll have a hot air balloon like this!
file:///C|/Documents and Settings/Administrator/Desktop/Art Attack/balloonmobile.html (5 of 7) [5/28/2009 4:51:12 PM]
copyrig
ht:Aadi
thyar@
gmail.
com

Art Attack
It's a good idea to pop a ball of modelling clay into the box, to add weight to the balloon. Here you can see that the box has been painted to look like a basket.
Tie some cotton around the split pin at the top, so that you can hang it up.
How about making a selection of balloons in different sizes and colours? You can also make some cotton wool clouds!
And how about making cardboard people to go in the baskets? Try it yourself!
© The Media Merchants Television Company Limited 2009.
file:///C|/Documents and Settings/Administrator/Desktop/Art Attack/balloonmobile.html (6 of 7) [5/28/2009 4:51:12 PM]
copyrig
ht:Aadi
thyar@
gmail.
com

Art Attack
Why not make some disgusting beady eyes as your own personal surveillance system! You will need:
● Balloons ● Ping pong ball ● Paintbrush ● Pencil ● Paint ● PVA glue ● Scissors
First, you need a ping-pong ball. Use a pencil to carefully draw a small circle for a pupil.
Draw another circle all the way around the pupil, for the iris. Try to keep it as circular as you can!
file:///C|/Documents and Settings/Administrator/Desktop/Art Attack/beadyeyes.html (1 of 6) [5/28/2009 4:52:07 PM]
copyrig
ht:Aadi
thyar@
gmail.
com

Art Attack
Next, paint the eyeball. Start with the coloured part, and use a fairly small brush to keep the painting as neat as possible.
Add a little white, flicking the paint outwards from the iris to get a realistic effect.
Now paint the pupil black, but leave a tiny white bit showing through. This helps the eyeball to look shiny and more realistic.
When it has dried, you'll have a finished eyeball. What you need now are the veins and nerves.... eww!
file:///C|/Documents and Settings/Administrator/Desktop/Art Attack/beadyeyes.html (2 of 6) [5/28/2009 4:52:07 PM]
copyrig
ht:Aadi
thyar@
gmail.
com
Art Attack
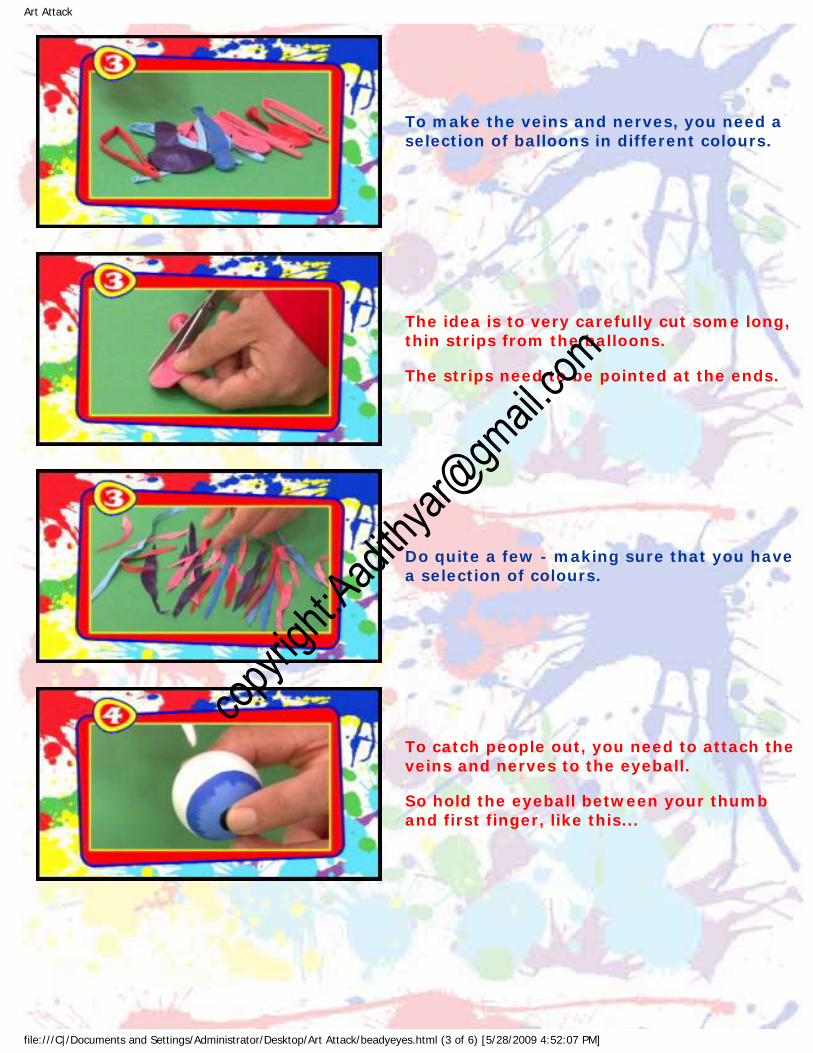
To make the veins and nerves, you need a selection of balloons in different colours.
The idea is to very carefully cut some long, thin strips from the balloons. The strips need to be pointed at the ends.
Do quite a few - making sure that you have a selection of colours.
To catch people out, you need to attach the veins and nerves to the eyeball. So hold the eyeball between your thumb and first finger, like this...
file:///C|/Documents and Settings/Administrator/Desktop/Art Attack/beadyeyes.html (3 of 6) [5/28/2009 4:52:07 PM]
copyrig
ht:Aadi
thyar@
gmail.
com

Art Attack
...and use a brush to paint PVA glue onto the middle part of the eyeball.
Place one of the "veins" into the glue, so that the pointy bit is set just back from the iris. Repeat the process, going all the way around the eyeball with the different coloured "veins".
When you've finished and the glue has dried, you should have something that looks like this.
You can draw on extra thin veins by using a red permanent pen or marker, like the ones you can see here. Finish off by varnishing the eyeball with PVA glue to make it nice and shiny.
file:///C|/Documents and Settings/Administrator/Desktop/Art Attack/beadyeyes.html (4 of 6) [5/28/2009 4:52:07 PM]
copyrig
ht:Aadi
thyar@
gmail.
com

Art Attack
You can use the eyeball to protect anything you like. The idea is to pick out a couple of "nerves"...
...and trap them inside whatever you're trying to protect!
If someone opens anything you're trying to protect, they'll dislodge the eye. And because they won't know which coloured nerves you used to set the trap, they won't be able to put it back exactly how you left it - so you'll know if someone's been snooping!
So keep a beady eye on things! Try it yourself.
© The Media Merchants Television Company Limited 2009.
file:///C|/Documents and Settings/Administrator/Desktop/Art Attack/beadyeyes.html (5 of 6) [5/28/2009 4:52:07 PM]
copyrig
ht:Aadi
thyar@
gmail.
com

Art Attack
Try making one of these rosettes and then presenting it to your best friend! You will need:
● Coloured card ● Crepe paper ● Glue ● Ribbon, coloured paper or wrappping paper ● Scissors ● Sticky tape ● Decorative materials
Cut out two circles the same size as each other from coloured card.
Paste glue all the way round the back edges of one of the circles, going about half way into the middle.
file:///C|/Documents and Settings/Administrator/Desktop/Art Attack/bestfriendrosette.html (1 of 4) [5/28/2009 4:53:28 PM]
copyrig
ht:Aadi
thyar@
gmail.
com

Art Attack
Place one end of a strip of crepe paper over the glue.
Scrunch up the crepe paper in the middle so that you're left with frilly bits sticking out of the edges of the circle. Go all the way round the edge - using more crepe paper if you need to. Leave it to dry.
When you've gone all the way round your circle should look like this from the front.
Now for the dangly bits! Take two pieces of ribbon and snip a triangle into the end of both pieces.
file:///C|/Documents and Settings/Administrator/Desktop/Art Attack/bestfriendrosette.html (2 of 4) [5/28/2009 4:53:28 PM]
copyrig
ht:Aadi
thyar@
gmail.
com

Art Attack
Tape the ribbons at a jaunty angle to the back of the rosette.
Now you need to neaten the back of the rosette. Glue the remaining circle onto the back, and leave it to dry.
Here are a few ideas of how to decorate...
You could add glue and sprinkle some glitter around the outside edge.
file:///C|/Documents and Settings/Administrator/Desktop/Art Attack/bestfriendrosette.html (3 of 4) [5/28/2009 4:53:28 PM]
copyrig
ht:Aadi
thyar@
gmail.
com

Art Attack
Or how about doing one for your Mum or Dad?
...or one to award to yourself! Try it yourself!
© The Media Merchants Television Company Limited 2009.
Privacy Policy Terms and Conditions
HIT Entertainment Limited Registered in England No: 2341947 Registered Office: Maple House, 149 Tottenham Court Road, London W1T 7NF
United Kingdom.
© The Media Merchants Television Company Limited 2009.
Privacy Policy Terms and Conditions
HIT Entertainment Limited Registered in England No: 2341947 Registered Office: Maple House, 149 Tottenham Court Road, London W1T 7NF
United Kingdom.
file:///C|/Documents and Settings/Administrator/Desktop/Art Attack/bestfriendrosette.html (4 of 4) [5/28/2009 4:53:28 PM]
copyrig
ht:Aadi
thyar@
gmail.
com

Art Attack
This Art Attack is no mean feat! Groan... You will need:
● Cardboard box card ● A pair of old trainers that you won't need again ● Sticky tape ● Scissors ● Pen ● Newspaper ● PVA glue ● Tissue paper (or loo / kitchen roll) ● Paint
Take a large piece of cardboard box card. Place a trainer on top, and draw around it. Whatever you do, don't use your best trainers!
Put the trainer to one side for now. Draw a large foot around the shoe outline. This one's going to be a cartoon foot! Make sure you leave a gap of about 5cm behind the heel.
file:///C|/Documents and Settings/Administrator/Desktop/Art Attack/bigfeet.html (1 of 5) [5/28/2009 4:54:21 PM]
copyrig
ht:Aadi
thyar@
gmail.
com

Art Attack
When you're happy with the shape, carefully cut it out and stick the trainer back in position using lots of tape.
Now you need to bulk out the foot, and give it some shape. Scrunch up a couple of sheets of newspaper, and stick them around the heel of the trainer.
Keep adding more newspaper to build up the foot. Cover the whole trainer but not the opening, so that your real foot will be able to slip in at the end!
Do some chunky bits for the end of the foot, and some big round bits for the toes.
file:///C|/Documents and Settings/Administrator/Desktop/Art Attack/bigfeet.html (2 of 5) [5/28/2009 4:54:21 PM]
copyrig
ht:Aadi
thyar@
gmail.
com

Art Attack
For toenails, cut out some pieces of cardboard and tape them into position. That completes the foot - but it's a little boney and weak, so...
...you need to strengthen it - Art Attack style! Mix up some PVA glue in equal parts with water, and slap on some strips of tissue paper, or loo/kitchen roll! This will give the foot a realistic, skin-like texture.
Seal everything in - but don't go inside the trainer! Tuck the kitchen roll underneath the foot, so that the sole is well sealed. Do two layers all the way round for added strength.
When it has dried, you should be left with a foot like this!
file:///C|/Documents and Settings/Administrator/Desktop/Art Attack/bigfeet.html (3 of 5) [5/28/2009 4:54:21 PM]
copyrig
ht:Aadi
thyar@
gmail.
com

Art Attack
Now you can paint however you like! Acrylic paint is good as it's hardwearing, but if you haven't got any, you could always mix up some PVA glue with some poster paint instead.
Now all you have to do is make another foot the same - and take them for a walk!
You can make any kind you like! This is what happens to your feet if you don't change your socks every day!
And these ugly duckling feet make Neil look a bit quackers! Try it yourself!
file:///C|/Documents and Settings/Administrator/Desktop/Art Attack/bigfeet.html (4 of 5) [5/28/2009 4:54:21 PM]
copyrig
ht:Aadi
thyar@
gmail.
com

Art Attack
Create a pair of giant hands - for any occasion! You will need:
● Cardboard ● Newspaper ● Sticky tape ● PVA glue ● Tissue paper ● Poster or acrylic paint ● An old glove
Find a pair of gloves that you don't want any more. Rubber gloves, wooly gloves or old gardening gloves work best but any will do.
Line up the opening of the glove with the bottom edge of a big piece of cardboard box card. Tape each glove palm side down on the cardboard, using plenty of sticky tape.
file:///C|/Documents and Settings/Administrator/Desktop/Art Attack/bighands.html (1 of 6) [5/28/2009 4:55:32 PM]
copyrig
ht:Aadi
thyar@
gmail.
com

Art Attack
Draw a much larger hand around the glove, using the shape of the glove as a guide. When you've finished, cut the shape out.
You should now have a basic big hand! It's a good idea to make sure that you can still put the glove on at this point... if you can't, simply adjust the sticky tape. For the next step, you need to fatten out the hand so that it looks much bigger.
So - scrunch up some newspaper into sausage-like fingers. Tape them into place carefully.
Next, make a flat pillow of newspaper to cover over the glove for the main part of the hand. Tape that securely into place. Again, it's a good idea to make sure that you can still get your hand into the glove!
file:///C|/Documents and Settings/Administrator/Desktop/Art Attack/bighands.html (2 of 6) [5/28/2009 4:55:32 PM]
copyrig
ht:Aadi
thyar@
gmail.
com

Art Attack
Turn the hand over and do exactly the same on the other side. Roll up newspaper into sausage shapes for the fingers, and into a big pillow shape for the palm of the hand.
When you've stuck everything on with lots of tape, you'll have something that looks like this. Now it's time to add detail to make it look really life like...
Cut out some fingernails from cardboard box card and tape them to the ends of the fingers.
Now you're ready to add on a layer of skin. Mix some PVA glue in a half and half mix with water and paste on strips of tissue paper or kitchen roll, all over the hand.
file:///C|/Documents and Settings/Administrator/Desktop/Art Attack/bighands.html (3 of 6) [5/28/2009 4:55:32 PM]
copyrig
ht:Aadi
thyar@
gmail.
com

Art Attack
Take care not to glue over the opening of the glove, so that you can still get your hand in!
When you've covered the whole hand and it's dry you'll have something that looks like this. Now you can finish it off - with some colour.
Paint your hand the same colour as your own skin. Use poster or acrylic paint for this.
You could even streak in some white and add on some fingernails with it.
file:///C|/Documents and Settings/Administrator/Desktop/Art Attack/bighands.html (4 of 6) [5/28/2009 4:55:32 PM]
copyrig
ht:Aadi
thyar@
gmail.
com

Art Attack
And how about some red to make the knuckles look a bit darker?
When you've finished painting the hand and it's dry, you can pick out any detail using a black pen, like the knuckles and fingernails.
Try it on! You could even make another one so you have one for both hands!
For other ideas - how about a hand that grabs things? The pencil here is just card rolled into a tube with a cone at the end. The fingers are all bent round and taped into place.
file:///C|/Documents and Settings/Administrator/Desktop/Art Attack/bighands.html (5 of 6) [5/28/2009 4:55:32 PM]
copyrig
ht:Aadi
thyar@
gmail.
com

Art Attack
Or maybe even this monster hand! Instead of fingernails it has pointed claws and is painted green. You could even put scraps of fake fur on the back!
Or how about this? You could even extend your hands with rolls of card to make them look like long arms! Try it yourself!
© The Media Merchants Television Company Limited 2009.
Privacy Policy Terms and Conditions
HIT Entertainment Limited Registered in England No: 2341947 Registered Office: Maple House, 149 Tottenham Court Road, London W1T 7NF
United Kingdom.
© The Media Merchants Television Company Limited 2009.
Privacy Policy Terms and Conditions
HIT Entertainment Limited Registered in England No: 2341947 Registered Office: Maple House, 149 Tottenham Court Road, London W1T 7NF
United Kingdom.
file:///C|/Documents and Settings/Administrator/Desktop/Art Attack/bighands.html (6 of 6) [5/28/2009 4:55:32 PM]
copyrig
ht:Aadi
thyar@
gmail.
com
Art Attack
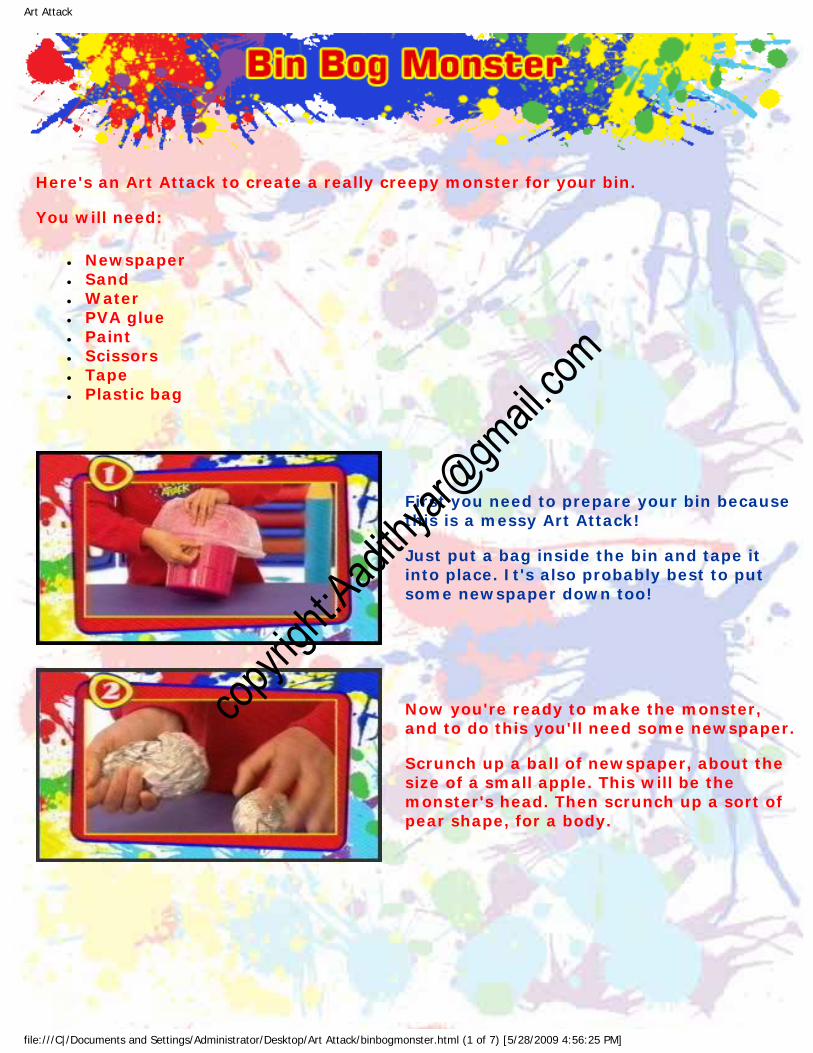
Here's an Art Attack to create a really creepy monster for your bin. You will need:
● Newspaper ● Sand ● Water ● PVA glue ● Paint ● Scissors ● Tape ● Plastic bag
First you need to prepare your bin because this is a messy Art Attack! Just put a bag inside the bin and tape it into place. It's also probably best to put some newspaper down too!
Now you're ready to make the monster, and to do this you'll need some newspaper. Scrunch up a ball of newspaper, about the size of a small apple. This will be the monster's head. Then scrunch up a sort of pear shape, for a body.
file:///C|/Documents and Settings/Administrator/Desktop/Art Attack/binbogmonster.html (1 of 7) [5/28/2009 4:56:25 PM]
copyrig
ht:Aadi
thyar@
gmail.
com

Art Attack
Tape them together. You should also use lots of tape for the apple and pear shapes for the head and the body, to keep them in shape.
Make three sausages for fingers, and tape those together for a claw. Make two claws in this way.
Position them on the side of the monster's body, where the head and body meet. Make sure the fingers are curled into a grabbing position.
When you've finished you'll have something that looks like this! You now have a basic Bin Bog Monster, and it should balance like this when you rest it on your finger!
file:///C|/Documents and Settings/Administrator/Desktop/Art Attack/binbogmonster.html (2 of 7) [5/28/2009 4:56:25 PM]
copyrig
ht:Aadi
thyar@
gmail.
com

Art Attack
Now to give the monster a slimy coating! Mix together one part of water with three parts of sand and one part of PVA glue.
The whole thing needs to be a thick but runny consistency. Stir the whole thing up. Don't forget that it's a good idea to put some newspaper down for this!
Spoon some of the mixture into a plastic bag. You may need to get someone to help you with this!
Pick the bag up and squeeze it all down into one corner.
file:///C|/Documents and Settings/Administrator/Desktop/Art Attack/binbogmonster.html (3 of 7) [5/28/2009 4:56:25 PM]
copyrig
ht:Aadi
thyar@
gmail.
com

Art Attack
Then very carefully snip off one corner to make a sort of piping bag. Don't cut off too much - just the end, so that just a small bit comes out at a time.
Drip the mixture all over the monster to give a great slimy effect! Keep it moving to leave a worm-cast effect, like the kind you see on a beach sometimes.
You have to do a section at a time and wait a while for it to set before adding more. This is because if you put too much sand on at once it will just fall off!
You can build up blobs for the eyes and bottom lip.
file:///C|/Documents and Settings/Administrator/Desktop/Art Attack/binbogmonster.html (4 of 7) [5/28/2009 4:56:25 PM]
copyrig
ht:Aadi
thyar@
gmail.
com

Art Attack
When you've covered the whole monster, leave it to dry overnight and you'll be left with something that looks like this. When you peel it away from the bag it will be rock hard and ready to paint!
Paint your monster a slimy green. Slop it on all over!
You can streak in darker and lighter shades, too.
You could even add in some yellow to pick out highlights.
file:///C|/Documents and Settings/Administrator/Desktop/Art Attack/binbogmonster.html (5 of 7) [5/28/2009 4:56:25 PM]
copyrig
ht:Aadi
thyar@
gmail.
com

Art Attack
Use a thin brush to add in eyes.
When you've finished, and the paint has dried, brush on a layer of PVA glue. This will dry clear and give it a shiny, slimy effect.
When it's all dry, you're finished. Hook the monster over the side of a bin and it'll look as if he's crawling out! Try it yourself!
© The Media Merchants Television Company Limited 2009.
Privacy Policy Terms and Conditions
HIT Entertainment Limited Registered in England No: 2341947 Registered Office: Maple House, 149 Tottenham Court Road, London W1T 7NF
United Kingdom.
file:///C|/Documents and Settings/Administrator/Desktop/Art Attack/binbogmonster.html (6 of 7) [5/28/2009 4:56:25 PM]
copyrig
ht:Aadi
thyar@
gmail.
com

Art Attack
This chicken doesn't lay eggs - it lays money! You will need:
● Empty plastic milk bottle (1 pint) ● Paintbrush ● Tissue paper or kitchen roll ● Cardboard box card ● Cereal box card ● Newspaper ● Sticky tape ● Paint
Here's a great looking chicken! But this one doesn't lay eggs...
...it lays...
file:///C|/Documents and Settings/Administrator/Desktop/Art Attack/birdbottlebank.html (1 of 12) [5/28/2009 4:57:31 PM]
copyrig
ht:Aadi
thyar@
gmail.
com

Art Attack
...money!
The main part of the chicken's body is made from an empty plastic milk bottle. Here's how to make one of your own.
Carefully cut a money slit into the plastic milk bottle, on the opposite side as the handle. Cutting plastic can be quite tricky, so don't forget to ask for help if you need it.
Now lay the bottle flat. This end will be the head end...
file:///C|/Documents and Settings/Administrator/Desktop/Art Attack/birdbottlebank.html (2 of 12) [5/28/2009 4:57:31 PM]
copyrig
ht:Aadi
thyar@
gmail.
com

Art Attack
...and end with the lid will be the tail end.
To create the body shape, scrunch up a small pillow of newspaper.
Use tape to stick the pillow of newspaper onto one side of the bottle.
Repeat the process on the other side, and curve some of the paper underneath into a padded base.
file:///C|/Documents and Settings/Administrator/Desktop/Art Attack/birdbottlebank.html (3 of 12) [5/28/2009 4:57:31 PM]
copyrig
ht:Aadi
thyar@
gmail.
com

Art Attack
Stick more newspaper to the front end - remember that's the end without the bottle top - to make the chicken's breast.
For the wings, make two smaller newspaper pads...
...and tape them onto the sides.
The chicken also needs a tail, so take some more newspaper and fold it in half...
file:///C|/Documents and Settings/Administrator/Desktop/Art Attack/birdbottlebank.html (4 of 12) [5/28/2009 4:57:31 PM]
copyrig
ht:Aadi
thyar@
gmail.
com
Art Attack
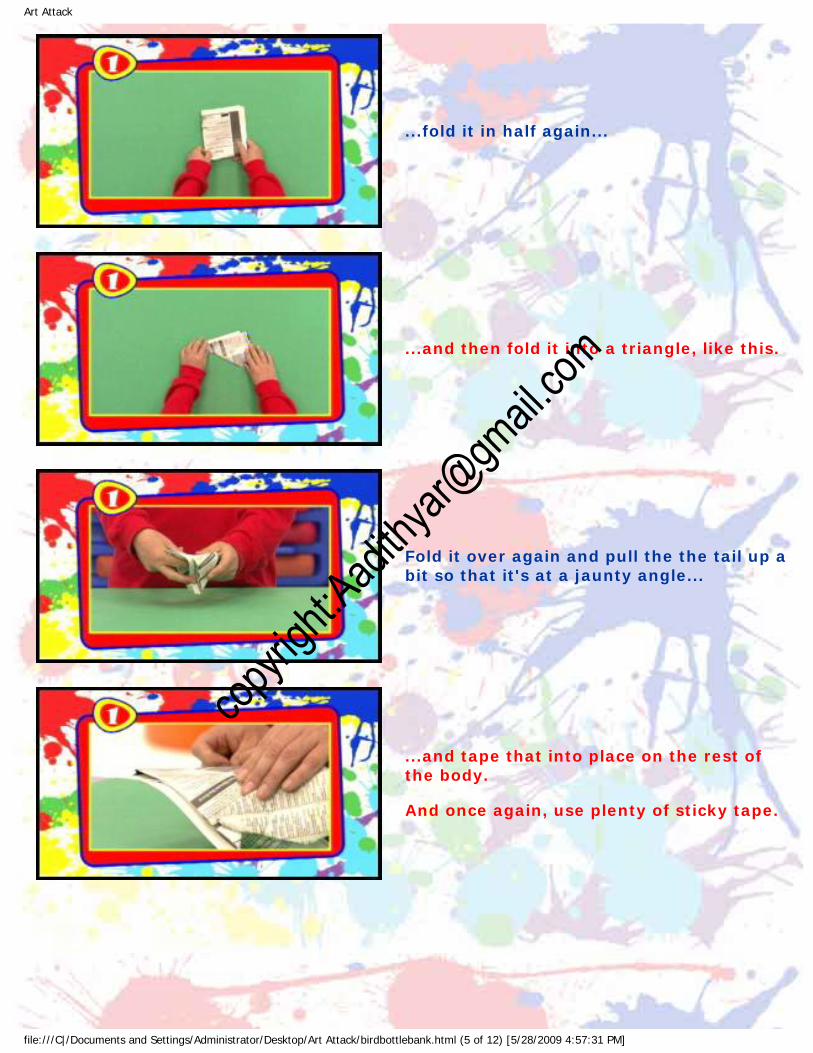
...fold it in half again...
...and then fold it into a triangle, like this.
Fold it over again and pull the the tail up a bit so that it's at a jaunty angle...
...and tape that into place on the rest of the body. And once again, use plenty of sticky tape.
file:///C|/Documents and Settings/Administrator/Desktop/Art Attack/birdbottlebank.html (5 of 12) [5/28/2009 4:57:31 PM]
copyrig
ht:Aadi
thyar@
gmail.
com

Art Attack
That completes the basic chicken shape! It's a good idea to use lots of tape to keep it secure.
To make the neck of the chicken, fold a semicircle of card into a cone, and tape it into position.
When you've attached the cone, flatten the point, like this.
Make a head from a newspaper ball and add balls of newspaper for eyes and a card beak.
file:///C|/Documents and Settings/Administrator/Desktop/Art Attack/birdbottlebank.html (6 of 12) [5/28/2009 4:57:31 PM]
copyrig
ht:Aadi
thyar@
gmail.
com

Art Attack
Place this on the bent bit of the cone, and tape into place.
Feather detail can be added now, using bits of cereal card, like this.
Stick them on so that they overlap. Use as many as you want until your chicken is fully feathered, like this one!
Make legs by rolling pieces of cereal box card into tubes, like these.
file:///C|/Documents and Settings/Administrator/Desktop/Art Attack/birdbottlebank.html (7 of 12) [5/28/2009 4:57:31 PM]
copyrig
ht:Aadi
thyar@
gmail.
com

Art Attack
Attach feet cut from cardboard box card to the legs, as well as small balls of newspaper for thighs.
Glue or tape the legs to the underneath of the chicken so that they're secure.
Once the legs are attached, test that the chicken stands up before doing anything else.
Next, the chicken's skin. For this, use torn strips of kitchen roll or tissue paper and PVA glue mixed in equal parts with water.
file:///C|/Documents and Settings/Administrator/Desktop/Art Attack/birdbottlebank.html (8 of 12) [5/28/2009 4:57:31 PM]
copyrig
ht:Aadi
thyar@
gmail.
com

Art Attack
Paint on the glue mixture all over the chicken...
...and lay on strips of tissue. Then paste over them with more of the PVA glue and water mixture.
You don't need to cover the whole chicken - just use the glue and tissue to smooth over where the head and neck join...
...and put some on near the start of the feathered areas...
file:///C|/Documents and Settings/Administrator/Desktop/Art Attack/birdbottlebank.html (9 of 12) [5/28/2009 4:57:31 PM]
copyrig
ht:Aadi
thyar@
gmail.
com

Art Attack
...but remember - don't put tissue over the money slit or the lid of the bottle!
Once you've finished pasting, let the glue dry. When it has dried, you can paint the chicken.
And when the paint has dried you can start saving.
Getting the money out is really easy - just take the lid off, and out it comes.
file:///C|/Documents and Settings/Administrator/Desktop/Art Attack/birdbottlebank.html (10 of 12) [5/28/2009 4:57:31 PM]
copyrig
ht:Aadi
thyar@
gmail.
com

Art Attack
You can use a plastic bottle as the basis for any kind of bird bottle bank. How about a duck?
A peacock?
Or a flamingo...
...with very long legs! Try it yourself!
© The Media Merchants Television Company Limited 2009.
file:///C|/Documents and Settings/Administrator/Desktop/Art Attack/birdbottlebank.html (11 of 12) [5/28/2009 4:57:31 PM]
copyrig
ht:Aadi
thyar@
gmail.
com

Art Attack
Here's a way to create a moody, and atmopsheric picture by using a simple pen and wash technique. You will need:
● Black ballpoint pen ● Very watery black paint, or watered down ink ● Paper
Ballpoint pens are very versatile. They're great for sketching.
Just draw with the pen as though it's a pencil.
Start with a few lines. You can use coloured paper if you like. Here, Neil is using light grey.
file:///C|/Documents and Settings/Administrator/Desktop/Art Attack/bironwash.html (1 of 5) [5/28/2009 4:58:33 PM]
copyrig
ht:Aadi
thyar@
gmail.
com

Art Attack
If you want, you can sketch in pencil first, and rub out the lines later. the great thing about ballpoint pens is that if you go over the lines to alter them, it gives the picture a really sketchy, scratchy feel that's quite spooky.
And just like a pencil, you can press harder for darker lines, or lighter for wispy lines.
Here, you can see that Neil's picture is almost finished.
When it comes to shading the picture in, use the hatching technique. Just do lots of lines going in the same direction.
file:///C|/Documents and Settings/Administrator/Desktop/Art Attack/bironwash.html (2 of 5) [5/28/2009 4:58:33 PM]
copyrig
ht:Aadi
thyar@
gmail.
com

Art Attack
You don't need to be neat...
...then you can make darker areas even darker by hatching lines, across the ones you've already done, but in the other direction.
Now for the wash! Neil's using very watered down black ink, though you can use watered down watercolour paint if you like - but it must be very watery!
Just brush it on, very lightly. Not too much.
file:///C|/Documents and Settings/Administrator/Desktop/Art Attack/bironwash.html (3 of 5) [5/28/2009 4:58:33 PM]
copyrig
ht:Aadi
thyar@
gmail.
com

Art Attack
You can even use a bit more to create a darker shade, too.
The great thing about this technique is that the ballpoint pen lines don't run when you wash over them.
You can even add darker shadows by adding a tiny bit more paint to the brush - but not much.
Try it yourself!
© The Media Merchants Television Company Limited 2009.
file:///C|/Documents and Settings/Administrator/Desktop/Art Attack/bironwash.html (4 of 5) [5/28/2009 4:58:33 PM]
copyrig
ht:Aadi
thyar@
gmail.
com

Art Attack
Here's how to draw straight lines without a ruler - by doing them bit by bit. You will need:
● Paper ● Pen
Here's a part-finished picture. The train in the picture needs a bridge to get across the gorge!
Instead of drawing one long straight line, draw the line bit by bit, using little lines.
Draw a short line, and then extend it a bit...
file:///C|/Documents and Settings/Administrator/Desktop/Art Attack/bitbybitstraightlines.html (1 of 3) [5/28/2009 4:59:29 PM]
copyrig
ht:Aadi
thyar@
gmail.
com

Art Attack
...and keep pushing it out, further and further.
Every now and then, stop to check that it looks OK.
When you're happy with the line, go over it again.
With a bit of practice you'll be able to draw any long lines by doing small lines and extending them bit by bit.
file:///C|/Documents and Settings/Administrator/Desktop/Art Attack/bitbybitstraightlines.html (2 of 3) [5/28/2009 4:59:29 PM]
copyrig
ht:Aadi
thyar@
gmail.
com

Art Attack
You can use a similar technique for shorter straight lines. Do them really quickly with a flick of the wrist.
Neil used a combination of both techniques to finish the top part of the bridge off. Try it yourself!
© The Media Merchants Television Company Limited 2009.
Privacy Policy Terms and Conditions
HIT Entertainment Limited Registered in England No: 2341947 Registered Office: Maple House, 149 Tottenham Court Road, London W1T 7NF
United Kingdom.
© The Media Merchants Television Company Limited 2009.
Privacy Policy Terms and Conditions
HIT Entertainment Limited Registered in England No: 2341947 Registered Office: Maple House, 149 Tottenham Court Road, London W1T 7NF
United Kingdom.
file:///C|/Documents and Settings/Administrator/Desktop/Art Attack/bitbybitstraightlines.html (3 of 3) [5/28/2009 4:59:29 PM]
copyrig
ht:Aadi
thyar@
gmail.
com

Art Attack
Chalk pastels can give great effects when you smudge them with fingers. But they can be messy... You will need:
● Chalk pastels ● Paper ● Sticky tape
Take a square of paper and roll it on a diagonal into a tight roll. You need one pointy end, and one slightly wider end. Tape it together.
The idea is to use the tube of paper to rub and blend the chalk pastels.
Use the wide end for bigger areas of colour...
file:///C|/Documents and Settings/Administrator/Desktop/Art Attack/blendyourchalk.html (1 of 2) [5/28/2009 5:00:33 PM]
copyrig
ht:Aadi
thyar@
gmail.
com

Art Attack
...and use the pointy end to blend the detail.
It works much better than fingers, because it's more precise, and it's much less messy! Try it yourself!
© The Media Merchants Television Company Limited 2004 A HIT Entertainment Company
Privacy Policy
Terms and Conditions
file:///C|/Documents and Settings/Administrator/Desktop/Art Attack/blendyourchalk.html (2 of 2) [5/28/2009 5:00:33 PM]
copyrig
ht:Aadi
thyar@
gmail.
com

Art Attack
Here's a way to give your cartoon characters crazy hairstyles! You will need:
● Paper ● Permanent pen ● Ink or watery poster paint ● Drinking straw
Draw a simple cartoon face. It doesn't need to be anything special. In fact, the simpler - the better! You must make sure that you use a permanent pen for this.
Next you'll need ink or watery poster paint, and a thick drinking straw.
Carefully blob some ink or watery poster paint onto the hairline of the cartoon face.
file:///C|/Documents and Settings/Administrator/Desktop/Art Attack/blowdriedhair.html (1 of 5) [5/28/2009 5:01:39 PM]
copyrig
ht:Aadi
thyar@
gmail.
com

Art Attack
Take a deep breath and blow through the drinking straw. Blow the ink to create the hairstyle.
You can do whatever style you like. How about blowing the ink to one side, to make it look like the hairstyle has been caught by a strong wind.
You can use different coloured inks, too. How's this for a blonde bombshell?
How about a granny's purple rinse?
file:///C|/Documents and Settings/Administrator/Desktop/Art Attack/blowdriedhair.html (2 of 5) [5/28/2009 5:01:39 PM]
copyrig
ht:Aadi
thyar@
gmail.
com
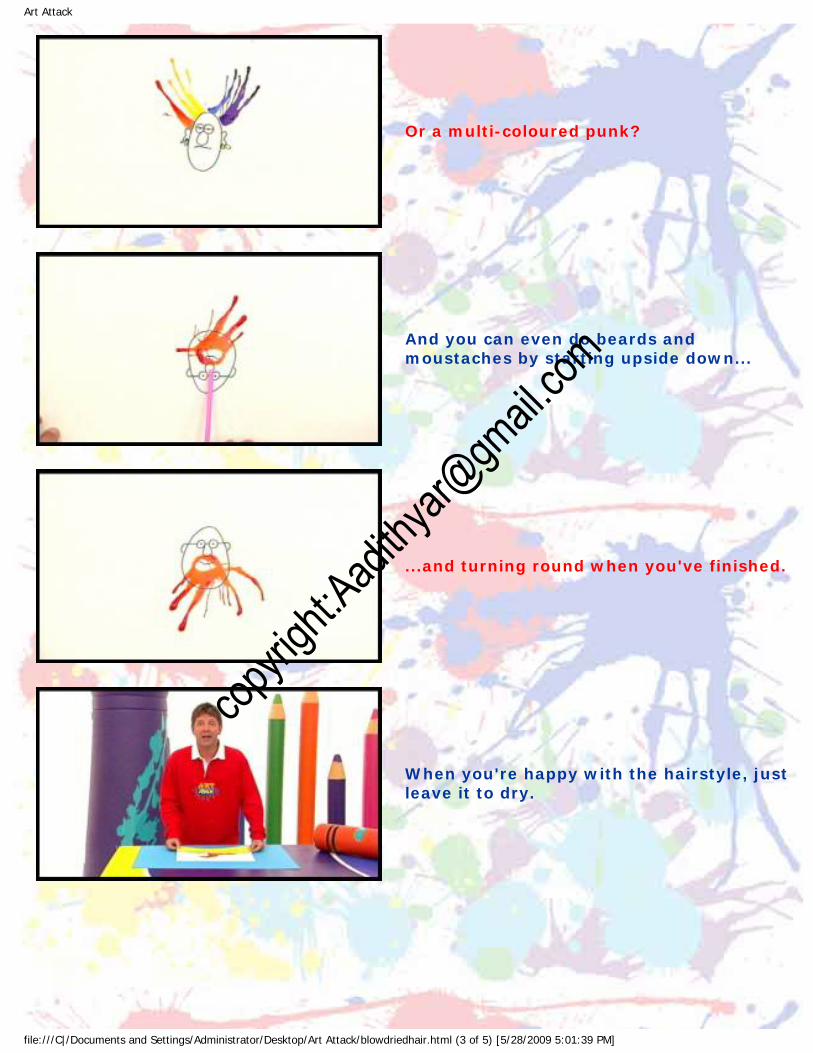
Art Attack
Or a multi-coloured punk?
And you can even do beards and moustaches by starting upside down...
...and turning round when you've finished.
When you're happy with the hairstyle, just leave it to dry.
file:///C|/Documents and Settings/Administrator/Desktop/Art Attack/blowdriedhair.html (3 of 5) [5/28/2009 5:01:39 PM]
copyrig
ht:Aadi
thyar@
gmail.
com

Art Attack
You can use the technique for animals too - how about a horse's mane?
Or a birds wing?
Or how about on an alien? Try it yourself.
© The Media Merchants Television Company Limited 2009.
Privacy Policy Terms and Conditions
HIT Entertainment Limited Registered in England No: 2341947 Registered Office: Maple House, 149 Tottenham Court Road, London W1T 7NF
United Kingdom.
file:///C|/Documents and Settings/Administrator/Desktop/Art Attack/blowdriedhair.html (4 of 5) [5/28/2009 5:01:39 PM]
copyrig
ht:Aadi
thyar@
gmail.
com

Art Attack
Make things look metallic with this Art Attack! You will need:
● Pencil, paint or wax crayons ● Paper
How do you get a shiny metallic effect into your drawings? In a cartoon, it's quite easy. Just add a pair of lightly drawn lines here and there to give a shiny effect!
But what about a colour picture. like this one?
The idea is similar - draw shine lines using pencil crayon (or wax crayon or even paint!) - but they must be in blue.
file:///C|/Documents and Settings/Administrator/Desktop/Art Attack/bmslines.html (1 of 5) [5/28/2009 5:02:47 PM]
copyrig
ht:Aadi
thyar@
gmail.
com

Art Attack
For flat metal, draw blue diagonal shine lines, all going in the same direction.
Do some lighter shading around the outside of the lines, like this.
Lightly smudge the lines with your finger, to blend the shading together.
For curved metal, do the shine lines along the edge...
file:///C|/Documents and Settings/Administrator/Desktop/Art Attack/bmslines.html (2 of 5) [5/28/2009 5:02:47 PM]
copyrig
ht:Aadi
thyar@
gmail.
com

Art Attack
...then add in shading around the line, going in the same direction.
Do the same sort of thing on other cylindrical shapes in the picture.
For the curved edges around the bumper, once again just draw in the shine lines around the edges...
...followed by shading.
file:///C|/Documents and Settings/Administrator/Desktop/Art Attack/bmslines.html (3 of 5) [5/28/2009 5:02:47 PM]
copyrig
ht:Aadi
thyar@
gmail.
com

Art Attack
You can add in a few diagonal shine lines too, if you like.
And once again, smudge the lines and shading by using your finger.
You can use this technique on any metallic object in your pictures. Here's a sign...
...and a robot! Try it yourself!
© The Media Merchants Television Company Limited 2009.
file:///C|/Documents and Settings/Administrator/Desktop/Art Attack/bmslines.html (4 of 5) [5/28/2009 5:02:47 PM]
copyrig
ht:Aadi
thyar@
gmail.
com

Art Attack
A great tip for drawing people! You will need:
● Sausages ● Eggs ● Paper ● Pencil ● Pen
Lay out the sausages and eggs like a person. One egg makes a head, two more form the body, and two sausages for each arm and leg.
Try copying how the sausage and egg shaped person looks.
file:///C|/Documents and Settings/Administrator/Desktop/Art Attack/bodyshapes.html (1 of 3) [5/28/2009 5:03:39 PM]
copyrig
ht:Aadi
thyar@
gmail.
com

Art Attack
That's not very realistic, though, so next time try drawing the person in pencil as a rough outline, so you can put some action into the picture.
Then you can go over it in pen, adding detail. Neil's drawn a musician.
When you're happy with the shape, carefully rub out the pencil marks.
That was Neil's first ever Art Attack. His Grandfather gave him the tip! Try it yourself!
file:///C|/Documents and Settings/Administrator/Desktop/Art Attack/bodyshapes.html (2 of 3) [5/28/2009 5:03:39 PM]
copyrig
ht:Aadi
thyar@
gmail.
com

Art Attack
If you're a keen reader, here's a great Art Attack that will keep your bookshelf tidy! You will need:
● 3 reasonably heavy stones ● Newspaper ● Sticky tape ● Kitchen roll ● PVA Glue ● Water ● Paintbrush ● Paper ● Cardboard box card ● Paint ● Permanent black pen or marker
For the front end of the bookworm, you'll need eight sheets of newspaper. Open them out, then find two reasonably heavy stones. Place them at the bottom of the newspaper sheets - one at the centre fold, and one at the bottom right hand corner.
Roll the stones up in the newspaper, so that you have a tube with a stone in the middle and one at the end.
file:///C|/Documents and Settings/Administrator/Desktop/Art Attack/bookwormbookends.html (1 of 9) [5/28/2009 5:04:13 PM]
copyrig
ht:Aadi
thyar@
gmail.
com

Art Attack
When you've finished rolling, use sticky tape to keep everything in place.
Next, grasp the newspaper tube between the two stones, and scrunch it up to make an arch.
Use more sticky tape to keep the shape in place.
Now scrunch the the end of the tube without the stone, so that it forms a worm-like neck.
file:///C|/Documents and Settings/Administrator/Desktop/Art Attack/bookwormbookends.html (2 of 9) [5/28/2009 5:04:13 PM]
copyrig
ht:Aadi
thyar@
gmail.
com

Art Attack
Roll up a ball of newspaper and tape it to the end of the neck, to make a head.
Then add on a couple of small newspaper balls for eyes - one on each side of the head.
For the worm's saddle, close one sheet of newspaper and fold it half. Then fold it in half again...
...and wrap it around the arched part of the worm's body.
file:///C|/Documents and Settings/Administrator/Desktop/Art Attack/bookwormbookends.html (3 of 9) [5/28/2009 5:04:13 PM]
copyrig
ht:Aadi
thyar@
gmail.
com

Art Attack
Once again, secure everything in place with more sticky tape.
You should now have something that looks like this!
This one has extra newspaper padding for cheeks, to make it look as though the bookworm is munching away.
The stones inside the body provide the necessary weight to prop up the books!
file:///C|/Documents and Settings/Administrator/Desktop/Art Attack/bookwormbookends.html (4 of 9) [5/28/2009 5:04:13 PM]
copyrig
ht:Aadi
thyar@
gmail.
com

Art Attack
For the tail end of the bookworm, find another stone and place it onto the edge of two closed double page spreads of newspaper.
Roll it up, and again, put some tape onto it, to hold the stone in place.
Twist the other end, to make a pointy tail. Once more, use tape to keep the shape!
That's both ends of the bookworm made!
file:///C|/Documents and Settings/Administrator/Desktop/Art Attack/bookwormbookends.html (5 of 9) [5/28/2009 5:04:13 PM]
copyrig
ht:Aadi
thyar@
gmail.
com

Art Attack
For the next step, take a piece of cardboard box card and draw an arch, like this. It needs to be big enough to cover the end of the bookworm's body. Cut this out.
Next, tear up lots of triangle shaped pieces of paper, and start to glue them around the outside edge of the arch.
Let the triangles stick out, like this...
...and when you've stuck them all the way around, put some more glue into the middle...
file:///C|/Documents and Settings/Administrator/Desktop/Art Attack/bookwormbookends.html (6 of 9) [5/28/2009 5:04:13 PM]
copyrig
ht:Aadi
thyar@
gmail.
com

Art Attack
...and press it onto the end of the bookworm's body until the glue dries. You need to make another one of these, in exactly the same way, and glue it to the end of the tail part.
The cardboard makes a flat surface against which your books will stay upright, and the torn triangles look like ripped pages where the worm has burst through the book!
Next, mix up PVA glue in equal parts with water and paste a layer of kitchen roll all over both parts of the bookworm. Don't go over the ripped triangle shaped pieces of paper!
When dry, you can paint the bookworm. The choice of colours are up to you.
file:///C|/Documents and Settings/Administrator/Desktop/Art Attack/bookwormbookends.html (7 of 9) [5/28/2009 5:04:13 PM]
copyrig
ht:Aadi
thyar@
gmail.
com

Art Attack
And when the paint has dried, you can add on extra detail using a permanent pen or marker. This one has extra ripped paper pieces glued around the mouth!
Finish off by placing the bookworm on your bookshelf, like this.
If you want to, you can make some smaller bookworms - without stones - to place on top of books, to make it look as though there's a real paper feast going on! Try it yourself!
© The Media Merchants Television Company Limited 2009.
Privacy Policy Terms and Conditions
HIT Entertainment Limited Registered in England No: 2341947 Registered Office: Maple House, 149 Tottenham Court Road, London W1T 7NF
United Kingdom.
file:///C|/Documents and Settings/Administrator/Desktop/Art Attack/bookwormbookends.html (8 of 9) [5/28/2009 5:04:13 PM]
copyrig
ht:Aadi
thyar@
gmail.
com

Art Attack
Here's a great way to make a really cool looking bookmark. You will need:
● a pencil ● a piece of cereal box card ● a black pen ● paint/pencils/felt tips ● a book to test with
First, use a pencil to draw a big, backwards S shape on the piece of cereal box card. Then draw an oval shape for the head at the top end. Fatten up both sides of the S, going from the head towards the tail, getting thinner as you go along.
Now use a black pen to go over the outline. It doesn’t need to be perfect at this stage. Draw two eyes on the top of the head, and add a mouth.
file:///C|/Documents and Settings/Administrator/Desktop/Art Attack/bookwormbookmark.html (1 of 4) [5/28/2009 5:05:08 PM]
copyrig
ht:Aadi
thyar@
gmail.
com

Art Attack
To turn this into a real bookworm, you need to draw a "saddle" in the middle, and add some lines above and below it - just as you can see here.
Now cut it out, remembering to be very careful with your scissors. You should end up with something that looks like this.
To make your bookworm grip the pages, you need to snip half-way up the pencil guideline on your bookmark’s face, as you can see here. Be very careful not to go all the way across and cut the head off completely!
file:///C|/Documents and Settings/Administrator/Desktop/Art Attack/bookwormbookmark.html (2 of 4) [5/28/2009 5:05:08 PM]
copyrig
ht:Aadi
thyar@
gmail.
com

Art Attack
Now it’s time to colour in. You can use anything you like - paint, pencils, or felt tips. Use pink to make the bookmark look like a real worm
After all your colouring in, you'll have something that looks like this.
Finally, test it out in a book. Simply find your page, pop it in, and position it so your bookworm’s head is hooked over the front. Try it yourself!
file:///C|/Documents and Settings/Administrator/Desktop/Art Attack/bookwormbookmark.html (3 of 4) [5/28/2009 5:05:08 PM]
copyrig
ht:Aadi
thyar@
gmail.
com

Art Attack
Tired of people snooping around all your private things? Here's a neat little Art Attack that can help you hide all your secret things... You will need:
● Cereal Box Card ● Cardboard Box Card ● Ink ● Cling Film ● Gold Pen ● Stick Glue ● Paintbrush
Take an empty cereal box, and tape all the flaps together so that it's nice and secure. Then draw a line around the middle of three of the narrow sides, leaving one of the longer ones untouched. Then cut the box open so it can open out like a book.
Next, you'll need two pieces of cardboard box card to give the Boring Old Book extra strength. They need to be just a few centimetres bigger than the front and back of your cereal box.
file:///C|/Documents and Settings/Administrator/Desktop/Art Attack/boringoldbook.html (1 of 5) [5/28/2009 5:05:38 PM]
copyrig
ht:Aadi
thyar@
gmail.
com

Art Attack
Glue the pieces of cardboard box card onto the front and back. Make sure that one edge of both pieces of card lines up with the uncut side of the cereal box.
Try to make sure the rest of the cardboard edges are about 1cm over the edges of the cereal box.
To keep the Boring Old Book closed, you need three strips of cereal box card. Make sure that they're the same sizes as the cut sides of the cereal box. Glue them inside, to make a lip so that the book stays closed. It's a good idea to check now that the book will open and close easily. If it doesn't, trim the strips if needed.
That's the basic shape completed. Now to make your book look old, take a piece of white paper and then use a paintbrush to cover the whole paper in ink!
file:///C|/Documents and Settings/Administrator/Desktop/Art Attack/boringoldbook.html (2 of 5) [5/28/2009 5:05:38 PM]
copyrig
ht:Aadi
thyar@
gmail.
com

Art Attack
Before the ink dries, cover it over in wrinkled cling film, then leave it to dry.
When the ink has dried, peel off the cling film, and you get a fantastic worn leather effect!
Now to cover the book. Cut a strip of the ink-covered paper, that's as long as it is tall, and twice as wide as the spine of your book. Put a line of glue down both long edges, and stick it to the spine. Turn the edges down onto the front and back of the book.
You may have to make a few more sheets of this paper, to cover the front and back of your book, and if the paper hangs over the edge just neatly tuck it underneath.
file:///C|/Documents and Settings/Administrator/Desktop/Art Attack/boringoldbook.html (3 of 5) [5/28/2009 5:05:38 PM]
copyrig
ht:Aadi
thyar@
gmail.
com

Art Attack
Next, paint the pages of your book in a creamy yellow paint!
To define the pages you can either paint on the brown lines, or draw them on using a brown pencil and ruler.
To finish off your book all you need is a gold pen so you can draw on a couple of lines on the front, back and spine.
When you're finished, just pop all your private things inside, and put it on a shelf with the rest of your books. Try it yourself!
file:///C|/Documents and Settings/Administrator/Desktop/Art Attack/boringoldbook.html (4 of 5) [5/28/2009 5:05:38 PM]
copyrig
ht:Aadi
thyar@
gmail.
com

Art Attack
Need a rubber to correct a picture or sketch done in pencil? Use your loaf! You will need:
● Slice of fresh bread
If ever you're working in pencil, need to rub something out but can't find a rubber...
...just grab a slice of fresh bread! Tear off a small piece and roll it into a ball...
...then use it just like a rubber. Try it yourself!
file:///C|/Documents and Settings/Administrator/Desktop/Art Attack/breadrubber.html (1 of 2) [5/28/2009 5:06:02 PM]
copyrig
ht:Aadi
thyar@
gmail.
com

Art Attack
Have you ever noticed that almost every object you can think of has been brought to life in cartoons? Here's how to do it. You will need:
● Pen ● Paper ● Felt Tips
First draw out any inanimate object. It can be anything you like - Neil drew a pencil and a paintbrush.
Then add living characteristics and features, like a face, arms and legs.
You can even use specific parts of the object as bits of the face! For example the brush part of the paintbrush can become a beard!
file:///C|/Documents and Settings/Administrator/Desktop/Art Attack/bringemtolife.html (1 of 2) [5/28/2009 5:06:28 PM]
copyrig
ht:Aadi
thyar@
gmail.
com

Art Attack
Once you've brought them to life, colour them in.
This technique will work with any object. Try it yourself!
© The Media Merchants Television Company Limited 2009.
Privacy Policy Terms and Conditions
HIT Entertainment Limited Registered in England No: 2341947 Registered Office: Maple House, 149 Tottenham Court Road, London W1T 7NF
United Kingdom.
© The Media Merchants Television Company Limited 2009.
Privacy Policy Terms and Conditions
HIT Entertainment Limited Registered in England No: 2341947 Registered Office: Maple House, 149 Tottenham Court Road, London W1T 7NF
United Kingdom.
file:///C|/Documents and Settings/Administrator/Desktop/Art Attack/bringemtolife.html (2 of 2) [5/28/2009 5:06:28 PM]
copyrig
ht:Aadi
thyar@
gmail.
com

Art Attack
Here's something you can make for that special someone on Valentine's Day, or just to show someone how you feel. You will need:
● Scissors ● Silver Pen ● Thin Card ● Pencil ● Cup or Mug
You'll need a piece of thick paper or thin card. Red or pink is the best colour for this, but you could always use white and colour it in if you like.
Fold the card in half...
file:///C|/Documents and Settings/Administrator/Desktop/Art Attack/brokenheart.html (1 of 4) [5/28/2009 5:07:09 PM]
copyrig
ht:Aadi
thyar@
gmail.
com

Art Attack
...then use a cup or mug to draw a semi-circle in the top corner.
The semicircle should just be touching the top and left edges of the card.
Now draw a line down from the semi-circle to the bottom of the card, like this.
Cut out the shape and you should have two identical pieces of card.
file:///C|/Documents and Settings/Administrator/Desktop/Art Attack/brokenheart.html (2 of 4) [5/28/2009 5:07:09 PM]
copyrig
ht:Aadi
thyar@
gmail.
com

Art Attack
Put the two shapes on top of each other and use the scissors again to make a cut, about two thirds of the way up both of the shapes.
Next, use a silver pen and write along the top of one of pieces "only you can mend"!
Along the top of the other piece, write "my broken heart".
Pop both pieces into an envelope and send
it off to your valentine! Then, truly only they can mend your broken heart. Don't give them any instructions, so then you'll know that if they take the time to figure it out, they must like you! Try it yourself!
file:///C|/Documents and Settings/Administrator/Desktop/Art Attack/brokenheart.html (3 of 4) [5/28/2009 5:07:09 PM]
copyrig
ht:Aadi
thyar@
gmail.
com

Art Attack
Bugs aren't normally cute, but these ones are, and they're really easy to make. You will need:
● Wool ● Scissors ● Cardboard box card ● Mug or cup to draw around ● Loo roll inner tube ● Scissors ● Ping pong balls
Draw around a mug or cup onto some cardboard box card.
Then place a loo roll tube in the middle of the circle and draw around it.
file:///C|/Documents and Settings/Administrator/Desktop/Art Attack/bugeyedbugs.html (1 of 6) [5/28/2009 5:07:33 PM]
copyrig
ht:Aadi
thyar@
gmail.
com
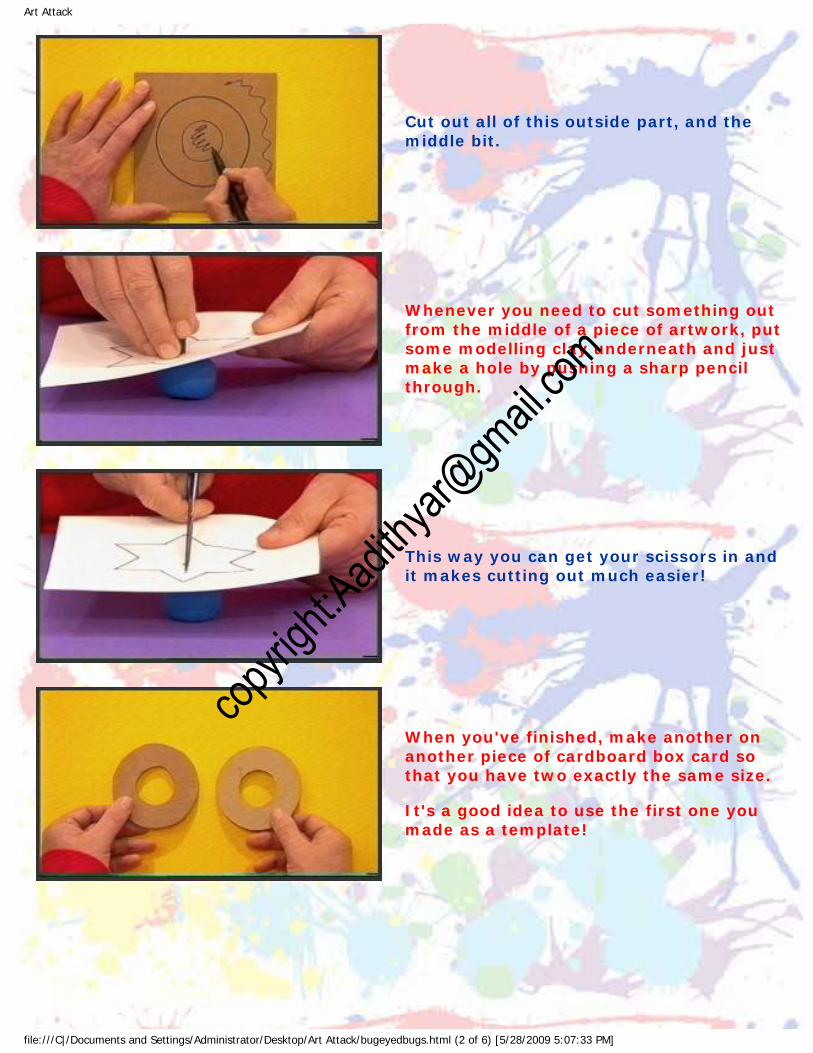
Art Attack
Cut out all of this outside part, and the middle bit.
Whenever you need to cut something out from the middle of a piece of artwork, put some modelling clay underneath and just make a hole by pushing a sharp pencil through.
This way you can get your scissors in and it makes cutting out much easier!
When you've finished, make another on another piece of cardboard box card so that you have two exactly the same size. It's a good idea to use the first one you made as a template!
file:///C|/Documents and Settings/Administrator/Desktop/Art Attack/bugeyedbugs.html (2 of 6) [5/28/2009 5:07:33 PM]
copyrig
ht:Aadi
thyar@
gmail.
com

Art Attack
Next you'll need to find some wool - in any colour. This will become the bug's body.
Place the two card circles together.
Then take a length of wool, poke the end through the hole and tie a knot around the top of the card.
Then start to loop the wool around the card circles.
file:///C|/Documents and Settings/Administrator/Desktop/Art Attack/bugeyedbugs.html (3 of 6) [5/28/2009 5:07:33 PM]
copyrig
ht:Aadi
thyar@
gmail.
com

Art Attack
Carry on looping until the centre circle is full of wool. This might take some time. Don't forget to pull the wool tightly.
Carefully put some scissors between the two card circles and snip the wool all the way around the edge.
To keep the wool in place, take another length of wool, slot it between the card circles, and tie a tight knot.
When you carefully slip the card circles off, you'll be left with a fluffy bug's body!
file:///C|/Documents and Settings/Administrator/Desktop/Art Attack/bugeyedbugs.html (4 of 6) [5/28/2009 5:07:33 PM]
copyrig
ht:Aadi
thyar@
gmail.
com

Art Attack
Now you can add extra features. These two ping pong balls have been painted to look like eyes. Stick them into position on top of the body using PVA glue.
How about a couple of card semi-circles for wings, one on either side of the body.
If you like, you can make a whole family! Try adding other features like feet, tongues and bat wings! Try it yourself!
© The Media Merchants Television Company Limited 2009.
Privacy Policy Terms and Conditions
HIT Entertainment Limited Registered in England No: 2341947 Registered Office: Maple House, 149 Tottenham Court Road, London W1T 7NF
United Kingdom.
file:///C|/Documents and Settings/Administrator/Desktop/Art Attack/bugeyedbugs.html (5 of 6) [5/28/2009 5:07:33 PM]
copyrig
ht:Aadi
thyar@
gmail.
com

Art Attack
Make this and you'll never lose your page in a book ever again! You will need:
● Card ● Felt tips ● Paperclips ● Thread ● Scissors
Start by drawing a selection of bugs onto card. They can be any design you fancy - just make them simple line drawings.
The idea is to produce about eight bugs. Colour them in with felt tips on both sides, and carefully cut them out.
file:///C|/Documents and Settings/Administrator/Desktop/Art Attack/bugmarks.html (1 of 3) [5/28/2009 5:08:15 PM]
copyrig
ht:Aadi
thyar@
gmail.
com

Art Attack
Now take some thread that's about twice the height of a book. Tie one end of the thread to a paperclip.
Tape one bug right at the end of the thread by using some sticky tape.
Now tape on a few more down the length of the thread.
Next, do exactly the same on another piece of thread. Don't forget to tie the end to a paperclip!
file:///C|/Documents and Settings/Administrator/Desktop/Art Attack/bugmarks.html (2 of 3) [5/28/2009 5:08:15 PM]
copyrig
ht:Aadi
thyar@
gmail.
com

Art Attack
Finish off by attaching the paperclip onto the page of the book you want to mark, and by placing the bugs inside.
Then, the next time you open the book, the bugs fall out. Try it yourself!
© The Media Merchants Television Company Limited 2009.
Privacy Policy Terms and Conditions
HIT Entertainment Limited Registered in England No: 2341947 Registered Office: Maple House, 149 Tottenham Court Road, London W1T 7NF
United Kingdom.
© The Media Merchants Television Company Limited 2009.
Privacy Policy Terms and Conditions
HIT Entertainment Limited Registered in England No: 2341947 Registered Office: Maple House, 149 Tottenham Court Road, London W1T 7NF
United Kingdom.
file:///C|/Documents and Settings/Administrator/Desktop/Art Attack/bugmarks.html (3 of 3) [5/28/2009 5:08:15 PM]
copyrig
ht:Aadi
thyar@
gmail.
com

Art Attack
Make your own paint palette, complete with brushes and tools, from cardboard! You will need:
● cardboard box card ● poster paint
Neil's got himself a new paint palette. And better than that, it didn't cost him a penny. He made it himself. This is his paint palette, and these are also his brushes and tools too - and everything is made completely out of cardboard box card.
Just get a little bit of poster paint, and paint onto more cardboard box card. Use different sizes of cardboard for different levels of detail. And there you have it - a picture painted on cardboard, using cardboard instead of brushes! Try it yourself!
© The Media Merchants Television Company Limited 2009.
Privacy Policy Terms and Conditions
HIT Entertainment Limited Registered in England No: 2341947 Registered Office: Maple House, 149 Tottenham Court Road, London W1T 7NF
United Kingdom.
file:///C|/Documents and Settings/Administrator/Desktop/Art Attack/cardboardpaintset.html (1 of 2) [5/28/2009 5:08:57 PM]
copyrig
ht:Aadi
thyar@
gmail.
com

Art Attack
These crocodiles are right at home, swimming through the carpet! You will need:
● Cardboard box card ● Saucer and plate ● Pencil ● Scissors ● Newspaper ● PVA glue ● Paintbrush ● Tissue paper or kitchen roll ● Paint
These crocodiles are right at home, swimming through the carpet! And they're easy to make...
This is a 4 Part Attack! For the first part, round a saucer and a big plate onto a large piece of cardboard box card.
file:///C|/Documents and Settings/Administrator/Desktop/Art Attack/carpetcrocs.html (1 of 10) [5/28/2009 5:09:43 PM]
copyrig
ht:Aadi
thyar@
gmail.
com

Art Attack
The circles need to be about 15cm apart. Use the circles as a guide to draw the croc's head shape, like this.
Draw a slightly pointy bit behind the middle of the big plate. The bit round the big circle is the head, and the bit round the smaller circle is the snout.
Cut out, to give you the basic head shape.
Next you'll need an oval shaped piece of card for the body. cut it a bit bigger than the head.
file:///C|/Documents and Settings/Administrator/Desktop/Art Attack/carpetcrocs.html (2 of 10) [5/28/2009 5:09:43 PM]
copyrig
ht:Aadi
thyar@
gmail.
com

Art Attack
For the tail, draw and cut out a sort of long "S" shape. Make it rounded at one end and pointed at the other.
Now you have all the basic parts for your carpet croc. Next you need to fatten it up!
The best way to fatten the croc up is with some newspaper sculpture. So, for part 2, scrunch a large piece of newspaper up into a big fat pillow. Place it into position on the card head.
For the snout end, make a smaller pillow and stick that in place.
file:///C|/Documents and Settings/Administrator/Desktop/Art Attack/carpetcrocs.html (3 of 10) [5/28/2009 5:09:43 PM]
copyrig
ht:Aadi
thyar@
gmail.
com

Art Attack
Then pad out in between the two.
Next, roll two small newspaper balls for eyes, and put them on top of the head.
Then make two big sausages of newspaper and two slightly smaller ones.
Tape the smaller sausages on, near the end of the snout, for nostrils.
file:///C|/Documents and Settings/Administrator/Desktop/Art Attack/carpetcrocs.html (4 of 10) [5/28/2009 5:09:43 PM]
copyrig
ht:Aadi
thyar@
gmail.
com

Art Attack
Tape the bigger ones over the eyes for eyelids.
To fatten up the other body parts, use newspaper in exactly the same way. Here's the main bit of the body.
And here's the tail!
The third part involves putting some scaly detail onto the croc. To do this, make lots of small screwed-up bits of newspaper.
file:///C|/Documents and Settings/Administrator/Desktop/Art Attack/carpetcrocs.html (5 of 10) [5/28/2009 5:09:43 PM]
copyrig
ht:Aadi
thyar@
gmail.
com

Art Attack
Arrange a few of them on top of the head and tape them in place.
On the body, arrange the bits of newspaper in rows and tape them in place.
Do the same thing on the tail and you'll have all the body parts with rows of scales.
For part 4 - making the skin - you need bits of torn-up tissue paper...
file:///C|/Documents and Settings/Administrator/Desktop/Art Attack/carpetcrocs.html (6 of 10) [5/28/2009 5:09:43 PM]
copyrig
ht:Aadi
thyar@
gmail.
com

Art Attack
...and PVA glue mixed in equal parts with water.
Paint the glue mixture onto the crocodile...
...then lay the pieces of tissue into the glue, and paint more glue over the top.
Cover everything with one layer of tissue and glue. Then leave the pieces to dry so you can paint them.
file:///C|/Documents and Settings/Administrator/Desktop/Art Attack/carpetcrocs.html (7 of 10) [5/28/2009 5:09:43 PM]
copyrig
ht:Aadi
thyar@
gmail.
com

Art Attack
It's best to give the whole thing a base coat of green paint.
Then you could add some yellow to pick out the raised detail.
Some darker colours are great for shading the nostrils.
Finish off with some yellow eyes with black slits!
file:///C|/Documents and Settings/Administrator/Desktop/Art Attack/carpetcrocs.html (8 of 10) [5/28/2009 5:09:43 PM]
copyrig
ht:Aadi
thyar@
gmail.
com

Art Attack
Then all you have to do is set your croc free to swim around your carpet or floor.
You could have a go at making other creatures. How about a little turtle?
If you haven't got much card or paper you could always make a baby carpet croc... aww!
© The Media Merchants Television Company Limited 2009.
Privacy Policy Terms and Conditions
HIT Entertainment Limited Registered in England No: 2341947 Registered Office: Maple House, 149 Tottenham Court Road, London W1T 7NF
United Kingdom.
file:///C|/Documents and Settings/Administrator/Desktop/Art Attack/carpetcrocs.html (9 of 10) [5/28/2009 5:09:43 PM]
copyrig
ht:Aadi
thyar@
gmail.
com

Art Attack
Have a bit of fun - create your own cartoon character. But where do you start? How about with this great Art Attack! You will need:
● paper ● pen ● tracing paper
Cartoon characters always have a lot of character! But how do you decide which character you want? First take a blank piece of paper, and experiment with facial features, starting with the eyes. There are lots of different types - as you can see from all these ones that Neil’s done here.
How about different noses too? What about a cute button nose, or a long straight nose, or a turned up snooty nose, a crooked nose, two little nostrils or maybe a splodge nose? Again, lots of different types of noses!
And what about mouths? A smiley mouth, goofy mouth, a cheesy smiley mouth, an evil mouth, a wide mouth, or even a very narrow mouth - just experiment!
file:///C|/Documents and Settings/Administrator/Desktop/Art Attack/cartooncharacters.html (1 of 4) [5/28/2009 5:10:24 PM]
copyrig
ht:Aadi
thyar@
gmail.
com

Art Attack
You don’t have to do these styles.
You can do any you like, and mix and match them. And that’s where tracing paper comes in. Using the tracing paper, select your preferred facial features. There are loads of different possibilities!
You can use the tracing paper to create your character’s body. Select a face, and add on a body.
When you’ve got your character, trace a few more of the same character, and experiment colouring them in. Your very own cartoon character. All you need to do is experiment!
You can easily create a whole gang of these characters by using the same features, but changing them a bit. If you want to create a girl version of a character, place some tracing paper over your finished drawing. To create a girl, make the features slightly smaller this time, using long eyelashes and larger lips.
file:///C|/Documents and Settings/Administrator/Desktop/Art Attack/cartooncharacters.html (2 of 4) [5/28/2009 5:10:24 PM]
copyrig
ht:Aadi
thyar@
gmail.
com

Art Attack
To create a younger character, use your original again, trace the features, but this time, make them more rounded, adding cheeky freckles and a baseball cap.
To create a dopey character, again trace from the original, but maybe give it droopy eyelids, a huge lower lip, a big toady body, long arms, and webbed feet.
You can create as many cartoon characters as you like, each slightly different, but all looking as if they’re part of the same ‘family’. Try it yourself!
© The Media Merchants Television Company Limited 2009.
Privacy Policy Terms and Conditions
HIT Entertainment Limited Registered in England No: 2341947 Registered Office: Maple House, 149 Tottenham Court Road, London W1T 7NF
United Kingdom.
file:///C|/Documents and Settings/Administrator/Desktop/Art Attack/cartooncharacters.html (3 of 4) [5/28/2009 5:10:24 PM]
copyrig
ht:Aadi
thyar@
gmail.
com

Art Attack
Find out how to turn shapes into faces, with a bit of imagination! You will need:
● paper ● pens
Take a look at this. What do you see? They’re not a load of weird shaped vegetables. They're just some scribbled shapes. But believe it or not, they can all be turned into cartoon faces!
Create any weird shape you like - this is a kind of pear shape. The idea is to make a face out of this shape, by giving it a bit of character. You can see here that the pear shape now has a long nose on it, some glasses, and a mouth! Just make it all up as you go along.
file:///C|/Documents and Settings/Administrator/Desktop/Art Attack/cartoonfaces.html (1 of 3) [5/28/2009 5:11:09 PM]
copyrig
ht:Aadi
thyar@
gmail.
com

Art Attack
The one on the top right looks a bit like a pumpkin. Simply draw whatever the shape reminds you of. In this case, a baby!
How about the one on the bottom left? A cool singing dude! Just make it up as you go along.
Finally, what about the one on the bottom right? A long faced traffic warden! It's good fun. Draw any shape, and then turn it into a cartoon person. Try it yourself!
file:///C|/Documents and Settings/Administrator/Desktop/Art Attack/cartoonfaces.html (2 of 3) [5/28/2009 5:11:09 PM]
copyrig
ht:Aadi
thyar@
gmail.
com

Art Attack
This Art Attack will show you a great way of creating a stone carving effect - without the stone! You will need:
● Rubber / eraser ● Charcoal ● Paper
First you'll need a piece of charcoal. Using it on its side, colour in a rough rectangle in the middle of the paper. The idea is to make the edges uneven, because this represents a stone slab. You'll get a good stone effect with charcoal.
Then take a rubber and carve out your initial in the middle of the charcoal, using the rubber.
You'll probably have to go over it a couple of times with the rubber. Try to make sure that the edges are a little uneven because it all adds to that chiselled effect.
file:///C|/Documents and Settings/Administrator/Desktop/Art Attack/carveyournameinstone.html (1 of 3) [5/28/2009 5:11:44 PM]
copyrig
ht:Aadi
thyar@
gmail.
com

Art Attack
Blow away any bits of dust or rubber.
Finally, using a small, sharp edge of charcoal, pick out the edge of one side of the letter. This gives it a 3D effect!
Now go around the stone shape too, and it'll end up looking like a heavy stone slab with a carved out letter!
This technique also works really well with other designs. How about this fossilised fish?
file:///C|/Documents and Settings/Administrator/Desktop/Art Attack/carveyournameinstone.html (2 of 3) [5/28/2009 5:11:44 PM]
copyrig
ht:Aadi
thyar@
gmail.
com

Art Attack
Or this cave wall painting, carved into a block of stone with a highlight at the top. Try it yourself!
© The Media Merchants Television Company Limited 2009.
Privacy Policy Terms and Conditions
HIT Entertainment Limited Registered in England No: 2341947 Registered Office: Maple House, 149 Tottenham Court Road, London W1T 7NF
United Kingdom.
© The Media Merchants Television Company Limited 2009.
Privacy Policy Terms and Conditions
HIT Entertainment Limited Registered in England No: 2341947 Registered Office: Maple House, 149 Tottenham Court Road, London W1T 7NF
United Kingdom.
file:///C|/Documents and Settings/Administrator/Desktop/Art Attack/carveyournameinstone.html (3 of 3) [5/28/2009 5:11:44 PM]
copyrig
ht:Aadi
thyar@
gmail.
com

Art Attack
Here's a 4 Part Attack for a notice board featuring a hungry caterpillar! You will need:
● Cardboard box card ● Pen ● Scissors ● Sticky tape ● Newspaper ● PVA glue ● Kitchen roll ● Cotton woll ● String ● Paint ● Paintbrush ● Drinking straw
Start off by making the leaves. Get a large piece of cardboard box card, and draw a large leaf shape onto it. Make it round at one end, and tapered at the other.
On the top edge, draw a sequence of semi circles, so that they look like a caterpillar's teeth marks. Cut the whole thing out.
file:///C|/Documents and Settings/Administrator/Desktop/Art Attack/caterpillarnboard.html (1 of 7) [5/28/2009 5:12:26 PM]
copyrig
ht:Aadi
thyar@
gmail.
com
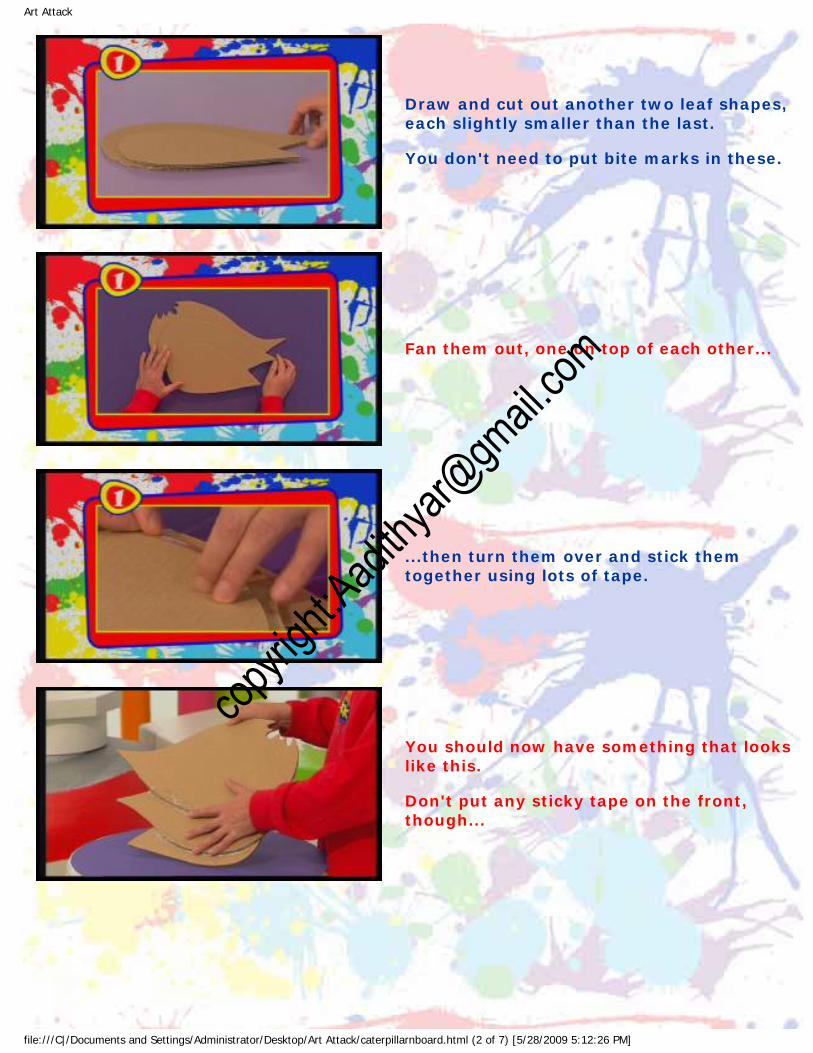
Art Attack
Draw and cut out another two leaf shapes, each slightly smaller than the last. You don't need to put bite marks in these.
Fan them out, one on top of each other...
...then turn them over and stick them together using lots of tape.
You should now have something that looks like this. Don't put any sticky tape on the front, though...
file:///C|/Documents and Settings/Administrator/Desktop/Art Attack/caterpillarnboard.html (2 of 7) [5/28/2009 5:12:26 PM]
copyrig
ht:Aadi
thyar@
gmail.
com

Art Attack
...because you'll use the gaps to slot whatever you want to put on your noticeboard in between.
Next, the caterpillar! Scrunch some newspaper into a ball and hold it together with sticky tape.
The idea is to make eight of these, to make up the caterpillar's body.
Place the balls of newspaper in an arch shape, like this...
file:///C|/Documents and Settings/Administrator/Desktop/Art Attack/caterpillarnboard.html (3 of 7) [5/28/2009 5:12:26 PM]
copyrig
ht:Aadi
thyar@
gmail.
com

Art Attack
...and then tape them all together. Once again, use plenty of tape for this!
Add two small balls of newspaper to the top of the first ball of the caterpillar's body, for eyes.
To make the antennae, cut a thin drinking straw in half and tape tiny balls of newspaper to each piece of straw.
Tape them onto the caterpillar's body, behind the eyes.
file:///C|/Documents and Settings/Administrator/Desktop/Art Attack/caterpillarnboard.html (4 of 7) [5/28/2009 5:12:26 PM]
copyrig
ht:Aadi
thyar@
gmail.
com

Art Attack
Now, position the caterpillar along the top edge of the leaves, and tape it into place. Position the caterpillar's head near to the bite mark in the top leaf!
Next, mix up some PVA glue with water and use it to paste on small, torn up pieces of kitchen paper all over the caterpillar's body. This will give it a great texture.
Make sure that you seal over all the joins.
Now dip some cotton wool into the glue. Add pieces to the top of each segment of the caterpillar's body and use your fingers to pinch the gluey cotton wool to give a spiky finish.
file:///C|/Documents and Settings/Administrator/Desktop/Art Attack/caterpillarnboard.html (5 of 7) [5/28/2009 5:12:26 PM]
copyrig
ht:Aadi
thyar@
gmail.
com

Art Attack
Next, paint the caterpillar with whatever colours you fancy. For inspiration, you could look at pictures in books or on the internet. Or - just make it up as you go along!
When the paint has dried you can add on extra detail using permament pen or marker.
Next, paint the leaves bright green.
Use lighter colours to add on the veins of each leaf, like this.
file:///C|/Documents and Settings/Administrator/Desktop/Art Attack/caterpillarnboard.html (6 of 7) [5/28/2009 5:12:26 PM]
copyrig
ht:Aadi
thyar@
gmail.
com

Art Attack
Finally, tie a loop of string...
...and tape it to the back of the leaves, so that you can hang the noticeboard up!
And that's it! Finish off by adding on whatever bits and pieces you want to keep on the noticeboard. Try it yourself!
© The Media Merchants Television Company Limited 2004 A HIT Entertainment Company
Privacy Policy
Terms and Conditions
file:///C|/Documents and Settings/Administrator/Desktop/Art Attack/caterpillarnboard.html (7 of 7) [5/28/2009 5:12:26 PM]
copyrig
ht:Aadi
thyar@
gmail.
com

Art Attack
Pictures made from chalk and charcoal. You will need:
● chalk ● charcoal ● coloured paper
For your "chalkoal" picture, you must use chalk for the light bits, and charcoal for the dark bits. You must also draw your picture onto coloured paper. Don't use white paper as the chalk won't show up, and avoid black paper as the charcoal won't show up!
When you use charcoal, you don't have to be neat or perfect, because if you make a mistake, you can just rub it out with your finger. It's a good idea to decide where the light is coming from. Once you've done that, you can highlight the edges facing the light with the chalk along the edges that are facing the light.
Use the charcoal for the shady bits - that is, the bits away from the light.
file:///C|/Documents and Settings/Administrator/Desktop/Art Attack/chalkoalpictures.html (1 of 2) [5/28/2009 5:13:00 PM]
copyrig
ht:Aadi
thyar@
gmail.
com

Art Attack
The great thing about charcoal is that you can create an atmospheric shadowy effect by lightly smudging it.
And there it is, a chalkoal picture. Try it yourself!
© The Media Merchants Television Company Limited 2009.
Privacy Policy Terms and Conditions
HIT Entertainment Limited Registered in England No: 2341947 Registered Office: Maple House, 149 Tottenham Court Road, London W1T 7NF
United Kingdom.
© The Media Merchants Television Company Limited 2009.
Privacy Policy Terms and Conditions
HIT Entertainment Limited Registered in England No: 2341947 Registered Office: Maple House, 149 Tottenham Court Road, London W1T 7NF
United Kingdom.
file:///C|/Documents and Settings/Administrator/Desktop/Art Attack/chalkoalpictures.html (2 of 2) [5/28/2009 5:13:00 PM]
copyrig
ht:Aadi
thyar@
gmail.
com

Art Attack
Here's an Art Attack trick to help you get vibrant colours from chalk pastels. You will need:
● Chalk pastels ● Water ● Paper
Here are some ordinary chalk pastels.
They're not the sort of art material you'd think of using for bright, vibrant colours. Instead, they're great for producing a soft, delicate look to a picture.
But, if you soak a chalk pastel in a beaker of water for a couple of minutes, then dry it off using a paper towel...
file:///C|/Documents and Settings/Administrator/Desktop/Art Attack/chalkpastelsinwater.html (1 of 2) [5/28/2009 5:13:39 PM]
copyrig
ht:Aadi
thyar@
gmail.
com

Art Attack
...when you use it, the colour will be really bright and vivid!
Don't leave the chalk pastels immersed in water for too long, though - or they'll go all soft and mushy! Try it yourself!
© The Media Merchants Television Company Limited 2009.
Privacy Policy Terms and Conditions
HIT Entertainment Limited Registered in England No: 2341947 Registered Office: Maple House, 149 Tottenham Court Road, London W1T 7NF
United Kingdom.
© The Media Merchants Television Company Limited 2009.
Privacy Policy Terms and Conditions
HIT Entertainment Limited Registered in England No: 2341947 Registered Office: Maple House, 149 Tottenham Court Road, London W1T 7NF
United Kingdom.
file:///C|/Documents and Settings/Administrator/Desktop/Art Attack/chalkpastelsinwater.html (2 of 2) [5/28/2009 5:13:39 PM]
copyrig
ht:Aadi
thyar@
gmail.
com

Art Attack
Chalk is a very versatile art material! You will need:
● Coloured chalk ● Paper ● Cotton wool
You can use chalk in lots of different ways, to get different effects into your artwork. Try rubbing a ruler along a stick of chalk. It'll produce a pile of chalk dust.
Dab a ball of cotton wool into the dust...
...then dab or wipe it onto a picture. It gives a really delicate, fluffy cloud effect. Perfect for skies!
file:///C|/Documents and Settings/Administrator/Desktop/Art Attack/chalktechniques.html (1 of 3) [5/28/2009 5:14:44 PM]
copyrig
ht:Aadi
thyar@
gmail.
com

Art Attack
If you want a quick way of colouring in a large block of colour, just turn a piece of chalk on its side...
...press down, and you'll get a wide strip of colour.
For hard lines, use the sharp edge on the end of the chalk. And if the end is too blunt...
...simply snap the chalk in two to produce a brand new sharp edge - perfect for small detail! Try it yourself!
file:///C|/Documents and Settings/Administrator/Desktop/Art Attack/chalktechniques.html (2 of 3) [5/28/2009 5:14:44 PM]
copyrig
ht:Aadi
thyar@
gmail.
com

Art Attack
Here are some great tips to help you paint in an oriental style. You will need:
● Tracing paper ● Watercolour paint
Chinese style paintings are often done using special inks and pigments on rice paper. But for this Art Attack you just need ordinary watercolour paints and tracing paper!
When painting on tracing paper it's best to
use only a little water. Even though you're using watercolour paint you need the brush to be fairly dry - otherwise the paper will buckle. Lots of Chinese paintings feature landscapes, flowers, trees and even animals. So that's what Neil's drawing here.
Because the brush is quite dry, you'll almost have to scrub the paint on! You don't have to be too perfect; the picture should be light and wispy.
file:///C|/Documents and Settings/Administrator/Desktop/Art Attack/chinesepainting.html (1 of 3) [5/28/2009 5:15:27 PM]
copyrig
ht:Aadi
thyar@
gmail.
com

Art Attack
Here you can see that Neil is moving on to other colours now. Again, try not to use too much water. Just dab the paint on.
How about a butterfly flitting around the blossom?
When you've put in all the basic bits, leave it to dry. This shouldn't take too long because there's not much water in the paint. Now, use a smaller brush for some finer details. Use the tip of the brush to paint on thin lines.
There you have it - an authentic, old, traditional Chinese design, even looking like it's on rice paper!
file:///C|/Documents and Settings/Administrator/Desktop/Art Attack/chinesepainting.html (2 of 3) [5/28/2009 5:15:27 PM]
copyrig
ht:Aadi
thyar@
gmail.
com

Art Attack
You could even try some different designs. How about this one: a bird on bamboo?
Or this great landscape design? Remember to keep your brush quite dry because otherwise you'll end up with too many wrinkles in the paper. Try it yourself!
© The Media Merchants Television Company Limited 2009.
Privacy Policy Terms and Conditions
HIT Entertainment Limited Registered in England No: 2341947 Registered Office: Maple House, 149 Tottenham Court Road, London W1T 7NF
United Kingdom.
© The Media Merchants Television Company Limited 2009.
Privacy Policy Terms and Conditions
HIT Entertainment Limited Registered in England No: 2341947 Registered Office: Maple House, 149 Tottenham Court Road, London W1T 7NF
United Kingdom.
file:///C|/Documents and Settings/Administrator/Desktop/Art Attack/chinesepainting.html (3 of 3) [5/28/2009 5:15:27 PM]
copyrig
ht:Aadi
thyar@
gmail.
com

Art Attack
Do you find drawing a landscape hard? Here's an easy way to do it - but don't tell anyone you've been cheating! You will need:
● Paper ● Pen ● Wax Crayons
Start off by drawing a wavy line about three quarters of the way up the paper, like this.
Next, draw another wavy line, directly underneath.
Then draw a third!
file:///C|/Documents and Settings/Administrator/Desktop/Art Attack/cheatslandscape.html (1 of 4) [5/28/2009 5:16:02 PM]
copyrig
ht:Aadi
thyar@
gmail.
com

Art Attack
And a fourth. Make the lines further apart as you go further down the page.
Next, continue some of the wavy lines so they join up with the lines underneath them.
Join up some of the lines in the foreground in the same way.
Now the picture starts to come to life! Add in some detail like bushes and tree. Remember, the further away they are the smaller and less detailed they need to be!.
file:///C|/Documents and Settings/Administrator/Desktop/Art Attack/cheatslandscape.html (2 of 4) [5/28/2009 5:16:02 PM]
copyrig
ht:Aadi
thyar@
gmail.
com

Art Attack
Add some parallel lines to create fields.
Create hedges in the background, to make some fields for cattle to graze in.
Add a farmhouse too, if you want to. It's best to put it in the middle of the picture.
If you've drawn a farmhouse, you'll also need a road - snaking over the hills toward the farmhouse. Just draw two lines that go in the same direction. You can even add a little stream - just make sure you add a few small squiggly lines so you can tell that it's water!
file:///C|/Documents and Settings/Administrator/Desktop/Art Attack/cheatslandscape.html (3 of 4) [5/28/2009 5:16:02 PM]
copyrig
ht:Aadi
thyar@
gmail.
com

Art Attack
Once you've drawn out the whole landscape, just colour it all in. You can use anything you like for this - felt tips, wax crayons, pastels - whatever! Just make sure that the further away the fields are, the lighter shade of green they should be. Try it yourself!
© The Media Merchants Television Company Limited 2009.
Privacy Policy Terms and Conditions
HIT Entertainment Limited Registered in England No: 2341947 Registered Office: Maple House, 149 Tottenham Court Road, London W1T 7NF
United Kingdom.
© The Media Merchants Television Company Limited 2009.
Privacy Policy Terms and Conditions
HIT Entertainment Limited Registered in England No: 2341947 Registered Office: Maple House, 149 Tottenham Court Road, London W1T 7NF
United Kingdom.
file:///C|/Documents and Settings/Administrator/Desktop/Art Attack/cheatslandscape.html (4 of 4) [5/28/2009 5:16:02 PM]
copyrig
ht:Aadi
thyar@
gmail.
com

Art Attack
Nobody would ever think that loo roll tubes were the slightest bit Christmassy. But they can be! Here’s how... You will need:
● a loo roll tube ● green and white thin card ● a dinner plate ● scissors ● tape ● paint
Start by drawing and cutting out a circle from green thin card. It needs to be about the size of a dinner plate, so why not draw round one?
Then, you need to cut out a white circle of card that’s a bit smaller than the green one.
file:///C|/Documents and Settings/Administrator/Desktop/Art Attack/christmascones.html (1 of 8) [5/28/2009 5:16:54 PM]
copyrig
ht:Aadi
thyar@
gmail.
com

Art Attack
And then another green circle that’s a bit smaller...
Then a white circle that’s a bit smaller...
...and another green circle that’s a bit smaller...
file:///C|/Documents and Settings/Administrator/Desktop/Art Attack/christmascones.html (2 of 8) [5/28/2009 5:16:54 PM]
copyrig
ht:Aadi
thyar@
gmail.
com

Art Attack
...and finally, a white circle that’s a bit smaller again! You should now have six circles getting smaller and smaller in a pattern: green, white, green, white, green, white.
Now you need to turn all these circles into cones. To do this, take one of them and cut it in half. You only need one half.
Curl the card around into a cone shape, by folding two bits back onto each other so that they overlap just a little bit.
file:///C|/Documents and Settings/Administrator/Desktop/Art Attack/christmascones.html (3 of 8) [5/28/2009 5:16:54 PM]
copyrig
ht:Aadi
thyar@
gmail.
com

Art Attack
Then tape them firmly into place, making sure it's nice and secure.
Do the same with all the circles, and you’ll end up with six cones getting smaller in size. It should look like this.
On all the green cones, you need to take some scissors and cut a zigzag pattern along the edge.
file:///C|/Documents and Settings/Administrator/Desktop/Art Attack/christmascones.html (4 of 8) [5/28/2009 5:16:54 PM]
copyrig
ht:Aadi
thyar@
gmail.
com

Art Attack
Once you’ve done that, on the white ones you need to cut out a wavy pattern along the bottom edges.
Now stack them one on top of the other in order of size and glue them all together.
When they’re all in place, you’ll have something that looks like this. Put it to one side to let the glue dry.
file:///C|/Documents and Settings/Administrator/Desktop/Art Attack/christmascones.html (5 of 8) [5/28/2009 5:16:54 PM]
copyrig
ht:Aadi
thyar@
gmail.
com

Art Attack
This is where you need your loo roll tube. Stick it into the bottom of your cone, making sure it’s nice and secure with lots of sticky tape. This will be your Christmas tree stand.
When you’ve done that, you need to gently pull up the green zigzag bits to create a frilly pattern.
Once you’ve done that, you’re ready to decorate your tree. You can use whatever you like - how about sweet wrappers?
file:///C|/Documents and Settings/Administrator/Desktop/Art Attack/christmascones.html (6 of 8) [5/28/2009 5:16:54 PM]
copyrig
ht:Aadi
thyar@
gmail.
com

Art Attack
Just scrunch them up into a ball, and then stick them onto the tree with a dab of glue.
When you’ve decorated the whole tree, and painted the loo roll, you’ll have something that looks like this. Brilliant, eh! Mini Christmas trees that you can put anywhere you like, year after year. Try it yourself!
© The Media Merchants Television Company Limited 2009.
Privacy Policy Terms and Conditions
HIT Entertainment Limited Registered in England No: 2341947 Registered Office: Maple House, 149 Tottenham Court Road, London W1T 7NF
United Kingdom.
© The Media Merchants Television Company Limited 2009.
Privacy Policy Terms and Conditions
file:///C|/Documents and Settings/Administrator/Desktop/Art Attack/christmascones.html (7 of 8) [5/28/2009 5:16:54 PM]
copyrig
ht:Aadi
thyar@
gmail.
com

Art Attack
Make a great picture of a city at night, by using different techniques. You will need:
● paper ● water ● paint ● a marker pen
First, dampen the entire sheet of paper.
Use watered down poster or watercolour paint to give it a really soft, atmospheric feel on the damp paper. Use lighter colours towards the top, and slightly more purple towards the bottom.
file:///C|/Documents and Settings/Administrator/Desktop/Art Attack/cityatnight.html (1 of 4) [5/28/2009 5:17:58 PM]
copyrig
ht:Aadi
thyar@
gmail.
com

Art Attack
Before it dries completely, add in some wispy clouds in the sky.
Another good technique is to take a bit of tissue paper and gently pad the clouds to pick a bit of the paint off, doing a little twist as you pad.
Once the paper is completely dry, you can add in some shapes with thicker black paint.
file:///C|/Documents and Settings/Administrator/Desktop/Art Attack/cityatnight.html (2 of 4) [5/28/2009 5:17:58 PM]
copyrig
ht:Aadi
thyar@
gmail.
com

Art Attack
Once that’s dry, start to add in darker shading along the sides and edges of the buildings. You can even add little hints of detail in the distance.
When that’s dry, you can add in more detail with marker pens. Use a thin pen to add in the fine details. For trees, just do very wispy branches.
Add in a car in the foreground with a thicker marker pen.
file:///C|/Documents and Settings/Administrator/Desktop/Art Attack/cityatnight.html (3 of 4) [5/28/2009 5:17:58 PM]
copyrig
ht:Aadi
thyar@
gmail.
com

Art Attack
Finally, chalks and pastels are really brilliant for highlights and lights, and bring the picture to life. Try it yourself!
© The Media Merchants Television Company Limited 2009.
Privacy Policy Terms and Conditions
HIT Entertainment Limited Registered in England No: 2341947 Registered Office: Maple House, 149 Tottenham Court Road, London W1T 7NF
United Kingdom.
© The Media Merchants Television Company Limited 2009.
Privacy Policy Terms and Conditions
HIT Entertainment Limited Registered in England No: 2341947 Registered Office: Maple House, 149 Tottenham Court Road, London W1T 7NF
United Kingdom.
file:///C|/Documents and Settings/Administrator/Desktop/Art Attack/cityatnight.html (4 of 4) [5/28/2009 5:17:58 PM]
copyrig
ht:Aadi
thyar@
gmail.
com
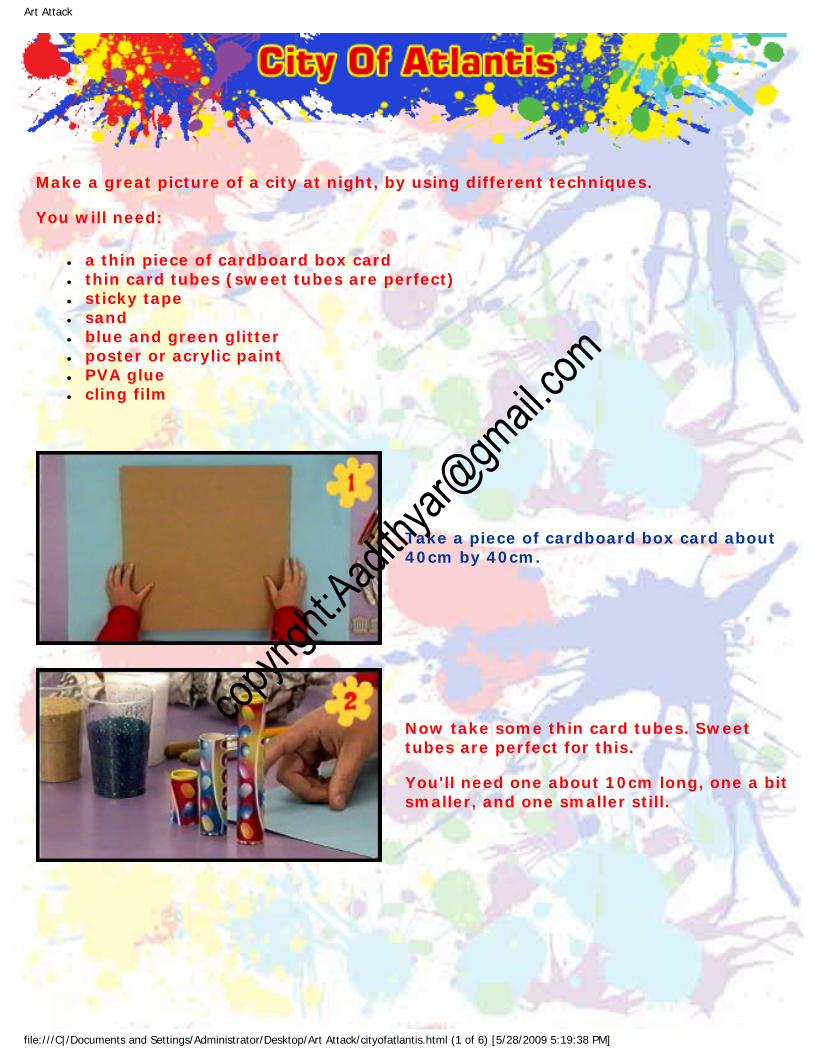
Art Attack
Make a great picture of a city at night, by using different techniques. You will need:
● a thin piece of cardboard box card ● thin card tubes (sweet tubes are perfect) ● sticky tape ● sand ● blue and green glitter ● poster or acrylic paint ● PVA glue ● cling film
Take a piece of cardboard box card about 40cm by 40cm.
Now take some thin card tubes. Sweet tubes are perfect for this. You'll need one about 10cm long, one a bit smaller, and one smaller still.
file:///C|/Documents and Settings/Administrator/Desktop/Art Attack/cityofatlantis.html (1 of 6) [5/28/2009 5:19:38 PM]
copyrig
ht:Aadi
thyar@
gmail.
com

Art Attack
The idea is to tape the big and medium tubes side by side.
Place the smaller tube near to the top of the medium one, and tape it on.
Now tape the tubes to the middle of the base, to form central turrets. Use lots of tape to make it secure.
Take some newspaper and twist it into a point. Place this into the top of a tube on your central turrets. Make sure the tops are pointy, and tape them into place.
file:///C|/Documents and Settings/Administrator/Desktop/Art Attack/cityofatlantis.html (2 of 6) [5/28/2009 5:19:38 PM]
copyrig
ht:Aadi
thyar@
gmail.
com

Art Attack
To make more pointy towers, use different lengths and thickness of newspaper, again with lots of twists.
Put them all outside your central turrets, and tape them all into position using loads of tape. Some towers might be wonky, but this all adds to the character.
Scrunch up newspaper bits at the bottom to create rocks...
...and tape them into place.
file:///C|/Documents and Settings/Administrator/Desktop/Art Attack/cityofatlantis.html (3 of 6) [5/28/2009 5:19:38 PM]
copyrig
ht:Aadi
thyar@
gmail.
com

Art Attack
Add more detail, like this newspaper twist bent into an arch shape and stuck to the tower to make a sort of cave entrance.
Add some ruined buildings made out of scraps of card and drinking straw, glued into position.
You should now have something that looks like this.
Now for the messy bit! Pour PVA glue all over the rocks and the ruins of your city of Atlantis. Use a brush to make sure you push the glue into every nook and cranny.
file:///C|/Documents and Settings/Administrator/Desktop/Art Attack/cityofatlantis.html (4 of 6) [5/28/2009 5:19:38 PM]
copyrig
ht:Aadi
thyar@
gmail.
com

Art Attack
Carefully pour some sand onto the glue-covered rocks. Mix the sand with blue and green glitter for the top half.
Leave it all to dry.
Use poster or acrylic paint to paint the sea.
Streak different shades of blue for added effect, with some splashes of white foam to indicate where the sea meets Atlantis.
file:///C|/Documents and Settings/Administrator/Desktop/Art Attack/cityofatlantis.html (5 of 6) [5/28/2009 5:19:38 PM]
copyrig
ht:Aadi
thyar@
gmail.
com

Art Attack
When the sea is painted and dry, paint on some PVA glue, and cover the sea with strips of cling film to create some crashing waves.
And there you have it - your very own city of Atlantis. You can even add sequins on the towers for windows. Try it yourself!
© The Media Merchants Television Company Limited 2009.
Privacy Policy Terms and Conditions
HIT Entertainment Limited Registered in England No: 2341947 Registered Office: Maple House, 149 Tottenham Court Road, London W1T 7NF
United Kingdom.
© The Media Merchants Television Company Limited 2009.
Privacy Policy Terms and Conditions
HIT Entertainment Limited Registered in England No: 2341947 Registered Office: Maple House, 149 Tottenham Court Road, London W1T 7NF
United Kingdom.
file:///C|/Documents and Settings/Administrator/Desktop/Art Attack/cityofatlantis.html (6 of 6) [5/28/2009 5:19:38 PM]
copyrig
ht:Aadi
thyar@
gmail.
com

Art Attack
Here's a really simple and easy way of making a classy painting - just like the old masters. You will need:
● paper ● paint ● paintbrush ● water ● cotton wool ball (or tissue)
Take a light coloured piece of paper, and in pencil draw silhouette shapes of buildings across the middle. You can draw any buildings you like, but only the outline. No detail is needed.
Mix some poster paint with water, thin enough to create a thin wash across the paper. Neil's using purple here, but you could use orange or blue. Add some water near to the bottom of the buildings, and as you get to the bottom of the picture, start to make it darker again.
file:///C|/Documents and Settings/Administrator/Desktop/Art Attack/classypaintings.html (1 of 3) [5/28/2009 5:22:27 PM]
copyrig
ht:Aadi
thyar@
gmail.
com

Art Attack
While it's drying, take a cotton wool ball or tissue to dab off some paint across the top to create a cloud effect.
When it's dry, paint the buildings in a darker colour. It's just a case of painting the shapes or silhouettes of those buildings.
Add in some darker paint again, for hints of windows.
When it's dry, add in some slight hints of detail with a black wax crayon.
file:///C|/Documents and Settings/Administrator/Desktop/Art Attack/classypaintings.html (2 of 3) [5/28/2009 5:22:28 PM]
copyrig
ht:Aadi
thyar@
gmail.
com

Art Attack
To really bring the painting to life, add detail in the foreground with a black felt pen. But again, just do silhouette shapes. You can also add in some highlights with white chalk. And there it is. A real classy painting using silhouettes. Try it yourself!
© The Media Merchants Television Company Limited 2009.
Privacy Policy Terms and Conditions
HIT Entertainment Limited Registered in England No: 2341947 Registered Office: Maple House, 149 Tottenham Court Road, London W1T 7NF
United Kingdom.
© The Media Merchants Television Company Limited 2009.
Privacy Policy Terms and Conditions
HIT Entertainment Limited Registered in England No: 2341947 Registered Office: Maple House, 149 Tottenham Court Road, London W1T 7NF
United Kingdom.
file:///C|/Documents and Settings/Administrator/Desktop/Art Attack/classypaintings.html (3 of 3) [5/28/2009 5:22:28 PM]
copyrig
ht:Aadi
thyar@
gmail.
com

Art Attack
Wouldn't it be fab to have your own fantasy land in the clouds to daydream all day long whenever you want? Well now you can! You will need:
● Cardboard box card ● Thin white card or paper ● Cotton wool balls ● Pens ● Scissors ● PVA glue ● Glitter
Draw a cloud shape onto some cardboard box card, and cut it out. This will form the base of your fantasy castle.
Take the thin white paper, and cut some battlements along one edge.
file:///C|/Documents and Settings/Administrator/Desktop/Art Attack/cloudnine.html (1 of 7) [5/28/2009 5:23:05 PM]
copyrig
ht:Aadi
thyar@
gmail.
com

Art Attack
Now you're going to make the castle walls. Start by folding the paper in half once.
Open it up again, then fold each edge in towards the middle fold...
... to create your four walls.
Put some sticky tape on the inside of one of the edges, so the sticky edge faces towards you.
file:///C|/Documents and Settings/Administrator/Desktop/Art Attack/cloudnine.html (2 of 7) [5/28/2009 5:23:05 PM]
copyrig
ht:Aadi
thyar@
gmail.
com

Art Attack
Then fold the edges together, so the tape is on the inside.
Now you should have a castle shape! Tape it onto the cardboard box card you cut into a cloud shape earlier. It doesn't matter if the sticky tape is visible - you're going to cover it up later.
For the rest of your castle you'll need some paper towers. Roll up three pieces of paper into tubes, then glue or tape the edges together to make tower shapes. It looks more realistic if you make them different lengths.
Now you need some cone-shaped rooves to go on top of the towers. Draw some semi-circles on some white paper or thin card.
file:///C|/Documents and Settings/Administrator/Desktop/Art Attack/cloudnine.html (3 of 7) [5/28/2009 5:23:05 PM]
copyrig
ht:Aadi
thyar@
gmail.
com

Art Attack
Roll each one over into a cone, adjusting them to the size of the tower. Tape down the edges.
Next you'll need to stick each roof onto a tower, by gluing the edge of the towers.
Hold the roof down while the glue dries.
You can make as many towers as you like.
file:///C|/Documents and Settings/Administrator/Desktop/Art Attack/cloudnine.html (4 of 7) [5/28/2009 5:23:05 PM]
copyrig
ht:Aadi
thyar@
gmail.
com

Art Attack
To build up the fluffy cloud effect, use cotton wool balls. Stick them onto the cardboard box card, using PVA glue. You could even cover the base of the cardboard, to make your cloud really floaty.
Have fun decorating your castle by drawing on windows and doors.
You could create an enchanted staircase using folded paper, consetina-style...
...or add glitter around the rim of the rooves...
file:///C|/Documents and Settings/Administrator/Desktop/Art Attack/cloudnine.html (5 of 7) [5/28/2009 5:23:05 PM]
copyrig
ht:Aadi
thyar@
gmail.
com

Art Attack
...or create the whole castle using different coloured card or cotton wool.
Attach some cotton thread or string, and you can hang the castle up, to make it look as though it's floating!
There it is, your own fantasy castle. Try it yourself!
© The Media Merchants Television Company Limited 2009.
Privacy Policy Terms and Conditions
HIT Entertainment Limited Registered in England No: 2341947 Registered Office: Maple House, 149 Tottenham Court Road, London W1T 7NF
United Kingdom.
file:///C|/Documents and Settings/Administrator/Desktop/Art Attack/cloudnine.html (6 of 7) [5/28/2009 5:23:05 PM]
copyrig
ht:Aadi
thyar@
gmail.
com
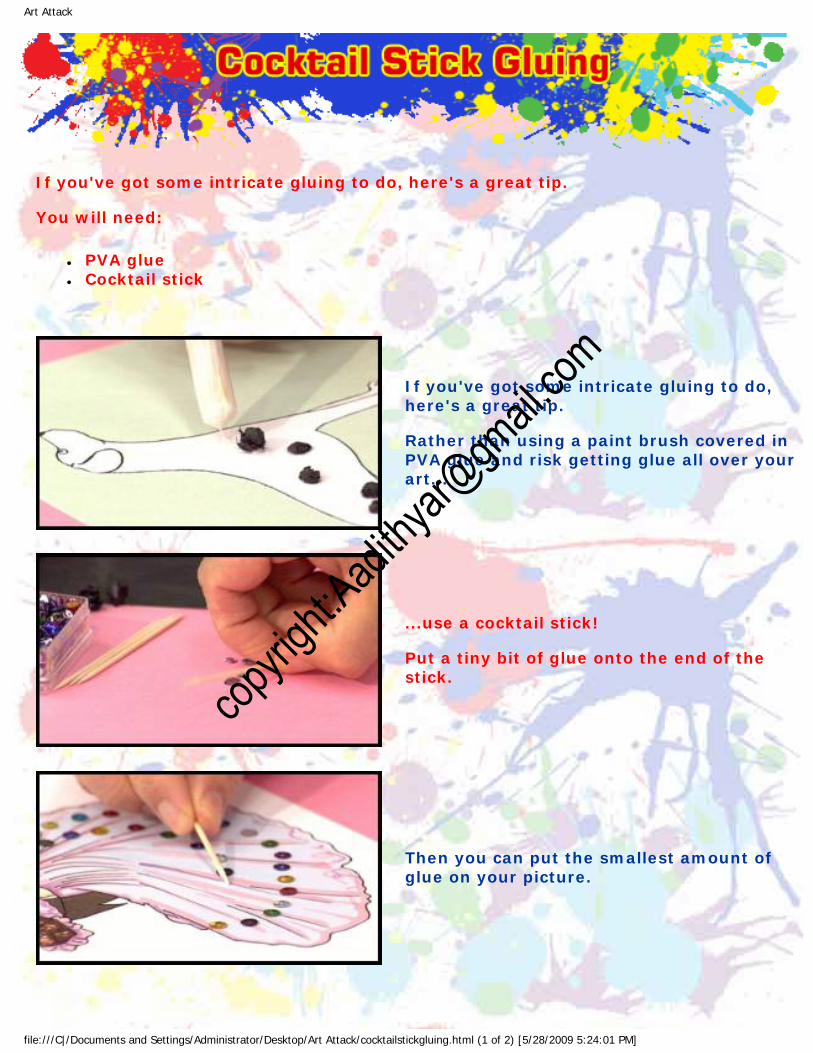
Art Attack
If you've got some intricate gluing to do, here's a great tip. You will need:
● PVA glue ● Cocktail stick
If you've got some intricate gluing to do, here's a great tip. Rather than using a paint brush covered in PVA glue and risk getting glue all over your art...
...use a cocktail stick! Put a tiny bit of glue onto the end of the stick.
Then you can put the smallest amount of glue on your picture.
file:///C|/Documents and Settings/Administrator/Desktop/Art Attack/cocktailstickgluing.html (1 of 2) [5/28/2009 5:24:01 PM]
copyrig
ht:Aadi
thyar@
gmail.
com

Art Attack
You can even use the cocktail stick for lifting tiny bits of art material, like this sequin.
On it goes, perfectly!
© The Media Merchants Television Company Limited 2009.
Privacy Policy Terms and Conditions
HIT Entertainment Limited Registered in England No: 2341947 Registered Office: Maple House, 149 Tottenham Court Road, London W1T 7NF
United Kingdom.
© The Media Merchants Television Company Limited 2009.
Privacy Policy Terms and Conditions
HIT Entertainment Limited Registered in England No: 2341947 Registered Office: Maple House, 149 Tottenham Court Road, London W1T 7NF
United Kingdom.
file:///C|/Documents and Settings/Administrator/Desktop/Art Attack/cocktailstickgluing.html (2 of 2) [5/28/2009 5:24:01 PM]
copyrig
ht:Aadi
thyar@
gmail.
com

Art Attack
Isn't it funny how we always do the outline first, and then the colour? Well, here's a different way of doing your picture - by doing the colour first. You will need:
● coloured paper ● scissors ● PVA glue ● black crayon
Draw the outline parts of your picture onto coloured paper. Here, Neil is drawing an orange skirt and an orange top.
On some blue paper, Neil is drawing a blue waistband, a sash and some cuffs.
file:///C|/Documents and Settings/Administrator/Desktop/Art Attack/colourfirstpictures.html (1 of 3) [5/28/2009 5:24:34 PM]
copyrig
ht:Aadi
thyar@
gmail.
com

Art Attack
Cut the shapes out, and put them all together.
Arrange all the parts of your picture together to form your picture. When you're happy with the result, glue all the pieces down.
But there's something missing - the outline! Take a crayon and make bold straight angular lines like the ones in this picture, to create energy and movement. These do not have to be neat, because they all add to the effect. Try it yourself!
© The Media Merchants Television Company Limited 2009.
Privacy Policy Terms and Conditions
HIT Entertainment Limited Registered in England No: 2341947 Registered Office: Maple House, 149 Tottenham Court Road, London W1T 7NF
United Kingdom.
file:///C|/Documents and Settings/Administrator/Desktop/Art Attack/colourfirstpictures.html (2 of 3) [5/28/2009 5:24:34 PM]
copyrig
ht:Aadi
thyar@
gmail.
com

Art Attack
Use the frame to make you focus on what it is that you want to draw. Try it yourself! You will need:
● Pencil ● Paper ● Felt tips
Lightly sketch a picture on paper using pencil.
Use felt tip pens to colour in different sections of the drawing. Instead of colouring in with blocks of colour, use words.
file:///C|/Documents and Settings/Administrator/Desktop/Art Attack/colourinwithwords.html (1 of 4) [5/28/2009 5:25:27 PM]
copyrig
ht:Aadi
thyar@
gmail.
com
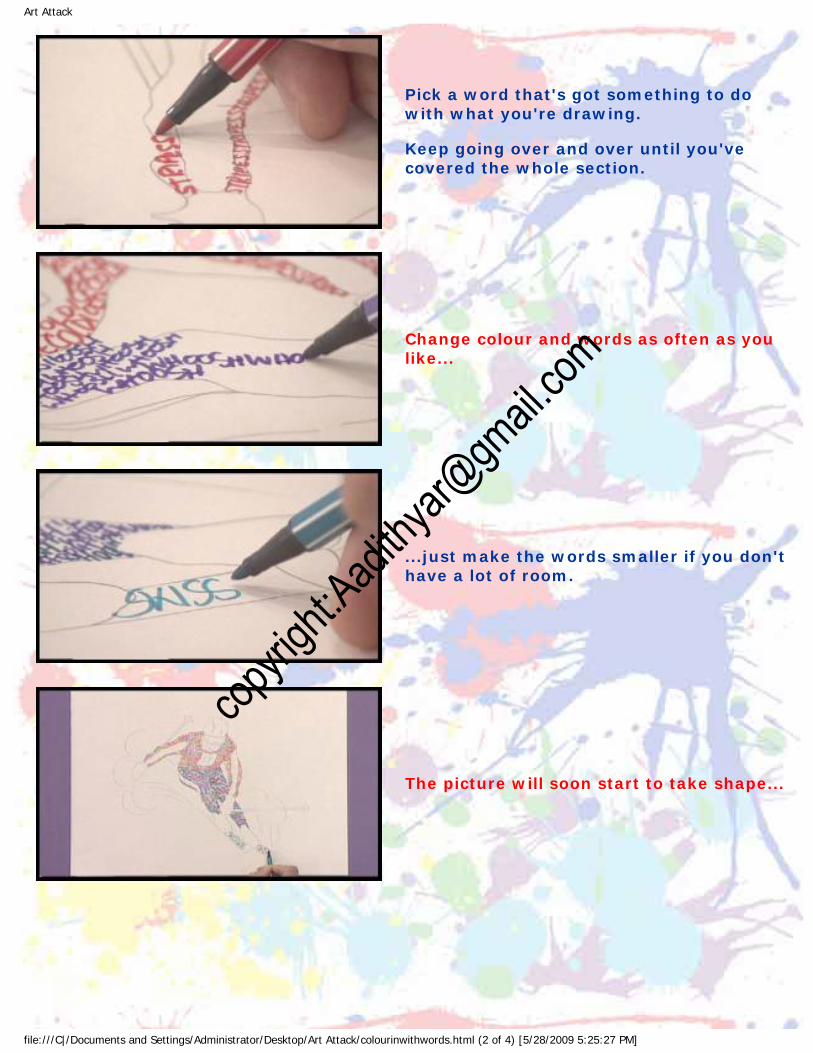
Art Attack
Pick a word that's got something to do with what you're drawing. Keep going over and over until you've covered the whole section.
Change colour and words as often as you like...
...just make the words smaller if you don't have a lot of room.
The picture will soon start to take shape...
file:///C|/Documents and Settings/Administrator/Desktop/Art Attack/colourinwithwords.html (2 of 4) [5/28/2009 5:25:27 PM]
copyrig
ht:Aadi
thyar@
gmail.
com

Art Attack
...and when you've finished, just rub out the pencil guidelines. It should look something like this.
Here's a parrot coloured using the same technique...
...here's a panda, done using white pencil on black paper...
...a tiger...
file:///C|/Documents and Settings/Administrator/Desktop/Art Attack/colourinwithwords.html (3 of 4) [5/28/2009 5:25:27 PM]
copyrig
ht:Aadi
thyar@
gmail.
com

Art Attack
...and Mr Neil Buchanan himself! Try it yourself!
© The Media Merchants Television Company Limited 2009.
Privacy Policy Terms and Conditions
HIT Entertainment Limited Registered in England No: 2341947 Registered Office: Maple House, 149 Tottenham Court Road, London W1T 7NF
United Kingdom.
© The Media Merchants Television Company Limited 2009.
Privacy Policy Terms and Conditions
HIT Entertainment Limited Registered in England No: 2341947 Registered Office: Maple House, 149 Tottenham Court Road, London W1T 7NF
United Kingdom.
file:///C|/Documents and Settings/Administrator/Desktop/Art Attack/colourinwithwords.html (4 of 4) [5/28/2009 5:25:27 PM]
copyrig
ht:Aadi
thyar@
gmail.
com

Art Attack
Make your friends laugh - with a comedy nose! You will need:
● Modelling clay ● Plastic bag ● Cling film ● PVA glue ● Paintbrush ● Kitchen roll ● Acrylic paint
With modelling clay, mould a nose shape onto an old plastic bag - but make sure that the nose is bigger than your real nose!
When you're happy with the nose, cover it with cling film. Press it around the nose, and smooth it down.
file:///C|/Documents and Settings/Administrator/Desktop/Art Attack/comedynoses.html (1 of 3) [5/28/2009 5:26:06 PM]
copyrig
ht:Aadi
thyar@
gmail.
com

Art Attack
Mix some PVA glue with water and use the mixture to paste a layer of kitchen roll all over the nose.
When the tissue has dried, carefully pull the paper nose off the mould.
Use a pair of scissors to trim off any untidy edges, to neaten things up.
Next, paint the nose! Use acrylic paint for this.
file:///C|/Documents and Settings/Administrator/Desktop/Art Attack/comedynoses.html (2 of 3) [5/28/2009 5:26:06 PM]
copyrig
ht:Aadi
thyar@
gmail.
com

Art Attack
And when the paint has dried, use a sharp pencil to pierce a hole through either side of the nose, and tie on a length of elastic or string, so you can wear the nose.
Here are some other ideas...
...and some more! Try it yourself!
© The Media Merchants Television Company Limited 2004 A HIT Entertainment Company
Privacy Policy
Terms and Conditions
file:///C|/Documents and Settings/Administrator/Desktop/Art Attack/comedynoses.html (3 of 3) [5/28/2009 5:26:06 PM]
copyrig
ht:Aadi
thyar@
gmail.
com

Art Attack
Don't throw away your old comics! With this great Art Attack, you can use them to create great-looking envelopes and cards! You will need:
● an envelope ● old comics ● marker pen ● scissors ● white paper ● thin card ● ruler ● stick glue
Take an envelope and open it out so that it lies flat. Be careful not to rip the glued joints!
Mark a dot on each of the edges where the
file:///C|/Documents and Settings/Administrator/Desktop/Art Attack/comicstripcard.html (1 of 7) [5/28/2009 5:26:46 PM]
copyrig
ht:Aadi
thyar@
gmail.
com
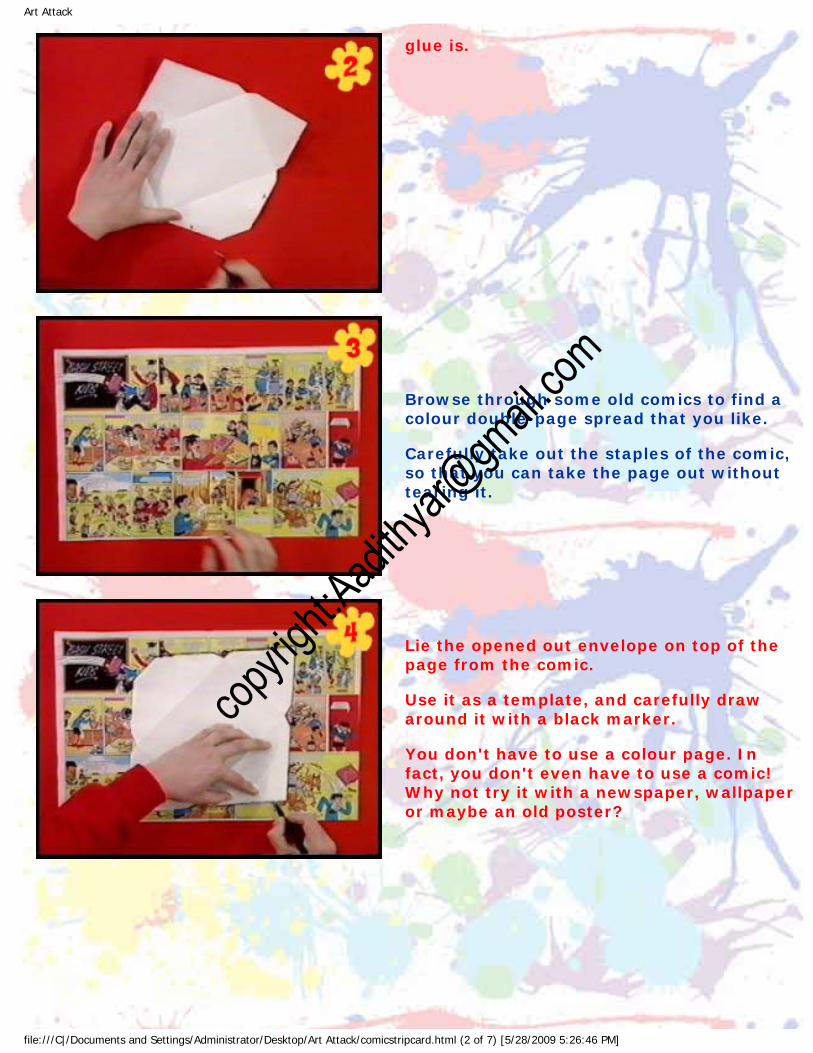
Art Attack
glue is.
Browse through some old comics to find a colour double-page spread that you like. Carefully take out the staples of the comic, so that you can take the page out without tearing it.
Lie the opened out envelope on top of the page from the comic. Use it as a template, and carefully draw around it with a black marker. You don't have to use a colour page. In fact, you don't even have to use a comic! Why not try it with a newspaper, wallpaper or maybe an old poster?
file:///C|/Documents and Settings/Administrator/Desktop/Art Attack/comicstripcard.html (2 of 7) [5/28/2009 5:26:46 PM]
copyrig
ht:Aadi
thyar@
gmail.
com

Art Attack
Carefully cut out the shape, so that you have something which looks like this.
Fold the cut-out comic up, in the same way as the original envelope that you opened out.
Now unfold it again! Looking back at the original envelope, put a dot on the edges of the comic which need to be glued.
file:///C|/Documents and Settings/Administrator/Desktop/Art Attack/comicstripcard.html (3 of 7) [5/28/2009 5:26:46 PM]
copyrig
ht:Aadi
thyar@
gmail.
com

Art Attack
Apply some stick glue on those edges.
Now carefully fold the envelope up again, sticking down the edges as you go. Fold down the glue-free flap first.
Finished! There you have a multi-coloured, comic strip enevlope. Not bad, eh?
file:///C|/Documents and Settings/Administrator/Desktop/Art Attack/comicstripcard.html (4 of 7) [5/28/2009 5:26:46 PM]
copyrig
ht:Aadi
thyar@
gmail.
com
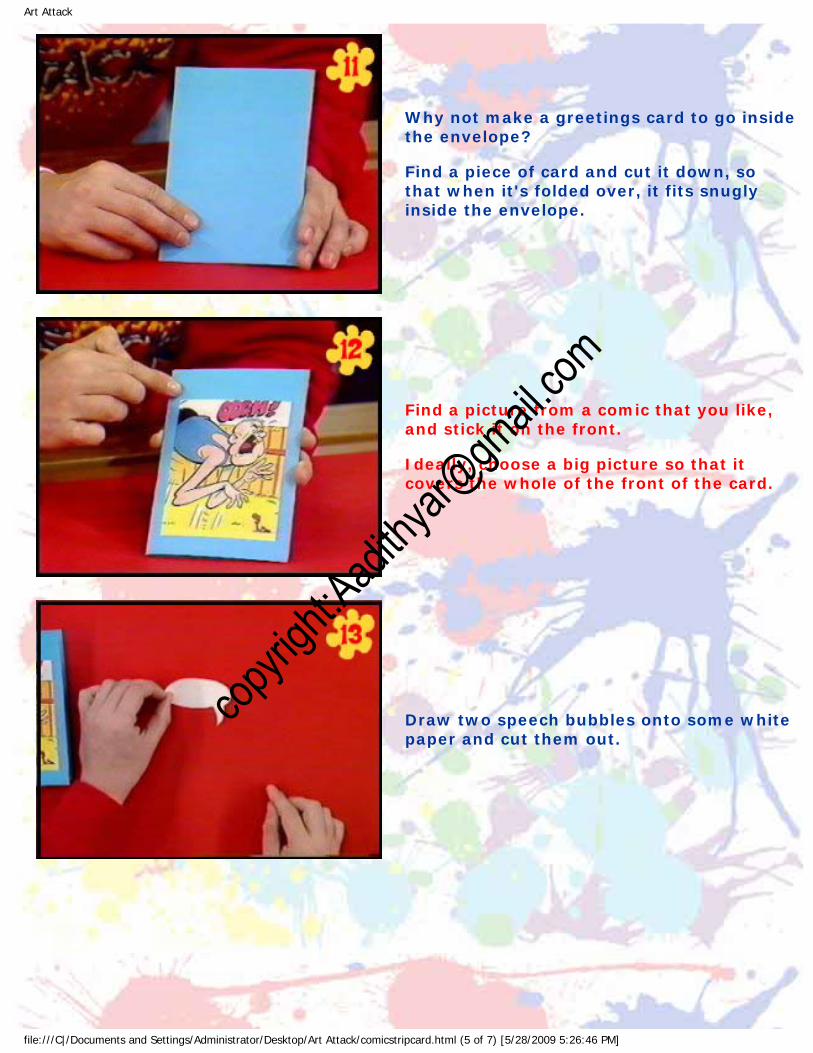
Art Attack
Why not make a greetings card to go inside the envelope? Find a piece of card and cut it down, so that when it's folded over, it fits snugly inside the envelope.
Find a picture from a comic that you like, and stick it on the front. Ideally, choose a big picture so that it covers the whole of the front of the card.
Draw two speech bubbles onto some white paper and cut them out.
file:///C|/Documents and Settings/Administrator/Desktop/Art Attack/comicstripcard.html (5 of 7) [5/28/2009 5:26:46 PM]
copyrig
ht:Aadi
thyar@
gmail.
com

Art Attack
Dab a little stick glue onto the back of one of the bubbles and stick it to the front of the card, so that it looks like it's coming out of the character's mouth.
Carefully draw around the edges of the speech bubble with a black marker. You can make it look even more professional by drawing round the picture from the comic, as well. Use a ruler for perfectly straight lines.
Write a message for the front of your card in the speech bubble.
file:///C|/Documents and Settings/Administrator/Desktop/Art Attack/comicstripcard.html (6 of 7) [5/28/2009 5:26:46 PM]
copyrig
ht:Aadi
thyar@
gmail.
com

Art Attack
Stick the other bubble onto the front of the envelope and write the name or address of the person you wish to send it to. So, there you have a multi-coloured comic strip card and matching envelope. Try it yourself!
© The Media Merchants Television Company Limited 2009.
Privacy Policy Terms and Conditions
HIT Entertainment Limited Registered in England No: 2341947 Registered Office: Maple House, 149 Tottenham Court Road, London W1T 7NF
United Kingdom.
© The Media Merchants Television Company Limited 2009.
Privacy Policy Terms and Conditions
HIT Entertainment Limited Registered in England No: 2341947 Registered Office: Maple House, 149 Tottenham Court Road, London W1T 7NF
United Kingdom.
file:///C|/Documents and Settings/Administrator/Desktop/Art Attack/comicstripcard.html (7 of 7) [5/28/2009 5:26:46 PM]
copyrig
ht:Aadi
thyar@
gmail.
com

Art Attack
Car design isn't a simple process... but you can make things much easier by drawing like a baby! You will need:
● Graph paper (ordinary paper works fine as well) ● Pencils, felt tips or crayons
This is an extremely simple car, drawn out as big rectangles and large circles for the wheels. But it's not going to stay this way!
You need to think curves and angles. So start by taking away the babyish rectangles. Curve everything so that it's much smoother.
Don't forget the wheelarches.
file:///C|/Documents and Settings/Administrator/Desktop/Art Attack/coolcars.html (1 of 4) [5/28/2009 5:27:32 PM]
copyrig
ht:Aadi
thyar@
gmail.
com

Art Attack
Finish off the underneath of the car and include bumpers at the front and back.
Don't forget the windows either!
Don't want to put too much detail in because it's just the main car shape that you're designing. But the wheels need to be a little more realistic.
Add in some lights on the front, side and rear.
file:///C|/Documents and Settings/Administrator/Desktop/Art Attack/coolcars.html (2 of 4) [5/28/2009 5:27:32 PM]
copyrig
ht:Aadi
thyar@
gmail.
com

Art Attack
And some shadow underneath!
Now colour it in, any way you like. This one is done with felt tips.
A couple of lightly drawn lines on the windows and the wheel trims will show the shine.
And there you have it. Just draw a couple of rectangles and some wheels on some graph paper - or you could draw the lines yourself on ordinary paper - and use it as a blueprint for your own, slick car design. Try it yourself!
© The Media Merchants Television Company Limited 2009.
file:///C|/Documents and Settings/Administrator/Desktop/Art Attack/coolcars.html (3 of 4) [5/28/2009 5:27:32 PM]
copyrig
ht:Aadi
thyar@
gmail.
com

Art Attack
You know the way a frame goes all the way around a picture? Well - here's one that doesn't - a corner frame. They look great, and they're so easy to make. You will need:
● cardboard box card ● poster or acrylic paint ● glue ● scissors ● pencil ● ruler ● black felt pen
Take a piece of A4 sized cardboard box card.
Line your ruler up against the left hand edge, and mark the point 20cm up.
file:///C|/Documents and Settings/Administrator/Desktop/Art Attack/cornerframe.html (1 of 5) [5/28/2009 5:28:12 PM]
copyrig
ht:Aadi
thyar@
gmail.
com

Art Attack
Repeat on the bottom edge, marking the point 20cm along.
Take the ruler away, and draw a line across from the top mark and a line up from the bottom mark. Make them about the same length, so that you end up with a sort of L shape.
Cut this out.
Now, take a bigger piece of cardboard box card, and draw around the L shape onto it in pencil, to create another L shape.
file:///C|/Documents and Settings/Administrator/Desktop/Art Attack/cornerframe.html (2 of 5) [5/28/2009 5:28:12 PM]
copyrig
ht:Aadi
thyar@
gmail.
com

Art Attack
The idea is to draw the front of your frame design using this L shape as a guide. Do not go below the bottom line, or your picture frame won't stand up! But you can go over the other lines in the picture. Once you've drawn your picture, you'll have something that looks like this.
Cut the whole thing out.
Turn your front design over, and put your L shape into position on the back by lining it up with the bottom edge, and draw around it.
To create a gap to slot your picture in, you need two long thinner strips of cardboard box card about 1cm wide that fit along this drawn L shape. Use some strong glue and stick them down.
file:///C|/Documents and Settings/Administrator/Desktop/Art Attack/cornerframe.html (3 of 5) [5/28/2009 5:28:12 PM]
copyrig
ht:Aadi
thyar@
gmail.
com
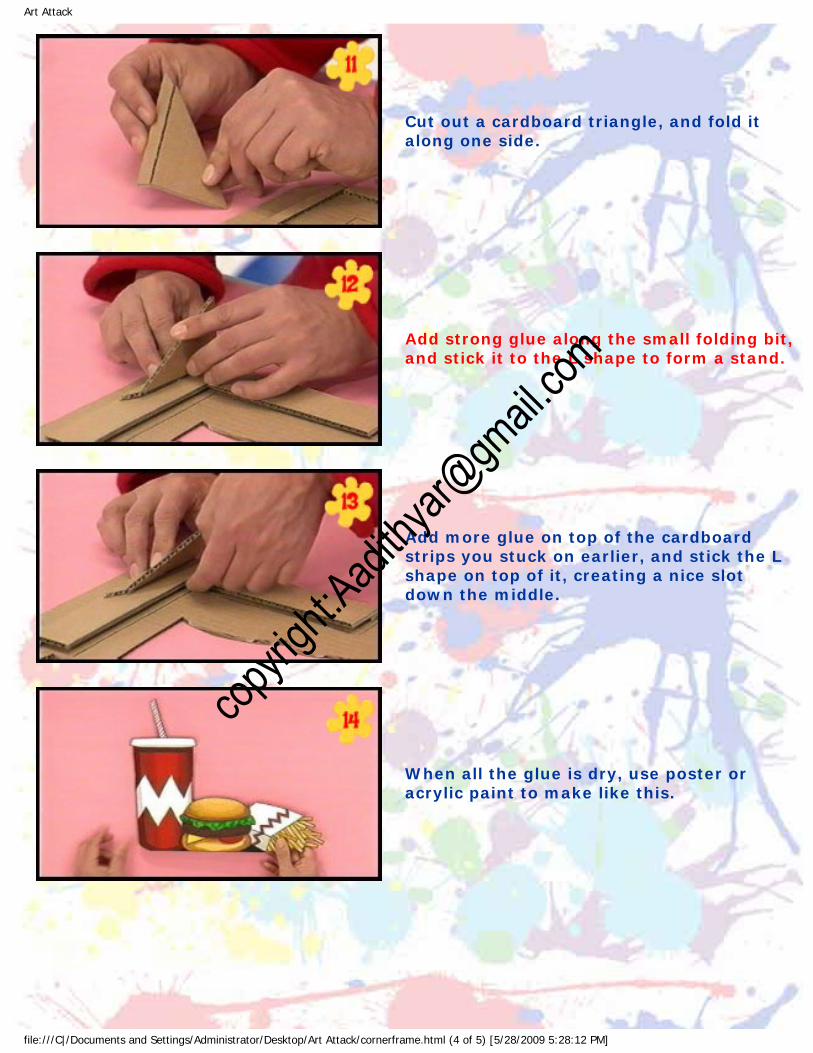
Art Attack
Cut out a cardboard triangle, and fold it along one side.
Add strong glue along the small folding bit, and stick it to the L shape to form a stand.
Add more glue on top of the cardboard strips you stuck on earlier, and stick the L shape on top of it, creating a nice slot down the middle.
When all the glue is dry, use poster or acrylic paint to make like this.
file:///C|/Documents and Settings/Administrator/Desktop/Art Attack/cornerframe.html (4 of 5) [5/28/2009 5:28:12 PM]
copyrig
ht:Aadi
thyar@
gmail.
com

Art Attack
Paint the back too, and use the back piece of cardboard as a frame stand.
Insert your picture into the frame to create a corner frame! Think about other designs like an exotic beach, or theme your frame to suit your picture. Try it yourself!
© The Media Merchants Television Company Limited 2009.
Privacy Policy Terms and Conditions
HIT Entertainment Limited Registered in England No: 2341947 Registered Office: Maple House, 149 Tottenham Court Road, London W1T 7NF
United Kingdom.
© The Media Merchants Television Company Limited 2009.
Privacy Policy Terms and Conditions
HIT Entertainment Limited Registered in England No: 2341947 Registered Office: Maple House, 149 Tottenham Court Road, London W1T 7NF
United Kingdom.
file:///C|/Documents and Settings/Administrator/Desktop/Art Attack/cornerframe.html (5 of 5) [5/28/2009 5:28:12 PM]
copyrig
ht:Aadi
thyar@
gmail.
com

Administrator
Revised