
ARROW GUIDE - Twin Coast Archerstwincoastarchers.com/downloads/Arrow_Guide.pdf · ARROW GUIDE...
32
www.TwinCoastArchers.com Archery Help ARROW GUIDE PROPER ARROWS ARE ESSENTIAL If you're one of the many bowhunters who select arrows each season by just grabbing a handful from the miscellaneous arrow bucket at the local store, you may be surprised to learn that you've been cheating yourself. Shooting the proper arrows will greatly improve your accuracy and success in the field - and for less money than you might think. If you want reliable and accurate performance from your compound bow, your arrow must be specifically matched to YOUR bow setup. There is no such thing as a "one size fits all" arrow. An improperly sized and/or poorly constructed arrow will not only fly erratically, profoundly degrading your accuracy, but it may present a safety hazard for you and your expensive compound bow. If you are serious about bowhunting, you owe it to yourself (and the game you pursue) to shoot the right ammunition. Modern archery is a technical sport. So there are a number of technical considerations to juggle when selecting arrows: proper spine, FOC balance, weight, straightness, fletching material, fletching angle, arrow length, etc. And if you're feeling a bit lost, don't worry. This isn't exactly rocket-science - this selection guide will provide you with all the information you'll need to choose the right arrows for your bow. These next sections will take you step-by-step through the process of selecting and ordering custom carbon arrows for YOUR bow system. We hope you find this help guide useful. PARTS OF AN ARROW Let start with the basics: The parts of a modern hunting arrow are pretty straight forward, but these parts will be referred to throughout this help guide. So before we really get going here, let's take a moment to bone-up on our arrow jargon. The foundation of every arrow is the SHAFT, a long hollow tube usually made of aluminium or carbon/graphite composite materials. The rear of the arrow is fitted with a small piece of moulded plastic called a NOCK, which allows the arrow to physically attach to the bow's string. At the front of the arrow is a small aluminium (sometimes plastic) sleeve called an insert. The insert gets glued into the end of the shaft and provides a threaded hole in which to screw in the arrow's TIP. A tip doesn't necessarily have to be a practice point (as pictured here). A standard insert allows you to screw-in and use of a variety of tips in the same arrow (broadheads, judo- points, blunt-tips, field points, fishing tips, etc.). The last component is the arrow's FLETCHING. The arrow's fletching is usually done with colourful parabolic shaped pieces of soft plastic (vanes) or feathers. In most cases, the three fletches are glued onto the shaft in an equally spaced circular pattern, with two fletches one colour (the hen-fletches) and the third fletch a different colour (the cock-fletch). - 1 - © Hunter’s Friend
Transcript of ARROW GUIDE - Twin Coast Archerstwincoastarchers.com/downloads/Arrow_Guide.pdf · ARROW GUIDE...

www.TwinCoastArchers.com Archery Help
ARROW GUIDE PROPER ARROWS ARE ESSENTIAL
If you're one of the many bowhunters who select arrows each season by just grabbing a handful from the miscellaneous arrow bucket at the local store, you may be surprised to learn that you've been cheating yourself. Shooting the proper arrows will greatly improve your accuracy and success in the field - and for less money than you might think. If you want reliable and accurate performance from your compound bow, your arrow must be specifically matched to YOUR bow setup. There is no such thing as a "one size fits all" arrow. An improperly sized and/or poorly constructed arrow will not only fly erratically, profoundly degrading your accuracy, but it may present a safety hazard for you and your expensive compound bow. If you are serious about bowhunting, you owe it to yourself (and the game you pursue) to shoot the right ammunition.
Modern archery is a technical sport. So there are a number of technical considerations to juggle when selecting arrows: proper spine, FOC balance, weight, straightness, fletching material, fletching angle, arrow length, etc. And if you're feeling a bit lost, don't worry. This isn't exactly rocket-science - this selection guide will provide you with all the information you'll need to choose the right arrows for your bow. These next sections will take you step-by-step through the process of selecting and ordering custom carbon arrows for YOUR bow system. We hope you find this help guide useful.
PARTS OF AN ARROW
Let start with the basics: The parts of a modern hunting arrow are pretty straight forward, but these parts will be referred to throughout this help guide. So before we really get going here, let's take a moment to bone-up on our arrow jargon.
The foundation of every arrow is the SHAFT, a long hollow tube usually made of aluminium or carbon/graphite composite materials. The rear of the arrow is fitted with a small piece of moulded plastic called a NOCK, which allows the arrow to physically attach to the bow's string. At the front of the arrow is a small aluminium (sometimes plastic) sleeve called an insert. The insert gets glued into the end of the shaft and provides a threaded hole in which to screw in the arrow's TIP. A tip doesn't necessarily have to be a practice point (as pictured here). A standard insert allows you to screw-in and use of a variety of tips in the same arrow (broadheads, judo-points, blunt-tips, field points, fishing tips, etc.). The last component is the arrow's FLETCHING. The arrow's fletching is usually done with colourful parabolic shaped pieces of soft plastic (vanes) or feathers. In most cases, the three fletches are glued onto the shaft in an equally spaced circular pattern, with two fletches one colour (the hen-fletches) and the third fletch a different colour (the cock-fletch).
- 1 - © Hunter’s Friend
www.TwinCoastArchers.com Archery Help
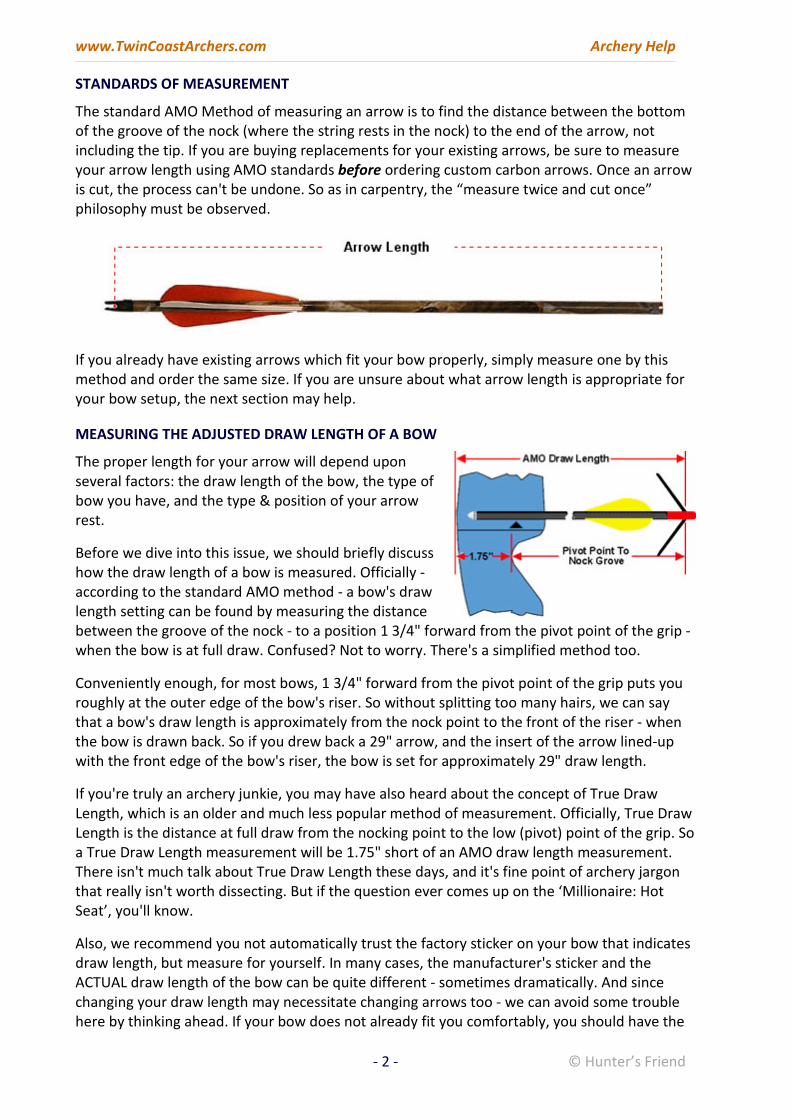
STANDARDS OF MEASUREMENT
The standard AMO Method of measuring an arrow is to find the distance between the bottom of the groove of the nock (where the string rests in the nock) to the end of the arrow, not including the tip. If you are buying replacements for your existing arrows, be sure to measure your arrow length using AMO standards before ordering custom carbon arrows. Once an arrow is cut, the process can't be undone. So as in carpentry, the “measure twice and cut once” philosophy must be observed.
If you already have existing arrows which fit your bow properly, simply measure one by this method and order the same size. If you are unsure about what arrow length is appropriate for your bow setup, the next section may help.
MEASURING THE ADJUSTED DRAW LENGTH OF A BOW
The proper length for your arrow will depend upon several factors: the draw length of the bow, the type of bow you have, and the type & position of your arrow rest.
Before we dive into this issue, we should briefly discuss how the draw length of a bow is measured. Officially - according to the standard AMO method - a bow's draw length setting can be found by measuring the distance between the groove of the nock - to a position 1 3/4" forward from the pivot point of the grip - when the bow is at full draw. Confused? Not to worry. There's a simplified method too.
Conveniently enough, for most bows, 1 3/4" forward from the pivot point of the grip puts you roughly at the outer edge of the bow's riser. So without splitting too many hairs, we can say that a bow's draw length is approximately from the nock point to the front of the riser - when the bow is drawn back. So if you drew back a 29" arrow, and the insert of the arrow lined-up with the front edge of the bow's riser, the bow is set for approximately 29" draw length.
If you're truly an archery junkie, you may have also heard about the concept of True Draw Length, which is an older and much less popular method of measurement. Officially, True Draw Length is the distance at full draw from the nocking point to the low (pivot) point of the grip. So a True Draw Length measurement will be 1.75" short of an AMO draw length measurement. There isn't much talk about True Draw Length these days, and it's fine point of archery jargon that really isn't worth dissecting. But if the question ever comes up on the ‘Millionaire: Hot Seat’, you'll know.
Also, we recommend you not automatically trust the factory sticker on your bow that indicates draw length, but measure for yourself. In many cases, the manufacturer's sticker and the ACTUAL draw length of the bow can be quite different - sometimes dramatically. And since changing your draw length may necessitate changing arrows too - we can avoid some trouble here by thinking ahead. If your bow does not already fit you comfortably, you should have the
- 2 - © Hunter’s Friend

www.TwinCoastArchers.com Archery Help
draw length adjusted before ordering your custom arrows. Arrows which may be perfect for a bow at 29" draw length, may be totally inappropriate for the same bow set at 27" draw length (much more on this topic later).
MEASURING THE DRAW LENGTH REQUIREMENT OF THE SHOOTER
Obviously, the draw length setting of the bow and the required draw length of the shooter should match. If they don't, we have some work to do first before thinking about what arrows to select.
Unlike a traditional recurve bow that can be drawn back to virtually any length, a compound bow will draw back only a specific distance before it "stops." Compound bows are designed to be shot from the full-draw position. If a compound bow is set for a 29" draw length, it should always be shot from the full 29" draw position. A bow that's set for 29" draw cannot drawn back to 30" or 31", without modifying the setup on the bow (or forcibly overdrawing the bow - a dangerous practice). Similarly, a compound bow should not be shot from a position less than full draw either. Where the bow stops, you stop. So if you're a 29" draw, then your bow should be a 29" draw. Easy enough!
To measure your draw length, determine the length of your arm-span in inches. Stand with your arms out and palms facing forward. Don't stretch when measuring. Just stand naturally. Have someone else help you, and measure from the tip of one middle finger to the other. Then simply divide that number by 2.5. The quotient is your approximate draw length (in inches) for your body size.
The majority of compound bow owners set their bows for too much draw length, which results in poor shooting form - inaccuracy - and painful string slap on the forearm. You will better enjoy - and be more successful with your compound bow when it is fitted properly to your body. And if in doubt, choose a little LESS draw length rather than a little more.
If you've heard that longer draw length bows shoot faster, you heard right. But don't even think of shooting an excessively long draw length just for the sake of generating more speed. That's a very poor trade-off which you will regret. Shooting your bow at an overly long draw length won't make you more macho. It will just make you miss the target. So don't do it. Shoot the correct draw length.
If you are a person of average proportions, your arm-span will be roughly equal to your height (in inches). So there is often a direct correlation between a person's height and their draw length as well. Once you have computed your draw length using the method above, you can double-check yourself by using the scale below - to see if your number is within the expected range.
- 3 - © Hunter’s Friend

www.TwinCoastArchers.com Archery Help
MORE DRAW LENGTH DISCUSSION
How close do you need to get? Within an inch? Half-inch? A quarter-inch? This issue could be debated, as there probably isn't a right and wrong answer to this question. For most shooters, a ±½" change in draw length is hardly noticed. To be realistic, half-inch sizes are probably precise enough (27½", 28", 28½, 29", 29½", etc.), particularly for the purposes of hunting and recreational archery. Besides, as your bow's string ages and stretches over time (as ALL strings do), your draw length will slightly increase - a little fraction at a time. So constantly maintaining a razor-specific 28 13/16" draw length may be a frustrating endeavour for you and the archery-shop.
If you're new to the sport, and unsure what draw length is appropriate for you, we strongly recommend you just play the averages and use the chart above. But admittedly, there is no perfect formula to solve this problem. Every shooter is different and the opinions on the methodology for measuring and checking draw length vary considerably throughout the industry: the yardstick against the breastbone, the fist against the wall, tip of the finger to the top of the shoulder, the arm-span method, etc. Without the benefit of an actual bow to draw back and actually check - each of these methods only provides us with an estimate.
You'll likely find that even the "pros" don't necessarily agree. If you go into several different archery shops to be measured for draw length, you're bound to get a variety of "expert" opinions. So before you get frustrated, remember that determining an individual's draw length isn't exactly a measurement of scientific certainty. So if you're just getting started in the sport, there's no need to get too carried away computing the square-root of your hypotenuse. Instead, we recommend you just play the averages and choose an initial draw length that's similar to others of your same size and stature (reference the chart above). There will always be time to "tweak" your draw length a little as you gain experience and learn to analyse your shooting form more closely. YOU will ultimately be the final judge on your own perfect personal draw length.
PROPER LENGTH OF AN ARROW
Safety first! Arrows that are too short for your bow setup are a serious hazard. Even an arrow that is just long enough is too short. The best safety practice is to make sure your arrows sit at least 1" forward of your arrow rest when the bow is at full draw.
A little bit of extra arrow length gives the arrows an important margin of safety. An arrow that is too short can lodge behind the arrow rest at full draw. If this happens and you don't notice it before you fire the bow, the arrow could buckle and snap upon release ... possibly sending shards of carbon into your bow hand or arm. This is called an obstructed path shot ... which is a very very bad thing.
- 4 - © Hunter’s Friend

www.TwinCoastArchers.com Archery Help
Unfortunately, some shooters (and shops) deliberately cut arrows too close to the arrow rest, usually to minimize arrow mass and get the fastest possible arrow speeds. But this practice regrettably comes at the expense of safety. The extra 1-2 fps you gain by cutting arrows "just long enough" isn't worth risking an arrow shaft stuck in the forearm. So never shoot arrows which are too short.
On the other hand, shooting an excessively long arrow isn't so smart either. If your arrow length is excessive, your arrow will have additional (and unnecessary) mass and the additional length will increase the arrow's spine requirements (more on this later). Basically, extra-long arrows significantly decrease your arrow speeds and limit the performance of your bow.
So choosing a safe yet optimally performing arrow length is very important. If you have a modern centre-shot cutaway riser bow which is already setup, finding your optimal arrow length is easy. Simply draw an arrow back to full draw and hold, while another person (safely standing to the side of course) takes a Sharpie marker and makes a mark on the arrow approximately 1" forward of the arrow rest. Then measure the arrow from the groove of the nock (like previously explained) to the mark on the arrow, and you've got it. Unfortunately, this doesn't apply to everyone ... especially those with older bows or traditional bows. So let's look at this in more detail.
ARROW LENGTH MISCONCEPTIONS
Some archers believe proper arrow length should be equal to bow's draw length. This is a dangerously incorrect rule-of-thumb. In some cases, proper arrow length may equal the bow's draw length. But modern compound bows tend to require less arrow length, while older compound bows and traditional bows require more. So DO NOT assume your draw length and proper arrow length numbers directly correspond. In most cases they will not.
BOW TYPE & RISER STYLE CONSIDERATIONS
There are several factors to consider here. So we'll start with the big one - riser type (the riser is the "handle" portion of the bow). Some years ago, as traditional magnesium moulded risers gave way to the production of CNC machined aluminium, we were blessed by the welcome innovation of the centre-shot cutaway riser (Figure A).
The centre-shot cutaway riser has a much wider arrow shelf, and the centre section of the riser is shifted well to the side. This allows the true centre-shot of the bow (where your arrow rest should line up left and right) to be spaced far enough away from the riser's edge as to allow feathers and vanes to easily pass by the inside edge without any contact with the bow. A brilliant idea! Almost all new compound bows are now of this style.
A basic moulded riser (Figure B) does not have this feature. If you have an 80's or early 90's vintage bow, you almost certainly have this type of riser. In a non-cutaway bow, the actual centre-shot of the bow is very close to (if not right against) the edge of the riser. This type of riser typically uses a flipper/plunger style rest mounted right against the side of the bow, where a cutaway riser generally cannot.
- 5 - © Hunter’s Friend

www.TwinCoastArchers.com Archery Help
It is important to identify what type of bow you have. If you have a modern cutaway bow (Fig A), your proper arrow length is often less than the bow's AMO draw length. If you have an older non-cutaway bow (Fig B), your proper arrow length will be more than the bow's AMO draw length.
CLEARANCE FOR BROADHEADS
With a traditional moulded riser bow, arrows must be AT LEAST as long as the bow's draw length if you ever intend to use broadheads or other tips larger than the diameter of the arrow. Since the arrow rides along close to the riser, there isn't enough room to draw back a broadhead over the arrow shelf such that one of the blades doesn't snag on the edge of the riser as you're coming to full draw. So if you have an older bow without the benefit of a centre-shot cutaway riser, choosing your arrow length is easy. In this case, we recommend you order arrows 1/2-1" longer than the bow's actual adjusted draw length. And regardless of what kind of riser you have, if you intend to shoot specialty small game hunting tips (Judo Points, Snaro's, Condor Tips, Turkey Guillotine Heads, etc.) which are unusually wide, you will definitely need arrows that are slightly longer than the bow's draw length. Even a centre-shot cutaway bow doesn't have sufficient clearance to draw that type of tip beyond the outer edge of the riser.
Now, if you shoot a modern bow with a centre-shot cutaway riser, the choice isn't so simple. Since a centre-shot cutaway riser allows clearance for common broadheads to be drawn back beyond the outer edge of the riser, you can shoot a considerably shorter arrow. The shorter an arrow is, the lighter it will be and the faster it will fly. We'll discuss the issue of arrow weight vs. speed in much more detail a bit later in this guide. But ultimately, the position of your arrow rest determines the minimum arrow length for a modern centre-shot cutaway bow. In most cases, trimming your arrows 1-1.5" beyond your arrow rest will make for an ideal arrow length on your modern cutaway bow.
ARROW REST TYPE & POSITION ON CUTAWAY BOWS
Some arrow rests mount more rearward than others, permitting the use of shorter arrows. There's even a device known as an overdraw, that's specifically designed to relocate and reposition the arrow rest rearward - just so a shorter arrow can be used. However, with the increasing popularity of lightweight carbon arrow shafts, overdraws aren't really necessary any more, and are rarely used on modern hunting rigs. But some type of modern arrow rests still function much like an overdraw - locating the rest position closer to the shooter.
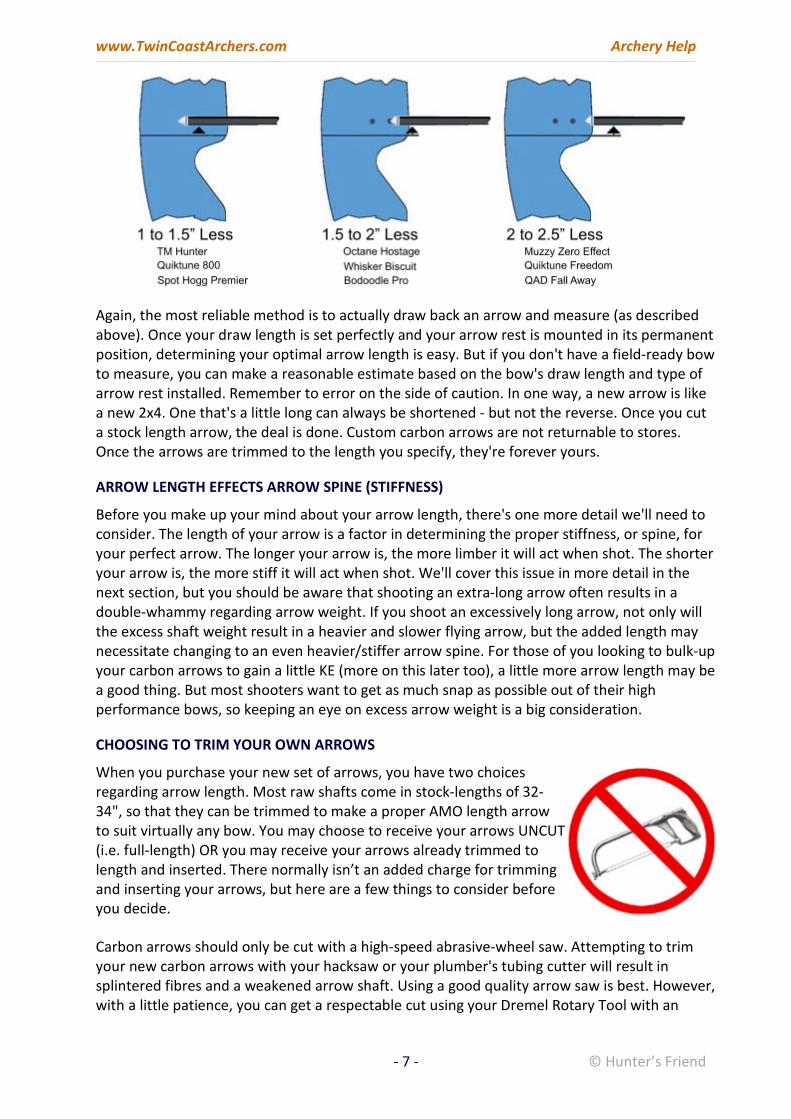
The diagram below illustrates how the position of the rest changes the bow's necessary arrow length. With a standard TM Hunter prong style rest, the proper arrow length is usually 1-1.5" less than the bow's draw length. With a Whisker Biscuit or similar rest which mounts just behind the riser, proper arrow length is usually 1.5-2" less than the draw length. And with a Muzzy Zero Effect or other far-rearward mounted rest, proper arrow length can be as much as 2-2.5" less than the bow's draw length. However, it should be noted that most arrow rests can be mounted and adjusted in different positions. So, consider this as an estimation only.
- 6 - © Hunter’s Friend
www.TwinCoastArchers.com Archery Help
Again, the most reliable method is to actually draw back an arrow and measure (as described above). Once your draw length is set perfectly and your arrow rest is mounted in its permanent position, determining your optimal arrow length is easy. But if you don't have a field-ready bow to measure, you can make a reasonable estimate based on the bow's draw length and type of arrow rest installed. Remember to error on the side of caution. In one way, a new arrow is like a new 2x4. One that's a little long can always be shortened - but not the reverse. Once you cut a stock length arrow, the deal is done. Custom carbon arrows are not returnable to stores. Once the arrows are trimmed to the length you specify, they're forever yours.
ARROW LENGTH EFFECTS ARROW SPINE (STIFFNESS)
Before you make up your mind about your arrow length, there's one more detail we'll need to consider. The length of your arrow is a factor in determining the proper stiffness, or spine, for your perfect arrow. The longer your arrow is, the more limber it will act when shot. The shorter your arrow is, the more stiff it will act when shot. We'll cover this issue in more detail in the next section, but you should be aware that shooting an extra-long arrow often results in a double-whammy regarding arrow weight. If you shoot an excessively long arrow, not only will the excess shaft weight result in a heavier and slower flying arrow, but the added length may necessitate changing to an even heavier/stiffer arrow spine. For those of you looking to bulk-up your carbon arrows to gain a little KE (more on this later too), a little more arrow length may be a good thing. But most shooters want to get as much snap as possible out of their high performance bows, so keeping an eye on excess arrow weight is a big consideration.
CHOOSING TO TRIM YOUR OWN ARROWS
When you purchase your new set of arrows, you have two choices regarding arrow length. Most raw shafts come in stock-lengths of 32-34", so that they can be trimmed to make a proper AMO length arrow to suit virtually any bow. You may choose to receive your arrows UNCUT (i.e. full-length) OR you may receive your arrows already trimmed to length and inserted. There normally isn’t an added charge for trimming and inserting your arrows, but here are a few things to consider before you decide.
Carbon arrows should only be cut with a high-speed abrasive-wheel saw. Attempting to trim your new carbon arrows with your hacksaw or your plumber's tubing cutter will result in splintered fibres and a weakened arrow shaft. Using a good quality arrow saw is best. However, with a little patience, you can get a respectable cut using your Dremel Rotary Tool with an
- 7 - © Hunter’s Friend

www.TwinCoastArchers.com Archery Help
abrasive cutting wheel attachment. So if you're the "handy" type, you may wish to order arrows full-length and trim your own.
If you would rather avoid the handyman hassle and you're already sure of your arrow length, most shops will be happy to professionally trim and insert your new arrows free of charge. In this case, once your arrows arrive, you'll be ready to shoot as soon as you open the box. However, before you select this option, you should double-check your measurements for accuracy. Again, it's always safer to measure twice and cut once, as once your arrows are trimmed to the length you specify, they cannot be returned for an exchange or refund.
ARROW STRAIGHTNESS AND THE ± 0.0$ FACTOR
Most carbon arrows are advertised to have a specific straightness tolerance between .001" and .006". The straighter the arrow, the more expensive they will typically be. Before we get too deep into this topic, it's worth noting that there doesn't seem to be an accepted universal method for HOW arrow straightness is measured. Per ATA/ASTM standards, arrow straightness should be measured along the full length of the shaft minus two inches. But as we understand it, this is NOT how things actually go inside the industry. On a number of occasions, we have heard arrow companies accuse each other of cheating their straightness measurements - either by measuring only short sections of their arrows, or by obtaining their straightness numbers via undisclosed measurement methodologies. If you think the bow business is cut-throat, you should witness how the arrow companies go at it behind closed doors. To avoid being shanked at the next trade show, we'll stay neutral, and assume that everyone’s' arrow straightness numbers are reasonably honest and comparable.
With that said, let's examine the typical straightness "classes" of arrows. Most standard-grade carbon arrows have an advertised straightness of .005-.006". These shafts are usually marketed exclusively to the hunter and beginning archers. For the purposes of big game hunting and general target use, standard-grade shafts are more than adequate. A typical human hair is about .004"-.006" in diameter. So even a basic carbon shaft of .006" straightness is quite good, and straighter than you could possibly perceive without specialized equipment.
But... making and selling arrows is a very competitive business. So most arrow shaft manufacturers also offer a mid-grade shafts which will have an advertised straightness of around .003-.004", and "pro" grade shafts claiming a straightness of .001-.002". And as you might expect, these premium grade arrows fetch a premium price. If you're the kind of buyer who always goes for the good stuff, then by all means, buy the straightest shaft you can find. But before you shell out the green for a ±.001 shaft, there are couple things you should know.
First, the difference in a ±.006" shaft and a ±.001" shaft is more razor-thin than you might think. Carbon arrow shafts are constructed by taking very thin layers of carbon sheets and rolling them up into perfectly straight tubes (usually 6ft. long or so), much like you might roll-up a big map. Once wound, the carbon tubes are then heat-treated to bond all the layers together. When the heating process is complete and the carbon tubes cool down to room temperature, they are cut into sections (raw shafts). Some of the shafts, particularly those that come from the centre of the roll, retain their ±.001" straightness while other sections distort slightly from the heating/cooling process.
As we understand it, the results vary from run to run and day to day. In most cases, even the manufacturer doesn't know how the day's crop of shafts will come out. But once the shafts are
- 8 - © Hunter’s Friend

www.TwinCoastArchers.com Archery Help
made, the manufacturer measures the straightness of each shaft and sorts them accordingly for banding and sale. One sort may be named and marketed as one arrow, another sort as something else. For example, the Beman Bowhunter ±.006" @ US$64.95 p/dz and the Beman ICS Hunter ±.003" @ US$89.95 are just two different sorts of the same shaft - same raw materials - same construction technique. Same is true for the popular Gold Tip Expedition ±.006", Gold Tip XT ±.003", and the Gold Tip Pro ±.001". They're literally cut from the same cloth.
Small variations in the daily manufacturing environment (humidity, pressure, air convection patterns, etc.) along with tiny deviations in the characteristics of the raw materials ultimately determine the straightness of the finished product. On one particular day, the manufacturer might yield an entire batch of ±.001" shafts, or an entire batch no better than ±.006", or even a mixed bag of straightnesses, all from the very same processes and materials. The finer tricks of the trade are carefully guarded secrets, as the art of consistently building straighter arrow shafts is literally a technical exercise in splitting hairs. But make no mistake, arrow manufacturers would rather avoid the ±.006" days. The more ±.001" days a manufacturer has, the more money they can make. Why? Because straighter shafts, whether they cost more to manufacture or not, are worth more in the marketplace. So don't be fooled into thinking that your set of $129 ±.001" pro-grade shafts are somehow fundamentally better constructed, stronger, or made from finer materials than a basic $69 a dozen ±.006" hunting shaft. In most cases, they're just a few thousandths of an inch from being the exact same product.
STRAIGHTER ARROWS SHOOT STRAIGHTER, RIGHT?
From a pure physics standpoint, yes! Arrow straightness certainly does matter. Straighter arrows undeniably fly more accurately. In long-range laboratory conditions with a mechanical shooting machine, the straightest arrows with the best spine consistencies will always group best. But try to keep this issue in reasonable perspective. You are not a mechanical shooting machine. You don't shoot in laboratory conditions, and you probably don't shoot at extreme distances (100+ yards). The straightness difference in a ±.006" arrow and a ±.001" arrow is literally the width of a single human hair. So realistically, the ±.001" arrow probably has more to do with selling arrows than shooting arrows. The truth is, only a handful of the world's archers actually have enough shooting skill to differentiate between a very good ±.003" arrow and a "pro grade" ±.001" arrow. And within the typical bowhunting range, any difference would be practically imperceptible.
Nonetheless, bowhunters tend to attribute their successes or failures to their equipment rather than to their actual skills. So owning and shooting a set of professional grade ±.001" arrows may provide some bowhunters with an edge in confidence, even if the actual technical advantage is negligible. If you're one of the many archers who believe that success is only one more purchase away, buy whatever arrows you like. Just remember that super-straight arrows won't correct poor shooting form. In the end, the benefits of a good practice regimen and proper bow tuning will FAR outweigh the benefits of shooting expensive arrow shafts.
- 9 - © Hunter’s Friend

www.TwinCoastArchers.com Archery Help
ARE CARBON ARROWS STRAIGHTER THAN ALUMINIUM?
Yes and no. While a carbon arrow's advertised specs may be no straighter than a typical aluminium shaft, carbon arrows resist distorting and "bending out of shape" much better than aluminium arrows. Though an aluminium shaft may BEGIN with a similar ±.003" straightness, its straightness quickly deteriorates through normal use and handling. So after a few months of use, your aluminium arrow set may contain a few arrows that are at original specs and some that are grossly out of straightness. Carbon arrows generally do not retain this kind of "memory" after being stressed (bent). So your carbon arrow set stays much more straight and uniform - even with heavy use. Some archers even joke that there are only two states of a carbon arrow: straight or broken, but never bent. While that's not entirely accurate, it does help to illustrate the point.
ARROW WEIGHT: GRAINS NOT GRAMS
The actual weight of your finished arrow is also very important. Arrows which are too heavy will fly too slowly and with too much loss of trajectory. Lighter arrows fly more quickly, but arrows which are too light can damage your equipment. So you'll need to know a thing or two about arrow mass and industry safety standards. How heavy should your arrows be? Well, let's start at the top.
First thing ... the weight of an arrow (as well as projectiles in most shooting sports) is customarily measured in GRAINS. Grains (gr) and grams (g) are totally different units of measure. So don't confuse them. The grain is a British system unit - based on the weight of a grain of barley. A gram is an entirely different unit of measurement. So let's just try to just forget about grams for now.
A grain is very small unit (only 1/7000th of a pound), so if you would like to have the ability to accurately weigh your own arrows, you'll need a specialized scale. You can purchase an archer's scale that's specifically calibrated in grains for under $50. However, when you order custom arrows from a professional archery shop, your arrow set will arrive already weighed and certified by one of their professional arrow builders.
ARE LIGHTER ARROWS BETTER?
This is a hotly debated topic that we'll cover in more detail further down this guide. But the fact is, lighter arrows fly faster with less loss of trajectory. A faster arrow won't necessarily penetrate better, but it will make it to the target more quickly. For some bowhunters and 3D shooters, this is a great benefit. A bow that shoots very fast is often described as "shooting flat." The "flat" part is a reference to the natural rainbow-shaped parabolic flight-path that all arrows invariably take. A faster arrow travels with less perceptible arc, so it is described as shooting "flat," although "flatter" might be the more accurate word. Either way, a fast flat-shooting arrow is something many shooters seek in a bowhunting or 3D rig.
In the current archery market, speed sells. Right or wrong, it's a fact. Like in many industries, archery manufacturers are under constant pressure to make things go faster. As a result, each year brings a new bumper-crop of even lighter arrow shafts, better string materials, more efficient bow designs, friction-reducing components, etc. Again, there is some disagreement on this issue, and we'll hammer out the pro's and con's a bit later, but the main idea is, lighter
- 10 - © Hunter’s Friend

www.TwinCoastArchers.com Archery Help
arrows go faster - sometimes dramatically faster. Heavy arrows go slower. So if you want your bow to shoot "flat," lightweight arrows are going to be a must.
IS THERE A LIMIT? HOW LIGHT IS TOO LIGHT?
Shooting an arrow that is too light can be dangerous, both to you and your expensive bow. Shooting an underweight arrow has a similar effect as dry-firing your bow. Without sufficient arrow weight, the string and limbs of your bow move too quickly and violently. It's like putting your car in neutral and flooring the gas pedal. The bow needs the resistance of the arrow to slow it down - so it doesn't "rev" out of control.
Of course, an underweight arrow will fly like a rocket - generating unbelievable speeds. But anyone who does this is just asking for trouble. Modern compound bows aren't toys. They generate a tremendous amount of energy and should be treated with the same respect you would give any dangerous weapon. The vast majority of serious bow failures are not caused by manufacturer defects, but rather by dry-firing the bow or shooting dramatically underweight arrows. For your personal safety, and the longevity of your bow, we strongly recommend you follow the IBO or AMO Standard regarding minimum arrow weight.
The International Bowhunting Organization (IBO) sets a 5 grains per pound standard that's pretty simple to follow. Arrow weight should never be less than 5X the bow's draw weight. So a 60# bow should shoot no lighter than a 300 (5 x 60) grain arrow. Simple enough! Another authority in the archery industry, the Archery Trade Association (formerly the AMO), also publishes an arrow weight recommendation chart called the AMO Minimum Arrow Weight Chart. The AMO chart is a bit more complex and takes more variables into account (brace height, bow efficiency, cam design, draw length, etc.), but it is less widely used. Some manufacturers ask you follow one standard, some the other. And depending upon your particular bow setup, the IBO and AMO recommendations may or may not be the same. Check the literature that came with your bow to find which standard you should follow.
However, since the IBO Standard applies at most 3D courses, many competitive shooters setup their arrows to weigh exactly 5 grains per pound. This keeps them just within the rules while providing the fastest possible arrow speeds. However, bowhunters usually choose arrow weights between 5 and 9 grains per pound.
- 11 - © Hunter’s Friend

www.TwinCoastArchers.com Archery Help
ARROW WEIGHT: FISH & GAME LAWS
When carbon arrows were first introduced in the archery market, their critics (mainly competing manufacturers who didn't make carbon arrows at the time) launched anti-carbon arrow advertising campaigns to dissuade archers from giving up their heavy aluminium arrows for lightweight carbon shafts. These ad campaigns claimed carbon arrows were dangerous, they would splinter and break, they were inaccurate, wouldn't penetrate well, they would ruin your meat, they could cut your hands during field dressing, etc. Of course, as we soon learned, all that corporate blathering was a distortion of the truth - and today carbon arrows continue to command an increasingly dominant share of the hunting arrow market.
The carbon arrow concept has prevailed, but there have been casualties in the Aluminium vs. Carbon War. Several American states still have hunting laws that reflect the early misconceptions about using lightweight carbon arrows for big game hunting. For examples: Washington State bowhunters must shoot arrows that weigh at least 6 grains per pound (rather than the 5 gr/lb recommended by the IBO), Alabama bowhunters must shoot at least 100 grain tips in their arrows, and Connecticut bowhunters must use arrows that weigh at least 400 grains regardless of their bow's draw weight. And while these antiquated restrictions may not exactly warrant an uprising, they are a part of each state's effort to ensure ethical bowhunting practices.
ARROW WEIGHT: MANUFACTURERS WARRANTIES
Virtually all manufacturers rate and advertise their bows' IBO SPEEDS using test arrows that weigh exactly 5 gr/lb (IBO standard). And if you want to make your bow shoot even close to its advertised IBO speed, you have to setup the bow to shoot at or near 5 gr/lb. So it would be logical to conclude that every bow manufacturer accepts 5 gr/lb as the minimum safe arrow weight. But this isn't necessarily the case.
Look at the photo on the left. How could this 70# bow ever shoot close to its 300 fps IBO speed if the manufacturer clearly marks the bow to require a minimum 420 grain arrow? This kind of manufacturer recommendation is kind of a marketing paradox. What they're saying is, "This bow can shoot 300 fps with a 350
grain arrow ... but YOU aren't allowed to make it shoot that fast." As ridiculous as that sounds, several manufacturers pull this little fast one.
To save a few dollars in warranty repairs and to pad their liabilities should a catastrophic failure occur, a few manufacturers will sneak in a 6+ gr/lb minimum recommendation on their limb sticker or in their manual. And some people follow it; others ignore it. But with all that said, if your bow has such a notation for heavier arrows, we suggest you contact the manufacturer to question the warranty implications before shooting arrows lighter than the official minimum. In all other cases (modern compound) a 5 gr/lb minimum is probably safe to assume.
- 12 - © Hunter’s Friend

www.TwinCoastArchers.com Archery Help
ARROW SPINE - THE 'BACKBONE' OF THE ARROW
If you've ever gone fishing, you probably already understand this concept. A fishing pole shouldn't be too limber or too stiff. You wouldn't take your heavyweight fishing-rod when you go Perch or Trout fishing? It's simply too stiff for the job and would perform poorly. A stiff rod doesn't cast light baits very well, and dragging in small pan fish on a heavyweight rod would be no fun anyway. On the other hand, you wouldn't dare take your ultra-lite fishing-rod for an afternoon of Blue Marlin fishing. The ultra-lite rod wouldn't be stiff enough to fight such large fish, and it might even break if you hooked a good one. For arrow selection, the concept is essentially the same - the arrow must have the appropriate strength and stiffness for the task - not too stiff - not too limber.
Before we go on, please note that the official term is "spine" - as in backbone. Not "spline" - as in gears and sprockets. Arrow spine refers to the arrow's degree of stiffness - how much the arrow resists being bent. Some arrows are very stiff, others are very limber. And if you ever intend to achieve serious accuracy with your bow, you'll need to choose an arrow that's just stiff enough - but not too stiff for your particular bow setup.
Most people think an arrow flies just like it looks when at rest - perfectly straight. But nothing could be further from the truth. Once fired from a bow, an arrow immediately begins flexing and oscillating. That's not a defect. Each arrow bends and flexes in a particular cycle as it leaves the bow (archer's paradox). If the timing of the cycle is correct, the tail of the arrow clears the bow without making contact with the arrow rest, riser, or cables. If the timing of the cycle is not correct due to improper arrow spine, the over- or under-oscillation of the arrow results in serious fletching contact and/or paper-tune tears which cannot be corrected. So we have to get this one right.
DETERMINING FACTORS WHICH EFFECT ARROW SPINE
There are three main ingredients which determine an arrow shaft's general spine characteristics:
(1). the stiffness of the actual shaft material (2). the length of the shaft (3). the tip weight that will be used
But it's not quite as simple as 1-2-3. How stiff an arrow is when it's sitting still on the workbench, and when it's busy accelerating from 0-180 mph as it's fired from the bow, are totally different issues. When the arrow is at rest, we refer to its stiffness characteristics as static spine. But when that same arrow is in motion, its stiffness is a matter of dynamic spine - which adds more ingredients into our consideration pot. So pay attention. This gets a little tricky.
- 13 - © Hunter’s Friend

www.TwinCoastArchers.com Archery Help
STATIC ARROW SPINE
If you support an arrow shaft at two points a given distance apart, then hang a weight in the middle of the arrow - the weight will cause the arrow shaft to sag. How much the shaft resists this type of bending would be a function of the arrow's static spine. The actual static spine of the arrow shaft is determined by the elasticity of the materials in the shaft and the geometry of the shaft. In multi-layered arrows (carbon/aluminium, etc.) the bonding materials also contribute to the static spine. The inside diameter, the cross-section shape, and the thickness of the material all contribute to the static spine of the shaft material. However, arrows don't perform under static conditions - like a floor joist or a curtain-rod. Arrows perform under dynamic conditions, with motion. A hanging weight doesn't really represent how forces are applied to arrows when they're actually shot, so static spine is really used as only a benchmark for predicting dynamic spine.
DYNAMIC ARROW SPINE
Unless your arrow shaft breaks or is altered, its static spine remains the same throughout its life. But your arrow's dynamic spine can change dramatically depending on how it's used. The real mean-n-potatoes of arrow performance rely on the arrow's dynamic spine. The dynamic spine is how the arrow actually bends when shot - and there are many factors which affect the dynamic spine. The static spine of the shaft is only part of the equation.
As you fire the arrow, the explosive force of the bow compresses the shaft and it momentarily bends under the strain. The more powerful the bow, the more the arrow bends. So the dynamic spine of two identical arrows, shot from two different bows of varying output, could be drastically different. If your arrow has the proper amount of dynamic spine when shot from your modern 70# hard-cam bow - its stiffness is just right - not too limber - not too stiff. But, if you take that same arrow and shoot it out of a 40# bow, it will be dramatically too stiff. The arrow will have too much dynamic spine. Likewise, if you shoot one if the 40# bow’s arrows in your 70# bow, it's likely the arrows will be dramatically too limber - not enough dynamic spine. Determining a proper dynamic spine is a bit more complex and requires examination of several contributing factors.
SHAFT LENGTH AFFECTS DYNAMIC ARROW SPINE
When an arrow is fired it bends because it is effectively being compressed. The arrow is momentarily trapped between the forward motion of the string and the static load of the arrow's tip. And the longer the shaft is, the more easily this compressive force can bend it. Imagine a brand new pencil. If you put each end of the pencil between your palms and began compressing the pencil
- 14 - © Hunter’s Friend

www.TwinCoastArchers.com Archery Help
by squeezing your palms together, this would be similar to the forces that cause an arrow to bend when shot.
If you had two pencils, one standard length and one that was 2 ft. long, you would get very different results when you tried the compress them. A short pencil is surprisingly stiff and resists bending this way. But the long pencil would bend easily under the compressive load between your palms.
So although the shaft material (wood & pencil lead) would be the same for each of your tests, the shorter pencil would exhibit more spine stiffness - it would act stiffer. The longer pencil would exhibit less spine stiffness - it would act more limber. This is similar to how arrow length affects dynamic arrow spine. The shorter an arrow shaft, the more dynamic spine stiffness it will exhibit under acceleration. The longer the arrow shaft, the less dynamic spine stiffness it exhibits under acceleration.
So if you change your arrow length, you must consider how that affects your arrow spine requirements.
TIP WEIGHT AFFECTS DYNAMIC ARROW SPINE
Every arrow should have a tip. The tip is the business end of the arrow. It could be a simple steel practice point, a razor sharp hunting broadhead, a small-game judo tip, or a number of other tips designed for a variety of purposes. Each of these arrow tips is also designed to a specific grain weight. The most popular weights are 75gr, 85gr, 90gr, 100gr, and 125gr. However, some specialty tips can be much lighter or heavier.
OK. Now remember how a bow compresses the arrow shaft? It's not hard to figure out what's pushing in one direction - the forward movement of the bow's string. That's an easy one. But what force pushes back the other direction? You can't get that kind of compression if you don't have two opposing forces - one pushing on each end of the shaft, right?
So what pushes on the other end? Oddly enough, it's the arrow's TIP. Of course, the tip doesn't actively do anything. It's just a weight - hanging out at the end of the shaft. But surely you must remember learning about Newton's Laws of Motion. Remember the one that says "an object at rest tends to stay at rest unless acted upon by a force?" Well think of it this way. The arrow's tip is the "object at rest," and the forward movement of the string is the "force." The stationary mass on the end of the arrow resists the forward motion of the string, and since the heavy tip of the arrow is where most of the arrow's mass is concentrated, that's the area of the arrow that resists the most. So the forward motion of the string and the resistance of the tip at rest create the opposing forces.
So, the greater the tip weight, the greater the compression (and flexing) of the arrow shaft when it's shot. The lighter the tip, the lesser the compression (and flexing) of the arrow shaft when it's shot. So a heavy tip DECREASES an arrow's dynamic spine (makes it act more limber). A lighter tip INCREASES an arrow's dynamic spine (makes it act more stiff).
- 15 - © Hunter’s Friend

www.TwinCoastArchers.com Archery Help
This idea is a bit more abstract, so consider a final dramatic example to illustrate the concept. Imagine if you screwed a bowling ball on the end of an arrow and tried to shoot it. Upon firing the bow, the arrow shaft would compress between the forward motion of the string and the bowling ball. The arrow would bend dramatically as the bowling ball started to grudgingly inch forward. This would be an extreme example of how a heavy tip would reduce the arrow's dynamic spine. So remember, lighter tips make an arrow act more stiff. Heavier tips make an arrow act more limber.
MACHO-MAN CHECKPOINT
A bit further in this guide, we'll discuss the topic of tip weight selection and explore its effects on arrow mass, front-of-centre balance, loss of shot trajectory, and kinetic energy in greater detail. But for now, it's worth noting that some archers are hopelessly stricken by the Macho-Man Syndrome when it comes to choosing arrows and arrow tips. Some guys simply cannot dispense with the macho idea that bigger is better. We assure you, bigger is not necessarily better - at least not when it comes to selecting arrows and arrow components.
Choosing an excessively stiff arrow shaft and/or an excessively heavy arrow tip will likely yield no benefit whatsoever to most bowhunters. In fact, MMS sufferers are often at a technical disadvantage to other bowhunters with proper setups. With today's hot new compound bows often pumping out 60, 70, even 80+ ft-lbs of kinetic energy, much of the "old school" thinking about hefty arrow mass and heavy tip weights is no longer applicable. If you absolutely must supersize some part of your bowhunting gear, get an extra big bow case. But get arrows that actually fit your bow.
BOW OUTPUT AFFECTS DYNAMIC ARROW SPINE
The physical features of the arrow (the shaft's static spine, the shaft length, and the arrow's tip weight) all play a part in giving the arrow its spine characteristics. But as we mentioned earlier, the arrows final dynamic spine (how much it will actually flex when shot) will also depend greatly on the output of the bow. Your draw weight, draw length, cam-type, let-off percentage, and bow efficiency all contribute to the actual output of the bow. And bows with more powerful outputs will require stiffer arrows to achieve the proper dynamic spine when shot. Bows with less powerful output will require more limber shafts.
Fortunately, the engineers have already crunched the numbers for us on their spine selection charts. But before we go to the charts, you should understand which attributes affect the output of a bow and the spine requirements of the arrow. Most arrow manufacturers publish charts which take some, or all, of these bow output factors into account when recommending a particular arrow spine size.
- 16 - © Hunter’s Friend

www.TwinCoastArchers.com Archery Help
BASIC SPINE APPLICATION CHARTS
Some arrow manufacturers have very complex charts that take many variables into account. But other arrow manufacturers offer a more simplified chart with an arbitrary number system, like the sample chart on the right which just references draw weight and arrow length. If you go by the simple chart method, then you'll need to apply a little common sense if your particular bow setup isn't exactly "average." For example, if you shoot a typical 310 fps compound bow, with normal 100 gr tips, and 75% let-off, all you'll need to do is follow the chart. If your bow is set for 60# and you use 29" arrows, you just follow the dots on the chart and choose the 2000 spine size. Easy!
But what if you shoot a very aggressive speed-bow with an IBO speed over 340 fps ... say a PSE X-Force or a Bowtech Destroyer 350? In that case, your bow will have more output than an average 60# bow, so you would need to accommodate by choosing a little stiffer spine like the 3000 shaft.
If you would rather not use the simplified method, then we suggest you get to know the concept of actual spine deflection.
SPINE DEFLECTION MEASUREMENT
Sometimes an arrow's spine stiffness is expressed as a more technical measurement, called a spine deflection. According to the modern standards (ASTM F2031-05) an arrow's official spine deflection is measured by hanging a 1.94 lb. weight in the centre of a 28" suspended section of the arrow shaft. The actual distance the 1.94 lb. weight causes the shaft to sag down is the arrow's actual spine deflection. For example, if a 1.94 lb. weight causes the centre of a 28" arrow to sag down 1/2 inch (.500"). Then the arrow's spine deflection would be .500". Stiffer arrows will, of course, sag less. More limber arrows will sag more. So the stiffer the arrow is, the LOWER its spine deflection measurement will be. The more limber an arrow is, the HIGHER its spine deflection measurement will be.
SPINE CONSISTENCY
Remember how we mentioned the cut-throat squabble about arrow straightness? Well, the same is true for spine consistency. If you test for spine deflection while slowly rotating the arrow, the spine deflection should remain constant. No matter which direction you bend the shaft, it should be equally resistant at all points, right? Nope! The wound layers of a carbon arrow will often have a seam somewhere inside the circle. This creates an imbalance in the spine consistency of the arrow, such that the arrow is a bit stiffer at one point around the circle. It's unfortunate, but the process by which carbon arrows are manufactured inevitably results in some imperfections. And if you want to get really technical, most arrow shafts aren't even perfectly round for that matter.
But the important question is, does it really make a difference? From a pure physics standpoint, yes. But again, few shooters have enough skill to notice. Small amounts of spine variance are
- 17 - © Hunter’s Friend
www.TwinCoastArchers.com Archery Help
realistically inconsequential to the weekend bowhunter and backyard enthusiast. But that doesn't stop the arrow companies from bickering about who has the best spine consistency and accusing each other of spine crimes. After all, every arrow company wants YOU to believe that their arrows will give you a technical advantage... even if that's a little distortion of the truth. Again, we'll avoid the internal melee here by not pointing fingers, but if you wish to know more about spine variance, check the forums. There are a few forum regulars out there who own spine testing devices and Hooter Shooters. And they'll be happy to disagree with us on this issue.
USING SPINE DEFLECTION MEASUREMENTS TO SELECT PUBLISHED ARROW SIZES
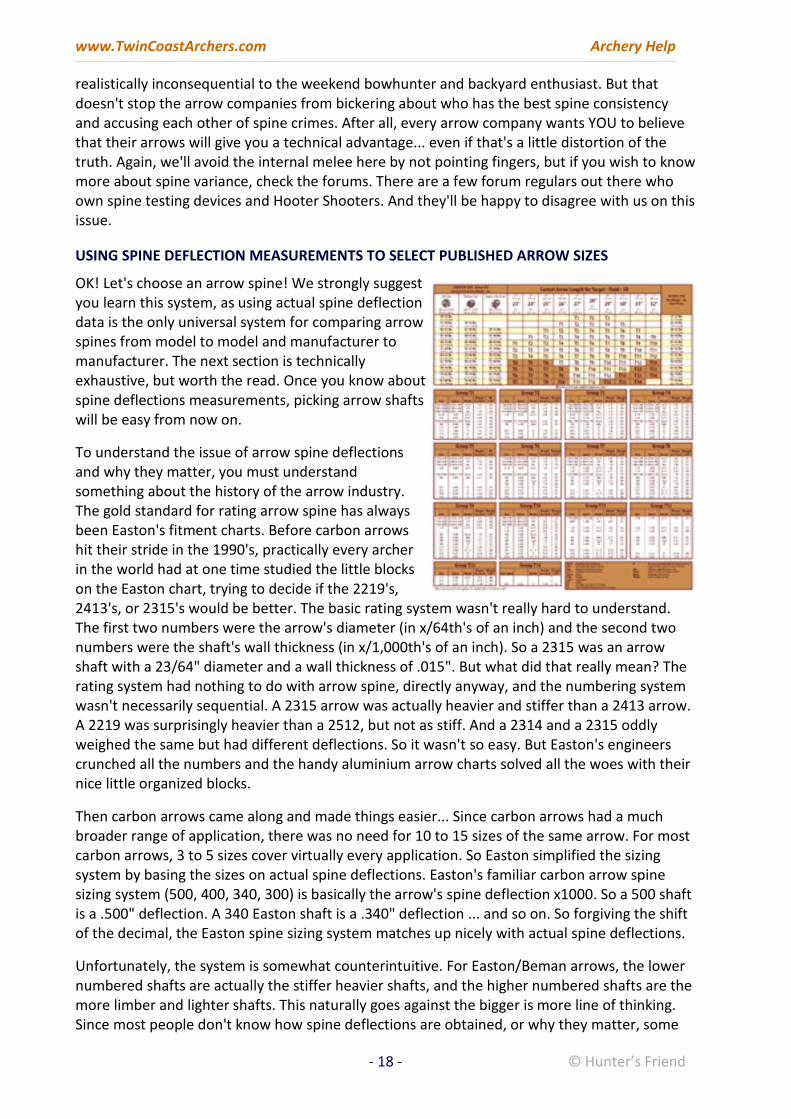
OK! Let's choose an arrow spine! We strongly suggest you learn this system, as using actual spine deflection data is the only universal system for comparing arrow spines from model to model and manufacturer to manufacturer. The next section is technically exhaustive, but worth the read. Once you know about spine deflections measurements, picking arrow shafts will be easy from now on.
To understand the issue of arrow spine deflections and why they matter, you must understand something about the history of the arrow industry. The gold standard for rating arrow spine has always been Easton's fitment charts. Before carbon arrows hit their stride in the 1990's, practically every archer in the world had at one time studied the little blocks on the Easton chart, trying to decide if the 2219's, 2413's, or 2315's would be better. The basic rating system wasn't really hard to understand. The first two numbers were the arrow's diameter (in x/64th's of an inch) and the second two numbers were the shaft's wall thickness (in x/1,000th's of an inch). So a 2315 was an arrow shaft with a 23/64" diameter and a wall thickness of .015". But what did that really mean? The rating system had nothing to do with arrow spine, directly anyway, and the numbering system wasn't necessarily sequential. A 2315 arrow was actually heavier and stiffer than a 2413 arrow. A 2219 was surprisingly heavier than a 2512, but not as stiff. And a 2314 and a 2315 oddly weighed the same but had different deflections. So it wasn't so easy. But Easton's engineers crunched all the numbers and the handy aluminium arrow charts solved all the woes with their nice little organized blocks.
Then carbon arrows came along and made things easier... Since carbon arrows had a much broader range of application, there was no need for 10 to 15 sizes of the same arrow. For most carbon arrows, 3 to 5 sizes cover virtually every application. So Easton simplified the sizing system by basing the sizes on actual spine deflections. Easton's familiar carbon arrow spine sizing system (500, 400, 340, 300) is basically the arrow's spine deflection x1000. So a 500 shaft is a .500" deflection. A 340 Easton shaft is a .340" deflection ... and so on. So forgiving the shift of the decimal, the Easton spine sizing system matches up nicely with actual spine deflections.
Unfortunately, the system is somewhat counterintuitive. For Easton/Beman arrows, the lower numbered shafts are actually the stiffer heavier shafts, and the higher numbered shafts are the more limber and lighter shafts. This naturally goes against the bigger is more line of thinking. Since most people don't know how spine deflections are obtained, or why they matter, some
- 18 - © Hunter’s Friend

www.TwinCoastArchers.com Archery Help
archers will simply buy the "larger" size for heavier bows and "smaller" sizes for lighter bows. Of course, this is completely backwards. So everyone ended up back at the Easton charts studying the little blocks. And why not? No archery pro-shop is complete without a big Easton chart on the wall. So why mess with tradition?
Turns out, Easton wasn't the only player in the carbon arrow game. In fact, they were one of the last to join-in when they purchased Beman in 1995. By that time, Gold Tip already had a five year head start with their popular graphite arrows. And Gold Tip had really simplified things with an easy 3 size system ... the famous 3555, 5575, and 7595. The system was intended to be self-explanatory. The 3555 roughly fit a 35-55# bow, a 5575 fit a 55-75# bow, and a 7595 fit a 75-95# bow. At least that's how most archers understood the sizing. But it didn't always work out. The Gold Tip arrows had spine deflections of .500" (3555), .400" (5575), and .340" (7595) respectively. So for example, a 53# bow shooting a 30" arrow actually required the 5575 spine (per the Easton gold standards anyway) instead of the 3555 that Gold Tip's sizing convention might suggest. So it wasn't long until Gold Tip published their own charts (yes, with the little blocks), based essentially on the Easton spine deflection data.
To be fair, Gold Tip's system really wasn't so bad ... comparatively anyway. There was worse to come. Not to be outdone, Carbon Force Arrows, a division of PSE, decided to really simplify things and make their sizes completely sequential ... 100, 200, 300, and 400. So the larger the number, the heavier and stiffer the arrow. Fine! But this scrambled all of our brains even worse because their arbitrary sizes actually overlapped the actual arrow deflections. The Carbon Force 100 has a .500" spine, the 200 has a .400" spine, the 300 has a .340" spine, and the 400 has a .300" spine. Try to wrap your head around that!
And just as our grey matter started to congeal from Carbon Force, Carbon Express reinvented their generally understandable 30/50, 45/60, 60/75 system (similar to Gold Tip's system but with the same drawbacks) to a system that's not just arbitrarily sequential (150, 250, 350), but varies from shaft to shaft. Their Maxima 250, for example, has a spine deflection of .404", but the Maxima Hunter (camo) 250 has a spine deflection of .417"!
It boils down to this. Whether you like Easton arrows or not, Easton is the big dog in the arrow market (biggest by far). And Easton's competitors don't want to be seen as "copycatting" Easton by following Easton's sizing format. They want to be unique and develop their own marketing and sizing system for their products ... even if it ultimately leaves us all confused. There are well over a dozen popular carbon arrow manufacturers who sell carbon arrows in New Zealand, and all of them are trying to sing their own tune. For archery enthusiasts this is both good and bad. Competition and innovation will continue to keep prices low and product quality high, but we'll all have to continue to put our thinking caps on when we shop for arrows. There are no universally agreed spine sizes among the various arrow manufacturers.
But the system of actual spine deflection is universal, because those measurements are guided by industry standards. That's the only apples-to-apples system that applies to every brand and model of carbon arrow. As long as the various carbon arrow manufacturers provide their spine deflection data (and they test using the industry standard method), manufacturers can size and market their arrows by any system they like ... and we can still reference the proper application to the gold standard Easton charts using actual spine deflections (see next page).
- 19 - © Hunter’s Friend
www.TwinCoastArchers.com Archery Help
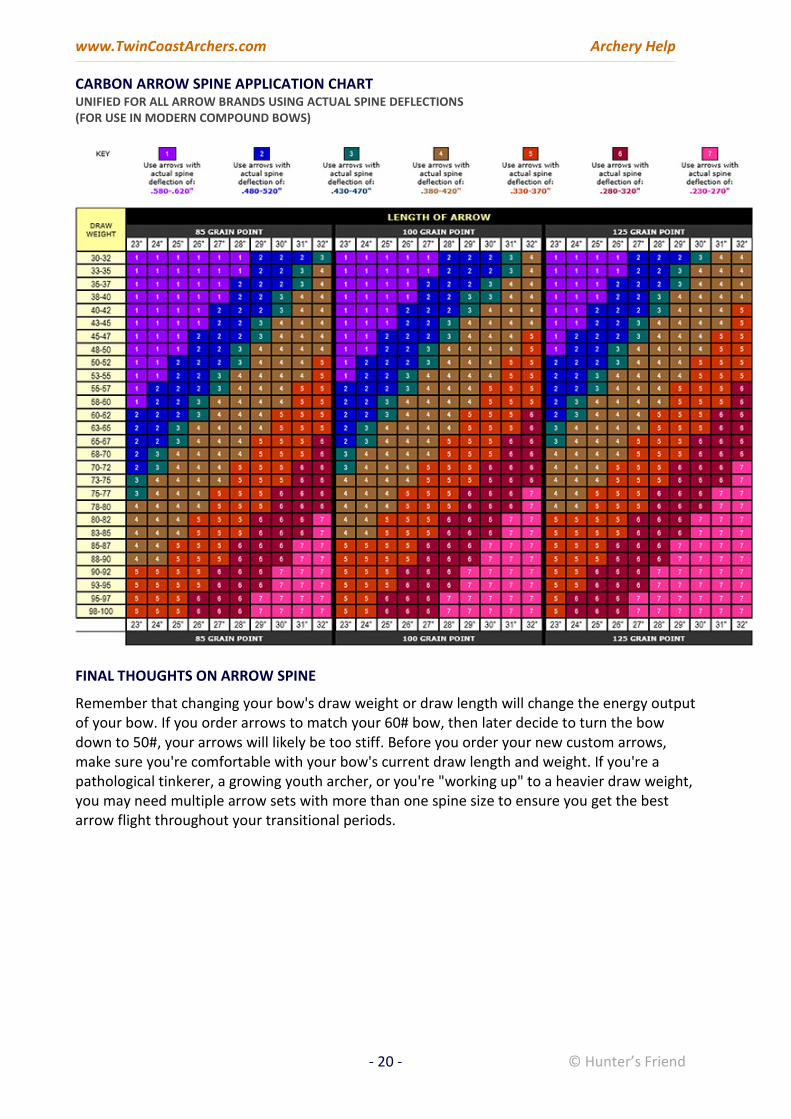
CARBON ARROW SPINE APPLICATION CHART UNIFIED FOR ALL ARROW BRANDS USING ACTUAL SPINE DEFLECTIONS (FOR USE IN MODERN COMPOUND BOWS)
FINAL THOUGHTS ON ARROW SPINE
Remember that changing your bow's draw weight or draw length will change the energy output of your bow. If you order arrows to match your 60# bow, then later decide to turn the bow down to 50#, your arrows will likely be too stiff. Before you order your new custom arrows, make sure you're comfortable with your bow's current draw length and weight. If you're a pathological tinkerer, a growing youth archer, or you're "working up" to a heavier draw weight, you may need multiple arrow sets with more than one spine size to ensure you get the best arrow flight throughout your transitional periods.
- 20 - © Hunter’s Friend

www.TwinCoastArchers.com Archery Help
THE REAL TWIST ON FLETCHING
Glued near the rear of most arrows are 3 (sometimes 4) feathers or plastic vanes, arranged in an equal pattern around the circumference of the shaft. These parabolic-shaped pieces of material (sometimes collectively called the "fletching") serve to help steer the arrow during flight. If the tail of the arrow is precisely following the tip during flight, the fletching slices cleanly through the air without changing the arrow's path. But if the arrow's tail isn't perfectly following the tip, friction occurs between the air and the fast moving fletch - pushing the fletch (and the tail of the arrow) back into proper alignment with the arrow's tip. So the fletching helps to stabilize and correct the arrow's flight.
Of course, all fletching materials aren't created equal. Arrow fletching is available in a number of different shapes, colours, types, thicknesses, lengths, etc. And they can be applied in different configurations: straight, offset, or helical (spiral). So how do we know which ones to pick? Should we go with feathers? Or vanes? Would a bigger fletch do a better job than small ones? Is one more durable than another? What are the trade-offs?
STANDARD VANES (Duravanes/Rubber Based):
Vanes are made of soft flexible plastic and are the popular choice for today's archer. They're inexpensive, easy to apply, quiet in flight, available in almost any size/colour, and they can be easily fletched in a number of different patterns (straight - offset - helical). Since vanes are impervious to water, they make an excellent all-weather choice for hunting. In addition, they're also relatively durable. Vanes can be crumpled and abused (up to a point of course) and they still pop back into shape... or they can be heat-treated with a hair dryer and made to pop back into shape. Either way, vanes aren't nearly as delicate as feathers.
However, compared to feathers of the same size, vanes are heavier - as much as 3X the weight of a comparable length feather. And since most vanes have a smooth surface, they don't "dig-into" the air as well as the rougher surface of feathers. So all other things being equal, vanes don't stabilize arrow flight quite as well as feathers. But don't make too big of a deal out of the vane's limitations. For the vast majority of applications, they're more than sufficient for the task.
SPECIALTY VANES (High-Profile Vanes):
The standard Duravane style vane is an enduring staple item of the industry, and it's the most widely used type of vane, BUT ... someone is always trying to invent a better mousetrap. So specialty vanes make a splash in the archery market periodically (Quikspin Vanes, Blazer Vanes, Vanetec High-Profile Vanes, Spin Wings, Bi-Delta Vanes, FOB's, etc.). Of course, the "improved" vane designs tend to come and go over time ... but the one specialty vane that seems to be hanging tough is the increasingly popular Blazer Vane, by The Bohning Company.
- 21 - © Hunter’s Friend

www.TwinCoastArchers.com Archery Help
The Blazer Vane is a small stiff 2" vane which is more plastic-like (urethane based) than rubber. Its claim to fame is three-fold. First, it's a little tougher than rubber-based vanes, so it stands up to Whisker Biscuit abuse without distorting or wrinkling. Secondly, the surface of the Blazer Vane isn't smooth, it's textured slightly to "bite" into the air better than smooth vanes. And finally, the manufacturer claims that the unique shape of the vane - specifically the straight leading edge - provides some kind of aerodynamic benefit.
Now, with all that said, we shouldn't get too carried away here. A 2" vane (regardless of the advertising wizardry and technical hoo-hah) is still a 2" vane - with the surface area of a 2" vane. So realistically, a claim that 2" Blazers can outperform standard 4" Duravanes might be a technical stretch. Nonetheless, High-Profile Vanes are small, light, look cool, and seem to work well enough.
FEATHERS:
Of course, feathers are the original arrow fletching material. When it comes to design, you just can't deny that Mother Nature knows best. First, feathers are very light. Three 4" Gateway feathers weigh just over 8 grains - compared to 24 grains for three 4" Duravanes. This means your arrows fly faster with less loss of trajectory downrange. Feathers also have a natural texture that effectively bites into the wind. So feathers do a particularly good job at stabilizing large broadheads and finger-released arrows. And archery feathers have a natural curvature to them (left-wing or right-wing, depending on which side of bird they're from), so they help arrows to spin in flight - which also aides in arrow stabilization. As a matter of achieving the best possible flight, it's just hard to beat a feather.
But feathers are not for everyone or every application. Firstly, feathers are rather expensive. Basic 4" feathers can cost four to ten times as much as comparable vanes. But remember, archery feathers aren't a synthetic product - they are made from the primary flight feathers of turkeys (usually). They must be harvested, cleaned, dyed, cut, sorted, inspected, etc. As you might imagine, this is a labour-intensive process. So archery feathers cannot be mass produced with the same kind of speed and automation as plastic vanes. So they cost more. And the fancier the feather, the fancier the price tag.
Feathers also require a little more care from the user. If you rough handle your feather fletched arrows, they won't respond well to the abuse. Feathers can be bent, crumpled, split, and degraded when they make high-speed contact with other surfaces (like arrow rests). And while a little steam and finger-rubbing can sometimes resurrect defunct feathers, they just aren't as tough as synthetic vanes. So you have to treat them well if you want them to last.
Finally, we should mention weather and the feather. We hear many archers remark that they don't want feathers because of the weather. This is probably an exaggerated prejudice. Feathers are certainly an outdoor product, designed for outdoor use. But not all feathers are the same. The answer to the question "What happens when a feather gets wet?" depends on what kind of feather you're talking about. Fluffy down feathers (like in your pillow) will soak-up water and flatten down like wet hair. But primary flight feathers, like the feathers used for archery, have a much more rigid structure, made from keratin (the same protein found in fingernails), with interlocking rows of barbs, barbules, and hooklets. This interlocking lattice-work allows primary feathers to generally retain their shapes even when wet. So don't assume
- 22 - © Hunter’s Friend

www.TwinCoastArchers.com Archery Help
that a wet feather is automatically a ruined feather. But do consider the weight of the water. A wet feather obviously weighs more than a dry feather, which means your arrow will weigh more and will fly differently when its feathers are wet.
If you are the kind of hardcore hunter who might sit for hours in the rain, you might want to consider waterproofing your feathers. Gateway Feathers offers a waterproofing powder specifically formulated for the task. Or if you want a quick and easy solution, pick up an $6 can of tent or boot waterproofing spray at the Warehouse. Many archers report this works just as well, and only takes a minute to apply.
FLETCHING TURN
Another factor that determines the effectiveness of your fletching is the TURN of the fletch. If your fletching is arranged in a helical (spiral) pattern - like a boat propeller - your arrow will rotate in flight. Much like a rugby ball that's thrown with a perfect spiral, an arrow will fly straighter and more stable if it rotates in-flight.
Aerodynamically, a helical configuration is clearly a better choice. However, a helical fletch may not be appropriate or necessary for your particular bow setup. For example, some arrow rests will not provide enough clearance to allow a helical fletch to pass thru without contact. In this case, we can use an offset fletch, where the vanes are still straight, rather than in a spiral pattern, but they are slightly turned on the shaft to promote some rotation in-flight without compromising fletching clearance.
For very unforgiving arrow rests with limited clearance, or for competition target setups that don't require much stabilization, the straight fletch may be the best option. Take a look at the diagrams below and the corresponding pro's and con's associated with each fletching configuration.
LEFT HELICAL LEFT OFFSET STRAIGHT RIGHT OFFSET RIGHT HELICAL
• Best broadhead stabilization.
• Most consistent arrow flight.
• Increased overall accuracy.
• Arrow corrects attitude.
• Better broadhead stabilization.
• Minimal air resistance in flight.
• Works with most arrow rests.
• Stable flight to moderate distance.
• Fastest flying vane configuration.
• Least amount of air resistance
• Works with any arrow rest
• Minimal fletching clearance problem.
• Better broadhead stabilization.
• Minimal air resistance in flight.
• Works with most arrow rests.
• Stable flight to moderate distance.
• Best broadhead stabilization.
• Most consistent arrow flight.
• Increased overall accuracy.
• Arrow corrects attitude.
• Notable loss of arrow velocity.
• Fletching clearance more problematic.
• LH rotation loosens tips.
• Some fletching clearance issues.
• Some loss of arrow velocity.
• LH rotation loosens tips.
• Less stable at long distances.
• Less stabilization for broadheads.
• Best used in a well-tuned bow.
• Some fletching clearance issues.
• Some loss of arrow velocity.
MOST POPULAR CHOICE
• Notable loss of arrow velocity.
• Fletching clearance more problematic.
Please note that some types of fletching can only be fletched certain ways. Feathers generally come in a right-wing or left-wing pre-formed helical shape. So feather fletching will be right-helical or left-helical. Forcing a feather into a straight clamp to produce an offset or straight fletch is not recommended. Also, some specialty vanes, like NAP's Quikspin Vanes, should not be fletched in LH configurations.
- 23 - © Hunter’s Friend

www.TwinCoastArchers.com Archery Help
If you are a fan of the short 2" Blazer Vane, please note that the turn of the fletch will be much less noticeable. Even when fletched with a full helical clamp, a short 2" Blazer Vane will appear to have only a slight offset.
RIGHT OR LEFT?
If you choose to go with an offset or helical fletch, the arrow will rotate in flight. But which way should it rotate? Right or left? The answer is, sometimes it matters, and sometimes it doesn't. So here are a few things to think about.
An arrow with a right turn will rotate clockwise (as viewed from the nock) during flight. An arrow with a left turn will rotate counter-clockwise. So what's the big difference? With most modern setups, nothing. One is as good as the other. The only major difference is that left-turn (counter-clockwise) arrows tend to impact the target and loosen your tips, while right-turn (clockwise) arrows tend to impact the target and tighten your tips. Otherwise, it really makes no difference.
Nonetheless, the traditional wisdom that RH shooters should shoot a right turn fletch and LH shooters should shoot a left turn fletch still exists. Unfortunately, this thinking is a leftover rule of thumb from the days before compounds and the centre-shot cutaway riser. It doesn't apply to modern compounds. But, if you shoot a traditional bow OR you have an old-fashioned flipper or plunger style rest on a non-centre-shot riser bow, this is still good advice for achieving the best vane/feather clearance. If you shoot a modern compound with a bolt-on arrow rest, we suggest you choose a RH turn fletch - as a few broadheads and other arrow components are designed to work best with RH rotation.
FLETCHING SIZE: HOW MUCH IS ENOUGH?
Most vanes and feathers are available in several different sizes. The most common are the 3", 4", and 5", with the 4" being the industry standard for most applications. However, you may decide a little larger or smaller fletch is better for you. Here are a few things to consider.
Weight: If you're concerned about your finished arrow weight or your F.O.C. balance (more on this in a moment), it's worth noting that your choice and size of fletching material will have a significant impact on both of those attributes. Take a look at the chart below to see how much your fletching choice will add to your finished arrow. Since all of that weight is going to be concentrated in the rear of the arrow, heavy fletching material means you'll also need more tip weight to maintain a good F.O.C. balance.
In addition to the TURN of your fletching, the second factor that determines how much stabilization you can expect will be directly related to the total amount of surface area of the fletching material you select. Larger fletching will have more surface area, small fletching will have less. The more surface area, the more contact the fletching will have with the surrounding air and the more effective the fletching will be at correcting the arrow in flight. So this is a
- 24 - © Hunter’s Friend

www.TwinCoastArchers.com Archery Help
trade-off between stability and speed. Most bowhunters choose the larger 4" fletching to get better broadhead flight, while most target archers opt for smaller fletching material to optimize speed. Of course, the choice is up to you.
FLETCHING CHOICE: PRO RECOMMENDATIONS
We strongly suggest you choose fletching that will yield more accuracy rather than more speed, especially if you're a bowhunter. Before you choose your fletching type, it's important to consider how difficult your arrows will be to stabilize in flight. If you only use your bow for recreational target shooting with field points or target nibbs only, a 2-3" fletch will probably be sufficient. Field points are easy to stabilize. But broadheads are another story. If you shoot broadheads (particularly large fixed-blade broadheads) which often tend to fly erratically, a larger fletch will be essential to achieving good arrow flight and consistent groups. If you shoot mechanical broadheads, you can get by with a little less. There probably isn't a true right and wrong here, as fletching material is essentially a personal choice. But here is general chart to help you select a reasonable fletching option for your setup.
FLETCHING SELECTOR:
Fletching Selector: Fletch Size/Type/Turn - Suggested for Modern Centre-shot Cutaway Compound Bow Setup I use a containment style arrow
rest with limited clearance. I use a shoot-tru style
arrow rest. I use a drop-away style
arrow rest. I’m careful with my
equipment. Inclement weather and
fletching durability isn’t really an issue.
Field Tips or Nibbs only
2-3” Straight Vanes
Field Tips or Nibbs only
3” R-Helical Feathers
Field Tips or Nibbs only
3” R-Helical Feathers
Mechanical Broadheads
3-4” Straight Vanes
Mechanical Broadheads
3-4” R-Helical Feathers
Mechanical Broadheads
3-4” R-Helical Feathers
Fixed-blade Broadheads
4-5” Straight Vanes
Fixed-blade Broadheads
4-5” R-Helical Feathers
Fixed-blade Broadheads
4-5” R-Helical Feathers
I’m a little rough on my equipment. So I need fletching that will take some abuse and
hold up in all weather situations.
Field Tips or Nibbs only
2-3” Straight Vanes
Field Tips or Nibbs only
2-3” Offset Vanes
Field Tips or Nibbs only
3” R-Helical Vanes
Mechanical Broadheads
3-4” Straight Vanes
Mechanical Broadheads
3-4” Offset Vanes
Mechanical Broadheads
3-4” R-Helical Vanes
Fixed-blade Broadheads
4-5” Straight Vanes
Fixed-blade Broadheads
4-5” Offset Vanes
Fixed-blade Broadheads
4-5” R-Helical Vanes
FOC (FRONT OF CENTER) BALANCE:
If you've ever played a friendly game of darts, you've surely noticed that the dart is designed so that it's heavy in the front, and light in the back. If the dart were weighted the opposite way, with the tail being heavier than the tip, it would literally spin around and hit the target tail-first. Obviously the ballistics of a dart and an arrow are a bit different, but the underlying concept is similar. A projectile's flight is most stable when most of the projectile's mass is positioned Front (or Forward) of Centre [FOC]. As such, an arrow should be heavier in the front than in the back. But how much? Where's the "perfect" balance point?
This is another hotly debated issue among archery enthusiasts. In fact, some of the self-proclaimed chat board gurus seem intent on beating the FOC issue to death. So before we get into this, we need a quick reality checkpoint. If your FOC is really out of whack, it's an issue. But don't spend too much time splitting hairs about whether your FOC should be 9% or 10%. If your FOC is reasonable (7-15%), your arrows will function as they should. And don't assume that the mathematical average (11%) of the recommended 7-15% range is somehow the best score. It doesn't work that way. The ballistic physics for FOC include some rather elastic variables that make finding a "mathematically optimal" FOC very difficult to declare and prove. To make matters worse, we even see a variation in how FOC itself is calculated (some include the tip of the arrow in the length measurement, some stick with the AMO arrow length measurement).
- 25 - © Hunter’s Friend

www.TwinCoastArchers.com Archery Help
So don't pull out your scientific calculator on the FOC issue. It's not necessary. Just choose a reasonable value and move on.
Fortunately, most common arrow components tend to yield finished arrows well within the recommended 7-15% FOC range. The only real danger of slipping off the FOC precipice is if you use really heavy fletching and super-lightweight target nibbs, or if you choose small light fletching and a jumbo tip weight (or a heavy brass insert). For common arrows with basic vanes or feathers, aluminium inserts, and 85-125 grain tips, chances are your FOC will come out just fine.
If you balance a standard raw arrow shaft (no components), the balance point would be the middle of the shaft (0% FOC). But since tips and inserts at the front of the arrow are usually heavier than the fletching and nock at the tail, most finished arrows balance somewhere just forward of the middle. So computing FOC is pretty basic. In the example on the left, the 30" long arrow has balance point that is 3" forward of the arrow's actual centre (15"). So its FOC is 3/30 or 10% of the total arrow length forward of the arrow's physical centre. Example 2: If a 28" arrow balanced 2" forward of its physical centre, you would compute the FOC as 2/28, or 7.1%. Easy!
With all that said, it is generally believed that an arrow with a high FOC will fly well, but with premature loss of trajectory (nose-diving). While an arrow with a very low FOC will hold its trajectory better, but it will fly erratically. So again, another trade-off for you to consider.
So when you order your custom arrows, keep FOC in mind. If you choose heavy 5" vanes and an anorexic 50 grain tip, you'll likely have an FOC that is too low. On the other hand, if you choose 3" lightweight feathers and a jumbo 175 grain tip, you'll likely have too much FOC. So try to avoid opposite extremes at the ends of the arrow, and choose an arrow setup that will give you an FOC balance of roughly 7-15%.
FEEL THE NEED FOR SPEED?
Fast cars, fast computers, fast wide receivers, fast-drying paint, fast-acting weed-killer.....if it's fast, we love it. And when it comes to our archery equipment, it's no different. Show most guys a brand new bow, and their first question is likely to be "How fast does it shoot?" Right or wrong, speed is a major consideration for most archers. And it's great to see how advancements in materials and design technologies have made today's compound bows better, faster, and more fun to shoot than ever before.
Of course, there will always be a few dissenters in the crowd, those who'll loftily claim they don't care about speed. But the market trends don't lie. Archery consumers are taking advantage of these innovations, buying high-performance bows and speed-boosting gadgets by the trainload. And nothing yields such a predictable and significant increase in speed like a good set of lightweight carbon arrows. So let's examine the pro's and con's to shooting
- 26 - © Hunter’s Friend
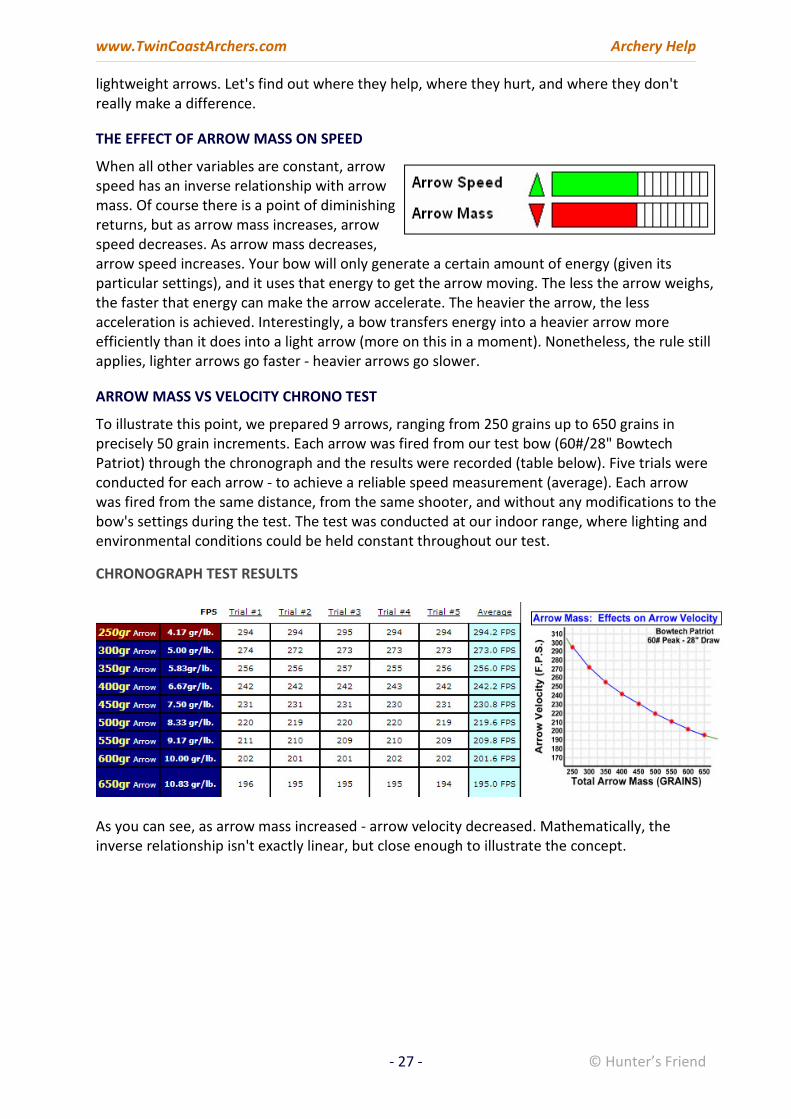
www.TwinCoastArchers.com Archery Help
lightweight arrows. Let's find out where they help, where they hurt, and where they don't really make a difference.
THE EFFECT OF ARROW MASS ON SPEED
When all other variables are constant, arrow speed has an inverse relationship with arrow mass. Of course there is a point of diminishing returns, but as arrow mass increases, arrow speed decreases. As arrow mass decreases, arrow speed increases. Your bow will only generate a certain amount of energy (given its particular settings), and it uses that energy to get the arrow moving. The less the arrow weighs, the faster that energy can make the arrow accelerate. The heavier the arrow, the less acceleration is achieved. Interestingly, a bow transfers energy into a heavier arrow more efficiently than it does into a light arrow (more on this in a moment). Nonetheless, the rule still applies, lighter arrows go faster - heavier arrows go slower.
ARROW MASS VS VELOCITY CHRONO TEST
To illustrate this point, we prepared 9 arrows, ranging from 250 grains up to 650 grains in precisely 50 grain increments. Each arrow was fired from our test bow (60#/28" Bowtech Patriot) through the chronograph and the results were recorded (table below). Five trials were conducted for each arrow - to achieve a reliable speed measurement (average). Each arrow was fired from the same distance, from the same shooter, and without any modifications to the bow's settings during the test. The test was conducted at our indoor range, where lighting and environmental conditions could be held constant throughout our test.
CHRONOGRAPH TEST RESULTS
As you can see, as arrow mass increased - arrow velocity decreased. Mathematically, the inverse relationship isn't exactly linear, but close enough to illustrate the concept.
- 27 - © Hunter’s Friend

www.TwinCoastArchers.com Archery Help
IS FASTER REALLY BETTER?
From a standpoint of accuracy, you may find that lightweight arrows will yield some surprising benefits. From the moment your arrow is released from the bow, it begins to lose trajectory. As it succumbs to the effects of gravity and air resistance, its flight path (trajectory) changes and the arrow eventually begins to drop back to earth. Arrows which fly more quickly hold their trajectory better than slower arrows. So archers who shoot lighter-faster arrows will have less need to adjust for distance - since the faster arrows will hold a "flatter" trajectory within a given distance. In effect, the faster arrow allows you to make more mistakes in yardage estimation. If you mis-estimate a deer to be 25 yards away, and it is actually 30 yards away, the fast arrow still lands lower than expected, but it "misses" its mark by a smaller margin. Look at the trajectory chart on the right from our Bowtech Patriot experiment. The heavier arrows nosedive more quickly than the lighter faster arrows. So whether you're a hunter or competition 3D shooter, you may find that faster arrows actually add a little forgiveness into your shooting, allowing you to make an error in yardage estimation without paying such a heavy price.
Hunters may also find that a faster arrow gives game animals less opportunity move out of position. When you fire an arrow at a game animal, the sound of the bow travels much faster (about 1100 fps) than the arrow. So the game animal will certainly hear the sound of the bow before the arrow arrives. During that time, the animal has a brief opportunity to lunge, jump, squat, or otherwise get out of the way. For example, an alarmed deer will often "crouch" in preparation to jump. This crouching motion makes it appear the deer has attempted to "duck" the arrow, when in fact the deer is just loading its muscles to jump and flee. As a result, many bowhunters tend to miss high, shooting the arrow over the deer's back or impacting above the kill-zone, resulting in an unfortunate wound. Of course, there are several factors that come into play (the alertness and athleticism of the deer, your distance and angle from the target, the amount of noise from your bow, etc.) which can affect how quickly a deer responds to the sound of your shot. But one thing is for sure. The faster your arrow arrives at the target, the less time the deer will have to react. So let's take a look at how quickly an arrow traverses its flight path, given a known distance and launch speed.
APPROXIMATE TIME TO ARROW IMPACT
- 28 - © Hunter’s Friend

www.TwinCoastArchers.com Archery Help
MORE SPEED = MORE NOISE
Shooting a lightweight arrow may result in a notable increase in noise from your bow. It's to be expected, as the faster moving string makes a bigger disturbance in the surrounding air and bows transfer energy into lightweight arrows slightly less efficiently than with heavier arrows. On your particular bow, the difference may be subtle - or quite significant. If you shoot a high-quality modern bow that's already pretty quiet, the difference may be minor. But if your bow is already noisy even when shooting your heavyweight aluminium arrows, shooting ultra-light carbon arrows will guarantee you a virtual harmonic train-wreck.
As with any bow rig, maintaining your fastener torques, along with a compliment of string silencers, dampeners, and a good high quality stabilizer will all help, but be advised that added speed will still come with some added noise too. If you're a hunter, noise is an important issue, and you'll have to weigh the advantages of flatter trajectory against increased noise. For what it's worth, most modern equipment bowhunters tend not to choose the lightest shafts, but rather a mid-weighted shaft (Easton Axis, Gold Tip Hunter, Beman ICS Hunter, etc.) which yields a moderate finished arrow weight.
Now ... if you're not a hunter, bow noise isn't really a concern. For competition 3D shooting, where noise and penetration really don't make a difference, lighter arrows with flatter trajectories are definitely better. Most competition shooters want arrows which are at the league minimums or speeds at the league maximums.
SPEED vs. KINETIC ENERGY
Here's where the debate gets heated. With all other variables constant, your bow will have more knock-down power when shooting heavier arrows. So some bowhunting enthusiasts will dismiss the benefits of faster arrow speeds and flatter trajectories, and claim that heavier and more deeply penetrating arrows are more responsible choices. But we have to keep this issue in perspective. Mathematically, there is a difference ... but how much? Does arrow mass affect knock-down power significantly? Does it actually make a difference in the field? Or is this debate just academic?
To understand this issue, let's look at the basic physics. How much penetration, or knock-down power, a projectile has in the shooting sports is generally expressed in ft-lbs of kinetic energy. Arrows which impact the target with more kinetic energy will penetrate the target more deeply than arrows with less kinetic energy. Kinetic energy is the energy of motion. Any object which has motion has kinetic energy. Total kinetic energy depends upon two variables: the mass of the object and the speed of the object. Since we had mass and speed data from our earlier chronograph test, we simply converted those numbers into Kinetic Energy and entered them into the table below. Notice that as the arrow gets heavier, the amount of kinetic energy increases.
- 29 - © Hunter’s Friend

www.TwinCoastArchers.com Archery Help
In our example, the computed kinetic energy of the (5 gr/lb) 300 grain arrow was 49.66 ft-lbs. But when a 600 grain arrow was fired from the same bow, its computed kinetic energy was 54.16 ft-lbs. So doubling the arrow mass yielded another 9% in kinetic energy, or "knock down power." Obviously, all bows won't perform exactly as our test bow did, but you get the general idea - heavier arrows absorb more of the bow's energy (and carry more energy downrange). So if you want the added kinetic energy, you can shoot arrows at a heavy 10 gr/lb, just don't forget that to get the extra 9% in KE, you'll give up over 25% of your arrow velocity.
So before you make your decision in the speed vs. kinetic energy debate, you should consider your target - and the energy is takes to ethically harvest that animal with a bow. If you're hunting smaller athletic animals, say a rabbit or hare, which are particularly alert and skittish, a faster arrow would surely be best. Hunting smaller game doesn't require as much knock-down power, so getting the arrow to the target quickly will increase your chances of success. Other the other hand, if you're pursuing a 600 lb. Wapiti deer, you'll be less concerned about the animal "jumping your string" and more concerned about getting optimal penetration. So if you hunt large heavy game, a heavier arrow may increase your chances of success.
Like many issues in archery, the speed vs. KE debate is one that may never end! Every hunter seems to have his own opinions on the proper techniques, strategies, and ethics of big game bowhunting - and what applies to one hunter may not necessarily apply to another. Ultimately, the choice is up to you.
HOW MUCH KE DO I NEED?
If you have a hot-rod modern compound bow producing 70+ ft-lbs of KE, and you only hunt Whitetail Deer, the speed vs. KE debate is just academic. No matter what arrow you shoot, you'll have practically twice the energy required to harvest your deer. In fact, at 70+ ft-lbs, you would have plenty of power for even the largest New Zealand game species. But if your bow isn't such a hot-rod, or if you shoot low poundage and/or a short draw length, the KE issue may be a hair worth splitting.
According to Easton's field chart, the amount of KE you'll need varies by the species you intend to hunt. Obviously, the larger the game, the more KE you'll need. And regardless of the power of your bow, you'll still need to land your shots in the boilermaker. If you hit an animal in the shoulder, all bets are off. But assuming you do your part, Easton's recommendations give us a place to start. Of course, these recommendations aren't absolutes, nor are they guarantees of success.
- 30 - © Hunter’s Friend
www.TwinCoastArchers.com Archery Help
KINETIC ENERGY Hunting Usage
< 25 ft. lbs. Small Game (rabbit, possum, etc.) 25-41 ft. lbs. Medium Game (goat, deer, etc.) 42-65 ft. lbs. Large Game (wapiti deer, wild boar, etc.) > 65 ft. lbs.
TOUGHEST GAME (CAPE BUFFALO, GRIZZLY, ETC..)
To give this some perspective, refer back to our Bowtech Patriot test. Would our bow be capable of harvesting a Whitetail Deer? According to the chart, yes. A properly placed arrow - impacting with 50+ ft-lbs of KE - has a very good chance of generating a clean pass-thru on a Whitetail Deer. So with respect to kinetic energy and Whitetail hunting, there may be no practical difference between the 300 grain arrow impacting with 49.66 ft-lbs of KE and a 600 grain arrow impacting with 54.16 ft-lbs (as in our experiment above). Assuming favourable conditions and a good shot, either arrow would provide sufficient energy to make a clean harvest on a deer. But if we decided to take our Bowtech Patriot out for some Wild Boar or Wapiti Deer... we just might come up short on power. So in that case, the extra KE might come in handy.
HOW DO I COMPUTE KINETIC ENERGY?
Kinetic energy of an arrow can be found by using the formula KE=(mv²)/450,240 where m is the mass of the arrow in grains and v is the velocity of the arrow in fps. The 450,240 just sorts out all the units and converts things from fps & grains to ft-lbs. So if your new bow setup ultimately shoots a 400 grain arrow at a respectable 250 fps, your actual kinetic energy or "knock down power" will be:
KE=(mv²)/450,240 KE=[(400)(250²)]/450,240 KE=25,000,000/450,240 KE=55.53 ft-lbs
MOMENTUM vs. KINETIC ENERGY:
Should you have an unquenchable interest in ballistic physics, you may find it interesting that a few sporting enthusiasts will even dispute the convention that KE is the best measurement for predicting hunting penetration with a bow and arrow. A number of enthusiasts will debate that MOMENTUM is the better mathematical model. Of course, KE and Momentum aren't the same thing.....
----> Kinetic Energy = Weight X Velocity Squared /2 X Acceleration of Gravity ----> Momentum = Weight X Velocity / Acceleration of Gravity
Since velocity isn't squared in the momentum formula, arrow mass and velocity play more equivalent roles. The kinetic energy of a moving body increases as the square of the velocity whereas the momentum increases directly as velocity increases. So if you recomputed our chart to show momentum, then the graph would look much different. The heavier arrows
- 31 - © Hunter’s Friend

www.TwinCoastArchers.com Archery Help
would show a significant improvement in overall momentum, and you could therefore conclude that heavier arrows would indeed yield dramatically better penetration.
Right or wrong, the shooting sports have a number of traditions and conventions regarding technical measurement. And the lethality of a projectile (whether from a firearm or bow) is traditionally expressed as a function of KE (ft-lbs). As such, most sporting enthusiasts have some comprehension of this measurement. Unfortunately, a momentum rating in Slug Feet-per-Second would surely leave many of us scratching our heads. Given the dramatic difference in the two methodologies, it seems unlikely that KE has remained the "standard" for so long if it's entirely incorrect. There are a lot of talented engineers in the archery industry. So either they have ALL missed it, or perhaps the momentum theory has a glitch (not to worry - our team of physicists are working on it now).
PERSPECTIVE ON HUNTING MATH
Regardless of how you crunch your numbers during pre-season, you can't avoid the elements of chance during the actual hunt. Shooting a live animal in the woods is quite different than shooting a block of ballistics gel in a laboratory. In the field you'll encounter unpredictable and complex variables that limit any mathematical model to just a "best guess." If you consider that your arrow must arrive on target then pass through layers of hair, hide, muscles, bones (perhaps), and a host of other tissues.....AND that all of this is happening in an uncontrolled outdoor environment, it's pretty clear that the issue of hunting penetration cannot truly be distilled into a mathematical puzzle. As many experienced bowhunters can attest, just as it's possible to make mistakes and get lucky, it's also possible to do everything right and come-up empty handed. That's just part of the sport. However, with good equipment, good technique, smart planning, and some good-old common sense, you can surely tip the scales in your favour and maximize your chances of success in the field.
- 32 - © Hunter’s Friend


