
Arrochar and Cowal Bloc Sport
16
1 ARROCHAR & COWAL BLOC SPORT A STONE COUNTRY BOULDERING & SPORT CLIMBING GUIDE eDITED BY j s WATSON
-
Upload
stone-country -
Category
Documents
-
view
219 -
download
0
description
Bouldering and sport climbing in Arrochar and Cowal
Transcript of Arrochar and Cowal Bloc Sport

1
ARROCHAR & COWAL BLOC SPORT
A STONE COUNTRY BOULDERING& SPORT CLIMBING GUIDE
eDITED BY j s WATSON

2
ARROCHAR ALPS Alan Cassidy on the Glen Croe classic ‘Precious’ 7c
This area, romantically called the Arrochar Alps, is a bouldering adventure park, but timing is of the essence to get the best of conditions. The venues are located in glens and alps around the centrepiece of the Cobbler, from Inveruglas round to Glen Croe and over the Rest and Be Thankful Pass. In winter Glen Croe is dark and dank, head to Coilessan or Loch Sloy and more southerly flanks.
Mica-Schist is a variable rock... it can be superbly rough and slopey, at other times flaky as a Forfar Bridie and dangerously snappy to boot - leave this kind of rock well alone! Finding the best quality rock is the key to enjoying your bouldering in this area. Good rock exists and it is worth hunting out: quality problems tend to be on steeper prows rather than roofs eg. Turbinal Nose, Precious, Thermostatic & Red October.
The venues are all open to further development with some almighty projects for the strong. Coilessan is remote but full of possibility, as is Loch Sloy. Glen Croe still hides some boulders which are being revealed as the forestry is cleared. The higher corries hold good stones but the trek is prohibitive with a mat. The Kennedy boulder is easily the best of the higher stones, but make sure you go in summer to get some light and stay in the howff for the true Scottish bouldering experience!
A83
* Glen Croe
* Narnain
* Kennedy Bloc
Loch Restil *
* Butterbridge
* Loch Sloy
Ardvorlich *
* Coilessan A82
ARROCHAR
ARROCHAR
TARBERT
INVERUGLAS

3
FIRTHOF
CLYDE
Mapping Copyright Stone Country
Jura
Islay
Arran
Bute
Arrochar
Arrochar & Cowal1. Ardvorlich Sport p.42. Loch Sloy Blocs p.53. Narnain Boulders p.8 4. Glen Croe Blocs p.105. Kennedy Bloc p.116. Coilessan Blocs p.127. Glen Kinglas p.138. The Anvil Sport p.149. Tighnabruaich Sport p. 1510. Glen Massan and Miracle Wall p. 16
Cowal

4
ARDVORLICH SPORTMap p. 3
Bloc NotesThese are the pleasant schist 'hidden walls' above Ardvorlich B&B on the west bank of Loch Lomond, 2km north of Inveruglas or 4km south of Ardlui. The higher crag 'Quarterdome' is the large open-book crag 15 minutes steep walk above the Hidden Walls. Routes are no more than 18m. Park discreetly by the barn at the entrance drive to Ardvorlich B&B, closing the gate behind you. Walk into the woods at the left side of the barn and turn right over a fence just before the railway track. Walk under the railway culvert and scramble across the burn to a path on the right bank which leads up to the Hidden Walls.
Hidden Walls - Left Wall1. Arm Carnage F6c/7aBoulder along the roofed crag at the left and lunge up to a ledge by the first bolt, follow this to step across to join 2.2. That Sinking Feeling F6a+Tricky left arête to first bolt (pre-clip), then easier up to a scooped groove crux. Step through this and finish up left. 3. The Groove F6a The central groove has good juggy climbing to a crux step up to good pockets and an enjoyable final headwall. 4. Drifting Too Far from Shore F6c The bulge right of the groove, taken on the right via cunning. Headwall finish direct. FA Graham Harrison 2004.5. Lake Lomond F6a After the initial cracked groove under the sapling, breathe deep and step left onto the superb headwall.
Hidden Walls - Right Wall6. Dilemma F6a+ Crux quartz pull through bulge and travel up right through 7 to finish direct to stepped ledges at top. 7. Snake Eyes F6a Central roof up left to join with 6, step left and finish up juggy ramp up to sapling, right to LO.8. Magic Carpet Ride F6b Bolts and pegs, hold your nerve. The direct central line aiming for the very apex of the right wall.
High Crag - Quarterdome9. Side Issue F6bClimb the blunt slabby arête via an initial slab to the groove of Godot gain higher slabs to step round to LO.10. Waiting for Godot F7bTake the wall through the quartz band to the left arête, step up and back round the arête crux to LO.11. ‘Endgame’ ProjectAmazing quartz band direct to the undercut overlap, from here crimps and pockets to top. Gets harder and harder.
Hidden Walls
54321
6 7 8
Lake Lomond
Dilemma
Quarterdome
1110
9

5
Bloc NotesThe Loch Sloy hydro station at Inveruglas on Loch Lomond is a remarkable and obvious feature on the A82 north of Tarbet. The walk to the dam is popular and the dramatic glen is littered with giant schist boulders, the best of which are described here. Most of the problems were developed by Dave Redpath, Dave MacLeod and John Watson amongst others. Despite some trekking to get to some of the boulders, there are some quality lines and vast potential for projects.
Glue Pony
500 metres
North
BenVorlich
BenVane
A’Chrois
Inveruglas
Power Station
1. Electro Blocs 2. Crag Alp Blocs3. High Blocs 14. Bootcrack Blocs5. High Blocs 26. Roadside Boulder7. Glue Pony Blocs8. Lookout Walls9. Dam Cluster10. Blob Blocs
A82
Loch Sloy Sectors
Relay Station
Approach Notes
Park or get off the Glen Coe bus at the Inveruglas Tourist Centre (good for a coffee), walk back south past the Power Station and take the tarmac road up under the railway viaduct. This eventually leads to the Loch Sloy dam in about 40 minutes brisk walk, all boulders can be accessed from the road fairly quickly. The Roadside boulder is on a knoll beside the road at the half-way bridge, whereas the other boulders lie on the flanks of Ben Vorlich at various altitudes. The Dam cluster has some big stones but boggy landings. Take a mat or two for the Roadside boulder. There are lots of warm-up and easy problems over good landings on smaller stones, and bracken is not a problem making it good in summer.
Free Energy
Roadside schist
LOCH SLOY

6
Bloc Notes: The remote nature of these blocs means that you need good legs to reach some of them, and maybe a project in mind. There are several undeveloped areas: the High Blocs and the Dam Cluster in particular. The Lookout walls have some highballs and traverses while the projects mentioned will all be around the 8a mark, so strong climbers take note!
7
8
Lomond Arête
Watt Wall
Bootcrack Bloc
1. Electrofunk Font 6c Electroblocs This is the slab directly opposite the power station. Climb the slab avoiding all of the good holds on the left arete. 2. Lomond Arête Font 4+ Crag Alp Blocs East bloc right of giant bloc. The attractive arête has good pockets to a long reach to finish.3. Lomond Wall Font 4 Crag Alp Blocs East bloc of the twin blocs on the alp. Climb the scooped wall left of the arête.4. Edison Arête Font 6a High Blocs 1 Edison Boulder. SS at a flake, up right on good holds and pockets, pinch on the arête to escape right at the ramp. 5. Edison Wall Font 6a+ High Blocs 1 Edison boulder. SS at the flake, up left to a long lunge for a good hold on the ramp. Swing right round the arete.6. Watt Wall Font 5+ High Blocs 1Slabby apexed wall down left from the Edison boulder. This teeters up the central seam, breaking left at the top. 7. Scissorhands Font 6c+ Bootcrack BlocThe knife-edged arete near the right end, climbed on the right side from a sit start. Highball. Dave MacLeod 2002.8. Project Bootcrack BlocThe left side of the cave from undercuts to an impasse and a drilled pocket..? The top wall may go a little easier.9. Split Personality Font 4+ Bootcrack BlocsOn the split block 50 metres downhill from the Bootcrack boulder - CS the left side of the crack.10. Glue Pony Font 6c+ Glue Pony BlocsAbove Roadside boulder by burn. Climb the left side of prow to slot and rock up left to the lip slopers exit left.11. Project Glue Pony BlocsThe obvious crimp rail right of Glue Pony has an attractive but very long and powerful lunge to the top!12. Paris Font 6c Dam BouldersIn the vale below the dam is a steep bloc taking the easier hanging right groove. Dave Redpath 2002.13. Project Dam BouldersThe steep wall left of Paris has monos and pockets but as yet has not been climbed.
Edison Wall
LOCH SLOY Map p. 5

7
Bloc NotesThis bloc is the huge cube lying beside another giant on the left flank of the glen below the dam, easily visible as you approach on the road. The best approach is to follow the road under the dam and skirt down to the blocs on the right side of the fences of the dam buildings. The problems are highball but the tops are juggy. Take a mat and tarp.
123
4
5
1. The Blobs Font 5+ The high wall facing the dam, with odd red protrusions. Climb direct via protruding blocks through a high left sidepull to crimps below hidden jugs on the highest blob. Easy climbing leads to the top.2. Whose Line Is It? Font 6c Sit start base of left arête, climb up to a handrail and traverse right to �nish up Blobs problem. 3. Probe Font 6b Climb the left edge of the Blobs wall following the line of two thin seams.4. Flake Arête Font 4 Right side of the right arête is easier but just as high.5. The Defender Font 6c Behind the boulder with the blobs is a leaning wall and arête in the small col between the giant boulders. SS on right, gain quartz pocket and slap up left for crimps, gain jugs and rock out the top.
Bloc NotesThis boulder lies about half way to the dam beside a junction in the road, opposite the bridge which leads to Ben Ime. The steep north side of this boulder has excellent rock but requires some clever pad placement to protect some moves. Most of the harder problems are the work of Dave MacLeod with powerful long moves and lock-off strength required to succeed.
1
2
3456
7
8
1. Zero Kelvin Font 7b+ CS Enthalpy, from the mono to a crimp and sloping pocket above.2. Enthalpy Font 7a+ CS edges to crimp and mono up left to the diagonal crack. 3. Free Energy Font 7b+ SS pocket to RH pocket thru sloper to diagonal crack. LH 7c.4. Powerhouse Font 7a SS blunt nose via slopers to the lip. Follow the edge L to The Economist.5. The Economist Font 6c+ SS niche, up to a break and crimps R to sloping finish.6. Splurge Font 7a+ SS back wall at pinch undercut, R then back L via undercut break to top.7. Triple X Font 5 SS the crack near the left end of the face.8. Energize Font 7b Start as for The Economist and traverse low left to finish up Triple X.
ROADSIDE BLOCMap p. 5
BLOBS BLOC Map p. 5
Dave MacLeod on Energize
Roadside Bloc
Blobs Wall

8
1. Cobbler Wall Font 6b High Boulder. To the far left of Crucifix, this is a clever solution to a puzzling blankness. From a quartz pinch and low right undercut, position yourself to reach a high left two-finger crimp, then find another undercut to gain the slotted pockets and the top.
2. The Tesseract Font 7a This is the vague scooped wall just to the left of Crucifix. Sit start in the groove and climb up and left through crimps to reach the better pockets of Cobbler Wall. FA Niall McNair 2004.
3. The Crucifix Font 6b This is the striking arête line facing the Cobbler on the higher boulder. Climb it direct with long reaches between holds, requir-ing balance and technique. First climbed by John Cunningham and the Creag Dhu members just after the Second World War. Try it on rations…
4. Occam’s Razor Font 6c+ Round the corner to the right is an impressive rippled west wall. Climb the black weep to the right of the Crucifix arête, needing steel in the fingers and grit in the soul.
5. Two Hot Honies Font 6b This climbs up to a good rail in the centre of the wall, where worry-ing reaches gain the top.
6. Left Wall Font 7a+ The lower boulder has good problems over the path. SS at a low pocket and press desperately to a three finger crescent hold, gain the big hole on the left, then gain higher holds to a ledge.
7. The Quartz Wall Font 5 The obvious quartz weakness through the centre. Pull directly through the quartz to the top. The caved prow to the right is unclimbed…
8. The Prow Pockets Font 6aClimb the far right-hand section of the roof through pockets to mantle out. Often attempted by fools with tools…
Bloc NotesThe two giant Narnain boulders have been climbed on for decades by climbers on their way to the peaks of the Cobbler. Once popular as a doss, the Creagh Dhu climbed some of the problems and this included an early ascent of Crucifix, which was a technical climbing highlight of the late forties and early fifties. They are situated on the Cobbler path before the main corrie, about an hour’s walk with a mat from the car-park at Succoth. Grid Ref. NN 272 056
NARNAIN BLOCS Map p. 3
67
8P
1 2 34
5
High Boulder descent scoop
High Boulder
Low Boulder
Niall McNair
John Cunningham on Crucifix

9
GLEN CROE
The Glen is easily gained from Glasgow by bus (Campbeltown service), or by car along the A83, a few winding miles west of Arrochar.
For the Precious boulder area, park at the large Honeymoon Bridge picnic area by the stand of trees. Climb up through the trees on the right for five minutes to the obvious giant bloc. 200 steep metres directly above this is the Supercrack wall.
For the other boulders, climb the hill over the bridge through the gorge to a parking spot by another bridge (Beer Can/Cutting Room), or continue on 100m to a layby on the right to the Roadside boulders (also the Woodwell area forestry track for Turbinal Nose).
Bloc Notes
This dramatic glen is a cragger’s delight, and recently it has become a decent bouldering venue. There are hundreds of boulders and walls, but only a few with high quality lines, as the ground can be terribly boggy or tree-hidden.
That said, there are many easy lines for the explorative boulderer, but it is probably best for choosing a project, as these are fantastic natural lines and they have very distinctive and powerful ‘schist moves’.
The best time to boulder is spring and early summer in a dry spell, as the steep-sided glen gets little sunlight in the winter. The problems described here are the best in the area and most have good dry landings, except the leaking Beer Can! Many new projects lurk in the forestry or on the higher alps below the peaks of the Cobbler and the Brack, as well as at Coilessan, Narnain and Glen Kinglas.
Most of the problems have been developed by the Creagh Dhu, Niall McNair, Mike Tweedley, Dave Redpath, Dave MacLeod & John Watson.

10
Bloc Notes: Wire brushes, a tarpaulin and several mats are very useful here. There are many easier problems and lots of rock but it is often disappoint-ing. The lower Glen Croe blocs are best in a dry spring or autumn spell, whereas the Kennedy boulder is better in summer. There is scope for more development especially on hidden blocs in the woods.
GLEN CROE BLOCS Map p. 3
1. Precious Font 7c Classic prow. SS at a pinch and climb up to a quartz pocket, crux moves to better holds on the leaning wall by a handrail, finish up the airy arête.
2. Supercrack Font 7b Right of the main crags is a wall left of a wee waterfall. Take the R-L horizontal crack using slopers and jams to finish up the juggier left crack to a jammed block.
3. Vulcan Wall Font 6c+ 100m right of Supercrack is a rounded wall. Start just right of the scoop and up right to the ‘vulcan’ split-finger pockets, reach up to finishing break.
4. Lopez Font 7a Fernandez Boulder (first wall above the old road and plunge pool). Traverse the vertical wall L-R through a pocket to jugs and finish up the groove on the right wall.
5. Ace Of Spades Font 7a+ Beer Can boulder lies over a stream and bog. SS obvious hanging right crack at a pocket and edge on the arête, climb crack to an ‘interesting’ finish.
6. The Cutting Room Font 7b+ Above the Beer Can cluster on plateau. Northwest wall of the drier boulder (left of The Nose). SS sidepull, wince through crimps to slap for the sloping shelf.
7. The Nose Font 6a+ The bulging nose of the Cutting Room boulder. From sidepulls, slap to the lip slopers, then follow these left to a quartz hold and rock to the top.
8. Rake Humour Font 6b+ The ‘Pitstop’ boulder is the roadside boulder just past the top layby under a tree. SS arête & cross to wall jugs, gain the big pocket and throw for the flat ledge, finish right.
9. Flash Bastard Font 7b Hard to find, this wall lies 50m into the woods north of the Pitstop boulder. If you find it, climb the obvious central wall on crimps.
10. Turbinal Nose Font 7c The Woodwell boulder. Up forestry track 400m below on left. SS slap up arête slopers to hook right to the lip, move right and pull left into the finishing groove.
5
6 7
Turbinal Nose
Rake Humour
Beercan Bloc
Cutting Room

11
11-16
3 4
5
6
7 8 910
Back Roof
Front Roof
1. Crossfire Font 6a Jugs up via undercuts through a low quartzy boss. 2. Assassin Font 6b SS right of small plinth. Good holds up right to a tough rockover.3. The Hotline Font 7c+ SS quartz sloper to crimp, match LH jugs & throw again for lip.4. The Nuclear Button 7c+ As Hotline but right to quartzy block, match & dyno for the lip.5. Trigger Happy Font 7b SS flakes and pockets problem just right of the embedded boulder.6. Cavalcade Font 7a+ As for Trigger Happy but break left to edge and dyno for the lip. 7. So Jackie O Font 7b SS sharp undercuts to RH sloper, match & up loose jug to rock over.8. Conspiracy Font 6c+ CS crimps and climb bulge mantle out at quartz jugs.9. Brinkmanship Font 7b SS press crimps to lip sloper to RH jug on slab, finish left.10. Bullit Font 7a A lip traverse of the low roof to the groove above Conspiracy. 11. Brains Font 6a Slab facing the glen. Descent on the other side over the heather.12. The Grassy Knoll Font 6a Back wall. LH crackline out of the cave to a hard rockover on the lip.13. Vietnam Font 6c Back wall. Low cave roof along hanging rail left to rock over via flake.14. Brain Drain Font 7b Direct of Vietnam from quartz pinch and rail to lip, mantel out.15. Bullet in Your Head 7b+ SS 2-finger pocket, lock up to slot in crack & through lip slopers. 16. Lone Gunman Font 6c SS low layaway feature to a flat pocket onto slab via slopers.17. Thermostatic Font 7c Howff bloc back arête. SS low holds & clamp via pinches and slopers.18. Oswald Font 6a Propped blocs roof 30m away from front face of Kennedy boulder.
Drive through Arrochar and swing into Glen Croe past the Ardgarten tourist centre, continue up past the Honeymoon parking to various layby at the second bridge over the River Croe by the waterfalls. Here you can see the bloc and its heather hat just underneath the craggy mass of‘The Brack’. From the ‘Brack’ side of the road-bridge, follow a fenced enclosure left and uphill over rough ground to a forestry road (5 mins). Continue right and uphill round the bends turning right at a junction, then shortly you’ll see the sign uphill for ‘The Brack 787m’. Follow this steeply through the forest for ten minutes and once clear of the forest, continue on the path uphill to where it crosses a wee water-fall. From here, contour across the open hillside towards the Kennedy boulder. A steep 40 minutes.
Bloc NotesLike a schist Bowderstone, but the parking is free and you’ll get it to yourself! The ‘front’ face of the boulder is a leaning wall and slab over a perfect grassy knoll, hence the themed names of the problems. The rock is a sharp, quartzy schist giving dynamic power problems. This really is the engine room of Glen Croe bouldering and the sheer concentrated butchness is what this bloc is all about, but there are plenty of other boulders in the area giving good amenable bouldering for all. Most of the problems were climbed by Michael Tweedley, Dave MacLeod and Dave Redpath around 2002 & 2003. Take a few wire brushes as some of the problems need cleaning after a long winter. Also bring plenty of chalk and nylon brushes to work out those quartz pockets!
1 2
1213
14
15
16
KENNEDY BLOCMap p. 3

12
Bloc Notes
NN 243 002 and marked as ‘Garbh’ on the OS 1:25000 map, Coilessan has a vast collection of boulders and crags below the 500m contour with a pleasant southerly aspect overlooking Loch Long and Arrochar. Some of the boulders are huge, the giant red/purple boulder being the centrepoint – ‘the Blaeberry’. The bouldering is extensive, but a lot of the schist rock needs cleaned.
Approach Notes
From Arrochar, head round the loch-head A83 and swing round the corner past Ardgarten campsite into Glen Croe. Turn off almost immediately at the Ardgarten visitor centre, cross the bridge, turn left and follow the B road for a few kilometres. There is a dead-end car-park at the top of a steep hill where the forestry tracks begin.
Walk along the forestry track 100m, turning right into Coilessan Glen (follow the ‘blue bicycle’ signs). After 500m at a junction (large boulder), turn left and continue up and left along the forest track for another 800m or so until a white post appears on the right beside a small stream. The crags and boulders are here visible high on the hill.
Follow the stream religiously uphill for about 15 minutes until well clear of the forest, then head left along the rising plateau towards the boulders, aiming for ‘the blaeberry’. Cross a fence and stomp up to the boulders. Allow 45 minutes. Don’t be tempted to descend through the forest by another route – this is the least painful!
Red October Font 7b The overhanging grey prow on the front face of the giant ‘Blaeberry’ boulder, finishing at jump-off jugs. From a low start sitting on the ‘plinth’, pull on and slap up to undercuts. Gain blind holds round left, tiptoe strenuously on the arête and power up to the slopey ledge jugs.
Blaeberry Crush Font 7a Just round the corner to the left of Red October on a low boulder, this is the obvious hanging arête in a grassy pit. From the lowest sit start, gain a crushing pinch and power up the arête to rockover onto the slab.
Niall’s Problem Font 7a The excellent Skyline boulder is the lowest stone overlook-ing Loch Long just above the forest. It may be small, but it is perfectly perched and has good rock. Climb the blank groove on the right from a sit start. FA Niall McNair 2007.
COILESSAN Map p. 3
Blaeberry Crush
Skyline Bloc
Coilessan view
Blaeberry Blocs
Niall’s Problem Red October
13
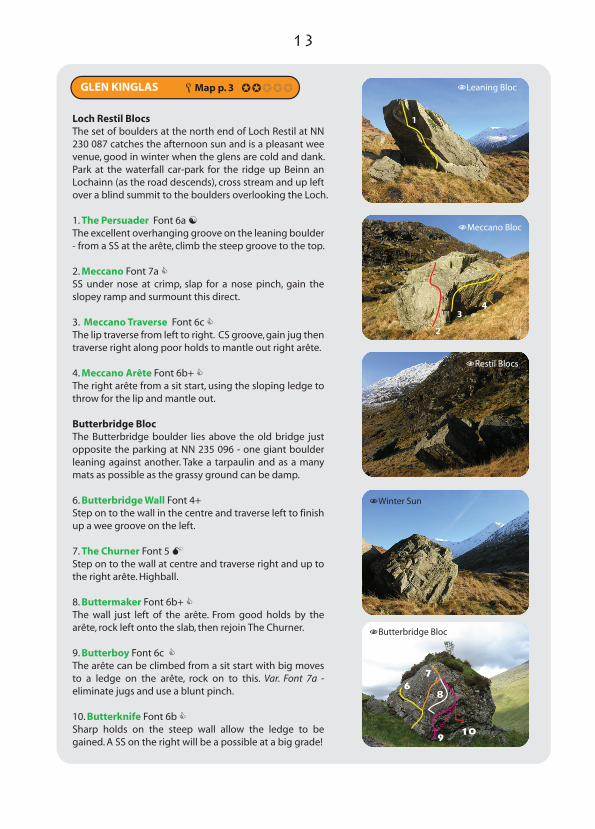
GLEN KINGLAS Map p. 3
5
Loch Restil BlocsThe set of boulders at the north end of Loch Restil at NN 230 087 catches the afternoon sun and is a pleasant wee venue, good in winter when the glens are cold and dank. Park at the waterfall car-park for the ridge up Beinn an Lochainn (as the road descends), cross stream and up left over a blind summit to the boulders overlooking the Loch.
1. The Persuader Font 6a The excellent overhanging groove on the leaning boulder - from a SS at the arête, climb the steep groove to the top.
2. Meccano Font 7a SS under nose at crimp, slap for a nose pinch, gain the slopey ramp and surmount this direct.
3. Meccano Traverse Font 6c The lip traverse from left to right. CS groove, gain jug then traverse right along poor holds to mantle out right arête.
4. Meccano Arête Font 6b+ The right arête from a sit start, using the sloping ledge to throw for the lip and mantle out.
Butterbridge BlocThe Butterbridge boulder lies above the old bridge just opposite the parking at NN 235 096 - one giant boulder leaning against another. Take a tarpaulin and as a many mats as possible as the grassy ground can be damp.
6. Butterbridge Wall Font 4+ Step on to the wall in the centre and traverse left to finish up a wee groove on the left.
7. The Churner Font 5 Step on to the wall at centre and traverse right and up to the right arête. Highball.
8. Buttermaker Font 6b+ The wall just left of the arête. From good holds by the arête, rock left onto the slab, then rejoin The Churner.
9. Butterboy Font 6c The arête can be climbed from a sit start with big moves to a ledge on the arête, rock on to this. Var. Font 7a - eliminate jugs and use a blunt pinch.
10. Butterknife Font 6b Sharp holds on the steep wall allow the ledge to be gained. A SS on the right will be a possible at a big grade!
Meccano Bloc
Restil Blocs
2
3
1
4
Leaning Bloc
Butterbridge Bloc
67
8
910
Winter Sun

14
‘The Anvil’ is the biggest boulder in Scotland! It hides in remote conifer woods and is only visible from Carrick Castle across Loch Goil. It is one hour easy walk from Lochgoilhead, quicker with bikes. Park in the village and walk along the residential road along the shore for a mile to a path leading up through the forest onto the main forestry road. Follow this south for what seems ages, round a dipping bend and burn and up again. As the road descends after another 2km to a flatter section, and directly opposite Carrick Castle, look out for an orange marker on the left. The giant block lies 20m uphill through the bushes. Suffers from seepage but dries out in summer. Best take a good map and seek out grid reference NS 206 949. There is plenty of bouldering potential up the hill behind the Anvil block, but the ‘Musical Block’ - the dark leaning wall left of the big roof - has two good problems from Mike Lee: Whiskers on Kittens Font 7a (the blunt arête on right side of the steep wall) and Raindrops on Roses Font 7a+ (just right of the small boulder, pull on at two side pulls and jump for LH hold. Top out direct). The routes are the butch progeny of Mike Tweedley, Dave Redpath, Dave MacLeod and Mal Smith.
THE ANVIL Map p. 3
Sport Routes R-L1. Way Out West F6c The right arête to ledge, then rock hard left to surmount final bulge.2. Nu Mettle F7bShallow right-trending groove to join Way Out West. Sloping holds.3. Hammertime F7b+ Main diagonal right on edges and pockets from first bolt of Black Out.4. Black Out F8b Malcolm Smith's testpiece straight up from Hammertime.5. Crossfire F7c+ Diagonal up Hammertime left through Spitfire, left along to Anvilfire LO.6. Spitfire F8a+ The red wall is fingery then dynamic with big moves to top quartz.7. Anvilfire F7c+The left arête of the front face onto the hanging slab at top.8. Friendly Fire F7a Up Anvilfire to first bolt, then left to slab and final juggy groove.9. The Atlantic Strikes Back 15m F7c+ The steep groove onto ledge and ramp above right to Friendly Fire LO.10. Cowal Crusaders F6cAlt. start to Friendly Fire. Ramp on the left and gain the ledge of original.11. The Smiddy 15m F8b+ The wall right of Shadowlands. At crack crux right to a jump finish.12. Shadowlands 20m F7c Classic cave arête via the long crack. Cave start to ledge then crack.13. Fire Power F8b Right side of the Anvil roof, starting right of the short arête.13. Blood Fire F8a+ Up the corner to a line of flat holds into Heavy Metal.14. Heavy Metal F7bGain Fire Power at mid-height by step off the opposite boulder. Pre-clip!15. Body Blow F8b+ Top half of the roof. Step off boulder and power up the headwall!16. Metalcore F8c+ Body Swerve start to follow the right-trending crack all the way to the apex of roof. 17. Body Swerve 8c The far left-hand roof. Bouldery, fingery desperation to easier groove of Amateur Hacker.18. Amateur Hacker 6cClimb round the prop boulder onto a shelf to slanting groove above.
Spitfire
Friendly Fire

15
TIGHNABRUAICH Map p. 3
Tighnabruaich is the pleasant marina town opposite Bute at the bottom of the Cowal peninsula. From Glasgow follow the A82 through Glen Croe and over the pass of Rest and Be Thankful to Glen Kinglas. Take the A815 signed for Dunoon and take a right at Strachur onto the A886 down Glendaruel. At the bottom of this glen take a right onto the A8003 which rises up to an obvious viewpoint over the Kyles of Bute and Loch Ridden a few miles before Tighnabruaich. Park out of the way, hop the rails and descend a rocky gully heading right steeply downhill. Mark Somerville, Mike Tweedley and Dave Redpath we should thank for their pioneering work! The first crag on the left is Savage Slab which turns the corner to a roof. For The Kraken keep descending to the right before Savage slab to a messy crag. Slide down the boulders to the right to come across the almighty Kraken roof. Jerusalem Buttress can be gained below Savage Slab to the left. The Lost World is seen across the trees from the descent gully. From the parking walk 50m uphill and bushwhack into a clearing above the crag. Abseil descents to bolt belays. Summer is horrible here - make sure you visit in spring or winter. In June, July and August the place is more like a rainforest.
Savage Slab1. Ya Butey 10m F6b+ Short wall is the first route seen.2. Event Horizon 12m F7c+ Hook along the cave lip to a jug and gain the pocket and rock over onto slab.3. Psychosis 12m F7b+ Campus over the lip, then gain tricky slab.4. Bananas in Pajamas 12m F7b Fingery pockets and a press crux gain better holds.8. Moon Beams and Honey Dreams 12m F7b+ Long reach to a sloping letterbox hold.
Jerusalem Buttress1. Killing in the Name Of 8m F7b+Steep gully wall to break, crux to chain. 2. Room With a View 15m F6b Left side of wedge through overlap to lower off.3. Jerusalem 15m F6b Right side of wedge. Pockets to slab.
The Lost World1. Distant Cries 20m F7b+ Left side of buttress. Wall to a grooved roof at top.2. Crouching Tiger 20m F6c+ Bolt belay to hanging ramp through the roof.3. Vanishing Point 20m F7a+ Bolt belay up slab to exit left through the roof. Bold.
The Kraken1. Moments of Enlightenment 10m F7a+ Power up wall, traverse to arête. Direct: Smoke on the Water F7b.2. Elysium 15m F8a The hanging ramp. Andromeda to jugs, undercut left to hanging ramp then arête.3. Apollo 15m F8a+ The horizontal groove, pulling over right on the nose. Groove undercuts sequence. 4. Hand of Andromeda 15m F8a+ Traverse into roof round past the jugs to gain the right wall and gain the crack to lower off. 5. Head of Medusa 10m F6b+Fight the Rhododendron bush to gain wall and through the overlap to ledge and next routes6. Shield of Perseus 18m F7c+ Left from ledge over crux shield to exit via groove.7. Clash of the Titans 22m F7b+ The overhanging wall above ledge to hanging arete direct.
The Kraken
1
2
3
4
5
67
The Lost World
1
2
3

16
Bloc NotesThere are plenty of other blocs in this glen for the explorative boulderer, but the highlight will be a visit to the almighty ‘House’ boulder which sits in a field under a line of trees. From the A815 at the bottom of Loch Eck, follow the Dunoon road over the bridge past the petrol garage and turn up the Glen Massan B road on the right. After 4km the boulders appear on the right, park just past Stonefield Farm by the river.
1
23
4
5
6
7
GLEN MASSAN Map p. 5
MIRACLE WALL Map p. 3
House Boulder
Sport NotesThis attractive little wall has unusual 'hueco' pockets and a few enjoyable sports routes. It is easily accessi-ble from the A815 Dunoon road on the east bank of Loch Eck, 3km south after the B-road turn o� to Ardentinny. As the road opens onto a straight section open to the loch, look out for a stone wall on the left. Park in a tiny layby at the end of this (old signpost ‘Dunoon’) or in laybys round the sharp bend. The crag lies in the woods above the road just before the sharp bend, above a boulder by the roadside. Routes are all no longer than 10m but have easy but run-out tops to the lower o�s.
Routes Left to Right1. Angels With Dirty Faces F7b Gain the crack and then up right via quartz pockets to reach the slab and lower o� on right.2. Holyman F6c Super pocket pulling up to the slab and lower o�.3. Bible Babble F6c Up the main wall on the right via a crux section mid height. Slab �nish.
House Boulder1. Right Wall Groove Font 6a+ Climb the groove on the right wall, from a crouching start it is 6c+.2. Crocodile Font 6c+ Start at the right arête at hard undercuts and use the flake to gain and climb the wall & groove.3. Broadsword Font 7c Blade Runner to the pocket, continue via tiny pockets, moving left at the top to a flat jug. 4. Rapier Font 7c SS Blade Runner up LH crimps to a mono. Up wall via two-finger pockets to a finishing jug. 5. Blade Runner Font 7b+ SS centre of front face and use side pulls and a poor crimp to crux move right to finish in a halfway pocket.6. House Boulder Arête Font 6aClimb the wall just right of the arête using pockets to the right.7. House Traverse Font 7b Traverse L-R arête. Strenuous undercutting crux then a pocket moves gains a spike on the right arête.
123
Miracle Wall