Arranging Walkthrough 1: “Happy Birthday” Web viewHow about an entirely different style:...
20
Contemporary a cappella has been around for over a decade, resulting in a dynamic and rhythmic sound and style that makes it different from barbershop, doo wop, close harmony, and other a cappella styles. Learn how to create a great contemporary a cappella arrangement using this tried and true 10 step formula. I) Choose a Song It's easy to come up with songs that would be fun to arrange, but usually there is a question of what's needed in the repertoire, or what's missing stylistically. Avoiding songs that are frequently performed by other a cappella groups is a good idea your group will make a name for itself much more quickly if you develop your own sound. You group should have a great first and last song, a great encore, and at least one ballad at its disposal. Make sure you have someone in your group who can sing the solo of the song you choose. The soloist is the most important vocalist in any song, and since as arranger you're organizing everything around this central voice and melody, you'd better be sure that you have a voice that can get the job done. II) Listen to the Original Repeatedly! This principle is the same as in foreign language study; listen to the song over and over and over again. While you're concentrating, and while you're not. You will begin to hear sounds, textures, rhythms, and chords that you never heard before, some of which are very subtle and mixed quietly in the background and can add a lot to make your arrangement exciting and interesting. III) Buy the Sheet Music - Get a midi file - Look at & listen to other arrangements of the song Stravinsky admitted to "stealing" musical ideas from others and himself, and he wasn't the first great musician to do so. There is a plagiarism case to be made from someone copying a paragraph out of a book, but there is no ownership of a texture, or vocal lick, or arranging trick. The artistry is in knowing when and where to use these various elements to enhance your personal style as opposed to slavishly imitating. Caveat emptor: there can be mistakes or simplifications in printed music/midi files (melody and/or chords), but if you've internalized the song, you'll catch them. At the same time, there can be interesting decisions made in vocal/piano or guitar arrangements that may spark new ideas. IV) Decide on a Form Sometimes there's no decision to be made, and other times it will take a great deal of creativity to know how to sew together the important sections of a song that has a lot of instrumental filler. The longer the original, the more
Transcript of Arranging Walkthrough 1: “Happy Birthday” Web viewHow about an entirely different style:...

Contemporary a cappella has been around for over a decade, resulting in a dynamic and rhythmic sound and style that makes it different from barbershop, doo wop, close harmony, and other a cappella styles. Learn how to create a great contemporary a cappella arrangement using this tried and true 10 step formula.
I) Choose a SongIt's easy to come up with songs that would be fun to arrange, but usually there is a question of what's needed in the repertoire, or what's missing stylistically. Avoiding songs that are frequently performed by other a cappella groups is a good idea your group will make a name for itself much more quickly if you develop your own sound. You group should have a great first and last song, a great encore, and at least one ballad at its disposal. Make sure you have someone in your group who can sing the solo of the song you choose. The soloist is the most important vocalist in any song, and since as arranger you're organizing everything around this central voice and melody, you'd better be sure that you have a voice that can get the job done.
II) Listen to the Original Repeatedly!This principle is the same as in foreign language study; listen to the song over and over and over again. While you're concentrating, and while you're not. You will begin to hear sounds, textures, rhythms, and chords that you never heard before, some of which are very subtle and mixed quietly in the background and can add a lot to make your arrangement exciting and interesting.
III) Buy the Sheet Music - Get a midi file - Look at & listen to other arrangements of the songStravinsky admitted to "stealing" musical ideas from others and himself, and he wasn't the first great musician to do so. There is a plagiarism case to be made from someone copying a paragraph out of a book, but there is no ownership of a texture, or vocal lick, or arranging trick. The artistry is in knowing when and where to use these various elements to enhance your personal style as opposed to slavishly imitating.
Caveat emptor: there can be mistakes or simplifications in printed music/midi files (melody and/or chords), but if you've internalized the song, you'll catch them. At the same time, there can be interesting decisions made in vocal/piano or guitar arrangements that may spark new ideas.
IV) Decide on a FormSometimes there's no decision to be made, and other times it will take a great deal of creativity to know how to sew together the important sections of a song that has a lot of instrumental filler. The longer the original, the more likely you'll have to cut something - say what needs to be said as poignantly as possible, and avoid unnecessary repetition. Since many songs are written for and recorded with instruments, there are often solos, long intros, and transitional passages that translate poorly to voices. Try singing through from start to finish, and see where you lose interest. Also listen for what sounds stupid when you sing it.
V) Lay Out the Paper/Computer File/CassetteIt doesn't matter if you notate music on paper, or use a computer program, or arrange by ear into a 4 track recorder it's important to set a solid framework. You'll need to choose the number of staves and measures per page, which brings up the question of the number of parts. If you have a small ensemble, your choice is made for you, as doubling only one or two parts can cause an imbalance. If you're arranging for a small ensemble consider assigning at least two people per part - you'll get a fuller sound, and tuning will be easier. Try to designate more people on the bass part. The lower-frequency bass lines can be drowned out by screaming tenors/sopranos when performing live. An easily audible bass line provides a solid harmonic centre that will help everyone tune better.

Don't forget to factor in the soloist and any extra parts, such as vocal percussion or duet lines, that need their own room on the paper. The solo should be on the top line, and may be joined by duet or trio parts. Ideally you should avoid having more than two parts per line, as the inner voices usually have difficulty following their parts in the middle of a cluster. When you have two parts (or more) per line, the upper voice should have "stems up" throughout, and the lower voice "stems down".
Finally, "lay out" the song by counting the number of measures, and making a note where each section begins (verse, chorus, bridge, etc.). Next, fill in your clefs and key signatures. When you're done, you'll have a solid framework that will allow you to work on sections in any order you'd like without confusion as to where you are or how it fits with the rest of the song.
VI) Write Out the SoloHaving the solo line written down will keep you from losing your place while you're arranging - it serves as a "place-keeper" and a road map. For small groups, the soloist's pitch and rhythm is important to consider at all times. Sometimes you will be missing a note in a chord, and the solo could be filling it in. Also remember that in performance a soloist sometimes doesn't sing exactly the same notes and rhythms as the original, or as the last time they performed the song. For this reason its worth noting, as you arrange, what sections of the melody should be sung exactly as written to make the arrangement work.
VII) Write Out the Bass LineIf the bass line in the original song is unique and/or memorable, you're probably going to want to duplicate it as closely as possible. If the bass isn't clearly definable, then you're free to weave a bass line of your own. Consider vocal range, roots of the chords, and the rhythmic feel of the original as primary factors. The bass line is the song's "second melody" and is usually the most recognizable line after the solo, so make it melodic, catchy, and fun. Also - don't forget to take into consideration things like where your bass is going to breathe, how fast they can articulate and how long they can sustain a note.
VIII) Write the UppersThe other background voices, or uppers are usually treated as a unit in contemporary a cappella arranging. Of all of these ten steps, this will prove the most time consuming, demanding, and ultimately most rewarding, as it's here that you get to be your most creative. There are many considerations when writing these parts too many to list exhaustively here. A few things to watch for are:
-Rhythmic variety (different rhythms from the solo and bass) -Syllabic sounds (words? nonsense syllables?) Voice leading (no unnecessary jumps, making the lines melodic)-Duet/Trio (same words/rhythms as the melody)-Block Chords vs. Counterpoint (all voices acting as a single unit vs. each line separate)-Arpeggiation (spelling out chords by singing one note at a time)-Instrumental idioms (using voices to imitate instrumental sounds/textures)-Musical Styles (classical, doo-wop, close harmony, pop, R&B, etc.)-Quoting other songs
IX) The Final TouchesNow is the time to go back and sing through the entire arrangement in your head. What does it need? Where is it too empty or repetitious? How do the sections fit together? Where are the weak passages and how can I fix them? It's best to turn your editor off when you're originally coming up with ideas, but at this stage you need to turn it back on and look at your arrangement as a whole.
X) Perform and LearnA great arrangement is one that grows and changes with the groups that sing it. Suggestions from the group, and your own changes after you hear a proper sing-through will only make the chart better. When listening to the sing-through, focus on your chart and their performance of it. How does the arrangement sound? Is it what you expected? What differs from your expectations, and do you like it or not? Be honest with yourself, and be open to trying a variety of ideas and suggestions. To be a great arranger you have to know how to write a standard arrangement, and also have the creativity and drive to try something new. The best arrangements manage to maintain the successful elements of an original version, and also bring to it something new.
Deke Sharon has been arranging a cappella since high school, and might just be the world's most prolific contemporary a cappella arranger. Custom and published arrangements by Deke are available at www.totalvocal.com.
2000 Total Vocal Music - all rights reserved If you’ve read the last two installments of this column about arranging approaches you might have a few questions about how to actually execute these ideas in practice. Fear not – the next two columns are for you! This time around we’re going to discuss syllables: one of the major tools you have at your disposal to use within the larger conceptual frameworks we’ve discussed, in order to come up with what exactly in the heck you’re going to put down on paper (or record).
If you’re a beginning or intermediate arranger (or really even if you consider yourself advanced) the best way to keep ideas for syllables percolating is to listen to a ton of a cappella. If you’re just starting out, this is going to give you an idea of what’s possible. If you’re more experienced, this is going to help you find out what has been overdone versus what still sounds fresh. If you’re advanced, you get to evaluate the work of others against what you have done or would have done – which keeps your ears on their toes!
Listening to your peers gives you the foundation, so where do you go from there? Consider the function of syllables (for ease of discussion, I refer to anything that’s a sung background as a “syllable”). Background syllables give shape to your vocals, which themselves are standing in for whatever instruments filled the same function in the song you’re covering (unless the song is being written originally a cappella, in which case, good for you!). Your challenge as an arranger is how to use these shapes to represent your impression of the music – not necessarily to best emulate the exact sound of the original instrument.
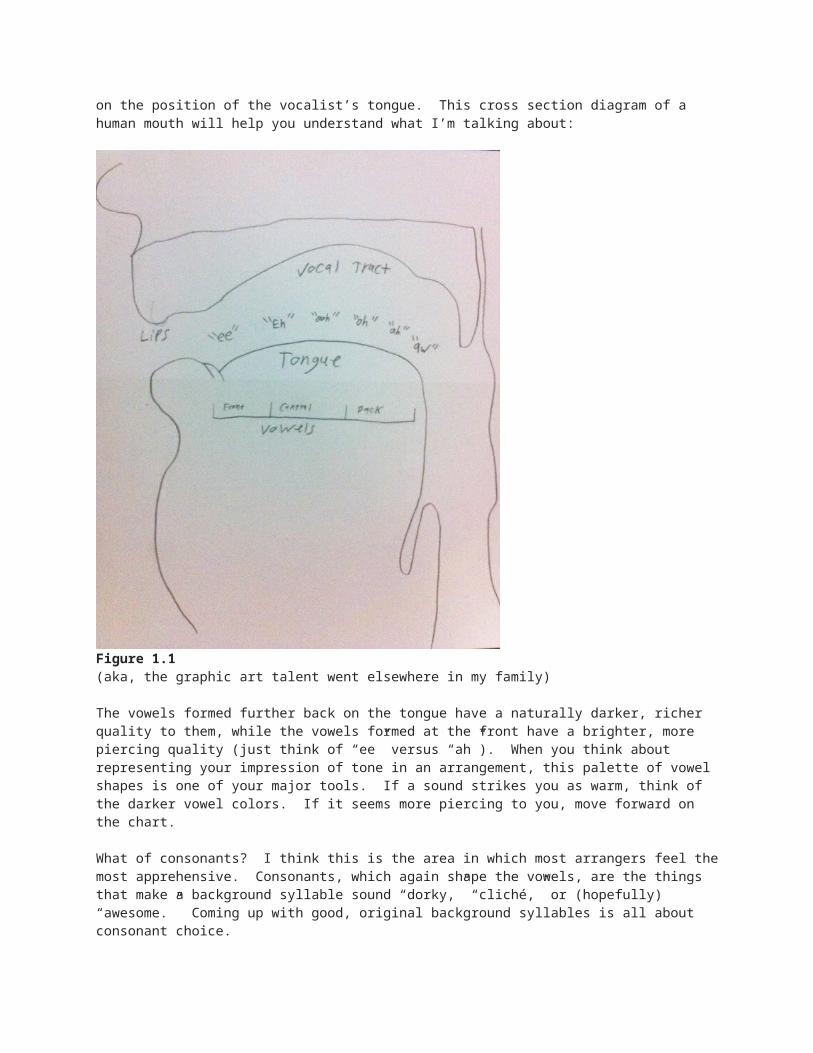
Let’s take a step back for a second and talk about vocal character. Vowels and consonants all have different qualities to them. Scientifically this is based on the overtones present in each sound, but that’s a bit beyond the scope of this article. First and foremost we have vowels, which carry the emotion in speech and singing, and which change in character based primarily on the position of the vocalist’s tongue. This cross section diagram of a human mouth will help you understand what I’m talking about:

Figure 1.1(aka, the graphic art talent went elsewhere in my family)
The vowels formed further back on the tongue have a naturally darker, richer quality to them, while the vowels formed at the front have a brighter, more piercing quality (just think of “ee” versus “ah”). When you think about representing your impression of tone in an arrangement, this palette of vowel shapes is one of your major tools. If a sound strikes you as warm, think of the darker vowel colors. If it seems more piercing to you, move forward on the chart.
What of consonants? I think this is the area in which most arrangers feel the most apprehensive. Consonants, which again shape the vowels, are the things that make a background syllable sound “dorky,” “cliché,” or (hopefully) “awesome.” Coming up with good, original background syllables is all about consonant choice.
So how do you choose? A good place to start is what feels natural to you. A good rule of thumb in all arranging is that if you can’t sing it, how will your group be able to? When you’re interpreting a line, after you’ve picked the vocal color (or perhaps colors) you feel is appropriate, ask yourself what consonants will best frame the sound around the rhythm you’re trying to convey so that the syllables roll easily off the tongue. The goal first and foremost is to create a background line that can be sung with ease so that the performer can focus on an expressive delivery.
Using this as a jumping off point, there are lots of things you can do to come up with creative new syllables. If you speak a foreign language, mine it for sounds that are distinctively non-English (Middle
Eastern and Asian languages have a host of sounds just waiting to be incorporated). If you have a particular regional accent (and you probably do whether you realize it or not) listen to others talking and experiment with their delivery as the basis for your syllable (Tom Anderson has spoken of the Mid-Western bright “oh” sound as a particularly powerful vowel choice). Of course, no matter how you choose to create your syllables, check in with other recordings to see how they compare to what’s been done, and check with your gut to make sure they’re effective!
Many arrangers have their own philosophies when it comes to what makes a background sound effective or not. I invite everyone to sound off in the comment section below. What makes a background effective to your ear? What strikes you as awkward or cliché? Everyone’s opinions are different, and everyone’s thoughts are valid!
Next time we’ll talk a bit about harmony. What are your options when it comes to expanding the harmonic body of the song you’re arranging? When you’re re-interpreting a song, which parts will a listener most readily gravitate to in order to make sense of your arrangement? How many notes is too many? All this and more coming your way.
About the author:Robert Dietz is a recent graduate of Ithaca College in upstate New York where he received a dual degree in music and business. He began singing in high school when he founded the Contemporary A Cappella Recording Award (CARA) winning male quintet, Ascending Height. During his time at Ithaca College, Robert had the pleasure of performing with and conducting Ithaca College’s only all male a cappella group, Ithacappella. Along with Ithacappella, Robert had the honor of twice advancing to the finals of the International Championship of Collegiate A Cappella (ICCAs), as well as sharing the stage with the internationally renowned rock band, Incubus. In addition to his CARA awards and nominations, Robert also holds three ICCA awards for outstanding vocal percussion, and his 100th arrangement received the award for outstanding arrangement at the ICCA semifinals at Rutgers in 2009. He currently lives in Sydney, Australia and is pursuing a graduate diploma in Music Composition and Production at the Australian Institute of Music.From portamental.com Lots of resources there!
The Quick and Dirty 10-step GuidePosted by Dan Newman on January 27, 2009 at 3:06 pm.
When you get a chance, slow down and clean up. Look presentable.So maybe you don’t want to peruse the multitude of articles right now, and you just want fast and easy directions of how to do an a cappella arrangement. Will do, but here’s the caveat- this is just one way of going about an arrangement. I would recommend reading the other articles on this website when you get the chance, as well as be aware of what works and doesn’t work for you.So here we go!1– Research and learning the song. Listen to the original tune and focus on it, but also have it on in the background while you do other stuff so it seeps inside your head. Familiarize yourself with the lyrics, the history of the song, the group that made it, everything. Scrounge around and see if you can find different versions. Take notes of what you think is cool, and STEAL IT! Great composers steal, and great arrangements steal from other sources. If you’re doing Autumn Leaves and you find a great lick in a techno version, take it and run.2– Chart out the form. Pop tunes are easy- they have very distinguishable sections, and often the chords repeat- so if you’re doing that, figure out what a “section” is and everything that goes on in it. When does the chorus start, how long is it, what are the chord changes? Ditto for verse, bridge, etc. Call a section whatever you want, just be consistent. If you’re a music theory nerd and know your roman numerals , do that (as well as the actual chord changes) so if you need to transpose later on, it’ll be easier . Chart out when each section happens- this will be your cheat sheet when you’re putting in the notes.When you’re doing this, you can start incorporating the gimmicks you picked up during research. Perhaps the bridge should be from another version- write that in. Are you mashing up tunes into a medley? Figure out what goes where, what parts need to be linked by what chords, if anything can be layered, etc.3– Plan out the parts. Depending on your role as the arranger, you may be making custom parts for particular singers or generic parts. Generic parts need to stay in certain ranges, and you have to know

that going outside them will make certain effects that you can’t really expect. For most pop tunes, you’ll want to keep a more compressed range, or if you have a larger group, also go for a more conservative range. As you get higher/lower, people’s individual voice quirks come out and it’s harder to blend and tune. For this step, be aware of the playing field for each voice.4– Start putting down notes. You know what notes to put in because you have the chords all written out and the parts delineated. You know how many measures to fill because you’ve charted the section lengths. You’ve cut down on your work by half because the song repeats all over the place. All you have to concentrate on now is vocal texture. See?! Preparation pays off. Use your cheat sheet liberally, but don’t be afraid of deviating from your plan if the moment sweeps you up.
Steal syllable ideas from...all types of places5– Putting in syllables. Don’t feel that you MUST wait until you’ve written every note before putting in syllables. Syllables for an a cappella group can be tricky if they’re to be done right, and if you write a particular texture that beautifully links with a certain word or syllable, go for it! If you are making an arrangement that uses words or sentences, then your texture will probably cater to these words. Don’t forget that the way an a cappella group forms notes can allow for just as much creativity and expression as pitch. Practice making goofy sounds in the shower to see what noises are made by certain syllables.Balance your syllables just like you balance parts- don’t have everyone on open vowels and two people with glottal syllables unless it’s for a particular reason. Let syllables characterize parts- have a particular riff be on a distinctive syllable pattern so it will be recognized in any part. Don’t underestimate the power of sustained “oohs” and “ahhs” as filler behind more distinctive textures- the voice does “oohs” and “ahhs” pretty well.6– Musical shaping. Knowing what group you’re arranging for may make this more or less important: a small and musically savvy group could listen and shape their parts around the other singers, or they could depend heavily on your instruction as an arranger. If you are writing for a group that doesn’t spontaneously shape the musical phrases, you have to do it for them! A tip for shaping is to utilize the number of parts doing certain things. If something is important, bring it out through volume, its texture relative to the other parts, or the number of people singing it. Also, you can drop out parts to highlight something, but don’t bore your singers too much by having them not sing. Entertained singers sing better…7– Make it pretty. Presentation is not only a method for ensuring another commission, but it’s part of preparing the arrangement for teaching. You’ve translated all of your great ideas and creativity into something wonderful, but now you have to translate it into the vernacular for singers and teachers. Pay special attention to syllables; syllables are often the most confused part of an arrangement due to millions of dialects and accents and it’s pretty much the syllables that are the most subtle affects that you can engineer in the parts.
Notes! Everywhere!If you handwrite your arrangement, make it very neat. If you use a computer program, make sure things don’t accidentally overlap or squish to be unreadable when you print. Put in measure numbers! Paginate! Mark your clearly delineated sections as sections, with either giant letters or the actual title of the section (“Chorus, Verse 2…”). If you have a metronome speed, mark it in the score. Give as much info as a teacher could want.8– Be receptive to input. Edit your arrangement like you would a term paper, and don’t be afraid to murder your darling. Don’t be afraid to strike what seemed to be a good idea- you definitely will have plenty more to fill the hole. Always always ALWAYS give credit to the original artist. They put in hard work just like you, and they totally deserve the credit. If your arrangement is really good, you can take the credit for that, but don’t be greedy. There’s plenty of ego stroking in making a good arrangement.Share what you’ve done! It’s a way of giving credit to the little steals you’ve done during the research phase. If you’re proud of your work, don’t be afraid to show it off!

9– Smile a lot.10– Everyone knows that quality lists are ten items long.Arranging Walkthrough 1: “Happy Birthday”Posted by Dan Newman on July 12, 2009 at 11:25 pm.
The proof is in the pudding. Or icing.In this article, we’ll be going through the motions of arranging a song. Instead of looking at a completed arrangement, we’ll walk through every step of the process to show how an a cappella arrangement evolves and is finally completed. Today, the tune is Happy Birthday, that old standby of yore.
STEP ONE- LEARN+PLAN
First things first, the original tune:Audio clip: Adobe Flash Player (version 9 or above) is required to play this audio clip. Download the
latest version here. You also need to have JavaScript enabled in your browser.Sounds familiar, eh? There are bajillions of ways to take this simple tune and morph it, or harmonize it, or arrange it for lute choir, so let’s narrow down the field a little bit. I think that an all-female SSAA quartet would love a short and nicely harmonized take that they can sing at concerts to some poor audience member. I believe that they’re called the SmarterTones.Already, the arrangement is taking form:
Four parts Two sopranos, two altos Short and simple Pretty harmoniesGreat! Is inane as it sounds, these four points help to trim down the possible directions you can take the arrangement. For this short tune, that’s enough planning…but don’t hesitate to go out and find other arrangements, other styles, other interpretations. Happy Birthday is ubiquitous enough to go in and arrange right away, but learning more about what’s out there will always help in some way.
STEP TWO- THE SETUP
Because I arrange on a computer, I’ll explain how to setup the page in a computer program. However, you can do this on paper just as easily; I just promised to walk through every step!(Did you know that you can download a music notation software demo for free? Check out Composition and Notation to see a bit about the ups and downs of using a computer program)
Create a new composition Set four staves (or four parts, look for Voice Oohs or Ahhs) Let’s do this in F major! Set the key signature for F major (one flat). What’s the time signature? If the first two notes are upbeats (the “Happy-“), then the downbeats
are “Happy birthday to you. Happy birthday to you…” That’s in three! We can set the time signature for 3/4.
The clefs will all be treble clefs, since it’s all girls. You could set the Altos to another clef (like alto or tenor clef), but most people just read bass and treble, so let’s keep it simple.
There’s your setup, the page should look a little like this:

The score.Now, let’s get into putting down notes!STEP THREE- MELODYIn this arrangement, we’ll keep the melody line in one of the parts. The audience can sing along! So, let’s do the work and transcribe the melody.You may be asking, “What’s an easy way to do this?” I answer, “Practice.” The skill of transcribing is one you can’t really fudge when you’re an arranger. Do a lot of it, and it’ll get easy. Sorry, there’s no trick.Here’s the melody line:
Happy birfday!Let’s put this in the Sop 2 part. Why? Just because.STEP FOUR- CHORDS

I’ve been raised on roman numerals, so I tend to think in roots and dominants. It’s a powerful way of attacking an arrangement: hearing how chords function lets you transpose and analyze any piece that isn’t too complicated. That’s music theory ear training paying off, finally. But anyways, back to the chord transcription.A tonic chord in F major is an F major chord- it sounds like home. All the words that sound like home are:
Now with tonic!The D’s in the second and fourth measures as well as the E in the seventh measure are non-chord tones…they won’t fit into the chord of the measure, but they resolve into the chord of the measure. In a nutshell, they sound a little wrong then sound right, which makes it all sound pretty.The dominant chord in F major is the C major chord, sometimes with an added Bflat (making it a dominant seventh chord). They sound like they should go home on the next chord. Added into the picture above are the dominant chords:
Plus some dominance...The subdominant chord in F major is Bflat major. A subdominant chord can go lots of places- to the dominant, back home to the tonic, to Venezuela…long story short, it’s the chords that aren’t the dominant and tonic, like this:
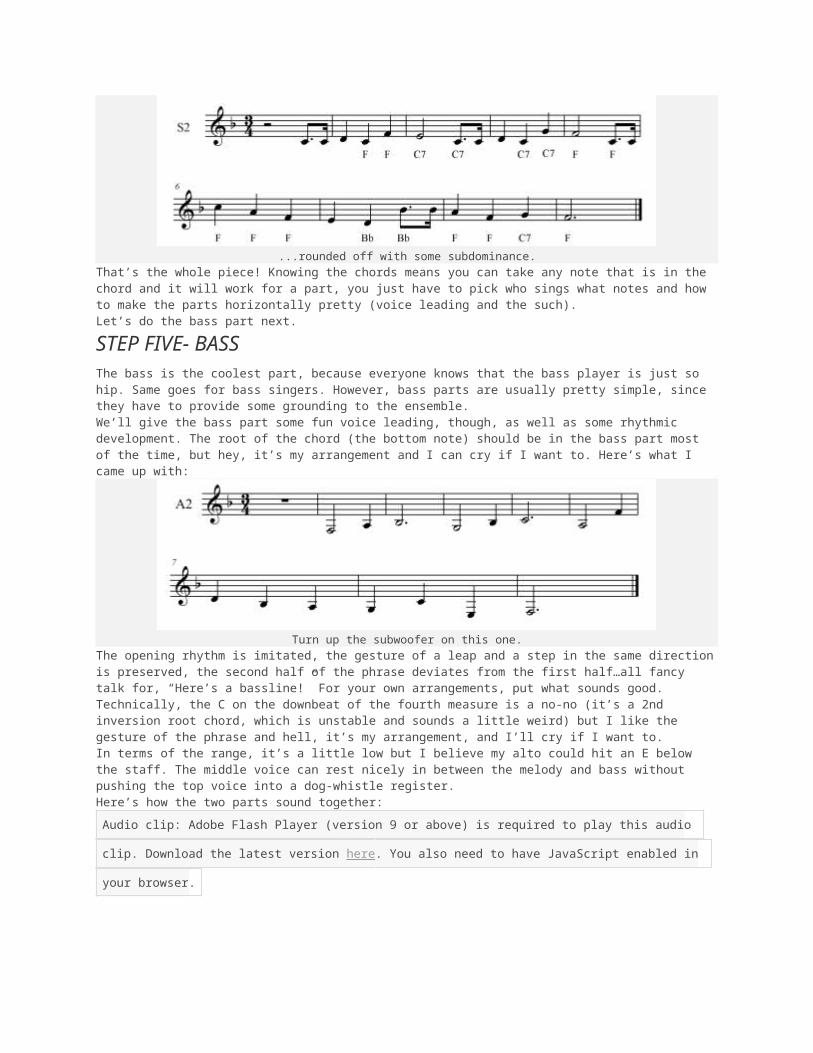
...rounded off with some subdominance.That’s the whole piece! Knowing the chords means you can take any note that is in the chord and it will work for a part, you just have to pick who sings what notes and how to make the parts horizontally pretty (voice leading and the such).Let’s do the bass part next.STEP FIVE- BASSThe bass is the coolest part, because everyone knows that the bass player is just so hip. Same goes for bass singers. However, bass parts are usually pretty simple, since they have to provide some grounding to the ensemble.

We’ll give the bass part some fun voice leading, though, as well as some rhythmic development. The root of the chord (the bottom note) should be in the bass part most of the time, but hey, it’s my arrangement and I can cry if I want to. Here’s what I came up with:
Turn up the subwoofer on this one.The opening rhythm is imitated, the gesture of a leap and a step in the same direction is preserved, the second half of the phrase deviates from the first half…all fancy talk for, “Here’s a bassline!” For your own arrangements, put what sounds good. Technically, the C on the downbeat of the fourth measure is a no-no (it’s a 2nd inversion root chord, which is unstable and sounds a little weird) but I like the gesture of the phrase and hell, it’s my arrangement, and I’ll cry if I want to.In terms of the range, it’s a little low but I believe my alto could hit an E below the staff. The middle voice can rest nicely in between the melody and bass without pushing the top voice into a dog-whistle register.Here’s how the two parts sound together:Audio clip: Adobe Flash Player (version 9 or above) is required to play this audio clip. Download the
latest version here. You also need to have JavaScript enabled in your browser.
STEP SIX- THE MIDDLE AND TOP VOICESI’m going to have the middle voice work with the bass voice and copy some rhythms and gestures, but let it have it’s own identity. I also want something speedy in the second-to-last measure, called the penultimate measure (great Scrabble word). Here’s what I came up with:
Snug as a bug in a rug.Here’s how it sounds, with three parts together:Audio clip: Adobe Flash Player (version 9 or above) is required to play this audio clip. Download the
latest version here. You also need to have JavaScript enabled in your browser.Not bad, eh? I like smooth voice leading because it sounds pretty and it’s easier to sing, but some leaps give it energy and make it exciting. Don’t ask me how leaps=energy or smoothness=pretty: the many metaphors in music analysis cannot really explain how music makes you feel one thing or another, but theorists will always keep pumping out the language…shmeh.Now the top voice, the icing on top. It’s going to have long and sustained notes, and I’d prefer if it was below an E or D- I’m jonesin’ for a tighter sound, rather than a spread-out sound. How about this:
Buttercream.

Smooth lines, and I keep below my waterline of a D by hitting only a C. Sweet. And now, with all the parts:Audio clip: Adobe Flash Player (version 9 or above) is required to play this audio clip. Download the
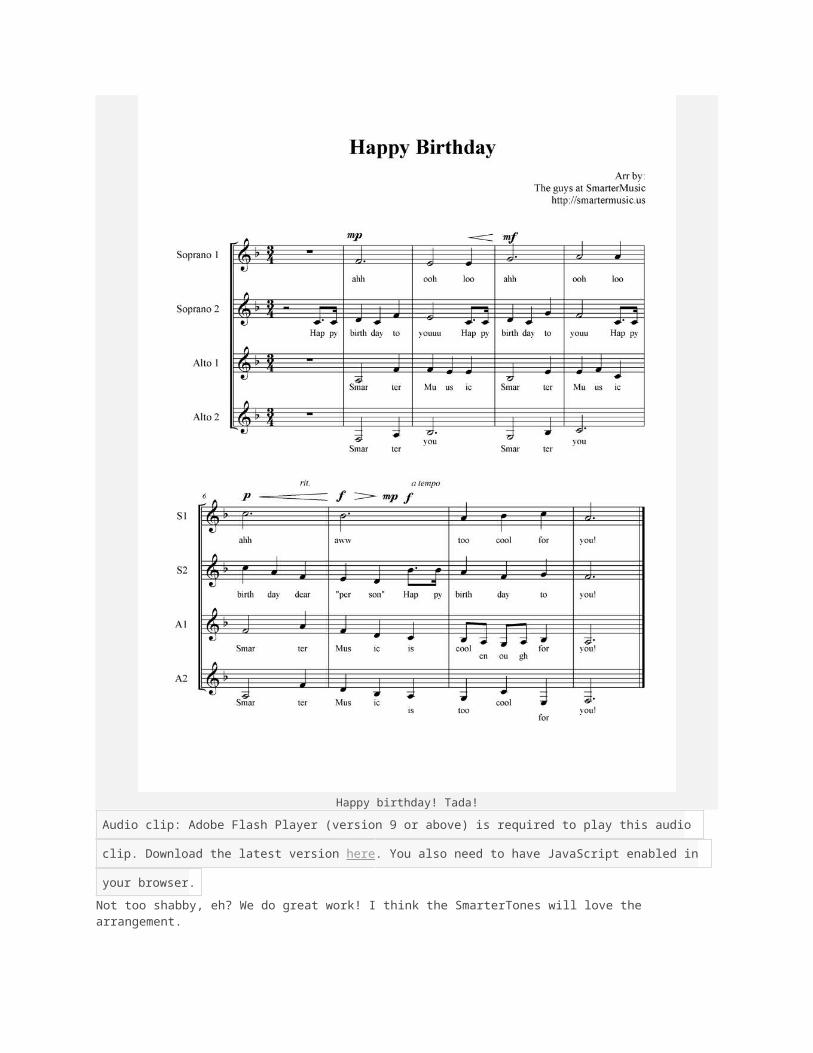
latest version here. You also need to have JavaScript enabled in your browser.It’s time to proofread the parts, do some tune-ups, and put in syllables.STEP SEVEN-SYLLABLESMaking syllables can be tedious, lame, and difficult. However, they can also be lots of fun. So, this arrangement will have some fun in it too. Instead of generic and boring syllables, let’s be shameless:“SmarterMusic” will be the basis for syllables.This is in actuality a dumb decision, but as cited before, it’s my arrangement and I’ll cry if I want to. It’s a bad idea because the Happy Birthday lyrics are the focal point, and if they get obscured you diminish the arrangement. Lots of erroneous words distract and dilute the effect of a fun and spontaneous Happy Birthday. Keep this in mind whenever you work an arrangement with dueling words- they draw the listener’s ear in two directions, which can be great or terrible.But let’s give this a shot. If we pretend that it’s a Boston-based female quartet and they pronounce their “Smart” more like “Smahht”, then the sustained Soprano 1 can sustain on “Ahh” and blend with the “Smart”. So, I’ll fill in some lyrics here…
I took some care to make the syllables match up somewhat. See the “music”, “ooh”, and “you” line up? The “ooh” phoneme will bring the four parts together. Here’s the second half with some more background lyrics:
The homophony of the last “you” will bring together the parts after the word salad in the previous measure…though it’s kind of like putting a band-aid on an amputation. Well, not that extreme, but this ain’t winning any KARA awards.
STEP EIGHT- PROOFREAD AND STUFFThe SmarterTones prefer scores, so lets make sure to paginate and put in measure numbers. Most computer programs do that automatically. Resize the page so the arrangement fits nicely- nine measures works out fine, but page turns could be a problem with a 14-page arrangement.Yes, this stage includes the boring stuff like putting in a nice heading and correcting the capitalization in the lyrics. This arrangement may be throw-away, but let’s put some dynamics and shaping in. A little louder with each sentence…a little grow near the end…a ritard here and there…who says a cappella isn’t an art? I like to put my dynamics in a place that can be seen without peering through all the parts; in this case, above the staff.Here’s the final, finished arrangement and audio file:

Happy birthday! Tada!Audio clip: Adobe Flash Player (version 9 or above) is required to play this audio clip. Download the
latest version here. You also need to have JavaScript enabled in your browser.Not too shabby, eh? We do great work! I think the SmarterTones will love the arrangement.(Side note: The Happy Birthday song is under copyright, so technically this was an illegal arranging. Be sure you secure the rights to other songs, unless they were written in the 1800s or before. Madrigals are ok, so you can breathe easy.)
TEN TIPS AND TRICKS FOR CRAFTING A GREAT ARRANGEMENTCreating your own original arrangement may sound daunting, but with patience, good listening skills, and perseverance, you can craft an exciting, engaging song that will be rewarding to sing and be heard. These tips are by no means exhaustive, and every arranger is different, but below you'll find some tried and true methods that have served me well over the years.
1) BE PICKY. Just because a song sounds good on the radio doesn't mean it will translate well to a cappella. Be selective; don't just go for whatever hit is on top of the charts. Think outside the box: pick an old standard or an 80's guilty pleasure, something you know will be played on the radio for years to come even when it's not peaking on iTunes. Especially if you plan on recording your arrangement, you want people to want to listen to your song long after it is gone from radio rotation. I think songs that tend to translate well have a good melody, full backgrounds, and emotional depth. Know the difference between a good song and a good record.
2) LISTEN, LISTEN, LISTEN. One you've picked your song, listen to it. Over and over again. And then some more. See if there are other versions of the song out there, unplugged arrangements, or other covers. Get to know the heart of the song. Be able to sing along. Look up the lyrics. Research why it was written, and by whom. And if you are not already listening to lots of music (a cappella and otherwise), do so. Get some musical ideas in your head. Figure out what you like to listen to, and why you like it. Then you can use it.
3) KNOW THYSELF. Your song is going to be sung by a specific group of singers, so know their range, know their strengths, know their weaknesses, and know what they are passionate about. Don't give the basses low C's if no one can sing it, and don't give your sopranos high B's (for any reason). Most importantly for modern pop songs: know if the soloist can handle it. Don't pick a Beyonce or Van Halen song if no one has the chops to shred the lead. Your audience will always be comparing your version to the original, even if you are not imitating

it, and you want to give your singers a fighting chance to measure up. It's sad but true: most modern a cappella performances live and die by the lead singer.
4) KNOW THY GOAL. Why are you arranging this song? For a one-time gig at your church? To perform every Thursday night at the local coffee house? To be the first track on your next album? To get a laugh and wild applause at your big end-of year concert? The answer will affect how you approach the arrangement. Think about the style you want to arrange: imitative or innovative. Do you want it to sound just like the original? Do you want it to be crazy different? Or somewhere in between? How about an entirely different style: power ballad, choral, jazz, country, gospel, reggae? If you don't know where you're going, you'll never get there, and your arrangement will be an unfocused mess. Make a decision, and go for it. You can always change your mind later. Also, what sounds good onstage may not always translate well to the studio, and what makes a great recording can't always be performed live very well. There is plenty of studio magic that can help you sing double low G's or add harmonic bell tones, but chances are these won't make it into a live set. Be ambitious, but realistic about what can actually be performed by your group. Decide up front if you are arranging for the stage or the studio, or both. It will make a difference. It's a good idea to write out the road map for your song before you ever start notating. First verse just bass and pad; chorus adds rhythm; second verse adds coutner meldoies; bridge changes the rhythm; etc. Or maybe really mix it up on the first verse as Gregorian chant and then transition into a more recognizable sound. This will help you tell your story, and give your arrangement the arc to get it where it needs to go. More on that later.
5) NOTATION. I don't have the patience to notate by hand with paper and pencil. More power to you if you do. I personally use Finale Songwriter, a program I paid about $50 for. There are more robust notation programs out there (the full version of Finale costs $600), and there are also freeware materials as well. Most universities have computer labs and software available for free to students, so ask around. Noteflight is a new online musical notation software that's free and requires no downloads (they do have a premium version available for purchase). But always keep in mind: you get what you pay for.
6) SECRET TIP #6. Order an arrangement from me and ask me about this secret super time saving trick!
7) WORK FROM THE OUTSIDE IN. For most regular old pop songs, in a typical collegiate style arrangement, I start with the melody and the bass line. It's usually easy to pick out from the recording and pretty easy to write down. Girl groups, the range of your low altos has everything to do with the shape your arrangement will take. Do NOT substitute a higher fifth in the chord for a bass note that's too low. Just go up the octave. The bass note, to most ears, determines the chord structure of the song, and it will sound weird if the bass notes are not where they are supposed to be, especially on a recording. Next decide what else you want to add: rhythm lines, pad lines (long, sustained notes), harmonies, counter melodies. What drives this song along: guitars, piano, percussion? How can you translate that to human voices? "Zhin zha da zho doh"? Or can you be more creative? I love to give my background singers lyrics from the lead to sing whenever
possible. It adds depth to the song, and gives the backgrounds more of a chance for emotional connection to what they are singing. Rhythm, along with the bass, helps give the arrangement its structure. Pad lines and counter melodies give the song its color. Listen to the original song for strings and synths and other parts that don't immediately come to the forefront. I typically like to put these in the higher voices, but beware of screechy sopranos. Then you can add details: fills, harmonies, etc. remember: human voices will be singing your notes, not guitars or synthesizers. Studio magic aside, people have to breathe, so keep that in mind when you arrange. As my choir director used to say, every singer is at his or her best when on a rest. But beware of patterns that lead to the whole group gasping together every four bars. Overlap layers and create lines that carry over measures where breathing might be expected. Have lyrics and syllables in mind as you start creating the textures and lines, but don't be afraid if you only have the notes to start with. I usually save lyrics to the very last in my notation. However, if you're not going for a traditional kind of imitative arrangement, all bets are off (and chances are you don't need my tips anyway). But let me know if you want some advice for those kinds of arrangements, I'm more than happy to talk with you on your journey.
8) SILENCE IS GOLDEN. Those 80's rockers got at least one thing right: audiences love it when the backgrounds drop out and one part soars through the silence. Break the patterns, find something new to regrab any wandering ears. Drop the percussion for two bars; go to lead and harmony only for that big high note; drop everyone but your rhythm line for the last beat of the bridge before the hook drops back in; use some arpeggiated bell tones (remember Committed from The Sing Off?). Taking out other parts for a few moments is a great way to highlight something new and interesting. And never underestimate the power of dynamic contrast.
9) TELL A STORY. It is tempting to use repeats and let verses one and two be identical, but the song has to take us on a journey and have ebb and flow to it. Each song needs to tell a story and have an arc to it. There needs to be growth and emotional content, something that will draw the listener in and hold her attention for three and a half minutes. Simple repetition doesn't always do that. Thinnk about the message of the song: is it about hope or despair, love or loss, fun or fury? What kind of growth and decay will take you and your listeners on that journey? Are there any thematic elements that you can translate aurally? Water images, lonliness, anger, and discord are just a few motifs that are simple to shape sonically in an arrangement. Find those themes in your song and translate them for your audience. Your story might be different from that of the original artist and producer. You definitely want to make this arrangement your own, but be true to the heart of the song. The heart of the song could just as easily be in the lyrics, the music, or the songwriter's background, so good textual analysis and research skills are a must. But, that being said, pop producers have spent millions of dollars and hours developing a sound and style of music that people love to hear, so there is no shame in sticking to that model and letting the original performance guide your arrangement. If it ain't broke, don't fix it.
10) HAVE FUN!

If you don't enjoy it, why are you doing it? You want your song to be fun to arrange as well as fun to listen to and fun to sing. Fun doesn't always mean funny, but it should always be rewarding in the end. It takes time and energy and effort, but you are creating something new and original that sings your story with a new voice. If you have more specific questions about arranging, just contact me and I'd love to chat with you. And if you don't have the time or energy to arrange, just contact me and we'll see what I can arrange for you. :)