ARCHIMEDES SCREW · 2019-12-19 · 12 11 10 9 7 8 ARCHIMEDES SCREW! It’s time to install this...
20
ROLLING! ARCHIMEDES SCREW
Transcript of ARCHIMEDES SCREW · 2019-12-19 · 12 11 10 9 7 8 ARCHIMEDES SCREW! It’s time to install this...

ROLLING!
ARCHIMEDES SCREW

We are constantly working to improve your maker experience. You may observe that the shape of a part
Please keep the wooden parts in your kit away from excessive heat and humidity.
Hello!
Thank you for being a Tinkineer! We’ve taken great care in creating the
experience that you are about to embark upon. We want your build, whether
performed alone or with a family member, to be something special and
memorable. Hands-on fun awaits!
The kit you are about to construct is made of real wood, right here in the United
States of America! Sometimes knots or other anomalies hidden in the material
can cause a part to be cut incorrectly. Not to worry! If you encounter an issue
that we didn’t catch, visit our website and use the “Contact Us” button at the
bottom of any page to let us know what you found. We’ll make it right.
One of the things about a kit is that, while we’ve tried, we can’t fully predict
exactly how you will approach the build, what things you will find easy and
you and/or your family have a wonderful experience. If you don’t, it means that
despite our best attempt, there may still be an instruction to tweak or an aspect
of the design to improve upon.
We’d like to take this opportunity to open a two-way dialog. If you had a great
experience, we want you to tell us and, of course, your friends. If you didn’t, we
would like the first opportunity to make things right for you. Please reach out
to us using the website link and we’ll get right back to you. Allow us to help - to
When you’re finished, it would give us great pride to see how your completed
model turned out. Share your photos, videos, and comments on our Tinkineer
Facebook page and on Instagram. Tag us @tinkineer and/or contact us directly
from the website.
Happy making!
Team Tinkineer

3
Hi! My name is Adam and I'm the creator of the Marbleocity® product line.
When I was a kid I loved machines, contraptions and, of course, marble ramps. I also loved building models but I found the plastic materials unsatisfying and model cement hard to work with. Today, amazing laser-cutting technology exists to craft highly detailed shapes out of wood. The real wood parts in your kit have a great tactile feel and can be assembled easily with household white glue.
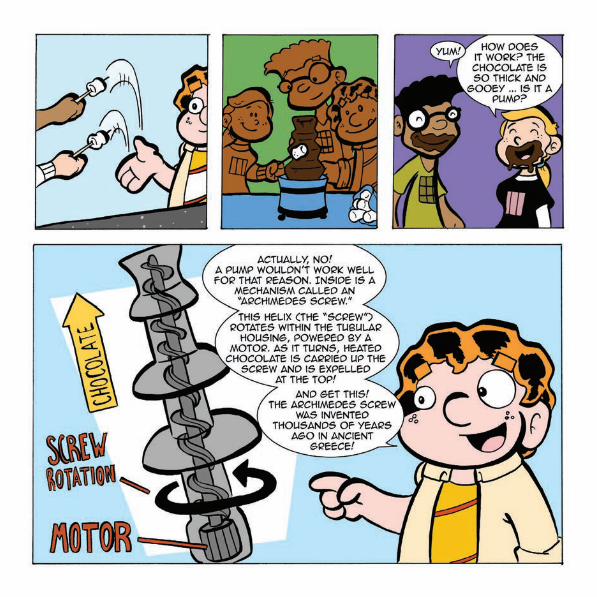
The kit that you are about to build was carefully designed to be a great maker experience that you’ll enjoy in and of itself. But beyond that there’s a little physics and a lot of engineering experience waiting for you. The graphic novel that begins on the next page will teach you about a really clever engineering innovation that was originally designed thousands of years ago! Although conceptualized in ancient times, the Archimedes Screw still has useful applications today in our modern world!
Another goal of this Marbleocity maker project is to show how you – yes, you! – can build a seemingly complex machine out of simple parts. Simple parts become sub-assemblies and sub-assemblies come together to construct an amazing, working machine that you built yourself. So grab your glue and let’s get started!
Adam B. Hocherman Chief Tinkineer
GETTING HELP FROM OUR COMMUNITY Have a question about a step you’re working on? Need a video tutorial? We’re building a community of Tinkineers – just like you! Please visit us online at Tinkineer.com/community.
LEARNING MORE Today you'll be building your very own model that utilizes an Archimedes Screw to lift marbles up in order to perform useful work ... well, in order to do something fun, anyway! If you’d like to learn more about the Archimedes Screw (and other clever engineering mechanisms) start at Wikipedia.org. You can also find a variety of cool videos highlighting real-world applications on YouTube.
A NOTE ABOUT SAFETY The kit that you are about to assemble is designed for children and adults ages 8+. It contains marbles and other small parts that can be a choking hazard for children under 3 years old. If you have younger siblings or other small children living in your household, please keep these small parts safely out of their reach.
Archimedes Screw_Inst.indd 3 5/10/18 4:00 PM


Archimedes Screw_Inst.indd 5 5/10/18 4:00 PM

Archimedes Screw_Inst.indd 6 5/10/18 4:00 PM
Archimedes Screw_Inst.indd 7 5/10/18 4:01 PM

Archimedes Screw_Inst.indd 8 5/10/18 4:01 PM

9
For this project you’ll need:
Elmer’s® Glue-All® Multi-Purpose white glue. A good, household white glue is the best glue for the job – it’s easy to work with, makes a strong bond in 20–30 minutes, and dries perfectly clear so your finished marble machine will look great! Elmer’s® Washable School Glue will bond but Glue-All® is recommended for the best experience.
BREAK SOMETHING? NEED A REPLACEMENT PART?
Marbleocity is a natural wood product! Sometimes a hidden knot can slip past our quality control gurus. If you need a replacement part contact us at Tinkineer.com. Please have your batch code handy, which is located on the bottom of upright part #8. The batch code is the last six digits found on that part. See example at right.
Check Tinkineer.com/community for helpful videos.
[example only]
Wax paper. Scavenge a sheet of wax paper from your kitchen – it’s the perfect work surface. Household white glue will not stick to it and you’ll avoid mom’s wrath by protecting the kitchen table.
Round toothpicks. These are perfect for applying glue. Make a puddle on your wax paper work surface and use the tip and/or edge of a toothpick to apply glue to your wood parts.
A wax stick is used to lubricate wood bearing surfaces that rub against one another.
Test Fit First!
Most steps can be test assembled without any glue at all! Check your part fit and marble operation first and then apply glue second.
Applying Glue to Flat Surfaces
Use glue sparingly - you don't need a lot! Wipe away excess glue using your finger or the edge of a clean toothpick.
Archimedes Screw_Inst.indd 9 5/10/18 4:01 PM
10
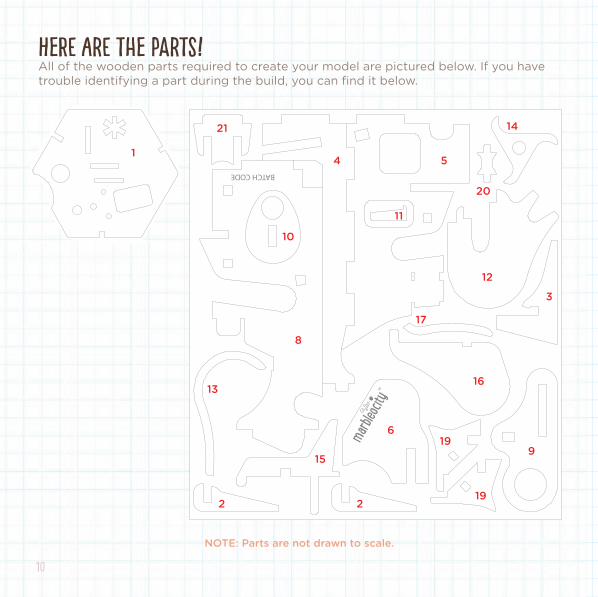
All of the wooden parts required to create your model are pictured below. If you have trouble identifying a part during the build, you can find it below.
NOTE: Parts are not drawn to scale.
11
1
2
24
6
5
3
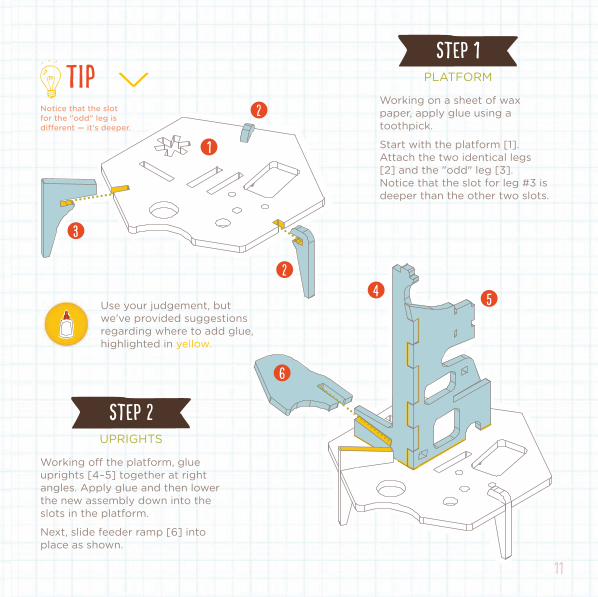
Notice that the slot for the "odd" leg is
Use your judgement, but we've provided suggestions regarding where to add glue, highlighted in yellow.
PLATFORM
UPRIGHTS
Working on a sheet of wax paper, apply glue using a toothpick.
Start with the platform [1]. Attach the two identical legs [2] and the "odd" leg [3]. Notice that the slot for leg #3 is deeper than the other two slots.
uprights [4–5] together at right angles. Apply glue and then lower the new assembly down into the slots in the platform.
Next, slide feeder ramp [6] into place as shown.
12
11
10
9
7
8
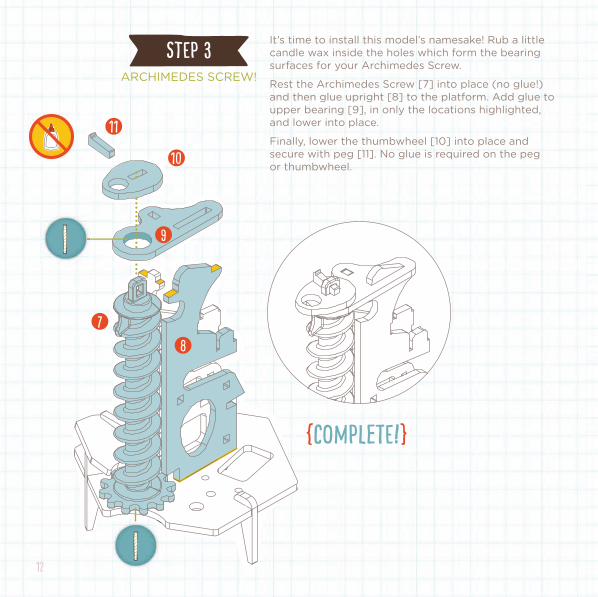
ARCHIMEDES SCREW!
It’s time to install this model’s namesake! Rub a little candle wax inside the holes which form the bearing surfaces for your Archimedes Screw.
Rest the Archimedes Screw [7] into place (no glue!) and then glue upright [8] to the platform. Add glue to upper bearing [9], in only the locations highlighted, and lower into place.
Finally, lower the thumbwheel [10] into place and secure with peg [11]. No glue is required on the peg or thumbwheel.
{ }

13
The pinwheel “claws” point upward. The marbles are “caught” here which is what creates the spinning action!
15
12 13
14
LOWER RAMP & PINWHEEL
Install the lower ramp [12] by sliding it forward into the slots in the uprights. Add its rail [13], aligning the edges carefully.
Using your wax stick, add a little lubrication to the pinwheel shaft [15] before installing it. Next, install the pinwheel ... here’s how!
Using one hand, hold the pinwheel [14] in place, between the two uprights. Notice that the pinwheel “claws” point upward.
Apply glue to part #15 in only the locations shown! Slide the shaft into place, capturing the pinwheel as you do so.
Use a finger to give your pinwheel a test-twirl to ensure it’s working properly. Wheee!!

14
18
17
16
Be sure to insert your vortex fully before gluing.
UPPER RAMP & VORTEX!
Install the upper ramp [16] and its rail [17] as shown in the diagram.
Next, without glue (yet), slide your vortex [18] into place. Its brackets span the two wooden uprights and protrude slightly on the far side (see insets). Add a dab of glue in these locations to hold the vortex in place.
{ }

15
19
19
20
21
B
a
DIVERTER
GO FOR A RIDE!
Assemble your diverter from the four parts shown at right. Start by gluing the two sides [19 x2] to cross-brace [20]. Then take that assembly and drop it into the slots on diverter base [21].
You can position your completed diverter on your model, as shown below, while the glue dries. But be careful! The diverter does not get glued to the platform. You’ll rotate this diverter later, when you link up additional Triple Play models!
Congrats! You did it! You’ve completed your model! Let the glue dry and then take her for a test run.
Drop a few marbles at the bottom of the Archimedes Screw. Use your finger to rotate the screw at point [A] or use a pencil eraser (or similar object) to spin the screw at point [B].
{ }

16
CONNECTING MODELS!
[OPTIONAL] ADD A MOTOR!
Individual Triple Play models can be operated by hand but for even more fun, add a motor kit (sold separately).
First attach the motor to the underside of the platform using the hardware included with the motor kit. Then, slip the 10-tooth gear onto the white motor shaft that protrudes above. Rotate the screw slightly, as necessary, to allow the gears to mesh properly.
The wires and battery box are not shown in this diagram. Follow the instructions included with the motor kit to make connections and get things running.
And, by the way, you will need a motor kit if you want to connect the Archimedes Screw to another Triple Play model. You can even connect it to a second Archimedes Screw kit, if you or a friend has one!
The secret to connecting multiple models together is to rotate the diverter. The illustration at left shows a top view of the model you just completed (some parts have been removed for clarity).
On the next page we’ll show you how you can connect two or three models …
17
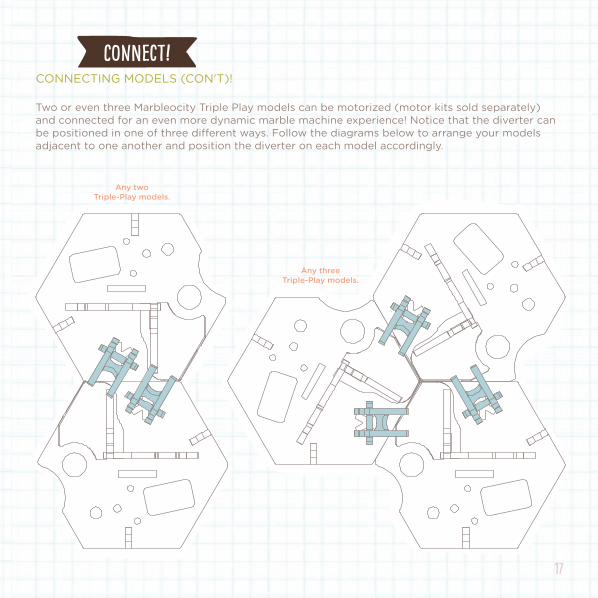
Any two Triple-Play models.
Any three Triple-Play models.
CONNECTING MODELS (CON'T)!
Two or even three Marbleocity Triple Play models can be motorized (motor kits sold separately) and connected for an even more dynamic marble machine experience! Notice that the diverter can
adjacent to one another and position the diverter on each model accordingly.
Archimedes Screw_Inst.indd 17 5/10/18 4:01 PM
18
POWER UP AND CONNECT!
Add the optional Motor Kit to power your Marbleocity model and keep those marbles rolling. Then you're ready to connect for the most epic experience! Connect any three Triple Play kits together (mix and match)! In addition, our two large Marbleocity kits are designed to interact together such that marbles pass between those models. So cool!
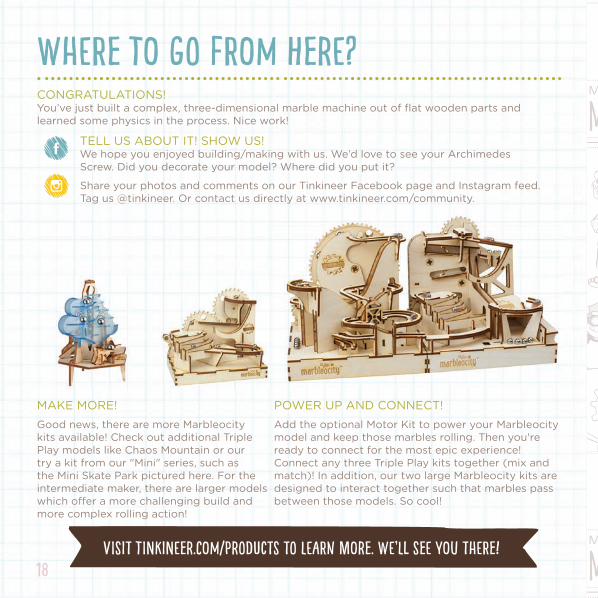
MAKE MORE!
Good news, there are more Marbleocity kits available! Check out additional Triple Play models like Chaos Mountain or our try a kit from our "Mini" series, such as the Mini Skate Park pictured here. For the intermediate maker, there are larger models
more complex rolling action!
CONGRATULATIONS! You’ve just built a complex, three-dimensional marble machine out of flat wooden parts and learned some physics in the process. Nice work!
TELL US ABOUT IT! SHOW US! We hope you enjoyed building/making with us. We’d love to see your Archimedes Screw. Did you decorate your model? Where did you put it?
Share your photos and comments on our Tinkineer Facebook page and Instagram feed. Tag us @tinkineer. Or contact us directly at www.tinkineer.com/community.
Archimedes Screw_Inst.indd 18 5/10/18 4:01 PM


Contact us at: Customer Service, 1400 E. Inman Pkwy.,
For more fun, visit playmonster.com
Tinkineer Marbleocity
Archimedes Screw_Inst.indd 20 5/10/18 4:01 PM


![Energy Saving in a Variable-Inclination Archimedes Screw · Energy Saving in a Variable-Inclination Archimedes Screw ... by Nagel [1] for the design of ... a screw pump according](https://static.fdocuments.us/doc/165x107/5af1e67f7f8b9a8b4c8f5a5a/energy-saving-in-a-variable-inclination-archimedes-screw-saving-in-a-variable-inclination.jpg)