AquaBlox Water Matrix - Rainwater...
12
AquaBlox ® Water Matrix ® Installation Instructions & Owner’s Manual • Step-by-step installation Instructions for the following AquaBlox ® Water Matrix ® Applications: Pondless { ® Waterfalls RainXchange { ™ Rainwater Harvest System Constructed Wetland System { Pump Wet Wells { Made in U.S.A. for: Aquascape, Inc. St. Charles, IL 60174 • Brampton, ON, L6T 5V7 www.aquascapeinc.com
Transcript of AquaBlox Water Matrix - Rainwater...
AquaBlox® Water Matrix®
Installation Instructions & Owner’s Manual
• Step-by-step installation Instructions for the following AquaBlox® Water Matrix® Applications:
Pondless { ® WaterfallsRainXchange { ™ Rainwater Harvest SystemConstructed Wetland System {Pump Wet Wells {
Made in U.S.A. for: Aquascape, Inc. St. Charles, IL 60174 • Brampton, ON, L6T 5V7www.aquascapeinc.com

2
AquaBlox® Water Matrix®
Table of Contents
Tank Assembly – Page 3 1.
Single Module Assembly Diagrama.
Double Module Assembly Diagramb.
Triple Module Assembly Diagramc.
Water Storage Basin Excavation and Tank Installation – Page 4-7 2.
Diagrams – Page 8-12 3.
Pondlessa. ® Waterfall Diagrams – Page 8
Pondless• ® Waterfall Large
Pondless• ® Waterfall Micro
RainXchangeb. ™ Diagrams – Page 8-11
RainXchange• ™ Decorative Fountain
RainXchange• ™ Permeable Paver
RainXchange• ™ Pondless® Waterfall
Water Storage Kits •
500 Gallon •
1000 Gallon •
1500 Gallon •
2000 Gallon •
2500 Gallon •
3000 Gallon •
Constructed Wetland Diagram – Page 12c.
Wet Well Diagram – Page 1d. 2

3
AquaBlox® Water Matrix® Tank Assembly InstructionsStep 1: Evenly distribute and connect the small panels to one large panel.•
Step 2: Next, working from one end to the other, attach a second large panel on the opposite side of the first.•
Step 3: Once the top and bottom large panels are attached, complete the sides of the tank module. This is a • "single" AquaBlox® Water Matrix® tank.
To build a double unit (or larger), follow the directions above, connecting the small panels to large panel on the top of a built AquaBlox®. Proceed with the remaining panels to complete the stacked tank.
Completed AquaBlox® Water Matrix® modules should be staged as close to the installation area as possible.
A
A
AB
8”
Small Matrix consists of 8 panels: 2 “A”, 2 “C” and 4 “D”(see chart below for dimensions)
Panel D
Panel A
Large Matrix consists of 8 panels: 4 “A” and 4 “B” (see chart below for dimensions)
Small AquaBlox® Water Matrix®
The Small AquaBlox® Water Matrix® is recommended in use with Pondless® Waterfalls using the MicroSnorkel™ and MicroCentipede™ and also when constructing an upflow Wetland using the Large Snorkel™ and Centipede™.
Large AquaBlox® Water Matrix®
The Large AquaBlox® Water Matrix® is recommended in use with Pondless® Waterfalls and RainXchange™ System using the Large Snorkel™ and ½ or full Centipede™.
Be sure to check all pieces upon arrival for any damages that may have occurred during shipping
Panel C
Panel A
Panel B
26.5”
16”
26.5”
8”
16”
14.5”
16”
26.5”
16”
26.5” 16”
17.5”26.5” 16”
9.5”
Load Bearing Top
Side
Load Bearing Bottom
Small Matrix Large Matrix
Side
Side
Single Module Assembly
B
A
A
B
Step 1 Step 2
Step 3
B
B
A
A
A
A
A
A
AB
Common Plate
Triple Module Assembly
AquaBlox® Water Matrix® Components
Double Module Assembly

4
Tank Installation Instructions
The excavation should allow for: AquaBlox® Water Matrix® tank dimensions, sufficient backfill material and compaction required during backfilling. See application diagrams for more information on excavation dimensions. (Basin sizes listed for each storage kits are approximations and does not account for additional excavation for Snorkel™.) It is recommended to lay out AquaBlox® and position of Snorkel™ prior to excavation in order to determine actual excavation dimensions. Please note an addtional 6” is recommended per side.
Note: Check for presence of high water table, which must be kept at levels a minimum of 3 feet below the bottom of the AquaBlox® Water Matrix® tank structure at all times.
Excavate a recessed and extended area for the Snorkel™ and Centipede™ filters. This positions the filters at the lowest point in the storage basin allowing maximum water availability for the pump system.
For RainXchange™ Water Storage Kits please refer to diagram section for Snorkel™ and Centipede™ locations.
The base of the excavation should be smooth soil, flat and free of lumps and debris. Check the size and depth of the excavation by placing the AquaBlox® Water Matix® into the excavated area. There should be approximately 6” between the AquaBlox® and the soil. Add compactable material such as sand, if existing soil conditions do not meet requirements listed above. The compactable material should be spread to a 4” minimum depth and compacted.
Step1: Excavate Basin
Step 2: Excavate Location of Snorkel™ and Centipede™ Filters
Step 3: Prepare Base

5
Lay the geotextile into the excavation covering the bottom and sides. Multiple sections of geotextile can be overlapped to accomplish complete coverage.
Lay the liner into the excavation and position to cover entire storage basin. Do not trim the excess liner material until later in the project.
Place the Snorkel™ and Centipede™ Modules into their proper location. Small cobbles will need to be backfilled around the excess excavated perimeter of the Snorkel™/Centipede™ filter in order to provide a sufficient base for the AquaBlox® Water Matrix® tank to sit on.
It is recommended using a second layer of geotextile within the lined storage basin to wrap around the bottom and sides of the AquaBlox® Water Matrix® tank. This is a precautionary step that helps protect the liner. Note: All RainXchange™ Water Storage Kits include enough geotextile for both the inner and outer geotextile installation. Lay the geotextile into the lined basin before installing the AquaBlox® Water Matrix® tanks. The geotextile does not need to be wrapped over the top of the AquaBlox® Water Matrix® tank, just the bottom and sides.
Step 4: Install Outer Geotextile Step 5: Install Liner
Step 6: Install Inner Geotextile
Step 7: Install Snorkel™/Centipede™

6
Tank Module Orientation: The AquaBlox® Water Matrix® tank must be installed with the correct orientation to ensure maximum load bearing capacity. See images below.
Proper Orientation
Note: When stacking AquaBlox® Water Matrix® tanks only one panel “A” is required between the two joined AquaBlox®. See tank assembly instructions for more detail.
Install AquaBlox® Water Matrix® tanks in the storage basin, butting them tightly against each other. After placement of the tanks, bring the inner geotextile (if using) up the sides of the tanks. For the RainXchange™ Water Storage Kits please refer to the RainXchange™ Water Storage Kits diagram that is being installed for the proper tank configuration.
The excess excavation along the outside perimeter of the storage basin can be backfilled once all of the AquaBlox® Water Matrix® tanks are installed. Use sand or compactible free draining material to backfill evenly on all sides to secure the AquaBlox® Water Matrix® tank into position. Note: Make sure to evenly distribute backfill material around the perimeter of the basin, working your way up to final grade. This will prevent AquaBlox® from shifting while backfilling. When backfilling be sure to add the material between outer layer of geotextile and liner. This will help with holding the AquaBlox® Water Matrix® in place and drainage. Backfill materials containing clay should not be used.
17.5”
16”
9.5”
16”
16”
9.5”
16”
17.5
”
UP
Step 8: Install Tanks
Step 9: Backfill Sides

7
The RainXchange™ Water Storage system requires an overflow to be installed in order to manage any excess water entering the basin. The overflow should be located as high as possible in the storage basin in order to maximize the amount of water storage. The overflow is installed by cutting a hole in the liner to the diameter of the male threads on the bulkhead adaptor included in the overflow kit. The bulkhead can be installed into the liner with the rubber gasket located inside the storage basin and the plastic gasket located on the outside of the storage basin liner. A small bead of silicone can be spread around the rubber gasket where it meets the liner to help ensure a water tight seal. Tighten down the large bulkhead nut being careful to not over-tighten and crack the bulkhead. An adjustable overflow elbow is included with the overflow kit. Add Teflon tape or silicone around the threads of the elbow and install into the bulkhead on the inside of the storage basin. This will allow fine adjustment of the overflow height. Add Teflon tape or silicone around the threads of the PVC male pipe adaptor and install into the bulkhead on the outside of the storage basin. PVC pipe can then be primed and glued into the overflow and run to the overflow location making sure to maintain a decrease in elevation of 1 inch for every 10 feet in run of overflow pipe for proper water flow by gravity.
Managing the overflow will be determined by the conditions on the site. One easy method of managing the overflow is to create an infiltration area using the AquaBlox® Water Matrix® wrapped in geotextile material. The quantity of AquaBlox® required will be based on the site’s soil percolation characteristics. See diagrams for example of overflow configuration using AquaBlox® Water Matrix®. There may be other options based on the site characteristics, such as discharging the overflow to a drainage location on the property or directly back into the stormwater drain. Choose the best solution based on the site’s characteristics.
The AquaBlox® Water Matrix® tank can be covered with a layer of 1 ½” or larger decorative gravel. Boulders can be placed around the perimeter of the water storage basin to complete the edges of the basin. The liner edges can be trimmed to at least 3” above the maximum water level in the basin and backfilled behind the boulders. The maximum water level is determined by the location of the overflow output. See installation of overflow output for more information.
Permeable paver applications installed on top of the water storage basin require a woven geotextile (Item #30219). The geotextile is laid directly on top of the exposed AquaBlox® Water Matrix® tank. This will provide a base for the paver screening to be spread. See diagram of permeable paver application for more detail.
Note: Do not use the inner and outer non-woven geotextile (underlayment) on top of the AquaBlox® Water Matrix® as it will potentially clog. Follow permeable paver manufacturer’s specifications for proper screening and compaction. See diagram section for permeable paver cross section.
Overflow Bulkhead Connection
Overflow Infiltration
Step 10: Install Overflow (RainXchange™ Systems)
Step 11: Backfill Top

8
Pondless® Waterfall application using:Large Snorkel• ™ and ½ Centipede™ Filters
Large AquaBlox• ® Water Matrix® (additional AquaBlox® can be used to create larger storage capacity)
Diagram B
Pondless® Waterfall application using:MicroSnorkel• ™ Vault and MicroCentipede™ Filter
Small AquaBlox• ® Water Matrix® (additional AquaBlox® can be used to create larger storage capacity)
Diagram C
Diagram A
Diagram D
Application Diagrams
RainXchange™ Applications
Decorative FountainThe following diagrams include examples of options associated with the RainXchange™ System.

9
Decorative Fountain with Permeable Paver
Pondless® Waterfall

10
RainXchange™ Water Storage KitsThe following diagrams include the storage basin dimensions, AquaBlox® Water Matrix® configuration and location of the Snorkel™ and Centipede™ Filters. Note: Overflow location and design are dependent on the site characteristics. See install overflow RainXchange™ section of instructions for more information. Basin sizes listed for each storage kits are approximations and does not account for additional excavation for Snorkel™. It is recommended to lay out AquaBlox® and position of Snorkel™ prior to excavation in order to determine actual excavation dimensions. Please note an addtional 6” is recommended per side.
500 Gallon System, 6’x9’x4’ Basin, 16 AquaBlox, 4x4 configuration Side View of 500 Gallon System, 4’Deep
1000 Gallon System, 6’x9’x5’ Basin, 32 AquaBlox, 4x4 Configuration, 2 Layers
Side View of 1000 Gallon System, 5’ Deep
1500 Gallon System, 8’x9’x5’ Basin, 48 AquaBlox, 4x6 Configuration, 2 Layers Side View of 1500 Gallon System
11
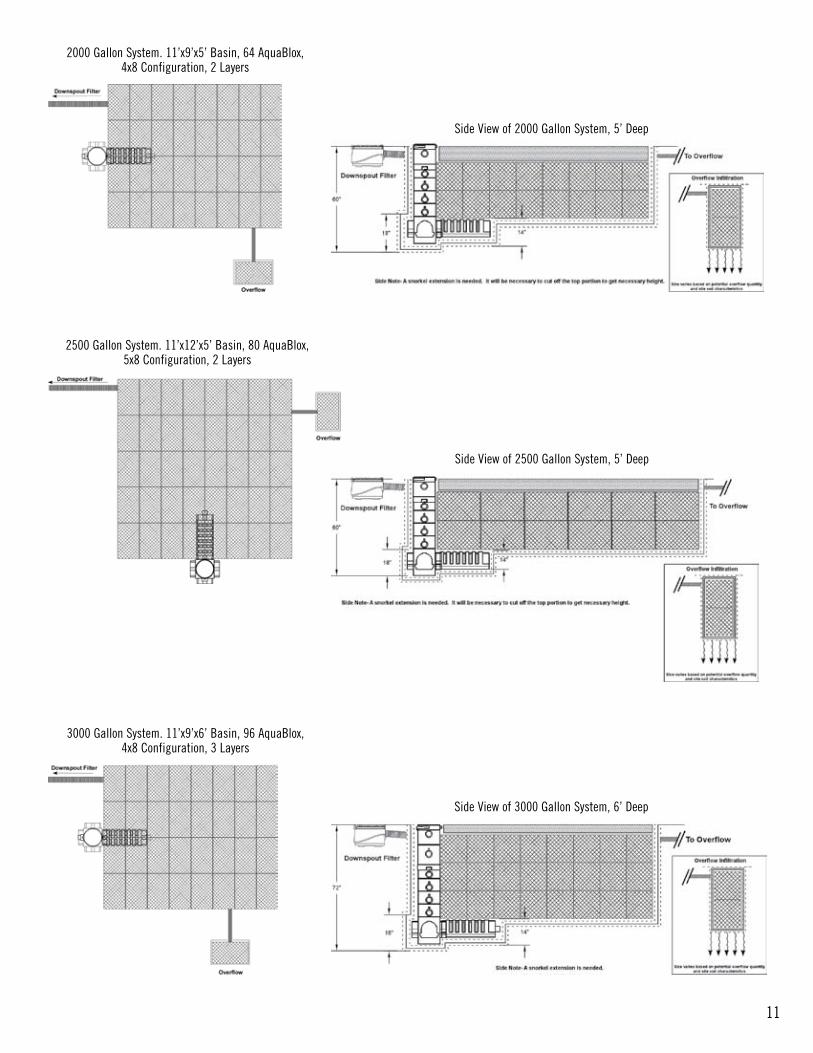
2000 Gallon System. 11’x9’x5’ Basin, 64 AquaBlox, 4x8 Configuration, 2 Layers
2500 Gallon System. 11’x12’x5’ Basin, 80 AquaBlox, 5x8 Configuration, 2 Layers
3000 Gallon System. 11’x9’x6’ Basin, 96 AquaBlox, 4x8 Configuration, 3 Layers
Side View of 2000 Gallon System, 5’ Deep
Side View of 3000 Gallon System, 6’ Deep
Side View of 2500 Gallon System, 5’ Deep
12
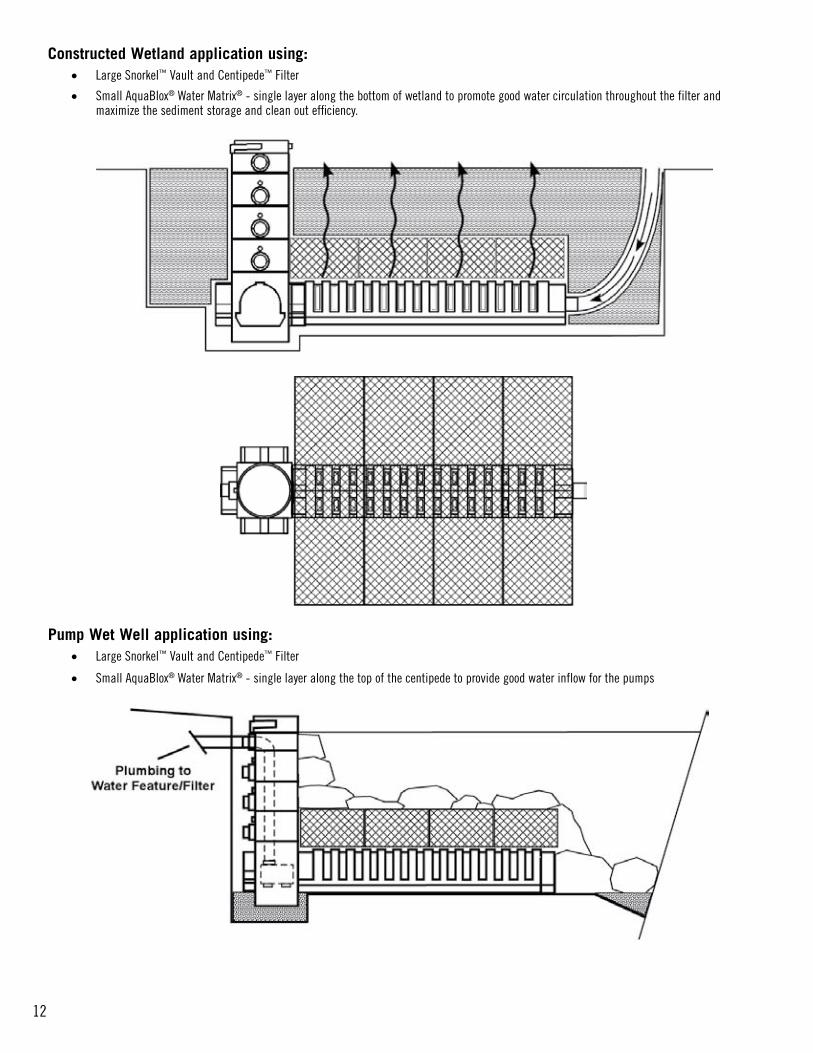
Constructed Wetland application using:Large Snorkel• ™ Vault and Centipede™ Filter
Small AquaBlox• ® Water Matrix® - single layer along the bottom of wetland to promote good water circulation throughout the filter and maximize the sediment storage and clean out efficiency.
Pump Wet Well application using:Large Snorkel• ™ Vault and Centipede™ Filter
Small AquaBlox• ® Water Matrix® - single layer along the top of the centipede to provide good water inflow for the pumps