Chaptre 2. Facility Layout Introduction Product layout Process layout Fixed position layout

Appspace 5.X – Reference Guide (Digital Signage) Updated on February 9, 2015
2
1 TABLE OF CONTENTS
2 What is Appspace For Digital Signage ................................................................................................... 4
3 Access Appspace ................................................................................................................................... 4
4 Best Practices and Notes ....................................................................................................................... 4
5 Appspace Terms .................................................................................................................................... 5
7 Appspace Overview .............................................................................................................................. 6
7.1 Dashboard ..................................................................................................................................... 6
7.2 Content Library ............................................................................................................................. 6
7.3 Sign Manager ................................................................................................................................ 6
7.4 Network Manager ......................................................................................................................... 7
7.5 Reporting....................................................................................................................................... 7
8 Content Library Management ............................................................................................................... 8
8.1 Uploading Files .............................................................................................................................. 8
8.2 Create Rich Text ............................................................................................................................ 9
8.3 Add External Content .................................................................................................................. 10
8.4 Add Dynamic Media .................................................................................................................... 12
8.5 Add Web Pages and HTML .......................................................................................................... 13
8.6 Editing Content ........................................................................................................................... 14
8.7 Deleting Content ......................................................................................................................... 14
8.8 Managing Folders ........................................................................................................................ 15
8.8.1 Moving Content in to Folders ............................................................................................. 15
9 Application Management ................................................................................................................... 16
9.1 Create an Application .................................................................................................................. 16
9.2 Application Design Window ........................................................................................................ 18
9.3 Enable/Disable Automatic Syncing ............................................................................................. 18
9.4 Setting Player Device Model and Resolution .............................................................................. 19
9.5 Edit a Layout ................................................................................................................................ 19
9.5.1 Layout Background Widget ................................................................................................. 20
9.5.2 Adding Uploaded Content from the Content Library ......................................................... 21
9.5.3 Adding Pre-Made Appspace Widgets ................................................................................. 22
9.5.4 Bring to Front/ Send to Back ............................................................................................... 24

3
9.5.5 Widget Properties: Transitions, Durations, Colors, and Borders ........................................ 25
9.5.6 Delete Widget ..................................................................................................................... 26
9.5.7 Saving your Layout .............................................................................................................. 27
9.5.8 Selecting Which Layouts to Use .......................................................................................... 27
9.5.9 Preview Your Layout ........................................................................................................... 27
9.6 Applications Settings ................................................................................................................... 28
9.6.1 Scheduling an Application ................................................................................................... 28
9.6.2 Delete a Schedule ............................................................................................................... 31
9.6.3 Edit a Schedule .................................................................................................................... 31
9.6.4 Delete an Application .......................................................................................................... 32
9.6.5 Sharing an Application ........................................................................................................ 32
10 Example Content ............................................................................................................................. 33
10.1 Create a Twitter Feed ................................................................................................................. 33
10.2 Example YouTube Video ............................................................................................................. 33

4
2 WHAT IS APPSPACE FOR DIGITAL SIGNAGE
Appspace is a content management application for digital signage that allows you to create, manage and
schedule multimedia presentations that can be played over Cisco DMP and Edge devices connected to
monitors, TVs, and video walls.
3 ACCESS APPSPACE
To log in to the Appspace application, go to http://appspace.uww.edu/app. Enter in your Net-ID and
password to log in. If you are unable to access Appspace, please email [email protected] and request
digital signage access.
4 BEST PRACTICES AND NOTES
Browser Issues: Issues have been found with the Appspace editor when using browsers other
than Google Chrome. Please use the Google Chrome browser whenever possible when signing in
to the Appspace application and editing your sign.
Designing Layout Backgrounds: It is easiest to design your main layout background image using
an application such as PowerPoint, Adobe Photoshop, or other media design application.
Automatic Syncing: When editing your sign layout, it is best to disable automatic syncing on the
Sign Manger page to avoid users seeing your changes while you are making them. Make sure to
enable automatic syncing when you are done editing your layout and ready to submit your
changes.
Content Library Folders: A newly uploaded file or picture to the content library will normally be
placed by default in to the Unassigned folder. It is a best practice to move that content to a
folder under My Libraries to make it easier to access as well as give you the ability to set sharing
permissions.
Choose Player Model and Resolution: To make sure you are designing applications that will run
on your media player, always make sure to configure your device model and resolution on the
Application’s Settings page. See Section 9.4 Setting Player Device Model and Resolution for
more information.
Schedule Layout: Once you create a schedule for a layout, you will only be able to view the
selected schedule layouts on the Preview page. To preview all layouts, you must disable the
layout scheduler from the Settings page.
Burn-In: If an image is displayed on a monitor/tv for a long period of time, image burn-in can
appear. This means that an image will be permanently burned into the screen. It is a best
practice to rotate your images and backgrounds on a regular basis to avoid image burn-in. Burn-
in typically will appear on CRT or plasma screens and can take as little as a few weeks to occur.

5
5 APPSPACE TERMS
Application: An application is a group of sign layouts that are used for a sign topic or location.
Layout: An individual layout that will be displayed on a sign containing a background and
widgets. Multiple layouts are usually used in one application.
Widget: Any individual item that is placed on a layout such as an image, uploaded file, pre-made
widget, or content from the Content Library.

6
7 APPSPACE OVERVIEW
7.1 DASHBOARD The dashboard is the first page you will see when you first log in to Appspace. It gives you a quick overview of your Appspace content, history, player health summary and device status.
7.2 CONTENT LIBRARY The Content Library is the storage location for all of your media content including pictures, backgrounds, dynamic media, HTML code and external content.
Filters: Filter your content views by media type.
Tags: Tag content with common names to make it easy to search and find.
Folders: Location of your different media.
Library View: Displays the media located in each folder.
7.3 SIGN MANAGER The Sign Manager is the main application and content management page. Here you will create applications, choose and modify your sign templates, and design your digital sign for publishing.
7
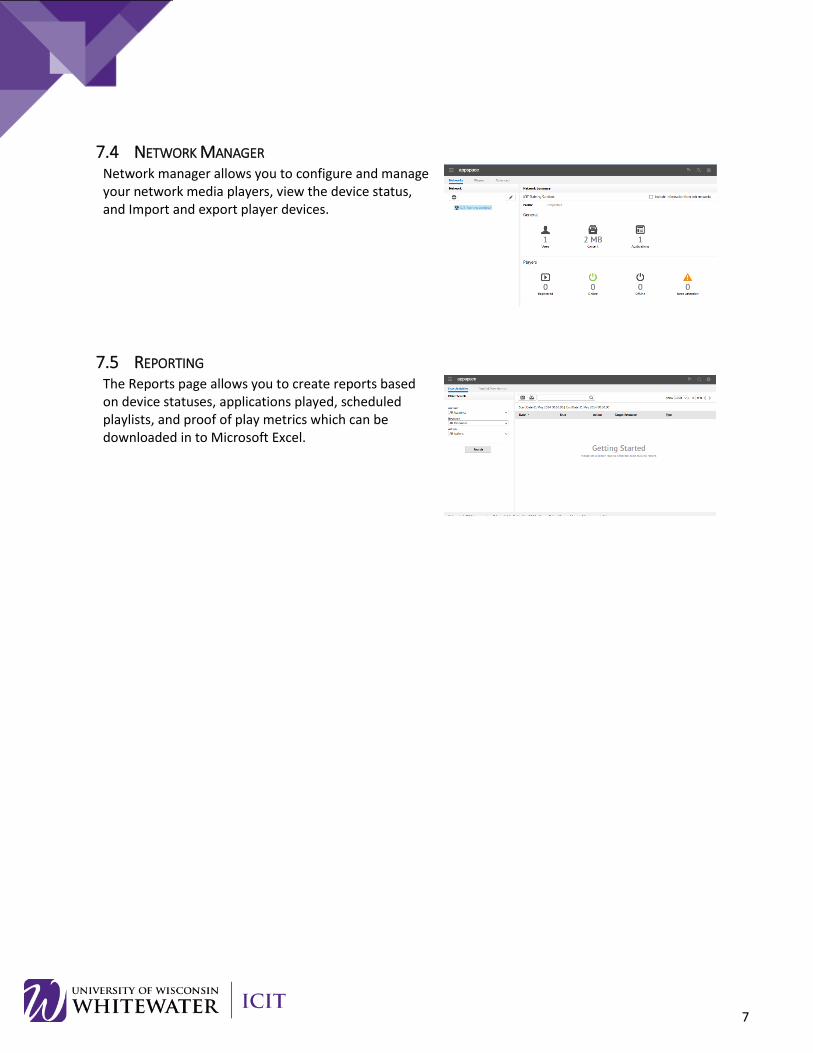
7.4 NETWORK MANAGER Network manager allows you to configure and manage your network media players, view the device status, and Import and export player devices.
7.5 REPORTING The Reports page allows you to create reports based on device statuses, applications played, scheduled playlists, and proof of play metrics which can be downloaded in to Microsoft Excel.

8
8 CONTENT LIBRARY MANAGEMENT
The Content Library is your primary location for creating and managing content for your applications.
Here you can upload pictures, text, backgrounds and other multimedia content. This is also where you
would create dynamic media, add external content, and create HTML snippets.
8.1 UPLOADING FILES 1. From the Content Library page, click the + symbol in the top toolbar
2. Select the type of file you want to add to your library. For this example, we will select Upload Local File so we can upload an image background, but you can also upload PDF files, PowerPoint, etc.
3. Click the Browse button and select the file you wish to upload. 4. Click the Open button.

9
5. Click the close window button once your file has been uploaded.
NOTE: New files are usually put in the Unassigned folder by default if a folder was not specifically selected from the left hand toolbar before uploading.
8.2 CREATE RICH TEXT 1. From the Content Library page, click the + symbol in the top toolbar.
2. Select the type of file you want to add to your library. For this example, we will select Add Rich Text.
3. Fill in your content properties:
Title: Name of your content.
Description: Description of your content.
Tags: Tag label that can be used to quickly find content by keyword.

10
4. Click the Edit tab located in the top toolbar. 5. Enter in your rich text. Use the text formatting toolbar located at the top of the window to modify fonts, change font size, etc. 6. Click the Apply button to save your content.
NOTE: New files are usually put in the Unassigned
folder by default if a folder was not specifically
selected from the left hand toolbar before
uploading.
8.3 ADD EXTERNAL CONTENT External content gives users the flexibility to add externally referenced media files, inline HTML
webpages, or externally referenced HTML pages. This content is hosted externally to UWW and
accessed using a URL or through HTML code.
1. From the Content Library page, click the + symbol in the top toolbar.
2. Select the type of file you want to add to your library. For this example, we will select Add External Content.

11
3. Fill in your content properties:
Title: Name of your content.
Description: Description of your content.
Tags: Tag label that can be used to quickly find content by keyword.
4. Click the Edit tab located in the top toolbar. 5. Select your content type by clicking the down arrow to the right of the content type. For this example we will choose an externally hosted video.
6. Select Video from the dropdown menu. 7. Enter in the URL of the video content. 8. Click the Apply button to save your changes.
NOTE: New files are usually put in the Unassigned
folder by default if a folder was not specifically
selected from the left hand toolbar before
uploading.

12
8.4 ADD DYNAMIC MEDIA Dynamic Media is content that is located externally to the UWW, but new content changes are
downloaded to the Content Library at a set frequency without manually uploading, such as traffic
camera images, weather updates and server generated graphs. Appspace background agents work
automatically to download the specified content at a user-configurable interval (default value is 15
minutes) and will then proceed to update an applications’ media zone playlist.
1. From the Content Library page, click the + symbol in the top toolbar.
2. Select the type of file you want to add to your library. For this example, we will select Add Dynamic Media.
3. Fill in your content properties:
Title: Name of your content.
Description: Description of your content.
Tags: Tag label that can be used to quickly find content by keyword.
4. Click the Edit button to configure your content. 5. Select http or https from the protocol selection box. 6. Enter in the http or https address of the content. 7. If your content requires the use of network credentials, click the Use Network Credentials option and enter in the credentials required for access. 8. Set your update frequency. Default is 15 minutes. 9. Click the Apply button to save your changes.

13
8.5 ADD WEB PAGES AND HTML Web Page and HTML content allows you to add in direct HTML links to websites or attach HTML code or
snippets to display external content.
1. From the Content Library page, click the + symbol in the top toolbar.
2. Select the type of file you want to add to your library. For this example, we will select Add Web Page (HTML).
3. Fill in your content properties:
Title: Name of your content.
Description: Description of your content.
Tags: Tag label that can be used to quickly find content by keyword.
4. Click the Edit tab to configure your content. 5. From the Type menu, select HTML Snippet or URL. For this example we will choose HTML Snippet. 6. Enter in the URL or HTML Snippet in the text box available. 7. Click Apply to save your changes.

14
8.6 EDITING CONTENT To edit content that is already in your Content Library, please follow the instructions below.
1. From the Content Library page, locate the media you wish to edit. 2. Double-click on the content to open the content editing box. 3. Edit your content as needed. 4. Click the Apply button to save your changes.
8.7 DELETING CONTENT 1. From the Content Library, select the file you wish to delete.
NOTE: A checkmark will appear in the upper left hand corner when a file is selected.
2. Click the delete icon in the upper toolbar to delete your file.
NOTE: You can select multiple files for deletion by checking the files you wish to delete.

15
8.8 MANAGING FOLDERS Folders help you organize your content in the Content Library.
1. From the main Content Library page, select the My Library folder. 2. Click on the + button located in the left hand toolbar under the Folders section.
3. Enter in the new name of your folder. Hit the Enter key on your keyboard to submit. Edit a Folder Name: To edit your folder name, select your folder you wish to rename. Click the Rename Folder button located in the folders toolbar. Delete a Folder: To delete a folder, select the folder you wish to delete. Click on the Delete Folder button located in the folders toolbar. Share a Folder: To allow other Appspace users to see your folder contents, click the Share Folders button located in the folders toolbar.
8.8.1 Moving Content in to Folders
1. From the main Content Library page, click on the content you wish to move. Once selected, a checkbox should appear In the upper left hand corner of the content box.

16
2. Drag the content from the main library screen to the folder in the left hand toolbar.
NOTE: Content can only be moved to folders under the My Library folder.
9 APPLICATION MANAGEMENT
A digital media application (or app) is a collection of layouts and widgets that can be programmed to run
at a specific time, duration, and location. Each app is designed to cater to a specific sign location and/or
purpose. An app can have multiple layouts and functions, suitable for use as a main entrance
information screen or to present commercial content in a lobby advertising panel. Apps can also stream
live data content and widgets, useful for news feeds or currency exchange boards. Interactive elements
within an app enable dynamic media content to be displayed and used on touch-screen enabled
displays.
9.1 CREATE AN APPLICATION An application is a group of layouts/templates and widgets that can be displayed on a digital sign
display. Typically you would create one application for each topic or media display console.
1. From the top Appspace toolbar, click the menu icon in the top left hand corner of the screen. 2. From the dropdown menu, select Sign Manager.
3. Click the + button to create a new application.
NOTE: If this is your first application you will be prompted to select a template.

17
4. Select your screen template.
NOTE: If you are new to Appspace, it is easiest to start out with a pre-made template than to select a blank template.
NOTE: Scroll down to see more template options.
For this example, I will choose the Info Board Landscape – Ocean Blue template.
5. Once you click on a template you have the ability to use this template or close out and select a different template. To use this template, click the Use This Template button at the top right hand side of the window.
6. Enter in the name of your application. Click the OK button to continue.
You will now be brought to the main application screen where you can edit and modify your display templates.

18
9.2 APPLICATION DESIGN WINDOW The application editing window has the following functionalities:
Preview your application
Displays application update history
Enable/disable automatic syncing
Configure application sharing permissions
9.3 ENABLE/DISABLE AUTOMATIC SYNCING It is a best practice to disable automatic syncing of applications while they are being edited to prevent
users from viewing your changes while you are editing them.
1. From the main Application window, locate the Automatic Syncing status.
2. Click the Change link to the right of the Mode heading.
3. Click Yes to confirm disabling automatic syncing. Click No to return to the previous screen.

19
Automatic syncing is now disabled. Click the Sync Now button to manually sync your application with your digital sign or click Change to enable automatic syncing.
9.4 SETTING PLAYER DEVICE MODEL AND RESOLUTION It is important to set the device model and resolution of your media player before editing your layouts
to ensure proper screen size and enable features that are allowed on your device.
1. From the Application editing page, click Settings from the top menu bar. 2. Locate the Target Device heading and select your device model from the dropdown menu. 3. Locate the Application Resolution heading and set the appropriate resolution for your media player. Select Custom Resolution if you want to modify your screens width and height. 4. Click Save to save your settings.
9.5 EDIT A LAYOUT Design and edit your application display templates.
NOTE: When editing your application you will normally want to disable automatic syncing to the media player to avoid users seeing changes to your sign while they are being made. Make sure to enable syncing again once you are done submitting your changes.
1. Click the Edit button from the top toolbar.

20
2. Select a layout you wish to edit.
Double-click on the layout to open the layout editor.
Double-click on an individual widget in the main display window to edit the widget properties.
For this example we will be editing a layout so we will double-click on the New Layout box located in the left hand toolbar.
9.5.1 Layout Background Widget
1. Click on the Background link in the right hand toolbar to select your background image. Double-click on the selection box to open the background editor.
2. Choose your background option:
One Background: Click the None button to the right of the Background Image heading located in the right hand side toolbar. Select your background image from the Content Library or click Upload Media to upload a new file.
Rotating Background: Click the Content button located in the top toolbar to upload multiple background images. Click the Add Media button to select your background images from the Content Library. Make sure the checkbox to the left of your content is selected. Click the Close Window link when complete.

21
3. Click the Save button to save and display your changes.
NOTE: Sometimes widget changes will not be displayed properly until the layout is saved.
9.5.2 Adding Uploaded Content from the Content Library
To add uploaded pictures, files, dynamic media, or other content from the Content Library to your
layout, follow the directions below:
1. From the layout editing screen, click the + Add Media button at the top of the window.
2. Select the content you wish to add.
Library: Click on the content you wish to add. Once you select the content, a check box will show up in the upper left hand corner of the content box. The content will also be placed in the Select Content field below.
NOTE: It is important that all content you wish to add shows up in the Selected Content field at the bottom of the screen.
Upload Local: Used to upload files from your local machine or network drives to the content library. Select the content you wish to upload. Verify your new content is located in the Selected Content box below. Click Apply to save your settings. Click the Close Window

22
link to return back to the layout editor window.
Others: Create text, html or dynamic media on the fly. Select from Rich Text, HTML, or Dynamic Media. Enter in your title and content information. Click the Add Content button to upload the new content to the Content Library. Click the Apply button to submit your request. Click the Close Window link to return to the layout editor page.
3. Once you media is added, it will show up as a new box on the layout editing screen. Click on the media and drag it to your preferred location. Click and drag on the frame of the image to resize.
NOTE: Hold down the Shift key on your keyboard when resizing your image to keep the correct image proportion.
4. Click the Save button to save and display your changes.
9.5.3 Adding Pre-Made Appspace Widgets
Appspace has many pre-made widgets available that you can add to your sign layout such as a clock, RSS
feeds, text tickers, and weather widgets.
1. From the layout editor page, click the + Add Widget button.

23
2. Locate the pre-made widget you would like to use. Use the scroll bar to view all of the widgets available. Click on the Widget Types toolbar on the left hand side of the screen to view widgets based on type. Click the Add Widget button to add that widget to your layout.
3. Click the Okay button at the confirmation screen.
4. The new widget will be placed on the layout editor screen. Click and drag the widget frame to resize the widget. Hold down the Shift key on your keyboard to keep the widget proportion.
3. Click the Save button to save and display your changes.

24
9.5.4 Bring to Front/ Send to Back
1. Select the widget you would like to move and take note of the name of the widget in the right hand Widgets toolbar.
NOTE: The widget that is currently selected will be in bold font and underlined in the Widgets toolbar located in the right hand side of the window.
2. Select the widget you would like to bring forward. 3. Drag the widget name, in the right hand toolbar, above the current widget out front.
Your widget should now be in front of the other widget. Drag widgets down the list to send them behind other widgets.
3. Click the Save button to save and display your changes.

25
9.5.5 Widget Properties: Transitions, Durations, Colors, and Borders
Widget properties allow you to configure many settings such as background color, transition properties,
play out times, font sizes, etc.
NOTE: Sometimes widget changes will not be displayed properly until the layout is saved.
1. To edit a widget’s properties, double-click on the widget. 2. Configure your properties using the toolbar located in the right hand side of the screen.
Widget Transitions and Duration: To modify the widget transitions (Ex. Fade in, fade out, slide from right, etc.) select your widget from the main screen. Double-click on the widget to access the widget properties. Select your transition and duration settings from the right hand side toolbar.
Widget Background Colors and Borders: Double-click on your widget to access the widget properties. Select your widget settings from the right hand side toolbar.
Widget Content: Click the Content tab to add additional media to your widget. (Ex. Multiple pictures set on a rotating schedule). Click Add Media to add additional content to the rotation. Make sure the check box to the left of the media is selected.

26
3. Click the Apply button to save your changes. 4. Click the Close Window link to return to the layout editor page.
9.5.6 Delete Widget
1. Click on the widget to select it.
2. Hit the Delete key on your keyboard. 3. Click the Yes button to confirm the deletion. Click the Cancel button to return to the layout editor page.
Widget should now be deleted.

27
9.5.7 Saving your Layout
A layout should be saved each time you have edited a widget or added/deleted a widget from the layout
screen. Save the layout often to prevent loosing changes.
1. From the main layout editor page, click on the Save button located in the top left hand corner of the window to save your changes.
9.5.8 Selecting Which Layouts to Use
Selected layouts are layouts that you want to use in your application.
1. From the Application layout window, click the Edit tab. Click the checkbox to the left of each layout that you want to use for your sign display.
NOTE: Only layouts that are selected will be available for preview and scheduling.
9.5.9 Preview Your Layout
1. From the Application layout window, click the Preview tab to preview your selected layouts. Select the layout you wish to view from the left hand toolbar.
NOTE: If you do not select a layout, it will scroll through each layout at the default 30 second configured duration.

28
9.6 APPLICATIONS SETTINGS The Application Settings page allows you to configure and edit your current application settings.
1. From the Application layout window, click Settings from the top toolbar. 2. Configure or edit the following:
Application Name: Used to rename your application.
Target Device: Configure your Edge or DMP device model.
Application Resolution: Configure the height and width of your display screen for the correct application resolution.
Layout Scheduling: Enable/disable application scheduling.
Approval Notification: Enable/disable content approval before content can be published.
Delete Application: Delete the application.
9.6.1 Scheduling an Application
You can configure your application to run at a specific date/time and on a specific device using the
Application Scheduler.
1. From the Application layout page, click the Settings tab. 2. Select the checkbox to the right of Layout Scheduling. 3. Click Save to save your changes.
NOTE: You will now see a Schedule tab located on the top toolbar.
NOTE: Once you enable scheduling, you will only be able to view selected schedule layouts on the Preview page. To view all layouts, you must disable the layout scheduler from the Settings page.

29
3. Click on the Schedule tab from the top toolbar. 4. Click on the + symbol
5. Fill in the information required for your new schedule:
Name: Name of your schedule.
Schedule Time: Date to play your scheduled application.
o Play Forever: Continue to play every day forever.
o Play between these dates: Select a schedule start and end date for playing the application.
Schedule Priority: o Normal Schedule: Play on a normal
priority schedule. o Exclusive Schedule: Play this schedule
only and ignore all other schedules.
Tag Rules: Select applications or layouts with only selected tags.
Recurrence: Configure the days and times to play this schedule.
6. Click Add to List to save your recurrence options.
NOTE: If you have multiple recurrence dates/times you would like your application to play, fill out the new recurrence date/time options again and then click Add to List.
7. Once you are done creating your schedule, click the Apply button in the top right hand corner of the screen.

30
8. If a layout has not been selected, you will prompted to at the next screen. Click the Add Layout button to select your layouts.
9. Select the check box to the left of each layout you wish to play during your scheduled application. Click the Apply button to save your changes.
10. If you would like to change the order in which each layout is played, click and drag the layout to the new position. 11. Click the Close Window link to return to the main schedule page.
You will now see your schedule in the schedule list. To view your current schedule by day, click on the calendar located in the upper left hand corner of the window. To view all schedules by day/month/year select the View by: drop down list located in the top right hand corner of the window.

31
9.6.2 Delete a Schedule
1. From the Schedule tab, click on the name of the schedule you wish to delete. 2. Click the Delete link located in the top right hand corner of the screen. 3. You will be asked if you wish to delete this schedule. Click OK to delete the schedule. Click Cancel to return to the schedule layout window.
9.6.3 Edit a Schedule
1. From the Schedule tab, click on the name of the schedule you wish to edit. 2. Click the More Options link located at the top of the window to edit your schedule options.
You will now see the main schedule configuration page. 3. Click the Apply button located in the top right hand corner of the window when you are done making your changes. 4. Click the Close Window link located in the top right hand corner of the window to return to the main scheduler page.
NOTE: Once you create a schedule, you will only be able to view selected sign layouts on the Preview page. To preview all layouts, you must disable the layout scheduler from the Settings page.

32
9.6.4 Delete an Application
1. From the main application window, select the Settings tab from the top toolbar. 2. Check the box to the right of Delete Application. 3. To continue with the application deletion, click the Yes, delete this application link.
4. Select Yes to delete the application. Click No to return to the main Settings page.
9.6.5 Sharing an Application
Sharing an application allows other Appspace users to view and/or edit your application layout and
settings.
1. From the main application page, click on the Permissions tab. 2. Select Custom from the Permissions Model section. 3. Select the permissions you would like each Appspace user to have by using the dropdown box located to the right of their name.

33
10 EXAMPLE CONTENT
To find external content on the web I did a search for “embed twitter feed using html” for example.
Using HTML snippets seemed to be the easiest way to display content.
10.1 CREATE A TWITTER FEED 1. Within the Appspace Content Library, create a new HTML widget.
2. Enter a name and description for the widget, then select the “Edit” tab.
3. Select “HTML Snippet” from the “Type” dropdown box.
4. Using a web browser, go to twitter.com and log into your Twitter account.
5. Click the (Settings) button located in the top right corner of the screen.
6. Select “Settings” from the dropdown menu.
7. Select “Widgets” from the left side toolbar.
8. Click the Create New button to create a new widget.
9. Enter the Username of the twitter feed you would like to follow, then select any other widget
options.
10. Click the Create widget button to create the HTML code for your Twitter feed.
11. Copy and paste the HTML code into the Appspace HTML snippet widget you created in step 3.
12. Click the Apply button to save your widget.
13. Insert your new widget into any Appspace application layout within the Sign Manager.
10.2 EXAMPLE YOUTUBE VIDEO HTML Snippet Widget:
<iframe width="560" height="315" src="http://www.youtube.com/embed/WsNUvSmbzAY?rel=0&autoplay=1" frameborder="0" allowfullscreen ></iframe>
http://www.w3schools.com/html/html_youtube.asp