
Applying Designs and Color Schemes -...
14
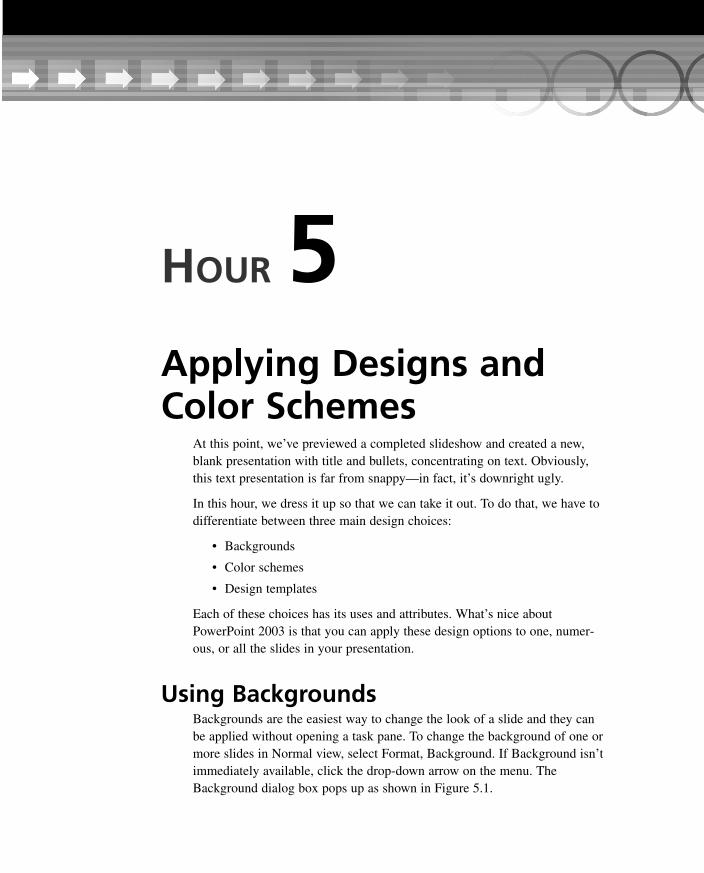
Applying Designs and Color Schemes At this point, we’ve previewed a completed slideshow and created a new, blank presentation with title and bullets, concentrating on text. Obviously, this text presentation is far from snappy—in fact, it’s downright ugly. In this hour, we dress it up so that we can take it out. To do that, we have to differentiate between three main design choices: • Backgrounds • Color schemes • Design templates Each of these choices has its uses and attributes. What’s nice about PowerPoint 2003 is that you can apply these design options to one, numer- ous, or all the slides in your presentation. Using Backgrounds Backgrounds are the easiest way to change the look of a slide and they can be applied without opening a task pane. To change the background of one or more slides in Normal view, select Format, Background. If Background isn’t immediately available, click the drop-down arrow on the menu. The Background dialog box pops up as shown in Figure 5.1. HOUR 5
Transcript of Applying Designs and Color Schemes -...
Applying Designs andColor Schemes
At this point, we’ve previewed a completed slideshow and created a new,blank presentation with title and bullets, concentrating on text. Obviously,this text presentation is far from snappy—in fact, it’s downright ugly.
In this hour, we dress it up so that we can take it out. To do that, we have todifferentiate between three main design choices:
• Backgrounds
• Color schemes
• Design templates
Each of these choices has its uses and attributes. What’s nice aboutPowerPoint 2003 is that you can apply these design options to one, numer-ous, or all the slides in your presentation.
Using BackgroundsBackgrounds are the easiest way to change the look of a slide and they canbe applied without opening a task pane. To change the background of one ormore slides in Normal view, select Format, Background. If Background isn’timmediately available, click the drop-down arrow on the menu. TheBackground dialog box pops up as shown in Figure 5.1.
HOUR 5
06 0672325551 CH05.qxd 8/27/03 1:51 PM Page 75
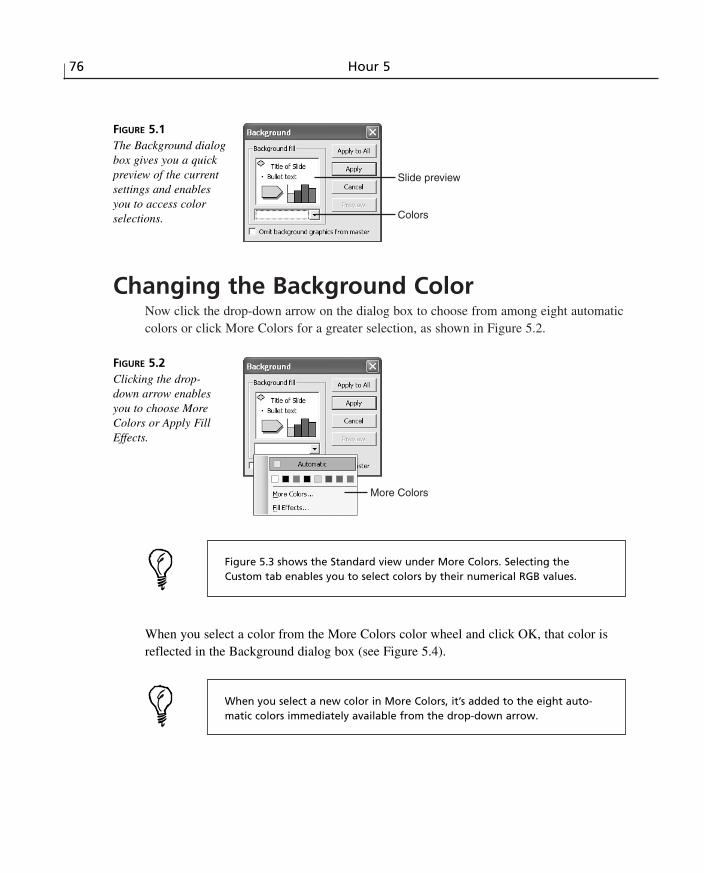
Changing the Background ColorNow click the drop-down arrow on the dialog box to choose from among eight automaticcolors or click More Colors for a greater selection, as shown in Figure 5.2.
76 Hour 5
Slide preview
Colors
FIGURE 5.1The Background dialogbox gives you a quickpreview of the currentsettings and enablesyou to access colorselections.
More Colors
FIGURE 5.2Clicking the drop-down arrow enablesyou to choose MoreColors or Apply FillEffects.
Figure 5.3 shows the Standard view under More Colors. Selecting theCustom tab enables you to select colors by their numerical RGB values.
When you select a color from the More Colors color wheel and click OK, that color isreflected in the Background dialog box (see Figure 5.4).
When you select a new color in More Colors, it’s added to the eight auto-matic colors immediately available from the drop-down arrow.
06 0672325551 CH05.qxd 8/27/03 1:51 PM Page 76
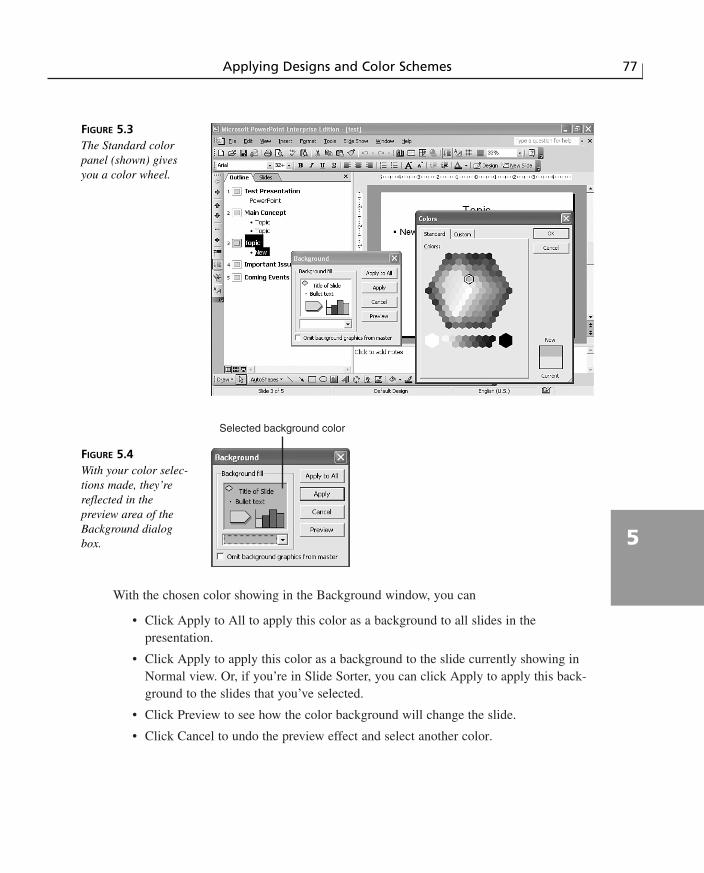
With the chosen color showing in the Background window, you can
• Click Apply to All to apply this color as a background to all slides in thepresentation.
• Click Apply to apply this color as a background to the slide currently showing inNormal view. Or, if you’re in Slide Sorter, you can click Apply to apply this back-ground to the slides that you’ve selected.
• Click Preview to see how the color background will change the slide.
• Click Cancel to undo the preview effect and select another color.
Applying Designs and Color Schemes 77
5
FIGURE 5.3The Standard colorpanel (shown) givesyou a color wheel.
Selected background color
FIGURE 5.4With your color selec-tions made, they’rereflected in thepreview area of theBackground dialogbox.
06 0672325551 CH05.qxd 8/27/03 1:51 PM Page 77
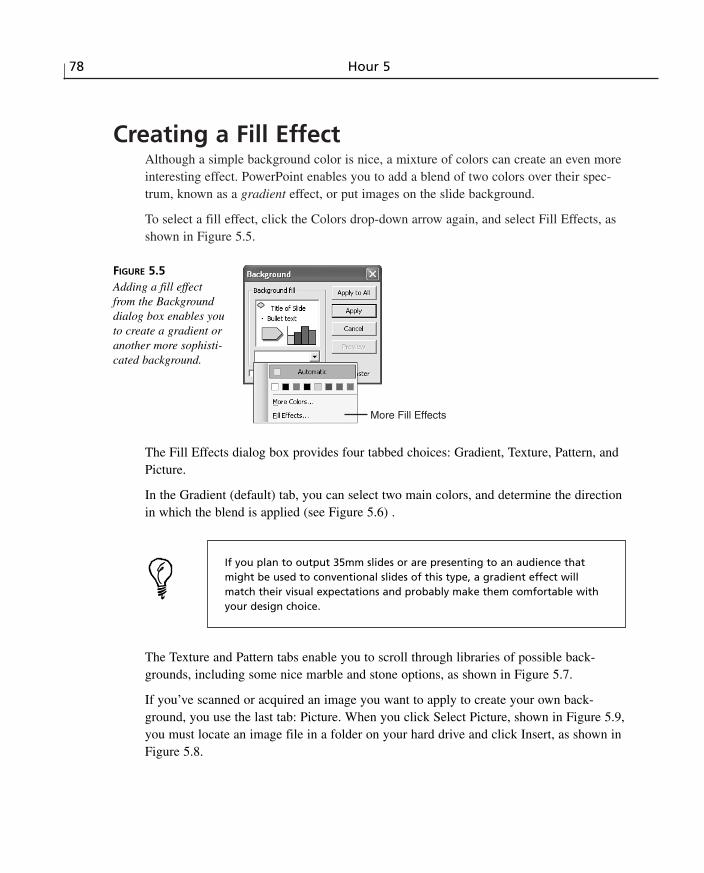
Creating a Fill EffectAlthough a simple background color is nice, a mixture of colors can create an even moreinteresting effect. PowerPoint enables you to add a blend of two colors over their spec-trum, known as a gradient effect, or put images on the slide background.
To select a fill effect, click the Colors drop-down arrow again, and select Fill Effects, asshown in Figure 5.5.
78 Hour 5
More Fill Effects
FIGURE 5.5Adding a fill effectfrom the Backgrounddialog box enables youto create a gradient oranother more sophisti-cated background.
The Fill Effects dialog box provides four tabbed choices: Gradient, Texture, Pattern, andPicture.
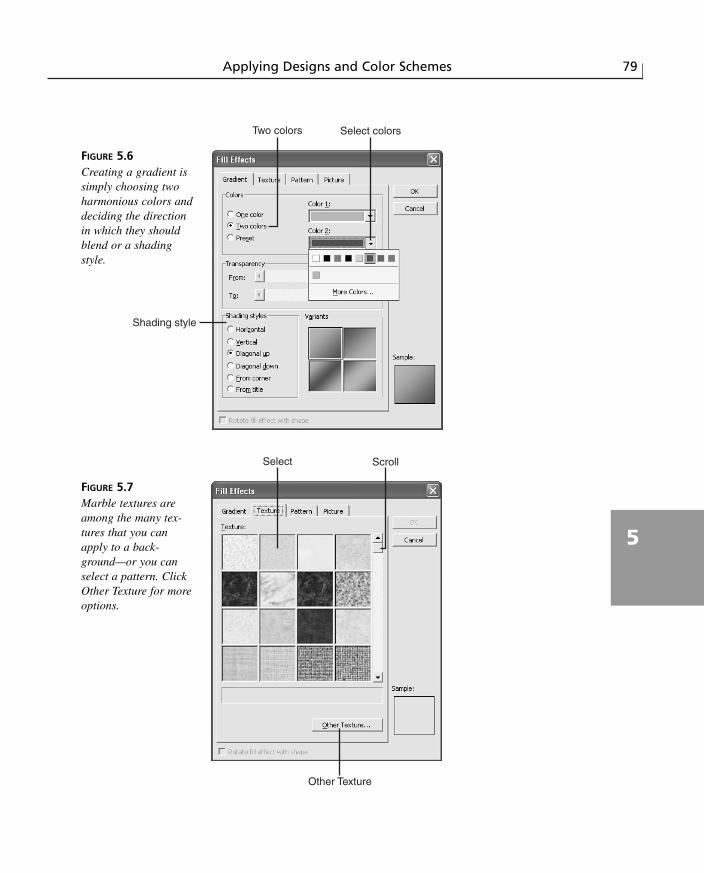
In the Gradient (default) tab, you can select two main colors, and determine the directionin which the blend is applied (see Figure 5.6) .
If you plan to output 35mm slides or are presenting to an audience thatmight be used to conventional slides of this type, a gradient effect willmatch their visual expectations and probably make them comfortable withyour design choice.
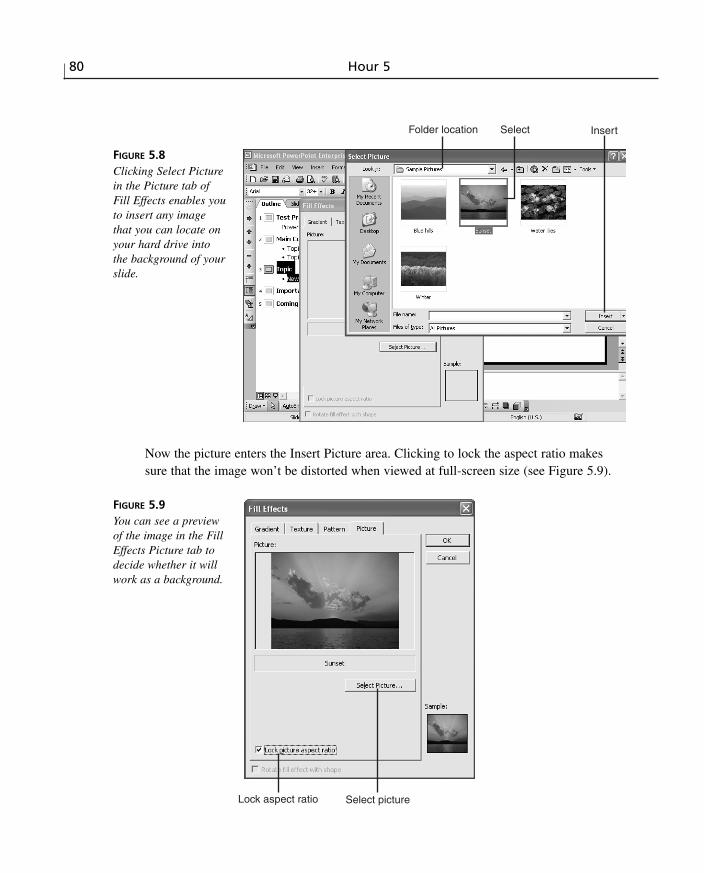
The Texture and Pattern tabs enable you to scroll through libraries of possible back-grounds, including some nice marble and stone options, as shown in Figure 5.7.
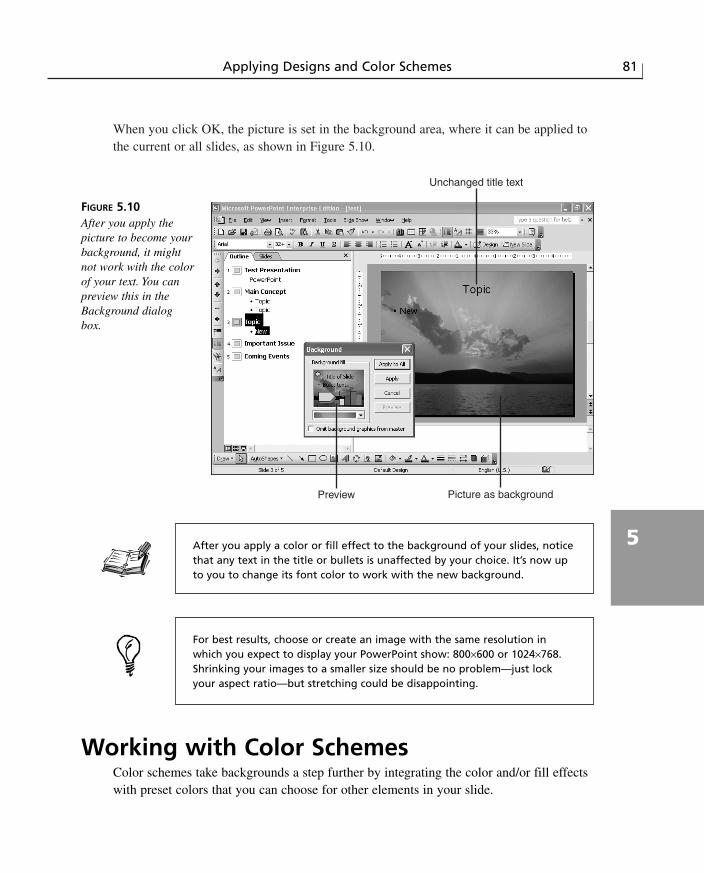
If you’ve scanned or acquired an image you want to apply to create your own back-ground, you use the last tab: Picture. When you click Select Picture, shown in Figure 5.9,you must locate an image file in a folder on your hard drive and click Insert, as shown inFigure 5.8.
06 0672325551 CH05.qxd 8/27/03 1:51 PM Page 78
Applying Designs and Color Schemes 79
5
Two colors Select colors
Shading style
FIGURE 5.6Creating a gradient issimply choosing twoharmonious colors anddeciding the directionin which they shouldblend or a shadingstyle.
Select
Other Texture
Scroll
FIGURE 5.7Marble textures areamong the many tex-tures that you canapply to a back-ground—or you canselect a pattern. ClickOther Texture for moreoptions.
06 0672325551 CH05.qxd 8/27/03 1:51 PM Page 79
80 Hour 5
Select InsertFolder location
FIGURE 5.8Clicking Select Picturein the Picture tab ofFill Effects enables youto insert any imagethat you can locate onyour hard drive intothe background of yourslide.
Now the picture enters the Insert Picture area. Clicking to lock the aspect ratio makessure that the image won’t be distorted when viewed at full-screen size (see Figure 5.9).
Lock aspect ratio Select picture
FIGURE 5.9You can see a previewof the image in the FillEffects Picture tab todecide whether it willwork as a background.
06 0672325551 CH05.qxd 8/27/03 1:51 PM Page 80
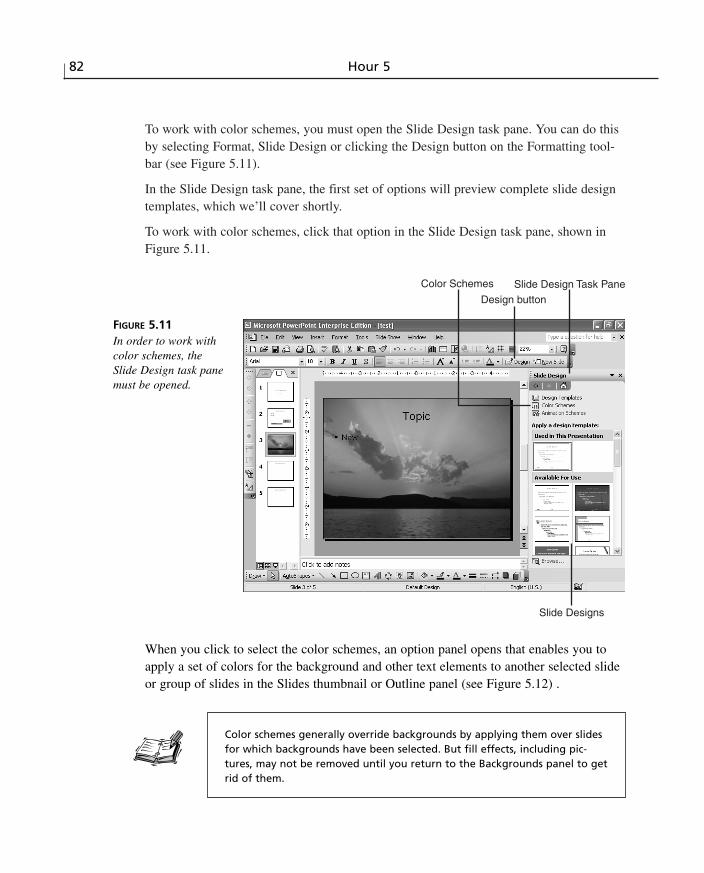
When you click OK, the picture is set in the background area, where it can be applied tothe current or all slides, as shown in Figure 5.10.
Applying Designs and Color Schemes 81
5
Picture as background
Unchanged title text
Preview
FIGURE 5.10After you apply thepicture to become yourbackground, it mightnot work with the colorof your text. You canpreview this in theBackground dialogbox.
After you apply a color or fill effect to the background of your slides, noticethat any text in the title or bullets is unaffected by your choice. It’s now upto you to change its font color to work with the new background.
Working with Color SchemesColor schemes take backgrounds a step further by integrating the color and/or fill effectswith preset colors that you can choose for other elements in your slide.
For best results, choose or create an image with the same resolution inwhich you expect to display your PowerPoint show: 800×600 or 1024×768.Shrinking your images to a smaller size should be no problem—just lockyour aspect ratio—but stretching could be disappointing.
06 0672325551 CH05.qxd 8/27/03 1:51 PM Page 81
To work with color schemes, you must open the Slide Design task pane. You can do thisby selecting Format, Slide Design or clicking the Design button on the Formatting tool-bar (see Figure 5.11).
In the Slide Design task pane, the first set of options will preview complete slide designtemplates, which we’ll cover shortly.
To work with color schemes, click that option in the Slide Design task pane, shown inFigure 5.11.
82 Hour 5
Slide Design Task PaneColor Schemes
Slide Designs
Design button
FIGURE 5.11In order to work withcolor schemes, theSlide Design task panemust be opened.
When you click to select the color schemes, an option panel opens that enables you toapply a set of colors for the background and other text elements to another selected slideor group of slides in the Slides thumbnail or Outline panel (see Figure 5.12) .
Color schemes generally override backgrounds by applying them over slidesfor which backgrounds have been selected. But fill effects, including pic-tures, may not be removed until you return to the Backgrounds panel to getrid of them.
06 0672325551 CH05.qxd 8/27/03 1:51 PM Page 82

Whenever you’re able to select one or more objects to which to apply aneffect or formatting option—such as the slides in the Slides thumbnail panelor in Slide Sorter view—you can select multiple objects in the following way:
For a series of objects, press the Shift key as you click the first and last itemin the series.
For individual objects, press the Ctrl key as you select each object.
This applies throughout Windows and is valuable when selecting to movefiles, images, or just about any set of objects.
Applying Designs and Color Schemes 83
5
Selected slideApply to Selected Slides
Selected color scheme
FIGURE 5.12You can select one ormore slide thumbnailsto which to apply anew color schemefrom the Slide Designtask pane.
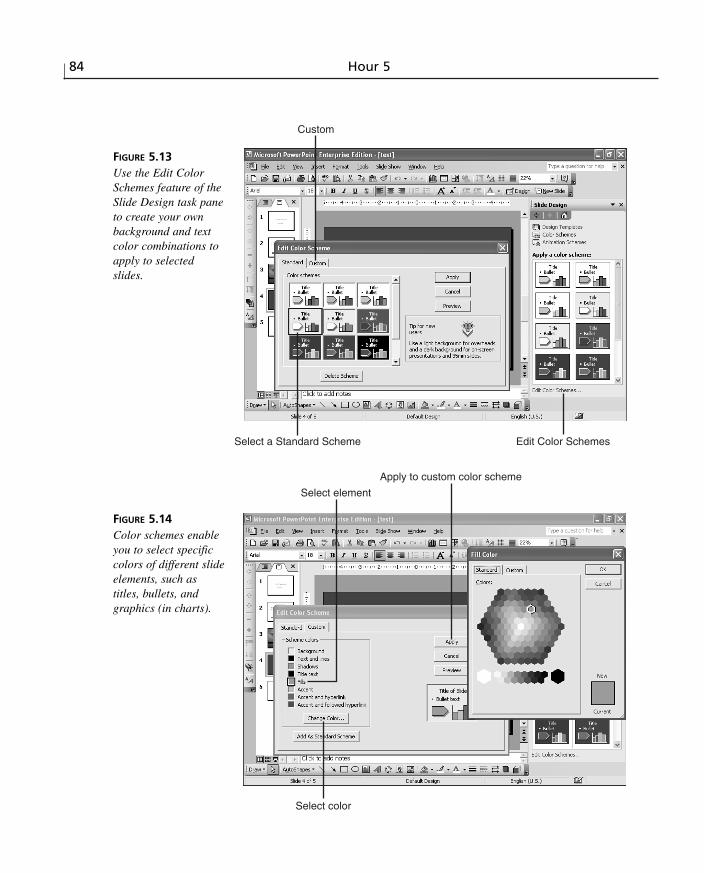
Creating Your Own Color SchemeThe easiest way to edit or create a color scheme is to click the Edit Color Scheme optionat the bottom of the task pane shown in Figure 5.13. Then click the Standard tab to selecta generic scheme you want to edit.
Now click the Custom tab and begin to select your own choices for various slide ele-ments. As you select each one, you can apply it to this custom color scheme, as shown inFigure 5.14.
06 0672325551 CH05.qxd 8/27/03 1:51 PM Page 83
84 Hour 5
Select a Standard Scheme
Custom
Edit Color Schemes
FIGURE 5.13Use the Edit ColorSchemes feature of theSlide Design task paneto create your ownbackground and textcolor combinations toapply to selectedslides.
Select color
Select element
Apply to custom color scheme
FIGURE 5.14Color schemes enableyou to select specificcolors of different slideelements, such astitles, bullets, andgraphics (in charts).
06 0672325551 CH05.qxd 8/27/03 1:51 PM Page 84
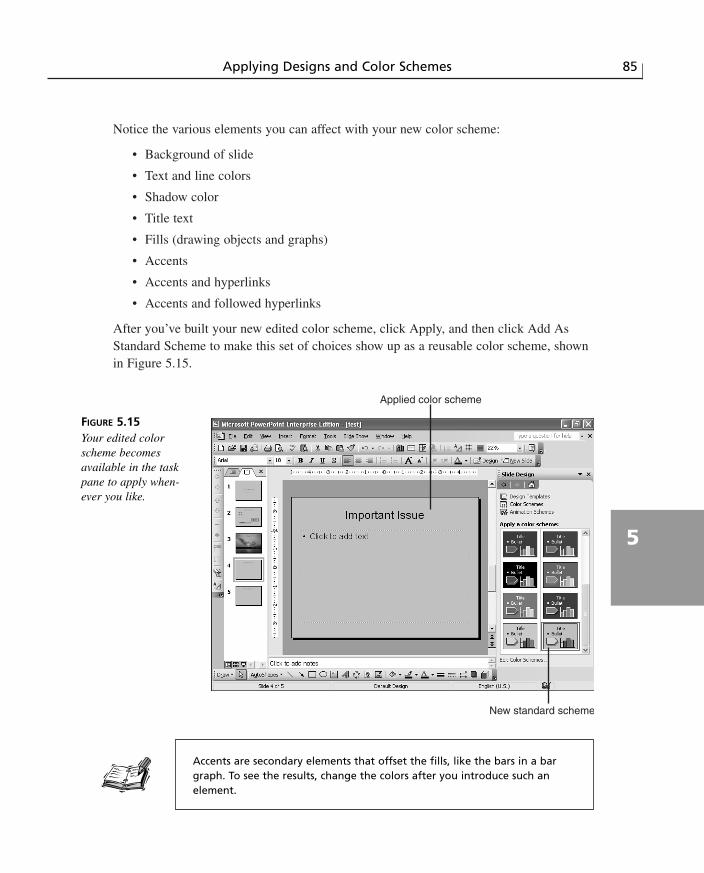
Notice the various elements you can affect with your new color scheme:
• Background of slide
• Text and line colors
• Shadow color
• Title text
• Fills (drawing objects and graphs)
• Accents
• Accents and hyperlinks
• Accents and followed hyperlinks
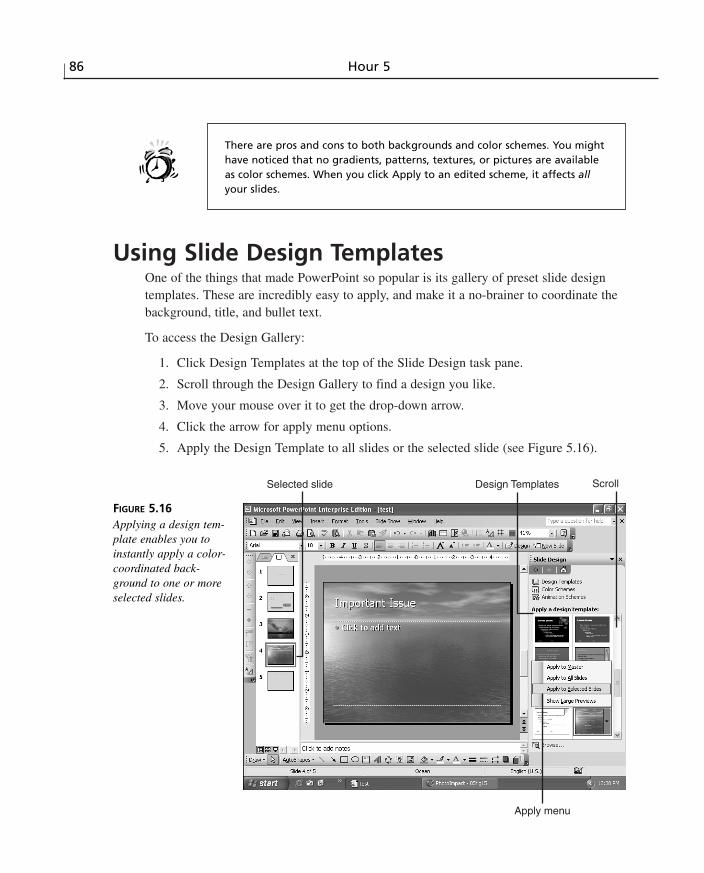
After you’ve built your new edited color scheme, click Apply, and then click Add AsStandard Scheme to make this set of choices show up as a reusable color scheme, shownin Figure 5.15.
Applying Designs and Color Schemes 85
5
Applied color scheme
New standard scheme
FIGURE 5.15Your edited colorscheme becomesavailable in the taskpane to apply when-ever you like.
Accents are secondary elements that offset the fills, like the bars in a bargraph. To see the results, change the colors after you introduce such anelement.
06 0672325551 CH05.qxd 8/27/03 1:51 PM Page 85
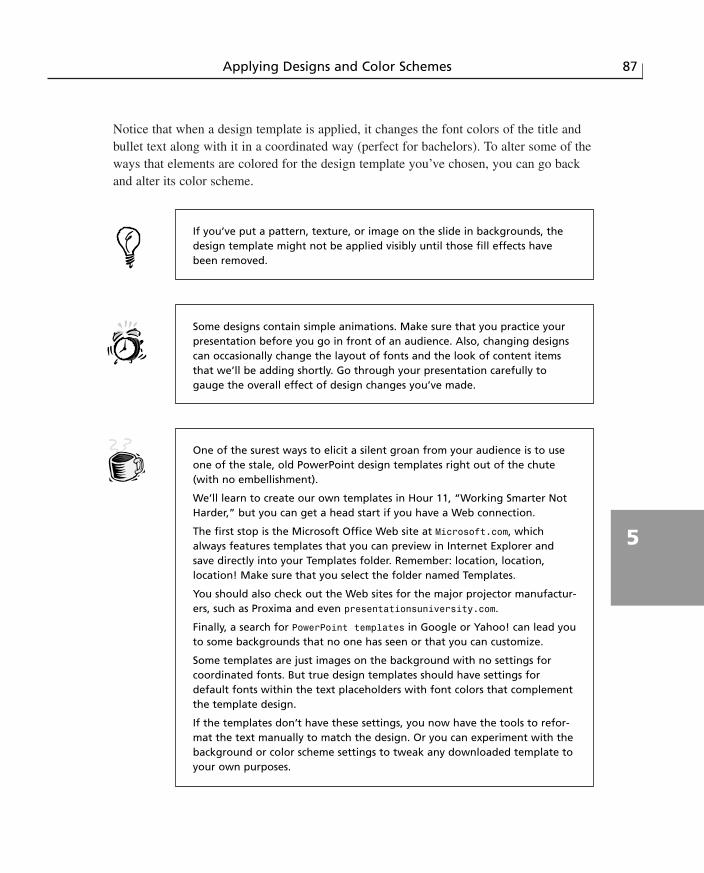
Using Slide Design TemplatesOne of the things that made PowerPoint so popular is its gallery of preset slide designtemplates. These are incredibly easy to apply, and make it a no-brainer to coordinate thebackground, title, and bullet text.
To access the Design Gallery:
1. Click Design Templates at the top of the Slide Design task pane.
2. Scroll through the Design Gallery to find a design you like.
3. Move your mouse over it to get the drop-down arrow.
4. Click the arrow for apply menu options.
5. Apply the Design Template to all slides or the selected slide (see Figure 5.16).
86 Hour 5
There are pros and cons to both backgrounds and color schemes. You mighthave noticed that no gradients, patterns, textures, or pictures are availableas color schemes. When you click Apply to an edited scheme, it affects allyour slides.
Selected slide
Apply menu
Design Templates Scroll
FIGURE 5.16Applying a design tem-plate enables you toinstantly apply a color-coordinated back-ground to one or moreselected slides.
06 0672325551 CH05.qxd 8/27/03 1:51 PM Page 86
Notice that when a design template is applied, it changes the font colors of the title andbullet text along with it in a coordinated way (perfect for bachelors). To alter some of theways that elements are colored for the design template you’ve chosen, you can go backand alter its color scheme.
Applying Designs and Color Schemes 87
5
If you’ve put a pattern, texture, or image on the slide in backgrounds, thedesign template might not be applied visibly until those fill effects havebeen removed.
Some designs contain simple animations. Make sure that you practice yourpresentation before you go in front of an audience. Also, changing designscan occasionally change the layout of fonts and the look of content itemsthat we’ll be adding shortly. Go through your presentation carefully togauge the overall effect of design changes you’ve made.
One of the surest ways to elicit a silent groan from your audience is to useone of the stale, old PowerPoint design templates right out of the chute(with no embellishment).
We’ll learn to create our own templates in Hour 11, “Working Smarter NotHarder,” but you can get a head start if you have a Web connection.
The first stop is the Microsoft Office Web site at Microsoft.com, whichalways features templates that you can preview in Internet Explorer andsave directly into your Templates folder. Remember: location, location, location! Make sure that you select the folder named Templates.
You should also check out the Web sites for the major projector manufactur-ers, such as Proxima and even presentationsuniversity.com.
Finally, a search for PowerPoint templates in Google or Yahoo! can lead youto some backgrounds that no one has seen or that you can customize.
Some templates are just images on the background with no settings forcoordinated fonts. But true design templates should have settings fordefault fonts within the text placeholders with font colors that complementthe template design.
If the templates don’t have these settings, you now have the tools to refor-mat the text manually to match the design. Or you can experiment with thebackground or color scheme settings to tweak any downloaded template toyour own purposes.
06 0672325551 CH05.qxd 8/27/03 1:51 PM Page 87
SummaryIn this hour, we introduced some simple ways to dress up the bland (or blank) slides wecreated with text earlier. Using backgrounds, color schemes, and slide designs, we canquickly add some flash to one or more slides in our presentation.
We’ll cover other aspects of working with designs in the coming hours. Design tem-plates, for example, can be saved and reused along with other template files, which wewill cover in Hour 11. Putting pictures on portions of a background and further refiningthe blueprints behind our slides will be covered in Hour 12, “Customizing YourPresentation.”
In the next hour, we’ll continue our tour of layouts, and concentrate on the first of manycontent layouts: the table. The concept of content was introduced in PowerPoint XP andis a big help in enhancing the communication power of a slideshow.
Q&AQ How can I add a gradient to a color scheme?
A Apply the color scheme to the slides first, and then go in and add your gradientusing the Format, Background menu selection.
Q I really like the gradient but the Format, Background menu selection lets meapply the gradient to only the current slide or to all slides. Any ideas?
A You can apply a Background to more than one selected slide by using SlideSorterview, and you can create your new slides using the Insert, Duplicate Slide menuchoice from a gradient slide. We’ll learn how to create our own templates in Hour 11, along with other techniques that will make this even easier.
Q I downloaded a template from the Web and my text just blends into the back-ground. What do I do?
A The template you downloaded is a simple image on a background, and maybe it’svery nice. You’ll have to manually change the title and bullets’ font colors to makethem stand out. We’ll learn how to create our own templates in Hour 11, and workwith the masters that make formatting the fonts a breeze in Hour 12.
88 Hour 5
Note that Backgrounds, Color Schemes, and Slide Designs can be applied tomultiple slides by selecting them in either the slide thumbnails or withinSlide Sorter view.
06 0672325551 CH05.qxd 8/27/03 1:51 PM Page 88


![A Technique to Improve an Ailing Interim Implant-Supported ... · assess proposed occlusal schemes before definitive restoration is . placed [9]. Provisional restorations designs](https://static.fdocuments.us/doc/165x107/5f85d815ef129373f346690c/a-technique-to-improve-an-ailing-interim-implant-supported-assess-proposed-occlusal.jpg)