APPLICATIONS See application list inside Hyundai/Kia … · 2005-2010 Sportage Dash Disassembly –...
16
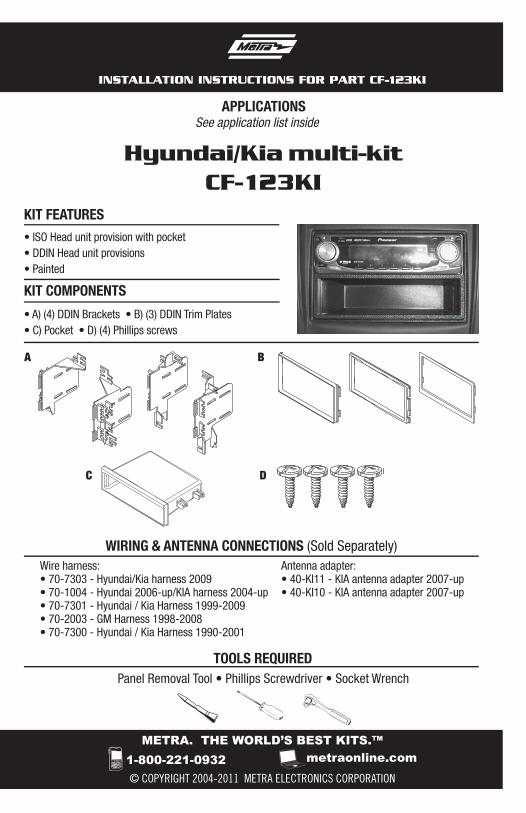
METRA. THE WORLD’S BEST KITS.™ © COPYRIGHT 2004-2011 METRA ELECTRONICS CORPORATION APPLICATIONS 1-800-221-0932 metraonline.com INSTALLATION INSTRUCTIONS FOR PART CF-123KI Hyundai/Kia multi-kit CF-123KI • ISO Head unit provision with pocket • DDIN Head unit provisions • Painted WIRING & ANTENNA CONNECTIONS (Sold Separately) Panel Removal Tool • Phillips Screwdriver • Socket Wrench C A B D • A) (4) DDIN Brackets • B) (3) DDIN Trim Plates • C) Pocket • D) (4) Phillips screws TOOLS REQUIRED KIT FEATURES KIT COMPONENTS See application list inside Antenna adapter: • 40-KI11 - KIA antenna adapter 2007-up • 40-KI10 - KIA antenna adapter 2007-up Wire harness: • 70-7303 - Hyundai/Kia harness 2009 • 70-1004 - Hyundai 2006-up/KIA harness 2004-up • 70-7301 - Hyundai / Kia Harness 1999-2009 • 70-2003 - GM Harness 1998-2008 • 70-7300 - Hyundai / Kia Harness 1990-2001
Transcript of APPLICATIONS See application list inside Hyundai/Kia … · 2005-2010 Sportage Dash Disassembly –...
METRA. THE WORLD’S BEST KITS.™
© COPYRIGHT 2004-2011 METRA ELECTRONICS CORPORATION
APPLICATIONS
1-800-221-0932 metraonline.com
INSTALLATION INSTRUCTIONS FOR PART CF-123KI
Hyundai/Kia multi-kitCF-123KI
• ISO Head unit provision with pocket• DDIN Head unit provisions• Painted
WIRING & ANTENNA CONNECTIONS (Sold Separately)
Panel Removal Tool • Phillips Screwdriver • Socket Wrench
C
A B
D
• A) (4) DDIN Brackets • B) (3) DDIN Trim Plates • C) Pocket • D) (4) Phillips screws
TOOLS REQUIRED
KIT FEATURES
KIT COMPONENTS
See application list inside
Antenna adapter:• 40-KI11 - KIA antenna adapter 2007-up• 40-KI10 - KIA antenna adapter 2007-up
Wire harness:• 70-7303 - Hyundai/Kia harness 2009• 70-1004 - Hyundai 2006-up/KIA harness 2004-up• 70-7301 - Hyundai / Kia Harness 1999-2009• 70-2003 - GM Harness 1998-2008• 70-7300 - Hyundai / Kia Harness 1990-2001
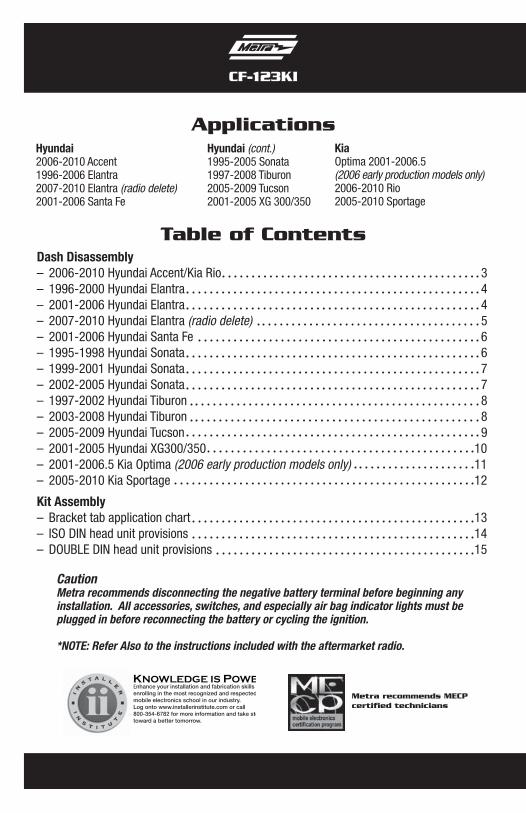
Table of Contents
Applications
KNOWLEDGE IS POWEREnhance your installation and fabrication skills by enrolling in the most recognized and respected mobile electronics school in our industry.Log onto www.installerinstitute.com or call 800-354-6782 for more information and take steps toward a better tomorrow.
Metra recommends MECP certified technicians
CF-123KI
CautionMetra recommends disconnecting the negative battery terminal before beginning any installation. All accessories, switches, and especially air bag indicator lights must be plugged in before reconnecting the battery or cycling the ignition.
*NOTE: Refer Also to the instructions included with the aftermarket radio.
Hyundai2006-2010 Accent1996-2006 Elantra2007-2010 Elantra (radio delete)2001-2006 Santa Fe
Hyundai (cont.)1995-2005 Sonata1997-2008 Tiburon2005-2009 Tucson2001-2005 XG 300/350
KiaOptima 2001-2006.5 (2006 early production models only)2006-2010 Rio2005-2010 Sportage
Dash Disassembly– 2006-2010 Hyundai Accent/Kia Rio 3– 1996-2000 Hyundai Elantra 4– 2001-2006 Hyundai Elantra 4– 2007-2010 Hyundai Elantra (radio delete) 5– 2001-2006 Hyundai Santa Fe 6– 1995-1998 Hyundai Sonata 6– 1999-2001 Hyundai Sonata 7– 2002-2005 Hyundai Sonata 7– 1997-2002 Hyundai Tiburon 8– 2003-2008 Hyundai Tiburon 8– 2005-2009 Hyundai Tucson 9– 2001-2005 Hyundai XG300/350 10– 2001-2006.5 Kia Optima (2006 early production models only) 11– 2005-2010 Kia Sportage 12
Kit Assembly– Bracket tab application chart 13– ISO DIN head unit provisions 14– DOUBLE DIN head unit provisions 15

1. Unclip and remove the trim panel surrounding the radio and including the a/c vents. (Figure A)
2. Remove (4) Phillips screws securing the radio. (Figure B)
3
2006-2010 Hyundai Accent/Kia Rio
Dash Disassembly CF-123KI
Figure A
Figure B
4
Dash Disassembly CF-123KI
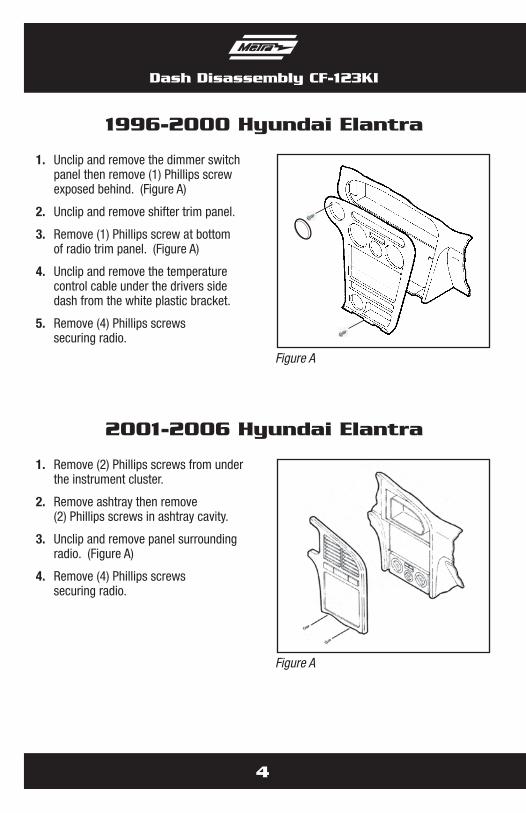
1. Unclip and remove the dimmer switch panel then remove (1) Phillips screw exposed behind. (Figure A)
2. Unclip and remove shifter trim panel.
3. Remove (1) Phillips screw at bottom of radio trim panel. (Figure A)
4. Unclip and remove the temperature control cable under the drivers side dash from the white plastic bracket.
5. Remove (4) Phillips screws securing radio.
1. Remove (2) Phillips screws from under the instrument cluster.
2. Remove ashtray then remove (2) Phillips screws in ashtray cavity.
3. Unclip and remove panel surrounding radio. (Figure A)
4. Remove (4) Phillips screws securing radio.
1996-2000 Hyundai Elantra
2001-2006 Hyundai Elantra
Figure A
Figure A
5
Dash Disassembly CF-123KI
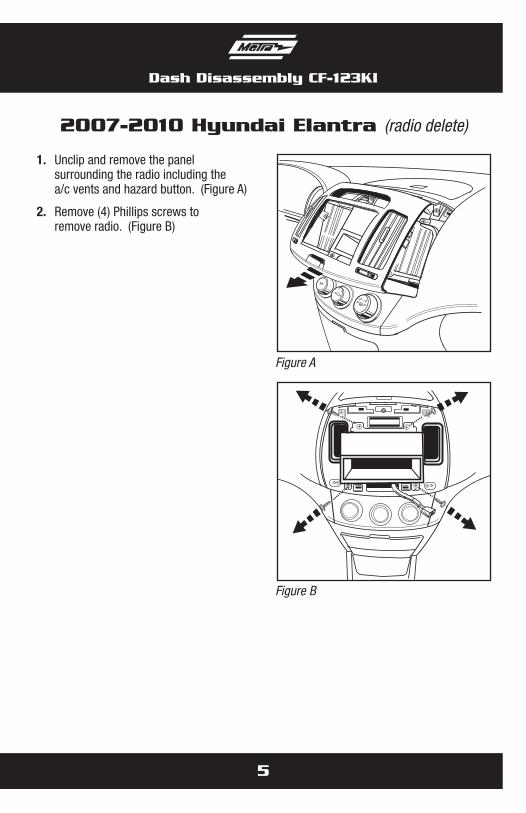
1. Unclip and remove the panel surrounding the radio including the a/c vents and hazard button. (Figure A)
2. Remove (4) Phillips screws to remove radio. (Figure B)
1 23
4
A/C
2007-2010 Hyundai Elantra (radio delete)
Figure A
Figure B

Dash Disassembly CF-123KI
6
2001-2006 Hyundai Santa Fe
1995-1998 Hyundai Sonata
1. Remove the ashtray and the (2) Phillips screws exposed in the cavity.
2. Unclip and remove trim panel with climate controls.
3. Remove (2) Phillips screws facing up at bottom of radio trim panel.
4. Unclip and remove the radio trim panel.
5. Remove (4) Phillips screws securing the radio.
1. Unclip and remove trim panel around the shifter.
2. Remove (1) Phillips screw at bottom of radio trim panel.
3. Unclip and remove radio trim panel. (Figure A)
4. Remove (4) Phillips screws securing the radio.
Figure A
Figure A
Dash Disassembly CF-123KI
7
2002-2005 Hyundai Sonata
1999-2001 Hyundai Sonata
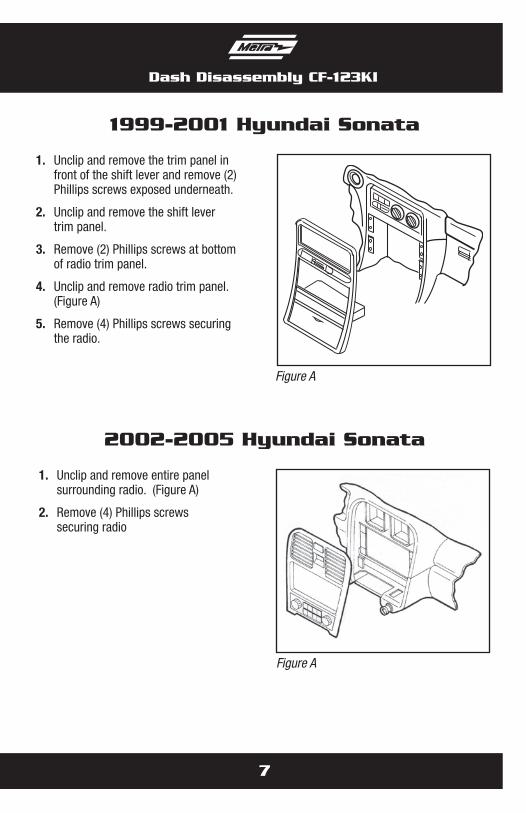
1. Unclip and remove the trim panel in front of the shift lever and remove (2) Phillips screws exposed underneath.
2. Unclip and remove the shift lever trim panel.
3. Remove (2) Phillips screws at bottom of radio trim panel.
4. Unclip and remove radio trim panel. (Figure A)
5. Remove (4) Phillips screws securing the radio.
1. Unclip and remove entire panel surrounding radio. (Figure A)
2. Remove (4) Phillips screws securing radio
Figure A
Figure A
Dash Disassembly CF-123KI
8
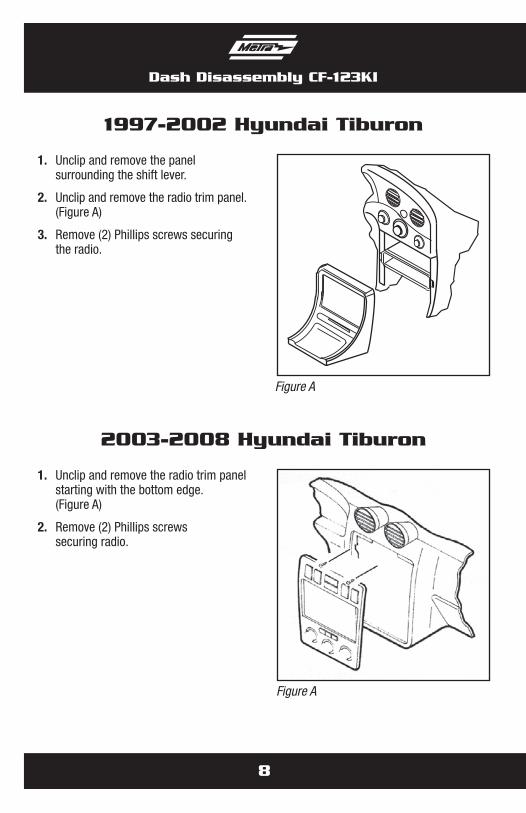
1997-2002 Hyundai Tiburon
2003-2008 Hyundai Tiburon
1. Unclip and remove the panel surrounding the shift lever.
2. Unclip and remove the radio trim panel. (Figure A)
3. Remove (2) Phillips screws securing the radio.
1. Unclip and remove the radio trim panel starting with the bottom edge. (Figure A)
2. Remove (2) Phillips screws securing radio.
Figure A
Figure A
Dash Disassembly CF-123KI
9
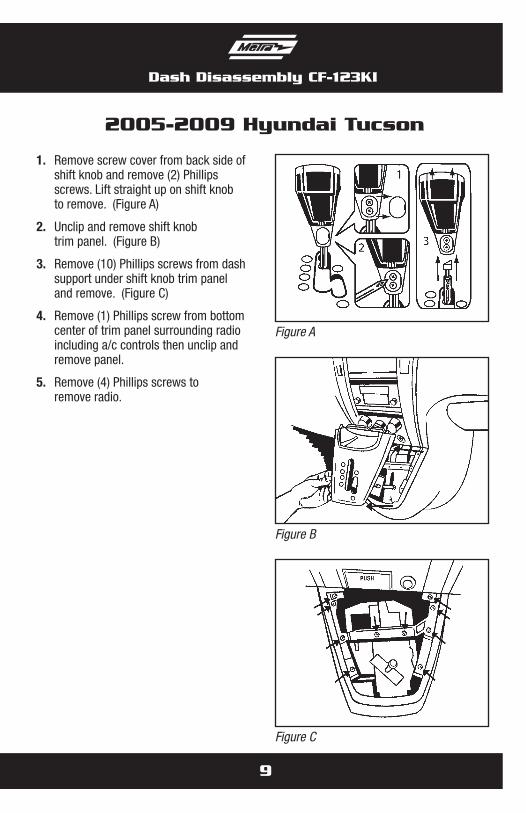
2005-2009 Hyundai Tucson
1. Remove screw cover from back side of shift knob and remove (2) Phillips screws. Lift straight up on shift knob to remove. (Figure A)
2. Unclip and remove shift knob trim panel. (Figure B)
3. Remove (10) Phillips screws from dash support under shift knob trim panel and remove. (Figure C)
4. Remove (1) Phillips screw from bottom center of trim panel surrounding radio including a/c controls then unclip and remove panel.
5. Remove (4) Phillips screws to remove radio.
Figure A
Figure B
Figure C
Dash Disassembly CF-123KI
10
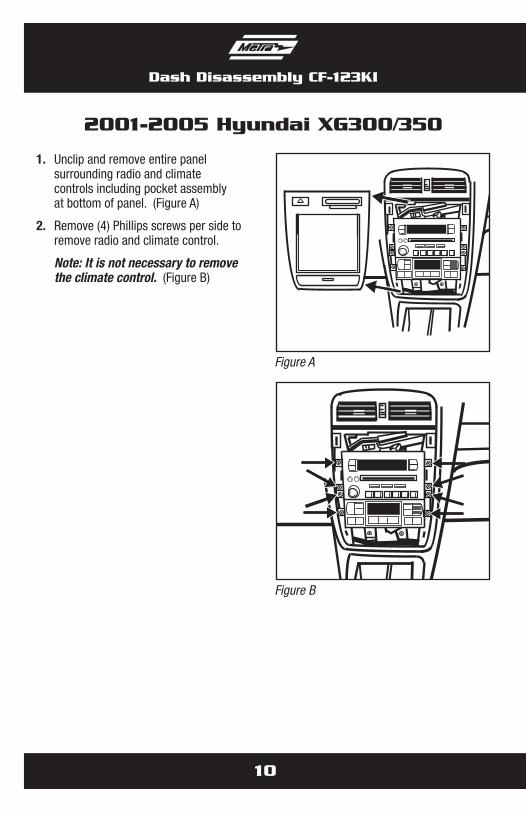
2001-2005 Hyundai XG300/350
1. Unclip and remove entire panel surrounding radio and climate controls including pocket assembly at bottom of panel. (Figure A)
2. Remove (4) Phillips screws per side to remove radio and climate control.
Note: It is not necessary to remove the climate control. (Figure B)
Figure A
Figure B
Dash Disassembly CF-123KI
11
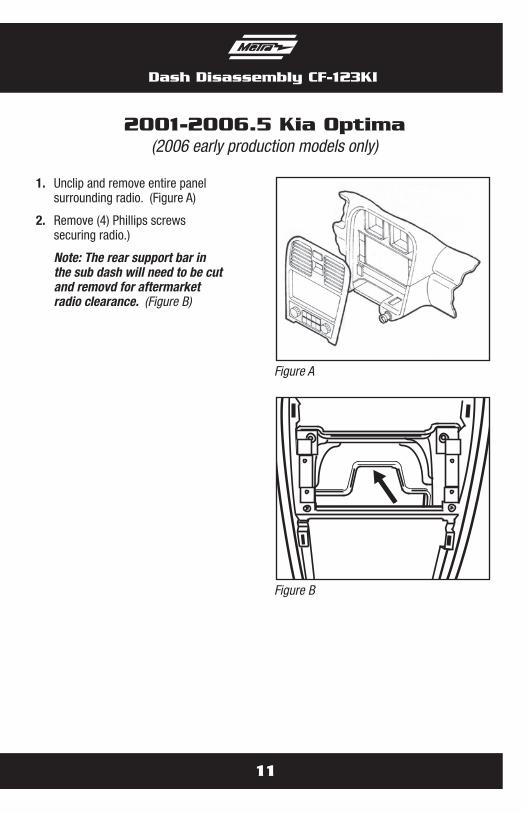
2001-2006.5 Kia Optima (2006 early production models only)
1. Unclip and remove entire panel surrounding radio. (Figure A)
2. Remove (4) Phillips screws securing radio.)
Note: The rear support bar in the sub dash will need to be cut and removd for aftermarket radio clearance. (Figure B)
Figure A
Figure B
Dash Disassembly CF-123KI
12
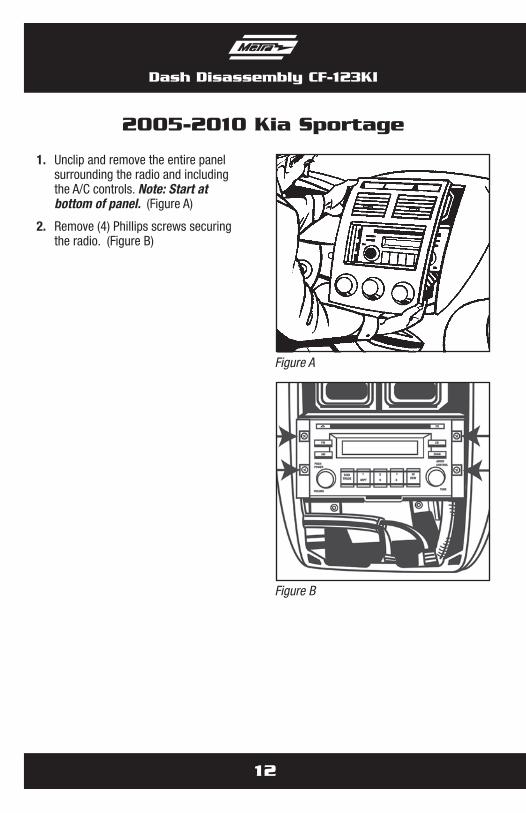
2005-2010 Kia Sportage
1. Unclip and remove the entire panel surrounding the radio and including the A/C controls. Note: Start at bottom of panel. (Figure A)
2. Remove (4) Phillips screws securing the radio. (Figure B)
Figure A
Figure B
Kit Assembly CF-123KI
13
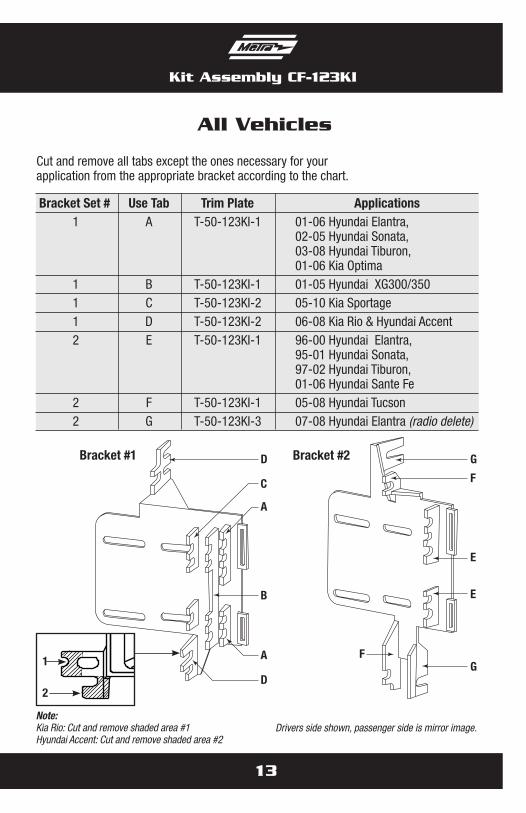
All Vehicles
Cut and remove all tabs except the ones necessary for your application from the appropriate bracket according to the chart.
Bracket Set # Use Tab Trim Plate Applications 1 A T-50-123KI-1 01-06 Hyundai Elantra, 02-05 Hyundai Sonata, 03-08 Hyundai Tiburon, 01-06 Kia Optima 1 B T-50-123KI-1 01-05 Hyundai XG300/350 1 C T-50-123KI-2 05-10 Kia Sportage 1 D T-50-123KI-2 06-08 Kia Rio & Hyundai Accent 2 E T-50-123KI-1 96-00 Hyundai Elantra, 95-01 Hyundai Sonata, 97-02 Hyundai Tiburon, 01-06 Hyundai Sante Fe 2 F T-50-123KI-1 05-08 Hyundai Tucson 2 G T-50-123KI-3 07-08 Hyundai Elantra (radio delete)
D
C
A
B
A
D
Bracket #1 G
F
E
E
GF
Bracket #2
Drivers side shown, passenger side is mirror image.
1
2
Note: Kia Rio: Cut and remove shaded area #1 Hyundai Accent: Cut and remove shaded area #2
Kit Assembly CF-123KI
14
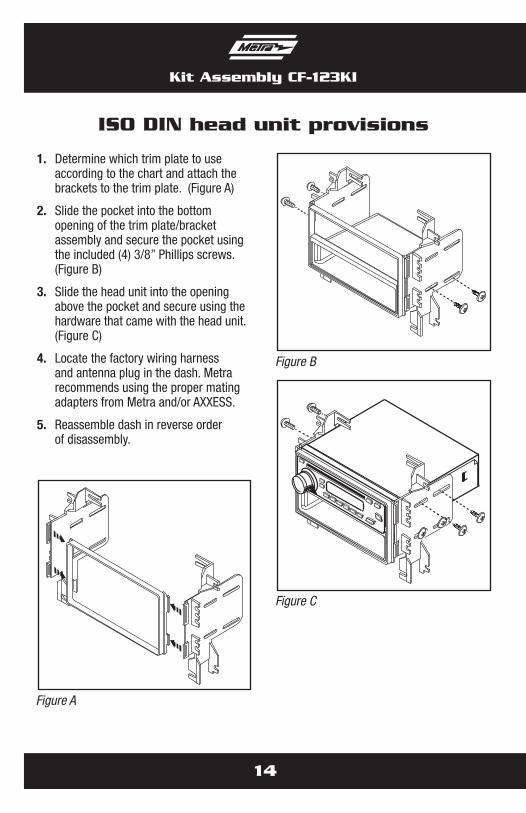
ISO DIN head unit provisions
1. Determine which trim plate to use according to the chart and attach the brackets to the trim plate. (Figure A)
2. Slide the pocket into the bottom opening of the trim plate/bracket assembly and secure the pocket using the included (4) 3/8” Phillips screws. (Figure B)
3. Slide the head unit into the opening above the pocket and secure using the hardware that came with the head unit. (Figure C)
4. Locate the factory wiring harness and antenna plug in the dash. Metra recommends using the proper mating adapters from Metra and/or AXXESS.
5. Reassemble dash in reverse order of disassembly.
Figure B
Figure C
Figure A
Kit Assembly CF-123KI
15
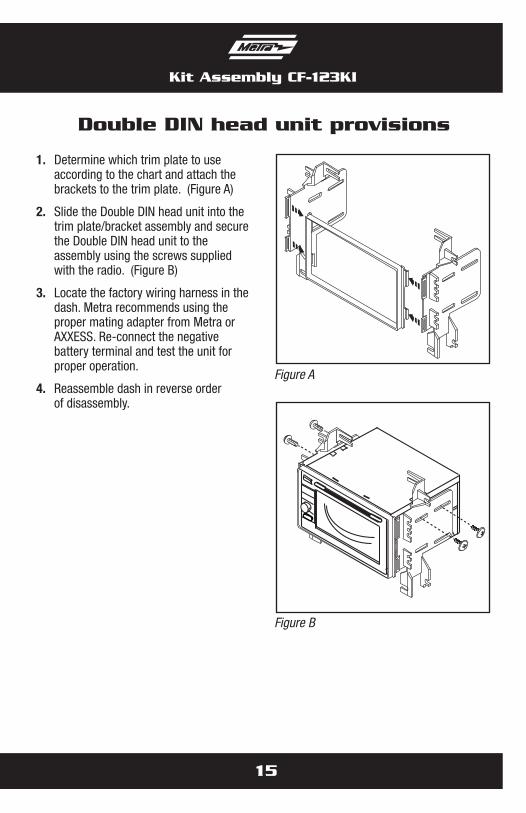
1. Determine which trim plate to use according to the chart and attach the brackets to the trim plate. (Figure A)
2. Slide the Double DIN head unit into the trim plate/bracket assembly and secure the Double DIN head unit to the assembly using the screws supplied with the radio. (Figure B)
3. Locate the factory wiring harness in the dash. Metra recommends using the proper mating adapter from Metra or AXXESS. Re-connect the negative battery terminal and test the unit for proper operation.
4. Reassemble dash in reverse order of disassembly.
Double DIN head unit provisions
Figure B
Figure A

METRA. THE WORLD’S BEST KITS.™
© COPYRIGHT 2004-2011 METRA ELECTRONICS CORPORATION 1-800-221-0932 metraonline.com
INSTALLATION INSTRUCTIONS FOR PART CF-123KI
REV.
3 /3
1/11