
APPLICATIONS See application list inside Ford multi-kit 2004-up 95
18
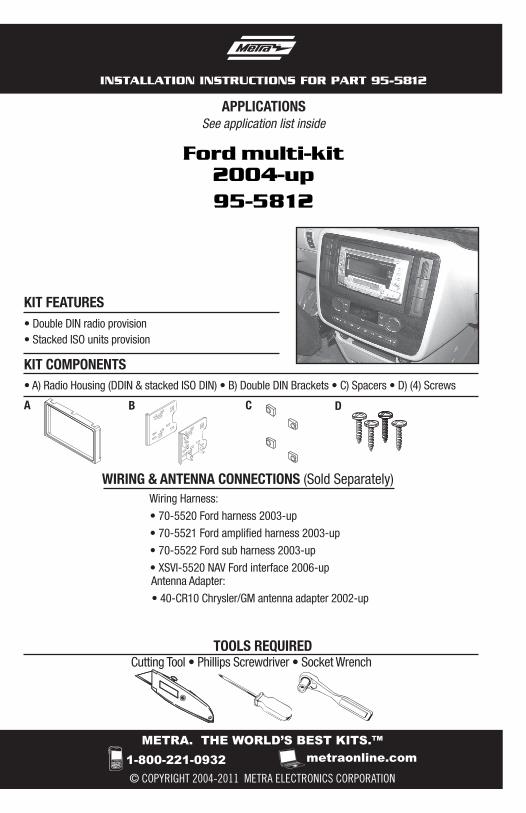
METRA. THE WORLD’S BEST KITS.™ © COPYRIGHT 2004-2011 METRA ELECTRONICS CORPORATION APPLICATIONS 1-800-221-0932 metraonline.com Cutting Tool • Phillips Screwdriver • Socket Wrench TOOLS REQUIRED Ford multi-kit 2004-up 95-5812 B A • A) Radio Housing (DDIN & stacked ISO DIN) • B) Double DIN Brackets • C) Spacers • D) (4) Screws KIT FEATURES KIT COMPONENTS • Double DIN radio provision • Stacked ISO units provision WIRING & ANTENNA CONNECTIONS (Sold Separately) Wiring Harness: • 70-5520 Ford harness 2003-up • 70-5521 Ford amplified harness 2003-up • 70-5522 Ford sub harness 2003-up • XSVI-5520 NAV Ford interface 2006-up Antenna Adapter: • 40-CR10 Chrysler/GM antenna adapter 2002-up See application list inside INSTALLATION INSTRUCTIONS FOR PART 95-5812 C D
Transcript of APPLICATIONS See application list inside Ford multi-kit 2004-up 95
METRA. THE WORLD’S BEST KITS.™
© COPYRIGHT 2004-2011 METRA ELECTRONICS CORPORATION
APPLICATIONS
1-800-221-0932 metraonline.com
Cutting Tool • Phillips Screwdriver • Socket Wrench TOOLS REQUIRED
Ford multi-kit 2004-up95-5812
BA
• A) Radio Housing (DDIN & stacked ISO DIN) • B) Double DIN Brackets • C) Spacers • D) (4) Screws
KIT FEATURES
KIT COMPONENTS
• Double DIN radio provision• Stacked ISO units provision
WIRING & ANTENNA CONNECTIONS (Sold Separately) Wiring Harness:
• 70-5520 Ford harness 2003-up
• 70-5521 Ford amplified harness 2003-up
• 70-5522 Ford sub harness 2003-up
• XSVI-5520 NAV Ford interface 2006-up Antenna Adapter:
• 40-CR10 Chrysler/GM antenna adapter 2002-up
See application list inside
INSTALLATION INSTRUCTIONS FOR PART 95-5812
C D
Applications
KNOWLEDGE IS POWEREnhance your installation and fabrication skills by enrolling in the most recognized and respected mobile electronics school in our industry.Log onto www.installerinstitute.com or call 800-354-6782 for more information and take steps toward a better tomorrow.
Metra recommends MECP certified technicians
CautionMetra recommends disconnecting the negative battery terminal before beginning any installation. All accessories, switches, and especially air bag indicator lights must be plugged in before reconnecting the battery or cycling the ignition.
*NOTE: Refer also to the instructions included with the aftermarket radio.
FordEdge 2007-2010F-150 2004-2008/Expedition 2007-upMustang 2005-2009Five Hundred 2005-2007Taurus 2008-2009Fusion 2006-2009Freestyle 2005-2007Taurus X 2008-2009Freestar 2004-2007Focus 2005-2007Explorer 2006-2010Explorer Sport Trac 2006-2010E Series 2009-upF Series Super Duty 2005-2007Super Duty 2008-Up
LincolnMark LT 2005-2008MKX 2007-2010Navigator 2007-up
MercurySable 2008-2009Montego 2005-2007Milan 2006-2009Monterey 2004-2007Mountaineer 2006-2010
95-5812

Table of ContentsDash Disassembly
- Ford Edge 2007-2010.........................................................................................................1
- Ford F-150 2004-2008/Expedition 2007-up........................................................................1
- Ford Lincoln Mark LT 2005-2009........................................................................................1
- Ford Mustang 2005-2009...................................................................................................2
- Ford Five Hundred 2005-2007............................................................................................3
- Mercury Sable 2008-2009..................................................................................................3
- Ford Taurus 2008-2009......................................................................................................3
- Mercury Montego 2005-2007.............................................................................................3
- Ford Fusion 2006-2009......................................................................................................4
- Mercury Milan 2006-2009..................................................................................................4
- Ford Freestyle 2005-2007...................................................................................................5
- Ford Taurus X 2008-2009....................................................................................................5
- Ford Freestar 2004-2007....................................................................................................6
- Mercury Monterey 2004-2007............................................................................................6
- Ford Focus 2005-2007........................................................................................................8
- Ford Explorer 2006-2010....................................................................................................8
- Ford Explorer Sport Trac 2006-2010...................................................................................8
- Mercury Mountaineer 2006-2010.......................................................................................8
- Ford E Series 2009-up........................................................................................................9
- Ford F Series Super Duty 2005-2007..................................................................................9
- Ford Super Duty 2008-up...................................................................................................10
- Lincoln MKX 2007-2010.....................................................................................................11
- Lincoln Navigator 2007-up.................................................................................................12
Kit Assembly
- DIN head unit provision ......................................................................................................13
- ISO DIN head unit provision ................................................................................................14
95-5812
1
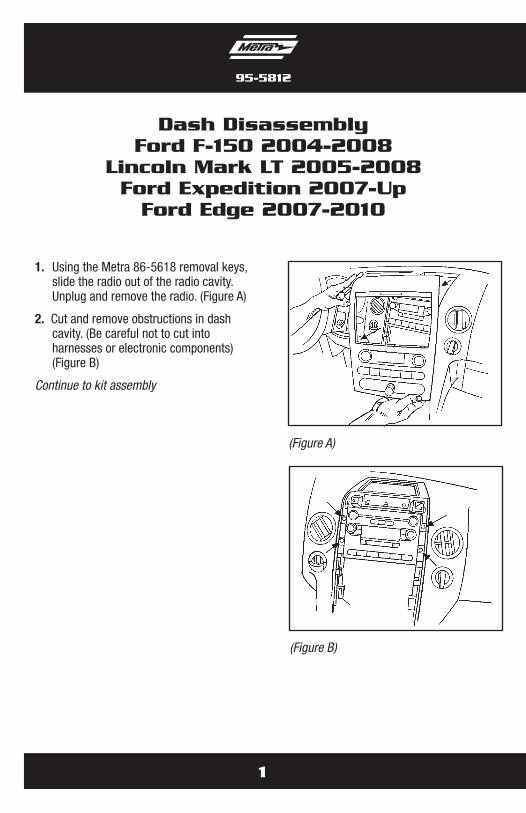
1. Using the Metra 86-5618 removal keys, slide the radio out of the radio cavity. Unplug and remove the radio. (Figure A)
2. Cut and remove obstructions in dash cavity. (Be careful not to cut into harnesses or electronic components)(Figure B)
Continue to kit assembly
Dash DisassemblyFord F-150 2004-2008
Lincoln Mark LT 2005-2008Ford Expedition 2007-Up
Ford Edge 2007-2010
(Figure A)
(Figure B)
95-5812

Ford Mustang 2005-2009
1. Disconnect the negative battery terminal to prevent an accidental short circuit.
2. Remove the small rectangular shifter lever trim panel if equipped. (Figure A)
3. Remove (2) Phillips screws from under the center armrest at the back of the shifter trim panel (including cup holders). (Figure B)
4. Unclip and remove panel. (Figure B)
5. Unclip and remove the (2) center stack trim panels from the left and right side of the radio and climate controls. (Figure C)
6. Remove (6) 9/32” screws from center trim panel surrounding the radio and climate controls then unclip and remove panel. (Figure D)
7. Remove (4) 9/32” screws from the radio to remove. (Figure E)
Continue to kit assembly
(Figure A)
(Figure B)
95-5812
(Figure C)
(Figure D)
(Figure E)
2

3
Ford Five-Hundred 2005-07, Ford Taurus 2008-09Mercury Montego 2005-07,
Mercury Sable 2008-09
1. Unclip and remove the small rectan-gular trim around shift lever. (Figure A)
2. Unclip and remove the entire panel (including cup holders) surrounding the shift lever. (Figure B)
3. Remove (2) 9/32” screws at the bottom of the center radio/ climate control panel. (Figure C)
4. Unclip and remove the center panel. (Figure D)
5. Remove (4) 9/32” screws from the radio to remove. (Figure E)
Continue to kit assembly
95-5812
(Figure A)
(Figure B)
(Figure C)
(Figure D)
(Figure E)

4
95-5812
Ford Fusion 2006-2009Mercury Milan 2006-2009
1. Unsnap and remove entire panel surrounding the radio and climate controls. (Figure A)
2. Remove (4) 9/32” screws to remove the factory radio. (Figure B)
Continue to kit assembly
(Figure A)
(Figure B)

5
95-5812
Ford Freestyle 2005-2007Ford Taurus X 2008-09
1. Unclip and remove entire panel surrounding the radio and a/c controls. (Figure A)
2. Remove (4) 9/32” screws from radio to remove. (Figure B)
Continue to kit assembly
(Figure A)
(Figure B)
6
95-5812
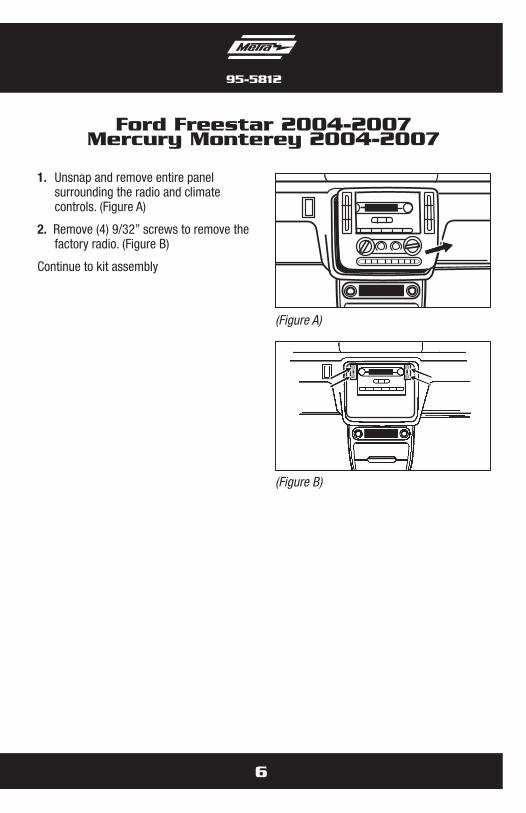
Ford Freestar 2004-2007Mercury Monterey 2004-2007
1. Unsnap and remove entire panel surrounding the radio and climate controls. (Figure A)
2. Remove (4) 9/32” screws to remove the factory radio. (Figure B)
Continue to kit assembly
(Figure A)
(Figure B)
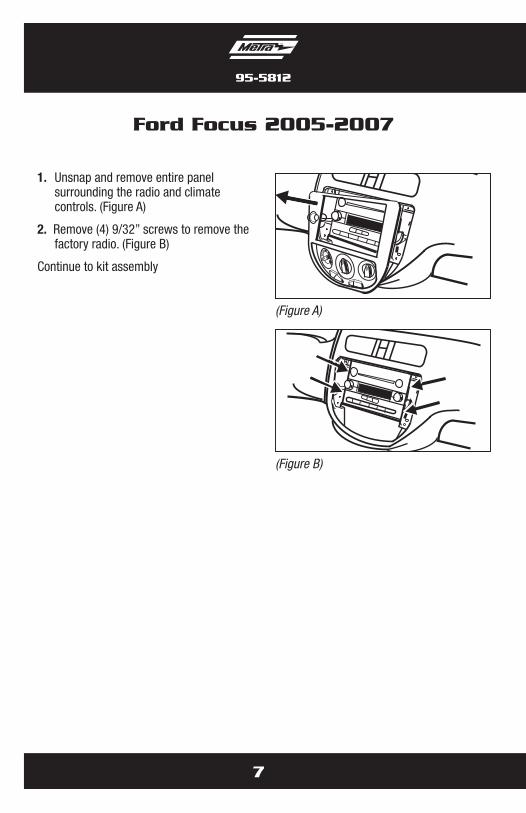
Ford Focus 2005-2007
1. Unsnap and remove entire panel surrounding the radio and climate controls. (Figure A)
2. Remove (4) 9/32” screws to remove the factory radio. (Figure B)
Continue to kit assembly
(Figure A)
(Figure B)
7
95-5812

8
95-5812
Ford Explorer 2006-2010Ford Sport Trac 2006-2010
Mercury Mountaineer 2006-20101. Open center console and remove (2)
Phillips screws then unclip and remove entire panel surrounding shifter.(Figure A)
2. Remove (4) 9/32” screws to remove the factory radio. (Figure B)
3. Remove (4) 9/32” screws to remove the factory radio. (Figure C)
Continue to kit assembly (Figure A)
(Figure B)
(Figure C)

9
95-5812
Ford E Series 2009-UpFord F Series Super Duty 2005-Up
1. Unsnap and remove entire panel surrounding the radio and climate controls. (Figure A)
2. Remove (4) 9/32” screws to remove the factory radio. (Figure B)
Continue to kit assembly
(Figure A)
(Figure B)
10
95-5812
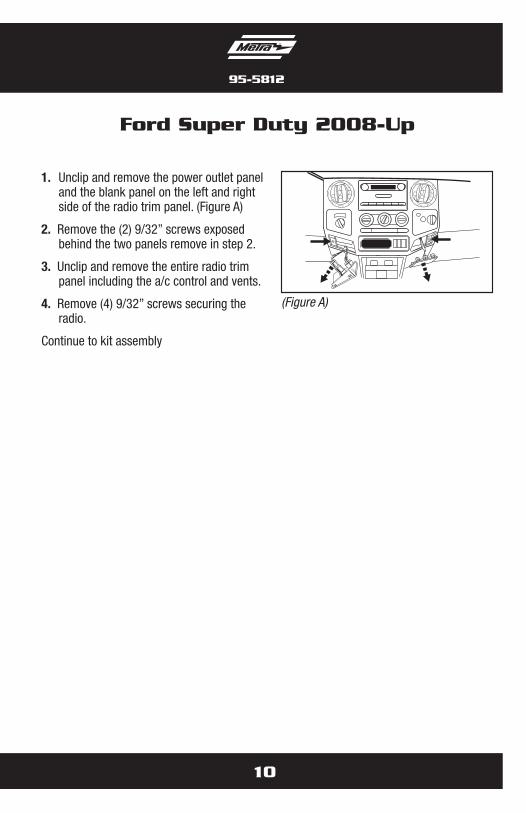
Ford Super Duty 2008-Up
1. Unclip and remove the power outlet panel and the blank panel on the left and right side of the radio trim panel. (Figure A)
2. Remove the (2) 9/32” screws exposed behind the two panels remove in step 2.
3. Unclip and remove the entire radio trim panel including the a/c control and vents.
4. Remove (4) 9/32” screws securing the radio.
Continue to kit assembly
(Figure A)
11
95-5812
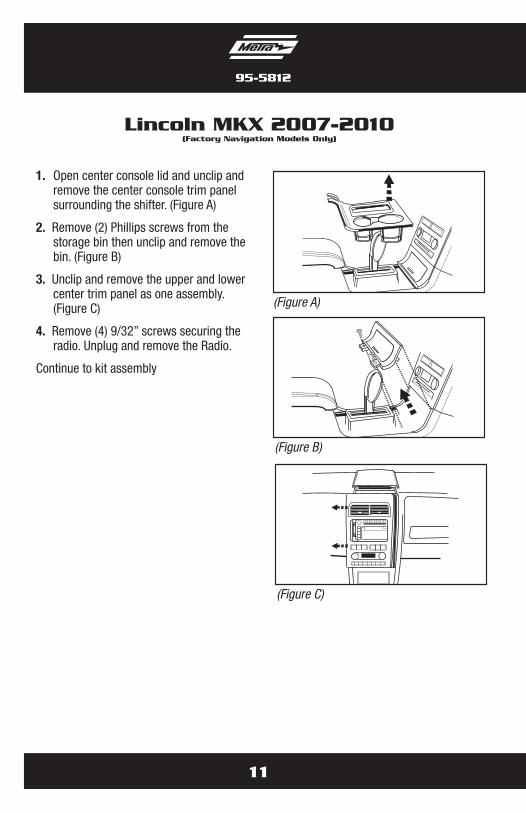
1. Open center console lid and unclip and remove the center console trim panel surrounding the shifter. (Figure A)
2. Remove (2) Phillips screws from the storage bin then unclip and remove the bin. (Figure B)
3. Unclip and remove the upper and lower center trim panel as one assembly. (Figure C)
4. Remove (4) 9/32” screws securing the radio. Unplug and remove the Radio.
Continue to kit assembly
Lincoln MKX 2007-2010(Factory Navigation Models Only)
(Figure A)
(Figure B)
(Figure C)
12
95-5812
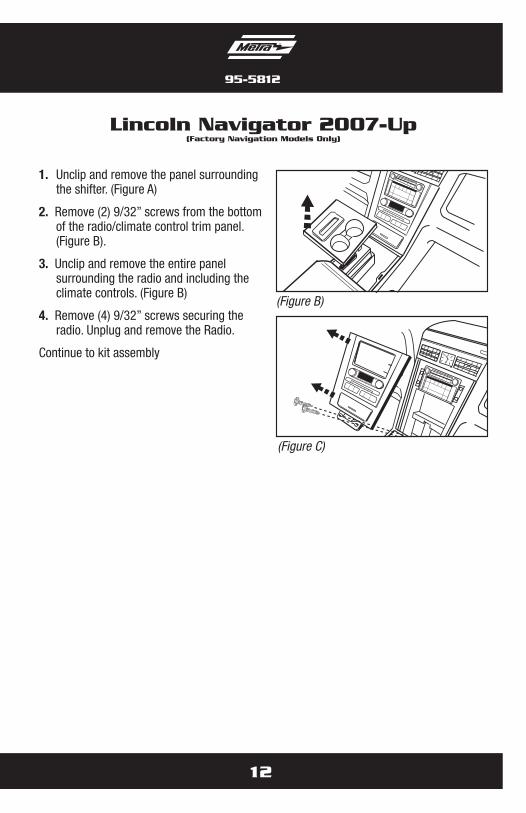
1. Unclip and remove the panel surrounding the shifter. (Figure A)
2. Remove (2) 9/32” screws from the bottom of the radio/climate control trim panel. (Figure B).
3. Unclip and remove the entire panel surrounding the radio and including the climate controls. (Figure B)
4. Remove (4) 9/32” screws securing the radio. Unplug and remove the Radio.
Continue to kit assembly
(Figure B)
(Figure C)
Lincoln Navigator 2007-Up(Factory Navigation Models Only)
13
95-5812
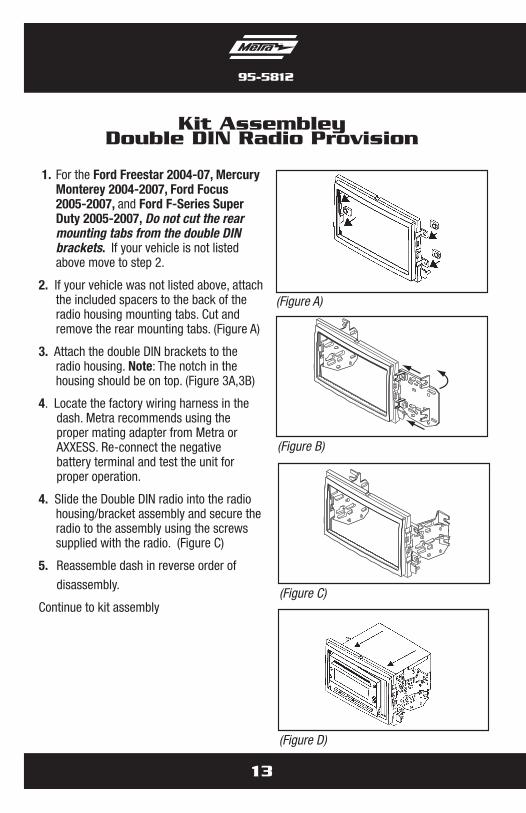
1. For the Ford Freestar 2004-07, Mercury Monterey 2004-2007, Ford Focus 2005-2007, and Ford F-Series Super Duty 2005-2007, Do not cut the rear mounting tabs from the double DIN brackets. If your vehicle is not listed above move to step 2.
2. If your vehicle was not listed above, attach the included spacers to the back of the radio housing mounting tabs. Cut and remove the rear mounting tabs. (Figure A)
3. Attach the double DIN brackets to the radio housing. Note: The notch in the housing should be on top. (Figure 3A,3B)
4. Locate the factory wiring harness in the dash. Metra recommends using the proper mating adapter from Metra or AXXESS. Re-connect the negative battery terminal and test the unit for proper operation.
4. Slide the Double DIN radio into the radio housing/bracket assembly and secure the radio to the assembly using the screws supplied with the radio. (Figure C)
5. Reassemble dash in reverse order of
disassembly.
Continue to kit assembly
Kit AssembleyDouble DIN Radio Provision
(Figure A)
(Figure B)
(Figure C)
(Figure D)
14
95-5812
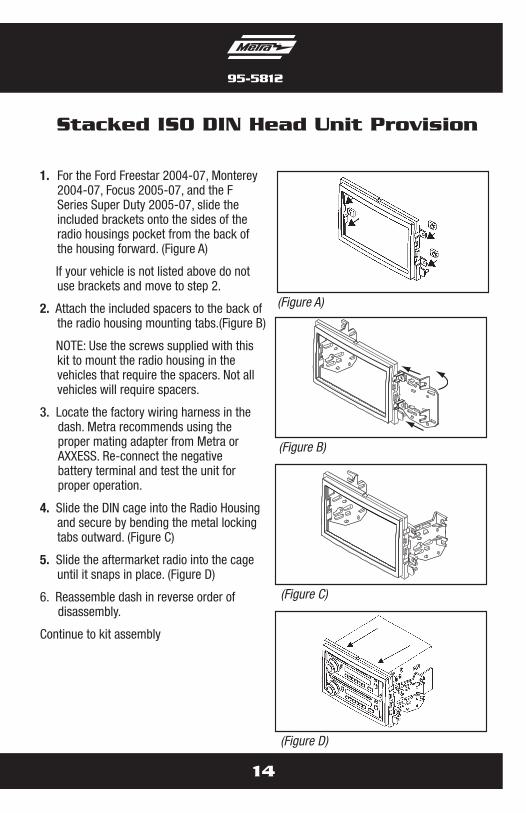
1. For the Ford Freestar 2004-07, Monterey 2004-07, Focus 2005-07, and the F Series Super Duty 2005-07, slide the included brackets onto the sides of the radio housings pocket from the back of the housing forward. (Figure A)
If your vehicle is not listed above do not use brackets and move to step 2.
2. Attach the included spacers to the back of the radio housing mounting tabs.(Figure B)
NOTE: Use the screws supplied with this kit to mount the radio housing in the vehicles that require the spacers. Not all vehicles will require spacers.
3. Locate the factory wiring harness in the dash. Metra recommends using the proper mating adapter from Metra or AXXESS. Re-connect the negative battery terminal and test the unit for proper operation.
4. Slide the DIN cage into the Radio Housing and secure by bending the metal locking tabs outward. (Figure C)
5. Slide the aftermarket radio into the cage until it snaps in place. (Figure D)
6. Reassemble dash in reverse order of disassembly.
Continue to kit assembly
Stacked ISO DIN Head Unit Provision
(Figure A)
(Figure B)
(Figure C)
(Figure D)

METRA. THE WORLD’S BEST KITS.™
© COPYRIGHT 2004-2011 METRA ELECTRONICS CORPORATION 1-800-221-0932 metraonline.com
REV.
9/2
6/11
INSTALLATION INSTRUCTIONS FOR PART 95-5817


![File:ltpif.ex Update:Thu May 9 15:22:45 19961 Introductory Information *[IN00300(ALL)04/95] Ford’s Commitment to You *[IN00400(ALL)04/95] At Ford Motor Company, excellence is the](https://static.fdocuments.us/doc/165x107/5e8bef5d7cc64b3e824a3b14/fileltpifex-updatethu-may-9-152245-1996-1-introductory-information-in00300all0495.jpg)


![[PI00100(ALL)06/95] - fordservicecontent.com · by a network of more than 5,100 participating Ford Motor Company dealers. [IN04600(ALL)05/96] NOTE: ... 07/95] Pollen, bird droppings](https://static.fdocuments.us/doc/165x107/5ad6933a7f8b9a32618b4a57/pi00100all0695-a-network-of-more-than-5100-participating-ford-motor-company.jpg)