Applications EnterpriseOne JD Edwards - Oracle
140
JD Edwards EnterpriseOne Applications Requisition Self Service Implementation Guide Release 9.2
Transcript of Applications EnterpriseOne JD Edwards - Oracle

JD EdwardsEnterpriseOneApplications
Requisition Self ServiceImplementation Guide
Release 9.2

JD Edwards EnterpriseOne ApplicationsRequisition Self Service Implementation Guide
Release 9.2
Part Number:E63943-04
Copyright © 2011, 2020, Oracle and/or its affiliates.
This software and related documentation are provided under a license agreement containing restrictions on use and disclosure and are protectedby intellectual property laws. Except as expressly permitted in your license agreement or allowed by law, you may not use, copy, reproduce, translate,broadcast, modify, license, transmit, distribute, exhibit, perform, publish, or display any part, in any form, or by any means. Reverse engineering,disassembly, or decompilation of this software, unless required by law for interoperability, is prohibited.
The information contained herein is subject to change without notice and is not warranted to be error-free. If you find any errors, please reportthem to us in writing.
If this is software or related documentation that is delivered to the U.S. Government or anyone licensing it on behalf of the U.S. Government, thenthe following notice is applicable:
U.S. GOVERNMENT END USERS: Oracle programs (including any operating system, integrated software, any programs embedded, installed oractivated on delivered hardware, and modifications of such programs) and Oracle computer documentation or other Oracle data delivered to oraccessed by U.S. Government end users are "commercial computer software" or "commercial computer software documentation" pursuant to theapplicable Federal Acquisition Regulation and agency-specific supplemental regulations. As such, the use, reproduction, duplication, release, display,disclosure, modification, preparation of derivative works, and/or adaptation of i) Oracle programs (including any operating system, integratedsoftware, any programs embedded, installed or activated on delivered hardware, and modifications of such programs), ii) Oracle computerdocumentation and/or iii) other Oracle data, is subject to the rights and limitations specified in the license contained in the applicable contract. Theterms governing the U.S. Government's use of Oracle cloud services are defined by the applicable contract for such services. No other rights aregranted to the U.S. Government.
This software or hardware is developed for general use in a variety of information management applications. It is not developed or intended foruse in any inherently dangerous applications, including applications that may create a risk of personal injury. If you use this software or hardwarein dangerous applications, then you shall be responsible to take all appropriate fail-safe, backup, redundancy, and other measures to ensure its safeuse. Oracle Corporation and its affiliates disclaim any liability for any damages caused by use of this software or hardware in dangerous applications.
Oracle and Java are registered trademarks of Oracle and/or its affiliates. Other names may be trademarks of their respective owners.
Intel and Intel Inside are trademarks or registered trademarks of Intel Corporation. All SPARC trademarks are used under license and are trademarksor registered trademarks of SPARC International, Inc. AMD, Epyc, and the AMD logo are trademarks or registered trademarks of Advanced MicroDevices. UNIX is a registered trademark of The Open Group.
This software or hardware and documentation may provide access to or information about content, products, and services from third parties. OracleCorporation and its affiliates are not responsible for and expressly disclaim all warranties of any kind with respect to third-party content, products, andservices unless otherwise set forth in an applicable agreement between you and Oracle. Oracle Corporation and its affiliates will not be responsiblefor any loss, costs, or damages incurred due to your access to or use of third-party content, products, or services, except as set forth in an applicableagreement between you and Oracle.

JD Edwards EnterpriseOne ApplicationsRequisition Self Service Implementation Guide
Contents
Preface .................................................................................................................................. i
1 Introduction to JD Edwards EnterpriseOne Requisition Self Service 1JD Edwards EnterpriseOne Requisition Self Service Overview ............................................................................................. 1
JD Edwards EnterpriseOne Requisition Self Service Business Process .............................................................................. 2
JD Edwards EnterpriseOne Requisition Self Service Integrations ....................................................................................... 3
JD Edwards EnterpriseOne Requisition Self Service Implementation ................................................................................ 5
Business Interface Integration Objects ...................................................................................................................................... 7
2 Setting Up the Requisition Self Service System 9Setting Up Next Numbers for the Requisition Self Service System .................................................................................... 9
Setting Up AAIs for the Requisition Self Service System .................................................................................................... 10
3 Setting Up Direct Connect and Purchase Order Dispatch 11........................................................................................................................................................................................................... 11
Understanding Direct Connect and PO Dispatch ................................................................................................................... 11
Understanding Network Security and Direct Connect .......................................................................................................... 11
Understanding Business Services for Direct Connect and PO Dispatch .......................................................................... 12
Setting Up the System for Direct Connect and PO Dispatch ............................................................................................. 22
Setting Up Additional Information for PO Dispatch ............................................................................................................ 30
Setting Up Suppliers for Direct Connect and PO Dispatch ................................................................................................. 34
4 Setting Up the Commodity Structure 41Understanding the Commodity Structure .............................................................................................................................. 41
Setting Up the Commodity Structure ...................................................................................................................................... 41
Setting Up the UNSPSC Code Descriptions ........................................................................................................................... 52
5 Setting Up Requisition Approval Workflow 55Understanding Requisition Approval Workflow Setup ........................................................................................................ 55
Setting Up Approval Authority Constants .............................................................................................................................. 57

JD Edwards EnterpriseOne ApplicationsRequisition Self Service Implementation Guide
Setting Up Approval Authority ................................................................................................................................................. 59
Setting Up Escalation for the Workflow Process .................................................................................................................. 64
6 Setting Up Delegation Information 69Understanding Delegation Entry .............................................................................................................................................. 69
Entering and Maintaining Delegation Records ..................................................................................................................... 70
7 Entering Requisitions 73Understanding Requisition Entry ............................................................................................................................................. 73
Understanding the Requisition Entry Business Function Application ............................................................................. 76
Entering a Requisition Using the Shopping Cart Program ................................................................................................. 76
Entering Requisitions by Using the Requisition Entry Program ........................................................................................ 84
8 Reviewing and Approving Requisitions 95Reviewing and Revising Requisitions ...................................................................................................................................... 95
Approving and Rejecting Requisitions .................................................................................................................................... 99
9 Creating Purchase Orders 103Understanding Purchase Order Creation .............................................................................................................................. 103
Creating Purchase Orders Manually ...................................................................................................................................... 104
Creating Purchase Orders Using a Batch Program ............................................................................................................. 110
Dispatching Purchase Orders using PO Dispatch ................................................................................................................ 113
10 Receiving Requisitions and Reversing Receipts 117Receiving Requisitions ............................................................................................................................................................... 117
Reversing Receipts ...................................................................................................................................................................... 121
11 Appendix A - Delivered Workflow for JD Edwards EnterpriseOneRequisition Self Service
125
......................................................................................................................................................................................................... 125
Delivered Workflow for JD Edwards EnterpriseOne Requisition Self Service ................................................................ 125
12 Appendix B - Tables Used by the JD Edwards EnterpriseOne RequisitionSelf Service System
127
......................................................................................................................................................................................................... 127

JD Edwards EnterpriseOne ApplicationsRequisition Self Service Implementation Guide
Requisition Self Service Tables ................................................................................................................................................ 127
13 Appendix C - Delivered User Defined Objects for Requisition Self Service(Release 9.2 Update)
131
......................................................................................................................................................................................................... 131
Requisition Self Service Notifications ..................................................................................................................................... 131

JD Edwards EnterpriseOne ApplicationsRequisition Self Service Implementation Guide

JD Edwards EnterpriseOne ApplicationsRequisition Self Service Implementation Guide
Preface
PrefaceWelcome to the JD Edwards EnterpriseOne Applications Requisition Self Service Implementation Guide.
AudienceThis guide is intended for implementers and end users of the JD Edwards EnterpriseOne Requisition Self Servicesystem.
JD Edwards EnterpriseOne ProductsThis implementation guide refers to these JD Edwards EnterpriseOne products:
• JD Edwards EnterpriseOne Procurement
• JD Edwards EnterpriseOne Foundation - Address Book
• JD Edwards EnterpriseOne Accounts Payable
• JD Edwards EnterpriseOne Advanced Pricing
• JD Edwards EnterpriseOne General Ledger
JD Edwards EnterpriseOne Application FundamentalsAdditional, essential information describing the setup and design of your system appears in a companion volumeof documentation called JD Edwards EnterpriseOne Financial Management Solutions Application FundamentalsImplementation Guide.
Customers must conform to the supported platforms for the release as detailed in the JD Edwards EnterpriseOneminimum technical requirements. See document 745831.1 (JD Edwards EnterpriseOne Minimum TechnicalRequirements Reference) on My Oracle Support: https://support.oracle.com/epmos/faces/DocumentDisplay?id=745831.1
In addition, JD Edwards EnterpriseOne may integrate, interface, or work in conjunction with other Oracle products. Referto the cross-reference material in the Program Documentation at http://oracle.com/contracts/index.html for Programprerequisites and version cross-reference documents to assure compatibility of various Oracle products.
Note:• JD Edwards EnterpriseOne Applications Financial Management Fundamentals Implementation Guide .
Documentation AccessibilityFor information about Oracle's commitment to accessibility, visit the Oracle Accessibility Program website at http://www.oracle.com/pls/topic/lookup?ctx=acc&id=docacc .
Access to Oracle SupportOracle customers that have purchased support have access to electronic support through My Oracle Support. Forinformation, visit http://www.oracle.com/pls/topic/lookup?ctx=acc&id=info or visit http://www.oracle.com/pls/topic/lookup?ctx=acc&id=trs if you are hearing impaired.
i

JD Edwards EnterpriseOne ApplicationsRequisition Self Service Implementation Guide
Preface
Related InformationFor additional information about JD Edwards EnterpriseOne applications, features, content, and training, visit the JDEdwards EnterpriseOne pages on the JD Edwards Resource Library located at:
http://learnjde.com
Conventions and Screen ImagesThe following text conventions are used in this document:
Convention Meaning
boldface
Boldface type indicates graphical user interface elements associated with an action, or terms defined intext or the glossary.
italic
Italic type indicates book titles, emphasis, or placeholder variables for which you supply particularvalues.
monospace
Monospace type indicates commands within a paragraph, URLs, code in examples, text that appearson the screen, or text that you enter.
ii

JD Edwards EnterpriseOne ApplicationsRequisition Self Service Implementation Guide
Chapter 1Introduction to JD Edwards EnterpriseOne Requisition Self
Service
1 Introduction to JD Edwards EnterpriseOneRequisition Self Service
JD Edwards EnterpriseOne Requisition Self ServiceOverview The JD Edwards Requisition Self Service system from Oracle enables organizations to reduce management andadministrative functions for procurement by providing employees with a self-service program with which they can entertheir own requests for items such as office supplies. Using the Direct Connect feature within Requisition Self Service,employees can connect to approved suppliers' websites to select items, and the Direct Connect process directs themback to the EnterpriseOne system to send their requisitions through the approval process. By not having to place ordersfor such items, purchasing departments can focus on approving requisitions and handling requests for items thatemployees or buyers cannot easily locate.
The user-defined commodity structure within JD Edwards EnterpriseOne Requisition Self Service enables organizationsto categorize items, products, and services into a hierarchical tree structure. Users can assign commodities torequisitions, and the commodity remains attached to the requisition and resulting purchase order so that organizationscan analyze spending by commodity using the JD Edwards Enterprise Performance Management products.
Using a workflow process, the system can alert specified approvers of requisitions awaiting approval using theWork Center and an internal email address. The setup for requisition approval workflow provides control over theprocurement process, as system administrators can specify up to six levels of required approval.
After requisitions are approved, buyers can use either a batch or interactive program to consolidate requisitions andcreate purchase orders. The interactive program, Requisition Expeditor (R43E060), allows buyers to manage exceptionsand make changes to requisitions before creating purchase orders. When you generate purchase orders, the systemconsolidates items that are from the same supplier, giving buyers leverage for pricing discounts. You can also use thePO Dispatch feature to automatically send purchase orders to vendors using integration technology.
To complete the requisition process, employees indicate that they have received their items using the DesktopReceiving program (P43E20). This program enables employees to receive by requisition number, instead of purchaseorder number. Employees can also reverse receipts.
Using JD Edwards EnterpriseOne Requisition Self Service with theCollaborative Portal If your organization has an employee portal, you can create links to programs that your employees might frequentlyuse, such as Shopping Cart (P43E25) and Desktop Receiving (P43E20) on the portal.
See Entering a Requisition Using the Shopping Cart Program.
See Understanding the Desktop Receiving Program.
You can also set up the JD Edwards EnterpriseOne Requisition Self Service portlet (P43E83) for buyers within yourorganization and attach it to the portal. The Requisition Self Service portlet contains alerts, such as:
• Open approvals.
1

JD Edwards EnterpriseOne ApplicationsRequisition Self Service Implementation Guide
Chapter 1Introduction to JD Edwards EnterpriseOne Requisition Self
Service• Requisition lines marked as high priority.
See Understanding the Requisition Entry Program.
• Requisition lines marked as special requests.
See Understanding the Requisition Entry Program.
• Requisition lines that have been open for more than 10 days.
If you want to modify the JD Edwards EnterpriseOne Requisition Self Service portlet, you must use Form Design Aidto make any modifications. The JD Edwards EnterpriseOne Requisition Self Service portlet conforms to the JSR 168specification.
See JD Edwards EnterpriseOne Tools Form Design Aid Guide .
JD Edwards EnterpriseOne Requisition Self ServiceBusiness Process This process flow illustrates the JD Edwards EnterpriseOne Requisition Self Service business processes:
2

JD Edwards EnterpriseOne ApplicationsRequisition Self Service Implementation Guide
Chapter 1Introduction to JD Edwards EnterpriseOne Requisition Self
Service
JD Edwards EnterpriseOne Requisition Self ServiceIntegrations The JD Edwards EnterpriseOne Requisition Self Service system integrates with these JD Edwards EnterpriseOnesystems:
• JD Edwards EnterpriseOne Inventory Management
• JD Edwards EnterpriseOne Address Book
3

JD Edwards EnterpriseOne ApplicationsRequisition Self Service Implementation Guide
Chapter 1Introduction to JD Edwards EnterpriseOne Requisition Self
Service• JD Edwards EnterpriseOne Procurement
• JD Edwards EnterpriseOne Advanced Pricing
• JD Edwards EnterpriseOne Accounts Payable
• JD Edwards EnterpriseOne General Accounting
We discuss integration considerations in the implementation chapters in this Implementation Guide. Supplementalinformation about third-party application integrations is located on the My Oracle Support website.
JD Edwards EnterpriseOne Inventory Management The JD Edwards EnterpriseOne Requisition Self Service system retrieves item costs and other item information forrequisitions.
JD Edwards EnterpriseOne Address Book Use the JD Edwards EnterpriseOne Address Book system to create records for your suppliers and to set up suppliers forDirect Connect.
JD Edwards EnterpriseOne Procurement The Batch Requisition Consolidation (R43E060) and the Requisition Expeditor (P43E060) programs create purchaseorders from requisitions. After creating purchase orders, you can use standard programs within the JD EdwardsEnterpriseOne Procurement system to process them.
JD Edwards EnterpriseOne Advanced Pricing If you have activated the system constant for JD Edwards EnterpriseOne Advanced Pricing, the system checksfor advanced pricing when you run the Batch Requisition Consolidation (R43E060) and the Requisition Expeditor(P43E060) to create purchase orders.
JD Edwards EnterpriseOne Accounts Payable After you create purchase orders, you can use the JD Edwards EnterpriseOne Procurement system to create vouchers inthe JD Edwards EnterpriseOne Accounts Payable system and then create payments for the vouchers.
JD Edwards EnterpriseOne General Accounting When you post Accounts Payable vouchers and payments to the general ledger, the system updates the AccountLedger (F0911) and Account Balances (F0902) tables in the JD Edwards EnterpriseOne General Accounting system.
4
JD Edwards EnterpriseOne ApplicationsRequisition Self Service Implementation Guide
Chapter 1Introduction to JD Edwards EnterpriseOne Requisition Self
ServiceAdditionally, the JD Edwards EnterpriseOne Requisition Self Service system uses the budgets created in the JD EdwardsEnterpriseOne General Accounting system when you submit requisitions.
JD Edwards EnterpriseOne Requisition Self ServiceImplementation This section provides an overview of the steps that are required to implement the JD Edwards EnterpriseOneRequisition Self Service system.
In the planning phase of your implementation, take advantage of all JD Edwards EnterpriseOne sources of information,including the installation guides and troubleshooting information.
When determining which electronic software updates (ESUs) to install for JD Edwards EnterpriseOne Requisition SelfService, use the EnterpriseOne and World Change Assistant. EnterpriseOne and World Change Assistant, a Java-basedtool, reduces the time required to search and download ESUs by 75 percent or more and enables you to install multipleESUs at one time.
See JD Edwards EnterpriseOne Tools Software Updates Guide .
For information about the Oracle Business Accelerator solution for implementation of JD Edwards EnterpriseOneRequisition Self Service, review the documentation available.
See http://docs.oracle.com/cd/E24705_01/index.htm .
Installation Steps for the JD Edwards EnterpriseOne CollaborativePortal You can use the JD Edwards EnterpriseOne Collaborative Portal to implement Customer Self Service. This guide doesnot describe in detail how to install and configure the Collaborative Portal. However, this section provides an overviewof the general steps involved in installing and configuring the Collaborative Portal.
Use this table as a guide to the installation and configuration process for the Collaborative Portal and the JD EdwardsEnterpriseOne portlets. You should perform the steps in the order listed.
• Verify that you meet the minimum technical requirements (MTRs) to implement the JD Edwards EnterpriseOneCollaborative Portal.
JD Edwards EnterpriseOne Collaborative Portal Reference Guide
• Install and configure the JD Edwards EnterpriseOne system.
Apply the updates, service packs, or Electronic Software Updates (ESUs) specified in the MTRs.
See your JD Edwards EnterpriseOne installation documentation.
• Install and configure the IBM WebSphere Portal.
Use one of these guides:
◦ JD Edwards EnterpriseOne Tools IBM WebSphere Portal for IBM i for Power Systems Guide
◦ JD Edwards EnterpriseOne Tools IBM WebSphere Portal for Unix Guide
5

JD Edwards EnterpriseOne ApplicationsRequisition Self Service Implementation Guide
Chapter 1Introduction to JD Edwards EnterpriseOne Requisition Self
Service
◦ JD Edwards EnterpriseOne Tools IBM WebSphere Portal for Microsoft Windows Guide
◦ JD Edwards EnterpriseOne Tools Configuration for Messaging Queue Adapter for IBM WebSphere MQ oniSeries Systems Guide
◦ JD Edwards EnterpriseOne Tools Configuration for Messaging Queue Adapter for IBM WebSphere MQ onUnix Guide
◦ JD Edwards EnterpriseOne Tools Configuration for Messaging Queue Adapter for IBM WebSphere MQ onWindows Guide
• Install and configure the JD Edwards EnterpriseOne Collaborative Portal.
JD Edwards EnterpriseOne Collaborative Portal Reference Guide
• Generate JD Edwards EnterpriseOne portlets in the WebClient_Portal.war file.
Use both of these guides:
◦ JD Edwards EnterpriseOne Tools Form Design Aid Guide .
◦ JD Edwards EnterpriseOne Server Manager Guide
• Install the WebClient_Portal.war file in the Collaborative Portal, and create pages and add portlets to pages inthe Collaborative Portal.
WebSphere Portal for Multiplatforms:
◦ JD Edwards EnterpriseOne Tools IBM WebSphere Portal for IBM i for Power Systems Guide
◦ JD Edwards EnterpriseOne Tools IBM WebSphere Portal for Unix Guide
◦ JD Edwards EnterpriseOne Tools IBM WebSphere Portal for Microsoft Windows Guide
◦ JD Edwards EnterpriseOne Tools Configuration for Messaging Queue Adapter for IBM WebSphere MQ oniSeries Systems Guide
◦ JD Edwards EnterpriseOne Tools Configuration for Messaging Queue Adapter for IBM WebSphere MQ onUnix Guide
◦ JD Edwards EnterpriseOne Tools Configuration for Messaging Queue Adapter for IBM WebSphere MQ onWindows Guide
Global Implementation Steps This table lists the global implementation steps for JD Edwards EnterpriseOne Requisition Self Service:
• Set up fiscal date patterns, companies, and business units.
See "Setting Up Organizations" in the JD Edwards EnterpriseOne Applications Financial ManagementFundamentals Implementation Guide .
• Create the chart of accounts and set up accounts and subledgers.
See "Creating the Chart of Accounts" in the JD Edwards EnterpriseOne Applications Financial ManagementFundamentals Implementation Guide .
• Set up multicurrency processing.
See "Understanding Multicurrency Setup" in the JD Edwards EnterpriseOne Applications MulticurrencyProcessing Implementation Guide .
6

JD Edwards EnterpriseOne ApplicationsRequisition Self Service Implementation Guide
Chapter 1Introduction to JD Edwards EnterpriseOne Requisition Self
Service• Set up ledger type rules.
See "Setting Up Ledger Type Rules for General Accounting" in the JD Edwards EnterpriseOne ApplicationsGeneral Accounting Implementation Guide .
• Enter address book records.
See "Entering Address Book Records" in the JD Edwards EnterpriseOne Applications Address BookImplementation Guide .
"Entering Address Book Records" in the JD Edwards EnterpriseOne Applications Address Book ImplementationGuide
• Set up inventory information such as branch/plant constants, default locations and printers, manufacturingand distribution automatic accounting instructions (AAIs), and document types.
See "Setting Up the Inventory Management System" in the JD Edwards EnterpriseOne Applications InventoryManagement Implementation Guide .
Core Implementation Steps This table lists the core implementation steps for JD Edwards EnterpriseOne Requisition Self Service:
• Set up the Requisition Self Service system.
See Setting Up the Requisition Self Service System.
• Set up the system for Direct Connect and PO Dispatch.
See Setting Up Direct Connect and Purchase Order Dispatch.
• Set up the commodity structure.
See Setting Up the Commodity Structure.
• Set up workflow approvals.
See Setting Up Requisition Approval Workflow.
Business Interface Integration Objects A business interface is a set of components that implementation teams can use to create an integration between JDEdwards EnterpriseOne and an external system. Business interfaces can include one or more of these business interfacecomponents:
• Business Services
• Real-Time Events
• Batch Import and Export Programs
For additional information about business interfaces, and the business objects available for this product area, see thesetopics in the JD Edwards EnterpriseOne Applications Business Interface Reference Guide
• Business Interfaces Overview
7
JD Edwards EnterpriseOne ApplicationsRequisition Self Service Implementation Guide
Chapter 1Introduction to JD Edwards EnterpriseOne Requisition Self
Service• Procurement Requisition Approval
8
JD Edwards EnterpriseOne ApplicationsRequisition Self Service Implementation Guide
Chapter 2Setting Up the Requisition Self Service System
2 Setting Up the Requisition Self ServiceSystem
Setting Up Next Numbers for the Requisition Self ServiceSystem This section provides an overview of next numbers for Requisition Self Service and discusses how to set up nextnumbers.
Understanding Next Numbers for Requisition Self Service You must set up a next number for the Requisition Self Service system to use when assigning document numbers torequisitions created in both the Shopping Cart (P43E25) and the Requisition Entry (P43E10) programs. You can also setup next numbers by company and fiscal year so that requisitions for different companies within your organization useseparate numbering.
See "Setting Up Next Numbers" in the JD Edwards EnterpriseOne Applications Financial Management FundamentalsImplementation Guide .
Form Used to Set Up Next Numbers for Requisition Self Service
Form Name Form ID Navigation Usage
Set Up Next Numbers bySystem
W0002C
Type NN in the FastPath.
Set up a next numberfor requisitions.
Setting Up Next Numbers for Requisition Self Service Access the Set Up Next Numbers by System form.
9

JD Edwards EnterpriseOne ApplicationsRequisition Self Service Implementation Guide
Chapter 2Setting Up the Requisition Self Service System
Setting Up AAIs for the Requisition Self Service System This section provides an overview of the AAIs for the Requisition Self Service system.
Understanding the AAIs for the Requisition Self Service System In addition to setting up the AAIs used in the Procurement system, you can also set up the 4318 AAI. The system usesthe 4318 AAI when you enter a requisition with a line type that has an inventory interface of A and uses it to determinethe expense account to which to post the journal entry. If you do not set up this AAI, the system prompts you to enter anaccount number when you enter requisitions for services.
See "Setting Up Automatic Accounting Instructions" in the JD Edwards EnterpriseOne Applications FinancialManagement Fundamentals Implementation Guide .
See "Setting Up AAIs" in the JD Edwards EnterpriseOne Applications Procurement Management Implementation Guide .
10

JD Edwards EnterpriseOne ApplicationsRequisition Self Service Implementation Guide
Chapter 3Setting Up Direct Connect and Purchase Order Dispatch
3 Setting Up Direct Connect and PurchaseOrder Dispatch
Setting Up Direct Connect and Purchase Order Dispatch Oracle's JD Edwards EnterpriseOne Direct Connect and Purchase Order (PO) Dispatch solutions use the combinationof JD Edwards EnterpriseOne applications and integrated business services to conform to the cXML 1.2.016 DirectPunchOut standard.
Note: If you are using Web Services Gateway (WSG) to support the Direct Connect or Purchase Order Dispatchsolution, refer to the 8.12 version of the Requisition Self Service implementation guide. This documentation discussesthe use of Service Oriented Architecture (SOA) and business services to support the integration with vendor websites.
Understanding Direct Connect and PO Dispatch The Direct Connect and PO Dispatch solutions enable JD Edwards EnterpriseOne users to share information betweenvendor websites and the JD Edwards EnterpriseOne interface. The Direct Connect solution enables users to selectgoods and services from approved vendor websites using the JD Edwards EnterpriseOne Shopping Cart program andadd them to a purchase requisition, which can go through standard approval routes.
The PO Dispatch solution enables users to electronically send purchase orders for goods and services directly to thevendor using XML documents. In combination, these two solutions help to streamline the purchasing process within anorganization.
Note:• Entering Requisitions.
• Creating Purchase Orders.
Understanding Network Security and Direct Connect Certain network configurations prevent outbound or inbound internet traffic through the firewall. In some cases, theyou must configure network security to enable outbound and inbound internet traffic. Direct Connect functionalityrequires the ability to access the vendor websites that are outside of the firewall, and also requires the ability to allow thevendor websites to post payload, or response documents, to the JD Edwards EnterpriseOne Business Services server.
See JD Edwards EnterpriseOne Business Services Server Reference Guide.
11

JD Edwards EnterpriseOne ApplicationsRequisition Self Service Implementation Guide
Chapter 3Setting Up Direct Connect and Purchase Order Dispatch
Understanding Business Services for Direct Connect andPO Dispatch Both the Direct Connect and the PO Dispatch solution rely on business services to transport data between JD EdwardsEnterpriseOne and vendor websites. Business services transform JD Edwards EnterpriseOne outbound data into aformat that can be read by your vendors and then transform inbound vendor data into a format that can be read by theJD Edwards EnterpriseOne system. Before you can use the solutions, you must understand how business services workand how to set up your system to implement business services correctly.
Note: You can find additional, essential information about setting up your system to use business services on theService Oriented Architecture (SOA) site on My Oracle Support. After you log in, select Implement, Optimize andUpgrade. Then select Implementation Guide and then Implementation Documentation and Software. Click the ServiceOriented Architecture (SOA) link to access the additional information.
Additionally, you can access Javadoc documentation about these business services. You can find Javadoc for DirectConnect and PO Dispatch by viewing these Javadoc packages:
• J43E0010 (Direct Connect Authentication Processor)
• J43E0020 (Shopping Cart Processor)
• J43E0030 (PO Dispatch Processor)
See “Accessing Javadoc for Business Services" in the JD Edwards EnterpriseOne Applications Business InterfaceReference Guide .
The Direct Connect solution uses these business services:
• Direct Connect Authentication Processor (J43E0010)
• Shopping Cart Processor (J43E0020)
The PO Dispatch solution uses the PO Dispatch Processor (J43E0030) business service.
Transferring Additional Vendor Data Both the Shopping Cart Processor (J43E0020) and the PO Dispatch Processor (J43E0030) contain five generic cross-reference fields that you can use to transfer vendor data that does not have a corresponding JD Edwards EnterpriseOnefield. These cross-reference fields are part of the built-in extension functionality within the Direct Connect solution.You can customize the inbound Direct Connect Punch-Out Order message and pass these fields through the JDEdwards EnterpriseOne system, where the message is stored in the Shopping Cart Cross Reference table (F43E15). Thatinformation is then sent to the PO Dispatch Order Request message. Customizations can leverage these fields to storecross-reference keys for special data.
For example, if your vendor wants to send back a promotion ID number when a JD Edwards EnterpriseOne user checksout of his shopping website, you can use one of these generic fields in the J43E0020 to transport the promotion IDnumber to the JD Edwards EnterpriseOne system. The data is stored in the F43E15 table. You must work with yourvendors to determine their data requirements and then customize both the PunchOutOrderMessage_CXML12016.xsdand the Map_PunchOutOrderMessage_From_CXML12016_To_E1XML.xsl to use the generic fields.
12

JD Edwards EnterpriseOne ApplicationsRequisition Self Service Implementation Guide
Chapter 3Setting Up Direct Connect and Purchase Order Dispatch
Note: You can find the Map_PunchOutOrderMessage_From_CXML12016_To_E1XML.xsl under J43E0040 in ObjectManager Workbench (OMW).
Similarly, if you want to include that promotion ID number when you dispatch purchase orders to your vendorsusing the J43E0030, you can include the data that is stored in the F43E15 table. Again, you must customize theOrderRequest_CXML12016.xsd and the Map_OrderRequest_From_E1XML_To_CXML12016.xsl to include the generic fields.
These five fields in the F43E15 table are available to store customized vendor data:
• CrossReference01 (CRSREF01)
• CrossReference02 (CRSREF02)
• CrossReference03 (CRSREF03)
• CrossReference04 (CRSREF04)
• CrossReference05 (CRSREF05)
Note: If you must customize a business service, Oracle recommends that you copy the existing business serviceand then customize the copy. Do not change the code of the business service that is delivered with the JD EdwardsEnterpriseOne system.
Direct Connect Authentication Processor Business Service(J43E0010) The Direct Connect Authentication Processor business service (J43E0010) is a transaction service that invokes theHTTP service to connect to the vendor's website and authenticates the user credentials.
When a user signs in to the JD Edwards EnterpriseOne system and tries to access a vendor's shopping catalog usingthe Shopping Cart program (P43E25) or the Requisition Entry program (P43E10), the system calls the Parse BuyerCookie business function (B43E0041), which gathers the user's credentials and sends the data to the J43E0010 businessservice.
The business service creates the request message and posts it to the HTTP connection service. The HTTP connectionservice sends the request to the vendor's website, where the user's credentials are authenticated.
The vendor's website then returns a response message, which is received by the business services server in cXML1.2.016 PunchOutSetupResponse schema format. The J43E0010 business service then transforms the responsemessage, or payload, from cXML 1.2.016 to JD Edwards EnterpriseOne XML format so that it can be read. This returnmessage includes the URL for the vendor's shopping catalog. For this data transformation to occur successfully, youmust set up file path names for all transformer documents.
If processing is successful, the JD Edwards EnterpriseOne system opens a browser and displays the vendor's website.The business services returns to the user any errors or warning messages that are encountered during processing.
Setup Considerations Before you use J43E0010, you can set business service properties, which the system uses to process userauthentication information. You must set up these properties before you can use the business service. This tabledescribes each of the properties that are associated with this business service:
13

JD Edwards EnterpriseOne ApplicationsRequisition Self Service Implementation Guide
Chapter 3Setting Up Direct Connect and Purchase Order Dispatch
Group Key Description Default Value
J43E0010
J43E0010_KEY_PUNCHOUT_ORDER_MESSAGE_UDC_CODE
Use this propertyto specify the codefor the punch outorder message. Thevalue that you enterin this property mustcorrespond to thevalue in UDC (43E/SN) that represents theHTTP transaction typePunchOutOrderMessage.
03
J43E0010
J43E0010_KEY_PUNCHOUT_SETUP_REQUEST_UDC_CODE
Use this propertyto specify the codefor the punch outsetup request. Thevalue that you enterin this property mustcorrespond to thevalue in UDC (43E/SN) that represents theHTTP transaction typePunchOutSetupRequest.
01
J43E0010
J43E0010_KEY_PUNCHOUT_SETUP_RESPONSE_UDC_CODE
Use this propertyto specify the codefor the punch outsetup response. Thevalue that you enterin this property mustcorrespond to thevalue in UDC (43E/SN) that represents theHTTP transaction typePunchOutSetupResponse.
02
J43E0010
J43E0010_DEPLOYMENT_MODE
Use this property tospecify the deploymentmode. This is thename of the vendor'senvironment. Thisvalue is suppliedby the vendor. Thesystem maps this valueto the deploymentmode attribute of thePunchOutSetupRequestcXML document.
test
J43E0010
J43E0010_DOMAIN_NAME
Use this property tospecify the serverdomain name thatis hosting the HTTPlistener service. Thisvalue is supplied by thevendor.
NO_DOMAIN
14

JD Edwards EnterpriseOne ApplicationsRequisition Self Service Implementation Guide
Chapter 3Setting Up Direct Connect and Purchase Order Dispatch
Group Key Description Default Value
J43E0010
J43E0010_USE_SECURE_HTTP_CONNECTION
Use this property tospecify whether the postback URL uses a secureHTTP protocol. Valuesare: Blank or 0: False 1: True
0: False
See JD Edwards EnterpriseOne Tools Business Services Development Methodology Guide , "Managing Business ServiceProperties."
Transformer Information Some business services use jDeveloper's transformer feature to create .xsl style sheet documents, which map thedata from the source to the target schema. The business services use the filter fields to retrieve the file path for theappropriate .xsl file to invoke. The file paths are entered using the Business Service File Locations program (P43E35).The J43E0010 uses these .xsl style sheet documents to process both the inbound and outbound messages.
This table lists the file paths and filter fields for the outbound (request), from the JD Edwards EnterpriseOne XMLschema to the supplier's cXML schema:
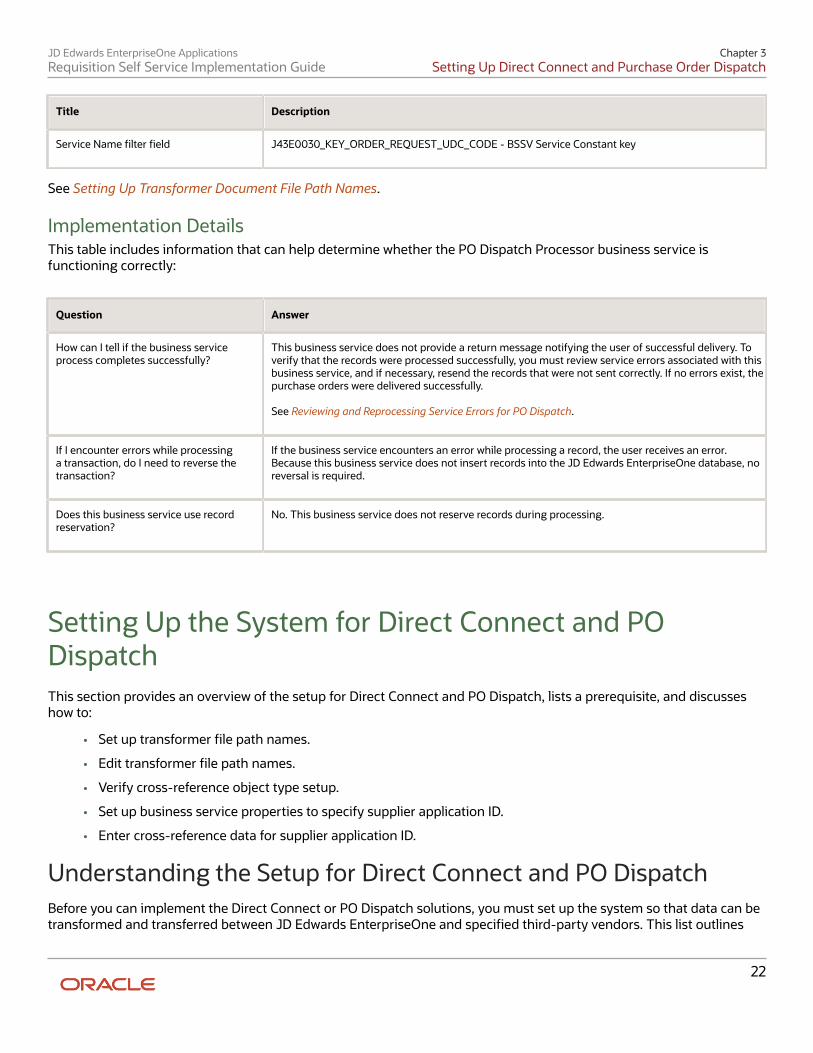
Title Description
Source Schema file path
oracle/e1/bssv/J43E0040/docs/PunchOutSetupRequestResponse_E1XML.xsd
Target Schema file path
oracle/e1/bssv/J43E0040/docs/PunchOutSetupRequest_CXML12016.xsd
XSL Style Sheet file path
oracle/e1/bssv/J43E0040/docs/Map_PunchOutSetupRequest_From_E1XML_To_CXML12016.xsl
Document Name filter field
setAuthenReqXMLDocName – Internal VO attribute
Service Name filter field
J43E0010_KEY_PUNCHOUT_SETUP_REQUEST_UDC_CODE – BSSV Service Constant key
This table lists the file paths and filter fields for the inbound (response), from the supplier's cXML schema to the JDEdwards EnterpriseOne schema:
Title Description
Source Schema file path
oracle/e1/bssv/J43E0040/docs/PunchOutSetupResponse_CXML12016.xsd
Target Schema file path
oracle/e1/bssv/J43E0040/docs/PunchOutSetupRequestResponse_E1XML.xsd
XSL Style Sheet file path
oracle/e1/bssv/J43E0040/docs/Map_PunchOutSetupRequest_From_CXML12016_To_EmXML.xsl
15

JD Edwards EnterpriseOne ApplicationsRequisition Self Service Implementation Guide
Chapter 3Setting Up Direct Connect and Purchase Order Dispatch
Title Description
Document Name filter field
setAuthenResXMLDocName - Internal VO attribute
Service Name filter field
J43E0010_KEY_PUNCHOUT_SETUP_RESPONSE_UDC_CODE - BSSV Service Constant key
See Setting Up Transformer Document File Path Names.
Implementation Details This table includes information that can help determine whether the Process Direct Punch Out Authentication businessservice is functioning correctly:
Question Answer
How can I tell if the business serviceprocess completes successfully?
If the operation completes successfully, the system opens a web browser and displays the vendor'sshopping website. If business service encounters errors or warning messages at any time duringprocessing, the user receives an error message.
If I encounter errors while processinga transaction, do I need to reverse thetransaction?
This business service does not update any records in the JD Edwards EnterpriseOne database.Therefore, it is not necessary to reverse any transactions if you encounter errors while processing. If you encounter errors during processing, verify your setup information and try the sign-in processagain.
Does this business service use recordreservation?
No. The business service does not reserve records within the JD Edwards EnterpriseOne system duringprocessing.
Shopping Cart Processor Business Service (J43E0020) After JD Edwards EnterpriseOne users access a vendor's website and select the products or services that they want topurchase, they complete the steps on the vendor's website to check out. When a user initiates the checkout process,the Shopping Cart Processor business service (J43E0020) is invoked. The Shopping Cart Processor is an inboundtransaction business service that transfers the user's checkout data from the vendor's website to the JD EdwardsEnterpriseOne database.
When the user checks out of the vendor's website, the listener service within the business services server calls theShopping Cart Processor business service. The business service receives the message from the vendor in cXML 1.2.016PunchOutOrderMessage schema format. The business service then transforms the data in the checkout message intoJD Edwards EnterpriseOne XML format so that it can be read by the JD Edwards EnterpriseOne system. For this datatransformation to occur successfully, you must set up file path names for all transformer documents.
The Shopping Cart Processor business service then calls the eReqSetShoppingCartWorkFile business function(B43E0690), which inserts each record that was successfully processed into the Shopping Cart Work File table(F43E20WF). If all lines are processed successfully, the user is returned to the shopping cart application, where he can
16

JD Edwards EnterpriseOne ApplicationsRequisition Self Service Implementation Guide
Chapter 3Setting Up Direct Connect and Purchase Order Dispatch
view all of the requested items. Only items that were successfully processed appear in the shopping cart. If errors areencountered during processing, the user receives one of these messages:
• No lines were found in the XML payload.
• Some lines were successful, but some had errors.
• No lines were successfully processed.
• Error occurred before any line processing could occur.
Note: The Shopping Cart Processor (J43E0020) is managed by the Shopping Cart Manager published businessservice (JP43E000). The Shopping Cart Manager is responsible only for passing data between the J43E0020 andthe JD Edwards EnterpriseOne system. The JP43E000 does not have its own document, and exists only because thelistener service cannot call the J43E0020 directly because that business service is an internal business service.
Setup Considerations Before you use this business service, you can set business service properties, which the system uses to process itempurchasing information. You must set up these properties before you can use the J43E0020 business service. This tabledescribes each of the properties that are associated with this business service:
Group Key Description Default Value
J43E0020
J43E0020_UOM_CATEGORY
Use this propertyto specify the unitof measure cross-reference object typethat the businessservice uses for crossreferencing data.
UOM
J43E0020
J43E0020_CURRENCY_CATEGORY
Use this property tospecify the currencycross-reference objecttype that the businessservice uses for crossreferencing data.
CURRENCY
J43E0020
J43E0020_LANGUAGE_CATEGORY
Use this property tospecify the languagecross-reference objecttype that the businessservice uses for crossreferencing data.
LANGUAGE
J43E0010
J43E0010_KEY_PUNCHOUT_ORDER_MESSAGE_UDC_CODE
Use this propertyto specify the codefor the punch outorder message. Thevalue that you enterin this property mustcorrespond to thevalue in UDC (43E/SN) that represents theHTTP transaction typePunchOutOrderMessage.
03
17

JD Edwards EnterpriseOne ApplicationsRequisition Self Service Implementation Guide
Chapter 3Setting Up Direct Connect and Purchase Order Dispatch
Note: The values that you enter for the UOM, CURRENCY, and LANGUAGE properties must be valid cross referenceobject types. Cross-reference object types are discussed later in this chapter.
See JD Edwards EnterpriseOne Tools Business Services Development Methodology Guide , "Managing Business ServiceProperties."
Transformer Information Some business services use jDeveloper's transformer feature to create .xsl style sheet documents, which map thedata from the source to the target schema. The business services use the filter fields to retrieve the file path for theappropriate .xsl file to invoke. The file paths are entered using the Business Service File Locations program (P43E35).The J43E0020 uses these .xsl style sheet documents to process inbound messages.
This table lists the file paths and filter fields for the inbound (response), from the supplier's cXML schema to the JDEdwards EnterpriseOne schema:
Title Description
Source Schema file path
oracle/e1/bssv/J43E0040/docs/PunchOutOrderMessage_CXML12016.xsd
Target Schema file path
oracle/e1/bssv/J43E0040/docs/PunchOutOrderMessage_E1XML.xsd
XSL Style Sheet file path
oracle/e1/bssv/J43E0040/docs/Map_PunchOutOrderMessage_From_CXML12016_To_E1XML.xsl
Document Name filter field
The XMLDocumentName parsed from the input BuyerCookie.
Service Name filter field
J43E0010_KEY_PUNCHOUT_SETUP_RESPONSE_UDC_CODE - BSSV Service Constant key This service constant is shared with J43E0010.
See Setting Up Transformer Document File Path Names.
Implementation Details This table includes information that can help determine whether the Shopping Cart Processor business service isfunctioning correctly:
Question Answer
How can I tell if the business serviceprocess completes successfully?
When the business service is finished processing, if all lines were successfully processed, the user isreturned to the Shopping Cart program, and all items appear on the form. Only successful lines appearon the form. If one or more lines does not complete successfully, the user receives an error message.
If I encounter errors while processinga transaction, do I need to reverse thetransaction?
If the business service encounters an error while processing a record, that record is not inserted intothe JD Edwards EnterpriseOne database. Therefore, it is not necessary to correct or remove any datafrom the system.
18

JD Edwards EnterpriseOne ApplicationsRequisition Self Service Implementation Guide
Chapter 3Setting Up Direct Connect and Purchase Order Dispatch
Question Answer
Does this business service use recordreservation?
No. This business service only creates new records in the JD Edwards EnterpriseOne database.Therefore, it is not necessary to reserve records within the JD Edwards EnterpriseOne system duringprocessing.
PO Dispatch Processor Business Service (J43E0030) Many organizations and vendors require purchase orders before they will complete a purchasing transaction. The PODispatch solution enables users to send purchase orders electronically from the JD Edwards EnterpriseOne system tothe vendor.
After a user generates the purchase orders, they can dispatch them to the vendor using one of these methods:
• Clicking the Dispatch Order button on the on the View Generated Orders form, which runs the Purchase OrderPrint program (R43500).
• Running the Purchase Order Print program from the menu.
When you run the Purchase Order Print program, the system checks to see if these criteria are met:
• The supplier's send method is set to XML.
• The purchase order status falls within the Next and Last Status values, as defined in the processing options forthe P43XPI.
• Call abstraction has been set up for PO Dispatch.
If these conditions exist, the R43500 calls the PO Dispatch Processor business service (J43E0030) which transformsthe data that is generated by the R43500 into cXML 1.2.016 OrderRequest schema format. The PO Dispatch Processorbusiness service then posts that cXML message so that it can be received by the vendor's website. The PO DispatchProcessor business service then receives the response from the vendor in cXML 1.2.016 OrderResponse schema format.For this data transformation to occur successfully, you must set up file path names for all transformer documents.
The PO Dispatch Processor business service uses cross-reference information to translate data between JD EdwardsEnterpriseOne and vendor websites.
See Setting Up Business Service Properties to Specify Supplier Application IDs Entering Cross Reference Data for SupplierApplication IDs.
Setup Considerations Before you use the PO Dispatch Processor business service, you can set business service properties, which the systemuses to process item purchasing information. You can set these properties before you can use the business service. Thistable describes each of the properties that are associated with the PO Dispatch Processor business service:
Group Key Description Default Value
J43E0030
{Vendor Number}
Use this property tospecify the vendor'sthird party applicationID that is used by thecross-reference table.
CXML
19

JD Edwards EnterpriseOne ApplicationsRequisition Self Service Implementation Guide
Chapter 3Setting Up Direct Connect and Purchase Order Dispatch
Group Key Description Default Value
See Setting Up BusinessService Propertiesto Specify SupplierApplication IDs.
J43E0030
J43E0030_DOMAIN_NAME
Use this property tospecify the serverdomain name hostingthe HTTP ListenerService. This value issupplied by the vendor.
NO_DOMAIN_NAME
J43E0020
J43E0020_UOM_CATEGORY
Use this property tospecify the unit ofmeasure (UOM) cross-reference object typethat is used for crossreferencing data.
UOM
J43E0020
J43E0020_CURRENCY_CATEGORY
Use this property tospecify the currencycross-reference objecttype that is used forcross referencing data.
CURRENCY
J43E0020
J43E0020_LANGUAGE_CATEGORY
Use this property tospecify the languagecross-reference objecttype that is used forcross referencing data.
LANGUAGE
J43E0030
J43E0030_ISO_COUNTRY
Use this property tospecify the ISO countrycross-reference objecttype that is used forcross referencing data.
ISO_COUNTRY
J43E0030
J43E0030_REFID_CATEGORY
Use this property tospecify the REFIDcross-reference objecttype that is used forcross referencing.Alternatively, you canspecify the related orderID from a previousdispatch.
REFID
J43E0030
J43E0030_KEY_ORDER_REQUEST_UDC_CODE
Use this propertyto specify the orderrequest document type.The value that youenter in this propertymust correspond tothe value in UDC (43E/SN) that represents the
04
20

JD Edwards EnterpriseOne ApplicationsRequisition Self Service Implementation Guide
Chapter 3Setting Up Direct Connect and Purchase Order Dispatch
Group Key Description Default Value
HTTP transaction typeOrderRequest.
J43E0030
J43E0030_KEY_ORDER_RESPONSE_UDC_CODE
Use this propertyto specify the orderresponse documenttype. The value that youenter in this propertymust correspond tothe value in UDC (43E/SN) that represents theHTTP transaction typeOrderResponse.
05
J43E0030
J43E0030_DEPLOYMENT_MODE
Use this property tospecify the deploymentmode. This valueis mapped to thedeployment modeattribute of theOrderRequest cXMLdocument. This value issupplied by the vendor.
test
Note: The values that you enter for the UOM, CURRENCY, ISO_COUNTRY, REFID, and LANGUAGE properties must bevalid cross-reference object types. Cross-reference object types are discussed later in this chapter.
See JD Edwards EnterpriseOne Tools Business Services Development Methodology Guide , "Managing Business ServiceProperties."
Transformer Information Some business services use jDeveloper's transformer feature to create .xsl style sheet documents, which map thedata from the source to the target schema. The business services use the filter fields to retrieve the file path for theappropriate .xsl file to invoke. The file paths are entered using the Business Service File Locations program (P43E35).The J43E0030 uses these .xsl style sheet documents to process inbound and outbound messages.
This table lists the file paths and filter fields for the outbound (request), from the JD Edwards EnterpriseOne schema tothe supplier's cXML schema:
Title Description
Source Schema file path
oracle/e1/bssv/J43E0040/docs/OrderRequest_E1XML.xsd
Target Schema file path
oracle/e1/bssv/J43E0040/docs/OrderRequest_CXML12016.xsd
XSL Style Sheet file path
oracle/e1/bssv/J43E0040/docs/Map_OrderRequest_From_E1XML_to_CXML12016.xsl
Document Name filter field
InternalVO member: szOrderReqXMLDocName
21
JD Edwards EnterpriseOne ApplicationsRequisition Self Service Implementation Guide
Chapter 3Setting Up Direct Connect and Purchase Order Dispatch
Title Description
Service Name filter field
J43E0030_KEY_ORDER_REQUEST_UDC_CODE - BSSV Service Constant key
See Setting Up Transformer Document File Path Names.
Implementation Details This table includes information that can help determine whether the PO Dispatch Processor business service isfunctioning correctly:
Question Answer
How can I tell if the business serviceprocess completes successfully?
This business service does not provide a return message notifying the user of successful delivery. Toverify that the records were processed successfully, you must review service errors associated with thisbusiness service, and if necessary, resend the records that were not sent correctly. If no errors exist, thepurchase orders were delivered successfully. See Reviewing and Reprocessing Service Errors for PO Dispatch.
If I encounter errors while processinga transaction, do I need to reverse thetransaction?
If the business service encounters an error while processing a record, the user receives an error.Because this business service does not insert records into the JD Edwards EnterpriseOne database, noreversal is required.
Does this business service use recordreservation?
No. This business service does not reserve records during processing.
Setting Up the System for Direct Connect and PODispatch This section provides an overview of the setup for Direct Connect and PO Dispatch, lists a prerequisite, and discusseshow to:
• Set up transformer file path names.
• Edit transformer file path names.
• Verify cross-reference object type setup.
• Set up business service properties to specify supplier application ID.
• Enter cross-reference data for supplier application ID.
Understanding the Setup for Direct Connect and PO Dispatch Before you can implement the Direct Connect or PO Dispatch solutions, you must set up the system so that data can betransformed and transferred between JD Edwards EnterpriseOne and specified third-party vendors. This list outlines
22

JD Edwards EnterpriseOne ApplicationsRequisition Self Service Implementation Guide
Chapter 3Setting Up Direct Connect and Purchase Order Dispatch
the steps that you must complete to set up the system and provides references to detailed documentation that you willneed to complete each step.
Note: Unless noted, instructions for completing the specified step are included in this chapter.
1. Install and set up the JD Edwards EnterpriseOne JAS server.
See JD Edwards EnterpriseOne Server Manager Guide, "Create a JD Edwards EnterpriseOne Web-Based Serveras a New Managed Instance."
2. Set up the Business Services server.
See JD Edwards EnterpriseOne Tools Business Services Server Reference Guide .
Complete these tasks when setting up the Business Services server:
◦ Set up proxies.
◦ Set up call-back listener service.
3. Enable the JAS.ini file to listen to JDENET messages.
See JD Edwards EnterpriseOne Server Manager Guide, "Kernel Ranges."4. Verify user defined codes for Direct Connect and PO Dispatch.5. Set business service properties for the Direct Connect and PO Dispatch business services.6. Set up transformer document file path names.7. Verify cross-reference object type setup.8. Set up business service properties to specify supplier application IDs.9. Enter cross-reference data for supplier application IDs.
10. Set processing options for the Purchase Order XPI program (P43XPI). (PO Dispatch only).11. Set up call abstraction for PO Dispatch. (PO Dispatch only).12. Set up the purchase order document type. (PO Dispatch only).13. Set up suppliers for Direct Connect and PO Dispatch.14. Set up the commodity structure and attach suppliers.
See Setting Up the Commodity Structure.
Note: Additional, you can find essential information about setting up your system to use business services onthe Service Oriented Architecture (SOA) site on My Oracle Support. After you log in to My Oracle Support, selectImplement, Optimize and Upgrade. Then select Implementation Guide and then Implementation Documentation andSoftware. Click the Service Oriented Architecture (SOA) link to access the additional information.
JDENET Messages The Shopping Cart Processor business service uses the BSSVSendXAPIMsgToClient API to notify the web client;therefore, you must enable the HTML Server's JAS.ini file to listen to the JDENET message. By default, when the HTMLweb client (JAS) is installed through Server Manager, the JDENET listener port is disabled. For the HTTP solution towork correctly and to ensure successful communication for the HTML web client, you must enable the JDENET listenerport through Server Manager.
Using Server Manager, select the desired web server from the EnterpriseOne HTML Server list. On the EnterpriseOneHTML Server: <server_name> page, select the Network Settings under the Configuration section. On the NetworkSettings page, ensure that the Disable JDENET Listener setting under JDENET Configuration is set to False. Contactyour system administrator to modify the settings if needed.
23

JD Edwards EnterpriseOne ApplicationsRequisition Self Service Implementation Guide
Chapter 3Setting Up Direct Connect and Purchase Order Dispatch
User-Defined Codes for Direct Connect and PO Dispatch To successfully communicate between JD Edwards EnterpriseOne and third-party vendors, you must verify that thetransformer document names exist in UDC table 43E/SN and that the cXML format that you are using exists in UDC43E/XS. This table lists the values that must exist to use the predefined transformer documents in cXML 1.2.016 format.Verify that all of these codes exist:
UDC Table Codes Description 01 Hard Coded
43E/XS
CXML12016
CXML 1.2.016
Y
43E/SN
01
PunchOutSetupRequest
Y
43E/SN
02
PunchOutSetupResponse
Y
43E/SN
03
PunchOutOrderMessage
Y
43E/SN
04
OrderRequest
Y
43E/SN
05
OrderResponse
Y
Note:
The descriptions listed in UDC 43E/SN are cXML document names for their respective HTTP services. However, JDEdwards EnterpriseOne applications might refer to them differently, as listed here:
PunchOutSetupRequest – Authentication Request
PunchOutSetupResponse – Authentication Response
PunchOutOrderMessage – Shopping Cart Response
OrderRequest – PO Dispatch Request
OrderResponse – PO Dispatch Response
See www.cxml.org for more information about cXML standards and versions.
Transformer Document File Paths After you have verified that the correct UDC values exist in the system, you can set up transformer document file pathnames. You use the Business Service File Locations program (P43E35) to set up file path names. The system uses thisinformation to find the correct style sheets to map data from the JD Edwards format to the vendor's format.
You must set up file path information for each document name and service name combination. The document namerefers to the cXML format, and the service name refers to the HTTP service names that exist in UDC 43E/SN. Therefore,if you are using cXML format 1.2.016, and you are using the predefined style sheets that are provided for you, you mustset up transformer file path names for:
• Document Name: CXML1.2.016, Service Name: PunchOutSetupRequest
24

JD Edwards EnterpriseOne ApplicationsRequisition Self Service Implementation Guide
Chapter 3Setting Up Direct Connect and Purchase Order Dispatch
• Document Name: CXML1.2.016, Service Name: PunchOutSetupResponse
• Document Name: CXML1.2.016, Service Name: PunchOutOrderMessage
• Document Name: CXML1.2.016, Service Name: OrderRequest
• Document Name: CXML1.2.016, Service Name: OrderResponse
If you are using a different format or different HTTP services, you must enter them in the respective UDC tables, andthen set up transformer document file path names for your documents and services.
Cross-Reference Data Before you can successfully share data between JD Edwards EnterpriseOne and a third-party vendor's system, you mustset up cross-reference information. The system uses cross-reference information to map data from the JD EdwardsEnterpriseOne database to the vendor's database, and vice versa.
To set up cross-reference data, you must first set up supplier records in the JD Edwards EnterpriseOne system. Then,you must set up cross-reference object types. Object types define the categories of data that you will pass between thetwo systems and include categories such as:
• CURRENCY
• ISO_COUNTRY
• LANGUAGE
• UOM (unit of measure)
• REFID (reference ID)
After you set up cross-reference object types, set up business service properties to specify the application ID of each ofyour vendors. After you have set up the application ID, you enter cross-reference records for each of those applicationIDs. Cross-reference records map the values from one system to the values in the other system. This is necessarybecause many systems use different codes or values to represent the same information.
For example, the JD Edwards EnterpriseOne system uses the currency code USD to represent U.S. dollars. However, athird-party system might use a different code, such as 004, to represent U.S. dollars. In order for the two systems toshare currency amounts in U.S. dollars, you must create a cross-reference record for this currency for the applicationID used by that vendor. You associate the record with the CURRENCY cross-reference object type. When you create therecord, you specify the value that represents the currency in the JD Edwards EnterpriseOne system (USD) and the valuethat represents that same currency in the vendor's system (004). You set up currency cross-reference records for allcurrencies in which your organization and vendors use.
Note: It is not necessary to set up cross-reference records for the REFID cross-reference object type. This objecttype is used to create a cross reference between and EnterpriseOne order ID and the PO Dispatch ID that thesupplier receives. These records are created automatically during the PO Dispatch process, using the JD EdwardsEnterpriseOne order ID to populate the EOne Value field and the PO Dispatch ID to populate the Third Party Valuefield.
When you enter cross-reference records, you also specify the third-party application ID for each vendor. Multiplevendors can share the same application ID; however, they must also use the same cross-reference values. If vendorsmust use different values, they must also use different application IDs.
25

JD Edwards EnterpriseOne ApplicationsRequisition Self Service Implementation Guide
Chapter 3Setting Up Direct Connect and Purchase Order Dispatch
Prerequisite Enter suppliers in the JD Edwards EnterpriseOne system.
See "Entering Address Book Records" in the JD Edwards EnterpriseOne Applications Address Book ImplementationGuide and "Setting Up Supplier Information" in the JD Edwards EnterpriseOne Applications Procurement ManagementImplementation Guide .
Forms Used to Set Up Direct Connect and PO Dispatch
Form Name Form ID Navigation Usage
Search and Select FilePath Names
W43E35A
From the Supplier DirectConnect menu (3/G43E31), select BusinessService File Locations.
Select the document forwhich you want to setup file path information.
Add File Path Names
W43E35B
On Search and SelectFile Path Names, selecta record and click Add.
Set up transformerdocument file pathnames.
Edit File Path Names
W43E35B
On Search and SelectFile Path Names, selecta record and click Select.
Edit transformerdocument file pathnames.
Work With BusinessService Cross Reference
W952000B
Enter P952000 in theFast Path field and thenclick Go.
Access the Work WithBusiness Service CrossReference Object Typeform. Access forms to entercross-reference data.
Work With BusinessService Cross ReferenceObject Type
W952000F
From the Work WithBusiness Service CrossReference form, selectObject Type from theForm menu.
Verify cross-referenceobject types.
Work With BusinessService Property
W951000F
Enter P951000 in theFast Path field and thenclick Go.
Access forms to setup business serviceproperties.
Add BSSV Property
W951000C
On the Work WithBusiness ServiceProperty form, selectthe BSSV option andthen click Add.
Set up business serviceproperties to specifysupplier application IDs.
26

JD Edwards EnterpriseOne ApplicationsRequisition Self Service Implementation Guide
Chapter 3Setting Up Direct Connect and Purchase Order Dispatch
Setting Up Transformer Document File Path Names Complete this task for all of the documents and HTTP services that you are using.
Access the Add File Path Names form.
1. Select an item from the Document Name list.
Values for this list are stored in UDC 43E/XS.2. Select an item from the Service Name list.
Values for this list are stored in UDC 43E/SN.3. After you have completed the Document Name and Service Name fields, the system enables the remaining
fields on the form and displays the Get Default Values button.
You can manually enter data into the fields, or you can click the Get Default Values button to populate therequired fields with the default values. Not all fields are required for all services. The system populates only therequired fields. The system populated values are based on hard-coded values that are based on the style sheetsthat are delivered with the system.
4. Click Save and Close to save your changes and return to the previous form.5. To edit the data in these fields after you enter it, select a record on the Search and Select File Path Names form
and click Select.6. On the Edit File Path Names form, update the information in any of the fields and then click the Save and Close
button.BSSV Class Name (business service class name)
Enter the fully qualified name of a business service class, including the package name. An example of a business serviceclass name is oracle.e1.bssv.J43E0010.PunchOutAuthenticationProcessor.
Note: For the PunchOutOrderMessage service (also called the Shopping Cart Response), the value in the BSSV ClassName field must be a published business service, such as JP43E000. This is because the outside source (supplier)invokes the service, and according to the business service methodology, the outside source must invoke a publishedbusiness service. The published business service then invokes in internal business service.
BSSV Method Name (business service method name)
Enter the method name within the EnterpriseOne business service. An example of a method name isauthenticatePunchOutCredentials.
XSL Transformer
Specify the relative file path for a valid style sheet (XSL) document. The system uses the XSL document to transformthe data so that it can be transferred between the JD Edwards EnterpriseOne XML document and the vendor's cXMLdocument.
The file path name should be prefixed with a backslash (/), with the exception of the file extension (.xsl). Also prefix thefolder and class/method names with a period.
Document Version
Specify the version of the XML document to be processed. In Direct Connect applications, this value determines theversion location of the cXML document to process at the supplier's site during PunchOut activities.
27

JD Edwards EnterpriseOne ApplicationsRequisition Self Service Implementation Guide
Chapter 3Setting Up Direct Connect and Purchase Order Dispatch
The file path name should be prefixed with a backslash (/), with the exception of the file extension (.xsl). The folder andclass/method names should be prefixed with a period.
Edit Transformer File Path Names Access the Edit File Path Names form.
To edit the existing information, change the data in any of the fields and then click the Save and Close button. To deletethe record, click the Delete button.
Verifying Cross Reference Object Type Setup Access the Work With Business Service Cross Reference Object Type form.
Verify that a record exists for each of these items:
• CURRENCY
• LANGUAGE
• REFID
• UOM
• ISO_COUNTRY
If these records do not exist, click Add and enter each record on the Add Business Service Cross Reference ObjectType form. When you are finished, click OK. You can also complete these steps to add additional categories that yourorganization might need when communicating with vendors.
Setting Up Business Service Properties to Specify SupplierApplication IDs Access the Add BSSV Property form. Complete this task for each vendor.
Key
Enter the address book number of a valid supplier record. This is the supplier or vendor with which you want to set upthe Direct Connect or PO Dispatch process.
Value
Enter the code that represents the third-party application ID that the vendor uses. This code must exist in the BSSVCross Reference table (F952000).
Description
Enter a description of the supplier's third-party application.
Level
Verify that the BSSV option is selected.
28

JD Edwards EnterpriseOne ApplicationsRequisition Self Service Implementation Guide
Chapter 3Setting Up Direct Connect and Purchase Order Dispatch
Group
Enter J43E0020 as the group for these business service properties.
Note:• J JD Edwards EnterpriseOne Tools Business Services Development Methodology Guide , "Managing Business
Service Properties."
Entering Cross Reference Data for Supplier Application IDs Access the Work With Business Service Cross Reference form.
Complete the following steps for each cross reference record that you need to create for a specified cross-referenceobject type.
Enter the object type for which you want to enter cross-reference data in the Cross Reference Object Type field, selectone of these options and then click Add:
Key
Select this option to enter cross-reference data for key cross-reference objects. When entering data for REFID, select thisoption.
You select this option when cross referencing data that is generated at run time, such as the payload ID or sales ordernumber that are created by the vendor.
Code
Select this option to enter cross-reference data for code cross-reference objects. You select this option when you arecross referencing static data, such as country, language, or currency code.
On the Add Business Service Cross Reference form, complete these fields and then click OK.
Cross Reference Type
Specify whether the cross reference is a code or key type of cross reference. Values are:
CODE: Select this option for cross referencing static data.
KEY: Select this option for cross referencing data that is generated at run time. Select this option when you are enteringcross-reference information for object type REFID.
Cross Reference Object Type
Specify the cross-reference object type, which is also known as the cross-reference category. This value specifies thecode or key that is being cross referenced between JD Edwards EnterpriseOne and a third party. You must already haveentered the object type into the system. Examples of cross-reference object types include CURRENCY, UOM, and REFID.
Third Party App ID (third-party application Identifier)
Enter the code that identifies the external system outside of JD Edwards EnterpriseOne to which the cross-referenceexternal value belongs. Examples of third-party application IDs might include Peoplesoft CRM or E-Business Suite.
Note: The value that you enter in this field must already be set up in business service properties.
29

JD Edwards EnterpriseOne ApplicationsRequisition Self Service Implementation Guide
Chapter 3Setting Up Direct Connect and Purchase Order Dispatch
See Setting Up Business Service Properties to Specify Supplier Application IDs.
Third Party Value
Specify the third-party application value, or external value, that requires cross referencing to an equivalent value in theJD Edwards EnterpriseOne system.
Note: When entering information for object type REFID, leave this field blank.
EOne Value (EnterpriseOne value)
Specify the JD Edwards EnterpriseOne value that requires cross referencing to an equivalent value in the external, orthird-party system.
Setting Up Additional Information for PO Dispatch This section provides an overview of additional setup for PO Dispatch and discusses how to:
• Set processing options for the Purchase Order XPI program (P43XPI).
• Set up call abstraction.
• Set up the purchase order document type.
Understanding Additional Setup for PO Dispatch Before you can dispatch purchase orders externally, you must define which order status codes that your system is ableto dispatch and you must set up the system to call the business services that send the purchase orders to the externalsupplier.
Using the processing options for the Purchase Order XPI program (P43XPI), you specify the status code range that thesystem uses to determine which purchase orders should be sent to the suppliers.
You use call abstraction to create a call from the Purchase Order Print program (R43500) to the CallPODispatchBSSVbusiness function (B43E0970). The B43E0970 calls the PO Dispatch Processor business service (J43E0030). Withoutcall abstraction, when you process the R43500, the system simply prints the purchase orders. However, if you have setup call abstraction for PO Dispatch, when you run the R43500 program, the J43E0030 business service transforms andtransmits the data so that it can be received by the vendor.
You use the Call Abstraction Registration program (P0049) to set up call abstraction records.
Lastly, you must verify that document type that you are using for purchase orders exists, and that the Publish Externallyoption for that document type is selected. You use the Document Types Maintenance program (P40040) to set up thisinformation. The default document type for purchase orders is OP. You can use this document type, or create your ownfor purchase orders.
30

JD Edwards EnterpriseOne ApplicationsRequisition Self Service Implementation Guide
Chapter 3Setting Up Direct Connect and Purchase Order Dispatch
Forms Used to Set Up Additional Information for PO Dispatch
Form Name Form ID Navigation Usage
Call AbstractionRegistration Workbench
W0049A
From the Setup menu(G43E41), selectCall AbstractionRegistration.
Access the Add CallAbstraction form, orselect existing recordsfor modification.
Add Call Abstraction
W0049E
On the Call AbstractionRegistration Workbenchform, click Add.
Set up call abstraction.
Work With DocumentType
W40040A
From the InventoryManagement menu(G4141), selectDocument TypeMaintenance.
Search for and selectdocument type OP.
Document TypeRevisions
W40040B
On the Work WithDocument Type form, search for and selectdocument type OP andthen click Select.
Set up document typeOP for PO Dispatch.
Setting Processing Options for Purchase Order XPI program(P43XPI) Processing options enable you to specify the default processing for programs and reports.
For programs, you can specify options such as the default values for specific transactions, whether fields appear on aform, and the version of the program that you want to run.
Order Statuses 1. Beginning Order Status allowed for External Publish
Specify a value from UDC 40/AT that indicates the last step in the processing cycle that this order line has successfullycompleted. For a purchase order to be published externally using PO Dispatch, the order status must be greater than orequal to the value that you enter in this option.
2. Ending Order Status allowed for External Publish
Specify a value from UDC 40/AT that indicates the next step in the order flow of the line type. For a purchase order tobe published externally using PO Dispatch, the order status must be less than or equal to the value that you enter in thisoption.
3. Acknowledged Order Status Code
31

JD Edwards EnterpriseOne ApplicationsRequisition Self Service Implementation Guide
Chapter 3Setting Up Direct Connect and Purchase Order Dispatch
Specify a value from UDC 40/AT that indicates the next step in the order flow of the line type.
4. Acknowledged With Change Order Status Code
Specify a value from UDC 40/AT that indicates the next step in the order flow of the line type.
5. Pending Order Status Code
Specify a value from UDC 40/AT that indicates the next step in the order flow of the line type.
Versions 1. Purchase Order Entry Processing Option Version (P4310)
Specify the version that the system uses when you enter a purchase order.
2. Voucher Match Processing Option Version (P4314)
Specify the version that the system uses when you match an invoice to a purchase order line or receipt line. If theVoucher Match processing option, which is located on the Voucher Match tab, is set to 1 or 2, the system validates theversion that you specify.
3. AP Master Business Function Processing Option Version for Logged Vouchers (P0400047)
Specify the version that the system uses when you log a voucher for an invoice. If the Voucher Match processing option,which is located on the Voucher Match tab, is set to blank or 1, the system validates the version that you specify toensure that the voucher logging process is active.
Receipts 1. Shipped Order Status Code
Specify a value from UDC 40/AT that indicates the next step in the order flow of the line type.
2. Advance Status Only
Specify whether the system advances the shipment status of the line or order. Values are:
Blank: Do not advance to Shipped Status.
1: Advance to shipped status (no receipt).
Voucher Match 1. Voucher Type
Specify whether the system creates a logged voucher or matched voucher. Values are:
Blank: The system always creates a logged voucher.
1: If the invoice includes specific purchase order information, the system creates a matched voucher. If the invoice doesnot include specific purchase order information, the system creates a logged voucher.
2: The system always creates a matched voucher.
2. Expense Account for Additional Charges
Specify the account that the system uses to expense the additional charges that are specified on the invoice. You setup the account format in the General Accounting Constants program (P0000), using one of the following formats foraccount numbers:
◦ Structured account (business unit.object.subsidiary)
32

JD Edwards EnterpriseOne ApplicationsRequisition Self Service Implementation Guide
Chapter 3Setting Up Direct Connect and Purchase Order Dispatch
◦ 25-digit unstructured number
◦ 25-digit unstructured number
◦ 8-digit short account ID number
◦ Speed code
Setting Up Call Abstraction Access the Add Call Abstraction form.
Note: This record is set up by JD Edwards EnterpriseOne. Verify that it exists. If it does not, complete this task usingthe example shown here.
Class Code
Enter a unique alphanumeric code to identify the group of abstract call business functions. Values are stored in UDC00/AD and include:
E1WSCBOMR: E1 WSC for Bill of Resource
E1WSCIB: E1 WSC for Inventory Adjust
E1WSCPO: E1 WSC for Purchase Order
E1WSCSO: E1 WSC for Sales Order
E1WSCWO: E1 WSC for Work Order
When setting up call abstraction for PO Dispatch, enter E1WSCPO.
Calling Function Name
Enter an alphanumeric code that identifies the origin of a calling function.
Invocation Sequence
Specify the invocation sequence of the called business function.
Called Function name
Enter the name of a valid JD Edwards EnterpriseOne business function that is called.
Configuration Group Code
Enter the code that identifies the group of abstract call business functions to which this call abstraction belongs. Youuse group codes to enable or disable groups of call abstraction records at the same time. Values are stored in UDC 00/CG and include:
E1RSSPO: E1 for PO Dispatch for RSS
When setting up call abstraction for PO Dispatch, enter E1RSSPO.
33

JD Edwards EnterpriseOne ApplicationsRequisition Self Service Implementation Guide
Chapter 3Setting Up Direct Connect and Purchase Order Dispatch
Setting Up Document Type OP Access the Document Type Revisions form and select the Procurement tab.
Publish Externally
Select this option to enable the system to publish purchase orders externally using PO Dispatch.
Setting Up Suppliers for Direct Connect and PO Dispatch
This section provides an overview of Direct Connect and PO Dispatch information for suppliers and discusses how to:
• Enter the send method for suppliers.
• Set up Direct Connect information for suppliers. (PO Dispatch only.)
34

JD Edwards EnterpriseOne ApplicationsRequisition Self Service Implementation Guide
Chapter 3Setting Up Direct Connect and Purchase Order Dispatch
Understanding Direct Connect and PO Dispatch Information forSuppliers You use the Direct Connect Setup Application program (P43E22) to enter Direct Connect information for suppliers. Youaccess this program from the Supplier Master Revisions form (P04012).
When you set up your suppliers for Direct Connect, you must specify a communication method. The Direct Connectcommunication method enables you to connect to your suppliers to view their websites. The PO Dispatch methodenables you to send a cXML message to the supplier that contains the items that you want to order from the supplier'ssite. To use both methods, you must set up the information on the Setup Direct Connect Supplier form twice–once foreach method.
Additionally, for the PO Dispatch solution to send messages to suppliers, you must also set the Send Method field onthe Supplier Master Revisions form to 5 (XML).
Before setting up Direct Connect information for suppliers, you must set up two user-defined code (UDC) tables: 43E/CM and 43E/XS.
This table describes the values you must set up for UDC table 43E/CM:
Codes Description 01
1
Direct Connect
2
PO Dispatch
This table describes the values you must set up for UDC table 43E/XS:
Codes Description 01
CXML12009
cXML 1.2.009
CXML 12016
cXML 1.2.016
You must add additional values to UDC table 43E/XS if you use formats other than cXML 1.2.009 or 1.2.016. For example,if you create a custom schema for Corporate Express, you must set up your own transformer and add it as a value toUDC table 43E/XS similar to the values in the following table:
Codes Description 01
CORPEXP
Corporate Express
You must also set the processing options for the Purchase Order XPI program (P43XPI). The system uses theinformation in these processing options to determine which purchase orders should be dispatched to suppliers.
35

JD Edwards EnterpriseOne ApplicationsRequisition Self Service Implementation Guide
Chapter 3Setting Up Direct Connect and Purchase Order Dispatch
After you set up Direct Connect and PO Dispatch information for suppliers, you then attach the suppliers to theappropriate commodity structure.
See Setting Up the Commodity Structure.
Form Used to Set Up Direct Connect Information for Suppliers
Form Name Form ID Navigation Usage
Work With SupplierMaster
W04012D
From the Supplier DirectConnect menu (3/G43E31), select SetupSupplier Information.
Select suppliersand access forms toenter Direct Connectinformation.
Supplier MasterRevisions
W04012A
From the Work WithSupplier Master form, select a supplier recordand then click Select.
Enter the send methodfor the supplier.
Set Up Direct ConnectSupplier
W43E22A
Select a supplier onthe Work With SupplierMaster form and selectDirect Connect from theRow menu.
Enter Direct Connectinformation for asupplier.
Enter the Send Method for Suppliers Access the Supplier Master Revisions form. Select the EDI Information tab.
36

JD Edwards EnterpriseOne ApplicationsRequisition Self Service Implementation Guide
Chapter 3Setting Up Direct Connect and Purchase Order Dispatch
Send Method
Specify the method that the system uses when sending information to suppliers. For the PO Dispatch solution enter 5 inthis field to send XML messages to suppliers.
Setting Up Direct Connect Information for Suppliers Access the Set Up Direct Connect Supplier form.
Communication Method
The JD Edwards EnterpriseOne system is set up to support the cXML 1.2.016 Direct Punch Out standard. Therefore, youmust select Direct Connect. If your suppliers use a different version, you can configure the Direct Connect setup tosupport the different version.
To set up suppliers for PO Dispatch, select PO Dispatch. PO Dispatch enables you to send a message to the supplierthat contains the items that you want to order from the supplier's website.
See Understanding Purchase Order Creation.
Authentication These fields define the information needed for authentication.
37

JD Edwards EnterpriseOne ApplicationsRequisition Self Service Implementation Guide
Chapter 3Setting Up Direct Connect and Purchase Order Dispatch
Login ID
Enter the sign-in user ID for authenticating with the third-party website.
Shared Secret
Enter the password to sign in to the JD Edwards EnterpriseOne menu driver.
Authentication URL
Enter the URL for authenticating user credentials on the supplier website.
Authentication Method
Select the method to authenticate with the supplier website. Values are:
1: Digital Certificates
2: Mac Credentials
3: Shared Secrets
See JD Edwards EnterpriseOne Tools Web Development Client Installation Guide.
Software Name
Enter the name of the software that communicates with the supplier website. The supplier uses this value to determinethe software with which it is communicating. For example, enter JD Edwards EnterpriseOne 9.0.
XML Communication Document These fields define the information that is required for the XML communication document.
Note: The fields that appear in this section of the form depend on the communication method that is selected.
Authentication Request
Select the XML schema that is used for the authentication request during the Direct Connect communication with thesupplier website. This field appears only when the Communication Method is Direct Connect.
Authentication Response
Select the XML schema that is used for the authentication response during the Direct Connect communication with thesupplier website. This field appears only when the Communication Method is Direct Connect.
Shopping Cart Request
Select the XML schema that is used for the shopping cart response during the Direct Connect communication with thesupplier website. This field appears only when the Communication Method is Direct Connect.
PO Dispatch Request
Select the XML schema that is used for the authentication request during the PO Dispatch communication with thesupplier website. This field appears only when the Communication Method is PO Dispatch.
PO Dispatch Response
Select the XML schema that is used for the authentication response during the PO Dispatch communication with thesupplier website. This field appears only when the Communication Method is PO Dispatch.
38

JD Edwards EnterpriseOne ApplicationsRequisition Self Service Implementation Guide
Chapter 3Setting Up Direct Connect and Purchase Order Dispatch
MAC Credentials These fields define the MAC Credentials. You must set up this information if you are using a third-party authenticationprovider.
Buyer Domain
Enter the name of the buyer domain.
Identity
Enter the identity of the buyer domain.
Supplier Domain
Enter the name of the supplier domain.
Identity
Enter the identity of the supplier domain.
Sender Domain
Enter the name of the sender domain.
Identity
Enter the identity of the sender domain.
Algorithm
Enter the algorithm for decrypting the MAC credentials.
Type
Enter the type of the algorithm for decrypting the MAC credentials.
Date Created
Enter the date that the MAC credentials were created.
Expiration Date
Enter the date that the MAC credentials expire.
MAC Value
Enter the value of the MAC credentials that were given by the third-party authentication process.
Set Up Extrinsic Information These fields define any additional data that might be required by a supplier for authentication and access to thesupplier's website. These values create a cross-reference that indicates to the supplier which user is connecting tothe supplier's website so that the supplier knows what information to display for the user. You can map the additionalrequired data using only these tables:
• F0101– Address Book Master
• F0111– Address Book - Who's Who
• F0006– Business Unit Master
• F0010– Company Constants
• F0401– Supplier Master
39

JD Edwards EnterpriseOne ApplicationsRequisition Self Service Implementation Guide
Chapter 3Setting Up Direct Connect and Purchase Order Dispatch
Extrinsic Name
Enter the name of the element for the extrinsic information section of the cXML document. For example, enter USER. Ifyou enter USER, the extrinsic information appears as: <Extrinsic name="User">98372762</Extrinsic>. This value mustbe a single string. Do not enter any spaces or special characters.
Description
Enter the description of the element name. For example, enter User ID to describe the element name of USER.
Data Dictionary Alias
Enter the data dictionary alias to retrieve the value that is specified in the Element Name field. The system usesa predefined key to retrieve any specified columns of the table ID and populates the cXML document with thisinformation.
For example, the F0101 table contains the information:
◦ Column: AN8
◦ Data: 98372762
Based on this information, the system cross-references the F0101 table by retrieving the F0101 Address Book using theaddress book number and returns the value of 98372762.
The system uses this information to create an extrinsic information element in the cXML document. The elementappears as <Extrinsic name="User">98372762</Extrinsic>.
Table ID
Enter a valid table number from UDC table 43/ET. The system uses this table to retrieve the value that is specified in theElement Name field. For example, enter F0101 if you want the system to retrieve the user ID from the F0101 table.
Note: The values in user-defined code table are hard-coded. You cannot enter a table other than those listed in theUDC table.
40

JD Edwards EnterpriseOne ApplicationsRequisition Self Service Implementation Guide
Chapter 4Setting Up the Commodity Structure
4 Setting Up the Commodity Structure
Understanding the Commodity Structure The commodity structure enables you to categorize items, services, and supplier branch information in a hierarchicaltree structure. After you set up the commodity structure, you create relationships for commodities. The system usescommodity relationships to provide default information for requisitions. Commodity relationship information iseventually passed to Enterprise Performance Management, where you can perform spend analysis.
When setting up the commodity structure, you must observe these guidelines:
• Each commodity may have only one parent commodity.
• You may not create duplicate commodities.
• You may have only three commodity levels in the commodity hierarchy.
• Each commodity may contain a maximum of 15 alphanumeric characters.
• The description associated with the commodity may contain a maximum of 30 alphanumeric characters.
• The first level of the commodity structure is level 0.
The Requisition Self Service system provides a default commodity, Unknown. The system uses this commodity if youdo not set up a commodity structure or if the system cannot find a default commodity for a requisition. You can attach abuyer to the Unknown commodity so that the buyer is alerted when users enter requisitions for which they do not knowthe commodity. You cannot set up line types, G/L class codes, and item relationships for the Unknown commodity.
Note: Do not delete the Unknown commodity.
After you have created the initial commodity structure, you can add new items to the structure as needed. If you want toapply the commodities to purchase order records created before you set up the commodity structure, run the PopulateF4311 Commodity/UNSPSC Program (R43910). This program assigns commodities and United Nations StandardProducts and Services Codes (UNSPSC) to existing purchase order lines, based on data selection.
See Understanding the Populate F4311 Commodity/UNSPSC Program.
Note: If you do not want to set up the commodity structure, you can still perform spend analysis on account-drivenrequisition lines by setting up relationships between UNSPSC codes and general ledger account numbers. Usethe UNSPSC to Account Relationship program (P40243) to set up these relationships, and then use the EnterprisePerformance Management systems to create reports that include UNSPSC code information. This program does notcreate UNSPSC relationships for item-driven requisition lines.
Setting Up the Commodity Structure This section provides overviews of the Commodity Structure program, commodity relationships, and the PopulateF4311 Commodity/UNSPSC program, and discusses how to:
• Add a commodity.
41

JD Edwards EnterpriseOne ApplicationsRequisition Self Service Implementation Guide
Chapter 4Setting Up the Commodity Structure
• Enter an item number.
• Enter a UNSPSC code.
• Enter a supplier relationship for the commodity.
• Enter a supplier's commodity code.
• Enter a G/L account number.
• Set up a UNSPSC code for an account number.
• Run the Populate F4311 Commodity/UNSPSC program (R43910).
Understanding the Commodity Structure Program Use the Commodity Structure program (P40500) to create the commodity structure. When you add a commodity,you enter the commodity, a description, whether it is a product, service, or both, and the line type. You can also entera buyer number and a G/L class code. You must enter this basic commodity data and save it before entering anyrelationship information.
After you add each commodity, you can cut and paste the commodities into the appropriate level of the hierarchy. Youcan create up to three levels in the structure.
You can also move nodes within the structure; however, you cannot move a node if moving the node would create morethan three levels in the structure. When you move a node, the system moves any children that are associated with thenode.
Note: The Commodity Structure program is enabled with record locking. Record locking prevents a user frommaking any changes to the commodity structure when another user is updating the structure, ensuring data integrity.If your business practices require that multiple users have access to the commodity structure at one time, you candisable the record locking feature for this program by removing the P40500 program from user-defined code table00/RR. However, we recommend that you leave record locking enabled.
See JD Edwards EnterpriseOne Tools APIs and Business Functions Guide .
Understanding Commodity Relationships You can set up relationships for each commodity. Relationships provide default information for the system to use whenyou enter a commodity on the requisition and throughout the requisition and purchase order process.
This graphic illustrates commodity relationships:
42

JD Edwards EnterpriseOne ApplicationsRequisition Self Service Implementation Guide
Chapter 4Setting Up the Commodity Structure
Item Number Enter an item number for a commodity when you want to track commodity by item number. If you enter an itemnumber for a commodity, you do not need to enter information such as G/L class code, because the system uses theinformation in the F4102 table. If you do enter any information for the commodity, the system overrides the informationwith the values specified in the F4102 table when you enter the requisition. The system stores item number relationshipinformation in the F40540 table.
You can also enter the commodity directly into the Item Master program (P4101).
UNSPSC Code If you want to track items by UNSPSC code separately or in addition to a commodity, you enter the UNSPSC code at theitem master level. When you enter a requisition for a stock item, the system uses the UNSPSC code and the commodityassociated with the item in the F4102 table.
However, you might want to enter a UNSPSC code for a commodity that does not have an item, such as a servicescommodity. To accomplish this, use the Commodity Structure program to associate the commodity with the UNSPSCcode. When a user enters a requisition, the system retrieves the UNSPSC code from the associated commodity. Usethe UNSPSC and Commodity program (P40510) to establish a one-to-one relationship between commodity codesand UNSPSC codes. The system uses the association when you enter a commodity and throughout the requisitionand purchase order process. When you enter a requisition, the system retrieves the UNSPSC code from the associatedcommodity. The system stores the associations in the UNSPSC and Commodity Structure table (F40510). The systemstores UNSPSC code relationship information in the F40510 table.
Note: You can download a complete list of the UNSPSC codes from the UNSPSC website (www.UNSPSC.com).When you download the codes, the system stores them in the F40241 table. The visual assist for the UNSPSC field isattached to this table.
43

JD Edwards EnterpriseOne ApplicationsRequisition Self Service Implementation Guide
Chapter 4Setting Up the Commodity Structure
Suppliers You usually attach supplier numbers to commodities for items that you do not normally stock, so that a user hasa list of preferred suppliers for that particular item. When you create this relationship, the supplier name appears inthe commodity structure under the designated commodity. If you implement the Direct Connect feature for one ormore suppliers, the user can connect directly to the suppliers' website to shop for items. The system stores supplierrelationship information in the F40520 table.
Note: When you enter a supplier for the commodity, you must also enter a branch/plant for that supplier. If you donot enter a branch/plant, the system assigns the value of ALL. You usually assign a branch/plant of ALL for nationalsuppliers that are used by all regions of your organization. For services, such as electrical work, you usually enter thebranch/plant that applies to each supplier, so that users can select a supplier that is located in their region.
Suppliers' Commodity Codes Enter a supplier's commodity code to create a cross-reference between your commodity and that of the supplier.You generally enter suppliers' commodity codes only if you are using the Direct Connect feature. After you set upthe relationship between your commodity and the supplier's commodity code, the supplier's website can pass thecommodity code to the Shopping Cart application so that the system can cross-reference this code and then use theinternal commodity as the default value for commodity on the requisition line. The system stores supplier commoditycode cross-reference information in the F40530 table.
Note: You must set up a supplier and branch/plant relationship before attaching a supplier's commodity code to acommodity.
G/L Account Number Enter a G/L account number commodity relationship if users at your organization most often enter an account numberinstead of a commodity on the requisition line. When the user enters an account number, the system searches theF40551 table for a related commodity for that account number. When searching for a commodity relationship, thesystem uses this hierarchy:
1. The system first searches the F40551 table to locate a related commodity for the business unit, object account,and subsidiary that the user entered.
2. If unsuccessful, the system then searches for a relationship for the object account and subsidiary that the userentered.
3. If unsuccessful, the system then searches for a relationship for the object account that the user entered.When the system locates a commodity, it populates the Commodity field on the Requisition Entry form.
The system stores general ledger account number relationship information in the F40551 table.
Understanding the Populate F4311 Commodity/UNSPSC Program If you create the commodity structure after you have already entered requisitions and purchase orders into the system,run the Populate F4311 Commodity/UNSPSC program (R43910) to attach commodities and UNSPSC codes to existingtransactions. Based on data selection that you specify, the system reviews existing records in the F4311 table andattempts to find a commodity and UNSPSC code to assign to the lines. For stock lines, the system uses the item numberto find a commodity relationship using the F40540 table. If the system does not find a commodity, the system assignsthe Unknown commodity. For account-based lines (services), the system uses the account number to search for a
44

JD Edwards EnterpriseOne ApplicationsRequisition Self Service Implementation Guide
Chapter 4Setting Up the Commodity Structure
commodity relationship using the F40551 table. After the system finds a commodity for a line, it searches for a UNSPSCrelationship for the commodity, by using the F40510 table.
Note: This program overwrites any existing values in the Commodity and UNSPSC Code fields, including blank andUnknown. Therefore, you should be certain that the data selection that you enter does not include requisition linesfor which you do not want the values updated.
If you decide that the commodity structure provides too much or too little detail on spend information, you can changethe commodity structure and run the Populate F4311 Commodity/UNSPSC program to update existing transactions withthe new commodities and UNSPSC codes.
Forms Used to Set Up the Commodity Structure
Form Name Form ID Navigation Usage
Set up CommodityStructure
W40500B
Commodity Structure(2/G43E31), CommodityStructure
Add base commodityinformation. Move a commodityfrom one tree node toanother.
Edit Item Relationship
W40500A
Select Edit on theItem tab of the Set upCommodity Structureform.
Enter an item numberfor the commodity.
Edit UNSPSC Code
W40500F
Select Edit on theUNSPSC tab of theSet up CommodityStructure form.
Enter a default UNSPSCcode for the commodity.
Edit SupplierRelationship
W40500D
Select Edit on theSupplier tab of theSet up CommodityStructure form.
Enter a valid suppliernumber for thecommodity.
Edit SupplierCommodity CodeRelationship
W40500E
Select Edit on theSupplier CommodityCode tab of the Set upCommodity Structureform.
Enter a supplier'scommodity code.
Edit G/L AccountRelationship
W40500H
Select Edit on the G/L Account tab of theSet up CommodityStructure form.
Enter a general ledgeraccount number for thecommodity code.
Confirm Delete
W40500G
Select Cut Tree Node onthe Set up CommodityStructure form.
Delete a node from thestructure.
45

JD Edwards EnterpriseOne ApplicationsRequisition Self Service Implementation Guide
Chapter 4Setting Up the Commodity Structure
Form Name Form ID Navigation Usage
Set up UNSPSC CodeAnd Commodity CodeRelationship
W40510A
Commodity Structure 2/(G43E31), UNSPSC andCommodity
Set up a relationship fora UNSPSC code and acommodity.
G/L Account andCommodity Code
W40551A
Commodity Structure(2/G43E31), G/L Account andCommodity
Set up a relationship fora general ledger accountand a commodity.
Search Branch Plant
W40521A
Supplier Direct Connectmenu (3/G43E31), SetupSupplier Information Select a supplier onthe Work With Supplierform and then selectCommodity Structurefrom the Row menu.
Search for a branch/plant associated withthe supplier. Click Set up SupplierBranch Plant. Click Set up SupplierCommodity Codes.
Set Up SupplierCommodity Codes
W40520A
Select Set Up SupplierCommodity Codes onthe Search Branch Plantform.
Set up a cross-referencebetween a supplier'scommodity codesand your commoditystructure.
Work With CommodityRelationships
W40243A
UNSPSC Definition(G43A412), UNSPSC toAccount Relationship
Review existingrelationships.
CommodityRelationship Revisions
W40243B
Click Add on the WorkWith CommodityRelationships form.
Set up a UNSPSCrelationship for anaccount number, ifyou do not want toset up the commoditystructure.
Adding A Commodity Access the Set up Commodity Structure form.
46

JD Edwards EnterpriseOne ApplicationsRequisition Self Service Implementation Guide
Chapter 4Setting Up the Commodity Structure
47

JD Edwards EnterpriseOne ApplicationsRequisition Self Service Implementation Guide
Chapter 4Setting Up the Commodity Structure
Commodity
Enter a commodity. The system uses the value that you specify when arranging the commodities in the structure inalphabetical order.
Commodity Description
Enter a description for the commodity. The system displays the value that you specify when displaying the commodityin the tree structure.
Commodity Category
Enter a value that specifies whether the commodity is a product, service, or both. This value determines on which tabthe commodity appears in the commodity structure. Values are: Both, Product, and Service.
Note: You should select Both for any commodities that have both product and service commodities subordinate tothem. If you do not select Both, the system does not display any subordinate commodities that have a category that isdifferent from that of the parent commodity.
Buyer Number
Enter the address book number of the buyer responsible for this commodity. The system uses this value for alerts onspecial requests and in the Requisition Expeditor program (P43E060). If you enter a stock item, the system uses thebuyer number from the F4102 table as the default value.
Line Type
Enter a line type for the commodity. This code controls how the system processes lines on a transaction. When youenter a requisition, the system uses the following hierarchy when searching for a line type to use as the default:
a. Use the line type defined in the item location record for the item.b. Use the line type defined in the item/branch record for the item.c. Use the line type defined in the item master for the item.d. Use the line type for the commodity.e. Use the line type specified in the processing options for the Requisition Entry Business Function
Application program (P43E0001) for services and products.f. Use the line type specified in the data dictionary. The default value for LNTY is S and the default value for
RLNTY is N.If you enter a stock item, the system uses the line type from the Item Branch or the Item Master table as the defaultvalue.
G/L Class Code
Enter the code that the system uses in conjunction with the document type to obtain an account number from theappropriate automatic accounting instruction (AAI). The system uses the value that you specify only if you enter a non-stock item (an item that is not in the item master) or service. If you enter a stock item, the system uses the G/L classcode from the item master as the default value.
When you enter requisitions, the system uses this hierarchy when determining which G/L class code to use:
a. If you enter an item number, the system uses the G/L class code from the item branch.b. If the item branch does not have a G/L class code, the system uses the G/L class code on the item
master.c. If you have not entered an item number, but have entered a commodity, the system uses the G/L class
code for the commodity.d. If the G/L class code for the commodity is blank, the system uses the line type on the commodity and
retrieves the G/L class code from the line type constants.
48

JD Edwards EnterpriseOne ApplicationsRequisition Self Service Implementation Guide
Chapter 4Setting Up the Commodity Structure
e. If the commodity on the requisition is Unknown, the system uses the line type specified in theprocessing options for the Requisition Entry Business Function Application program, as the line type forthe Unknown commodity is blank.
Using the line type specified in the processing options, the system retrieves the G/L class code from theline type constants.
f. If the Line Type processing option is blank, the system uses the data dictionary default values for linetype (value for the LNTY field is S and the value for RLNTY is N) and retrieves the G/L class code from theline type constants.
Note:
If you are using a line type with an inventory interface, the system determines which AAI to use as follows:
If the inventory interface is set to Y or C, the system uses the 4310 AAI.
If set to B, the system uses the 4315 AAI.
If set to A, the system uses the 4318 AAI.
Entering an Item Number Access the Edit Item Relationship form.
Item Number
Enter a value in this field if you want to filter on a particular item. For example, enter 42* if you want to view all itemsbeginning with the number 42.
2nd Item Number
Enter the item number with which you want to associate the commodity. If you entered a commodity or UNSPSC codefor an item in the F4102 table, these values appear when you inquire on the item. Each item can only be associatedwith one commodity. If you change the item on this form, the system only uses the new item on new transactions. Thesystem does not update existing transactions with the new item for the commodity.
Entering a UNSPSC Code Access the Edit UNSPSC Code form.
Primary
Select this option if you have related more than one UNSPSC code to a commodity. This option designates a primaryUNSPSC code for the system to use as a default value for the requisition.
UNSPSC Code
Enter a UNSPSC code if you want to filter on a particular UNSPSC code for the field in the header.
For the field in the detail, enter a UNSPSC code if you want to add a new commodity relationship. When you enter acommodity during requisition entry, the system uses this UNSPSC code as the default value.
49

JD Edwards EnterpriseOne ApplicationsRequisition Self Service Implementation Guide
Chapter 4Setting Up the Commodity Structure
Note: If you receive an error stating that the transaction cannot be committed, you must first turn on journaling forF40510 and F40520, and then retry.
UNSPSC Code Description
Enter a UNSPSC code description if you want to filter on a particular UNSPSC description for the field in the header.
For the field in the detail, the system uses the description associated with the UNSPSC code in the F40241 table.
Note: If user's language preference is set and an alternate description for the UNSPSC code is defined in the user'spreferred language, then the system displays the alternate description in the UNSPSC Alternate Description field.
Setting Up UNSPSC Code and Commodity Code Relationships Access the Set up UNSPSC Code And Commodity Code Relationship form.
UNSPSC Code
Enter the UNSPSC code for which you group commodity codes. If the language preference is set for the user, youcan search and select for only the UNSPSC code, which has an alternate description specified in the user's preferredlanguage.
Commodity Code
Enter the commodity code to group under a UNSPSC code.
Note: When you select the UNSPSC code, the system displays the description that corresponds to it in the UNSPSCCode Description field.
Entering a Supplier Relationship for the Commodity Access the Edit Supplier Relationship form.
Supplier Number
Enter the address book number of the supplier or subcontractor that you want to associate with the commodity.
Branch Plant
Enter the branch/plant for the supplier.
Entering a Supplier's Commodity Code Access the Edit Supplier Commodity Code Relationship form.
Supplier Commodity Code
50
JD Edwards EnterpriseOne ApplicationsRequisition Self Service Implementation Guide
Chapter 4Setting Up the Commodity Structure
Enter the commodity code defined by the supplier. You obtain this information from the supplier, usually when youreceive the information necessary for Direct Connect.
Supplier Commodity Code Description
Enter the description for the supplier's commodity code. You obtain this information from the supplier, usually whenyou receive the information necessary for Direct Connect.
Entering a G/L Account Number Access the Edit G/L Account Relationship form.
Branch Plant
Enter the branch/plant number of the account for which you want to set up a relationship for the commodity. This fieldis optional.
Object Account
Enter the object of the account number for which you want to set up a relationship for the commodity. This field isrequired.
Subsidiary
Enter the subsidiary of the account number for which you want to set up a relationship for the commodity. This field isoptional.
Setting Up a UNSPSC Code for an Account Number Access the Commodity Relationship Revisions form.
Business Unit
Enter the business unit of the account number for which you want to set up a UNSPSC code relationship.
Object Account
Enter the object account of the account number for which you want to set up a UNSPSC code relationship.
Subsidiary
Enter the subsidiary of the account number for which you want to set up a UNSPSC code relationship
UNSPSC Code
Select a valid UNSPSC code to relate to the general ledger account number that you specified.
Note: If user's language preference is set and an alternate description for the UNSPSC code is defined in the user'spreferred language, then the system displays the alternate description in the UNSPSC Alternate Description field ofthe Work With Commodity Relationships form (W40243A).
51

JD Edwards EnterpriseOne ApplicationsRequisition Self Service Implementation Guide
Chapter 4Setting Up the Commodity Structure
Running the Populate F4311 Commodity/UNSPSC Program Select Adv/Tech Operations (G43E31), Populate F4311 Commodity/UNSPSC.
Setting Up the UNSPSC Code Descriptions This section provides an overview of the UNSPSC code description definition and discusses how to:
• Define the UNSPSC code descriptions.
• Define alternate descriptions for UNSPSC Codes.
Understanding the UNSPSC Code Description Definition UNSPSC provides a universal standard that you must use to classify products and services efficiently and accurately.UNSPSC is a classification code, not a product code. That is, UNSPSC stores a code for a specific category of productsinstead of storing a code for each product. Products and services are classified based on common functions, purposes,or tasks. To avoid creating a duplicate classification of commodity under a UNSPSC code, you must consider thesefactors:
• A commodity can have many uses.
• A commodity can have many variations.
• A commodity can have many names.
The classification is based on the dominant use of the commodity in the global marketplace. The level of dominancemay vary over time by country, region, or industry. Therefore, UNSPSC codes must be described in the language of theuser. For example, a buyer in China can define a commodity code, classify it under a UNSPSC code, and describe theclassification in the local language, which is Mandarin. This description can be easily understood by users using thesame UNSPSC code for classifying their commodity code in future.
To enable global users to work with the UNSPSC codes, the JD Edwards EnterpriseOne system is modified to supportthis code in various languages. The system now stores and displays the description of the code in your preferredlanguage.
Note: You set up your preferred language in the User Profile Revisions program (P0092).
Use the UNSPSC codes to identify a category of products. The classification of products and services is based oncommon functions, purposes, or tasks. You can download a complete list of UNSPSC codes from the UNSPSC website(www.UNSPSC.com). When you download the codes, the system stores them in the UNSPSC Commodity Code table(F40241). You can change the descriptions associated with the codes using the UNSPSC Commodity Code Definitionprogram (P40241).
Use the UNSPSC Code Alternate Description program (P40241D) to enter a description in the user's preferred language.You access the UNSPSC Code Alternate Description program from an option on the Row menu in the UNSPSCCommodity Code Definition program. You can search for the UNSPSC code based on the language in which you needto define the alternate descriptions. It is also possible to define alternate descriptions for multiple UNSPSC codes in theselected language at one time rather than defining alternate description for each UNSPSC codes one after another. The
52

JD Edwards EnterpriseOne ApplicationsRequisition Self Service Implementation Guide
Chapter 4Setting Up the Commodity Structure
system displays the descriptions in the user's preferred language in the applications that use the UNSPSC code. Theapplications are:
• UNSPSC to Account Relationship (P40243)
• Commodity Structure (P40500)
• UNSPSC and Commodity (P40510)
• Enter Purchase Orders (P4310)
• Item Master (P4101)
• Non Stock Item Master (P4101N)
Forms Used to Define the UNSPSC Code Description
Form Name Form ID Navigation Usage
Work With UNSPSCCommodity Codes
W40241A
UNSPSC Definition(G43A412), UNSPSCDefinition.
Review and change thedescription of UNSPSCcodes.
UNSPSC CommodityCode Revisions
W40241B
Click Add on theWork With UNSPSCCommodity Codes form.
Add a new descriptionfor the UNSPSC code.
Work With UNSPSCCode AlternateDescription
W40241DA
Enter P40241D in thefast path.
Enter alternatedescriptions for theUNSPSC codes inthe user's preferredlanguage.
UNSPSC Code AlternateDescription
W40241DB
On the Work WithUNSPSC CommodityCodes form, select aUNSPSC code and thenselect UNSPSC Alt Descfrom the Row menu.
Enter UNSPSCdescriptions in theuser's preferredlanguage.
Defining UNSPSC Code Descriptions Access the Work With UNSPSC Commodity Codes form.
UNSPSC Code
Enter the UNSPSC code. You can add or change the description associated with the code.
UNSPSC Code Description
Enter the description for the UNSPSC code. You can define alternate descriptions for this code by selecting UNSPSC AltDesc from the Row menu.
53
JD Edwards EnterpriseOne ApplicationsRequisition Self Service Implementation Guide
Chapter 4Setting Up the Commodity Structure
Defining Alternate Descriptions for UNSPSC Code Access UNSPSC Code Alternate Description form.
Language Preference
Enter the user defined code (01/LP) that specifies the language to use on forms and printed reports. Before you specifya language, a code for that language must exist at either the system level or in your user preferences.
UNSPSC Code
Enter the unique UNSPSC code for which you need to define alternate description.
UNSPSC Alternate Description
Enter the alternate description for the UNSPSC code in the user's preferred language.
54

JD Edwards EnterpriseOne ApplicationsRequisition Self Service Implementation Guide
Chapter 5Setting Up Requisition Approval Workflow
5 Setting Up Requisition Approval Workflow
Understanding Requisition Approval Workflow Setup Using the Approval Authority Constants program (P43E094) in conjunction with the Approval Authority program(P43E09A), you can set up approval authority at varying levels of detail to meet the needs of your organization. Forexample, you can attach each employee to an approver or distribution list, or you can attach entire employee groups toapprovers or distribution lists.
You first set up the Approval Authority constants; which determine the level at which the system should check for aspecified approver or distribution list. After you set up the constants, you set up approval authority, which specifies theapprover or distribution lists for each of the levels that you set up in the constants.
This diagram illustrates the workflow approval setup:
55

JD Edwards EnterpriseOne ApplicationsRequisition Self Service Implementation Guide
Chapter 5Setting Up Requisition Approval Workflow
After you set up workflow approval, the system sends messages to required approvers using either the Work Center, anemail address, or both. You specify in the Address Book system to which location the system sends a message.
See "Adding Electronic Address Information to Who's Who Records" in the JD Edwards EnterpriseOne ApplicationsAddress Book Implementation Guide .
Note: This chapter discusses the setup for approval workflow for only the Requisition Self Service system. If you wantto use approval for the purchase orders created by this system, you must also set up approval in the Procurementsystem.
56

JD Edwards EnterpriseOne ApplicationsRequisition Self Service Implementation Guide
Chapter 5Setting Up Requisition Approval Workflow
See "Processing Approvals" in the JD Edwards EnterpriseOne Applications Procurement Management ImplementationGuide .
Escalation for Requisition Approval Workflow After setting up the Approval Authority constants and approval authority, you can set up escalation for requisitionworkflow approval. Escalations enable the system to send messages to additional approvers if the original approverdoes not process the requisition in a specified time frame. Setting up escalations is optional.
See JD Edwards EnterpriseOne Tools Workflow Tools Guide .
Setting Up Approval Authority Constants This section provides an overview of approval authority constants and discusses how to set up approval authorityconstants.
Understanding Approval Authority Constants Approval authority constants determine the level at which the system checks for an approver or distribution list for therequisition. Using the Approval Authority Constants program (P43E094), you can specify that the system checks for anapprover or distribution list at the order level, the commodity line level, or both. At the order level, you can select any orall of these levels:
• Employee
The system verifies whether the employee on the requisition is attached to a specific approver or distributionlist.
• Employee Group/Business Unit
The system verifies whether there is an approver or distribution list attached to the employee group andbusiness unit to which the employee on the requisition belongs.
• Employee Group
The system verifies whether there is an approver or distribution list attached to just the employee group towhich the employee on the requisition belongs.
• Business Unit
The system verifies whether there is an approver or distribution list attached to the business unit to which theemployee on the requisition belongs.
At the line level, you can select either or both of the following:
• Commodity/Business Unit
The system verifies whether there is an approver or distribution list attached to the commodity and thebusiness unit on the requisition line.
• Commodity
57

JD Edwards EnterpriseOne ApplicationsRequisition Self Service Implementation Guide
Chapter 5Setting Up Requisition Approval Workflow
The system verifies whether there is an approver or distribution list attached to the commodity on therequisition line.
When the user clicks Submit on a requisition, the system accesses the Approval Authority constants. The systemchecks each option, in order, to see if they are selected, and then checks for an approver or distribution list for onlythose options that are selected. For example, the system first checks the Employee option. If the Employee option isnot selected, the system then checks the Employee Group/Business Unit option. However, if the Employee option isselected, the system checks the approval authority to see if the employee on the requisition is attached to a specificapprover or distribution list, and then sends the approval message to the specified approver or distribution list. If theemployee on the requisition is not attached to a specific approver, the system then checks the next selected constant.
The system checks the approval authority constants at the order level first, and then sends an approval message tothe approver or distribution list specified in the Approval Authority program. If the requisition is approved, the systemthen checks the constants at the line level to see if another approval message is required. For example, if an employeecreated a requisition for a new office chair, the requisition might require approval from a manager first, and then anadditional approval from the buyer for that particular commodity might also be required. If the approval messagegenerated at the order level is not approved, the system does not check the approval constants at the line level.
The system stores the approval authority constants in the F43E094 table.
Note: If an employee does not have a specific approver or distribution list and is not part of an employee group orbusiness unit that has one, the system automatically approves the requisition. Therefore, you should verify that allemployees needing requisition approval are attached to an approver or distribution list.
Form Used to Set Up Approval Authority Constants
Form Name Form ID Navigation Usage
Manage Constants
W43E094B
Workflow Approvals(1/G43E31), ApprovalAuthority Constants
Set up approvalauthority constants.
Setting Up Approval Authority Constants Access the Manage Constants form.
Active
Select the constant for the levels for which you want the system to check for approvers or distribution lists.
58

JD Edwards EnterpriseOne ApplicationsRequisition Self Service Implementation Guide
Chapter 5Setting Up Requisition Approval Workflow
Setting Up Approval Authority This section provides overviews of approval authority and employee groups and discusses how to:
• Set processing options for Approval Authority.
• Set up approval authority for a single approver.
• Set up approval authority for a distribution list.
Understanding Approval Authority You use the Approval Authority program to set up approvers or distribution lists for each level that you specified inthe Approval Authority constants. The system enables you to set up approvers and distribution lists for only the levelsthat you activated in the Approval Authority Constants program. If you do not activate any of the approval authorityconstants, the system generates an error when you access the Manage Distribution List form.
Manage Single Recipient The approval authority program contains a processing option, Form Display, that enables you to determine whetheryou assign single approvers or distribution lists to each level of authority. If you enter 1 in the processing option, thesystem displays the Manage Single Recipient form, and you can assign only single approvers to each level. You cannotassign distribution lists by using this form.
In addition to entering a single approver for the level of authority, you also enter an approval limit. This amountindicates the minimum amount for a requisition that requires approval. The system evaluates the amount that you enteras a greater-than or equal-to amount. Therefore, if you enter 100.00 USD as the approval limit, the system requiresapproval on all requisitions with an amount greater than or equal to 100.00 USD.
Manage Distribution List If you leave the Form Display processing option blank, the system displays the Manage Distribution List form and youcan assign only distribution lists to each level of authority. You cannot assign single approvers by using this form.
When you set up distribution lists, you set up the list of required approvers, and you also specify the threshold level andescalation information for each required approver. Depending on how you set up the threshold levels, you can requireapproval on all requisitions, or only those with a certain amount.
This diagram illustrates how the system would route approvals if you set up a distribution list so that approval isrequired on all requisitions, regardless of the amount:
59

JD Edwards EnterpriseOne ApplicationsRequisition Self Service Implementation Guide
Chapter 5Setting Up Requisition Approval Workflow
This diagram illustrates how the system would route approvals if you set up a distribution list so that approval isrequired, starting at a specified amount.
The Threshold field is a greater-than or equal-to field, meaning that the system requires approval for any requisitionsor requisition lines with amounts greater than or equal to the amount in the Threshold field. For example, if you enter100.00 in the Threshold field, any requisition lines of 100.00 or more must be approved.
Understanding Employee Groups You can set up employee groups to attach to approvers and distribution lists so that you don't have to enter approvalauthority for each individual employee. To set up employee groups, you first create the groups and add them to user-defined code (UDC) table 43E/AA. You must also create address book records, using a search type of M for eachgroup. After you have added the groups to UDC 43E/AA, you enter a group for each applicable employee by using theEmployee Group Approvals field on the Additional 1 tab of the Address Book Revisions form.
60

JD Edwards EnterpriseOne ApplicationsRequisition Self Service Implementation Guide
Chapter 5Setting Up Requisition Approval Workflow
See JD Edwards EnterpriseOne Tools Foundation Guide .
See "Entering Address Book Records" in the JD Edwards EnterpriseOne Applications Address Book ImplementationGuide .
Prerequisites Before you complete the tasks in this section:
Create address book records for distribution lists and for approvers that you want to include in distribution lists.
See "Entering Address Book Records" in the JD Edwards EnterpriseOne Applications Address Book ImplementationGuide .
Set up employee groups in UDC 43E/AA.
Add employees to employee groups.
See "Setting Up Parent, Child Relationships and Organizational Structures" in the JD Edwards EnterpriseOneApplications Address Book Implementation Guide .
Forms Used to Set Up Approval Authority
Form Name Form ID Navigation Usage
Manage Distribution List
W43E09AA
Workflow Approvals(G43E31), ApprovalAuthority
Set up approvers ordistribution lists foreach level for which youhave set up constants.
Address Parent/ChildRevisions
W0150A
Select Edit DistributionList on the ManageDistribution List form.
Set up distribution lists. Add or changethreshold and escalationinformation.
Manage Single Recipient
W43E09AB
Workflow Approvals(G43E31), ApprovalAuthority Select Manage SingleRecipient on theManage Distribution Listform.
Set up only approversfor each approvalauthority. You cannotassign distribution liststo approval authoritylevels by using thisform.
61

JD Edwards EnterpriseOne ApplicationsRequisition Self Service Implementation Guide
Chapter 5Setting Up Requisition Approval Workflow
Setting Processing Options for Approval Authority (P43E09A) These processing options specify default values for using the Approval Authority program.
1. Form Display
Specify whether the system displays the Distribution List field. Values are:
Blank: Displays the Manage Distribution List form. This form allows you to enter only distribution lists for each level ofauthority.
1: Displays the Manage Single Recipient form. This form allows you to enter only approvers for each level of authority.
2. Enter the Version
Enter the version of the Organizational Structure Revisions program (P0150) to use when entering revisions fordistribution lists. If you leave this processing option blank, the system uses version ZJDE0001.
Setting Up Approval Authority for a Single Approver Access the Manage Single Recipient form.
Select the appropriate level of authority for which you want to set up an approver, using the Select Approval Authorityfield.
Click this button after selecting the approval level authority to display the subform that is associated with the authoritylevel. Depending on the level selected, the system displays one or more of the fields described in this table.
Employee
Enter the address book number of the employee for which you want to set up an approver.
Approval Limit
Enter the minimum requisition amount that requires approval. This field is a greater-than or equal-to value.
Org Chart (organizational chart)
Select this option if you want the system to use an existing organizational chart to determine the approver for theemployee that you specify. If you select the Org Chart option, the organizational structure overrides any other approversetup that you create.
For the system to use this option, the employee must be included in a valid organizational structure in the AddressOrganization Structure Master table (F0150). The structure type must be ES, and the Authorization Required optionmust be selected for the structure. If you want to set up the organizational structure so that the system routes approvalsbased on monetary limits, you must set up threshold limits for employees under the supervisor's record.
See “Creating a Distribution List for Hierarchical Processing" in the JD Edwards EnterpriseOne Tools Workflow ToolsGuide .
Note: The F0150 table must be mapped to the same data source as the workflow tables.
62
JD Edwards EnterpriseOne ApplicationsRequisition Self Service Implementation Guide
Chapter 5Setting Up Requisition Approval Workflow
See JD Edwards EnterpriseOne Tools System Administration Guide .
Approver
Enter the address book number of the person to approve requisitions for the employee that you specified.
Employee Group
Enter the name of the group for which you want to attach an approver.
Business Unit
Enter the business unit for which you want to attach an approver. When you have selected Employee Group/BusinessUnit for approval authority, you must enter both an employee group and a business unit.
Commodity
Enter the commodity for which you want to attach an approver.
Setting Up Approval Authority for a Distribution List Access the Manage Distribution List form.
Click this button after selecting the approval level authority to display the subform that is associated with the authoritylevel. Depending on the level selected, the system displays one or more of the fields described in this table.
Employee
Enter the address book number of the employee for which you want to attach a distribution list.
Org Chart (organizational chart)
Select this option if you want the system to use an existing organizational chart to determine the approver for theemployee that you specify. If you select this option, the organizational structure overrides any other approver setup thatyou create.
For the system to use the Org Chart option, the employee must be included in a valid organizational structure in theAddress Organization Structure Master table (F0150). The structure type must be ES, and the Authorization Requiredoption must be selected for the structure. If you want to set up the organizational structure so that the system routesapprovals based on monetary limits, you must set up threshold limits for employees by updating the supervisor'srecord.
Note: The F0150 table must be mapped to the same data source as the workflow tables.
See JD Edwards EnterpriseOne Tools System Administration Guide .
Employee Group
Enter the name of the group for which you want to attach a distribution list. You must enter a valid group from UDC43E/AA.
Business Unit
Enter the business unit for which you want to attach a distribution list.
Commodity
63

JD Edwards EnterpriseOne ApplicationsRequisition Self Service Implementation Guide
Chapter 5Setting Up Requisition Approval Workflow
Enter the commodity for which you want to attach a distribution list.
Approver/Distribution List
Enter the address book number of the distribution list to approve requisitions for the employee.
Structure Type
Enter RSS. RSS is the default structure type for distribution lists for requisition approval.
Distribution List Click Edit Distribution List to add employees to the distribution list and to enter threshold and escalation information.
Address Number
Enter the address book number for each person in the distribution list.
Threshold Value
Enter the amount for which requisitions should require approval. This field is a greater-than or equal-to value.
Escalation Hours
Enter the number of hours that you want to elapse before the system escalates a requisition to the next approver in thedistribution list for approval.
Escalation Minutes
Enter the number of minutes that you want to elapse before the system escalates a requisition to the next approver inthe distribution list for approval.
Remark
Enter a remark to provide additional information for the threshold and escalation information.
Begin Eff Date (beginning effective date)
Enter the beginning date in a range of dates for which the threshold and escalation information is effective. The systemuses the current year specified in the F0010 table for company 00000 as the default year.
End Eff Date (ending effective date)
Enter the ending date in a range of dates for which the threshold and escalation information is effective. The systemuses the current year specified in the F0010 table for company 00000 as the default year.
Setting Up Escalation for the Workflow Process This chapter provides overviews of the workflow process for Requisition Self Service and escalation for workflowprocesses and discusses how to:
• Activate escalation for the APPROVEMSG Message task.
• Set up the To Recipient event rule.
• Set up the Cc Recipient event rule.
• Set up the Bcc Recipient event rule.
• Set up the Mailbox event rule.
64

JD Edwards EnterpriseOne ApplicationsRequisition Self Service Implementation Guide
Chapter 5Setting Up Requisition Approval Workflow
• Set up the Subject event rule.
• Set up the Text event rule.
• Set up the Shortcut event rule.
• Set up the Message event rule.
• Set up the Media Object Name and Media Object Key event rules.
• Validate the workflow.
Understanding the Workflow Process for Requisition Self Service Requisition Self Service uses the workflow process, K43E08, to monitor and process approvals for requisitions.Requisition Self Service is delivered with K43E08 activated. Use the version of K43E08 provided. If you want to createa new version, you must first deactivate the existing version. You must also replace the version name throughout thebusiness functions used by the workflow process.
Understanding Escalation for Workflow Processes When you install Requisition Self Service, the K43E08 workflow process is activated; however, the escalation feature isnot activated. The escalation feature allows for messages to be sent to additional approvers if the first and subsequentapprovers do not respond in a specified amount of time.
Note: In addition to the time frames specified for escalation for this workflow process, the jde.ini file also containsa setting for the amount of time before a message is escalated. The jde.ini setting controls escalations for all othersystems in JD Edwards EnterpriseOne. Therefore, you must consider how each system is using escalations and enterthe lowest time frame in the jde.ini. For example, if distribution lists for Payroll are set to escalate every three hours,but those in Requisition Self Service are set for every 30 minutes, you should set the jde.ini to escalate every 30minutes to ensure that requisition approvals are escalated in the appropriate time frame. You must also consider thefact that the setting in the jde.ini file always overrides the setting for the K43E08 workflow process. Therefore, thejde.ini setting should be aligned with the escalation settings in the distribution lists.
Use these guidelines when activating escalation for K43E08:
• If you do not initially activate escalation, you must delete any existing workflow messages before activatingescalation.You use the Purge Completed Processes button on the Workflow Design form to delete existing messages.See JD Edwards EnterpriseOne Tools Workflow Tools Guide
• If one version of K43E08 is activated and you create and activate the new version, the system does not processworkflow approvals correctly and generates errors.If you decide to create a new version of K43E08, you must first deactivate the existing version.
Activating Escalation for the APPROVEMSG Message Task Access Workflow Modeler.
1. Right-click the Message task, select Escalation, and then select Add and Attach.
65

JD Edwards EnterpriseOne ApplicationsRequisition Self Service Implementation Guide
Chapter 5Setting Up Requisition Approval Workflow
2. On the Escalation Rules form, complete these fields:
◦ Escalation Rule
Enter a unique name for the escalation rule.
◦ Description
Enter a description for the escalation rule.
Setting Up the To Recipient Event Rule Access Workflow Modeler.
This form appears after you highlight the To Recipient parameter and then select <Define Dynamic Recipient> fromthe available objects on the System Functions form.
1. In Workflow Modeler, right-click the Message task and then select Event Rules from the menu.2. On the System Functions form, highlight the To Recipient parameter and then select <Define Dynamic
Recipient> from the available objects.3. On the Define Recipient form, select WA szRecipient from the available objects for the Recipient Type field.4. Select WA mnPerson Responsible from the available objects for the Address Book Number field.5. Select WA mnContact Number from the available objects for the Contact Number field.6. Select WA szOrganization Type Structure from the available objects for the Structure Type field.7. Select WA szSMTPAddress from the available objects for the SMTP Address field.8. Click OK to return to the System Functions form.
Setting Up the Cc Recipient Event Rule Access the System Functions form.
To set up the Cc Recipient event rule:
1. On System Functions, select Cc Recipient from the Parameters form.2. From the available objects, select <None>.
Setting Up the Bcc Recipient Event Rule Access the System Functions form.
To set up the Bcc Recipient event rule:
1. On System Functions, select Bcc Recipient from the Parameters form.2. From the available objects, select <None>.
Setting Up the Mailbox Event Rule Access the System Functions form.
66

JD Edwards EnterpriseOne ApplicationsRequisition Self Service Implementation Guide
Chapter 5Setting Up Requisition Approval Workflow
To set up the Mailbox event rule:
1. On System Functions, select Mailbox from the Parameters form.2. From the available objects, select <Requisition Management>.
Setting Up the Subject Event Rule Access the System Functions form.
To set up the Subject event rule:
1. On System Functions, select Subject from the Parameters form.2. From the available objects, select <Blank>.
Setting Up the Text Event Rule Access the System Functions form.
To set up the Text event rule:
1. On System Functions, select Text from the Parameters form.2. From the available objects, select <Blank>.
Setting Up the Shortcut Event Rule Access the System Functions form.
This is the fourth form that appears after the System Functions form.
To set up the Shortcut event rule:
1. On System Functions, select Shortcut from the Parameters form.2. From the available objects, select <Define Active Message>.
The system displays the Work With Applications form.3. On Work With Applications, enter P43E82 in the QBE line above the Object Name field.4. Click the Find button.5. Select the object, P43E82.
The system displays the Work With Forms form.6. On Work With Forms, select W43E82A.
The system displays the Work With Versions form.7. On Work With Versions, select ZJDE0001.
The system displays the Form Interconnections form.8. On Form Interconnections, position the cursor on the szTaskAssignmentUnique data item.9. From the available objects, select SL Current Workflow Task.
10. Click the Dir field so that the arrow points in the direction of the data item column.11. Click the OK button to return to the System Functions form.
67

JD Edwards EnterpriseOne ApplicationsRequisition Self Service Implementation Guide
Chapter 5Setting Up Requisition Approval Workflow
Setting Up the Message Event Rule Access the System Functions form.
This form appears after the System Functions form.
To set up the Message event rule:
1. On System Functions, highlight the Message parameter, and then select <Define Message> from the availableobjects.
The system displays the Text Substitution form.2. On Text Substitution, enter LM0024E in the Dictionary Item field.3. Click Find.4. From the available objects, select WA szCompanyKeyOrderNo.5. Click OK to return to the System Functions form.
Setting Up the Media Object Name and Media Object Key EventRules Access the System Functions form.
To set up the Media Object Name and Media Object Key event rules:
1. From the available objects, select <None> for the Media Object Name and Media Object Key fields.2. Click OK.
Validating the Workflow Access the System Functions form.
To validate the workflow:
1. Click OK to save the event rules.2. Click Save to return to the Workflow Design form.3. On Workflow Design, click the Validate Workflow button.
68

JD Edwards EnterpriseOne ApplicationsRequisition Self Service Implementation Guide
Chapter 6Setting Up Delegation Information
6 Setting Up Delegation Information
Understanding Delegation Entry Requisition Self Service enables users to easily create requisitions for goods and services that they need. To provideusers with greater flexibility during the requisition process, you can set up delegates who have the authority to enter,inquire on, reverse, and receive requisitions on behalf of other users.
Using the Requisition Delegation program (P43E280), users can search for, review, add, edit, copy, or delete delegationrecords. Delegation records are stored in the Delegation Master table (F43E280).
CAUTION: The Requisition Delegation program enables authorized users to enter delegation records for anyonein the organization. Oracle recommends that you use application security when implementing this program, andthat you grant access to only those users who are authorized to set up delegation records for all members of theorganization. Typically, authorized users of this program are in the purchasing and/or procurement departments ofan organization, and all requests for delegation setup are sent to these authorized users. For more information aboutsetting up application security, see the JD Edwards EnterpriseOne Tools Security Administration Guide
The Requisition Delegation program enables you to:
• Allow a delegated requestor to perform requisition entry task on behalf of the original requestor.
• Allow approvals for the requisition order that is created by the delegated requestor to be routed to the originalrequestor's approval route.
• Review previously active delegation records.
For example, if Ray Allen (original requestor) wants to give requisition entry authority to his administrative assistant,Dominique Abbott (delegated requestor), Ray (or another authorized user of the program) can create delegation recordsfor each program for which he wants to grant Dominique delegation rights. The following graphic illustrates what thedelegation records for this scenario might look like.
Ray, or a delegation rights administrator, could also give other employees delegation authority by entering additionalrecords on the Add Delegation form.
You can specify delegation rights for these programs:
• Requisition Entry (P43E10)
When you set up delegation records for this program, delegated requestors have the authority to enterrequisitions for the original requestor.
• Requisition Inquiry (P43E15)
When you set up delegation records for this program, delegated requestors have the authority to inquire onand edit requisitions that are associated with the original requestor.
• Desktop Receiving (P43E20)
When you set up delegation records for this program, delegated requestors have the authority to receiverequisitions for the original requestor.
• Requisition Receipt Inquiry (P43E214)
69

JD Edwards EnterpriseOne ApplicationsRequisition Self Service Implementation Guide
Chapter 6Setting Up Delegation Information
When you set up delegation records for this program, delegated requestors have the authority to inquire onand reverse receipts that are associated with the original requestor.
When you set up delegation records, you can enter an Effective Date and an Expiration Date. The Expiration Date fieldis optional. If left blank, the record remains active until a date is entered and that date is reached. Conversely, you mustenter a value in the Effective Date field. You cannot enter a past date in this field. Additionally, you cannot enter recordswith overlapping date ranges.
When editing a delegation record, the Effective Date and Expiration Date fields are enabled. However, if the value in theEffective Date field is a past date, the user will receive an error if they try and change the date.
After you enter delegation records, you must then set the processing options for these programs, to specify whetherdelegation functionality is enabled:
• Requisition Entry (P43E10)See Setting Processing Options for Requisition Entry (P43E10).
• Requisition Inquiry (P43E15)See Setting Processing Options for Requisition Inquiry (P43E15).
• Desktop Receiving (P43E20)See Setting Processing Options for Desktop Receiving (P43E20).
• Requisition Receipt Inquiry (P43E214)See Setting Processing Options for Requisition Receipt Inquiry (P43E214).
Note: All of the programs listed above have processing options that allow you to enable or disable the Requested Byfield on the associated application. Using these processing options, you can enable the Requested By field for entrywithout using delegation records. If you choose to set the processing options in this way, users of these programs canenter any valid address book number in the Requested By field. Oracle recommends giving these processing optionsserious consideration to ensure that users in your organization have the appropriate delegation authority duringrequisition processing.
After delegation records have been created, and the processing options to enable delegation functionality have beenset, delegated requestors can then enter, edit, and inquire on requisitions for other users, and receive, inquire on, andreverse receipts for other users.
Note:• Entering Requisitions.
• Reviewing and Approving Requisitions.
• Receiving Requisitions and Reversing Receipts.
Entering and Maintaining Delegation Records This section lists the forms used to enter and maintain delegation records, and discusses how to enter delegationrecords.
70

JD Edwards EnterpriseOne ApplicationsRequisition Self Service Implementation Guide
Chapter 6Setting Up Delegation Information
Forms Used to Enter and Maintain Delegation Records
Form Name Form ID Navigation Usage
Work With RequisitionDelegation
W43E280A
From the Setup menu(G43E41), selectDelegation Definition.
Use this form to accessforms to add newdelegation records, and to search for, copy, and delete existingdelegation records.
Add Delegation
W43E280B
From the Work WithRequisition Delegationform, click Add.
Use this form to enterdelegate records.
Entering Delegation Records Access the Add Delegation form.
Original Requestor
Enter the address book number of the person who is delegating their RSS rights to another user. For example, if amanager wants his administrative assistant to be able to enter, review, and receive requisitions for her, enter the addressbook number of the manager in this field.
Delegated Requestor
Enter the address book number of the person to whom you are giving rights to. For example, if you want anadministrative assistant to be able to enter requisitions on behalf of her manager, enter the address book number of theadministrative assistant in this field.
Delegated Application
Select the application for which you are designating rights. For example, if you want to give the delegated requestorrights to enter requisitions on behalf of the original requestor, select P43E10 from the list of program IDs. Valuesinclude:
◦ P43E10
◦ P43E15
◦ P43E20
◦ P43E214
Effective Date
Enter the date on which the record becomes active. The date must be on or after the system date. You cannot enter apast date in this field.
Expiration Date
Enter a date through which the delegation record is active. This field is optional. If you leave this field blank, the systemassumes that there is no expiration date for the delegation record.
71
JD Edwards EnterpriseOne ApplicationsRequisition Self Service Implementation Guide
Chapter 6Setting Up Delegation Information
Delegation Active
Use this option to specify whether the delegation record is active. By default, the system selects this option when youcreate a delegation record. You can deselect this option to specify that a record is no longer active.
Editing and Deactivating Delegation Records 1. Access the Work With Requisition Delegation form.2. Search for and select the record that you want to edit or deactivate, and then click Select.3. On the Edit Delegation form, you can update one or more of these fields:
◦ Effective Date: You can edit this field only if the date is on or after the current system date. If the date inthis field is a past date, you can not update this field.
◦ Expiration Date: You can change this date only if the field contains a future date, or is blank.
◦ Delegation Active: You can select or deselect this option, as long as the Expiration Date for the record hasnot yet been reached.
4. Click OK to save your changes.
Copying Delegation Records 1. Access the Work With Requisition Delegation form.2. Search for and select the records that you want to copy, and then click Copy.
You can select multiple records at once.3. On the Copy Delegation form, update the information so that you do not create duplicate records, and then
click OK.
For example, you might want to create four different delegation records, one for each program. You couldcreate the first record, and then copy that record three times, changing the value in the Delegating Programfield for each new record.
Deleting Delegation Records 1. Access the Work With Requisition Delegation form.2. Search for and select the records that you want to delete, and then click Delete.
You can select multiple records at once. Also, you cannot delete records that have expired, or have a past dateor the current system date in the Effective Date field.
72

JD Edwards EnterpriseOne ApplicationsRequisition Self Service Implementation Guide
Chapter 7Entering Requisitions
7 Entering Requisitions
Understanding Requisition Entry The Requisition Self Service system provides two programs for entering requisitions:
• Shopping Cart (P43E25)
• Requisition Entry (P43E10)
The Shopping Cart program is intended to be used by novice users to create requisitions, either for stock items or foritems such as office supplies, using Direct Connect. The Shopping Cart program contains only a few fields that the usermust enter; and the system provides default information for most other fields, based on setup.
The Requisition Entry program is designed for more frequent users, such as buyers, and provides more fields andadditional options for the requisition, such as flagging the item as a high priority or as a special request. The RequisitionEntry program is also designed to allow direct entry of account information.
Requisition Entry With Delegation Using delegation functionality, you can enable users in your organization to enter requisitions on behalf of others.For example, you might enable an administrative assistant to enter requisitions on behalf of the managers in hisdepartment.
Using the processing options of the P43E10, you can specify whether your organization allows delegation. You canchoose to:
• Disable the Requested By field: When you select this option, the system disables the Requested By field on theRequisition Entry form. The user cannot enter requisitions on behalf of another employee.
• Enable the Requested By field: When you select this option, the system enables the Requested By field on theRequisition Entry form, and allows users to enter any valid address book number in this field. When you use thisoption, users can enter requisitions on behalf of any employee in the organization. Oracle recommends usingthis option only if you use application security to restrict the users who are able to enter requisitions using thisapplication.
• Enable the Requested By field with delegation: When you select this option, users can enter requisitions forthemselves, and on behalf of those employees for whom they have been given delegation rights.
If you choose to enable the Requested By field with delegation, you must set up delegation records using theRequisition Delegation program (P43E280). These records include information about the dates during which thedelegation is active, and the users for whom a delegated requestor has the authority to enter requisitions during thattime.
Note: Delegation functionality is not available on the Shopping Cart program.
Note: Setting Up Delegation Information.
73

JD Edwards EnterpriseOne ApplicationsRequisition Self Service Implementation Guide
Chapter 7Entering Requisitions
Using Direct Connect Both the Shopping Cart and the Requisition Entry program use the Direct Connect feature. When you have set up yoursystem and suppliers to use Direct Connect, users can connect from within the requisition entry programs directly tosuppliers' websites to search for items. After users select items and check out from the site, the system returns the userto the requisition entry program and populates the requisition cart with the items that they selected. The user does notactually purchase items on the site; they simply select items to be added to the requisition cart. Therefore, the users'srequest can be processed within the Requisition Self Service system and is subject to proper approvals and editingbefore the items are actually purchased.
Users can add items from multiple websites to the same requisition cart. As users select items from suppliers' websites,the system adds records to the Shopping Cart table (F43E20) and the Cross Reference table (F43E15). When the usersubmits the requisition, the system removes the records from the F43E20 table and creates records in these tables:
• F43E01 (Requisition Header)
• F43E11 (Requisition Detail)
See Setting Up Direct Connect and Purchase Order Dispatch.
Budget Checking and Commitments Using the processing options for the Requisition Entry Business Function Application (P43E0001), you can specify thatyou want to perform budget checking once the user submits a requisition. If you activate budget checking, the systemuses the same budget checking process as in the Procurement system.
If any line on the requisition does not pass budget checking, the entire requisition remains at a status of Composing,while the individual lines that did not pass are assigned a status of Over Budget. If the entire requisition does not pass,the system leaves the status of the requisition header at Composing. You can perform the following actions once therequisition and the individual lines are at this status:
• Request an additional budget amount.
• Change the account number on the requisition to one that has the necessary budget available.
• Change the version of the Requisition Entry Business Function Application (P43E0001) in the Requisition Entryprogram to one that does not have budget checking activated and submit the requisition again.
See Understanding the Requisition Entry Business Function Application.
If the requisition passes the budget, the system can create a commitment, both financial and inventory, if the systemhas been set up for commitments. The process for commitments also works the same as in the Procurement system
Note:• "Working with Budgets" in the JD Edwards EnterpriseOne Applications Procurement Management
Implementation Guide .
• "Setting Up Purchase Order Commitments" in the JD Edwards EnterpriseOne Applications ProcurementManagement Implementation Guide .
74

JD Edwards EnterpriseOne ApplicationsRequisition Self Service Implementation Guide
Chapter 7Entering Requisitions
Common Elements Used in This Section Domestic Cost
Review and/or enter a cost per unit in this field. This field displays the amount in the domestic currency.
Foreign Cost
Review the amount in this field. This field is populated only if you enter a foreign supplier.
Extended Amount
Enter the amount, which is the number of units multiplied by the unit price. You can also use this field to enter a lumpsum amount. If you enter a lump sum amount, do not enter a quantity. The system always displays the extendedamount in the domestic currency so that this amount appears in the same currency as that in the Total Amount field.
Item Number
Enter a number for the inventory item. The system provides three separate item numbers plus an extensivecross-reference capability to other item numbers (see data item XRT) to accommodate substitute item numbers,replacements, bar codes, customer numbers, supplier numbers, and so forth. The item numbers are:
◦ Item Number (short): An eight-digit, computer-assigned item number.
◦ 2nd Item Number: The 25-digit, free-form, user-defined alphanumeric item number.
◦ 3rd Item Number: Another 25-digit, free-form, user-defined alphanumeric item number.
Item Description
Verify the description associated with the item. The system uses the item description from the Item Master table (F4101).Enter a different description if you do not want to use the value from the F4101 table.
Quantity
Enter the number of units that you want to order. If you entered a lump sum in the Extended Amount field, do not entera quantity.
Supplier Number
Enter the address book number of the supplier.
Supplier Description
Enter the associated description of the supplier number.
UM (unit of measure)
Enter the user-defined code (00/UM) that indicates the quantity in which to express an inventory item, for example: CS(case) or BX (box).
Unit Price
Enter the unit cost of one item, as purchased from the supplier, excluding freight, taxes, discounts, and other factorsthat might modify the actual unit cost that you record when you receive the item. The system always displays thisamount in the domestic currency.
75
JD Edwards EnterpriseOne ApplicationsRequisition Self Service Implementation Guide
Chapter 7Entering Requisitions
Understanding the Requisition Entry Business FunctionApplication The Shopping Cart and Requisition Entry programs both use a business function application to provide additionalinformation for processing requisitions. The Requisition Entry Business Function Application (P43E0001) provides:
• Default values for fields such as Order Type, Line Type, Product, and Service Line Type.
• Processing information, such as whether the system should generate Post Before Cut Off (PBCO) and Post AfterCut Off (PACO) warnings, and whether the system should validate the business unit on a requisition.
• Options for budget checking, such as budget ledger type and level of detail.
When you set up the processing options for a version of the Requisition Entry Business Function Application, youspecify the version number in the processing options for the Shopping Cart and Requisition Entry programs. To accessthe processing options for the Requisition Entry Business Function Application, you use the Interactive Versionsprogram.
See JD Edwards EnterpriseOne Tools Foundation Guide .
Entering a Requisition Using the Shopping Cart Program
This section provides an overview of the Shopping Cart program and discusses how to:
• Set processing options for Requisition Entry Business Function Application.
• Set processing options for the Shopping Cart program.
• Enter requisitions using the Shopping Cart program.
Understanding the Shopping Cart Program The Shopping Cart program (P43E25) provides a simple, efficient means of entering requisitions. The ShoppingCart program displays the commodity structure so that a user can select a particular item or service by selecting acommodity. The program also contains a Product tab, which lists items from the Item Master table, and a Supplier tab,which lists preferred suppliers for a particular item. Users can search for valid products and services using standardsearching capability, which includes the use of wild cards.
Additionally, if any of the suppliers are set up for Direct Connect, the Supplier tab provides links to those suppliers'websites.
After you connect to a supplier's site, you select items directly on their site. When you return to the Shopping Cartprogram, the system loads the items that you selected into the shopping cart. You can then either click Submit, or youcan connect to another supplier's site to continue shopping. Within one session, the system loads items from multiplesuppliers into the same shopping cart. You can also add stock items to the shopping cart.
When you click Submit, the system displays the requisition number that it created and assigns the requisition a statusof Submitted.If you have activated budget checking in the processing options for the Requisition Entry Business
76

JD Edwards EnterpriseOne ApplicationsRequisition Self Service Implementation Guide
Chapter 7Entering Requisitions
Function Application (P43E0001), the system performs budget checking after you click Submit. If errors occur duringthe requisition creation process, the system displays the Requisition Creation form and highlights the error, enablingyou to correct the error and resubmit the requisition.
If your internet session times out before you click Submit, the system saves the contents of the shopping cart so thatyou do not have to recreate it.
Prerequisites Before you complete the tasks in this section:
Activate the Budget Checking processing option for the Requisition Entry Business Function Application program if youwant to use budget checking.
See "Working with Budgets" in the JD Edwards EnterpriseOne Applications Procurement Management ImplementationGuide .
Set up the system for commitment tracking if you want to create commitments.
See "Setting Up Purchase Order Commitments" in the JD Edwards EnterpriseOne Applications ProcurementManagement Implementation Guide .
Forms Used to Enter Requisitions by Using the Shopping CartProgram
Form Name Form ID Navigation Usage
Shopping Cart - OrderItems
W43E25D
Daily Processing(G43E11), Shopping Cart
Create a requisitionby using a stock item, or use Direct Connectto shop for items onsuppliers' websites.
RequisitionConfirmation
W43E25C
Click Checkout on theShopping Cart - OrderItems form.
Confirm that you wantto create the requisition.
Direct Connect SetupMessage
W43E23C
Click a supplier numberon the Shopping Cart -Order Items form.
This message notifiesyou that Direct Connectinformation has notbeen set up for asupplier, so you cannotconnect to the supplier'swebsite.
77

JD Edwards EnterpriseOne ApplicationsRequisition Self Service Implementation Guide
Chapter 7Entering Requisitions
Setting Processing Options for Requisition Entry BusinessFunction Application (P43E0001) These processing options specify information for the system to use when processing requisitions.
Defaults 1. Order Type
Specify the default document type for the system to assign to requisitions. Enter a valid document type from user-defined code 00/DT.
2. Service Line Type
Specify the default service line type for the system to assign to requisitions. This value specifies how the systemprocesses lines on a transaction and is used only when you enter a requisition for a service. The line type affects thesystems with which the transaction interfaces (General Ledger, Job Cost, Accounts Payable, Accounts Receivable, andInventory Management). The line type also specifies the conditions for including a line on reports and in calculations.The line type specified must have an inventory interface of A or N and the Edit Item Master for Non Stock option mustbe cleared in the Line Type Constants program (P40205).
3. Product Line Type
Specify the default line type for the system to assign to requisitions. This value specifies how the system processeslines on a transaction and is used only when you enter a requisition for a product. The line type affects the systemswith which the transaction interfaces (General Ledger, Job Cost, Accounts Payable, Accounts Receivable, and InventoryManagement). The line type also specifies the conditions for including a line on reports and in calculations. If you entera valid item from the Item Master table, the system uses the default line type from the Item Branch or the Item Mastertable.
4. Unit of Measure
Specify the default unit of measure for the system to assign to the requisition if you leave the Unit of Measure fieldblank. If you enter a valid item from the Item Master table on the requisition, the system uses the value that is specifiedin the Transaction Unit of Measure processing option for the unit of measure.
5. Transaction Unit of Measure
Specify where the system locates transaction unit of measure information to use as the default during requisition entry.Values are:
1: Uses the primary unit of measure from the F4101 table as the default for the transaction unit of measure.
Blank: Uses the purchasing unit of measure from the F4101 table. The transaction unit of measure directly relates to thenumber that you have entered in the Quantity field on the Requisition Entry form.
6. Account Description
Specify which account description to use as the default for requisitions. Values are:
1: Uses the business unit and the subsidiary (cost code header) as the default account description. Typically, the accountis a nonposting header account. The object account is not used when the system retrieves the account description.
Blank: Uses the business unit, object, and subsidiary as the default account description.
78
JD Edwards EnterpriseOne ApplicationsRequisition Self Service Implementation Guide
Chapter 7Entering Requisitions
Processing 1. Business Unit Validation
Specify how the system validates the branch/plant. Values are:
1: Validates the branch/plant against the F4101 table. If you are performing stock purchasing, enter 1 for this processingoption. When you enter 1, the system uses the address book number in the F4101 table as the default for the ship toaddress book number.
Blank: Validates the branch/plant against the F0006 table. Typically, you use this processing option when you areperforming services expenditure purchasing. When you leave this processing option blank, the ship to address booknumber appears by default from the address book number in the F0006 table. You can access the F0006 table throughthe Revise Single Business Unit program.
2. PBCO Warning
Specify whether the system should generate a PBCO warning. The PBCO warning indicates that the G/L date for therequisition is in a period prior to the current period for the company specified on the requisition. However, if the AllowPBCO Postings option in the General Accounting Constants program is not selected, the system generates an errorregardless of the value in this processing option. Values are:
1: Do not issue the PBCO warning. Typically, you use this value when you are performing services or expenditure-typepurchasing.
Blank: Compares the G/L date on the requisition to the current period in the F0010 table for the company and businessunit specified on the requisition. If the G/L date for the requisition is in a period prior to the current period for thecompany, the system generates a PBCO warning. The warning ensures that you are not recording purchases in a priorgeneral accounting period.
3. PACO Warning
Specify whether the system should generate a PACO warning. The PACO warning indicates that the G/L date for therequisition is in a period that falls after the current or next period. Values are:
1: Do not generate.
Blank: Generate. The system compares the G/L date on the requisition to the current period in the F0010 table for thecompany on the requisition. If the G/L date falls outside of the current or next period, the system generates a PACOwarning.
4. Edit Supplier Master
Specify whether the system validates the supplier number against the F0401 table. Values are:
1: Do not validate.
Blank: Validate.
5. Financial AAIs
Specify whether the system should use financial automatic accounting instructions (AAIs) or distribution AAIs. Valuesare:
1: Use distribution AAIs.
Blank: Use financial AAIs, specifically the CD, CT, CR AAIs. If you leave this processing option blank, the system verifiesthat the account number on the requisition falls within the allowable account ranges specified in the CD, CT, and CRAAIs.
79

JD Edwards EnterpriseOne ApplicationsRequisition Self Service Implementation Guide
Chapter 7Entering Requisitions
6. Project/Job Validation
Specify how the system should validate the header business unit and the account business unit on the detail line. Valuesare:
Blank: Allows the account business unit on the detail line to be different from the header business unit.
1: Generates a warning if the account business unit on the detail line and the header business unit are different.
2: Generates an error if the account business unit on the detail line and the header business unit are different.
3: Issues an error if the job (account business unit on the detail line) does not belong to the project (header businessunit). A project number is assigned to a job in the Business Unit Master (F0006). If you enter 3 in this processing option,the system verifies that the Project Number field in the F0006 table for the business unit in the detail line has the samenumber as the header business unit on the requisition.
Note: A business unit description may be displayed as Branch/Plant, Project, Job, or Business Unit.
Budget 1. Activate Budget Checking
Specify whether to activate budget checking. If you activate budget checking, the system compares the actual amount(amount listed in the AA ledger) plus commitments (amount listed in the PA ledger) to the budget ledger specified inthe Budget Ledger Type processing option to determine if the amount for a detail line is over budget. If a detail lineexceeds the budget for an account, the system prevents the requisition from being submitted for approval and changesthe status of the line to Over Budget. Values are:
Blank: Do not activate.
1: Activate.
2. Budget Ledger Type
Specify the ledger type for the system to use when performing budget checking. Enter a valid ledger type from theLedger Type Master Setup program (P0025). If you specify a budget ledger type, the system performs budget checkingonly for that budget ledger type. If you leave this processing option blank, the system performs budget checking on allbudget ledger types specified in the Ledger Type Master Setup program (P0025).
3. Level of Detail
Specify the value (3 through 9) for the level of detail that the system uses during the budget checking process. If youleave this processing option blank, the system uses a default value of 9.
You can use this processing option with the processing option for level of detail accumulation.
4. Budget Total Method
Specify the method for the system to use to calculate the budget. If you leave this processing option blank, the systemuses the job cost budget calculation method. Values are:
1: Uses the job cost budget calculation method (original budget + period amounts for the current year + prior yearpostings).
2: Uses the standard financial budget calculation method (sum of period amounts for the current year).
3: Uses the standard financial spread calculation method (original budget + period amounts for the current year).
5. Period Accumulation Method
80

JD Edwards EnterpriseOne ApplicationsRequisition Self Service Implementation Guide
Chapter 7Entering Requisitions
Specify the time period that the system uses when accumulating the budget. Values are:
Blank: Use the total annual budget to accumulate the budget.
1: Accumulate the budget through the current period.
6. Tolerance Percentage
Specify the percentage by which the detail line amount can exceed the budget before the system places the order onbudget hold.
7. Budget Accumulation Level of Detail
Specify whether the system uses the Level of Detail processing option value (under the Budgeting tab) to accumulatebudget amounts. Values are:
Blank: The system determines the budget amount from the account entered in the purchase order detail line.
1: The system determines the budget checking account from the values in the purchase order detail account and theLevel of Detail processing option. The system then calculates the budget amount by accumulating the budget amountsof all the child accounts of the budget checking account.
8. Exclude Subledger/Type
Specify whether the system excludes the subledger and subledger type when validating the budget information. Valuesare:
Blank: The system includes only those accounts that have a subledger and a subledger type specified in the purchaseorder detail.
1: The system does not consider the subledger and subledger type. All of the accounts (with and without a subledgerand a subledger type) are considered for budget checking.
9. Job Cost Account Sequence
Specify the job cost account sequence that the system uses for budgeting. Values are:
Blank: Uses the standard account sequence (for example, cost center, object, and subsidiary).
1: Uses the job cost sequence (for example, job, cost code, and cost type).
Setting Processing Options for Shopping Cart (P43E25) The processing options for the Shopping Cart program provide the system with default versions to use when accessingadditional programs from within the Shopping Cart program.
Versions 1. Enter version for P43E15 Requisition Inquiry program
Specify a version of the Requisition Inquiry program for the system to use. The system accesses the Requisition Inquiryprogram when encountering problems with processing the requisition. For example, if budget checking is activated andthe requisition does not meet the budget requirements, the user can correct the requisition by using the RequisitionInquiry program.
2. Enter version for Requisition Entry business function
81

JD Edwards EnterpriseOne ApplicationsRequisition Self Service Implementation Guide
Chapter 7Entering Requisitions
Specify a version of the Requisition Entry Business Function application (P43E0001) for the system to use whenprocessing requisitions entered using the Direct Connect Shopping Cart program. The Requisition Entry BusinessFunction application provides the system with default information for requisitions and with additional information forprocessing requisitions.
Entering Requisitions Using the Shopping Cart Program Access the Shopping Cart - Order Items form.
82

JD Edwards EnterpriseOne ApplicationsRequisition Self Service Implementation Guide
Chapter 7Entering Requisitions
83
JD Edwards EnterpriseOne ApplicationsRequisition Self Service Implementation Guide
Chapter 7Entering Requisitions
Quantity
Enter the quantity for the items in the shopping cart. You can change this value after selecting items from the supplier'swebsite. If you are entering a requisition for which a lump sum is used, for example, a service, do not enter a quantity.
Entering Requisitions by Using the Requisition EntryProgram This section provides overviews of the Requisition Entry program, G/L class code assignment, and discusses how to:
• Set processing options for Requisition Entry.
• Enter requisitions by using Requisition Entry.
• Enter requisition details.
Understanding the Requisition Entry Program Whereas the Shopping Cart program provides a simple and efficient means for users to order items such as officesupplies, the Requisition Entry program (P43E10) provides the ability to enter different types of requisitions in a varietyof ways, including:
• Requisition entry using a G/L account number.
If you know the G/L account number for the requisition, you can enter the account number instead ofchoosing a commodity. If the account number is associated with a commodity, the system retrieves thatcommodity and populates the Commodity field for you. Use the processing options for the Requisition Entryprogram to specify how the system displays the account number field. You can select from three formats:
◦ Standard account number, displayed as one field.
◦ Job cost sequence, displayed as three fields.
◦ Standard account number, displayed as three separate fields.
• Requisition entry without details.
You can enter the header information for a requisition, such as the description, but enter the details for therequisition at a later time. The requisition remains at a status of Composing until you complete the details andthen submit it for approvals. The system does not save any line default information that you enter; you mustreenter it when you complete the entire requisition.
Note: For this type of requisition, the system creates a temporary detail record in the F43E11 table that youcannot view using the Requisition Entry program. After you add requisition detail lines, the system removesthe temporary detail record from the F43E11 table.
• Requisition with multiple suppliers.
You can select items from multiple suppliers on the same requisition. When you use the Requisition Expeditorprogram (P43E060) or the Batch Requisition Consolidation program (R43E060) to create purchase orders forrequisitions with multiple suppliers, the system creates as many purchase orders by supplier as necessary.
• Requisition entry for a high priority item.
84
JD Edwards EnterpriseOne ApplicationsRequisition Self Service Implementation Guide
Chapter 7Entering Requisitions
If you need to receive an item quickly, you can select the High Priority option for your requisition. Buyers canfilter their search in the Requisition Expeditor program (P43E060) to process such requisitions before others.
• Requisitions for special requests.
If you need to request an item for which you do not have a supplier or item number, click the Special Requestoption, which directs the system to disable editing for the requisition. For a special request requisition, thesystem requires only a description; and the requisition remains at a status of Composing until you resolve andsubmit the requisition for approvals. If you enter a commodity for the requisition, the system then alerts thebuyer attached to that commodity. If you do not enter a commodity, the system alerts the buyer attached tothe Unknown commodity, if one is attached. If the Unknown commodity is not attached to a buyer, the systemdoes not route the requisition for approval.
After researching special requests, use the Edit Details form to resolve the requisition by entering the necessaryinformation, and then clear the Special Request option. When you clear the Special Request option, the systemperforms editing on all fields, so you must enter all necessary information before you clear the option. You canthen submit the requisition for approvals.
• Requisitions with multiple account distribution.
Using the Edit Details form, you can distribute the amount for the requisition to several accounts. For example,you can distribute the expense for window cleaning to all affected departments. You can enter multiple accountdistributions only for requisitions with a line type that has an inventory interface of A or B.
• Requisitions using delegation functionality.
You can set up users to have requisition entry rights for other users. For example, you might set up anadministrative assistant with delegation rights for the managers that he supports. Using delegation authority,the administrative assistant can enter requisitions on behalf of the managers, and the system uses themanagers' information, rather than the information of the administrative assistant, for approval routing.
• Requisitions with foreign suppliers.
Although you can also use the Shopping Cart program to enter requisitions using a foreign supplier, theRequisition Entry program enables users to view both the domestic and foreign currency for the requisitionduring the entry process when using a foreign supplier.
As in the Shopping Cart program, the Requisition Entry program displays the commodity structure, from which youcan select the commodity for the item or service that you are requesting. If the commodity is attached to an item, thesystem displays a list of items from which to select in the Choose Item or Supplier subform. If a commodity is attachedto specific suppliers, the system displays the suppliers in the same subform. You can also enter the commodity directlyinto the field, and the system displays the associated items or suppliers in the Choose Item or Supplier subform. Youcan also use the search feature on the Requisition Entry form to search for the commodity you want to select. Users cansearch for valid products and services using standard searching capability, which includes the use of wild cards.
Using processing options, you can also specify whether users are able to use the UNKNOWN commodity when enteringa requisition. You can also search for a commodity using standard wildcard search functionality.
The Requisition Entry program enables you to connect to suppliers' websites to shop for items using Direct Connect.You connect to suppliers' websites by clicking the supplier number. After you click a supplier number, the systempopulates the Supplier Number field for you and connects you to their website.
You might have suppliers attached to a commodity that are not set up for Direct Connect. If you click a supplier thatis not set up for Direct Connect; the system displays a message notifying you that it has not been set up, and thenpopulates the Supplier Number field for you.
85

JD Edwards EnterpriseOne ApplicationsRequisition Self Service Implementation Guide
Chapter 7Entering Requisitions
The Requisition Entry program enables you to add additional text for the requisition for situations where you need toprovide justification or an explanation for the requisition. Click the Justification field to enter free-form text for therequisition. When the requisition is submitted for approval, the approver can view the text at the header and detail levelof the requisition.
After you have determined which items you want to request, click the Add to Cart field. The system adds the itemsto the Requisition Cart subform. When the items are in the requisition cart, you can use the Edit Details form to addor change information for the details lines, and then click Submit. When you click Submit, the system displays therequisition number and assigns the requisition a status of Submitted. If errors occur during the requisition submitprocess, the system highlights the error(s), enabling you to correct the requisition and submit it again.
If you have activated budget checking in the processing options for the Requisition Entry Business Function Application,the system performs budget checking.
You can click Save for Later if you are not ready to submit the requisition. The system stores the requisition in the F43E11table. However, the system does not perform budget checking or send the requisition through workflow approvals. Therequisition remains at a Composing status.
Understanding G/L Class Code Assignment Depending on the information that you enter on the requisition, the system obtains the G/L class code from differentsources. The system uses this hierarchy when obtaining the G/L class code:
1. If you enter an item number, the system uses the G/L class code from the item location record.2. If the item location record does not have a G/L class code, the system uses the G/L class code from the item
branch record.3. If the item branch record does not have a G/L class code, the system uses the G/L class code on the item
master record.4. If you have not entered an item number, but have entered a commodity, the system uses the G/L class code for
the commodity.5. If the G/L class code for the commodity is blank, the system uses the line type on the commodity and retrieves
the G/L class code from the line type constants.6. If the commodity on the requisition is UNKNOWN, the system uses the line type specified in the processing
options for the Requisition Entry Business Function Application, as the line type for the UNKNOWN commodityis blank. You can change this line type, if necessary.
Using the line type specified in the processing options, the system retrieves the G/L class code from the linetype constants.
7. If the Line Type processing option is blank, the system uses the data dictionary default values for line type(value for the LNTY field is S and the value for RLNTY is N) and retrieves the G/L class code from the line typeconstants.
Note:
The Line Type field is editable, and can be changed by the user. If you are using a line type with an inventory interface,the system determines which AAI to use as follows:
If the inventory interface is set to Y or C, the system uses the 4310 AAI.
If set to B, the system uses the 4315 AAI.
If set to A, the system uses the 4318 AAI.
86

JD Edwards EnterpriseOne ApplicationsRequisition Self Service Implementation Guide
Chapter 7Entering Requisitions
Prerequisites Before completing the tasks in this section:
Set up the commodity structure.
See Setting Up the Commodity Structure.
Set up workflow approvals.
See Setting Up Requisition Approval Workflow.
Set the processing options for the Requisition Entry Business Function Application program.
See Setting Processing Options for Requisition Entry Business Function Application (P43E0001).
Activate the Budget Checking processing option for the Requisition Entry Business Function Application program if youwant to use budget checking.
See "Working with Budgets" in the JD Edwards EnterpriseOne Applications Procurement Management ImplementationGuide .
Set up the system for commitment tracking if you want to create commitments.
See "Setting Up Purchase Order Commitments" in the JD Edwards EnterpriseOne Applications ProcurementManagement Implementation Guide .
Set up Direct Connect information.
See Setting Up Direct Connect and Purchase Order Dispatch.
Set up delegation information, if necessary.
See Setting Up Delegation Information
Forms Used to Enter Requisitions by Using the Requisition EntryProgram
Form Name Form ID Navigation Usage
Add Requisitions
W43E10A
Daily Processing(G43E11), RequisitionEntry
Add requisitions.
Delete Confirmation
W43E10B
Click Delete on the AddRequisitions form.
Confirm that you wantto delete the requisition.
Delete LineConfirmation
W43E10D
Click Delete on theRequisition Cartsubform.
Confirm that you wantto delete a line from therequisition.
87

JD Edwards EnterpriseOne ApplicationsRequisition Self Service Implementation Guide
Chapter 7Entering Requisitions
Form Name Form ID Navigation Usage
Direct Connect SetupMessage
W43E23C
Click a supplier on theAdd Requisition form.
Confirm that DirectConnect is not set up forthe supplier.
Edit Requisition Details
W43E10
Click Edit on the AddRequisition form.
Resolve special requestrequisitions Add details, such asaccount distribution, toa requisition
Setting Processing Options for Requisition Entry (P43E10) These processing options provide additional information for the system to use when processing requisitions.
Display 1. Suppress Canceled Lines
Specify whether the system should suppress canceled lines. Values are:
Blank: Do not suppress.
1: Suppress.
Note: If you create requisition lines and then cancel the lines in the same session of the Requisition Entry program,the system does not create records for them in the Requisition Detail table; therefore, such records do not appearupon re-inquiry.
2. Account Display
Specify how the system displays the Account Number field on the Requisition Entry form. Values are:
Blank: Displays the standard account number, third account number, account ID, or the speed code, depending on thefirst character that the user enters. You specify in the General Accounting constants the correlation between specialcharacters and account number formats.
1: Displays the job cost sequence. For example, the system displays job, cost code, and cost type, and displays the fieldsseparately.
2: Displays the standard sequence. For example, the system displays business unit, object account, and subsidiary, anddisplays the fields separately.
3. Cost Protection
Specify whether the system protects the product cost fields. Values are:
1: Disables the product cost fields.
Blank: Enables the product cost fields.
4. Business Unit Display
88

JD Edwards EnterpriseOne ApplicationsRequisition Self Service Implementation Guide
Chapter 7Entering Requisitions
Specify the description that the system displays for the Business Unit field. Depending on the value that you specify, thesystem displays applicable field descriptions for other fields. Values are:
Blank: Displays the description, Branch/Plant, and displays field descriptions applicable to Procurement.
1: Displays the description, Job, and displays field descriptions applicable to Subcontracts.
2: Displays the description, Project, and displays field descriptions applicable to Subcontracts.
3: Displays the description, Business Unit, and displays field descriptions applicable to Procurement.
5. Display account fields on Products tab
Use this processing option to specify whether the system displays and enables account fields on the Products tab.Values are:
Blank: Do not display or enable.
1: Display and enable.
6. Enable Requested By
Use this processing option to specify whether the user can update the value in the Requested By field. By default, thesystem populates the field with the signed-on user's address book number. Values include:
Blank: Disable the Requested By field.
1: Enable Requested By field, and allow the user to change the value to any address book number.
2: Enable Requested By field with delegation, and allow the user to change the value to only the address book numbersfor whom they have been assigned delegation rights.
7. Enable Business Unit
Use this option to specify whether a user can update the value in the business unit field.
The system populates this field with the business unit of the signed-on user. Therefore, if you allow users to enterrequisitions on behalf of other employees, you should enable this field so that the delegated user can enter the businessunit of the original requestor.
Values include:
Blank: Disable Business Unit field.
1: Enable Business Unit field.
8. Disable Unknown Commodity
Use this option to specify whether the commodity Unknown can be used when entering a requisition. Values include:
Blank: Allow the use of the Unknown commodity during requisition entry.
1: Do not allow the use of the Unknown commodity during requisition entry. If you select this option, the user mustenter a valid commodity code.
Versions 1. P43E0001 Version
Specify the version of the P43E0001 that the system uses.
89
JD Edwards EnterpriseOne ApplicationsRequisition Self Service Implementation Guide
Chapter 7Entering Requisitions
Entering Requisitions by Using Requisition Entry Access the Add Requisition form.
Select the Requisition tab to enter a title for the requisition and to enter justification information. Complete these fields:
Requested By
The system populates this field with the user ID of the person signed on to the system. Whether this field is editable isdetermined by the processing option settings for the P43E10.
If this field is enabled, users can search for valid address book numbers to enter in this field. If the field is enabled withdelegation, users can only select from employees who have been set up with delegation rights. If the field has beenenabled without delegation, users can enter any valid address book number here.
Job, Branch/Plant, Project, and Business Unit
Displays one of these field descriptions depending on the value you specify in the Business Unit Display processingoption for the Requisition Entry program. This field represents the business unit for an account number, and the systemretrieves the default value for this field. Whether this field is editable is also determined by the processing options.
To determine the default value for this field, the system first checks to see if a default location has been set up in theDefault Location & Printers program (P400951) for the user ID in the Requested By field. If one is set up, the system usesthis value as the default. If one is not set up, the system then checks the Business Unit field on the Address Book masterrecord for the user ID in the Requested By field and uses that value.
Title
Enter a title for the requisition. You can enter up to 30 alphanumeric characters.
Justification
Click this field if you want to enter additional information for the requisition.
Select the Line Defaults tab to enter information that the system uses as default values for requisition lines. Thesystem does not store these values at the header level for the requisition, as the values are used only to provide defaultinformation for requisition lines. Complete these fields:
Order Date
Enter a date if you want to use a date other than the default, which is the current date.
Requested Date
Enter a date by which you want to receive the item. You must enter a date that falls after the value specified in the OrderDate field.
Ship To
Enter the address number of the location to which you want to ship the order. The address book provides default valuesfor customer address, including street, city, state, zip code, and country. The system uses the ship to address specifiedin the Branch Plant Constants as the default value. If the ship to address in the Branch Plant Constants is blank, thesystem uses the value specified in the Business Unit Master table (F0006).
Select the Products tab to enter information for a product requisition, and then complete these fields:
Commodity
90
JD Edwards EnterpriseOne ApplicationsRequisition Self Service Implementation Guide
Chapter 7Entering Requisitions
Enter a commodity or allow the system to populate this field with the value you select from the commodity structure.You can also use the search feature to find a commodity.
Item Number
Enter the item number for the item you are ordering. If you selected an item from the Choose Item or Supplier subform,the system populates this field with the value you selected. If you enter a value in the Commodity field and thecommodity has an item associated with it, you can override the item associated with that commodity.
Description
Overrides the description for the item you selected.
UoM (Unit of Measure)
Enter a user-defined code (00/UM) that indicates the quantity in which to express an inventory item, for example, CS(case) or BX (box).
Supplier
Enter the supplier number for the product. If you selected a supplier from the Choose Item or Supplier subform, thesystem populates this field with the value you selected.
Quantity
Enter the quantity for the item that you are ordering. If you are entering a lump sum order, do not enter a quantity.
G/L Date
Enter a date to identify the financial period to which the transaction is to be posted. The system uses this date whenperforming budget checking and when creating commitments.
Line Type
Review, and if necessary, update the value in this field to specify the line type of the item you are entering. The systempopulates this field with the default line type. However, you can change this value if necessary.
Domestic Cost
Review and/or enter a cost per unit in this field. This field displays the amount in the domestic currency.
Foreign Cost
Review the amount in this field. This field is populated only if you enter a foreign supplier.
Special Request
Select this option if this item does not have an item or account number associated with it. If you select this option, thesystem disables all editing for the requisition and alerts the buyer. The system does not submit the requisition, and alllines within the requisition are not processed.
High Priority
Select this option to indicate that the buyer should expedite the requisition. The buyer can search on requisitions withthis option selected when reviewing requisitions in the Requisition Inquiry program (P43E15).
Account Number, Job, Cost Code, Cost Type, Business Unit, Object Account, and Subsidiary
Displays one of three formats for the account number depending on the value you specified in the Account Displayprocessing option for the Requisition Entry program. Whether this field is enabled for editing is also controlled by theprocessing options.
91

JD Edwards EnterpriseOne ApplicationsRequisition Self Service Implementation Guide
Chapter 7Entering Requisitions
Enter the account number associated with the product. If you enter an account associated with a commodity, the systempopulates the Commodity field with the related commodity.
Sub
Enter a code that represents a subset of an object account. Subsidiary accounts include detailed records of theaccounting activity for an object account.
Subledger Type
Enter a user defined code (00/ST) that is used with the Subledger field to identify the subledger type and how thesystem performs subledger editing. Values include:
A: Alphanumeric field, do not edit.
N: Numeric field, right justify and zero fill.
C: Alphanumeric field, right justify and blank fill.
Subledger
Enter a code that identifies a detailed, auxiliary account within a general ledger account. A subledger can be anequipment item number or an address book number. If you enter a subledger, you must also specify the subledger type.
Select the Services tab to enter information for a services request, and complete these fields:
Extended Price
Enter the extended price, which is the number of units multiplied by the unit price.
Supplier
Enter the number of the supplier for the service. If you selected a supplier from the Choose Item or Supplier subform,the system populates this field with the value you selected.
Account Number, Job, Cost Code, Cost Type, Business Unit, Object Account, and Subsidiary
Displays one of three formats for the account number depending on the value you specified in the Account Displayprocessing option for the Requisition Entry program.
Enter the account number associated with the service. If you enter an account associated with a commodity, the systempopulates the Commodity field with the related commodity.
G/L Date
Enter a date to identify the financial period to which the transaction is to be posted. The system uses this date whenperforming budget checking and when creating commitments.
Sub
Enter a code that represents a subset of an object account. Subsidiary accounts include detailed records of theaccounting activity for an object account.
Subledger Type
Enter a user defined code (00/ST) that is used with the Subledger field to identify the subledger type and how thesystem performs subledger editing. Values include:
A: Alphanumeric field, do not edit.
N: Numeric field, right justify and zero fill.
92

JD Edwards EnterpriseOne ApplicationsRequisition Self Service Implementation Guide
Chapter 7Entering Requisitions
C: Alphanumeric field, right justify and blank fill.
Subledger
Enter a code that identifies a detailed, auxiliary account within a general ledger account. A subledger can be anequipment item number or an address book number. If you enter a subledger, you must also specify the subledger type.
Click Add to Cart to populate the Requisition Cart subform.
Quantity Ordered
Use this field to change the quantity for individual requisition lines.
Tr. UoM (transaction unit of measure)
Use this field to change the unit of measure for individual requisition lines.
Extended Amount
Use this field to change the extended amount for individual requisition lines. Enter the amount, which is the numberof units multiplied by the unit price. You can also use this field to enter a lump sum amount. If you enter a lump sumamount, do not enter a quantity. The system always displays the extended amount in the domestic currency.
Entering Requisition Details Access the Edit Requisition Details form.
Description 2
Enter additional text for the description of the requisition.
Supplier Item Number
If you selected items from a supplier using Direct Connect, the system populates this field with the item number fromthe supplier's system. You can change the value in this field.
Buyer Number
Enter or change the buyer number.
Ship To
Enter or change the ship to address.
Order Date
Use this field to change the order date.
Requested Date
Use this field to change the requested date.
High Priority
Select or clear this option.
Special Request
93

JD Edwards EnterpriseOne ApplicationsRequisition Self Service Implementation Guide
Chapter 7Entering Requisitions
Select or clear this option. If you are resolving a special request, you must enter values in all other required fields beforeclearing this option. The system performs editing on all fields after you clear this option, so if you have not enteredrequired values, the system generates errors.
Domestic Amount
This field displays the amount of the requisition in domestic currency. If the supplier is a domestic supplier, this field iseditable when updating a requisition. If the supplier is a foreign supplier, you can edit the Foreign Amount field, and thesystem calculates the value in the Domestic Amount field.
Foreign Amount
This field displays the amount of the requisition in foreign currency, and appears only if the supplier is a foreignsupplier. This field is editable when updating a requisition.
Distributed by
Select a method by which to distribute the amount. Based on the value you select, the system enables and disables therelated fields. Values are:
Percentage: Distribute the amount for the requisition by percentage.
Fixed Amount: Distribute the amount for the requisition by dollar amount.
Fixed Quantity: Distribute the amount for the requisition by units. The system does not enable this field if you entereda lump sum amount.
Click this button after you select a method for distribution to display the related fields.
Account Number
Enter the account number to which you want to distribute an amount.
G/L Date
Enter the G/L date for the accounting period to which you want to post the journal entry.
Distributed Percentage
Enter a distribution percentage for the account specified.
Distributed Amount
Enter a distribution amount for the account specified.
Distributed Quantity
Enter a distribution quantity for the account specified.
Save and Close
Click this button when you are finished entering detail for your requisition. You must then click the Submit button on theAdd Requisition form. If you do not submit the requisition, the system does not save your requisition in the F43E11 table.
94

JD Edwards EnterpriseOne ApplicationsRequisition Self Service Implementation Guide
Chapter 8Reviewing and Approving Requisitions
8 Reviewing and Approving Requisitions
Reviewing and Revising Requisitions This section provides an overview of reviewing and revising requisitions and discusses how to:
• Set processing options for Requisition Inquiry.
• Review requisitions.
• Review requisition details.
Understanding Reviewing and Revising Requisitions The Requisition Inquiry program (P43E15) enables managers, buyers, and originators to review requisitions anddetermine what actions must be taken for them. If you need to revise a requisition, select it and click Edit on the ViewRequisition form, and the system displays the Add Requisition form for you to revise fields as necessary. If you makeany changes to the requisition, you must resubmit the requisition for approvals.
The default view for the View Requisitions form is to display all requisitions for the originator signed on to the system.However, you can narrow the search by entering a buyer number, commodity, supplier, or a range of requisition dates.Within a search, you can also filter by:
• Requisitions at a status of Composing, Submitted, Completed, or Canceled.
• Requisitions that have been flagged as special requests.
• Requisition lines with errors.
• Requisitions that have been flagged as high priority.
You can also review the approval route for requisitions.
Additionally, if you have been given delegation rights to review requisitions of other employees, you can use thisprogram to review the requisitions of appropriate original requestors.
Note: Setting Up Delegation Information
Mobile Enterprise Applications for Requisition Self Service The following mobile applications are available for reviewing and approving RSS orders on a mobile device:
• RSS Approvals Smartphone Application
• RSS Approvals Tablet Application
These applications require system administrator configuration before they are available to individual users. Contact yoursystem administrator to determine whether these applications are available for use.
95

JD Edwards EnterpriseOne ApplicationsRequisition Self Service Implementation Guide
Chapter 8Reviewing and Approving Requisitions
Additionally, see the following topics in the JD Edwards EnterpriseOne Applications Mobile Enterprise ApplicationsImplementation Guide :
• Requisition Self Service Mobile Applications
Forms Used to Review and Revise Requisitions
Form Name Form ID Navigation Usage
View Requisitions
W43E15A
Daily Processing(G43E11), RequisitionInquiry
Review Requisitions
Requisition
W43E82B
Click Review Approvalson the View Requisitionsform.
Review the approvalroute for requisitions.
View Requisition Details
W43E10C
Click the value in theDescription field inthe Requisition Detailsubform on the ViewRequisitions form.
Review additionaldetails for therequisition, such asaccount distribution.
Add Requisition
W43E10A
Click Edit on the ViewRequisitions form.
Revise requisitions.
Setting Processing Options for Requisition Inquiry (P43E15) These processing options determine default processing information for viewing requisitions.
Defaults 1. Order Type
Specify an order type for the system to use as a default value for the Order Type field on the View Requisitions form.Enter a valid order type.
Display 1. Enable Requested By
Use this processing option to determine whether the user can update the value in the Requested By field, and if so,whether delegation authority is being used. Values include:
Blank: Disable the Requested By field.
1: Enable the Requested By Field. If you select this option, the signed on user can enter any valid address book numberin this field.
96

JD Edwards EnterpriseOne ApplicationsRequisition Self Service Implementation Guide
Chapter 8Reviewing and Approving Requisitions
2: Enable the Requested By field with Delegation: If you select this option, the signed-on user can enter only the addressbook numbers for whom he has delegation authority on this program. Valid address book numbers are displayed whenthe user clicks on the visual assist option next to the Requested By field.
2. Allow RSS Workflow Message to be Canceled.
Use this option to specify whether the Cancel Messag button is displayed on the form. Values include:
Blank: Hide Cancel Message button.
1: Show Cancel Message button.
Versions 1. Requisition Entry (P43E10)
Specify the version to use when accessing the Requisition Entry program from within Requisition Inquiry.
Reviewing Requisitions Access the View Requisitions form.
97

JD Edwards EnterpriseOne ApplicationsRequisition Self Service Implementation Guide
Chapter 8Reviewing and Approving Requisitions
98

JD Edwards EnterpriseOne ApplicationsRequisition Self Service Implementation Guide
Chapter 8Reviewing and Approving Requisitions
Reviewing Requisition Details Access the View Requisition Details form.
Approving and Rejecting Requisitions This section provides overview of approving and rejecting requisitions and approving over-budget requisitions anddiscusses how to:
• Set processing options for Approve Requisitions Over Budget (P43E070).
• Approve and reject requisitions.
• Approve over-budget requisitions.
Understanding Requisition Approval and Rejection The Requisition Approval program (P43E82) enables you to view all requisitions, all requisitions at a certain status, ora specific requisition or line. You can also enter a date range for requisitions to view, including a future date range. The
99

JD Edwards EnterpriseOne ApplicationsRequisition Self Service Implementation Guide
Chapter 8Reviewing and Approving Requisitions
date range enables you to view not only the requisitions currently waiting for approval, but also all requisitions that willbe needing approval at a later date. You can approve one requisition or several at once.
When you approve or reject a requisition, the system uses workflow to send messages to the originator. If you approve arequisition, the system assigns a status of Approved to only the approved requisition lines. The system does not changethe status of the requisition header until a purchase order is generated.
This diagram illustrates the approval flow:
When approving or rejecting requisitions, you can review the existing justification information that was entered by therequestor. You can enter additional comments to the justification, and the system saves the comments when you clickApprove or Reject. The requestor can then review the additional comments in the Requisition Inquiry program (P43E15).
Understanding Approval for Over-Budget Requisitions If you have activated budget checking in the Procurement system, use the Requisitions Over Budget program(P43E070) to process requisitions that exceed the budget. This program enables you to inquire on all requisitionsthat have at least one line that is over budget. To release lines that are over budget, you select one or more lines forrelease, and then you must enter a password. The password that you enter is the same password that you would usefor releasing purchase orders in the JD Edwards EnterpriseOne Procurement system. After the system validates thepassword, it updates the status on the lines to Submitted and sends the requisitions for approval, if you have set up
100

JD Edwards EnterpriseOne ApplicationsRequisition Self Service Implementation Guide
Chapter 8Reviewing and Approving Requisitions
the system for approvals. If you have not set up requisition approval correctly, the system generates an error. You mustcorrect the workflow approval setup and then process the budget release again.
See "Working with Orders on Hold" in the JD Edwards EnterpriseOne Applications Procurement ManagementImplementation Guide .
See Setting Up Requisition Approval Workflow.
Forms Used to Approve and Reject Requisitions
Form Name Form ID Navigation Usage
Requisition
W43E82B
Daily Processing(G43E11), RequisitionApproval
View requisitions to beapproved.
Approve Requisition
W43E82A
Select Approve or Rejectfrom the Requisitionform
Approve and rejectrequisitions.
Add Requisition
W43E10A
Select ReviewRequisition on theApprove Requisitionform.
Review details of therequisition to determinewhether to approve orreject.
Approve RequisitionsOver Budget
W43E070A
Daily Processing menu(G43E11), ApproveRequisitions OverBudget
Review existingrequisitions that areover budget. Select a requisition toapprove.
Confirm Password
W43E070B
Select a requisitionon the ApproveRequisitions OverBudget form and clickApprove Budget.
Enter the correctpassword to approve therequisition.
Setting Processing Options for Approve Requisitions Over Budget(P43E070) These processing options provide default processing information for the Approve Requisitions Over Budget program.
Defaults 1. Order Type
101

JD Edwards EnterpriseOne ApplicationsRequisition Self Service Implementation Guide
Chapter 8Reviewing and Approving Requisitions
Specify the default document type for the system to use on the Approve Requisitions Over Budget form. Enter a validdocument type from user-defined code table 00/DT.
2. Hold Orders Code
Specify the hold code that the system uses to approve requisition lines that are over budget. The user will need toprovide the correct password corresponding to the hold code to approve the over-budget line.
Versions 1. Requisition Entry Version (P43E10)
Specify the version of the Requisition Entry program (P43E10) for the system to use when accessing it from within theApprove Requisitions Over Budget program. When you specify a version, review its processing options to ensure that itmeets your needs.
Approving and Rejecting Requisitions Access the Approve Requisition form.
Click Approve or Reject.
Approving Over-Budget Requisitions Access the Confirm Password form.
Password
Specify the correct password. You set up the password in the Release Code processing option for the Held Order Releaseprogram (P43070).
See "Setting Processing Options for Held Order Release (P43070)" in the JD Edwards EnterpriseOne ApplicationsProcurement Management Implementation Guide .
102

JD Edwards EnterpriseOne ApplicationsRequisition Self Service Implementation Guide
Chapter 9Creating Purchase Orders
9 Creating Purchase Orders
Understanding Purchase Order Creation After you have approved requisitions, you can use one of two methods for creating purchase orders:
• Manually, using the Requisition Expeditor program (P43E060).
• Automatically, using the Batch Requisition Consolidation program (R43E060).
For most requisitions, you can create purchase orders by using the Batch Requisition Consolidation program. You canrun this batch program several times a week. It creates purchase orders for all approved requisitions. For the requisitionsthat require buyer intervention, use the Requisition Expediter program. This program enables the buyer to managerequisitions that become exceptions, such as high priority items, items for which a supplier must be assigned, or itemsfor which the cost must be changed.
Using Purchase Order Dispatch If you have set up your system to use Direct Connect and Purchase Order (PO) Dispatch, you can run the PurchaseOrder Print program (R43500) to print the purchase orders that you have created. If the system is set up to support PODispatch, the R43500 calls the PO Dispatch Processor business service (J43E0030), which translates the data into cXML1.2.016 format and posts that cXML message so that it can be received by the vendor's website.
If an error occurs during the execution of the business service for any reason, such as server unavailability or anotherfunctional issue, the system saves the data that was generated by the R43500 in the Services Error Recovery table(F0045). You can then use the Service Error Recovery program (P0045) to review the errors and resend the data. Or youcan use the Services Error Recovery batch program (R0045) to resend the data to the supplier.
To use PO Dispatch to send purchase orders directly to suppliers, you must complete these steps before running theR43500:
• Set up the system for Direct Connect and PO Dispatch, which includes setting up supplier information.
See Setting Up Direct Connect and Purchase Order Dispatch.
• Select the Publish Externally option for the purchase order document type using the Procurement tab in theDocument Type Maintenance program (P40040).
See "Setting Up Document Type Information" in the JD Edwards EnterpriseOne Applications InventoryManagement Implementation Guide .
• Enter the status code range using the NEXT status in the processing options for the Purchase Order XPIprogram (P43XPI).
• Activate Order Revisions.
See "Understanding Order Revisions" in the JD Edwards EnterpriseOne Applications Procurement ManagementImplementation Guide .
103
JD Edwards EnterpriseOne ApplicationsRequisition Self Service Implementation Guide
Chapter 9Creating Purchase Orders
Creating Purchase Orders Manually This section provides an overview of the Requisition Expeditor program and discusses how to:
• Set processing options for Requisition Expeditor.
• Revise requisition headers.
• Revise requisition lines.
• View account distribution.
• Create purchase orders.
Understanding the Requisition Expeditor Program Requisitions for standard items, such as office supplies, usually do not require intervention from the buyer. Forsituations such as special requests or high priority items, use the Requisition Expeditor program (P43E060) to managethese exceptions and then create purchase orders. Using the Requisition Expeditor program, you can:
• Search on high-priority items so that you process them first.
• Add or change supplier numbers for requisitions.
• Postpone requisitions while you are negotiating price.
You can search for requisitions by requisition number, supplier, item number, account number, business unit, buyer,requestor, or commodity. When you enter a commodity to narrow your search, the system uses the commoditystructure hierarchy and displays requisitions for that commodity as well as requisitions that contain a commoditysubordinate.
Before creating requisitions, you can preview the purchase orders that the system will create by clicking Review BeforeGeneration. When you click Review Before Generation, the system performs the same tasks as when you generatepurchase orders, which include:
• Dividing lines by supplier and currency code for requisitions that contain multiple suppliers and currency codes.
• Consolidating order headers using one of two methods, depending on how you set the Order HeaderGeneration processing option:
a. Consolidate by supplier number, currency, and exchange rate.b. Consolidate by supplier number, currency, exchange rate, and branch/plant.
• Consolidating order lines using one of two methods, depending on how you set the Order Detail Consolidationprocessing option:
a. Consolidate by item, branch/plant, unit of measure, requested date, line type, and ship to.b. Consolidate by item, branch/plant, unit of measure, requested date, line type, ship to, and unit cost.c. No line-level consolidation.
• Checking for blanket orders (optional).
• Checking for agreements if blanket orders are not found (optional).
• Checking for advanced pricing if blanket orders or agreements are not found. The system performs this taskonly if you have selected the system constant for Advanced Pricing.
• Checking the F0401 table to retrieve default information for suppliers, such as payment terms and taxinformation.
104

JD Edwards EnterpriseOne ApplicationsRequisition Self Service Implementation Guide
Chapter 9Creating Purchase Orders
When you use the form exit for Supplier Master, the system uses the version of the Supplier Master Informationprogram (P04012) that you specify in the processing options for the Requisition Expeditor program.
Note: The system uses this version of the Supplier Master Information program only when you use theSupplier Master form exit within the Requisition Expeditor program.
See "Entering Supplier Information" in the JD Edwards EnterpriseOne Applications Accounts PayableImplementation Guide .
• Retrieving information such as line status and activity rules by using the processing options of the PurchaseOrders program (P4310).
The system uses the version of the Purchase Order program that you specify in the processing options for theRequisition Expeditor program.
The system displays the purchase orders for you to review before generating them. You can revise order headers andlines, add new lines to orders, or edit the account distribution.
Note: : If you change the buyer number using the Requisition Expeditor program (P43E060), the new buyer numberwill be reflected on the purchase order that you generate from the expeditor process, but will not be updated on theoriginal requisition. To change the buyer number on the requisition, you must use the Requisition Inquiry program(P43E15) to select the requisition, and then update the buyer number. You must perform this update before runningthe requisition expeditor process.
When you have finalized requisitions, click Generate Orders to create the purchase orders. The system runs the BatchRequisition Consolidation program (R43E060), performs the tasks as when you click Generate Orders in the RequisitionExpeditor program, and displays the Confirm Order Generation form for you to confirm that the system should createthe orders.
The system then displays the View Generated Orders form, which provides you with purchase order numbers. If youwant the system to dispatch the purchase orders immediately, click Dispatch Orders. If any of the orders contain itemsfrom Direct Connect suppliers, the system sends an XML message to those suppliers to complete the requisitionprocess. If you do not want to dispatch the orders immediately, you can click Close, and the Purchase Order Printprogram processes the orders.
The following diagram illustrates the process flow for expediting requisitions:
105

JD Edwards EnterpriseOne ApplicationsRequisition Self Service Implementation Guide
Chapter 9Creating Purchase Orders
106
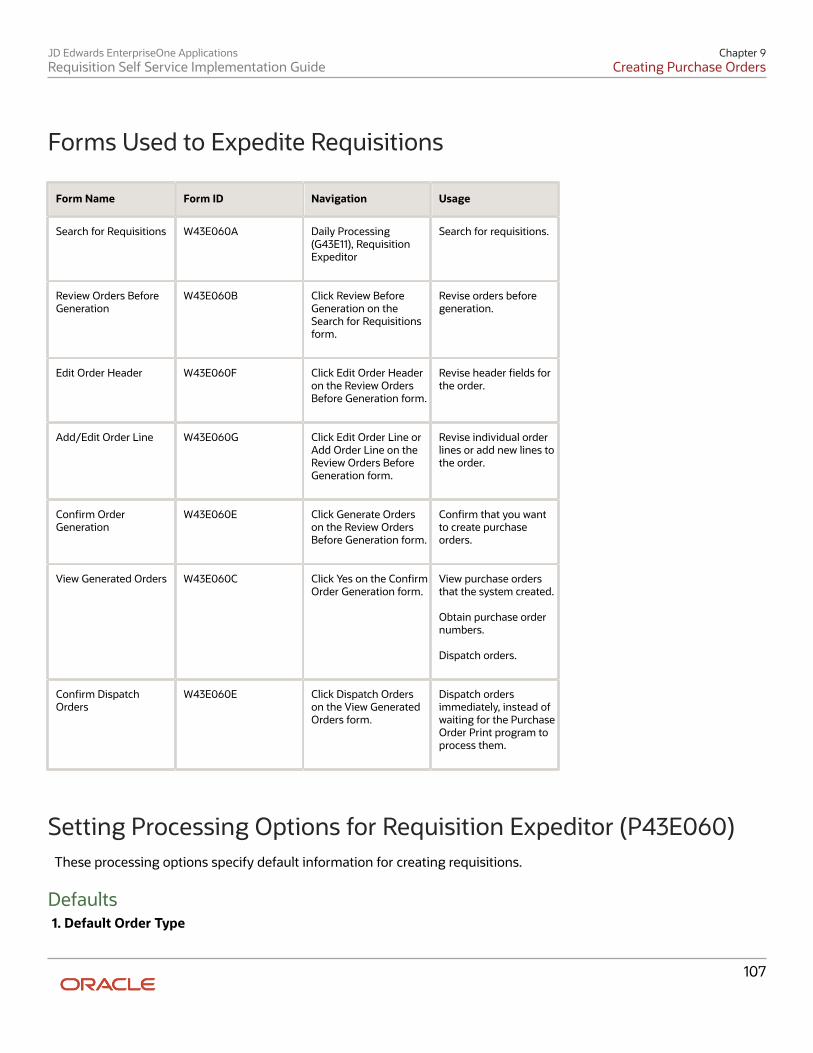
JD Edwards EnterpriseOne ApplicationsRequisition Self Service Implementation Guide
Chapter 9Creating Purchase Orders
Forms Used to Expedite Requisitions
Form Name Form ID Navigation Usage
Search for Requisitions
W43E060A
Daily Processing(G43E11), RequisitionExpeditor
Search for requisitions.
Review Orders BeforeGeneration
W43E060B
Click Review BeforeGeneration on theSearch for Requisitionsform.
Revise orders beforegeneration.
Edit Order Header
W43E060F
Click Edit Order Headeron the Review OrdersBefore Generation form.
Revise header fields forthe order.
Add/Edit Order Line
W43E060G
Click Edit Order Line orAdd Order Line on theReview Orders BeforeGeneration form.
Revise individual orderlines or add new lines tothe order.
Confirm OrderGeneration
W43E060E
Click Generate Orderson the Review OrdersBefore Generation form.
Confirm that you wantto create purchaseorders.
View Generated Orders
W43E060C
Click Yes on the ConfirmOrder Generation form.
View purchase ordersthat the system created. Obtain purchase ordernumbers. Dispatch orders.
Confirm DispatchOrders
W43E060E
Click Dispatch Orderson the View GeneratedOrders form.
Dispatch ordersimmediately, instead ofwaiting for the PurchaseOrder Print program toprocess them.
Setting Processing Options for Requisition Expeditor (P43E060) These processing options specify default information for creating requisitions.
Defaults 1. Default Order Type
107
JD Edwards EnterpriseOne ApplicationsRequisition Self Service Implementation Guide
Chapter 9Creating Purchase Orders
Specify the document type that you want to create. This code also determines the original document type of thetransaction.
Process 1. Order Header Generation
Specify how the system generates order headers when releasing multiple requisition lines and orders. Values are:
Blank: Group multiple requisitions into one order if values in the following three fields are the same for all selectedrequisitions: Supplier, Currency Code, and Exchange Rate.
1: Group multiple requisitions into one order if values in the following four fields are the same for all selectedrequisitions: Supplier, Currency Code, Exchange Rate, and Branch/Plant. For example, if you release two requisitionlines with the same supplier, currency code, exchange rate, and branch/plant, each for a quantity of 10, then thesystem creates one order header with two detail lines. The number of detail lines is determined by the Order DetailConsolidation rule.
2. Order Detail Consolidation
Specify whether the system consolidates detail lines when releasing multiple requisition lines and orders. Values are:
Blank: Do not consolidate detail lines.
1: Consolidate detail lines by item, branch/plant, unit of measure, requested date, line type, and ship to.
2: Consolidate detail lines by supplier, item, branch/plant, unit of measure, requested date, line type, ship to, and unitcost. For example, if you enter 1 or 2 in this processing option and you release two lines with the same item, branch/plant, unit of measure, and requested date, each for a quantity of 10, then the system creates one line with a quantity of20 on the new order. If you entered 1 in the Order Header Generation processing option, the system uses the lower costof the two requisition lines.
Note: This processing option is valid only for line types with an inventory interface of Y. For all other line types, thesystem does not consolidate by order detail (item consolidation).
3. Recost the Requisition Line
Specify whether the system recosts the requisition lines when generating orders. Values are:
Blank: Do not recost. The system generates the order with the same cost entered in the requisition. The system doesnot recalculate the cost
1: Recost, and retain the new cost. The system ignores the unit cost on the requisition and retrieves the new cost basedon the setup. The system generates the order by using the new cost, even though it is higher than the cost on theoriginal requisition.
2: Recost, and retain the lower cost. The system retrieves the new cost based on the setup. The system then comparesthe new cost to the unit cost on the requisition and generates the order with the lower of the two costs. For example,when you release requisition lines with a cost of 20.00 USD and the setup cost is 22.00 USD, the system generates theorder using 20.00 USD.
3: Recost only the requisition cost that has not been overridden, and retain the new cost. The system retrieves thenew cost based on the setup. For example, if you release a requisition with two lines and on one requisition line, therequestor allowed the system to assign the cost to the item, but on the second line the user overwrote the system cost,the system generates the order using the cost based on setup only for the first line. The system retains the cost on thesecond line because the unit cost was overridden on this requisition line.
108

JD Edwards EnterpriseOne ApplicationsRequisition Self Service Implementation Guide
Chapter 9Creating Purchase Orders
4. Unit Cost Retrieval Upon Supplier Change
Specify whether the system retrieves the cost from the original order (requisition) or from the unit cost when youchange the supplier number on the requisition. Values are:
Blank: Retain the unit cost from the originating order (requisition). If you change the supplier number on a requisitionline, the system retains the original unit cost from the requisition. However, if the supplier is a foreign supplier, thesystem displays and also calculates the foreign cost based on the current exchange rate.
1: Retrieve the new unit cost based on the setup. If you change the supplier number on a requisition line, the systemretrieves a new unit cost using the information specified in the Supplier/Item Relationship table.
Versions 1. Purchase Order Entry (P4310)
Specify the version number of the Purchase Order Entry program for the system to use when creating purchase orders.
2. Supplier Master Inquiry (P04012)
Specify the version number for the system to use when you access the Supplier Master Information program.
3. Blanket Order Release (P43E216)
Specify the version number for the system to use when you access the Blanket Order Release program.
4. Dispatch Orders - PO Print (R43500)
Specify the version number of the Dispatch Orders - PO Print program to use when printing purchase orders.
Revising Requisition Headers Access the Edit Order Header form.
Populate Header to Detail
Select this option if you want the system to populate the corresponding field on the detail lines with the value that youspecified in the associated field.
Revising Requisition Lines Access the Add/Edit Order Line form.
Viewing Account Distribution Access the View Account Distribution form by clicking the View Acct. Dist. button on the Review Orders beforeGeneration form.
Note: For an existing requisition line, you can only view the account distribution. You cannot edit the accountdistribution of an existing record.
109

JD Edwards EnterpriseOne ApplicationsRequisition Self Service Implementation Guide
Chapter 9Creating Purchase Orders
Creating Purchase Orders Access the Confirm Order Generation form.
Click Yes to generate purchase orders.
Creating Purchase Orders Using a Batch Program This section provides an overview of the Batch Requisition Consolidation program and discusses how to:
• Run the Batch Requisition Consolidation program.
• Set processing options for Batch Requisition Consolidation.
Understanding the Batch Requisition Consolidation Program For the requisitions that do not need to be expedited, you can run the Batch Requisition Consolidation program(R43E060) to create purchase orders in batch mode. This program performs the same tasks as described in theRequisition Expeditor section, but it does not provide you with the opportunity to make changes to orders before finalgeneration. To be processed by the Batch Requisition Consolidation program, requisition lines must have an Approvedstatus, a supplier number, a price, and must not have the Postponed option selected in the Requisition Expeditorprogram.
The Batch Requisition Consolidation program does not provide the hierarchical commodity search, as in the RequisitionExpeditor program. Therefore, if you want the system to generate orders for both a specific commodity and those withthat commodity's subordinates, you must enter data selection for both the parent commodity and the subordinates.
This diagram illustrates the process flow of the Batch Requisition Consolidation program:
110
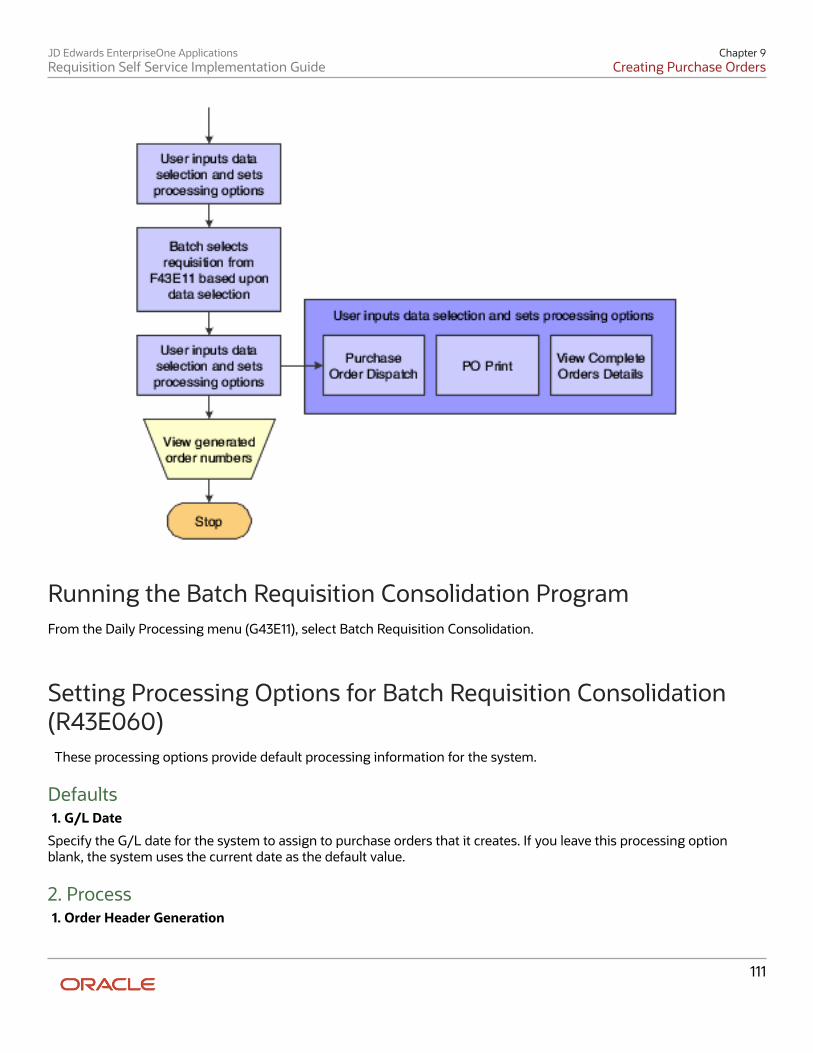
JD Edwards EnterpriseOne ApplicationsRequisition Self Service Implementation Guide
Chapter 9Creating Purchase Orders
Running the Batch Requisition Consolidation Program From the Daily Processing menu (G43E11), select Batch Requisition Consolidation.
Setting Processing Options for Batch Requisition Consolidation(R43E060) These processing options provide default processing information for the system.
Defaults 1. G/L Date
Specify the G/L date for the system to assign to purchase orders that it creates. If you leave this processing optionblank, the system uses the current date as the default value.
2. Process 1. Order Header Generation
111

JD Edwards EnterpriseOne ApplicationsRequisition Self Service Implementation Guide
Chapter 9Creating Purchase Orders
Specify how the system generates order headers when releasing multiple requisition lines and orders. Values are:
Blank: Group multiple requisitions into one order if values in the following three fields are the same for all selectedrequisitions: Supplier, Currency Code, and Exchange Rate.
1: Group multiple requisitions into one order if values in the following four fields are the same for all selectedrequisitions: Supplier, Currency Code, Exchange Rate, and Branch/Plant. For example, if you release two requisitionlines with the same supplier, currency code, exchange rate, and branch/plant, each for a quantity of 10, then thesystem creates one order header with two detail lines. The number of detail lines is determined by the Order DetailConsolidation rule.
2. Order Detail Consolidation
Specify whether the system consolidates detail lines when releasing multiple requisition lines and orders. Values are:
Blank: Do not consolidate detail lines
1: Consolidate detail lines by item, branch/plant, unit of measure, requested date, line type, and ship to.
2: Consolidate detail lines by supplier, item, branch/plant, unit of measure, requested date, line type, ship to, and unitcost. For example, if you enter 1 or 2 in this processing option and you release two lines with the same item, branch/plant, unit of measure, and requested date, each for a quantity of 10, then the system creates one line with a quantity of20 on the new order. If you entered 1 in the Order Header Generation processing option, the system uses the lower costof the two requisition lines.
Note: This processing option is valid only for line types with an inventory interface of Y. For all other line types, thesystem does not consolidate by order detail (item consolidation).
3. Recost the Requisition Line
Specify whether the system recosts the requisition lines when generating orders. Values are:
Blank: Do not recost. The system generates the order with the same cost entered in the requisition. The system doesnot recalculate the cost.
1: Recost, and retain the new cost. The system ignores the unit cost on the requisition and retrieves the new cost basedon the setup. The system generates the order by using the new cost, even though it is higher than the cost on theoriginal requisition
2: Recost, and retain the lower cost. The system retrieves the new cost based on the setup. The system then comparesthe new cost to the unit cost on the requisition and generates the order with the lower of the two costs. For example,when you release requisition lines with a cost of 20.00 USD, and the setup cost is 22.00 USD, the system generates theorder using 20.00 USD.
3: Recost only the requisition cost that has not been overridden, and retain the new cost. The system retrieves the newcost based on the setup. For example, if when you release a requisition with two lines and on one requisition line, therequestor allowed the system to assign the cost to the item, but on the second line the user overwrote the system cost,the system generates the order by using the cost based on setup only for the first line. The system retains the cost onthe second line because the unit cost was overridden on this requisition line.
4. Dispatch Orders
Specify whether the system should dispatch all generated orders. The system dispatches orders using the PO Printprogram (R43500). Values are:
Blank: Do not dispatch.
112

JD Edwards EnterpriseOne ApplicationsRequisition Self Service Implementation Guide
Chapter 9Creating Purchase Orders
1: Dispatch.
Versions 1. Purchase Order Entry (P4310)
Specify the version of the Purchase Order Entry program that the system uses to generate the purchase orders.
2. Dispatch Orders - PO Print (R43500)
Specify the version of the Dispatch Orders - PO Print program that the system uses to dispatch and print the generatedorders.
Dispatching Purchase Orders using PO Dispatch This section provides an overview of the PO Dispatch process and discusses how to:
• Dispatch purchase orders.
• Run the Purchase Order Print program (R43500).
• Review and reprocess service errors for PO Dispatch.
• Run the Services Error Recovery program (R0045).
Understanding the PO Dispatch process After you create purchase orders, you can use two methods to dispatch purchase orders to suppliers:
• Click the Dispatch Orders button on the View Generated Orders form.
• Run the Purchase Order Print program (R43500).
If you have set up your system to use Direct Connect and PO Dispatch, when you click the Dispatch Order button, orrun the R43500, the system calls the PO Dispatch Processor business service (J43E0030), which translates the data intocXML 1.2.016 format and posts that cXML message so that it can be received by the vendor's website.
If an error occurs during the execution of the business service for any reason, such as server unavailability or anotherfunctional issue, the system saves the data that was generated by the R43500 in the Services Error Recovery table(F0045). You can then use the Service Error Recovery program (P0045) to review the errors, and resend the data. Or youcan use the Services Error Recovery batch program (R0045) to resend the data to the supplier.
Note:• Setting Up Direct Connect and Purchase Order Dispatch.
• "Using Service Error Recovery" in the JD Edwards EnterpriseOne Tools Business Services Development Guide .
113

JD Edwards EnterpriseOne ApplicationsRequisition Self Service Implementation Guide
Chapter 9Creating Purchase Orders
Forms Used to Dispatch Purchase Orders using PO Dispatch
Form Name Form ID Navigation Usage
View Generated Orders
W43E060C
Click Yes on the ConfirmOrder Generation form.
Dispatch purchaseorders by clicking theDispatch Orders button.
Confirm DispatchOrders
W43E060E
Click Dispatch Orderson the View GeneratedOrders form.
Dispatch ordersimmediately, instead ofwaiting for the PurchaseOrder Print program toprocess them.
Work With ServicesError
W0045A
From the Adv/TechOperations menu(G43E31), select PODispatch Error Recovery(P0045).
Review and updateservice errors for PODispatch, and resenddata to suppliers.
Service Error RecoveryRevisions
W0045C
On the Work WithServices Error form, select a record and clickthe View Errors button.
View error details andupdate error records.
Dispatching Purchase Orders Access the View Generated Orders form.
Click Dispatch Orders to dispatch purchase orders immediately, or click Close to have the Purchase Order Print programprocess them.
Running the Purchase Order Print Program (R43500) From the Purchase Order Processing menu (G43A11), select Print Purchase Orders.
Reviewing and Reprocessing Service Errors for PO Dispatch Access the Work With Services Error form.
BSSV Package (business service package)
114

JD Edwards EnterpriseOne ApplicationsRequisition Self Service Implementation Guide
Chapter 9Creating Purchase Orders
Enter the package name of the business service that is associated with the errors that you want to review. To reviewerrors that are generated by the PO Dispatch Processor business service (J43E0030), enter this package name and thenclick Find:
oracle.e1.bssv.J43E0030.PODispatchProcessor.
Rep Num (reprocess number)
Review this field to determine how many times the system has attempted to resend the record to the supplier. If thevalue in this field is greater than the value that is set in the processing options for the allowed number of times toreprocess, the record becomes inactive, and the system will not attempt to resend the record. You must manuallyreactivate the record to reprocess it.
Rep St (reprocess status)
Review the value in this field to determine whether the record is active. If the record is active, the system will reprocessthe record. If the record is inactive and the Services Error Recovery batch program (R43500) is run, the system ignoresthe record and does not reprocess it. Values include:
A or Blank: Active
I: Inactive
To resend the record to the supplier, select the record, verify that it is active, and click the Resend button.
To review the details of the error associated with a particular record, select the record and then click the View Errorsbutton.
Action Code
Review this field to determine the type of transaction that is in error. Values include:
1: Add a new record.
2: Change an existing record.
3: Delete an existing record.
4: Inquire on an existing record.
Running the Services Error Recovery Program (R0045) From the Adv/Tech Operations menu (G43E31), select PO Dispatch Error Recovery (R0045).
Note: There are two menu options with this name. One menu option enables you to access the P0045, and the otherto access the R0045. Hover over the menu option with your mouse to view which program is associated with eachmenu option.
115

JD Edwards EnterpriseOne ApplicationsRequisition Self Service Implementation Guide
Chapter 9Creating Purchase Orders
116

JD Edwards EnterpriseOne ApplicationsRequisition Self Service Implementation Guide
Chapter 10Receiving Requisitions and Reversing Receipts
10 Receiving Requisitions and ReversingReceipts
Receiving Requisitions This section provides an overview of the Desktop Receiving program and discusses how to:
• Set processing options for Desktop Receiving.
• Receive requisitions.
Understanding the Desktop Receiving Program When you receive the items from the requisition, use the Desktop Receiving program (P43E20) to receive the purchaseorder. When you access the Desktop Receiving program, the system populates the Requested By field with the user IDof the person signed on to the system so that users can view existing purchase orders at a status of Ordered. If you areusing delegation, you can set the processing options for this application to enable the Requested By field for entry. Youcan enable the field to accept any valid address book number, or you can enable the field with delegation. If you enablethe field with delegation, the signed on user can enter only those address book numbers for whom they have been setup with delegation rights.
Note: Setting Up Delegation Information.
Note: The Desktop Receiving program uses the processing options for the PO Receipts program (P4312) whendetermining which orders are eligible for receipt. Therefore, you should verify that the Acceptable Incoming StatusCode processing options are set up correctly for your business needs before using the Desktop Receiving program. Ifthey are not set up correctly, the Receive Requisitions form might not display your requisitions.
For each line, you can select one of three possible receipt options:
• Receive
Select this option to receive the requisition line only. This is the default value when you select a line.
• Receive/Close
Select this option to receive a partial quantity or amount on the requisition and purchase order, and close theremaining units and amounts on both the requisition and the associated purchase order.
• Cancel
Select this option to close both the requisition line and the related purchase order line.
If the requisition line you want to receive is not consolidated, you can select any of the above options. However, youcan select only the Receive option for consolidated lines. The related purchase order for consolidated lines comprisesitems from more than one purchaser; therefore, selecting Receive/Close or Cancel would result in a partial closure of apurchase order line. The system displays the + symbol next to consolidated lines.
117

JD Edwards EnterpriseOne ApplicationsRequisition Self Service Implementation Guide
Chapter 10Receiving Requisitions and Reversing Receipts
If you entered 1 in the Display Confirmation Message processing option for the Desktop Receiving program, the systemdisplays a confirmation message after you select a receipt option and click Receive. This message displays the numberof lines to be received fully, the number of lines to be received partially, and the number of lines to be canceled.
Once you click Continue, the system processes the receipts and alerts to either the Requester, the Buyer, or both,depending on the value in the Receipt Email processing option in the version of the PO Receipts program that youspecify in the Desktop Receiving program.
If you encounter errors while entering information on the Receive Requisitions form, such as establishing an invalid datefor the Date Received field, click Find to refresh the form and begin again.
This diagram illustrates the desktop receiving process:
118

JD Edwards EnterpriseOne ApplicationsRequisition Self Service Implementation Guide
Chapter 10Receiving Requisitions and Reversing Receipts
Prerequisite Before you complete the tasks in this section:
Set the processing options for the PO Receipts and the Requisition Receipts Inquiry programs. Set the processingoptions for the same version that you specify in the processing options for the Desktop Receipts program.
See "Setting Processing Options for PO Receipts (P4312)" in the JD Edwards EnterpriseOne Applications ProcurementManagement Implementation Guide .
See Setting Processing Options for Requisition Receipt Inquiry (P43E214).
Forms Used to Receive Requisitions
Form Name Form ID Navigation Usage
Receive Requisitions
W43E20A
Daily Processing(G43E11), DesktopReceiving
Review requisitions byRequestor and receiverequisitions.
Confirm ReceiptSelection
W43E20B
Click Receive on theReceive Requisitionsform.
Confirm that you havereceived a requisition.
Setting Processing Options for Desktop Receiving (P43E20) These processing options provide default information for the system to use when processing receipts.
Display 1. Display Cost Data
Specify whether to display the unit cost data and extended amount in the grid on the Receive Requisitions form. Thesystem uses the cost data from the Purchase Order table. Values are:
Blank: Do not display.
1: Display. Although the system displays the Unit Cost field, the field is disabled. If you need to change unit costinformation, you must use the PO Receipts program (P4312). You can change the Extended Amount field for lump-sumentries, for example, where the quantity is zero
2. Display Purchase Order Information
Specify whether the system displays the purchase order information in the grid on the Receive Requisitions form. Valuesare:
Blank: Do not display.
119

JD Edwards EnterpriseOne ApplicationsRequisition Self Service Implementation Guide
Chapter 10Receiving Requisitions and Reversing Receipts
1: Display. If you enter 1 in this processing option, the system displays a field that you can click to access the PO DetailInquiry form.
3. Display Receipt Confirmation Message
Specify whether to display the receipt confirmation message. Values are:
Blank: Do not display. The system processes requisitions immediately after you click Receive.
1: Display, listing the number of lines fully received, number of lines partially received, and the number of lines to becanceled, and an option to continue or return to the previous form.
4. Allow Over-Receipt on Requisition
Specify whether to allow users to change the quantity or amount to more than the line on the requisition. Thisprocessing option refers only to the requisition line, not to the related purchase order line. Over-receipt of the purchaseorder line is controlled by the processing options for the PO Receipts (P4312) program. Values are:
Blank: Do not allow.
1: Allow.
5. Allow receipt of Consolidated Items
Specify whether to allow receipt of requisition lines that have been consolidated to a single purchase order line. Valuesare:
Blank: Do not allow. The system displays consolidated requisition lines, but does not allow you to select them for receipt
1: Allow. You can select consolidated lines, but you cannot select Receive and Close or Cancel from the available optionsin the Receipt Options field as these options would potentially affect multiple requisitions across multiple requestors.
6. Enable Requested By
Use this processing option to determine whether the user can update the value in the Requested By field, and if so,whether delegation authority is being used. Values include:
Blank: Disable the Requested By field.
1: Enable the Requested By Field. If you select this option, the signed on user can enter any valid address book numberin this field.
2: Enable the Requested By field with Delegation: If you select this option, the signed-on user can enter only the addressbook numbers for whom he has delegation authority on this program. Valid address book numbers are displayed whenthe user clicks on the visual assist option next to the Requested By field.
Versions 1. PO Receipts (P4312)
Specify the version of the PO Receipts program (P4312) for the system to use when accessing the program from theDesktop Receipts and Desktop Reversals programs. You should use the version created specifically for use with DesktopReceipts, which is ZJDE0021.
2. Requisition Receipt Inquiry (P43E214)
Specify the version of the Requisition Receipt Inquiry for the system to use when accessing the program from theDesktop Receipts program.
120

JD Edwards EnterpriseOne ApplicationsRequisition Self Service Implementation Guide
Chapter 10Receiving Requisitions and Reversing Receipts
Receiving Requisitions Access the Receive Requisitions form.
Requisition Number
Enter a requisition number to search for a specific requisition.
Line Number
Enter a line number to search for a specific requisition.
Date Received
Enter a date if you want to use a date other than the current date, which is the default. The system uses the value youspecify as the G/L date for the entire transaction. You must enter a date before selecting any lines for receipt. Once youselect lines, you cannot change this date.
Receipt Option
Select a receipt option from user–defined code table 43E/DR. Values are:
1: Receive the requisition
7: Receive and close the requisition. If you select this option, the system receives the quantity or amount specified in theline and closes both the requisition line and the related purchase order line.
9: Cancel the requisition. If you select this option, the system closes both the requisition line and the related purchaseorder line.
Extended Amount
Enter the value of the goods received to date against the original order line.
Reversing Receipts This section provides an overview of reversing receipts and discusses how to:
• Set processing options for Requisition Receipt Inquiry.
• Reverse receipts.
Understanding Receipt Reversal If you receive a requisition in error, use the Requisition Receipt Inquiry program to reverse the receipt. You can accessthe Requisition Receipt Inquiry program either from within the Desktop Receiving program or from the menu. If youaccess the program from within the Desktop Receiving program, the system populates the Receipt number field withthe receipt that you just received and displays the receipt.
121

JD Edwards EnterpriseOne ApplicationsRequisition Self Service Implementation Guide
Chapter 10Receiving Requisitions and Reversing Receipts
Forms Used to Reverse Receipts
Form Name Form ID Navigation Usage
Search for RequisitionReceipts
W43E214A
Daily Processing(G43E11), RequisitionReceipt Inquiry. Click Reverse requisitionreceipts on the ReceiveRequisitions form.
Search for requisitionsto reverse.
Confirm Reversal
W43E214B
Click Reverse Receipton the Search forRequisition Receiptsform.
Reverse the receipt of arequisition.
Setting Processing Options for Requisition Receipt Inquiry(P43E214) These processing options specify whether the system displays a confirmation screen before you reverse a receipt andthe version of the PO Receipts program to use.
Display 1. Display reversal confirmation message?
Specify whether the system should display a confirmation screen before proceeding with the reversal of requisitionreceipts. Values are:
Blank: Do not display.
1: Display.
6. Enable Requested By
Use this processing option to determine whether the user can update the value in the Requested By field, and if so,whether delegation authority is being used. Values include:
Blank: Disable the Requested By field.
1: Enable the Requested By Field. If you select this option, the signed on user can enter any valid address book numberin this field.
2: Enable the Requested By field with Delegation: If you select this option, the signed-on user can enter only the addressbook numbers for whom he has delegation authority on this program. Valid address book numbers are displayed whenthe user clicks on the visual assist option next to the Requested By field.
122

JD Edwards EnterpriseOne ApplicationsRequisition Self Service Implementation Guide
Chapter 10Receiving Requisitions and Reversing Receipts
Versions 1. PO Receipts (P4312)
Specify the version of the PO Receipts program for the system to use when accessing the program from the RequisitionReceipts Inquiry program. You should use the version created for Requisition Receipts Inquiry, which is ZJDE0021.
Reversing Receipts Access the Search for Requisition Receipts form.
123

JD Edwards EnterpriseOne ApplicationsRequisition Self Service Implementation Guide
Chapter 10Receiving Requisitions and Reversing Receipts
124

JD Edwards EnterpriseOne ApplicationsRequisition Self Service Implementation Guide
Chapter 11Appendix A - Delivered Workflow for JD Edwards
EnterpriseOne Requisition Self Service
11 Appendix A - Delivered Workflow forJD Edwards EnterpriseOne Requisition SelfService
Delivered Workflow for JD Edwards EnterpriseOneRequisition Self Service
Note:• JD Edwards EnterpriseOne Tools Workflow Tools Guide .
Delivered Workflow for JD Edwards EnterpriseOneRequisition Self Service This section discusses the JD Edwards EnterpriseOne Requisition Self Service workflow.
Requisition Self Service Approvals This section discusses the Requisition Self Service Approvals workflow.
Description Workflow Description
The system sends a workflow message to a specified approver when a user enters a requisition that meets or exceedsthe threshold amount for the required approver.
Workflow Trigger
A user enters a requisition for an active approval authority level. Workflow triggers at the Order level and Commoditylevel.
Workflow Action
The approver receives a message to approve the requisition. Depending on the electronic address information for theuser in the Address Book system, the system sends a message using the Work Center, an email address, or both. Whenthe approver selects the message in the Work Center or selects the link in the email message, the system displays theRequisition Approval form, where the approver can review the requisition and commodity line.
Workflow Objects System
125

JD Edwards EnterpriseOne ApplicationsRequisition Self Service Implementation Guide
Chapter 11Appendix A - Delivered Workflow for JD Edwards
EnterpriseOne Requisition Self Service
43E
Workflow Object Name
K43E08
Object ID
N43E1300
Event Description / Function Name
LaunchRequisitionWF
Sequence / Line Number
2
126

JD Edwards EnterpriseOne ApplicationsRequisition Self Service Implementation Guide
Chapter 12Appendix B - Tables Used by the JD Edwards EnterpriseOne
Requisition Self Service System
12 Appendix B - Tables Used by the JDEdwards EnterpriseOne Requisition SelfService System
Tables Used by the JD Edwards EnterpriseOneRequisition Self Service System The JD Edwards EnterpriseOne Requisition Self Service System uses several tables to store processing information.
Requisition Self Service Tables This table lists the tables used by the JD Edwards EnterpriseOne Requisition Self Service system:
Table Description
UNSPSC Commodity Code F40241
Stores UNSPSC codes that you download from the UNSPSC website (www.unspsc.com).
Secondary Commodity Code F40242
Stores a secondary relationship with a given commodity (optional).
Commodity Relationship F40243
Stores the relationship between a UNSPSC code and a general ledger account number.
Commodity Structure Definitions F40500
Stores the commodity structure.
UNSPSC and Commodity StructureRelationship F40510
Stores the relationships between UNSPSC codes and commodities.
Supplier and Commodity StructureRelationship F40520
Store the relationships between suppliers and commodities.
127

JD Edwards EnterpriseOne ApplicationsRequisition Self Service Implementation Guide
Chapter 12Appendix B - Tables Used by the JD Edwards EnterpriseOne
Requisition Self Service System
Table Description
Supplier Commodity Structure CrossReference F40530
Stores the relationships between your commodities and the corresponding commodity code ofsuppliers.
Item and Commodity StructureRelationship F40540
Stores the relationships between items and commodities.
G/L Account and Commodity StructureRelationship F40551
Stores the relationships between general ledger account numbers and commodities.
Item Master F4101
Stores basic information about each item, such as: item number, description, search keys, categorycodes, and default units of measure,
Item Branch F4102
Stores default item information, such as each item's process and dimension groups.
Item Location F41021
Stores each item's quantity information, G/L class, and lot status in each location.
Purchase Order Header F4301
Stores header information for the purchase order created from the requisition.
Purchase Order Detail File F4311
Stores the detail for the purchase order created from the requisition.
Requisition Order Header F43E01
Stores requisition header information, such as: order company, order number, order type, businessunit, order date, order amount, currency, number of detail lines, number of completed detail lines, number of canceled detail lines, requisition header status, and requisition title.
Requisition Detail F43E11
Stores information for each detail line on a requisition, such as: supplier number, ship to number, buyernumber, item number, unit cost, extended price, quantity ordered, commodity, and requisition detailstatus, and line type.
eRequisition Receiver file F43E121
Stores requisitions and related receipt information, such as requisition order number, purchase ordernumber, amount received, and quantity received.
Requisition Multiple Account File F43E16
Stores account distribution information for requisitions with multiple account distribution.
128

JD Edwards EnterpriseOne ApplicationsRequisition Self Service Implementation Guide
Chapter 12Appendix B - Tables Used by the JD Edwards EnterpriseOne
Requisition Self Service System
Table Description
eReq - Shopping Cart Work File F43E20WF
Stores information regarding items that a user selects when using the Shopping Cart program.
Shopping Cart Detail F43E20
Stores information regarding items a user selected using the Shopping Cart program. The systemcreates records in this table when the user submits a requisition from the shopping cart program.
Direct Connect Setup F43E22
Stores information for suppliers that is required for using Direct Connect.
Direct Connect Supplier ExtrinsicInformation F43E25
Stores extrinsic information required for suppliers with which you use Direct Connect.
Approval Authority (Employee) F43E091
Stores approval authority setup information that was created at the employee level.
Approval Authority (Employee Group/BU) F43E092
Stores approval authority setup information that was created at the employee group and business unitlevel.
Approval Authority (Business Unit) F43E093
Stores approval authority setup information that was created at the business unit level.
Approval Authority Constants F43E094
Stores the settings for the approval authority constants.
Approval Authority (Commodity/BU) F43E095
Stores approval authority setup information that was created at the commodity and business unit level.
Delegation Master (F43E280)
Stores the details about the Requisition delegation. Details about the delegator, original requestor, delegated requestor, delegation period and the application on which the delegation is valid is stored inthis table.
129

JD Edwards EnterpriseOne ApplicationsRequisition Self Service Implementation Guide
Chapter 12Appendix B - Tables Used by the JD Edwards EnterpriseOne
Requisition Self Service System
130

JD Edwards EnterpriseOne ApplicationsRequisition Self Service Implementation Guide
Chapter 13Appendix C - Delivered User Defined Objects for Requisition
Self Service (Release 9.2 Update)
13 Appendix C - Delivered User DefinedObjects for Requisition Self Service (Release9.2 Update)
Delivered User Defined Objects for Requisition SelfService (Release 9.2 Update) This appendix discusses delivered user defined objects (UDOs) that you can use with the Requisition Self Servicesystem.
Requisition Self Service Notifications JD Edwards EnterpriseOne notifications enable you to improve your business efficiency through the use of proactivenotifications that are actionable. Proactive notifications enable the system to notify users of business events as theyhappen without the need for the user to be online.
This section discusses delivered notifications that you can use with the Requisition Self Service system. For a completelisting of available notifications, along with additional information about them, see the Notifications Cross Reference inOracle Support (Document 2365066.1 - JD Edwards EnterpriseOne Delivered Notifications), which can be found at:
https://support.oracle.com/epmos/faces/DocumentDisplay?id=2365066.1
For additional information about using and subscribing to notifications, see these topics:
• Creating a Notification in the JD Edwards EnterpriseOne Tools Notifications Guide .
• Testing Notifications in the JD Edwards EnterpriseOne Tools Notifications Guide .
• Subscribing to Notifications (Release 9.2.2) in the JD Edwards EnterpriseOne Tools Foundation Guide .
This table describes the notifications that you can use with the Requisition Self Service system:
Notification Description
JDE_NOTIFY_43E_High_Priority_Reqs
Notifies subscribers of open high priority requisitions for the subscription's order type and businessunit. This notification runs twice every weekday at 8:00 am and 2:00 pm. Note: Only those orders where the order date is less than or equal to the current date will be includedin this notification.
JDE_NOTIFY_43E_Over_Budget_Reqs
Notifies subscribers of over budget requisitions awaiting approval for the subscription's order type andbusiness unit. This notification runs twice every weekday at 8:00 am and 2:00 pm.
JDE_NOTIFY_43E_Spl_Request_Reqs
Notifies subscribers of open special request requisitions for the subscription's order type and businessunit. This notification runs twice every weekday at 8:00 am and 2:00 pm.
131

JD Edwards EnterpriseOne ApplicationsRequisition Self Service Implementation Guide
Chapter 13Appendix C - Delivered User Defined Objects for Requisition
Self Service (Release 9.2 Update)
Notification Description
Note: Only those orders where the order date is less than or equal to the current date will be includedin this notification.
132


![JD Edwards EnterpriseOne Administration Guide[1]JD Edwards EnterpriseOne Administration Guide Release 9.2 E53541-04 February 2019 Describes JD Edwards EnterpriseOne administration](https://static.fdocuments.us/doc/165x107/5f0f067c7e708231d4421dd3/jd-edwards-enterpriseone-administration-guide-1jd-edwards-enterpriseone-administration.jpg)