
Application Manual Plus - TN... · • Can be used beneath foundation slabs and with single or...
62
Preprufe ® Plus Application Manual
Transcript of Application Manual Plus - TN... · • Can be used beneath foundation slabs and with single or...

Preprufe® PlusApplication Manual
VAR Cover Preprufe® Manual Handbook.indd 2 27/02/2015 16:00

&of applying Preprufe® Plus
do'sdon'ts
Please turn over
VAR Cover Preprufe® Manual Handbook.indd 3 27/02/2015 16:00

Pre
pru
fe® -
So
me
Do
’s &
Do
n’t
s Don’ts 1. Do not use a protection screed over
Preprufe® Plus The membrane isdesigned to bond to structural concrete.
2. Do not use as pond or tank liner.3. Do not use Preprufe® Plus for installation
in concrete infilled hollow block wallconstruction. Preprufe® Plus is designedfor use with reinforced concrete designedfor a maximum crack width of 0.6mm.
4. Avoid curved shapes for permanentformwork and blinding otherwiseextensive cutting and folding of thePreprufe® Plus will be necessary. Angularformwork will generally be easier foruse with Preprufe® Plus.
5. Do not try to bond the selvedge if thePreprufe® Plus is wet. A hot air gun canbe used to dry the selvedge.
6. Do not use staples to fix Preprufe® Plus totemporary formwork.
7. Do not allow water to pond beneath thePreprufe® Plus prior to concreting - can liftto the membrane and damage the joints.
8. Do not ‘mix & match’ Grace waterproofingmembranes with membranes from othermanufacturers except with prioragreement with both companies.
9. Do not allow the vibrator to come intocontact with Preprufe® Plus - can damagethe membrane.
10. Do not apply Shotcrete to Preprufe® Plus.

Do’s1. Use flush fixings to fix Preprufe® Plus to permanent formwork.2. Place flush fixings through the Preprufe® Plus selvedge to enable them to be covered by the next overlapping sheet.3. Where fixings are made to secure vertical Preprufe® Plus to temporary formwork, 40 mm clout nails should be used, 20 mm being left exposed to provide an anchor for the nail during striking of the formwork.4. Seal fixings with 2 layers of Preprufe® tape where fixings have been placed through the membrane into blinding but not overlapped.5. Firm fold Preprufe® Plus at 90° changes in direction to allow maximum contact with the substrate.6. Extend the Preprufe® Plus beyond the starter bars rather than the edge of the stop-end formwork to ensure easy overlapping of the adjacent bay Preprufe® Plus. 7. Stop the Preprufe® Plus minimum 50 mm below top of concrete surface on temporary (removable) formwork.8. Use Preprufe® Tape at all overlaps including the adhesive selvedge when the ambient application temperature is expected to fall below 0°C.9. Seal ‘Fish Mouth’ openings i.e. where the overlapping Preprufe® Plus has not stuck to the layer beneath should be sealed, with Preprufe® Tape.10. Air lance debris away immediately prior to concreting unless there has been a heavy build up of mud on the Preprufe® Plus in which case use a high pressure water hose and air lance.11. Repair damage to the Preprufe® Plus membrane before concreting.12. Remove surplus water from the excavation to be concreted.13. Check all the release liner has been removed before concreting.14. Remove grout spillage on Preprufe® Plus as it can locally inhibit the bond of fresh concrete placed on it.15. Ensure that correct concreting and vibrating practices are observed during concreting.16. Concrete with pfa, additives and admixtures can be used with Preprufe® Plus.17. Wait until the concrete strength is 10 N/mm2 before striking the formwork.

PagesIntroduction Applications 4 IndependentAssessments 5 Advantages 5 Limitations 6 SystemComponents 6 MaterialProperties 8
HealthSafety&Environmental Issues FirstAidMeasures 10 Fire-fightingMeasures 10 HandlingandStorage 10 EnvironmentalEffects 10 PersonalProtectionEquipment(PPE) 11
Installation-General Deliverytosite 12 MaterialStorage 12 SubstratePreparation 13 RemovingPreprufe®Plusfromthebox 15 Tools/Materialsrequired 17
InstallationforSlabs Method1-VerticalPreprufe®<900mm 18 Installation-Internal&External 20 Method2-VerticalPreprufe®>900mm 22
Installation–Horizontal ApplicationSequence 24 EndLapsandCutEdges 26
Penetrations 28
MembraneRepair 29
Installation–VerticalApplication ApplicationSequence 30 PlacementonVerticalPileWalls 31
Installation–DoubleSidedFormwork Woodenformwork 32 Metalformwork 34 Preprufe®PlusPreparationwhen 35 Preprufe®800PA/Bituthene®areused onWalls InspectionProcedures 36 PlacementofReinforcingSteel 36 PlacingofConcrete 37 RemovalofFormwork 37
TroubleShooting Examples 38 Details 42
InstallationChecklist 58
Co
nte
nts
3

Preprufe®PluswaterproofmembranesarecompositesheetscomprisingarobustHDPEbacking,apressuresensitiveadhesiveandatrafficableweatherresistantcoating.Uniquely,themembranedevelopsacontinuousadhesivebondtoconcretepouredagainstit.Thispreventswatermigrationbetweenthestructureandthemembrane,substantiallyreducingtheriskofleaksandminimisingtheriskofaggressivesaltsinsolutionreachingthestructuralconcrete.
GraceConstructionProductscanprovidealistofapplicators,trainedbyGraceintheinstallationofPreprufe®Plus.
Applications•Waterandvapourproofingallbasement gradestoBS8102:1990•Waterproofingcivilengineering substructures.•Methane,carbondioxideandradon gasprotectioninexcessofthestandard membranerequirementsinBRE Reports211(Radon)and212(Methane andCarbonDioxide).•Protectionofreinforcedconcrete structuresinaggressiveground conditions.
Intr
od
uc
tio
n
4 5

Intr
od
uc
tio
n
IndependentAssessments•BBACertificateNo.97/3325•CECertificateNo.09/F017•MottMacDonaldSpecialServices ReportMay2001•NationalCertificationsavailable
Advantages•Canbeusedbeneathfoundationslabs andwithsingleordouble-sided formworksystems.•Sealsadhesivelytoconcretecast againstit.•Easytohandleandinstallwithout specialcornerpieces.•Alljointshavedoublesidebonded ‘selvedge’orPreprufe®Tapeoverlapsfor leakprotection.•Unaffectedbygroundwater contaminants,pondedwaterorwet/dry cycling.•Smoothsurfacemembrane–site contaminantseasilyremoved.•Excellentchemicalresistance–protects structurefromsalts,sulphateattackand mostcontaminantslikelytobefoundin theground.•Requiresnopriming,surface conditioningorprotectionscreeds.•Simplyinstalledwithoutanymechanical liftingdeviceorspecialequipment.•Noreleaseliner.Kickoutroll.
4 5

Intr
od
uc
tio
n Limitations•Preprufe®Plusshouldnotbe permanentlyexposedtosunlight.•Preprufe®Plusisnotintendedforroof underlaymentsorthroughwallflashing applications.•Preprufe®Plusshouldnotbeusedasa pondortankliner.•Preprufe®Plusshouldnotbeused betweenconcreteinfilledhollowblock walls.•Preprufe®Plusisnotintendedtoprovide themainwaterproofingforexpansion joints.•Preprufe®Plusisnotintendedfor negativesidewaterproofingapplications.•Preprufe®Plusshouldnotbeusedwhere in-servicetemperatureswillexceed 65°C.•Pourconcretewithin56days(42days inhotclimates)ofinstallationofthe membrane.
SystemComponents
6 7
AdhesivesurfaceofPreprufePlusMembrane

Intr
od
uc
tio
n
6 7
Preprufe®PlusZipLap™havebeentestedforhydrostaticheadresistancetoinexcessof70m(0.7MPa).
HDPEfilm
Preprufe®ZipLap™
Mate
ria
lP
rop
ert
ies
Prod
uct
Reco
mm
ende
d Ap
plic
atio
nsM
ater
ial P
rope
rties
Thic
knes
sRo
ll Si
zeRo
ll Ar
eaW
eigh
t per
uni
t
Prep
rufe
®
300R
Plu
s • B
enea
th s
ub-s
truct
ure
slabs
> 3
50 m
m th
ick.
• Hor
izont
al a
nd v
ertic
al a
pplic
atio
ns w
here
risk
of m
embr
ane
da
mag
e fro
m re
info
rcem
ent p
lace
men
t, ba
ckfill
ing
or o
ther
site
oper
atio
ns is
con
sider
ed h
igh.
1.2
mm
1.17
m x
31
m36
m2
50 k
g
Prep
rufe
®
160R
Plu
s• B
enea
th s
ub-s
truct
ure
slabs
< 3
50 m
m th
ick.
• Ver
tical
ly, a
gain
st s
ub-s
truct
ure
walls
with
sin
gle
or d
oubl
e
sided
form
work
sys
tem
s.
0.8
mm
1.17
m x
36.
5 m
42 m
242
kg
Prep
rufe
®
Tape
LT
• App
licat
ions
at –
5°C
to +
30°
C.• T
apin
g ro
ll end
laps
, cut
edg
e la
ps a
nd d
etai
ling.
0.7
mm
100
mm
x 1
5 m
2 kg
Prep
rufe
®
Tape
HC
• App
licat
ions
at +
10°
C to
+ 5
0°C.
• Tap
ing
roll e
nd la
ps, c
ut e
dge
laps
and
det
ailin
g.0.
7 m
m10
0 m
m x
15
m2
kg
8 9

Mate
ria
lP
rop
ert
ies
Prod
uct
Reco
mm
ende
d Ap
plic
atio
nsM
ater
ial P
rope
rties
Thic
knes
sRo
ll Si
zeRo
ll Ar
eaW
eigh
t per
uni
t
Bitu
then
e® L
M• L
iqui
d m
embr
ane
for d
etai
ling
term
inat
ions
, pile
cap
s an
d pi
pe
pe
netra
tions
. App
licat
ion
tem
pera
ture
5°C
and
risin
g.5.
7 kg
Gra
ce
Prot
ectio
n Bo
ard
• Opt
iona
l pro
tect
ion
of P
repr
ufe® 1
60R
appl
ied
in d
oubl
e sid
ed
fo
rmwo
rk, p
rior t
o ba
ckfill
ing.
3 m
m1
m x
2 m
5 kg
per
boa
rd
Adco
r®
550
MI/T
-MI
• Hyd
ro e
xpan
sive
inje
ctab
le w
ater
stop
for a
dded
sec
urity
of
con
cret
e co
nstru
ctio
n jo
ints
5 m
rolls
6 ro
lls/c
arto
n13
kg
Adco
r® 5
00S/
T• H
ydro
exp
ansiv
e wa
ters
top
for u
se in
con
cret
e co
nstru
ctio
n
join
ts a
nd a
t pip
e en
tries
.5
m ro
lls6
rolls
/car
ton
23 k
g
AT S
yste
m• H
ydro
-exp
ansiv
e PV
C co
-ext
rude
d wa
ters
top
for m
ovem
ent
and
exp
ansio
n jo
ints
.Av
aila
ble
in s
hape
s an
d co
nfigu
ratio
ns to
sui
t site
re
quire
men
ts.
Ref
er to
AT
syst
em D
ata
shee
t.
8 9

SafetydatasheetsforPREPRUFE®PLUS&PREPRUFE®TAPESarenotrequired,sincetheyarefinishedgoods.Nevertheless,customersareprovidedwiththeinformationbelowtoassistwiththesafeuseoftheproduct.SafetydatasheetsforotherGraceproductsareavailableonourwebsite:www.grace.comFirstAidMeasures•EyeContact:Directcontactwithadhesive layermaycauseirritation.Rinseopened eyeforseveralminutesunderrunning water.Seekimmediatemedicaladvice.
Fire-fightingMeasures •Suitableextinguishingmedia:Water, foam,andcarbondioxide.•Specialexposurehazards:Donot breathesmoke.•Specialequipmentforfire-fighters:Self containedbreathingapparatus.
HandlingandstorageGlovesshouldbeworntoreducehandcontamination.Anytransferofadhesivetoskinshouldberemovedwithsoapandwater-notsolvent.•Storeincool,drybuildingtoprevent physicaldamage.
EnvironmentaleffectsNotexpectedtobedangerousfortheenvironment.•SafetyInstructionsareonthesideof thePreprufe®cardboardcontainerboxes andonthemaincanofBituthene®LM.
He
alt
hS
afe
ty&
Envir
on
me
nta
lIs
su
es
10 11

He
alt
hS
afe
ty&
Envir
on
me
nta
lIs
su
esPersonalProtectionEquipment
(PPE)MinimumrecommendedPPEforinstallersofPreprufe®Plus/Preprufe®Tape/Adcor®500S/T/Adcor550MI/T-MI:•Safetyhelmet•Safetyshoes•Safetyglasses•WherePreprufe®isappliedinbright sunlightconditions,itisadvisablethat tintedsafetyglassesbeusedby installers•Gloves
MinimumrecommendedPPEforapplicationofBituthene®LMinnon-confinedareas:•Longsleevedoveralls•Safetyhelmet•Safetyfootwear•Safetyglasses/spectacles•Gloves-longgauntlettype•RefertoSafetyDataSheet
FullboxesofPreprufe®160RPlusand300RPlusrequiretwomentolift.Alternativelymechanicalliftingequipmentcanbeused.
WetPreprufe®withitsplasticreleaselinerinplacecanbeslipperytowalkon.
10 11

Insta
llati
on
-G
en
era
l
12 13
Deliverytosite
NormallyPreprufe®Plusisdeliveredtositeshrinkwrappedonpalletsandwillrequiredmechanicalequipmentforoffloadingatsite.However,smallordersmaybedeliveredasindividualrolls.
MaterialStorageStorePreprufe®Plusrollsvertically.Sequencedeliveriestoavoiddelays,butminimiseon-sitestorage.Selectasafe,coveredsecurelocationformaterialstorageforeachday’suseinalocationthatwon’trequiremovementasecondtime.Donotstackpalletsofwaterproofingonthejobsite.Providecoverontopandallsides.

Insta
llati
on
-G
en
era
l
12 13
SubstratePreparation
Suitablesubstratesinclude:•concreteblinding•wellcompactedsandonrolledcrushed stone•rigidinsulation•clayheaveboards•permanentformwork•removableformwork•19mmplywood•Plasticflutedprotectionboard•Hydroduct®drainagesheets•Adjacentsub-structures
Itisessentialthatthesubstrateissoundandsolidtoensurenomembranemovementduringtheconcretepour.
CompactedSandBlinding
ConcreteBlinding
Insta
llati
on
-G
en
era
l
14 15
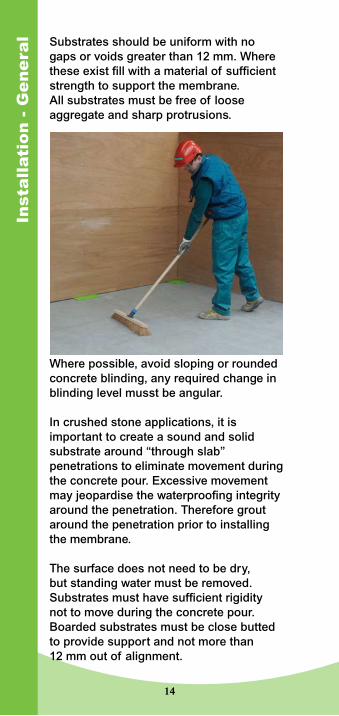
Substratesshouldbeuniformwithnogapsorvoidsgreaterthan12mm.Wheretheseexistfillwithamaterialofsufficientstrengthtosupportthemembrane.Allsubstratesmustbefreeoflooseaggregateandsharpprotrusions.
Wherepossible,avoidslopingorroundedconcreteblinding,anyrequiredchangeinblindinglevelmusstbeangular.
Incrushedstoneapplications,itisimportanttocreateasoundandsolidsubstratearound“throughslab”penetrationstoeliminatemovementduringtheconcretepour.Excessivemovementmayjeopardisethewaterproofingintegrityaroundthepenetration.Thereforegroutaroundthepenetrationpriortoinstallingthemembrane.
Thesurfacedoesnotneedtobedry,butstandingwatermustberemoved.Substratesmusthavesufficientrigiditynottomoveduringtheconcretepour.Boardedsubstratesmustbeclosebuttedtoprovidesupportandnotmorethan12mmoutofalignment.

Insta
llati
on
-G
en
era
l
14 15
2
RemovingPreprufe®PlusfromtheboxThefollowingsequenceindicatestherecommendedmethodforremovingthePreprufe®Plusfromitsbox.
1
2

Insta
llati
on
-G
en
era
l
16 17
3
4

Tools/MaterialsRequired•Heavydutylaproller•Utilityknifewithretractableblade (blademustbesharp).•Tapemeasure•Cottoncleaningcloths•Plywoodorsimilarcuttingboard•Thinmetalstraightedge•Chalkline•Broom•2metrelongpipeorheavybroomhandle•Spiralpaddleformixing Bituthene®LM•Heavy-dutylowspeed
(500rpm)drill•Roundnosetrowelorspatula•Requiredprotectionand/ordrainage boardsandotherancillaryproducts
Preprufe®Plusmembranesaresuppliedinrolls1.17mwidewithdualadhesivePreprufe®ZipLaps™onbothedgestoenablefullybondedlapsbetweenadjacentrolls.AllotherlapsmustbetapedwithPreprufe®Tape.
Insta
llati
on
-G
en
era
l
16 17

ApplicationSequenceforSlabs-Method1-verticallyappliedPreprufe®<900mm
1.Forminternal/externalcornersections
Formingcorners-refertopage20
2.Installhorizontal/verticalinterface.
Insta
llati
on
Fo
rS
lab
s
2
18 19
2
1AInternal
1BExternal
2

Insta
llati
on
Fo
rS
lab
s
3.Placehorizontallengths
Refertopage24
4.Removereleasefilm
5.Inspect&repairanydamage
5
18 19
3
4

Installation-Internal&ExternalCornersInternalandexternalcornersshouldbeformedasshowninthediagramsreturningthemembraneaminimumof100mmandsealingwithPreprufe®Tape.EnsurethattheapexofthecorneriscoveredandsealedwithTapeandrollfirmly.Creaseandfoldthemembranetoensureaclosefittothesubstrateprofileandavoidhollows.
Insta
llati
on
Fo
rS
lab
s
Internal External
20 21
Preprufe®Tape

Insta
llati
on
Fo
rS
lab
s
20 21
Measure,crease&foldmembrane
Foldinternalcorner&tape
Formexternalcorner&tape

ApplicationSequenceforSlabs-Method2-verticallyappliedPreprufe®>900mm1.Placehorizontallengthsfirst.
2.Forminternal/externalcorners. Refertopage23
3.Installhorizontal/vertical interface-wallpaperfashion.
4.Removereleasefilm
5.Inspect&repairanydamage
Insta
llati
on
Fo
rS
lab
s
5
22 23
4

Insta
llati
on
Fo
rS
lab
sCornersInternalandexternalcornersshouldbeformedasshowninthediagramsreturningthemembraneaminimumof100mmonthehorizontalandsealingwithPreprufe®Tape.EnsurethattheapexofthecorneriscoveredandsealedwithTapeandrollfirmly.Creaseandfoldthemembranetoensureaclosefittothesubstrateprofileandavoidhollows.
Internal External
22 23
Preprufe®Tape

Insta
llati
on
–H
ori
zon
tal Installation–Horizontal
Placethemembranewiththegreenzipstripfacingtowardstheconcretepour.Endlapsshouldbestaggeredtoavoidabuildupoflayers.Leavegreenandbluezipstripsonthemembraneuntiloverlapprocedureiscompleted.Accuratelypositionsucceedingsheetstooverlaptheprevioussheet3in.(75mm)alongthemarkedselvedge.Peelbackandremoveboththegreenandbluezipstripsintheoverlapareatoachieveanadhesivetoadhesivebondattheoverlap.Ensureacontinuousbondisachievedwithoutcreasesandrollfirmlywithaheavyroller.Oncompletionoftheinstallation,ensurecompleteremovaloftheplasticzipstripsfromalloverlapsandtape.
WheninstallingPreprufe®Plusincoldormarginalweatherconditions(<0°C)theuseofPreprufe®TapeLTisrecommendedatalllapsanddetailing.Preprufe®TapeLTshouldbeappliedtocleandrysurfacesandthereleaselinermustberemovedimmediatelyafterapplication.
24 25

Insta
llati
on
–H
ori
zon
tal
24 25

En
dL
ap
sa
nd
Cu
tE
dg
es EndLapsandCutEdges
Overlapallrollendsandcutedgesbyaminimum75mmandensuretheareaiscleanandfreefromcontamination,wipingwithadampclothifnecessary.
AllowtodryandapplyPreprufe®Tapecentredoverthelapandrollfirmly.Removebluereleaseliner.ReferalsotoPreprufe®PlusStandardDetails.
26 27

En
dL
ap
sa
nd
Cu
tE
dg
es
26 27
Pe
ne
trati
on
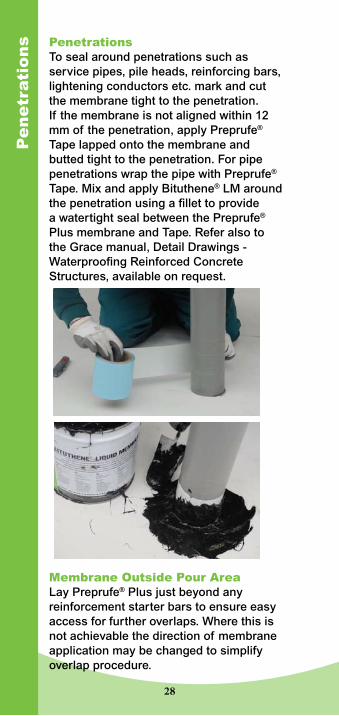
s PenetrationsTosealaroundpenetrationssuchasservicepipes,pileheads,reinforcingbars,lighteningconductorsetc.markandcutthemembranetighttothepenetration.Ifthemembraneisnotalignedwithin12mmofthepenetration,applyPreprufe®Tapelappedontothemembraneandbuttedtighttothepenetration.ForpipepenetrationswrapthepipewithPreprufe®Tape.MixandapplyBituthene®LMaroundthepenetrationusingafillettoprovideawatertightsealbetweenthePreprufe®PlusmembraneandTape.ReferalsototheGracemanual,DetailDrawings-WaterproofingReinforcedConcreteStructures,availableonrequest.
28 29
MembraneOutsidePourAreaLayPreprufe®Plusjustbeyondanyreinforcementstarterbarstoensureeasyaccessforfurtheroverlaps.Wherethisisnotachievablethedirectionofmembraneapplicationmaybechangedtosimplifyoverlapprocedure.

Me
mb
ran
eR
ep
airMembraneRepair
Inspectthemembranefordamagebeforeinstallationofreinforcementsteel,formworkandfinalplacementofconcrete.Cleanbyjetwashingifrequired.
Wipetheareawithadampclothtoensuretheareaiscleanandfreefromdust,andallowtodry.Forminorrepairs,applyPreprufe®Tapecentrallyoverthedamagedareaandrollfirmly.ForlargerrepairsuseapatchofPreprufe®PlusandtapealledgeswithPreprufe®Tape.RemoveplasticreleaselinerfromTape.
Whereexposedselvedgehaslostadhesionorlapshavenotbeensealed,ensuretheareaiscleananddryandoverbandwithPreprufe®Tapeandrollfirmly.
28 29

Insta
llati
on
–V
ert
ica
l Installation–VerticalApplythemembranewiththegreenzipstripfacingtowardstheconcretepour.Mechanicallyfastenthemembraneverticallyusingflatheadedfixingsappropriatetothesubstrate.Themembranemaybeinstalledinanyconvenientlength.Securethetopofthemembraneusingabattenorfixings50mmbelowthetopedge.Usefixingsattypically600mmcentrestosecurethemembraneflatagainstthesubstrate.Fixingscanbemadethroughtheselvedge,thisallowsfirmlyrolledoverlaps,whicharecoveredbythesubsequentstripsofPreprufe®Plus.AnyexposedfixingsshouldbepatchedwithPreprufe®Tape.Peelbackandremoveboththegreenandbluezipstripsintheoverlapareatoachieveanadhesivetoadhesivebondattheoverlap.Ensureacontinuousbondisachievedwithoutcreasesandrollfirmly.Oncompletionoftheinstallation,completely remove the plastic zip strips from all overlaps and tape.
30 31
Insta
llati
on
–V
ert
ica
lPlacementonVerticalPileWallsThePreprufe®Plusisfixedthroughtheselvedgeintotheregulariseddiaphragm/secantwallanddoesnotrequireanyseparationboardunlessusedtofaceupthewallingwhereitisroughandfullofvoidsanddepressions.BoardcanbeplywoodorhighqualityfibreboardcapableoftakingtheweightofPreprufe®Plusfixingsandtheweightofconcreteduringthepour.
Similarly,sheetpilingwillrequirethepriorinstallationofplywoodorhighqualityfibreboardorconcreteinfillbeforeinstallingPreprufe®Plusverticallyagainstthepiling.
30 31

Insta
llati
on
–D
ou
ble
Sid
ed
Fo
rmw
ork Installation–DoubleSided
FormworkWoodenformwork:1. Applythemembranewiththegreen zipstripfacingtowardstheconcrete pour.2. Cutlengthsofmembranetoheightof formworkless50mm.3. Alignthefirstpieceofmembrane againsttheformworkedgeand50mm belowthetopoftheformwork.4. Nailthemembraneinplaceatthetop oftheformworkusing40mm galvanisedcloutnailsat300mm centres.Thenailheadsshouldbeleft protrudingaminimum20mm.(This willenableencapsulationofthenail headwhentheconcreteispoured).5. Atthemiddleandbottomofthe formworkcutandapply150mmx150mm squarepatchesofBitustik™4000 doublesidedbituminoustapetoboth edgesofthemembrane.6. TheBitustik™4000patcheswill partiallyadherethemembranetothe formworkandkeepitflatduringthe concretepour.7. Alledgelapsshouldbeformed usingtheself-adhesiveselvedgeon themembrane.8. Anycutedgelapsandendlapsshould besealedwithPreprufe®Tape.9. Oncompletionoftheinstallation, completelyremovetheplasticzip stripsfromalloverlapsandtape.10.Placeformwork,pourandvibrate concrete.11.Removeformworkwhenconcretehas aminimumstrengthof10N/mm2.
32 33

Insta
llati
on
–D
ou
ble
Sid
ed
Fo
rmw
ork
.
20 mm
50 mm
40 mm galvanisedclout nail withlarge head
nail bentflush tomembrane
PreprufePlus
12.Afterremovalofformwork: a.Useahammertobendall protrudingnailpointsflushto membranesurface. b.FilltiebarholeswithBETEC®350 orGraceapprovedequivalent. Allow48hourstodrythenprime withPreprufe®SC1andcoverwith cutpatchesofPreprufe®800PA selfadhesivemembrane,150mmx 150mm. c.LapPreprufe®Plusmembraneat bottomofwalltoslabedge membraneusingPreprufe®Tape. d.Formagreedterminationdetailat groundlevelusingBituthene®LM.
.
20 mm
50 mm
40 mm galvanisedclout nail withlarge head
nail bentflush tomembrane
PreprufePlus
Preprufe®Plus-DoubleSidedFormwork(wooden)TerminationDetailBeforeFormworkRemoval
Preprufe®Plus-DoubleSidedFormwork(wooden)TerminationDetailAfterFormworkRemoval
32 33

Insta
llati
on
-D
ou
ble
Sid
ed
Fo
rmw
ork
34 35
Installation–DoubleSidedFormworkMetalformwork:1. InstallPreprufe®Plusasforwooden formworkexcept:2. AttopofmetalformworkfixPreprufe® Plusmembranetoflangeofformwork systemusingboltsortiewire.3. Onremovalofformworkcuttheexcess unbondedmembraneatthetopofthe wallflush,usingastraightedgetoavoid damagingthebondedmembrane.
Preprufe®800PApostappliedtowalls
inconjunctionwithPreprufe®Plusbelowslabs
Bituthene®postappliedtowallsin
conjunctionwithPreprufe®Plusbelowslabs
5
43
2
1A
2
1B
43
5

Pre
pru
fe®8
00
PA
/B
itu
the
ne
®o
nW
all
s-
Pre
pru
feP
rep
ara
tio
n
34 35
Preprufe®PlusPreparationwhenPreprufe®800PAorBituthene®areusedonWallsInspectthePreprufe®Plusaroundtheperimeteredgeoftheconcreteslab.Identifyanyexposednon-selvedgeoverlapsinPreprufe®Plus.Toensurecontinuityofthefullybondedsystem,carefullycutandremovea75mmtriangularpieceofthetopflapofPreprufe®Plusonly,asshownshadedinthestandarddetail,‘SlabPerimeterDetail–NonSelvedgeLap.’
25
Do not prime Preprufe R with
B2 Primer
Bituthene 8000 on primed concrete
surface
Preprufe
BitutheneLM
Adcor500S
75 mm overlap
75 mm
Taped non-selvedge lapPoured Concrete Remove formwork Cut and remove shaded piece beforeapplying Bituthene
1234
1
2
4
Slab Perimeter Detail
25
Do not prime Preprufe R with
B2 Primer
Bituthene 8000 on primed concrete
surface
Preprufe
BitutheneLM
Adcor500S
75 mm overlap
75 mm
Taped non-selvedge lapPoured Concrete Remove formwork Cut and remove shaded piece beforeapplying Bituthene
1234
1
2
4
Slab Perimeter Detail
PerimeterDetailforNon-SelvedgeLap
Preprufe®800PAonprimedconcretesurfaceBituthene®onprimedconcretesurfaceBituthene®LMDonotprimePreprufe®PluswithPrimerPreprufe®PlusAdcor®500S/T/Adcor®550MI/T-MI
1A
23
1B
45

Insp
ec
tio
nP
roc
ed
ure
s
36 37
InspectionProceduresPreprufe®Plusapplication’sshouldbeinspectedoncompletionofaspecificareabeforeplacinganyreinforcingsteel.AnydamagetothemembranesystemshouldbemadegoodusingPreprufe®TapeoroversizepatchingwithPreprufe®Plus.
Duringplacingofreinforcingsteelanydamageshouldbeidentifiedandmadegoodwhileaccesstothemembraneisrelativelyeasy.Oncompletionofreinforcingplacementanotherinspectionshouldoccurandanydamagemadegood.
ItshouldbenotedthatuseofanairlancetoblowoutdebrispriortopouringconcreteisagoodidentifierofpoorlybondedPreprufe®Tape,andoverlaps.AfurtherapplicationofPreprufe®Tapewillberequiredaftertheaffectedareashavebeencleanedanddried.
PlacingofReinforcingSteelBeforeplacingreinforcementensurethatthemembraneapplicationiscontinuous,hasbondedlaps,endlapstaped,penetrationsandpileheadssealedwithBituthene®LMandalltheplasticreleasefilmremovedfromthemembranesandtapes.
Placingofthereinforcementshouldbedonewithcaretopreventdamagetothemembraneusingspreadertypespacerblocksorsimilar,toavoidpointloadingsandpuncturing.Progressiveremovaloftemporarymembraneprotectionusedforaccessandstorageshouldoccurassteelfixingproceeds.LocaliseddisplacementofthePreprufe®adhesivemayoccuraroundspacerblocksbutisnotdetrimentaltomembraneperformance.
PlacingofConcreteEnsuretheplasticzipstripshavebeenremovedfromalloverlapsandTape.
Itisrecommendedthatconcretebepouredwithin56daysofapplicationofthemembrane.WherePreprufe®Plusisusedinhotclimates,themembraneexposureshouldbereducedto42days.
Concretemustbeplacedandcompactedcarefullytoavoiddamagetothemembrane.Neveruseasharpobjecttoconsolidatetheconcrete.
WheregroutsplashesoccuronthePreprufe®Plustheseshouldbeimmediatelyremovedbeforecuringbeginsandthesurfacecleanedwithdampcloths.IfgroutsplasheshaveoccurredandbondedontothePreprufe®Plus,aBitustik™stripshouldbeappliedtothecleanedanddriedundersideofthemembranetoenableanunderlaptobemadeensuringmembranecontinuity.
AlternativelygroutmayberemovedwithametalscrapertogetherwiththetopadhesivelayertoexposethewhiteHDPEbeforejoiningorlappingadjacentsheet.
RemovalofFormworkPreprufe®Plusmembranescanbeappliedtoremovable,slabperimeterformwork,pilecapsetc.Onceconcreteispoured,theformworkmustremaininplaceuntiltheconcretehasgainedsufficientcompressivestrengthtodevelopthesurfacebondwithPreprufe®Plus.
Aminimumconcretecompressivestrengthof10N/mm2isrecommendedpriortostrippingformworksupportingPreprufe®Plusmembranes.Prematurestrippingmayresultinlossofadhesionbetweenthemembraneandconcrete.

Co
nc
rete
Pla
ce
me
nt
an
dF
orm
wo
rkR
em
ova
l
36 37
InspectionProceduresPreprufe®Plusapplication’sshouldbeinspectedoncompletionofaspecificareabeforeplacinganyreinforcingsteel.AnydamagetothemembranesystemshouldbemadegoodusingPreprufe®TapeoroversizepatchingwithPreprufe®Plus.
Duringplacingofreinforcingsteelanydamageshouldbeidentifiedandmadegoodwhileaccesstothemembraneisrelativelyeasy.Oncompletionofreinforcingplacementanotherinspectionshouldoccurandanydamagemadegood.
ItshouldbenotedthatuseofanairlancetoblowoutdebrispriortopouringconcreteisagoodidentifierofpoorlybondedPreprufe®Tape,andoverlaps.AfurtherapplicationofPreprufe®Tapewillberequiredaftertheaffectedareashavebeencleanedanddried.
PlacingofReinforcingSteelBeforeplacingreinforcementensurethatthemembraneapplicationiscontinuous,hasbondedlaps,endlapstaped,penetrationsandpileheadssealedwithBituthene®LMandalltheplasticreleasefilmremovedfromthemembranesandtapes.
Placingofthereinforcementshouldbedonewithcaretopreventdamagetothemembraneusingspreadertypespacerblocksorsimilar,toavoidpointloadingsandpuncturing.Progressiveremovaloftemporarymembraneprotectionusedforaccessandstorageshouldoccurassteelfixingproceeds.LocaliseddisplacementofthePreprufe®adhesivemayoccuraroundspacerblocksbutisnotdetrimentaltomembraneperformance.
PlacingofConcreteEnsuretheplasticzipstripshavebeenremovedfromalloverlapsandTape.
Itisrecommendedthatconcretebepouredwithin56daysofapplicationofthemembrane.WherePreprufe®Plusisusedinhotclimates,themembraneexposureshouldbereducedto42days.
Concretemustbeplacedandcompactedcarefullytoavoiddamagetothemembrane.Neveruseasharpobjecttoconsolidatetheconcrete.
WheregroutsplashesoccuronthePreprufe®Plustheseshouldbeimmediatelyremovedbeforecuringbeginsandthesurfacecleanedwithdampcloths.IfgroutsplasheshaveoccurredandbondedontothePreprufe®Plus,aBitustik™stripshouldbeappliedtothecleanedanddriedundersideofthemembranetoenableanunderlaptobemadeensuringmembranecontinuity.
AlternativelygroutmayberemovedwithametalscrapertogetherwiththetopadhesivelayertoexposethewhiteHDPEbeforejoiningorlappingadjacentsheet.
RemovalofFormworkPreprufe®Plusmembranescanbeappliedtoremovable,slabperimeterformwork,pilecapsetc.Onceconcreteispoured,theformworkmustremaininplaceuntiltheconcretehasgainedsufficientcompressivestrengthtodevelopthesurfacebondwithPreprufe®Plus.
Aminimumconcretecompressivestrengthof10N/mm2isrecommendedpriortostrippingformworksupportingPreprufe®Plusmembranes.Prematurestrippingmayresultinlossofadhesionbetweenthemembraneandconcrete.
Tro
ub
leS
ho
oti
ng
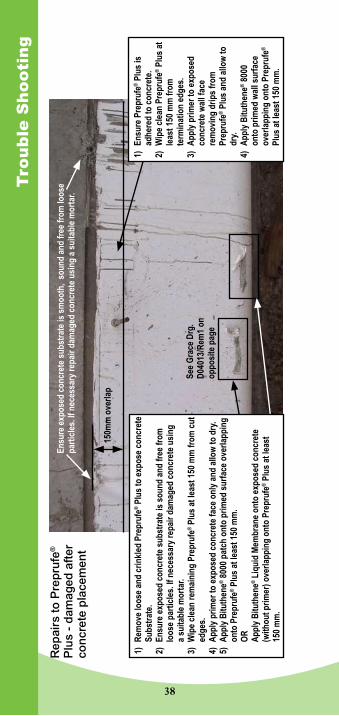
150m
m o
verla
p
Ensu
re e
xpos
ed c
oncr
ete
subs
trat
e is
sm
ooth
, so
und
and
free
from
loos
e pa
rtic
les.
If n
eces
sary
repa
ir da
mag
ed c
oncr
ete
usin
g a
suita
ble
mor
tar.
See
Gra
ce D
rg.
D04
013/
Rem
1 on
op
posi
te p
age
1) E
nsur
e Pr
epru
fe® P
lus
is
ad
here
d to
con
cret
e.2)
Wip
e cl
ean
Prep
rufe
® P
lus
at
le
ast 1
50 m
m fr
om
term
inat
ion
edge
s.3)
App
ly p
rimer
to e
xpos
ed
co
ncre
te w
all f
ace
re
mov
ing
drip
s fr
om
Prep
rufe
® P
lus
and
allo
w to
dry.
4) A
pply
Bitu
then
e® 8
000
on
to p
rimed
wal
l sur
face
over
lapp
ing
onto
Pre
pruf
e®
Pl
us a
t lea
st 1
50 m
m.
1) R
emov
e lo
ose
and
crin
kled
Pre
pruf
e® P
lus
to e
xpos
e co
ncre
te
Su
bstr
ate.
2) E
nsur
e ex
pose
d co
ncre
te s
ubst
rate
is s
ound
and
free
from
loos
e pa
rtic
les.
If n
eces
sary
repa
ir da
mag
ed c
oncr
ete
usin
g
a
suita
ble
mor
tar.
3) W
ipe
clea
n re
mai
ning
Pre
pruf
e® P
lus
at le
ast 1
50 m
m fr
om c
ut
ed
ges.
4) A
pply
prim
er to
exp
osed
con
cret
e fa
ce o
nly
and
allo
w to
dry
.5)
App
ly B
ituth
ene®
800
0 pa
tch
onto
prim
ed s
urfa
ce o
verla
ppin
g
on
to P
repr
ufe®
Plu
s at
leas
t 150
mm
.
OR
A
pply
Bitu
then
e® L
iqui
d M
embr
ane
onto
exp
osed
con
cret
e
(w
ithou
t prim
er) o
verla
ppin
g on
to P
repr
ufe®
Plu
s at
leas
t
150
mm
.
Rep
airs
toP
rep
rufe
®
Plu
s-
dam
aged
aft
erco
ncr
ete
pla
cem
ent
38 39

Tro
ub
leS
ho
oti
ng
38 39
Gra
ceD
raw
ing

Tro
ub
leS
ho
oti
ng
Ensu
re e
xpos
ed c
oncr
ete
subs
trat
e is
sm
ooth
, sou
nd a
nd fr
ee fr
om lo
ose
part
icle
s. If
nec
essa
ry re
pair
dam
aged
con
cret
e us
ing
a su
itabl
e m
orta
r.
ASe
e G
race
Drg
. D
0401
3/R
em2
B1)
Rem
ove
loos
e an
d cr
inkl
ed P
repr
ufe®
Plu
s
to e
xpos
e co
ncre
te S
ubst
rate
.2)
Ens
ure
expo
sed
conc
rete
sub
stra
te is
soun
d an
d fr
ee fr
om lo
ose
part
icle
s. If
nece
ssar
y re
pair
dam
aged
con
cret
e
us
ing
a su
itabl
e m
orta
r.3)
Wip
e cl
ean
rem
aini
ng P
repr
ufe®
Plu
s at
le
ast 1
50 m
m fr
om c
ut e
dges
.4)
App
ly p
rimer
to e
xpos
ed c
oncr
ete
face
only
and
allo
w to
dry
.5)
App
ly P
repr
ufe®
800
PA p
atch
ont
o pr
imed
surf
ace
over
lapp
ing
onto
Pre
pruf
e® P
lus
at
le
ast 1
50 m
m.
O
R
App
ly B
ituth
ene®
Liq
uid
Mem
bran
e on
to
ex
pose
d co
ncre
te (w
ithou
t prim
er)
over
lapp
ing
onto
Pre
pruf
e® P
lus
at le
ast
15
0mm
.
Rep
airs
toP
rep
rufe
®P
lus
-d
amag
eda
fter
co
ncr
ete
pla
cem
ent
40 41

Tro
ub
leS
ho
oti
ng
40 41
Gra
ceD
raw
ing

De
tail
s
No
n-S
elve
dge
Ove
rlap
D
etai
lRC
Wal
lPla
nS
elve
dge
Ove
rlap
Det
ail
RC
Wal
lPla
n
42 43

All
th
ea
bove
de
tail
sa
rea
va
ila
ble
via
ww
w.g
rac
e.c
om
De
tail
s
42 43
No
n-S
elve
dge
Ove
rlap
D
etai
lRC
Sla
bS
elve
dge
Ove
rlap
Det
ail
RC
Sla
b

De
tail
s
RC
Sla
bC
on
stru
ctio
nJ
oin
t
44 45

All
th
ea
bove
de
tail
sa
rea
va
ila
ble
via
ww
w.g
rac
e.c
om
De
tail
s
44 45
RC
Sla
bE
xpan
sio
nJ
oin
tP
ileD
etai
l(l
arge
dia
met
er)

De
tail
s
Pile
Det
ail
(sm
alld
iam
eter
)P
ipe
Th
rou
gh
RC
Sla
b
46 47

All
th
ea
bove
de
tail
sa
rea
va
ila
ble
via
ww
w.g
rac
e.c
om
De
tail
s
46 47
RC
Sla
b-
Ro
dP
enet
ratio
nN
ewT
oE
xist
ing
Sla
bD
etai
lP
rep
rufe
®
Not
eG
race
Con
stru
ctio
n P
rod
ucts
can
not a
ccep
t re
spon
sib
ility
for
moi
stur
e b
ypas
sing
the
new
w
ater
pro
ofin
g th
roug
h th
e ex
istin
g s
truc
ture
.

De
tail
s
RC
Wal
lCo
nst
ruct
ion
Jo
int
48 49
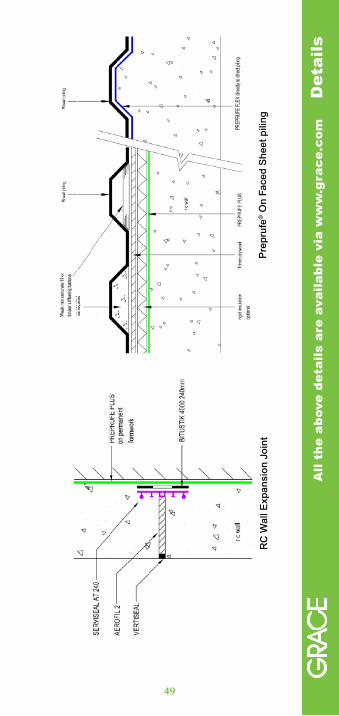
All
th
ea
bove
de
tail
sa
rea
va
ila
ble
via
ww
w.g
rac
e.c
om
De
tail
s
RC
Wal
lExp
ansi
on
Jo
int
Pre
pru
fe®O
nF
aced
Sh
eetp
ilin
g
48 49
De
tail
s
Pip
eT
hro
ug
hR
CW
all
Pre
-Fix
edF
orm
wo
rkT
ie
det
ail
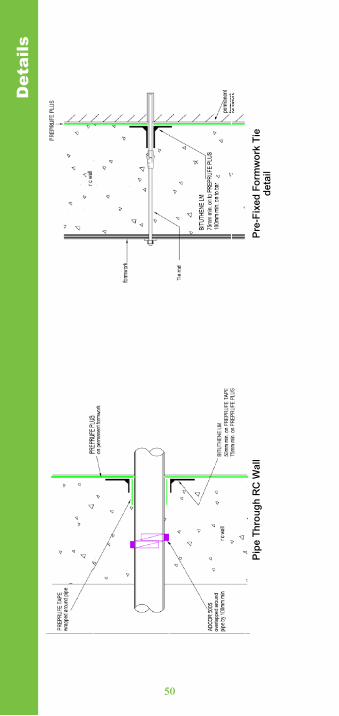
50 51

All
th
ea
bove
de
tail
sa
rea
va
ila
ble
via
ww
w.g
rac
e.c
om
De
tail
s
50 51
RC
Wal
lBas
eD
etai
lA
gain
stP
erm
anen
tSh
utt
er
Alte
rnat
ive
Pre
pru
fe®
Co
nfig
ura
tion
H
ori
zon
talT
oV
ertic
alTo
be
read
inc
on
jun
ctio
n
with
ab
ove
det
ails

De
tail
s
52 53
RC
Wal
lBas
eD
etai
lWith
D
rain
Sh
eet
Alte
rnat
ive
Pre
pru
fe®
Co
nfig
ura
tion
H
ori
zon
talT
oV
ertic
alTo
be
read
inc
on
jun
ctio
n
with
ab
ove
det
ails

All
th
ea
bove
de
tail
sa
rea
va
ila
ble
via
ww
w.g
rac
e.c
om
De
tail
s
RC
Wal
lTo
Up
per
Lev
el
RC
Sla
bD
etai
lP
rep
rufe
®to
Pre
pru
fe®
52 53

De
tail
s
RC
Wal
lTo
Up
per
Lev
elR
CS
lab
Det
ail
Pre
pru
fe®to
Pre
pru
fe®
Sla
bE
dge
Ter
min
atio
nP
rep
rufe
®
54 55

All
th
ea
bove
de
tail
sa
rea
va
ila
ble
via
ww
w.g
rac
e.c
om
De
tail
s
Pile
Dir
ectT
oS
lab
Pre
pru
fe®T
erm
inat
ion
sO
nM
on
olit
hic
ally
Cas
tPile
Cap
54 55

De
tail
s
56 57
Pile
Cap
-F
ully
Tan
ked
1P
ileC
ap-
Fu
llyT
anke
d2
All
th
ea
bove
de
tail
sa
rea
va
ila
ble
via
ww
w.g
rac
e.c
om
De
tail
s
56 57
Mo
no
lith
icP
ileC
ap-
Dis
con
tinu
ou
sW
ater
pro
ofin
g1
Ap
plic
able
On
lyT
oP
ileca
ps
Ove
r60
0m
mD
eep
Mo
no
lith
icP
ileC
ap-
Dis
con
tinu
ou
sW
ater
pro
ofin
g2
Ap
plic
able
On
lyT
oP
ileca
ps
Ove
r60
0m
mD
eep
InstallationChecklistBeforePreprufe®PlusInstallationCheck• Substrateisfirm®ular.• Gapsorvoidsgreaterthan12mm filled.• Noprotrusionslikelytodamage membrane.• Substratesweptclean.• Nopondedwater.• Tools&equipmentinplace.• InstallersaretrainedforPreprufe®Plus installation.• Concretingtobewithin56days (42daysinhotclimates)ofPreprufe®
Plusinstallation.
Preprufe®Installation–referpages12to37AfterPreprufe®InstallationCheck• AreaofinstalledPreprufe®Plus.• Preprufe®Plusside&endlapsare sealed.ReinforcewithPreprufe®Tapeif necessary.• Internal&externalcornersaresound &properlytaped.Reinforcewith Preprufe®Tapeifnecessary.• Damagetomembraneisrepaired. Referpages29.• Penetrationsandpile(head)treatment hasbeencorrectlycarriedout.• Temporaryfixingstoformwork.• Ensureplasticzipstripshavebeen removedfromalloverlapsandTape.
Insta
llati
on
Ch
eck
list
58

Insta
llati
on
Ch
eck
list
Placement of Reinforcing SteelCheck• Temporary membrane protection where grinding/welding etc. being carried out.• Temporary protection removed as installation progresses.• Spacer blocks used beneath reinforcement.• Any damage to Preprufe® Plus repaired as installation of reinforcement progresses.• Again all plastic zip strips removed from all overlaps and tape.
Immediately before ConcretingCheck• Damage to Preprufe® Plus & Laps. Repair as necessary.• All plastic zip strips removed.• External waterstop is secured and correctly positioned/sealed against Preprufe® Plus.• Preprufe® Plus self-adhesive laps area intact behind external waterstop.• Membrane surface clear of dust & debris.• Concreting will be within 56 days (42 days in hot climates) of membrane installation.
During ConcretingCheck• Concrete placement procedure will not damage membrane.• Vibrating pokers do not touch the membrane surface.
Formwork RemovalCheck• Concrete has a minimum compressive strength of 10 N/mm2.• Good membrane to concrete adhesion. Repair if necessary.
59

Adcor, Bituthene and Preprufe are registered trademarks of W R Grace & Co.-Conn. Advanced Bond Technology is a trademark of W R Grace & Co.-Conn.
The information given is based on data and knowledge considered to be true and accurate and is offered for the user’s consideration, investigation and verification. Since the conditions of use are beyond our control we do not warrant the results to be obtained. Please read all statements, recommendations or suggestions in conjunction with our conditions of sale including those limiting warranties and remedies which apply to all goods supplied by us. No statement, recommendation or suggestion is intended for any use which would violate or infringe statutory obligations or any rights belonging to a third party. Products included in this publication may be covered by patents.
© 2015 Grace Construction Products Ltd.Printed in England - 02.15 - CSGTV09022015
Grace technical experts can assist throughout your project delivery process
Grace has a global specification team committed to ensure that projects in all countries run smoothly and receive full support and coordination from the conception of the specification to its execution. No matter the distance between you and your project, we can help.
Grace’s team has developed relationships, infrastructure and knowledge of the complexities of construction practices in all regions around the world and offers a broad technology portfolio.
Grace supplies products to more than 120 countries worldwide, through its plants and facilities in more than 40 countries, supported by a team of almost 6,000 people.
grace.com/constructionwww.preprufe.com
VAR Cover Preprufe® Manual Handbook.indd 1 27/02/2015 16:00