Application, Maintenance and Removal · 2012. 2. 4. · Instruction Bulletin 5.27 Release B,...
12
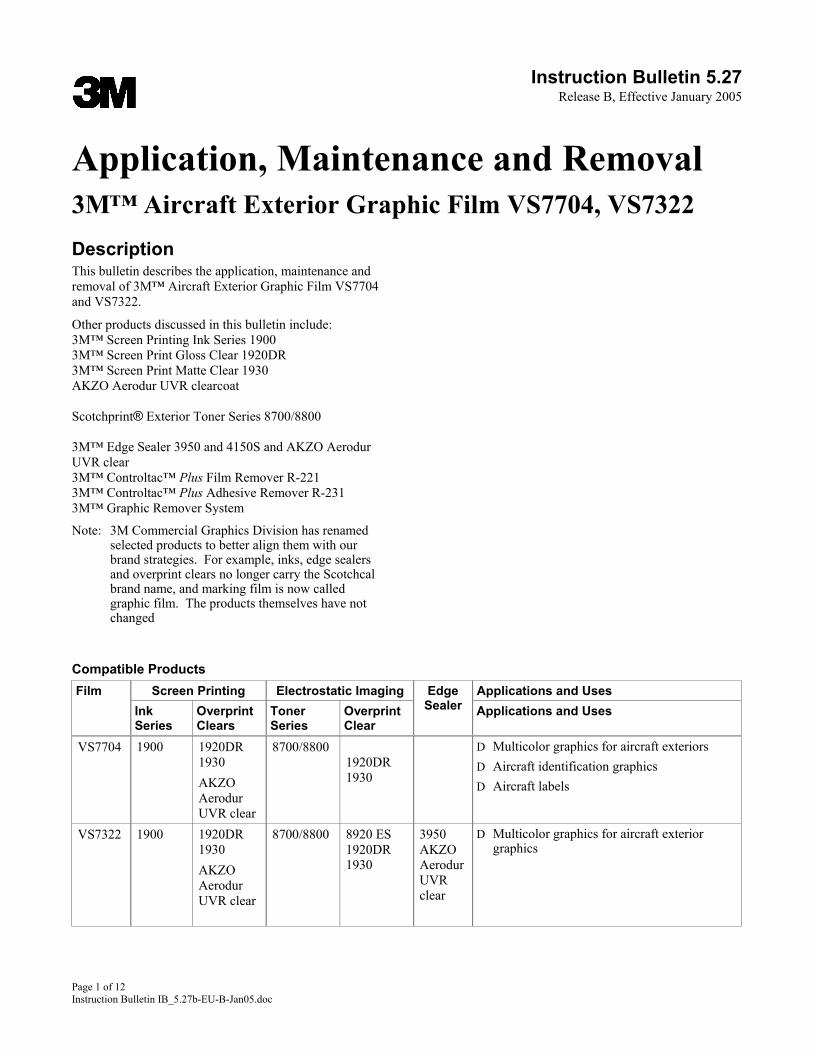
Instruction Bulletin 5.27 Release B, Effective January 2005 Application, Maintenance and Removal 3M™ Aircraft Exterior Graphic Film VS7704, VS7322 Description This bulletin describes the application, maintenance and removal of 3M™ Aircraft Exterior Graphic Film VS7704 and VS7322. Other products discussed in this bulletin include: 3M™ Screen Printing Ink Series 1900 3M™ Screen Print Gloss Clear 1920DR 3M™ Screen Print Matte Clear 1930 AKZO Aerodur UVR clearcoat Scotchprint® Exterior Toner Series 8700/8800 3M™ Edge Sealer 3950 and 4150S and AKZO Aerodur UVR clear 3M™ Controltac™ Plus Film Remover R-221 3M™ Controltac™ Plus Adhesive Remover R-231 3M™ Graphic Remover System Note: 3M Commercial Graphics Division has renamed selected products to better align them with our brand strategies. For example, inks, edge sealers and overprint clears no longer carry the Scotchcal brand name, and marking film is now called graphic film. The products themselves have not changed Compatible Products Screen Printing Electrostatic Imaging Applications and Uses Film Ink Series Overprint Clears Toner Series Overprint Clear Edge Sealer Applications and Uses VS7704 1900 1920DR 1930 AKZO Aerodur UVR clear 8700/8800 1920DR 1930 D Multicolor graphics for aircraft exteriors D Aircraft identification graphics D Aircraft labels VS7322 1900 1920DR 1930 AKZO Aerodur UVR clear 8700/8800 8920 ES 1920DR 1930 3950 AKZO Aerodur UVR clear D Multicolor graphics for aircraft exterior graphics Page 1 of 12 Instruction Bulletin IB_5.27b-EU-B-Jan05.doc
Transcript of Application, Maintenance and Removal · 2012. 2. 4. · Instruction Bulletin 5.27 Release B,...
Instruction Bulletin 5.27
Release B, Effective January 2005
Application, Maintenance and Removal 3M™ Aircraft Exterior Graphic Film VS7704, VS7322Description This bulletin describes the application, maintenance and removal of 3M™ Aircraft Exterior Graphic Film VS7704 and VS7322.
Other products discussed in this bulletin include: 3M™ Screen Printing Ink Series 1900 3M™ Screen Print Gloss Clear 1920DR 3M™ Screen Print Matte Clear 1930 AKZO Aerodur UVR clearcoat Scotchprint® Exterior Toner Series 8700/8800 3M™ Edge Sealer 3950 and 4150S and AKZO Aerodur UVR clear 3M™ Controltac™ Plus Film Remover R-221 3M™ Controltac™ Plus Adhesive Remover R-231 3M™ Graphic Remover System
Note: 3M Commercial Graphics Division has renamed selected products to better align them with our brand strategies. For example, inks, edge sealers and overprint clears no longer carry the Scotchcal brand name, and marking film is now called graphic film. The products themselves have not changed
Compatible Products Screen Printing Electrostatic Imaging Applications and Uses Film
Ink Series
Overprint Clears
Toner Series
Overprint Clear
Edge Sealer Applications and Uses
VS7704 1900
1920DR 1930 AKZO Aerodur UVR clear
8700/8800 1920DR 1930
D Multicolor graphics for aircraft exteriors D Aircraft identification graphics D Aircraft labels
VS7322 1900
1920DR 1930 AKZO Aerodur UVR clear
8700/8800 8920 ES 1920DR 1930
3950 AKZO Aerodur UVR clear
D Multicolor graphics for aircraft exterior graphics
Page 1 of 12 Instruction Bulletin IB_5.27b-EU-B-Jan05.doc

Note: For the full product names of the 3M products listed
on this page, please see page 1.
Compatible Application Surfaces and Substrates • Films VS7704: For use on flat surfaces with or without
flush rivets and simple curved surfaces. Apply to clean, bare, primed or painted aluminum
• Film VS7322: Can be used on a raised bead riveted surface (maximum dimensions of rivets: 9.5 mm (3/8”) wide by 3 mm (1/8 inch) high). Apply to clean, bare, primed or painted aluminum
Limitations of End Uses 3M has identified certain limitations for these films. This listing is not meant to imply that all other applications are safe or will provide acceptable performance.
• These films are only for exterior aircraft graphics. However, the aircraft operator is responsible for determining if installing this product requires regulatory approval from the operator’s authorizing agent or appropriate aviation authorities.
• This film is restricted for sale to properly trained users. The end user is responsible for determining the product’s suitability for the end user’s application.
• Do not use in applications that require conformance to Mil-P-38477A.
• For 3M™ Aircraft Exterior Graphic Film VS7322 only: Do not use for any regulatory-required graphics.
• For 3M™ Aircraft Exterior Graphic Films VS7704: Polyester film is not as conformable as other film constructions, such as vinyl, that may be used on aircraft. This is a property for all polyester film constructions on the market. Keep in mind that polyester film does not conform well over rivets, ridges, valleys and other contours. Also read the Application section in the individual Product Bulletins.
• Do not use this film on these surfaces: - Areas exposed to severe abrasion
- Within 406 mm (16 inches) of leading edges
- Areas exposed to high operating temperatures
- Interior surfaces
- Surfaces exposed to leaking fluids, such as LD-4
- Film VS7704: Raised, bead-riveted surfaces, unless cut around and film removed from the raised rivet.
- Covering seams, unless film is completely cut along seam
- Hinges, locking mechanisms or other similar uneven surfaces
- Extreme, sharply rounded or complex curves
• Do not apply film at less than 10°C (50°F). Film may not have sufficient adhesion at lower application temperatures.
• Graphics made for automotive Original Equipment Manufacturers (OEM).
• For optimum film performance, new users of 3M aircraft exterior graphic films should contact 3M Technical Service at +49 02131/14-3500 before fabricating, applying, maintaining or removing this product.
Health and Safety When handling any chemical products, read the manufacturers’ container labels and the Material Safety Data Sheets (MSDS) for important health, safety and environmental information.
To obtain MSDS sheets for 3M products:
Electronically, visit us at http://www.3m.com/msds.
When using any equipment, always follow the manufacturers’ instructions for safe operation.
Shipping and Storage • Keep film and processed graphic in a clean area away
from excessive moisture and out of direct sunlight. Maintain the temperature below 38°C (100°F).
• Store rolls horizontally in the shipping carton. Return partially used rolls to the shipping carton, replace roll-end inserts and store horizontally.
• Ship cut sheets and fabricated parts flat with minimal pressure on the stacks or wind them with the film side out around a core of the following size: - Films VS7704: at least 200 mm (8 inches)
diameter
- Film VS7322: at least 152 mm (6 inch) diameter
• Unprocessed film has a shelf life of 2 years after receipt. Processed film has a shelf life of 1 year. However, the total shelf life of a graphic before and after processing cannot exceed 2 years.
Page 2 of 12 Instruction Bulletin IB_5.27b-EU-B-Jan05.doc

Note: For the full product names of the 3M products listed
on this page, please see page 1 and 2. Surface Preparation
Do not assume that the surface is clean. All substrates must be cleaned. The surface location and condition determines which preparation method to use.
Application Materials • 3MTM surface preparation system Unpainted Exterior • 1 inch masking tape 1. Clean the surface with a solvent such as 3M™
Surface Preparation System or isopropyl alcohol, and wipe dry with clean lint free rags. Do not allow the solvent to evaporate before wiping.
• Edge sealers
Tools • 6 to 8 foot (1.8 to 2.4 m) table 2. Repeat until you are sure all contaminants are
removed. • 8 foot (3 m) measuring tape • Metal straight edge
Primed Exterior • Clean lint free rags
1. Sand and prepare the final primer coat according to the paint manufacturer’s directions. • 3M™ PA-1 Plastic Applicator (gold)
• Low friction sleeve 2. Clean the surface with a solvent such as 3M™ Surface Preparation System or isopropyl alcohol and wipe dry with clean lint free rags. Do not allow the solvent to evaporate before wiping.
• 3M™ RBA-1 Rivet Brush • Precision cutting tool
Key Steps for a Good Application 1. Review the application instructions before starting and
read the Application section in the applicable Product Bulletin for special application requirements for the type of film being applied.
Topcoated Exterior 1. Before applying the graphics to a freshly painted
surface, the paint must be cured for the time recommended by the paint manufacturer. Special attention must be given to two-part polyurethane paint systems and clear coats because these outgas as they cure. The outgassing will cause bubbling of the graphic. A minimum of 5 days curing time at 21° C (70° F) or above is generally required before outgassing decreases to a point where bubbles are no longer detectable.
2. Apply all film within 2 years of receipt, and printed or imaged film within 1 year.
3. Apply the film only if the air and surface temperatures are within the range of 10° to 38°C (50° to 100°F).
4. Make sure the surface is clean. Even newly finished surfaces must be cleaned before application.
2. Freshly painted surfaces must be cleaned. Clean the surface with a solvent such as 3M surface preparation system or isopropyl alcohol and wipe dry with clean lint free rags. Do not allow the solvent to evaporate before wiping.
5. Use a sharp PA-1 applicator.
6. Use firm squeegee pressure with overlapping strokes.
7. Overlap adjacent pieces by at least 5 mm (1/4 inch), but not more than 10 mm (1/2 inch).
8. Remove the premask tape at a 180 degree angle.
9. Work out all air bubbles by pushing the air out to the nearest edge or perforation.
10. Work the film down into irregular areas with a rivet brush.
11. Re-squeegee all edges and overlaps after the premask is removed.
12. Edge seal required edges.
13. Cut the film over all substrate seams, and then edge seal.
Temperature Requirements Apply the film only if the air and surface temperatures are within the range of 10° to 38°C (50° to 100°F). Page 3 of 12 Instruction Bulletin IB_5.27b-EU-B-Jan05.doc
Note: For the full product names of the 3M products listed
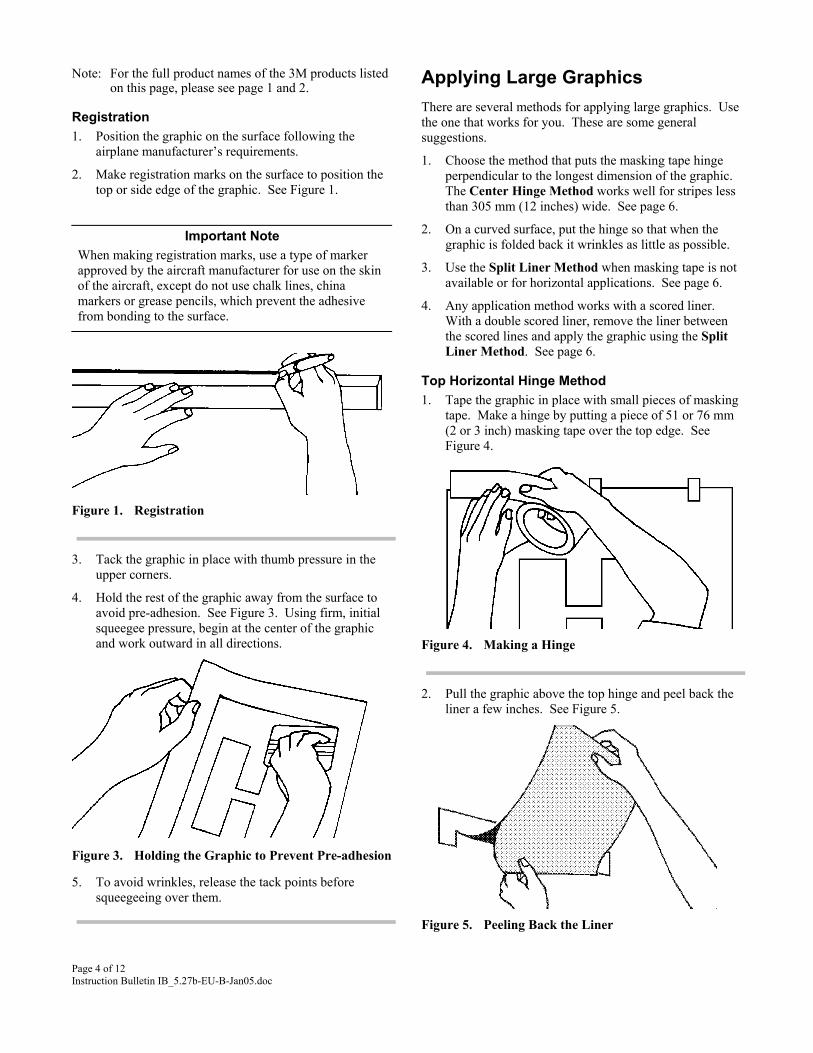
on this page, please see page 1 and 2. Applying Large Graphics There are several methods for applying large graphics. Use the one that works for you. These are some general suggestions.
Registration 1. Position the graphic on the surface following the
airplane manufacturer’s requirements. 1. Choose the method that puts the masking tape hinge
perpendicular to the longest dimension of the graphic. The Center Hinge Method works well for stripes less than 305 mm (12 inches) wide. See page 6.
2. Make registration marks on the surface to position the top or side edge of the graphic. See Figure 1.
Important Note
When making registration marks, use a type of marker approved by the aircraft manufacturer for use on the skin of the aircraft, except do not use chalk lines, china markers or grease pencils, which prevent the adhesive from bonding to the surface.
2. On a curved surface, put the hinge so that when the graphic is folded back it wrinkles as little as possible.
3. Use the Split Liner Method when masking tape is not available or for horizontal applications. See page 6.
4. Any application method works with a scored liner. With a double scored liner, remove the liner between the scored lines and apply the graphic using the Split Liner Method. See page 6.
Top Horizontal Hinge Method 1. Tape the graphic in place with small pieces of masking
tape. Make a hinge by putting a piece of 51 or 76 mm (2 or 3 inch) masking tape over the top edge. See Figure 4.
Figure 1. Registration
3. Tack the graphic in place with thumb pressure in the upper corners.
4. Hold the rest of the graphic away from the surface to avoid pre-adhesion. See Figure 3. Using firm, initial squeegee pressure, begin at the center of the graphic and work outward in all directions. Figure 4. Making a Hinge
2. Pull the graphic above the top hinge and peel back the liner a few inches. See Figure 5.
Figure 3. Holding the Graphic to Prevent Pre-adhesion
5. To avoid wrinkles, release the tack points before squeegeeing over them.
Figure 5. Peeling Back the Liner
Page 4 of 12 Instruction Bulletin IB_5.27b-EU-B-Jan05.doc
Page 5 of 12 Instruction Bulletin IB_5.27b-EU-B-Jan05.doc
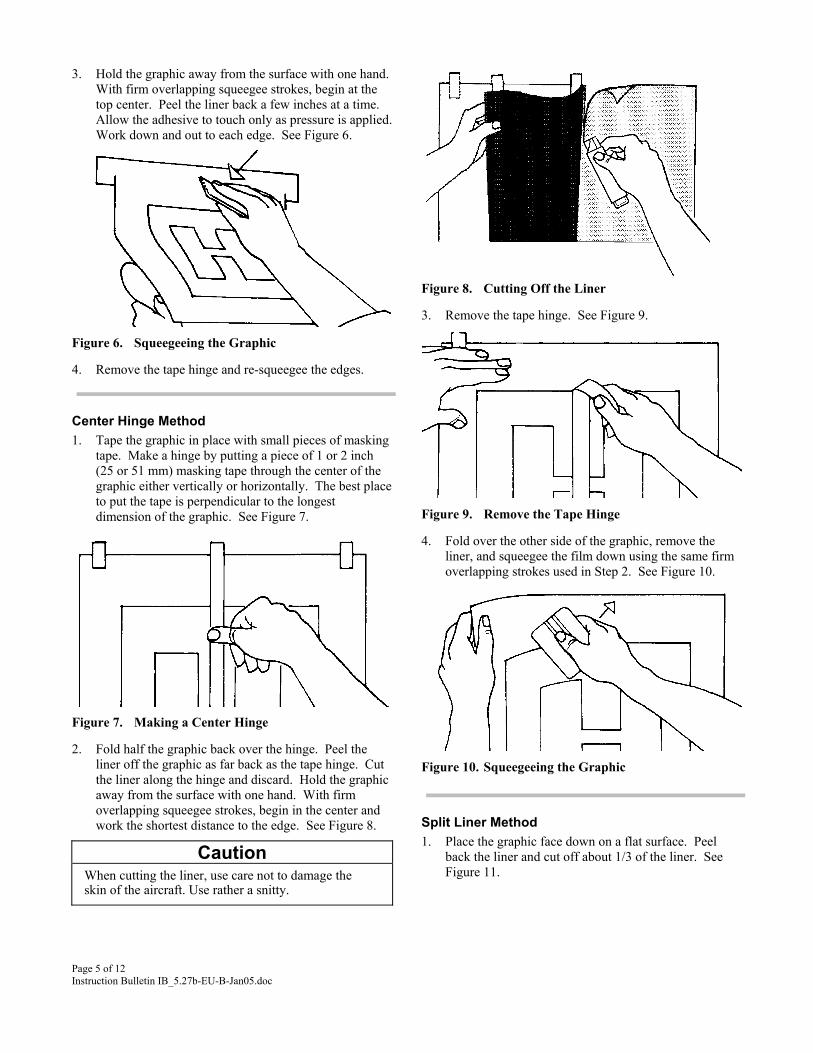
3. Hold the graphic away from the surface with one hand. With firm overlapping squeegee strokes, begin at the top center. Peel the liner back a few inches at a time. Allow the adhesive to touch only as pressure is applied. Work down and out to each edge. See Figure 6.
Figure 8. Cutting Off the Liner
3. Remove the tape hinge. See Figure 9.
Figure 6. Squeegeeing the Graphic
4. Remove the tape hinge and re-squeegee the edges.
Center Hinge Method 1. Tape the graphic in place with small pieces of masking
tape. Make a hinge by putting a piece of 1 or 2 inch (25 or 51 mm) masking tape through the center of the graphic either vertically or horizontally. The best place to put the tape is perpendicular to the longest dimension of the graphic. See Figure 7. Figure 9. Remove the Tape Hinge
4. Fold over the other side of the graphic, remove the liner, and squeegee the film down using the same firm overlapping strokes used in Step 2. See Figure 10.
Figure 7. Making a Center Hinge
2. Fold half the graphic back over the hinge. Peel the liner off the graphic as far back as the tape hinge. Cut the liner along the hinge and discard. Hold the graphic away from the surface with one hand. With firm overlapping squeegee strokes, begin in the center and work the shortest distance to the edge. See Figure 8.
Figure 10. Squeegeeing the Graphic
Split Liner Method 1. Place the graphic face down on a flat surface. Peel
back the liner and cut off about 1/3 of the liner. See Figure 11.
Caution When cutting the liner, use care not to damage the skin of the aircraft. Use rather a snitty.
Page 6 of 12 Instruction Bulletin IB_5.27b-EU-B-Jan05.doc
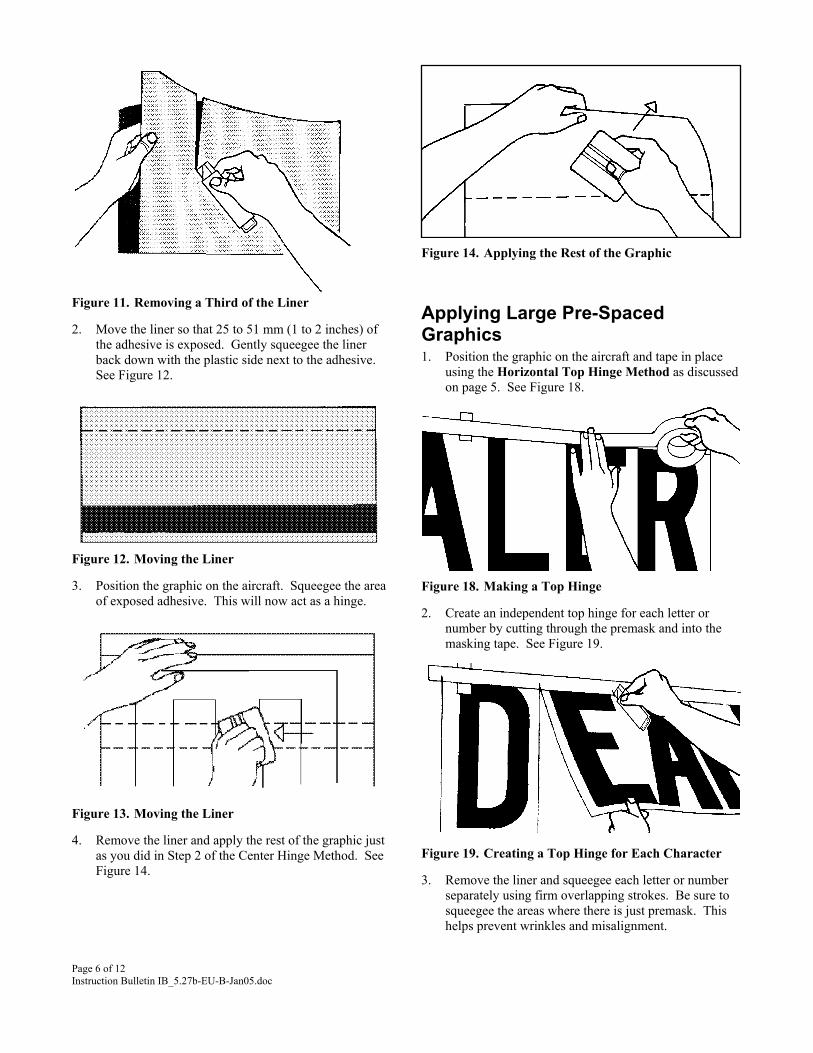
Figure 14. Applying the Rest of the Graphic
Figure 11. Removing a Third of the Liner Applying Large Pre-Spaced Graphics 2. Move the liner so that 25 to 51 mm (1 to 2 inches) of
the adhesive is exposed. Gently squeegee the liner back down with the plastic side next to the adhesive. See Figure 12.
1. Position the graphic on the aircraft and tape in place using the Horizontal Top Hinge Method as discussed on page 5. See Figure 18.
Figure 12. Moving the Liner
3. Position the graphic on the aircraft. Squeegee the area of exposed adhesive. This will now act as a hinge.
Figure 18. Making a Top Hinge
2. Create an independent top hinge for each letter or number by cutting through the premask and into the masking tape. See Figure 19.
Figure 13. Moving the Liner
4. Remove the liner and apply the rest of the graphic just as you did in Step 2 of the Center Hinge Method. See Figure 14.
Figure 19. Creating a Top Hinge for Each Character
3. Remove the liner and squeegee each letter or number separately using firm overlapping strokes. Be sure to squeegee the areas where there is just premask. This helps prevent wrinkles and misalignment.
Page 7 of 12 Instruction Bulletin IB_5.27b-EU-B-Jan05.doc
Note: For the full product names of the 3M products listed on this page, please see page 1.
These areas must be edge sealed: • Leading edges of the film. • Edges where the graphic has been cut for doors, access
panels and similar items. Finishing Steps 1. Remove the premask by pulling it back on itself at a
180 degree angle. Squeegee the film wherever it is not firmly bonded to the surface. Using a felt squeegee or SA-1 low friction sleeve on a plastic squeegee will help to prevent scratching of the film surface. Re-squeegee all edges and overlaps using very firm pressure.
• Any cut out repair areas where the film overlaps film. Apply the edge sealer with 1 cm brush. Place the brush so that it covers both the aircraft surface and film equally. Pull it along the edge in a smooth, continuous motion.
2. Cut the graphic on all substrate seams with a razor
blade (in a holder) or similar cutting tool. Re-squeegee the edges or use a rivet brush.
Storage of Edge Sealers Edge sealers should be stored in a cool, dry place and should be used within one year of data of purchase. Containers should be tightly capped after each use. 3. Look for bubbles in the flat areas. To remove a bubble,
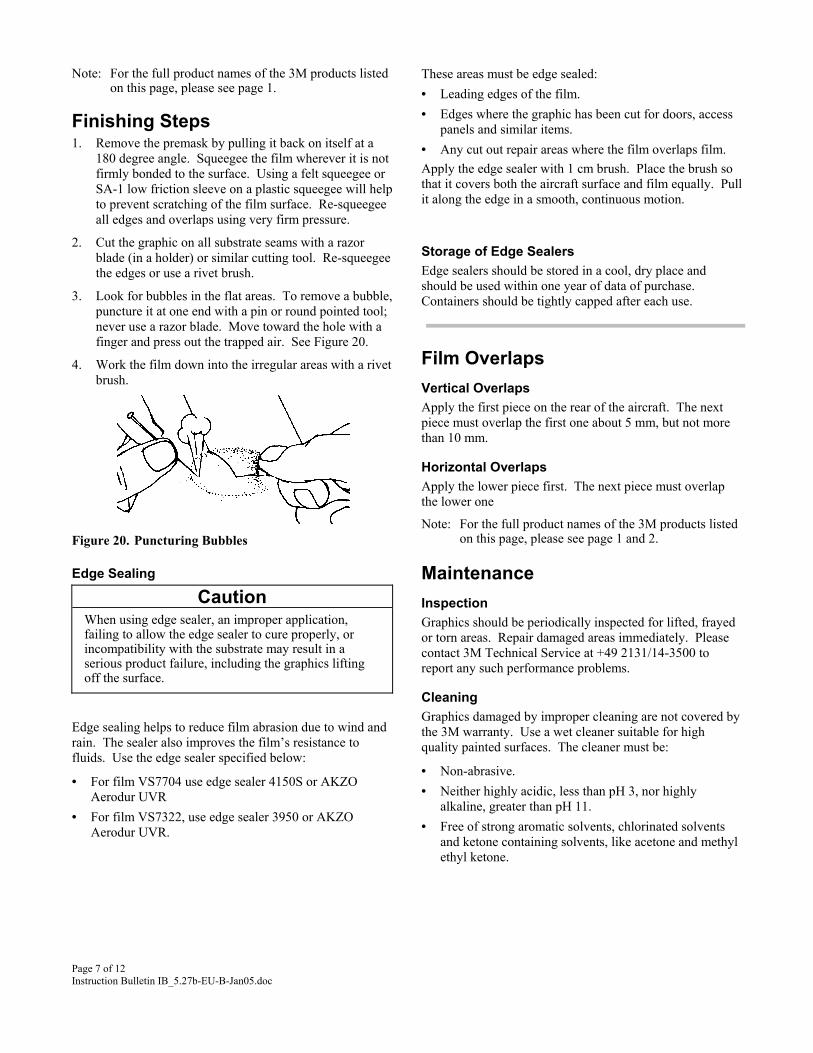
puncture it at one end with a pin or round pointed tool; never use a razor blade. Move toward the hole with a finger and press out the trapped air. See Figure 20.
Film Overlaps 4. Work the film down into the irregular areas with a rivet brush. Vertical Overlaps
Apply the first piece on the rear of the aircraft. The next piece must overlap the first one about 5 mm, but not more than 10 mm.
Horizontal Overlaps Apply the lower piece first. The next piece must overlap the lower one
Note: For the full product names of the 3M products listed on this page, please see page 1 and 2. Figure 20. Puncturing Bubbles
Maintenance Edge Sealing
Caution When using edge sealer, an improper application, failing to allow the edge sealer to cure properly, or incompatibility with the substrate may result in a serious product failure, including the graphics lifting off the surface.
Inspection Graphics should be periodically inspected for lifted, frayed or torn areas. Repair damaged areas immediately. Please contact 3M Technical Service at +49 2131/14-3500 to report any such performance problems.
Cleaning Graphics damaged by improper cleaning are not covered by
the 3M warranty. Use a wet cleaner suitable for high quality painted surfaces. The cleaner must be:
Edge sealing helps to reduce film abrasion due to wind and rain. The sealer also improves the film’s resistance to fluids. Use the edge sealer specified below:
• Non-abrasive. • For film VS7704 use edge sealer 4150S or AKZO
Aerodur UVR • Neither highly acidic, less than pH 3, nor highly alkaline, greater than pH 11.
• For film VS7322, use edge sealer 3950 or AKZO Aerodur UVR. • Free of strong aromatic solvents, chlorinated solvents
and ketone containing solvents, like acetone and methyl ethyl ketone.
Repairing Damaged Areas Caution
Before handling any chemical products, always read the container label and the MSDS.
1. Mask around the damaged area with 5 cm (2 inch) masking tape. This will keep the primer on the damaged area. It is not necessary to mask the windows.
2. Remove lifted, frayed, or torn film.
3. Cut a replacement patch 6 mm +/- 3 mm (1/4 inch +/- 1/8 inch) larger than the repair area.
4. Clean the area thoroughly with isopropyl alcohol. 5. Apply the film following the usual application
method.
6. Edge seal all the edges with the recommended edge sealer. See the Edge Sealing section to the left
Removal of Films VS7704 Caution
When using any equipment, always follow the manufacturers’ instructions for safe operation.
Heat Gun Removal Method
Important Note Before using a heat gun, consult the aircraft manufacturer regarding the maximum temperature to which the skin of the aircraft can be heated without affecting surface integrity.
Caution Solvents may ignite near heat or open flame. Do not use heat sources near solvents. Failure to avoid the use of heat sources near solvents can cause flash fire.
Material that has not been on the aircraft too long may be removed by using an industrial heat gun. Heat one corner of the graphic. Slide a razor blade (in a blade holder) or knife edge under the corner to loosen the graphic. Be careful not to damage the substrate. Slowly pull the film at an angle less than 90 degrees and heat the area immediately ahead.
There several methods that can be used to remove film. The methods provided here are listed in the order of ease of use. Typically, we recommend using the easiest method. However, you may need to use one of the other methods, depending on graphic size, condition and length of service use.
Steam Removal Method Some customers have indicated that a professional steaming unit, such as a wallpaper steamer (Bosch PTL1), may be used to soften the film, before removing it. This procedure may be used on a customer test-and-approve basis. Follow the instructions provided by the manufacturer of the steaming unit. Once softened, slowly pull the film at an angle less than 90 degrees to maximize the amount of adhesive that is removed.
Page 8 of 12 Instruction Bulletin IB_5.27b-EU-B-Jan05.doc
Note: For the full product names of the 3M products listed
on this page, please see page 1 and 2. Primer and Tape Removal Procedure
Caution
Before handling any chemical products, always read the container label and the MSDS.
Chemical Removal Methods
3M™ Graphic Remover System (where available)
Where the product is available, 3M Graphic Remover System can be used to remove film VS7704 . Please consult your 3M Sales or Technical Service Representative for details.
1. Break the film loose from any edge sealer using a sharp, hard plastic tool.
2. It may be possible to skip the priming step and still remove the film by applying Scotch box sealing tape 375 to aircraft exterior graphic films. Test the film by going through Steps 6 to 10 without putting the primer down.
Paint Stripper The same method used to strip paint from the aircraft will also remove aircraft film.
3. Begin at the aft at an exposed leading edge, like a door. With a paint roller, roll the primer on the graphic in a thin even coat. Work toward the fore about eight feet. Stop at a graphic overlap.
Primer and Tape In this method, an adhesive primer is applied and then a tape. The tape strengthens the film and makes it easier to remove. It works better to have two people working together removing one stripe at a time. The following materials, tools, temperature and procedure refer to the Primer and Tape method.
4. Allow the adhesive to dry 10 minutes, or until it is tacky to the touch.
5. Within 60 minutes after coating the primer, start at the back section applying the tape 375. Materials Needed
• Scotch™ Masking Tape, 51 mm (2 inch) 6. Put tape 375 perpendicular to the long dimension of graphic with a PA-1 plastic applicator. Work methodically from the top down. Carefully squeegee out all the air between tape 375 and the primer.
• 3M™ Fastbond™ Adhesive 30NF • Scotch™ Box Sealing Tape 375, 101 mm (4 inch) • Cleaners and Removers
- 3M™ Adhesive Remover 8908, or 7. Continue applying tape overlapping each section
from the aft to the fore over the rest of the primed area.
- 3M™ Natural Cleaner, or
- 3M™ Stripe Remover 8907, or 8. Start at the aft of the primed and taped section.
Carefully lift the trailing edge. Pull the taped graphic at an angle. The angle between the aircraft skin and the taped section should be less than 90 degrees. Work in the direction of the longest dimension of the graphic section.
- 3M™ Citrus Base Industrial Cleaner
Tools Needed • Paint roller • Paint tray • Utility knife
9. When a 152 mm (6 inch) piece has been removed, attach it to a 101 mm (4 inch) diameter PVC tube. Twist the tube slowly forward on the graphic. The film should begin to roll onto the tube and to remove from the side of the aircraft.
• Blade holder and single edge razor blades • Hard plastic scraper • 3M™ PA-1 plastic applicator (gold or blue) • 76 to 101 mm (3 to 4 inch) diameter PVC tube
with handle 10. Watch the adhesive side of the graphic for tears or adhesive splitting. If the graphic tears, lift the torn flap and stick it to the remover tape and the PVC tube. If the adhesive splits, change the pulling angle and speed.
Note: All 3M brand and Scotch brand products are available from 3M Commercial Graphics Division
Temperature Requirements For the best results, work when the air and surface temperatures are 20° to 32°C (60° to 90°F).
11. Use an adhesive remover or any other airline approved solvent to remove any adhesive left behind. After using the adhesive remover, clean the surface with isopropyl alcohol.
Page 9 of 12 Instruction Bulletin IB_5.27b-EU-B-Jan05.doc
Storage Removal of Film VS7322 The film remover and adhesive remover may be stored unopened for up to 3 years from purchase without affecting product performance. The maximum storage life is 3 years from receipt from 3M with these exceptions:
Note: For the full product names of the 3M products listed on this page, please see page 1 and 2.
Caution When using any equipment, always follow the manufacturers’ instructions for safe operation.
• The storage life is 1 year after opening the container. • The product may be stored up to 2 years unopened and 1
year open. Coverage Rates
Caution Solvents may ignite near heat or open flame. Do not use heat sources near solvents. Failure to avoid the use of heat sources near solvents can cause flash fire.
Listed below are the approximate coverage rates for film remover R-221 and adhesive remover R-231 when used on film VS7322. Product Rate
Film remover R-221 3.7 square meters/liter (150 square feet/gallon)
Adhesive remover R-231 37 square meters/liter (1500 square feet/gallon*)
* Based on the maximum adhesive residue left by 37 square meters (1500 square feet) of film.
Steam Removal Method Some customers have indicated that a professional steaming unit, such as a wallpaper steamer, may be used to soften the film, before removing it. This procedure may be used on a customer test-and-approve basis. Follow the instructions provided by the manufacturer of the steaming unit. Once softened, slowly pull the film at an angle less than 90 degrees to maximize the amount of adhesive that is removed.
Removal Conditions Condition Rate
Minimum surface temperature 50°F (10°C)
Number of applications of film remover R-221
1
Minimum drying time for film remover R-221
15 minutes
Minimum drying time for adhesive remover R-231
30 seconds
Heat Gun Removal First try to remove the film with an industrial heat gun. Film that has not been on the aircraft too long may be removed this way. Heat the corner of the graphic. Slide a razor blade (in a blade holder), or a knife edge, under the corner to loosen the graphic. Be careful not to damage the substrate. Slowly pull the film at an angle less than 90 degrees, and then heat the area immediately ahead.
Paint Stripper Removal The same method used to strip paint from the aircraft may be used to remove film VS7322.
Key Steps To a Faster, Cleaner Removal 1. The graphic to be removed must be film VS7322.
3M™ Graphic Remover System (where available) 2. Read the removal instructions. Where the product is available, 3M Graphic Remover System can be used to remove film VS7322. Please consult your 3M Sales or Technical Service Representative for details.
3. Wash the graphic and the surface around the graphic.
4. Dry the surface and the graphic.
5. Be sure that the surface temperature is at least 10°C (50°F).
3M™ Film Remover R-221 and Adhesive Remover R-231 6. If the surface is painted, test the surface for possible
paint damage. The removal system consists of film remover R-221 and adhesive remover R-231. This system is compatible with aluminum surfaces.
7. Mask off the area surrounding the graphic.
8. Construct a drip trough. Limitation of the System Equipment List Always test before using! The removal system may damage certain paints or finishes. To determine the suitability of the system, test the remover in a small, unmarked and inconspicuous area.
• 2.5 cm (1 inch) wide masking tape • Paper towels • Paint brush or paint roller
Page 10 of 12 Instruction Bulletin IB_5.27b-EU-B-Jan05.doc
4. Be sure you have all the required equipment; see
Equipment List on page 13. Use all recommended safety procedures including the wearing of unvented goggles and appropriate gloves.
• Plastic applicator • Rivet brush • Plastic squeeze bottle or trigger-type bottle • Appropriate safety equipment. See the MSDS for
recommendations. 5. Clean the surface and film with detergent and water. Dry the surface thoroughly before proceeding.
Removal Procedure 6. To minimize cleanup of film remover R-221, one of the following two methods should be used:
Caution Before handling any chemical products, always read the container label and the MSDS.
a. Mask the surface around the film and make a “drip trough” with masking tape or cardboard to prevent residue from dripping onto surfaces around the film.
b. Spray the surface around the edge of the film with
a commercially-available release agent, such as vegetable cooking spray. Form a “drip trough” with masking tape or cardboard along the bottom to prevent residue dripping onto the surface below the film. Care should be taken to ensure that the release agent is not sprayed onto the graphic which is to be removed. Any release agent accidentally sprayed onto the graphic must be wiped off.
Caution When using any equipment, always follow the manufacturers’ instructions for safe operation.
Caution
Solvents may ignite near heat or open flame. Do not use heat sources near solvents. Failure to avoid the use of heat sources near solvents can cause flash fire. Note: Film remover R-221 is extremely difficult to remove
from weathered paint; therefore, it is imperative that the surface around the graphic be masked off or sprayed with a release agent.
1. Film remover R-221 and adhesive remover R-231 is a system for removing film VS7322 only. If you are unsure of what type of film you are trying to remove, follow the Heat Removal Method or Paint Stripper Removal Method on page 12, but attempt to remove only a small piece of the film. If adhesive residue exceeds approximately 25 percent after the film has been removed, this removal system is NOT recommended for use.
7. Using a paint brush or roller, thoroughly coat the graphic film remover R-221. Keep the container covered when not in use to prevent rapid evaporation of solvent.
8. Allow film remover R-221 to dry for at least 15 minutes after application. Cooler temperatures require additional drying time.
Drying Time Requirements for Film Remover R-221 2. Make certain that the surface temperature is at least 10°C (50°F). If it is 29°C (85°F) or above, move the vehicle to a shaded area.
Temperature Approximate Drying Time
27°C (80°F) 15-20 minutes
21°C (70°F) 15-30 minutes
16°C (60°F) 15-45 minutes
10°C (50°F) 30-60 minutes or longer
3. Check for possible paint damage.
a. Using a paint brush or sponge-type roller, thoroughly wet a small area of the painted surface with film remover R-221.
b. Allow the remover to dry for at least 15 minutes. If the ambient temperature is below 21°C (70°F), longer drying time is required; see Drying Time Requirements.
9. Test for removability by grasping a corner of the film and pulling from the surface at less than a 90 degree angle with gentle/moderate force.
10. The film should stretch like rubber while being removed; if it is brittle, stop, apply a second coat, let dry and proceed with the removal.
c. Peel the dried film remover from the painted surface.
d. Check for paint or substrate damage. If any occurs, the remover system is specifically NOT RECOMMENDED.
11. When the film has been completely removed, pull off the masking tape but leave the drip trough.
Page 11 of 12 Instruction Bulletin IB_5.27b-EU-B-Jan05.doc

Page 12 of 12 Instruction Bulletin IB_5.27b-EU-B-Jan05.doc
12. Fill a squeeze or trigger-type bottle with adhesive remover R-231. Squirt this liquid in 1 square foot sections onto any adhesive residue remaining. Allow the liquid to penetrate for at least 30 seconds, but not longer than 60 seconds.
Limitation of Liability. Except where prohibited by law, 3M SHALL NOT UNDER ANY CIRCUMSTANCES BE LIABLE TO PURCHASER OR USER FOR ANY DIRECT, INDIRECT, SPECIAL, INCIDENTAL, OR CONSEQUENTIAL DAMAGES (INCLUDING, BUT NOT LIMITED TO, LOSS OF PROFITS, REVENUE, BUSINESS, OPPORTUNITY, OR GOODWILL) RESULTING FROM OR IN ANY WAY RELATED TO SELLER’S PRODUCTS OR SERVICES. This limitation of liability applies regardless of the legal or equitable theory under which such losses or damages are sought including breach of contract, breach of warranty, negligence, strict liability, or any other legal or equitable theory.
13. Remove the adhesive by scraping with a plastic applicator or rivet brush. Once loosened, wipe the residue with a cloth saturated with adhesive remover. Repeat these steps if necessary.
14. Remove the drip trough. Clean the entire surface with a solvent wipe, followed by a wash with detergent and water. Dry the surface.
15. Failure to properly wash and remove all excess adhesive remover will adversely affect the adhesion of new graphics applied to the surface. For Further Assistance
Note: If new graphics are to be applied, the surface must be solvent wiped following the procedures outlined in Instruction Bulletin 5.27.
For help on specific questions relating to 3M Commercial Graphics products, please contact your local 3M Technical service person or contact:
Disposal of Waste 3M Deutschland GmbH Commercial Graphics Division Caution
Adhesive or film removers, and solvent wipes or film wetter with the removers, should be incinerated in a permitted hazardous waste incinerator. Since regulations vary, consult the applicable regulations or authorities before disposal.
Carl-Schurz-Straße 1 D-41453 Neuss Germany Phone +49 (0) 2131 14 3500 Fax +49 (0) 2131 14 2377 Internet: www.scotchprint.com
The use of trademark signs and brand names in this bulletin is based upon US standards. These standards may vary from country to country outside the USA.Disclaimer of Warranty, Limited
Remedy, and Important Notice 3M MAKES NO FURTHER WARRANTIES, EXPRESS OR IMPLIED, INCLUDING, BUT NOT LIMITED TO, ANY IMPLIED WARRANTY OF MERCHANTABILITY OR FITNESS FOR A PARTICULAR PURPOSE OR IMPLIED WARRANTY ARISING OUT OF A COURSE OF DEALING, CUSTOM, OR USAGE OF TRADE. User is a sophisticated purchaser and responsible for determining whether the 3M product is fit for its particular purpose and suitable for user’s method of application. Many factors can affect the use and performance of this 3M product in a particular application. The materials to which the product will be adhered , the surface preparation of those materials, the product selected for use, the conditions in which the product is used, and the time and environmental conditions in which the product is expected to perform are among the many factors that can affect the use and performance of a 3M product. Given these variety of factors, many of which are uniquely within the user’s knowledge and control, it is essential that the user evaluate the 3M product to determine whether it is fit for a particular purpose and suitable for the user’s method of application.