APPENDIX C CONFIGURING AND USING MSDE AND THE SQL...
14
Burrows & Langford – Appendix C page 1 Learning Programming Using VISUAL BASIC .NET APPENDIX C CONFIGURING AND USING MSDE AND THE SQL SELECT STATEMENT In this appendix we provide more information about MSDE (Microsoft Desktop Engine) that is supports Visual Basic .NET and elaborate on the SQL (Structured Query Language) that was briefly introduced in Chapter 8. Although SQL queries are automatically generated by the Query Builder when using Visual Basic .NET, it is useful to have an understanding of SQL as it is the de-facto language used by almost all commercial relational databases. MSDE (Microsoft Desktop Engine) Installation. After installing Visual Basic .NET (or the complete Visual Studio .NET package), you need to install MSDE and the sample databases. To install MSDE, you should find a file named “instmsde.exe” located in the following folder: C:\Program Files\Microsoft Visual Studio .NET\FrameworkSDK\Samples\Setup\msde Figure C.1 shows the file in the Windows Explorer. Note the path that is shown in the title bar of the folder. You need to execute this file by double-clicking on it. Double-click here to start installer Figure C.1 Installation file for MSDE After installing MSDE, you need to install the sample databases. To do this, you run the program named ConfigSamples.exe that should be located at: C:\Program Files\Microsoft Visual Studio .NET\FrameworkSDK\Samples\Setup Figure C.2 shows the folder and the program you need to run. Double-clicking on the program file should start it executing. When this is done executing, you should see the databases named GrocerToGo, master, model, msdb, Northwind, Portal, and pubs using the Server Explorer. 03/15/02 Draft
Transcript of APPENDIX C CONFIGURING AND USING MSDE AND THE SQL...

Burrows & Langford – Appendix C page 1 Learning Programming Using VISUAL BASIC .NET
APPENDIX C CONFIGURING AND USING MSDE AND THE SQL SELECT STATEMENT
In this appendix we provide more information about MSDE (Microsoft Desktop Engine) that is supports Visual Basic .NET and elaborate on the SQL (Structured Query Language) that was briefly introduced in Chapter 8. Although SQL queries are automatically generated by the Query Builder when using Visual Basic .NET, it is useful to have an understanding of SQL as it is the de-facto language used by almost all commercial relational databases. MSDE (Microsoft Desktop Engine) Installation. After installing Visual Basic .NET (or the complete Visual Studio .NET package), you need to install MSDE and the sample databases. To install MSDE, you should find a file named “instmsde.exe” located in the following folder:
C:\Program Files\Microsoft Visual Studio .NET\FrameworkSDK\Samples\Setup\msde Figure C.1 shows the file in the Windows Explorer. Note the path that is shown in the title bar of the folder. You need to execute this file by double-clicking on it.
Double-click here to start installer
Figure C.1 Installation file for MSDE
After installing MSDE, you need to install the sample databases. To do this, you run the program named ConfigSamples.exe that should be located at:
C:\Program Files\Microsoft Visual Studio .NET\FrameworkSDK\Samples\Setup Figure C.2 shows the folder and the program you need to run. Double-clicking on the program file should start it executing. When this is done executing, you should see the databases named GrocerToGo, master, model, msdb, Northwind, Portal, and pubs using the Server Explorer.
03/15/02 Draft
Burrows & Langford – Appendix C page 2 Learning Programming Using VISUAL BASIC .NET
Double-click here to install sample databases
Figure C.2 Installation file for the sample databases Configuration. Operations like starting and stopping of the server are available through the SQL Server Service Manager. The icon for the service manager for the MSDE server is found in the icons on the Start bar. This icon and the Server Services Manager are shown in Figure C.3. At the bottom of the Server Services Manager window you can see that the server is running. You can also see the machine name (PICO) and the server name (NetSDK). You should expect to see a different name because it is unlikely your computer is also named PICO.
Server Manager Icon
Figure C.3 The MSDE icon on the Start Bar and the Server Services Manager MSDE is a fully SQL Server compliant database engine and can be used for
creating desktop and shared database solutions. Applications that use the MSDE server can be built using development environments like Visual Studio 6, Visual Studio .NET as well as Microsoft Access. MSDE and Microsoft Access
A Microsoft Access database is based on what Microsoft calls the Jet technology. It is file system based database engine and the databases are stored in individual files. In
03/15/02 Draft

Burrows & Langford – Appendix C page 3 Learning Programming Using VISUAL BASIC .NET
contrast, MSDE supports client-server architecture, runs as a service on the computer, and provides many of the advantages of a powerful database server like SQL Server. Some of these advantages are that it allows various SQL operations like creation of stored procedures, user-defined functions, and views inside databases. It allows for creating scalable applications that can be easily migrated to SQL Server without any modifications and thus, it is ideal for migrating desktop-based applications to the enterprise environment.
MSDE uses a query language that is fully compliant with Transact-SQL (T-SQL). Transact-SQL is a standard language for communicating with a database server defined by ANSI1. It defines the way in which queries are written for a database server and allows the use of custom business logic in the query language. Transact-SQL is an augmentation of the core SQL language and most of the statements cited as being SQL, including those in Chapter 8, are actually Transact-SQL statements.
The Jet technology used by Access is not compliant with T-SQL, instead it uses its own query language with support for functions using Visual Basic for Applications.
A disadvantage of MSDE is that it does not have a user-interface; all the interactions with it can only be done through either Visual Studio .NET, Visual Studio 6.0, or Access. Database Operations using MSDE
In Section 8.4 we briefly described some of the operations that are possible using the Server Explorer. In this section we present some of the operations that can be carried out in the “pubs” database through the Server Explorer. Note that before any of these operations can be performed, connection objects, discussed in Chapter 8, must first be created. Figure C.4 shows a snapshot of the “pubs” database in the Server Explorer. To perform any operation presented in this section you need select the object being discussed and then right-click on it to bring up the appropriate pop-up menu.
Figure C.4 The pubs database in the Server Explorer
For any database, “Database Diagrams” allow the creation of new database diagram or modification of existing diagram. In a database diagram you can create relationships between tables which allow you to enforce data integrity rules.
The “Tables” folder contains the existing tables in the database and allows creation, modification, and deletion of tables in the database.
The “Views” folder contains the views in the database. Views are similar to tables as they are also composed of columns and rows but they are not real tables, they are a saved query that selects fields from different tables in the database. The advantage of creating views is that it is possible to organize data from columns in different tables under a single object in the database; this object can later be referenced in queries like any other table in the database. In the “pubs” database we have a single view called
1 American National Standards Institute.
03/15/02 Draft

Burrows & Langford – Appendix C page 4 Learning Programming Using VISUAL BASIC .NET
“titleview”. To modify the query that creates this view select "Design View" from the right-click pop-up menu.
“Stored Procedures” are a very important part of a database and are used extensively while creating database applications. To perform operations in the database in Chapters 8-11, you have been creating SQL statements in your program and sending them to the database for processing. An alternative is to store the statements in procedures inside the database and call them from the applications. Such procedures are called stored procedures and they consist of a group of SQL statements compiled together.
Stored procedures are very similar to the concept of functions you have seen in Visual Basic.NET. They are similar as they can have parameters, perform operations on the database, and return values. The advantages of using stored procedures are (1) improved performance, (2) reuse of code across different applications, and (3) separating the SQL code from the application code. It is considered a good application design to write stored procedures for commonly used queries and tasks in the database.
The example that follows demonstrates creating a stored procedure in the “pubs” database using the Server Explorer. Example C.1 Creating a Stored Procedure
We start by right-clicking on Stored Procedures for the “pubs” database and then selecting "New Stored Procedure" from the pop-up menu. Visual Studio.NET opens a Stored Procedure editor and creates a basic structure of the stored procedure.
The commented code provides an example of creating input and output parameters. Comments start with "/*" and close with "*/". We change the name of the stored procedure to "AuthorsFromState" and add an input parameter named "state" with a data type "char(2)" and a default value of 'CA' . We will not go into detail on MSDE data types but they are conceptually similar to Visual Basic .NET data types.
We now add the SQL statement. We will explain the various parts of the SQL query in the next section, for now we will just save the new stored procedure. Figure C.5 shows that changes outlined previously. The developer has right-clicked on the designer tab for the procedure and is selecting the save option. Note that the name of the file to be saved is shown as “StoredProcedure1”. This will be changed by the system to “AuthorsFromState” when the save takes place. Note also that the heading of the procedure will change from “CREATE PROCEDURE” to “ALTER PROCEDURE”
03/15/02 Draft

Burrows & Langford – Appendix C page 5 Learning Programming Using VISUAL BASIC .NET
Figure C.5 Creating a Stored Procedure To run the new stored procedure, place the cursor anywhere in the editor, then
right-click and select "Run Stored Procedure" from the pop-up menu. You will be prompted with a window to enter the parameter value. You may enter a state code or click OK( without entering a value) since your parameter in the stored procedure has a default value (in Figure C.6, the value entered was "UT"). You may need to expand the output tab to view the results.
Figure C.6 Output from running a stored procedure
The Server Explorer also enables us to see the “Functions” inside a database and also create new functions. Functions are similar to stored procedures, they are made of one of more SQL statements and they can be used to achieve the reuse of code. There are many built-in functions in SQL but SQL also enables developers to create their own functions (called “User Defined Functions”). A Function can be either a “Scalar Function” that return a single data value or it can be a “Table Valued Function” that returns a table.
In the following section we will demonstrate writing SQL queries using the Query Builder; however, as an alternative, you can create stored procedures and use them to follow and try the examples. SQL
SQL can be used to perform operations like retrieving information from DBMS (Database Management Systems), inserting data, deleting data, and also for updating the data. The scope of SQL is too extensive to be covered in its entirety here; hence we will be concentrating on the retrieval of data and some interesting operators that allow us to organize the data during retrieval. We also provide a brief introduction to the SQL language statements that will allow us to update data.
03/15/02 Draft
Burrows & Langford – Appendix C page 6 Learning Programming Using VISUAL BASIC .NET
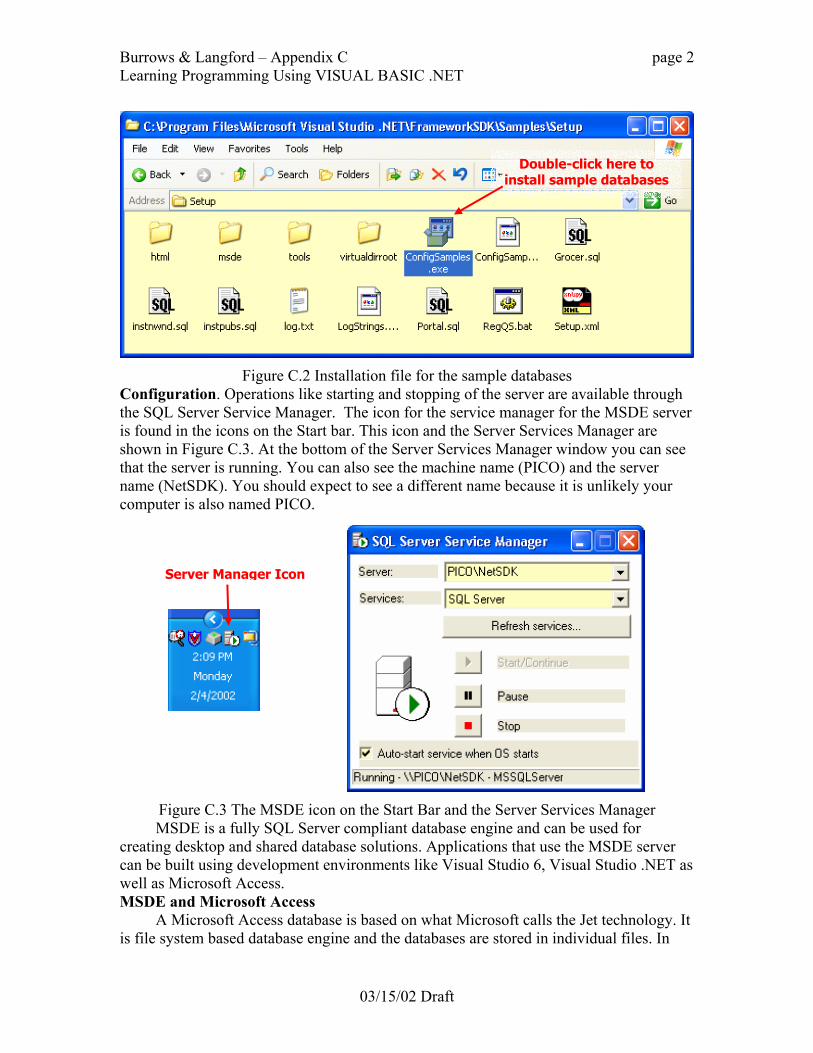
The samples in this appendix are run in the Query Builder available in Visual Basic.NET. To get to the Query Builder, create a new Windows Application project and add a new OleDbDataAdapter and proceed through the wizard until you get to the SQL window where you can show the Query Builder. Be sure there is a connection to the “pubs” database. Within the Query Builder, hide the top two panes (we will be typing the SQL directly into the SQL pane). To hide a pane, right-click on the pane and select Hide Pane from the pop-up menu as shown in Figure C.7. Note that we could use either an OLEDB or SQL data adapter to access an SQL database such as “pubs”. Using the SQL data adapter is more efficient.
Figure C.7 Hiding a pane within the Query Builder
SQL Select Syntax. The basic SQL Select expression consists of three clauses: the “select” clause, the “from” clause, and the “where” clause. These clauses are used in a combination to retrieve information from a database (this is called a query). The syntax of a SQL Select statement with the various clauses is:
select [select_list] from [table_list] where [search_expression] In the syntax, [select_list] refers to the list of columns that will be included in the
result set, [table_list] refers to the tables in which the data are coming from, and [search_expression] provides search conditions that limit the data range to specific rows in the tables that meet the search condition. Also be aware that all SQL statements are not case sensitive (like Visual Basic .NET and unlike XML).
In the pubs database there are a number of tables, such as titles, authors, publishers, employees etc, which can be used in SQL queries. While querying the database, one or more of these tables can be used in the “from” clause’s [table_list]. If we choose the authors table, we can only use the columns from the authors table in the [select_list]. Let us start with a simple query that will retrieve the author id (au_id), the Last Name (au_lname), the First Name (au_fname), the phone (phone), and the contract (contract) data for all the authors. The SQL query is shown in Figure C.8. If you right-click on the
03/15/02 Draft

Burrows & Langford – Appendix C page 7 Learning Programming Using VISUAL BASIC .NET
SQL pane in the Query Builder and bring up the popup window, you can then click on Run to run the query and see the database records that are returned from running the query. Each row will contain one entry that consists of the all columns that were listed in the “select” clause.
Figure C.8 Simple query to retrieve information from authors table
The ‘*’ is used to represent all the columns. If we remove the “where” clause and use the “*” in the Select clause, data from all the columns and all the rows is retrieved, in other words the entire table data is retrieved. In the next query we filter the records returned from the authors table to all authors where “contract = 0”. We use the where clause to filter the records. If the argument we compare to is not numeric we need to wrap it with single quotes. The query in Figure C.9 selects all the authors who do not have a contract (Contract = 0) and who are from California (state = ‘CA’). Note that since CA is not numeric, we enclose the value in single quotes. The “where” clause allows the use of comparison operators like < and >. It also it allows the use of logical operators like and, or and not. The use of comparison operator, logical operators, and the use of parenthesis is very similar to Visual Basic .NET
03/15/02 Draft

Burrows & Langford – Appendix C page 8 Learning Programming Using VISUAL BASIC .NET
Figure C.9 Query demonstrating select statement using ‘*’ operator
In the following query we change from the authors tables and we retrieve data from all the columns in the titles table where the price of the title is between 10.0 and 20.0 inclusive:
Select * From titles Where (price >= 10.0) AND (price <= 20.0)
Additional Keywords. There are other keywords provided in the SQL Select statement that enables us to organize the data further. The most commonly used additional keywords are the Distinct, Order By and Group By.
Distinct: This keyword is used to remove any duplicate rows from the retrieved information.
Order By: This keyword is used to sort the results based on the column list specified. It will first sort by the first column and then by the other columns in the order they appear in the “order by” clause. The default sort is ascending, to sort in a descending order we add the keyword “DESC”.
Group By: This keyword is used to group the values returned based on certain criteria. The Group By clause is required if an aggregation function such as Sum is used in the select clause. We will expand on this in the aggregation function section.
03/15/02 Draft

Burrows & Langford – Appendix C page 9 Learning Programming Using VISUAL BASIC .NET
In the Figure C.10, we show a query that uses the Distinct keyword to retrieve distinct states in the “authors” table; we order the result in a descending order.
Figure C.10 Query to demonstrate the Distinct keyword
String Functions. SQL allows a variety of functions that act on character strings. Some of the commonly used functions are SubString (for extracting substrings), Replace (for replacing strings) and the “||” operator for concatenating strings. There also other utility functions like Year and Month that retrieve the year and month from a “DateTime” data type value. In the following example we show the use of the SubString function. The syntax of the SubString function is:
SubString (expression, start, length) The arguments of the SubString function are the string from which the substring is extracted (expression), the starting point of the extracted string (start) and the length of the extracted string (length). In this query (Figure C.11) we get the area code by extracting the first three digits of the phone number of the authors in the authors table. The “As” keyword we see in the Select clause is used to give the resulting substring a name.
03/15/02 Draft
Burrows & Langford – Appendix C page 10 Learning Programming Using VISUAL BASIC .NET
Figure C.11 Query that demonstrates the use of String Function SubString
Aggregate Functions. Aggregate Functions take multiple rows and perform an operation on the values to return a single value of a particular type. The following list includes some of the aggregation functions available with SQL:
AVG: This is used to return the average value from a set of values. COUNT: This is used to return the count of the set of values. MAX: This is used to return the maximum value from a set of values. MIN: This is used to return the minimum value from a set of values. SUM: This is used to return the sum of the set of values.
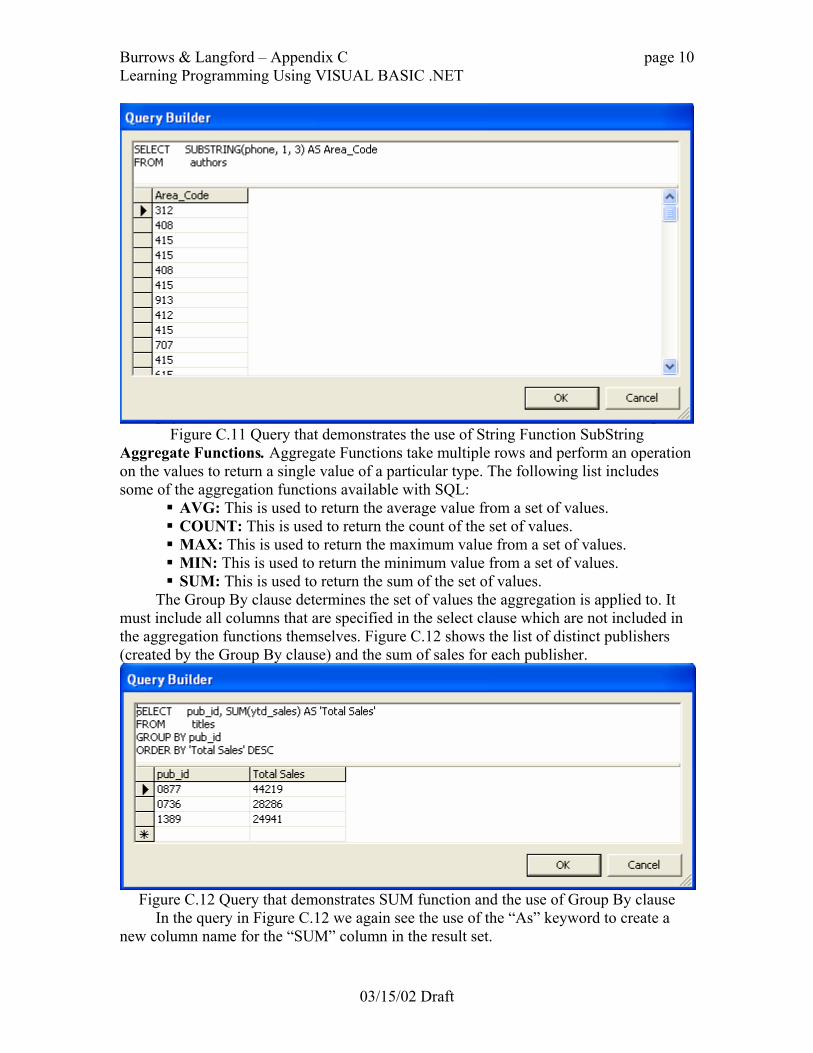
The Group By clause determines the set of values the aggregation is applied to. It must include all columns that are specified in the select clause which are not included in the aggregation functions themselves. Figure C.12 shows the list of distinct publishers (created by the Group By clause) and the sum of sales for each publisher.
Figure C.12 Query that demonstrates SUM function and the use of Group By clause
In the query in Figure C.12 we again see the use of the “As” keyword to create a new column name for the “SUM” column in the result set.
03/15/02 Draft

Burrows & Langford – Appendix C page 11 Learning Programming Using VISUAL BASIC .NET
By doing the aggregation on the server, we usually experience better overall performance. It is typically much faster to have the DBMS perform this function rather than querying all the records back to the client as a DataSet and using Visual Basic .NET code to perform the aggregation. Creating relationship using joins In Chapter 8 we discussed relationships between entities in an ERD. Special SQL statements are needed to create relationships between different tables that are joined through common fields. The Join keyword is to be used in SQL to create relationship between tables. Joins can be of two types, INNER Join and OUTER Join. We will discuss the difference between these two types of joins in the following sections. In addition to using the Join keyword, we can create a relationship by creating expressions in the Where clause. For example, we can create an inner join relationship between the titles and the publishers tables using the following expression.
Where titels.pub_id = publishers.pub_id However since the query builder is using the Join keyword, we will continue our discussion on creating relationship using Join syntax:
From table1 Join table2 ON table1.field = table2.field Join table3 ON table3.field = …
We can join any number of tables with any number of fields. Inner Join. The inner join creates a new set of records by using the search condition to equate the values in fields that are common between tables. Thus, the query returns only records that have the same value in the fields participating in the join in both tables. Once a join is created, we can return any field from the tables participating in the join using the Select clause. For example, if we create an inner join between the titles and the publishers table on pub_id field, the records returned by the query will be records where the same pub_id appears in both tables. In Figure C.13, we have modified the query in Figure C.12 to return the publisher name with the total YTD sales. Since the publisher name appears in the “publishers” table and the YTD sales appear in the “titles” table, we need to create a join between these tables. In figure C.13 we see that there are 3 publishers in the “titles” table. If we run the query “Select COUNT(pub_id) From publishers”, the result is 8, which means that there are a total of 8 publishers in the “publishers” table (note that pub_id is a primary key in the publisher table). Since the query in Figure C.13 returns only three publishers, there are only three publishers who appear in both tables.
03/15/02 Draft

Burrows & Langford – Appendix C page 12 Learning Programming Using VISUAL BASIC .NET
Figure C.13 Using Inner Join to return the publisher name Outer Join. Outer join returns rows that are have the same values in the Join fields and in addition, rows from one of the tables for which there are no matching rows in the other table. The table from which the additional rows are returned depends on the type of the join. The various types of joins that are possible are:
Left Outer Join: All the rows from the left table specified in the Left Outer Join clause are returned. Null values are used for unmatched rows from the right table.
Right Outer Join: This is the reverse of left outer join and all the rows of the table on the right of the clause are returned.
Full Outer Join: All the rows from both the tables are returned. Once we create the Join equality, we determine whether it is a left or right join
based on which side of the join the table that we want to return all the rows is located. Outer joins are especially useful when we want to verify the completeness of the data that we query on. For example, in Figure C.14 we would like to include in the publisher sales report all publishers including the publishers without any sales so far. We use a right outer join between the “publishers” table (right table) and the “titles” table (left table) to retrieves all the publishers and the total YTD sales. In order to avoid returning NULL, which would require special processing later, we use the ISNULL function to replace the NULL values with 0.The syntax of the ISNULL function is
ISNULL(expression, replace value)
Figure C.14 Using Right Outer Join to return all publishers Updating Data using SQL
SQL also provides the capability to update the data in a table. This can be done by either inserting new rows, updating existing rows or by deleting existing rows. Insert. SQL allows insertion of data into tables using the insert statement. The general syntax of the insert statement is:
Insert Into [table_name]
03/15/02 Draft

Burrows & Langford – Appendix C page 13 Learning Programming Using VISUAL BASIC .NET
Columns([col1],[ col2], …) Values ([col _val], [col2_val], …) 1
In the above, [table_name] refers to the table where the data are to be inserted; the columns list contains the columns that will have values in the value list. If a column in the table is not included in the “Columns” list, then SQL will insert a value of Null (assuming that the database allows the field to be Null). Figure C.15 shows example of inserting a new row into the “authors” table. Note that this row already exists in the table so you will need to delete it before you insert it again.
Figure C.15 Inserting a single row in authors table
Insertion of new rows into a table can be complicated if the table is related to some other table through a relationship. In such cases, it is not possible to place arbitrary values in a table as some of the columns are constrained by values in the columns in related tables.
There are various other options possible when inserting rows. Some of these include inserting multiple rows, inserting rows from one table to another table, inserting Null values, plus some other options. These additional options are not covered in this Appendix. Delete. The SQL Delete statement has a very simple syntax, however it is a very powerful statement and you should be cautious when using it since it is difficult or impossible to undo. We advise you to first try a similar Select statement to see how many rows are going to be deleted (the same number selected will be deleted if you next try a delete). Then replace “Select” with “Delete”. The Delete statement syntax is:
Delete From [table_name] Where [search_expression]
You can only delete entire rows; if you want to delete specific values from a row you should use the Update statement that is described next. Figure C.16 shows an example of deletion of all the records from “titleauthor” table where the royaltyper = 99 (0 records). We chose the value 99 so you would not actually delete records from the sample database.
03/15/02 Draft

Burrows & Langford – Appendix C page 14 Learning Programming Using VISUAL BASIC .NET
03/15/02 Draft
Figure C.16 Deletion of 10 records from the “titleauthor” table
Update. The SQL Update statement allows us to change the values of a specific column (field) in a group of rows (records) selected by the Where clause. The general syntax of an update statement is:
Update [table_list] Set [value] Where [search_condition]
The “Set” clause is used to provide the new value for a column in the rows that match the search condition. We can also use an expression to generate the new value as you can see in Figure C.17. In this example, we increased the royalty schedule for title_id PC1035 adding 2%.
Figure C.17 Query Demonstrating update of royalty schedule
Summary This appendix has provided a brief overview of SQL with a focus on the SQL
Select statement. For additional information, you can consult any number of good reference books on SQL and Databases.


![Braunton Burrows[1]](https://static.fdocuments.us/doc/165x107/55158f62497959f31d8b4e0a/braunton-burrows1.jpg)