Annotated digests
14
1 Annotate Annotate This guide will introduce you to annotation possibilities in Cabinet. You’ll learn about annotation tools, see how to toggle annotation mode, get acquainted with annotation history and more. © 2013 Motech Ltd. All Rights Reserved.
-
Upload
natsmagbalon -
Category
Documents
-
view
27 -
download
0
description
digests
Transcript of Annotated digests
1
Annotate
!
AnnotateThis guide will introduce you to annotation possibilities in Cabinet. You’ll learn about annotation tools, see how to toggle annotation mode, get acquainted with annotation history and more.
© 2013 Motech Ltd. All Rights Reserved.
2
Annotate
!! !!!!!!!While designing the annotation feature for Cabinet we tried to keep a perfect balance between simplicity, design and functionality. There is quite a number of apps offering an ability to annotate PDF documents, but many of them are either too complex for a common user with their overwhelming amount of tools and settings, or lack a common sense of user interface design. !In Cabinet you’ll have only 6 annotation tools – we find that’s more than enough for any document annotation. They are:
• Pencil for freehand drawing and taking notes; • Marker or Highlighter for making horizontal and vertical highlights; • Arrow tool for drawing pointing arrows and lines; • Text comment tool for leaving text notes; • Eraser tool to delete or make corrections to your annotations; • Text selection tool allows you copying text and looking up words in
dictionaries. !We also tried to implement a concept of quick and efficient annotation tool switching, so you waste no time choosing from available colors and settings. Cabinet’s annotation tool menu allows you to select any annotation instrument and any setting with one simple tap and slide of your finger. All this without half of your screen occupied by tool palettes. !This guide will introduce you to the following topics:
• How to enter and leave annotation mode; • How to use the annotation tool menu; • Available annotation instruments and their settings; • Annotation history. !!
!!!
Introduction
3
Annotate
Table of Contents
Annotation Process 4 ......................................................................................................................
Beginning Document Annotation 4 ................................................................................................................
In the Annotation Mode 5 ..................................................................................................................................
Finishing Document Annotation 6 ..................................................................................................................
Dynamic Annotation Menu 7 .......................................................................................................
Changing Instruments 7 ......................................................................................................................................
Changing Instrument Settings 7 ......................................................................................................................
Annotation Tools 8 ...........................................................................................................................
Pencil 8 .......................................................................................................................................................................
Arrow 9 .......................................................................................................................................................................
Marker or Highlighter 11 .....................................................................................................................................
Text Comment 11 ...................................................................................................................................................
Eraser 13 ....................................................................................................................................................................
Working with History 14 ................................................................................................................
4
Annotate
!
Annota.on Process !To enhance your document reading experience, we made the reading mode different from the one you are annotating a document in. Each mode has only the most essential features not to distract you from the task you’re currently concentrated on.
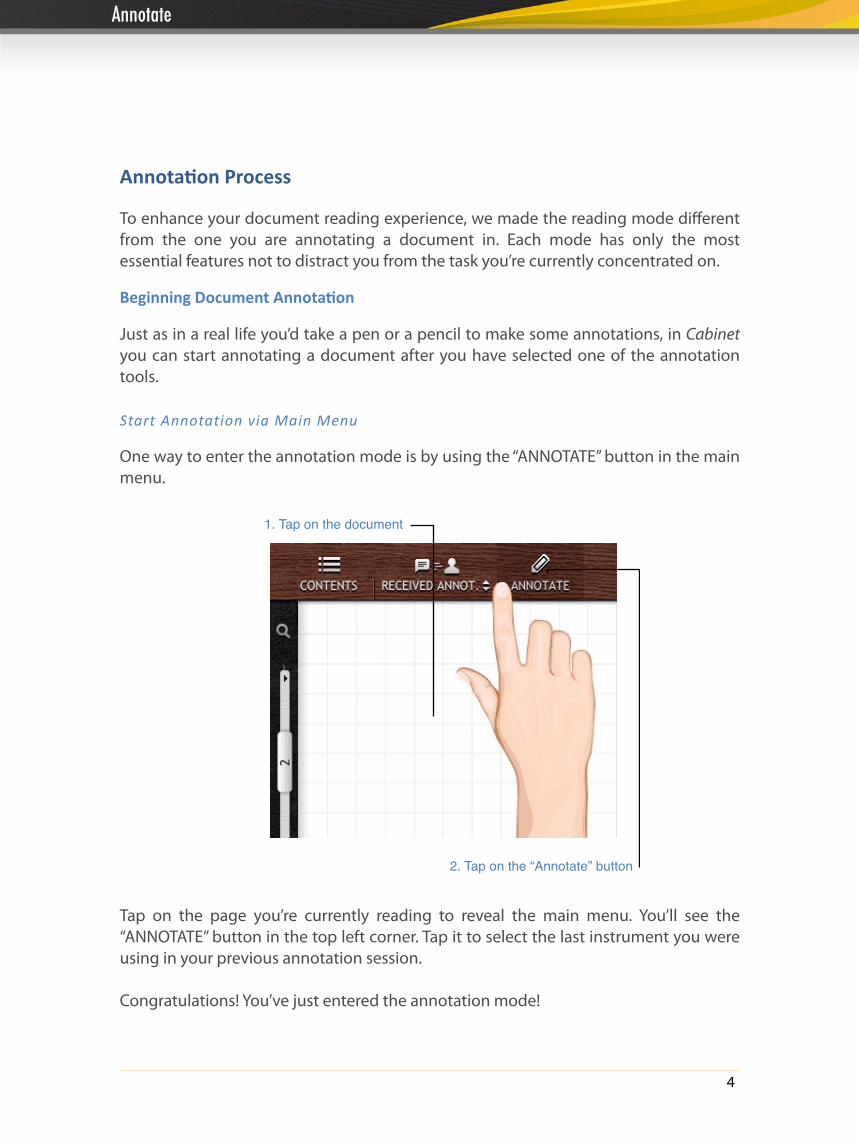
Beginning Document Annota.on !Just as in a real life you’d take a pen or a pencil to make some annotations, in Cabinet you can start annotating a document after you have selected one of the annotation tools. !Start Annotation via Main Menu !One way to enter the annotation mode is by using the “ANNOTATE” button in the main menu.
!Tap on the page you’re currently reading to reveal the main menu. You’ll see the “ANNOTATE” button in the top left corner. Tap it to select the last instrument you were using in your previous annotation session. !Congratulations! You’ve just entered the annotation mode! !
1. Tap on the document
2. Tap on the “Annotate” button
5
Annotate
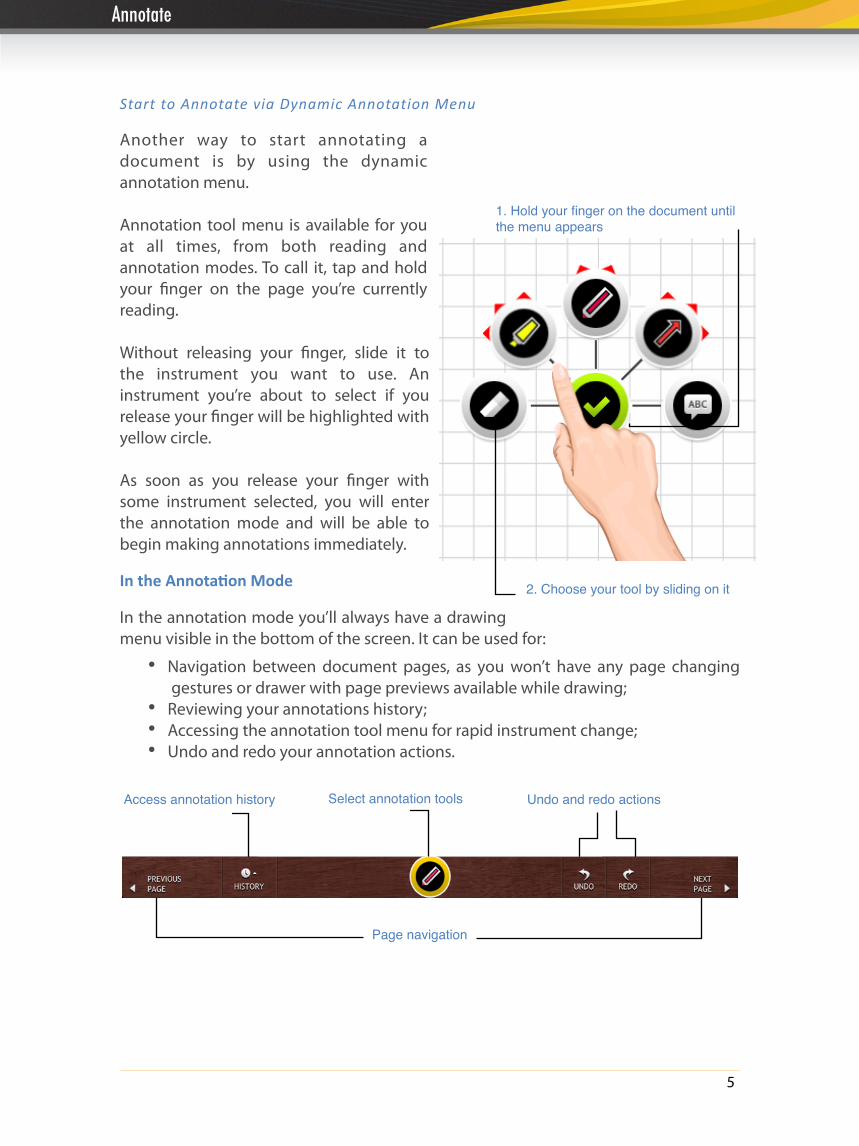
Start to Annotate via Dynamic Annotation Menu !Another way to start annotating a document is by using the dynamic annotation menu. !Annotation tool menu is available for you at all times, from both reading and annotation modes. To call it, tap and hold your finger on the page you’re currently reading. !Without releasing your finger, slide it to the instrument you want to use. An instrument you’re about to select if you release your finger will be highlighted with yellow circle. !As soon as you release your finger with some instrument selected, you will enter the annotation mode and will be able to begin making annotations immediately.
In the Annota.on Mode !In the annotation mode you’ll always have a drawing menu visible in the bottom of the screen. It can be used for:
• Navigation between document pages, as you won’t have any page changing gestures or drawer with page previews available while drawing;
• Reviewing your annotations history; • Accessing the annotation tool menu for rapid instrument change; • Undo and redo your annotation actions. !
�
!
Access annotation history
Page navigation
Select annotation tools Undo and redo actions
1. Hold your finger on the document until the menu appears
2. Choose your tool by sliding on it
6
Annotate
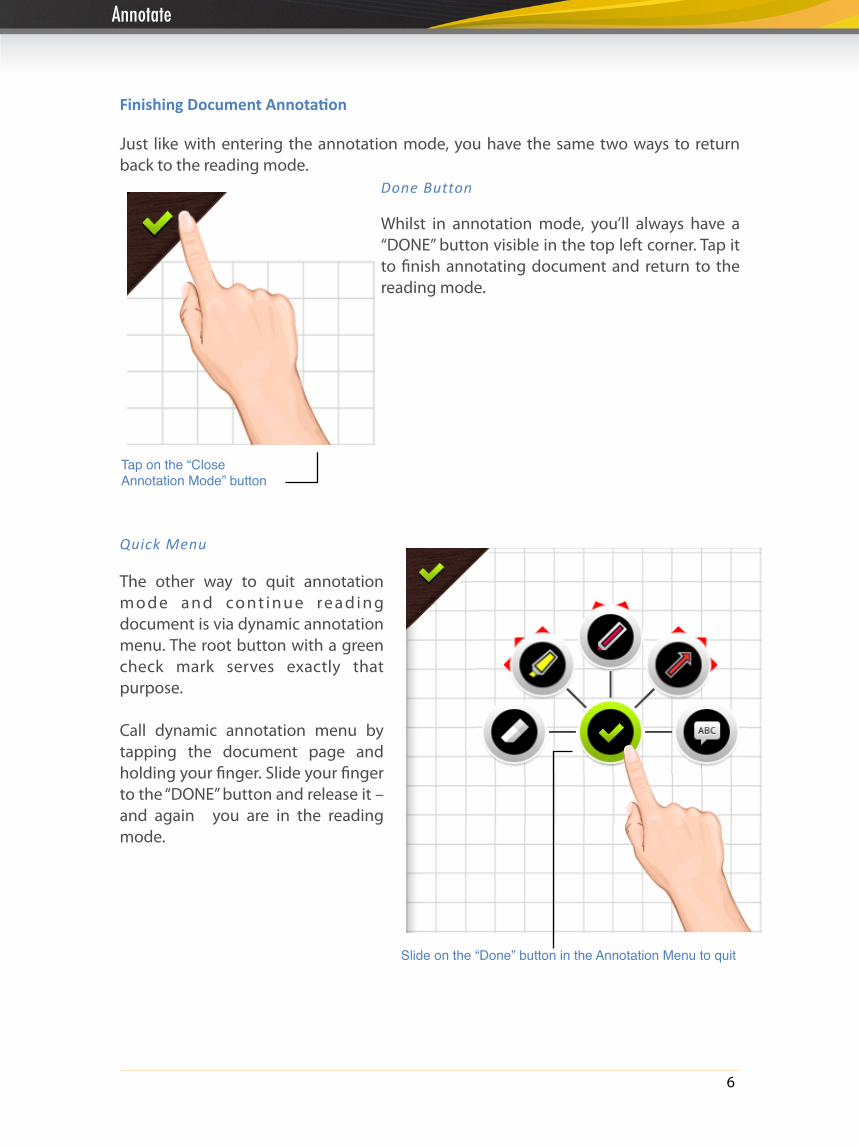
Finishing Document Annota.on !Just like with entering the annotation mode, you have the same two ways to return back to the reading mode.
Done Button !Whilst in annotation mode, you’ll always have a “DONE” button visible in the top left corner. Tap it to finish annotating document and return to the reading mode. !!!!!!!!!!!
Quick Menu !The other way to quit annotation m o d e a n d co n t i n u e re a d i n g document is via dynamic annotation menu. The root button with a green check mark serves exactly that purpose. !Call dynamic annotation menu by tapping the document page and holding your finger. Slide your finger to the “DONE” button and release it – and again you are in the reading mode. !!!
Slide on the “Done” button in the Annotation Menu to quit
Tap on the “Close Annotation Mode” button
7
Annotate
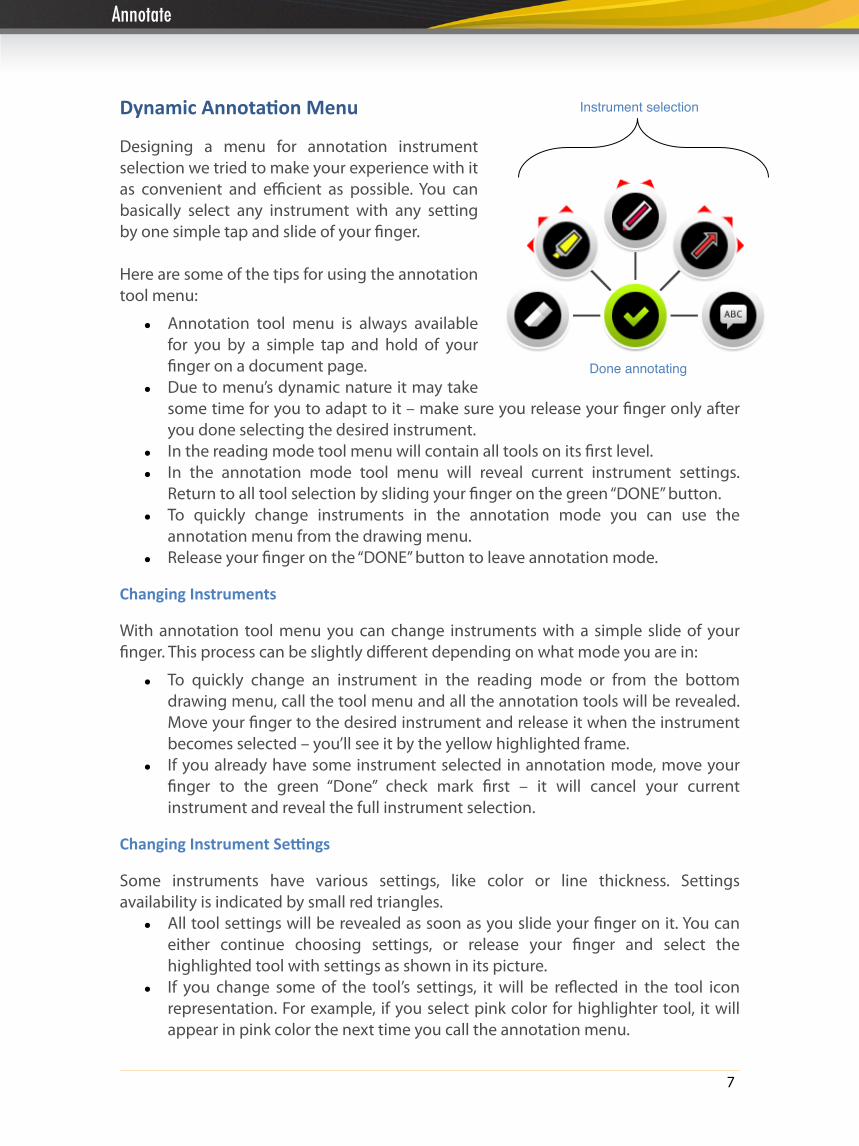
Dynamic Annota.on Menu !Designing a menu for annotation instrument selection we tried to make your experience with it as convenient and efficient as possible. You can basically select any instrument with any setting by one simple tap and slide of your finger. !Here are some of the tips for using the annotation tool menu:
• Annotation tool menu is always available for you by a simple tap and hold of your finger on a document page.
• Due to menu’s dynamic nature it may take some time for you to adapt to it – make sure you release your finger only after you done selecting the desired instrument.
• In the reading mode tool menu will contain all tools on its first level. • In the annotation mode tool menu will reveal current instrument settings.
Return to all tool selection by sliding your finger on the green “DONE” button. • To quickly change instruments in the annotation mode you can use the
annotation menu from the drawing menu. • Release your finger on the “DONE” button to leave annotation mode.
Changing Instruments !With annotation tool menu you can change instruments with a simple slide of your finger. This process can be slightly different depending on what mode you are in:
• To quickly change an instrument in the reading mode or from the bottom drawing menu, call the tool menu and all the annotation tools will be revealed. Move your finger to the desired instrument and release it when the instrument becomes selected – you’ll see it by the yellow highlighted frame.
• If you already have some instrument selected in annotation mode, move your finger to the green “Done” check mark first – it will cancel your current instrument and reveal the full instrument selection.
Changing Instrument Se?ngs !Some instruments have various settings, like color or line thickness. Settings availability is indicated by small red triangles.
• All tool settings will be revealed as soon as you slide your finger on it. You can either continue choosing settings, or release your finger and select the highlighted tool with settings as shown in its picture.
• If you change some of the tool’s settings, it will be reflected in the tool icon representation. For example, if you select pink color for highlighter tool, it will appear in pink color the next time you call the annotation menu.
Done annotating!
Instrument selection!
8
Annotate
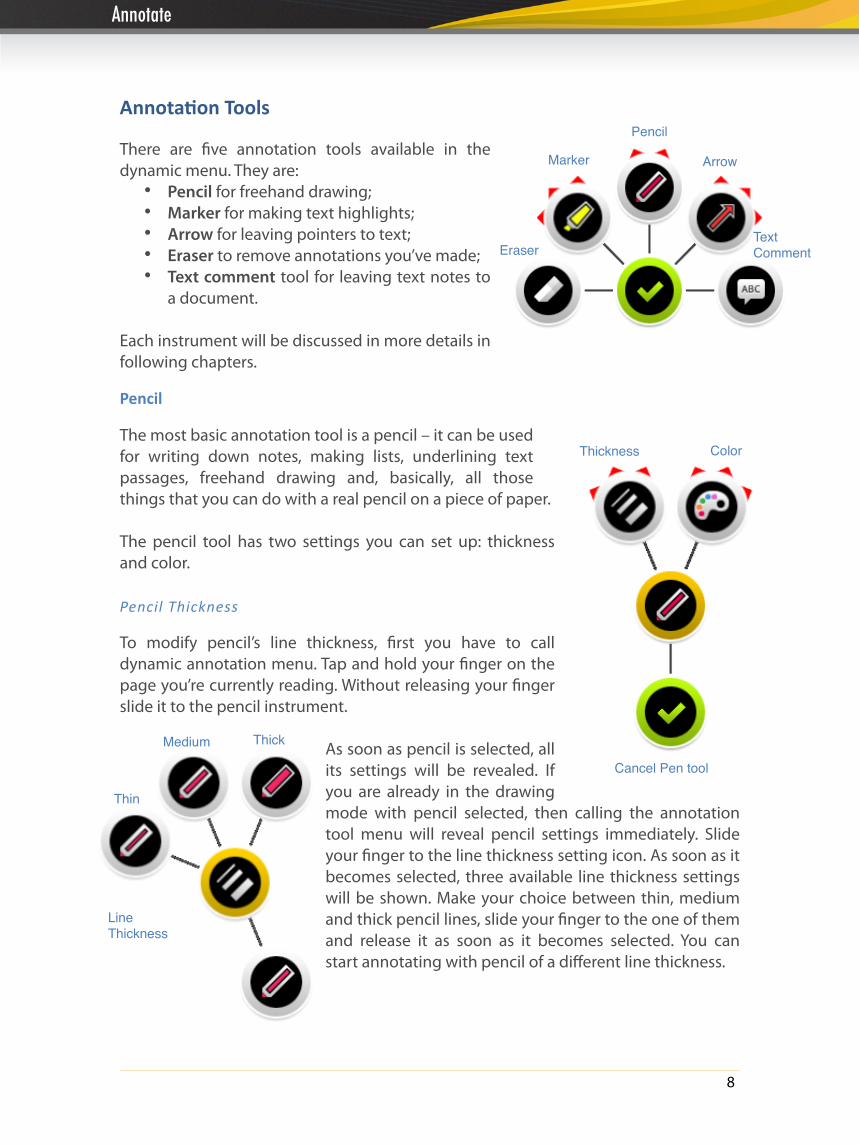
Annota.on Tools !There are five annotation tools available in the dynamic menu. They are:
• Pencil for freehand drawing; • Marker for making text highlights; • Arrow for leaving pointers to text; • Eraser to remove annotations you’ve made; • Text comment tool for leaving text notes to
a document. !Each instrument will be discussed in more details in following chapters.
Pencil !The most basic annotation tool is a pencil – it can be used for writing down notes, making lists, underlining text passages, freehand drawing and, basically, all those things that you can do with a real pencil on a piece of paper. !The pencil tool has two settings you can set up: thickness and color. !Pencil Thickness !To modify pencil’s line thickness, first you have to call dynamic annotation menu. Tap and hold your finger on the page you’re currently reading. Without releasing your finger slide it to the pencil instrument. !
As soon as pencil is selected, all its settings will be revealed. If you are already in the drawing mode with pencil selected, then calling the annotation tool menu will reveal pencil settings immediately. Slide your finger to the line thickness setting icon. As soon as it becomes selected, three available line thickness settings will be shown. Make your choice between thin, medium and thick pencil lines, slide your finger to the one of them and release it as soon as it becomes selected. You can start annotating with pencil of a different line thickness. !!!
Pencil
Marker
Eraser
Arrow
Text Comment
Thickness Color
Cancel Pen tool
ThickMedium
Thin
Line Thickness
9
Annotate
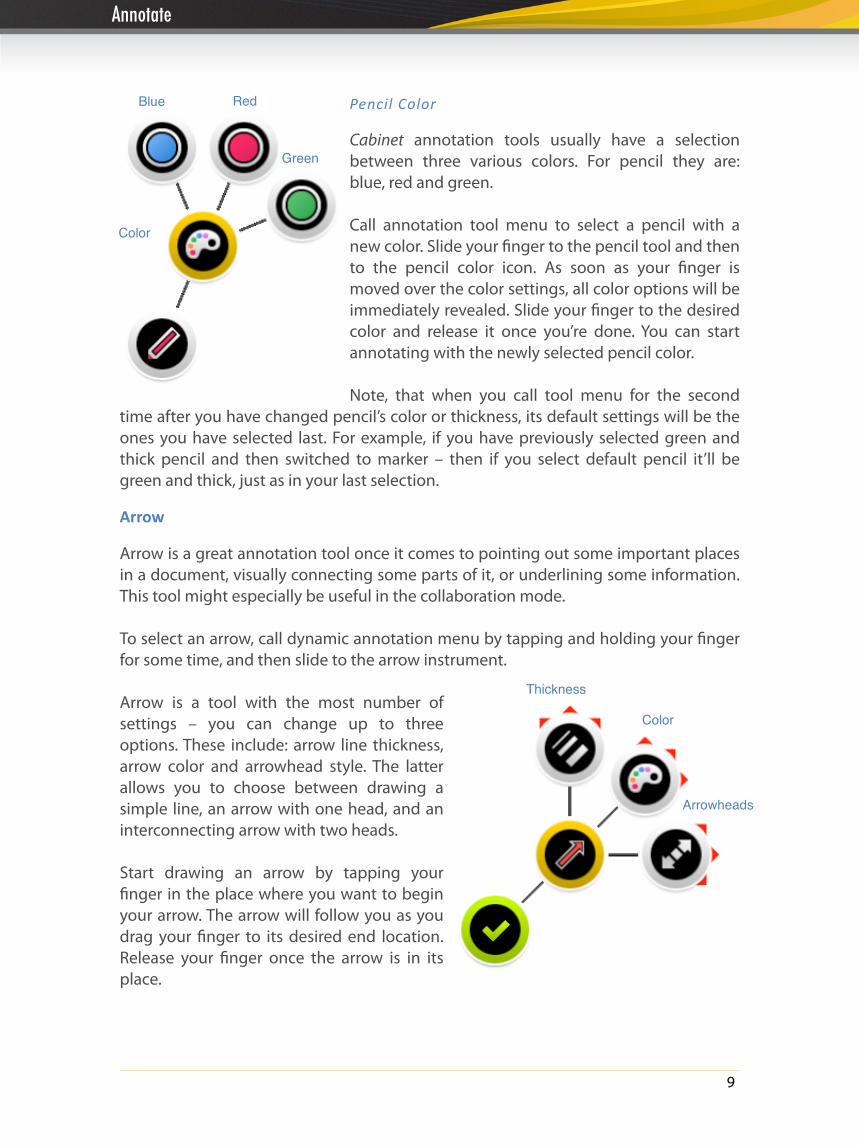
Pencil Color !Cabinet annotation tools usually have a selection between three various colors. For pencil they are: blue, red and green. !Call annotation tool menu to select a pencil with a new color. Slide your finger to the pencil tool and then to the pencil color icon. As soon as your finger is moved over the color settings, all color options will be immediately revealed. Slide your finger to the desired color and release it once you’re done. You can start annotating with the newly selected pencil color. !Note, that when you call tool menu for the second
time after you have changed pencil’s color or thickness, its default settings will be the ones you have selected last. For example, if you have previously selected green and thick pencil and then switched to marker – then if you select default pencil it’ll be green and thick, just as in your last selection.
Arrow !Arrow is a great annotation tool once it comes to pointing out some important places in a document, visually connecting some parts of it, or underlining some information. This tool might especially be useful in the collaboration mode. !To select an arrow, call dynamic annotation menu by tapping and holding your finger for some time, and then slide to the arrow instrument. !Arrow is a tool with the most number of settings – you can change up to three options. These include: arrow line thickness, arrow color and arrowhead style. The latter allows you to choose between drawing a simple line, an arrow with one head, and an interconnecting arrow with two heads. !Start drawing an arrow by tapping your finger in the place where you want to begin your arrow. The arrow will follow you as you drag your finger to its desired end location. Release your finger once the arrow is in its place. !!
Thickness
Color
Arrowheads
Blue Red
Green
Color
10
Annotate
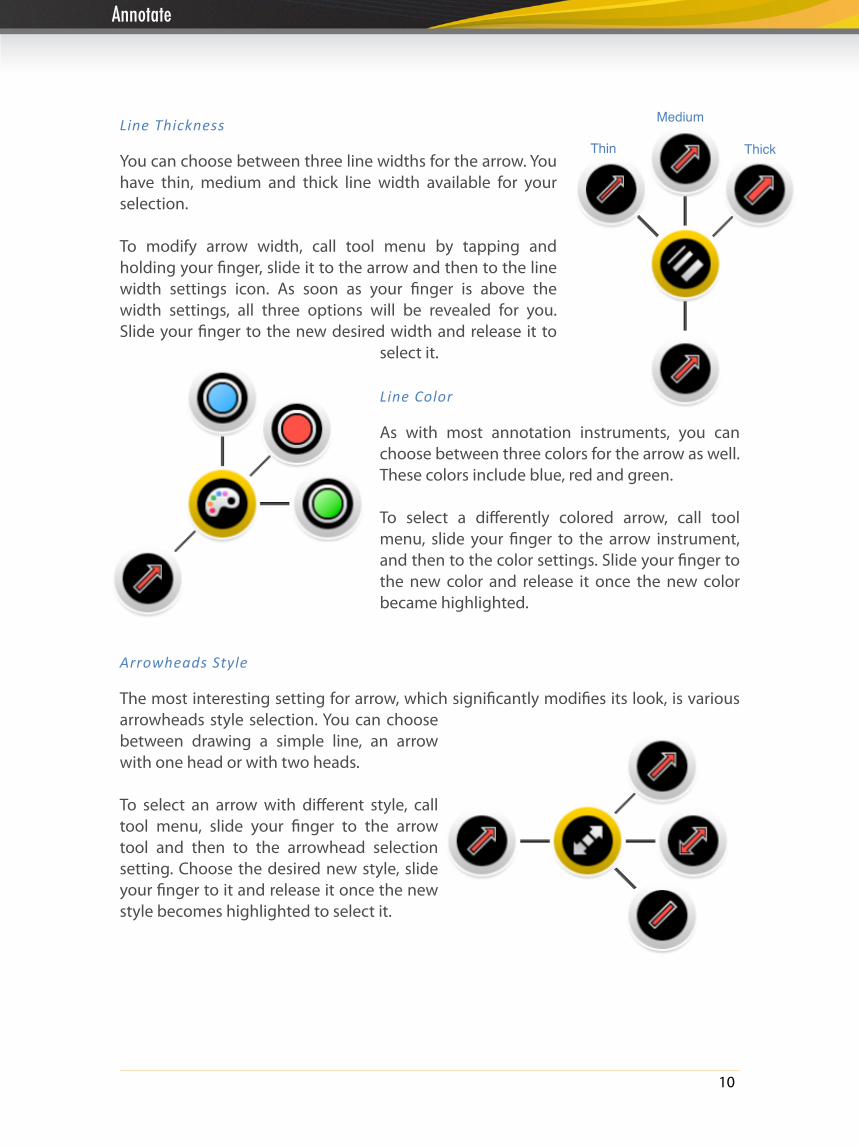
!Line Thickness !You can choose between three line widths for the arrow. You have thin, medium and thick line width available for your selection. !To modify arrow width, call tool menu by tapping and holding your finger, slide it to the arrow and then to the line width settings icon. As soon as your finger is above the width settings, all three options will be revealed for you. Slide your finger to the new desired width and release it to
select it. !Line Color !As with most annotation instruments, you can choose between three colors for the arrow as well. These colors include blue, red and green. !To select a differently colored arrow, call tool menu, slide your finger to the arrow instrument, and then to the color settings. Slide your finger to the new color and release it once the new color became highlighted. !!
Arrowheads Style !The most interesting setting for arrow, which significantly modifies its look, is various arrowheads style selection. You can choose between drawing a simple line, an arrow with one head or with two heads. !To select an arrow with different style, call tool menu, slide your finger to the arrow tool and then to the arrowhead selection setting. Choose the desired new style, slide your finger to it and release it once the new style becomes highlighted to select it. !!
Thick
Medium
Thin

11
Annotate
Marker or Highlighter !Marker is an indispensable annotation tool once it comes to making text highlights. As it might be quite tricky to draw straight highlights on a tablet computer, we tried to make highlighting task simpler by allowing marker tool draw in only one of two ways: horizontally or vertically. This ensures you always have neat and straight highlights in your text. !Marker tool has only one basic setting – its color. As with most common marker colors, you can choose between bright green, yellow or pink. !Reveal the annotations menu by tapping and holding your finger on the current page for some time, then slide it to the marker tool, and, eventually, to the desired color. Next time you select marker it will remain the same color as you selected last.
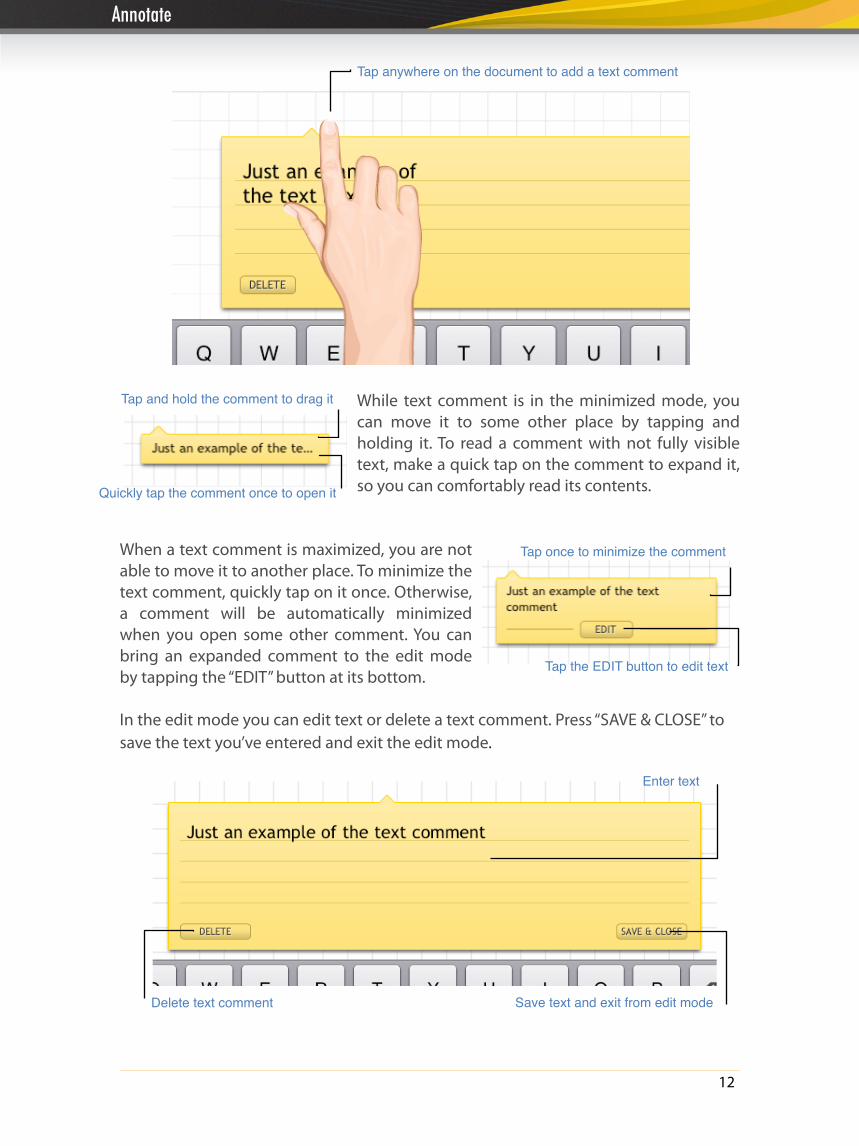
Text Comment !When it comes to making big text notes in the document you’re reading, you can always use the text comment tool. !Text comment has no settings – it is that plain and simple. To leave a text comment you should take the following steps. First, you have to reveal the annotation tool menu by tapping and holding your finger on the page you want to annotate, and then slide your finger to the text comment tool. !Release your finger once text comment is selected. To leave a text comment, tap your finger on the place you’d like to place it. Text comment will immediately appear together with a keyboard. !Enter the text you wanted and press “SAVE&CLOSE” to, yes, save and close the comment. It will be minimized to a small bubble to consume less space. !!!!!!!!
Choose Text Comment tool by sliding on it
12
Annotate
!!!!!!!!!
While text comment is in the minimized mode, you can move it to some other place by tapping and holding it. To read a comment with not fully visible text, make a quick tap on the comment to expand it, so you can comfortably read its contents. !!
When a text comment is maximized, you are not able to move it to another place. To minimize the text comment, quickly tap on it once. Otherwise, a comment will be automatically minimized when you open some other comment. You can bring an expanded comment to the edit mode by tapping the “EDIT” button at its bottom. !In the edit mode you can edit text or delete a text comment. Press “SAVE & CLOSE” to save the text you’ve entered and exit the edit mode.
!!
Tap anywhere on the document to add a text comment
Tap and hold the comment to drag it
Quickly tap the comment once to open it
Tap once to minimize the comment
Tap the EDIT button to edit text
Enter text
Save text and exit from edit modeDelete text comment
13
Annotate
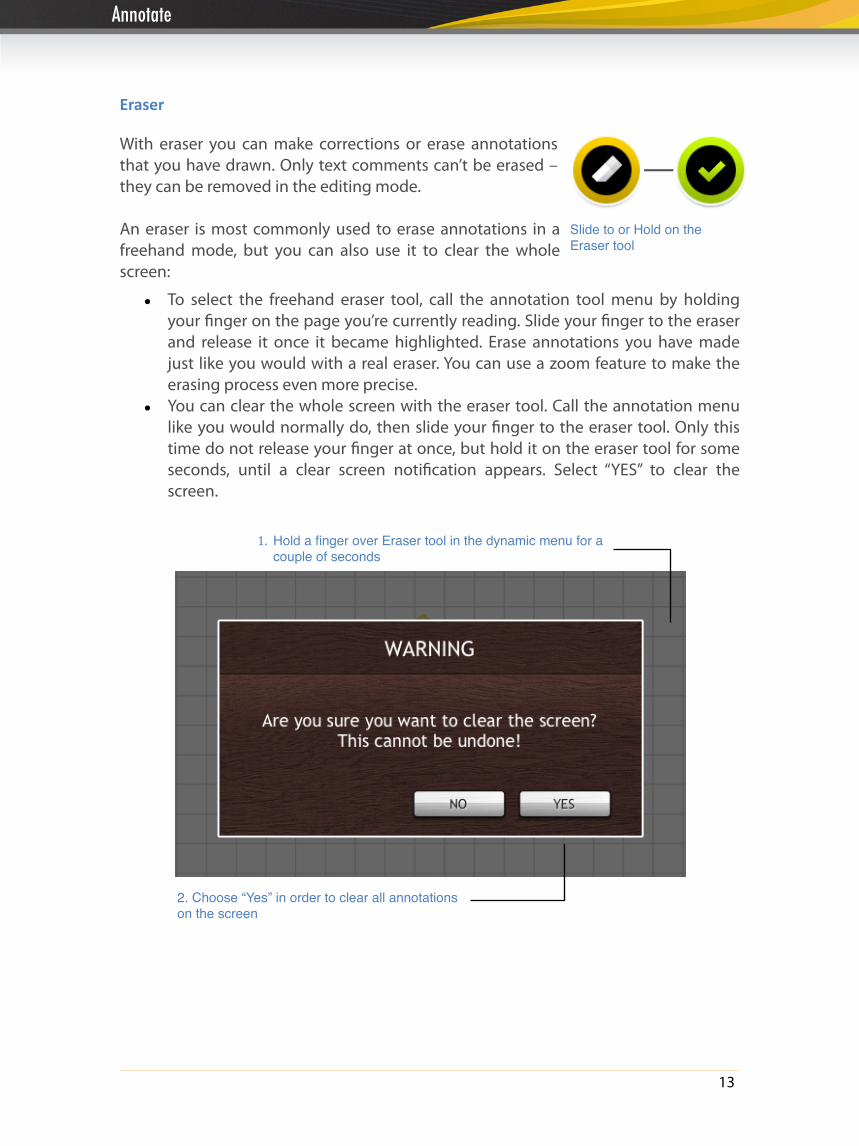
Eraser !With eraser you can make corrections or erase annotations that you have drawn. Only text comments can’t be erased – they can be removed in the editing mode. !An eraser is most commonly used to erase annotations in a freehand mode, but you can also use it to clear the whole screen:
• To select the freehand eraser tool, call the annotation tool menu by holding your finger on the page you’re currently reading. Slide your finger to the eraser and release it once it became highlighted. Erase annotations you have made just like you would with a real eraser. You can use a zoom feature to make the erasing process even more precise.
• You can clear the whole screen with the eraser tool. Call the annotation menu like you would normally do, then slide your finger to the eraser tool. Only this time do not release your finger at once, but hold it on the eraser tool for some seconds, until a clear screen notification appears. Select “YES” to clear the screen. !
!
Slide to or Hold on the Eraser tool
2. Choose “Yes” in order to clear all annotations on the screen
1. Hold a finger over Eraser tool in the dynamic menu for a couple of seconds!
14
Annotate
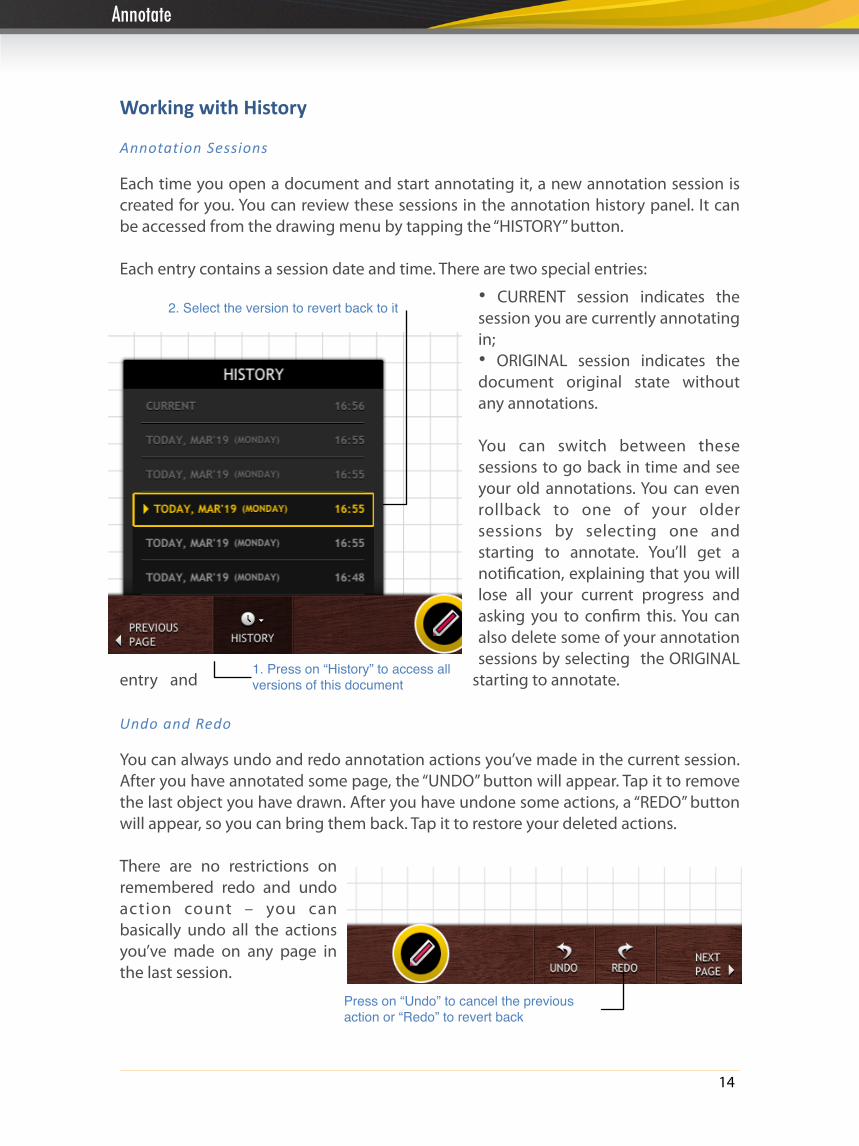
Working with History !Annotation Sessions !Each time you open a document and start annotating it, a new annotation session is created for you. You can review these sessions in the annotation history panel. It can be accessed from the drawing menu by tapping the “HISTORY” button. !Each entry contains a session date and time. There are two special entries:
• CURRENT session indicates the session you are currently annotating in; • ORIGINAL session indicates the document original state without any annotations. !You can switch between these sessions to go back in time and see your old annotations. You can even rollback to one of your older sessions by selecting one and starting to annotate. You’ll get a notification, explaining that you will lose all your current progress and asking you to confirm this. You can also delete some of your annotation sessions by selecting the ORIGINAL
entry and starting to annotate. !Undo and Redo !You can always undo and redo annotation actions you’ve made in the current session. After you have annotated some page, the “UNDO” button will appear. Tap it to remove the last object you have drawn. After you have undone some actions, a “REDO” button will appear, so you can bring them back. Tap it to restore your deleted actions. !There are no restrictions on remembered redo and undo action count – you can basically undo all the actions you’ve made on any page in the last session.
Press on “Undo” to cancel the previous action or “Redo” to revert back!
2. Select the version to revert back to it
1. Press on “History” to access all versions of this document