Android Application Development: A Beginner's Tutorial Application... · Table of Contents...
368
-
Upload
hoangkhuong -
Category
Documents
-
view
228 -
download
11
Transcript of Android Application Development: A Beginner's Tutorial Application... · Table of Contents...

AndroidApplicationDevelopment
ABeginner’sTutorial
BudiKurniawan
AndroidApplicationDevelopment:ABeginner’sTutorial
FirstEdition:February2015
All rights reserved.No part of this bookmay be reproduced or transmitted in anyformorbyanymeans,electronicormechanical,includingphotocopying,recording,orbyanyinformationstorageandretrievalsystem,withoutwrittenpermissionfromthepublisher,exceptfortheinclusionofbriefquotationsinareview.
ISBN:9780992133016
Indexer:ChrisMayle
Trademarks
OracleandJavaareregisteredtrademarksofOracleand/orit’saffiliatesUNIXisaregisteredtrademarkoftheOpenGroupApacheisatrademarkofTheApacheSoftwareFoundation.FirefoxisaregisteredtrademarkoftheMozillaFoundation.GoogleisatrademarkofGoogle,Inc.
Throughout this book the printing of trademarked names without the trademarksymbol is for editorial purpose only.We have no intention of infringement of thetrademark.
WarningandDisclaimerEveryefforthasbeenmadetomakethisbookasaccurateaspossible.Theauthorandthe publisher shall have neither liability nor responsibility to any person or entitywithrespecttoanylossordamagesarisingfromtheinformationinthisbook.

AbouttheAuthorBudi Kurniawan is known for his clear writing style. A consultant at Brainy SoftwareCorp., he haswritten software licensed by Fortune 100 companies and architected anddevelopedlargescaleapplicationsforvariousorganizationsaroundtheworld.Hehasalsopublishedmorethan100articlesinprestigiouspublications.Hisotherbooksincludethepopular“HowTomcatWorks”and“ServletandJSP:ATutorial.”
TableofContentsIntroduction
OverviewApplicationDevelopmentinBriefAndroidVersionsOnlineReferenceWhichJavaVersionsCanIUse?AboutThisBookCodeDownload
Chapter1:GettingStarted
DownloadingandInstallingAndroidStudioCreatingAnApplicationRunningtheApplicationontheEmulatorTheApplicationStructureDebugingYourApplicationTheAndroidSDKManagerCreatingAnAndroidVirtualDeviceRunningAnApplicationonAPhysicalDeviceOpeningAProjectinAndroidStudioUsingJava8GettingRidoftheSupportLibrarySummary
Chapter2:Activities
TheActivityLifecycleActivityDemoExampleChangingtheApplicationIconUsingAndroidResourcesStartingAnotherActivityActivity-RelatedIntentsSummary
Chapter3:UIComponents
OverviewUsingtheAndroidStudioUIToolUsingBasicComponentsToastAlertDialogNotificationsSummary
Chapter4:Layouts
Overview

LinearLayoutRelativeLayoutFrameLayoutTableLayoutGridLayoutCreatingALayoutProgrammaticallySummary
Chapter5:Listeners
OverviewUsingtheonClickAttributeImplementingAListenerSummary
Chapter6:TheActionBar
OverviewAddingActionItemsAddingDropdownNavigationGoingBackUpSummary
Chapter7:Menus
OverviewTheMenuFileTheOptionsMenuTheContextMenuThePopupMenuSummary
Chapter8:ListView
OverviewCreatingAListAdapterUsingAListViewExtendingListActivityandWritingACustomAdapterStylingtheSelectedItemSummary
Chapter9:GridView
OverviewUsingtheGridViewSummary
Chapter10:StylesandThemes
OverviewUsingStylesUsingThemesSummary
Chapter11:BitmapProcessing
OverviewBitmapProcessingSummary
Chapter12:GraphicsandCustomViews
OverviewHardwareAccelerationCreatingACustomViewDrawingBasicShapesDrawingTextTransparencyShadersClippingUsingPathsTheCanvasDemoApplicationSummary
Chapter13:Fragments
TheFragmentLifecycleFragmentManagementUsingAFragmentExtendingListFragmentandUsingFragmentManagerSummary
Chapter14:Multi-PaneLayouts
OverviewAMulti-PaneExampleSummary
Chapter15:Animation
OverviewPropertyAnimationAnAnimationProjectSummary
Chapter16:Preferences
SharedPreferencesThePreferenceAPIUsingPreferencesSummary
Chapter17:WorkingwithFiles
OverviewCreatingaNotesApplicationAccessingthePublicStorage
Summary
Chapter18:WorkingwiththeDatabase
OverviewTheDatabaseAPIExampleSummary
Chapter19:TakingPictures
OverviewUsingCameraTheCameraAPIUsingtheCameraAPISummary
Chapter20:MakingVideos
UsingtheBuilt-inIntentMediaRecorderUsingMediaRecorderSummary
Chapter21:TheSoundRecorder
TheMediaRecorderClassExampleSummary
Chapter22:HandlingtheHandler
OverviewExampleSummary
Chapter23:AsynchronousTasks
OverviewExampleSummary
Chapter24:Services
OverviewTheServiceAPIDeclaringAServiceAServiceExampleSummary
Chapter25:BroadcastReceivers
OverviewBroadcastReceiver-basedClockCancelingANotification
Summary
Chapter26:TheAlarmService
OverviewExampleSummary
Chapter27:ContentProviders
OverviewTheContentProviderClassCreatingAContentProviderConsumingAContentProviderSummary
AppendixA:InstallingtheJDK
DownloadingandInstallingtheJDK
AppendixB:UsingtheADTBundle
InstallingtheADTCreatingAnApplicationRunningAnApplicationonAnEmulatorLoggingDebuggingAnApplication
IntroductionThis book is for you if you want to learn Android application development for smartphonesandtablets.AndroidisthemostpopularmobileplatformtodayanditcomeswithacomprehensivesetofAPIsthatmakeiteasyfordeveloperstowrite,testanddeployapps.With theseAPIs you can easily show user interface (UI) components, play and recordaudioandvideo,creategamesandanimation,storeandretrievedata,searchtheInternet,andsoon.
Thesoftwaredevelopmentkit(SDK)forAndroidapplicationdevelopmentisfreeandincludes an emulator, a computer program that can be configured tomimic a hardwaredevice.Thismeans,youcandevelop,debugand testyourapplicationswithoutphysicaldevices.
ThisintroductionprovidesanoverviewoftheAndroidplatformandthecontentsofthebook.
OverviewTheAndroidoperating system is amulti-userLinux system.Eachapplication runs as adifferentuserinaseparateLinuxprocess.Assuch,anapplicationrunsinisolationfromotherapps.
OneofthereasonsforAndroid’srapidascenttothetopisthefactthatitusesJavaasitsprogramminglanguage.But,isAndroidreallyJava?Theanswerisyesandno.Yes,Javais thedefaultprogramminglanguageforAndroidapplicationdevelopment.No,AndroidapplicationsdonotrunonaJavaVirtualMachineasallJavaapplicationsdo.Instead,uptoAndroidversion4.4allAndroidapplicationsrunonavirtualmachinecalledDalvik.Inversion 5.0 and later, Android sources are ultimately compiled to machine code andapplicationsrunwithanewruntimecalledART(AndroidRuntime).Android4.4wastheturningpointandshippedwithbothDalvikandART.
As for the development process, initially code written in Java is compiled to Javabytecode. The bytecode is then cross-compiled to a dex (Dalvik executable) file thatcontainsoneormultipleJavaclasses.Thedexfile,resourcefilesandotherfilesarethenpackagedusingtheapkbuildertoolintoanapkfile,whichisbasicallyazipfilethatcanbeextractedusingunziporWinzip.APK,bytheway,standsforapplicationpackage.
Theapkfileishowyoudeployyourapp.AnyonewhogetsacopyofitcaninstallandrunitonhisorherAndroiddevice.
Inpre-5.0versionsofAndroid,theapkfilerunonDalvik.Inversion5.0andlater,thedexfileintheapkisconvertedintomachinecodewhentheapplicationisinstalled.Themachinecodeisexecutedwhentheuserrunstheapplication.Allofthisistransparenttothedeveloperandyoudonothavetounderstandintimatelythedexformatortheinternalworkingoftheruntime.
An apk file can run on a physical device or the emulator. Deploying an Androidapplication is easy.You canmake the apk file available for download and download itwithanAndroiddevicetoinstallit.Youcanalsoemailtheapkfiletoyourselfandopen
theemailonanAndroiddeviceandinstallit.TopublishyourapplicationonGooglePlay,however,youneedtosigntheapkfileusingthejarsignertool.Fortunately,signinganapkiseasywithanintegrateddevelopmentenvironment(IDE),eitheritisAndroidStudioorADTEclipse.
If you’re interested in learningmore about theAndroid build process, thisweb pageexplainstheAndroidbuildprocessindetail.
https://developer.android.com/tools/building/index.html
ApplicationDevelopmentinBriefBefore you embark on a long journey to becoming a professional Android applicationdeveloper,youshouldknowwhatliesahead.
Beforestartingaproject,youshouldalreadyhaveanideawhatAndroiddeviceswillbeyourtarget.Mostapplicationswilltargetsmartphonesandtablets.However,thecurrentAndroidreleasealsoallowsyoutodevelopappsforsmartTVsandwearables.Thisbook,however,isfocusedonapplicationdevelopmentforsmartphonesandtablets.
Then,youneedtodecidewhatversionsofAndroidyouwanttosupport.Androidwasreleased in 2008, but at the time of writing this book there are already 21 API levelsavailable, level 1 to level 21. Of course, the higher the level, the more features areavailable. However, many older phones and tablets do not run the latest Android andcannotrunapplicationsthattargethigherAPIlevelsthanwhatareinstalled.Forexample,ifyou’reusingfeaturesinAPIlevel21,yourapplicationwillnotruninAndroiddevicesthat support API level 20, let alone API level 2. Fortunately, Android is backward-compatible.Applicationswrittenforanearlierversionwillalwaysrunonnewerversions.Inotherwords,ifyouwriteapplicationsusingAPIlevel10,yourapplicationswillworkindevicesthatsupportAPIlevel10andlater.Therefore,youwouldwanttoaimthelowestAPIlevelpossible.Thistopicwillbediscussedfurtherinthesectiontocome.
Once you decidewhatAndroid devices to target and theAPI level you shouldwriteyour program in, you can start looking at the API. There are four types of Androidapplicationcomponents:
Activity:Awindowthatcontainsuserinterfacecomponents.Service:Alongrunningoperationthatrunsinthebackground.Broadcastreceiver:Alistenerthatrespondstoasystemorapplicationannouncement.Contentprovider:Acomponent thatmanages a set ofdata tobe sharedwithotherapplications.
An application can contain multiple component types, even though a beginner wouldnormally start with an application that has one or two activities. You can think of anactivity as a window. You can use Android user interface components or controls todecorateanactivityandasawaytointeractwiththeuser.IfyouareusinganIDE,youcandesign an activityby simplydragginganddroppingcontrols aroundyour computerscreen.
Toencouragecodereuse,anapplicationcomponentcanbeofferedtootherapplications.In fact,youshould takeadvantageof thissharingmechanismtospeedupdevelopment.For instance, insteadofwritingyourownphoto capture component, youcanutilize thecomponent of the default Camera application. Instead of writing an email sendingcomponentandreinventingthewheel,youcanusethesystem’semailapplicationtosendemailsfromyourapp.
Another important concept in Android programming is the intent. An intent is amessagesenttothesystemoranotherapplicationtorequestthatanactionbeperformed.Youcandoalotofdifferentthingswithintents,butgenerallyyouuseanintenttostartanactivity,startaserviceorsendabroadcast.
Everyapplicationmusthaveamanifest,whichdescribestheapplication.ThemanifesttakestheformofanXMLfileandcontainsoneorseveralofthefollowing:
TheminimumAPIlevelrequiredtoruntheapplication.Thenameoftheapplication.Thisnamewillbedisplayedonthedevice.Thefirstactivity(window)thatwillbeopenedwhentheusertouchestheapplicationiconontheHomescreenofhisorherphoneortablet.? Whether or not you allow your application components be invoked from otherapplications.Topromotecodereuse, functionality inanapplicationcanbe invokedfromotherapplicationsaslongastheauthoroftheapplicationagreetoshareit.Forinstance,thedefaultCameraapplicationcanbeinvokedfromotherapplicationsthatneedphotoorvideocapturefunctionality.Whatsetofpermissionstheusermustgrantfortheapplicationtobeinstalledonthetargetdevice.Iftheuserdoesnotgrantalltherequiredpermissions,theapplicationwillnotinstall.
Yes,manythingsrequireuserpermissions.Forexample,ifyourapplicationneedstostoredata in external storage or access the Internet, the application must request the user’spermissionbefore itcanbeinstalled.If theapplicationneedstobeautomaticallystartedwhenthedevicebootsup,thereisapermissionforthattoo.Infact,therearemorethan150permissionsthatanapplicationmayrequirebeforeitcanbeinstalledonanAndroiddevice.
Most applications are probably simple enough to only need activities and not othertypes of application components. Even with only activities, there is a lot to learn: UIcontrols,eventsandlisteners, fragments,animation,multi-threading,graphicandbitmapprocessingandsoon.Onceyoumasterthese,youmaywanttolookatservices,broadcastreceiversandcontentproviders.Allareexplainedinthisbook.
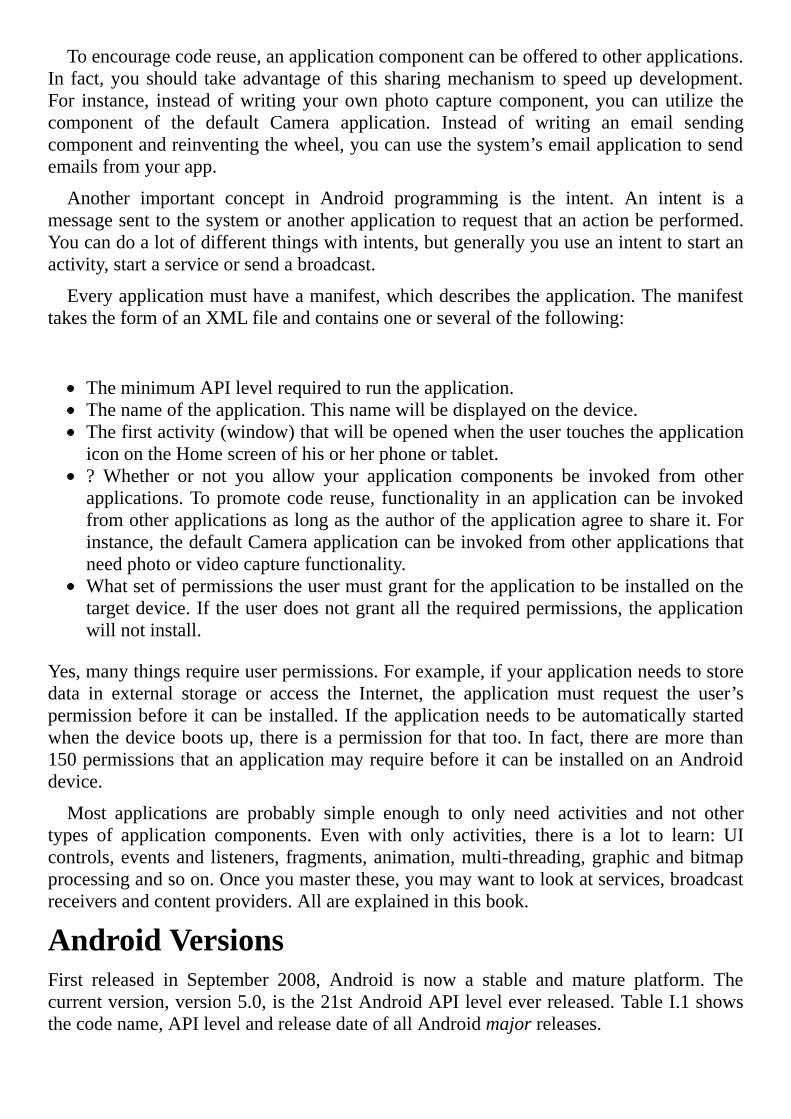
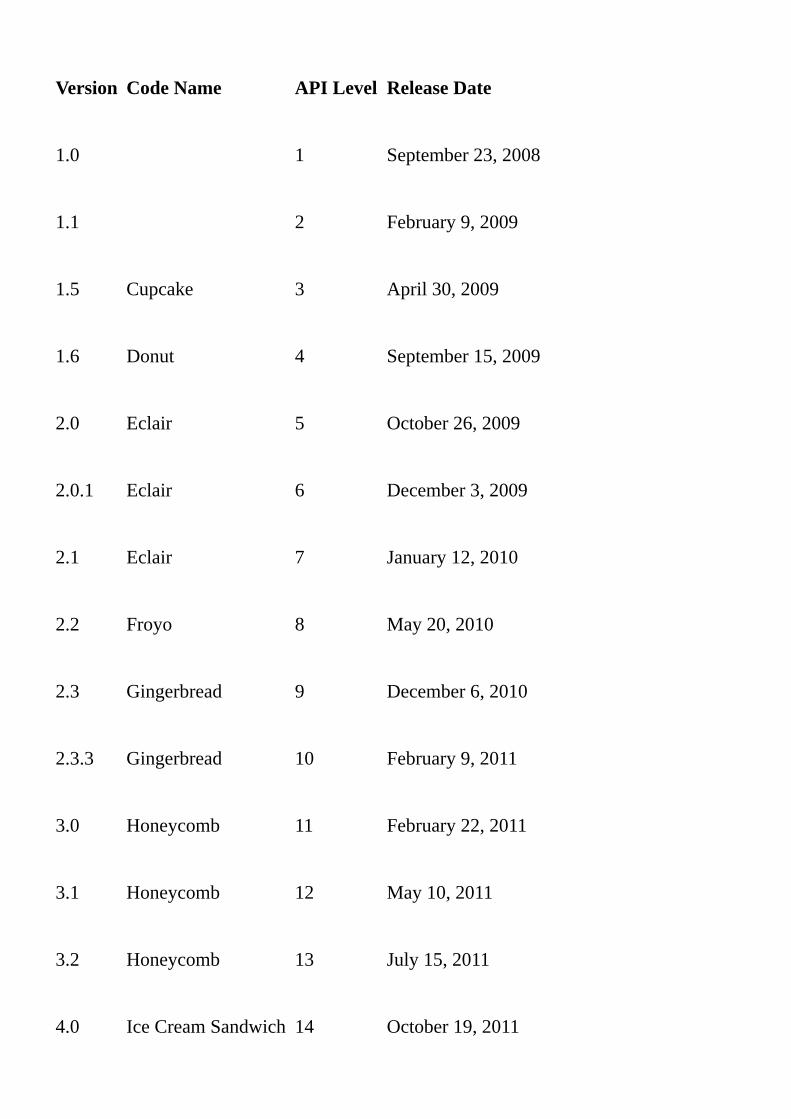
AndroidVersionsFirst released in September 2008, Android is now a stable and mature platform. Thecurrentversion,version5.0,isthe21stAndroidAPIleveleverreleased.TableI.1showsthecodename,APIlevelandreleasedateofallAndroidmajorreleases.
Version
CodeName
APILevel
ReleaseDate
1.0
1
September23,2008
1.1
2
February9,2009
1.5
Cupcake
3
April30,2009
1.6
Donut
4
September15,2009
2.0
Eclair
5
October26,2009
2.0.1
Eclair
6
December3,2009
2.1
Eclair
7
January12,2010
2.2
Froyo
8
May20,2010
2.3
Gingerbread
9
December6,2010
2.3.3
Gingerbread
10
February9,2011
3.0
Honeycomb
11
February22,2011
3.1
Honeycomb
12
May10,2011
3.2
Honeycomb
13
July15,2011
4.0
IceCreamSandwich
14
October19,2011
4.0.3
IceCreamSandwich
15
December16,2011
4.1
JellyBean
16
July9,2012
4.2
JellyBean
17
November13,2012
4.3
JellyBean
18
July24,2013
4.4
Kitkat
19
October31,2013
4.4w
Kitkat
20
July22,2014
5.0
Lollipop
21
November3,2014
TableI.1:Androidversions
NoteVersion4.4wisthesameas4.4butwithwearableextensions.
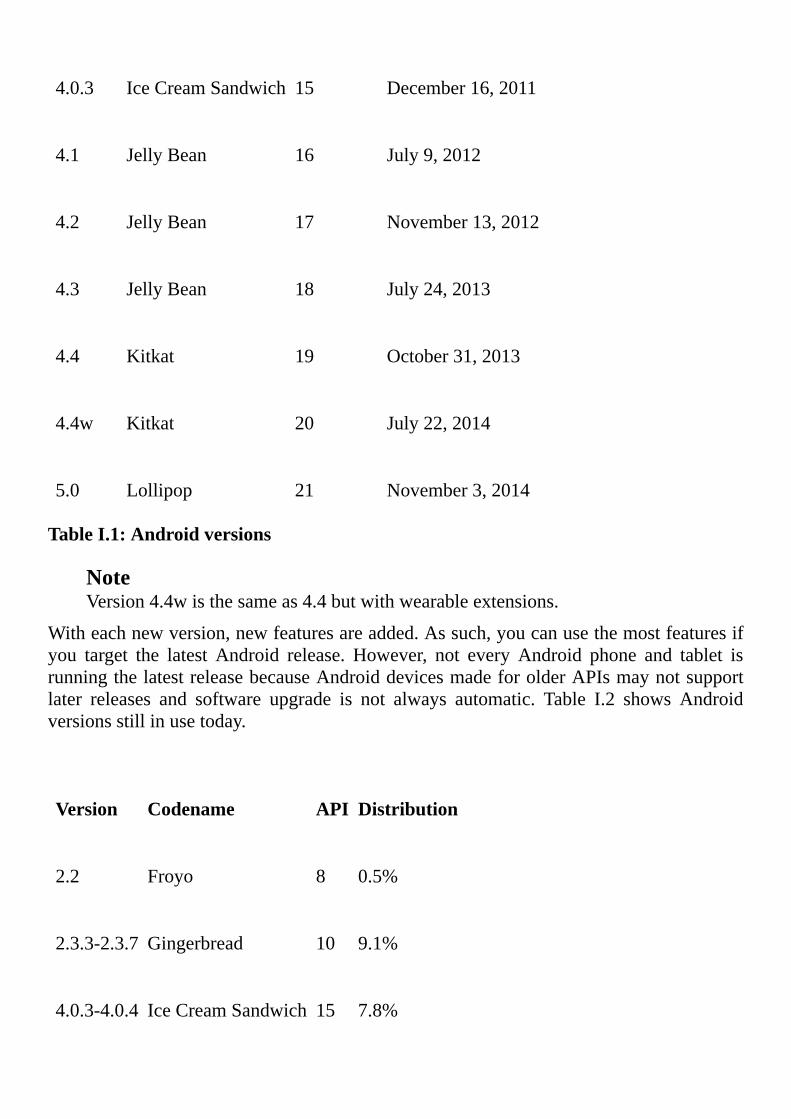
Witheachnewversion,newfeaturesareadded.Assuch,youcanusethemostfeaturesifyou target the latest Android release. However, not every Android phone and tablet isrunningthelatestreleasebecauseAndroiddevicesmadeforolderAPIsmaynotsupportlater releases and software upgrade is not always automatic. Table I.2 shows Androidversionsstillinusetoday.
Version
Codename
API
Distribution
2.2
Froyo
8
0.5%
2.3.3-2.3.7
Gingerbread
10
9.1%
4.0.3-4.0.4
IceCreamSandwich
15
7.8%
4.1.x
JellyBean
16 21.3%
4.2.x
17
20.4%
4.3
18
7.0%
4.4
KitKat
19
33.9%
TableI.2:Androidversionsstillinuse(December2014)
ThedatainTableI.2wastakenfromthiswebpage:
https://developer.android.com/about/dashboards/index.html
IfyoudistributeyourapplicationthroughGooglePlay,themostpopularmarketplaceforAndroidapplications,thelowestversionofAndroidthatcandownloadyourapplicationis2.2, because versions older than 2.2 cannot access Google Play. In general you wouldwanttoreachaswidecustomerbaseaspossible,whichmeanssupportingversion2.2andup.Ifyouonlysupportversion4.0andup,forexample,youleaveout9.6%ofAndroiddevices,whichmayormaynotbeokay.
However, the lower the version, the fewer features are supported. Some people riskalienatingsomecustomersinordertobeabletousethemorerecentfeatures.Toalleviatethisproblem,Googleprovidesasupportlibrarythatallowsyoutousenewerfeaturesinolddeviceswhichotherwisewouldnotbeabletoenjoythosefeatures.Youwilllearnhowtousethissupportlibraryinthisbook.
OnlineReferenceThe first challenge facing newAndroid programmers is understanding the componentsavailable inAndroid.Luckily,documentation is inabundanceand it iseasy tofindhelpovertheInternet.ThedocumentationofallAndroidclassesandinterfacescanbefoundonAndroid’sofficialwebsite:
http://developer.android.com/reference/packages.html
Undoubtedly,youwillfrequentthiswebsiteaslongasyouworkwithAndroid.Ifyouhadachancetobrowsethewebsite,you’dhavelearnedthatthefirstbatchoftypesbelongtotheandroidpackageanditssubpackages.AfterthemcomethejavaandjavaxpackagesthatyoucanuseinAndroidapplications.JavapackagesthatcannotbeusedinAndroid,suchasjavax.swingandjava.nio.file,arenotlistedthere.
WhichJavaVersionsCanIUse?TodevelopAndroidapplicationsusingtoolssuchasAndroidStudioorADTEclipse,youneed JDK 6 or later. Support for Java 7 language features was added to Android 4.4
(Kitkat).
At the timeofwriting there isnoofficialsupport forJava8yet.However, ifyouareusingAndroidStudioandhaveJDK8installed,youcanalreadyuselambdaexpressions,anewmajorfeatureinJava8.
AboutThisBookThissectionoutlinesthecontentsofthisbook.
Chapter1,“GettingStarted”showshowtoinstalltheAndroidSDKandAndroidStudioandcreateasimpleAndroidapplication.
Chapter2,“Activities”explainstheactivityanditslifecycle.TheactivityisoneofthemostimportantconceptsinAndroidprogramming.
Chapter 3, “UI Components” covers the more important UI components, includingwidgets,Toast,AlertDialogandnotifications.
Chapter4,“Layouts”showshowtolayoutUIcomponentsinAndroidapplicationsandusethebuilt-inlayoutsavailableinAndroid.
Chapter5,“Listeners”talksaboutcreatingalistenertohandleevents.
Chapter6,“TheActionBar”showshowyoucanadditemstotheactionbaranduseittodriveapplicationnavigation.
Menus are a common feature inmany graphical user interface (GUI) systemswhoseprimary role is to provide shortcuts to certain actions. Chapter 7, “Menus” looks atAndroidmenusclosely.
Chapter8,“ListView”explainsaboutListView,aviewthatshowsascrollable listofitemsandgetsitsdatasourcefromalistadapter.
Chapter9, “GridView”covers theGridViewwidget, a view similar to theListView.UnliketheListView,however,theGridViewdisplaysitsitemsinagrid.
Chapter 10, “Styles and Themes” discusses the two important topics directlyresponsibleforthelookandfeelofyourapps.
Chapter11, “BitmapProcessing” teachesyouhow tomanipulatebitmap images.Thetechniquesdiscussedinthischapterareusefulevenifyouarenotwritinganimageeditorapplication.
The Android SDK comes with a wide range of views that you can use in yourapplications.Ifnoneofthesesuitsyourneed,youcancreateacustomviewanddrawonit.Chapter 12, “Graphics andCustomViews” shows how to create a custom view anddrawshapesonacanvas.
Chapter13,“Fragments”discussesfragments,whicharecomponentsthatcanbeaddedto an activity. A fragment has its own lifecycle and hasmethods that get called whencertainphasesofitslifeoccur.
Chapter 14, “Multi-Pane Layouts” shows how you can use different layouts fordifferentscreensizes,likethatofhandsetsandthatoftablets.
Chapter15,“Animation”discussesthelatestAnimationAPIinAndroidcalledpropertyanimation.Italsoprovidesanexample.
Chapter 16, “Preferences” teaches you how to use the Preference API to storeapplicationsettingsandreadthemback.
Chapter 17, “WorkingwithFiles” showhow to use the JavaFileAPI in anAndroidapplication.
Chapter18,“WorkingwiththeDatabase”discussestheAndroidDatabaseAPI,whichyoucanuse to connect to anSQLitedatabase.SQLite is thedefault relationaldatabasethatcomeswitheveryAndroiddevice.
Chapter19, “TakingPictures” teachesyouhow to take still imagesusing thebuilt-inCameraapplicationandtheCameraAPI.
Chapter 20, “Making Videos” shows the two methods for providing video-makingcapabilityinyourapplication,byusingabuilt-inintentorbyusingtheMediaRecorderclass.
Chapter21,“TheSoundRecorder”showshowyoucanrecordaudio.
Chapter22,“HandlingtheHandler”talksabouttheHandlerclass,whichcanbeused,amongothers,toscheduleaRunnableatafuturetime.
Chapter 23, “Asynchronous Tasks” explains how to handle asynchronous tasks inAndroid.
Chapter24,“Services”explainshowtocreatebackgroundservices thatwill runevenaftertheapplicationthatstartedthemwasterminated.
Chapter 25, “Broadcast Receivers” discusses another kind of android component forreceivingintentbroadcasts.
Chapter 26, “The AlarmManager” shows how you can use theAlarmManager toschedulejobs.
Chapter27, “ContentProviders” explainsyet another application component type forencapsulatingdatathatcanbesharedacrossapplications.
AppendixA,“InstallingtheJDK”providesinstructionsonhowtoinstalltheJDK.
Appendix B, “Using the ADT Bundle” explains how to use the ADT Bundle as analternativeIDEtodevelopAndroidapps.
CodeDownloadTheexamplesaccompanyingthisbookcanbedownloadedfromthepublisher’swebsite:
http://books.brainysoftware.com
Chapter1GettingStarted
YouneedtheAndroidSoftwareDevelopmentKit(SDK)todevelop,debugandtestyourapplications.TheSDKcontainsvarioustoolsincludinganemulatortohelpyoutestyourapplicationswithoutaphysicaldevice.CurrentlytheSDKisavailableforWindows,MacOSXandLinuxoperatingsystems.
Youalsoneedanintegrateddevelopmentenvironment(IDE)tospeedupdevelopment.YoucouldbuildapplicationswithoutanIDE,butthatwouldbemoredifficultandunwise.TherearetwoIDEscurrentlyavailable,bothfree:
AndroidStudio,whichisbasedonIntelliJIDEA,apopularJavaIDE.ThissoftwaresuiteincludestheAndroidSDK.The Android Developer Tools (ADT) Bundle, a bundle that includes the AndroidSDKandEclipse.EclipseisanotherpopularJavaIDE.
Released inDecember 2014,AndroidStudio is the preferred IDE and theADTbundlewill not be supported in the future. Therefore, you should start using Android StudiounlessyouhaveverygoodreasonstochoosetheADTBundle.ThisbookassumesyouareusingAndroidStudio.
In thischapteryouwill learnhowtodownloadand installAndroidStudio.Afteryouhave successfully installed the IDE, you will write and build your first Androidapplicationandrunitontheemulator.
AndroidapplicationdevelopmentrequiresaJavaDevelopmentKit(JDK).ForAndroid5orlater,orifyouaredevelopingusingAndroidStudio,youneedJDK7orlater.Forpre-5Android,youneedJDK6or later.IfyoudonothaveaJDKinstalled,makesureyoudownload and install one by following the instructions in Appendix A, “Installing theJDK.”
DownloadingandInstallingAndroidStudioYoucandownloadAndroidStudiofromthiswebpage:
http://developer.android.com/sdk/index.html
AndroidStudioisavailableforWindows,MacOSXandLinux.InstallingAndroidStudioalsodownloadsandinstallstheAndroidSDK.
InstallingonWindowsFollowthesestepstoinstallAndroidStudioonWindows.
1. Double-click the exe file you downloaded to launch the Setup wizard. The
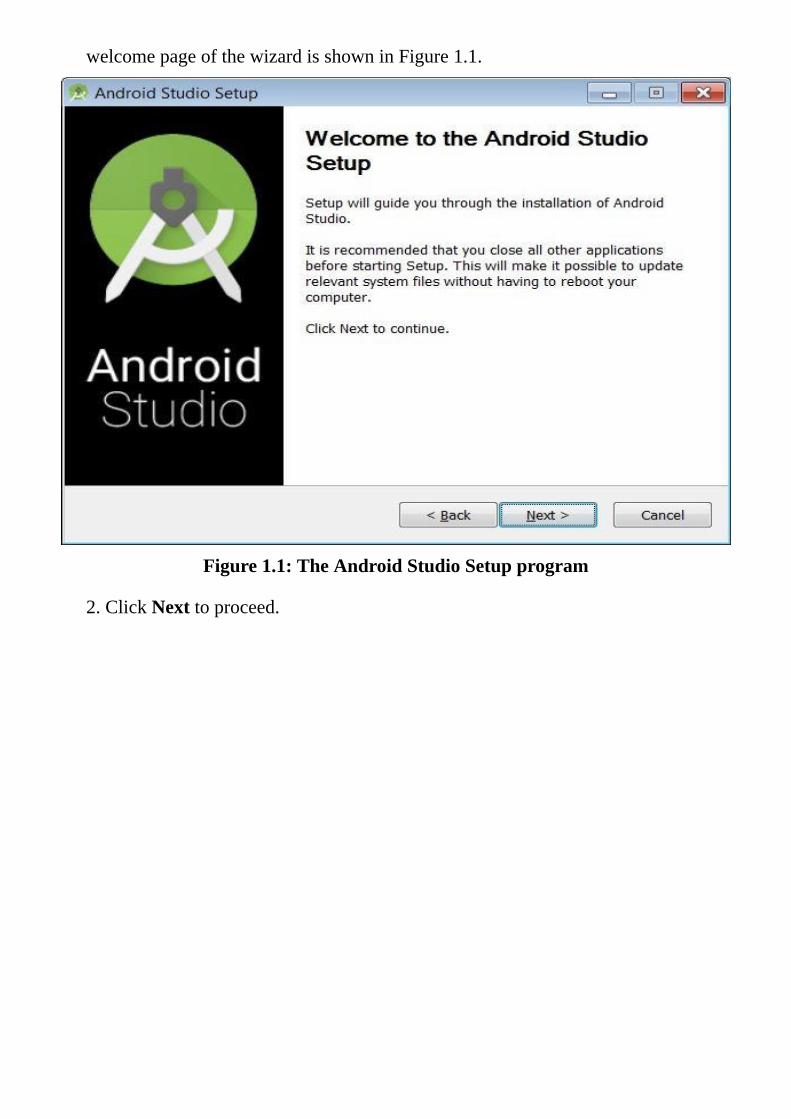
welcomepageofthewizardisshowninFigure1.1.
Figure1.1:TheAndroidStudioSetupprogram
2.ClickNexttoproceed.
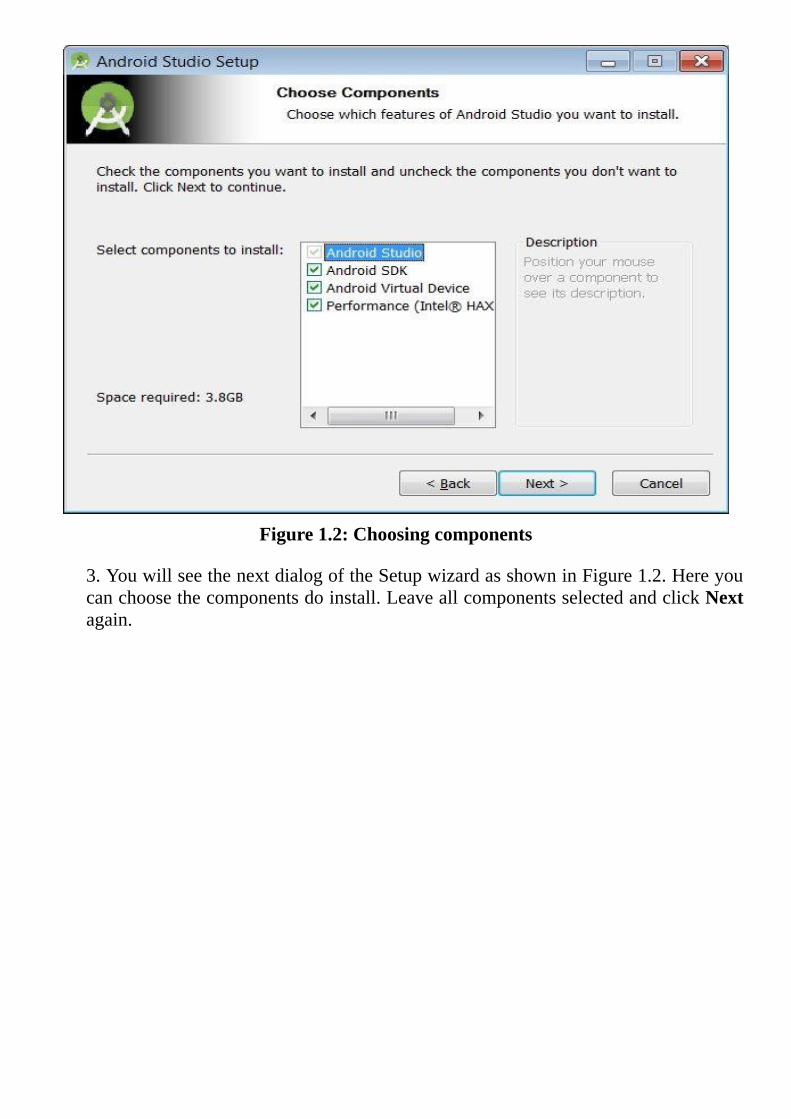
Figure1.2:Choosingcomponents
3.YouwillseethenextdialogoftheSetupwizardasshowninFigure1.2.Hereyoucanchoosethecomponentsdoinstall.LeaveallcomponentsselectedandclickNextagain.
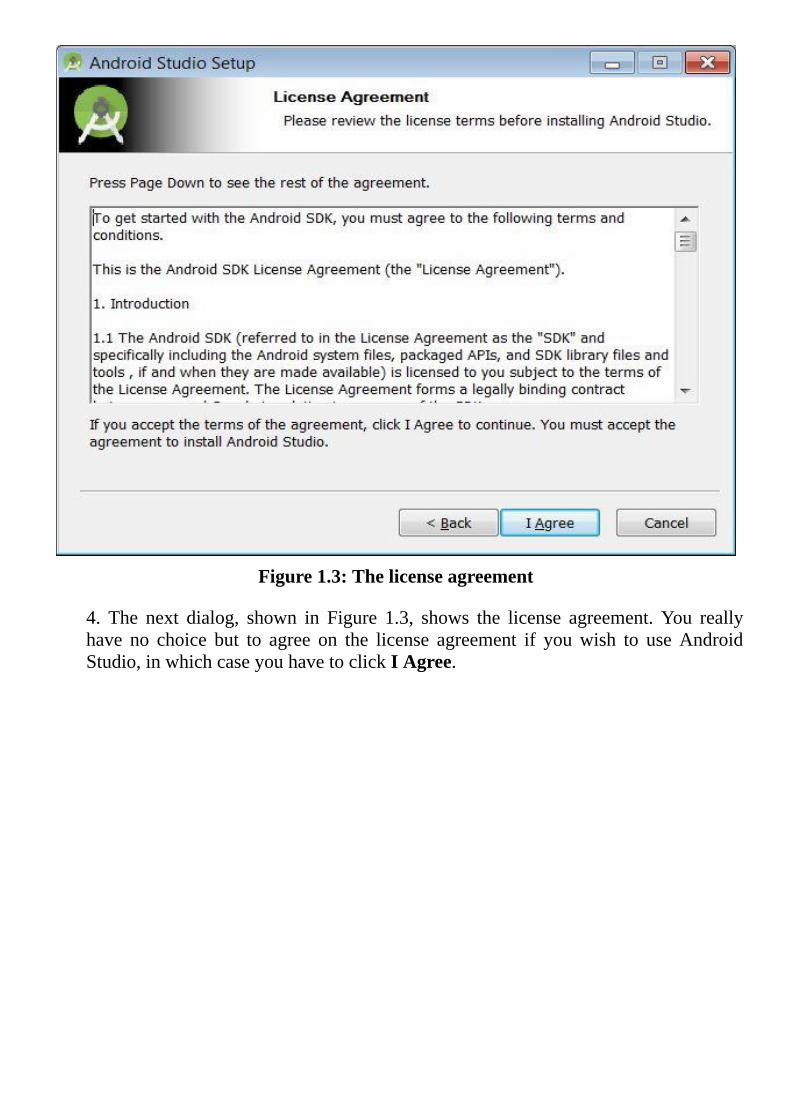
Figure1.3:Thelicenseagreement
4. The next dialog, shown in Figure 1.3, shows the license agreement. You reallyhave no choice but to agree on the license agreement if youwish to useAndroidStudio,inwhichcaseyouhavetoclickIAgree.
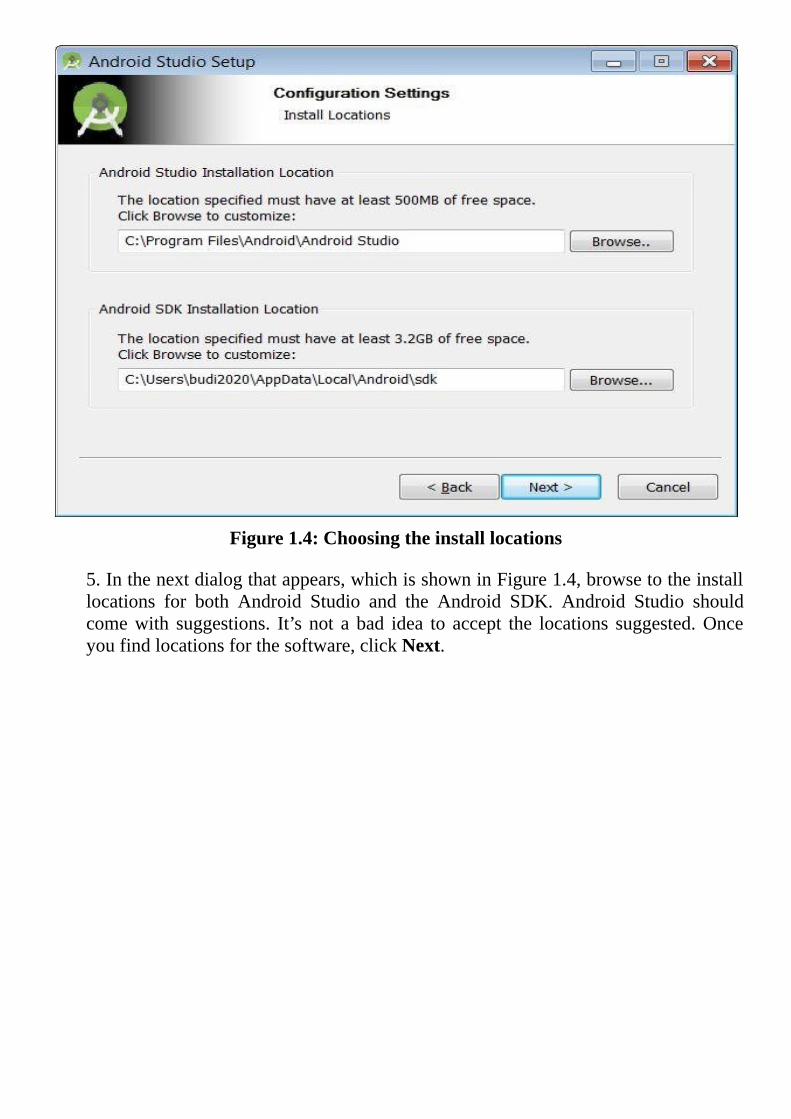
Figure1.4:Choosingtheinstalllocations
5.Inthenextdialogthatappears,whichisshowninFigure1.4,browsetotheinstalllocations for both Android Studio and the Android SDK. Android Studio shouldcomewith suggestions. It’s not a bad idea to accept the locations suggested.Onceyoufindlocationsforthesoftware,clickNext.
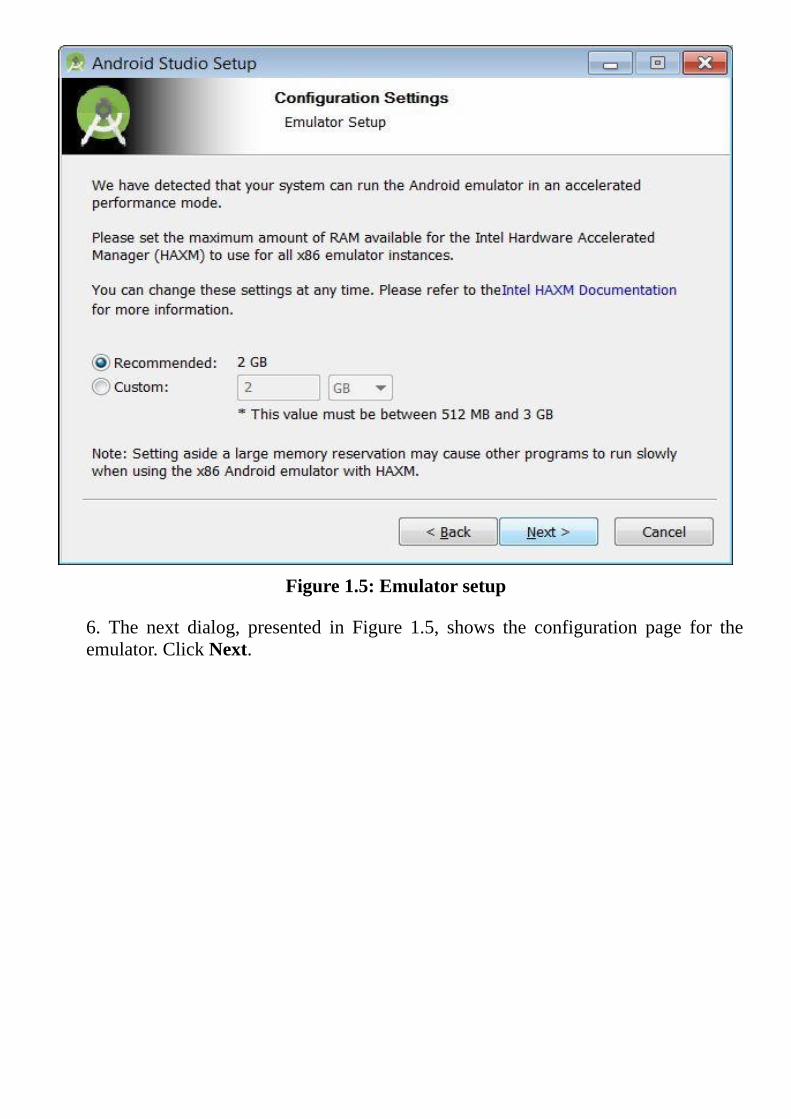
Figure1.5:Emulatorsetup
6. The next dialog, presented in Figure 1.5, shows the configuration page for theemulator.ClickNext.
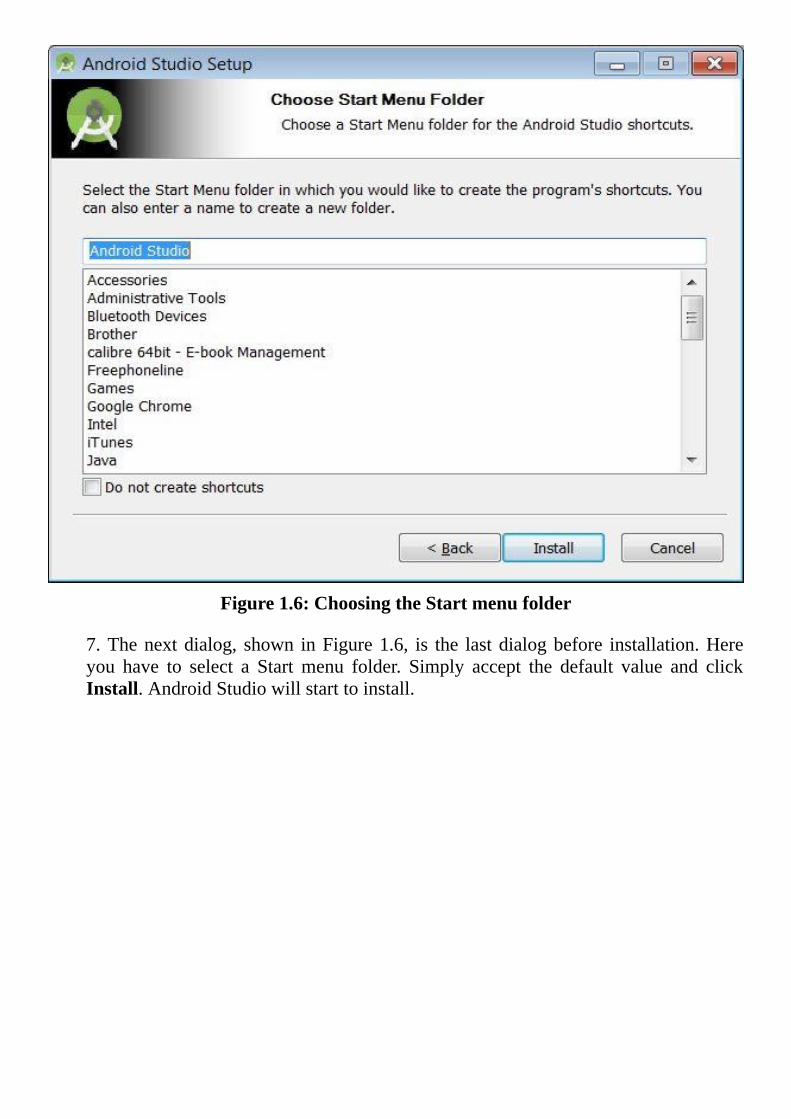
Figure1.6:ChoosingtheStartmenufolder
7.Thenextdialog, shown inFigure1.6, is the lastdialogbefore installation.Hereyou have to select a Start menu folder. Simply accept the default value and clickInstall.AndroidStudiowillstarttoinstall.
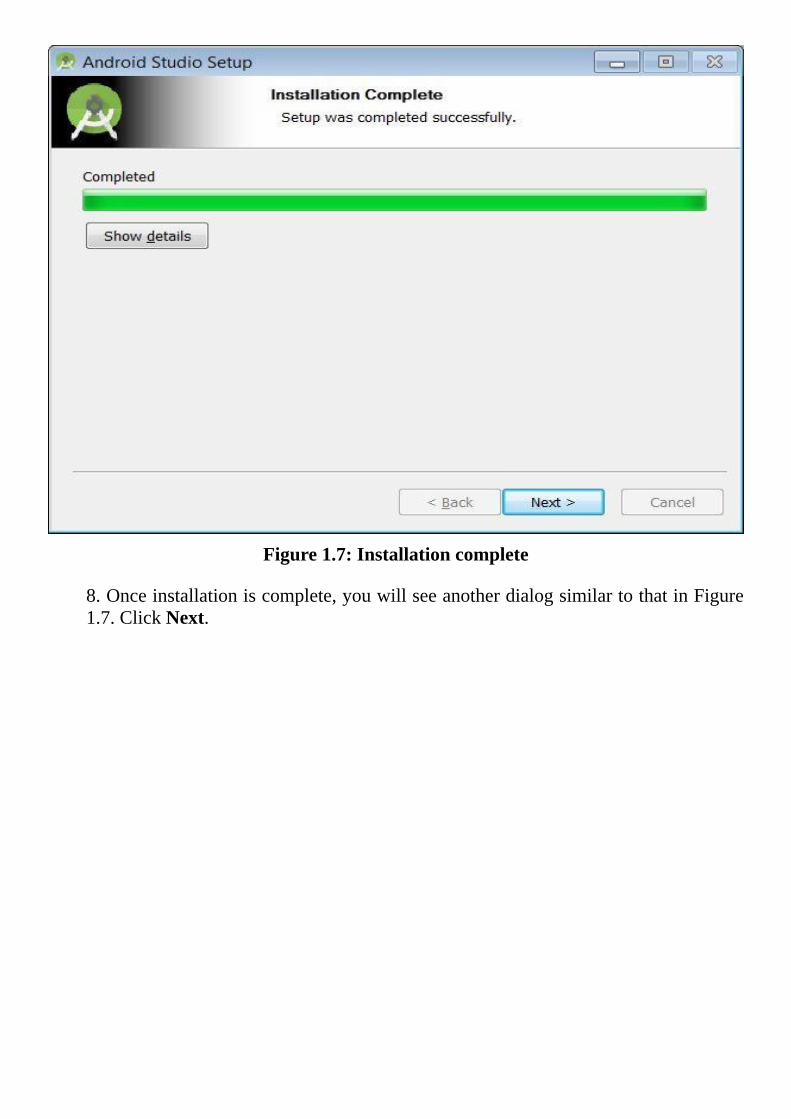
Figure1.7:Installationcomplete
8.Onceinstallationiscomplete,youwillseeanotherdialogsimilartothatinFigure1.7.ClickNext.
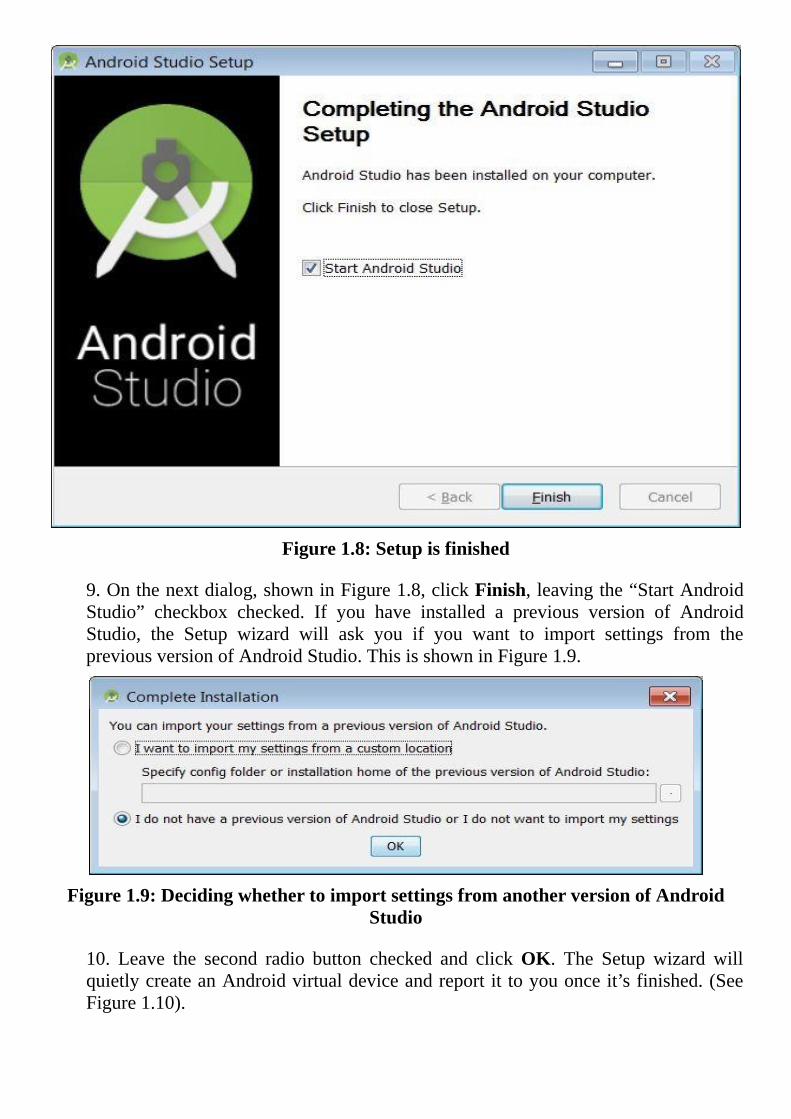
Figure1.8:Setupisfinished
9.Onthenextdialog,showninFigure1.8,clickFinish,leavingthe“StartAndroidStudio” checkbox checked. If you have installed a previous version of AndroidStudio, the Setup wizard will ask you if you want to import settings from thepreviousversionofAndroidStudio.ThisisshowninFigure1.9.
Figure1.9:DecidingwhethertoimportsettingsfromanotherversionofAndroidStudio
10. Leave the second radio button checked and clickOK. The Setup wizard willquietlycreateanAndroidvirtualdeviceandreportit toyouonceit’sfinished.(SeeFigure1.10).
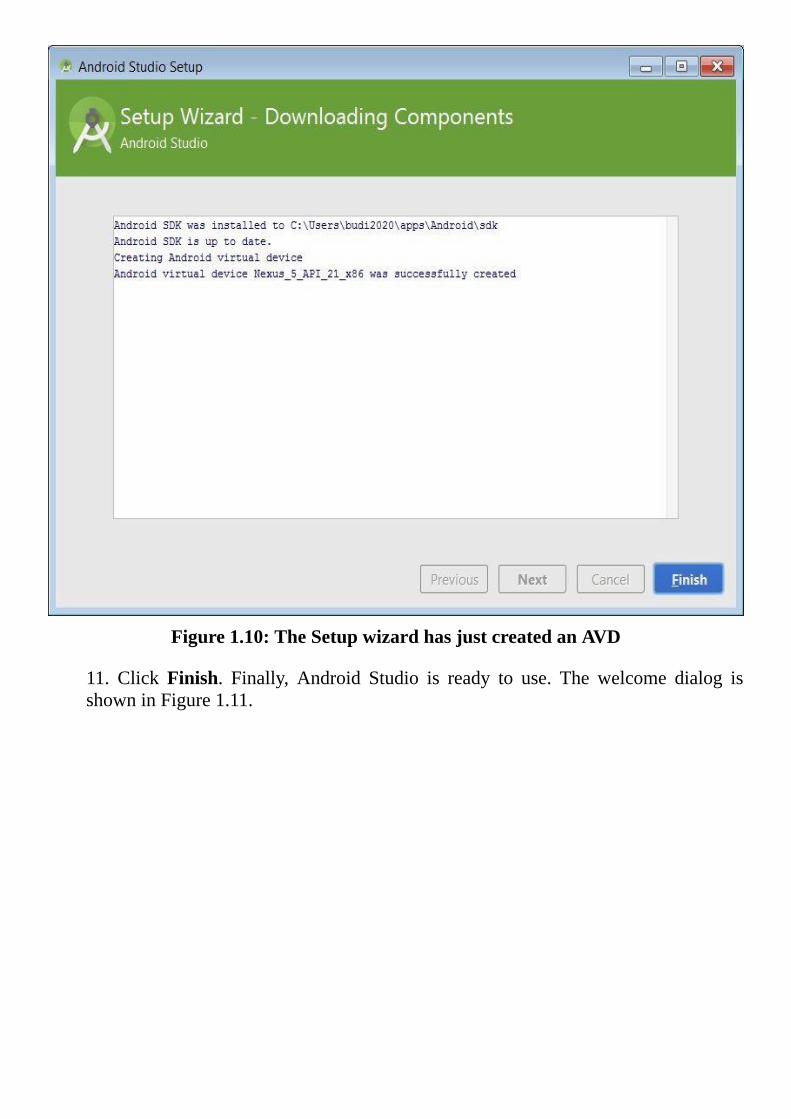
Figure1.10:TheSetupwizardhasjustcreatedanAVD
11. ClickFinish. Finally, Android Studio is ready to use. The welcome dialog isshowninFigure1.11.
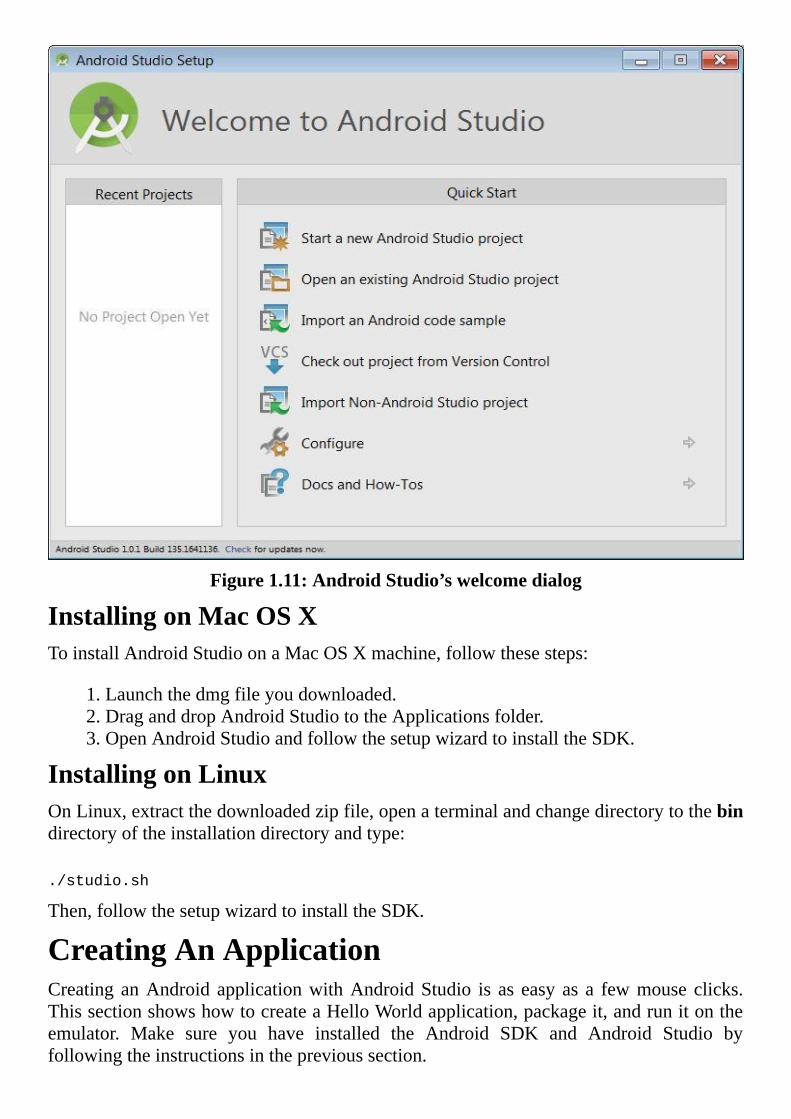
Figure1.11:AndroidStudio’swelcomedialog
InstallingonMacOSXToinstallAndroidStudioonaMacOSXmachine,followthesesteps:
1.Launchthedmgfileyoudownloaded.2.DraganddropAndroidStudiototheApplicationsfolder.3.OpenAndroidStudioandfollowthesetupwizardtoinstalltheSDK.
InstallingonLinuxOnLinux,extractthedownloadedzipfile,openaterminalandchangedirectorytothebindirectoryoftheinstallationdirectoryandtype:
./studio.sh
Then,followthesetupwizardtoinstalltheSDK.
CreatingAnApplicationCreating anAndroid applicationwithAndroidStudio is as easy as a fewmouse clicks.ThissectionshowshowtocreateaHelloWorldapplication,packageit,andrunitontheemulator. Make sure you have installed the Android SDK and Android Studio byfollowingtheinstructionsintheprevioussection.

Next,followthesesteps.
1.ClicktheFilemenuinAndroidStudioandselectNewProject.ThefirstdialogoftheCreateNewProjectwizard,showninFigure1.12,appears.
Figure1.12:Enteringapplicationdetails
2.Enter thedetailsof thenewapplication.IntheApplicationname field, type thename to appear on theAndroid device. In theCompanyDomain field, type yourcompany’s domain. If you do not have one, just use example.com. The companydomain in reverseorderwillbeusedas thebasepackagenamefor theapplication.Thepackagenameuniquelyidentifiesyourapplication.YoucanchangethepackagenamebyclickingtheEditbuttontotherightofthefield.Bydefault,theprojectwillbe created under theAndroidStudioProjects directory createdwhen you installedAndroidStudio.Youcanchangethelocationtooifyouwish.3.ClickNext.TheseconddialogopensasshowninFigure1.13.Hereyouneedtoselect a target (phone andTablet,TV, etc) and theminimumAPI level.This bookonlydiscussesAndroidapplicationdevelopmentforphonesandtablets,soleavetheselectedoptionchecked.AsfortheminimumAPIlevel,thelowerthelevel,themoredevicesyourapplicationcanrunon,butthefewerfeaturesareavailabletoyou.Fornow,keeptheAPIlevelAndroidStudiohasselectedforyou.
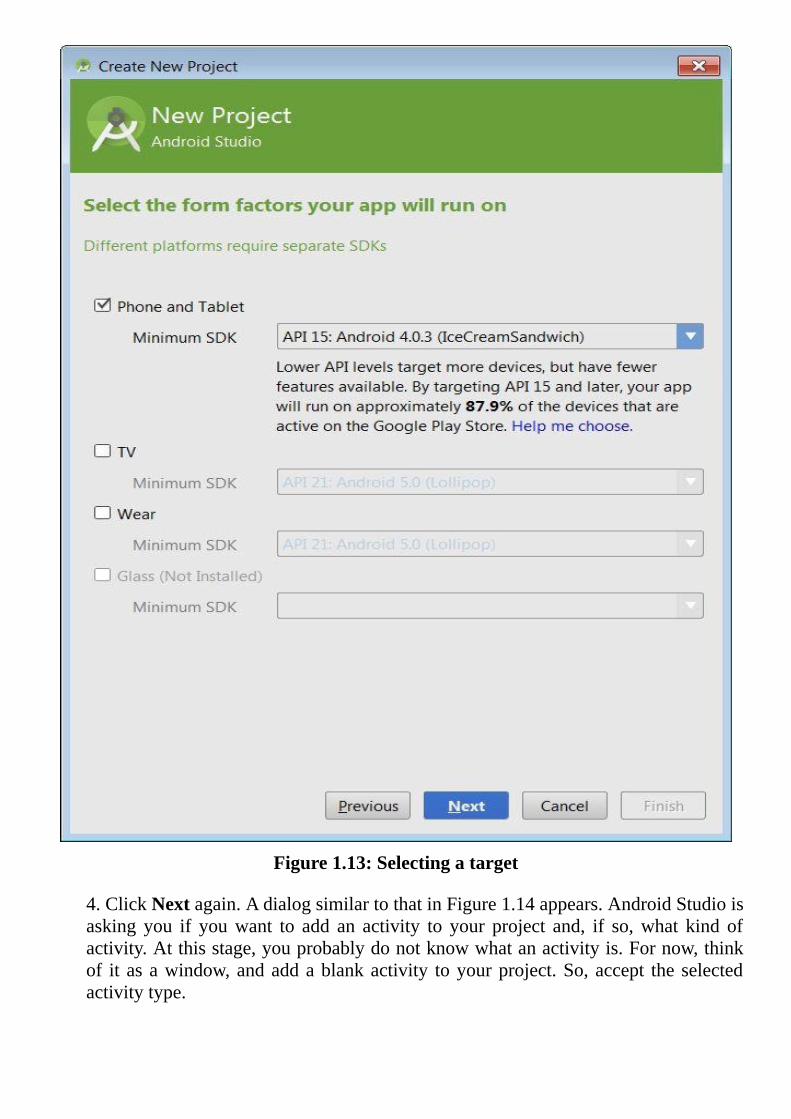
Figure1.13:Selectingatarget
4.ClickNextagain.AdialogsimilartothatinFigure1.14appears.AndroidStudioisasking you if youwant to add an activity to your project and, if so,what kind ofactivity.Atthisstage,youprobablydonotknowwhatanactivityis.Fornow,thinkof it asawindow,andaddablankactivity toyourproject.So,accept the selectedactivitytype.
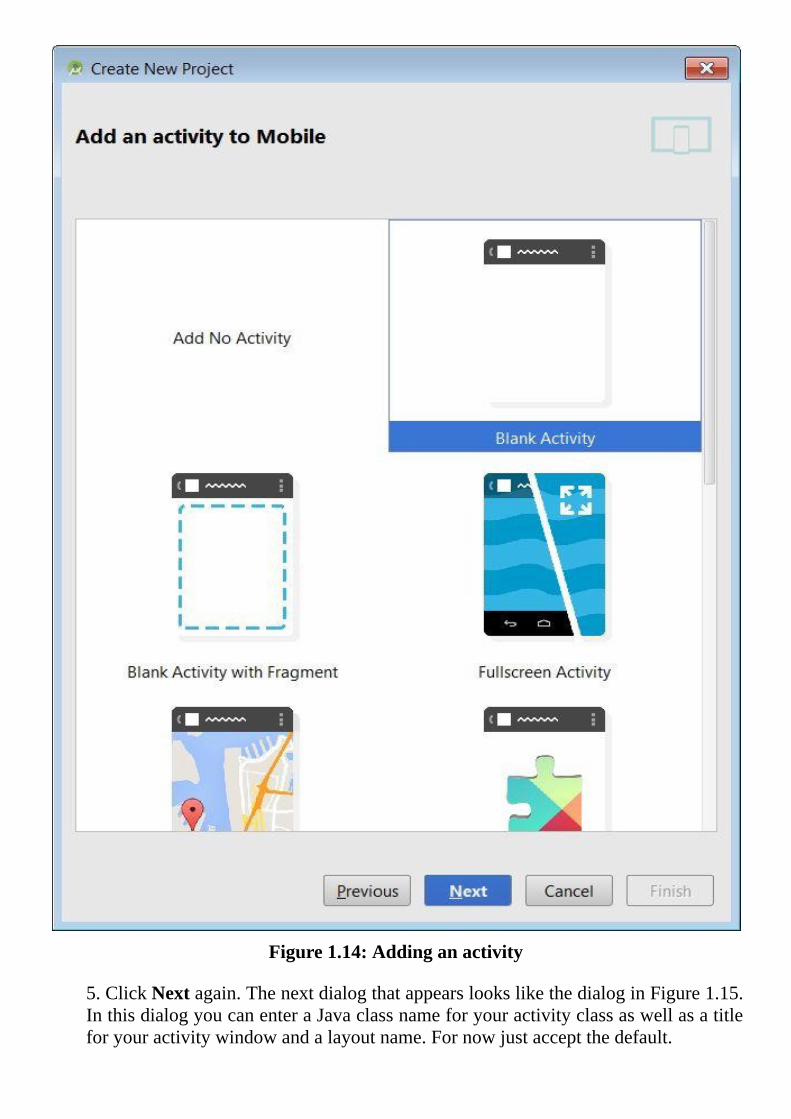
Figure1.14:Addinganactivity
5.ClickNextagain.ThenextdialogthatappearslookslikethedialoginFigure1.15.InthisdialogyoucanenteraJavaclassnameforyouractivityclassaswellasatitleforyouractivitywindowandalayoutname.Fornowjustacceptthedefault.

Figure1.15:Enteringtheactivityclassnameandotherdetails
5.ClickFinish.AndroidStudiowill prepareyourproject and itmay takeawhile.Finally,whenit’sfinished,youwillseeyourprojectinAndroidStudio,liketheoneshowninFigure1.16.
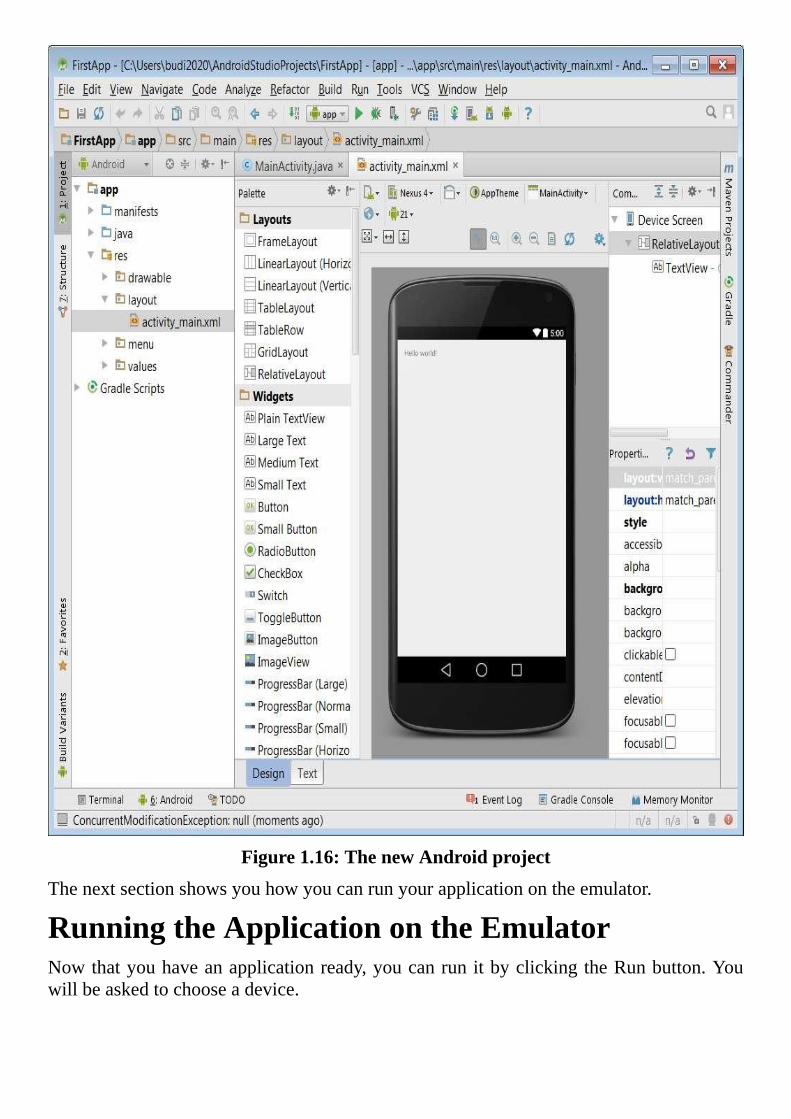
Figure1.16:ThenewAndroidproject
Thenextsectionshowsyouhowyoucanrunyourapplicationontheemulator.
RunningtheApplicationontheEmulatorNowthatyouhaveanapplicationready,youcanrunitbyclickingtheRunbutton.Youwillbeaskedtochooseadevice.
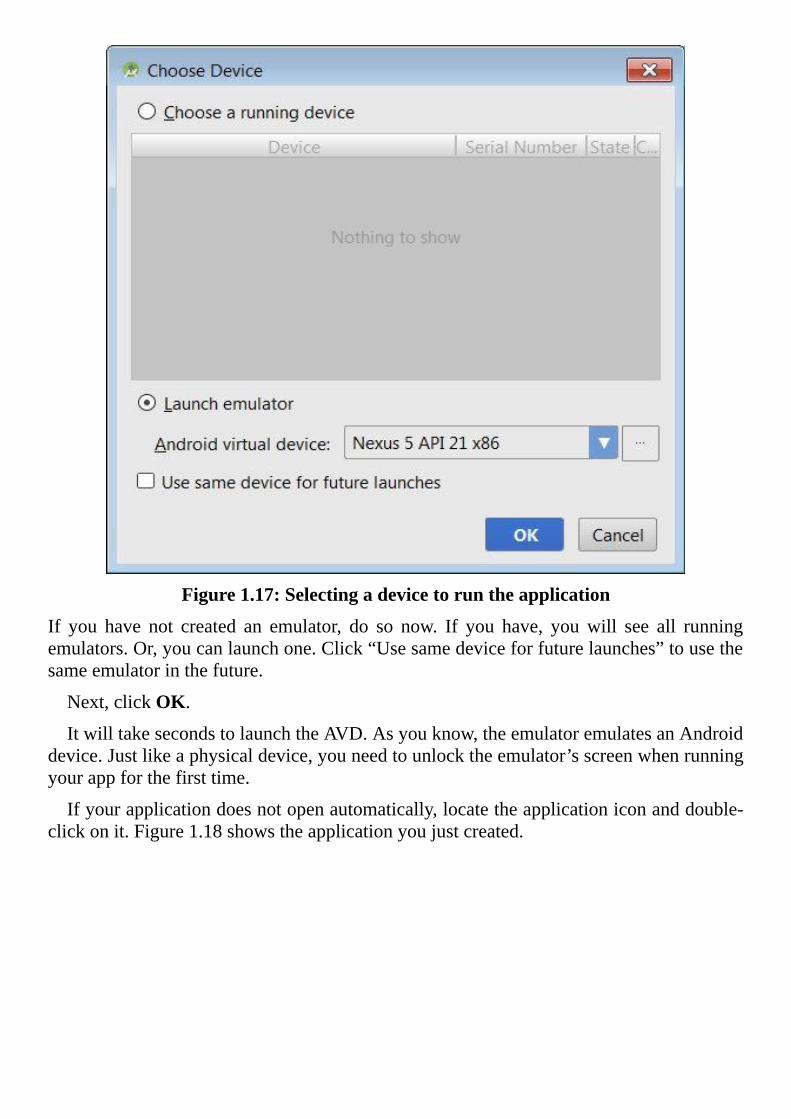
Figure1.17:Selectingadevicetoruntheapplication
If you have not created an emulator, do so now. If you have, youwill see all runningemulators.Or,youcanlaunchone.Click“Usesamedeviceforfuturelaunches”tousethesameemulatorinthefuture.
Next,clickOK.
ItwilltakesecondstolaunchtheAVD.Asyouknow,theemulatoremulatesanAndroiddevice.Justlikeaphysicaldevice,youneedtounlocktheemulator’sscreenwhenrunningyourappforthefirsttime.
Ifyourapplicationdoesnotopenautomatically,locatetheapplicationiconanddouble-clickonit.Figure1.18showstheapplicationyoujustcreated.
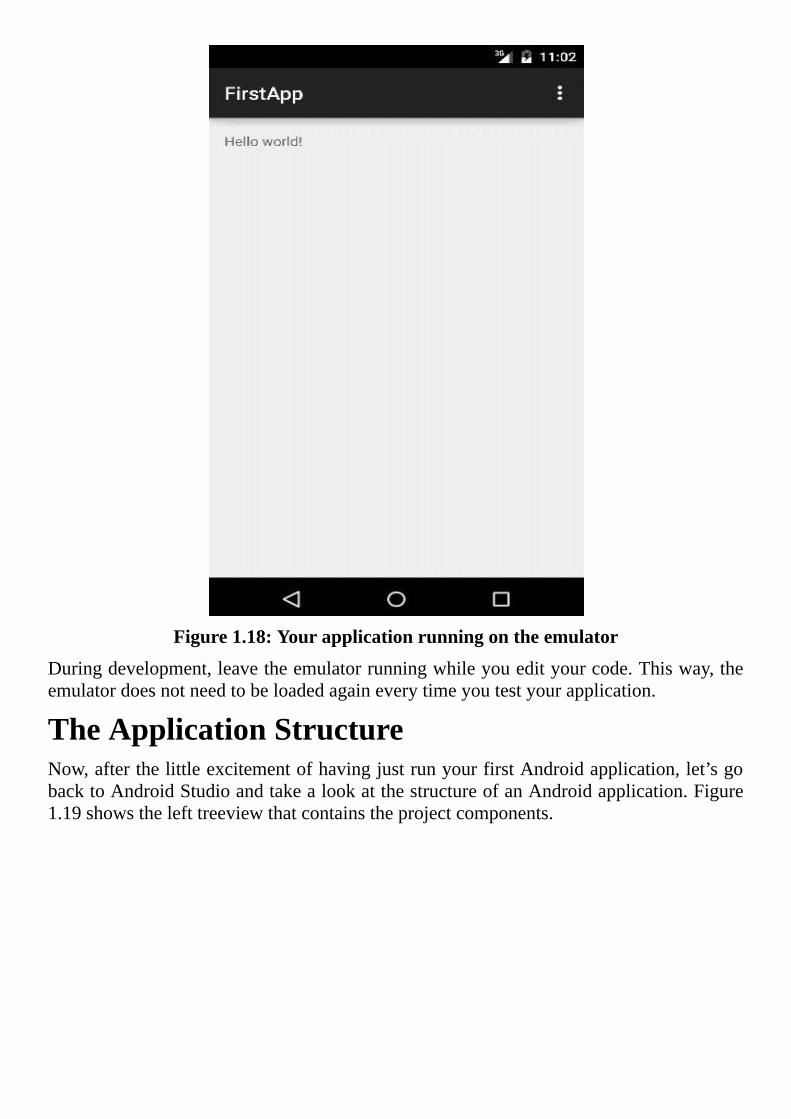
Figure1.18:Yourapplicationrunningontheemulator
Duringdevelopment,leavetheemulatorrunningwhileyouedityourcode.Thisway,theemulatordoesnotneedtobeloadedagaineverytimeyoutestyourapplication.
TheApplicationStructureNow,afterthelittleexcitementofhavingjustrunyourfirstAndroidapplication,let’sgobacktoAndroidStudioandtakealookatthestructureofanAndroidapplication.Figure1.19showsthelefttreeviewthatcontainstheprojectcomponents.
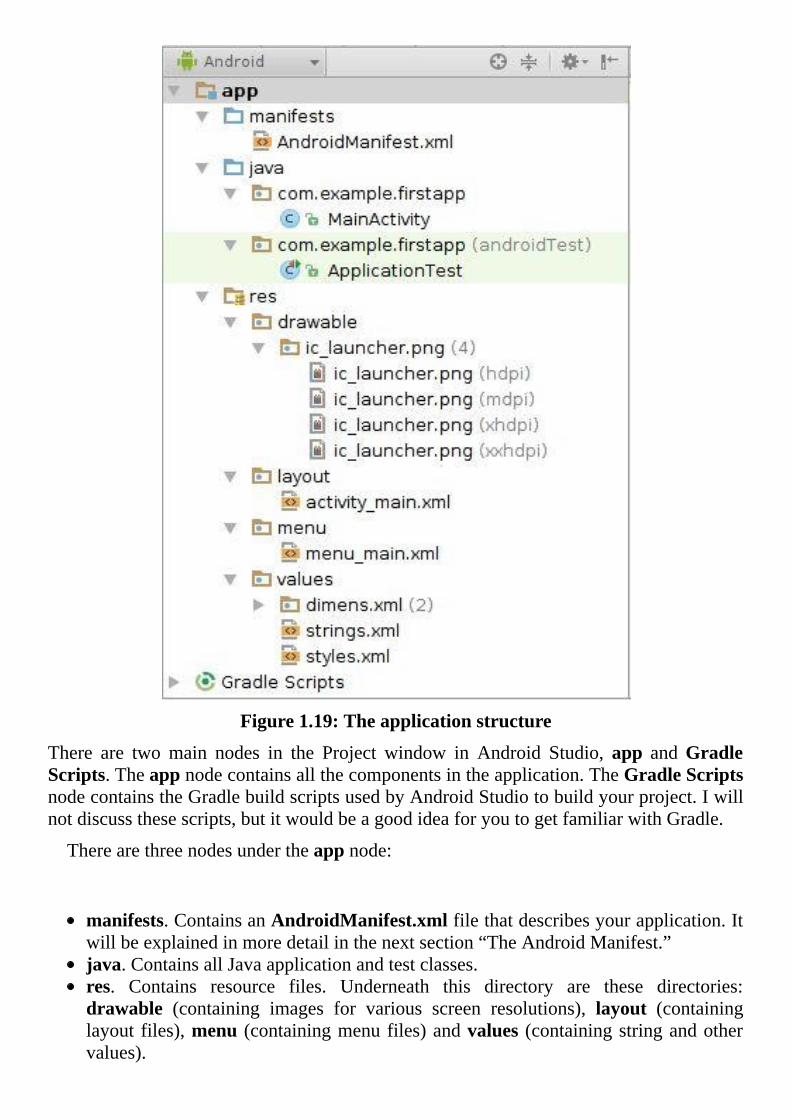
Figure1.19:Theapplicationstructure
There are twomain nodes in the Project window in Android Studio, app andGradleScripts.Theappnodecontainsallthecomponentsintheapplication.TheGradleScriptsnodecontainstheGradlebuildscriptsusedbyAndroidStudiotobuildyourproject.Iwillnotdiscussthesescripts,butitwouldbeagoodideaforyoutogetfamiliarwithGradle.
Therearethreenodesundertheappnode:
manifests.ContainsanAndroidManifest.xmlfilethatdescribesyourapplication.Itwillbeexplainedinmoredetailinthenextsection“TheAndroidManifest.”java.ContainsallJavaapplicationandtestclasses.res. Contains resource files. Underneath this directory are these directories:drawable (containing images for various screen resolutions), layout (containinglayout files),menu (containingmenufiles)andvalues (containingstringandothervalues).
TheRClass
NotvisiblefrominsideAndroidStudioisageneratedJavaclassnamedR,whichcanbe found in the app/build/generated/source directory of the project. R containsnestedclassesthatinturncontainall theresourceIDsforallyourresources.Everytimeyouadd,changeordeletearesource,Risre-generated.Forinstance,ifyouaddan image file named logo.png to the res/drawable directory, Android Studio willgenerateafieldnamedlogounderthedrawableclass,anestedclassinR.The purpose of havingR is so that you can refer to a resource in your code. Forinstance,youcanrefertothelogo.pngimagefilewithR.drawable.logo.
TheAndroidManifestEvery Android applicationmust have a manifest file calledAndroidManifest.xml filethatdescribestheapplication.Listing1.1showsasamplemanifestfile.
Listing1.1:Asamplemanifest
<?xmlversion=“1.0”encoding=“utf-8”?>
<manifestxmlns:android=“http://schemas.android.com/apk/res/android”
package=“com.example.firstapp”>
<application
android:allowBackup=“true”
android:icon=”@drawable/ic_launcher”
android:label=”@string/app_name”
android:theme=”@style/AppTheme”>
<activity
android:name=“com.example.firstapp.MainActivity”
android:label=”@string/app_name”>
<intent-filter>
<actionandroid:name=“android.intent.action.MAIN”/>
<category
android:name=“android.intent.category.LAUNCHER”/>
</intent-filter>
</activity>
</application>
</manifest>
Amanifest file is anXML documentwithmanifest as the root element. Thepackageattributeofthemanifestelementspecifiesauniqueidentifierfortheapplication.AndroidtoolswillalsousethisinformationtogenerateappropriateJavaclassesthatareusedfromtheJavasourceyouwrite.
Under<manifest> is an application element that describes the application. Amongothers,itcontainsoneormoreactivityelements thatdescribeactivities inyourapp.Anapplicationtypicallyhasamainactivitythatservesastheentrypoint totheapplication.Thename attribute of anactivity element specifies an activity class. It can be a fullyqualifiednameorjust theclassname.If it is thelatter, theclassisassumedtobeinthepackagespecifiedbythepackageattributeofthemanifestelement. Inotherwords, thenameattributeoftheaboveactivityelementcanbewrittenasoneofthefollowing:
android:name=“MainActivity”
android:name=”.MainActivity”
Youcanreferencearesourcefromyourmanifestfile(andotherXMLfilesintheproject)usingthisformat:
@resourceType/name
Forexample,thesearesomeoftheattributesoftheapplicationelementinListing1.1:
android:icon=”@drawable/ic_launcher”
android:label=”@string/app_name”
android:theme=”@style/AppTheme”
Thefirstattribute,android:icon,referstoadrawablenamedic_launcher.IfyoubrowsetheprojectinAndroidStudio,youcanfindanic_launcher.pngfileunderres/drawable.
Thesecondattribute,android:label, refers toa string resourcecalledapp_name.Allstringresourcesarelocatedinthestrings.xmlfileunderres/values.
Finally, the thirdattribute,android:theme, references a stylenamedAppTheme.Allstylesaredefinedinthestyles.xmlfileunderres/values.StylesandthemesarediscussedinChapter10,“StylesandThemes.”
ThereareotherelementsthatmayappearintheAndroidmanifestandyouwilllearntousemanyoftheminthisbook.Youcanfindthecompletelistofelementshere:
http://developer.android.com/guide/topics/manifest/manifest-
element.html
TheAPKFileAnAndroidapplicationispackagedintoanapkfile,whichisbasicallyazipfileandcanbeopenedusingWinZiporasimilarprogram.Allapplicationsaresignedwithaprivatekey. This process sounds hard enough, but thankfully Android Studio takes care ofeverything.WhenyourunanAndroidapplicationfrominsideAndroidStudio,anapkfilewillbebuiltandsignedautomatically.Thefilewillbenamedapp-debug.apkandstoredin theapp/build/outputs/apkdirectoryunder theprojectdirectory.AndroidStudioalsonotifiestheemulatororthetargetdeviceofthelocationsothattheapkfilecanbefoundandexecuted.
Theautomaticallygeneratedapkfilealsocontainsdebuginformationtoenablerunningitindebugmode.
Figure 1.20 shows the structure of the apk file that is created when you run yourapplication.
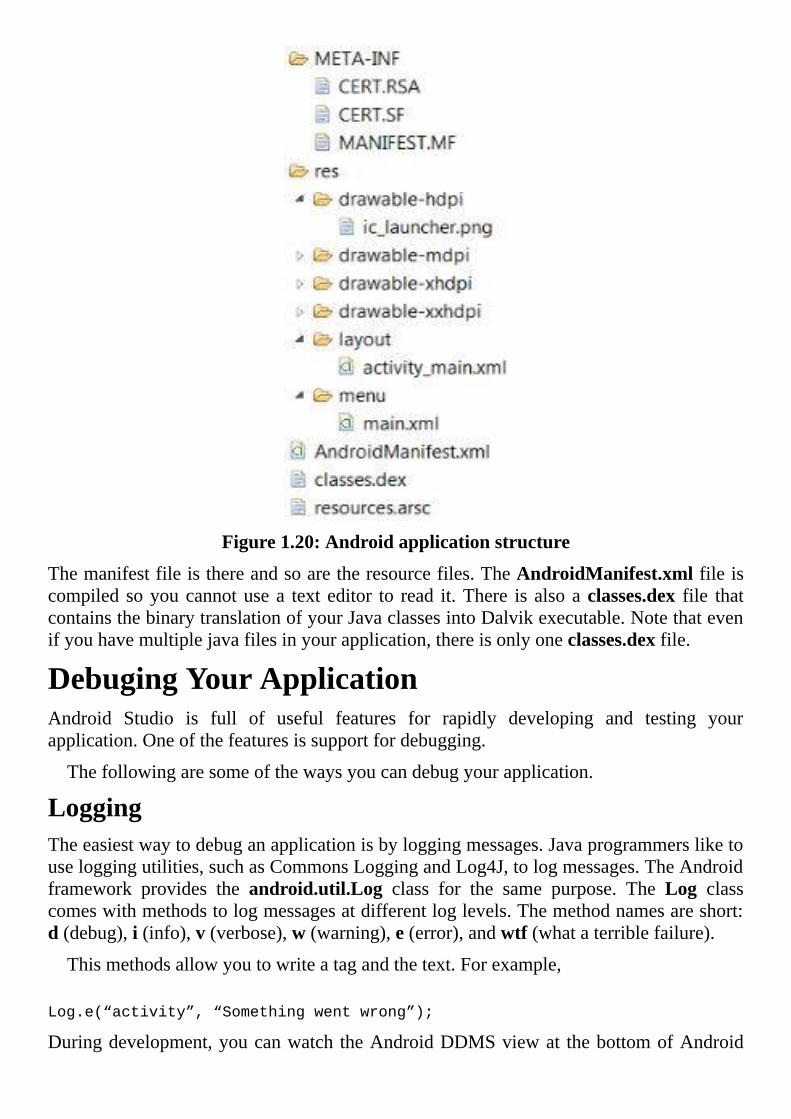
Figure1.20:Androidapplicationstructure
Themanifestfileisthereandsoaretheresourcefiles.TheAndroidManifest.xmlfileiscompiled soyoucannotusea text editor to read it.There is alsoaclasses.dex file thatcontainsthebinarytranslationofyourJavaclassesintoDalvikexecutable.Notethatevenifyouhavemultiplejavafilesinyourapplication,thereisonlyoneclasses.dexfile.
DebugingYourApplicationAndroid Studio is full of useful features for rapidly developing and testing yourapplication.Oneofthefeaturesissupportfordebugging.
Thefollowingaresomeofthewaysyoucandebugyourapplication.
LoggingTheeasiestwaytodebuganapplicationisbyloggingmessages.Javaprogrammersliketouseloggingutilities,suchasCommonsLoggingandLog4J,tologmessages.TheAndroidframework provides the android.util.Log class for the same purpose. The Log classcomeswithmethodstologmessagesatdifferentloglevels.Themethodnamesareshort:d(debug),i(info),v(verbose),w(warning),e(error),andwtf(whataterriblefailure).
Thismethodsallowyoutowriteatagandthetext.Forexample,
Log.e(“activity”,“Somethingwentwrong”);
Duringdevelopment,youcanwatch theAndroidDDMSviewat thebottomofAndroid
Studio’smainscreen.
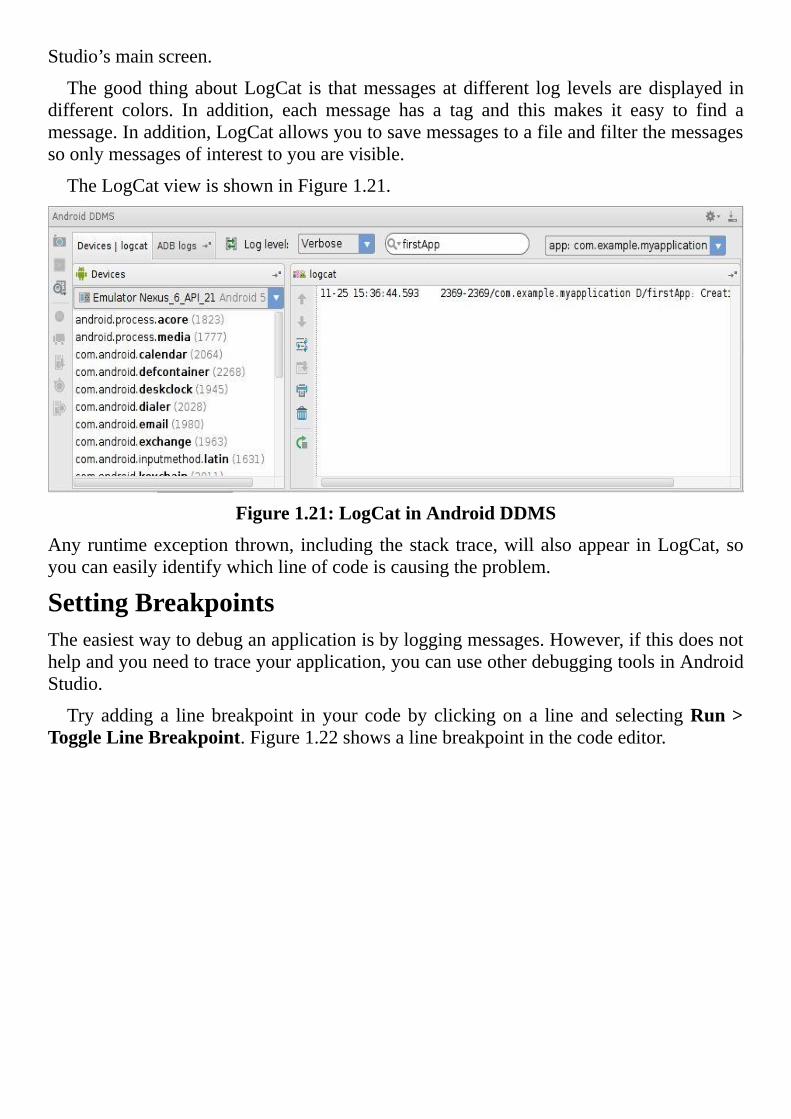
Thegood thingaboutLogCat is thatmessagesatdifferent log levelsaredisplayed indifferent colors. In addition, each message has a tag and this makes it easy to find amessage.Inaddition,LogCatallowsyoutosavemessagestoafileandfilterthemessagessoonlymessagesofinteresttoyouarevisible.
TheLogCatviewisshowninFigure1.21.
Figure1.21:LogCatinAndroidDDMS
Anyruntimeexception thrown, including thestack trace,willalsoappear inLogCat,soyoucaneasilyidentifywhichlineofcodeiscausingtheproblem.
SettingBreakpointsTheeasiestwaytodebuganapplicationisbyloggingmessages.However,ifthisdoesnothelpandyouneedtotraceyourapplication,youcanuseotherdebuggingtoolsinAndroidStudio.
Try addinga linebreakpoint inyour codeby clickingon a line and selectingRun>ToggleLineBreakpoint.Figure1.22showsalinebreakpointinthecodeeditor.
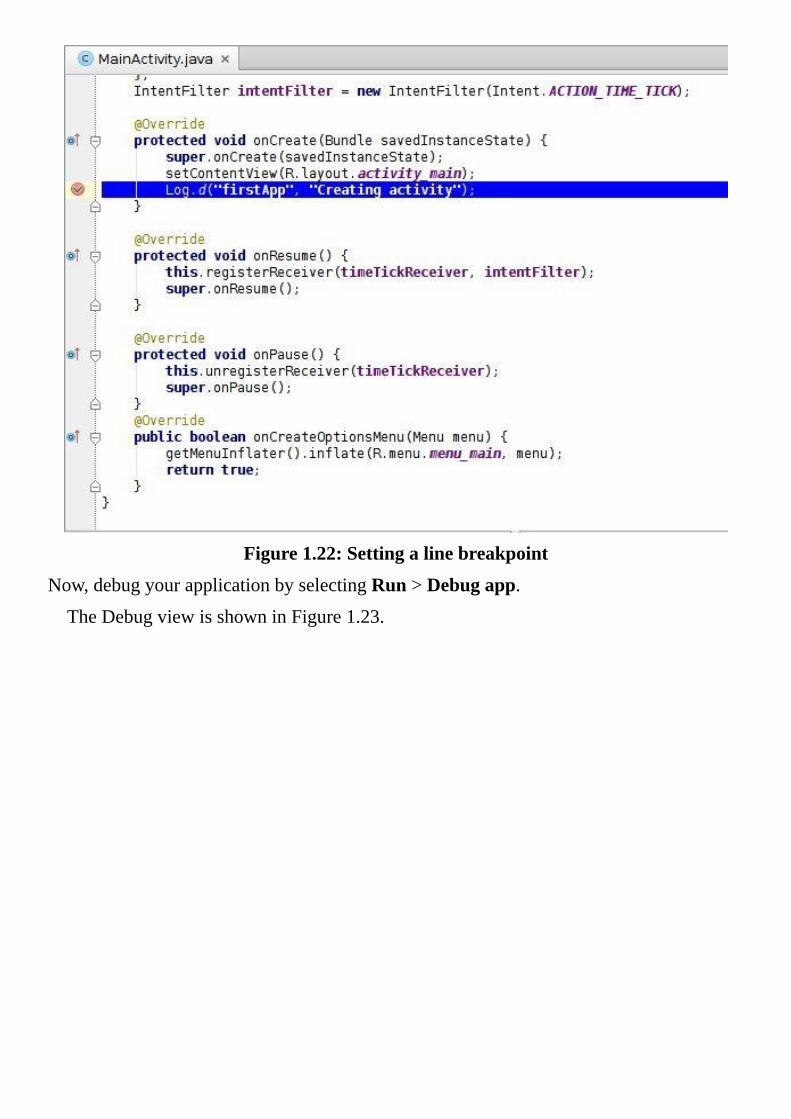
Figure1.22:Settingalinebreakpoint
Now,debugyourapplicationbyselectingRun>Debugapp.
TheDebugviewisshowninFigure1.23.
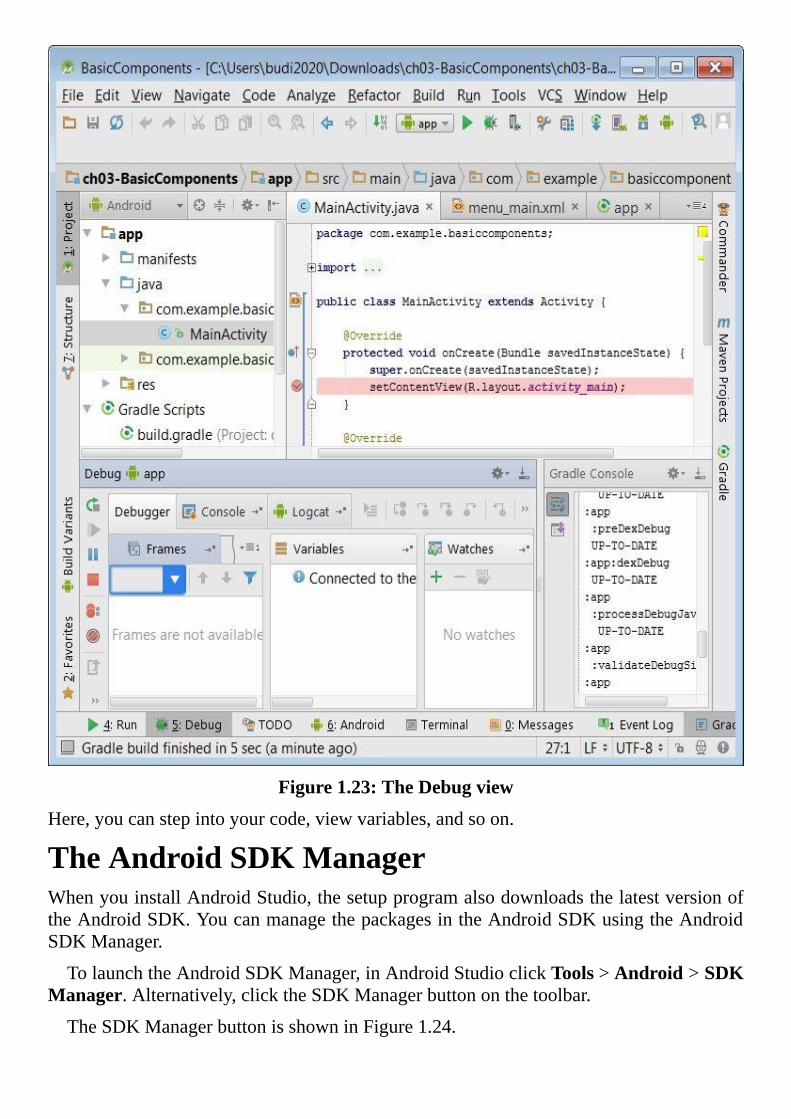
Figure1.23:TheDebugview
Here,youcanstepintoyourcode,viewvariables,andsoon.
TheAndroidSDKManagerWhenyouinstallAndroidStudio,thesetupprogramalsodownloadsthelatestversionoftheAndroidSDK.YoucanmanagethepackagesintheAndroidSDKusingtheAndroidSDKManager.
TolaunchtheAndroidSDKManager,inAndroidStudioclickTools>Android>SDKManager.Alternatively,clicktheSDKManagerbuttononthetoolbar.
TheSDKManagerbuttonisshowninFigure1.24.
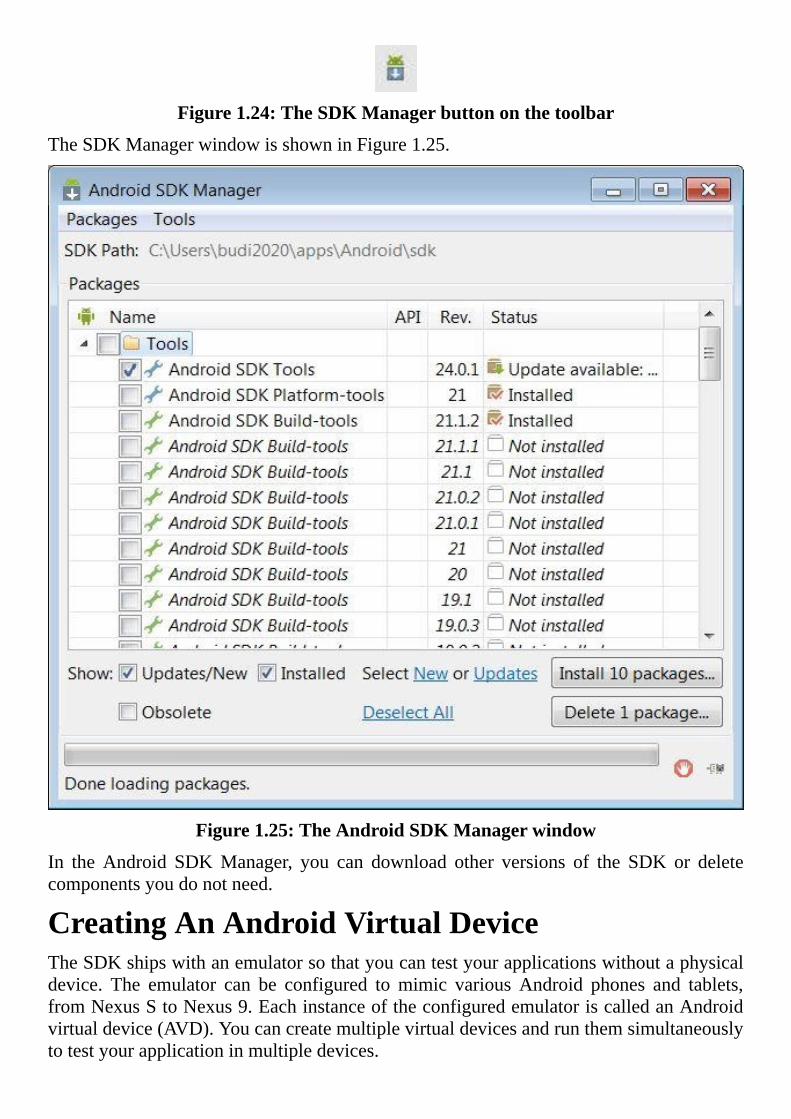
Figure1.24:TheSDKManagerbuttononthetoolbar
TheSDKManagerwindowisshowninFigure1.25.
Figure1.25:TheAndroidSDKManagerwindow
In theAndroid SDKManager, you can download other versions of the SDK or deletecomponentsyoudonotneed.
CreatingAnAndroidVirtualDeviceTheSDKshipswithanemulatorsothatyoucantestyourapplicationswithoutaphysicaldevice. The emulator can be configured tomimic various Android phones and tablets,fromNexusStoNexus9.EachinstanceoftheconfiguredemulatoriscalledanAndroidvirtualdevice(AVD).Youcancreatemultiplevirtualdevicesandrunthemsimultaneouslytotestyourapplicationinmultipledevices.

When you installAndroid Studio, it also creates anAndroid virtual device.You cancreatemorevirtualdevicesusingtheAndroidVirtualDevice(AVD)Manager.
TocreateanAVD,opentheAndroidVirtualDevice(AVD)Manager.Youcanopenitby clickingTools >Android > AVDManager. Alternatively, simply click the AVDManagerbuttononthetoolbar.Figure1.26showstheAVDManagerbutton
Figure1.26:TheAVDManagerbuttononthetoolbar
If you have not created a single AVD in your machine, the first window of the AVDManagerwilllooklikethatinFigure1.27.Ifyouhavecreatedvirtualdevicesbefore,thefirstwindowwilllistallthedevices.

Figure1.27:TheAVDManager’swelcomescreen
TocreateanAVD,followthesesteps.
1.ClicktheCreateavirtualdevicebutton.YouwillseeawindowsimilartothatinFigure1.28.
Figure1.28:Selectingaphoneprofile
2. SelectPhone from Category and then select a device from the center window.Next,clicktheNextbutton.Thenextwindowwillshow.SeeFigure1.29.
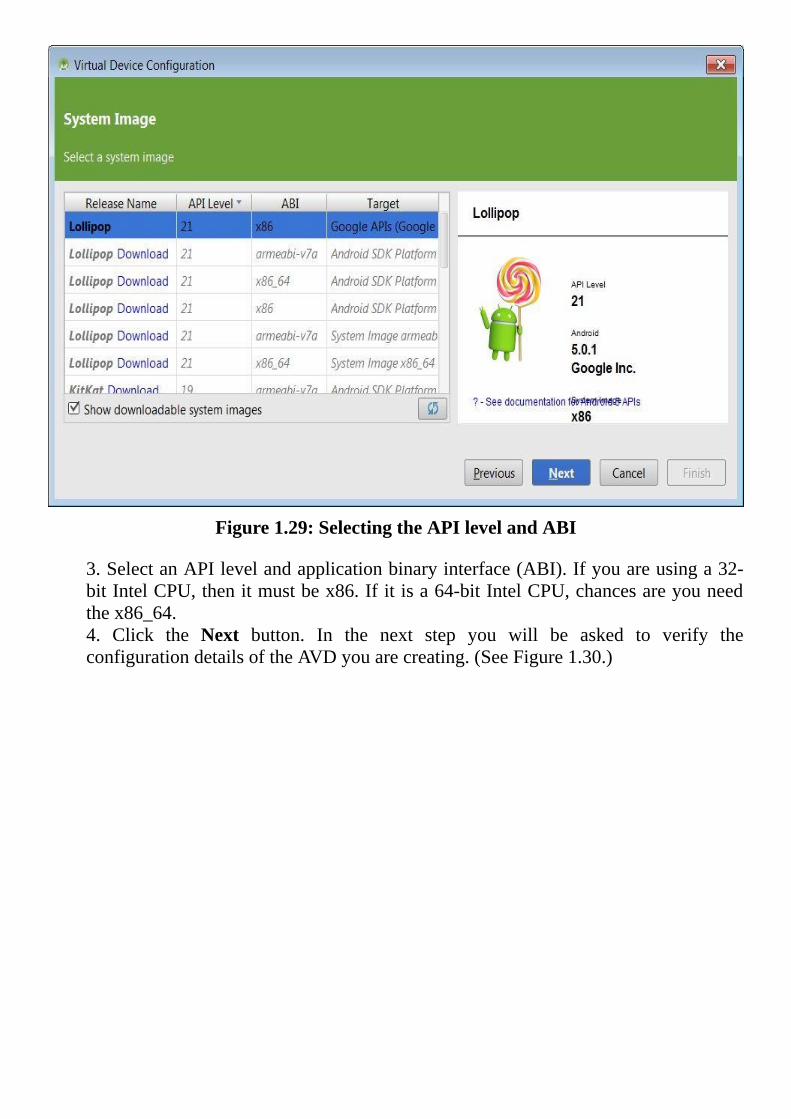
Figure1.29:SelectingtheAPIlevelandABI
3.SelectanAPIlevelandapplicationbinaryinterface(ABI).Ifyouareusinga32-bitIntelCPU,thenitmustbex86.Ifitisa64-bitIntelCPU,chancesareyouneedthex86_64.4. Click the Next button. In the next step you will be asked to verify theconfigurationdetailsoftheAVDyouarecreating.(SeeFigure1.30.)
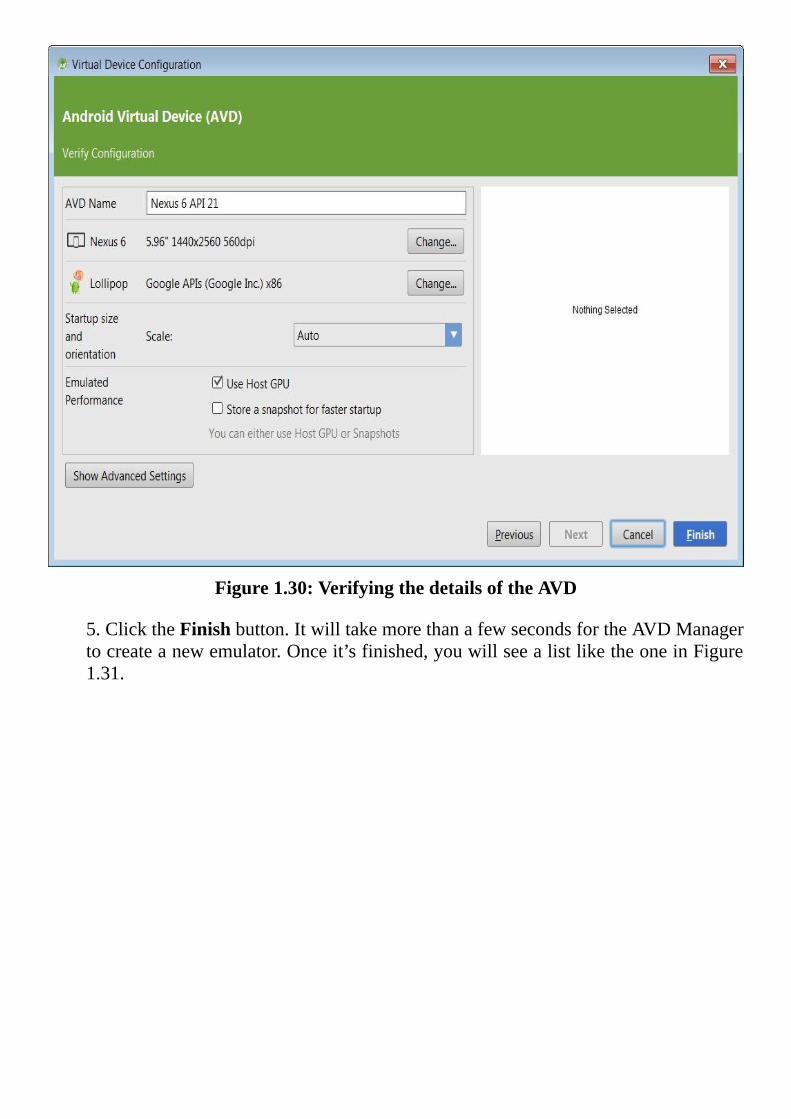
Figure1.30:VerifyingthedetailsoftheAVD
5.ClicktheFinishbutton.ItwilltakemorethanafewsecondsfortheAVDManagertocreateanewemulator.Onceit’sfinished,youwillseealistliketheoneinFigure1.31.
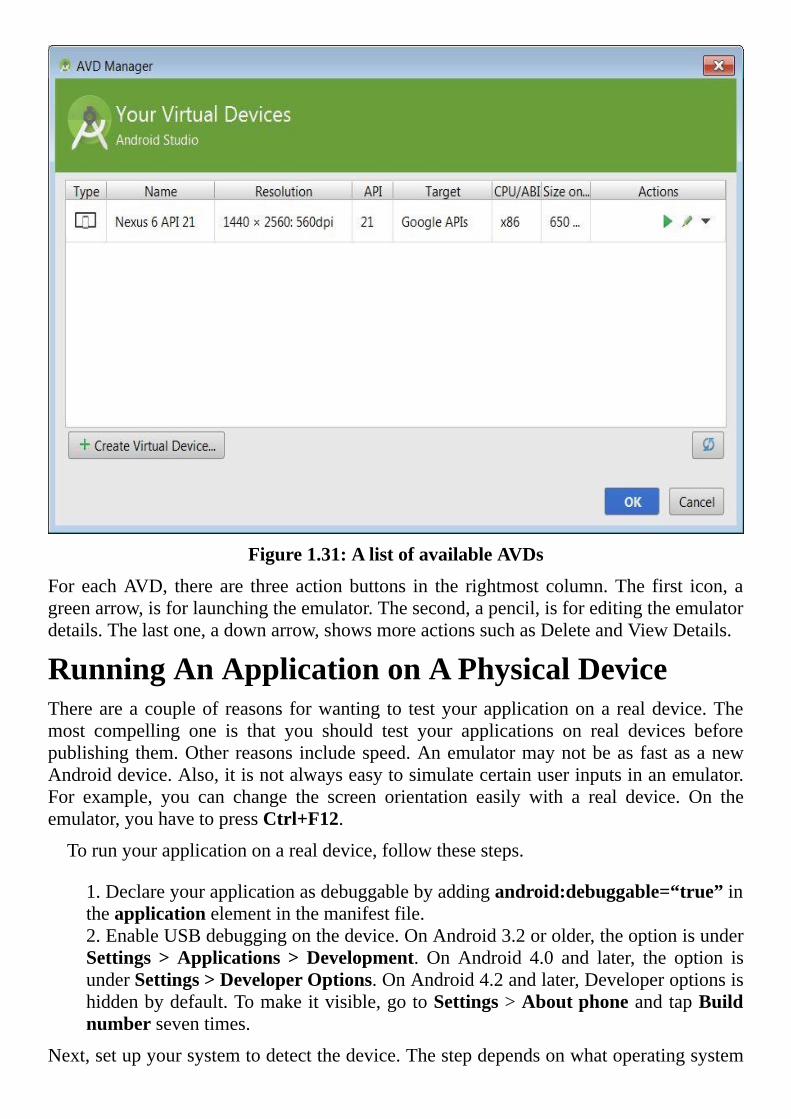
Figure1.31:AlistofavailableAVDs
For eachAVD, there are three actionbuttons in the rightmost column.The first icon, agreenarrow,isforlaunchingtheemulator.Thesecond,apencil,isforeditingtheemulatordetails.Thelastone,adownarrow,showsmoreactionssuchasDeleteandViewDetails.
RunningAnApplicationonAPhysicalDeviceThereareacoupleof reasons forwanting to testyourapplicationona realdevice.Themost compelling one is that you should test your applications on real devices beforepublishing them.Otherreasons includespeed.AnemulatormaynotbeasfastasanewAndroiddevice.Also,itisnotalwayseasytosimulatecertainuserinputsinanemulator.For example, you can change the screen orientation easily with a real device. On theemulator,youhavetopressCtrl+F12.
Torunyourapplicationonarealdevice,followthesesteps.
1.Declareyourapplicationasdebuggablebyaddingandroid:debuggable=“true”intheapplicationelementinthemanifestfile.2.EnableUSBdebuggingonthedevice.OnAndroid3.2orolder,theoptionisunderSettings >Applications >Development. OnAndroid 4.0 and later, the option isunderSettings>DeveloperOptions.OnAndroid4.2andlater,Developeroptionsishiddenbydefault.Tomakeitvisible,gotoSettings>AboutphoneandtapBuildnumberseventimes.
Next,setupyoursystemtodetectthedevice.Thestepdependsonwhatoperatingsystem

you’reusing.ForMacusers,youcanskipthisstep.Itwilljustwork.
For Windows users, you need to install the USB driver for Android Debug Bridge(adb), a tool that lets you communicatewith an emulator or connectedAndroiddevice.Youcanfindthelocationofthedriverfromthissite.
http://developer.android.com/tools/extras/oem-usb.html
ForLinuxusers,pleaseseetheinstructionshere.
http://developer.android.com/tools/device.html
OpeningAProjectinAndroidStudioYou can download the Android Studio projects accompanying this book from thepublisher’swebsite.Toopenaproject,selectFile>Openandbrowsetotheapplicationdirectory.Figure1.32showshowtheOpenFileorProjectwindowlookslike.
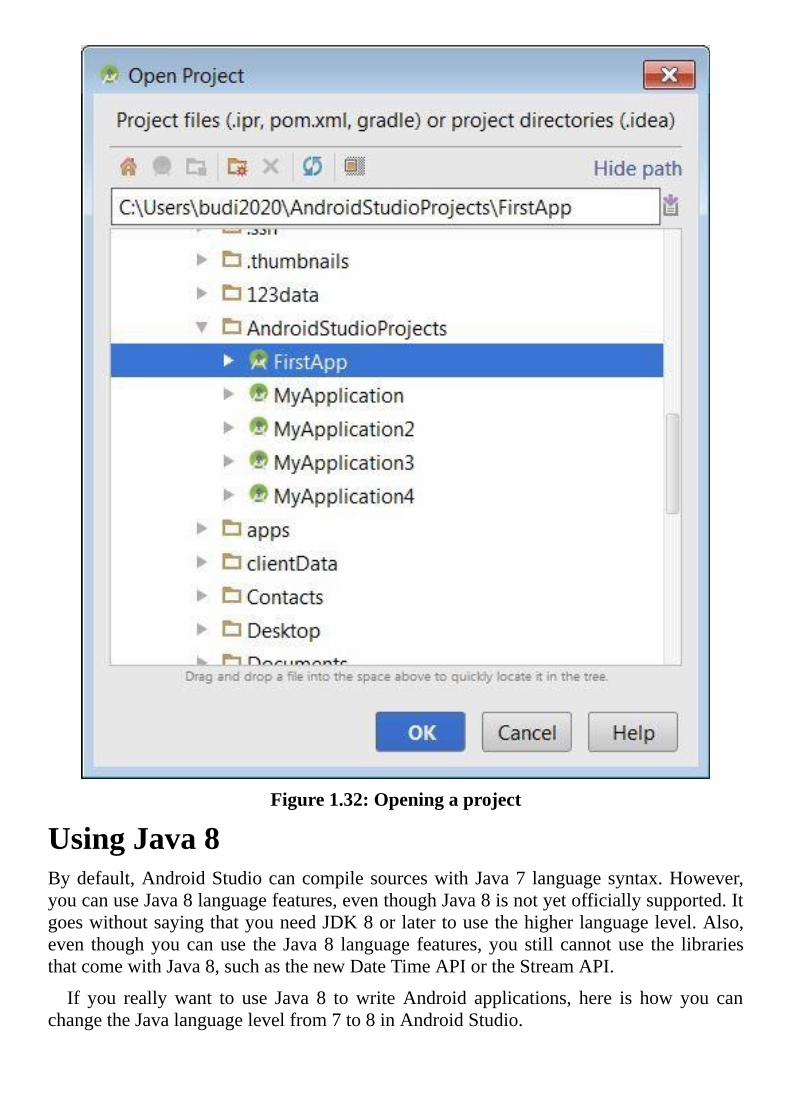
Figure1.32:Openingaproject
UsingJava8Bydefault,AndroidStudiocancompilesourceswithJava7 languagesyntax.However,youcanuseJava8languagefeatures,eventhoughJava8isnotyetofficiallysupported.ItgoeswithoutsayingthatyouneedJDK8orlatertousethehigherlanguagelevel.Also,even thoughyoucanuse the Java8 language features,you still cannotuse the librariesthatcomewithJava8,suchasthenewDateTimeAPIortheStreamAPI.
If you reallywant to use Java 8 towriteAndroid applications, here is how you canchangetheJavalanguagelevelfrom7to8inAndroidStudio.
1.ExpandtheGradleScriptsnodeontheProjectview.Youwillseetwobuild.gradlenodes on the list. Double-click the second build file to open it. You will seesomethinglikethis:
android{
compileSdkVersion21
buildToolsVersion“19.1.0”
defaultConfig{
…
}
buildTypes{
…
}
}
2.Addthelineinboldtothebuildfiletochangethelanguagelevelto7.
android{
compileSdkVersion21
buildToolsVersion“19.1.0”
defaultConfig{
…
}
buildTypes{
…
}
compileOptions{
sourceCompatibilityJavaVersion.VERSION_1_8
targetCompatibilityJavaVersion.VERSION_1_8
}
}
Aschangingthelanguageleveladdscomplexitytoaproject,thisbookwillstickwithJava7.
GettingRidoftheSupportLibraryWhenyoucreateanewprojectwithAndroidStudio,itstructurestheapplicationtousetheAndroidsupportlibrary,sothatyourapplicationcanberunwithalowerAPIlevel.Whilethismighthelp, inmanypractical circumstances,youmaynotwant the support library.Fortunately,youcanremovethesupportlibraryquiteeasilybyfollowingthesesteps.
1. In the app’s build.gradle file, remove the dependency on appcompat-v7 byremovingorcommentingoutthecorrespondingline:
dependencies{
compilefileTree(dir:‘libs’,include:[‘*.jar’])
//compile‘com.android.support:appcompat-v7:21.0.2’
}
2.Savethebuild.gradlefile.Amessageinlightyellowbackgroundwillappearonthetoppartoftheeditor,askingyoutosynchronizetheproject.ClickSyncnow.3. In the res/values/styles.xml file, assign android:Theme.Holo orandroid:Theme.Holo.Lighttotheparentattribute,likeso
<stylename=“AppTheme”parent=“android:Theme.Holo”>
<!—Customizeyourthemehere.—>
</style>
4. ChangeActionBarActivity in every activity class toActivity and remove theimportstatementthat importsActionBarActivity.Theshortcut for this inAndroidStudioisCtrl+Alt+O.5. In all the menu.xml files, replace app:showAsAction withandroid:showAsAction.Forexample,replace
app:showAsAction=“never”
with
android:showAsAction=“never”
6.RebuildtheprojectbyselectingProject>RebuildProject.
SummaryThis chapter discusses how to install the required software and create your firstapplication.Youalso learnedhow tocreateavirtualdevicesoyoucan testyourapp inmultipledeviceswithoutphysicaldevices.
Chapter2Activities
InChapter1, “GettingStarted”you learned towrite a simpleAndroid application. It isnow time to delve deeper into the art and science ofAndroid application development.This chapter discusses one of the most important component types in Androidprogramming,theactivity.
TheActivityLifecycleThe first application component that you need to get familiar with is the activity. Anactivityisawindowcontaininguserinterface(UI)componentsthattheusercaninteractwith.Startinganactivityoftenmeansdisplayingawindow.
An activity is an instance of the android.app.Activity class. A typical Androidapplication starts by starting an activity, which, as I said, loosely means showing awindow. The first window that the application creates is called the main activity andservesastheentrypointtotheapplication.Needlesstosay,anAndroidapplicationmaycontain multiple activities and you specify the main activity by declaring it in theapplicationmanifestfile.
For example, the followingapplication element in anAndroidmanifest defines twoactivities,oneofwhichisdeclaredasthemainactivityusingtheintent-filterelement.Tomakeanactivitythemainactivityofanapplication,itsintent-filterelementmustcontaintheMAINactionandLAUNCHERcategorylikeso.
<application…>
<activity
android:name=“com.example.MainActivity”
android:label=”@string/app_name”>
<intent-filter>
<actionandroid:name=“android.intent.action.MAIN”/>
<category
android:name=“android.intent.category.LAUNCHER”/>
</intent-filter>
</activity>
<activity
android:name=“com.example.SecondActivity”
android:label=”@string/title_activity_second”>
</activity>
</application>
Inthesnippetabove,itisnothardtoseethatthefirstactivityisthemainactivity.
WhentheuserselectsanapplicationiconfromtheHomescreen,thesystemwilllookforthemainactivityoftheapplicationandstartit.Startinganactivityentailsinstantiatingtheactivityclass(whichisspecifiedintheandroid:nameattributeoftheactivityelementinthemanifest)andcallingitslifecyclemethods.Itisimportantthatyouunderstandthesemethodssoyoucanwritecodecorrectly.
Thefollowingare the lifecyclemethodsofActivity.Somearecalledonceduring theapplicationlifetime,somecanbecalledmorethanonce.
onCreateonStartonResumeonPauseonStoponRestartonDestroy
Totrulyunderstandhowtheselifecyclemethodscomeintoplay,considerthediagraminFigure2.1.
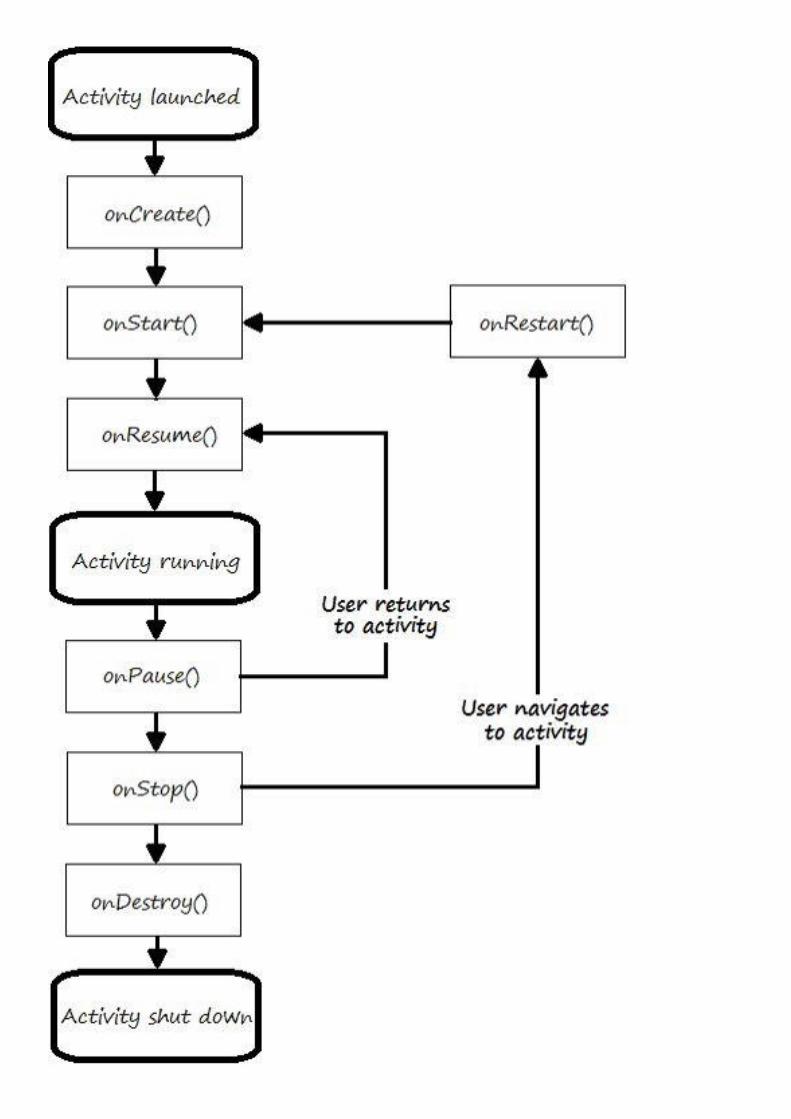
Figure2.1:Theactivitylifecycle
ThesystembeginsbycallingtheonCreatemethodtocreatetheactivity.YoushouldplacethecodethatconstructstheUIhere.OnceonCreateiscompleted,youractivityissaidtobeintheCreatedstate.Thismethodwillonlybecalledonceduringtheactivitylifetime.
Next, thesystemcalls theactivity’sonStartmethod.When thismethod iscalled, theactivity becomes visible. Once thismethod is completed, the activity is in theStartedstate.Thismethodmaybecalledmorethanonceduringtheactivitylifetime.
onStartisfollowedbyonResumeandonceonResumeiscompleted,theactivityisintheResumedstate.HowIwishtheyhadcalleditRunninginsteadofResumed,becausethefactisthisisthestatewhereyouractivityisfullyrunning.onResumemaybecalledmultipletimesduringtheactivitylifetime.
Therefore, onCreated, onStart, and onResume will be called successively unlesssomething goes awry during the process. Once in the Resumed state, the activity isbasicallyrunningandwillstayinthisstateuntilsomethingoccurstochangethat,suchasifthealarmclocksetsofforthescreenturnsoffbecausethedeviceisgoingtosleep,orperhapsbecauseanotheractivityisstarted.
The activity that is leaving theResumed statewill have itsonPausemethod called.OnceonPause iscompleted,theactivityentersthePausedstate.onPausecanbecalledmultipletimesduringtheactivitylifetime.
What happens after onPause depends on whether or not your activity becomescompletely invisible. If it does, theonStopmethod is called and the activity enters theStoppedstate.Ontheotherhand,iftheactivitybecomesactiveagainafteronPause,thesystemcallstheonResumemethodandtheactivityre-enterstheResumedstate.
AnactivityintheStoppedstatemaybere-activatediftheuserchoosestogobacktothe activity or for some other reason it goes back to the foreground. In this case, theonRestartmethodwillbecalled,followedbyonStart.
Finally, when the activity is decommissioned, its onDestroy method is called. Thismethod,likeonCreate,canonlybecalledonceduringtheactivitylifetime.
ActivityDemoExampleTheActivityDemo application accompanying this book demonstrates when the activitylifecyclemethodsarecalled.Listing2.1showsthemanifestforthisapplication.
Listing2.1:ThemanifestforActivityDemo
<?xmlversion=“1.0”encoding=“utf-8”?>
<manifestxmlns:android=“http://schemas.android.com/apk/res/android”
package=“com.example.activitydemo”
android:versionCode=“1”
android:versionName=“1.0”>
<uses-sdk
android:minSdkVersion=“8”
android:targetSdkVersion=“21”/>
<application
android:allowBackup=“true”
android:icon=”@drawable/ic_launcher”
android:label=”@string/app_name”
android:theme=”@style/AppTheme”>
<activity
android:name=“com.example.activitydemo.MainActivity”
android:screenOrientation=“landscape”
android:label=”@string/app_name”>
<intent-filter>
<actionandroid:name=“android.intent.action.MAIN”/>
<category
android:name=“android.intent.category.LAUNCHER”/>
</intent-filter>
</activity>
</application>
</manifest>
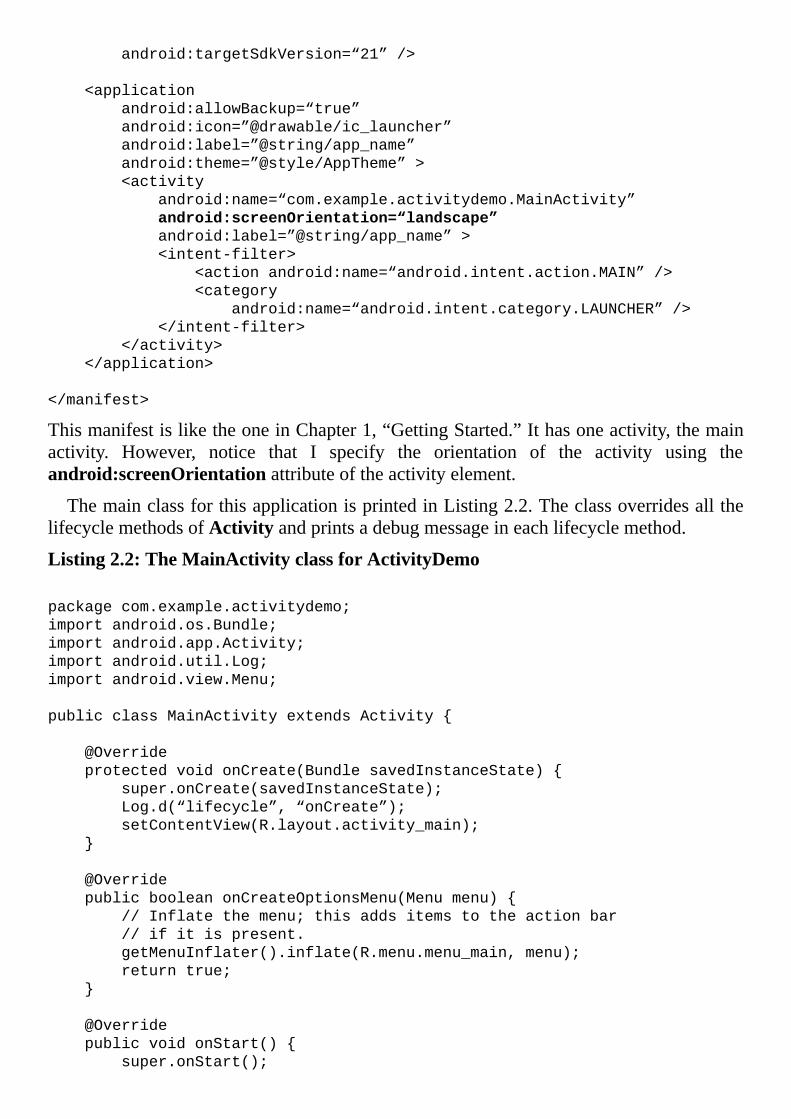
ThismanifestisliketheoneinChapter1,“GettingStarted.”Ithasoneactivity,themainactivity. However, notice that I specify the orientation of the activity using theandroid:screenOrientationattributeoftheactivityelement.
ThemainclassforthisapplicationisprintedinListing2.2.TheclassoverridesallthelifecyclemethodsofActivityandprintsadebugmessageineachlifecyclemethod.
Listing2.2:TheMainActivityclassforActivityDemo
packagecom.example.activitydemo;
importandroid.os.Bundle;
importandroid.app.Activity;
importandroid.util.Log;
importandroid.view.Menu;
publicclassMainActivityextendsActivity{
@Override
protectedvoidonCreate(BundlesavedInstanceState){
super.onCreate(savedInstanceState);
Log.d(“lifecycle”,“onCreate”);
setContentView(R.layout.activity_main);
}
@Override
publicbooleanonCreateOptionsMenu(Menumenu){
//Inflatethemenu;thisaddsitemstotheactionbar
//ifitispresent.
getMenuInflater().inflate(R.menu.menu_main,menu);
returntrue;
}
@Override
publicvoidonStart(){
super.onStart();
Log.d(“lifecycle”,“onStart”);
}
@Override
publicvoidonRestart(){
super.onRestart();
Log.d(“lifecycle”,“onRestart”);
}
@Override
publicvoidonResume(){
super.onResume();
Log.d(“lifecycle”,“onResume”);
}
@Override
publicvoidonPause(){
super.onPause();
Log.d(“lifecycle”,“onPause”);
}
@Override
publicvoidonStop(){
super.onStop();
Log.d(“lifecycle”,“onStop”);
}
@Override
publicvoidonDestroy(){
super.onDestroy();
Log.d(“lifecycle”,“onDestroy”);
}
}
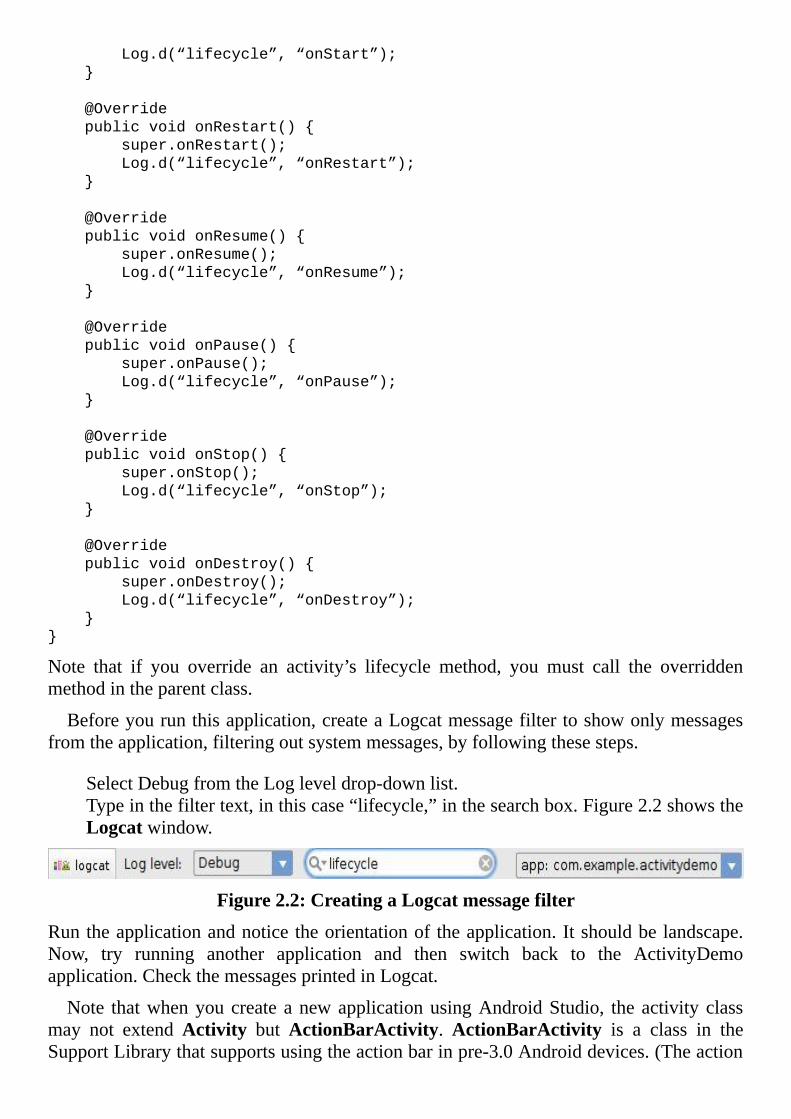
Note that if you override an activity’s lifecycle method, you must call the overriddenmethodintheparentclass.
Beforeyourunthisapplication,createaLogcatmessagefiltertoshowonlymessagesfromtheapplication,filteringoutsystemmessages,byfollowingthesesteps.
SelectDebugfromtheLogleveldrop-downlist.Typeinthefiltertext,inthiscase“lifecycle,”inthesearchbox.Figure2.2showstheLogcatwindow.
Figure2.2:CreatingaLogcatmessagefilter
Runtheapplicationandnoticetheorientationoftheapplication.Itshouldbelandscape.Now, try running another application and then switch back to the ActivityDemoapplication.CheckthemessagesprintedinLogcat.
Note thatwhenyoucreate anewapplicationusingAndroidStudio, theactivityclassmay not extendActivity butActionBarActivity.ActionBarActivity is a class in theSupportLibrarythatsupportsusingtheactionbarinpre-3.0Androiddevices.(Theaction
barisdiscussedinChapter6,“TheActionBar.”)Ifyouarenotusingtheactionbarordonot plan on deploying to pre-3.0Android devices, you can replaceActionBarActivitywithActivity.
ChangingtheApplicationIconIf you do not like the application icon you have chosen, you can easily change it byfollowingthesesteps.
Saveajpegorpngfileinres/drawable.Pngispreferredbecausetheformatsupportstransparency.Edit theandroid:iconattributeof themanifest topoint to thenew image.Youcanrefertotheimagefilewiththisformat:@drawable/fileName,wherefileNameisthenameoftheimagefilewithouttheextension.
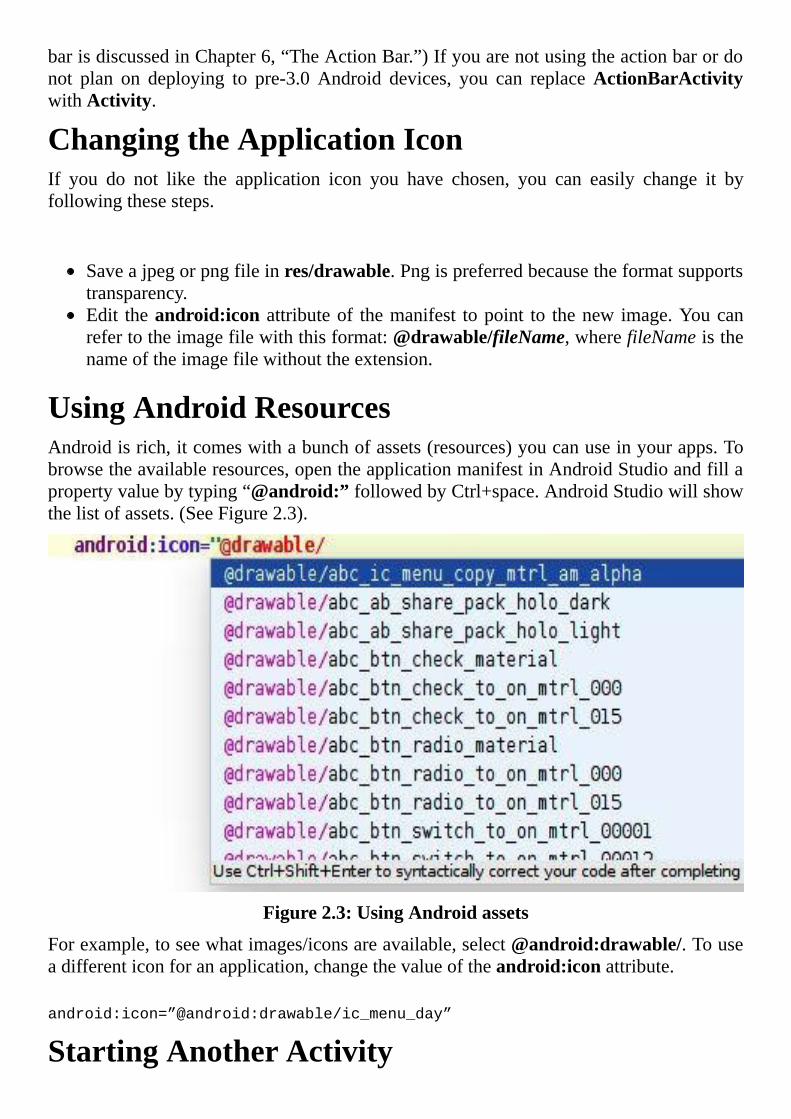
UsingAndroidResourcesAndroidisrich,itcomeswithabunchofassets(resources)youcanuseinyourapps.Tobrowsetheavailableresources,opentheapplicationmanifestinAndroidStudioandfillapropertyvaluebytyping“@android:”followedbyCtrl+space.AndroidStudiowillshowthelistofassets.(SeeFigure2.3).
Figure2.3:UsingAndroidassets
Forexample,toseewhatimages/iconsareavailable,select@android:drawable/.Touseadifferenticonforanapplication,changethevalueoftheandroid:iconattribute.
android:icon=”@android:drawable/ic_menu_day”
StartingAnotherActivity
ThemainactivityofanAndroidapplicationisstartedbythesystemitself,whentheuserselectstheappiconfromtheHomescreen.Inanapplicationwithmultipleactivities,itispossible (and easy) to start another activity. In fact, starting an activity from anotheractivitycanbedonesimplybycallingthestartActivitymethodlikethis.
startActivity(intent);
whereintentisaninstanceoftheandroid.content.Intentclass.
Asanexample,considertheSecondActivityDemoprojectthataccompaniesthisbook.Ithastwoactivities,MainActivityandSecondActivity.MainActivitycontainsabuttonthatwhenclicked startsSecondActivity.Thisprojectalso showshowyoucanwriteaneventlistenerprogrammatically.
ThemanifestforSecondActivityDemoisgiveninListing2.3.
Listing2.3:ThemanifestforSecondActivityDemo
<?xmlversion=“1.0”encoding=“utf-8”?>
<manifestxmlns:android=“http://schemas.android.com/apk/res/android”
package=“com.example.secondactivitydemo”
android:versionCode=“1”
android:versionName=“1.0”>
<uses-sdk
android:minSdkVersion=“8”
android:targetSdkVersion=“19”/>
<application
android:allowBackup=“true”
android:icon=”@drawable/ic_launcher”
android:label=”@string/app_name”
android:theme=”@style/AppTheme”>
<activity
android:name=“com.example.secondactivitydemo.MainActivity”
android:label=”@string/app_name”>
<intent-filter>
<actionandroid:name=“android.intent.action.MAIN”/>
<categoryandroid:name=“android.intent.category.LAUNCHER”/>
</intent-filter>
</activity>
<activity
android:name=“com.example.secondactivitydemo.SecondActivity”
android:label=”@string/title_activity_second”>
</activity>
</application>
</manifest>
Unlikethepreviousapplication,thisprojecthastwoactivities,oneofwhichisdeclaredasthemainactivity.
The layout files for themain and second activities are listed inListings 2.4 and 2.5,respectively.
Listing2.4:Theactivity_main.xmlfile
<RelativeLayout
xmlns:android=“http://schemas.android.com/apk/res/android”
xmlns:tools=“http://schemas.android.com/tools”
android:layout_width=“match_parent”
android:layout_height=“match_parent”
android:paddingBottom=”@dimen/activity_vertical_margin”
android:paddingLeft=”@dimen/activity_horizontal_margin”
android:paddingRight=”@dimen/activity_horizontal_margin”
android:paddingTop=”@dimen/activity_vertical_margin”
tools:context=”.MainActivity”>
<TextView
android:id=”@+id/textView1”
android:layout_width=“wrap_content”
android:layout_height=“wrap_content”
android:text=”@string/first_screen”/>
</RelativeLayout>
Listing2.5:Theactivity_second.xmlfile
<RelativeLayoutxmlns:android=“http://schemas.android.com/apk/res/android”
xmlns:tools=“http://schemas.android.com/tools”
android:layout_width=“match_parent”
android:layout_height=“match_parent”
android:paddingBottom=”@dimen/activity_vertical_margin”
android:paddingLeft=”@dimen/activity_horizontal_margin”
android:paddingRight=”@dimen/activity_horizontal_margin”
android:paddingTop=”@dimen/activity_vertical_margin”
tools:context=”.SecondActivity”>
<TextView
android:id=”@+id/textView1”
android:layout_width=“wrap_content”
android:layout_height=“wrap_content”/>
</RelativeLayout>
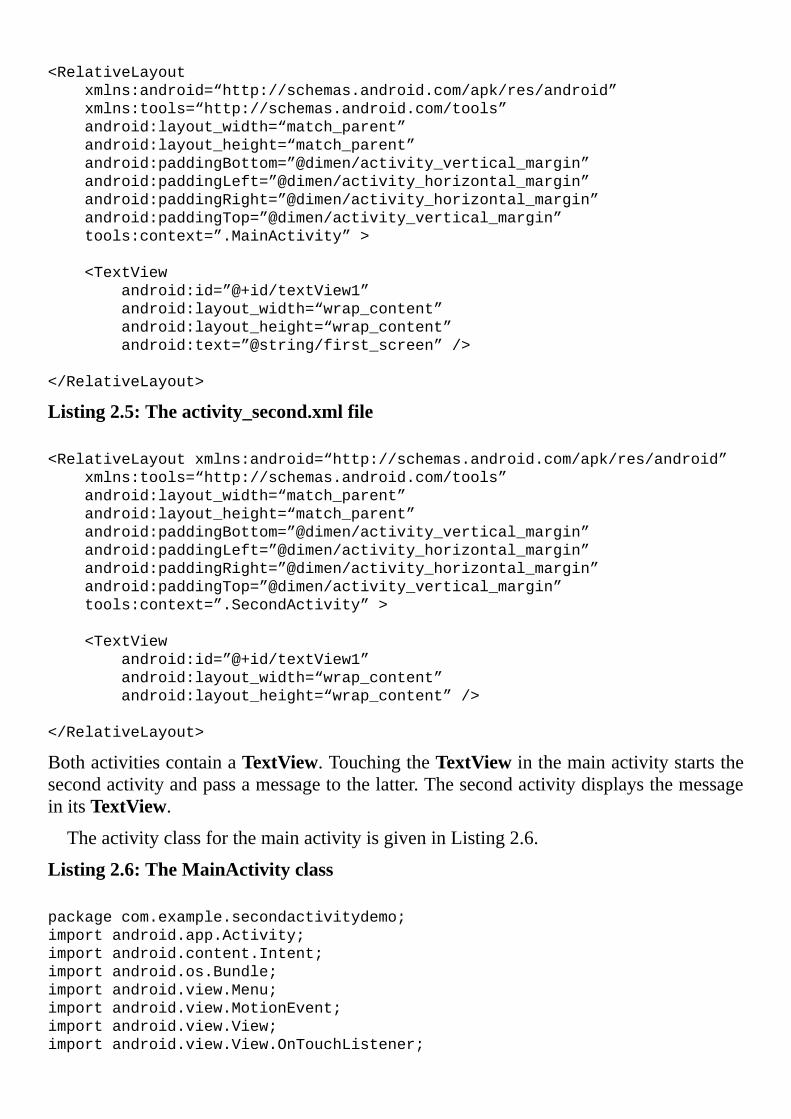
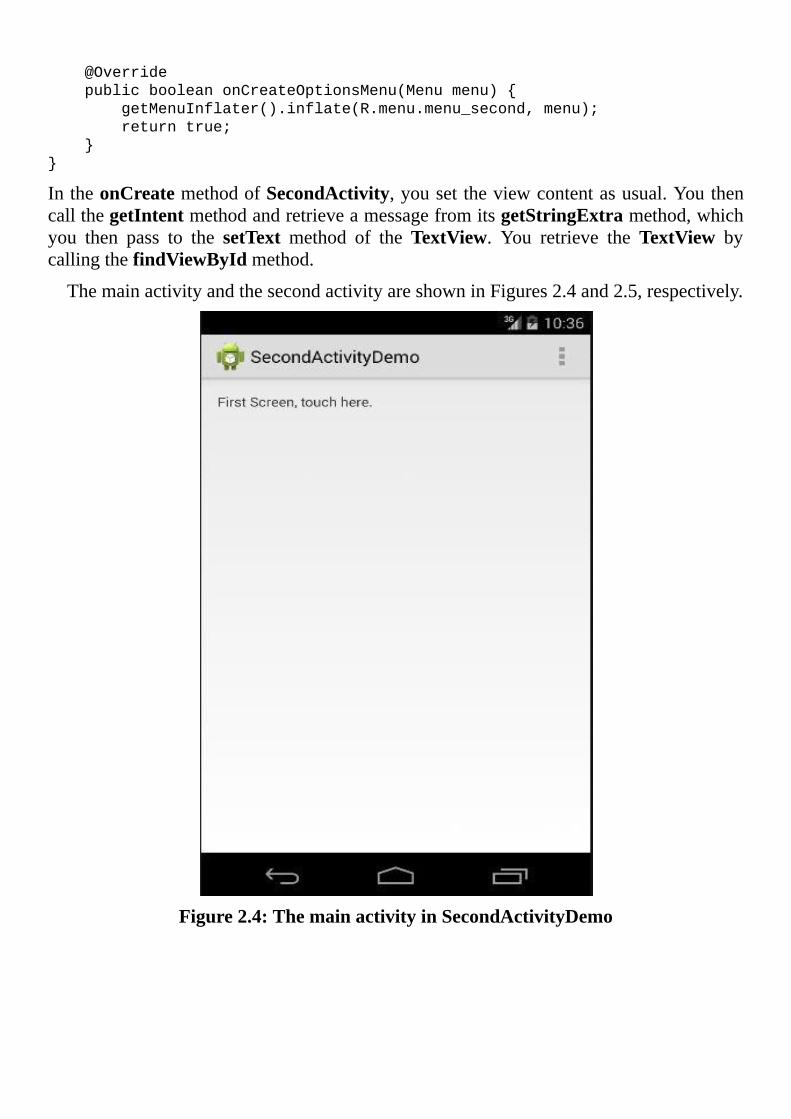
BothactivitiescontainaTextView.TouchingtheTextViewinthemainactivitystartsthesecondactivityandpassamessagetothelatter.ThesecondactivitydisplaysthemessageinitsTextView.
TheactivityclassforthemainactivityisgiveninListing2.6.
Listing2.6:TheMainActivityclass
packagecom.example.secondactivitydemo;
importandroid.app.Activity;
importandroid.content.Intent;
importandroid.os.Bundle;
importandroid.view.Menu;
importandroid.view.MotionEvent;
importandroid.view.View;
importandroid.view.View.OnTouchListener;
importandroid.widget.TextView;
publicclassMainActivityextendsActivityimplements
OnTouchListener{
@Override
protectedvoidonCreate(BundlesavedInstanceState){
super.onCreate(savedInstanceState);
setContentView(R.layout.activity_main);
TextViewtv=(TextView)findViewById(R.id.textView1);
tv.setOnTouchListener(this);
}
@Override
publicbooleanonCreateOptionsMenu(Menumenu){
//Inflatethemenu;thisaddsitemstotheactionbarifit
//ispresent.
getMenuInflater().inflate(R.menu.menu_main,menu);
returntrue;
}
@Override
publicbooleanonTouch(Viewarg0,MotionEventevent){
Intentintent=newIntent(this,SecondActivity.class);
intent.putExtra(“message”,“MessagefromFirstScreen”);
startActivity(intent);
returntrue;
}
}
To handle the touch event, the MainActivity class has implemented theOnTouchListener interface and overridden its onTouch method. In this method, youcreateanIntentandputamessageinit.Youthencall thestartActivitymethodtostartthesecondactivity.
TheSecondActivityclassisgiveninListing2.7.
Listing2.7:TheSecondActivityclass
packagecom.example.secondactivitydemo;
importandroid.app.Activity;
importandroid.content.Intent;
importandroid.os.Bundle;
importandroid.view.Menu;
importandroid.widget.TextView;
publicclassSecondActivityextendsActivity{
@Override
protectedvoidonCreate(BundlesavedInstanceState){
super.onCreate(savedInstanceState);
setContentView(R.layout.activity_second);
Intentintent=getIntent();
Stringmessage=intent.getStringExtra(“message”);
((TextView)findViewById(R.id.textView1)).setText(message);
}
@Override
publicbooleanonCreateOptionsMenu(Menumenu){
getMenuInflater().inflate(R.menu.menu_second,menu);
returntrue;
}
}
IntheonCreatemethodofSecondActivity,yousettheviewcontentasusual.YouthencallthegetIntentmethodandretrieveamessagefromitsgetStringExtramethod,whichyou then pass to the setText method of theTextView. You retrieve theTextView bycallingthefindViewByIdmethod.
ThemainactivityandthesecondactivityareshowninFigures2.4and2.5,respectively.
Figure2.4:ThemainactivityinSecondActivityDemo
Figure2.5:ThesecondactivityinSecondActivityDemo
Activity-RelatedIntentsIn the SecondActivityDemo project, you learned that you can start a new activity bypassinganintenttothestartActivitymethod.YoucanalsocallstartActivityForResultifyouwantaresultfromtheinvokedactivity.
Hereisthecodethatactivatesanactivityintheproject:
Intentintent=newIntent(this,SecondActivity.class);
startActivity(intent);
Andoftenyouwanttopassadditionalinformationtotheinvokedactivity,whichyoucando by attaching the information to the intent. In the previous example, you did so bycallingtheputExtramethodontheIntent:
Intentintent=newIntent(this,SecondActivity.class);
intent.putExtra(“message”,“MessagefromFirstScreen”);
startActivity(intent);
Anintentthatisconstructedbypassingtoitanactivityclassiscalledanexplicitintent.TheIntentinSecondActivityDemoissuchanexample.
Youcanalsocreateanimplicitintent,inwhichcaseyoudonotspecifyanactivityclass.Rather,youpasstotheIntentclass’sconstructoranaction,suchasACTION_SEND,andlet thesystemdecidewhichactivity tostart. If there ismore thanoneactivities thatcanhandletheintent,thesystemwillnormallyasktheusertochoose.
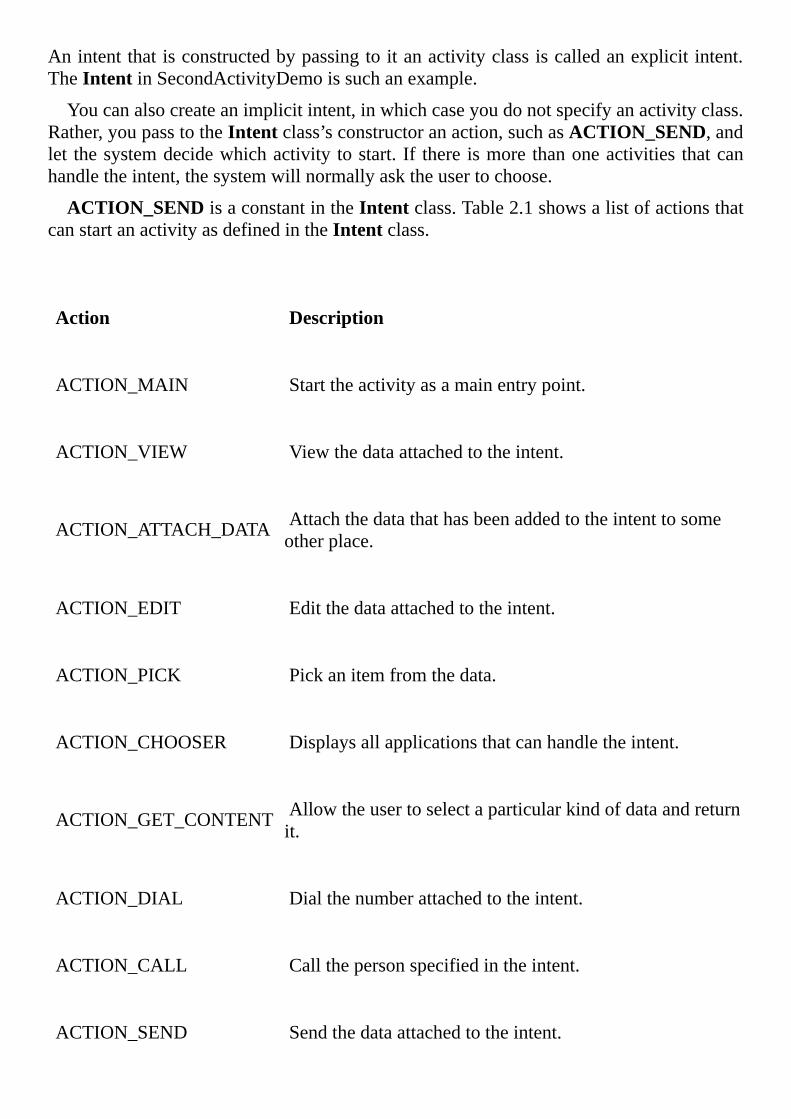
ACTION_SENDisaconstantintheIntentclass.Table2.1showsalistofactionsthatcanstartanactivityasdefinedintheIntentclass.
Action
Description
ACTION_MAIN
Starttheactivityasamainentrypoint.
ACTION_VIEW
Viewthedataattachedtotheintent.
ACTION_ATTACH_DATA
Attachthedatathathasbeenaddedtotheintenttosomeotherplace.
ACTION_EDIT
Editthedataattachedtotheintent.
ACTION_PICK
Pickanitemfromthedata.
ACTION_CHOOSER
Displaysallapplicationsthatcanhandletheintent.
ACTION_GET_CONTENT
Allowtheusertoselectaparticularkindofdataandreturnit.
ACTION_DIAL
Dialthenumberattachedtotheintent.
ACTION_CALL
Callthepersonspecifiedintheintent.
ACTION_SEND
Sendthedataattachedtotheintent.
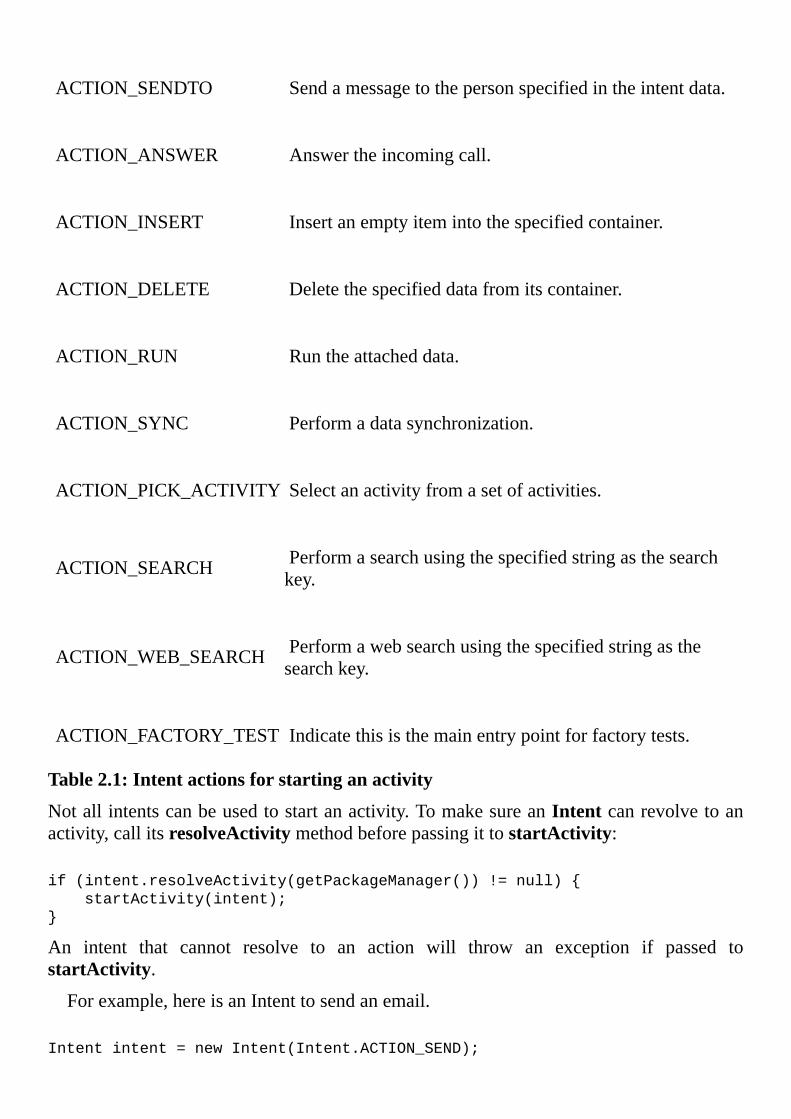
ACTION_SENDTO
Sendamessagetothepersonspecifiedintheintentdata.
ACTION_ANSWER
Answertheincomingcall.
ACTION_INSERT
Insertanemptyitemintothespecifiedcontainer.
ACTION_DELETE
Deletethespecifieddatafromitscontainer.
ACTION_RUN
Runtheattacheddata.
ACTION_SYNC
Performadatasynchronization.
ACTION_PICK_ACTIVITY
Selectanactivityfromasetofactivities.
ACTION_SEARCH
Performasearchusingthespecifiedstringasthesearchkey.
ACTION_WEB_SEARCH
Performawebsearchusingthespecifiedstringasthesearchkey.
ACTION_FACTORY_TEST
Indicatethisisthemainentrypointforfactorytests.
Table2.1:Intentactionsforstartinganactivity
Notallintentscanbeusedtostartanactivity.TomakesureanIntentcanrevolvetoanactivity,callitsresolveActivitymethodbeforepassingittostartActivity:
if(intent.resolveActivity(getPackageManager())!=null){
startActivity(intent);
}
An intent that cannot resolve to an action will throw an exception if passed tostartActivity.
Forexample,hereisanIntenttosendanemail.
Intentintent=newIntent(Intent.ACTION_SEND);
intent.setType(“message/rfc822”);//required
intent.putExtra(Intent.EXTRA_EMAIL,
newString[]{“[email protected]”});//optional
intent.putExtra(Intent.EXTRA_SUBJECT,“subject”);//optional
intent.putExtra(Intent.EXTRA_TEXT,“body”);//optional
//Verifythattheintentwillresolvetoanactivity
if(intent.resolveActivity(getPackageManager())!=null){
startActivity(intent);
}else{
Toast.makeText(this,“Noemailclientfound.”,
Toast.LENGTH_LONG).show();
}
IfmultipleapplicationscanhandleanIntent, theuserwillbeable todecidewhether toalwaysusetheselectedapplicationinthefutureortouseitjustforthisoccasion.Youcanforceachoosertoappeareachtime(regardlessofwhetherornottheuserhasdecidedtousethesameapp),byusingthiscode:
startActivity(Intent.createChooser(intent,dialogTitle));
wheredialogTitleisthetitleoftheChooserdialog.
As another example, the following code sends an ACTION_WEB_SEARCH intent.Upon receiving themessage, the systemwill open thedefaultwebbrowser and tell thebrowsertogooglethesearchkey.
StringsearchKey=“Buffalo”;
Intentintent=newIntent(Intent.ACTION_WEB_SEARCH);
intent.putExtra(SearchManager.QUERY,searchKey);
startActivity(intent);
SummaryInthischapteryoulearnedabouttheactivitylifecycleandcreatedtwoapplications.Thefirstapplicationallowedyou toobservewheneachof the lifecyclemethodswascalled.Thesecondapplicationshowedhowtostartanactivityfromanotheractivity.
Chapter3UIComponents
One of the first things you do when creating an Android application is build the userinterface(UI)forthemainactivity.Thisisarelativelyeasytaskthankstotheready-to-useUIcomponentsthatAndroidprovides.
ThischapterdiscussessomeofthemoreimportantUIcomponents.
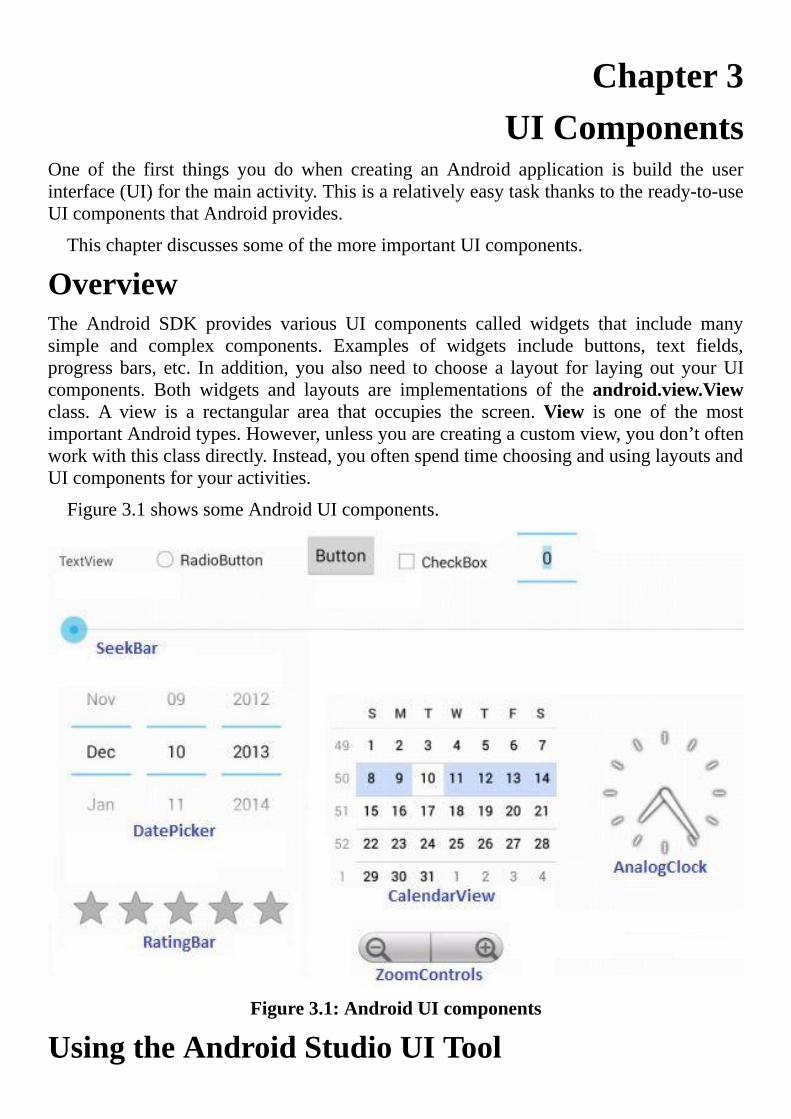
OverviewThe Android SDK provides various UI components called widgets that include manysimple and complex components. Examples of widgets include buttons, text fields,progressbars, etc. In addition, you alsoneed to choose a layout for layingout yourUIcomponents. Both widgets and layouts are implementations of the android.view.Viewclass. A view is a rectangular area that occupies the screen.View is one of the mostimportantAndroidtypes.However,unlessyouarecreatingacustomview,youdon’toftenworkwiththisclassdirectly.Instead,youoftenspendtimechoosingandusinglayoutsandUIcomponentsforyouractivities.
Figure3.1showssomeAndroidUIcomponents.
Figure3.1:AndroidUIcomponents
UsingtheAndroidStudioUITool
Creating aUI is easywithAndroid Studio.All you need is open the layout file for anactivityanddraganddropUIcomponentstothelayout.Theactivityfilesarelocatedintheres/layoutdirectoryofyourapplication.
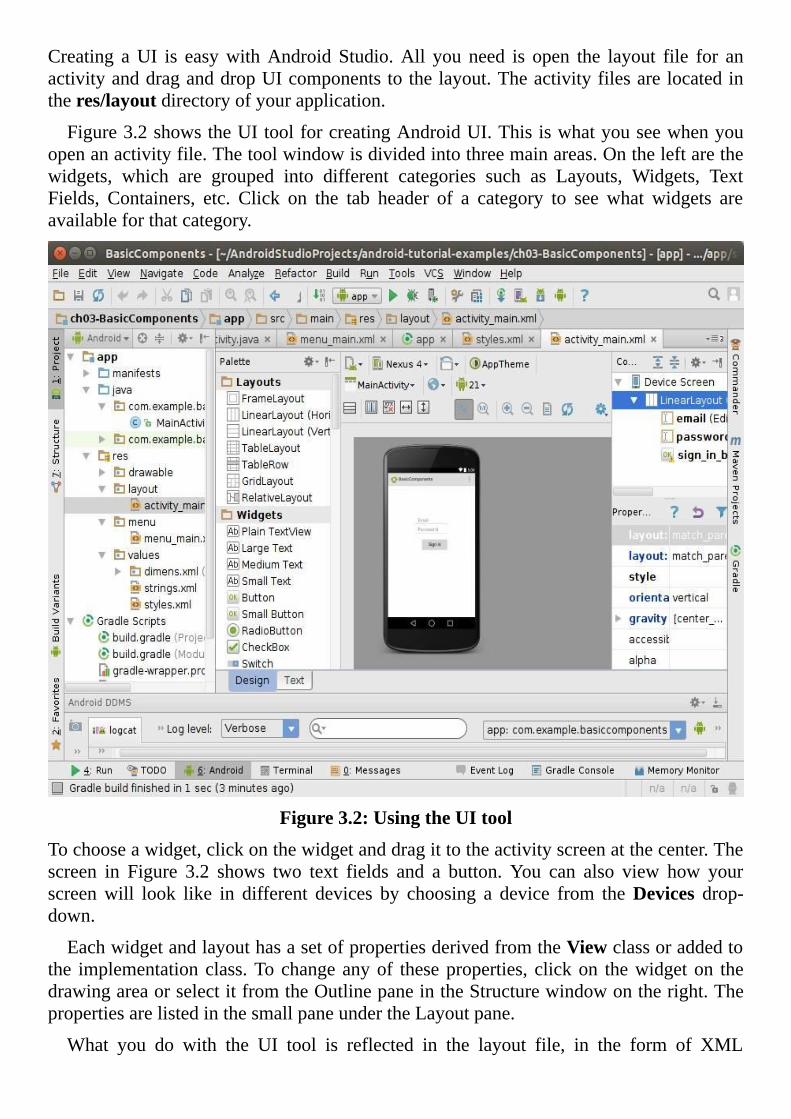
Figure3.2showstheUItoolforcreatingAndroidUI.Thisiswhatyouseewhenyouopenanactivityfile.Thetoolwindowisdividedintothreemainareas.Ontheleftarethewidgets, which are grouped into different categories such as Layouts, Widgets, TextFields, Containers, etc. Click on the tab header of a category to see what widgets areavailableforthatcategory.
Figure3.2:UsingtheUItool
Tochooseawidget,clickonthewidgetanddragittotheactivityscreenatthecenter.Thescreen in Figure 3.2 shows two text fields and a button. You can also view how yourscreenwill look like in different devices by choosing a device from theDevices drop-down.
EachwidgetandlayouthasasetofpropertiesderivedfromtheViewclassoraddedtothe implementationclass.Tochangeanyof theseproperties, clickon thewidgeton thedrawingareaorselectitfromtheOutlinepaneintheStructurewindowontheright.ThepropertiesarelistedinthesmallpaneundertheLayoutpane.
What you do with the UI tool is reflected in the layout file, in the form of XML
elements.Toseewhathasbeengeneratedforyou,clicktheXMLviewatthebottomoftheUItool.
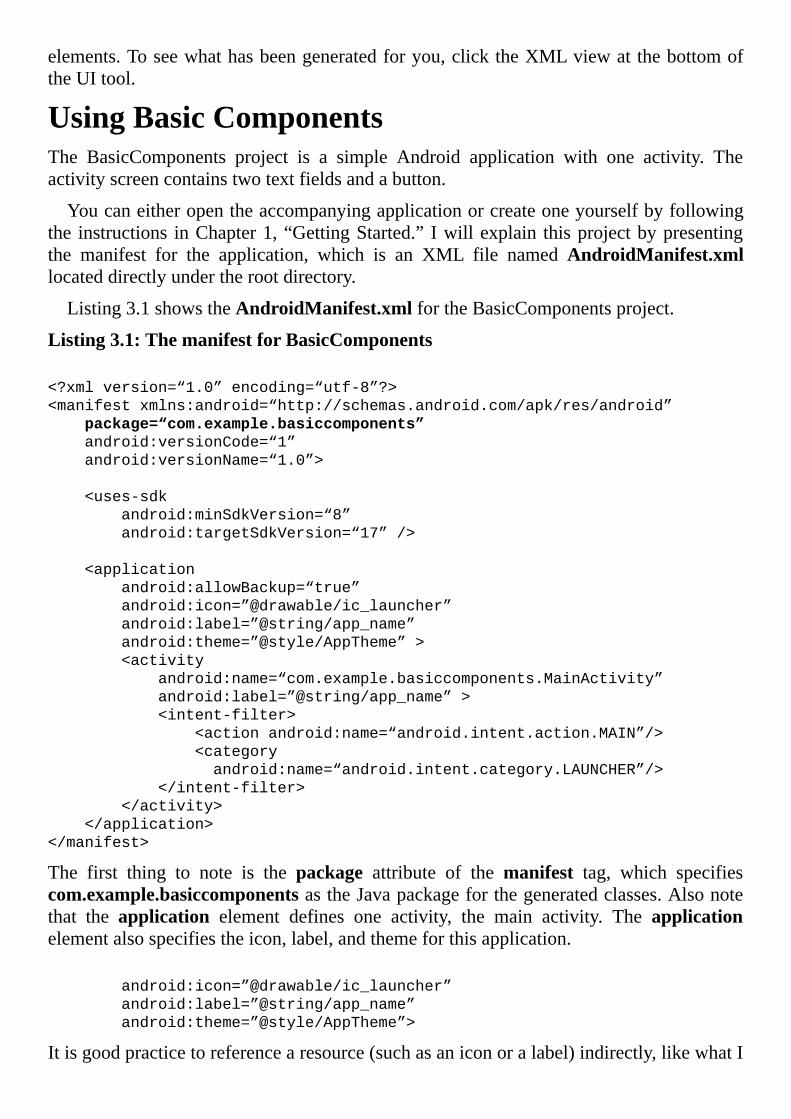
UsingBasicComponentsThe BasicComponents project is a simple Android application with one activity. Theactivityscreencontainstwotextfieldsandabutton.
Youcaneitheropentheaccompanyingapplicationorcreateoneyourselfbyfollowingthe instructions inChapter1,“GettingStarted.” Iwillexplain thisprojectbypresentingthe manifest for the application, which is an XML file named AndroidManifest.xmllocateddirectlyundertherootdirectory.
Listing3.1showstheAndroidManifest.xmlfortheBasicComponentsproject.
Listing3.1:ThemanifestforBasicComponents
<?xmlversion=“1.0”encoding=“utf-8”?>
<manifestxmlns:android=“http://schemas.android.com/apk/res/android”
package=“com.example.basiccomponents”
android:versionCode=“1”
android:versionName=“1.0”>
<uses-sdk
android:minSdkVersion=“8”
android:targetSdkVersion=“17”/>
<application
android:allowBackup=“true”
android:icon=”@drawable/ic_launcher”
android:label=”@string/app_name”
android:theme=”@style/AppTheme”>
<activity
android:name=“com.example.basiccomponents.MainActivity”
android:label=”@string/app_name”>
<intent-filter>
<actionandroid:name=“android.intent.action.MAIN”/>
<category
android:name=“android.intent.category.LAUNCHER”/>
</intent-filter>
</activity>
</application>
</manifest>
The first thing to note is the package attribute of themanifest tag, which specifiescom.example.basiccomponentsastheJavapackageforthegeneratedclasses.Alsonotethat the application element defines one activity, the main activity. The applicationelementalsospecifiestheicon,label,andthemeforthisapplication.
android:icon=”@drawable/ic_launcher”
android:label=”@string/app_name”
android:theme=”@style/AppTheme”>
Itisgoodpracticetoreferencearesource(suchasaniconoralabel)indirectly,likewhatI
amdoinghere.@drawable/ic_launcher,thevalueforandroid:icon,referstoadrawable(normallyan imagefile) that residesunder theres/drawabledirectory. ic_launchercanmeananic_launcher.pngoric_launcher.jpgfile.
All string references start with@string. In the example above,@string/app_namerefers to theapp_name key in the res/values/strings.xml file. For this application, thestrings.xmlfileisgiveninListing3.2.
Listing3.2:Thestrings.xmlfileunderres/values
<?xmlversion=“1.0”encoding=“utf-8”?>
<resources>
<stringname=“app_name”>BasicComponents</string>
<stringname=“action_settings”>Settings</string>
<stringname=“prompt_email”>Email</string>
<stringname=“prompt_password”>Password</string>
<stringname=“action_sign_in”><b>Signin</b></string>
</resources>
Let’snowlookat themainactivity.Thereare tworesourcesconcernedwithanactivity,thelayoutfilefortheactivityandtheJavaclassthatderivesfromandroid.app.Activity.Forthisproject,thelayoutfileisgiveninListing3.3andtheactivityclass(MainActivity)inListing3.4.
Listing3.3:Thelayoutfile
<LinearLayout
xmlns:android=“http://schemas.android.com/apk/res/android”
xmlns:tools=“http://schemas.android.com/tools”
android:layout_width=“match_parent”
android:layout_height=“match_parent”
android:layout_gravity=“center”
android:gravity=“center_horizontal”
android:orientation=“vertical”
android:padding=“120dp”
tools:context=”.MainActivity”>
<EditText
android:id=”@+id/email”
android:layout_width=“match_parent”
android:layout_height=“wrap_content”
android:hint=”@string/prompt_email”
android:inputType=“textEmailAddress”
android:maxLines=“1”
android:singleLine=“true”/>
<EditText
android:id=”@+id/password”
android:layout_width=“match_parent”
android:layout_height=“wrap_content”
android:hint=”@string/prompt_password”
android:imeActionId=”@+id/login”
android:imeOptions=“actionUnspecified”
android:inputType=“textPassword”
android:maxLines=“1”
android:singleLine=“true”/>
<Button
android:id=”@+id/sign_in_button”
android:layout_width=“wrap_content”
android:layout_height=“wrap_content”
android:layout_gravity=“right”
android:layout_marginTop=“16dp”
android:paddingLeft=“32dp”
android:paddingRight=“32dp”
android:text=”@string/action_sign_in”/>
</LinearLayout>
The layout file contains a LinearLayout element with three children, namely twoEditTextcomponentsandabutton.
Listing3.4:TheMainActivityclassofBasicComponents
packagecom.example.basiccomponents;
importandroid.os.Bundle;
importandroid.app.Activity;
importandroid.view.Menu;
publicclassMainActivityextendsActivity{
@Override
protectedvoidonCreate(BundlesavedInstanceState){
super.onCreate(savedInstanceState);
setContentView(R.layout.activity_main);
}
@Override
publicbooleanonCreateOptionsMenu(Menumenu){
//Inflatethemenu;thisaddsitemstotheactionbarifit
//ispresent.
getMenuInflater().inflate(R.menu.menu_main,menu);
returntrue;
}
}
TheMainActivityclassinListing3.4isaboilerplateclasscreatedbyAndroidStudio.Itoverrides the onCreate and onCreateOptionsMenu methods. onCreate is a lifecyclemethodthatgetscalledwhentheapplicationiscreated.InListing3.4, itsimplysetsthecontentviewfortheactivityusingthelayoutfile.onCreateOptionsMenuinitializesthecontentoftheactivity’soptionsmenu.Itmustreturntrueforthemenutobedisplayed.
Runtheapplicationandyou’llseetheactivityasshowninFigure3.3.

Figure3.3:TheBasicComponentsproject
ToastAToastisasmallpopupfordisplayingamessageasfeedbackfortheuser.AToastdoesnotreplacethecurrentactivityandonlyoccupiesthespacetakenbythemessage.
Figure3.4showsaToastthatsays“Downloadingfile…”TheToastdisappearsafteraprescribedperiodoftime.
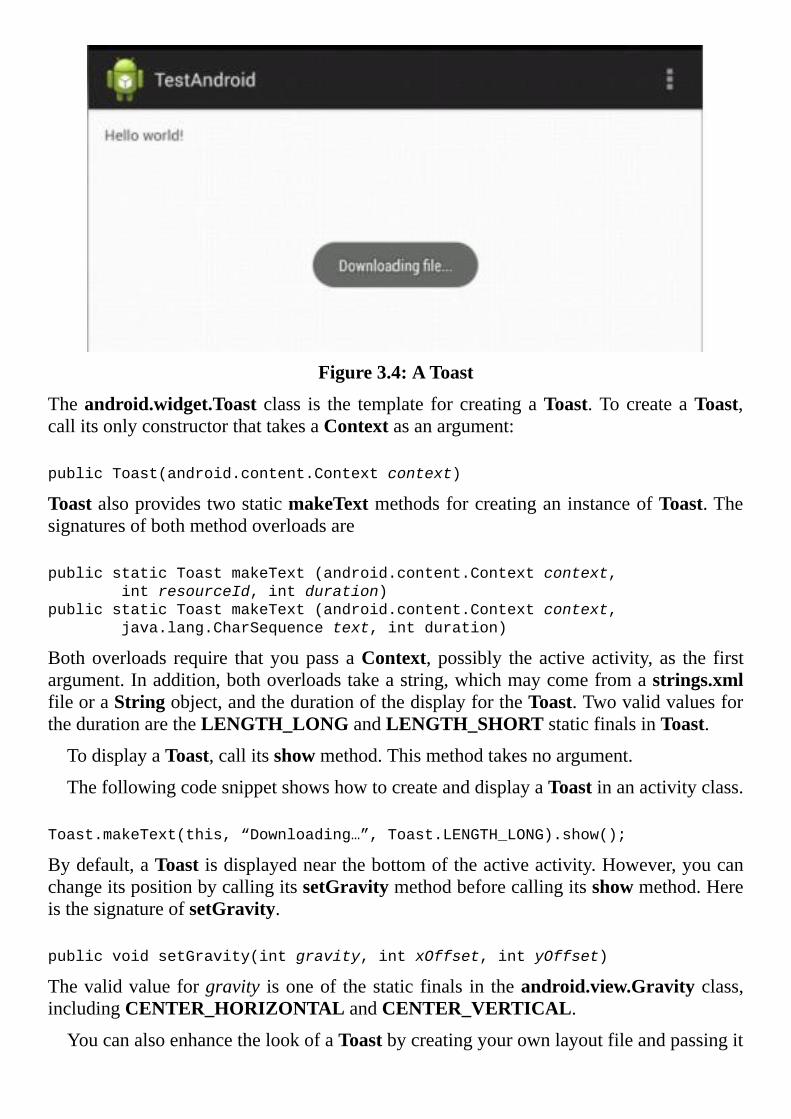
Figure3.4:AToast
Theandroid.widget.Toast class is the template forcreatingaToast.TocreateaToast,callitsonlyconstructorthattakesaContextasanargument:
publicToast(android.content.Contextcontext)
ToastalsoprovidestwostaticmakeTextmethodsforcreatinganinstanceofToast.Thesignaturesofbothmethodoverloadsare
publicstaticToastmakeText(android.content.Contextcontext,
intresourceId,intduration)
publicstaticToastmakeText(android.content.Contextcontext,
java.lang.CharSequencetext,intduration)
Bothoverloads require thatyoupassaContext, possibly theactiveactivity, as the firstargument.Inaddition,bothoverloadstakeastring,whichmaycomefromastrings.xmlfileoraStringobject,andthedurationofthedisplayfortheToast.TwovalidvaluesforthedurationaretheLENGTH_LONGandLENGTH_SHORTstaticfinalsinToast.
TodisplayaToast,callitsshowmethod.Thismethodtakesnoargument.
ThefollowingcodesnippetshowshowtocreateanddisplayaToastinanactivityclass.
Toast.makeText(this,“Downloading…”,Toast.LENGTH_LONG).show();
Bydefault,aToastisdisplayednearthebottomoftheactiveactivity.However,youcanchangeitspositionbycallingitssetGravitymethodbeforecallingitsshowmethod.HereisthesignatureofsetGravity.
publicvoidsetGravity(intgravity,intxOffset,intyOffset)
Thevalidvalueforgravity isoneof thestatic finals in theandroid.view.Gravityclass,includingCENTER_HORIZONTALandCENTER_VERTICAL.
YoucanalsoenhancethelookofaToastbycreatingyourownlayoutfileandpassingit
totheToast’ssetViewmethod.HereisanexampleofhowtocreateacustomToast.
LayoutInflaterinflater=getLayoutInflater();
Viewlayout=inflater.inflate(R.layout.toast_layout,
(ViewGroup)findViewById(R.id.toast_layout_root));
Toasttoast=newToast(getApplicationContext());
toast.setView(layout);
toast.show();
In this case, R.layout.toast_layout is the layout identifier for the Toast andR.id.toast_layout_rootistheidoftherootelementinthelayoutfile.
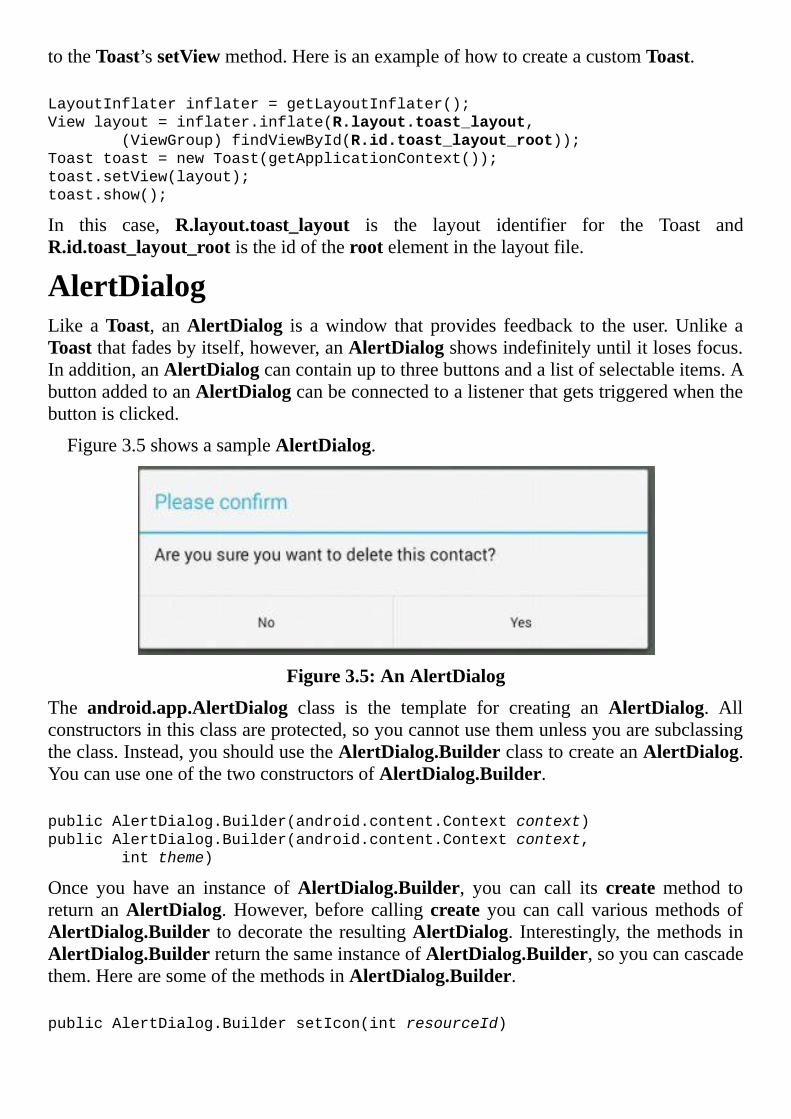
AlertDialogLike aToast, anAlertDialog is awindow that provides feedback to the user.Unlike aToastthatfadesbyitself,however,anAlertDialogshowsindefinitelyuntilitlosesfocus.Inaddition,anAlertDialogcancontainuptothreebuttonsandalistofselectableitems.AbuttonaddedtoanAlertDialogcanbeconnectedtoalistenerthatgetstriggeredwhenthebuttonisclicked.
Figure3.5showsasampleAlertDialog.
Figure3.5:AnAlertDialog
The android.app.AlertDialog class is the template for creating an AlertDialog. Allconstructorsinthisclassareprotected,soyoucannotusethemunlessyouaresubclassingtheclass.Instead,youshouldusetheAlertDialog.BuilderclasstocreateanAlertDialog.YoucanuseoneofthetwoconstructorsofAlertDialog.Builder.
publicAlertDialog.Builder(android.content.Contextcontext)
publicAlertDialog.Builder(android.content.Contextcontext,
inttheme)
Once you have an instance ofAlertDialog.Builder, you can call its createmethod toreturn anAlertDialog.However, before callingcreate you can call variousmethodsofAlertDialog.Builder todecoratetheresultingAlertDialog. Interestingly, themethods inAlertDialog.BuilderreturnthesameinstanceofAlertDialog.Builder,soyoucancascadethem.HerearesomeofthemethodsinAlertDialog.Builder.
publicAlertDialog.BuildersetIcon(intresourceId)
SetstheiconoftheresultingAlertDialogwiththeDrawablepointedbyresourceId.
publicAlertDialog.BuildersetMessage(java.lang.CharSequencemessage)
SetsthemessageoftheresultingAlertDialog.
publicAlertDialog.BuildersetTitle(java.lang.CharSequencetitle)
SetsthetitleoftheresultingAlertDialog.
publicAlertDialog.BuildersetNegativeButton(
java.lang.CharSequencetext,
android.content.DialogInterface.OnClickListenerlistener)
Assignsabuttonthattheusershouldclicktoprovideanegativeresponse.
publicAlertDialog.BuildersetPositiveButton(
java.lang.CharSequencetext,
android.content.DialogInterface.OnClickListenerlistener)
Assignsabuttonthattheusershouldclicktoprovideapositiveresponse.
publicAlertDialog.BuildersetNeutralButton(
java.lang.CharSequencetext,
android.content.DialogInterface.OnClickListenerlistener)
Assignsabuttonthattheusershouldclicktoprovideaneutralresponse.
Forinstance,thefollowingcodeproducesanAlertDialogthatlooksliketheoneinFigure3.5.
newAlertDialog.Builder(this)
.setTitle(“Pleaseconfirm”)
.setMessage(
“Areyousureyouwanttodelete”+
“thiscontact?”)
.setPositiveButton(“Yes”,
newDialogInterface.OnClickListener(){
publicvoidonClick(
DialogInterfacedialog,
intwhichButton){
//deletepicturehere
dialog.dismiss();
}
})
.setNegativeButton(“No”,
newDialogInterface.OnClickListener(){
publicvoidonClick(
DialogInterfacedialog,
intwhich){
dialog.dismiss();
}
})
.create()
.show();
PressingtheYesbuttonwillexecutethelistenerpassedtothesetPositiveButtonmethodandpressingtheNobuttonwillrunthelistenerpassedtothesetNegativeButtonmethod.
NotificationsAnotificationisamessageonthestatusbar.Unlikeatoast,anotificationispersistentandwillkeepshowinguntilitisclosedorthedeviceisshutdown.
Anotificationisaninstanceofandroid.app.Notification.ThemostconvenientwaytocreateanotificationisbyusinganestedclasscalledBuilder,whichcanbeinstantiatedbypassing a Context. You can then call the build method on the builder to create aNotification.
Notificationn=newNotification.Builder(context).build();
TheNotification.Builderclasshasmethods todecorate theresultingnotification.Thesemethods include addAction, setAutoCancel, setColor, setContent, setContentTitle,setContentIntent,setLargeIcon,setSmallIconandsetSound.
Manyofthesemethodsareself-explanatory,butaddActionandsetContentIntentareofparticularimportancebecauseyoucanusethemtoaddanactionthatwillbeperformedwhentheusertouchesthenotification.Inthiscase,anotificationactionisrepresentedbyaPendingIntent.Here are the signatures ofaddAction and setContentIntent, both ofwhichtakeaPendingIntent.
publicNotification.BuilderaddAction(inticon,
java.lang.CharSequencetitle,
android.app.PendingIntentintent)
publicNotification.BuildersetContentIntent(
android.app.PendingIntentintent)
When the user touches the notification, the sendmethod of thePendingIntent will beinvoked.SeethesidebarforadescriptionofPendingIntent.
setAutoCancel is also important and passing true to it allows the notification to bedismissedwhentheusertouchesitonthenotificationdrawer.Thenotificationdrawerisanareathatopenswhenyouslidedownthestatusbar.Thenotificationdrawershowsallnotificationsthatthesystemhavereceivedandhavenotbeendismissed.
Themethods inNotification.Builder return the sameBuilder object, so they can becascaded:
Notificationnotification=newNotification.Builder(context)
.setContentTitle(“Newnotification”)
.setContentText(“You’vegotone!”)
.setSmallIcon(android.R.drawable.star_on)
.setContentIntent(pendingIntent)
.setAutoCancel(false)
.addAction(android.R.drawable.star_big_on,
“Open”,pendingIntent)
.build();
To sound a ringtone, flash lights andmake thedevicevibrate, you canOR thedefaultsflagslikeso:
notification.defaults|=Notification.DEFAULT_SOUND;
notification.defaults|=Notification.DEFAULT_LIGHTS;
notification.defaults|=Notification.DEFAULT_VIBRATE;
Inaddition,tomakerepeatingsound,youcansettheFLAG_INSISTENTflag.
notification.flags|=Notification.FLAG_INSISTENT;
ThePendingIntentClass
APendingIntentencapsulatesanIntentandanactionthatwillbecarriedoutwhenitssendmethodisinvoked.SinceaPendingIntentisapendingintent,theactionisnormallyanoperationthatwillbeinvokedsometimeinthefuture,mostprobablybythesystem.Forexample,aPendingIntentcanbeusedtoconstructaNotificationsothatsomethingcanbemadehappenwhentheusertouchesthenotification.TheactioninaPendingIntentisoneofseveralmethodsintheContextclass,suchasstartActivity,startServiceorsendBroadcast.YouhavelearnedthattostartanactivityyoucanpassanIntenttothestartActivitymethodonaContext.
Intentintent=…
context.startActivity(intent);
TheequivalentcodeforstartinganactivityusingaPendingIntentlookslikethis:
Intentintent=…
PendingIntentpendingIntent=PendingIntent.getActivity(context,0,intent,0);
pendingIntent.send();
ThestaticmethodgetActivity isoneofseveralmethods that returnsan instanceofPendingIntent. Other methods are getActivities, getService and getBroadcast.Thesemethodsdetermine the action that the resultingPendingIntent canperform.Constructing aPendingIntent by calling getActivity returns an instance that canstart an activity.Creating aPendingIntent usinggetService gives you an instancethat can be used to start a service. You call getBroadcast if you want aPendingIntentforsendingabroadcast.
To publish a notification, use the NotificationManager, which is one of the built-in
services in theAndroidsystem.Asit isanexistingsystemservice,youcanobtain itbycallingthegetSystemServicemethodonanactivity,likeso:
NotificationManagernotificationManager=(NotificationManager)
getSystemService(NOTIFICATION_SERVICE);
Then, you can publish a notification by calling the notify method on theNotificationManager,passingauniqueIDandthenotification.
notificationManager.notify(notificationId,notification);
ThenotificationIDisanintegerthatyoucanchoose.ThisIDisneededjustincaseyouwanttocancelthenotification,inwhichcaseyoupasstheIDtothecancelmethodoftheNotificationManager:
notificationManager.cancel(notificationId);
TheNotificationDemoproject isanapplicationthatshowshowtousenotifications.Themainactivityoftheappcontainstwobuttons,oneforpublishinganotificationandoneforcancellingit.Afterthenotificationispublished,openingitwillinvokeasecondactivity.
Listing3.5showsthelayoutfileandListing3.6theactivityclass.
Listing3.5:ThelayoutfileofthemainactivityofNotificationDemo
<LinearLayout
xmlns:android=“http://schemas.android.com/apk/res/android”
xmlns:tools=“http://schemas.android.com/tools”
android:layout_width=“wrap_content”
android:layout_height=“wrap_content”
android:orientation=“horizontal”>
<Button
android:layout_width=“wrap_content”
android:layout_height=“wrap_content”
android:onClick=“setNotification”
android:text=“SetNotification”/>
<Button
android:layout_width=“wrap_content”
android:layout_height=“wrap_content”
android:onClick=“clearNotification”
android:text=“ClearNotification”/>
</LinearLayout>
Listing3.6:Themainactivityclass
packagecom.example.notificationdemo;
importandroid.app.Activity;
importandroid.app.Notification;
importandroid.app.NotificationManager;
importandroid.app.PendingIntent;
importandroid.content.Intent;
importandroid.os.Bundle;
importandroid.view.Menu;
importandroid.view.View;
publicclassMainActivityextendsActivity{
intnotificationId=1001;
@Override
protectedvoidonCreate(BundlesavedInstanceState){
super.onCreate(savedInstanceState);
setContentView(R.layout.activity_main);
}
@Override
publicbooleanonCreateOptionsMenu(Menumenu){
getMenuInflater().inflate(R.menu.menu_main,menu);
returntrue;
}
publicvoidsetNotification(Viewview){
Intentintent=newIntent(this,SecondActivity.class);
PendingIntentpendingIntent=
PendingIntent.getActivity(this,0,intent,0);
Notificationnotification=newNotification.Builder(this)
.setContentTitle(“Newnotification”)
.setContentText(“You’vegotanotification!”)
.setSmallIcon(android.R.drawable.star_on)
.setContentIntent(pendingIntent)
.setAutoCancel(true)
.addAction(android.R.drawable.ic_menu_gallery,
“Open”,pendingIntent)
.build();
NotificationManagernotificationManager=
(NotificationManager)getSystemService(
NOTIFICATION_SERVICE);
notificationManager.notify(notificationId,notification);
}
publicvoidclearNotification(Viewview){
NotificationManagernotificationManager=
(NotificationManager)getSystemService(
NOTIFICATION_SERVICE);
notificationManager.cancel(notificationId);
}
}
Whenyouruntheapplication,youwillseethemainactivitywithtwobuttons,liketheoneshowninFigure3.6.
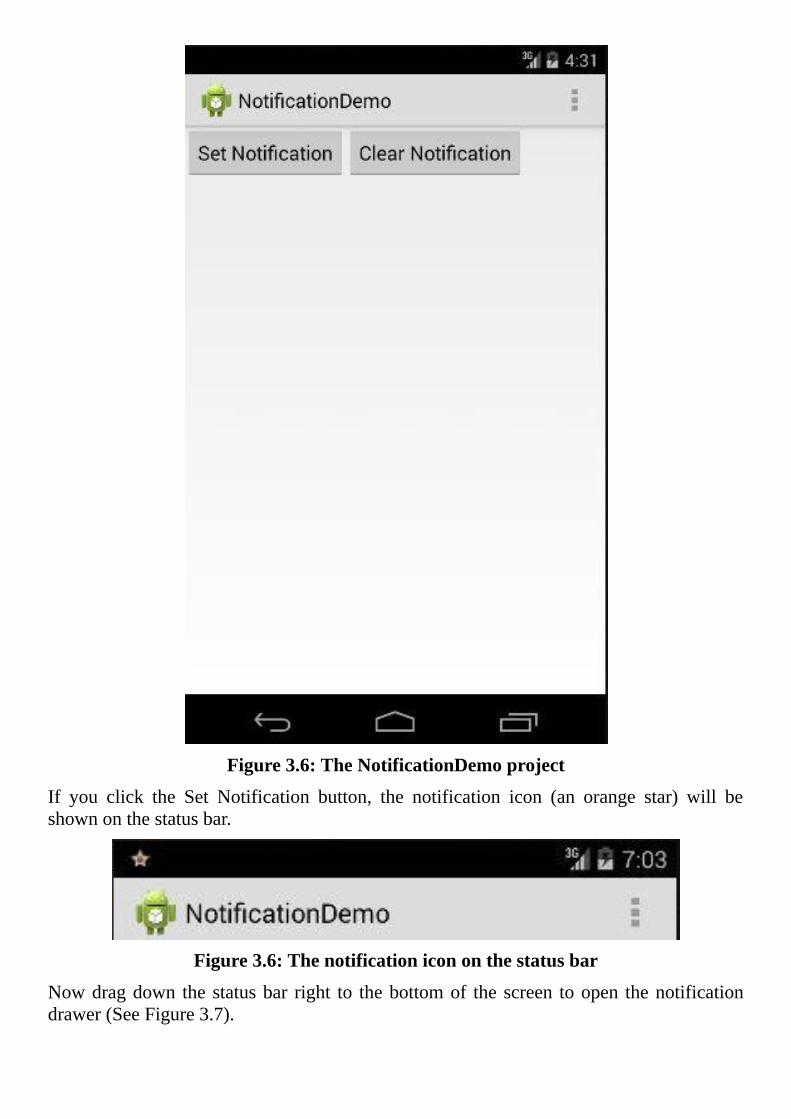
Figure3.6:TheNotificationDemoproject
If you click the Set Notification button, the notification icon (an orange star) will beshownonthestatusbar.
Figure3.6:Thenotificationicononthestatusbar
Nowdragdown thestatusbar right to thebottomof the screen toopen thenotificationdrawer(SeeFigure3.7).
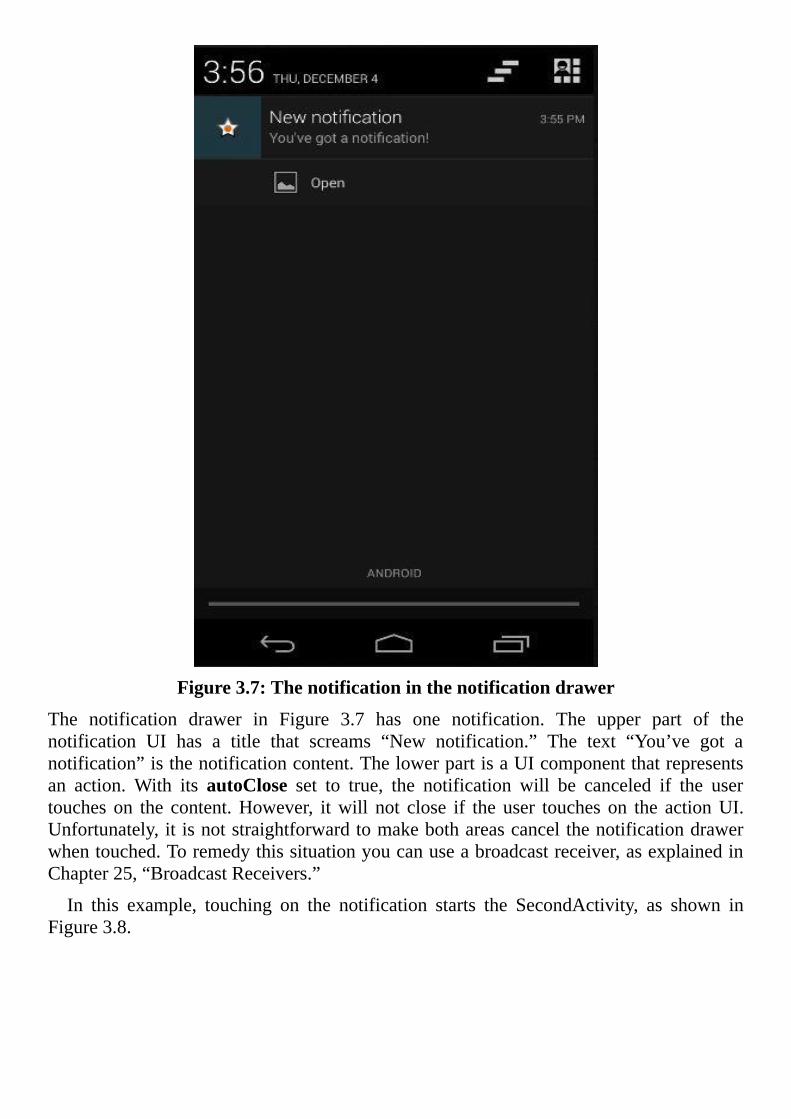
Figure3.7:Thenotificationinthenotificationdrawer
The notification drawer in Figure 3.7 has one notification. The upper part of thenotification UI has a title that screams “New notification.” The text “You’ve got anotification”isthenotificationcontent.ThelowerpartisaUIcomponentthatrepresentsan action. With its autoClose set to true, the notification will be canceled if the usertouches on the content.However, itwill not close if the user touches on the actionUI.Unfortunately,itisnotstraightforwardtomakebothareascancelthenotificationdrawerwhentouched.Toremedythissituationyoucanuseabroadcastreceiver,asexplainedinChapter25,“BroadcastReceivers.”
In this example, touching on the notification starts the SecondActivity, as shown inFigure3.8.
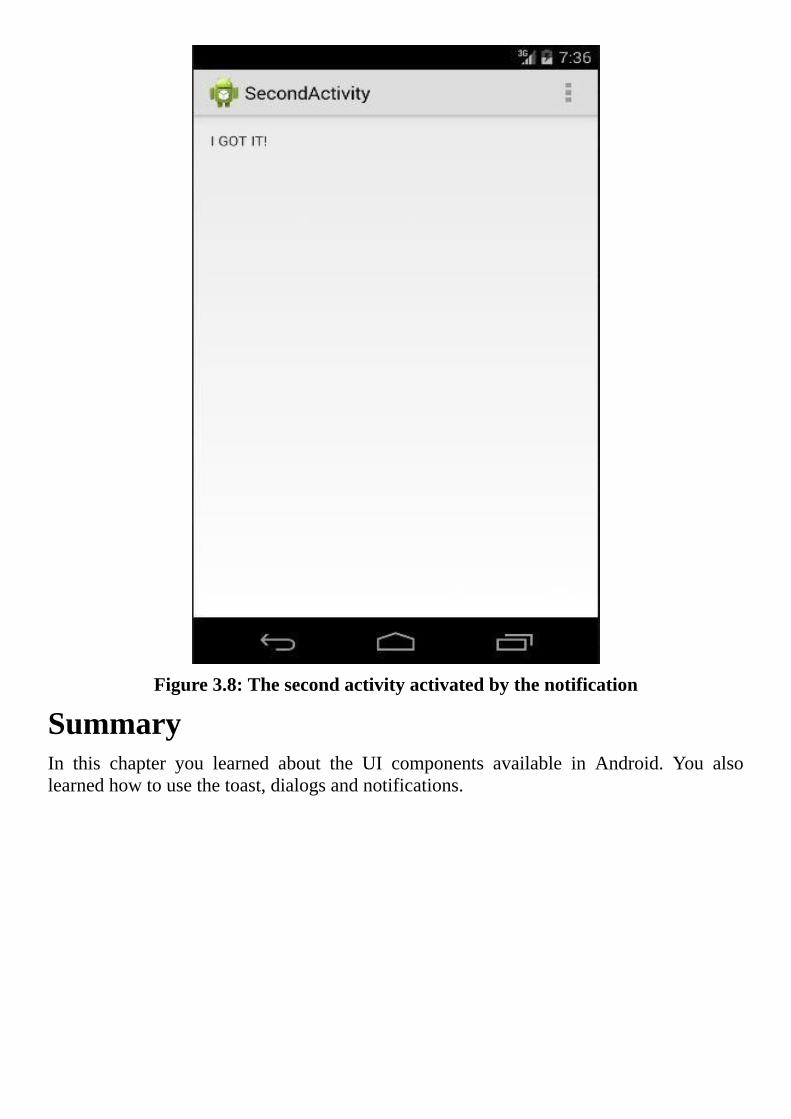
Figure3.8:Thesecondactivityactivatedbythenotification
SummaryIn this chapter you learned about the UI components available in Android. You alsolearnedhowtousethetoast,dialogsandnotifications.
Chapter4Layouts
Layoutsare importantbecause theydirectlyaffect the lookandfeelofyourapplication.Technically,alayoutisaviewthatarrangeschildviewsaddedtoit.Androidcomeswithanumber of built-in layouts, ranging fromLinearLayout,which is the easiest to use, toRelativeLayout,whichisthemostpowerful.
ThischapterdiscussesthevariouslayoutsinAndroid.
OverviewAn important Android component, a layout defines the visual structure of your UIcomponents.A layout is a subclassofandroid.view.ViewGroup,which in turn derivesfromandroid.view.View.AViewGroupisaspecialviewthatcancontainotherviews.Alayoutcanbedeclaredinalayoutfileoraddedprogrammaticallyatruntime.
ThefollowingaresomeofthelayoutsinAndroid.
LinearLayout. A layout that aligns its children in the same direction, eitherhorizontallyorvertically.RelativeLayout.Alayoutthatarrangeseachofitschildrenbasedonthepositionsofoneormoreofitssiblings.FrameLayout. A layout that arranges each of its children based on top of oneanother.TableLayout.Alayoutthatorganizesitschildrenintorowsandcolumns.GridLayout.Alayoutthatarrangesitschildreninagrid.
Inamajorityofcases,aviewinalayoutmusthavethelayout_widthandlayout_heightattributes so that the layout knows how to size the view. Both layout_width andlayout_heightattributesmaybeassignedthevaluematch_parent(tomatchtheparent’swidth/height),wrap_content(tomatchthewidth/heightofitscontent)orameasurementunit.
TheAbsoluteLayout,whichoffersexactlocationsforitschildviews,isdeprecatedandshouldnotbeused.UseRelativeLayoutinstead.
LinearLayoutALinearLayout is a layout that arranges its children either horizontally or vertically,depending on the value of its orientation property. The LinearLayout is the easiestlayouttouse.
ThelayoutinListing4.1isanexampleofLinearLayoutwithhorizontalorientation.Itcontainsthreechildren,anImageButton,aTextViewandaButton.
Listing4.1:AhorizontalLinearLayout
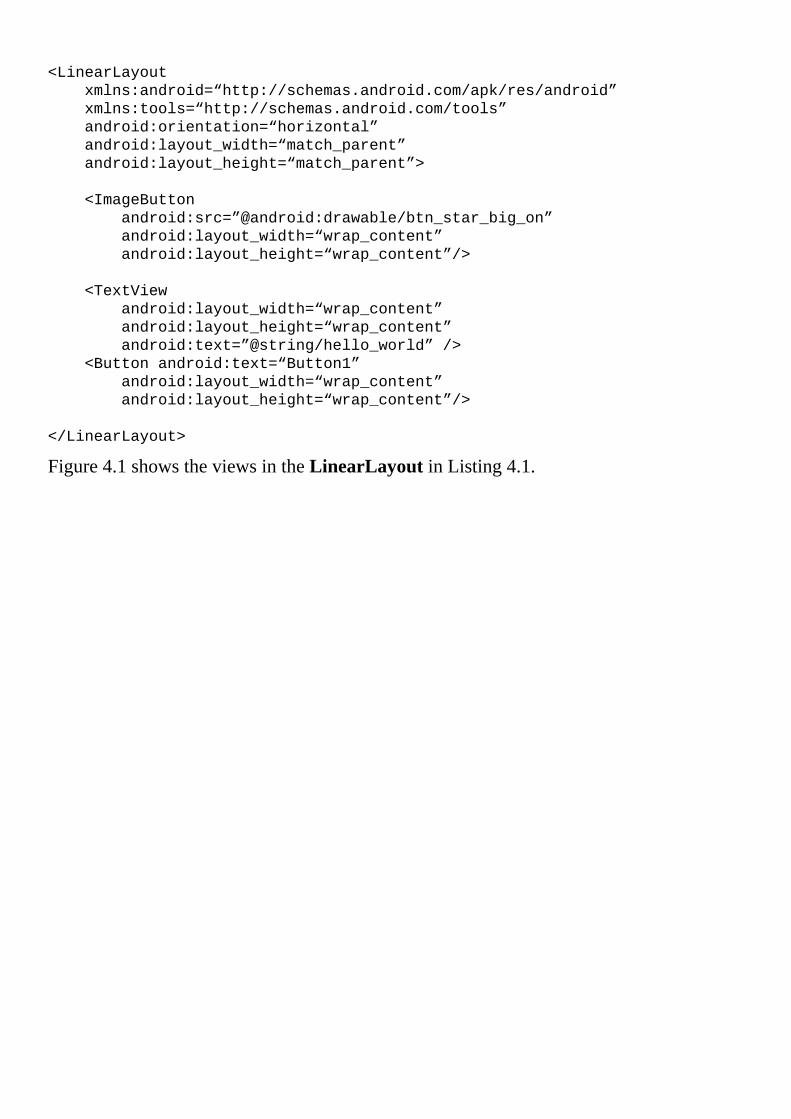
<LinearLayout
xmlns:android=“http://schemas.android.com/apk/res/android”
xmlns:tools=“http://schemas.android.com/tools”
android:orientation=“horizontal”
android:layout_width=“match_parent”
android:layout_height=“match_parent”>
<ImageButton
android:src=”@android:drawable/btn_star_big_on”
android:layout_width=“wrap_content”
android:layout_height=“wrap_content”/>
<TextView
android:layout_width=“wrap_content”
android:layout_height=“wrap_content”
android:text=”@string/hello_world”/>
<Buttonandroid:text=“Button1”
android:layout_width=“wrap_content”
android:layout_height=“wrap_content”/>
</LinearLayout>
Figure4.1showstheviewsintheLinearLayoutinListing4.1.
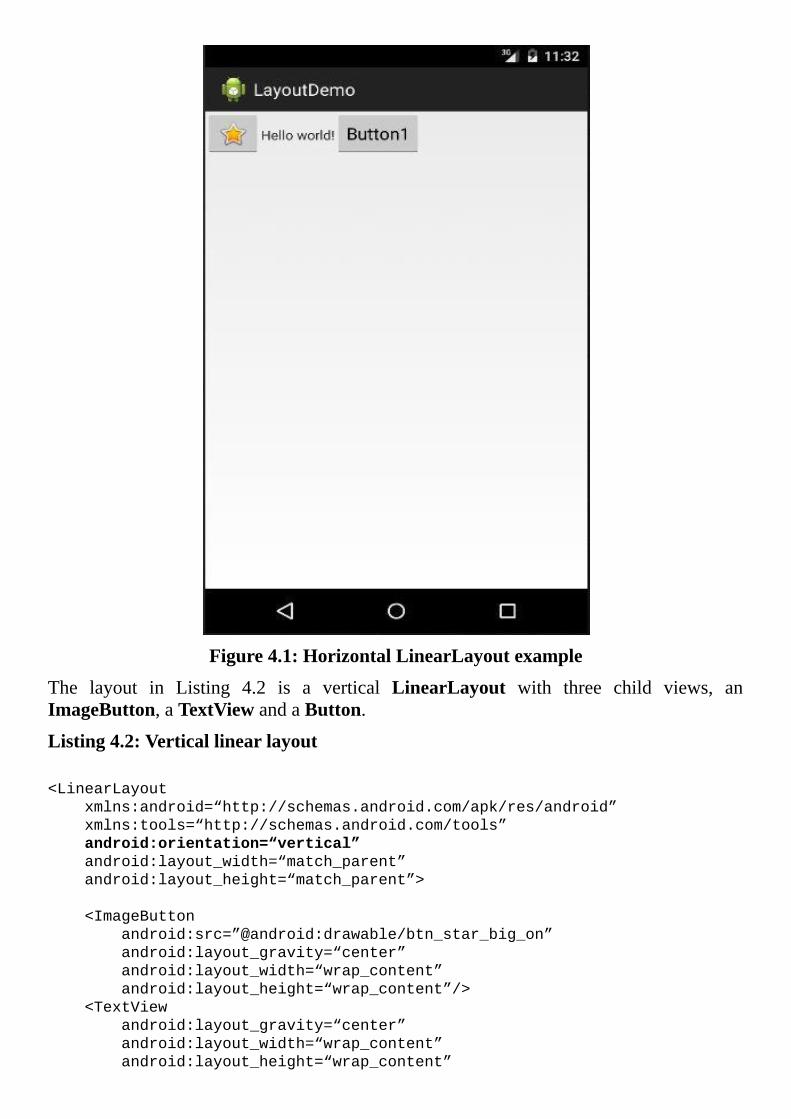
Figure4.1:HorizontalLinearLayoutexample
The layout in Listing 4.2 is a vertical LinearLayout with three child views, anImageButton,aTextViewandaButton.
Listing4.2:Verticallinearlayout
<LinearLayout
xmlns:android=“http://schemas.android.com/apk/res/android”
xmlns:tools=“http://schemas.android.com/tools”
android:orientation=“vertical”
android:layout_width=“match_parent”
android:layout_height=“match_parent”>
<ImageButton
android:src=”@android:drawable/btn_star_big_on”
android:layout_gravity=“center”
android:layout_width=“wrap_content”
android:layout_height=“wrap_content”/>
<TextView
android:layout_gravity=“center”
android:layout_width=“wrap_content”
android:layout_height=“wrap_content”
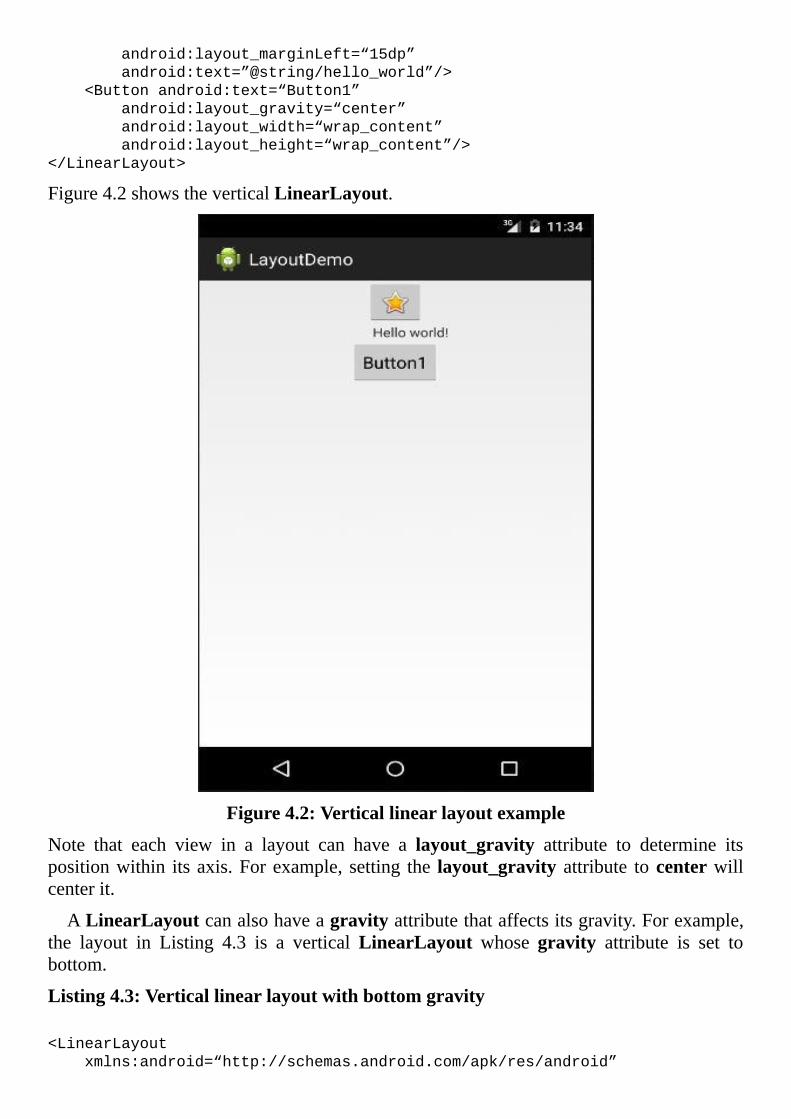
android:layout_marginLeft=“15dp”
android:text=”@string/hello_world”/>
<Buttonandroid:text=“Button1”
android:layout_gravity=“center”
android:layout_width=“wrap_content”
android:layout_height=“wrap_content”/>
</LinearLayout>
Figure4.2showstheverticalLinearLayout.
Figure4.2:Verticallinearlayoutexample
Note that each view in a layout can have a layout_gravity attribute to determine itspositionwithin itsaxis.Forexample, setting the layout_gravity attribute tocenterwillcenterit.
ALinearLayoutcanalsohaveagravityattributethataffectsitsgravity.Forexample,the layout in Listing 4.3 is a verticalLinearLayout whose gravity attribute is set tobottom.
Listing4.3:Verticallinearlayoutwithbottomgravity
<LinearLayout
xmlns:android=“http://schemas.android.com/apk/res/android”
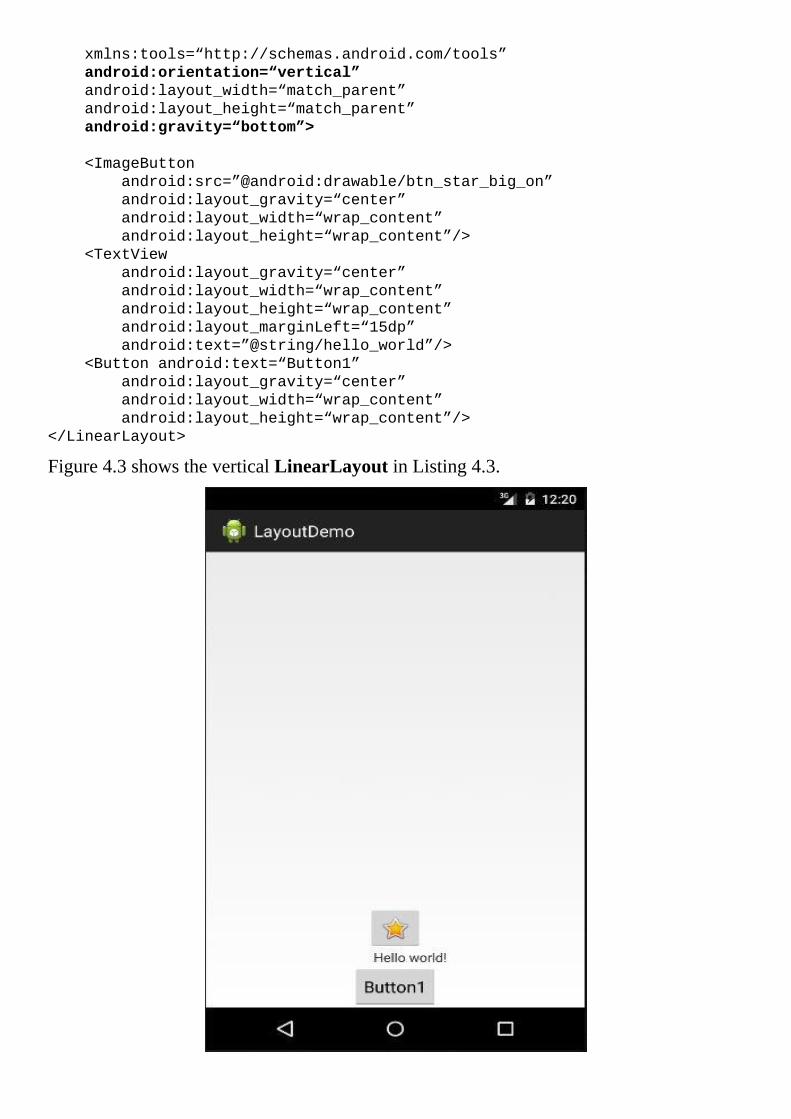
xmlns:tools=“http://schemas.android.com/tools”
android:orientation=“vertical”
android:layout_width=“match_parent”
android:layout_height=“match_parent”
android:gravity=“bottom”>
<ImageButton
android:src=”@android:drawable/btn_star_big_on”
android:layout_gravity=“center”
android:layout_width=“wrap_content”
android:layout_height=“wrap_content”/>
<TextView
android:layout_gravity=“center”
android:layout_width=“wrap_content”
android:layout_height=“wrap_content”
android:layout_marginLeft=“15dp”
android:text=”@string/hello_world”/>
<Buttonandroid:text=“Button1”
android:layout_gravity=“center”
android:layout_width=“wrap_content”
android:layout_height=“wrap_content”/>
</LinearLayout>
Figure4.3showstheverticalLinearLayoutinListing4.3.
Figure4.3:Verticallinearlayoutwithgravity
RelativeLayoutThe RelativeLayout is the most powerful layout available. All children in aRelativeLayoutcanbepositionedrelativetoeachotheror totheirparent.Forexample,youcantellaviewtobepositionedtotheleftorrightofanotherview.Or,youcanspecifythataviewisalignedtothebottomortopedgeofitsparent.
PositioningachildinaRelativeLayoutisachievedusingtheattributessummarizedinTable4.1.
Attribute
Description
layout_above
PlacesthebottomedgeofthisviewabovethespecifiedviewID.
layout_alignBaseline
PlacesthebaselineofthisviewonthebaselineofthespecifiedviewID.
layout_alignBottom
Alignsthebottomofthisviewwiththespecifiedview.
layout_alignEnd
Alignstheendedgeofthisviewwiththeendedgeofthespecifiedview.
layout_alignLeft
Alignstheleftedgeofthisviewwiththeleftedgeofthespecifiedview.
layout_alignParentBottom
Avalueoftruealignsthebottomofthisviewwiththebottomedgeofitsparent.
layout_alignParentEnd
Avalueoftruealignstheendedgeofthisviewwiththeendedgeofitsparent.
layout_alignParentLeft
Avalueoftruealignstheleftedgeofthisviewwiththeleftedgeofitsparent.
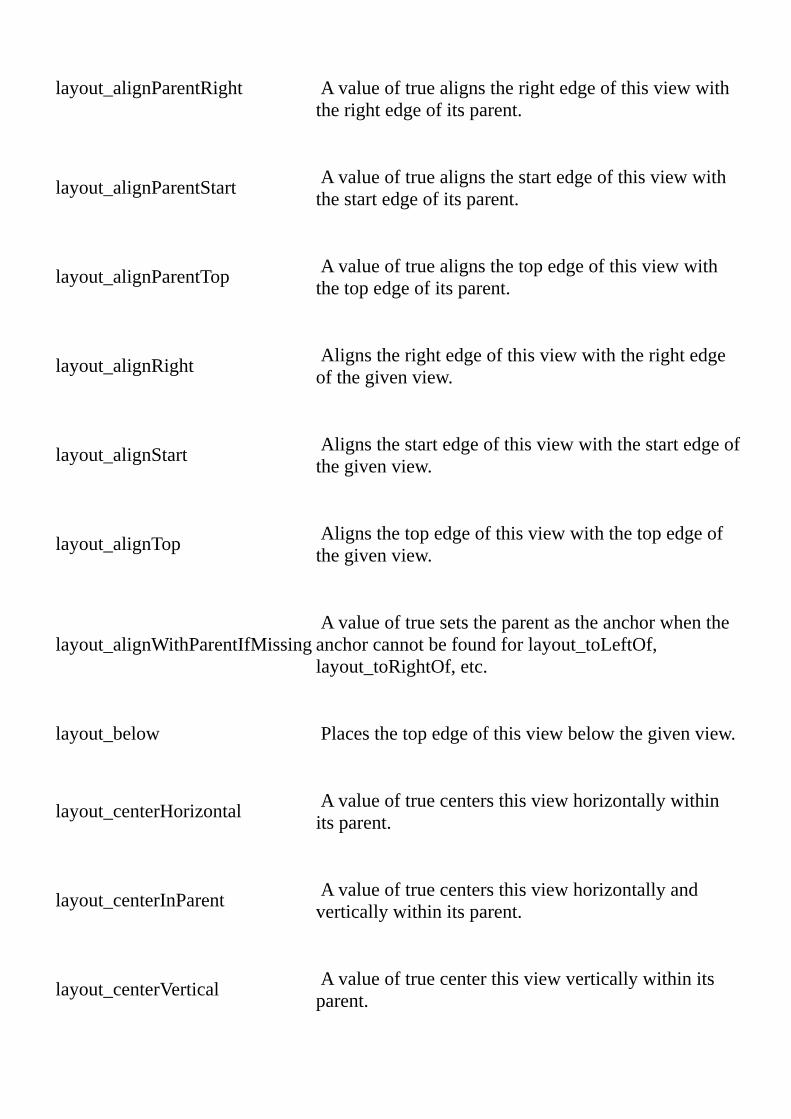
layout_alignParentRight
Avalueoftruealignstherightedgeofthisviewwiththerightedgeofitsparent.
layout_alignParentStart
Avalueoftruealignsthestartedgeofthisviewwiththestartedgeofitsparent.
layout_alignParentTop
Avalueoftruealignsthetopedgeofthisviewwiththetopedgeofitsparent.
layout_alignRight
Alignstherightedgeofthisviewwiththerightedgeofthegivenview.
layout_alignStart
Alignsthestartedgeofthisviewwiththestartedgeofthegivenview.
layout_alignTop
Alignsthetopedgeofthisviewwiththetopedgeofthegivenview.
layout_alignWithParentIfMissing
Avalueoftruesetstheparentastheanchorwhentheanchorcannotbefoundforlayout_toLeftOf,layout_toRightOf,etc.
layout_below
Placesthetopedgeofthisviewbelowthegivenview.
layout_centerHorizontal
Avalueoftruecentersthisviewhorizontallywithinitsparent.
layout_centerInParent
Avalueoftruecentersthisviewhorizontallyandverticallywithinitsparent.
layout_centerVertical
Avalueoftruecenterthisviewverticallywithinitsparent.
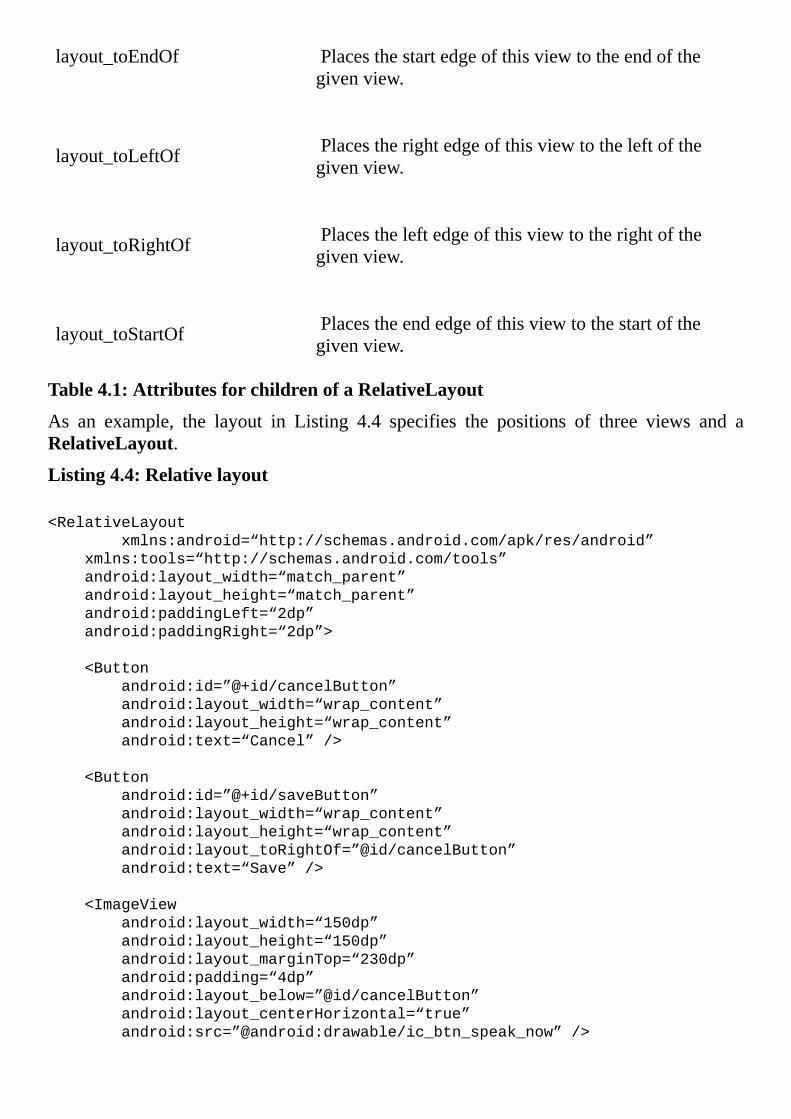
layout_toEndOf Placesthestartedgeofthisviewtotheendofthegivenview.
layout_toLeftOf
Placestherightedgeofthisviewtotheleftofthegivenview.
layout_toRightOf
Placestheleftedgeofthisviewtotherightofthegivenview.
layout_toStartOf
Placestheendedgeofthisviewtothestartofthegivenview.
Table4.1:AttributesforchildrenofaRelativeLayout
As an example, the layout in Listing 4.4 specifies the positions of three views and aRelativeLayout.
Listing4.4:Relativelayout
<RelativeLayout
xmlns:android=“http://schemas.android.com/apk/res/android”
xmlns:tools=“http://schemas.android.com/tools”
android:layout_width=“match_parent”
android:layout_height=“match_parent”
android:paddingLeft=“2dp”
android:paddingRight=“2dp”>
<Button
android:id=”@+id/cancelButton”
android:layout_width=“wrap_content”
android:layout_height=“wrap_content”
android:text=“Cancel”/>
<Button
android:id=”@+id/saveButton”
android:layout_width=“wrap_content”
android:layout_height=“wrap_content”
android:layout_toRightOf=”@id/cancelButton”
android:text=“Save”/>
<ImageView
android:layout_width=“150dp”
android:layout_height=“150dp”
android:layout_marginTop=“230dp”
android:padding=“4dp”
android:layout_below=”@id/cancelButton”
android:layout_centerHorizontal=“true”
android:src=”@android:drawable/ic_btn_speak_now”/>
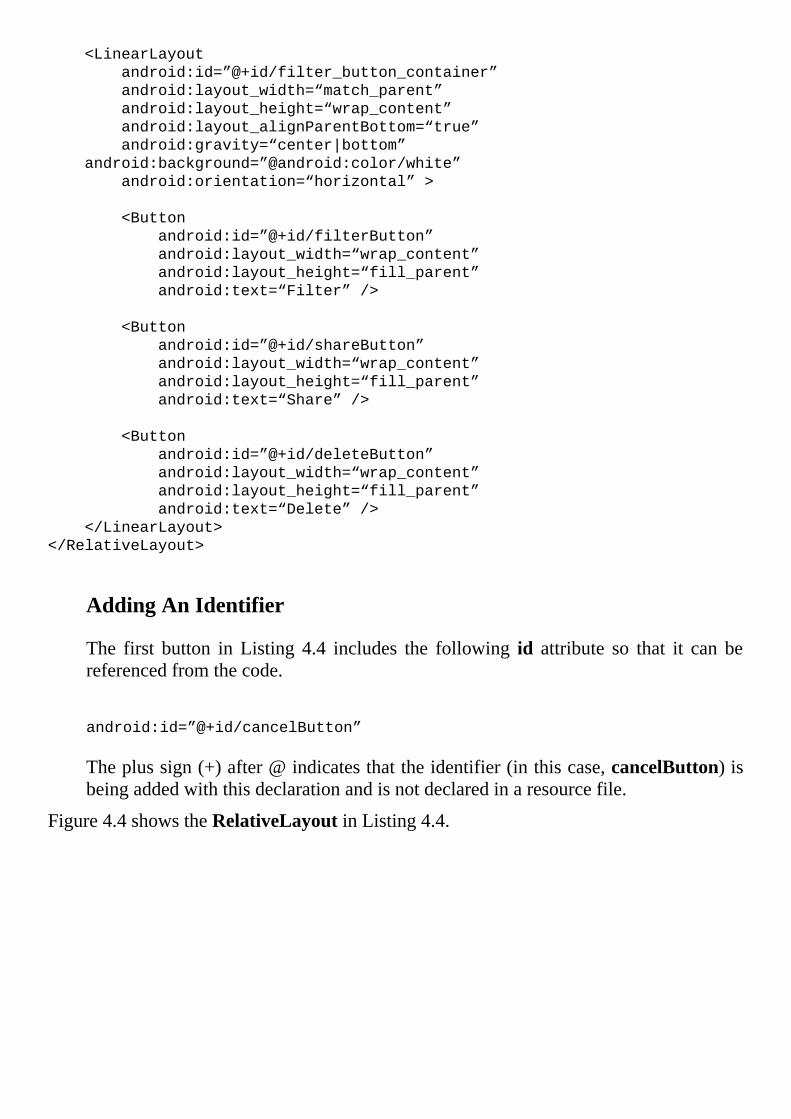
<LinearLayout
android:id=”@+id/filter_button_container”
android:layout_width=“match_parent”
android:layout_height=“wrap_content”
android:layout_alignParentBottom=“true”
android:gravity=“center|bottom”
android:background=”@android:color/white”
android:orientation=“horizontal”>
<Button
android:id=”@+id/filterButton”
android:layout_width=“wrap_content”
android:layout_height=“fill_parent”
android:text=“Filter”/>
<Button
android:id=”@+id/shareButton”
android:layout_width=“wrap_content”
android:layout_height=“fill_parent”
android:text=“Share”/>
<Button
android:id=”@+id/deleteButton”
android:layout_width=“wrap_content”
android:layout_height=“fill_parent”
android:text=“Delete”/>
</LinearLayout>
</RelativeLayout>
AddingAnIdentifier
The first button inListing 4.4 includes the following id attribute so that it can bereferencedfromthecode.
android:id=”@+id/cancelButton”
Theplussign(+)after@indicatesthattheidentifier(inthiscase,cancelButton)isbeingaddedwiththisdeclarationandisnotdeclaredinaresourcefile.
Figure4.4showstheRelativeLayoutinListing4.4.
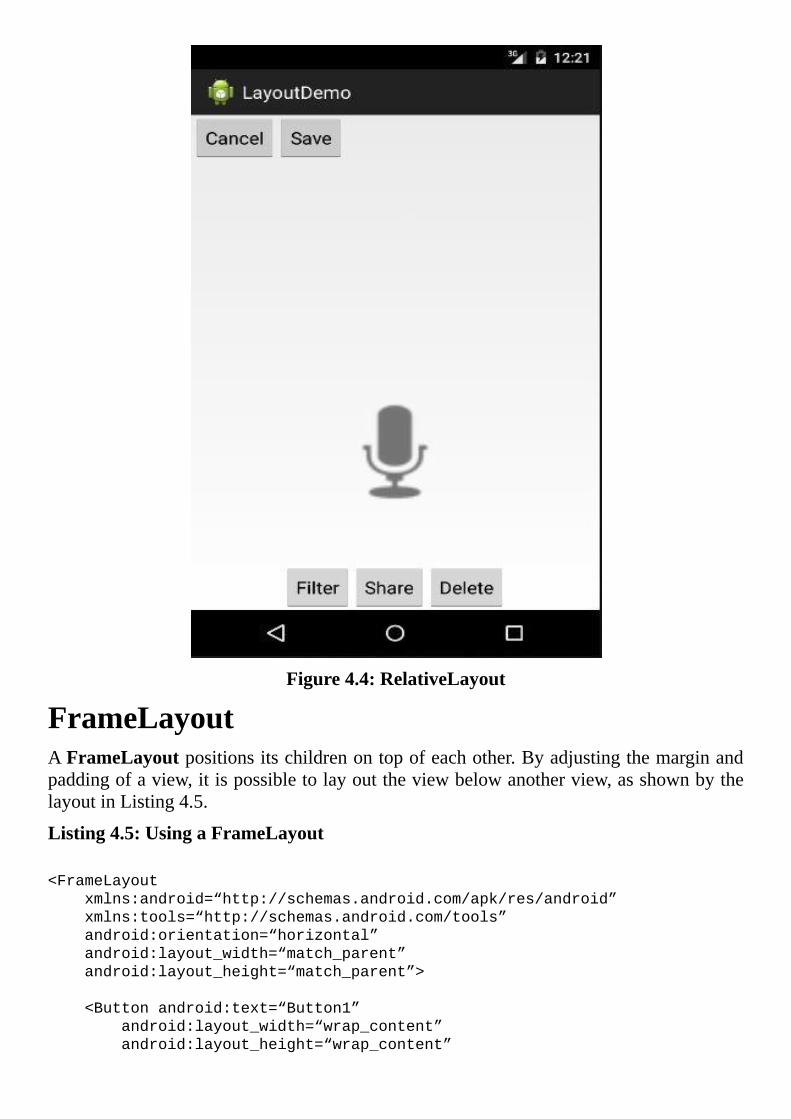
Figure4.4:RelativeLayout
FrameLayoutAFrameLayoutpositionsitschildrenontopofeachother.Byadjustingthemarginandpaddingofaview,itispossibletolayouttheviewbelowanotherview,asshownbythelayoutinListing4.5.
Listing4.5:UsingaFrameLayout
<FrameLayout
xmlns:android=“http://schemas.android.com/apk/res/android”
xmlns:tools=“http://schemas.android.com/tools”
android:orientation=“horizontal”
android:layout_width=“match_parent”
android:layout_height=“match_parent”>
<Buttonandroid:text=“Button1”
android:layout_width=“wrap_content”
android:layout_height=“wrap_content”
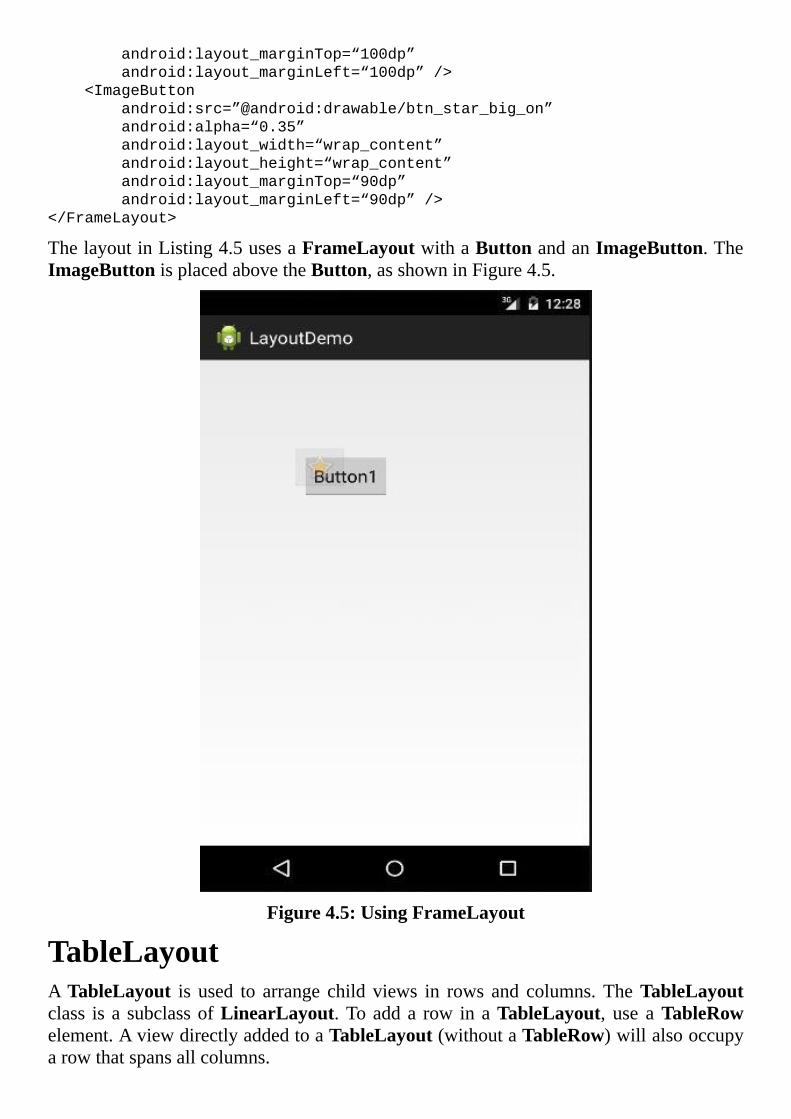
android:layout_marginTop=“100dp”
android:layout_marginLeft=“100dp”/>
<ImageButton
android:src=”@android:drawable/btn_star_big_on”
android:alpha=“0.35”
android:layout_width=“wrap_content”
android:layout_height=“wrap_content”
android:layout_marginTop=“90dp”
android:layout_marginLeft=“90dp”/>
</FrameLayout>
ThelayoutinListing4.5usesaFrameLayoutwithaButtonandanImageButton.TheImageButtonisplacedabovetheButton,asshowninFigure4.5.
Figure4.5:UsingFrameLayout
TableLayoutATableLayout is used to arrange child views in rows and columns.TheTableLayoutclass isa subclassofLinearLayout.Toadda row inaTableLayout, use aTableRowelement.AviewdirectlyaddedtoaTableLayout(withoutaTableRow)willalsooccupyarowthatspansallcolumns.
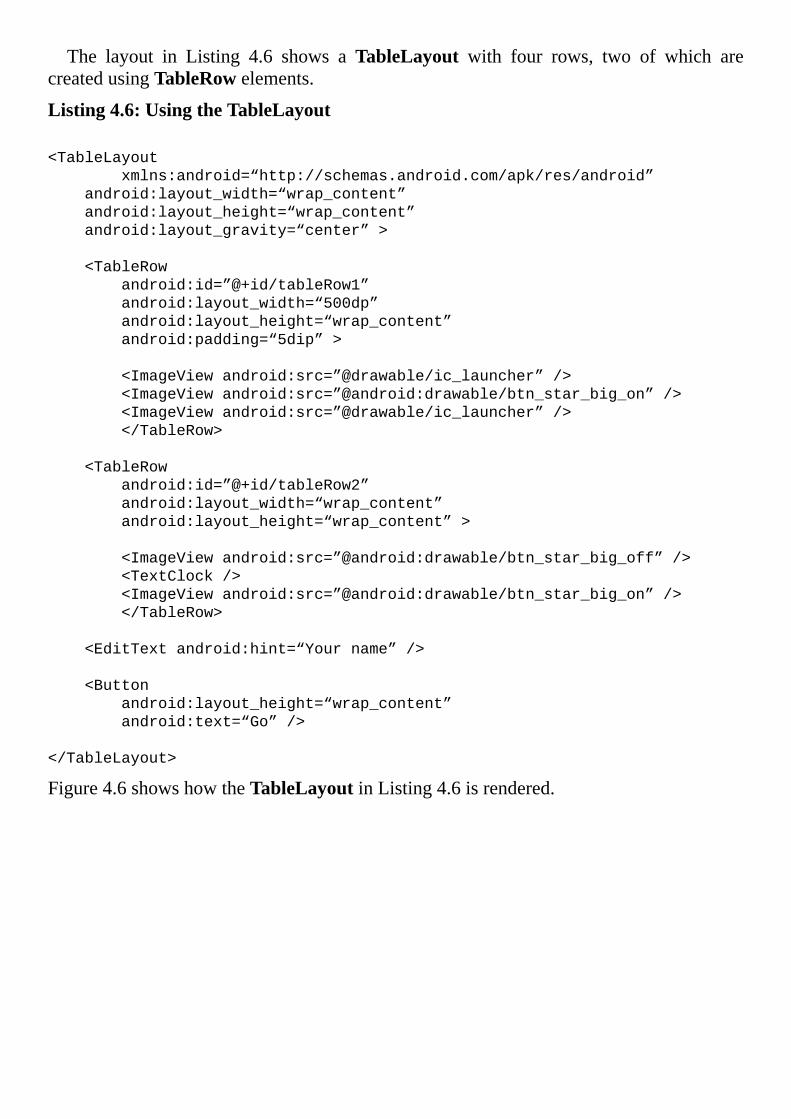
The layout in Listing 4.6 shows a TableLayout with four rows, two of which arecreatedusingTableRowelements.
Listing4.6:UsingtheTableLayout
<TableLayout
xmlns:android=“http://schemas.android.com/apk/res/android”
android:layout_width=“wrap_content”
android:layout_height=“wrap_content”
android:layout_gravity=“center”>
<TableRow
android:id=”@+id/tableRow1”
android:layout_width=“500dp”
android:layout_height=“wrap_content”
android:padding=“5dip”>
<ImageViewandroid:src=”@drawable/ic_launcher”/>
<ImageViewandroid:src=”@android:drawable/btn_star_big_on”/>
<ImageViewandroid:src=”@drawable/ic_launcher”/>
</TableRow>
<TableRow
android:id=”@+id/tableRow2”
android:layout_width=“wrap_content”
android:layout_height=“wrap_content”>
<ImageViewandroid:src=”@android:drawable/btn_star_big_off”/>
<TextClock/>
<ImageViewandroid:src=”@android:drawable/btn_star_big_on”/>
</TableRow>
<EditTextandroid:hint=“Yourname”/>
<Button
android:layout_height=“wrap_content”
android:text=“Go”/>
</TableLayout>
Figure4.6showshowtheTableLayoutinListing4.6isrendered.
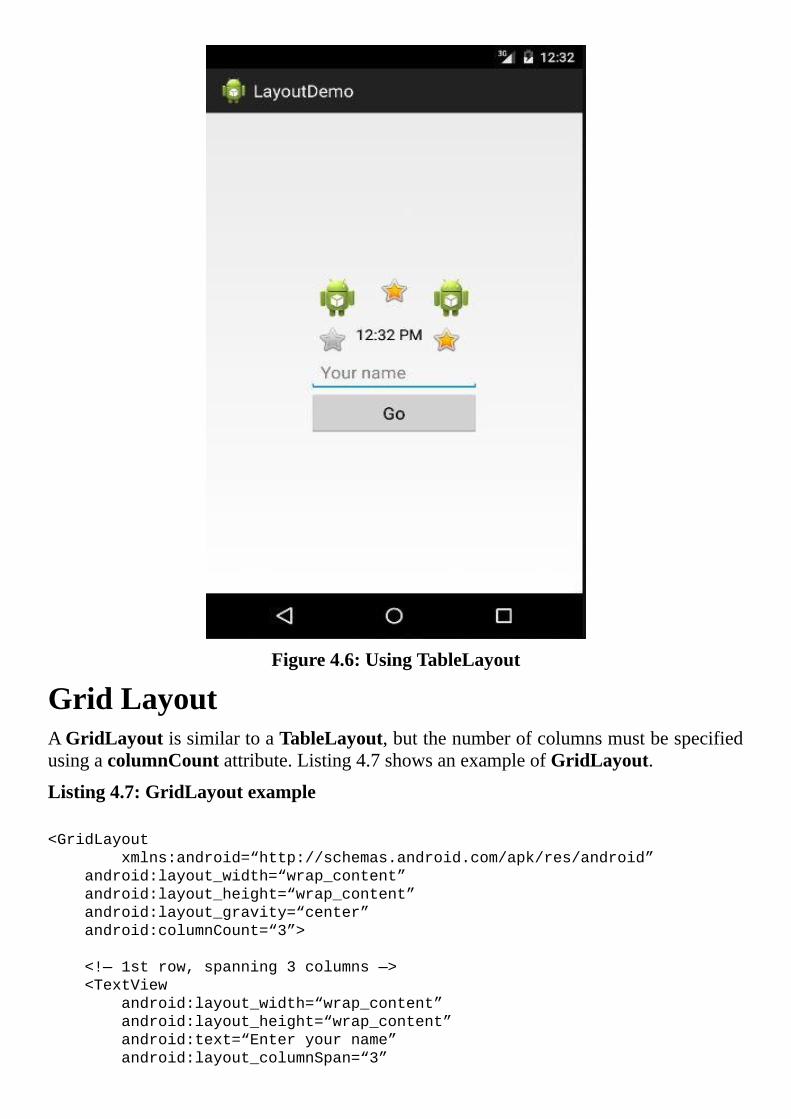
Figure4.6:UsingTableLayout
GridLayoutAGridLayoutissimilartoaTableLayout,butthenumberofcolumnsmustbespecifiedusingacolumnCountattribute.Listing4.7showsanexampleofGridLayout.
Listing4.7:GridLayoutexample
<GridLayout
xmlns:android=“http://schemas.android.com/apk/res/android”
android:layout_width=“wrap_content”
android:layout_height=“wrap_content”
android:layout_gravity=“center”
android:columnCount=“3”>
<!—1strow,spanning3columns—>
<TextView
android:layout_width=“wrap_content”
android:layout_height=“wrap_content”
android:text=“Enteryourname”
android:layout_columnSpan=“3”
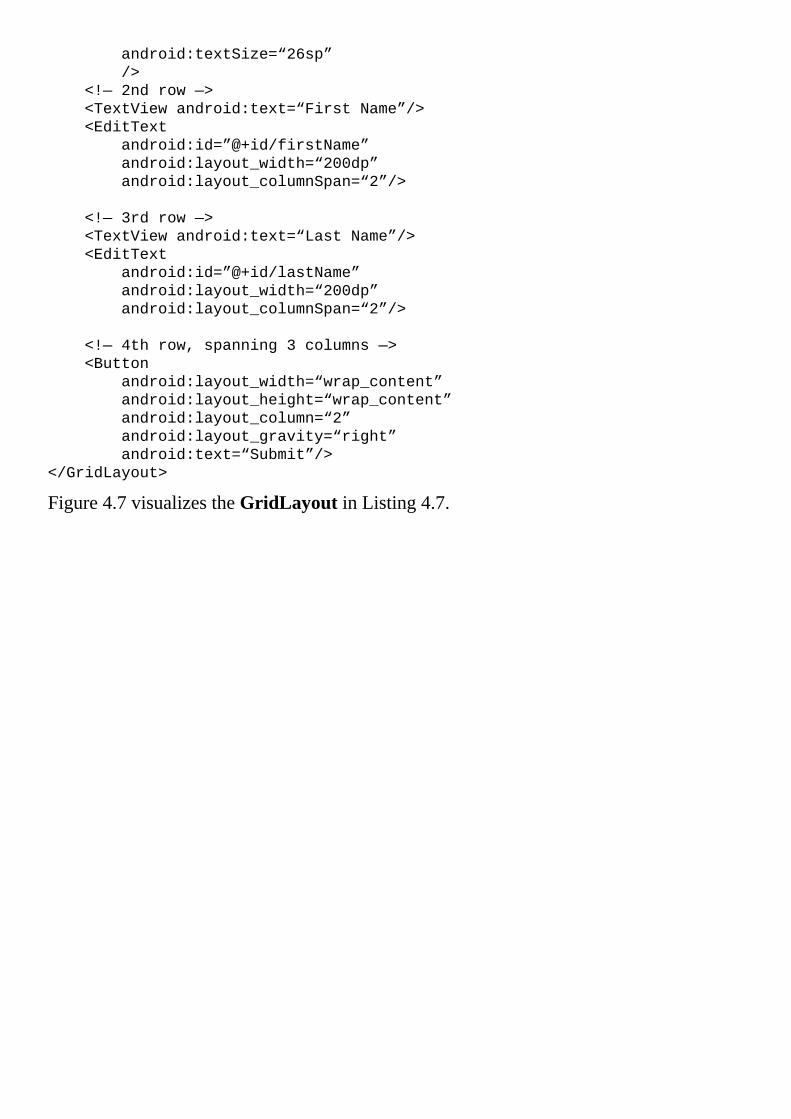
android:textSize=“26sp”
/>
<!—2ndrow—>
<TextViewandroid:text=“FirstName”/>
<EditText
android:id=”@+id/firstName”
android:layout_width=“200dp”
android:layout_columnSpan=“2”/>
<!—3rdrow—>
<TextViewandroid:text=“LastName”/>
<EditText
android:id=”@+id/lastName”
android:layout_width=“200dp”
android:layout_columnSpan=“2”/>
<!—4throw,spanning3columns—>
<Button
android:layout_width=“wrap_content”
android:layout_height=“wrap_content”
android:layout_column=“2”
android:layout_gravity=“right”
android:text=“Submit”/>
</GridLayout>
Figure4.7visualizestheGridLayoutinListing4.7.
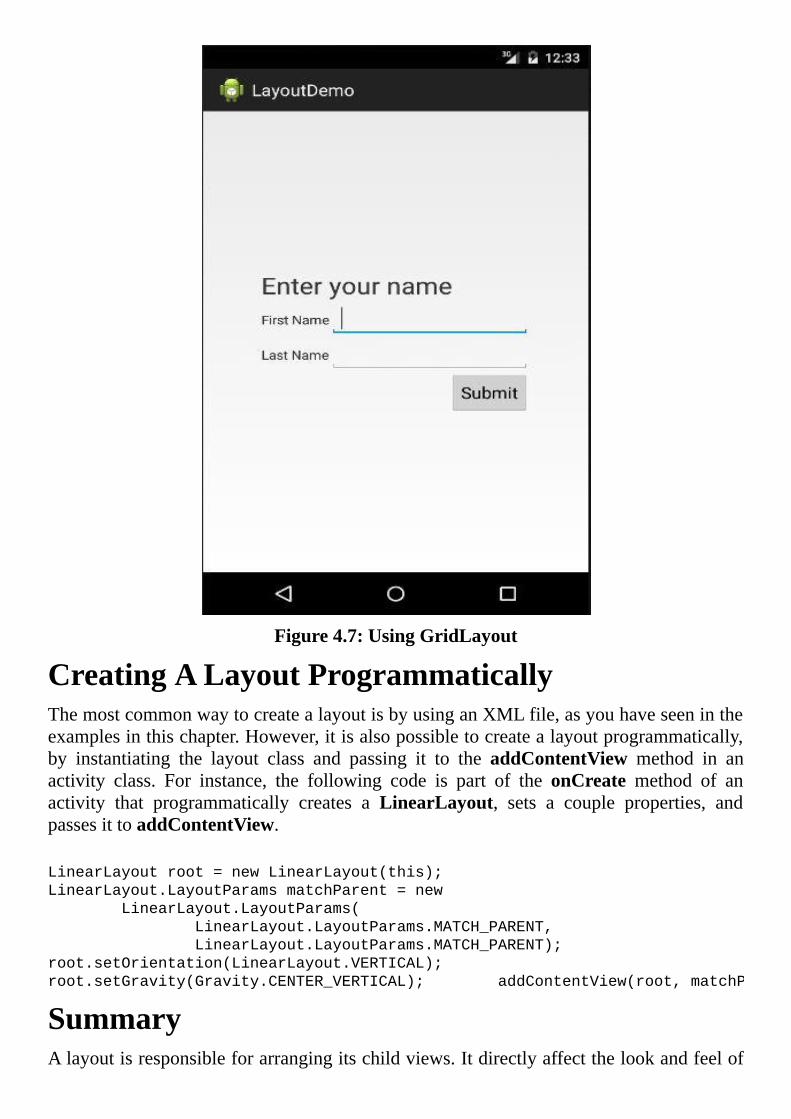
Figure4.7:UsingGridLayout
CreatingALayoutProgrammaticallyThemostcommonwaytocreatealayoutisbyusinganXMLfile,asyouhaveseenintheexamplesinthischapter.However,itisalsopossibletocreatealayoutprogrammatically,by instantiating the layout class and passing it to the addContentView method in anactivity class. For instance, the following code is part of the onCreate method of anactivity that programmatically creates a LinearLayout, sets a couple properties, andpassesittoaddContentView.
LinearLayoutroot=newLinearLayout(this);
LinearLayout.LayoutParamsmatchParent=new
LinearLayout.LayoutParams(
LinearLayout.LayoutParams.MATCH_PARENT,
LinearLayout.LayoutParams.MATCH_PARENT);
root.setOrientation(LinearLayout.VERTICAL);
root.setGravity(Gravity.CENTER_VERTICAL);addContentView(root,matchParent);
SummaryAlayoutisresponsibleforarrangingitschildviews.Itdirectlyaffectthelookandfeelof

an application. In this chapter you learned some of the layouts available in Android,LinearLayout,RelativeLayout,FrameLayout,TableLayout,andGridLayout.
Chapter5Listeners
Like many GUI systems, Android is event based. User interaction with a view in anactivitymay triggeraneventandyoucanwritecode thatgetsexecutedwhen theeventoccurs. The class that contains code to respond to a certain event is called an eventlistener.
Inthischapteryouwilllearnhowtohandleeventsandwriteeventlisteners.
OverviewMostAndroidprogramsare interactive.Theusercaninteractwiththeapplicationeasilythanks to the event-driven programming paradigm the Android framework offers.Examplesofeventsthatmayoccurwhentheuserisinteractingwithanactivityareclick,long-click,touch,key,andsoon.
Tomake a program respond to a certain event, you need towrite a listener for thatevent. The way to do it is by implementing an interface that is nested in theandroid.view.Viewclass.Table5.1showssomeofthelistenerinterfacesinViewandthecorrespondingmethodineachinterfacethatwillgetcalledwhenthecorrespondingeventoccurs.
Interface
Method
OnClickListener
onClick()
OnLongClickListner
OnLongClick()
OnFocusChangeListener
OnFocusChange()
OnKeyListener
OnKey()
OnTouchListener
OnTouch()
Table5.1:ListenerinterfacesinView
Once you create an implementation of a listener interface, you can pass it to theappropriatesetOnXXXListenermethodof theviewyouwant to listento,whereXXX is
theeventname.Forexample,tocreateaclicklistenerforabutton,youwouldwritethisinyouractivityclass.
privateOnClickListenerclickListener=newOnClickListener(){
publicvoidonClick(Viewview){
//codetoexecuteinresponsetotheclickevent
}
};
protectedvoidonCreate(BundlesavedValues){
…
Buttonbutton=(Button)findViewById(…);
button.setOnClickListener(clickListener);
…
}
Alternatively, you can make your activity class implement the listener interface andprovideanimplementationoftheneededmethodaspartoftheactivityclass.
publicclassMyActivityextendsActivity
implementsView.OnClickListener{
protectedvoidonCreate(BundlesavedValues){
…
Buttonbutton=(Button)findViewById(…);
button.setOnClickListener(this);
…
}
//implementationofView.OnClickListener
@Override
publicvoidonClick(Viewview){
//codetoexecuteinresponsetotheclickevent
}
…
}
In addition, there is a shortcut for handling the click event. You can use the onClickattributeinthedeclarationofthetargetviewinthelayoutfileandwriteapublicmethodintheactivityclass.ThepublicmethodmusthavenoreturnvalueandtakeaViewargument.Forexample,ifyouhavethismethodinyouractivityclass
publicvoidshowNote(Viewview){
//dosomething
}
youcanusethisonClickattributeinaviewtoattachthemethodtotheclickeventofthatview.
<Buttonandroid:onClick=“showNote”…/>
In the background, Android will create an implementation of the OnClickListener
interfaceandattachittotheview.
Inthesampleapplicationsthatfollowyouwilllearnhowtowriteeventlisteners.
NoteAlistenerrunson themain thread.Thismeansyoushoulduseadifferent thread ifyour listener takes a long time (say, more than 200ms) to run. Or else, yourapplication will look unresponsive during the execution of the listener code. Youhavetwochoicesforsolvingthis.YoucaneitheruseahandleroranAsyncTask.ThehandleriscoveredinChapter2,“HandlingtheHandler”andAsyncTaskinChapter23, “AsynchronousTasks.”For long-running tasks, you should also considerusingtheJavaConcurrencyUtilities.
UsingtheonClickAttributeAsanexampleofusingtheonClickattributetohandletheclickeventofaview,considertheMulticolorClockprojectthataccompaniesthisbook.Itisasimpleapplicationwithasingle activity that shows an analog clock that can be clicked to change its color.AnalogClock is one of the widgets available on Android, so writing the view for theapplicationisabreeze.Themainobjectiveofthisprojectistodemonstratehowtowritealistenerbyusingacallbackmethodinthelayoutfile.
The manifest for MulticolorClock is given in Listing 5.1. There is nothing out ofordinaryhereandyoushouldnotfinditdifficulttounderstand.
Listing5.1:ThemanifestforMulticolorClock
<?xmlversion=“1.0”encoding=“utf-8”?>
<manifestxmlns:android=“http://schemas.android.com/apk/res/android”
package=“com.example.multicolorclock”
android:versionCode=“1”
android:versionName=“1.0”>
<uses-sdk
android:minSdkVersion=“8”
android:targetSdkVersion=“17”/>
<application
android:allowBackup=“true”
android:icon=”@drawable/ic_launcher”
android:label=”@string/app_name”
android:theme=”@style/AppTheme”>
<activity
android:name=“com.example.multicolorclock.MainActivity”
android:label=”@string/app_name”>
<intent-filter>
<actionandroid:name=“android.intent.action.MAIN”/>
<categoryandroid:name=“android.intent.category.LAUNCHER”/>
</intent-filter>
</activity>
</application>
</manifest>
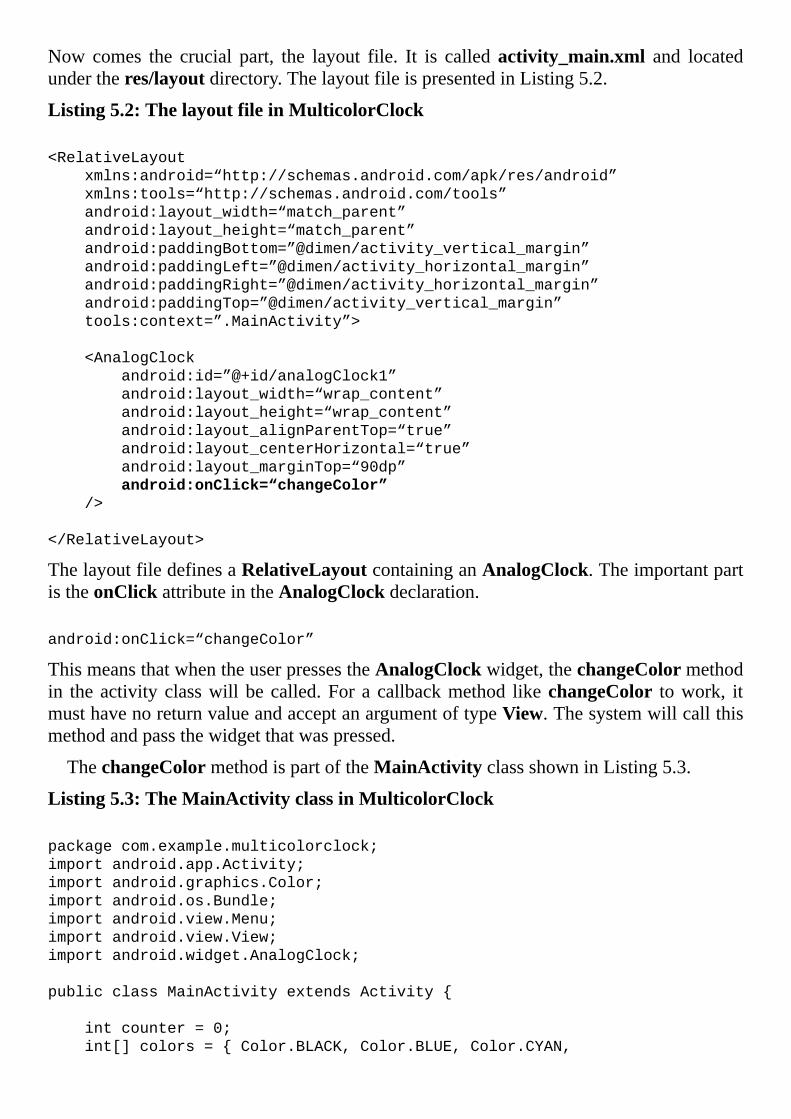
Now comes the crucial part, the layout file. It is calledactivity_main.xml and locatedundertheres/layoutdirectory.ThelayoutfileispresentedinListing5.2.
Listing5.2:ThelayoutfileinMulticolorClock
<RelativeLayout
xmlns:android=“http://schemas.android.com/apk/res/android”
xmlns:tools=“http://schemas.android.com/tools”
android:layout_width=“match_parent”
android:layout_height=“match_parent”
android:paddingBottom=”@dimen/activity_vertical_margin”
android:paddingLeft=”@dimen/activity_horizontal_margin”
android:paddingRight=”@dimen/activity_horizontal_margin”
android:paddingTop=”@dimen/activity_vertical_margin”
tools:context=”.MainActivity”>
<AnalogClock
android:id=”@+id/analogClock1”
android:layout_width=“wrap_content”
android:layout_height=“wrap_content”
android:layout_alignParentTop=“true”
android:layout_centerHorizontal=“true”
android:layout_marginTop=“90dp”
android:onClick=“changeColor”
/>
</RelativeLayout>
ThelayoutfiledefinesaRelativeLayoutcontaininganAnalogClock.TheimportantpartistheonClickattributeintheAnalogClockdeclaration.
android:onClick=“changeColor”
ThismeansthatwhentheuserpressestheAnalogClockwidget,thechangeColormethodin theactivity classwillbecalled.For a callbackmethod likechangeColor towork, itmusthavenoreturnvalueandacceptanargumentoftypeView.Thesystemwillcallthismethodandpassthewidgetthatwaspressed.
ThechangeColormethodispartoftheMainActivityclassshowninListing5.3.
Listing5.3:TheMainActivityclassinMulticolorClock
packagecom.example.multicolorclock;
importandroid.app.Activity;
importandroid.graphics.Color;
importandroid.os.Bundle;
importandroid.view.Menu;
importandroid.view.View;
importandroid.widget.AnalogClock;
publicclassMainActivityextendsActivity{
intcounter=0;
int[]colors={Color.BLACK,Color.BLUE,Color.CYAN,
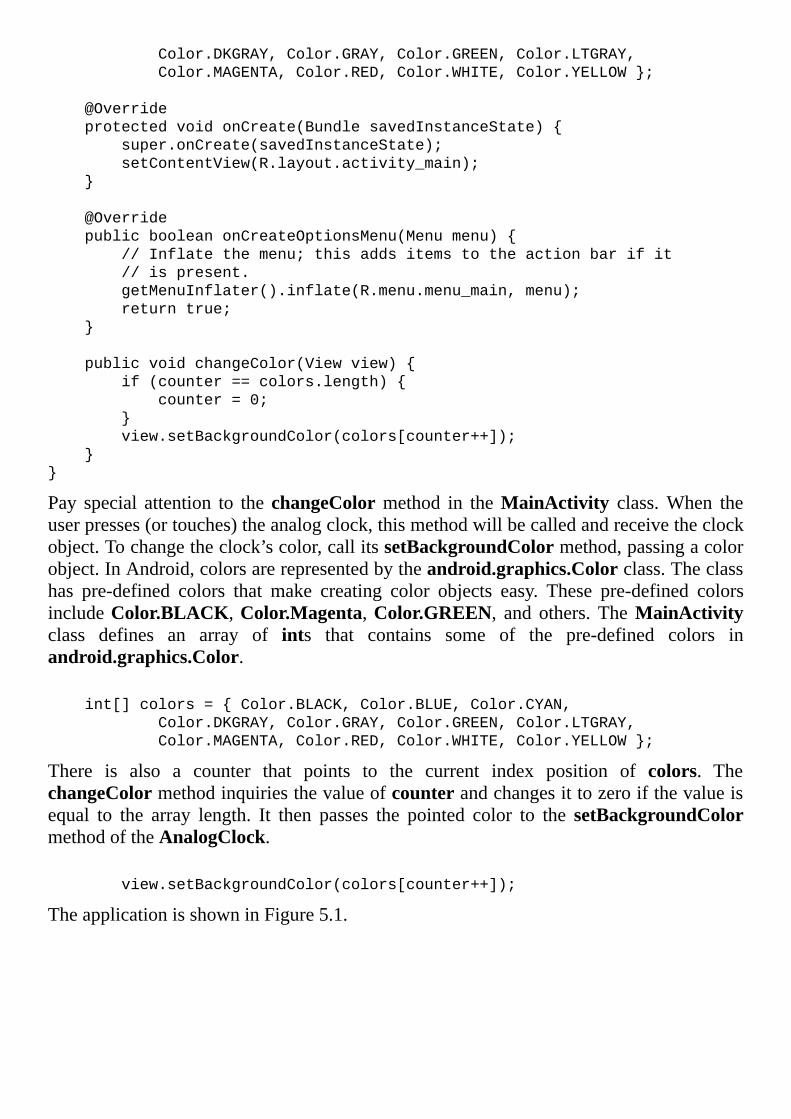
Color.DKGRAY,Color.GRAY,Color.GREEN,Color.LTGRAY,
Color.MAGENTA,Color.RED,Color.WHITE,Color.YELLOW};
@Override
protectedvoidonCreate(BundlesavedInstanceState){
super.onCreate(savedInstanceState);
setContentView(R.layout.activity_main);
}
@Override
publicbooleanonCreateOptionsMenu(Menumenu){
//Inflatethemenu;thisaddsitemstotheactionbarifit
//ispresent.
getMenuInflater().inflate(R.menu.menu_main,menu);
returntrue;
}
publicvoidchangeColor(Viewview){
if(counter==colors.length){
counter=0;
}
view.setBackgroundColor(colors[counter++]);
}
}
Pay special attention to thechangeColormethod in theMainActivity class.When theuserpresses(ortouches)theanalogclock,thismethodwillbecalledandreceivetheclockobject.Tochangetheclock’scolor,callitssetBackgroundColormethod,passingacolorobject.InAndroid,colorsarerepresentedbytheandroid.graphics.Colorclass.Theclasshas pre-defined colors that make creating color objects easy. These pre-defined colorsincludeColor.BLACK,Color.Magenta,Color.GREEN, and others. TheMainActivityclass defines an array of ints that contains some of the pre-defined colors inandroid.graphics.Color.
int[]colors={Color.BLACK,Color.BLUE,Color.CYAN,
Color.DKGRAY,Color.GRAY,Color.GREEN,Color.LTGRAY,
Color.MAGENTA,Color.RED,Color.WHITE,Color.YELLOW};
There is also a counter that points to the current index position of colors. ThechangeColormethodinquiriesthevalueofcounterandchangesittozeroifthevalueisequal to the array length. It then passes the pointed color to the setBackgroundColormethodoftheAnalogClock.
view.setBackgroundColor(colors[counter++]);
TheapplicationisshowninFigure5.1.
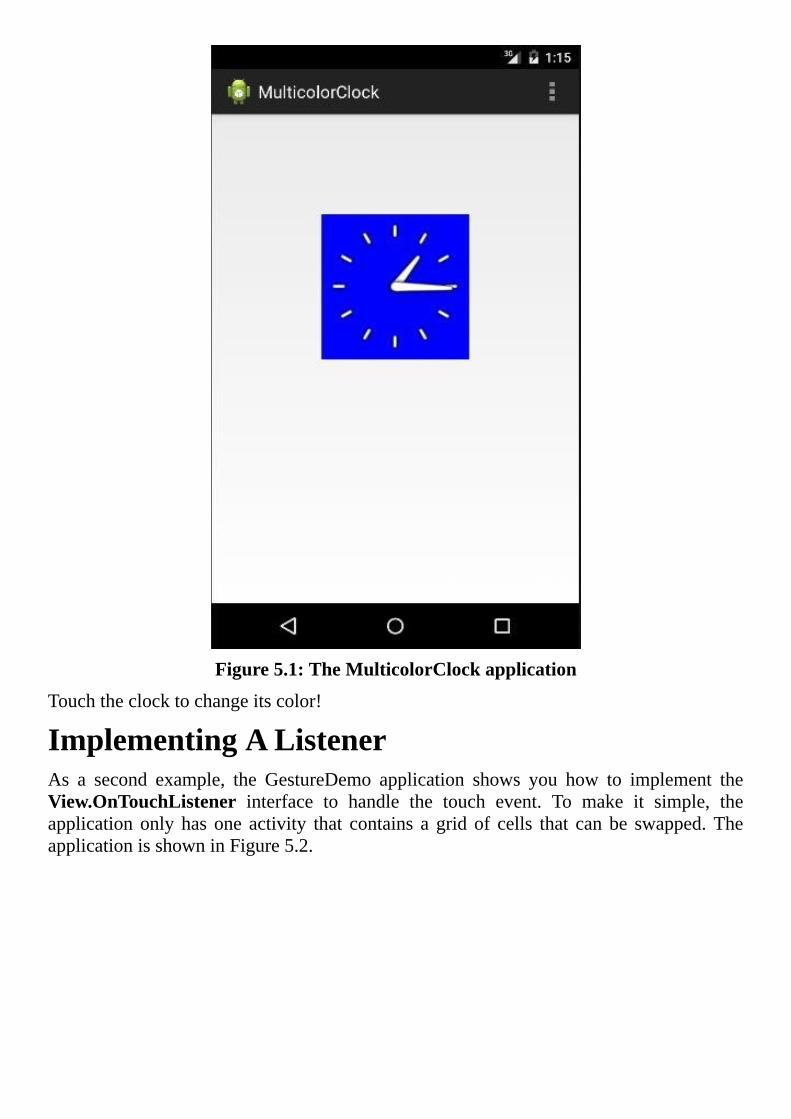
Figure5.1:TheMulticolorClockapplication
Touchtheclocktochangeitscolor!
ImplementingAListenerAs a second example, the GestureDemo application shows you how to implement theView.OnTouchListener interface to handle the touch event. To make it simple, theapplicationonly has one activity that contains a grid of cells that canbe swapped.TheapplicationisshowninFigure5.2.

Figure5.2:TheGestureDemoapplication
Eachof the images is an instance of theCellView class given inListing 5.4. It simplyextendsImageViewandaddsxandyfieldstostorethepositioninthegrid.
Listing5.4:TheCellViewclass
packagecom.example.gesturedemo;
importandroid.content.Context;
importandroid.widget.ImageView;
publicclassCellViewextendsImageView{
intx;
inty;
publicCellView(Contextcontext,intx,inty){
super(context);
this.x=x;
this.y=y;
}
}
There is no layout class for the activity as the layout is built programmatically.This isshownintheonCreatemethodoftheMainActivityclassinListing5.5.
Listing5.5:TheMainActivityclass
packagecom.example.gesturedemo;
importandroid.app.Activity;
importandroid.graphics.drawable.Drawable;
importandroid.os.Bundle;
importandroid.view.Gravity;
importandroid.view.Menu;
importandroid.view.MotionEvent;
importandroid.view.View;
importandroid.view.View.OnTouchListener;
importandroid.view.ViewGroup;
importandroid.widget.ImageView;
importandroid.widget.LinearLayout;
publicclassMainActivityextendsActivity{
introwCount=7;
intcellCount=7;
ImageViewimageView1;
ImageViewimageView2;
CellView[][]cellViews;
intdownX;
intdownY;
booleanswapping=false;
@Override
protectedvoidonCreate(BundlesavedInstanceState){
super.onCreate(savedInstanceState);
LinearLayoutroot=newLinearLayout(this);
LinearLayout.LayoutParamsmatchParent=
newLinearLayout.LayoutParams(
LinearLayout.LayoutParams.MATCH_PARENT,
LinearLayout.LayoutParams.MATCH_PARENT);
root.setOrientation(LinearLayout.VERTICAL);
root.setGravity(Gravity.CENTER_VERTICAL);
addContentView(root,matchParent);
//createrow
cellViews=newCellView[rowCount][cellCount];
LinearLayout.LayoutParamsrowLayoutParams=
newLinearLayout.LayoutParams(
LinearLayout.LayoutParams.MATCH_PARENT,
LinearLayout.LayoutParams.WRAP_CONTENT);
ViewGroup.LayoutParamscellLayoutParams=
newViewGroup.LayoutParams(
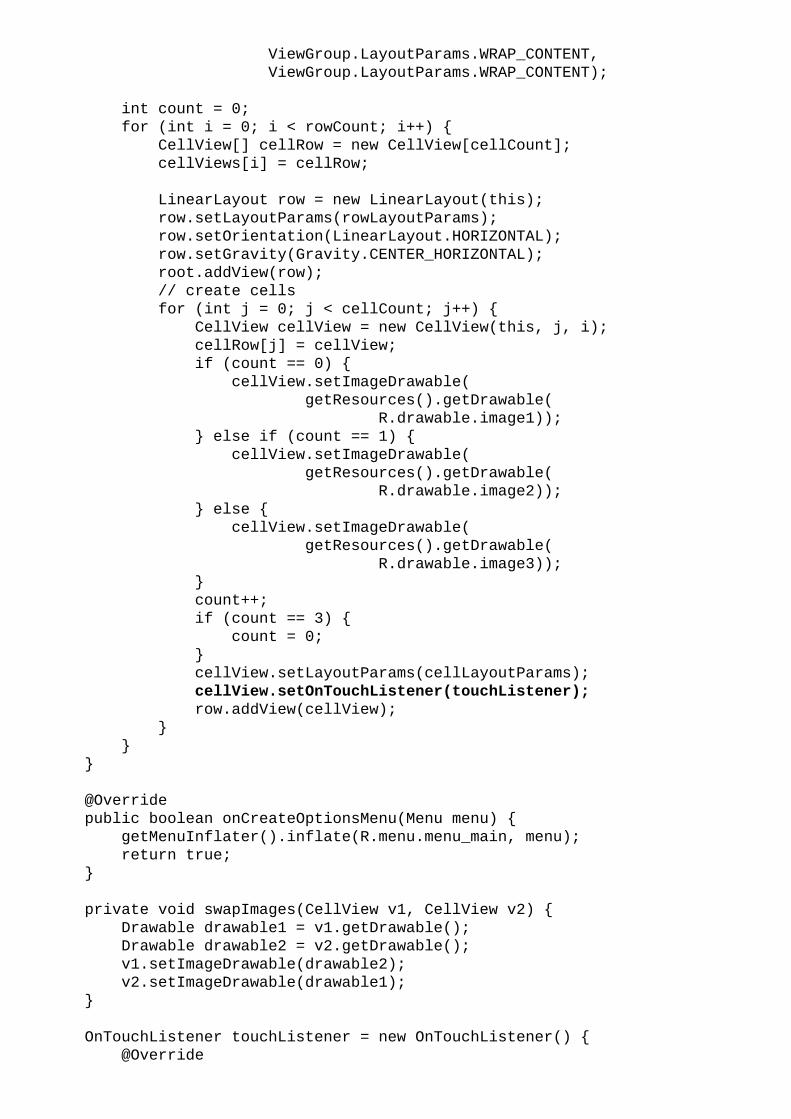
ViewGroup.LayoutParams.WRAP_CONTENT,
ViewGroup.LayoutParams.WRAP_CONTENT);
intcount=0;
for(inti=0;i<rowCount;i++){
CellView[]cellRow=newCellView[cellCount];
cellViews[i]=cellRow;
LinearLayoutrow=newLinearLayout(this);
row.setLayoutParams(rowLayoutParams);
row.setOrientation(LinearLayout.HORIZONTAL);
row.setGravity(Gravity.CENTER_HORIZONTAL);
root.addView(row);
//createcells
for(intj=0;j<cellCount;j++){
CellViewcellView=newCellView(this,j,i);
cellRow[j]=cellView;
if(count==0){
cellView.setImageDrawable(
getResources().getDrawable(
R.drawable.image1));
}elseif(count==1){
cellView.setImageDrawable(
getResources().getDrawable(
R.drawable.image2));
}else{
cellView.setImageDrawable(
getResources().getDrawable(
R.drawable.image3));
}
count++;
if(count==3){
count=0;
}
cellView.setLayoutParams(cellLayoutParams);
cellView.setOnTouchListener(touchListener);
row.addView(cellView);
}
}
}
@Override
publicbooleanonCreateOptionsMenu(Menumenu){
getMenuInflater().inflate(R.menu.menu_main,menu);
returntrue;
}
privatevoidswapImages(CellViewv1,CellViewv2){
Drawabledrawable1=v1.getDrawable();
Drawabledrawable2=v2.getDrawable();
v1.setImageDrawable(drawable2);
v2.setImageDrawable(drawable1);
}
OnTouchListenertouchListener=newOnTouchListener(){
@Override
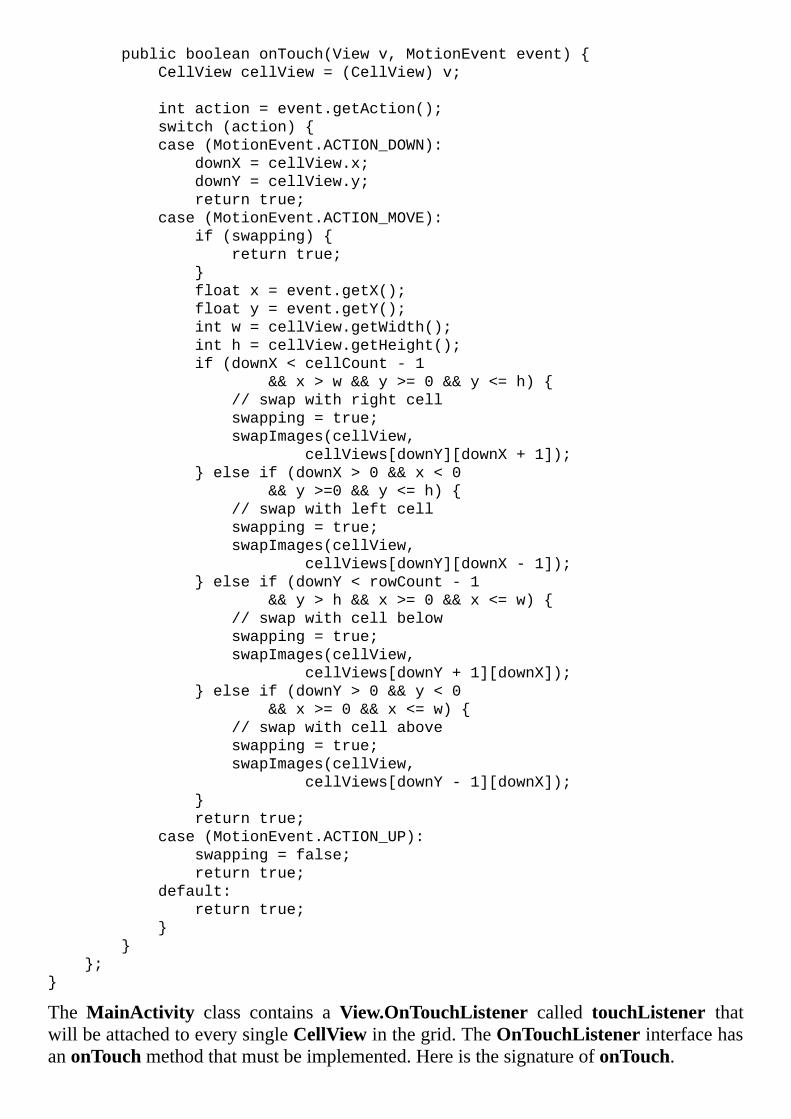
publicbooleanonTouch(Viewv,MotionEventevent){
CellViewcellView=(CellView)v;
intaction=event.getAction();
switch(action){
case(MotionEvent.ACTION_DOWN):
downX=cellView.x;
downY=cellView.y;
returntrue;
case(MotionEvent.ACTION_MOVE):
if(swapping){
returntrue;
}
floatx=event.getX();
floaty=event.getY();
intw=cellView.getWidth();
inth=cellView.getHeight();
if(downX<cellCount-1
&&x>w&&y>=0&&y<=h){
//swapwithrightcell
swapping=true;
swapImages(cellView,
cellViews[downY][downX+1]);
}elseif(downX>0&&x<0
&&y>=0&&y<=h){
//swapwithleftcell
swapping=true;
swapImages(cellView,
cellViews[downY][downX-1]);
}elseif(downY<rowCount-1
&&y>h&&x>=0&&x<=w){
//swapwithcellbelow
swapping=true;
swapImages(cellView,
cellViews[downY+1][downX]);
}elseif(downY>0&&y<0
&&x>=0&&x<=w){
//swapwithcellabove
swapping=true;
swapImages(cellView,
cellViews[downY-1][downX]);
}
returntrue;
case(MotionEvent.ACTION_UP):
swapping=false;
returntrue;
default:
returntrue;
}
}
};
}
TheMainActivity class contains aView.OnTouchListener called touchListener thatwillbeattachedtoeverysingleCellViewinthegrid.TheOnTouchListenerinterfacehasanonTouchmethodthatmustbeimplemented.HereisthesignatureofonTouch.
publicbooleanonTouch(Viewview,MotionEventevent)
Themethodshouldreturntrueifithasconsumedtheevent,whichmeansthattheeventshouldnotpropagatetootherviews.Otherwise,itshouldreturnfalse.
AsingletouchactionbytheusercausestheonTouchmethodtobecalledseveraltimes.Whentheusertouchestheview,themethodiscalled.Whentheusermoveshis/herfinger,onTouch is called. Likewise, onTouch is calledwhen the user lifts his/her finger. ThesecondargumenttoonTouch,aMotionEvent,containstheinformationabouttheevent.You can inquire what type of action is triggering the event by calling the getActionmethodontheMotionEvent.
intaction=event.getAction();
ThereturnvaluewillbeoneofthestaticfinalintsdefinedintheMotionEventclass.Forthis application we are interested in MotionEvent.ACTION_DOWN,MotionEvent.ACTION_MOVE, and MotionEvent.ACTION_UP. When the usertouchestheview,thegetActionmethodreturnsaMotionEvent.ACTION_DOWN.Thecodesimplystoresthelocationoftheeventtothexandyfieldsandreturnstrue.
case(MotionEvent.ACTION_DOWN):
downX=cellView.x;
downY=cellView.y;
returntrue;
If the user moves his/her finger to a neighboring cell, the touch action will return aMotionEvent.ACTION_MOVEandyouneedtoswaptheimagesoftheoriginalcellandthe destination cell and set the swapping field to true. This would prevent anotherswappingbeforethefingerislifted.
Finally,when the user lifts his/her finger, the swapping field is set to false to enableanotherswapping.
ThelayoutfortheactivityisbuiltdynamicallyintheonCreatemethodoftheactivityclass.EachCellViewispassedtheOnTouchListenersothatthelistenerwillhandletheCellView’stouchevent.
cellView.setOnTouchListener(touchListener);
SummaryInthischapteryoulearnedthebasicsofAndroideventhandlingandhowtowritelistenersby implementing anested interface in theView class.Youhavealso learned touse theshortcutforhandlingtheclickevent.
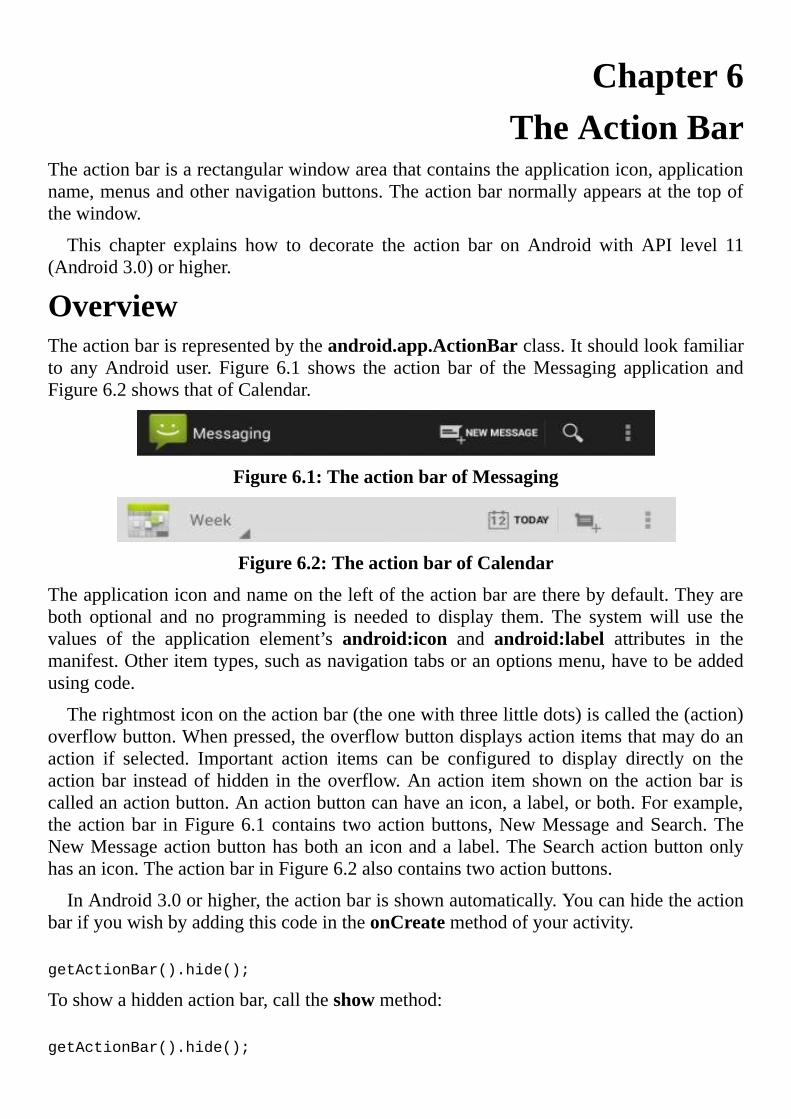
Chapter6TheActionBar
Theactionbarisarectangularwindowareathatcontainstheapplicationicon,applicationname,menusandothernavigationbuttons.Theactionbarnormallyappearsatthetopofthewindow.
This chapter explains how to decorate the action bar on Android with API level 11(Android3.0)orhigher.
OverviewTheactionbarisrepresentedbytheandroid.app.ActionBarclass.Itshouldlookfamiliarto anyAndroid user. Figure 6.1 shows the action bar of theMessaging application andFigure6.2showsthatofCalendar.
Figure6.1:TheactionbarofMessaging
Figure6.2:TheactionbarofCalendar
Theapplicationiconandnameontheleftoftheactionbararetherebydefault.Theyareboth optional and no programming is needed to display them. The systemwill use thevalues of the application element’s android:icon and android:label attributes in themanifest.Otheritemtypes,suchasnavigationtabsoranoptionsmenu,havetobeaddedusingcode.
Therightmosticonontheactionbar(theonewiththreelittledots)iscalledthe(action)overflowbutton.Whenpressed,theoverflowbuttondisplaysactionitemsthatmaydoanaction if selected. Important action items can be configured to display directly on theactionbar insteadofhidden in theoverflow.Anaction itemshownon theactionbar iscalledanactionbutton.Anactionbuttoncanhaveanicon,alabel,orboth.Forexample,theactionbar inFigure6.1contains twoactionbuttons,NewMessageandSearch.TheNewMessageactionbuttonhasbothaniconandalabel.TheSearchactionbuttononlyhasanicon.TheactionbarinFigure6.2alsocontainstwoactionbuttons.
InAndroid3.0orhigher,theactionbarisshownautomatically.YoucanhidetheactionbarifyouwishbyaddingthiscodeintheonCreatemethodofyouractivity.
getActionBar().hide();
Toshowahiddenactionbar,calltheshowmethod:
getActionBar().hide();
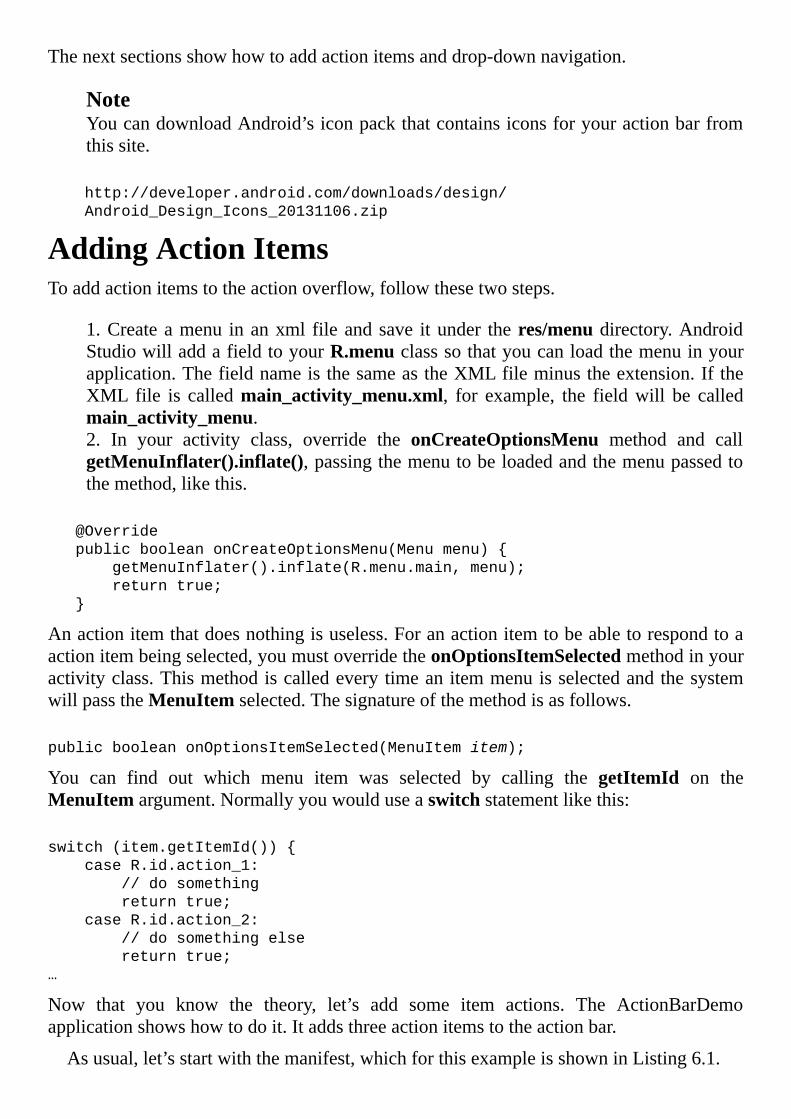
Thenextsectionsshowhowtoaddactionitemsanddrop-downnavigation.
NoteYoucandownloadAndroid’siconpackthatcontainsiconsforyouractionbarfromthissite.
http://developer.android.com/downloads/design/
Android_Design_Icons_20131106.zip
AddingActionItemsToaddactionitemstotheactionoverflow,followthesetwosteps.
1.Createamenu inanxml fileandsave itunder theres/menudirectory.AndroidStudiowilladdafieldtoyourR.menuclasssothatyoucanloadthemenuinyourapplication.ThefieldnameisthesameastheXMLfileminustheextension.IftheXML file is calledmain_activity_menu.xml, for example, the fieldwill be calledmain_activity_menu.2. In your activity class, override the onCreateOptionsMenu method and callgetMenuInflater().inflate(),passingthemenutobeloadedandthemenupassedtothemethod,likethis.
@Override
publicbooleanonCreateOptionsMenu(Menumenu){
getMenuInflater().inflate(R.menu.main,menu);
returntrue;
}
Anactionitemthatdoesnothingisuseless.Foranactionitemtobeabletorespondtoaactionitembeingselected,youmustoverridetheonOptionsItemSelectedmethodinyouractivityclass.ThismethodiscalledeverytimeanitemmenuisselectedandthesystemwillpasstheMenuItemselected.Thesignatureofthemethodisasfollows.
publicbooleanonOptionsItemSelected(MenuItemitem);
You can find out which menu item was selected by calling the getItemId on theMenuItemargument.Normallyyouwoulduseaswitchstatementlikethis:
switch(item.getItemId()){
caseR.id.action_1:
//dosomething
returntrue;
caseR.id.action_2:
//dosomethingelse
returntrue;
…
Now that you know the theory, let’s add some item actions. The ActionBarDemoapplicationshowshowtodoit.Itaddsthreeactionitemstotheactionbar.
Asusual,let’sstartwiththemanifest,whichforthisexampleisshowninListing6.1.

Listing6.1:ThemanifestforActionBarDemo
<?xmlversion=“1.0”encoding=“utf-8”?>
<manifestxmlns:android=“http://schemas.android.com/apk/res/android”
package=“com.example.actionbardemo”
android:versionCode=“1”
android:versionName=“1.0”>
<uses-sdk
android:minSdkVersion=“11”
android:targetSdkVersion=“18”/>
<application
android:allowBackup=“true”
android:icon=”@drawable/ic_launcher”
android:label=”@string/app_name”
android:theme=”@style/AppTheme”>
<activity
android:name=“com.example.actionbardemo.MainActivity”
android:label=”@string/app_name”>
<intent-filter>
<actionandroid:name=“android.intent.action.MAIN”/>
<category
android:name=“android.intent.category.LAUNCHER”/>
</intent-filter>
</activity>
</application>
</manifest>
Itisgoodpracticetolistactionnamesinaresourcefile.Listing6.2showsthestrings.xmlfile that contains three strings for the action items,action_capture, action_profile andaction_about.
Listing6.2:Theres/values/strings.xml
<?xmlversion=“1.0”encoding=“utf-8”?>
<resources>
<stringname=“app_name”>ActionBarDemo</string>
<stringname=“action_capture”>Capture</string>
<stringname=“action_profile”>Profile</string>
<stringname=“action_about”>About</string>
<stringname=“hello_world”>Helloworld!</string>
</resources>
Next, create an XML file under res/menu. If you used Android Studio to create theAndroidapplication,onehasbeencreatedforyou.Youjustneedtoadditemelementstoit.Listing6.3showsthemenufortheactionitems.
Listing6.3:Theres/menu/menu_main.xml
<menuxmlns:android=“http://schemas.android.com/apk/res/android”>
<item
android:id=”@+id/action_capture”
android:orderInCategory=“100”
android:showAsAction=“ifRoom|withText”
android:icon=”@drawable/icon1”
android:title=”@string/action_capture”/>
<item
android:id=”@+id/action_profile”
android:orderInCategory=“200”
android:showAsAction=“ifRoom|withText”
android:icon=”@drawable/icon2”
android:title=”@string/action_profile”/>
<item
android:id=”@+id/action_about”
android:orderInCategory=“50”
android:showAsAction=“never”
android:title=”@string/action_about”/>
</menu>
Theitemelementmayhaveanyoftheseattributes.
android:id.Auniqueidentifiertorefertotheactionitemintheprogram.android:orderInCategory.Theordernumberforthisitem.Anitemwithasmallernumberwillbeshownbeforeitemswithlargernumbers.android:icon.Theiconforthisactionitemifitisshownasanactionbutton(directlyontheactionbar).android:title.Theactionlabel.android:showAsAction. The value can be one or a combination of these values:ifRoom,never,withText,always,andcollapseActionView.Populatingthisattributewithneverindicatesthatthisitemwillneverbeshownontheactionbardirectly.Onthe other hand, always forces the system to always display this item as an actionbutton.However,becautiouswhenusingthisvalueasifthereisnotenoughroomontheactionbar,whatwillbedisplayedwillbeunpredictable.Instead,useifRoom todisplayanitemasanactionbuttonifthereisroom.ThewithTextvaluewilldisplaythisitemwithalabelifthisitemisbeingdisplayedasanactionbutton.
Thecompletelistofattributesfortheitemelementcanbefoundhere.
http://developer.android.com/guide/topics/resources/menu-
resource.html
Finally,Listing6.4presentstheMainActivityclassfortheapplication.
Listing6.4:TheMainActivityclass
packagecom.example.actionbardemo;
importandroid.app.Activity;
importandroid.app.AlertDialog;
importandroid.os.Bundle;
importandroid.view.Menu;
importandroid.view.MenuItem;
publicclassMainActivityextendsActivity{
@Override
protectedvoidonCreate(BundlesavedInstanceState){
super.onCreate(savedInstanceState);
setContentView(R.layout.activity_main);
}
@Override
publicbooleanonCreateOptionsMenu(Menumenu){
getMenuInflater().inflate(R.menu.menu_main,menu);
returntrue;
}
@Override
publicbooleanonOptionsItemSelected(MenuItemitem){
//Handlepressesontheactionbaritems
switch(item.getItemId()){
caseR.id.action_profile:
showAlertDialog(“Profile”,“YouselectedProfile”);
returntrue;
caseR.id.action_capture:
showAlertDialog(“Settings”,
“YouselectedSettings”);
returntrue;
caseR.id.action_about:
showAlertDialog(“About”,“YouselectedAbout”);
returntrue;
default:
returnsuper.onOptionsItemSelected(item);
}
}
privatevoidshowAlertDialog(Stringtitle,Stringmessage){
AlertDialogalertDialog=new
AlertDialog.Builder(this).create();
alertDialog.setTitle(title);
alertDialog.setMessage(message);
alertDialog.show();
}
}
NoticedthattheactivityclassoverridestheonOptionsItemSelectedmethod?SelectinganitemwillinvoketheshowAlertDialogmethodthatshowsanAlertDialog.
Figure6.3showsthreeactionitemsinActionBarDemo.Twooftheitemsaredisplayedasactionbuttons.
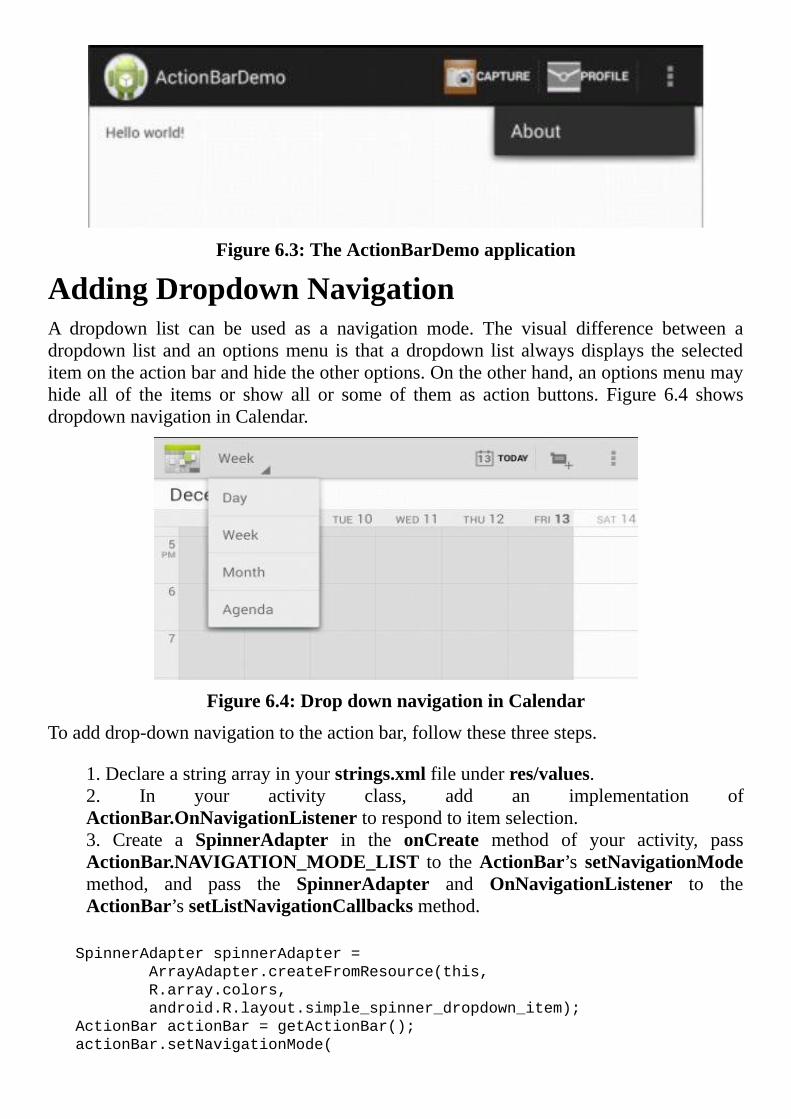
Figure6.3:TheActionBarDemoapplication
AddingDropdownNavigationA dropdown list can be used as a navigation mode. The visual difference between adropdown list andanoptionsmenu is that adropdown list alwaysdisplays the selecteditemontheactionbarandhidetheotheroptions.Ontheotherhand,anoptionsmenumayhide all of the items or show all or some of them as action buttons. Figure 6.4 showsdropdownnavigationinCalendar.
Figure6.4:DropdownnavigationinCalendar
Toadddrop-downnavigationtotheactionbar,followthesethreesteps.
1.Declareastringarrayinyourstrings.xmlfileunderres/values.2. In your activity class, add an implementation ofActionBar.OnNavigationListenertorespondtoitemselection.3. Create a SpinnerAdapter in the onCreate method of your activity, passActionBar.NAVIGATION_MODE_LIST to theActionBar’s setNavigationModemethod, and pass the SpinnerAdapter and OnNavigationListener to theActionBar’ssetListNavigationCallbacksmethod.
SpinnerAdapterspinnerAdapter=
ArrayAdapter.createFromResource(this,
R.array.colors,
android.R.layout.simple_spinner_dropdown_item);
ActionBaractionBar=getActionBar();
actionBar.setNavigationMode(
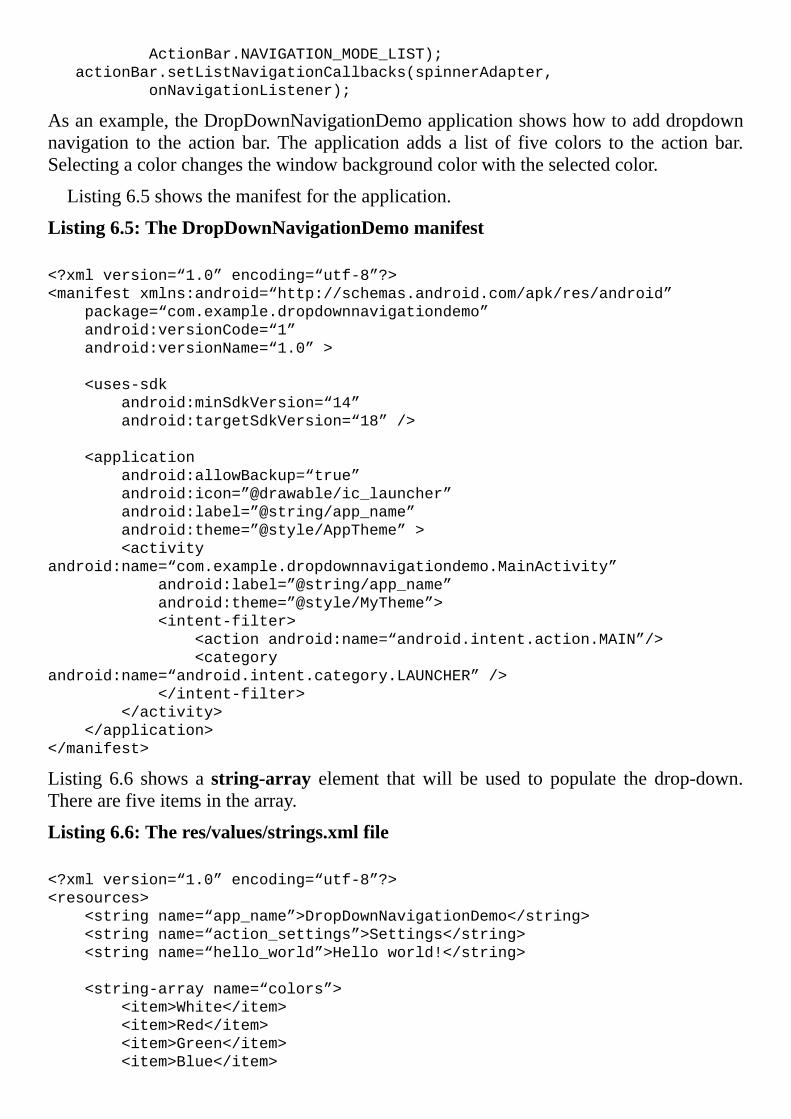
ActionBar.NAVIGATION_MODE_LIST);
actionBar.setListNavigationCallbacks(spinnerAdapter,
onNavigationListener);
Asanexample,theDropDownNavigationDemoapplicationshowshowtoadddropdownnavigation to the actionbar.The application adds a list of five colors to the actionbar.Selectingacolorchangesthewindowbackgroundcolorwiththeselectedcolor.
Listing6.5showsthemanifestfortheapplication.
Listing6.5:TheDropDownNavigationDemomanifest
<?xmlversion=“1.0”encoding=“utf-8”?>
<manifestxmlns:android=“http://schemas.android.com/apk/res/android”
package=“com.example.dropdownnavigationdemo”
android:versionCode=“1”
android:versionName=“1.0”>
<uses-sdk
android:minSdkVersion=“14”
android:targetSdkVersion=“18”/>
<application
android:allowBackup=“true”
android:icon=”@drawable/ic_launcher”
android:label=”@string/app_name”
android:theme=”@style/AppTheme”>
<activity
android:name=“com.example.dropdownnavigationdemo.MainActivity”
android:label=”@string/app_name”
android:theme=”@style/MyTheme”>
<intent-filter>
<actionandroid:name=“android.intent.action.MAIN”/>
<category
android:name=“android.intent.category.LAUNCHER”/>
</intent-filter>
</activity>
</application>
</manifest>
Listing6.6 shows a string-array element thatwill be used to populate the drop-down.Therearefiveitemsinthearray.
Listing6.6:Theres/values/strings.xmlfile
<?xmlversion=“1.0”encoding=“utf-8”?>
<resources>
<stringname=“app_name”>DropDownNavigationDemo</string>
<stringname=“action_settings”>Settings</string>
<stringname=“hello_world”>Helloworld!</string>
<string-arrayname=“colors”>
<item>White</item>
<item>Red</item>
<item>Green</item>
<item>Blue</item>
<item>Yellow</item>
</string-array>
</resources>
Listing6.7showstheMainActivityclassfortheapplication.
Listing6.7:TheMainActivityclass
packagecom.example.dropdownnavigationdemo;
importandroid.app.ActionBar;
importandroid.app.ActionBar.OnNavigationListener;
importandroid.app.Activity;
importandroid.graphics.Color;
importandroid.os.Bundle;
importandroid.view.Menu;
importandroid.widget.ArrayAdapter;
importandroid.widget.SpinnerAdapter;
publicclassMainActivityextendsActivity{
@Override
protectedvoidonCreate(BundlesavedInstanceState){
super.onCreate(savedInstanceState);
setContentView(R.layout.activity_main);
SpinnerAdapterspinnerAdapter=
ArrayAdapter.createFromResource(this,
R.array.colors,
android.R.layout.simple_spinner_dropdown_item);
ActionBaractionBar=getActionBar();
actionBar.setNavigationMode(
ActionBar.NAVIGATION_MODE_LIST);
actionBar.setListNavigationCallbacks(spinnerAdapter,
onNavigationListener);
}
@Override
publicbooleanonCreateOptionsMenu(Menumenu){
getMenuInflater().inflate(R.menu.menu_main,menu);
returntrue;
}
OnNavigationListeneronNavigationListener=new
OnNavigationListener(){
@Override
publicbooleanonNavigationItemSelected(
intposition,longitemId){
String[]colors=getResources().
getStringArray(R.array.colors);
StringselectedColor=colors[position];
getWindow().getDecorView().setBackgroundColor(
Color.parseColor(selectedColor));
returntrue;
}
};
}
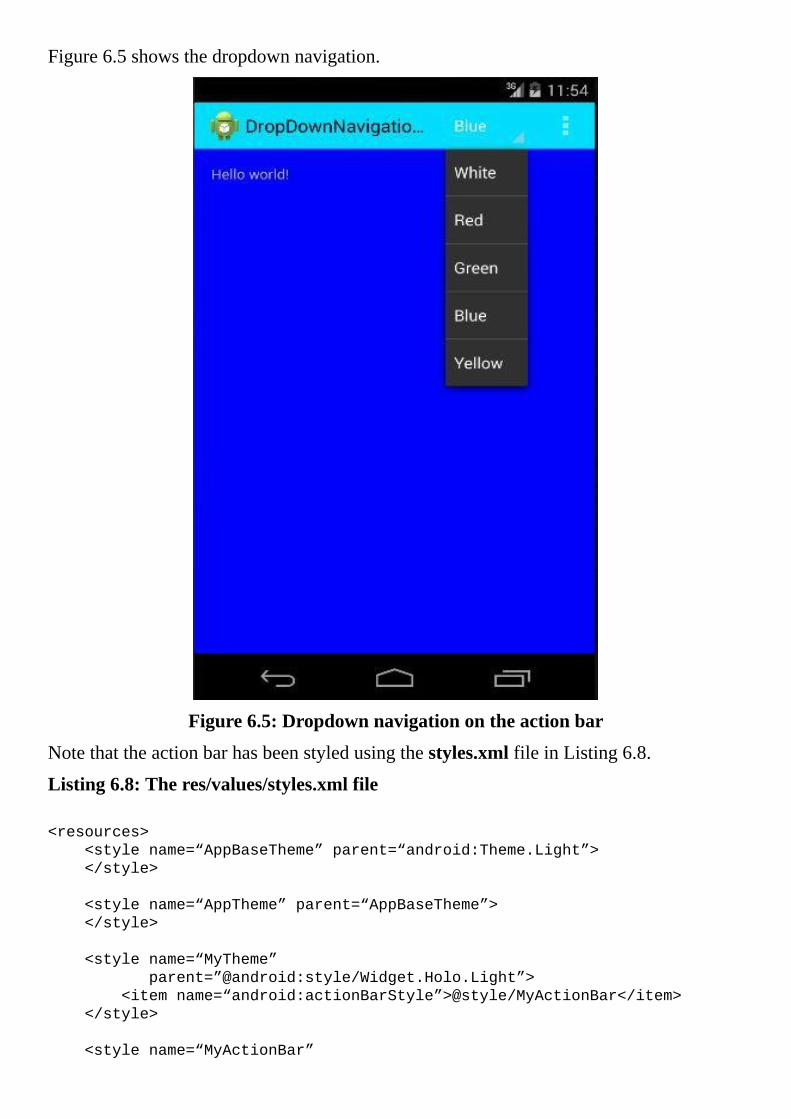
Figure6.5showsthedropdownnavigation.
Figure6.5:Dropdownnavigationontheactionbar
Notethattheactionbarhasbeenstyledusingthestyles.xmlfileinListing6.8.
Listing6.8:Theres/values/styles.xmlfile
<resources>
<stylename=“AppBaseTheme”parent=“android:Theme.Light”>
</style>
<stylename=“AppTheme”parent=“AppBaseTheme”>
</style>
<stylename=“MyTheme”
parent=”@android:style/Widget.Holo.Light”>
<itemname=“android:actionBarStyle”>@style/MyActionBar</item>
</style>
<stylename=“MyActionBar”
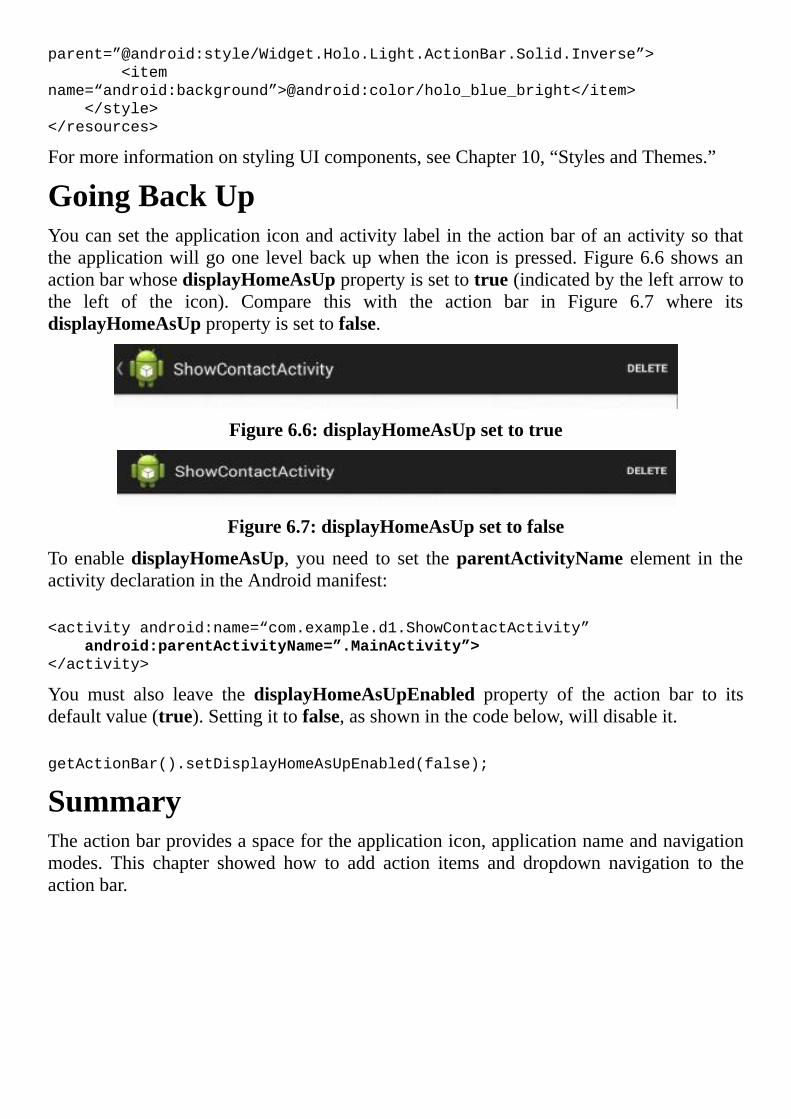
parent=”@android:style/Widget.Holo.Light.ActionBar.Solid.Inverse”>
<item
name=“android:background”>@android:color/holo_blue_bright</item>
</style>
</resources>
FormoreinformationonstylingUIcomponents,seeChapter10,“StylesandThemes.”
GoingBackUpYoucansettheapplicationiconandactivitylabelintheactionbarofanactivitysothattheapplicationwillgoonelevelbackupwhenthe iconispressed.Figure6.6showsanactionbarwhosedisplayHomeAsUppropertyissettotrue(indicatedbytheleftarrowtothe left of the icon). Compare this with the action bar in Figure 6.7 where itsdisplayHomeAsUppropertyissettofalse.
Figure6.6:displayHomeAsUpsettotrue
Figure6.7:displayHomeAsUpsettofalse
ToenabledisplayHomeAsUp, youneed to set theparentActivityName element in theactivitydeclarationintheAndroidmanifest:
<activityandroid:name=“com.example.d1.ShowContactActivity”
android:parentActivityName=”.MainActivity”>
</activity>
You must also leave the displayHomeAsUpEnabled property of the action bar to itsdefaultvalue(true).Settingittofalse,asshowninthecodebelow,willdisableit.
getActionBar().setDisplayHomeAsUpEnabled(false);
SummaryTheactionbarprovidesaspacefortheapplicationicon,applicationnameandnavigationmodes. This chapter showed how to add action items and dropdown navigation to theactionbar.
Chapter7Menus
Menus are a common feature in many graphical user interface (GUI) systems. Theirprimaryroleistoprovideshortcutstocertainactions.
ThischapterlooksatAndroidmenuscloselyandprovidesthreesampleapplications.
OverviewPre-3.0Androiddevicesshippedwitha(hardware)buttonforshowingmenusintheactiveapplication. Starting from Android 3.0, the action bar is the recommended way ofachievingthesamething,ineffectmakingahardwareMenubuttonredundant.Withthehardwaremenubuttongone,“soft”menushavebecomeevenmoreimportantthanever.
TherearethreetypesofmenusinAndroid:
OptionsmenuContextmenuPopupmenu
Theoptionsmenuisthetypeofmenuyounormallyincorporateintheactionbar,asyouhave seen inChapter 6, “TheActionBar.” In this chapter youwill look at the optionsmenumore closely and learn about the other two. Thankfully, nomatter what kind ofmenuyou’reusing inyourapp,youuse the sameAPI.And,yes,youcanusedifferenttypesofmenusinthesameapplication.
Like many other things in Android, menus can be defined declaratively orprogrammatically. The first method offers more flexibility than the second because itallowsyoutochangemenuitemsusingatexteditor.Doingsoprogrammatically,ontheotherhand,wouldrequireyoutochangeyourprogramandrecompileeverytimeyouneedtoedityourmenu.
Herearethethreethingsyouneedtodowhenworkingwithoptionsandcontextmenus.
1.Createamenuinanxmlfileandsaveitundertheres/menudirectory.2. In your activity class, override either onCreateOptionsMenu oronCreateContextMenu, depending on the menu type. Then, in the overriddenmethod,callgetMenuInflater().inflate(),passingthemenutobeused.3. In your activity class, override either onOptionsItemSelected oronContextItemSelected,dependingonthemenutype.
Popupmenusareabitdifferent.Toworkwiththem,dothefollowing:
1.Createamenuinanxmlfileandsaveitundertheres/menudirectory.2. In your activity class, create a PopupMenu object and a
PopupMenu.OnMenuItemClickListener object. In the listener class you define amethodthathandlestheclickeventthatoccurswhenoneofthepopupmenuitemsisselected.
TheMenuFileTo create a menu declaratively, start by creating an XML file and place it under theres/menudirectory.TheXMLfilemusthavethefollowingstructure.
<menuxmlns:android=“http://schemas.android.com/apk/res/android”>
<group>…</group>
<group>…</group>
…
<item>…</item>
<item>…</item>
…
</menu>
Therootelementismenuanditcancontainanynumberofgroupanditemelements.Thegroupelementrepresentsamenugroupandtheitemelementrepresentsamenuitem.
Foreverymenufileyoucreate,AndroidStudiowilladdafieldtoyourR.menuclasssothatyoucanloadthemenuinyourapplication.ThefieldnameisthesameastheXMLfileminustheextension.IftheXMLfileiscalledmain_activity_menu.xml,forexample,thefieldinR.menuwillbecalledmain_activity_menu.
NoteTheRclasswasexplainedinChapter1,“GettingStarted.”
TheOptionsMenuTheOptionsMenuDemoapplicationisasimpleapplicationthatusesanoptionsmenuinitsactionbar.ItissimilartotheapplicationthatdemonstratestheactionbarinChapter6,“TheActionBar.”
Themanifest(AndroidManifest.xmlfile)forthisapplicationisshowninListing7.1.
Listing7.1:ThemanifestforOptionsMenuDemo
<?xmlversion=“1.0”encoding=“utf-8”?>
<manifestxmlns:android=“http://schemas.android.com/apk/res/android”
package=“com.example.optionsmenudemo”
android:versionCode=“1”
android:versionName=“1.0”>
<uses-sdk
android:minSdkVersion=“18”
android:targetSdkVersion=“18”/>
<application
android:allowBackup=“true”
android:icon=”@drawable/ic_launcher”
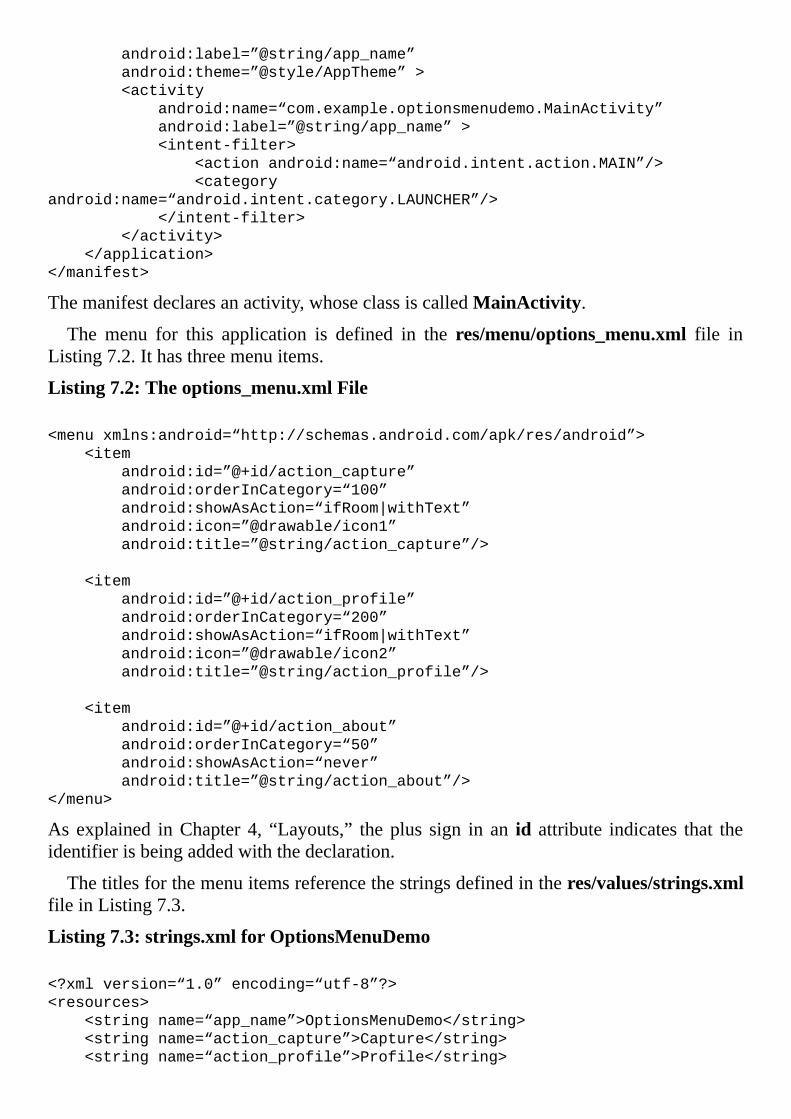
android:label=”@string/app_name”
android:theme=”@style/AppTheme”>
<activity
android:name=“com.example.optionsmenudemo.MainActivity”
android:label=”@string/app_name”>
<intent-filter>
<actionandroid:name=“android.intent.action.MAIN”/>
<category
android:name=“android.intent.category.LAUNCHER”/>
</intent-filter>
</activity>
</application>
</manifest>
Themanifestdeclaresanactivity,whoseclassiscalledMainActivity.
The menu for this application is defined in the res/menu/options_menu.xml file inListing7.2.Ithasthreemenuitems.
Listing7.2:Theoptions_menu.xmlFile
<menuxmlns:android=“http://schemas.android.com/apk/res/android”>
<item
android:id=”@+id/action_capture”
android:orderInCategory=“100”
android:showAsAction=“ifRoom|withText”
android:icon=”@drawable/icon1”
android:title=”@string/action_capture”/>
<item
android:id=”@+id/action_profile”
android:orderInCategory=“200”
android:showAsAction=“ifRoom|withText”
android:icon=”@drawable/icon2”
android:title=”@string/action_profile”/>
<item
android:id=”@+id/action_about”
android:orderInCategory=“50”
android:showAsAction=“never”
android:title=”@string/action_about”/>
</menu>
Asexplained inChapter 4, “Layouts,” theplus sign in an id attribute indicates that theidentifierisbeingaddedwiththedeclaration.
Thetitlesforthemenuitemsreferencethestringsdefinedintheres/values/strings.xmlfileinListing7.3.
Listing7.3:strings.xmlforOptionsMenuDemo
<?xmlversion=“1.0”encoding=“utf-8”?>
<resources>
<stringname=“app_name”>OptionsMenuDemo</string>
<stringname=“action_capture”>Capture</string>
<stringname=“action_profile”>Profile</string>
<stringname=“action_about”>About</string>
<stringname=“hello_world”>Helloworld!</string>
</resources>
Theactivityclassfortheapplication,theMainActivityclass,isshowninListing7.4.
Listing7.4:MainActivityforOptionsMenuDemo
packagecom.example.optionsmenudemo;
importandroid.app.Activity;
importandroid.app.AlertDialog;
importandroid.os.Bundle;
importandroid.view.Menu;
importandroid.view.MenuItem;
publicclassMainActivityextendsActivity{
@Override
protectedvoidonCreate(BundlesavedInstanceState){
super.onCreate(savedInstanceState);
setContentView(R.layout.activity_main);
}
@Override
publicbooleanonCreateOptionsMenu(Menumenu){
getMenuInflater().inflate(R.menu.options_menu,menu);
returntrue;
}
@Override
publicbooleanonOptionsItemSelected(MenuItemitem){
//Handleclickonmenuitems
switch(item.getItemId()){
caseR.id.action_profile:
showAlertDialog(“Profile”,“YouselectedProfile”);
returntrue;
caseR.id.action_capture:
showAlertDialog(“Settings”,
“YouselectedSettings”);
returntrue;
caseR.id.action_about:
showAlertDialog(“About”,“YouselectedAbout”);
returntrue;
default:
returnsuper.onOptionsItemSelected(item);
}
}
privatevoidshowAlertDialog(Stringtitle,Stringmessage){
AlertDialogalertDialog=new
AlertDialog.Builder(this).create();
alertDialog.setTitle(title);
alertDialog.setMessage(message);
alertDialog.show();
}
}
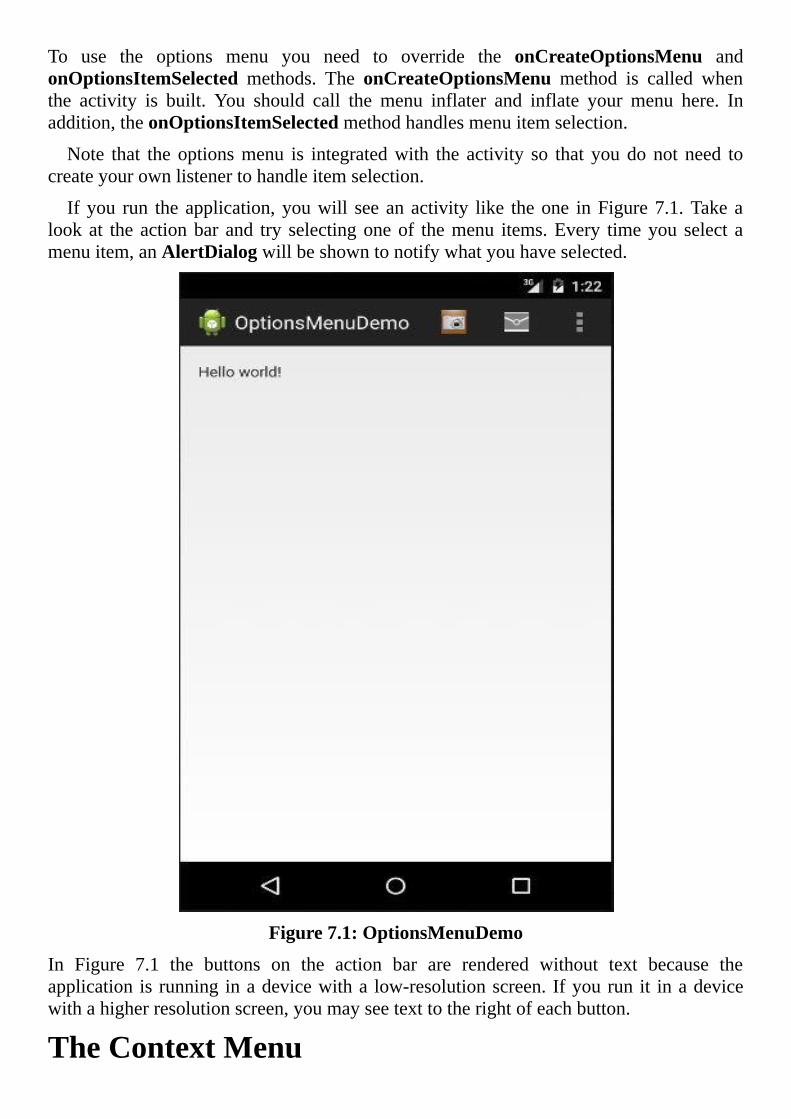
To use the options menu you need to override the onCreateOptionsMenu andonOptionsItemSelected methods. The onCreateOptionsMenu method is called whenthe activity is built. You should call the menu inflater and inflate your menu here. Inaddition,theonOptionsItemSelectedmethodhandlesmenuitemselection.
Note that theoptionsmenu is integratedwith the activity so that youdonot need tocreateyourownlistenertohandleitemselection.
Ifyou run theapplication,youwill seeanactivity like theone inFigure7.1.Takealookat the actionbar and try selectingoneof themenu items.Every timeyou select amenuitem,anAlertDialogwillbeshowntonotifywhatyouhaveselected.
Figure7.1:OptionsMenuDemo
In Figure 7.1 the buttons on the action bar are rendered without text because theapplication is running inadevicewitha low-resolutionscreen. Ifyourun it inadevicewithahigherresolutionscreen,youmayseetexttotherightofeachbutton.
TheContextMenu
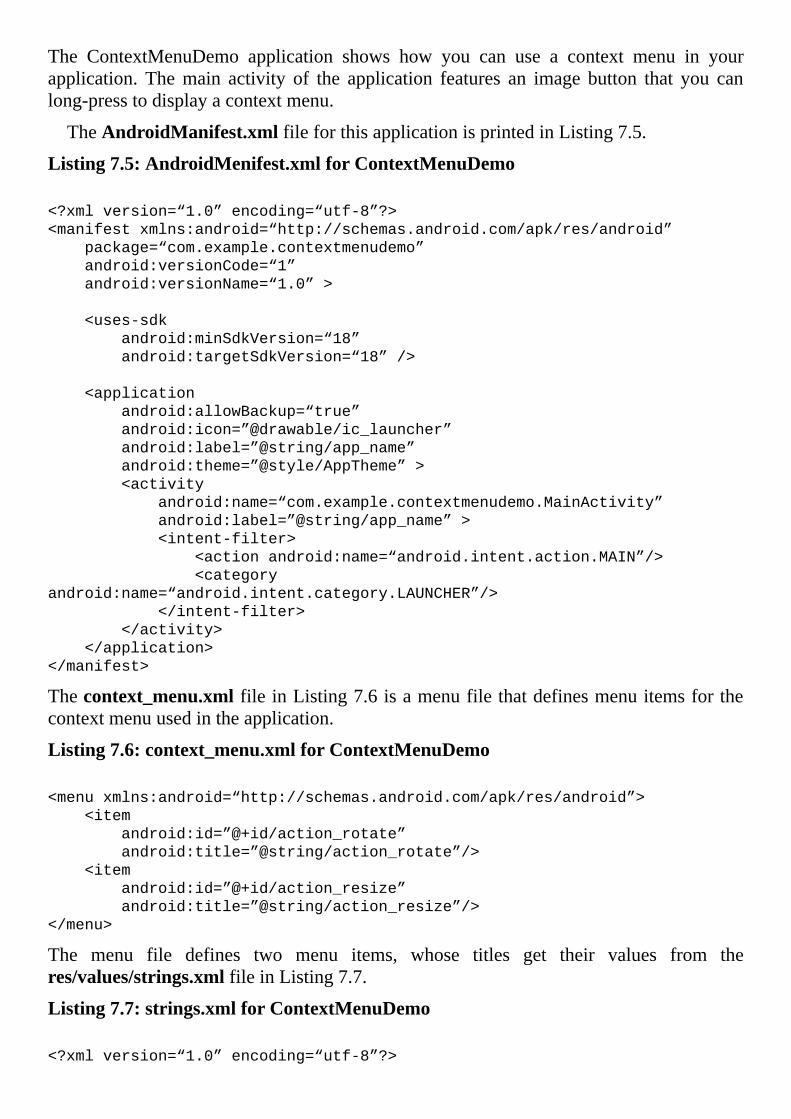
The ContextMenuDemo application shows how you can use a context menu in yourapplication. Themain activity of the application features an image button that you canlong-presstodisplayacontextmenu.
TheAndroidManifest.xmlfileforthisapplicationisprintedinListing7.5.
Listing7.5:AndroidMenifest.xmlforContextMenuDemo
<?xmlversion=“1.0”encoding=“utf-8”?>
<manifestxmlns:android=“http://schemas.android.com/apk/res/android”
package=“com.example.contextmenudemo”
android:versionCode=“1”
android:versionName=“1.0”>
<uses-sdk
android:minSdkVersion=“18”
android:targetSdkVersion=“18”/>
<application
android:allowBackup=“true”
android:icon=”@drawable/ic_launcher”
android:label=”@string/app_name”
android:theme=”@style/AppTheme”>
<activity
android:name=“com.example.contextmenudemo.MainActivity”
android:label=”@string/app_name”>
<intent-filter>
<actionandroid:name=“android.intent.action.MAIN”/>
<category
android:name=“android.intent.category.LAUNCHER”/>
</intent-filter>
</activity>
</application>
</manifest>
Thecontext_menu.xmlfileinListing7.6isamenufilethatdefinesmenuitemsforthecontextmenuusedintheapplication.
Listing7.6:context_menu.xmlforContextMenuDemo
<menuxmlns:android=“http://schemas.android.com/apk/res/android”>
<item
android:id=”@+id/action_rotate”
android:title=”@string/action_rotate”/>
<item
android:id=”@+id/action_resize”
android:title=”@string/action_resize”/>
</menu>
The menu file defines two menu items, whose titles get their values from theres/values/strings.xmlfileinListing7.7.
Listing7.7:strings.xmlforContextMenuDemo
<?xmlversion=“1.0”encoding=“utf-8”?>

<resources>
<stringname=“app_name”>ContextMenuDemo</string>
<stringname=“action_settings”>Settings</string>
<stringname=“action_rotate”>Rotate</string>
<stringname=“action_resize”>Resize</string>
<stringname=“hello_world”>Helloworld!</string>
</resources>
Finally, Listing 7.8 shows theMainActivity class for the application. There are twomethods that you need to override to use a contextmenu,onCreateContextMenuandonContextItemSelected.TheonCreateContextMenumethodiscalledwhentheactivityisbuilt.Youshouldinflateyourmenuhere.
TheonContextItemSelectedmethod is called every timeamenu item in the contextmenuisselected.
Listing7.8:MainActivityforContextMenuDemo
packagecom.example.contextmenudemo;
importandroid.app.Activity;
importandroid.app.AlertDialog;
importandroid.os.Bundle;
importandroid.view.ContextMenu;
importandroid.view.ContextMenu.ContextMenuInfo;
importandroid.view.MenuInflater;
importandroid.view.MenuItem;
importandroid.view.View;
importandroid.widget.ImageButton;
publicclassMainActivityextendsActivity{
@Override
protectedvoidonCreate(BundlesavedInstanceState){
super.onCreate(savedInstanceState);
setContentView(R.layout.activity_main);
ImageButtonimageButton=(ImageButton)
findViewById(R.id.button1);
registerForContextMenu(imageButton);
}
@Override
publicvoidonCreateContextMenu(ContextMenumenu,Viewv,
ContextMenuInfomenuInfo){
super.onCreateContextMenu(menu,v,menuInfo);
MenuInflaterinflater=getMenuInflater();
inflater.inflate(R.menu.context_menu,menu);
}
@Override
publicbooleanonContextItemSelected(MenuItemitem){
switch(item.getItemId()){
caseR.id.action_rotate:
showAlertDialog(“Rotate”,“YouselectedRotate”);
returntrue;
caseR.id.action_resize:
showAlertDialog(“Resize”,“YouselectedResize”);
returntrue;
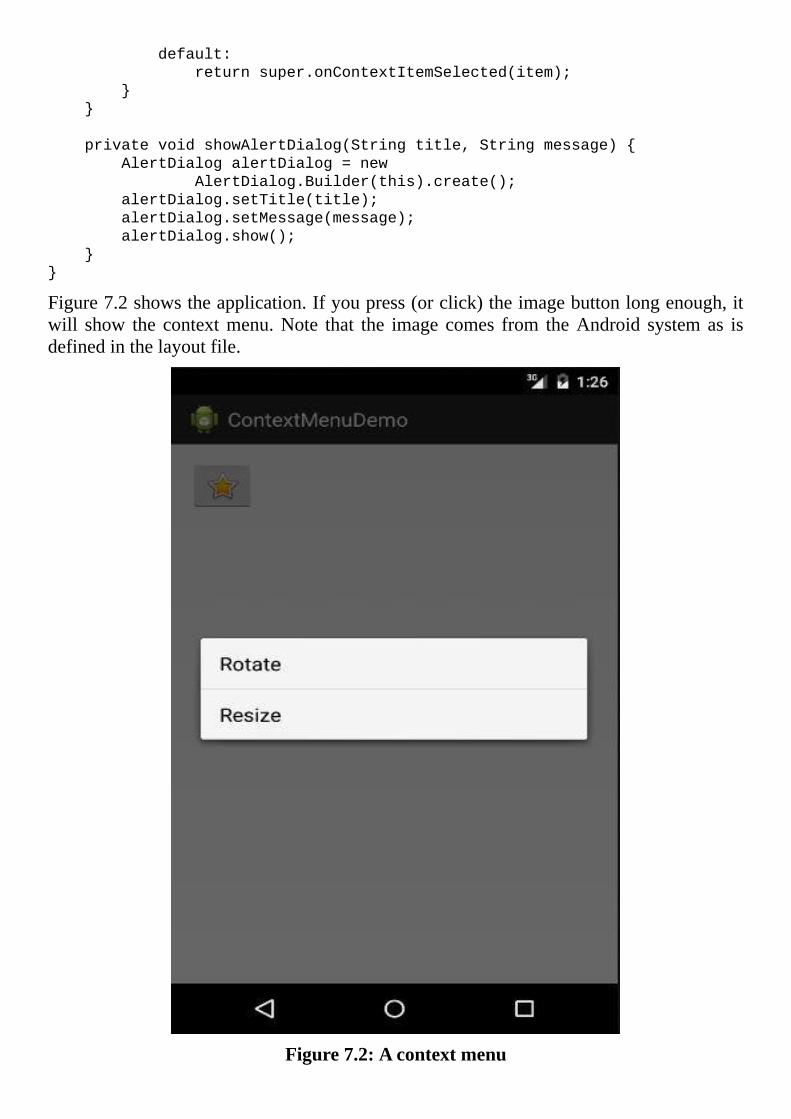
default:
returnsuper.onContextItemSelected(item);
}
}
privatevoidshowAlertDialog(Stringtitle,Stringmessage){
AlertDialogalertDialog=new
AlertDialog.Builder(this).create();
alertDialog.setTitle(title);
alertDialog.setMessage(message);
alertDialog.show();
}
}
Figure7.2showstheapplication.Ifyoupress(orclick)theimagebuttonlongenough,itwill show the contextmenu.Note that the image comes from theAndroid systemas isdefinedinthelayoutfile.
Figure7.2:Acontextmenu
ThePopupMenuApopupmenuisassociatedwithaviewandisshowneverytimeaneventoccurstotheview. The PopupMenuDemo application shows how to use a popup menu. It uses abutton that displays a popup menu when it is clicked. Listing 7.9 shows theAndroidManifest.xmlfileforPopupMenuDemo.
Listing7.9:AndroidMenifest.xmlforPopupMenuDemo
<?xmlversion=“1.0”encoding=“utf-8”?>
<manifestxmlns:android=“http://schemas.android.com/apk/res/android”
package=“com.example.popupmenudemo”
android:versionCode=“1”
android:versionName=“1.0”>
<uses-sdk
android:minSdkVersion=“18”
android:targetSdkVersion=“18”/>
<application
android:allowBackup=“true”
android:icon=”@drawable/ic_launcher”
android:label=”@string/app_name”
android:theme=”@style/AppTheme”>
<activity
android:name=“com.example.popupmenudemo.MainActivity”
android:label=”@string/app_name”>
<intent-filter>
<actionandroid:name=“android.intent.action.MAIN”/>
<category
android:name=“android.intent.category.LAUNCHER”/>
</intent-filter>
</activity>
</application>
</manifest>
ThemanifestinListing7.9isastandardXMLfilethatyou’veseenmanytimes.IthasoneactivitywithabuttonthatwillactivatethemenushowninListing7.10.
Listing7.10:popup_menu.xmlforPopupMenuDemo
<menuxmlns:android=“http://schemas.android.com/apk/res/android”>
<item
android:id=”@+id/action_delete”
android:title=”@string/action_delete”/>
<item
android:id=”@+id/action_copy”
android:title=”@string/action_copy”/>
</menu>
ThemenuinListing7.10hastwomenuitems.Thetitlesfortheitemsrefertothestringsdefinedintheres/values/strings.xmlfileinListing7.11.
Listing7.11:strings.xmlforPopupMenuDemo
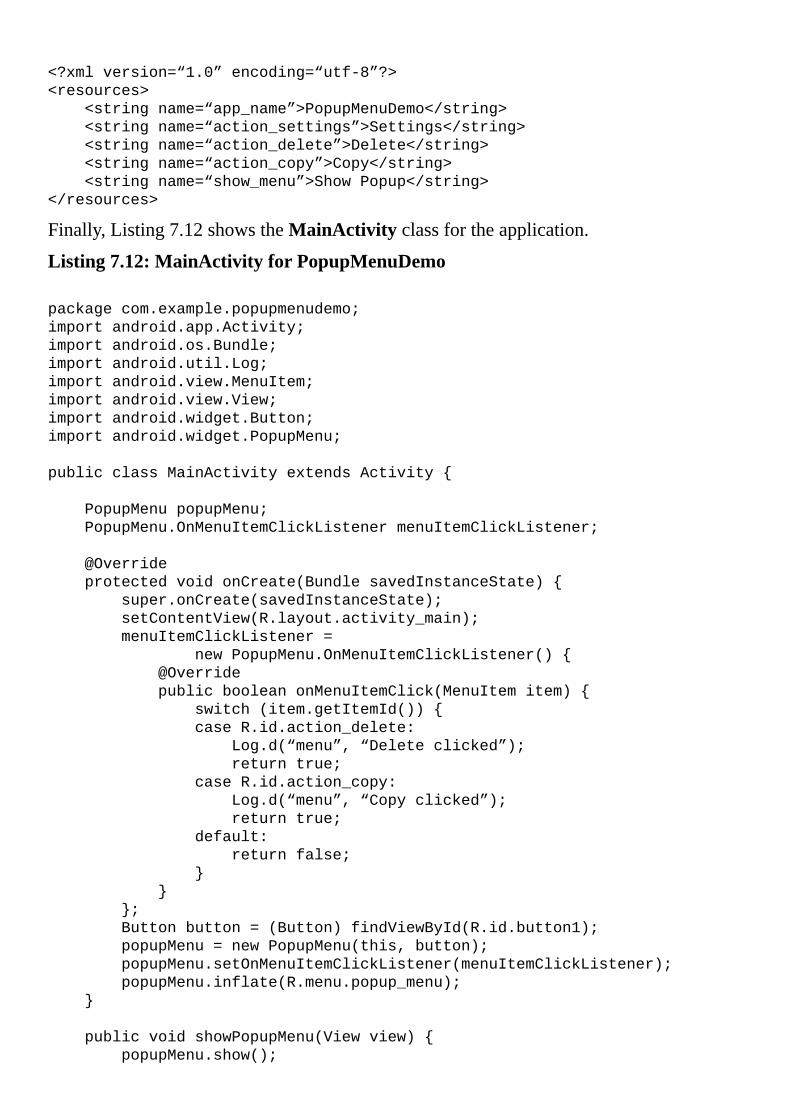
<?xmlversion=“1.0”encoding=“utf-8”?>
<resources>
<stringname=“app_name”>PopupMenuDemo</string>
<stringname=“action_settings”>Settings</string>
<stringname=“action_delete”>Delete</string>
<stringname=“action_copy”>Copy</string>
<stringname=“show_menu”>ShowPopup</string>
</resources>
Finally,Listing7.12showstheMainActivityclassfortheapplication.
Listing7.12:MainActivityforPopupMenuDemo
packagecom.example.popupmenudemo;
importandroid.app.Activity;
importandroid.os.Bundle;
importandroid.util.Log;
importandroid.view.MenuItem;
importandroid.view.View;
importandroid.widget.Button;
importandroid.widget.PopupMenu;
publicclassMainActivityextendsActivity{
PopupMenupopupMenu;
PopupMenu.OnMenuItemClickListenermenuItemClickListener;
@Override
protectedvoidonCreate(BundlesavedInstanceState){
super.onCreate(savedInstanceState);
setContentView(R.layout.activity_main);
menuItemClickListener=
newPopupMenu.OnMenuItemClickListener(){
@Override
publicbooleanonMenuItemClick(MenuItemitem){
switch(item.getItemId()){
caseR.id.action_delete:
Log.d(“menu”,“Deleteclicked”);
returntrue;
caseR.id.action_copy:
Log.d(“menu”,“Copyclicked”);
returntrue;
default:
returnfalse;
}
}
};
Buttonbutton=(Button)findViewById(R.id.button1);
popupMenu=newPopupMenu(this,button);
popupMenu.setOnMenuItemClickListener(menuItemClickListener);
popupMenu.inflate(R.menu.popup_menu);
}
publicvoidshowPopupMenu(Viewview){
popupMenu.show();
}
}
Unlike the optionsmenu and contextmenu, the popupmenu requires that you create amenuobjectandalistenerobjectforhandlingitemselection.
In the onCreate method ofMainActivity, you create a PopupMenu object and aPopupMenu.OnMenuItemClickListener object. You then pass the listener to thePopupMenu.Thelistenerclasshandlesmenuitemclicks.
TheshowPopupMenumethodinMainActivityisassociatedwiththebuttonusingtheonClick attribute of the button in themain activity layout file. Themethod shows thepopupmenu.
Figure7.3showsthepopupmenuthatdisplayswhenthebuttonisclicked.
Figure7.3:Apopupmenu
Summary
Inthischapteryoulearnedhowtousemenustoprovideshortcutstocertainactions.TherearethreetypesofmenusinAndroid,optionsmenus,contextmenus,andpopupmenus.
Chapter8ListView
AListViewisaviewforshowingascrollablelistofitems,whichmaycomefromalistadapteroranarrayadapter.Selectingan iteminaListView triggersanevent forwhichyoucanwritealistener.
Ifanactivitycontainsonlyoneview that isaListView,youcanextendListActivityinsteadofActivity as your activity class.UsingListActivity is convenient as it comeswithanumberofusefulfeatures.
ThischaptershowshowyoucanusetheListViewandListActivityaswellascreateacustomListAdapterandstyleaListViewinthreesampleapplications.
OverviewTechnically, android.widget.ListView, the template for creating a ListView, is adescendantoftheViewclass.Youcanuseitthesamewayyouwouldotherviews.WhatmakesListViewabittrickytouseisthefactthatyouhavetoobtainadatasourceforitintheformofaListAdapter.TheListAdapteralsosupplythelayoutforeachitemontheListView,sotheListAdapterreallyplaysaveryimportantroleinthelifeofaListView.
The android.widget.ListAdapter interface is a subinterface ofandroid.widget.Adapter.ThecloserelativesofthisinterfaceareshowninFigure8.1.
CreatingaListAdapterisexplainedinthenextsection,“CreatingaListAdapter.”OnceyouhaveaListAdapter,youcanpassittoaListView’ssetAdaptermethod:
listView.setAdapter(listAdapter);
You can alsowrite a listener that implementsAdapterView.OnItemClickListener andpass it to theListView’ssetOnItemClickListenermethod.The listenerwillbenotifiedeverytimealistitemisselectedandyoucanwritecodetohandleit,likeso.
listView.setOnItemClickListener(new
AdapterView.OnItemClickListener(){
@Override
publicvoidonItemClick(AdapterView<?>parent,finalViewview,
intposition,longid){
//handleitem
});

Figure8.1:TheparentsandimplementationsofListAdapter
CreatingAListAdapterAsmentionedintheprevioussection,thetrickiestpartofusingaListViewiscreatingadatasourceforit.YouneedaListAdapterandasyoucanseeinFigure8.1youhaveatleasttwoimplementationsofListAdapterthatyoucanuse.
Oneof theconcrete implementationsofListAdapter is theArrayAdapter class.AnArrayAdapter is backed by an array of objects. The string returned by the toStringmethodofeachobjectisusedtopopulateeachitemintheListView.
TheArrayAdapterclassoffersseveralconstructors.AllofthemrequirethatyoupassaContextandaresourceidentifierthatpointstoalayoutthatcontainsaTextView.ThisisbecauseeachiteminaListViewisaTextView.ThesearesomeoftheconstructorsintheArrayAdapterclass.
publicArrayAdapter(android.content.Contextcontext,intresourceId)
publicArrayAdapter(android.content.Contextcontext,intresourceId,
T[]objects)
Ifyoudonotpassanobjectarraytoaconstructor,youwillhavetopassonelater.Asfortheresourceidentifier,Androidprovidessomepre-definedlayoutsforaListAdapter.Theidentifierstotheselayoutscanbefoundintheandroid.R.layoutclass.Forexample,youcancreateanArrayAdapterusingthiscodesnippetinyouractivity.
ArrayAdapter<String>adapter=newArrayAdapter<String>(this,
android.R.layout.simple_list_item_1,objects);
Using android.R.layout.simple_list_item_1 will create a ListView with the simplestlayout where the text for each item is printed in black. Alternatively, you can useandroid.R.layout.simple_expandable_list_item_1. However, you probably want tocreateyourownlayoutandpassit totheconstructor, instead.ThiswayyouwouldhavemorecontroloverthelookandfeelofyourListView.
MostofthetimeyoucanuseastringarrayasthedatasourceforyourListView.Youcancreateastringarrayprogrammaticallyordeclaratively.Doingitprogrammaticallyissimpleandyoudonothavetodealwithanexternalresource:
String[]objects={“item1”,“item2”,“item-n”};
The disadvantage of this approach is that updating the array would require you torecompileyourclass.Creatinga stringarraydeclaratively,on theotherhand,givesyoumoreflexibilityasyoucaneasilyedittheelements.
Tocreateastringarraydeclaratively,startbycreatingastring-arrayelementinyourstrings.xml file under res/values. For example, the following is a string-array namedplayers.
<string-arrayname=“players”>
<item>Player1</item>
<item>Player2</item>
<item>Player3</item>
<item>Player4</item>
</string-array>
Whenyousave thestrings.xml file,AndroidStudiowillupdateyourRgeneratedclassandaddastaticfinalclassnamedarray,ifnoneexists,aswellasaddaresourceidentifierforthestring-arrayelementtothearrayclass.Asaresult,younowhavethisresourceidentifiertoaccessyourstringarrayfromyourcode:
R.array.players
Toconverttheuser-definedstringarraytoaJavastringarray,usethiscode.
String[]values=getResources().getStringArray(R.array.players);
YoucanthenusethisstringarraytocreateanArrayAdapter.
UsingAListViewThe ListViewDemo1 application shows how to use a ListView that is backed by anArrayAdapter. The array that supplies values to theArrayAdapter is a string arraydefinedinthestrings.xmlfile.Listing8.1showsthestrings.xmlfile.
Listing8.1:Theres/values/strings.xmlfileforListViewDemo1
<?xmlversion=“1.0”encoding=“utf-8”?>
<resources>
<stringname=“app_name”>ListViewDemo1</string>
<stringname=“action_settings”>Settings</string>
<string-arrayname=“players”>
<item>Player1</item>
<item>Player2</item>
<item>Player3</item>
<item>Player4</item>
<item>Player5</item>
</string-array>
</resources>
ThelayoutfortheArrayAdapterisdefinedinthelist_item.xmlfilepresentedinListing8.2.It is locatedunderres/layoutandcontainsaTextViewelement.This layoutwillbeusedasthelayoutforeachitemintheListView.
Listing8.2:Thelist_item.xmlfile
<?xmlversion=“1.0”encoding=“utf-8”?>
<TextViewxmlns:android=“http://schemas.android.com/apk/res/android”
android:id=”@+id/list_item”
android:layout_width=“fill_parent”
android:layout_height=“fill_parent”
android:padding=“7dip”
android:textSize=“16sp”
android:textColor=”@android:color/holo_green_dark”
android:textStyle=“bold”>
</TextView>
The application consists of only one activity, MainActivity. The layout file(activity_main.xml)fortheactivityisgiveninListing8.3andtheMainActivityclassinListing8.4.
Listing8.3:Theactivity_main.xmlfileforListViewDemo1
<LinearLayout
xmlns:android=“http://schemas.android.com/apk/res/android”
android:orientation=“vertical”
android:layout_width=“fill_parent”
android:layout_height=“fill_parent”>
<ListView
android:id=”@+id/listView1”
android:layout_width=“wrap_content”
android:layout_height=“wrap_content”/>
</LinearLayout>
Listing8.4:TheMainActivityclassforListViewDemo1
packagecom.example.listviewdemo1;
importandroid.app.Activity;
importandroid.app.AlertDialog;
importandroid.os.Bundle;
importandroid.util.Log;
importandroid.view.Menu;
importandroid.view.View;
importandroid.widget.AdapterView;
importandroid.widget.ArrayAdapter;
importandroid.widget.ListView;
publicclassMainActivityextendsActivity{
@Override
protectedvoidonCreate(BundlesavedInstanceState){
super.onCreate(savedInstanceState);
setContentView(R.layout.activity_main);
String[]values=getResources().getStringArray(
R.array.players);
ArrayAdapter<String>adapter=newArrayAdapter<String>(
this,R.layout.list_item,values);
ListViewlistView=(ListView)findViewById(R.id.listView1);
listView.setAdapter(adapter);
listView.setOnItemClickListener(new
AdapterView.OnItemClickListener(){
@Override
publicvoidonItemClick(AdapterView<?>parent,
finalViewview,intposition,longid){
Stringitem=(String)
parent.getItemAtPosition(position);
AlertDialog.Builderbuilder=new
AlertDialog.Builder(MainActivity.this);
builder.setMessage(“Selecteditem:”
+item).setTitle(“ListView”);
builder.create().show();
Log.d(“ListView”,“Selecteditem:”+item);
}
});
}
@Override
publicbooleanonCreateOptionsMenu(Menumenu){
getMenuInflater().inflate(R.menu.menu_main,menu);
returntrue;
}
}
Figure8.2showstheapplication.
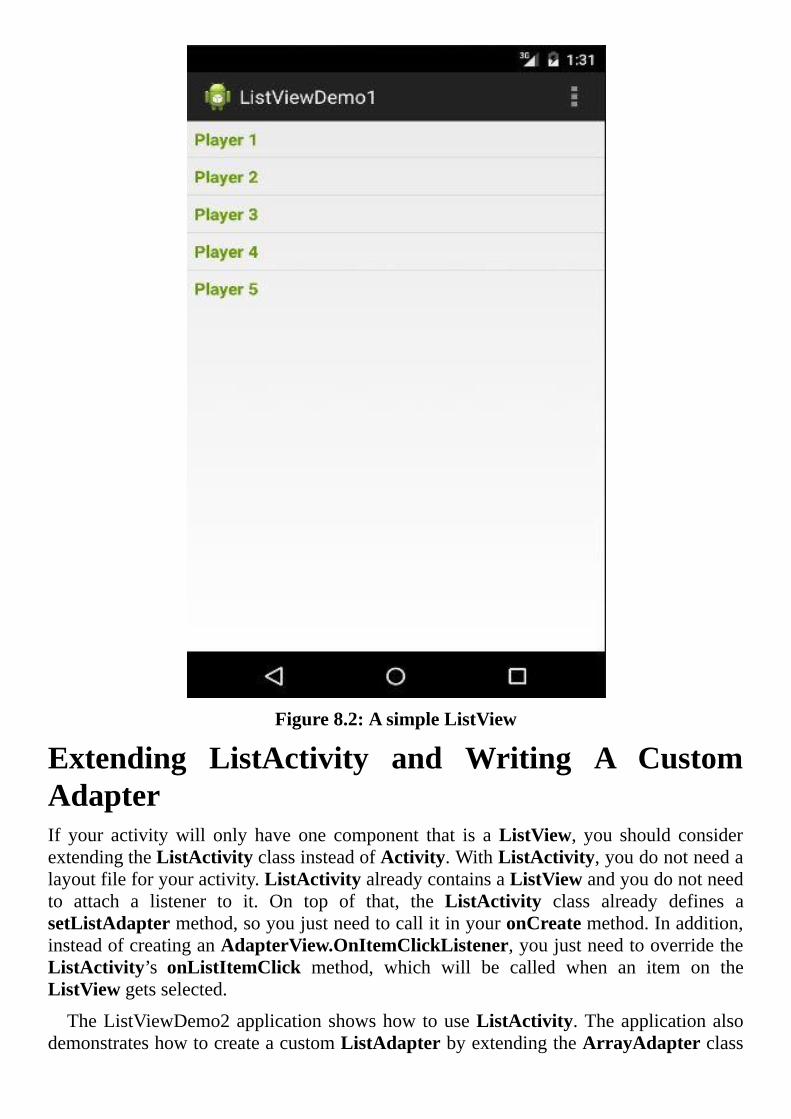
Figure8.2:AsimpleListView
Extending ListActivity and Writing A CustomAdapterIf your activitywill only have one component that is aListView, you should considerextendingtheListActivityclassinsteadofActivity.WithListActivity,youdonotneedalayoutfileforyouractivity.ListActivityalreadycontainsaListViewandyoudonotneedto attach a listener to it. On top of that, the ListActivity class already defines asetListAdaptermethod,soyoujustneedtocallitinyouronCreatemethod.Inaddition,insteadofcreatinganAdapterView.OnItemClickListener,youjustneedtooverridetheListActivity’s onListItemClick method, which will be called when an item on theListViewgetsselected.
TheListViewDemo2applicationshowshowtouseListActivity.TheapplicationalsodemonstrateshowtocreateacustomListAdapterbyextendingtheArrayAdapterclass
andcreatingalayoutfileforthecustomListAdapter.
ThelayoutfileforthecustomListAdapter inListViewDemo2ispresentedinListing8.5.Itisnamedpretty_adapter.xmlfileandislocatedunderres/layout.
Listing8.5:Thepretty_adapter.xmlfile
<?xmlversion=“1.0”encoding=“utf-8”?>
<LinearLayout
xmlns:android=“http://schemas.android.com/apk/res/android”
android:layout_width=“match_parent”
android:layout_height=“match_parent”>
<ImageView
android:id=”@+id/icon”
android:layout_width=“36dp”
android:layout_height=“fill_parent”/>
<TextView
android:id=”@+id/label”
android:layout_width=“fill_parent”
android:layout_height=“fill_parent”
android:gravity=“center_vertical”
android:padding=“12dp”
android:textSize=“18sp”
android:textColor=”@android:color/holo_blue_bright”/>
</LinearLayout>
Listing8.6showsthecustomadapterclass,calledPrettyAdapter.
Listing8.6:ThePrettyAdapterclass
packagecom.example.listviewdemo2;
importandroid.content.Context;
importandroid.graphics.drawable.Drawable;
importandroid.view.LayoutInflater;
importandroid.view.View;
importandroid.view.ViewGroup;
importandroid.widget.ArrayAdapter;
importandroid.widget.ImageView;
importandroid.widget.TextView;
publicclassPrettyAdapterextendsArrayAdapter<String>{
privateLayoutInflaterinflater;
privateString[]items;
privateDrawableicon;
privateintviewResourceId;
publicPrettyAdapter(Contextcontext,
intviewResourceId,String[]items,Drawableicon){
super(context,viewResourceId,items);
inflater=(LayoutInflater)context
.getSystemService(Context.LAYOUT_INFLATER_SERVICE);
this.items=items;
this.icon=icon;
this.viewResourceId=viewResourceId;
}
@Override
publicintgetCount(){
returnitems.length;
}
@Override
publicStringgetItem(intposition){
returnitems[position];
}
@Override
publiclonggetItemId(intposition){
return0;
}
@Override
publicViewgetView(intposition,ViewconvertView,
ViewGroupparent){
convertView=inflater.inflate(viewResourceId,null);
ImageViewimageView=(ImageView)
convertView.findViewById(R.id.icon);
imageView.setImageDrawable(icon);
TextViewtextView=(TextView)
convertView.findViewById(R.id.label);
textView.setText(items[position]);
returnconvertView;
}
}
Thecustomadaptermustoverrideseveralmethods,notably thegetViewmethod,whichmustreturnaViewthatwillbeusedforeachitemontheListView.Inthisexample,theviewcontainsanImageViewandaTextView.ThetextfortheTextViewistakenfromthearraypassedtothePrettyAdapterinstance.
The last piece of the application is theMainActivity class in Listing 8.7. It extendsListActivityandistheonlyactivityintheapplication.
Listing8.7:TheMainActivityclassforListViewDemo2
packagecom.example.listviewdemo2;
importandroid.app.ListActivity;
importandroid.content.Context;
importandroid.content.res.Resources;
importandroid.graphics.drawable.Drawable;
importandroid.os.Bundle;
importandroid.util.Log;
importandroid.view.View;
importandroid.widget.ListView;
publicclassMainActivityextendsListActivity{
@Override
publicvoidonCreate(BundlesavedInstanceState){
super.onCreate(savedInstanceState);
//Sincewe’reextendingListActivity,wedo
//notneedtocallsetContentView();
Contextcontext=getApplicationContext();
Resourcesresources=context.getResources();
String[]items=resources.getStringArray(
R.array.players);
Drawabledrawable=resources.getDrawable(
R.drawable.pretty);
setListAdapter(newPrettyAdapter(context,
R.layout.pretty_adapter,items,drawable));
}
@Override
publicvoidonListItemClick(ListViewlistView,
Viewview,intposition,longid){
Log.d(“listView2”,“listView:”+listView+
”,view:”+view.getClass()+
”,position:”+position);
}
}
Ifyouruntheapplication,youwillseeanactivitylikethatinFigure8.3.
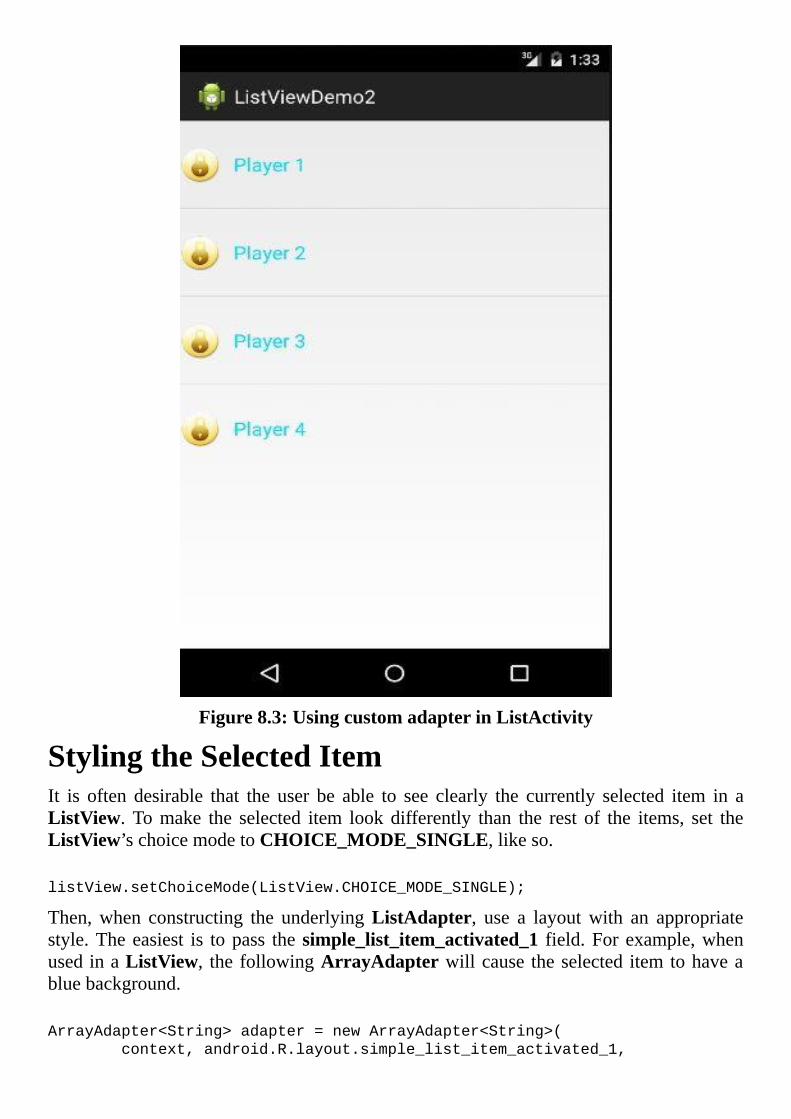
Figure8.3:UsingcustomadapterinListActivity
StylingtheSelectedItemIt is often desirable that the user be able to see clearly the currently selected item in aListView.Tomake the selected item lookdifferently than the rest of the items, set theListView’schoicemodetoCHOICE_MODE_SINGLE,likeso.
listView.setChoiceMode(ListView.CHOICE_MODE_SINGLE);
Then,when constructing the underlyingListAdapter, use a layoutwith an appropriatestyle.Theeasiest is topass thesimple_list_item_activated_1 field.Forexample,whenusedinaListView, the followingArrayAdapterwillcause theselected itemtohaveabluebackground.
ArrayAdapter<String>adapter=newArrayAdapter<String>(
context,android.R.layout.simple_list_item_activated_1,

array);
If thedefault styledoesnotappeal toyou,youcancreateyourownstylebycreatingaselector. A selector is a drawable that can be used as a background drawable in aTextView.Here isanexampleofaselector file thatmustbesaved in theres/drawabledirectory.
<selector
xmlns:android=“http://schemas.android.com/apk/res/android”>
<itemandroid:state_activated=“true”
android:drawable=”@drawable/activated”/>
</selector>
Theselectormusthaveanitemwhosestate_activatedattributeissettotrueandwhosedrawableattributereferstoanotherdrawable.
TheListViewDemo3applicationcontainsanactivitythatemploystwoListViews thatareplacedsidebyside.ThefirstListViewontheleftisgiventhedefaultstylewhereasthesecondListViewisdecoratedusingacustomstyle.Figure8.4showstheapplication.
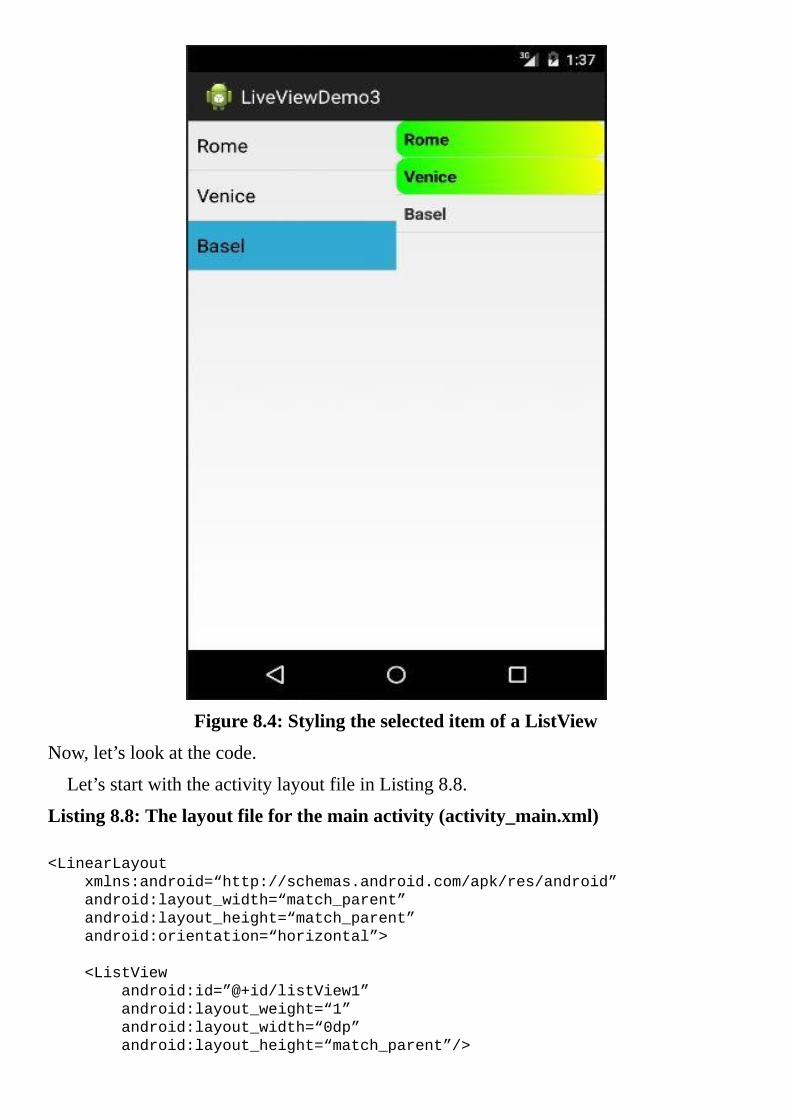
Figure8.4:StylingtheselecteditemofaListView
Now,let’slookatthecode.
Let’sstartwiththeactivitylayoutfileinListing8.8.
Listing8.8:Thelayoutfileforthemainactivity(activity_main.xml)
<LinearLayout
xmlns:android=“http://schemas.android.com/apk/res/android”
android:layout_width=“match_parent”
android:layout_height=“match_parent”
android:orientation=“horizontal”>
<ListView
android:id=”@+id/listView1”
android:layout_weight=“1”
android:layout_width=“0dp”
android:layout_height=“match_parent”/>
<ListView
android:id=”@+id/listView2”
android:layout_weight=“1”
android:layout_width=“0dp”
android:layout_height=“match_parent”/>
</LinearLayout>
ThelayoutusesahorizontalLinearLayoutthatcontainstwoListViews,namedlistView1and listView2, respectively. Both ListViews receive the same value for theirlayout_weightattribute,sotheywillhavethesamewidthwhenrendered.
TheMainActivity class in Listing 8.9 represents the activity for the application. It’sonCreatemethodloadsbothListViewsandpassthemaListAdapter.Inadditon,thefirstListView’s choice mode is set to CHOICE_MODE_SINGLE, making a single itemselectable at a time. The second ListView’s choice mode is set toCHOICE_MODE_MULTIPLE,whichmakesmultipleitemsselectableatatime.
Listing8.9:TheMainActivityclass
packagecom.example.listviewdemo3;
importandroid.app.Activity;
importandroid.os.Bundle;
importandroid.widget.ArrayAdapter;
importandroid.widget.ListView;
publicclassMainActivityextendsActivity{
@Override
protectedvoidonCreate(BundlesavedInstanceState){
super.onCreate(savedInstanceState);
setContentView(R.layout.activity_main);
String[]cities={“Rome”,“Venice”,“Basel”};
ArrayAdapter<String>adapter1=new
ArrayAdapter<String>(this,
android.R.layout.simple_list_item_activated_1,
cities);
ListViewlistView1=(ListView)
findViewById(R.id.listView1);
listView1.setAdapter(adapter1);
listView1.setChoiceMode(ListView.CHOICE_MODE_SINGLE);
ArrayAdapter<String>adapter2=new
ArrayAdapter<String>(this,
R.layout.list_item,cities);
ListViewlistView2=(ListView)
findViewById(R.id.listView2);
listView2.setAdapter(adapter2);
listView2.setChoiceMode(ListView.CHOICE_MODE_MULTIPLE);
}
}
The first ListView’s ListAdapter is given the default layout(simple_list_item_activated_1).ThesecondListView’sListAdapter,ontheotherhand,is set to use a layout that is pointed by R.layout.list_item. This refers to theres/layout/list_item.xmlfileshowninListing8.10.
Listing8.10:Thelist_item.xmlfile
<?xmlversion=“1.0”encoding=“utf-8”?>
<TextViewxmlns:android=“http://schemas.android.com/apk/res/android”
android:id=”@+id/list_item”
android:layout_width=“fill_parent”
android:layout_height=“fill_parent”
android:padding=“7dip”
android:textSize=“16sp”
android:textStyle=“bold”
android:background=”@drawable/list_selector”
/>
AlayoutfileforaListViewmustcontainaTextView,asthelist_item.xmlfiledoes.Notethatitsbackgroundattributeisgiventhevaluedrawable/list_selector,whichreferencesthelist_selector.xmlfileinListing8.11.ThisisaselectorfilethatwillbeusedtostyletheselecteditemonlistView2.Theselectorelementcontainsanitemwhosestate_activatedattributeissettotrue,whichmeansitwillbeusedtostyletheselecteditem.Itsdrawableattribute is set to drawable/activated, referring to the drawable/activated.xml file inListing8.12.
Listing8.11:Thedrawable/list_selector.xmlfile
<?xmlversion=“1.0”encoding=“utf-8”?>
<selector
xmlns:android=“http://schemas.android.com/apk/res/android”>
<itemandroid:state_activated=“true”
android:drawable=”@drawable/activated”/>
</selector>
Listing8.12:Thedrawable/activated.xmlfile
<shapexmlns:android=“http://schemas.android.com/apk/res/android”
android:shape=“rectangle”>
<cornersandroid:radius=“8dp”/>
<gradient
android:startColor=”#FFFF0000”
android:endColor=”#FFFF00”
android:angle=“45”/>
</shape>
ThedrawableinListing8.12isbasedonanXMLfilethatcontainsashapewithagivengradientcolor.
RunningtheapplicationwillgiveyouanactivitylikethatinFigure8.4.
SummaryAListView isaviewthatcontainsalistofscrollableitemsandgetsitsdatasourceandlayoutfromaListAdapter,whichinturncanbecreatedfromanArrayAdapter.Inthischapter you learned how to use the ListView. You also learned how to use theListActivityandstyletheselecteditemonaListView.

Chapter9GridView
AGridView is a view that can display a list of scrollable items in a grid. It is like aListVIewexceptthatitdisplayitemsinmultiplecolumns,unlikeaListViewwhereitemsaredisplayedinasinglecolumn.LikeaListView,aGridView tootakesitsdatasourceandlayoutfromaListAdapter.
This chapter shows how you can use theGridView widget and presents a sampleapplication.YoushouldhavereadChapter8,“ListView”beforereadingthischapter.
OverviewTheandroid.widget.GridView class is the template for creating aGridView. Both theGridView andListView classes are direct descendants of android.view.AbsListView.Like aListView, aGridView gets its data source from aListAdapter. Please refer toChapter8,“ListView”formoreinformationontheListAdapter.
You can use aGridView just like youwould other views: by declaring a node in alayoutfile.InthecaseofaGridView,youwouldusethisGridViewelement:
<GridView
android:id=”@+id/gridView1”
android:layout_width=“fill_parent”
android:layout_height=“fill_parent”
android:columnWidth=“120dp”
android:numColumns=“auto_fit”
android:verticalSpacing=“10dp”
android:horizontalSpacing=“10dp”
android:stretchMode=“columnWidth”
/>
You can then find theGridView in your activity class using findViewById and pass aListAdaptertoit.
GridViewgridView=(GridView)findViewById(R.id.gridView1);
gridView.setAdapter(listAdapter);
Optionally, you can pass an AdapterView.OnItemClickListener to a GridView’ssetOnItemClickListenermethodtorespondtoitemselection:
gridview.setOnItemClickListener(
newAdapterView.OnItemClickListener(){
publicvoidonItemClick(AdapterView<?>parent,Viewv,int
position,longid){
//dosomethinghere
}
});
UsingtheGridViewTheGridViewDemo1application showsyouhow touse theGridView.Theapplicationonlyhasanactivity,whichusesaGridViewtofillitsentiredisplayarea.TheGridViewinturnusesacustomListAdapterforitsitemsandlayout.
Listing9.1showstheapplicationmanifest.
Listing9.1:TheAndroidManifest.xmlfile
<?xmlversion=“1.0”encoding=“utf-8”?>
<manifestxmlns:android=“http://schemas.android.com/apk/res/android”
package=“com.example.gridviewdemo1”
android:versionCode=“1”
android:versionName=“1.0”>
<uses-sdk
android:minSdkVersion=“18”
android:targetSdkVersion=“18”/>
<application
android:allowBackup=“true”
android:icon=”@drawable/ic_launcher”
android:label=”@string/app_name”
android:theme=”@style/AppTheme”>
<activity
android:name=“com.example.gridviewdemo1.MainActivity”
android:label=”@string/app_name”>
<intent-filter>
<actionandroid:name=“android.intent.action.MAIN”/>
<category
android:name=“android.intent.category.LAUNCHER”/>
</intent-filter>
</activity>
</application>
</manifest>
ThecustomListAdapter that feeds theGridView is an instanceofGridViewAdapter,which is presented in Listing 9.2. GridViewAdapter extendsandroid.widget.BaseAdapter, which in turn implements theandroid.widget.ListAdapterinterface.Therefore,aGridViewAdapterisaListAdapterandcanbepassedtoaGridView’ssetAdaptermethod.
Listing9.2:TheGridViewAdapterclass
packagecom.example.gridviewdemo1;
importandroid.content.Context;
importandroid.view.View;
importandroid.view.ViewGroup;
importandroid.widget.BaseAdapter;
importandroid.widget.GridView;
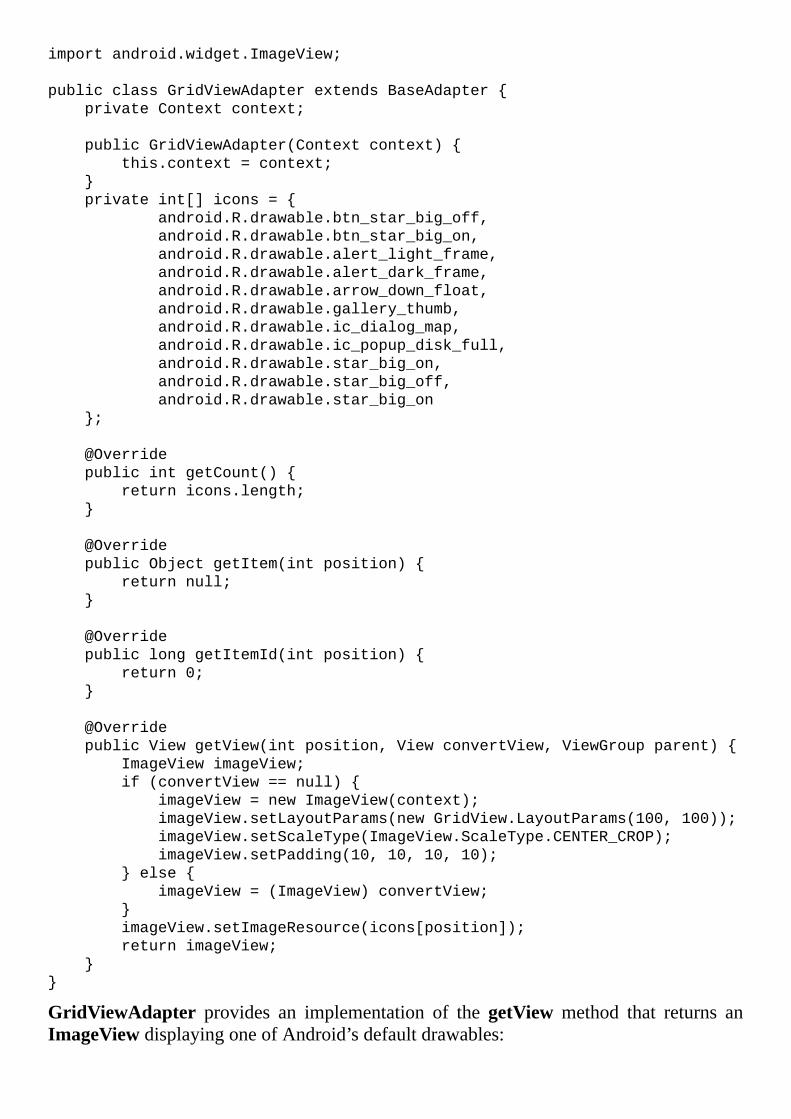
importandroid.widget.ImageView;
publicclassGridViewAdapterextendsBaseAdapter{
privateContextcontext;
publicGridViewAdapter(Contextcontext){
this.context=context;
}
privateint[]icons={
android.R.drawable.btn_star_big_off,
android.R.drawable.btn_star_big_on,
android.R.drawable.alert_light_frame,
android.R.drawable.alert_dark_frame,
android.R.drawable.arrow_down_float,
android.R.drawable.gallery_thumb,
android.R.drawable.ic_dialog_map,
android.R.drawable.ic_popup_disk_full,
android.R.drawable.star_big_on,
android.R.drawable.star_big_off,
android.R.drawable.star_big_on
};
@Override
publicintgetCount(){
returnicons.length;
}
@Override
publicObjectgetItem(intposition){
returnnull;
}
@Override
publiclonggetItemId(intposition){
return0;
}
@Override
publicViewgetView(intposition,ViewconvertView,ViewGroupparent){
ImageViewimageView;
if(convertView==null){
imageView=newImageView(context);
imageView.setLayoutParams(newGridView.LayoutParams(100,100));
imageView.setScaleType(ImageView.ScaleType.CENTER_CROP);
imageView.setPadding(10,10,10,10);
}else{
imageView=(ImageView)convertView;
}
imageView.setImageResource(icons[position]);
returnimageView;
}
}
GridViewAdapter provides an implementation of the getView method that returns anImageViewdisplayingoneofAndroid’sdefaultdrawables:
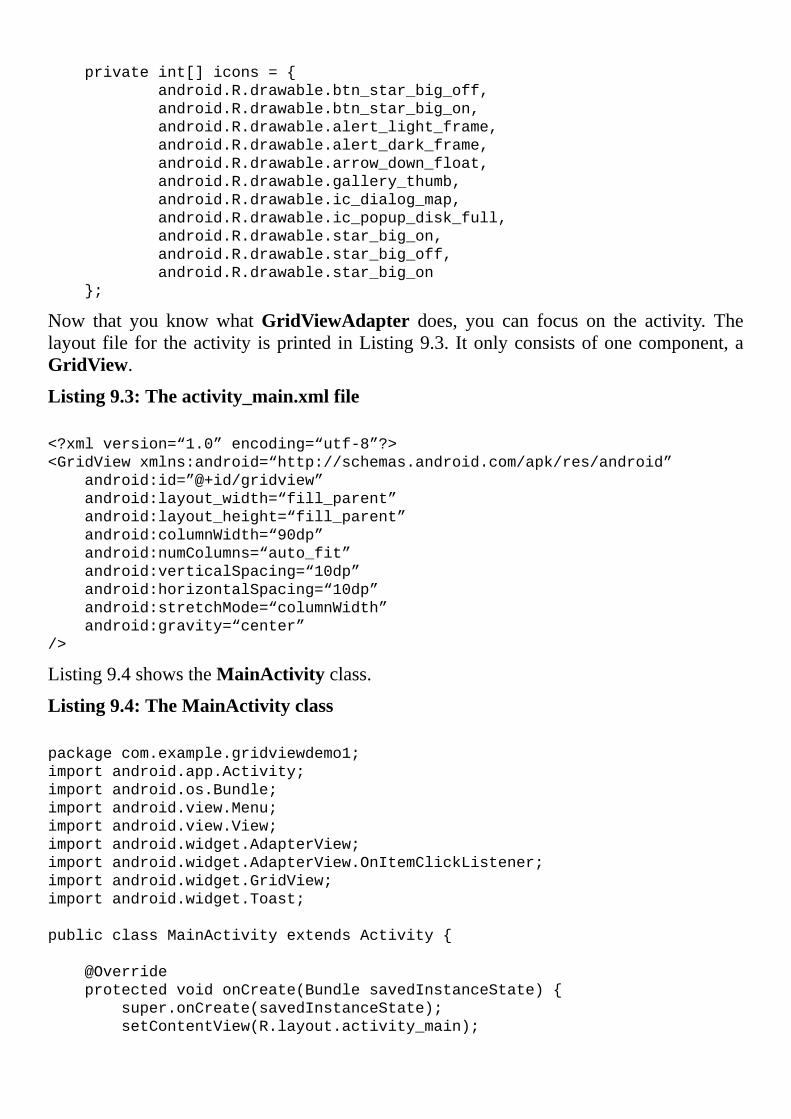
privateint[]icons={
android.R.drawable.btn_star_big_off,
android.R.drawable.btn_star_big_on,
android.R.drawable.alert_light_frame,
android.R.drawable.alert_dark_frame,
android.R.drawable.arrow_down_float,
android.R.drawable.gallery_thumb,
android.R.drawable.ic_dialog_map,
android.R.drawable.ic_popup_disk_full,
android.R.drawable.star_big_on,
android.R.drawable.star_big_off,
android.R.drawable.star_big_on
};
Now that you knowwhatGridViewAdapter does, you can focus on the activity. Thelayoutfile for theactivity isprinted inListing9.3. Itonlyconsistsofonecomponent,aGridView.
Listing9.3:Theactivity_main.xmlfile
<?xmlversion=“1.0”encoding=“utf-8”?>
<GridViewxmlns:android=“http://schemas.android.com/apk/res/android”
android:id=”@+id/gridview”
android:layout_width=“fill_parent”
android:layout_height=“fill_parent”
android:columnWidth=“90dp”
android:numColumns=“auto_fit”
android:verticalSpacing=“10dp”
android:horizontalSpacing=“10dp”
android:stretchMode=“columnWidth”
android:gravity=“center”
/>
Listing9.4showstheMainActivityclass.
Listing9.4:TheMainActivityclass
packagecom.example.gridviewdemo1;
importandroid.app.Activity;
importandroid.os.Bundle;
importandroid.view.Menu;
importandroid.view.View;
importandroid.widget.AdapterView;
importandroid.widget.AdapterView.OnItemClickListener;
importandroid.widget.GridView;
importandroid.widget.Toast;
publicclassMainActivityextendsActivity{
@Override
protectedvoidonCreate(BundlesavedInstanceState){
super.onCreate(savedInstanceState);
setContentView(R.layout.activity_main);
GridViewgridview=(GridView)findViewById(R.id.gridview);
gridview.setAdapter(newGridViewAdapter(this));
gridview.setOnItemClickListener(newOnItemClickListener(){
publicvoidonItemClick(AdapterView<?>parent,
Viewview,intposition,longid){
Toast.makeText(MainActivity.this,””+position,
Toast.LENGTH_SHORT).show();
}
});
}
@Override
publicbooleanonCreateOptionsMenu(Menumenu){
getMenuInflater().inflate(R.menu.menu_main,menu);
returntrue;
}
}
MainActivityisasimpleclass,withthebulkofitsbrainresidesinitsonCreatemethod.HereitloadstheGridViewfromthelayoutandpassesaninstanceofGridViewAdapterto theGridView’ssetAdaptermethod. It also creates anOnItemClickListener for theGridView so that every time an item on theGridView is selected, the onItemClickmethodin the listenergetscalled.In thiscase,onItemClick simplycreatesaToast thatshowsthepositionoftheselecteditem.
RunningGridViewDemo1givesyouanactivitythatlooksliketheoneinFigure9.1.

Figure9.1:UsingaGridView
SummaryAGridView isaviewthatcontainsa listofscrollable itemsdisplayed inagrid.LikeaListView, a GridView gets its data and layout from a ListAdapter. In addition, aGridView can also receive an AdapterView.OnItemClickListener to handle itemselection.
Chapter10StylesandThemes
Thelookandfeelofanapplicationaregovernedbythestylesandthemesitisusing.Thischapterdiscussesthesetwoimportanttopicsandshowsyouhowtousethem.
OverviewAviewdeclaration ina layout file canhaveattributes,manyofwhichare style-related,includingtextColor,textSize,background,andtextAppearance.
Style-relatedattributesforanapplicationcanbelumpedinagroupandthegroupcanbegiven a name and moved to a styles.xml file. A styles.xml file that is saved in theres/valuesdirectorywillberecognizedbytheapplicationasastylesfileandthestylesinthefilecanbeusedtostyletheviewsintheapplication.Toapplyastyletoaview,usethestyle attribute. The advantage of creating a style is to make the style reusable andshareable.Stylessupportinheritancesoyoucanextendastyletocreateanewstyle.Hereisanexampleofastyleinastyles.xmlfile.
<stylename=“Style1”>
<itemname=“android:layout_width”>wrap_content</item>
<itemname=“android:layout_height”>wrap_content</item>
<itemname=“android:textColor”>#FFFFFF</item>
<itemname=“android:textStyle”>bold</item>
<itemname=“android:textSize”>25sp</item>
</style>
Toapplythestyletoaview,assignthestylenametothestyleattribute.
<TextView
android:id=”@+id/textView1”
style=”@style/Style1”
android:text=“Style1”/>
Notethatthestyleattribute,unlikeotherattributes,doesnotusetheandroidprefix.So,it’sstyleandnotandroid:style.
TheTextViewelementdeclarationaboveisequivalenttothefollowing.
<TextView
android:id=”@+id/textView1”
android:layout_width=“wrap_content”
android:layout_height=“wrap_content”
android:textColor=”#FFFFFF”
android:textStyle=“bold”
android:textSize=“25sp”
android:text=“Style1”/>
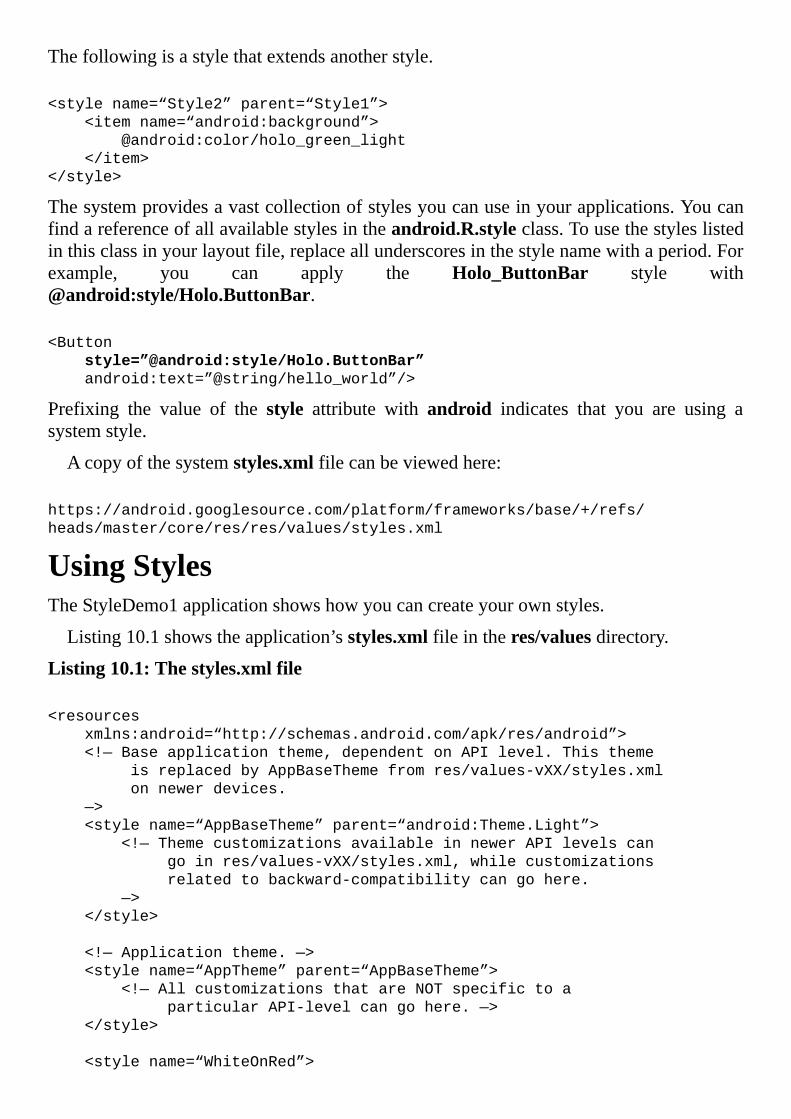
Thefollowingisastylethatextendsanotherstyle.
<stylename=“Style2”parent=“Style1”>
<itemname=“android:background”>
@android:color/holo_green_light
</item>
</style>
Thesystemprovidesavastcollectionofstylesyoucanuseinyourapplications.Youcanfindareferenceofallavailablestylesintheandroid.R.styleclass.Tousethestyleslistedinthisclassinyourlayoutfile,replaceallunderscoresinthestylenamewithaperiod.Forexample, you can apply the Holo_ButtonBar style with@android:style/Holo.ButtonBar.
<Button
style=”@android:style/Holo.ButtonBar”
android:text=”@string/hello_world”/>
Prefixing the value of the style attribute with android indicates that you are using asystemstyle.
Acopyofthesystemstyles.xmlfilecanbeviewedhere:
https://android.googlesource.com/platform/frameworks/base/+/refs/
heads/master/core/res/res/values/styles.xml
UsingStylesTheStyleDemo1applicationshowshowyoucancreateyourownstyles.
Listing10.1showstheapplication’sstyles.xmlfileintheres/valuesdirectory.
Listing10.1:Thestyles.xmlfile
<resources
xmlns:android=“http://schemas.android.com/apk/res/android”>
<!—Baseapplicationtheme,dependentonAPIlevel.Thistheme
isreplacedbyAppBaseThemefromres/values-vXX/styles.xml
onnewerdevices.
—>
<stylename=“AppBaseTheme”parent=“android:Theme.Light”>
<!—ThemecustomizationsavailableinnewerAPIlevelscan
goinres/values-vXX/styles.xml,whilecustomizations
relatedtobackward-compatibilitycangohere.
—>
</style>
<!—Applicationtheme.—>
<stylename=“AppTheme”parent=“AppBaseTheme”>
<!—AllcustomizationsthatareNOTspecifictoa
particularAPI-levelcangohere.—>
</style>
<stylename=“WhiteOnRed”>

<itemname=“android:layout_width”>wrap_content</item>
<itemname=“android:layout_height”>wrap_content</item>
<itemname=“android:textColor”>#FFFFFF</item>
<itemname=“android:background”>
@android:color/holo_red_light
</item>
<itemname=“android:typeface”>serif</item>
<itemname=“android:textStyle”>bold</item>
<itemname=“android:textSize”>25sp</item>
<itemname=“android:padding”>30dp</item>
</style>
<stylename=“WhiteOnRed.Italic”>
<itemname=“android:textStyle”>bold|italic</item>
</style>
<stylename=“WhiteOnGreen”parent=“WhiteOnRed”>
<itemname=“android:background”>
@android:color/holo_green_light
</item>
</style>
</resources>
Therearefivestylesdefinedinthestyles.xmlfileinListing10.1.Thefirsttwoareaddedby Android Studio when the application was created. They will be explained in the“Themes”sectionlaterinthischapter.
Theotherthreestylesareusedbythemainactivityoftheapplicationinthelayoutfileforthatactivity.ThelayoutfileisshowninListing10.2.
Listing10.2:theactivity_main.xmllayoutfile
<RelativeLayout
xmlns:android=“http://schemas.android.com/apk/res/android”
xmlns:tools=“http://schemas.android.com/tools”
android:layout_width=“match_parent”
android:layout_height=“match_parent”
android:paddingBottom=”@dimen/activity_vertical_margin”
android:paddingLeft=”@dimen/activity_horizontal_margin”
android:paddingRight=”@dimen/activity_horizontal_margin”
android:paddingTop=”@dimen/activity_vertical_margin”
tools:context=”.MainActivity”>
<TextView
android:id=”@+id/textView1”
style=”@style/WhiteOnRed”
android:text=“StyleWhiteOnRed”/>
<TextView
android:id=”@+id/textView2”
android:layout_below=”@id/textView1”
android:layout_marginLeft=“20sp”
android:layout_marginTop=“10sp”
style=”@style/WhiteOnRed.Italic”
android:text=“StyleWhiteOnRed.Italic”/>
<TextView
android:id=”@+id/textView3”
android:layout_below=”@id/textView2”
android:layout_toEndOf=”@id/textView2”
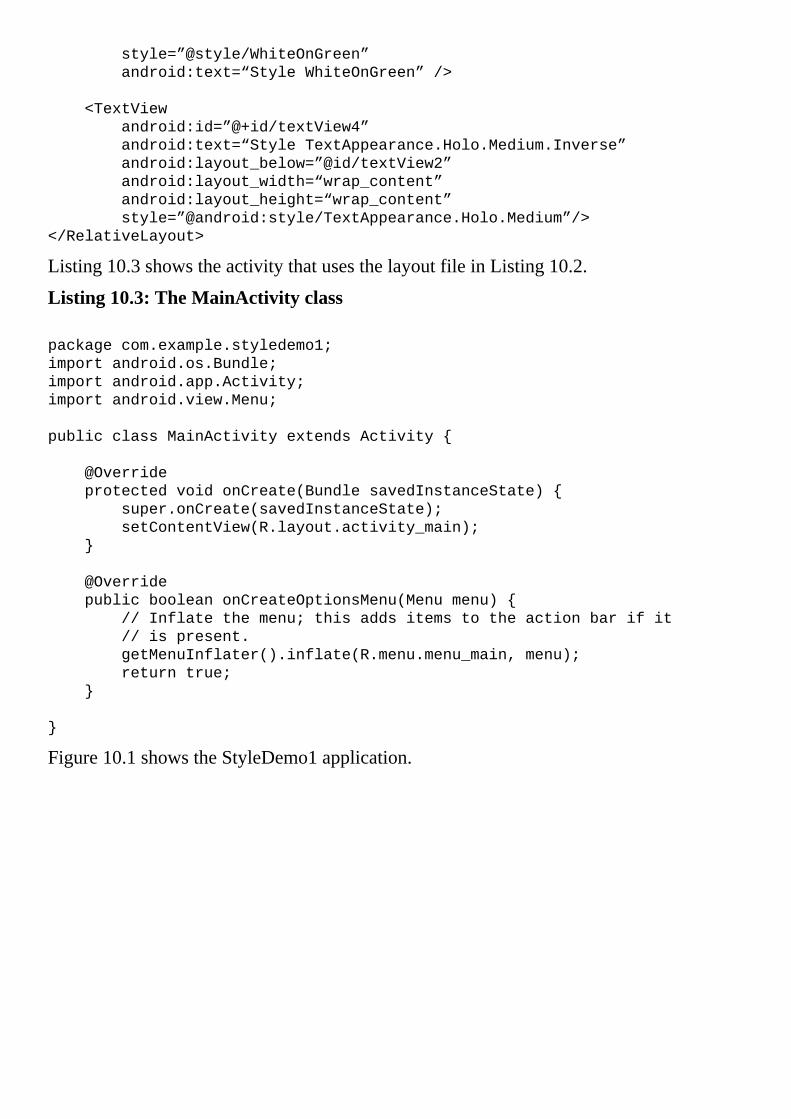
style=”@style/WhiteOnGreen”
android:text=“StyleWhiteOnGreen”/>
<TextView
android:id=”@+id/textView4”
android:text=“StyleTextAppearance.Holo.Medium.Inverse”
android:layout_below=”@id/textView2”
android:layout_width=“wrap_content”
android:layout_height=“wrap_content”
style=”@android:style/TextAppearance.Holo.Medium”/>
</RelativeLayout>
Listing10.3showstheactivitythatusesthelayoutfileinListing10.2.
Listing10.3:TheMainActivityclass
packagecom.example.styledemo1;
importandroid.os.Bundle;
importandroid.app.Activity;
importandroid.view.Menu;
publicclassMainActivityextendsActivity{
@Override
protectedvoidonCreate(BundlesavedInstanceState){
super.onCreate(savedInstanceState);
setContentView(R.layout.activity_main);
}
@Override
publicbooleanonCreateOptionsMenu(Menumenu){
//Inflatethemenu;thisaddsitemstotheactionbarifit
//ispresent.
getMenuInflater().inflate(R.menu.menu_main,menu);
returntrue;
}
}
Figure10.1showstheStyleDemo1application.
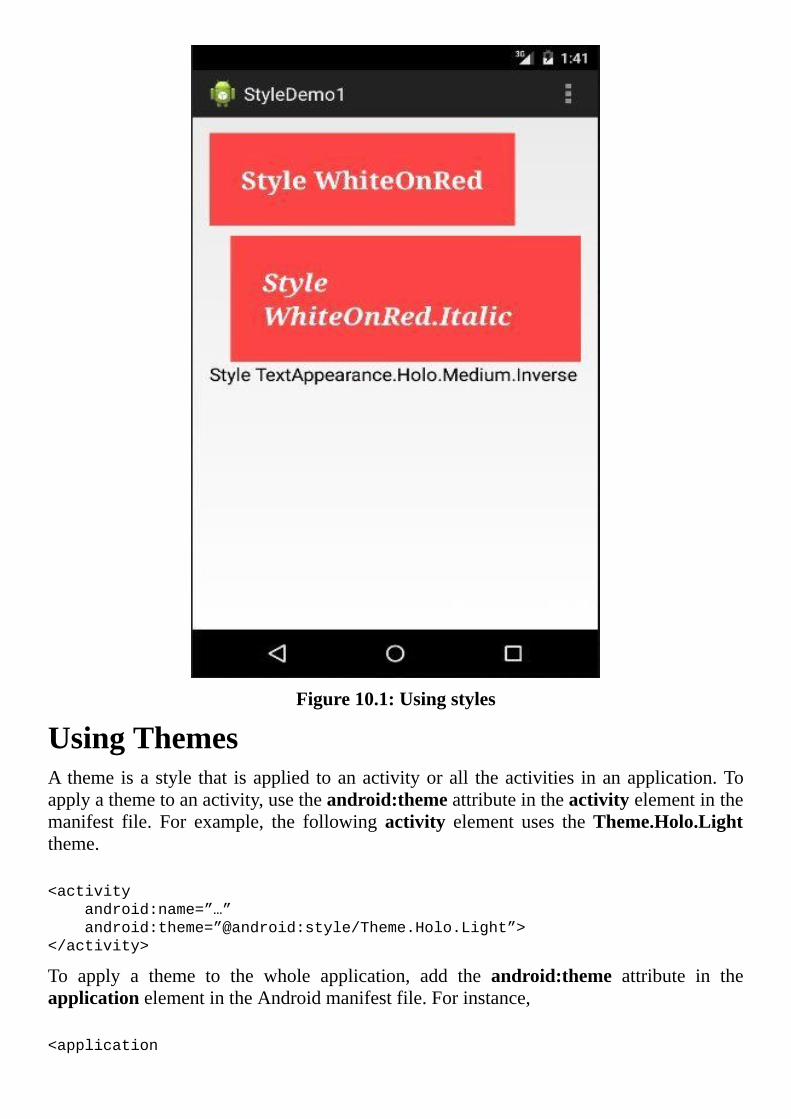
Figure10.1:Usingstyles
UsingThemesAtheme isastyle that isapplied toanactivityorall theactivities inanapplication.Toapplyathemetoanactivity,usetheandroid:themeattributeintheactivityelementinthemanifest file. For example, the following activity element uses theTheme.Holo.Lighttheme.
<activity
android:name=”…”
android:theme=”@android:style/Theme.Holo.Light”>
</activity>
To apply a theme to the whole application, add the android:theme attribute in theapplicationelementintheAndroidmanifestfile.Forinstance,
<application
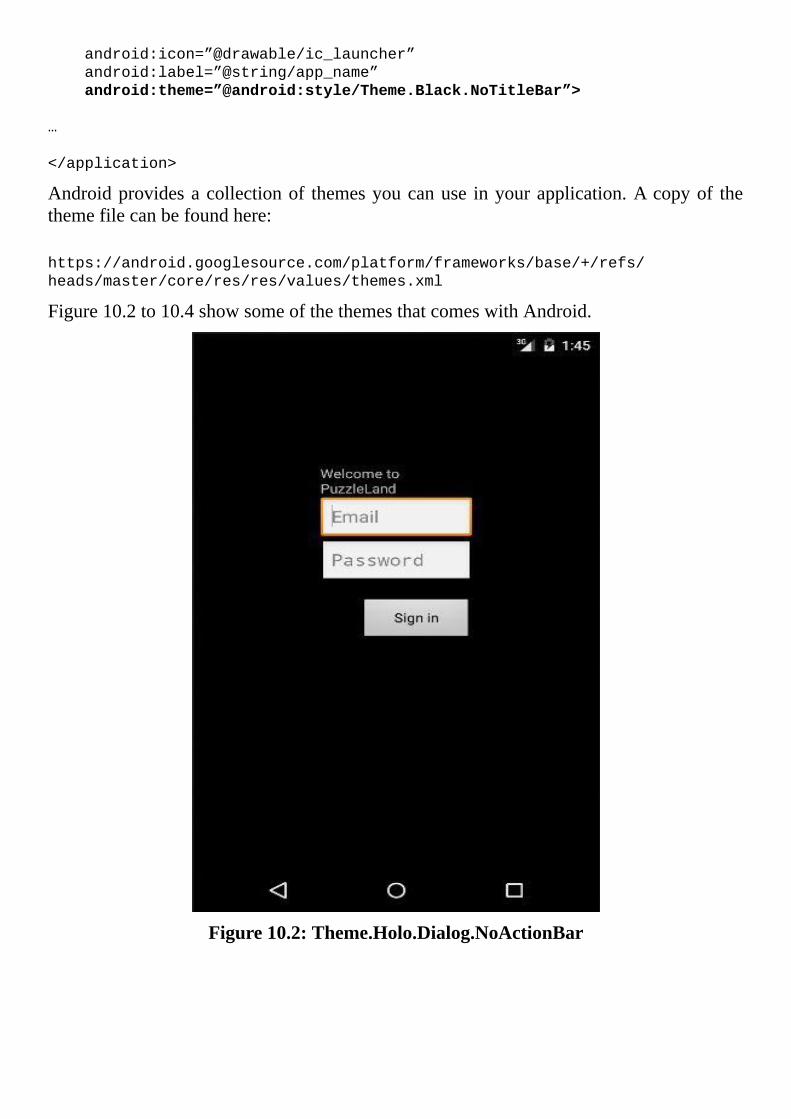
android:icon=”@drawable/ic_launcher”
android:label=”@string/app_name”
android:theme=”@android:style/Theme.Black.NoTitleBar”>
…
</application>
Androidprovidesacollectionof themesyoucanuse inyourapplication.Acopyof thethemefilecanbefoundhere:
https://android.googlesource.com/platform/frameworks/base/+/refs/
heads/master/core/res/res/values/themes.xml
Figure10.2to10.4showsomeofthethemesthatcomeswithAndroid.
Figure10.2:Theme.Holo.Dialog.NoActionBar
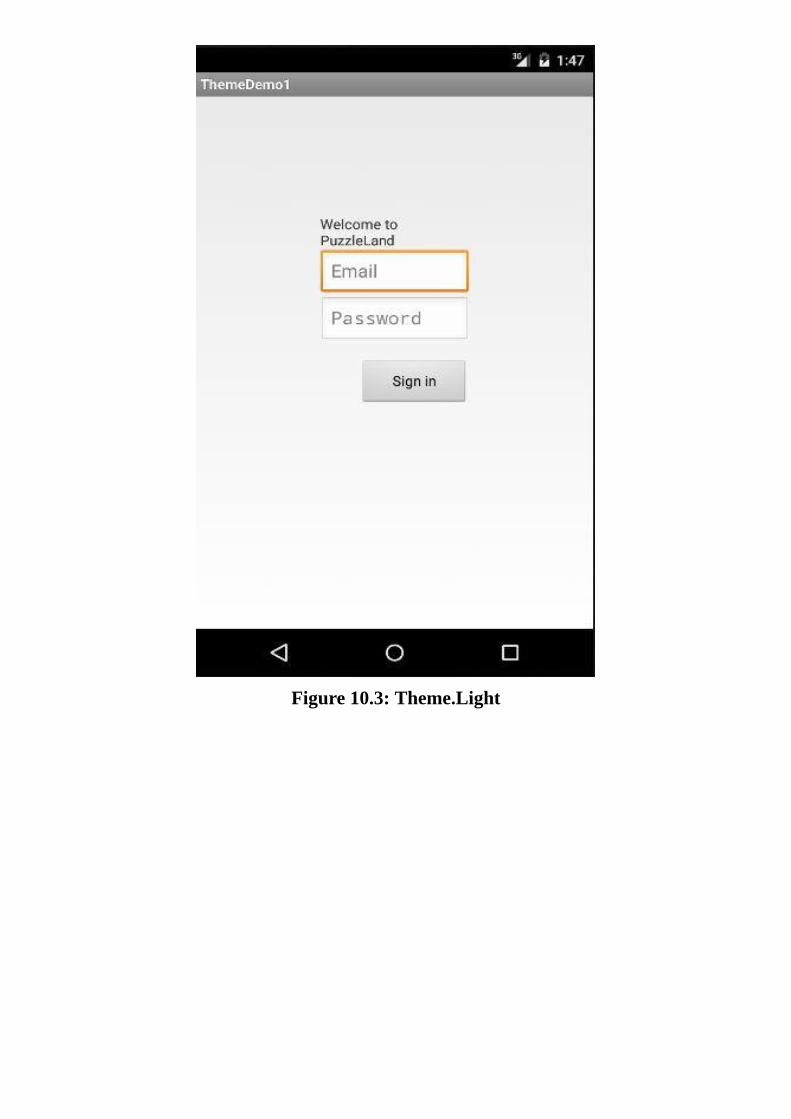
Figure10.3:Theme.Light
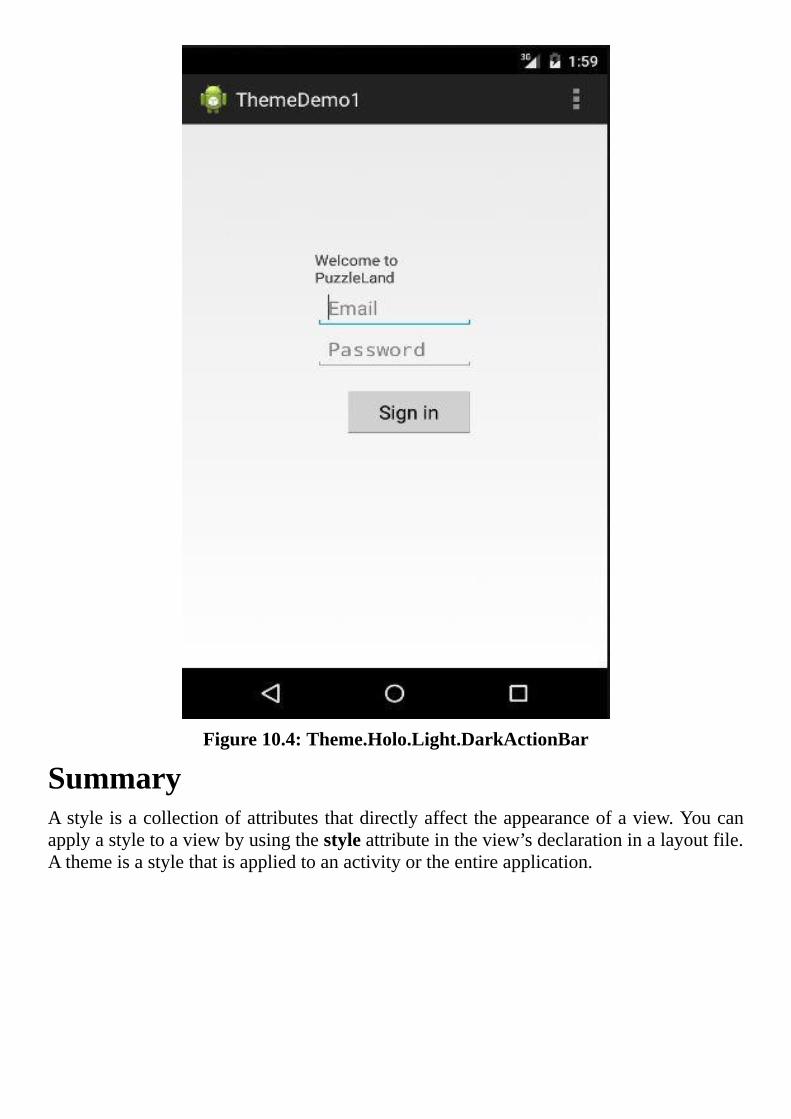
Figure10.4:Theme.Holo.Light.DarkActionBar
SummaryAstyleisacollectionofattributesthatdirectlyaffecttheappearanceofaview.Youcanapplyastyletoaviewbyusingthestyleattributeintheview’sdeclarationinalayoutfile.Athemeisastylethatisappliedtoanactivityortheentireapplication.
Chapter11BitmapProcessing
With theAndroidBitmapAPIyoucanmanipulate images in JPG,PNGorGIF format,suchasbychangingthecolorortheopacityofeachpixelintheimage.Inaddition,youcanusetheAPItodown-samplealargeimagetosavememory.Assuch,knowinghowtouse this API is useful, even when you are not writing a photo editor or an imageprocessingapplication.
Thischapterexplainshowtoworkwithbitmapsandprovidesanexample.
OverviewAbitmapisanimagefileformatthatcanstoredigitalimagesindependentlyofthedisplaydevice.Abitmapsimplymeansamapofbits.Todaythetermalsoincludesotherformatsthatsupportlossyandlosslesscompression,suchasJPEG,GIFandPNG.GIFandPNGsupporttransparencyandlosslesscompression,whereasJPEGsupportlossycompressionanddoesnotsupporttransparency.Anotherwayofrepresentingdigitalimagesisthroughmathematicalexpressions.Suchimagesareknownasvectorgraphics.
TheAndroidframeworkprovidesanAPIforprocessingbitmapimages.ThisAPItakesthe form of classes, interfaces, and enums in the android.graphics package and itssubpackages.TheBitmapclassmodelsabitmapimage.ABitmapcanbedisplayedonanactivityusingtheImageViewwidget.
The easiest way to load a bitmap is by using theBitmapFactory class. This classprovidesstaticmethods forconstructingaBitmap froma file,abytearray,anAndroidresourceoranInputStream.Herearesomeofthemethods.
publicstaticBitmapdecodeByteArray(byte[]data,intoffset,
intlength)
publicstaticBitmapdecodeFile(java.lang.StringpathName)
publicstaticBitmapdecodeResource(
android.content.res.Resourcesres,intid)
publicstaticBitmapdecodeStream(java.io.InputStreamis)
For example, to construct aBitmap fromanAndroid resource in an activity class, youwouldusethiscode.
Bitmapbmp=BitmapFactory.decodeResource(getResources(),
R.drawable.image1);
Here,getResources is a method in the android.content.Context class that returns theapplication’s resources (Context is the parent class of Activity). The identifier(R.drawable.image1)allowsAndroidtopickthecorrectimagefromtheresources.
The BitmapFactory class also offers static methods that take options as aBitmapFactory.Optionsobject:
publicstaticBitmapdecodeByteArray(byte[]data,intoffset,
intlength,BitmapFactory.Optionsopts)
publicstaticBitmapdecodeFile(java.lang.StringpathName,
BitmapFactory.Optionsopts)
publicstaticBitmapdecodeResource(android.content.res.Resources
res,intid,BitmapFactory.Optionsopts)
publicstaticBitmapdecodeStream(java.io.InputStreamis,
RectoutPadding,BitmapFactory.Optionsopts)
TherearetwothingsyoucandowithaBitmapFactory.Options.Thefirstisitallowsyoutoconfiguretheresultingbitmapastheclassallowsyoutodown-samplethebitmap,setthe bitmap to be mutable and configure its density. The second is you can use theBitmapFactory.Options to read thepropertiesof abitmapwithout actually loading theimage. For example, you may pass a BitmapFactory.Options to one of the decodemethods inBitmapFactoryandread thesizeof the image. If thesize isconsidered toolarge, then you can down-sample it, saving precious memory. Down-sampling makessensefor largebitmapswhen itdoesnot reducerenderquality.For instance,a20,000x10,000bitmapcanbedown-sampledto2,000x1,000withoutdegradationassumingthedevicescreen resolutiondoesnotexceed2,000x1,000. In theprocess, it savesa lotofmemory.
TodecodeaBitmapwithoutactuallyloadingthebitmap,settheinJustDecodeBoundsfieldoftheBitmapFactory.Optionsobjecttotrue.
BitmapFactory.Optionsopts=newBitmapFactory.Options()
opts.inJustDecodeBounds=true;
IfyoupasstheoptionstooneofthedecodemethodsinBitmapFactory,themethodwillreturnnullandsimplypopulatetheBitmapFactory.Optionsobjectthatyoupassed.Fromthisobject,youcanretrievethebitmapsizeandotherproperties:
intimageHeight=options.outHeight;
intimageWidth=options.outWidth;
StringimageType=options.outMimeType;
The inSampleSize field of BitmapFactor.Options tells the system how to sample abitmap. A value greater than 1 indicates that the image should be down-sampled. Forexample,settingtheinSampleSizefieldto4returnsanimagewhosesizeisaquarterthatoftheoriginalimage.
Regardingthisfield,theAndroiddocumentationsaysthatthedecoderusesafinalvaluebasedonpowersof2,whichmeansyoushouldonlyassignapowerof2,suchas2,4,8,andsoon.However,myowntestshowsthatthisonlyappliestoimagesinJPGformatanddoesnotapplytoPNGs.Forinstance,ifthewidthofaPNGimageis1200,assigning3tothis field returns an imagewith awidth of 400 pixels,whichmeans the inSampleSizevaluedoesnothavetobeapoweroftwo.
Finally,onceyougetaBitmapfromaBitmapFactory,youcanpasstheBitmaptoanImageViewtobedisplayed:
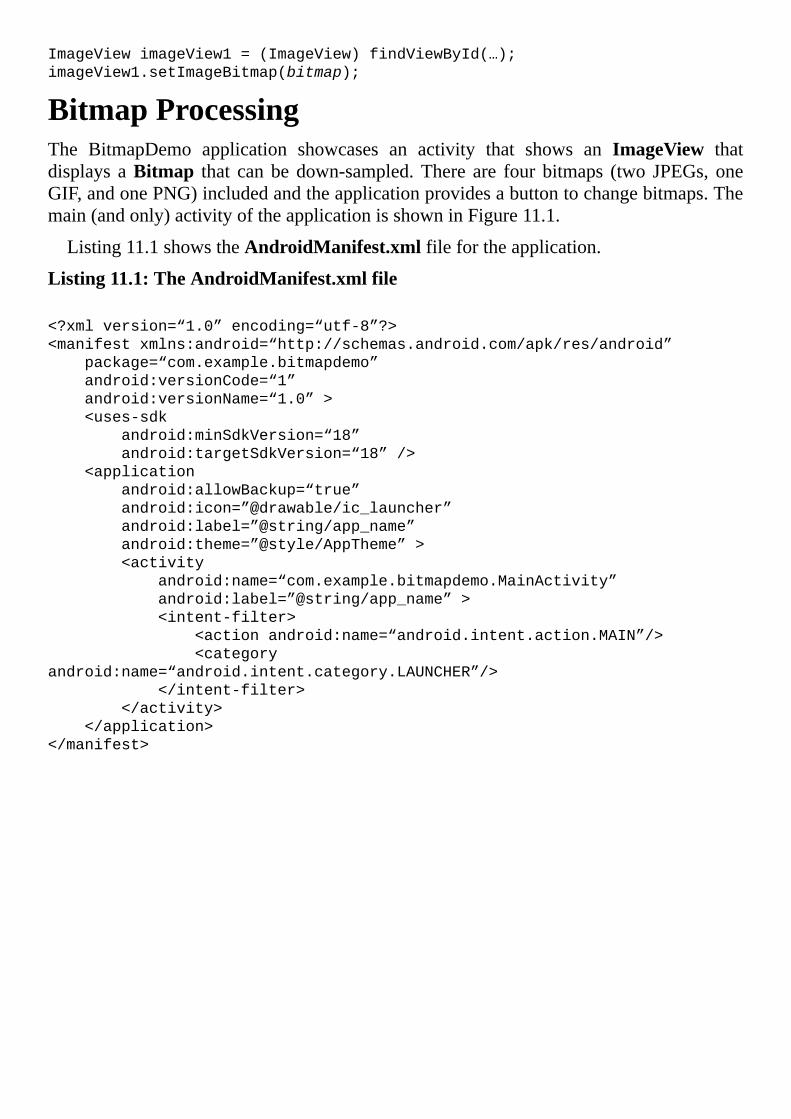
ImageViewimageView1=(ImageView)findViewById(…);
imageView1.setImageBitmap(bitmap);
BitmapProcessingThe BitmapDemo application showcases an activity that shows an ImageView thatdisplays aBitmap that canbe down-sampled.There are four bitmaps (two JPEGs, oneGIF,andonePNG)includedandtheapplicationprovidesabuttontochangebitmaps.Themain(andonly)activityoftheapplicationisshowninFigure11.1.
Listing11.1showstheAndroidManifest.xmlfilefortheapplication.
Listing11.1:TheAndroidManifest.xmlfile
<?xmlversion=“1.0”encoding=“utf-8”?>
<manifestxmlns:android=“http://schemas.android.com/apk/res/android”
package=“com.example.bitmapdemo”
android:versionCode=“1”
android:versionName=“1.0”>
<uses-sdk
android:minSdkVersion=“18”
android:targetSdkVersion=“18”/>
<application
android:allowBackup=“true”
android:icon=”@drawable/ic_launcher”
android:label=”@string/app_name”
android:theme=”@style/AppTheme”>
<activity
android:name=“com.example.bitmapdemo.MainActivity”
android:label=”@string/app_name”>
<intent-filter>
<actionandroid:name=“android.intent.action.MAIN”/>
<category
android:name=“android.intent.category.LAUNCHER”/>
</intent-filter>
</activity>
</application>
</manifest>
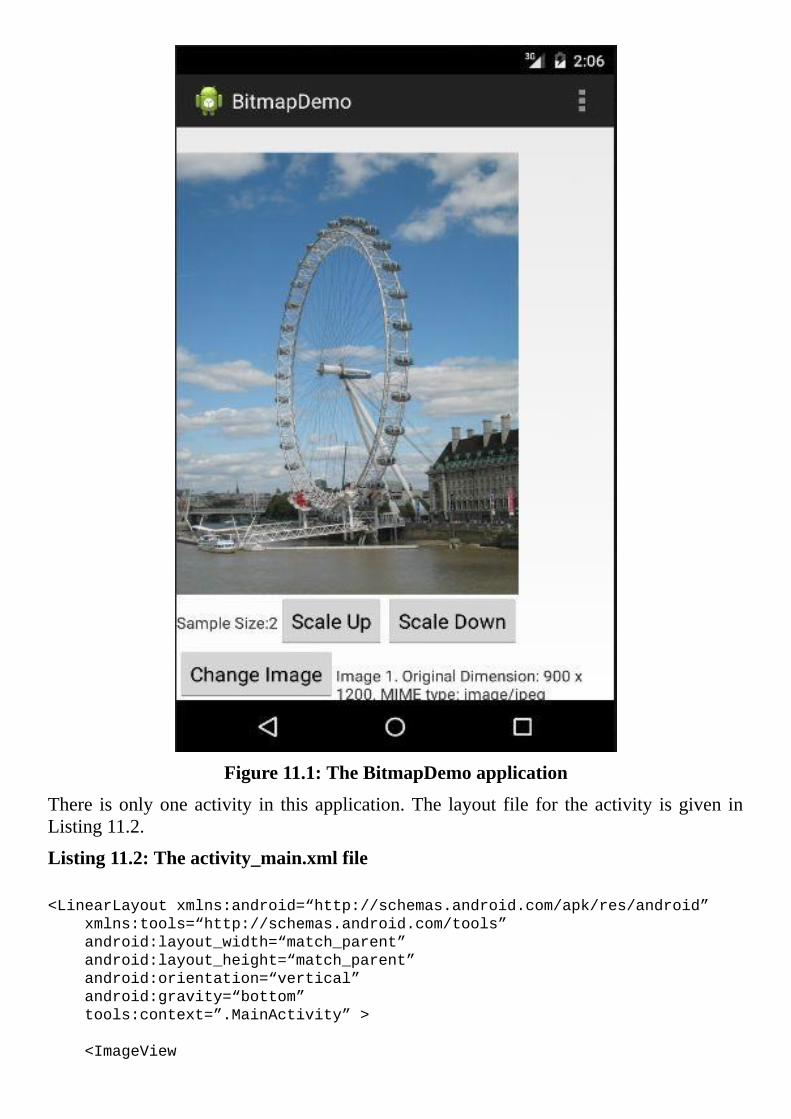
Figure11.1:TheBitmapDemoapplication
There isonlyoneactivity in thisapplication.The layout file for theactivity isgiven inListing11.2.
Listing11.2:Theactivity_main.xmlfile
<LinearLayoutxmlns:android=“http://schemas.android.com/apk/res/android”
xmlns:tools=“http://schemas.android.com/tools”
android:layout_width=“match_parent”
android:layout_height=“match_parent”
android:orientation=“vertical”
android:gravity=“bottom”
tools:context=”.MainActivity”>
<ImageView
android:id=”@+id/image_view1”
android:layout_width=“wrap_content”
android:layout_height=“wrap_content”
android:contentDescription=”@string/text_content_desc”/>
<LinearLayout
android:layout_width=“match_parent”
android:layout_height=“wrap_content”
android:orientation=“horizontal”>
<TextView
android:layout_width=“wrap_content”
android:layout_height=“wrap_content”
android:text=”@string/text_sample_size”/>
<TextView
android:id=”@+id/sample_size”
android:layout_width=“wrap_content”
android:layout_height=“wrap_content”
/>
<Button
android:onClick=“scaleUp”
android:layout_width=“wrap_content”
android:layout_height=“wrap_content”
android:text=”@string/action_scale_up”/>
<Button
android:onClick=“scaleDown”
android:layout_width=“wrap_content”
android:layout_height=“wrap_content”
android:text=”@string/action_scale_down”/>
</LinearLayout>
<LinearLayout
android:layout_width=“match_parent”
android:layout_height=“wrap_content”
android:orientation=“horizontal”>
<Button
android:onClick=“changeImage”
android:layout_width=“wrap_content”
android:layout_height=“wrap_content”
android:text=”@string/action_change_image”/>
<TextView
android:id=”@+id/image_info”
android:layout_width=“wrap_content”
android:layout_height=“wrap_content”/>
</LinearLayout>
</LinearLayout>
The layout contains a LinearLayout that in turn contains an ImageView and twoLinearLayouts.ThefirstinnerlayoutcontainstwoTextViewsandbuttonsforscalingupanddownthebitmap.ThesecondinnerlayoutcontainsaTextViewtodisplaythebitmapmetadataandabuttontochangethebitmap.
TheMainActivityclassispresentedinListing11.3.
Listing11.3:TheMainActivityclass
packagecom.example.bitmapdemo;
importandroid.app.Activity;
importandroid.graphics.Bitmap;
importandroid.graphics.BitmapFactory;
importandroid.os.Bundle;
importandroid.view.Menu;
importandroid.view.View;
importandroid.widget.ImageView;
importandroid.widget.TextView;
publicclassMainActivityextendsActivity{
intsampleSize=2;
intimageId=1;
@Override
protectedvoidonCreate(BundlesavedInstanceState){
super.onCreate(savedInstanceState);
setContentView(R.layout.activity_main);
refreshImage();
}
@Override
publicbooleanonCreateOptionsMenu(Menumenu){
getMenuInflater().inflate(R.menu.menu_main,menu);
returntrue;
}
publicvoidscaleDown(Viewview){
if(sampleSize<8){
sampleSize++;
refreshImage();
}
}
publicvoidscaleUp(Viewview){
if(sampleSize>2){
sampleSize—;
refreshImage();
}
}
privatevoidrefreshImage(){
BitmapFactory.Optionsoptions=newBitmapFactory.Options();
options.inJustDecodeBounds=true;
BitmapFactory.decodeResource(getResources(),
R.drawable.image1,options);
intimageHeight=options.outHeight;
intimageWidth=options.outWidth;
StringimageType=options.outMimeType;
StringBuilderimageInfo=newStringBuilder();
intid=R.drawable.image1;
if(imageId==2){
id=R.drawable.image2;
imageInfo.append(“Image2.”);
}elseif(imageId==3){
id=R.drawable.image3;
imageInfo.append(“Image3.”);
}elseif(imageId==4){
id=R.drawable.image4;
imageInfo.append(“Image4.”);
}else{
imageInfo.append(“Image1.”);
}
imageInfo.append(“OriginalDimension:”+imageWidth
+”x”+imageHeight);
imageInfo.append(“.MIMEtype:”+imageType);
options.inSampleSize=sampleSize;
options.inJustDecodeBounds=false;
Bitmapbitmap1=BitmapFactory.decodeResource(
getResources(),id,options);
ImageViewimageView1=(ImageView)
findViewById(R.id.image_view1);
imageView1.setImageBitmap(bitmap1);
TextViewsampleSizeText=(TextView)
findViewById(R.id.sample_size);
sampleSizeText.setText(””+sampleSize);
TextViewinfoText=(TextView)
findViewById(R.id.image_info);
infoText.setText(imageInfo.toString());
}
publicvoidchangeImage(Viewview){
if(imageId<4){
imageId++;
}else{
imageId=1;
}
refreshImage();
}
}
ThescaleDown,scaleUpandchangeImagemethodsareconnected to the threebuttons.AllmethodseventuallycalltherefreshImagemethod.
The refreshImagemethod uses theBitmapFactory.decodeResourcemethod to firstread thepropertiesof thebitmapresource,bypassingaBitmapFactory.OptionswhoseinJustDecodeBoundsfieldissettotrue.Recallthatthisisastrategyforavoidingloadingalargeimagethatwilltakemuchifnotalloftheavailablememory.
BitmapFactory.Optionsoptions=newBitmapFactory.Options();
options.inJustDecodeBounds=true;
BitmapFactory.decodeResource(getResources(),
R.drawable.image1,options);
Itthenreadsthedimensionandimagetypeofthebitmap.
intimageHeight=options.outHeight;
intimageWidth=options.outWidth;
StringimageType=options.outMimeType;
Next,itsetstheinJustDecodeBoundsfieldtofalseandusesthesampleSizevalue(thatthe user can change by clicking the Scale Up or Scale Down button) to set theinSampleSizefieldoftheBitmapFactory.Options,anddecodethebitmapforthesecondtime.
options.inSampleSize=sampleSize;
options.inJustDecodeBounds=false;
Bitmapbitmap1=BitmapFactory.decodeResource(
getResources(),id,options);
The dimension of the resulting Bitmap will be determined by the value of theinSampleSizefield.
SummaryTheAndroidBitmapAPI centers around theBitmapFactory andBitmap classes. Theformer provides static methods for constructing a Bitmap object from an Androidresource, a file, an InputStream, or a byte array. Some of the methods can take aBitmapFactory.Options to determine what kind of bitmap they will produce. TheresultingbitmapcanthenbeassignedtoanImageViewfordisplay.

Chapter12GraphicsandCustomViews
Thanks to Android’s extensive library, you have dozens of views and widgets at yourdisposal. If none of these meets your need, you can create a custom view and drawdirectlyonitusingtheAndroidGraphicsAPI.
This chapter discusses the use of somemembers of the Graphics API to draw on acanvasandcreateacustomview.AsampleapplicationcalledCanvasDemoispresentedattheendofthischapter.
OverviewTheAndroidGraphicsAPIcomprisesthemembersoftheandroid.graphicspackage.TheCanvasclassinthispackageplaysacentralrolein2Dgraphics.YoucangetaninstanceofCanvasfromthesystemandyoudonotneedtocreateoneyourself.Onceyouhaveaninstance ofCanvas, you can call its various methods, such as drawColor, drawArc,drawRect,drawCircle,anddrawText.
InadditiontoCanvas,ColorandPaintarefrequentlyused.AColorobjectrepresentsacolorcodeasanint.TheColorclassdefinesanumberofcolorcodefieldsandmethodsfor creating and converting color ints. Color code fields defined in Color includesBLACK,CYAN,MAGENTA,YELLOW,WHITE,RED,GREENandBLUE.
Take thedrawColormethod inCanvas as an example.Thismethod accepts a colorcodeasanargument.
publicvoiddrawColor(intcolor);
drawColorchangesthecolorofthecanvaswiththespecifiedcolor.Tochangethecanvascolortomagenta,youwouldwrite
canvas.drawColor(Color.MAGENTA);
APaint is required when drawing a shape or text. A Paint determines the color andtransparencyoftheshapeortextdrawnaswellasthefontfamilyandstyleofthetext.
TocreateaPaint,useoneofthePaintclass’sconstructors:
publicPaint()
publicPaint(intflags)
publicPaint(PaintanotherPaint)
Ifyouuse thesecondconstructor,youcanpassoneormore fieldsdefined in thePaintclass. For example, the following code creates a Paint by passing theLINEAR_TEXT_FLAGandANTI_ALIAS_FLAGfields.
Paintpaint=newPaint(
Paint.LINEAR_TEXT_FLAG|Paint.ANTI_ALIAS_FLAG);
HardwareAccelerationModern smart phones and tablets come with a graphic processing unit (GPU), anelectroniccircuit thatspecializes in imagecreationandrendering.StartingwithAndroid3.0, the Android framework will utilize any GPU it can find on a device, resulting inimprovedperformance throughhardware acceleration.Hardware acceleration is enabledbydefaultforanyapplicationtargetingAndroidAPIlevel14orabove.
Unfortunately,currentlynotalldrawingoperationsworkwhenhardwareaccelerationisturned on. You can disable hardware acceleration by setting theandroid:hardwareAccelerated attribute to false in either the application or activityelementinyourandroidmanifestfile.Forexample,toturnoffhardwareaccelerationforthewholeapplication,usethis:
<applicationandroid:hardwareAccelerated=“false”>
Todisablehardwareaccelerationinanactivity,usethis:
<activityandroid:hardwareAccelerated=“false”/>
It is possible to use the android:hardwareAccelerated attribute in both application oractivity levels. For example, the following indicates that all except one activity in theapplicationshouldusehardwareacceleration.
<applicationandroid:hardwareAccelerated=“true”>
<activity…/>
<activityandroid:hardwareAccelerated=“false”/>
</application>
NoteTotryouttheexamplesinthischapter,youmustdisablehardwareacceleration.
CreatingACustomViewTocreateacustomview,extendtheandroid.view.ViewclassoroneofitssubclassesandoverrideitsonDrawmethod.HereisthesignatureofonDraw.
protectedvoidonDraw(android.graphics.Canvascanvas)
The systemcalls theonDrawmethod and pass aCanvas.You can use themethods inCanvas to draw shapes and text. You can also create path and regions to draw morecomplexshapes.
The onDrawmethodmay be calledmany times during the application lifecycle.Assuch, you should not perform expensive operations here, such as allocating objects.ObjectsthatyouneedtouseinonDrawshouldbecreatedsomewhereelse.
Forexample,mostdrawingmethodsinCanvasrequireaPaint.RatherthancreatingaPaintinonDraw,youshouldcreate itat theclass levelandhave itavailable foruse in
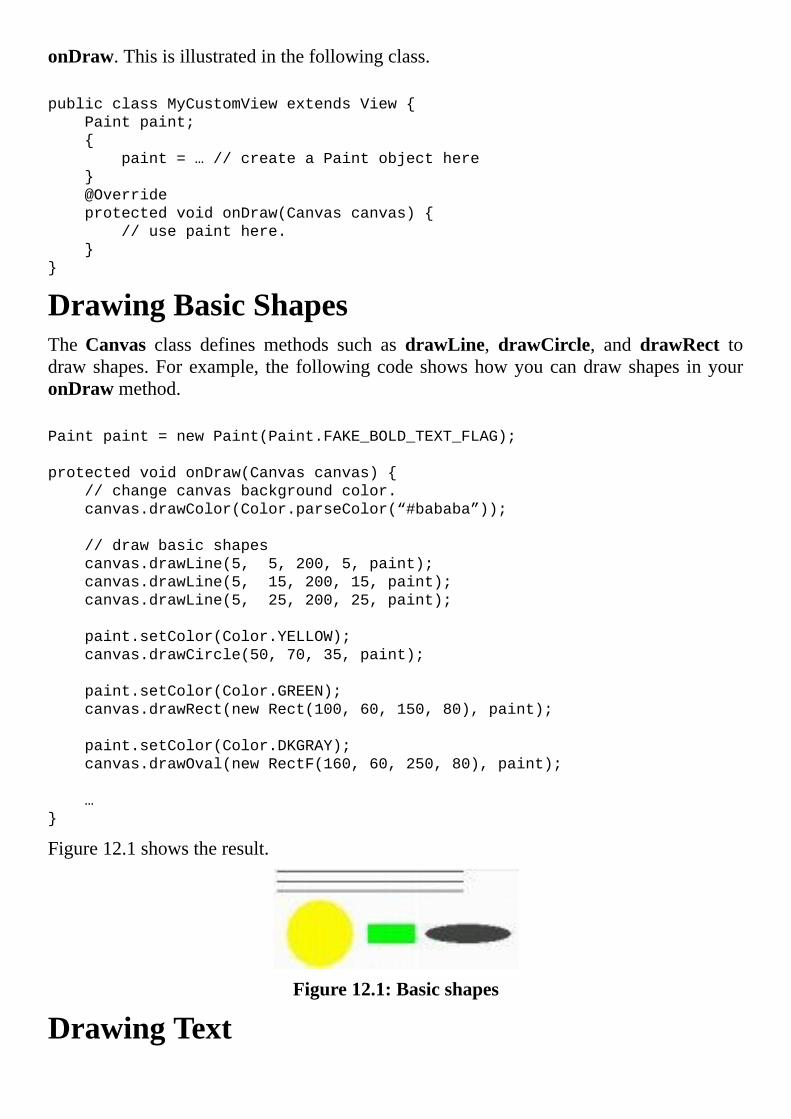
onDraw.Thisisillustratedinthefollowingclass.
publicclassMyCustomViewextendsView{
Paintpaint;
{
paint=…//createaPaintobjecthere
}
@Override
protectedvoidonDraw(Canvascanvas){
//usepainthere.
}
}
DrawingBasicShapesTheCanvas class defines methods such as drawLine, drawCircle, and drawRect todrawshapes.Forexample, the followingcodeshowshowyoucandrawshapes inyouronDrawmethod.
Paintpaint=newPaint(Paint.FAKE_BOLD_TEXT_FLAG);
protectedvoidonDraw(Canvascanvas){
//changecanvasbackgroundcolor.
canvas.drawColor(Color.parseColor(“#bababa”));
//drawbasicshapes
canvas.drawLine(5,5,200,5,paint);
canvas.drawLine(5,15,200,15,paint);
canvas.drawLine(5,25,200,25,paint);
paint.setColor(Color.YELLOW);
canvas.drawCircle(50,70,35,paint);
paint.setColor(Color.GREEN);
canvas.drawRect(newRect(100,60,150,80),paint);
paint.setColor(Color.DKGRAY);
canvas.drawOval(newRectF(160,60,250,80),paint);
…
}
Figure12.1showstheresult.
Figure12.1:Basicshapes
DrawingText
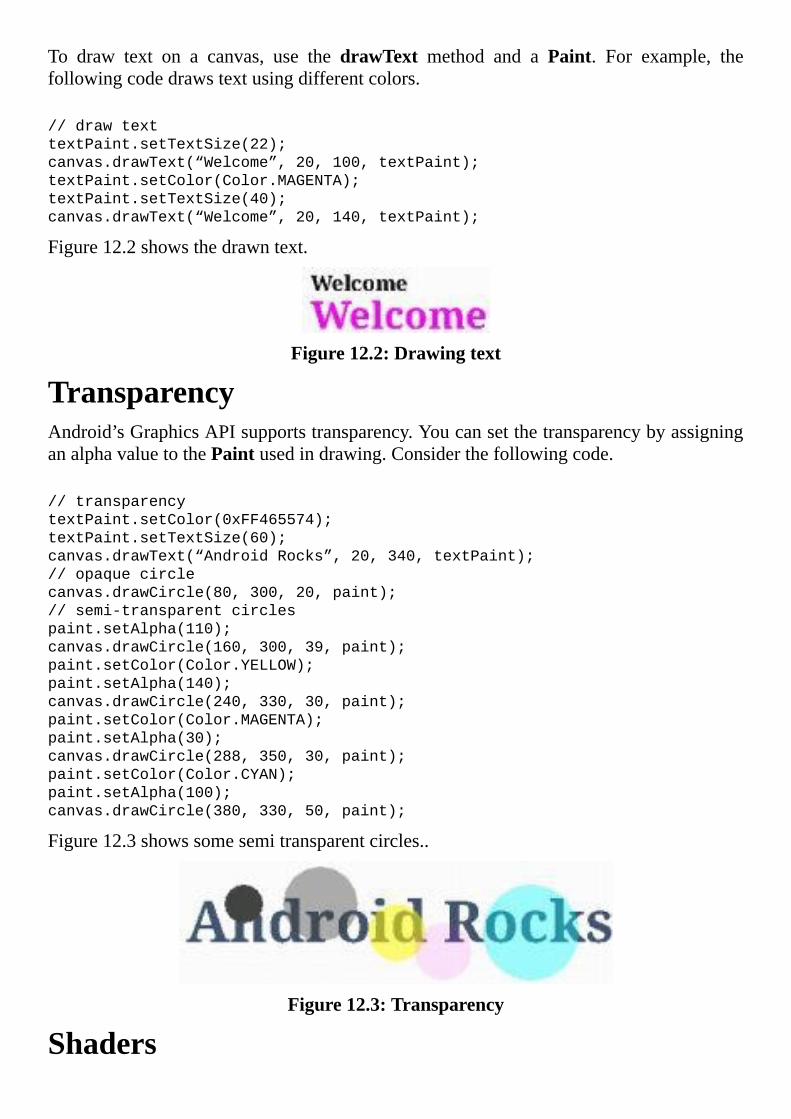
To draw text on a canvas, use the drawText method and a Paint. For example, thefollowingcodedrawstextusingdifferentcolors.
//drawtext
textPaint.setTextSize(22);
canvas.drawText(“Welcome”,20,100,textPaint);
textPaint.setColor(Color.MAGENTA);
textPaint.setTextSize(40);
canvas.drawText(“Welcome”,20,140,textPaint);
Figure12.2showsthedrawntext.
Figure12.2:Drawingtext
TransparencyAndroid’sGraphicsAPIsupportstransparency.YoucansetthetransparencybyassigninganalphavaluetothePaintusedindrawing.Considerthefollowingcode.
//transparency
textPaint.setColor(0xFF465574);
textPaint.setTextSize(60);
canvas.drawText(“AndroidRocks”,20,340,textPaint);
//opaquecircle
canvas.drawCircle(80,300,20,paint);
//semi-transparentcircles
paint.setAlpha(110);
canvas.drawCircle(160,300,39,paint);
paint.setColor(Color.YELLOW);
paint.setAlpha(140);
canvas.drawCircle(240,330,30,paint);
paint.setColor(Color.MAGENTA);
paint.setAlpha(30);
canvas.drawCircle(288,350,30,paint);
paint.setColor(Color.CYAN);
paint.setAlpha(100);
canvas.drawCircle(380,330,50,paint);
Figure12.3showssomesemitransparentcircles..
Figure12.3:Transparency
Shaders
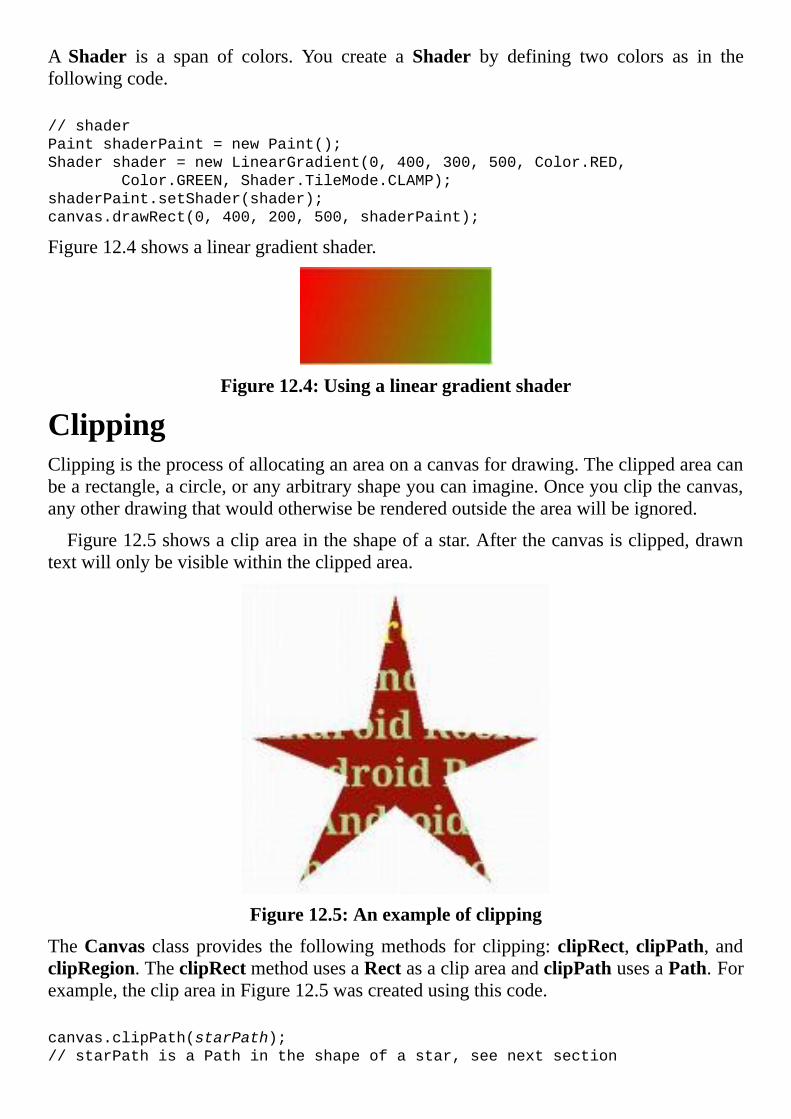
AShader is a span of colors. You create a Shader by defining two colors as in thefollowingcode.
//shader
PaintshaderPaint=newPaint();
Shadershader=newLinearGradient(0,400,300,500,Color.RED,
Color.GREEN,Shader.TileMode.CLAMP);
shaderPaint.setShader(shader);
canvas.drawRect(0,400,200,500,shaderPaint);
Figure12.4showsalineargradientshader.
Figure12.4:Usingalineargradientshader
ClippingClippingistheprocessofallocatinganareaonacanvasfordrawing.Theclippedareacanbearectangle,acircle,oranyarbitraryshapeyoucanimagine.Onceyouclipthecanvas,anyotherdrawingthatwouldotherwiseberenderedoutsidetheareawillbeignored.
Figure12.5showsaclipareaintheshapeofastar.Afterthecanvasisclipped,drawntextwillonlybevisiblewithintheclippedarea.
Figure12.5:Anexampleofclipping
TheCanvas classprovides the followingmethods for clipping:clipRect,clipPath,andclipRegion.TheclipRectmethodusesaRectasaclipareaandclipPathusesaPath.Forexample,theclipareainFigure12.5wascreatedusingthiscode.
canvas.clipPath(starPath);
//starPathisaPathintheshapeofastar,seenextsection
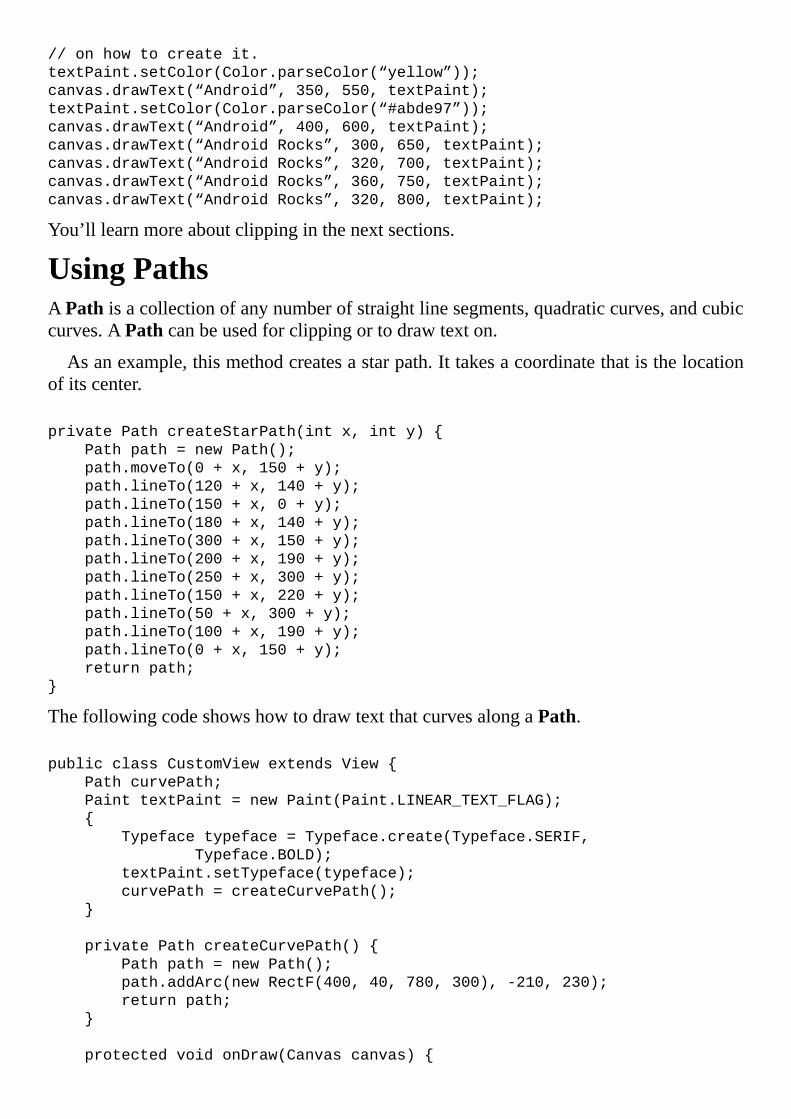
//onhowtocreateit.
textPaint.setColor(Color.parseColor(“yellow”));
canvas.drawText(“Android”,350,550,textPaint);
textPaint.setColor(Color.parseColor(“#abde97”));
canvas.drawText(“Android”,400,600,textPaint);
canvas.drawText(“AndroidRocks”,300,650,textPaint);
canvas.drawText(“AndroidRocks”,320,700,textPaint);
canvas.drawText(“AndroidRocks”,360,750,textPaint);
canvas.drawText(“AndroidRocks”,320,800,textPaint);
You’lllearnmoreaboutclippinginthenextsections.
UsingPathsAPathisacollectionofanynumberofstraightlinesegments,quadraticcurves,andcubiccurves.APathcanbeusedforclippingortodrawtexton.
Asanexample,thismethodcreatesastarpath.Ittakesacoordinatethatisthelocationofitscenter.
privatePathcreateStarPath(intx,inty){
Pathpath=newPath();
path.moveTo(0+x,150+y);
path.lineTo(120+x,140+y);
path.lineTo(150+x,0+y);
path.lineTo(180+x,140+y);
path.lineTo(300+x,150+y);
path.lineTo(200+x,190+y);
path.lineTo(250+x,300+y);
path.lineTo(150+x,220+y);
path.lineTo(50+x,300+y);
path.lineTo(100+x,190+y);
path.lineTo(0+x,150+y);
returnpath;
}
ThefollowingcodeshowshowtodrawtextthatcurvesalongaPath.
publicclassCustomViewextendsView{
PathcurvePath;
PainttextPaint=newPaint(Paint.LINEAR_TEXT_FLAG);
{
Typefacetypeface=Typeface.create(Typeface.SERIF,
Typeface.BOLD);
textPaint.setTypeface(typeface);
curvePath=createCurvePath();
}
privatePathcreateCurvePath(){
Pathpath=newPath();
path.addArc(newRectF(400,40,780,300),-210,230);
returnpath;
}
protectedvoidonDraw(Canvascanvas){
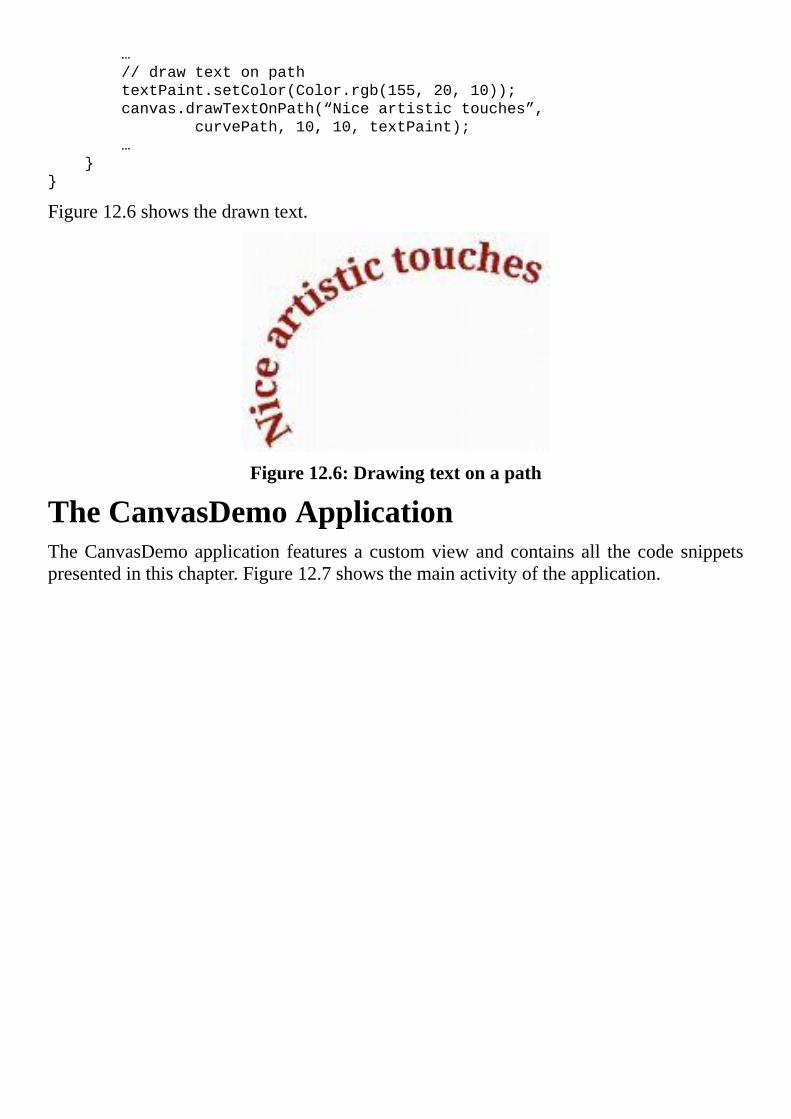
…
//drawtextonpath
textPaint.setColor(Color.rgb(155,20,10));
canvas.drawTextOnPath(“Niceartistictouches”,
curvePath,10,10,textPaint);
…
}
}
Figure12.6showsthedrawntext.
Figure12.6:Drawingtextonapath
TheCanvasDemoApplicationTheCanvasDemoapplication featuresacustomviewandcontainsall thecode snippetspresentedinthischapter.Figure12.7showsthemainactivityoftheapplication.
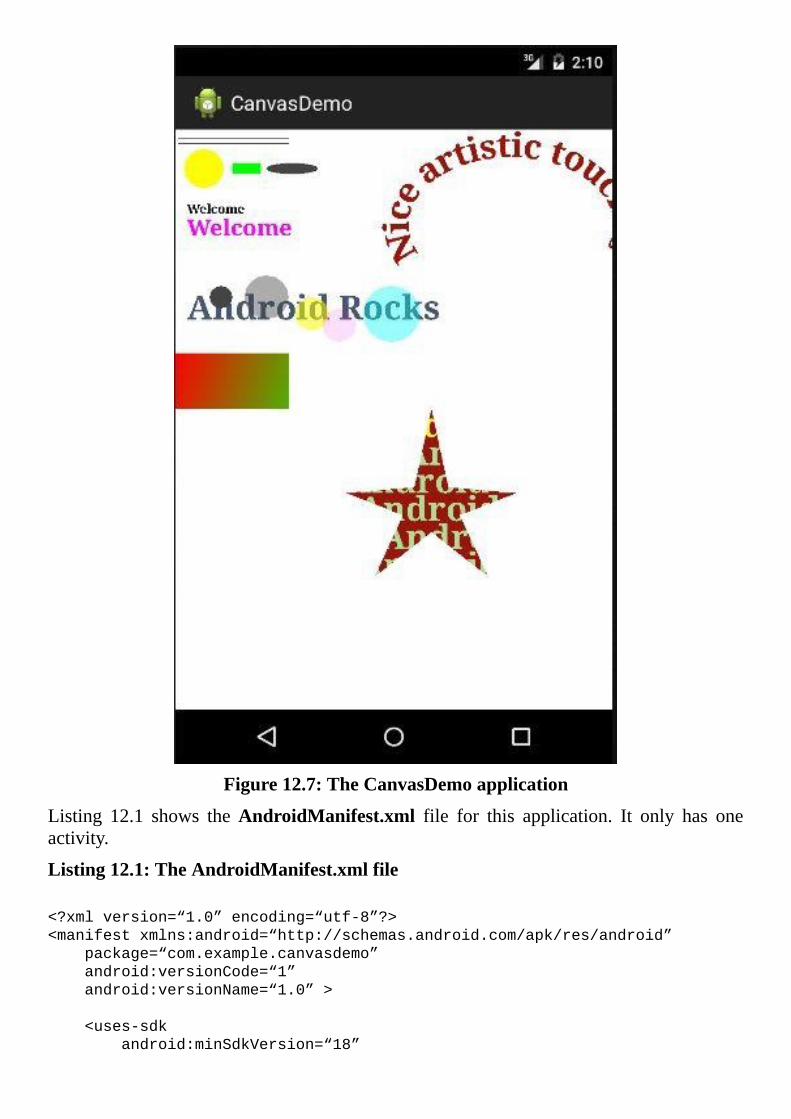
Figure12.7:TheCanvasDemoapplication
Listing 12.1 shows theAndroidManifest.xml file for this application. It only has oneactivity.
Listing12.1:TheAndroidManifest.xmlfile
<?xmlversion=“1.0”encoding=“utf-8”?>
<manifestxmlns:android=“http://schemas.android.com/apk/res/android”
package=“com.example.canvasdemo”
android:versionCode=“1”
android:versionName=“1.0”>
<uses-sdk
android:minSdkVersion=“18”
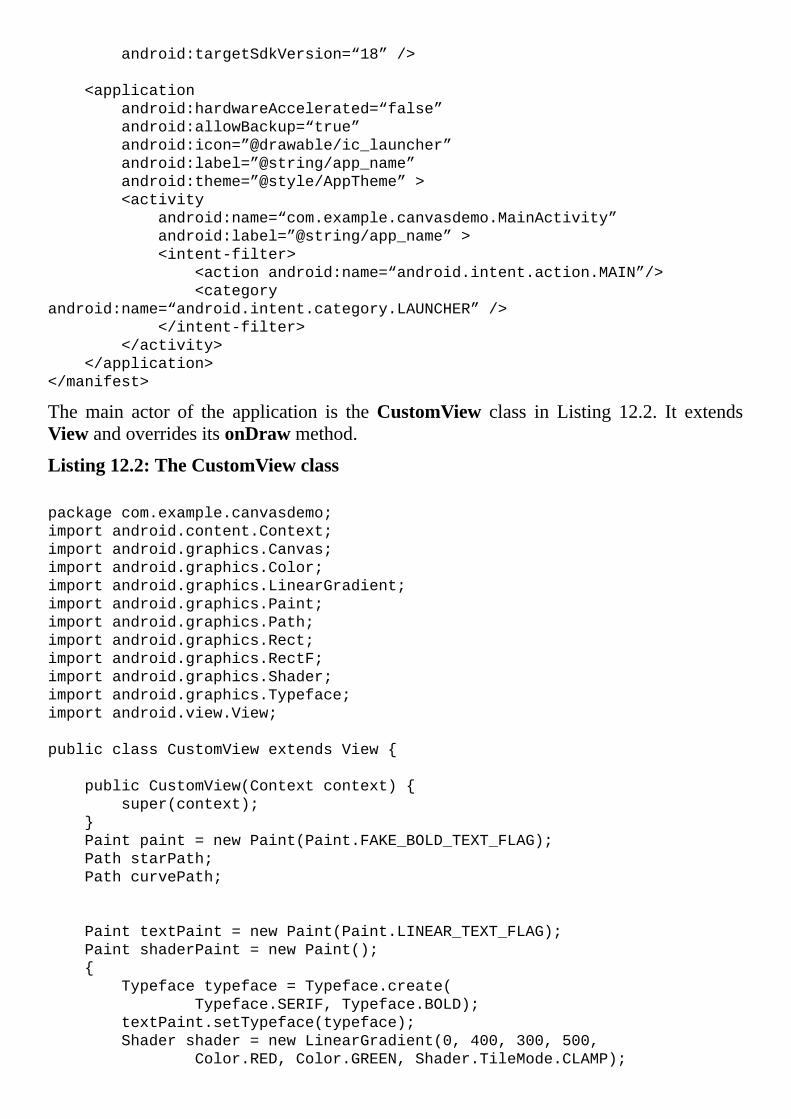
android:targetSdkVersion=“18”/>
<application
android:hardwareAccelerated=“false”
android:allowBackup=“true”
android:icon=”@drawable/ic_launcher”
android:label=”@string/app_name”
android:theme=”@style/AppTheme”>
<activity
android:name=“com.example.canvasdemo.MainActivity”
android:label=”@string/app_name”>
<intent-filter>
<actionandroid:name=“android.intent.action.MAIN”/>
<category
android:name=“android.intent.category.LAUNCHER”/>
</intent-filter>
</activity>
</application>
</manifest>
Themain actor of the application is theCustomView class in Listing 12.2. It extendsViewandoverridesitsonDrawmethod.
Listing12.2:TheCustomViewclass
packagecom.example.canvasdemo;
importandroid.content.Context;
importandroid.graphics.Canvas;
importandroid.graphics.Color;
importandroid.graphics.LinearGradient;
importandroid.graphics.Paint;
importandroid.graphics.Path;
importandroid.graphics.Rect;
importandroid.graphics.RectF;
importandroid.graphics.Shader;
importandroid.graphics.Typeface;
importandroid.view.View;
publicclassCustomViewextendsView{
publicCustomView(Contextcontext){
super(context);
}
Paintpaint=newPaint(Paint.FAKE_BOLD_TEXT_FLAG);
PathstarPath;
PathcurvePath;
PainttextPaint=newPaint(Paint.LINEAR_TEXT_FLAG);
PaintshaderPaint=newPaint();
{
Typefacetypeface=Typeface.create(
Typeface.SERIF,Typeface.BOLD);
textPaint.setTypeface(typeface);
Shadershader=newLinearGradient(0,400,300,500,
Color.RED,Color.GREEN,Shader.TileMode.CLAMP);
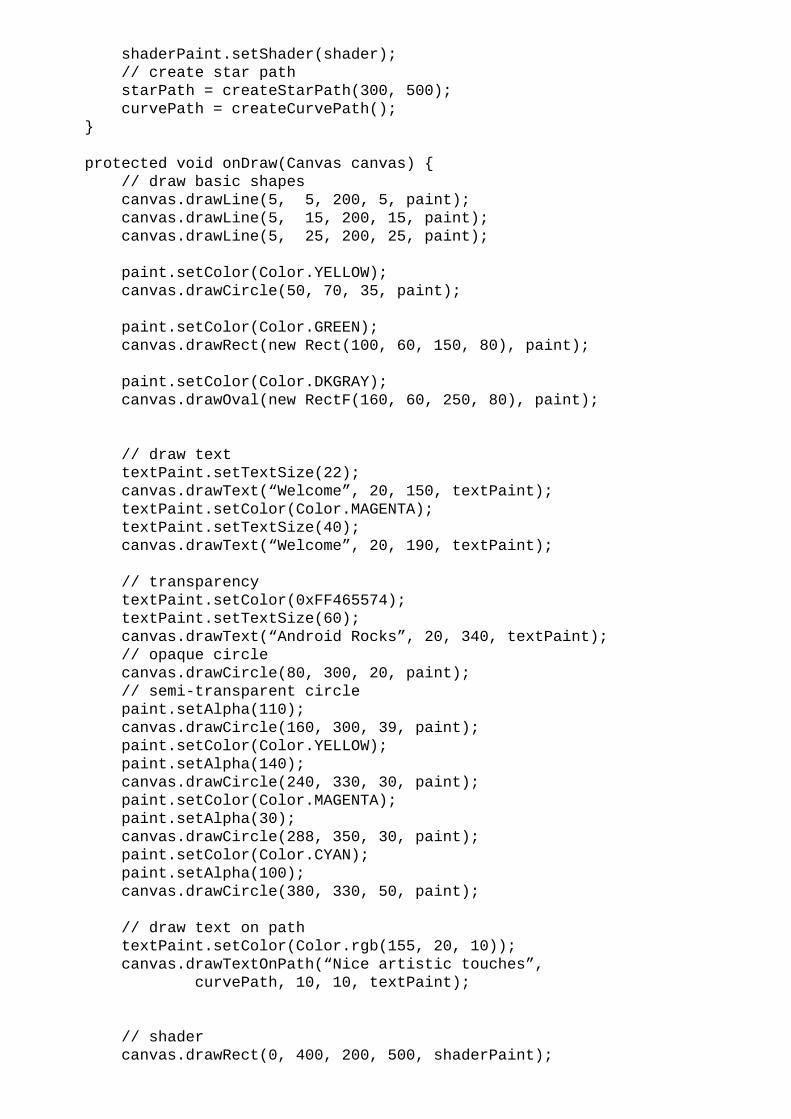
shaderPaint.setShader(shader);
//createstarpath
starPath=createStarPath(300,500);
curvePath=createCurvePath();
}
protectedvoidonDraw(Canvascanvas){
//drawbasicshapes
canvas.drawLine(5,5,200,5,paint);
canvas.drawLine(5,15,200,15,paint);
canvas.drawLine(5,25,200,25,paint);
paint.setColor(Color.YELLOW);
canvas.drawCircle(50,70,35,paint);
paint.setColor(Color.GREEN);
canvas.drawRect(newRect(100,60,150,80),paint);
paint.setColor(Color.DKGRAY);
canvas.drawOval(newRectF(160,60,250,80),paint);
//drawtext
textPaint.setTextSize(22);
canvas.drawText(“Welcome”,20,150,textPaint);
textPaint.setColor(Color.MAGENTA);
textPaint.setTextSize(40);
canvas.drawText(“Welcome”,20,190,textPaint);
//transparency
textPaint.setColor(0xFF465574);
textPaint.setTextSize(60);
canvas.drawText(“AndroidRocks”,20,340,textPaint);
//opaquecircle
canvas.drawCircle(80,300,20,paint);
//semi-transparentcircle
paint.setAlpha(110);
canvas.drawCircle(160,300,39,paint);
paint.setColor(Color.YELLOW);
paint.setAlpha(140);
canvas.drawCircle(240,330,30,paint);
paint.setColor(Color.MAGENTA);
paint.setAlpha(30);
canvas.drawCircle(288,350,30,paint);
paint.setColor(Color.CYAN);
paint.setAlpha(100);
canvas.drawCircle(380,330,50,paint);
//drawtextonpath
textPaint.setColor(Color.rgb(155,20,10));
canvas.drawTextOnPath(“Niceartistictouches”,
curvePath,10,10,textPaint);
//shader
canvas.drawRect(0,400,200,500,shaderPaint);
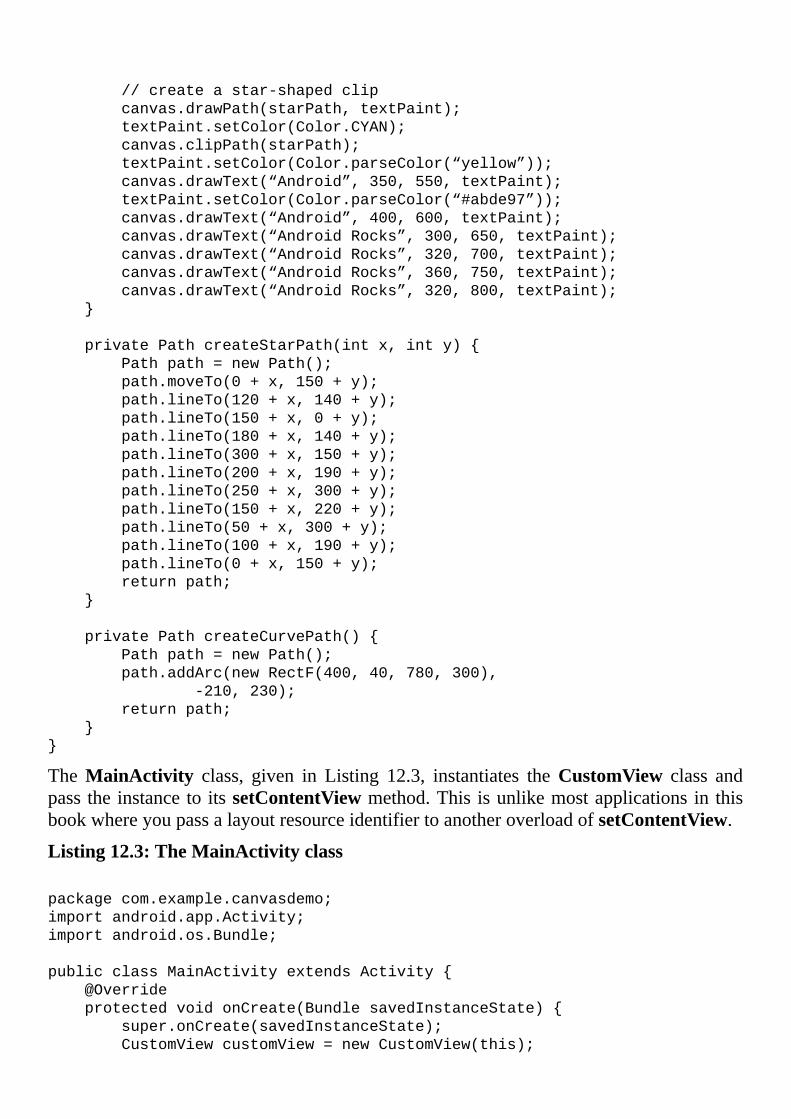
//createastar-shapedclip
canvas.drawPath(starPath,textPaint);
textPaint.setColor(Color.CYAN);
canvas.clipPath(starPath);
textPaint.setColor(Color.parseColor(“yellow”));
canvas.drawText(“Android”,350,550,textPaint);
textPaint.setColor(Color.parseColor(“#abde97”));
canvas.drawText(“Android”,400,600,textPaint);
canvas.drawText(“AndroidRocks”,300,650,textPaint);
canvas.drawText(“AndroidRocks”,320,700,textPaint);
canvas.drawText(“AndroidRocks”,360,750,textPaint);
canvas.drawText(“AndroidRocks”,320,800,textPaint);
}
privatePathcreateStarPath(intx,inty){
Pathpath=newPath();
path.moveTo(0+x,150+y);
path.lineTo(120+x,140+y);
path.lineTo(150+x,0+y);
path.lineTo(180+x,140+y);
path.lineTo(300+x,150+y);
path.lineTo(200+x,190+y);
path.lineTo(250+x,300+y);
path.lineTo(150+x,220+y);
path.lineTo(50+x,300+y);
path.lineTo(100+x,190+y);
path.lineTo(0+x,150+y);
returnpath;
}
privatePathcreateCurvePath(){
Pathpath=newPath();
path.addArc(newRectF(400,40,780,300),
-210,230);
returnpath;
}
}
TheMainActivity class, given in Listing 12.3, instantiates theCustomView class andpasstheinstancetoitssetContentViewmethod.This isunlikemostapplications in thisbookwhereyoupassalayoutresourceidentifiertoanotheroverloadofsetContentView.
Listing12.3:TheMainActivityclass
packagecom.example.canvasdemo;
importandroid.app.Activity;
importandroid.os.Bundle;
publicclassMainActivityextendsActivity{
@Override
protectedvoidonCreate(BundlesavedInstanceState){
super.onCreate(savedInstanceState);
CustomViewcustomView=newCustomView(this);
setContentView(customView);
}
}
SummaryThe Android SDK comes with a wide range of views that you can use in yourapplications.Ifnoneofthesesuitsyourneed,youcancreateacustomviewanddrawonit.Thischaptershowedyouhowtocreateacustomviewanddrawmultipleshapesonacanvas.
Chapter13Fragments
Apowerful featureadded toAndroid3.0(API level11), fragmentsarecomponents thatcan be embedded into an activity. Unlike custom views, fragments have their ownlifecycleandmayormaynothaveauserinterface.
Thischapterexplainswhatfragmentsareandshowshowtousethem.
TheFragmentLifecycleYou create a fragment by extending the android.app.Fragment class or one of itssubclasses.A fragmentmayormaynot have a user interface.A fragmentwith nouserinterface(UI)normallyactsasaworkerfortheactivitythefragmentisembeddedinto.IfafragmenthasaUI,itmaycontainviewsarrangedinalayoutfilethatwillbeloadedafterthe fragment is created. In many aspects, writing a fragment is similar to writing anactivity.
Inordertocreatefragmentseffectively,youneedtoknowthelifecycleofafragment.Figure13.1showsthelifecycleofafragment.
Thelifecycleofafragmentissimilartothatofanactivity.Forexample,ithascallbackmethodssuchasonCreate,onResumeandonPause.Ontopofthat,thereareadditionalmethods likeonAttach,onActivityCreatedandonDetach.onAttach is called after thefragment is associated with an activity and onActivityCreated gets called after theonCreate method of the activity that contains the fragment is completed. onDetach isinvokedbeforeafragmentisdetachedfromanactivity.
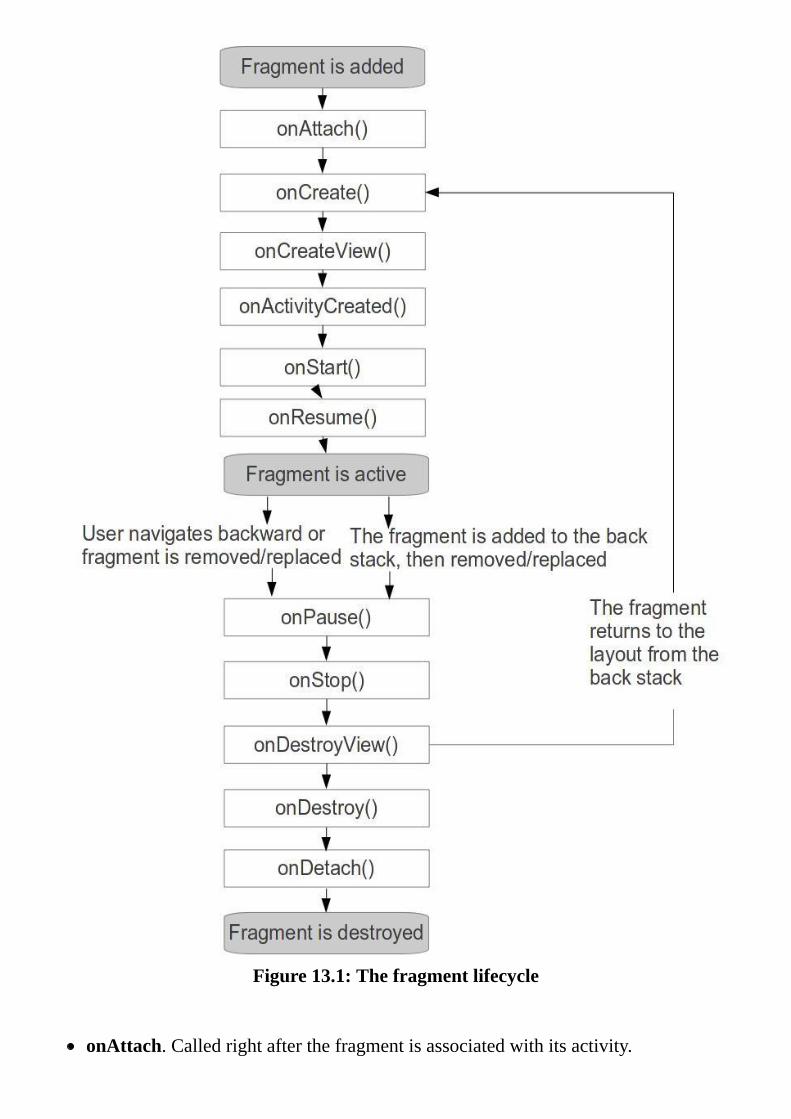
Figure13.1:Thefragmentlifecycle
onAttach.Calledrightafterthefragmentisassociatedwithitsactivity.
onCreate.Calledtocreatethefragmentthefirsttime.onCreateView.Calledwhenitistimetocreatethelayoutforthefragment.Itmustreturnthefragment’srootview.onActivityCreated.Called to tell the fragment that its activity’sonCreatemethodhascompleted.onStart.Calledwhenthefragment’sviewismadevisibletotheuser.onResume. Called when the containing activity enters theResumed state, whichmeanstheactivityisrunning.onPause.Calledwhenthecontainingactivityisbeingpaused.onStop.Calledwhenthecontainingactivityisstopped.onDestroyView.Calledtoallowthefragmenttoreleaseresourcesusedforitsview.onDestroy.Calledtoallowthefragmenttodofinalclean-upbeforeitisdestroyed.onDetach.Calledrightafterthefragmentisdetachedfromitsactivity.
Therearesomesubtledifferencesbetweenanactivityandafragment.Inanactivity,younormallysettheviewfortheactivityinitsonCreatemethodusingthesetContentViewmethod,e.g.
protectedvoidonCreate(android.os.BundlesavedInstanceState){
super(savedInstanceState);
setContentView(R.layout.activity_main);
…
}
In a fragment you normally create a view in its onCreateView method. Here is thesignatureoftheonCreateViewmethod.
publicViewonCreateView(android.view.LayoutInflaterinflater,
android.view.ViewGroupcontainer,
android.os.BundlesavedInstanceState);
NoticedtherearethreeargumentsthatarepassedtoonCreateView?ThefirstargumentisaLayoutInflaterthatyouusetoinflateanyviewinthefragment.Thesecondargumentistheparentviewthefragmentshouldbeattachedto.Thethirdargument,aBundle,ifnotnullcontainsinformationfromthepreviouslysavedstate.
Inanactivity,youcanobtainareferencetoaviewbycallingthefindViewByIdmethodon the activity. In a fragment, you can find a view in the fragment by calling thefindViewByIdontheparentview.
Viewroot=inflater.inflate(R.layout.fragment_names,
container,false);
ViewaView=(View)root.findViewById(id);
Alsonotethatafragmentshouldnotknowanythingaboutitsactivityorotherfragments.Ifyouneedtolistenforaneventthatoccursinafragmentthataffectstheactivityorotherviewsor fragments,donotwrite a listener in the fragment class. Instead, trigger aneweventinresponsetothefragmenteventandlettheactivityhandleit.
Youwilllearnmoreaboutcreatingafragmentinlatersectionsinthischapter.
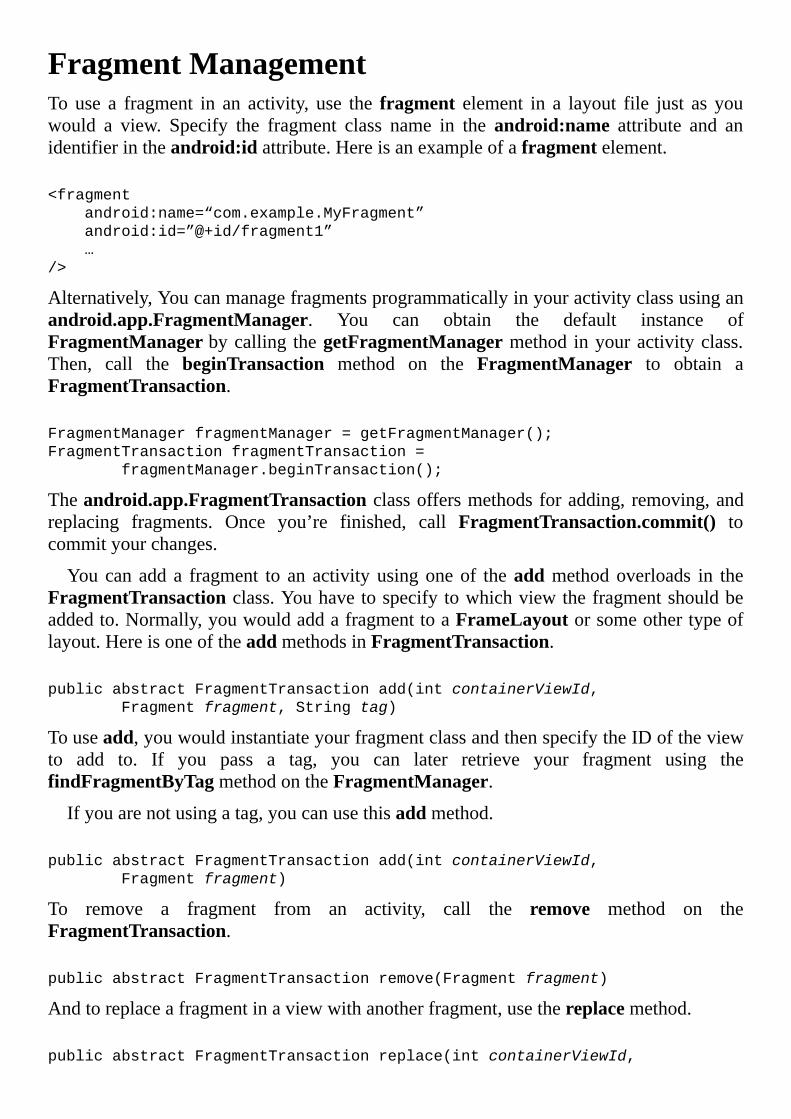
FragmentManagementTouse a fragment in an activity, use the fragment element in a layout file just as youwould a view. Specify the fragment class name in the android:name attribute and anidentifierintheandroid:idattribute.Hereisanexampleofafragmentelement.
<fragment
android:name=“com.example.MyFragment”
android:id=”@+id/fragment1”
…
/>
Alternatively,Youcanmanagefragmentsprogrammaticallyinyouractivityclassusinganandroid.app.FragmentManager. You can obtain the default instance ofFragmentManagerbycalling thegetFragmentManagermethod inyouractivityclass.Then, call the beginTransaction method on the FragmentManager to obtain aFragmentTransaction.
FragmentManagerfragmentManager=getFragmentManager();
FragmentTransactionfragmentTransaction=
fragmentManager.beginTransaction();
Theandroid.app.FragmentTransactionclassoffersmethodsforadding,removing,andreplacing fragments. Once you’re finished, call FragmentTransaction.commit() tocommityourchanges.
Youcan add a fragment to an activityusingoneof theaddmethodoverloads in theFragmentTransactionclass.Youhavetospecifytowhichviewthefragmentshouldbeaddedto.Normally,youwouldaddafragmenttoaFrameLayoutorsomeothertypeoflayout.HereisoneoftheaddmethodsinFragmentTransaction.
publicabstractFragmentTransactionadd(intcontainerViewId,
Fragmentfragment,Stringtag)
Touseadd,youwouldinstantiateyourfragmentclassandthenspecifytheIDoftheviewto add to. If you pass a tag, you can later retrieve your fragment using thefindFragmentByTagmethodontheFragmentManager.
Ifyouarenotusingatag,youcanusethisaddmethod.
publicabstractFragmentTransactionadd(intcontainerViewId,
Fragmentfragment)
To remove a fragment from an activity, call the remove method on theFragmentTransaction.
publicabstractFragmentTransactionremove(Fragmentfragment)
Andtoreplaceafragmentinaviewwithanotherfragment,usethereplacemethod.
publicabstractFragmentTransactionreplace(intcontainerViewId,
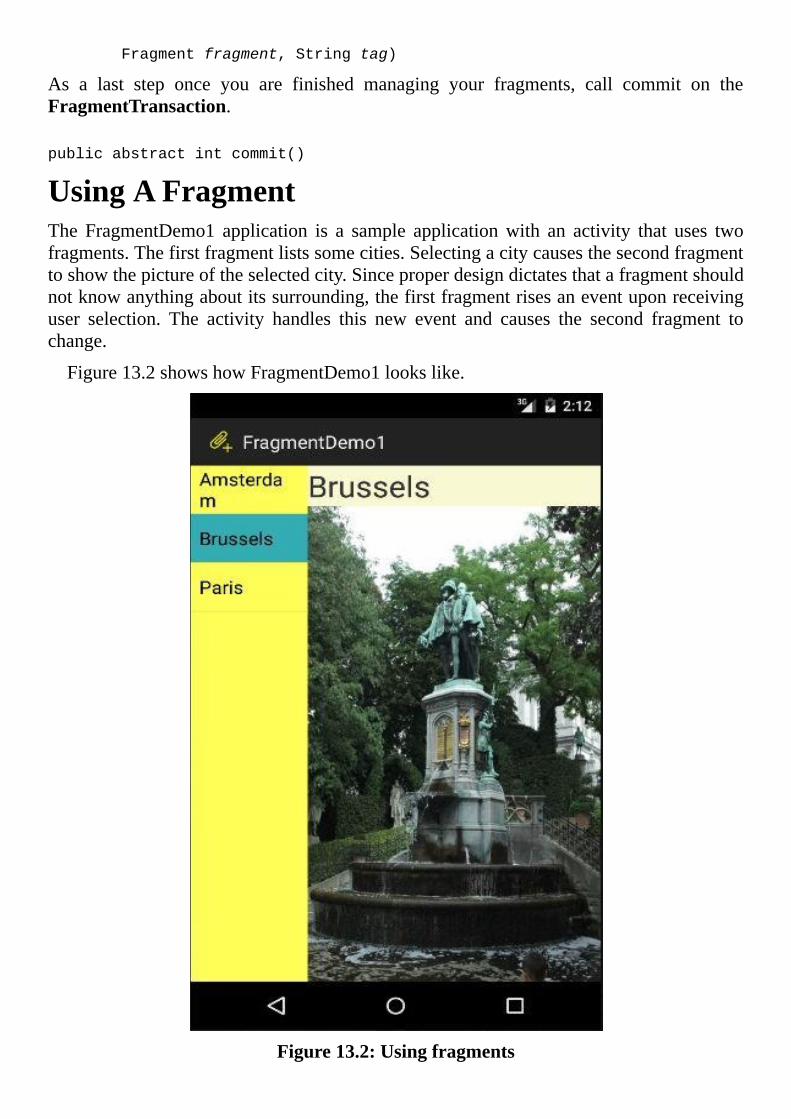
Fragmentfragment,Stringtag)
As a last step once you are finished managing your fragments, call commit on theFragmentTransaction.
publicabstractintcommit()
UsingAFragmentThe FragmentDemo1 application is a sample applicationwith an activity that uses twofragments.Thefirstfragmentlistssomecities.Selectingacitycausesthesecondfragmenttoshowthepictureoftheselectedcity.Sinceproperdesigndictatesthatafragmentshouldnotknowanythingaboutitssurrounding,thefirstfragmentrisesaneventuponreceivinguser selection. The activity handles this new event and causes the second fragment tochange.
Figure13.2showshowFragmentDemo1lookslike.
Figure13.2:Usingfragments
ThemanifestfortheapplicationisprintedinListing13.1.
Listing13.1:TheAndroidManifest.xmlfileforFragmentDemo1
<?xmlversion=“1.0”encoding=“utf-8”?>
<manifestxmlns:android=“http://schemas.android.com/apk/res/android”
package=“com.example.fragmentdemo1”
android:versionCode=“1”
android:versionName=“1.0”>
<uses-sdk
android:minSdkVersion=“18”
android:targetSdkVersion=“18”/>
<application
android:allowBackup=“true”
android:icon=”@drawable/ic_launcher”
android:label=”@string/app_name”
android:theme=”@style/AppTheme”>
<activity
android:name=“com.example.fragmentdemo1.MainActivity”
android:label=”@string/app_name”>
<intent-filter>
<actionandroid:name=“android.intent.action.MAIN”/>
<categoryandroid:name=“android.intent.category.LAUNCHER”/>
</intent-filter>
</activity>
</application>
</manifest>
Nothingextraordinaryhere.Itsimplydeclaresanactivityfortheapplication.
Youusea fragment asyouwouldavieworawidget,bydeclaring it in anactivity’slayout fileorbyprogrammaticallyaddingone.ForFragmentDemo1, two fragmentsareaddedtothelayoutoftheapplication’smainactivity.ThelayoutfileisshowninListing13.2.
Listing13.2:Thelayoutfileforthemainactivity(activity_main.xml)
<LinearLayout
xmlns:android=“http://schemas.android.com/apk/res/android”
android:orientation=“horizontal”
android:layout_width=“match_parent”
android:layout_height=“match_parent”>
<fragment
android:name=“com.example.fragmentdemo1.NamesFragment”
android:id=”@+id/namesFragment”
android:layout_weight=“1”
android:layout_width=“0dp”
android:layout_height=“match_parent”/>
<fragment
android:name=“com.example.fragmentdemo1.DetailsFragment”
android:id=”@+id/detailsFragment”
android:layout_weight=“2.5”
android:layout_width=“0dp”
android:layout_height=“match_parent”/>
</LinearLayout>
ThelayoutforthemainactivityusesahorizontalLinearLayoutthatsplitsthescreenintotwo panes. The ratio of the pane widths is 1:2.5, as defined by the layout_weightattributesofthefragmentelements.Eachpaneisfilledwithafragment.ThefirstpaneisrepresentedbytheNamesFragmentclassandthesecondpanebytheDetailsFragmentclass.
The first fragment,NamesFragment, gets its layout from the fragment_names.xmlfileinListing13.3.Thisfileislocatedintheres/layoutfolder.
Listing13.3:Thefragment_names.xmlfile
<ListView
xmlns:android=“http://schemas.android.com/apk/res/android”
android:id=”@+id/listView1”
android:layout_width=“wrap_content”
android:layout_height=“wrap_content”
android:background=”#FFFF55”/>
The layout of NamesFragment is very simple. It contains a single view that is aListView.Thelayout is loadedin theonCreateViewmethodof thefragmentclass(SeeListing13.4).
Listing13.4:TheNamesFragmentclass
packagecom.example.fragmentdemo1;
importandroid.app.Activity;
importandroid.app.Fragment;
importandroid.os.Bundle;
importandroid.view.LayoutInflater;
importandroid.view.View;
importandroid.view.ViewGroup;
importandroid.widget.AdapterView;
importandroid.widget.ArrayAdapter;
importandroid.widget.ListView;
publicclassNamesFragmentextendsFragment{
@Override
publicViewonCreateView(LayoutInflaterinflater,
ViewGroupcontainer,BundlesavedInstanceState){
finalString[]names={“Amsterdam”,“Brussels”,“Paris”};
//useandroid.R.layout.simple_list_item_activated_1
//tohavetheselectediteminadifferentcolor
ArrayAdapter<String>adapter=newArrayAdapter<String>(
getActivity(),
android.R.layout.simple_list_item_activated_1,
names);
Viewview=inflater.inflate(R.layout.fragment_names,
container,false);
finalListViewlistView=(ListView)view.findViewById(
R.id.listView1);
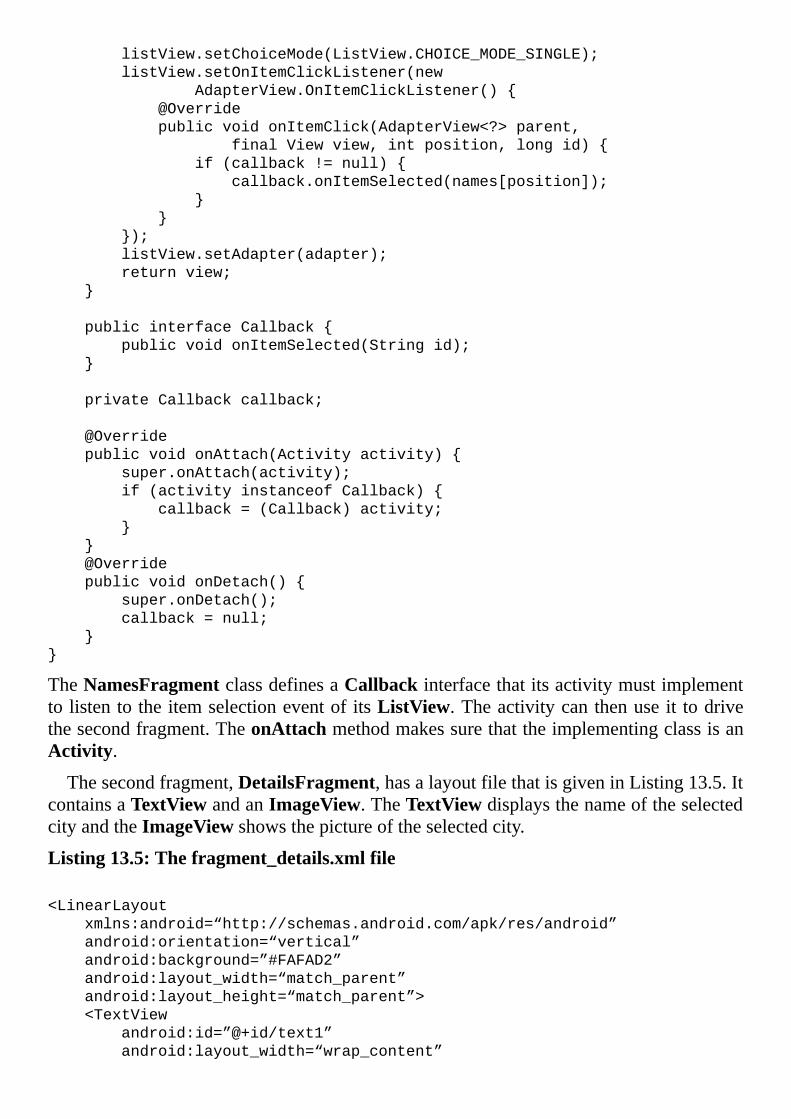
listView.setChoiceMode(ListView.CHOICE_MODE_SINGLE);
listView.setOnItemClickListener(new
AdapterView.OnItemClickListener(){
@Override
publicvoidonItemClick(AdapterView<?>parent,
finalViewview,intposition,longid){
if(callback!=null){
callback.onItemSelected(names[position]);
}
}
});
listView.setAdapter(adapter);
returnview;
}
publicinterfaceCallback{
publicvoidonItemSelected(Stringid);
}
privateCallbackcallback;
@Override
publicvoidonAttach(Activityactivity){
super.onAttach(activity);
if(activityinstanceofCallback){
callback=(Callback)activity;
}
}
@Override
publicvoidonDetach(){
super.onDetach();
callback=null;
}
}
TheNamesFragmentclassdefinesaCallbackinterfacethatitsactivitymustimplementtolistentotheitemselectioneventofitsListView.Theactivitycanthenuseit todrivethesecondfragment.TheonAttachmethodmakessurethattheimplementingclassisanActivity.
Thesecondfragment,DetailsFragment,hasalayoutfilethatisgiveninListing13.5.ItcontainsaTextViewandanImageView.TheTextViewdisplaysthenameoftheselectedcityandtheImageViewshowsthepictureoftheselectedcity.
Listing13.5:Thefragment_details.xmlfile
<LinearLayout
xmlns:android=“http://schemas.android.com/apk/res/android”
android:orientation=“vertical”
android:background=”#FAFAD2”
android:layout_width=“match_parent”
android:layout_height=“match_parent”>
<TextView
android:id=”@+id/text1”
android:layout_width=“wrap_content”
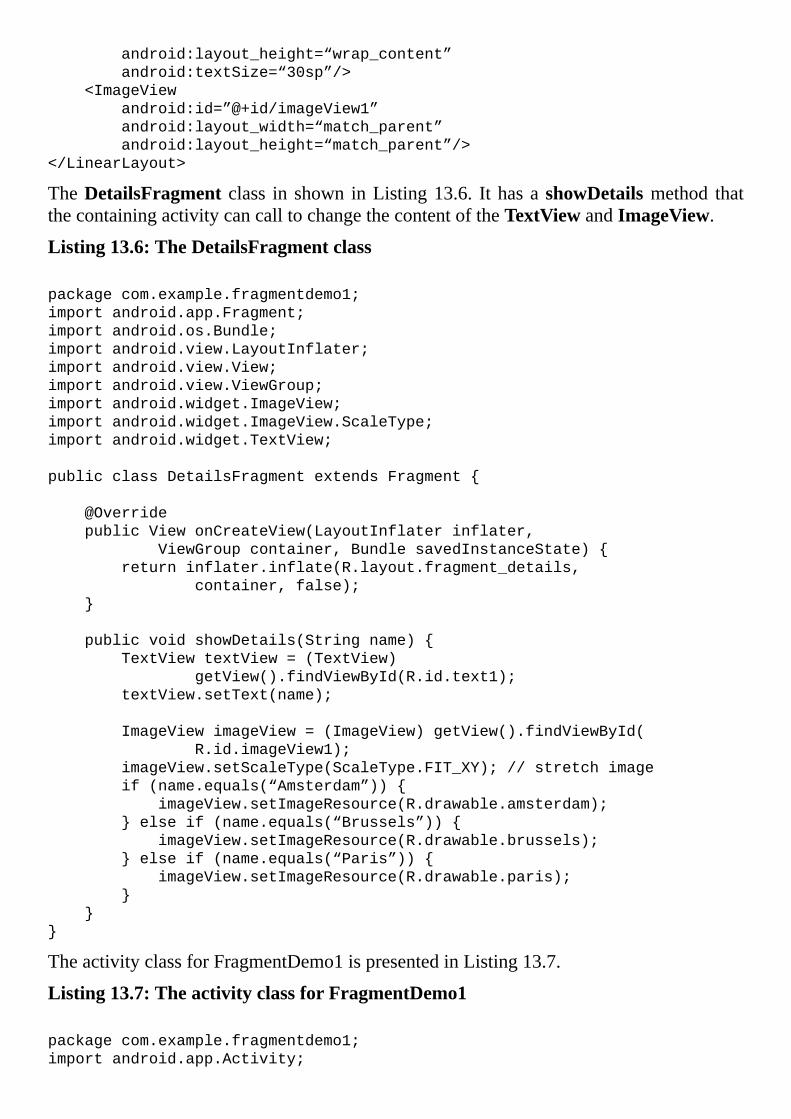
android:layout_height=“wrap_content”
android:textSize=“30sp”/>
<ImageView
android:id=”@+id/imageView1”
android:layout_width=“match_parent”
android:layout_height=“match_parent”/>
</LinearLayout>
TheDetailsFragment class in shown inListing13.6. IthasashowDetailsmethod thatthecontainingactivitycancalltochangethecontentoftheTextViewandImageView.
Listing13.6:TheDetailsFragmentclass
packagecom.example.fragmentdemo1;
importandroid.app.Fragment;
importandroid.os.Bundle;
importandroid.view.LayoutInflater;
importandroid.view.View;
importandroid.view.ViewGroup;
importandroid.widget.ImageView;
importandroid.widget.ImageView.ScaleType;
importandroid.widget.TextView;
publicclassDetailsFragmentextendsFragment{
@Override
publicViewonCreateView(LayoutInflaterinflater,
ViewGroupcontainer,BundlesavedInstanceState){
returninflater.inflate(R.layout.fragment_details,
container,false);
}
publicvoidshowDetails(Stringname){
TextViewtextView=(TextView)
getView().findViewById(R.id.text1);
textView.setText(name);
ImageViewimageView=(ImageView)getView().findViewById(
R.id.imageView1);
imageView.setScaleType(ScaleType.FIT_XY);//stretchimage
if(name.equals(“Amsterdam”)){
imageView.setImageResource(R.drawable.amsterdam);
}elseif(name.equals(“Brussels”)){
imageView.setImageResource(R.drawable.brussels);
}elseif(name.equals(“Paris”)){
imageView.setImageResource(R.drawable.paris);
}
}
}
TheactivityclassforFragmentDemo1ispresentedinListing13.7.
Listing13.7:TheactivityclassforFragmentDemo1
packagecom.example.fragmentdemo1;
importandroid.app.Activity;
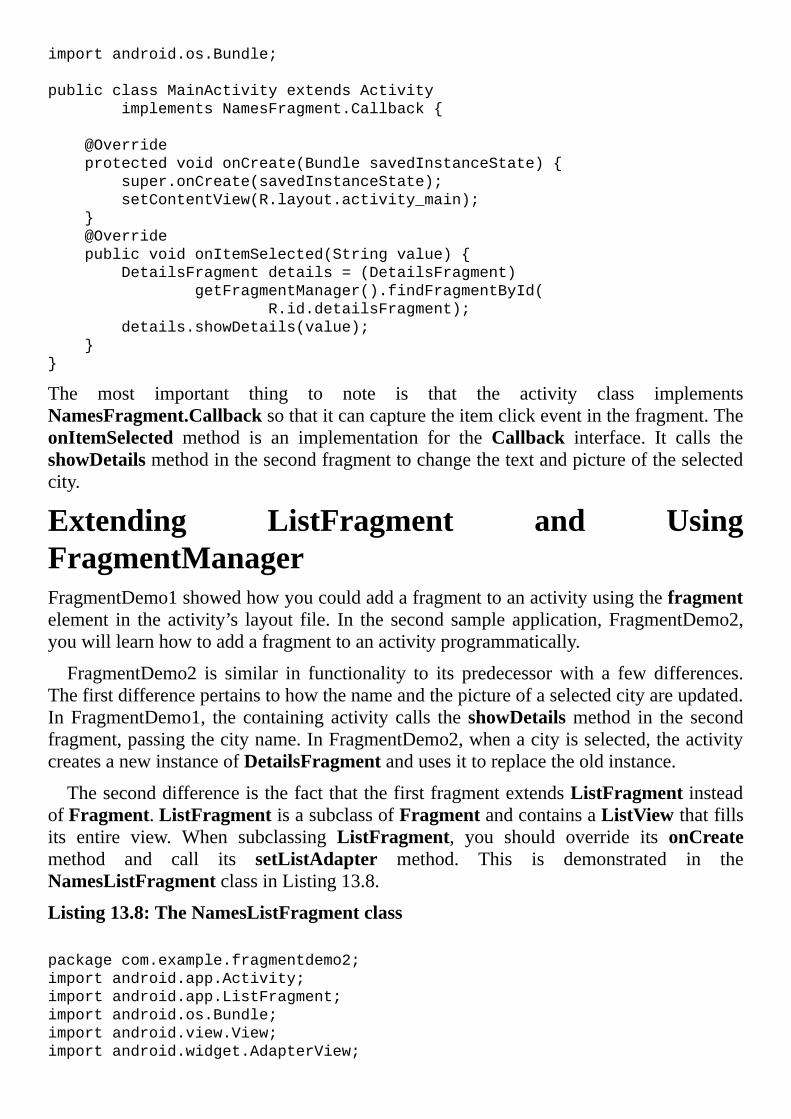
importandroid.os.Bundle;
publicclassMainActivityextendsActivity
implementsNamesFragment.Callback{
@Override
protectedvoidonCreate(BundlesavedInstanceState){
super.onCreate(savedInstanceState);
setContentView(R.layout.activity_main);
}
@Override
publicvoidonItemSelected(Stringvalue){
DetailsFragmentdetails=(DetailsFragment)
getFragmentManager().findFragmentById(
R.id.detailsFragment);
details.showDetails(value);
}
}
The most important thing to note is that the activity class implementsNamesFragment.Callbacksothatitcancapturetheitemclickeventinthefragment.TheonItemSelected method is an implementation for the Callback interface. It calls theshowDetailsmethodinthesecondfragmenttochangethetextandpictureoftheselectedcity.
Extending ListFragment and UsingFragmentManagerFragmentDemo1showedhowyoucouldaddafragmenttoanactivityusingthefragmentelement in the activity’s layout file. In the second sample application,FragmentDemo2,youwilllearnhowtoaddafragmenttoanactivityprogrammatically.
FragmentDemo2 is similar in functionality to its predecessorwith a few differences.Thefirstdifferencepertainstohowthenameandthepictureofaselectedcityareupdated.InFragmentDemo1, the containing activity calls the showDetailsmethod in the secondfragment,passingthecityname.InFragmentDemo2,whenacityisselected,theactivitycreatesanewinstanceofDetailsFragmentandusesittoreplacetheoldinstance.
TheseconddifferenceisthefactthatthefirstfragmentextendsListFragmentinsteadofFragment.ListFragmentisasubclassofFragmentandcontainsaListViewthatfillsits entire view. When subclassing ListFragment, you should override its onCreatemethod and call its setListAdapter method. This is demonstrated in theNamesListFragmentclassinListing13.8.
Listing13.8:TheNamesListFragmentclass
packagecom.example.fragmentdemo2;
importandroid.app.Activity;
importandroid.app.ListFragment;
importandroid.os.Bundle;
importandroid.view.View;
importandroid.widget.AdapterView;
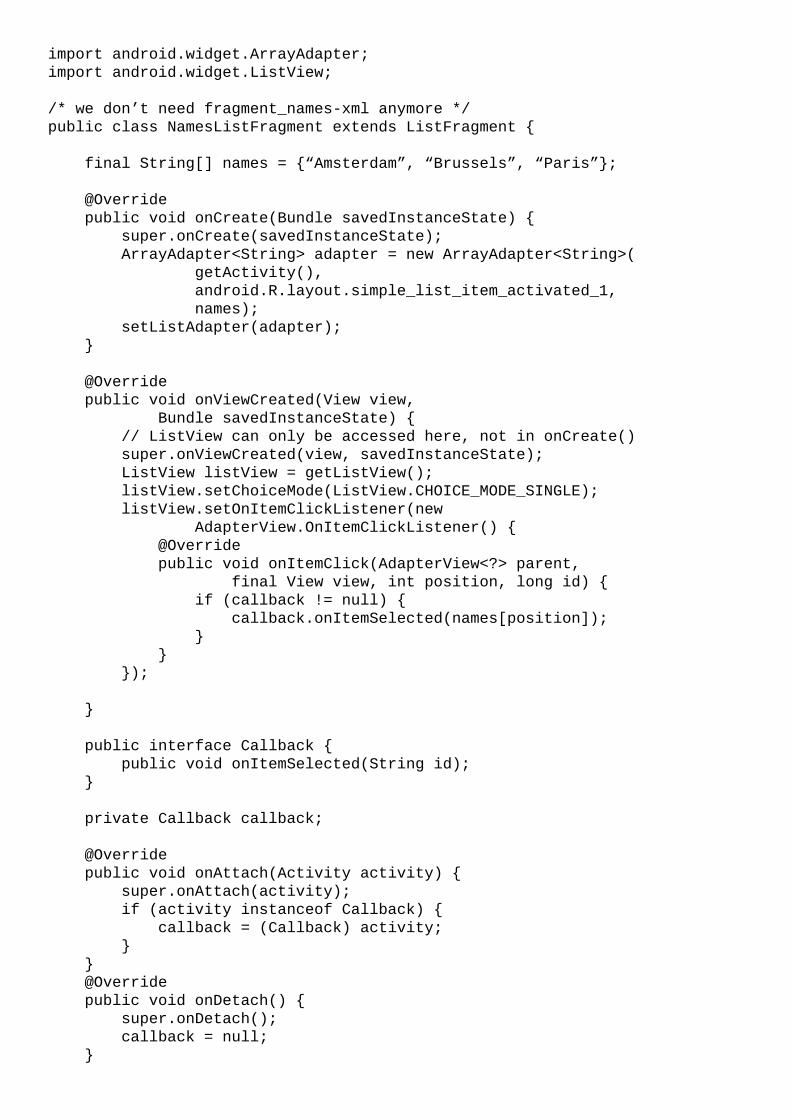
importandroid.widget.ArrayAdapter;
importandroid.widget.ListView;
/*wedon’tneedfragment_names-xmlanymore*/
publicclassNamesListFragmentextendsListFragment{
finalString[]names={“Amsterdam”,“Brussels”,“Paris”};
@Override
publicvoidonCreate(BundlesavedInstanceState){
super.onCreate(savedInstanceState);
ArrayAdapter<String>adapter=newArrayAdapter<String>(
getActivity(),
android.R.layout.simple_list_item_activated_1,
names);
setListAdapter(adapter);
}
@Override
publicvoidonViewCreated(Viewview,
BundlesavedInstanceState){
//ListViewcanonlybeaccessedhere,notinonCreate()
super.onViewCreated(view,savedInstanceState);
ListViewlistView=getListView();
listView.setChoiceMode(ListView.CHOICE_MODE_SINGLE);
listView.setOnItemClickListener(new
AdapterView.OnItemClickListener(){
@Override
publicvoidonItemClick(AdapterView<?>parent,
finalViewview,intposition,longid){
if(callback!=null){
callback.onItemSelected(names[position]);
}
}
});
}
publicinterfaceCallback{
publicvoidonItemSelected(Stringid);
}
privateCallbackcallback;
@Override
publicvoidonAttach(Activityactivity){
super.onAttach(activity);
if(activityinstanceofCallback){
callback=(Callback)activity;
}
}
@Override
publicvoidonDetach(){
super.onDetach();
callback=null;
}
}
Like theNamesFragment class in FragmentDemo1, theNamesListFragment class inFragmentDemo2 also defines a Callback interface that a containing activity mustimplementtolistentotheListView’sOnItemClickevent.
Thesecondfragment,DetailsFragmentinListing13.9,expectsitsactivitytopasstwoarguments,anameandanimageID.InitsonCreatemethod,thefragmentretrievestheseargumentsandstoretheminclasslevelvariables,nameandimageId.Thevaluesofthevariables are then used in its onCreateView method to populate its TextView andImageView.
Listing13.9:TheDetailsFragmentclass
packagecom.example.fragmentdemo2;
importandroid.app.Fragment;
importandroid.os.Bundle;
importandroid.view.LayoutInflater;
importandroid.view.View;
importandroid.view.ViewGroup;
importandroid.widget.ImageView;
importandroid.widget.ImageView.ScaleType;
importandroid.widget.TextView;
publicclassDetailsFragmentextendsFragment{
intimageId;
Stringname;
publicDetailsFragment(){
}
@Override
publicvoidonCreate(BundlesavedInstanceState){
super.onCreate(savedInstanceState);
if(getArguments().containsKey(“name”)){
name=getArguments().getString(“name”);
}
if(getArguments().containsKey(“imageId”)){
imageId=getArguments().getInt(“imageId”);
}
}
@Override
publicViewonCreateView(LayoutInflaterinflater,
ViewGroupcontainer,BundlesavedInstanceState){
ViewrootView=inflater.inflate(
R.layout.fragment_details,container,false);
TextViewtextView=(TextView)
rootView.findViewById(R.id.text1);
textView.setText(name);
ImageViewimageView=(ImageView)rootView.findViewById(
R.id.imageView1);
imageView.setScaleType(ScaleType.FIT_XY);//stretchimage
imageView.setImageResource(imageId);
returnrootView;
}
}
Nowthatyouhavelookedat thefragments, takeacloselookat theactivity.ThelayoutfileisgiveninListing13.10.InsteadoftwofragmentelementslikeinFragmentDemo1,theactivity layoutfile inFragmentDemo2hasafragmentelementandaFrameLayout.Thelatteractsasthecontainerforthesecondfragment.
Listing13.10:Theactivity_main.xmlfile
<LinearLayout
xmlns:android=“http://schemas.android.com/apk/res/android”
android:orientation=“horizontal”
android:layout_width=“match_parent”
android:layout_height=“match_parent”>
<fragment
android:name=“com.example.fragmentdemo2.NamesListFragment”
android:id=”@+id/namesFragment”
android:layout_weight=“1”
android:layout_width=“0dp”
android:layout_height=“match_parent”/>
<FrameLayout
android:id=”@+id/details_container”
android:layout_width=“0dp”
android:layout_height=“match_parent”
android:layout_weight=“2.5”/>
</LinearLayout>
TheactivityclassforFragmentDemo2isgiveninListing13.11.LiketheactivityclassinFragmentDemo1,italsoimplementstheCallbackinterface.However,itsimplementationof the onItemSelected method is different. First, it passes two arguments to theDetailsFragment.Second,everytimeonItemSelectediscalled,anewDetailsFragmentinstanceiscreatedandpassedtotheFrameLayout.
Listing13.11:TheMainActivityclass
packagecom.example.fragmentdemo2;
importandroid.app.Activity;
importandroid.app.FragmentManager;
importandroid.app.FragmentTransaction;
importandroid.os.Bundle;
publicclassMainActivityextendsActivity
implementsNamesListFragment.Callback{
@Override
protectedvoidonCreate(BundlesavedInstanceState){
super.onCreate(savedInstanceState);
setContentView(R.layout.activity_main);
}
@Override
publicvoidonItemSelected(Stringvalue){
Bundlearguments=newBundle();
arguments.putString(“name”,value);
if(value.equals(“Amsterdam”)){
arguments.putInt(“imageId”,R.drawable.amsterdam);
}elseif(value.equals(“Brussels”)){
arguments.putInt(“imageId”,R.drawable.brussels);
}elseif(value.equals(“Paris”)){
arguments.putInt(“imageId”,R.drawable.paris);
}
DetailsFragmentfragment=newDetailsFragment();
fragment.setArguments(arguments);
FragmentManagerfragmentManager=getFragmentManager();
FragmentTransactionfragmentTransaction=
fragmentManager.beginTransaction();
fragmentTransaction.replace(
R.id.details_container,fragment);
fragmentTransaction.commit();
}
}
Figure13.3showsFragmentDemo2.
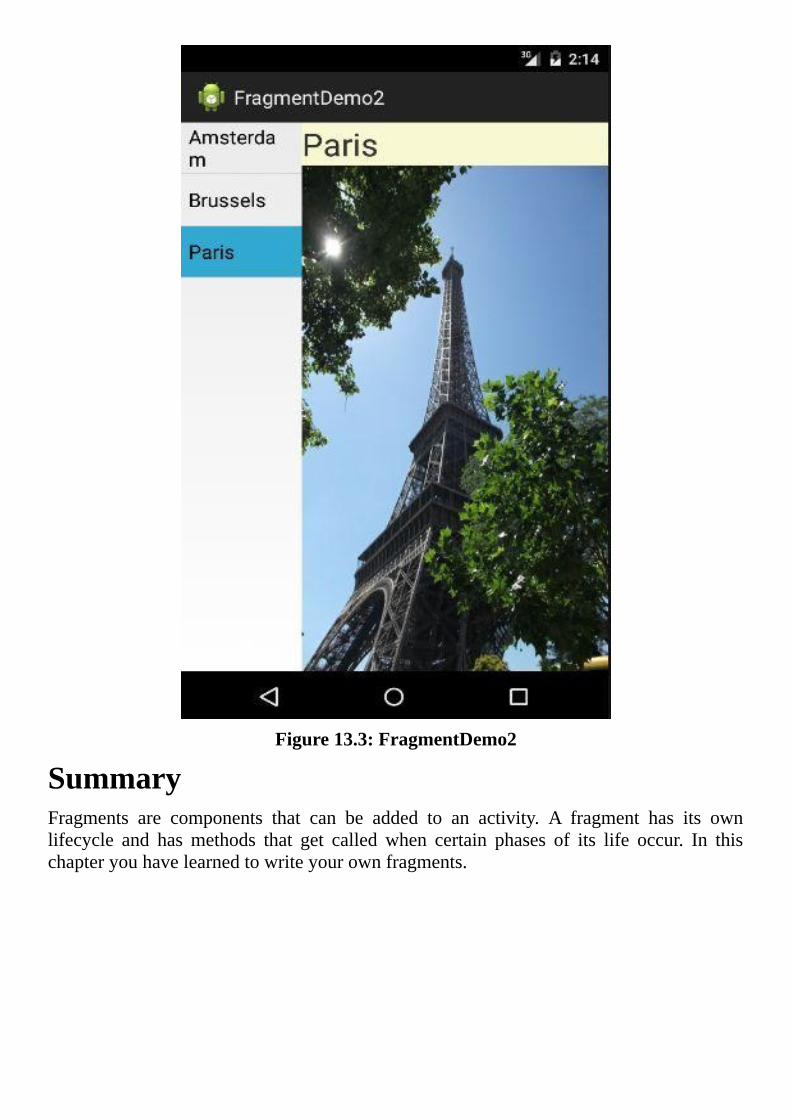
Figure13.3:FragmentDemo2
SummaryFragments are components that can be added to an activity. A fragment has its ownlifecycle and has methods that get called when certain phases of its life occur. In thischapteryouhavelearnedtowriteyourownfragments.
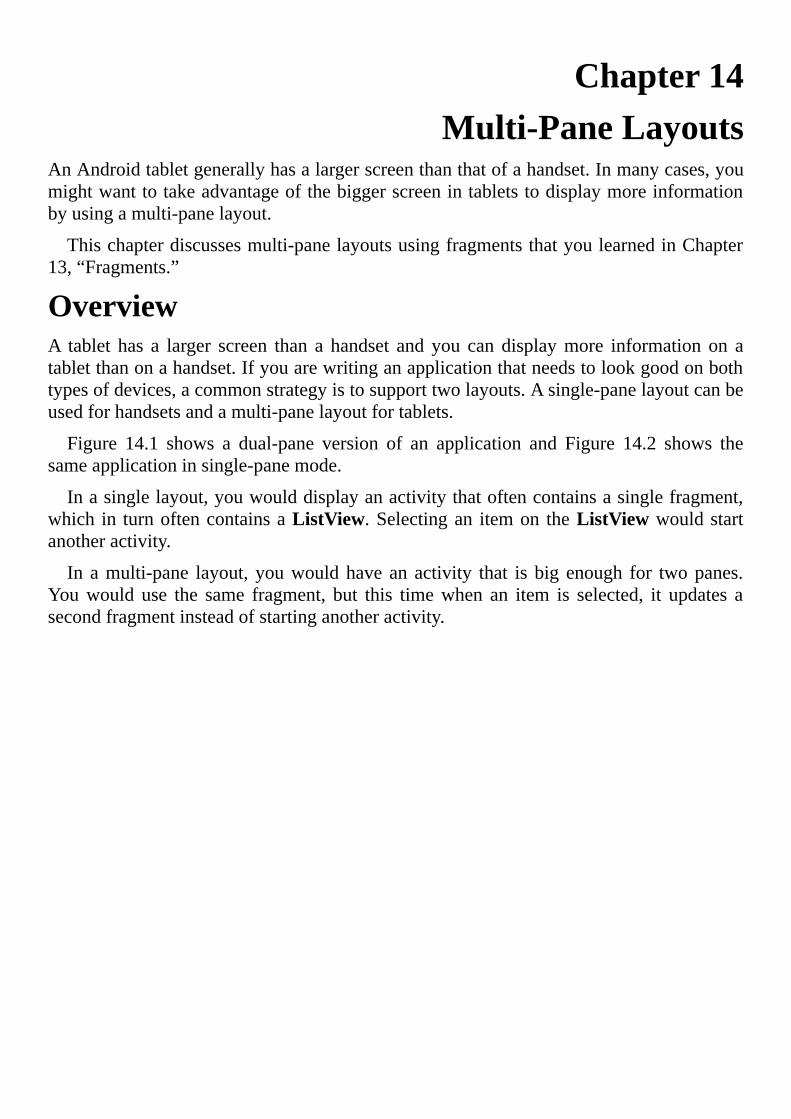
Chapter14Multi-PaneLayouts
AnAndroidtabletgenerallyhasalargerscreenthanthatofahandset.Inmanycases,youmightwanttotakeadvantageofthebiggerscreenintabletstodisplaymoreinformationbyusingamulti-panelayout.
Thischapterdiscussesmulti-panelayoutsusingfragmentsthatyoulearnedinChapter13,“Fragments.”
OverviewA tablet has a larger screen than a handset and you can displaymore information on atabletthanonahandset.Ifyouarewritinganapplicationthatneedstolookgoodonbothtypesofdevices,acommonstrategyistosupporttwolayouts.Asingle-panelayoutcanbeusedforhandsetsandamulti-panelayoutfortablets.
Figure 14.1 shows a dual-pane version of an application and Figure 14.2 shows thesameapplicationinsingle-panemode.
Inasinglelayout,youwoulddisplayanactivitythatoftencontainsasinglefragment,which in turnoftencontainsaListView.Selectingan itemon theListViewwouldstartanotheractivity.
In amulti-pane layout, youwouldhave an activity that is big enough for twopanes.Youwould use the same fragment, but this timewhen an item is selected, it updates asecondfragmentinsteadofstartinganotheractivity.

Figure14.1:Dual-panelayout
Figure14.2:Single-panelayout

Thequestionis,howdoyoutellthesystemtopicktherightlayout?PriortoAndroid3.2(APIlevel13)ascreenmayfallintooneofthesecategoriesdependingonitssize:
small,forscreensthatareatleast426dpx320dpnormal,forscreensthatareatleast470dpx320dplarge,forscreensthatareatleast640dpx480dpxlarge,forscreensthatareatleast960dpx720dp
Here,dpstandsfordensityindependentpixel.Youcancalculatethenumberofpixels(px)fromthedpandthescreendensity(indotsperinchordpi)byusingthisformula.
px=dp*(dpi/160)
Tosupportascreencategory,youwouldplaceyourlayoutfilesinthefolderdedicatedtothat category, that is res/layout-small for small screens, res/layout for normal screens,res/layout-large for large screens, andres/layout-xlarge for xlarge screens.To supportboth normal and large screens, you would have layout files in both res/layout andres/layout-largedirectories.
The system is not without limitations, however. For example, a 7” tablet and a 10”tabletwouldbothfallintothexlargecategory,eventhoughtheyprovidedifferentamountsofspace.Toallowfordifferent layouts for7”and10” tablets,Android3.2changed theway it worked. Instead of the four screen sizes, Android 3.2 and later employ a newtechniquethatmeasuresthescreenbasedontheamountofspaceindp,ratherthantryingtomakethelayoutfitthegeneralizedsizegroups.
With the new system, it is easy to provide different layouts for tabletswith a 600dpscreenwidth(suchasinatypical7”tablet)andtabletswitha720dpscreenwidth(suchasinatypical10”tablet).Atypicalhandset,bytheway,hasa320dpscreenwidth.
Now, to support large screen devices for both pre-3.2 devices and later devices, youneedtostorelayoutfilesinbothres/layout-largeandres/layout-sw600dpdirectories.Inother words, for each layout you end up with three files (assuming your layout file iscalledmain.xml):
res/layout/main.xmlfornormalscreensres/layout-large/main.xml for devices running pre-3.2 Android having a largescreenres/layout-sw600dp/main.xml for devices running Android 3.2 or later having alargescreen
Inaddition,ifyourapplicationhasadifferentscreenfor10”tablets,youwillalsoneedares/layout-sw720dp/main.xmlfile.
Themain.xml files in the layout-large and layout-sw600dp directories are identicalandhavingduplicatesthatbothhavetobechangedifoneofthemwasupdatediscertainlyamaintenancenightmare.
To get around it, you can use references.With references, you only need two layoutfiles,one fornormalscreensandone for largescreens,both in theres/layout directory.Assumingthenamesofyourlayoutfilesaremain.xmlandmain_large.xml,toreferencethe latter, you need to have a refs.xml file in both res/values-large and res/values-sw600dp.Thecontentofrefs.xmlwouldbeasfollows.
<resources>
<itemname=“main”type=“layout”>@layout/main_large</item>
</resources>
Figure14.3showsthecontentoftheresdirectory.
Figure14.3:Thestructureoftheresdirectorythatsupportslayoutreferences
Thisway,youstillhavetwoidenticalfiles,therefs.xmlfileinthevalues-largedirectoryandtherefs.xmlfileinthevalues-sw600dpdirectory.However,thesearereferencefilesthatdonotneedtobeupdatedifthelayoutchanges.
AMulti-PaneExampleMultiPaneDemoisanapplicationthatsupportssmallandlargescreens.Forlargescreensitshowsanactivitythatusesamulti-panelayoutconsistingoftwofragments.Forsmallerscreens,anotheractivitywillbeshownthatcontainsonlyonefragment.
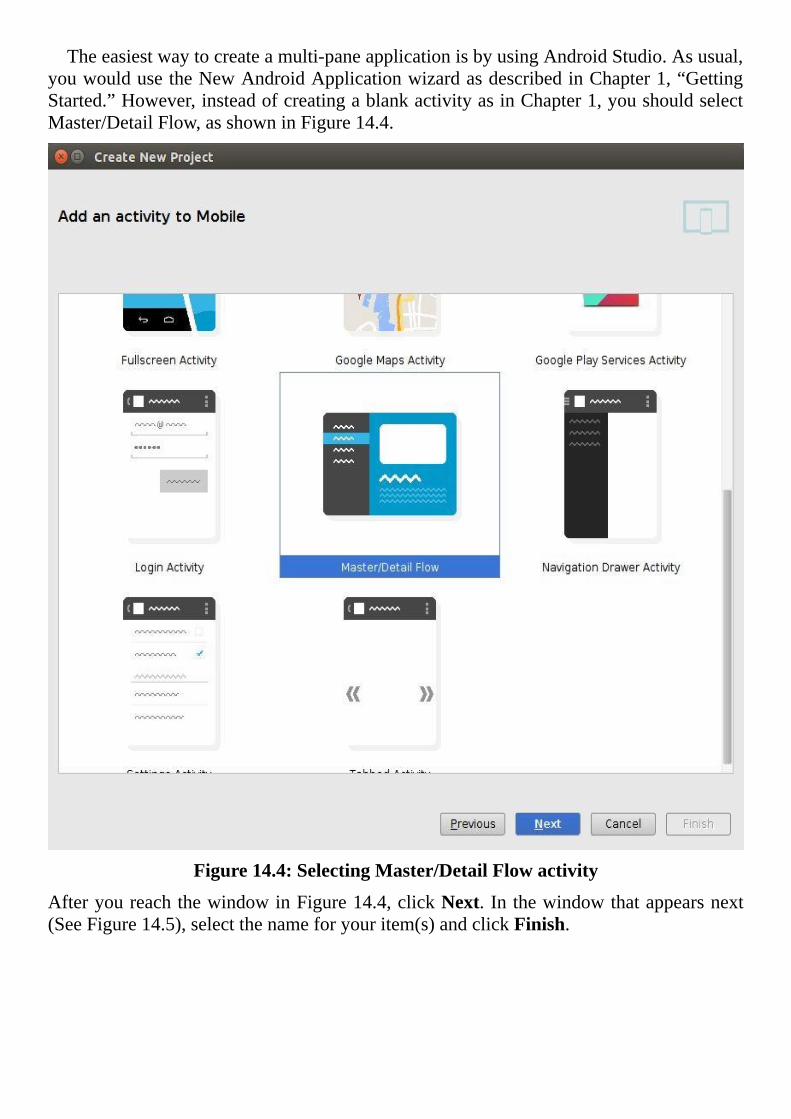
Theeasiestwaytocreateamulti-paneapplicationisbyusingAndroidStudio.Asusual,youwouldusetheNewAndroidApplicationwizardasdescribedinChapter1,“GettingStarted.”However,insteadofcreatingablankactivityasinChapter1,youshouldselectMaster/DetailFlow,asshowninFigure14.4.
Figure14.4:SelectingMaster/DetailFlowactivity
AfteryoureachthewindowinFigure14.4,clickNext.Inthewindowthatappearsnext(SeeFigure14.5),selectthenameforyouritem(s)andclickFinish.
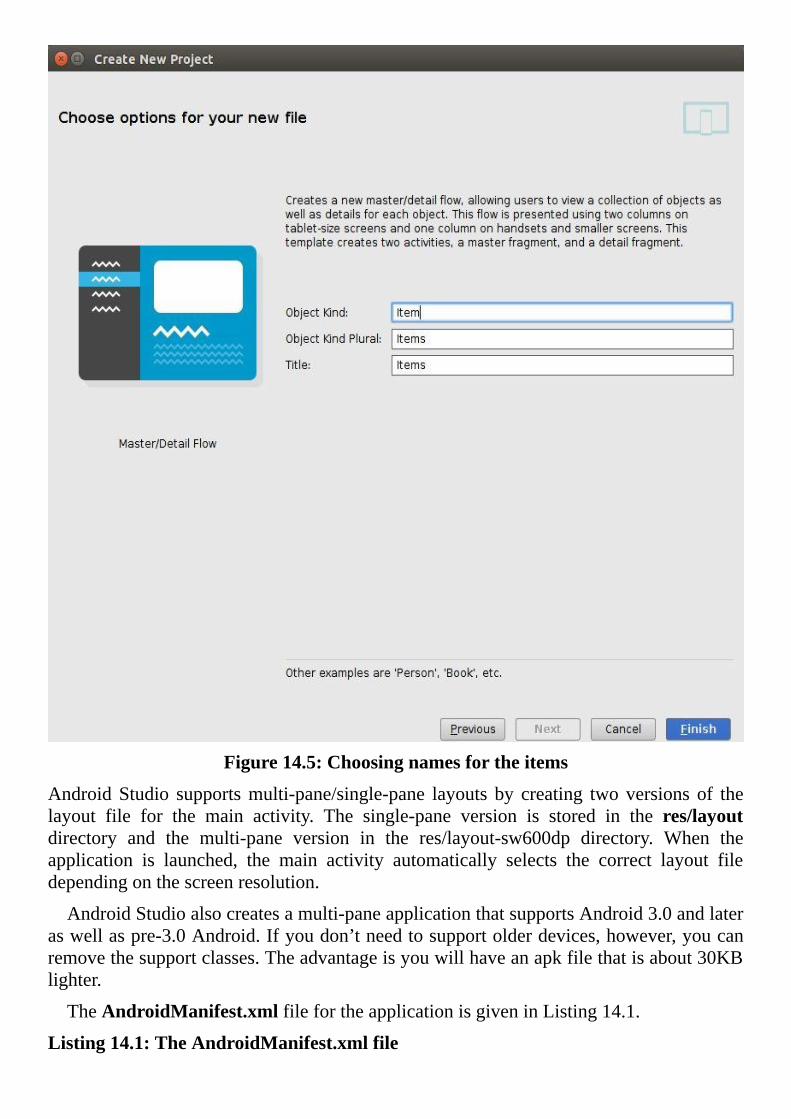
Figure14.5:Choosingnamesfortheitems
AndroidStudio supportsmulti-pane/single-pane layouts by creating twoversions of thelayout file for the main activity. The single-pane version is stored in the res/layoutdirectory and the multi-pane version in the res/layout-sw600dp directory. When theapplication is launched, the main activity automatically selects the correct layout filedependingonthescreenresolution.
AndroidStudioalsocreatesamulti-paneapplicationthatsupportsAndroid3.0andlateraswellaspre-3.0Android.Ifyoudon’tneedtosupportolderdevices,however,youcanremovethesupportclasses.Theadvantageisyouwillhaveanapkfilethatisabout30KBlighter.
TheAndroidManifest.xmlfilefortheapplicationisgiveninListing14.1.
Listing14.1:TheAndroidManifest.xmlfile
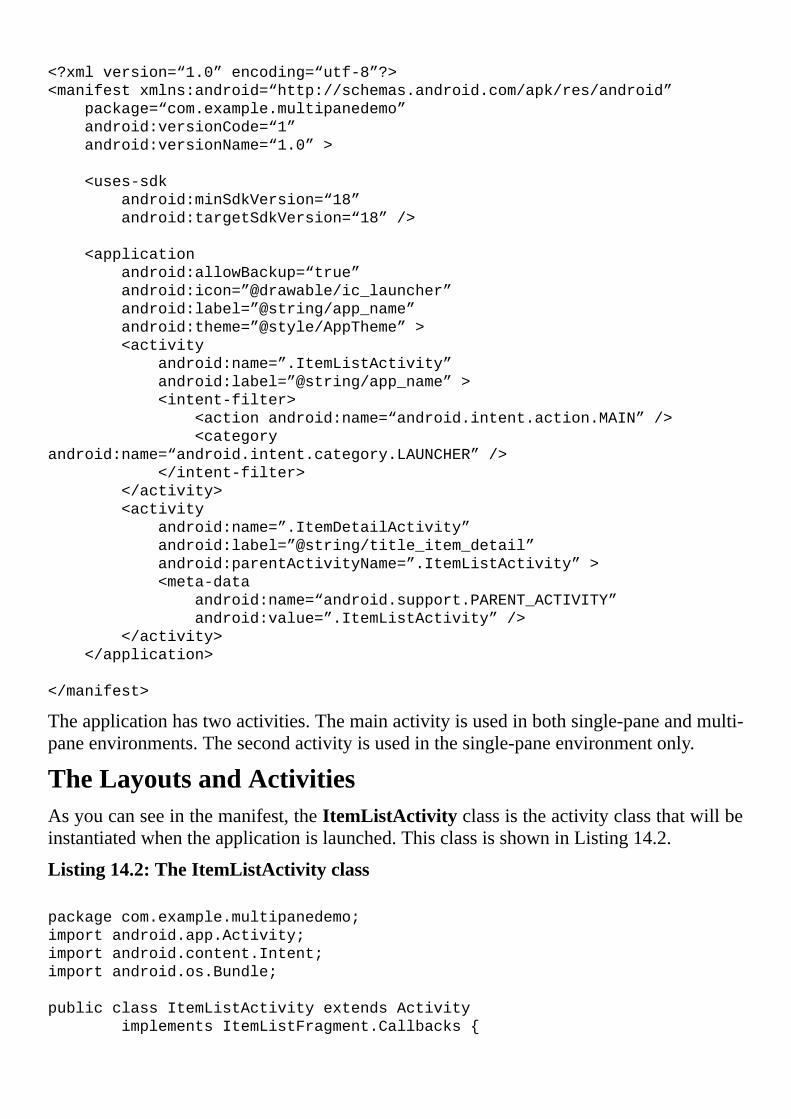
<?xmlversion=“1.0”encoding=“utf-8”?>
<manifestxmlns:android=“http://schemas.android.com/apk/res/android”
package=“com.example.multipanedemo”
android:versionCode=“1”
android:versionName=“1.0”>
<uses-sdk
android:minSdkVersion=“18”
android:targetSdkVersion=“18”/>
<application
android:allowBackup=“true”
android:icon=”@drawable/ic_launcher”
android:label=”@string/app_name”
android:theme=”@style/AppTheme”>
<activity
android:name=”.ItemListActivity”
android:label=”@string/app_name”>
<intent-filter>
<actionandroid:name=“android.intent.action.MAIN”/>
<category
android:name=“android.intent.category.LAUNCHER”/>
</intent-filter>
</activity>
<activity
android:name=”.ItemDetailActivity”
android:label=”@string/title_item_detail”
android:parentActivityName=”.ItemListActivity”>
<meta-data
android:name=“android.support.PARENT_ACTIVITY”
android:value=”.ItemListActivity”/>
</activity>
</application>
</manifest>
Theapplicationhastwoactivities.Themainactivityisusedinbothsingle-paneandmulti-paneenvironments.Thesecondactivityisusedinthesingle-paneenvironmentonly.
TheLayoutsandActivitiesAsyoucanseeinthemanifest,theItemListActivityclassistheactivityclassthatwillbeinstantiatedwhentheapplicationislaunched.ThisclassisshowninListing14.2.
Listing14.2:TheItemListActivityclass
packagecom.example.multipanedemo;
importandroid.app.Activity;
importandroid.content.Intent;
importandroid.os.Bundle;
publicclassItemListActivityextendsActivity
implementsItemListFragment.Callbacks{
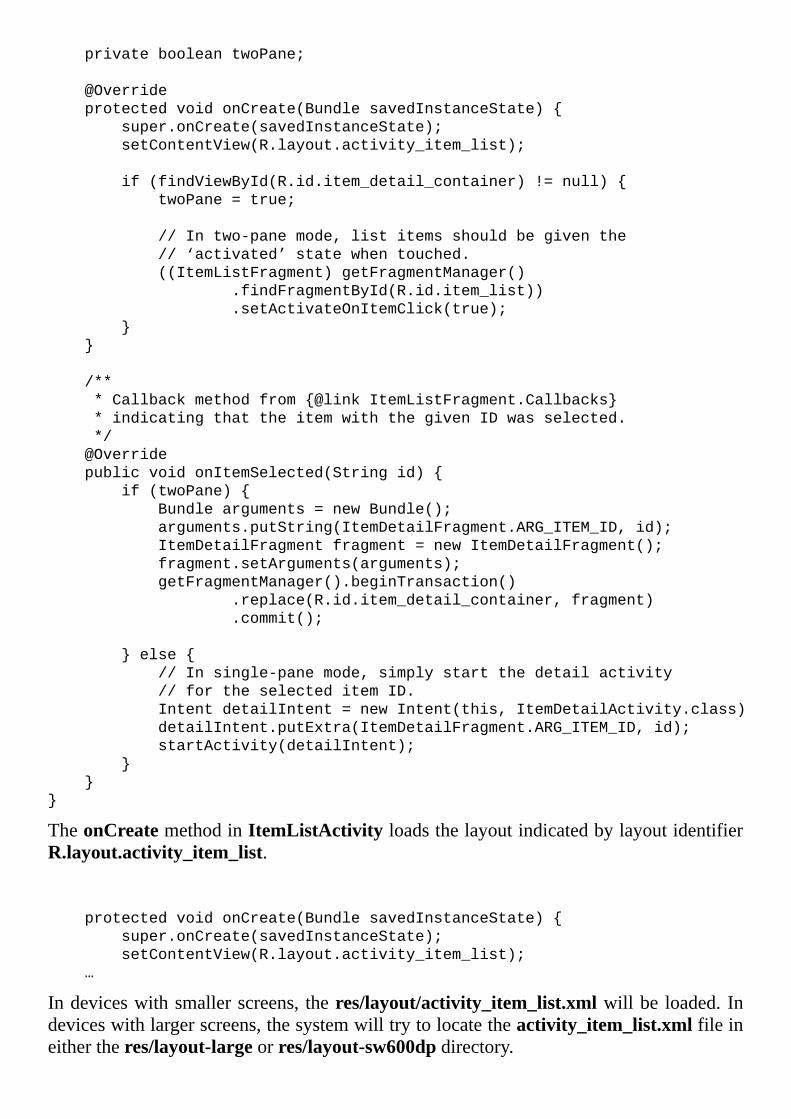
privatebooleantwoPane;
@Override
protectedvoidonCreate(BundlesavedInstanceState){
super.onCreate(savedInstanceState);
setContentView(R.layout.activity_item_list);
if(findViewById(R.id.item_detail_container)!=null){
twoPane=true;
//Intwo-panemode,listitemsshouldbegiventhe
//‘activated’statewhentouched.
((ItemListFragment)getFragmentManager()
.findFragmentById(R.id.item_list))
.setActivateOnItemClick(true);
}
}
/**
*Callbackmethodfrom{@linkItemListFragment.Callbacks}
*indicatingthattheitemwiththegivenIDwasselected.
*/
@Override
publicvoidonItemSelected(Stringid){
if(twoPane){
Bundlearguments=newBundle();
arguments.putString(ItemDetailFragment.ARG_ITEM_ID,id);
ItemDetailFragmentfragment=newItemDetailFragment();
fragment.setArguments(arguments);
getFragmentManager().beginTransaction()
.replace(R.id.item_detail_container,fragment)
.commit();
}else{
//Insingle-panemode,simplystartthedetailactivity
//fortheselecteditemID.
IntentdetailIntent=newIntent(this,ItemDetailActivity.class);
detailIntent.putExtra(ItemDetailFragment.ARG_ITEM_ID,id);
startActivity(detailIntent);
}
}
}
TheonCreatemethodinItemListActivityloadsthelayoutindicatedbylayoutidentifierR.layout.activity_item_list.
protectedvoidonCreate(BundlesavedInstanceState){
super.onCreate(savedInstanceState);
setContentView(R.layout.activity_item_list);
…
Indeviceswithsmallerscreens, theres/layout/activity_item_list.xmlwillbe loaded. Indeviceswithlargerscreens,thesystemwilltrytolocatetheactivity_item_list.xmlfileineithertheres/layout-largeorres/layout-sw600dpdirectory.
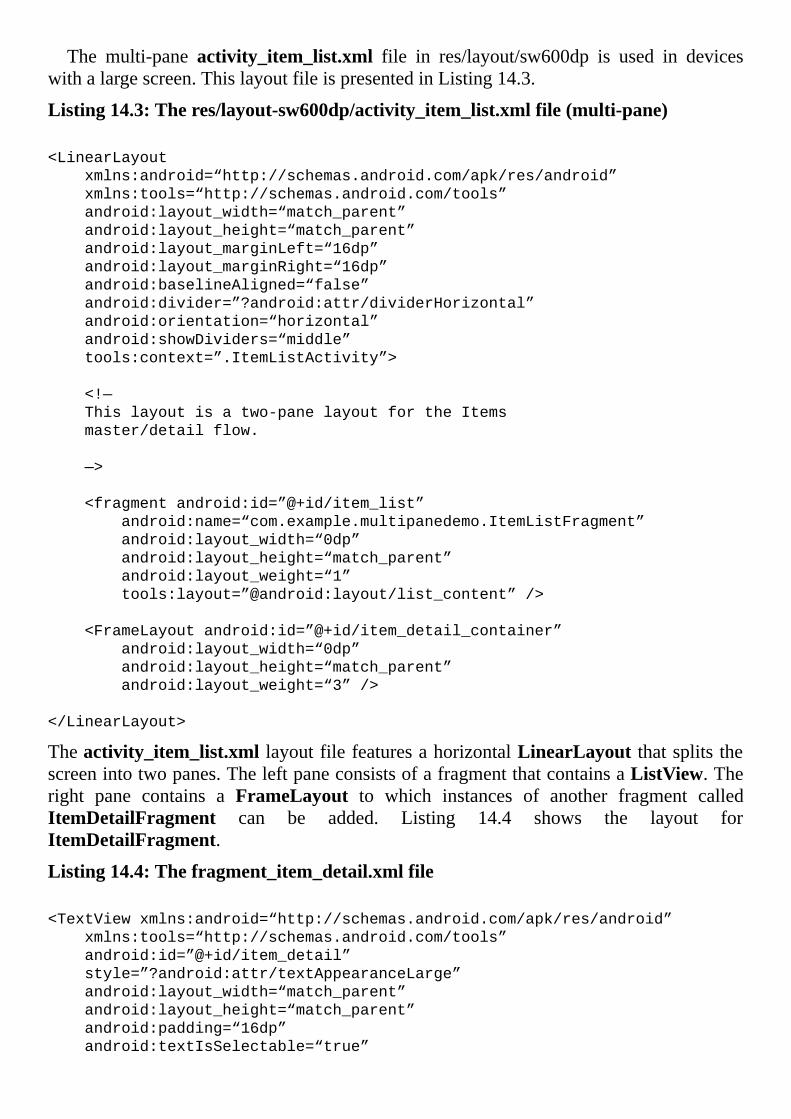
The multi-pane activity_item_list.xml file in res/layout/sw600dp is used in deviceswithalargescreen.ThislayoutfileispresentedinListing14.3.
Listing14.3:Theres/layout-sw600dp/activity_item_list.xmlfile(multi-pane)
<LinearLayout
xmlns:android=“http://schemas.android.com/apk/res/android”
xmlns:tools=“http://schemas.android.com/tools”
android:layout_width=“match_parent”
android:layout_height=“match_parent”
android:layout_marginLeft=“16dp”
android:layout_marginRight=“16dp”
android:baselineAligned=“false”
android:divider=”?android:attr/dividerHorizontal”
android:orientation=“horizontal”
android:showDividers=“middle”
tools:context=”.ItemListActivity”>
<!—
Thislayoutisatwo-panelayoutfortheItems
master/detailflow.
—>
<fragmentandroid:id=”@+id/item_list”
android:name=“com.example.multipanedemo.ItemListFragment”
android:layout_width=“0dp”
android:layout_height=“match_parent”
android:layout_weight=“1”
tools:layout=”@android:layout/list_content”/>
<FrameLayoutandroid:id=”@+id/item_detail_container”
android:layout_width=“0dp”
android:layout_height=“match_parent”
android:layout_weight=“3”/>
</LinearLayout>
Theactivity_item_list.xml layoutfilefeaturesahorizontalLinearLayout thatsplitsthescreenintotwopanes.TheleftpaneconsistsofafragmentthatcontainsaListView.Theright pane contains a FrameLayout to which instances of another fragment calledItemDetailFragment can be added. Listing 14.4 shows the layout forItemDetailFragment.
Listing14.4:Thefragment_item_detail.xmlfile
<TextViewxmlns:android=“http://schemas.android.com/apk/res/android”
xmlns:tools=“http://schemas.android.com/tools”
android:id=”@+id/item_detail”
style=”?android:attr/textAppearanceLarge”
android:layout_width=“match_parent”
android:layout_height=“match_parent”
android:padding=“16dp”
android:textIsSelectable=“true”
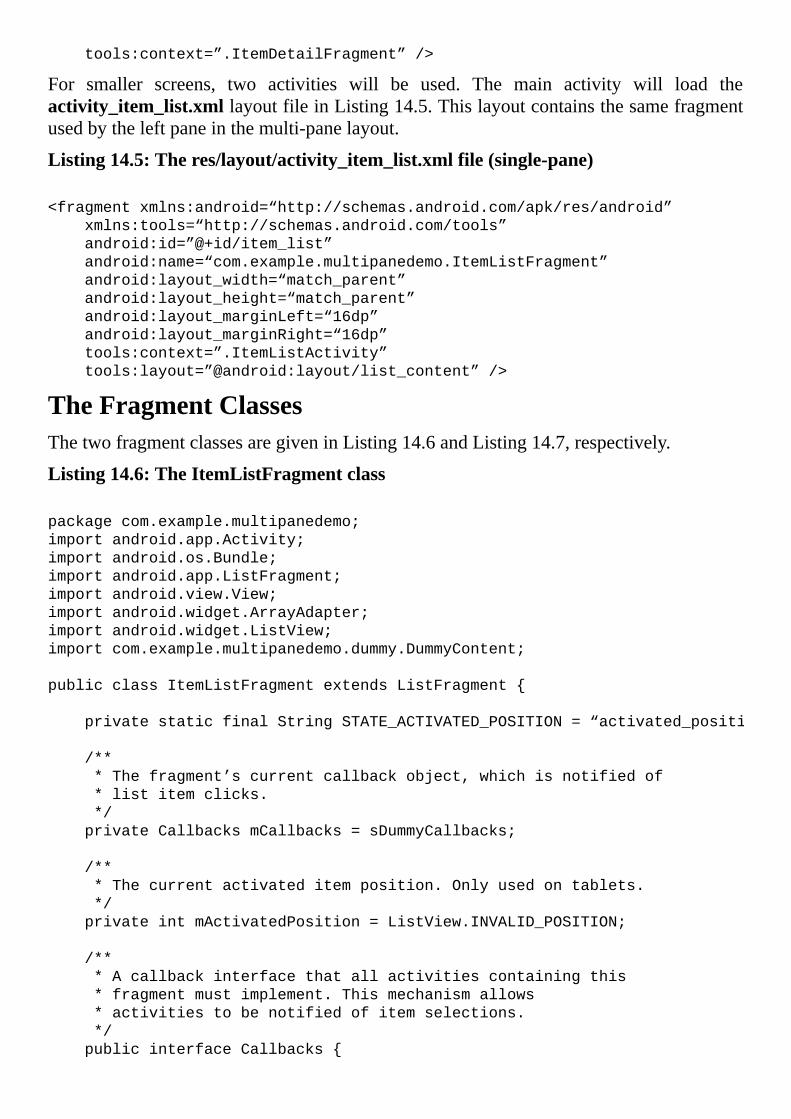
tools:context=”.ItemDetailFragment”/>
For smaller screens, two activities will be used. The main activity will load theactivity_item_list.xmllayoutfileinListing14.5.Thislayoutcontainsthesamefragmentusedbytheleftpaneinthemulti-panelayout.
Listing14.5:Theres/layout/activity_item_list.xmlfile(single-pane)
<fragmentxmlns:android=“http://schemas.android.com/apk/res/android”
xmlns:tools=“http://schemas.android.com/tools”
android:id=”@+id/item_list”
android:name=“com.example.multipanedemo.ItemListFragment”
android:layout_width=“match_parent”
android:layout_height=“match_parent”
android:layout_marginLeft=“16dp”
android:layout_marginRight=“16dp”
tools:context=”.ItemListActivity”
tools:layout=”@android:layout/list_content”/>
TheFragmentClassesThetwofragmentclassesaregiveninListing14.6andListing14.7,respectively.
Listing14.6:TheItemListFragmentclass
packagecom.example.multipanedemo;
importandroid.app.Activity;
importandroid.os.Bundle;
importandroid.app.ListFragment;
importandroid.view.View;
importandroid.widget.ArrayAdapter;
importandroid.widget.ListView;
importcom.example.multipanedemo.dummy.DummyContent;
publicclassItemListFragmentextendsListFragment{
privatestaticfinalStringSTATE_ACTIVATED_POSITION=“activated_position”;
/**
*Thefragment’scurrentcallbackobject,whichisnotifiedof
*listitemclicks.
*/
privateCallbacksmCallbacks=sDummyCallbacks;
/**
*Thecurrentactivateditemposition.Onlyusedontablets.
*/
privateintmActivatedPosition=ListView.INVALID_POSITION;
/**
*Acallbackinterfacethatallactivitiescontainingthis
*fragmentmustimplement.Thismechanismallows
*activitiestobenotifiedofitemselections.
*/
publicinterfaceCallbacks{
/**
*Callbackforwhenanitemhasbeenselected.
*/
publicvoidonItemSelected(Stringid);
}
/**
*Adummyimplementationofthe{@linkCallbacks}interface
*thatdoesnothing.Usedonlywhenthisfragmentisnot
*attachedtoanactivity.
*/
privatestaticCallbackssDummyCallbacks=newCallbacks(){
@Override
publicvoidonItemSelected(Stringid){
}
};
/**
*Mandatoryemptyconstructorforthefragmentmanagerto
*instantiatethefragment(e.g.uponscreenorientation
*changes).
*/
publicItemListFragment(){
}
@Override
publicvoidonCreate(BundlesavedInstanceState){
super.onCreate(savedInstanceState);
//TODO:replacewithareallistadapter.
setListAdapter(newArrayAdapter<DummyContent.DummyItem>(
getActivity(),
android.R.layout.simple_list_item_activated_1,
android.R.id.text1,
DummyContent.ITEMS));
}
@Override
publicvoidonViewCreated(Viewview,BundlesavedInstanceState){
super.onViewCreated(view,savedInstanceState);
//Restorethepreviouslyserializedactivateditem
//position.
if(savedInstanceState!=null
&&savedInstanceState.containsKey(
STATE_ACTIVATED_POSITION)){
setActivatedPosition(savedInstanceState.getInt(
STATE_ACTIVATED_POSITION));
}
}
@Override
publicvoidonAttach(Activityactivity){
super.onAttach(activity);
//Activitiescontainingthisfragmentmustimplementits
//callbacks.
if(!(activityinstanceofCallbacks)){
thrownewIllegalStateException(
“Activitymustimplementfragment’scallbacks.”);
}
mCallbacks=(Callbacks)activity;
}
@Override
publicvoidonDetach(){
super.onDetach();
//Resettheactivecallbacksinterfacetothedummy
//implementation.
mCallbacks=sDummyCallbacks;
}
@Override
publicvoidonListItemClick(ListViewlistView,Viewview,int
position,longid){
super.onListItemClick(listView,view,position,id);
//Notifytheactivecallbacksinterface(theactivity,if
//thefragmentisattachedtoone)thatanitemhasbeen
//selected.
mCallbacks.onItemSelected(DummyContent.ITEMS.get(
position).id);
}
@Override
publicvoidonSaveInstanceState(BundleoutState){
super.onSaveInstanceState(outState);
if(mActivatedPosition!=ListView.INVALID_POSITION){
//Serializeandpersisttheactivateditemposition.
outState.putInt(STATE_ACTIVATED_POSITION,
mActivatedPosition);
}
}
/**
*Turnsonactivate-on-clickmode.Whenthismodeison,list
*itemswillbe
*giventhe‘activated’statewhentouched.
*/
publicvoidsetActivateOnItemClick(booleanactivateOnItemClick){
//WhensettingCHOICE_MODE_SINGLE,ListViewwill
//automatically
//giveitemsthe‘activated’statewhentouched.
getListView().setChoiceMode(activateOnItemClick
?ListView.CHOICE_MODE_SINGLE
:ListView.CHOICE_MODE_NONE);
}
privatevoidsetActivatedPosition(intposition){
if(position==ListView.INVALID_POSITION){
getListView().setItemChecked(mActivatedPosition,false);
}else{
getListView().setItemChecked(position,true);
}
mActivatedPosition=position;
}
}
TheItemListFragment class extendsListFragment and gets the data for itsListViewfrom aDummyContent class. It also provides aCallbacks interface that any activityusingthisfragmentmustimplementtohandletheListItemClickeventoftheListView.IntheonAttachmethod,thefragmentmakessuretheactivityclassimplementsCallbacksand replaces the content ofmCallbackswith the activity, in effect delegating the eventhandlingtotheactivity.
Listing14.7:TheItemDetailFragmentclass
packagecom.example.multipanedemo;
importandroid.os.Bundle;
importandroid.app.Fragment;
importandroid.view.LayoutInflater;
importandroid.view.View;
importandroid.view.ViewGroup;
importandroid.widget.TextView;
importcom.example.multipanedemo.dummy.DummyContent;
/**
*AfragmentrepresentingasingleItemdetailscreen.
*Thisfragmentiseithercontainedina{@linkItemListActivity}
*intwo-panemode(ontablets)ora{@linkItemDetailActivity}
*onhandsets.
*/
publicclassItemDetailFragmentextendsFragment{
/**
*ThefragmentargumentrepresentingtheitemIDthatthis
*fragmentrepresents.
*/
publicstaticfinalStringARG_ITEM_ID=“item_id”;
/**
*Thedummycontentthisfragmentispresenting.
*/
privateDummyContent.DummyItemmItem;
/**
*Mandatoryemptyconstructorforthefragmentmanagerto
*instantiatethefragment(e.g.uponscreenorientation
*changes).
*/
publicItemDetailFragment(){
}
@Override
publicvoidonCreate(BundlesavedInstanceState){
super.onCreate(savedInstanceState);
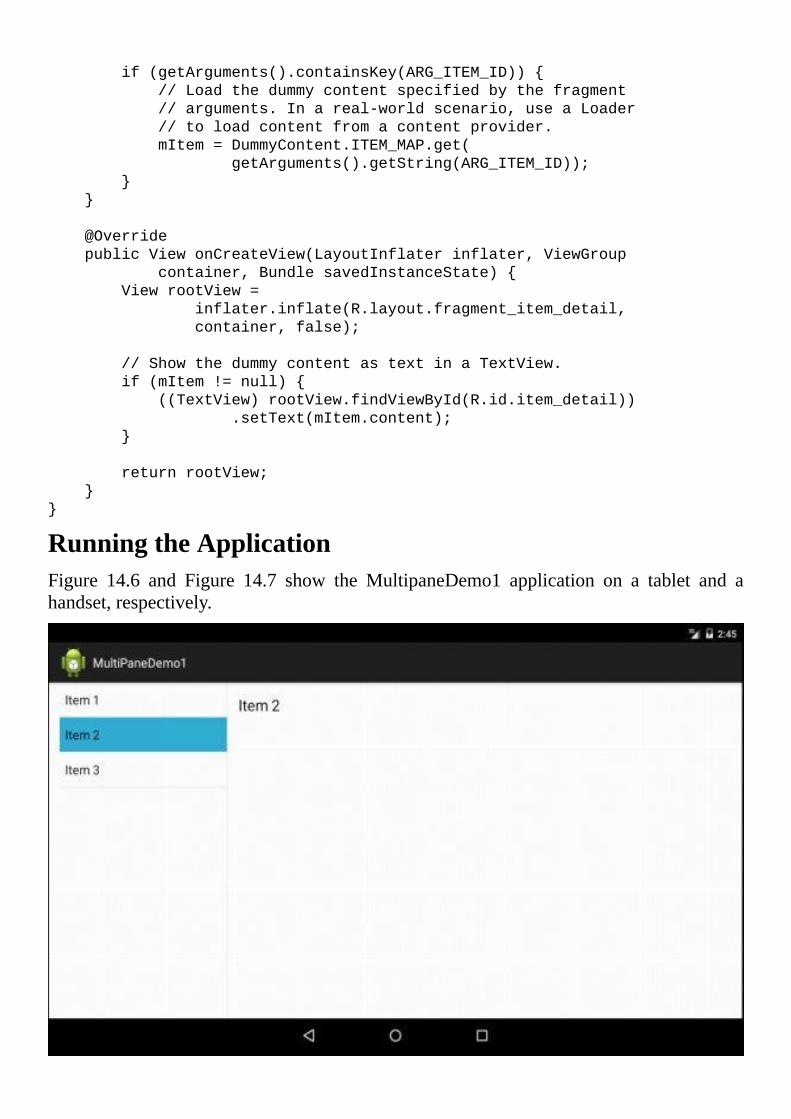
if(getArguments().containsKey(ARG_ITEM_ID)){
//Loadthedummycontentspecifiedbythefragment
//arguments.Inareal-worldscenario,useaLoader
//toloadcontentfromacontentprovider.
mItem=DummyContent.ITEM_MAP.get(
getArguments().getString(ARG_ITEM_ID));
}
}
@Override
publicViewonCreateView(LayoutInflaterinflater,ViewGroup
container,BundlesavedInstanceState){
ViewrootView=
inflater.inflate(R.layout.fragment_item_detail,
container,false);
//ShowthedummycontentastextinaTextView.
if(mItem!=null){
((TextView)rootView.findViewById(R.id.item_detail))
.setText(mItem.content);
}
returnrootView;
}
}
RunningtheApplicationFigure 14.6 and Figure 14.7 show the MultipaneDemo1 application on a tablet and ahandset,respectively.
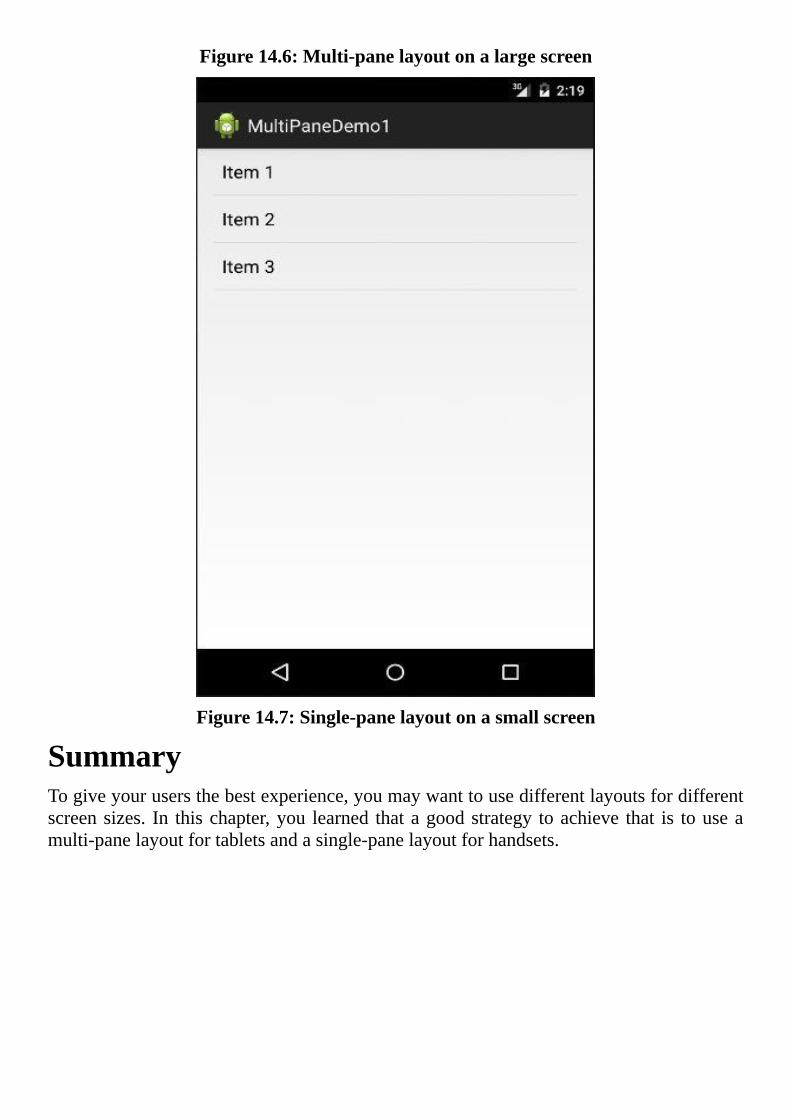
Figure14.6:Multi-panelayoutonalargescreen
Figure14.7:Single-panelayoutonasmallscreen
SummaryTogiveyourusersthebestexperience,youmaywanttousedifferentlayoutsfordifferentscreensizes. In thischapter,you learned thatagoodstrategy toachieve that is touseamulti-panelayoutfortabletsandasingle-panelayoutforhandsets.
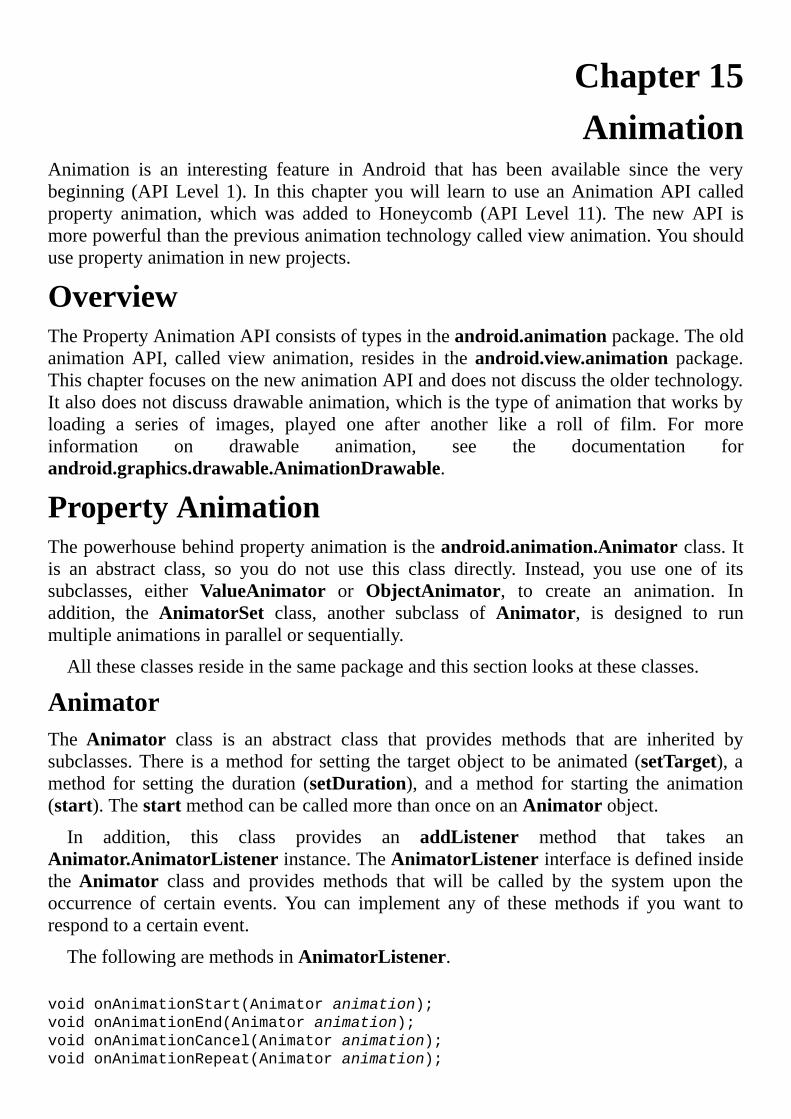
Chapter15Animation
Animation is an interesting feature in Android that has been available since the verybeginning (APILevel1). In this chapteryouwill learn touseanAnimationAPIcalledproperty animation, which was added to Honeycomb (API Level 11). The newAPI ismorepowerfulthanthepreviousanimationtechnologycalledviewanimation.Youshouldusepropertyanimationinnewprojects.
OverviewThePropertyAnimationAPIconsistsoftypesintheandroid.animationpackage.TheoldanimationAPI, called view animation, resides in theandroid.view.animation package.ThischapterfocusesonthenewanimationAPIanddoesnotdiscusstheoldertechnology.Italsodoesnotdiscussdrawableanimation,whichisthetypeofanimationthatworksbyloading a series of images, played one after another like a roll of film. For moreinformation on drawable animation, see the documentation forandroid.graphics.drawable.AnimationDrawable.
PropertyAnimationThepowerhousebehindpropertyanimationistheandroid.animation.Animatorclass.Itis an abstract class, so you do not use this class directly. Instead, you use one of itssubclasses, either ValueAnimator or ObjectAnimator, to create an animation. Inaddition, the AnimatorSet class, another subclass of Animator, is designed to runmultipleanimationsinparallelorsequentially.
Alltheseclassesresideinthesamepackageandthissectionlooksattheseclasses.
AnimatorTheAnimator class is an abstract class that provides methods that are inherited bysubclasses.There isamethod for setting the targetobject tobeanimated (setTarget),amethod for setting the duration (setDuration), and amethod for starting the animation(start).ThestartmethodcanbecalledmorethanonceonanAnimatorobject.
In addition, this class provides an addListener method that takes anAnimator.AnimatorListenerinstance.TheAnimatorListenerinterfaceisdefinedinsidetheAnimator class and provides methods that will be called by the system upon theoccurrence of certain events. You can implement any of thesemethods if youwant torespondtoacertainevent.
ThefollowingaremethodsinAnimatorListener.
voidonAnimationStart(Animatoranimation);
voidonAnimationEnd(Animatoranimation);
voidonAnimationCancel(Animatoranimation);
voidonAnimationRepeat(Animatoranimation);
Forexample,theonAnimationStartmethodiscalledwhentheanimationstartsandtheonAnimationEndmethodiscalledwhenitends.
ValueAnimatorAValueAnimatorcreatesananimationbycalculatingavaluethattransitionsfromastartvalueandtoanendvalue.YouspecifywhatthestartvalueandendvalueshouldbewhenconstructingtheValueAnimator.ByregisteringanUpdateListenertoaValueAnimator,youcanreceiveanupdateateachframe,givingyouachancetoupdateyourobject(s).
HerearetwostaticfactorymethodsthatyoucanusetoconstructaValueAnimator.
publicstaticValueAnimatorofFloat(float…values)
publicstaticValueAnimatorofInt(int…values)
Whichmethodyoushouldusedependsonwhetheryouwanttoreceiveanintorafloatineachframe.
Once you create a ValueAnimator, you should create an implementation ofAnimationUpdateListener, write your animation code under its onAnimationUpdatemethod,andregisterthelistenerwiththeValueAnimator.Hereisanexample.
valueAnimator.addUpdateListener(new
ValueAnimator.AnimatorUpdateListener(){
@Override
publicvoidonAnimationUpdate(ValueAnimatoranimation){
Floatvalue=(Float)animation.getAnimatedValue();
//usevaluetosetapropertyormultipleproperties
//Example:view.setRotationX(value);
}
});
Finally, call theValueAnimator’s setDuration method to set a duration and its startmethodtostarttheanimation.IfyoudonotcallsetDuration,thedefaultmethod(300ms)willbeused.
MoreonusingValueAnimatorisgivenintheexamplebelow.
ObjectAnimatorTheObjectAnimatorclassoffers theeasiestwaytoanimateanobject,mostprobablyaView, by continually updating one of its properties. To create an animation, create anObjectAnimator using one of its factory methods, passing a target object, a propertyname, and the start and end values for the property. In recognition of the fact that apropertycanhaveanintvalue,afloatvalue,oranothertypeofvalue,ObjectAnimatorprovidesthreestaticmethods:ofInt,ofFloat,andofObject.Herearetheirsignatures.
publicstaticObjectAnimatorofInt(java.lang.Objecttarget,
java.lang.StringpropertyName,int…values)
publicstaticObjectAnimatorofFloat(java.lang.Objecttarget,
java.lang.StringpropertyName,float…values)
publicstaticObjectAnimatorofObject(java.lang.Objecttarget,
java.lang.StringpropertyName,java.lang.Object…values)
Youcanpassoneortwoargumentstothevaluesargument.Ifyoupasstwoarguments,thefirstwillbeusedasthestartvalueandthesecondtheendvalue.Ifyoupassoneargument,thevaluewillbeusedastheendvalueandthecurrentvalueofthepropertywillbeusedasthestartvalue.
Once you have an ObjectAnimator, call the setDuration method on theObjectAnimatortosetthedurationandthestartmethodtostartit.HereisanexampleofanimatingtherotationpropertyofaView.
ObjectAnimatorobjectAnimator=ObjectAnimator.ofFloat(view,
“rotationY”,0F,720.0F);//rotate720degrees.
objectAnimator.setDuration(2000);//2000milliseconds
objectAnimator.start();
Runningtheanimationwillcausetheviewtomaketwofullcircleswithintwoseconds.
Asyoucansee,youjustneedtwoorthreelinesofcodetocreateapropertyanimationusing ObjectAnimator. You will learn more about ObjectAnimator in the examplebelow.
AnimatorSetAnAnimatorSet isuseful ifyouwant toplaya setof animations in a certainorder.Adirect subclass of Animator, the AnimatorSet class allows you to play multipleanimations together or one after another. Once you’re finished deciding how youranimationsshouldbecalled,callthestartmethodontheAnimatorSettostartit.
TheplayTogethermethodarrangesthesuppliedanimationstoplaytogether.Therearetwooverridesforthismethod.
publicvoidplayTogether(java.util.Collection<Animator>items)
publicvoidplayTogether(Animator…items)
TheplaySequentiallymethodarrangesthesuppliedanimationstoplaysequentially.Ittoohastwooverrides.
publicvoidplaySequentially(Animator…items)
publicvoidplaySequentially(java.util.List<Animator>items)
AnAnimationProjectThe AnimationDemo project uses the ValueAnimator, ObjectAnimator, andAnimatorSet to animate an ImageView. It provides three buttons to play differentanimations.
ThemanifestfortheapplicationisgiveninListing15.1.
Listing15.1:ThemanifestforAnimationDemo
<?xmlversion=“1.0”encoding=“utf-8”?>
<manifestxmlns:android=“http://schemas.android.com/apk/res/android”
package=“com.example.animationdemo”
android:versionCode=“1”
android:versionName=“1.0”>
<uses-sdk
android:minSdkVersion=“11”
android:targetSdkVersion=“18”/>
<application
android:allowBackup=“true”
android:icon=”@drawable/ic_launcher”
android:label=”@string/app_name”
android:theme=”@style/AppTheme”>
<activity
android:name=“com.example.animationdemo.MainActivity”
android:label=”@string/app_name”>
<intent-filter>
<actionandroid:name=“android.intent.action.MAIN”/>
<categoryandroid:name=“android.intent.category.LAUNCHER”/>
</intent-filter>
</activity>
</application>
</manifest>
NotethattheminimumSDKlevelis11(Honeycomb).
Theapplicationhasoneactivity,whoselayoutisprintedinListing15.2
Listing15.2:Theactivity_main.xmlfile
<LinearLayout
xmlns:android=“http://schemas.android.com/apk/res/android”
xmlns:tools=“http://schemas.android.com/tools”
android:layout_width=“match_parent”
android:layout_height=“match_parent”
android:paddingBottom=”@dimen/activity_vertical_margin”
android:paddingLeft=”@dimen/activity_horizontal_margin”
android:paddingRight=”@dimen/activity_horizontal_margin”
android:paddingTop=”@dimen/activity_vertical_margin”
android:orientation=“vertical”
tools:context=”.MainActivity”>
<LinearLayout
android:layout_width=“match_parent”
android:layout_height=“wrap_content”>
<Button
android:id=”@+id/button1”
android:text=”@string/button_animate1”
android:textColor=”#ff4433”
android:layout_width=“wrap_content”
android:layout_height=“wrap_content”
android:onClick=“animate1”/>
<Button
android:id=”@+id/button2”
android:text=”@string/button_animate2”
android:textColor=”#33ff33”
android:layout_width=“wrap_content”
android:layout_height=“wrap_content”
android:onClick=“animate2”/>
<Button
android:id=”@+id/button3”
android:text=”@string/button_animate3”
android:textColor=”#3398ff”
android:layout_width=“wrap_content”
android:layout_height=“wrap_content”
android:onClick=“animate3”/>
</LinearLayout>
<ImageView
android:id=”@+id/imageView1”
android:layout_width=“wrap_content”
android:layout_height=“wrap_content”
android:layout_gravity=“top|center”
android:src=”@drawable/photo1”/>
</LinearLayout>
ThelayoutdefinesanImageViewandthreeButtons.
Finally,Listing15.3showstheMainActivityclassfortheapplication.Therearethreeevent-processingmethods(animate1,animate2,andanimate3)thateachusesadifferentanimationmethod.
Listing15.3:TheMainActivityclass
packagecom.example.animationdemo;
importandroid.animation.AnimatorSet;
importandroid.animation.ObjectAnimator;
importandroid.animation.ValueAnimator;
importandroid.app.Activity;
importandroid.os.Bundle;
importandroid.view.Menu;
importandroid.view.View;
publicclassMainActivityextendsActivity{
@Override
protectedvoidonCreate(BundlesavedInstanceState){
super.onCreate(savedInstanceState);
setContentView(R.layout.activity_main);
}
@Override
publicbooleanonCreateOptionsMenu(Menumenu){
getMenuInflater().inflate(R.menu.menu_main,menu);
returntrue;
}
publicvoidanimate1(Viewsource){
Viewview=findViewById(R.id.imageView1);
ObjectAnimatorobjectAnimator=ObjectAnimator.ofFloat(
view,“rotationY”,0F,720.0F);
objectAnimator.setDuration(2000);
objectAnimator.start();
}
publicvoidanimate2(Viewsource){
finalViewview=findViewById(R.id.imageView1);
ValueAnimatorvalueAnimator=ValueAnimator.ofFloat(0F,
7200F);
valueAnimator.setDuration(15000);
valueAnimator.addUpdateListener(new
ValueAnimator.AnimatorUpdateListener(){
@Override
publicvoidonAnimationUpdate(ValueAnimatoranimation){
Floatvalue=(Float)animation.getAnimatedValue();
view.setRotationX(value);
if(value<3600){
view.setTranslationX(value/20);
view.setTranslationY(value/20);
}else{
view.setTranslationX((7200-value)/20);
view.setTranslationY((7200-value)/20);
}
}
});
valueAnimator.start();
}
publicvoidanimate3(Viewsource){
Viewview=findViewById(R.id.imageView1);
ObjectAnimatorobjectAnimator1=
ObjectAnimator.ofFloat(view,“translationY”,0F,
300.0F);
ObjectAnimatorobjectAnimator2=
ObjectAnimator.ofFloat(view,“translationX”,0F,
300.0F);
objectAnimator1.setDuration(2000);
objectAnimator2.setDuration(2000);
AnimatorSetanimatorSet=newAnimatorSet();
animatorSet.playTogether(objectAnimator1,objectAnimator2);
ObjectAnimatorobjectAnimator3=
ObjectAnimator.ofFloat(view,“rotation”,0F,
1440F);
objectAnimator3.setDuration(4000);
animatorSet.play(objectAnimator3).after(objectAnimator2);
animatorSet.start();
}
}
Run theapplicationandclick thebuttons toplay theanimations.Figure15.1shows theapplication.
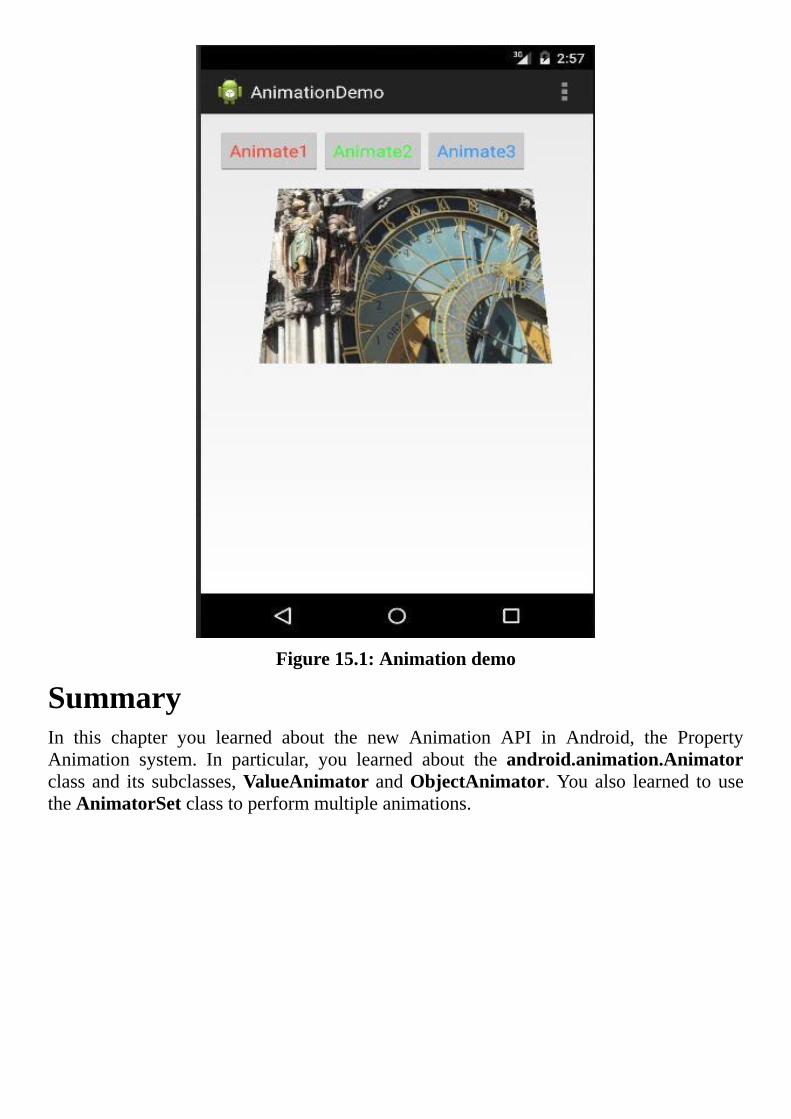
Figure15.1:Animationdemo
SummaryIn this chapter you learned about the new Animation API in Android, the PropertyAnimation system. In particular, you learned about the android.animation.Animatorclassand its subclasses,ValueAnimatorandObjectAnimator.Youalso learned tousetheAnimatorSetclasstoperformmultipleanimations.
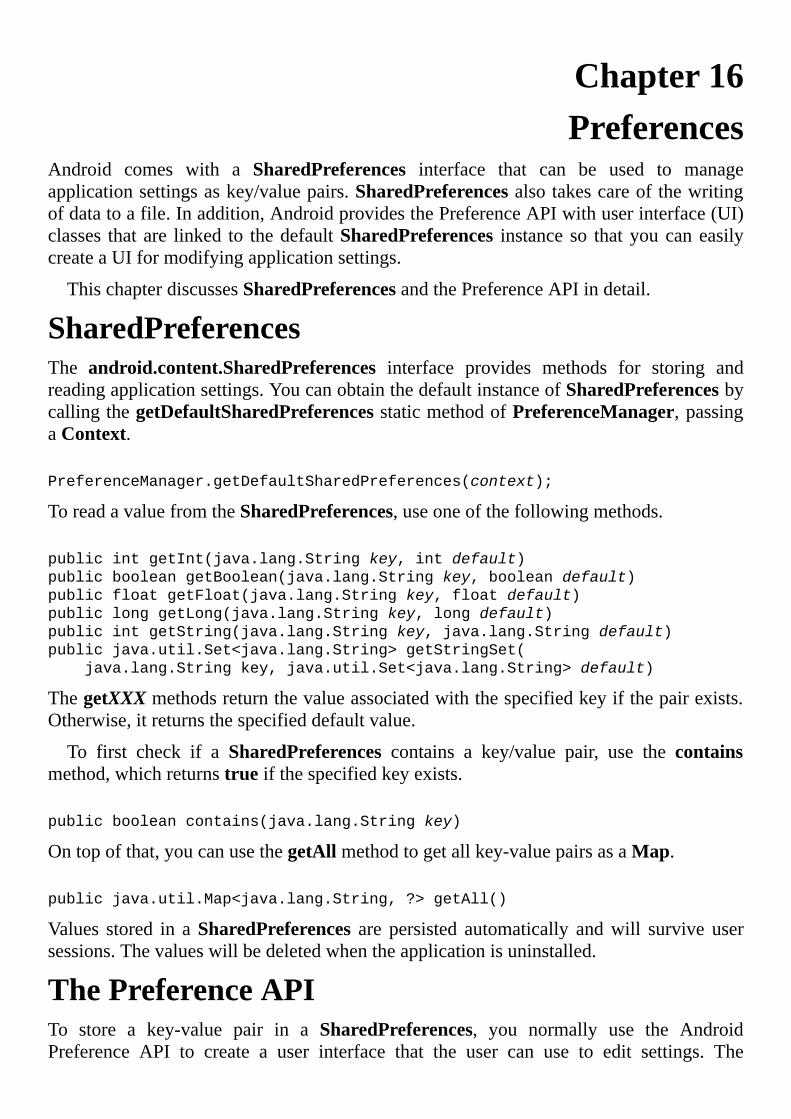
Chapter16Preferences
Android comes with a SharedPreferences interface that can be used to manageapplicationsettingsaskey/valuepairs.SharedPreferencesalsotakescareofthewritingofdatatoafile.Inaddition,AndroidprovidesthePreferenceAPIwithuserinterface(UI)classes thatare linked to thedefaultSharedPreferences instance so thatyoucaneasilycreateaUIformodifyingapplicationsettings.
ThischapterdiscussesSharedPreferencesandthePreferenceAPIindetail.
SharedPreferencesThe android.content.SharedPreferences interface provides methods for storing andreadingapplicationsettings.YoucanobtainthedefaultinstanceofSharedPreferencesbycallingthegetDefaultSharedPreferencesstaticmethodofPreferenceManager,passingaContext.
PreferenceManager.getDefaultSharedPreferences(context);
ToreadavaluefromtheSharedPreferences,useoneofthefollowingmethods.
publicintgetInt(java.lang.Stringkey,intdefault)
publicbooleangetBoolean(java.lang.Stringkey,booleandefault)
publicfloatgetFloat(java.lang.Stringkey,floatdefault)
publiclonggetLong(java.lang.Stringkey,longdefault)
publicintgetString(java.lang.Stringkey,java.lang.Stringdefault)
publicjava.util.Set<java.lang.String>getStringSet(
java.lang.Stringkey,java.util.Set<java.lang.String>default)
ThegetXXXmethodsreturnthevalueassociatedwiththespecifiedkeyifthepairexists.Otherwise,itreturnsthespecifieddefaultvalue.
To first check if a SharedPreferences contains a key/value pair, use the containsmethod,whichreturnstrueifthespecifiedkeyexists.
publicbooleancontains(java.lang.Stringkey)
Ontopofthat,youcanusethegetAllmethodtogetallkey-valuepairsasaMap.
publicjava.util.Map<java.lang.String,?>getAll()
Values stored in aSharedPreferences are persisted automatically andwill survive usersessions.Thevalueswillbedeletedwhentheapplicationisuninstalled.
ThePreferenceAPITo store a key-value pair in a SharedPreferences, you normally use the AndroidPreference API to create a user interface that the user can use to edit settings. The
android.preference.Preferenceclassisthemainclassforthis.Someofitssubclassesare
CheckBoxPreferenceEditTextPreferenceListPreferenceDialogPreference
AninstanceofaPreferencesubclasscorrespondstoasetting.
YoucouldcreateaPreferenceatruntime,butthebestwaytocreateoneisbyusinganXML file to lay out your preferences and then use aPreferenceFragment to load theXMLfile.TheXMLfilemusthaveaPreferenceScreen rootelementand iscommonlynamedpreferences.xmlandshouldbesavedtoanxmldirectoryunderres.
NotePriortoAndroid3.0,thePreferenceActivitywasoftenusedtoloadapreferencexmlfile.Thisclassisnowdeprecatedandshouldnotbeused.UsePreferenceFragment,instead.
YouwilllearnhowtousePreferenceinthefollowingexample.
UsingPreferencesThePreferenceDemo1application showsyouhowyou canuseSharedPreferences andthe Preference API. It has two activities. The first activity shows the values of threeapplication settings by reading themwhen the activity is resumed. The second activitycontainsaPreferenceFragmentthatallowstheusertochangeeachofthesettings.
Figures16.1and16.2showthemainactivityandthesecondactivity,respectively.
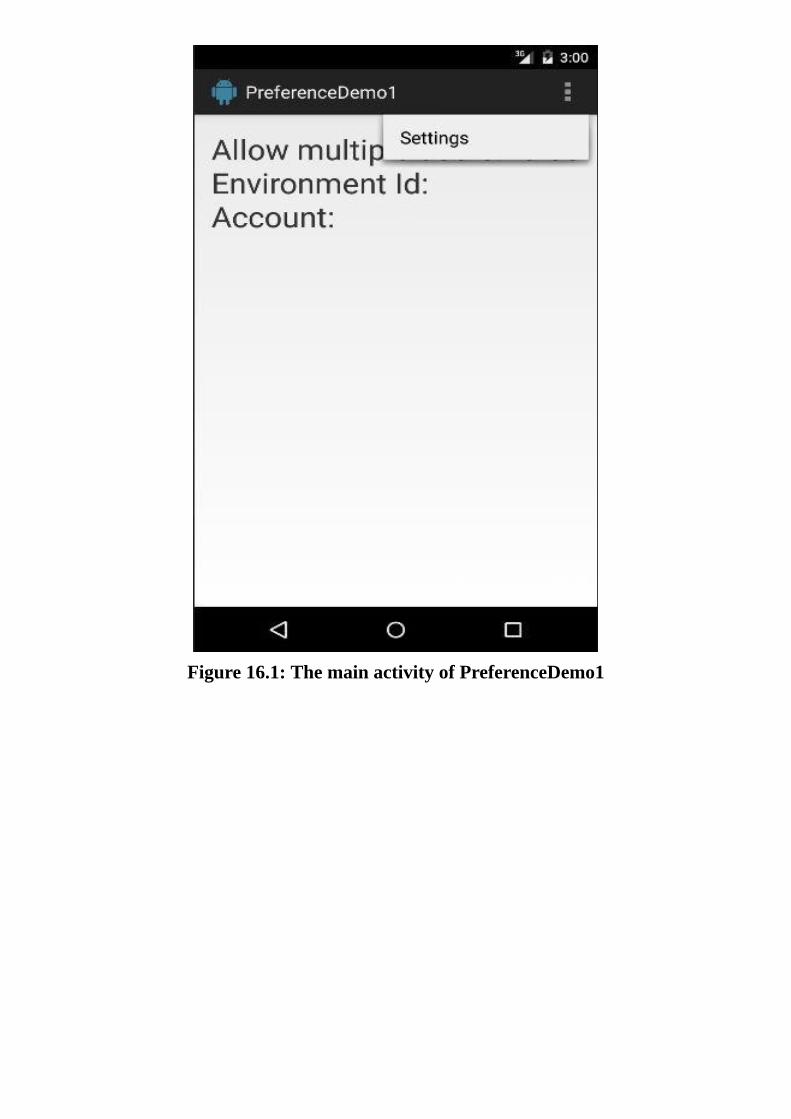
Figure16.1:ThemainactivityofPreferenceDemo1
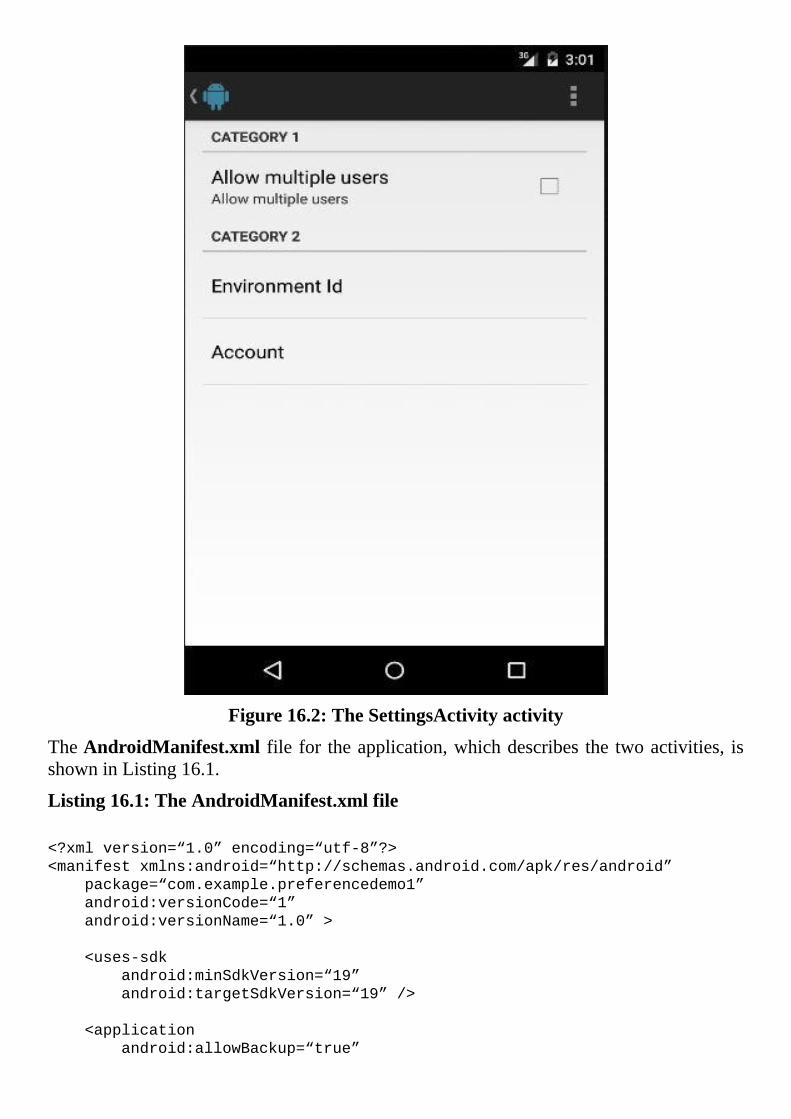
Figure16.2:TheSettingsActivityactivity
TheAndroidManifest.xml filefor theapplication,whichdescribes the twoactivities, isshowninListing16.1.
Listing16.1:TheAndroidManifest.xmlfile
<?xmlversion=“1.0”encoding=“utf-8”?>
<manifestxmlns:android=“http://schemas.android.com/apk/res/android”
package=“com.example.preferencedemo1”
android:versionCode=“1”
android:versionName=“1.0”>
<uses-sdk
android:minSdkVersion=“19”
android:targetSdkVersion=“19”/>
<application
android:allowBackup=“true”
android:icon=”@drawable/ic_launcher”
android:label=”@string/app_name”
android:theme=”@style/AppTheme”>
<activity
android:name=“com.example.preferencedemo1.MainActivity”
android:label=”@string/app_name”>
<intent-filter>
<actionandroid:name=“android.intent.action.MAIN”/>
<category
android:name=“android.intent.category.LAUNCHER”/>
</intent-filter>
</activity>
<activity
android:name=“com.example.preferencedemo1.SettingsActivity”
android:parentActivityName=”.MainActivity”
android:label=””>
</activity>
</application>
</manifest>
ThefirstactivityhasaverysimplelayoutthatfeaturesasoleTextViewasispresentedbytheactivity_main.xmlfileinListing16.2.
Listing16.2:Thelayoutfileforthefirstactivity(activity_main.xml)
<RelativeLayout
xmlns:android=“http://schemas.android.com/apk/res/android”
android:layout_width=“match_parent”
android:layout_height=“match_parent”
android:paddingBottom=”@dimen/activity_vertical_margin”
android:paddingLeft=”@dimen/activity_horizontal_margin”
android:paddingRight=”@dimen/activity_horizontal_margin”
android:paddingTop=”@dimen/activity_vertical_margin”>
<TextView
android:id=”@+id/info”
android:layout_width=“wrap_content”
android:layout_height=“wrap_content”
android:textSize=“30sp”/>
</RelativeLayout>
TheMainActivityclass,showninListing16.3,istheactivityclassforthefirstactivity.Itreads three settings from the default SharedPreferences in its onResume method anddisplaysthevaluesintheTextView.
Listing16.3:TheMainActivityclass
packagecom.example.preferencedemo1;
importandroid.app.Activity;
importandroid.content.Intent;
importandroid.content.SharedPreferences;
importandroid.os.Bundle;
importandroid.preference.PreferenceManager;
importandroid.view.Menu;
importandroid.view.MenuItem;
importandroid.widget.TextView;

publicclassMainActivityextendsActivity{
@Override
protectedvoidonCreate(BundlesavedInstanceState){
super.onCreate(savedInstanceState);
setContentView(R.layout.activity_main);
}
@Override
publicvoidonResume(){
super.onResume();
SharedPreferencessharedPref=PreferenceManager.
getDefaultSharedPreferences(this);
booleanallowMultipleUsers=sharedPref.getBoolean(
SettingsActivity.ALLOW_MULTIPLE_USERS,false);
StringenvId=sharedPref.getString(
SettingsActivity.ENVIRONMENT_ID,””);
Stringaccount=sharedPref.getString(
SettingsActivity.ACCOUNT,””);
TextViewtextView=(TextView)findViewById(R.id.info);
textView.setText(“Allowmultipleusers:”+
allowMultipleUsers+”\nEnvironmentId:”+envId
+”\nAccount:”+account);
}
@Override
publicbooleanonCreateOptionsMenu(Menumenu){
getMenuInflater().inflate(R.menu.menu_main,menu);
returntrue;
}
@Override
publicbooleanonOptionsItemSelected(MenuItemitem){
switch(item.getItemId()){
caseR.id.action_settings:
startActivity(newIntent(this,
SettingsActivity.class));
returntrue;
default:
returnsuper.onOptionsItemSelected(item);
}
}
}
In addition, the MainActivity class overrides the onCreateOptionsMenu andonOptionsItemSelectedmethodssothataSettingsactionappearsontheactionbarandclickingitwillstartthesecondactivity,SettingsActivity.
SettingsActivity,presentedinListing16.4,containsadefaultlayoutthatisreplacedbyan instance of SettingsFragment when the activity is created. Pay attention to theonCreatemethodoftheclass.Ifthelastlinesofcodeinthemethodlooksforeigntoyou,pleasefirstreadChapter13,“Fragments.”
Listing16.4:TheSettingsActivityclass
packagecom.example.preferencedemo1;
importandroid.app.Activity;
importandroid.os.Bundle;
importandroid.view.Menu;
publicclassSettingsActivityextendsActivity{
publicstaticfinalStringALLOW_MULTIPLE_USERS=
“allowMultipleUsers”;
publicstaticfinalStringENVIRONMENT_ID=“envId”;
publicstaticfinalStringACCOUNT=“account”;
@Override
protectedvoidonCreate(BundlesavedInstanceState){
super.onCreate(savedInstanceState);
getActionBar().setDisplayHomeAsUpEnabled(true);
getFragmentManager()
.beginTransaction()
.replace(android.R.id.content,
newSettingsFragment()).commit();
}
@Override
publicbooleanonCreateOptionsMenu(Menumenu){
getMenuInflater().inflate(R.menu.menu_settings,menu);
returntrue;
}
}
Note that theSettingsActivityclassdeclares threepublicstatic finals thatdefinesettingkeys.Thefieldsareusedinternallyaswellasfromotherclasses.
TheSettingsFragmentclassisasubclassofPreferenceFragment.Itisasimpleclassthat simplycallsaddPreferencesFromResource to load theXMLdocument containingthe layout for three Preference subclasses. The SettingsFragment class is shown inListing16.5andtheXMLfileinListing16.6.
Listing16.5:TheSettingsFragmentclass
packagecom.example.preferencedemo1;
importandroid.os.Bundle;
importandroid.preference.PreferenceFragment;
publicclassSettingsFragmentextendsPreferenceFragment{
@Override
publicvoidonCreate(BundlesavedInstanceState){
super.onCreate(savedInstanceState);
//LoadthepreferencesfromanXMLresource
addPreferencesFromResource(R.xml.preferences);
}
}
Listing16.6:Theres/xml/preferences.xmlfile
<PreferenceScreen
xmlns:android=“http://schemas.android.com/apk/res/android”>
<PreferenceCategoryandroid:title=“Category1”>
<CheckBoxPreference
android:key=“allowMultipleUsers”
android:title=“Allowmultipleusers”
android:summary=“Allowmultipleusers”/>
</PreferenceCategory>
<PreferenceCategoryandroid:title=“Category2”>
<EditTextPreference
android:key=“envId”
android:title=“EnvironmentId”
android:dialogTitle=“EnvironmentId”/>
<EditTextPreference
android:key=“account”
android:title=“Account”/>
</PreferenceCategory>
</PreferenceScreen>
Thepreferences.xmlfilegroupsthePreferencesubclassesintotwocategories.InthefirstcategoryisaCheckBoxPreferencelinkedtotheallowMultipleUserskey.InthesecondcategoryaretwoEditTextPreferenceslinkedtoenvIdandaccount.
SummaryAneasywaytomanageapplicationsettingsisbyusingthePreferenceAPIandthedefaultSharedPreferences.Inthischapteryoulearnedhowtouseboth.
Chapter17WorkingwithFiles
Readingfromandwritingtoafilearesomeofthemostcommonoperationsinanytypeofapplication,includingAndroid.Inthischapter,youwilllearnhowAndroidstructuresitsstorageareasandhowtousetheAndroidFileAPI.
OverviewAndroid devices offer two storage areas, internal and external. The internal storage isprivatetotheapplication.Theuserandotherapplicationscannotaccessit.
Theexternalstorageiswhereyoustorefilesthatwillbesharedwithotherapplicationsorthattheuserwillbeabletoaccess.Forexample,thebuilt-inCameraapplicationstoresdigitalimagefilesintheexternalstoragesotheusercaneasilycopythemtoacomputer.
InternalStorageAllapplicationscanreadfromandwrite to internalstorage.The locationof the internalstorage is /data/data/[app package], so if your application package iscom.example.myapp, the internal directory for this application is/data/data/com.example.myapp.TheContextclassprovidesvariousmethodstoaccessthe internalstorage fromyourapplication.Youshoulduse thesemethods toaccess filesyou store in the internal storage and should not hardcode the location of the internalstorage. (Recall that Activity is a subclass of Context, so you can call public andprotectedmethodsinContextfromyouractivityclass).HerearethemethodsinContextforworkingwithfilesandstreamsintheinternalstorage.
publicjava.io.FilegetFilesDir()
Returnsthepathtothedirectorydedicatedtoyourapplicationininternalstorage.
publicjava.io.FileOutputStreamopenFileOutput(
java.lang.Stringname,intmode)
OpensaFileOutputStreamintheapplication’ssectionofinternalstorage.
publicjava.io.FileInputStreamopenFileInput(java.lang.Stringname)
OpensaFileInputStreamforreading.Thenameargumentisthenameofthefiletoopenandcannotcontainpathseparators.
publicjava.io.FilegetFilesDir()
Obtainstheabsolutepathtothefilesystemdirectorywhereinternalfilesaresaved.
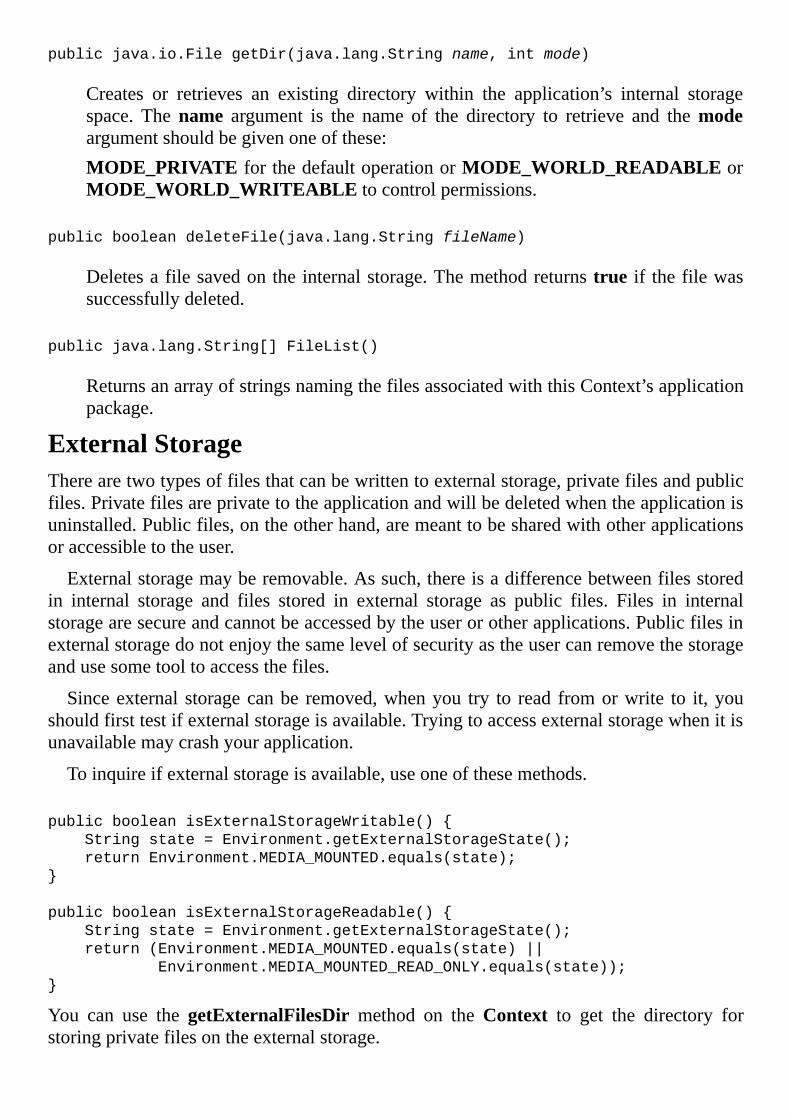
publicjava.io.FilegetDir(java.lang.Stringname,intmode)
Creates or retrieves an existing directory within the application’s internal storagespace. Thename argument is the name of the directory to retrieve and themodeargumentshouldbegivenoneofthese:MODE_PRIVATEforthedefaultoperationorMODE_WORLD_READABLEorMODE_WORLD_WRITEABLEtocontrolpermissions.
publicbooleandeleteFile(java.lang.StringfileName)
Deletesafilesavedontheinternalstorage.Themethodreturnstrue if thefilewassuccessfullydeleted.
publicjava.lang.String[]FileList()
ReturnsanarrayofstringsnamingthefilesassociatedwiththisContext’sapplicationpackage.
ExternalStorageTherearetwotypesoffilesthatcanbewrittentoexternalstorage,privatefilesandpublicfiles.Privatefilesareprivatetotheapplicationandwillbedeletedwhentheapplicationisuninstalled.Publicfiles,ontheotherhand,aremeanttobesharedwithotherapplicationsoraccessibletotheuser.
Externalstoragemayberemovable.Assuch,thereisadifferencebetweenfilesstoredin internal storage and files stored in external storage as public files. Files in internalstoragearesecureandcannotbeaccessedbytheuserorotherapplications.Publicfilesinexternalstoragedonotenjoythesamelevelofsecurityastheusercanremovethestorageandusesometooltoaccessthefiles.
Sinceexternal storagecanbe removed,whenyou try to read fromorwrite to it,youshouldfirsttestifexternalstorageisavailable.Tryingtoaccessexternalstoragewhenitisunavailablemaycrashyourapplication.
Toinquireifexternalstorageisavailable,useoneofthesemethods.
publicbooleanisExternalStorageWritable(){
Stringstate=Environment.getExternalStorageState();
returnEnvironment.MEDIA_MOUNTED.equals(state);
}
publicbooleanisExternalStorageReadable(){
Stringstate=Environment.getExternalStorageState();
return(Environment.MEDIA_MOUNTED.equals(state)||
Environment.MEDIA_MOUNTED_READ_ONLY.equals(state));
}
You can use the getExternalFilesDir method on theContext to get the directory forstoringprivatefilesontheexternalstorage.
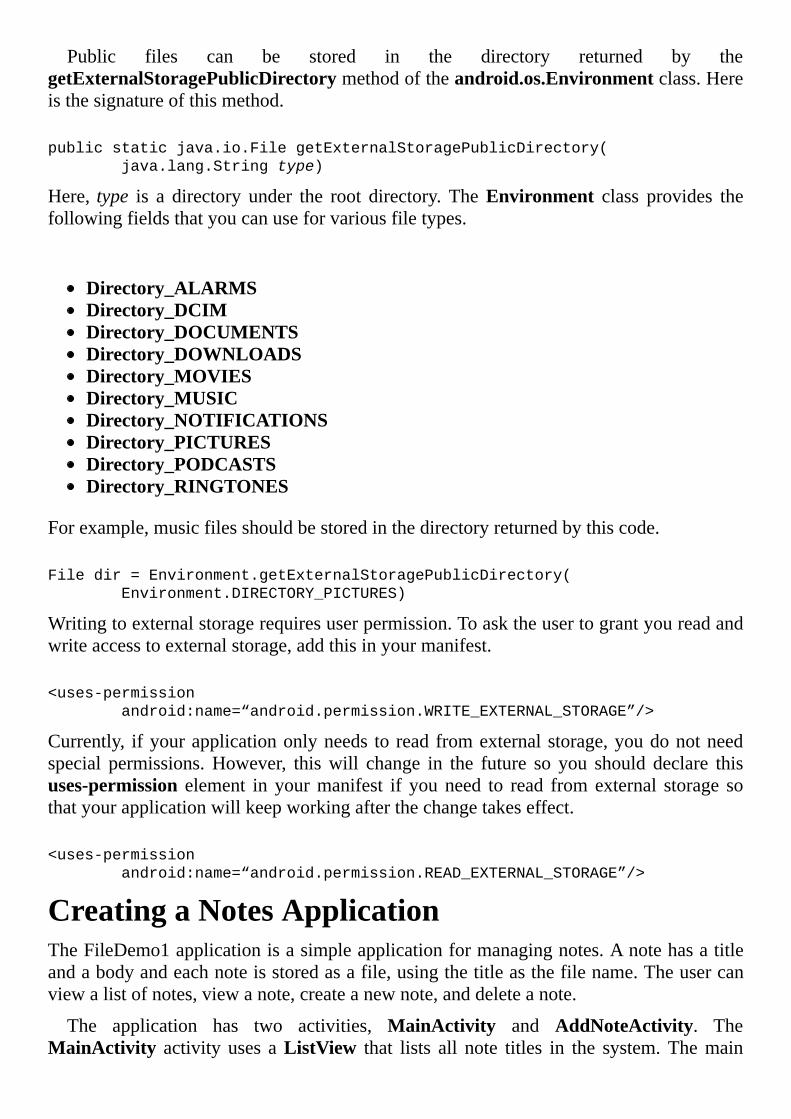
Public files can be stored in the directory returned by thegetExternalStoragePublicDirectorymethodoftheandroid.os.Environmentclass.Hereisthesignatureofthismethod.
publicstaticjava.io.FilegetExternalStoragePublicDirectory(
java.lang.Stringtype)
Here, type is a directory under the root directory. TheEnvironment class provides thefollowingfieldsthatyoucanuseforvariousfiletypes.
Directory_ALARMSDirectory_DCIMDirectory_DOCUMENTSDirectory_DOWNLOADSDirectory_MOVIESDirectory_MUSICDirectory_NOTIFICATIONSDirectory_PICTURESDirectory_PODCASTSDirectory_RINGTONES
Forexample,musicfilesshouldbestoredinthedirectoryreturnedbythiscode.
Filedir=Environment.getExternalStoragePublicDirectory(
Environment.DIRECTORY_PICTURES)
Writingtoexternalstoragerequiresuserpermission.Toasktheusertograntyoureadandwriteaccesstoexternalstorage,addthisinyourmanifest.
<uses-permission
android:name=“android.permission.WRITE_EXTERNAL_STORAGE”/>
Currently, ifyourapplicationonlyneeds to readfromexternalstorage,youdonotneedspecial permissions.However, thiswill change in the future so you should declare thisuses-permission element in yourmanifest if youneed to read fromexternal storage sothatyourapplicationwillkeepworkingafterthechangetakeseffect.
<uses-permission
android:name=“android.permission.READ_EXTERNAL_STORAGE”/>
CreatingaNotesApplicationTheFileDemo1applicationisasimpleapplicationformanagingnotes.Anotehasatitleandabodyandeachnoteisstoredasafile,usingthetitleasthefilename.Theusercanviewalistofnotes,viewanote,createanewnote,anddeleteanote.
The application has two activities, MainActivity and AddNoteActivity. TheMainActivity activity uses aListView that lists all note titles in the system.Themain
activity contains a ListView that lists all note titles. Selecting a note title from theListViewshowsthenoteintheTextViewbesidetheListView.
Figures17.1and17.2showtheMainActivity activity andAddNoteActivityactivity,respectively.TheMainActivityactivitycontainsaListViewthatlistsallnotetitlesandaTextView that shows the body of the selected note. Its action bar also contains twobuttons, Add and Delete. Add starts theAddNoteActivity activity. Delete deletes theselectednote.
Figure17.1:MainActivity
Figure17.2:AddNoteActivity
Let’s now take a look at the application code. Listing 17.1 shows theAndroidManifest.xmlfileforthisapplication.
Listing17.1:TheAndroidManifest.xmlfile
<?xmlversion=“1.0”encoding=“utf-8”?>
<manifestxmlns:android=“http://schemas.android.com/apk/res/android”
package=“com.example.filedemo1”
android:versionCode=“1”
android:versionName=“1.0”>
<uses-sdk
android:minSdkVersion=“19”
android:targetSdkVersion=“19”/>
<application
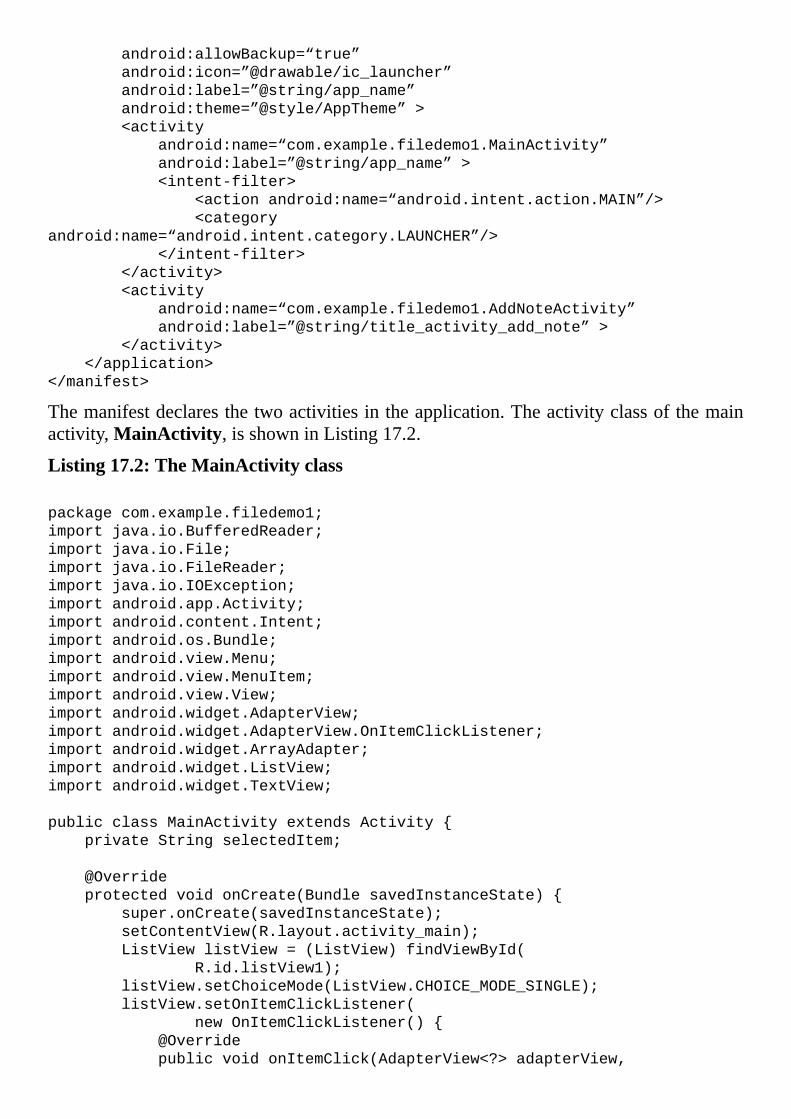
android:allowBackup=“true”
android:icon=”@drawable/ic_launcher”
android:label=”@string/app_name”
android:theme=”@style/AppTheme”>
<activity
android:name=“com.example.filedemo1.MainActivity”
android:label=”@string/app_name”>
<intent-filter>
<actionandroid:name=“android.intent.action.MAIN”/>
<category
android:name=“android.intent.category.LAUNCHER”/>
</intent-filter>
</activity>
<activity
android:name=“com.example.filedemo1.AddNoteActivity”
android:label=”@string/title_activity_add_note”>
</activity>
</application>
</manifest>
Themanifestdeclaresthetwoactivitiesintheapplication.Theactivityclassofthemainactivity,MainActivity,isshowninListing17.2.
Listing17.2:TheMainActivityclass
packagecom.example.filedemo1;
importjava.io.BufferedReader;
importjava.io.File;
importjava.io.FileReader;
importjava.io.IOException;
importandroid.app.Activity;
importandroid.content.Intent;
importandroid.os.Bundle;
importandroid.view.Menu;
importandroid.view.MenuItem;
importandroid.view.View;
importandroid.widget.AdapterView;
importandroid.widget.AdapterView.OnItemClickListener;
importandroid.widget.ArrayAdapter;
importandroid.widget.ListView;
importandroid.widget.TextView;
publicclassMainActivityextendsActivity{
privateStringselectedItem;
@Override
protectedvoidonCreate(BundlesavedInstanceState){
super.onCreate(savedInstanceState);
setContentView(R.layout.activity_main);
ListViewlistView=(ListView)findViewById(
R.id.listView1);
listView.setChoiceMode(ListView.CHOICE_MODE_SINGLE);
listView.setOnItemClickListener(
newOnItemClickListener(){
@Override
publicvoidonItemClick(AdapterView<?>adapterView,
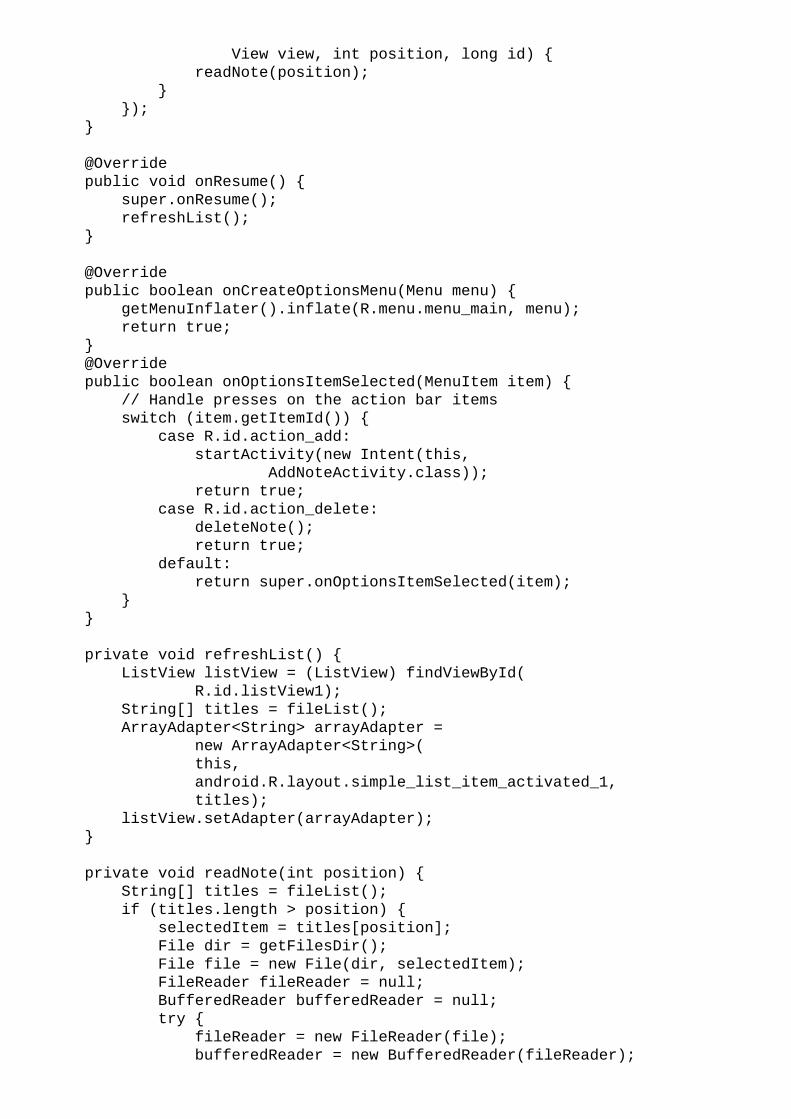
Viewview,intposition,longid){
readNote(position);
}
});
}
@Override
publicvoidonResume(){
super.onResume();
refreshList();
}
@Override
publicbooleanonCreateOptionsMenu(Menumenu){
getMenuInflater().inflate(R.menu.menu_main,menu);
returntrue;
}
@Override
publicbooleanonOptionsItemSelected(MenuItemitem){
//Handlepressesontheactionbaritems
switch(item.getItemId()){
caseR.id.action_add:
startActivity(newIntent(this,
AddNoteActivity.class));
returntrue;
caseR.id.action_delete:
deleteNote();
returntrue;
default:
returnsuper.onOptionsItemSelected(item);
}
}
privatevoidrefreshList(){
ListViewlistView=(ListView)findViewById(
R.id.listView1);
String[]titles=fileList();
ArrayAdapter<String>arrayAdapter=
newArrayAdapter<String>(
this,
android.R.layout.simple_list_item_activated_1,
titles);
listView.setAdapter(arrayAdapter);
}
privatevoidreadNote(intposition){
String[]titles=fileList();
if(titles.length>position){
selectedItem=titles[position];
Filedir=getFilesDir();
Filefile=newFile(dir,selectedItem);
FileReaderfileReader=null;
BufferedReaderbufferedReader=null;
try{
fileReader=newFileReader(file);
bufferedReader=newBufferedReader(fileReader);
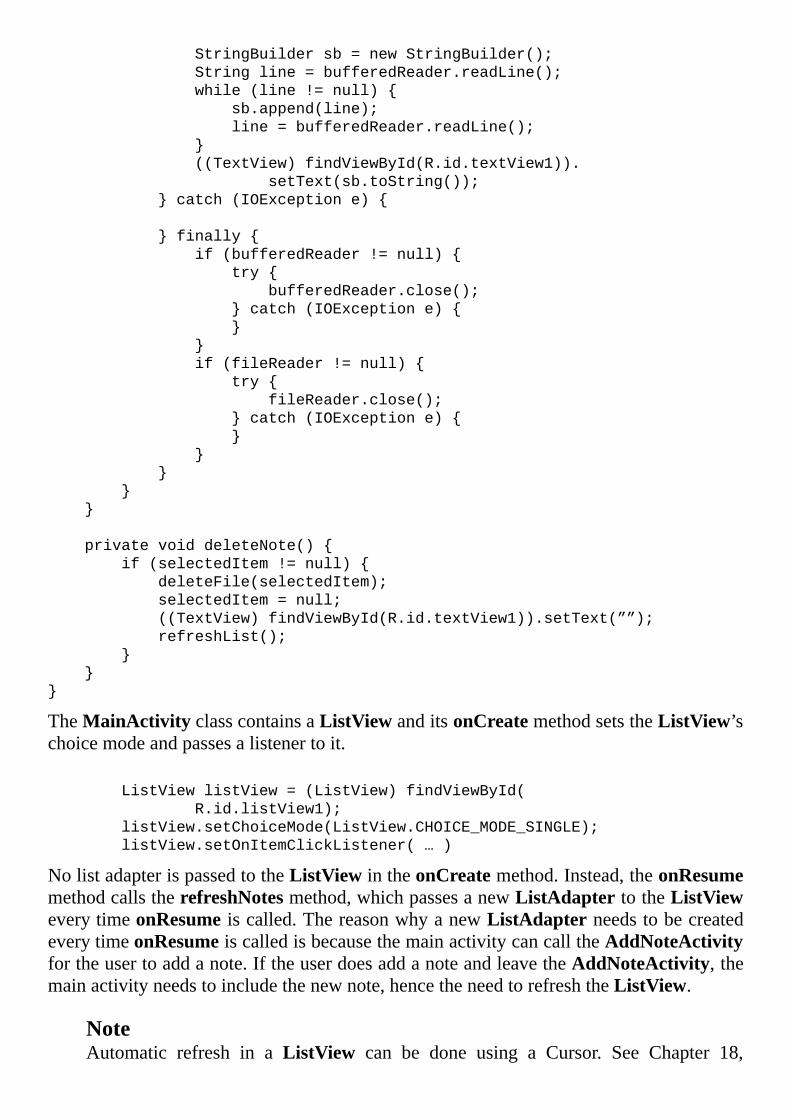
StringBuildersb=newStringBuilder();
Stringline=bufferedReader.readLine();
while(line!=null){
sb.append(line);
line=bufferedReader.readLine();
}
((TextView)findViewById(R.id.textView1)).
setText(sb.toString());
}catch(IOExceptione){
}finally{
if(bufferedReader!=null){
try{
bufferedReader.close();
}catch(IOExceptione){
}
}
if(fileReader!=null){
try{
fileReader.close();
}catch(IOExceptione){
}
}
}
}
}
privatevoiddeleteNote(){
if(selectedItem!=null){
deleteFile(selectedItem);
selectedItem=null;
((TextView)findViewById(R.id.textView1)).setText(””);
refreshList();
}
}
}
TheMainActivityclasscontainsaListViewanditsonCreatemethodsetstheListView’schoicemodeandpassesalistenertoit.
ListViewlistView=(ListView)findViewById(
R.id.listView1);
listView.setChoiceMode(ListView.CHOICE_MODE_SINGLE);
listView.setOnItemClickListener(…)
NolistadapterispassedtotheListViewintheonCreatemethod.Instead,theonResumemethodcallstherefreshNotesmethod,whichpassesanewListAdaptertotheListVieweverytimeonResumeiscalled.ThereasonwhyanewListAdapterneedstobecreatedeverytimeonResumeiscalledisbecausethemainactivitycancalltheAddNoteActivityfortheusertoaddanote.IftheuserdoesaddanoteandleavetheAddNoteActivity,themainactivityneedstoincludethenewnote,hencetheneedtorefreshtheListView.
NoteAutomatic refresh in a ListView can be done using a Cursor. See Chapter 18,
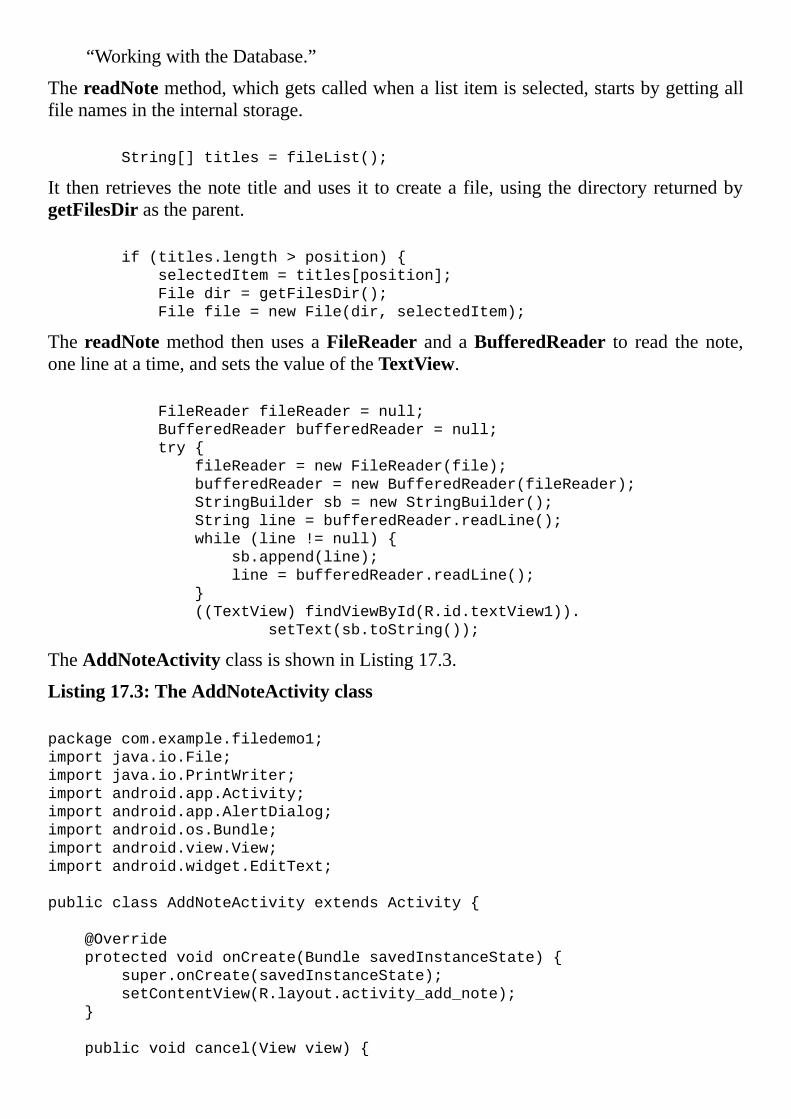
“WorkingwiththeDatabase.”
ThereadNotemethod,whichgetscalledwhenalistitemisselected,startsbygettingallfilenamesintheinternalstorage.
String[]titles=fileList();
It thenretrievesthenote titleanduses it tocreateafile,usingthedirectoryreturnedbygetFilesDirastheparent.
if(titles.length>position){
selectedItem=titles[position];
Filedir=getFilesDir();
Filefile=newFile(dir,selectedItem);
ThereadNotemethod thenuses aFileReader andaBufferedReader to read thenote,onelineatatime,andsetsthevalueoftheTextView.
FileReaderfileReader=null;
BufferedReaderbufferedReader=null;
try{
fileReader=newFileReader(file);
bufferedReader=newBufferedReader(fileReader);
StringBuildersb=newStringBuilder();
Stringline=bufferedReader.readLine();
while(line!=null){
sb.append(line);
line=bufferedReader.readLine();
}
((TextView)findViewById(R.id.textView1)).
setText(sb.toString());
TheAddNoteActivityclassisshowninListing17.3.
Listing17.3:TheAddNoteActivityclass
packagecom.example.filedemo1;
importjava.io.File;
importjava.io.PrintWriter;
importandroid.app.Activity;
importandroid.app.AlertDialog;
importandroid.os.Bundle;
importandroid.view.View;
importandroid.widget.EditText;
publicclassAddNoteActivityextendsActivity{
@Override
protectedvoidonCreate(BundlesavedInstanceState){
super.onCreate(savedInstanceState);
setContentView(R.layout.activity_add_note);
}
publicvoidcancel(Viewview){

finish();
}
publicvoidaddNote(Viewview){
StringfileName=((EditText)
findViewById(R.id.noteTitle))
.getText().toString();
Stringbody=((EditText)findViewById(R.id.noteBody))
.getText().toString();
Fileparent=getFilesDir();
Filefile=newFile(parent,fileName);
PrintWriterwriter=null;
try{
writer=newPrintWriter(file);
writer.write(body);
finish();
}catch(Exceptione){
showAlertDialog(“Erroraddingnote”,e.getMessage());
}finally{
if(writer!=null){
try{
writer.close();
}catch(Exceptione){
}
}
}
}
privatevoidshowAlertDialog(Stringtitle,Stringmessage){
AlertDialogalertDialog=new
AlertDialog.Builder(this).create();
alertDialog.setTitle(title);
alertDialog.setMessage(message);
alertDialog.show();
}
}
TheAddNoteActivityclasshastwopublicmethodsthatactasclicklistenerstothetwobuttons in its layout,cancelandaddNote.Thecancelmethodsimplycloses theactivity.TheaddNotemethodreads thevalues in theTextViewsandcreatea file in the internalstorageusingaPrintWriter.
AccessingthePublicStorageThe second example in this chapter, FileDemo2, shows how you can access the publicstorage.FileDemo2isafilebrowserthatshowsthecontentofastandarddirectory.ThereisonlyoneactivityinFileDemo2anditisshowninFigure17.3.
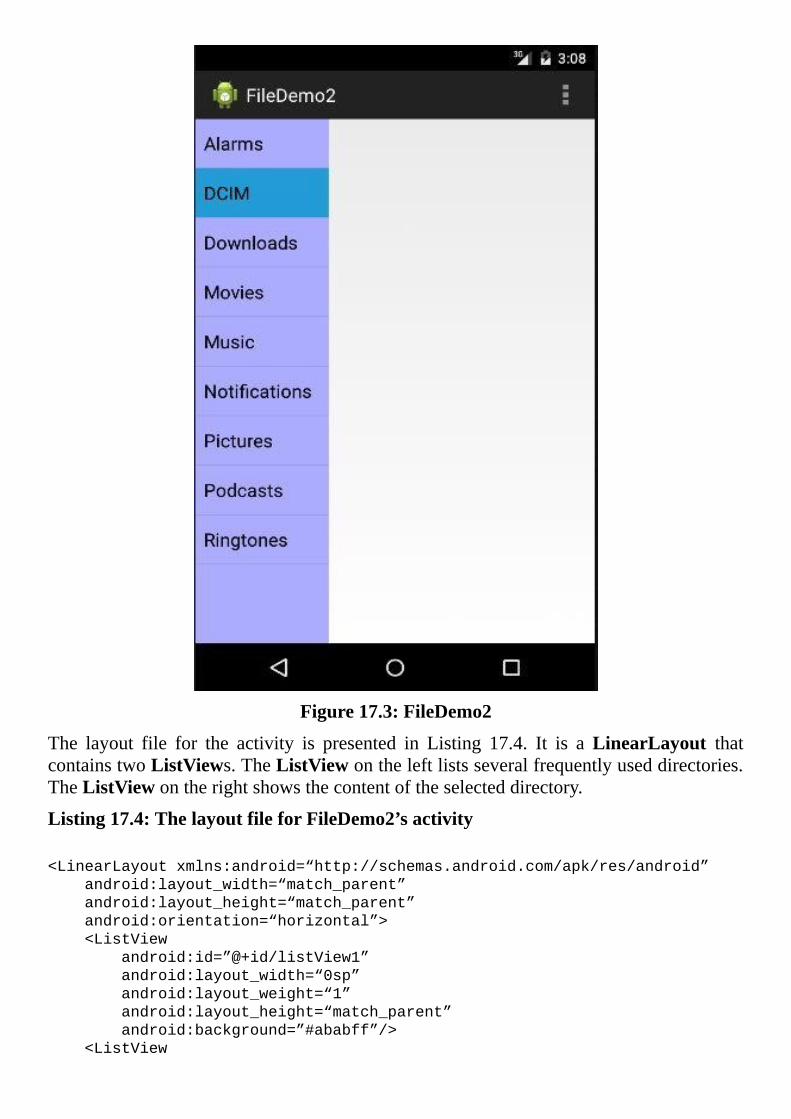
Figure17.3:FileDemo2
The layout file for the activity is presented in Listing 17.4. It is aLinearLayout thatcontainstwoListViews.TheListViewontheleftlistsseveralfrequentlyuseddirectories.TheListViewontherightshowsthecontentoftheselecteddirectory.
Listing17.4:ThelayoutfileforFileDemo2’sactivity
<LinearLayoutxmlns:android=“http://schemas.android.com/apk/res/android”
android:layout_width=“match_parent”
android:layout_height=“match_parent”
android:orientation=“horizontal”>
<ListView
android:id=”@+id/listView1”
android:layout_width=“0sp”
android:layout_weight=“1”
android:layout_height=“match_parent”
android:background=”#ababff”/>
<ListView
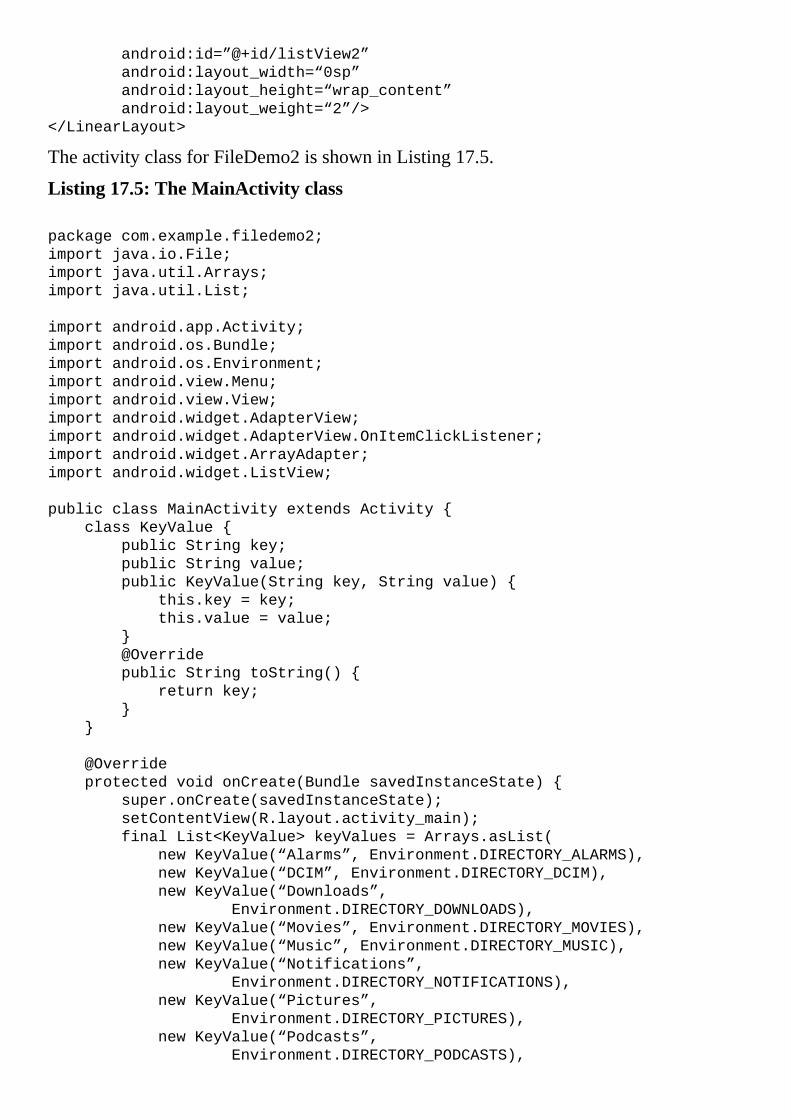
android:id=”@+id/listView2”
android:layout_width=“0sp”
android:layout_height=“wrap_content”
android:layout_weight=“2”/>
</LinearLayout>
TheactivityclassforFileDemo2isshowninListing17.5.
Listing17.5:TheMainActivityclass
packagecom.example.filedemo2;
importjava.io.File;
importjava.util.Arrays;
importjava.util.List;
importandroid.app.Activity;
importandroid.os.Bundle;
importandroid.os.Environment;
importandroid.view.Menu;
importandroid.view.View;
importandroid.widget.AdapterView;
importandroid.widget.AdapterView.OnItemClickListener;
importandroid.widget.ArrayAdapter;
importandroid.widget.ListView;
publicclassMainActivityextendsActivity{
classKeyValue{
publicStringkey;
publicStringvalue;
publicKeyValue(Stringkey,Stringvalue){
this.key=key;
this.value=value;
}
@Override
publicStringtoString(){
returnkey;
}
}
@Override
protectedvoidonCreate(BundlesavedInstanceState){
super.onCreate(savedInstanceState);
setContentView(R.layout.activity_main);
finalList<KeyValue>keyValues=Arrays.asList(
newKeyValue(“Alarms”,Environment.DIRECTORY_ALARMS),
newKeyValue(“DCIM”,Environment.DIRECTORY_DCIM),
newKeyValue(“Downloads”,
Environment.DIRECTORY_DOWNLOADS),
newKeyValue(“Movies”,Environment.DIRECTORY_MOVIES),
newKeyValue(“Music”,Environment.DIRECTORY_MUSIC),
newKeyValue(“Notifications”,
Environment.DIRECTORY_NOTIFICATIONS),
newKeyValue(“Pictures”,
Environment.DIRECTORY_PICTURES),
newKeyValue(“Podcasts”,
Environment.DIRECTORY_PODCASTS),
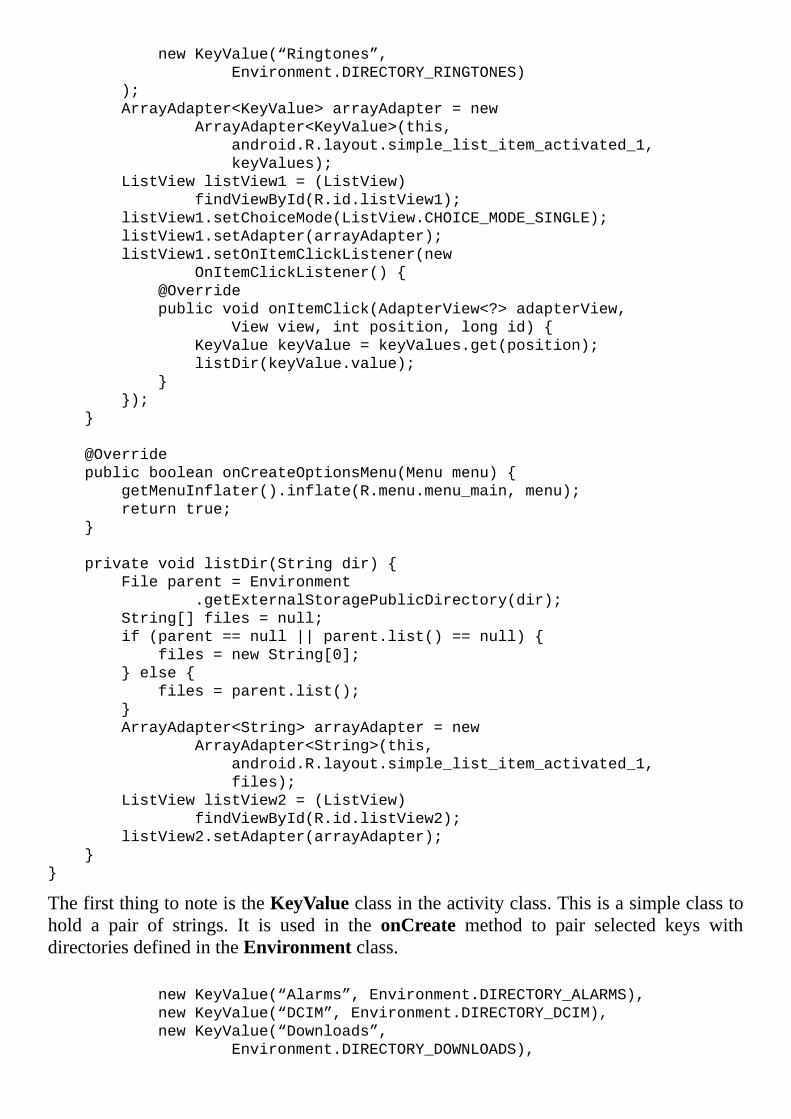
newKeyValue(“Ringtones”,
Environment.DIRECTORY_RINGTONES)
);
ArrayAdapter<KeyValue>arrayAdapter=new
ArrayAdapter<KeyValue>(this,
android.R.layout.simple_list_item_activated_1,
keyValues);
ListViewlistView1=(ListView)
findViewById(R.id.listView1);
listView1.setChoiceMode(ListView.CHOICE_MODE_SINGLE);
listView1.setAdapter(arrayAdapter);
listView1.setOnItemClickListener(new
OnItemClickListener(){
@Override
publicvoidonItemClick(AdapterView<?>adapterView,
Viewview,intposition,longid){
KeyValuekeyValue=keyValues.get(position);
listDir(keyValue.value);
}
});
}
@Override
publicbooleanonCreateOptionsMenu(Menumenu){
getMenuInflater().inflate(R.menu.menu_main,menu);
returntrue;
}
privatevoidlistDir(Stringdir){
Fileparent=Environment
.getExternalStoragePublicDirectory(dir);
String[]files=null;
if(parent==null||parent.list()==null){
files=newString[0];
}else{
files=parent.list();
}
ArrayAdapter<String>arrayAdapter=new
ArrayAdapter<String>(this,
android.R.layout.simple_list_item_activated_1,
files);
ListViewlistView2=(ListView)
findViewById(R.id.listView2);
listView2.setAdapter(arrayAdapter);
}
}
ThefirstthingtonoteistheKeyValueclassintheactivityclass.Thisisasimpleclasstohold a pair of strings. It is used in the onCreate method to pair selected keys withdirectoriesdefinedintheEnvironmentclass.
newKeyValue(“Alarms”,Environment.DIRECTORY_ALARMS),
newKeyValue(“DCIM”,Environment.DIRECTORY_DCIM),
newKeyValue(“Downloads”,
Environment.DIRECTORY_DOWNLOADS),
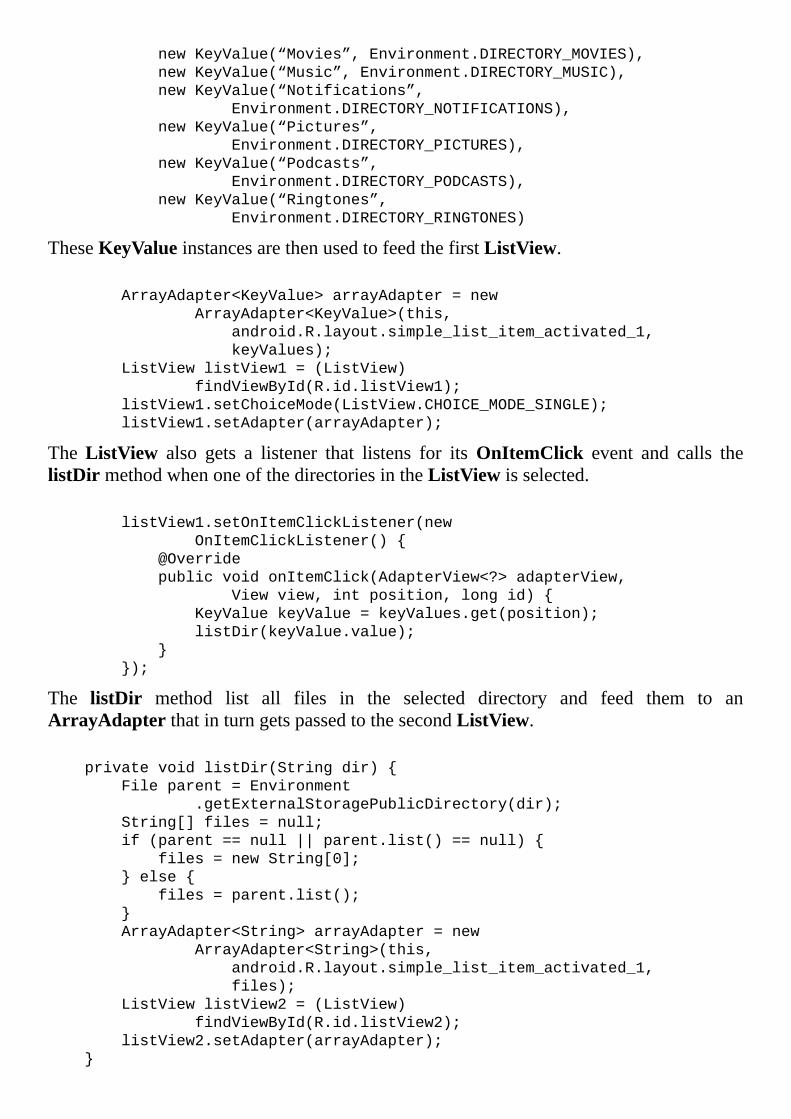
newKeyValue(“Movies”,Environment.DIRECTORY_MOVIES),
newKeyValue(“Music”,Environment.DIRECTORY_MUSIC),
newKeyValue(“Notifications”,
Environment.DIRECTORY_NOTIFICATIONS),
newKeyValue(“Pictures”,
Environment.DIRECTORY_PICTURES),
newKeyValue(“Podcasts”,
Environment.DIRECTORY_PODCASTS),
newKeyValue(“Ringtones”,
Environment.DIRECTORY_RINGTONES)
TheseKeyValueinstancesarethenusedtofeedthefirstListView.
ArrayAdapter<KeyValue>arrayAdapter=new
ArrayAdapter<KeyValue>(this,
android.R.layout.simple_list_item_activated_1,
keyValues);
ListViewlistView1=(ListView)
findViewById(R.id.listView1);
listView1.setChoiceMode(ListView.CHOICE_MODE_SINGLE);
listView1.setAdapter(arrayAdapter);
TheListView also gets a listener that listens for itsOnItemClick event and calls thelistDirmethodwhenoneofthedirectoriesintheListViewisselected.
listView1.setOnItemClickListener(new
OnItemClickListener(){
@Override
publicvoidonItemClick(AdapterView<?>adapterView,
Viewview,intposition,longid){
KeyValuekeyValue=keyValues.get(position);
listDir(keyValue.value);
}
});
The listDir method list all files in the selected directory and feed them to anArrayAdapterthatinturngetspassedtothesecondListView.
privatevoidlistDir(Stringdir){
Fileparent=Environment
.getExternalStoragePublicDirectory(dir);
String[]files=null;
if(parent==null||parent.list()==null){
files=newString[0];
}else{
files=parent.list();
}
ArrayAdapter<String>arrayAdapter=new
ArrayAdapter<String>(this,
android.R.layout.simple_list_item_activated_1,
files);
ListViewlistView2=(ListView)
findViewById(R.id.listView2);
listView2.setAdapter(arrayAdapter);
}
SummaryYouusetheFileAPItoworkwithfilesinAndroidapplications.Inadditiontomasteringthis API, in order to work with files effectively in Android, you need to know howAndroidstructuresitsstoragesystemandthefile-relatedmethodsdefinedintheContextandEnvironmentclasses.
Chapter18WorkingwiththeDatabase
AndroidhasitsowntechnologyforworkingwithdatabasesandithasnothingtodowithJava Database Connectivity (JDBC), the technology Java developers use for accessingdata in a relational database. In addition, Android ships with SQLite, an open sourcedatabase.
This chapter shows how to work with the Android Database API and the SQLitedatabase.
OverviewAndroid comes with its own Database API. The API consists of two packages,android.database and android.database.sqlite. Android ships with SQLite, an opensourcerelationaldatabasethatpartiallyimplementsSQL-92,thethirdrevisionoftheSQLstandard.
Currentlyatversion3,SQLiteoffersaminimumnumberofdata types: Integer,Real,Text,Blob,andNumeric.OneinterestingfeatureofSQLiteisthatanintegerprimarykeyisautomaticallyauto-incrementedwhenarowisinsertedwithoutpassingavalueforthefield.
MoreinformationonSQLitecanbefoundhere:
http://sqlite.org
TheDatabaseAPIThe SQLiteDatabase and SQLiteOpenHelper classes, both part ofandroid.database.sqlite,arethetwomostfrequentlyusedclassesintheDatabaseAPI.Intheandroid.databasepackage,theCursorinterfaceisoneofthemostimportanttypes.
Thethreetypesarediscussedindetailinthefollowingsubsections.
TheSQLiteOpenHelperClassTouseadatabase inyourAndroidapplication,extendSQLiteOpenHelper tohelpwithdatabase and table creation as well as connecting to the database. In a subclass ofSQLiteOpenHelper,youneedtodothefollowing.
Provideaconstructorthatcallsitssuper,passing,amongothers,theContextandthedatabasename.OverridetheonCreateandonUpgrademethods.
Forexample,hereisaconstructorforasubclassofSQLiteOpenHelper.
publicSubClassOfSQLiteOpenHelper(Contextcontext){
super(context,
“mydatabase”,//databasename
null,
1//dbversion
);
}
TheonCreatemethodthatneedstobeoverriddenhasthefollowingsignature.
publicvoidonCreate(SQLiteDatabasedatabase)
ThesystemwillcallonCreatethefirsttimeaccesstooneofthetablesisrequired.InthismethodimplementationyoushouldcalltheexecSQLmethodontheSQLiteDatabaseandpassanSQLstatementforcreatingyourtable(s).Hereisanexample.
@Override
publicvoidonCreate(SQLiteDatabasedb){
Stringsql=“CREATETABLE”+TABLE_NAME
+”(“+ID_FIELD+”INTEGER,”
+FIRST_NAME_FIELD+”TEXT,”
+LAST_NAME_FIELD+”TEXT,”
+PHONE_FIELD+”TEXT,”
+EMAIL_FIELD+”TEXT,”
+”PRIMARYKEY(“+ID_FIELD+”));”;
db.execSQL(sql);
}
SQLiteOpenHelper automaticallymanages connections to the underlying database. Toretrievethedatabaseinstance,calloneofthesemethods,bothofwhichreturnaninstanceofSQLiteDatabase.
publicSQLiteDatabasegetReadableDatabase()
publicSQLiteDatabasegetWritableDatabase()
Thefirsttimeoneofthesemethodsiscalledadatabasewillbecreatedifnoneexists.ThedifferencebetweengetReadableDatabaseandgetWritableDatabaseistheformercanbeusedforread-onlywhereasthelattercanbeusedtoreadfromandwritetothedatabase.
TheSQLiteDatabaseClassOnceyougetaSQLiteDatabasefromaSQLiteOpenHelper’sgetReadableDatabaseorgetWritableDatabasemethod,youcanmanipulatethedatainthedatabasebycallingtheSQLiteDatabase’s insert or execSQL method. For example, to add a record, call theinsertmethodwhosesignatureisasfollows.
publiclonginsert(Stringtable,StringnullColumnHack,
ContentValuesvalues)
Here,tableisthenameofthetableandvaluesisanandroid.content.ContentValuesthatcontainspairsof fieldnames/values tobe inserted to the table.Thismethod returns therowidentifierforthenewrow.
Forinstance,thefollowingcodeinsertsarecordintotheemployeestablepassingthreefieldvalues.
SQLiteDatabasedb=this.getWritableDatabase();
//thisisaninstanceofSQLiteOpenHelper
ContentValuesvalues=newContentValues();
values.put(“first_name”,“Joe”);
values.put(“last_name”,“Average”);
values.put(“position”,“SystemAnalyst”);
longid=db.insert(“employees”,null,values);
db.close();
To update or delete a record, use the update or delete method, respectively. Thesignaturesofthesemethodsareasfollows.
publicintdelete(java.lang.Stringtable,
java.lang.StringwhereClause,java.lang.String[]whereArgs)
publicintupdate(java.lang.Stringtable,
android.content.ContentValuesvalues,
java.lang.StringwhereClause,java.lang.String[]whereArgs)
Examplesofthetwomethodsareshownintheaccompanyingapplication.
ToexecuteaSQLstatement,usetheexecSQLmethod.
publicvoidexecSQL(java.lang.Stringsql)
Finally, toretrieverecords,useoneofthequerymethods.Oneofthemethodoverloadshasthissignature.
publicandroid.database.Cursorquery(java.lang.Stringtable,
java.lang.String[]columns,java.lang.Stringselection,
java.lang.String[]selectionArgs,
java.lang.StringgroupBy,
java.lang.Stringhaving,
java.lang.StringorderBy,hava.lang.Stringlimit)
You can find an example on how to use this method in the sample applicationaccompanyingthischapter.
Onethingtonote:ThedatareturnedbythequerymethodiscontainedinaninstanceofCursor,aninterestingtypeexplainedinthenextsection.
TheCursorInterfaceCalling the query method on a SQLiteDatabase returns a Cursor. A Cursor, animplementationoftheandroid.database.Cursorinterface,providesreadandwriteaccesstotheresultsetreturnedbyadatabasequery.
Toreadarowofdata throughaCursor,youfirstneedtopoint theCursor toadatarow by calling its moveToFirst, moveToNext, moveToPrevious, moveToLast, ormoveToPosition method. moveToFirst moves the Cursor to the first row andmoveToNexttothenextrow.moveToLast,youmayhaveguessedcorrectly,movesitto
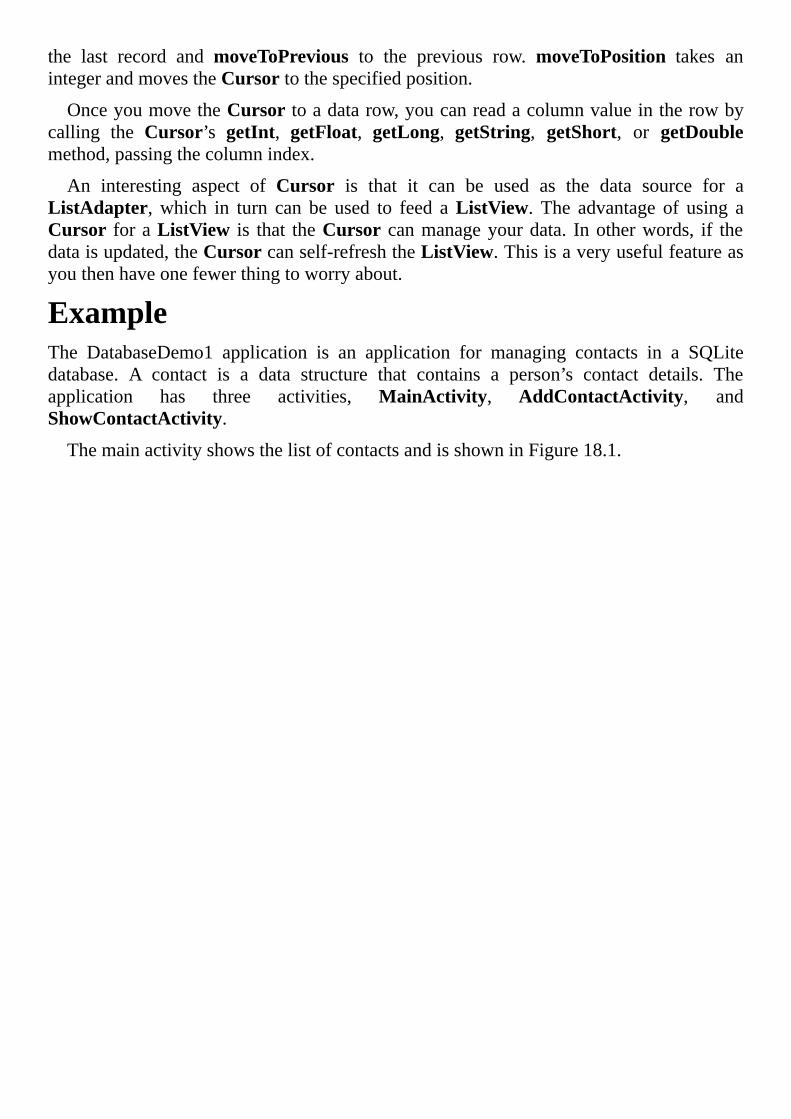
the last record and moveToPrevious to the previous row. moveToPosition takes anintegerandmovestheCursortothespecifiedposition.
OnceyoumovetheCursortoadatarow,youcanreadacolumnvalueintherowbycalling the Cursor’s getInt, getFloat, getLong, getString, getShort, or getDoublemethod,passingthecolumnindex.
An interesting aspect of Cursor is that it can be used as the data source for aListAdapter,which in turn can be used to feed aListView. The advantage of using aCursor foraListView is that theCursor canmanageyourdata. Inotherwords, if thedataisupdated,theCursorcanself-refreshtheListView.Thisisaveryusefulfeatureasyouthenhaveonefewerthingtoworryabout.
ExampleThe DatabaseDemo1 application is an application for managing contacts in a SQLitedatabase. A contact is a data structure that contains a person’s contact details. Theapplication has three activities, MainActivity, AddContactActivity, andShowContactActivity.
ThemainactivityshowsthelistofcontactsandisshowninFigure18.1.
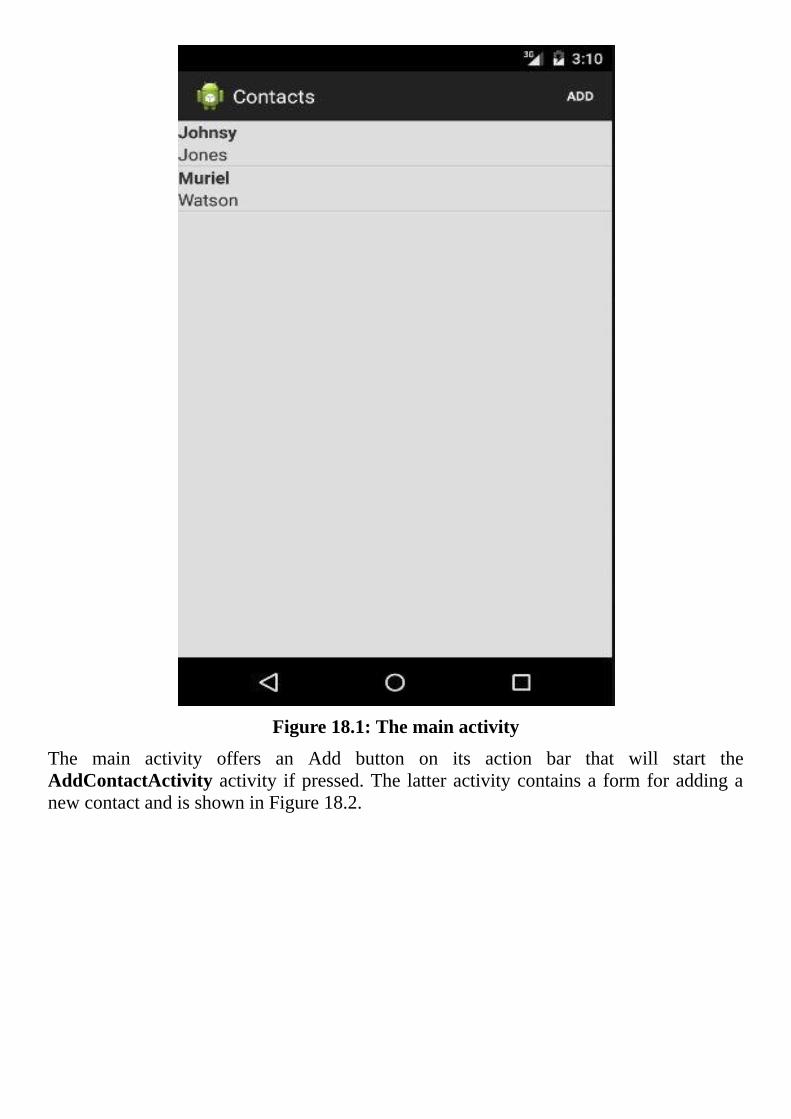
Figure18.1:Themainactivity
The main activity offers an Add button on its action bar that will start theAddContactActivityactivity ifpressed.The latteractivitycontainsa formforaddinganewcontactandisshowninFigure18.2.
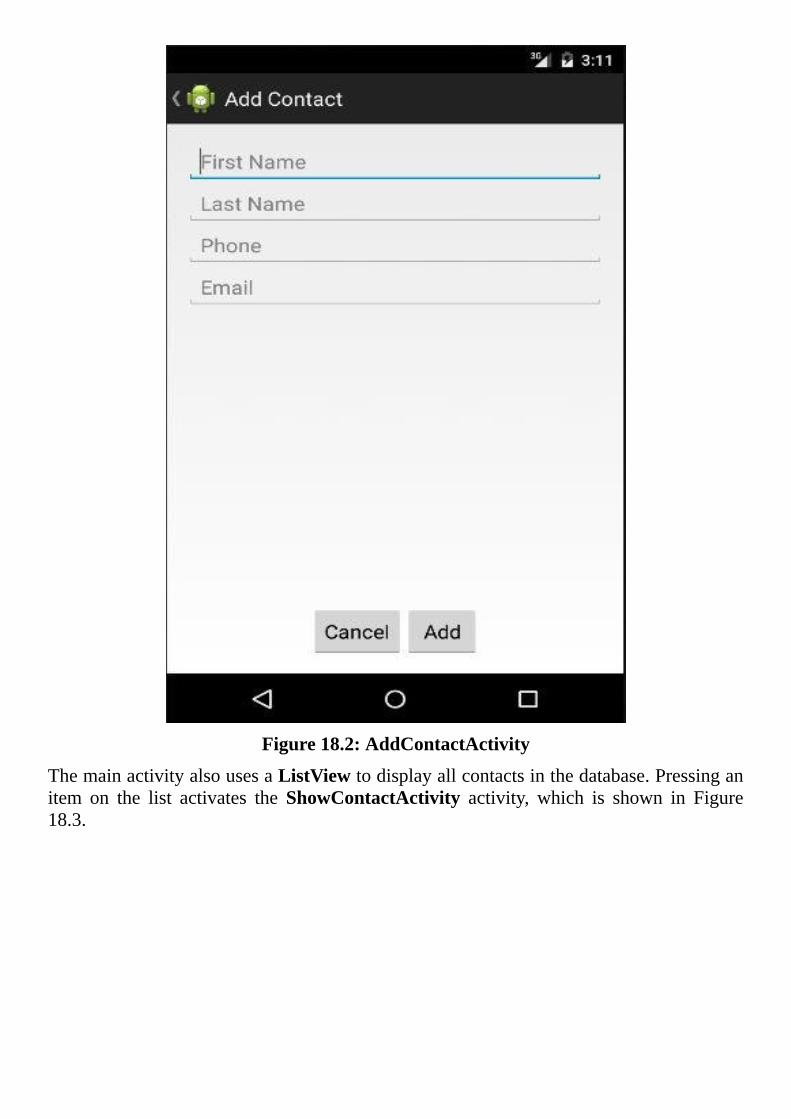
Figure18.2:AddContactActivity
ThemainactivityalsousesaListViewtodisplayallcontactsinthedatabase.Pressinganitem on the list activates the ShowContactActivity activity, which is shown in Figure18.3.
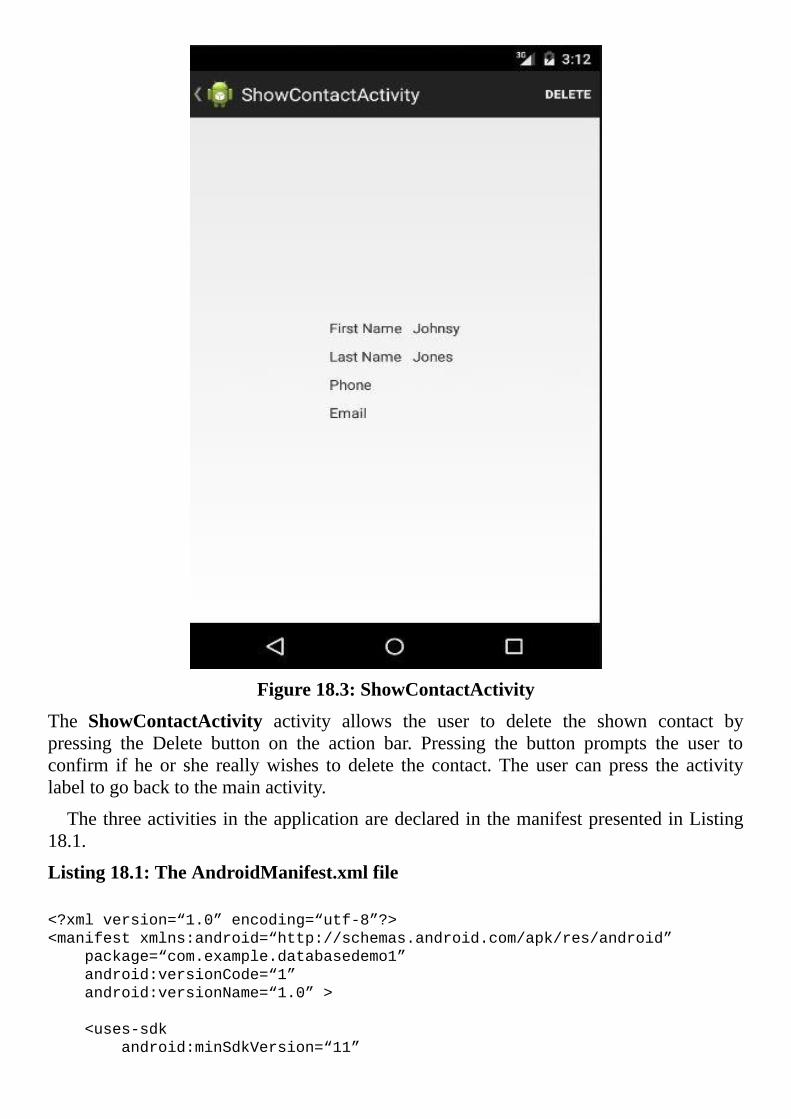
Figure18.3:ShowContactActivity
The ShowContactActivity activity allows the user to delete the shown contact bypressing the Delete button on the action bar. Pressing the button prompts the user toconfirm if he or she reallywishes to delete the contact.The user can press the activitylabeltogobacktothemainactivity.
ThethreeactivitiesintheapplicationaredeclaredinthemanifestpresentedinListing18.1.
Listing18.1:TheAndroidManifest.xmlfile
<?xmlversion=“1.0”encoding=“utf-8”?>
<manifestxmlns:android=“http://schemas.android.com/apk/res/android”
package=“com.example.databasedemo1”
android:versionCode=“1”
android:versionName=“1.0”>
<uses-sdk
android:minSdkVersion=“11”
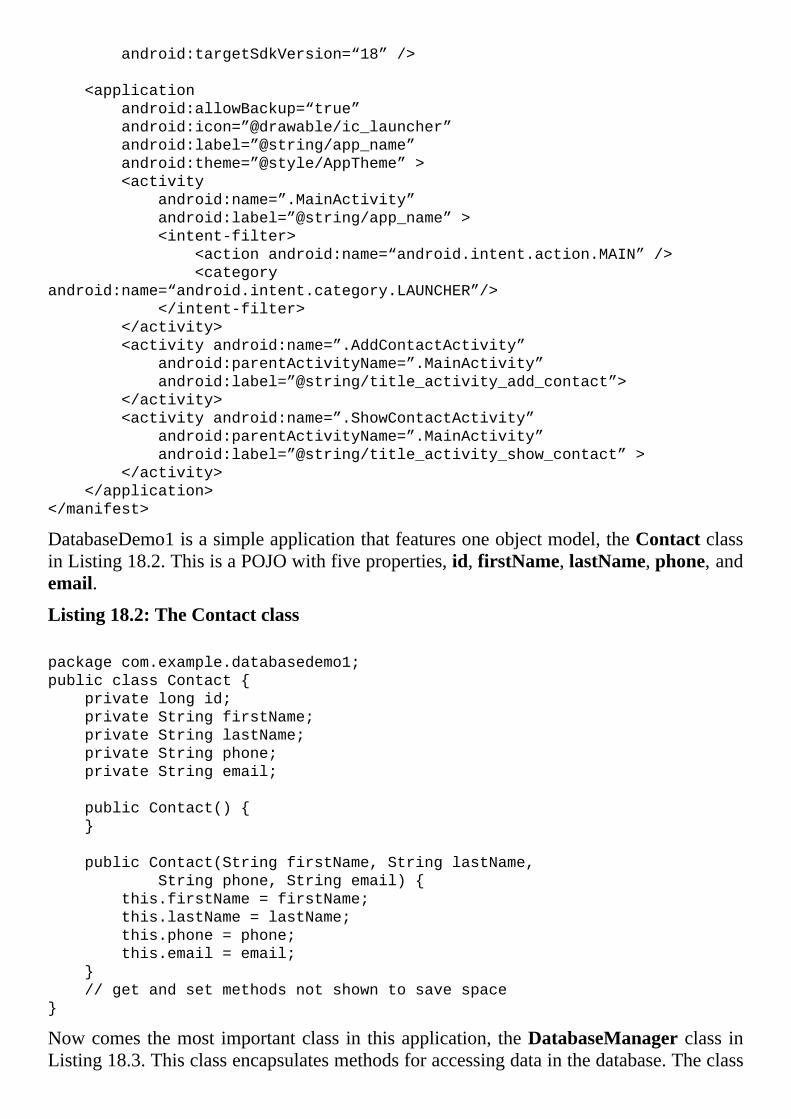
android:targetSdkVersion=“18”/>
<application
android:allowBackup=“true”
android:icon=”@drawable/ic_launcher”
android:label=”@string/app_name”
android:theme=”@style/AppTheme”>
<activity
android:name=”.MainActivity”
android:label=”@string/app_name”>
<intent-filter>
<actionandroid:name=“android.intent.action.MAIN”/>
<category
android:name=“android.intent.category.LAUNCHER”/>
</intent-filter>
</activity>
<activityandroid:name=”.AddContactActivity”
android:parentActivityName=”.MainActivity”
android:label=”@string/title_activity_add_contact”>
</activity>
<activityandroid:name=”.ShowContactActivity”
android:parentActivityName=”.MainActivity”
android:label=”@string/title_activity_show_contact”>
</activity>
</application>
</manifest>
DatabaseDemo1isasimpleapplicationthatfeaturesoneobjectmodel,theContactclassinListing18.2.ThisisaPOJOwithfiveproperties,id,firstName,lastName,phone,andemail.
Listing18.2:TheContactclass
packagecom.example.databasedemo1;
publicclassContact{
privatelongid;
privateStringfirstName;
privateStringlastName;
privateStringphone;
privateStringemail;
publicContact(){
}
publicContact(StringfirstName,StringlastName,
Stringphone,Stringemail){
this.firstName=firstName;
this.lastName=lastName;
this.phone=phone;
this.email=email;
}
//getandsetmethodsnotshowntosavespace
}
Nowcomes themost importantclass in thisapplication, theDatabaseManagerclass inListing18.3.Thisclassencapsulatesmethodsforaccessingdatainthedatabase.Theclass
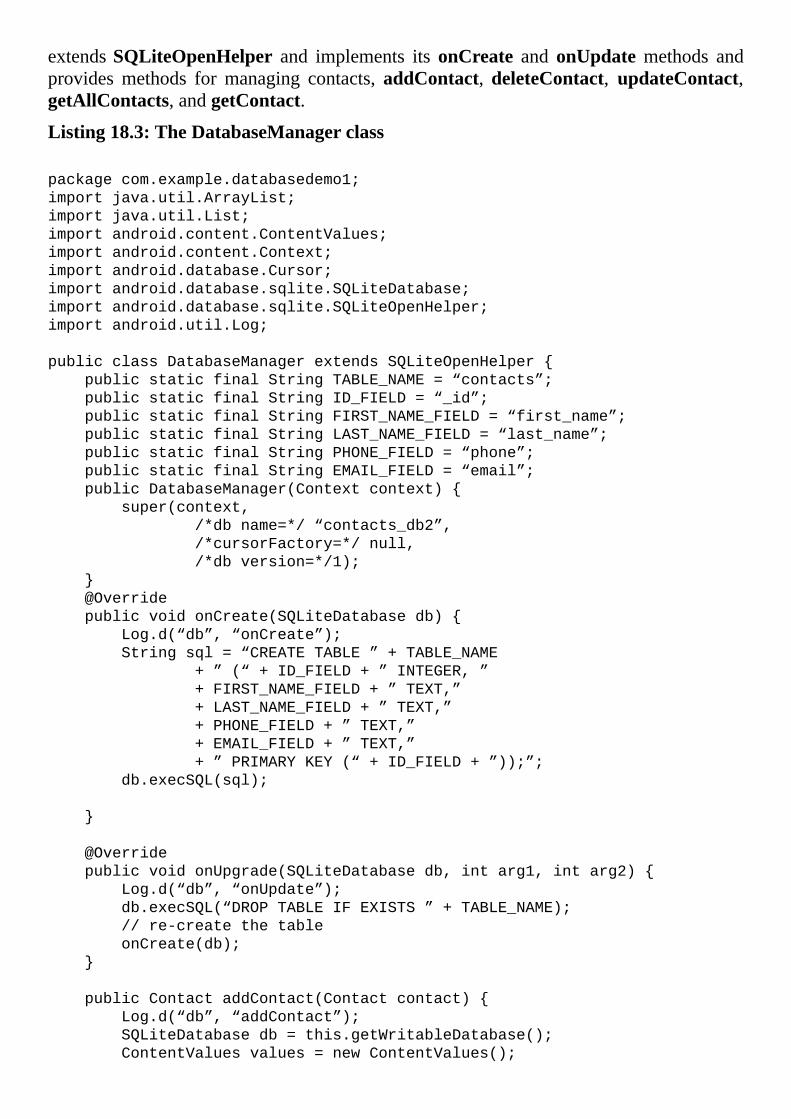
extendsSQLiteOpenHelper and implements itsonCreate and onUpdatemethods andprovidesmethods formanaging contacts, addContact,deleteContact, updateContact,getAllContacts,andgetContact.
Listing18.3:TheDatabaseManagerclass
packagecom.example.databasedemo1;
importjava.util.ArrayList;
importjava.util.List;
importandroid.content.ContentValues;
importandroid.content.Context;
importandroid.database.Cursor;
importandroid.database.sqlite.SQLiteDatabase;
importandroid.database.sqlite.SQLiteOpenHelper;
importandroid.util.Log;
publicclassDatabaseManagerextendsSQLiteOpenHelper{
publicstaticfinalStringTABLE_NAME=“contacts”;
publicstaticfinalStringID_FIELD=“_id”;
publicstaticfinalStringFIRST_NAME_FIELD=“first_name”;
publicstaticfinalStringLAST_NAME_FIELD=“last_name”;
publicstaticfinalStringPHONE_FIELD=“phone”;
publicstaticfinalStringEMAIL_FIELD=“email”;
publicDatabaseManager(Contextcontext){
super(context,
/*dbname=*/“contacts_db2”,
/*cursorFactory=*/null,
/*dbversion=*/1);
}
@Override
publicvoidonCreate(SQLiteDatabasedb){
Log.d(“db”,“onCreate”);
Stringsql=“CREATETABLE”+TABLE_NAME
+”(“+ID_FIELD+”INTEGER,”
+FIRST_NAME_FIELD+”TEXT,”
+LAST_NAME_FIELD+”TEXT,”
+PHONE_FIELD+”TEXT,”
+EMAIL_FIELD+”TEXT,”
+”PRIMARYKEY(“+ID_FIELD+”));”;
db.execSQL(sql);
}
@Override
publicvoidonUpgrade(SQLiteDatabasedb,intarg1,intarg2){
Log.d(“db”,“onUpdate”);
db.execSQL(“DROPTABLEIFEXISTS”+TABLE_NAME);
//re-createthetable
onCreate(db);
}
publicContactaddContact(Contactcontact){
Log.d(“db”,“addContact”);
SQLiteDatabasedb=this.getWritableDatabase();
ContentValuesvalues=newContentValues();
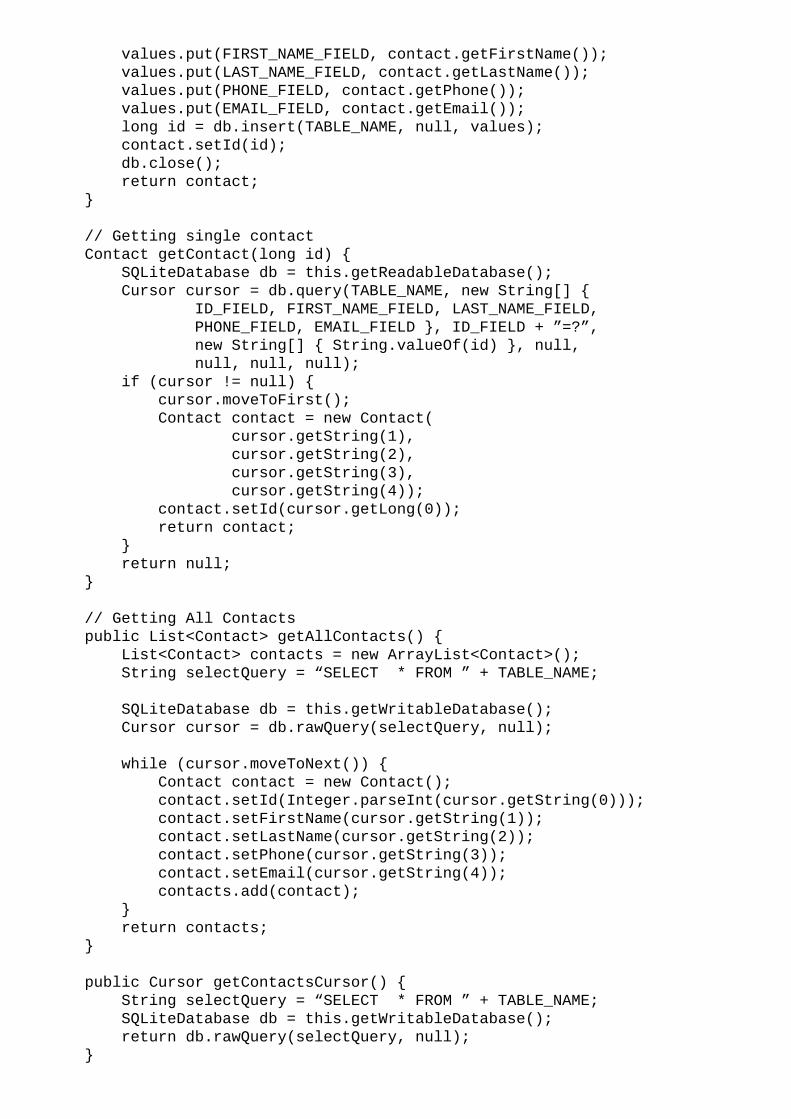
values.put(FIRST_NAME_FIELD,contact.getFirstName());
values.put(LAST_NAME_FIELD,contact.getLastName());
values.put(PHONE_FIELD,contact.getPhone());
values.put(EMAIL_FIELD,contact.getEmail());
longid=db.insert(TABLE_NAME,null,values);
contact.setId(id);
db.close();
returncontact;
}
//Gettingsinglecontact
ContactgetContact(longid){
SQLiteDatabasedb=this.getReadableDatabase();
Cursorcursor=db.query(TABLE_NAME,newString[]{
ID_FIELD,FIRST_NAME_FIELD,LAST_NAME_FIELD,
PHONE_FIELD,EMAIL_FIELD},ID_FIELD+”=?”,
newString[]{String.valueOf(id)},null,
null,null,null);
if(cursor!=null){
cursor.moveToFirst();
Contactcontact=newContact(
cursor.getString(1),
cursor.getString(2),
cursor.getString(3),
cursor.getString(4));
contact.setId(cursor.getLong(0));
returncontact;
}
returnnull;
}
//GettingAllContacts
publicList<Contact>getAllContacts(){
List<Contact>contacts=newArrayList<Contact>();
StringselectQuery=“SELECT*FROM”+TABLE_NAME;
SQLiteDatabasedb=this.getWritableDatabase();
Cursorcursor=db.rawQuery(selectQuery,null);
while(cursor.moveToNext()){
Contactcontact=newContact();
contact.setId(Integer.parseInt(cursor.getString(0)));
contact.setFirstName(cursor.getString(1));
contact.setLastName(cursor.getString(2));
contact.setPhone(cursor.getString(3));
contact.setEmail(cursor.getString(4));
contacts.add(contact);
}
returncontacts;
}
publicCursorgetContactsCursor(){
StringselectQuery=“SELECT*FROM”+TABLE_NAME;
SQLiteDatabasedb=this.getWritableDatabase();
returndb.rawQuery(selectQuery,null);
}
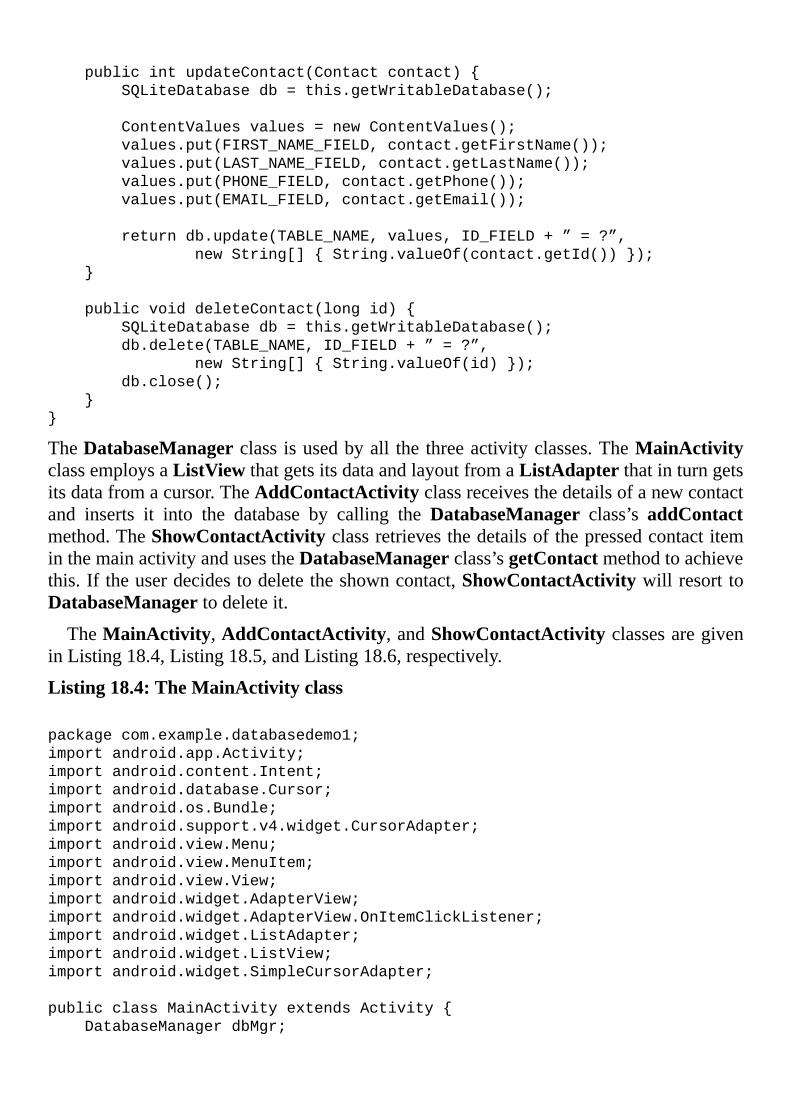
publicintupdateContact(Contactcontact){
SQLiteDatabasedb=this.getWritableDatabase();
ContentValuesvalues=newContentValues();
values.put(FIRST_NAME_FIELD,contact.getFirstName());
values.put(LAST_NAME_FIELD,contact.getLastName());
values.put(PHONE_FIELD,contact.getPhone());
values.put(EMAIL_FIELD,contact.getEmail());
returndb.update(TABLE_NAME,values,ID_FIELD+”=?”,
newString[]{String.valueOf(contact.getId())});
}
publicvoiddeleteContact(longid){
SQLiteDatabasedb=this.getWritableDatabase();
db.delete(TABLE_NAME,ID_FIELD+”=?”,
newString[]{String.valueOf(id)});
db.close();
}
}
TheDatabaseManagerclass isusedbyall thethreeactivityclasses.TheMainActivityclassemploysaListViewthatgetsitsdataandlayoutfromaListAdapterthatinturngetsitsdatafromacursor.TheAddContactActivityclassreceivesthedetailsofanewcontactand inserts it into the database by calling theDatabaseManager class’s addContactmethod.TheShowContactActivityclassretrievesthedetailsofthepressedcontactiteminthemainactivityandusestheDatabaseManagerclass’sgetContactmethodtoachievethis.Iftheuserdecidestodeletetheshowncontact,ShowContactActivitywillresorttoDatabaseManagertodeleteit.
TheMainActivity,AddContactActivity,andShowContactActivityclassesaregiveninListing18.4,Listing18.5,andListing18.6,respectively.
Listing18.4:TheMainActivityclass
packagecom.example.databasedemo1;
importandroid.app.Activity;
importandroid.content.Intent;
importandroid.database.Cursor;
importandroid.os.Bundle;
importandroid.support.v4.widget.CursorAdapter;
importandroid.view.Menu;
importandroid.view.MenuItem;
importandroid.view.View;
importandroid.widget.AdapterView;
importandroid.widget.AdapterView.OnItemClickListener;
importandroid.widget.ListAdapter;
importandroid.widget.ListView;
importandroid.widget.SimpleCursorAdapter;
publicclassMainActivityextendsActivity{
DatabaseManagerdbMgr;
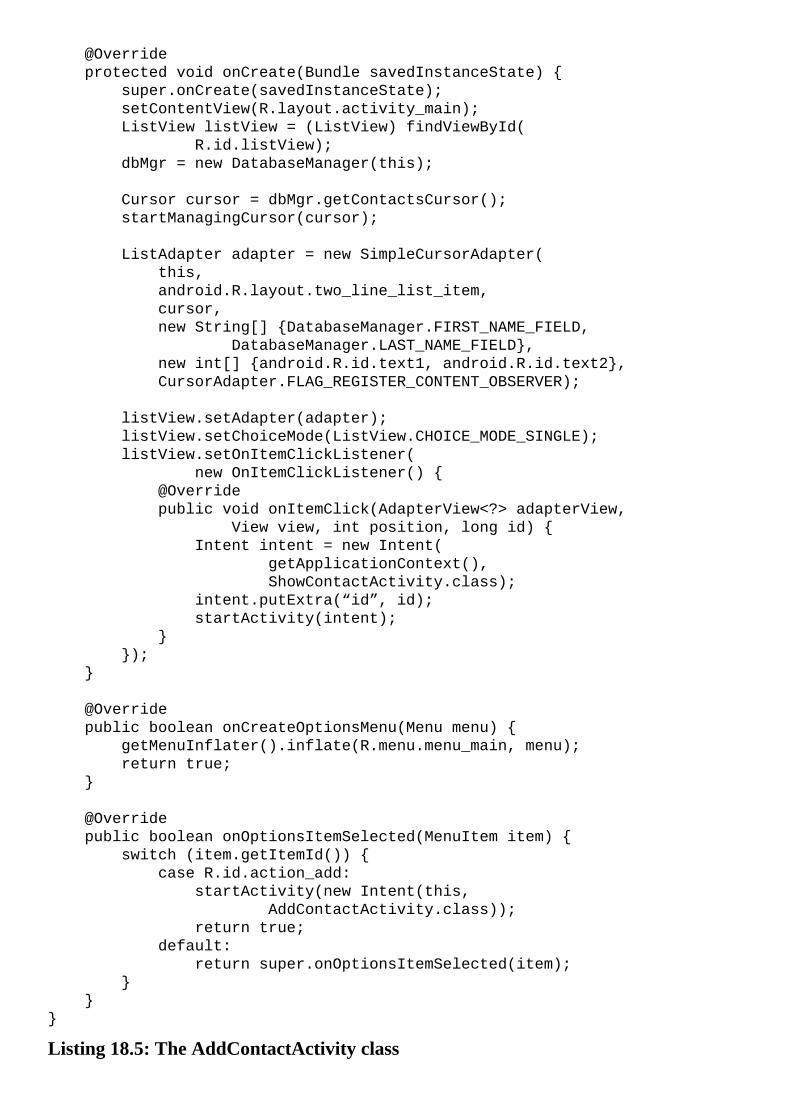
@Override
protectedvoidonCreate(BundlesavedInstanceState){
super.onCreate(savedInstanceState);
setContentView(R.layout.activity_main);
ListViewlistView=(ListView)findViewById(
R.id.listView);
dbMgr=newDatabaseManager(this);
Cursorcursor=dbMgr.getContactsCursor();
startManagingCursor(cursor);
ListAdapteradapter=newSimpleCursorAdapter(
this,
android.R.layout.two_line_list_item,
cursor,
newString[]{DatabaseManager.FIRST_NAME_FIELD,
DatabaseManager.LAST_NAME_FIELD},
newint[]{android.R.id.text1,android.R.id.text2},
CursorAdapter.FLAG_REGISTER_CONTENT_OBSERVER);
listView.setAdapter(adapter);
listView.setChoiceMode(ListView.CHOICE_MODE_SINGLE);
listView.setOnItemClickListener(
newOnItemClickListener(){
@Override
publicvoidonItemClick(AdapterView<?>adapterView,
Viewview,intposition,longid){
Intentintent=newIntent(
getApplicationContext(),
ShowContactActivity.class);
intent.putExtra(“id”,id);
startActivity(intent);
}
});
}
@Override
publicbooleanonCreateOptionsMenu(Menumenu){
getMenuInflater().inflate(R.menu.menu_main,menu);
returntrue;
}
@Override
publicbooleanonOptionsItemSelected(MenuItemitem){
switch(item.getItemId()){
caseR.id.action_add:
startActivity(newIntent(this,
AddContactActivity.class));
returntrue;
default:
returnsuper.onOptionsItemSelected(item);
}
}
}
Listing18.5:TheAddContactActivityclass
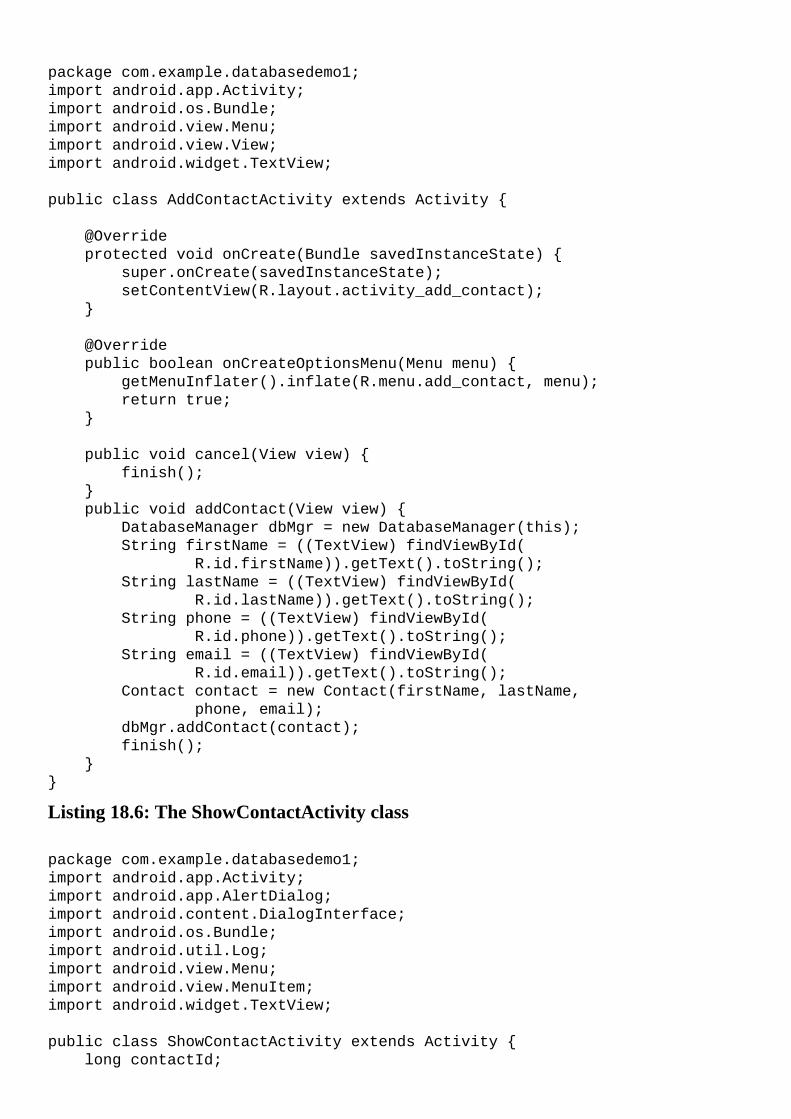
packagecom.example.databasedemo1;
importandroid.app.Activity;
importandroid.os.Bundle;
importandroid.view.Menu;
importandroid.view.View;
importandroid.widget.TextView;
publicclassAddContactActivityextendsActivity{
@Override
protectedvoidonCreate(BundlesavedInstanceState){
super.onCreate(savedInstanceState);
setContentView(R.layout.activity_add_contact);
}
@Override
publicbooleanonCreateOptionsMenu(Menumenu){
getMenuInflater().inflate(R.menu.add_contact,menu);
returntrue;
}
publicvoidcancel(Viewview){
finish();
}
publicvoidaddContact(Viewview){
DatabaseManagerdbMgr=newDatabaseManager(this);
StringfirstName=((TextView)findViewById(
R.id.firstName)).getText().toString();
StringlastName=((TextView)findViewById(
R.id.lastName)).getText().toString();
Stringphone=((TextView)findViewById(
R.id.phone)).getText().toString();
Stringemail=((TextView)findViewById(
R.id.email)).getText().toString();
Contactcontact=newContact(firstName,lastName,
phone,email);
dbMgr.addContact(contact);
finish();
}
}
Listing18.6:TheShowContactActivityclass
packagecom.example.databasedemo1;
importandroid.app.Activity;
importandroid.app.AlertDialog;
importandroid.content.DialogInterface;
importandroid.os.Bundle;
importandroid.util.Log;
importandroid.view.Menu;
importandroid.view.MenuItem;
importandroid.widget.TextView;
publicclassShowContactActivityextendsActivity{
longcontactId;
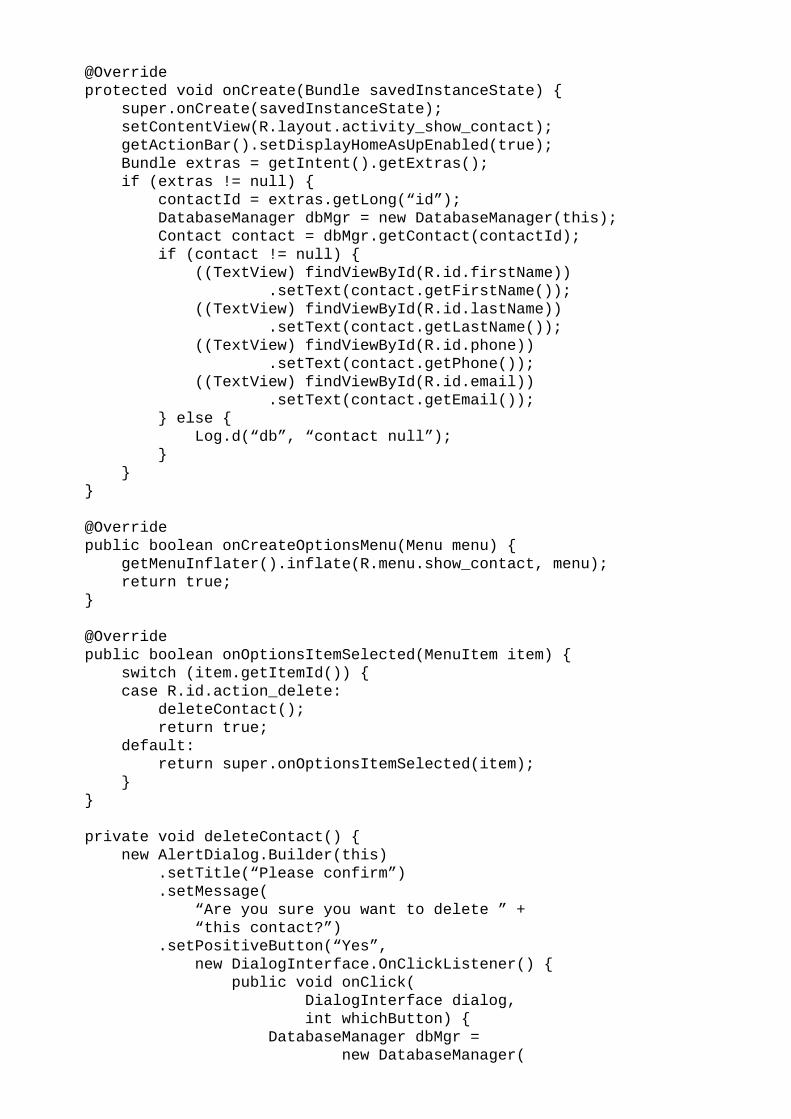
@Override
protectedvoidonCreate(BundlesavedInstanceState){
super.onCreate(savedInstanceState);
setContentView(R.layout.activity_show_contact);
getActionBar().setDisplayHomeAsUpEnabled(true);
Bundleextras=getIntent().getExtras();
if(extras!=null){
contactId=extras.getLong(“id”);
DatabaseManagerdbMgr=newDatabaseManager(this);
Contactcontact=dbMgr.getContact(contactId);
if(contact!=null){
((TextView)findViewById(R.id.firstName))
.setText(contact.getFirstName());
((TextView)findViewById(R.id.lastName))
.setText(contact.getLastName());
((TextView)findViewById(R.id.phone))
.setText(contact.getPhone());
((TextView)findViewById(R.id.email))
.setText(contact.getEmail());
}else{
Log.d(“db”,“contactnull”);
}
}
}
@Override
publicbooleanonCreateOptionsMenu(Menumenu){
getMenuInflater().inflate(R.menu.show_contact,menu);
returntrue;
}
@Override
publicbooleanonOptionsItemSelected(MenuItemitem){
switch(item.getItemId()){
caseR.id.action_delete:
deleteContact();
returntrue;
default:
returnsuper.onOptionsItemSelected(item);
}
}
privatevoiddeleteContact(){
newAlertDialog.Builder(this)
.setTitle(“Pleaseconfirm”)
.setMessage(
“Areyousureyouwanttodelete”+
“thiscontact?”)
.setPositiveButton(“Yes”,
newDialogInterface.OnClickListener(){
publicvoidonClick(
DialogInterfacedialog,
intwhichButton){
DatabaseManagerdbMgr=
newDatabaseManager(
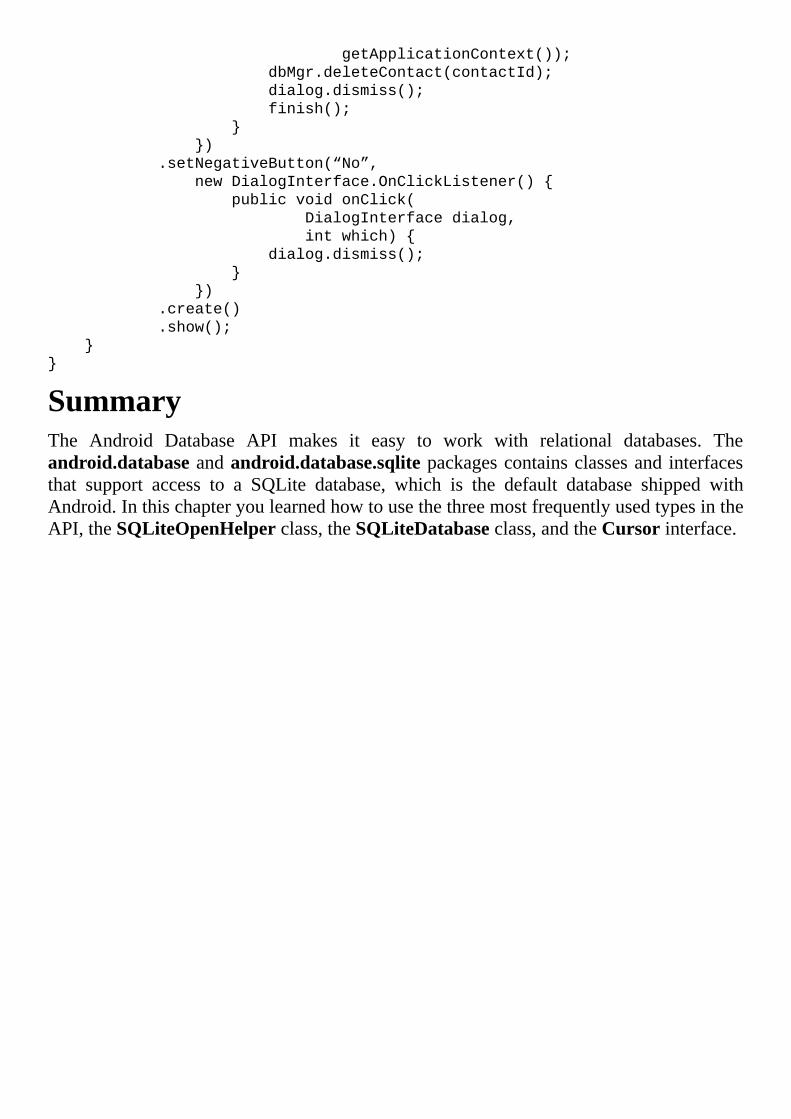
getApplicationContext());
dbMgr.deleteContact(contactId);
dialog.dismiss();
finish();
}
})
.setNegativeButton(“No”,
newDialogInterface.OnClickListener(){
publicvoidonClick(
DialogInterfacedialog,
intwhich){
dialog.dismiss();
}
})
.create()
.show();
}
}
SummaryThe Android Database API makes it easy to work with relational databases. Theandroid.databaseandandroid.database.sqlitepackagescontainsclassesand interfacesthat support access to a SQLite database, which is the default database shipped withAndroid.InthischapteryoulearnedhowtousethethreemostfrequentlyusedtypesintheAPI,theSQLiteOpenHelperclass,theSQLiteDatabaseclass,andtheCursorinterface.

Chapter19TakingPictures
Almost allAndroidhandsets and tablets comewithoneor twocameras.Youcanuse acameratotakestillpicturesbystartinganactivityinthebuilt-inCameraapplicationorusetheCameraAPI.
Thischaptershowshowtousebothapproaches.
OverviewAnAndroidapplicationcancallanotherapplicationtouseoneortwofeaturesofferedbythe latter.Forexample, to sendanemail fromyourapplication,youcanuse thedefaultEmail application rather thanwritingyourownapp. In thecaseof takingapicture, theeasiestway to do this is by using theCamera application. To activateCamera, use thefollowingcode.
intrequestCode=…;
Intentintent=newIntent(MediaStore.ACTION_IMAGE_CAPTURE);
startActivityForResult(intent,requestCode);
Basically, you need to create an Intent by passingMediaStore.ACTION_IMAGE_CAPTUREtotheIntentclass’sconstructor.Then,youneed tocallstartActivityForResult fromyouractivitypassing theIntentanda requestcode.Therequestcodecanbeany integeryourheartdesires.Youwill learnshortly thepurposeofpassingarequestcode.
TotellCamerawheretosavethetakenpicture,youcanpassaUritotheIntent.Hereisthecompletecode.
intrequestCode=…;
Intentintent=newIntent(MediaStore.ACTION_IMAGE_CAPTURE);
Uriuri=…;
intent.putExtra(MediaStore.EXTRA_OUTPUT,uri);
startActivityForResult(intent,requestCode);
When theuserclosesCameraafter takingapictureorcanceling theoperation,Androidwill notifyyour applicationby calling theonActivityResultmethod in the activity thatcalledCamera.ThisgivesyoutheopportunitytosavethepicturetakenusingCamera.ThesignatureofonActivityResultisasfollows.
protectedvoidonActivityResult(intrequestCode,intresultCode,
android.content.Intentdata)
The system calls onActivityResult by passing three arguments. The first argument,requestCode, is the request code passed when calling startActivityForResult. Therequestcodeisimportantifyoucallotheractivitiesfromyouractivity,passingadifferentrequestcodeeachtime.SinceyoucanonlyhaveoneonActivityResultimplementationin

your activity, all calls to startActivityForResultwill share the sameonActivityResult,andyouneedtoknowwhichactivitycausedonActivityResult tobecalledbycheckingtherequestcode.
The second argument to onActivityResult is a result code. The value can be eitherActivity.RESULT_OK or Activity.RESULT_CANCELED or a user defined value.Activity.RESULT_OK indicates that the operation succeeded andActivity.RESULT_CANCELEDindicatesthattheoperationwascanceled.
The third argument toonActivityResult contains data from the called activity if theoperationwassuccessful.
UsingCameraiseasy.However,ifCameradoesnotsuityourneeds,youcanalsousethe Camera API directly. This is not as easy as using Camera, but the API lets youconfiguremanyaspectsofthecamera.
Thesamplesaccompanyingthischaptershowyoubothmethods.
UsingCameraTousethecamera,youneedtheseinyourmanifest.
<uses-featureandroid:name=“android.hardware.camera”/>
<uses-permissionandroid:name=“android.permission.CAMERA”/>
TheCameraDemoapplicationshowshowtousethebuilt-inintenttoactivatetheCameraapplicationanduseittotakeapicture.CameraDemohasonlyoneactivity,whichsportstwo button on its action bar, ShowCamera andEmail.TheShowCamera button startsCameraandtheEmailbuttonemailsthepicture.TheapplicationisshowninFigure19.1.
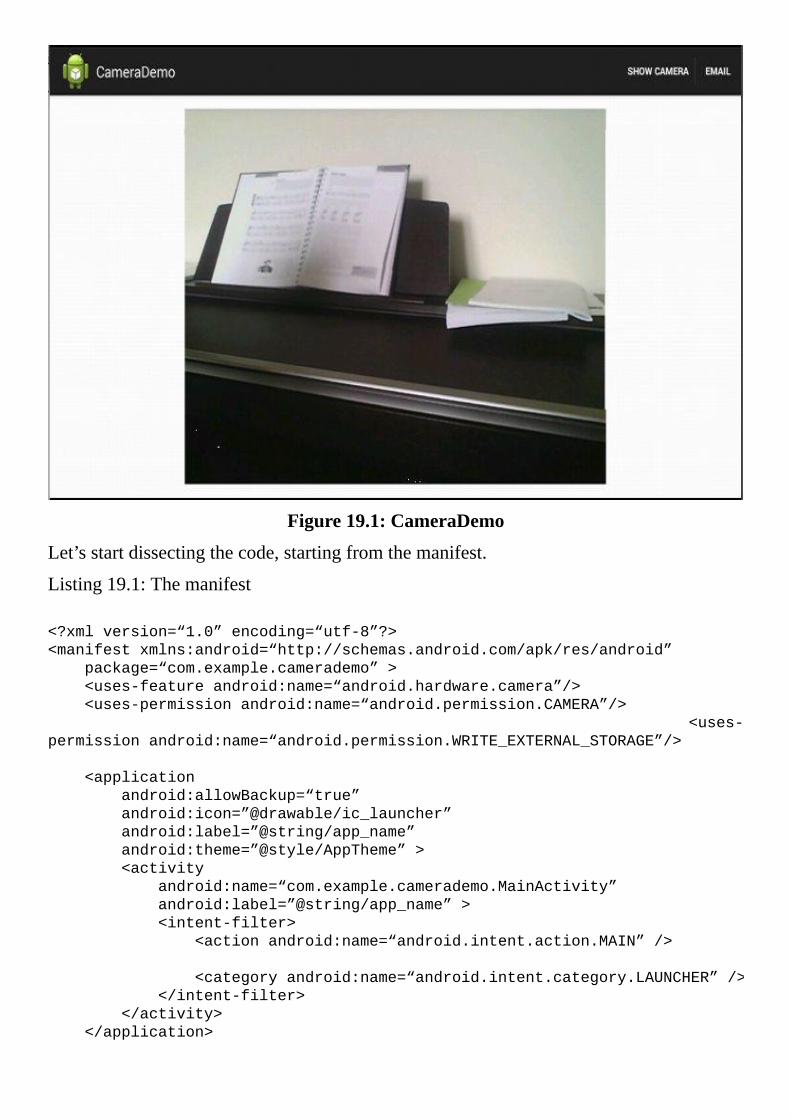
Figure19.1:CameraDemo
Let’sstartdissectingthecode,startingfromthemanifest.
Listing19.1:Themanifest
<?xmlversion=“1.0”encoding=“utf-8”?>
<manifestxmlns:android=“http://schemas.android.com/apk/res/android”
package=“com.example.camerademo”>
<uses-featureandroid:name=“android.hardware.camera”/>
<uses-permissionandroid:name=“android.permission.CAMERA”/>
<uses-
permissionandroid:name=“android.permission.WRITE_EXTERNAL_STORAGE”/>
<application
android:allowBackup=“true”
android:icon=”@drawable/ic_launcher”
android:label=”@string/app_name”
android:theme=”@style/AppTheme”>
<activity
android:name=“com.example.camerademo.MainActivity”
android:label=”@string/app_name”>
<intent-filter>
<actionandroid:name=“android.intent.action.MAIN”/>
<categoryandroid:name=“android.intent.category.LAUNCHER”/>
</intent-filter>
</activity>
</application>
</manifest>
menufile(themain.xmlfileinListing19.1)thatcontainstwomenuitemsfortheactionbar.
Listing19.1:Themenufile(menu_main.xml)
<menuxmlns:android=“http://schemas.android.com/apk/res/android”>
<item
android:id=”@+id/action_camera”
android:orderInCategory=“100”
android:showAsAction=“ifRoom”
android:title=”@string/action_show_camera”/>
<item
android:id=”@+id/action_email”
android:orderInCategory=“200”
android:showAsAction=“ifRoom”
android:title=”@string/action_email”/>
</menu>
ThelayoutfileforthemainactivityispresentedinListing19.2.ItcontainsanImageViewforshowingthetakenpicture.TheactivityclassitselfisshowninListing19.3.
Listing19.2:Theactivity_main.xmlfile
<RelativeLayoutxmlns:android=“http://schemas.android.com/apk/res/android”
android:layout_width=“match_parent”
android:layout_height=“match_parent”
android:paddingBottom=”@dimen/activity_vertical_margin”
android:paddingLeft=”@dimen/activity_horizontal_margin”
android:paddingRight=”@dimen/activity_horizontal_margin”
android:paddingTop=”@dimen/activity_vertical_margin”>
<ImageView
android:id=”@+id/imageView”
android:layout_width=“match_parent”
android:layout_height=“match_parent”
/>
</RelativeLayout>
Listing19.3:TheMainActivityclass
packagecom.example.camerademo;
importjava.io.File;
importandroid.app.Activity;
importandroid.content.Intent;
importandroid.net.Uri;
importandroid.os.Bundle;
importandroid.os.Environment;
importandroid.provider.MediaStore;
importandroid.util.Log;
importandroid.view.Menu;
importandroid.view.MenuItem;
importandroid.widget.ImageView;
importandroid.widget.Toast;
publicclassMainActivityextendsActivity{
privatestaticfinalintCAPTURE_IMAGE_ACTIVITY_REQUEST_CODE=100;
FilepictureDir=newFile(Environment.getExternalStoragePublicDirectory(
Environment.DIRECTORY_PICTURES),“CameraDemo”);
privatestaticfinalStringFILE_NAME=“image01.jpg”;
privateUrifileUri;
@Override
protectedvoidonCreate(BundlesavedInstanceState){
super.onCreate(savedInstanceState);
setContentView(R.layout.activity_main);
if(!pictureDir.exists()){
pictureDir.mkdirs();
}
}
@Override
publicbooleanonCreateOptionsMenu(Menumenu){
getMenuInflater().inflate(R.menu.menu_main,menu);
returntrue;
}
@Override
publicbooleanonOptionsItemSelected(MenuItemitem){
switch(item.getItemId()){
caseR.id.action_camera:
showCamera();
returntrue;
caseR.id.action_email:
emailPicture();
returntrue;
default:
returnsuper.onContextItemSelected(item);
}
}
privatevoidshowCamera(){
Intentintent=newIntent(
MediaStore.ACTION_IMAGE_CAPTURE);
Fileimage=newFile(pictureDir,FILE_NAME);
fileUri=Uri.fromFile(image);
intent.putExtra(MediaStore.EXTRA_OUTPUT,fileUri);
//checkifthedevicehasacamera:
if(intent.resolveActivity(getPackageManager())!=null){
startActivityForResult(intent,
CAPTURE_IMAGE_ACTIVITY_REQUEST_CODE);
}
}
@Override
protectedvoidonActivityResult(intrequestCode,
intresultCode,Intentdata){
if(requestCode==
CAPTURE_IMAGE_ACTIVITY_REQUEST_CODE){
if(resultCode==RESULT_OK){
ImageViewimageView=(ImageView)
findViewById(R.id.imageView);
Fileimage=newFile(pictureDir,FILE_NAME);
fileUri=Uri.fromFile(image);
imageView.setImageURI(fileUri);
}elseif(resultCode==RESULT_CANCELED){
Toast.makeText(this,“Actioncancelled”,
Toast.LENGTH_LONG).show();
}else{
Toast.makeText(this,“Error”,
Toast.LENGTH_LONG).show();
}
}
}
privatevoidemailPicture(){
IntentemailIntent=newIntent(
android.content.Intent.ACTION_SEND);
emailIntent.setType(“application/image”);
emailIntent.putExtra(android.content.Intent.EXTRA_EMAIL,
newString[]{“[email protected]”});
emailIntent.putExtra(android.content.Intent.EXTRA_SUBJECT,
“Newphoto”);
emailIntent.putExtra(android.content.Intent.EXTRA_TEXT,
“FromMyApp”);
emailIntent.putExtra(Intent.EXTRA_STREAM,fileUri);
startActivity(Intent.createChooser(emailIntent,
“Sendmail…”));
}
}
TheShowCamerabuttoninMainActivitycallstheshowCameramethod.ThismethodstartsCamerabycallingstartActivityForResult.TheemailPicturemethodstartsanotheractivitythatinturnactivatesthedefaultEmailapplication.
TheCameraAPIAt the center of the Camera API is the android.hardware.Camera class. ACamerarepresentsadigitalcamera.
Every camera has a viewfinder, through which the photographer can see what thecamera isseeing.Aviewfindercanbeopticalorelectronic.Ananalogcameranormallyoffersanopticalviewfinder,whichisareversedtelescopemountedonthecamerabody.Somedigitalcamerashaveanelectronicviewfinderandsomehaveanelectroniconeplusanopticalone.OnanAndroidtabletandhandset,thewholescreenorpartofthescreenisnormallyusedasaviewfinder.
Inanapplicationthatusesacamera, theandroid.view.SurfaceViewclassisnormallyusedasaviewfinder.SurfaceViewisasubclassofViewand,assuch,canbeaddedtoanactivity by declaring it in a layout file using the SurfaceView element. The area of aSurfaceView will be continuously updated with what the camera sees. You control a
SurfaceViewthroughitsSurfaceHolder,whichyoucanobtainbycallingthegetHoldermethodontheSurfaceView.SurfaceHolderisaninterfaceintheandroid.viewpackage.
Therefore,whenworkingwithacamera,youneedtomanageaninstanceofCameraaswellasaSurfaceHolder.
ManagingACameraWhenworkingwiththeCameraAPI,youshouldstartbycheckingifthedevicedoeshaveacamera.Youmustalsodeterminewhichcameratouseifadevicehasmultiplecameras.YoudoitbycallingtheopenstaticmethodoftheCameraclass.
Cameracamera=null;
try{
if(Build.VERSION.SDK_INT>=Build.VERSION_CODES.GINGERBREAD){
camera=Camera.open(0);
}else{
camera=Camera.open();
}
}catch(Exceptione){
e.printStackTrace();
}
For pre-Gingerbread Android (Android version 2.3), use the no-argument methodoverload.ForAndroidversion2.3,usetheoverloadthattakesaninteger.
publicstaticCameraopen(intcameraId)
Passing0tothemethodgivesyouthefirstcamera,1thesecondcamera,andsoon.
Youshouldenclosethecalltoopeninatryblockasitmaythrowanexception.
OnceyouobtainaCamera,passaSurfaceHolder to thesetPreviewDisplaymethodontheCamera.
publicvoidsetPreviewDisplay(android.view.SurfaceHolderholder)
IfsetPreviewDisplayreturnssuccessfully,callthecamera’sstartPreviewmethodandtheSurfaceViewcontrolledbytheSurfaceHolderwillstartdisplayingwhatthecamerasees.
To takeapicture, call thecamera’s takePicturemethod.After apicture is taken, thepreviewwillstopsoyouwillneedtocallstartPreviewagaintotakeanotherpicture.
When you are finishedwith the camera, call stopPreview and release to release thecamera.
Optionally, you can configure the camera after you call open by calling itsgetParametersmethod,modifyingtheparameters,andpassingthembacktothecamerausingthesetParametersmethod.
WiththetakePicturemethodyoucandecidewhattodototheresultingrawandJPEGimagesfromthecamera.ThesignatureoftakePictureisasfollows.
publicfinalvoidtakePicture(Camera.ShutterCallbackshutter,
Camera.PictureCallbackraw,Camera.PictureCallbackpostview,
Camera.PictureCallbackjpeg)
Thefourparametersarethese.
shutter.Thecallbackforimagecapturemoment.Forexample,youcanpasscodethatplaysaclicksoundtomakeitmorelikearealcamera.raw.Thecallbackforuncompressedimagedata.postview.Thecallbackwithpostviewimagedata.jpeg.ThecallbackforJPEGimagedata.
YouwilllearnhowtouseCameraintheCameraAPIDemoapplication.
ManagingASurfaceHolderA SurfaceHolder communicates with its user through a series of methods inSurfaceHolder.Callback.TomanageaSurfaceHolder,youneedtopassaninstanceofSurfaceHolder.CallbacktotheSurfaceHolder’saddCallbackmethod.
SurfaceHolder.CallbackexposesthesethreemethodsthattheSurfaceHolderwillcallinresponsetoevents.
publicabstractvoidsurfaceChanged(SurfaceHolderholder,
intformat,intwidth,intheight)
Calledafteranystructuralchanges(formatorsize)havebeenmadetothesurface.
publicabstractvoidsurfaceCreated(SurfaceHolderholder)
Calledafterthesurfaceisfirstcreated.
publicabstractvoidsurfaceDestroyed(SurfaceHolderholder)
Calledbeforeasurfaceisbeingdestroyed.
For instance, you might want to link a SurfaceHolder with aCamera right after theSurfaceHolder is created. Therefore, you might want to override the surfaceCreatedmethodwiththiscode.
@Override
publicvoidsurfaceCreated(SurfaceHolderholder){
try{
camera.setPreviewDisplay(holder);
camera.startPreview();
}catch(Exceptione){
Log.d(“camera”,e.getMessage());
}
}
UsingtheCameraAPITheCameraAPIDemo application demonstrates the use of theCameraAPI to take stillpictures.ItusesaSurfaceViewasaviewfinderandabuttontotakeapicture.Clickingthebuttontakesthepictureandemitsabeepsound.Afterapictureistaken,theSurfaceViewfreezesfor twosecondstogivetheuser thechangeto inspect thepictureandrestart thecamerapreviewtoallowtheusertotakeanotherpicture.Allpicturesaregivenarandomnameandstoredintheexternalstorage.
Theapplicationhasoneactivity,whoselayoutisshowninListing19.4.
Listing19.4:Thelayoutfile(activity_main.xml)
<LinearLayoutxmlns:android=“http://schemas.android.com/apk/res/android”
android:orientation=“vertical”
android:layout_width=“fill_parent”
android:layout_height=“fill_parent”>
<Button
android:id=”@+id/button1”
android:layout_width=“wrap_content”
android:layout_height=“wrap_content”
android:layout_gravity=“center”
android:onClick=“takePicture”
android:text=”@string/button_take”/>
<SurfaceView
android:id=”@+id/surfaceview”
android:layout_width=“match_parent”
android:layout_height=“match_parent”/>
</LinearLayout>
ThelayoutfeaturesaLinearLayoutcontainingabuttonandaSurfaceView.TheactivityclassispresentedinListing19.5.
Listing19.5:TheMainActivityclass
packagecom.example.cameraapidemo;
importjava.io.File;
importjava.io.FileNotFoundException;
importjava.io.FileOutputStream;
importjava.io.IOException;
importandroid.app.Activity;
importandroid.hardware.Camera;
importandroid.hardware.Camera.PictureCallback;
importandroid.hardware.Camera.ShutterCallback;
importandroid.media.AudioManager;
importandroid.media.SoundPool;
importandroid.net.Uri;
importandroid.os.Build;
importandroid.os.Bundle;
importandroid.os.Environment;
importandroid.os.Handler;
importandroid.provider.Settings;

importandroid.util.Log;
importandroid.view.Menu;
importandroid.view.SurfaceHolder;
importandroid.view.SurfaceView;
importandroid.view.View;
importandroid.widget.Button;
importandroid.widget.Toast;
publicclassMainActivityextendsActivity
implementsSurfaceHolder.Callback{
privateCameracamera;
SoundPoolsoundPool;
intbeepId;
FilepictureDir=newFile(Environment
.getExternalStoragePublicDirectory(
Environment.DIRECTORY_PICTURES),
“CameraAPIDemo”);
privatestaticfinalStringTAG=“camera”;
@Override
publicvoidonCreate(BundlesavedInstanceState){
super.onCreate(savedInstanceState);
setContentView(R.layout.activity_main);
pictureDir.mkdirs();
soundPool=newSoundPool(1,
AudioManager.STREAM_NOTIFICATION,0);
Uriuri=Settings.System.DEFAULT_RINGTONE_URI;
beepId=soundPool.load(uri.getPath(),1);
SurfaceViewsurfaceView=(SurfaceView)
findViewById(R.id.surfaceview);
surfaceView.getHolder().addCallback(this);
}
@Override
publicbooleanonCreateOptionsMenu(Menumenu){
getMenuInflater().inflate(R.menu.menu_main,menu);
returntrue;
}
@Override
publicvoidonResume(){
super.onResume();
try{
if(Build.VERSION.SDK_INT>=
Build.VERSION_CODES.GINGERBREAD){
camera=Camera.open(0);
}else{
camera=Camera.open();
}
}catch(Exceptione){
e.printStackTrace();
}
}
@Override
publicvoidonPause(){
super.onPause();
if(camera!=null){
try{
camera.release();
camera=null;
}catch(Exceptione){
e.printStackTrace();
}
}
}
privatevoidenableButton(booleanenabled){
Buttonbutton=(Button)findViewById(R.id.button1);
button.setEnabled(enabled);
}
publicvoidtakePicture(Viewview){
enableButton(false);
camera.takePicture(shutterCallback,null,
pictureCallback);
}
privateShutterCallbackshutterCallback=
newShutterCallback(){
@Override
publicvoidonShutter(){
//playsound
soundPool.play(beepId,1.0f,1.0f,0,0,1.0f);
}
};
privatePictureCallbackpictureCallback=
newPictureCallback(){
@Override
publicvoidonPictureTaken(byte[]data,
finalCameracamera){
Toast.makeText(MainActivity.this,“Savingimage”,
Toast.LENGTH_LONG)
.show();
FilepictureFile=newFile(pictureDir,
System.currentTimeMillis()+”.jpg”);
try{
FileOutputStreamfos=newFileOutputStream(
pictureFile);
fos.write(data);
fos.close();
}catch(FileNotFoundExceptione){
Log.d(TAG,e.getMessage());
}catch(IOExceptione){
Log.d(TAG,e.getMessage());
}
Handlerhandler=newHandler();
handler.postDelayed(newRunnable(){
@Override
publicvoidrun(){
try{
enableButton(true);
camera.startPreview();
}catch(Exceptione){
Log.d(“camera”,
“Errorstartingcamerapreview:”
+e.getMessage());
}
}
},2000);
}
};
@Override
publicvoidsurfaceCreated(SurfaceHolderholder){
try{
camera.setPreviewDisplay(holder);
camera.startPreview();
}catch(Exceptione){
Log.d(“camera”,e.getMessage());
}
}
@Override
publicvoidsurfaceChanged(SurfaceHolderholder,
intformat,intw,inth3){
if(holder.getSurface()==null){
Log.d(TAG,“surfacedoesnotexist,return”);
return;
}
try{
camera.setPreviewDisplay(holder);
camera.startPreview();
}catch(Exceptione){
Log.d(“camera”,e.getMessage());
}
}
@Override
publicvoidsurfaceDestroyed(SurfaceHolderholder){
Log.d(TAG,“surfaceDestroyed”);
}
}
TheMainActivity class uses a Camera and a SurfaceView. The latter continuouslydisplayswhat the camera sees.Since aCamera takes a lot of resources to operate, theMainActivity releases the camerawhen the application stops and re-opens itwhen theapplicationresumes.
TheMainActivityclassalsoimplementsSurfaceHolder.CallbackandpassesitselftotheSurfaceHolderoftheSurfaceView itemploysasaviewfinder.Thisisshowninthe
followinglinesintheonCreatemethod.
SurfaceViewsurfaceView=(SurfaceView)
findViewById(R.id.surfaceview);
surfaceView.getHolder().addCallback(this);
InbothsurfaceCreatedandsurfaceChangedmethods thatMainActivityoverrides, theclasscalls thecamera’ssetPreviewDisplayandstartPreviewmethods.Thismakessurewhen the camera is linkedwith aSurfaceHolder, theSurfaceHolder has already beencreated.
Another important point inMainActivity is the takePicturemethod that gets calledwhentheuserpressesthebutton.
publicvoidtakePicture(Viewview){
enableButton(false);
camera.takePicture(shutterCallback,null,
pictureCallback);
}
ThetakePicturemethoddisablesthebuttonsothatnomorepicturecanbetakenuntilthepicture is saved and calls the takePicture method on the Camera, passing aCamera.ShutterCallbackandaCamera.PictureCallback.NotethatcallingtakePictureonaCameraalsostopspreviewingtheimageontheSurfaceHolderlinkedtothecamera.
TheCamera.ShutterCallbackinMainActivityhasonemethod,onShutter,thatplaysasoundfromthesoundpool.
@Override
publicvoidonShutter(){
//playsound
soundPool.play(beepId,1.0f,1.0f,0,0,1.0f);
}
TheCamera.PictureCallbackalsohasonemethod,onPictureTaken,whosesignatureisthis.
publicvoidonPictureTaken(byte[]data,finalCameracamera)
Thismethod is called by theCamera’s takePicture method and receives a byte arraycontainingthephotoimage.
TheonPictureTakenmethodimplementationinMainActivitydoesthreethings.First,itdisplaysamessageusingtheToast.Second,itsavesthebytearrayintoafile.ThenameofthefileisgeneratedusingSystem.currentTimeMillis().Finally, themethodcreatesaHandler to schedule a task thatwill be executed in two seconds. The task enables thebuttonandcallsthecamera’sstartPreviewsothattheviewfinderwillstartworkingagain.
Figure19.2showstheCameraAPIDemoapplication.
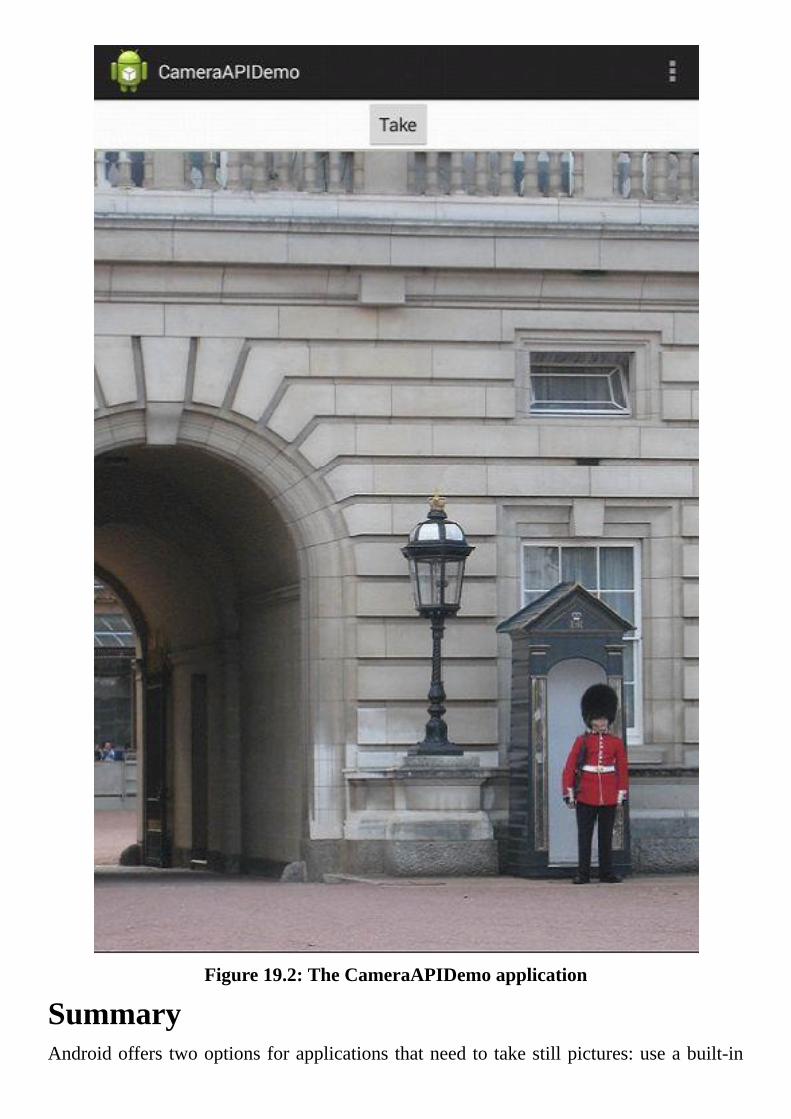
Figure19.2:TheCameraAPIDemoapplication
SummaryAndroidoffers twooptionsforapplicationsthatneedtotakestillpictures:useabuilt-in

intenttostartCameraorusetheCameraAPI.ThefirstoptionistheeasieronetousebutlacksthefeaturesthattheCameraAPIprovides.
Thischaptershowedhowtousebothmethods.
Chapter20MakingVideos
Theeasiestwaytoprovidevideo-makingcapabilityinyourapplicationistouseabuilt-inintent to activate an existing activity.However, if youneedmore thanwhat the defaultapplicationcanprovide,youneedtogetyourhandsdirtyandworkwiththeAPIdirectly.
Thischaptershowshowtousebothmethodsformakingvideos.
UsingtheBuilt-inIntentIfyouchoosetousethedefaultCameraapplicationformakingvideo,youcanactivatetheapplicationwiththesethreelinesofcode.
intrequestCode=…;
Intentintent=newIntent(MediaStore.ACTION_VIDEO_CAPTURE);
startActivityForResult(intent,requestCode);
Basically, you need to create an Intent object by passingMediaStore.ACTION_VIDEO_CAPTURE to its constructor and pass it to thestartActivityForResultmethodinyouractivityclass.Youcanchooseanyintegerfortherequestcode thatyouwillpassas thesecondargument tostartActivityForResult. Thismethodwill pause the current activity and startCamera andmake it ready to capture avideo.
Whenyouexit fromCamera,eitherbycanceling theoperationorwhenyouaredonemaking a video, the system will resume your original activity (the activity where youcalled startActivityForResult) and call its onActivityResult method. If you areinterested in saving or processing the captured video, you must overrideonActivityResult.Itssignatureisasfollows.
protectedvoidonActivityResult(intrequestCode,intresultCode,android.content.Intentdata)
The system calls onActivityResult by passing three arguments. The first argument,requestCode, is the request code passedwhen you called startActivityForResult.Therequestcode is important ifyouarecallingotheractivities fromyouractivity,passingadifferent request code for each activity. Since you can only have oneonActivityResultimplementation inyouractivity, all calls tostartActivityForResultwill share the sameonActivityResult, andyouneed toknowwhichactivity causedonActivityResult to becalledbycheckingthevalueoftherequestcode.
The second argument to onActivityResult is a result code. The value can be eitherActivity.RESULT_OK or Activity.RESULT_CANCELED or a user defined value.Activity.RESULT_OK indicates that the operation succeeded andActivity.RESULT_CANCELEDindicatesthattheoperationwascanceled.
ThethirdargumenttoonActivityResultcontainsdatafromCameraiftheoperationwassuccessful.

Inaddition,youneedthefollowinguses-featureelement inyourmanifest to indicatethatyourapplicationneedstousethecamerahardwareofthedevice.
<uses-featureandroid:name=“android.hardware.camera”
android:required=“true”/>
Asanexample,considertheVideoDemoapplicationthathasanactivitywithabuttononitsactionbar.Youcanpress thisbutton toactivateCamerafor thepurposeofmakingavideo.TheVideoDemoapplicationisshowninFigure20.1.
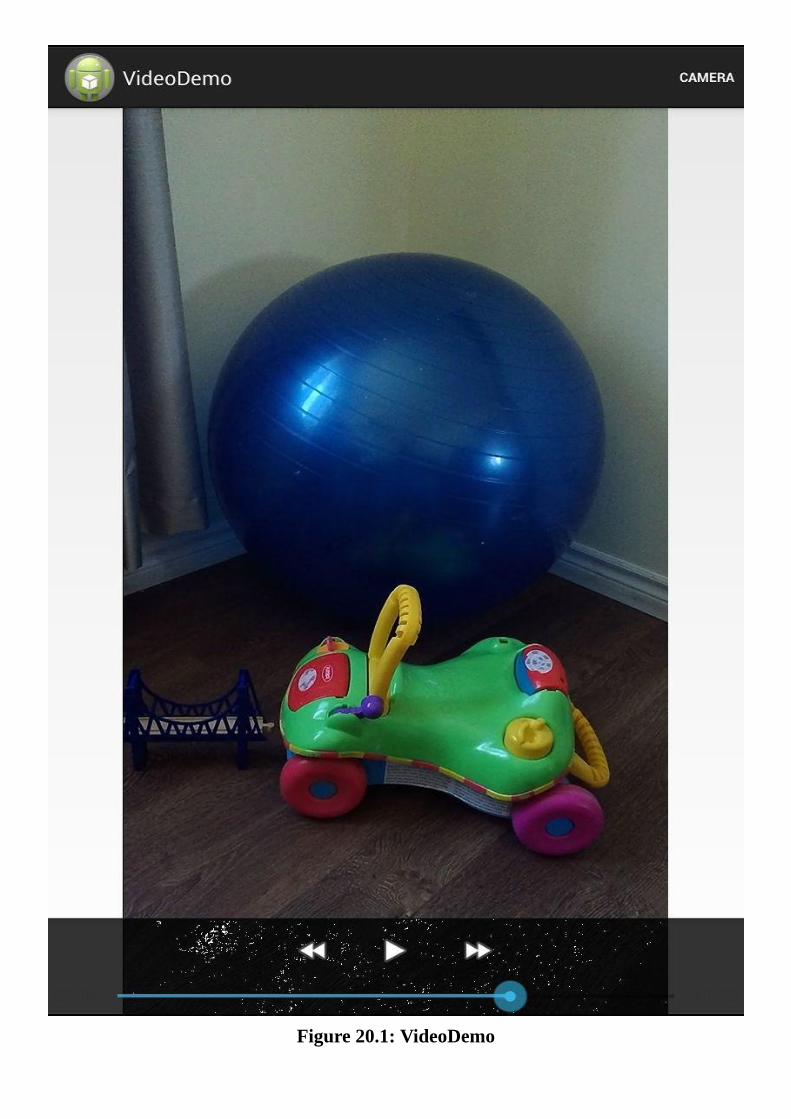
Figure20.1:VideoDemo
TheAndroidManifest.xmlfileinListing20.1showstheactivityusedintheapplicationaswellasause-featureelement.
Listing20.1:TheAndroidManifest.xmlfile
<?xmlversion=“1.0”encoding=“utf-8”?>
<manifestxmlns:android=“http://schemas.android.com/apk/res/android”
package=“com.example.videodemo”
android:versionCode=“1”
android:versionName=“1.0”>
<uses-sdk
android:minSdkVersion=“16”
android:targetSdkVersion=“19”/>
<uses-featureandroid:name=“android.hardware.camera”
android:required=“true”/>
<application
android:allowBackup=“true”
android:icon=”@drawable/ic_launcher”
android:label=”@string/app_name”
android:theme=”@style/AppTheme”>
<activity
android:name=“com.example.videodemo.MainActivity”
android:label=”@string/app_name”>
<intent-filter>
<actionandroid:name=“android.intent.action.MAIN”/>
<categoryandroid:name=“android.intent.category.LAUNCHER”/>
</intent-filter>
</activity>
</application>
</manifest>
Thereisonlyoneactivityintheapplication,theMainActivityactivity.TheactivityreadsthemenufileinListing20.2topopulateitsactionbar.
Listing20.2:Themenufile(menu_main.xml)
<menuxmlns:android=“http://schemas.android.com/apk/res/android”>
<item
android:id=”@+id/action_camera”
android:orderInCategory=“100”
android:showAsAction=“always”
android:title=”@string/action_camera”/>
</menu>
The activity also uses the layout file in Listing 20.3 to set its view. There is only aFrameLayoutwithaVideoViewelementthatisusedtodisplaythevideofile.
Listing20.3:Theactivity_main.xmlfile
<FrameLayoutxmlns:android=“http://schemas.android.com/apk/res/android”
android:layout_width=“match_parent”
android:layout_height=“match_parent”>
<VideoView
android:id=”@+id/videoView”
android:layout_width=“match_parent”
android:layout_height=“match_parent”
android:layout_gravity=“center”>
</VideoView>
</FrameLayout>
NotethatIuseaFrameLayouttoenclosetheVideoViewtocenterit.Forsomereason,aLinearLayoutoraRelativeLayoutwillnotcenterit.
Finally,theMainActivityclassispresentedinListing20.4.Youshouldknowbynowthat theonOptionsItemSelectedmethod is calledwhen the amenu item is pressed. Inshort, pressing the Camera button on the action bar calls the showCamera method.showCamera constructs a built-in Intent and passes it to startActivityForResult toactivatethevideomakingfeatureinCamera.
Listing20.4:TheMainActivityclass
packagecom.example.videodemo;
importandroid.app.Activity;
importandroid.content.Intent;
importandroid.net.Uri;
importandroid.os.Bundle;
importandroid.provider.MediaStore;
importandroid.view.Menu;
importandroid.view.MenuItem;
importandroid.widget.MediaController;
importandroid.widget.Toast;
importandroid.widget.VideoView;
publicclassMainActivityextendsActivity{
privatestaticfinalintREQUEST_CODE=200;
@Override
protectedvoidonCreate(BundlesavedInstanceState){
super.onCreate(savedInstanceState);
setContentView(R.layout.activity_main);
}
@Override
publicbooleanonCreateOptionsMenu(Menumenu){
getMenuInflater().inflate(R.menu.menu_main,menu);
returntrue;
}
@Override
publicbooleanonOptionsItemSelected(MenuItemitem){
switch(item.getItemId()){
caseR.id.action_camera:
showCamera();
returntrue;
default:
returnsuper.onContextItemSelected(item);
}
}
privatevoidshowCamera(){
//cannotsetthevideofile
Intentintent=newIntent(
MediaStore.ACTION_VIDEO_CAPTURE);
//checkifthedevicehasacamera:
if(intent.resolveActivity(getPackageManager())!=null){
startActivityForResult(intent,REQUEST_CODE);
}else{
Toast.makeText(this,“Openingcamerafailed”,
Toast.LENGTH_LONG).show();
}
}
@Override
protectedvoidonActivityResult(intrequestCode,
intresultCode,Intentdata){
if(requestCode==REQUEST_CODE){
if(resultCode==RESULT_OK){
if(data!=null){
Uriuri=data.getData();
VideoViewvideoView=(VideoView)
findViewById(R.id.videoView);
videoView.setVideoURI(uri);
videoView.setMediaController(
newMediaController(this));
videoView.requestFocus();
}
}elseif(resultCode==RESULT_CANCELED){
Toast.makeText(this,“Actioncancelled”,
Toast.LENGTH_LONG).show();
}else{
Toast.makeText(this,“Error”,Toast.LENGTH_LONG)
.show();
}
}
}
}
What is interesting is the implementation of the onActivityResult method, which getscalledwhentheuser leavesCamera.If theresultcodeisRESULT_OKanddata isnotnull,themethodcallsthegetDatamethodondatatogetaUripointingtothelocationofthevideo.Next, it finds theVideoViewwidget and set itsvideoURI property andcallstwoothermethodsontheVideoView,setMediaControllerandrequestFocus.
protectedvoidonActivityResult(intrequestCode,
intresultCode,Intentdata){
if(requestCode==REQUEST_CODE){
if(resultCode==RESULT_OK){
if(data!=null){
Uriuri=data.getData();
VideoViewvideoView=(VideoView)
findViewById(R.id.videoView);
videoView.setVideoURI(uri);
videoView.setMediaController(
newMediaController(this));
videoView.requestFocus();
}
…
PassingaMediaControllerdecoratestheVideoViewwithamediacontrollerthatcanbeusedtoplayandstopthevideo.CallingrequestFocus()ontheVideoViewsetsfocusonthewidget.
MediaRecorderIfyouchoosetodealwiththeAPIdirectlyratherthanusingtheCameratoprovideyourapplication with video-making capability, you need to know the details ofMediaRecorder.
The android.media.MediaRecorder class can be used to record audio and video.Figure20.2showsthevariousstatesaMediaRecordcanbein.
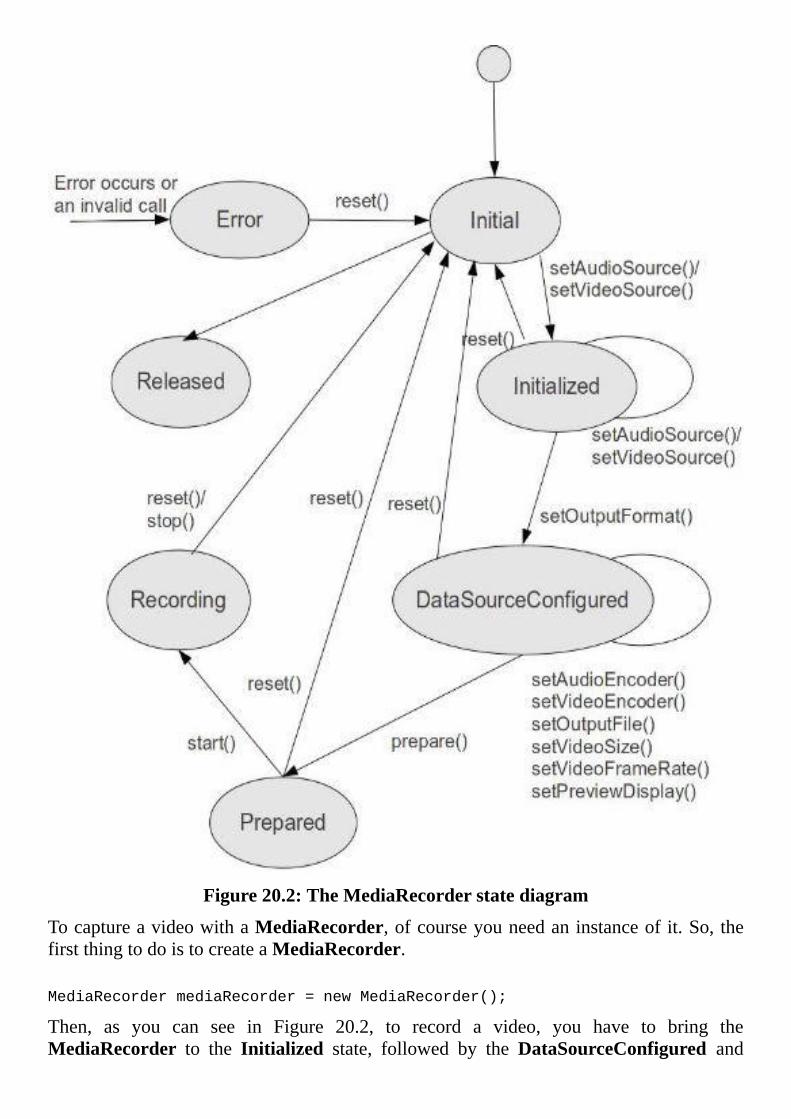
Figure20.2:TheMediaRecorderstatediagram
TocaptureavideowithaMediaRecorder,ofcourseyouneedaninstanceofit.So,thefirstthingtodoistocreateaMediaRecorder.
MediaRecordermediaRecorder=newMediaRecorder();
Then, as you can see in Figure 20.2, to record a video, you have to bring theMediaRecorder to the Initialized state, followed by theDataSourceConfigured and
Preparedstatesbycallingcertainmethods.
To transitionaMediaRecorder to the Initialized state, call the setAudioSource andsetVideoSource methods to set the audio and video sources. The valid value forsetAudioSource isoneof the fieldsdefined in theMediaRecorder.AudioSourceclass,which areCAMCORDER,DEFAULT,MIC,REMOTE_SUBMIX,VOICE_CALL,VOICE_COMMUNICATION, VOICE_DOWNLINK, VOICE_RECOGNITION,andVOICE_UPLINK.
The valid value for setVideoSource is one of the fields in theMediaRecorder.VideoSourceclass,whichareCAMERAandDEFAULT.
OncetheMediaRecorderisintheInitializedstate,callitssetOutputFormatmethod,passing one of the file formats in the MediaRecorder.OutputFormat class. Thefollowing fields are defined: AAC_ADTS, AMR_NB, AMR_WB, DEFAULT,MPEG_4,RAW_AMR,andTHREE_GPP.
Successfully calling setOutputFormat brings the MediaRecorder to theDataSourceConfigured state. You just need to call prepare to prepare theMediaRecorder.
Tostartrecording,callthestartmethod.Itwillkeeprecordinguntilstopiscalledoranerroroccurs.AnerrormayoccuriftheMediaRecorderrunsoutofspacetostorevideoorifaspecifiedmaximumrecordtimeisexceeded.
Once you stop aMediaRecorder, it goes back to the initial state. Youmust take itthroughthepreviousthreestatesagaintorecordanothervideo.
AlsonotethataMediaRecorderusesalotofresourcesanditisprudenttoreleasetheresources by calling its release method if theMediaRecorder is not being used. Forexample, you should release theMediaRecorder when the activity is paused. Once aMediaRecorderisreleased,thesameinstancecannotbereusedtorecordanothervideo.
UsingMediaRecorderTheVideoRecorderapplicationdemonstrateshowtousetheMediaRecordertorecordavideo.IthasoneactivitythatcontainsabuttonandaSurfaceView.Thebuttonisusedtostart and stop recordingwhereas theSurfaceView for displayingwhat the camera sees.SurfaceViewwasexplainedindetailinChapter19,“TakingPictures.”
ThelayoutfilefortheactivityisshowninListing20.5andtheactivityclassinListing20.6.
Listing20.5:Thelayoutfile(activity_main.xml)
<LinearLayoutxmlns:android=“http://schemas.android.com/apk/res/android”
android:orientation=“vertical”
android:layout_width=“fill_parent”
android:layout_height=“fill_parent”>
<Button
android:id=”@+id/button1”
android:layout_width=“wrap_content”
android:layout_height=“wrap_content”
android:layout_marginLeft=“33dp”
android:layout_marginTop=“22dp”
android:onClick=“startStopRecording”
android:text=”@string/button_start”/>
<SurfaceView
android:id=”@+id/surfaceView”
android:layout_width=“match_parent”
android:layout_height=“match_parent”/>
</LinearLayout>
Listing20.6:TheMainActivityclass
packagecom.example.videorecorder;
importjava.io.File;
importjava.io.IOException;
importandroid.app.Activity;
importandroid.media.MediaRecorder;
importandroid.os.Bundle;
importandroid.os.Environment;
importandroid.view.SurfaceHolder;
importandroid.view.SurfaceView;
importandroid.view.View;
importandroid.widget.Button;
publicclassMainActivityextendsActivity{
privateMediaRecordermediaRecorder;
privateFileoutputDir;
privatebooleanrecording=false;
@Override
publicvoidonCreate(BundlesavedInstanceState){
super.onCreate(savedInstanceState);
FilemoviesDir=Environment
.getExternalStoragePublicDirectory(
Environment.DIRECTORY_MOVIES);
outputDir=newFile(moviesDir,
“VideoRecorder”);
outputDir.mkdirs();
setContentView(R.layout.activity_main);
}
@Override
protectedvoidonResume(){
super.onResume();
mediaRecorder=newMediaRecorder();
initAndConfigureMediaRecorder();
}
@Override
protectedvoidonPause(){
super.onPause();
if(recording){
try{
mediaRecorder.stop();

}catch(IllegalStateExceptione){
}
}
releaseMediaRecorder();
Buttonbutton=(Button)findViewById(R.id.button1);
button.setText(“Start”);
recording=false;
}
privatevoidreleaseMediaRecorder(){
if(mediaRecorder!=null){
mediaRecorder.reset();
mediaRecorder.release();
mediaRecorder=null;
}
}
privatevoidinitAndConfigureMediaRecorder(){
mediaRecorder.setAudioSource(
MediaRecorder.AudioSource.CAMCORDER);
mediaRecorder
.setVideoSource(MediaRecorder.VideoSource.CAMERA);
mediaRecorder.setOutputFormat(
MediaRecorder.OutputFormat.MPEG_4);
mediaRecorder.setVideoFrameRate(10);//makeitverylow
mediaRecorder.setVideoEncoder(
MediaRecorder.VideoEncoder.MPEG_4_SP);
mediaRecorder.setAudioEncoder(
MediaRecorder.AudioEncoder.AMR_NB);
StringoutputFile=newFile(outputDir,
System.currentTimeMillis()+”.mp4”)
.getAbsolutePath();
mediaRecorder.setOutputFile(outputFile);
SurfaceViewsurfaceView=(SurfaceView)
findViewById(R.id.surfaceView);
SurfaceHoldersurfaceHolder=surfaceView.getHolder();
mediaRecorder.setPreviewDisplay(surfaceHolder
.getSurface());
}
publicvoidstartStopRecording(Viewview){
Buttonbutton=(Button)findViewById(R.id.button1);
if(recording){
button.setText(“Start”);
try{
mediaRecorder.stop();
}catch(IllegalStateExceptione){
}
releaseMediaRecorder();
}else{
button.setText(“Stop”);
if(mediaRecorder==null){
mediaRecorder=newMediaRecorder();
initAndConfigureMediaRecorder();
}
//prepareMediaRecorder
try{
mediaRecorder.prepare();
}catch(IllegalStateExceptione){
e.printStackTrace();
}catch(IOExceptione){
e.printStackTrace();
}
mediaRecorder.start();
}
recording=!recording;
}
}
Let’s start with the onCreate method. It does an important job which is to create adirectoryforallvideoscapturedunderthedefaultdirectoryformoviefiles.
FilemoviesDir=Environment
.getExternalStoragePublicDirectory(
Environment.DIRECTORY_MOVIES);
outputDir=newFile(moviesDir,
“VideoRecorder”);
outputDir.mkdirs();
TheothertwoimportantmethodsareonResumeandonPause.InonResumeyoucreateanew instance of MediaRecorder and initialize and configure it by callinginitAndConfigureMediaRecorder.Whyanewinstanceeverytime?Becauseonceused,aMediaRecordercannotbereused.
In onPause, you stop the MediaRecorder if it is recording and call thereleaseMediaRecordermethodtoreleasetheMediaRecorder.
Now, let’s have a look at the initAndConfigureMediaRecorder andreleaseMediaRecordermethods.
Asthenameimplies,initAndConfigureMediaRecorderinitializesandconfigurestheMediaRecorder created by the onResume method. It calls various methods inMediaRecorder to transition it to the Initialized andDataSourceConfigured states. ItalsopassestheSurfaceoftheSurfaceViewtodisplaywhatthecamerasees.
SurfaceViewsurfaceView=(SurfaceView)
findViewById(R.id.surfaceView);
SurfaceHoldersurfaceHolder=surfaceView.getHolder();
mediaRecorder.setPreviewDisplay(surfaceHolder
.getSurface());
Inthisstate,theMediaRecorderjustwaitsuntiltheuserpressestheStartbutton.Whenithappens, thestartStopRecordingmethod iscalled,which in turncalls theprepareandstartmethodsontheMediaRecorder.ItalsochangestheStartbuttontoaStopbutton.
WhentheuserpressestheStopbutton,theMediaRecorder’sstopmethodiscalledand

theMediaRecorder is released. The Stop button is changed back to a Start button,waitingforanotherturn.
SummaryTwo methods are available if you want to equip your application with video-makingcapability. The first, the easy one, is by creating the default intent and passing it tostartActivityForResult. The second method is to useMediaRecorder directly. Thismethodisharderbutbringswithitthefullfeaturesofthedevicecamera.
Thischaptershowedhowtousebothmethodstomakevideo.
Chapter21TheSoundRecorder
TheAndroidplatformshipswithamultitudeofAPIs,includingoneforrecordingaudioandvideo.InthischapteryoulearnhowtousetheMediaRecorderclasstosamplesoundlevels.ThisisthesameclassyouusedformakingvideosinChapter20,“MakingVideos.”
TheMediaRecorderClassSupportformultimediaisrocksolidinAndroid.Thereareclassesthatyoucanusetoplayaudio and video as well as record them. In the SoundMeter project discussed in thischapter, you will use the MediaRecorder class to sample sound or noiselevels.MediaRecorderisusedtorecordaudioandvideo.Theoutputcanbewrittentoafileandtheinputsourcecanbeeasilyselected.Itisrelativelyeasytousetoo.YoustartbyinstantiatingtheMediaRecorderclass.
MediaRecordermediaRecorder=newMediaRecorder();
Then, configure the instance by calling its setAudioSource, setVideoSource,setOutputFormat, setAudioEncoder, setOutputFile, or other methods. Next, preparetheMediaRecorderbycallingitspreparemethod:
mediaRecorder.prepare();
NotethatpreparemaythrowexceptioniftheMediaRecorderisnotconfiguredpropertyorifyoudonothavetherightpermissions.
Tostartrecording,callitsstartmethod.Tostoprecording,callstop.
Whenyou’redonewithaMediaRecorder,callitsresetmethodtoreturnittoitsinitialstateanditsreleasemethodtoreleaseresourcesitcurrentlyholds.
mediaRecorder.reset();
mediaRecorder.release();
ExampleNowthatyouknowhowtousetheMediaRecorder,let’stakealookattheSoundMeterproject. The application samples sound amplitudes at certain intervals and displays thecurrentlevelasabar.
Asusual,let’sstartbylookingatthemanifest(theAndroidManifest.xmlfile)fortheproject.ItisgiveninListing21.1.
Listing21.1:ThemanifestforSoundMeter
<?xmlversion=“1.0”encoding=“utf-8”?>
<manifestxmlns:android=“http://schemas.android.com/apk/res/android”
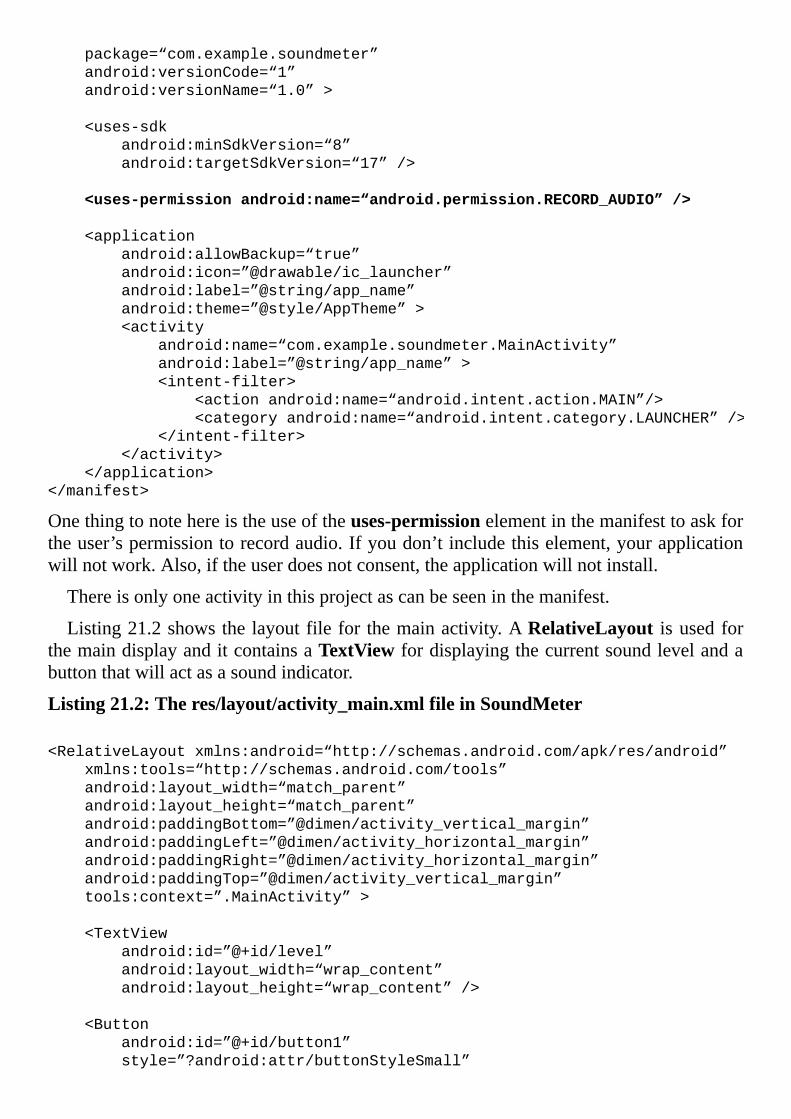
package=“com.example.soundmeter”
android:versionCode=“1”
android:versionName=“1.0”>
<uses-sdk
android:minSdkVersion=“8”
android:targetSdkVersion=“17”/>
<uses-permissionandroid:name=“android.permission.RECORD_AUDIO”/>
<application
android:allowBackup=“true”
android:icon=”@drawable/ic_launcher”
android:label=”@string/app_name”
android:theme=”@style/AppTheme”>
<activity
android:name=“com.example.soundmeter.MainActivity”
android:label=”@string/app_name”>
<intent-filter>
<actionandroid:name=“android.intent.action.MAIN”/>
<categoryandroid:name=“android.intent.category.LAUNCHER”/>
</intent-filter>
</activity>
</application>
</manifest>
Onethingtonotehereistheuseoftheuses-permissionelementinthemanifesttoaskfortheuser’spermissiontorecordaudio.Ifyoudon’tincludethiselement,yourapplicationwillnotwork.Also,iftheuserdoesnotconsent,theapplicationwillnotinstall.
Thereisonlyoneactivityinthisprojectascanbeseeninthemanifest.
Listing21.2showsthelayoutfileforthemainactivity.ARelativeLayout isusedforthemaindisplayanditcontainsaTextViewfordisplayingthecurrentsoundlevelandabuttonthatwillactasasoundindicator.
Listing21.2:Theres/layout/activity_main.xmlfileinSoundMeter
<RelativeLayoutxmlns:android=“http://schemas.android.com/apk/res/android”
xmlns:tools=“http://schemas.android.com/tools”
android:layout_width=“match_parent”
android:layout_height=“match_parent”
android:paddingBottom=”@dimen/activity_vertical_margin”
android:paddingLeft=”@dimen/activity_horizontal_margin”
android:paddingRight=”@dimen/activity_horizontal_margin”
android:paddingTop=”@dimen/activity_vertical_margin”
tools:context=”.MainActivity”>
<TextView
android:id=”@+id/level”
android:layout_width=“wrap_content”
android:layout_height=“wrap_content”/>
<Button
android:id=”@+id/button1”
style=”?android:attr/buttonStyleSmall”
android:layout_width=“wrap_content”
android:layout_height=“wrap_content”
android:layout_alignLeft=”@+id/level”
android:layout_below=”@+id/level”
android:background=”#ff0000”
android:layout_marginTop=“30dp”/>
</RelativeLayout>
There are two Java classes in this application.The first one, given inListing21.3, is aclasscalledSoundMeterthatencapsulatesaMediaRecorderandexposesthreemethodstomanageit.Thefirstmethod,start,createsaninstanceofMediaRecorder,configuresit, andstarts it.Thesecondmethod,stop, stops theMediaRecorder.The thirdmethod,getAmplitude,returnsadoubleindicatingthesampledsoundlevel.
Listing21.3:TheSoundMeterclass
packagecom.example.soundmeter;
importjava.io.IOException;
importandroid.media.MediaRecorder;
publicclassSoundMeter{
privateMediaRecordermediaRecorder;
booleanstarted=false;
publicvoidstart(){
if(started){
return;
}
if(mediaRecorder==null){
mediaRecorder=newMediaRecorder();
mediaRecorder.setAudioSource(
MediaRecorder.AudioSource.MIC);
mediaRecorder.setOutputFormat(
MediaRecorder.OutputFormat.THREE_GPP);
mediaRecorder.setAudioEncoder(
MediaRecorder.AudioEncoder.AMR_NB);
mediaRecorder.setOutputFile(“/dev/null”);
try{
mediaRecorder.prepare();
}catch(IllegalStateExceptione){
e.printStackTrace();
}catch(IOExceptione){
e.printStackTrace();
}
mediaRecorder.start();
started=true;
}
}
publicvoidstop(){
if(mediaRecorder!=null){
mediaRecorder.stop();
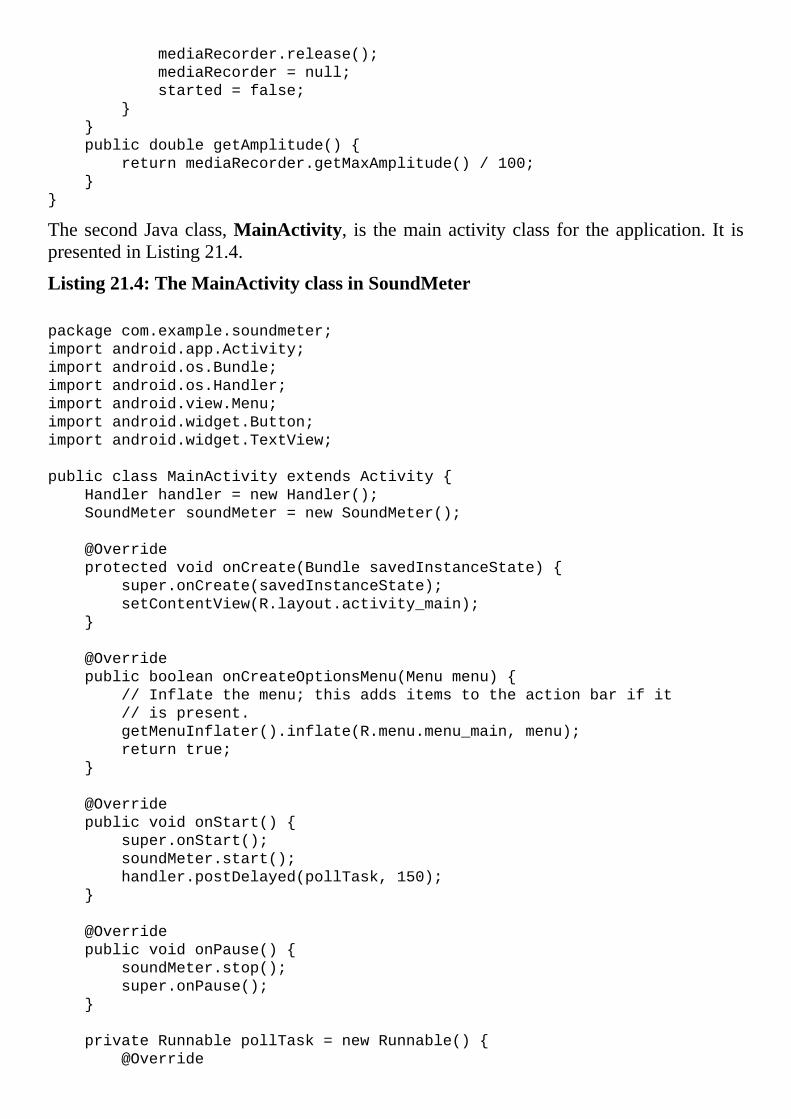
mediaRecorder.release();
mediaRecorder=null;
started=false;
}
}
publicdoublegetAmplitude(){
returnmediaRecorder.getMaxAmplitude()/100;
}
}
ThesecondJavaclass,MainActivity, is themainactivityclass for theapplication. It ispresentedinListing21.4.
Listing21.4:TheMainActivityclassinSoundMeter
packagecom.example.soundmeter;
importandroid.app.Activity;
importandroid.os.Bundle;
importandroid.os.Handler;
importandroid.view.Menu;
importandroid.widget.Button;
importandroid.widget.TextView;
publicclassMainActivityextendsActivity{
Handlerhandler=newHandler();
SoundMetersoundMeter=newSoundMeter();
@Override
protectedvoidonCreate(BundlesavedInstanceState){
super.onCreate(savedInstanceState);
setContentView(R.layout.activity_main);
}
@Override
publicbooleanonCreateOptionsMenu(Menumenu){
//Inflatethemenu;thisaddsitemstotheactionbarifit
//ispresent.
getMenuInflater().inflate(R.menu.menu_main,menu);
returntrue;
}
@Override
publicvoidonStart(){
super.onStart();
soundMeter.start();
handler.postDelayed(pollTask,150);
}
@Override
publicvoidonPause(){
soundMeter.stop();
super.onPause();
}
privateRunnablepollTask=newRunnable(){
@Override
publicvoidrun(){
doubleamplitude=soundMeter.getAmplitude();
TextViewtextView=(TextView)findViewById(R.id.level);
textView.setText(“amp:”+amplitude);
Buttonbutton=(Button)findViewById(R.id.button1);
button.setWidth((int)amplitude*10);
handler.postDelayed(pollTask,150);
}
};
}
TheMainActivityclassoverrides twoactivity lifecyclemethods,onStartandonPause.YoumayrecallthatthesystemcallsonStartrightafteranactivitywascreatedorafteritwas restarted.The systemcallsonPausewhen the activitywas paused because anotheractivitywasstartedorbecauseanimportanteventoccurred.IntheMainActivityclass,theonStart method starts the SoundMeter and the onPause method stops it. TheMainActivity class also uses a Handler to sample the sound level every 150milliseconds.
Figure 21.1 shows the application. The horizontal bar shows the current soundamplitude.
Figure21.1:TheSoundMeterapplication

SummaryIn this chapter you learned to use theMediaRecorder class to record audio. You alsocreatedanapplicationforsamplingnoiselevels.
Chapter22HandlingtheHandler
Oneof themost interestinganduseful types in theAndroidSDK is theHandler class.Mostofthetime,itisusedtoprocessmessagesandscheduleatasktorunatafuturetime.
Thischapterexplainswhattheclassisgoodforandoffersexamples.
OverviewThe android.os.Handler class is an exciting utility class that, among others, can bescheduleddoexecuteaRunnableatafuturetime.AnytaskassignedtoaHandlerwillrunontheHandler’sthread.Inturn,theHandlerrunsonthethreadthatcreatedit,whichinmostcaseswouldbe theUI thread.Assuch,youshouldnotschedulea long-runningtaskwithaHandlerbecauseitwouldmakeyourapplicationfreeze.However,youcanuseaHandler to handle a long-running task if you canbe split the task into smaller parts,whichyoulearnhowtoachieveinthissection.
To schedule a task to run at a future time, call theHandler class’spostDelayed orpostAtTimemethod.
publicfinalbooleanpostDelayed(Runnabletask,longx)
public final boolean postAtTime(Runnable task, long time)postDelayed runs a task xmillisecondsafterthemethodiscalled.Forexample,ifyouwantaRunnabletostartfivesecondsfromnow,usethiscode.
Handlerhandler=newHandler();
handler.postDelayed(runnable, 5000);postAtTime runs a task at a certain time in thefuture.Forexample,ifyouwantatasktorunsixsecondslater,writethis.
Handlerhandler=newHandler();
handler.postAtTime(runnable,6000+System.currentTimeMillis());
ExampleAs an example, consider theHandlerDemo project that usesHandler to animate anImageView. The animation performed is simple: show an image for 400milliseconds,thenhide it for400milliseconds, and repeat this five times.Theentire taskwould takeaboutfoursecondsifalltheworkisdoneinaforloopthatsleepsfor400millisecondsateachiteration.UsingtheHandler,however,youcansplit this into10smallerparts thateachtakeslessthanonemillisecond(theexacttimewoulddependonthedevicerunningit).TheUI thread is releasedduringeach400mswait so that itcancater for somethingelse.
Note
Android offers animation APIs that you should use for all animation tasks. ThisexampleusesHandlertoanimateacontrolsimplytoillustratetheuseofHandler.
Listing22.1showsthemanifest(theAndroidManifest.xmlfile)fortheproject.
Listing22.1:ThemanifestforHandlerDemo
<?xmlversion=“1.0”encoding=“utf-8”?>
<manifestxmlns:android=“http://schemas.android.com/apk/res/android”
package=“com.example.handlerdemo”
android:versionCode=“1”
android:versionName=“1.0”>
<uses-sdk
android:minSdkVersion=“8”
android:targetSdkVersion=“17”/>
<application
android:allowBackup=“true”
android:icon=”@drawable/ic_launcher”
android:label=”@string/app_name”
android:theme=”@style/AppTheme”>
<activity
android:name=”.MainActivity”
android:label=”@string/app_name”>
<intent-filter>
<actionandroid:name=“android.intent.action.MAIN”/>
<category
android:name=“android.intent.category.LAUNCHER”/>
</intent-filter>
</activity>
</application>
</manifest>
Nothing spectacular in the manifest. It shows that there is one activity namedMainActivity.ThelayoutfilefortheactivityisgiveninListing22.2.
Listing22.2:Theres/layout/activity_main.xmlfileinHandlerTest
<RelativeLayoutxmlns:android=“http://schemas.android.com/apk/res/android”
xmlns:tools=“http://schemas.android.com/tools”
android:layout_width=“match_parent”
android:layout_height=“match_parent”
android:paddingBottom=”@dimen/activity_vertical_margin”
android:paddingLeft=”@dimen/activity_horizontal_margin”
android:paddingRight=”@dimen/activity_horizontal_margin”
android:paddingTop=”@dimen/activity_vertical_margin”
tools:context=”.MainActivity”>
<ImageView
android:id=”@+id/imageView1”
android:layout_width=“wrap_content”
android:layout_height=“wrap_content”
android:layout_alignParentLeft=“true”
android:layout_alignParentTop=“true”
android:layout_marginLeft=“51dp”
android:layout_marginTop=“58dp”
android:src=”@drawable/surprise”/>
<Button
android:id=”@+id/button1”
style=”?android:attr/buttonStyleSmall”
android:layout_width=“wrap_content”
android:layout_height=“wrap_content”
android:layout_alignRight=”@+id/imageView1”
android:layout_below=”@+id/imageView1”
android:layout_marginRight=“18dp”
android:layout_marginTop=“65dp”
android:onClick=“buttonClicked”
android:text=“Button”/>
</RelativeLayout>
ThemainlayoutforMainActivityisaRelativeLayoutthatcontainsanImageViewtobeanimatedandabuttontostartanimation.
Now look at theMainActivity class in Listing 22.3. This is the main core of theapplication.
Listing22.3:TheMainActivityclassinHandlerDemo
packagecom.example.handlerdemo;
importandroid.app.Activity;
importandroid.os.Bundle;
importandroid.os.Handler;
importandroid.view.Menu;
importandroid.view.View;
importandroid.widget.ImageView;
publicclassMainActivityextendsActivity{
intcounter=0;
Handlerhandler=newHandler();
@Override
protectedvoidonCreate(BundlesavedInstanceState){
super.onCreate(savedInstanceState);
setContentView(R.layout.activity_main);
getUserAttention();
}
@Override
publicbooleanonCreateOptionsMenu(Menumenu){
//Inflatethemenu;thisaddsitemstotheactionbarifit
//ispresent.
getMenuInflater().inflate(R.menu.menu_main,menu);
returntrue;
}
publicvoidbuttonClicked(Viewview){
counter=0;
getUserAttention();
}
privatevoidgetUserAttention(){
handler.post(task);
}
Runnabletask=newRunnable(){
@Override
publicvoidrun(){
ImageViewimageView=(ImageView)
findViewById(R.id.imageView1);
if(counter%2==0){
imageView.setVisibility(View.INVISIBLE);
}else{
imageView.setVisibility(View.VISIBLE);
}
counter++;
if(counter<8){
handler.postDelayed(this,400);
}
}
};
}
ThebrainofthisactivityareaRunnablecalledtask,whichanimatestheImageView,andthe getUserAttention method that calls the postDelayed method on aHandler. TheRunnable sets theImageView’svisibility toVisibleorInvisibledependingonwhetherthevalueofthecountervariableisoddoreven.
IfyouruntheHandlerDemoproject,you’llseesomethingsimilartothescreenshotinFigure 22.1. Note how the ImageView flashes to get your attention. Try clicking thebuttonseveraltimesquicklytomaketheimageflashfaster.Canyouexplainwhyitgoesfasterasyouclick?
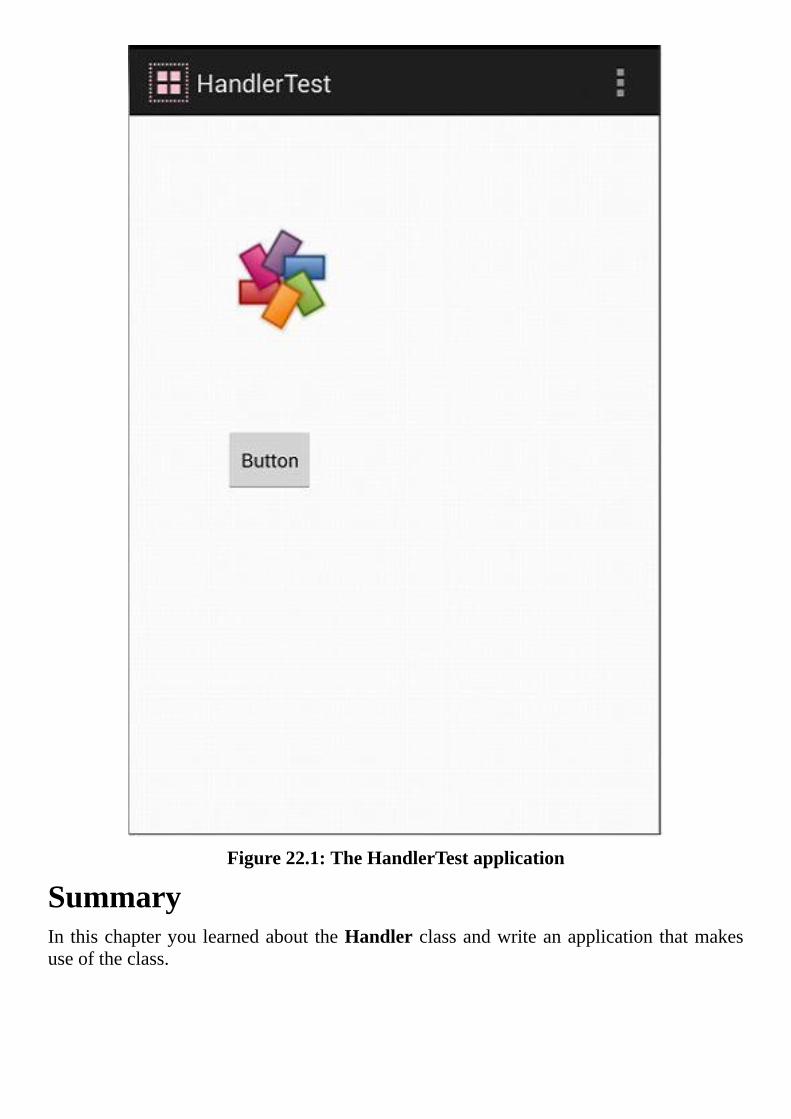
Figure22.1:TheHandlerTestapplication
SummaryIn thischapteryoulearnedabout theHandlerclassandwriteanapplicationthatmakesuseoftheclass.
Chapter23AsynchronousTasks
Thischapter talksaboutasynchronous tasksandexplainshow tohandle themusing theAsyncTaskclass.Italsopresentsaphotoeditorapplicationthatillustrateshowthisclassshouldbeused.
OverviewTheandroid.os.AsyncTaskclassisautilityclassthatmakesiteasytohandlebackgroundprocesses and publish progress updates on theUI thread. This class ismeant for shortoperationsthatlastatmostafewseconds.Forlong-runningbackgroundtasks,youshouldusetheJavaConcurrencyUtilitiesframework.
The AsyncTask class comes with a set of public methods and a set of protectedmethods. The public methods are for executing and canceling its task. The executemethodstartsanasynchronousoperationandcancelcancelsit.Theprotectedmethodsareforyou tooverride ina subclass.ThedoInBackgroundmethod,aprotectedmethod, isthe most important method in this class and provides the logic for the asynchronousoperation.
There is alsoapublishProgressmethod, also a protectedmethod,which is normallycalledmultipletimesfromdoInBackground.Typically,youwillwritecode toupdateaprogressbarorsomeotherUIcomponenthere.
Then thereare twoonCancelledmethods foryou towritewhat shouldhappen if theoperationwascanceled(i.e.iftheAsyncTask’scancelmethodwascalled).
ExampleAs an example, the PhotoEditor application that accompanies this book uses theAsyncTaskclasstoperformimageoperationsthateachtakesafewseconds.AsyncTaskis used so as not to jam the UI thread. Two image operations, invert and blur, aresupported.
Theapplicationmanifest(theAndroidManifest.xmlfile)isprintedinListing23.1.
Listing23.1:ThemanifestforPhotoEditor
<?xmlversion=“1.0”encoding=“utf-8”?>
<manifestxmlns:android=“http://schemas.android.com/apk/res/android”
package=“com.example.photoeditor”
android:versionCode=“1”
android:versionName=“1.0”>
<uses-sdk
android:minSdkVersion=“8”
android:targetSdkVersion=“17”/>
<application
android:allowBackup=“true”
android:icon=”@drawable/ic_launcher”
android:label=”@string/app_name”
android:theme=”@style/AppTheme”>
<activity
android:name=“com.example.photoeditor.MainActivity”
android:label=”@string/app_name”>
<intent-filter>
<actionandroid:name=“android.intent.action.MAIN”/>
<categoryandroid:name=“android.intent.category.LAUNCHER”/>
</intent-filter>
</activity>
</application>
</manifest>
The layout file, printed in Listing 23.2, shows that the application uses a verticalLinearLayout tohouseanImageView,aProgressBar, and twobuttons.The latter arecontainedinahorizontalLinearLayout.Thefirstbuttonisusedtostartthebluroperationandthesecondtostarttheinvertoperation.
Listing23.2:Theres/layout/activity_main.xmlfileinPhotoEditor
<LinearLayoutxmlns:android=“http://schemas.android.com/apk/res/android”
xmlns:tools=“http://schemas.android.com/tools”
android:layout_width=“fill_parent”
android:layout_height=“fill_parent”
android:orientation=“vertical”
android:paddingLeft=“16dp”
android:paddingRight=“16dp”>
<LinearLayout
android:layout_height=“wrap_content”
android:layout_width=“fill_parent”
android:orientation=“horizontal”>
<Button
android:id=”@+id/blurButton”
android:layout_width=“wrap_content”
android:layout_height=“wrap_content”
android:onClick=“doBlur”
android:text=”@string/blur_button_text”/>
<Button
android:id=”@+id/button2”
android:layout_width=“wrap_content”
android:layout_height=“wrap_content”
android:onClick=“doInvert”
android:text=”@string/invert_button_text”/>
</LinearLayout>
<ProgressBar
android:id=”@+id/progressBar1”
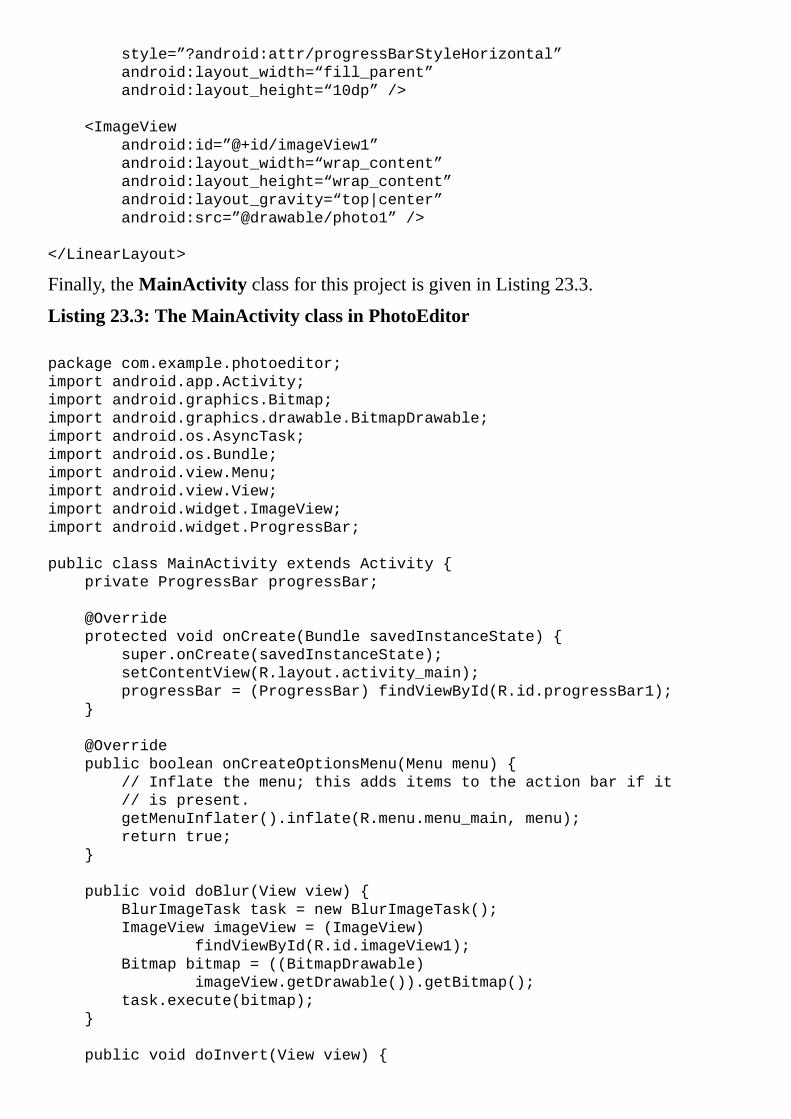
style=”?android:attr/progressBarStyleHorizontal”
android:layout_width=“fill_parent”
android:layout_height=“10dp”/>
<ImageView
android:id=”@+id/imageView1”
android:layout_width=“wrap_content”
android:layout_height=“wrap_content”
android:layout_gravity=“top|center”
android:src=”@drawable/photo1”/>
</LinearLayout>
Finally,theMainActivityclassforthisprojectisgiveninListing23.3.
Listing23.3:TheMainActivityclassinPhotoEditor
packagecom.example.photoeditor;
importandroid.app.Activity;
importandroid.graphics.Bitmap;
importandroid.graphics.drawable.BitmapDrawable;
importandroid.os.AsyncTask;
importandroid.os.Bundle;
importandroid.view.Menu;
importandroid.view.View;
importandroid.widget.ImageView;
importandroid.widget.ProgressBar;
publicclassMainActivityextendsActivity{
privateProgressBarprogressBar;
@Override
protectedvoidonCreate(BundlesavedInstanceState){
super.onCreate(savedInstanceState);
setContentView(R.layout.activity_main);
progressBar=(ProgressBar)findViewById(R.id.progressBar1);
}
@Override
publicbooleanonCreateOptionsMenu(Menumenu){
//Inflatethemenu;thisaddsitemstotheactionbarifit
//ispresent.
getMenuInflater().inflate(R.menu.menu_main,menu);
returntrue;
}
publicvoiddoBlur(Viewview){
BlurImageTasktask=newBlurImageTask();
ImageViewimageView=(ImageView)
findViewById(R.id.imageView1);
Bitmapbitmap=((BitmapDrawable)
imageView.getDrawable()).getBitmap();
task.execute(bitmap);
}
publicvoiddoInvert(Viewview){
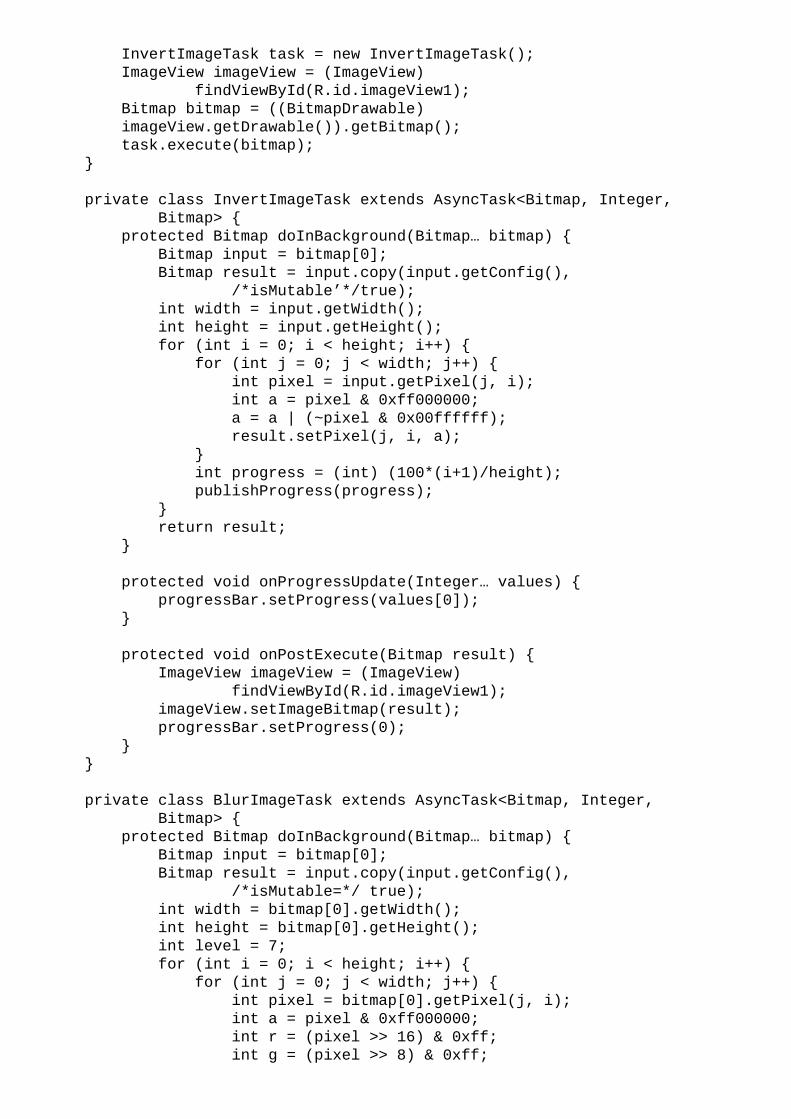
InvertImageTasktask=newInvertImageTask();
ImageViewimageView=(ImageView)
findViewById(R.id.imageView1);
Bitmapbitmap=((BitmapDrawable)
imageView.getDrawable()).getBitmap();
task.execute(bitmap);
}
privateclassInvertImageTaskextendsAsyncTask<Bitmap,Integer,
Bitmap>{
protectedBitmapdoInBackground(Bitmap…bitmap){
Bitmapinput=bitmap[0];
Bitmapresult=input.copy(input.getConfig(),
/*isMutable’*/true);
intwidth=input.getWidth();
intheight=input.getHeight();
for(inti=0;i<height;i++){
for(intj=0;j<width;j++){
intpixel=input.getPixel(j,i);
inta=pixel&0xff000000;
a=a|(~pixel&0x00ffffff);
result.setPixel(j,i,a);
}
intprogress=(int)(100*(i+1)/height);
publishProgress(progress);
}
returnresult;
}
protectedvoidonProgressUpdate(Integer…values){
progressBar.setProgress(values[0]);
}
protectedvoidonPostExecute(Bitmapresult){
ImageViewimageView=(ImageView)
findViewById(R.id.imageView1);
imageView.setImageBitmap(result);
progressBar.setProgress(0);
}
}
privateclassBlurImageTaskextendsAsyncTask<Bitmap,Integer,
Bitmap>{
protectedBitmapdoInBackground(Bitmap…bitmap){
Bitmapinput=bitmap[0];
Bitmapresult=input.copy(input.getConfig(),
/*isMutable=*/true);
intwidth=bitmap[0].getWidth();
intheight=bitmap[0].getHeight();
intlevel=7;
for(inti=0;i<height;i++){
for(intj=0;j<width;j++){
intpixel=bitmap[0].getPixel(j,i);
inta=pixel&0xff000000;
intr=(pixel>>16)&0xff;
intg=(pixel>>8)&0xff;
intb=pixel&0xff;
r=(r+level)/2;
g=(g+level)/2;
b=(b+level)/2;
intgray=a|(r<<16)|(g<<8)|b;
result.setPixel(j,i,gray);
}
intprogress=(int)(100*(i+1)/height);
publishProgress(progress);
}
returnresult;
}
protectedvoidonProgressUpdate(Integer…values){
progressBar.setProgress(values[0]);
}
protectedvoidonPostExecute(Bitmapresult){
ImageViewimageView=(ImageView)
findViewById(R.id.imageView1);
imageView.setImageBitmap(result);
progressBar.setProgress(0);
}
}
}
The MainActivity class contains two private classes, InvertImageTask andBlurImageTask,whichextendAsyncTask.TheInvertImageTasktaskisexecutedwhentheInvertbuttonisclickedandtheBlurImageTaskwhentheBlurbuttonisclicked.
ThedoInBackgroundmethod ineach taskprocesses theImageViewbitmap inaforloop.AteachiterationitcallsthepublishProgressmethodtoupdatetheprogressbar.
Figure23.1showstheinitialbitmapandFigure23.2showsthebitmapafteraninvertoperation.

Figure23.1:TheImageEditorapplication
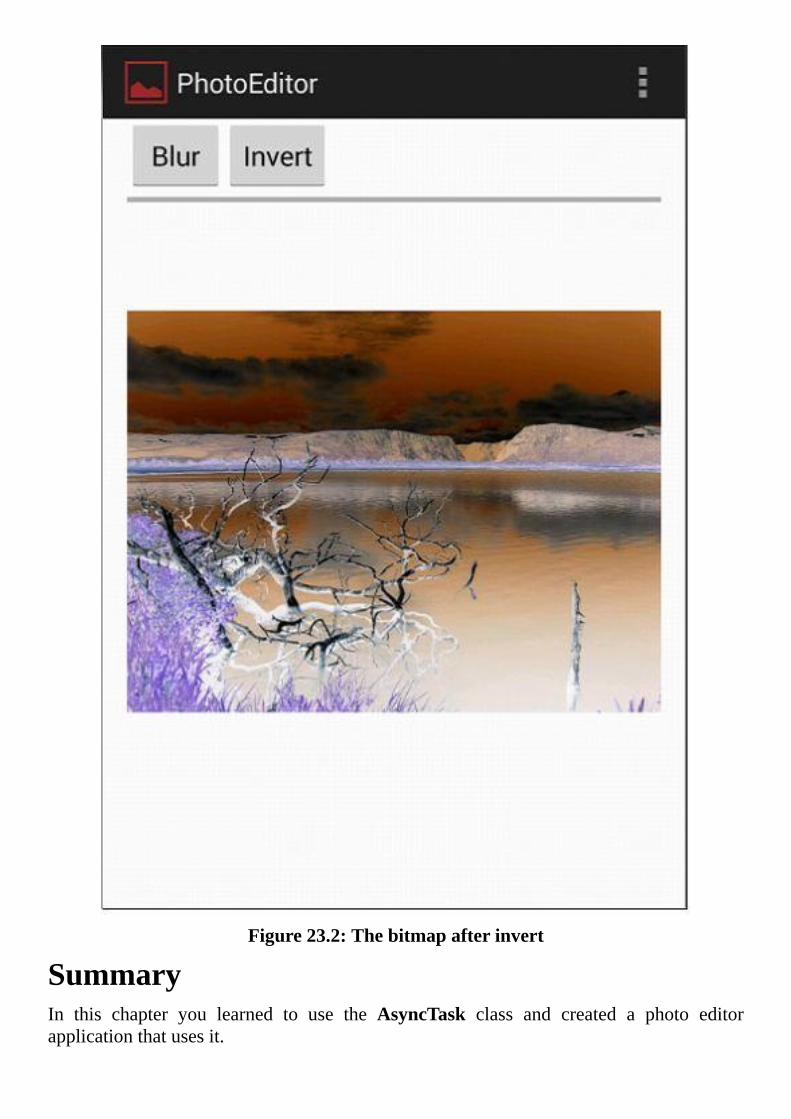
Figure23.2:Thebitmapafterinvert
SummaryIn this chapter you learned to use the AsyncTask class and created a photo editorapplicationthatusesit.
Chapter24Services
Sofarinthisbook,everythingyouhavelearnedisrelatedtoactivities.ItisnowtimetopresentanotherAndroidcomponent,theservice.Aservicehasnouserinterfaceandrunsinthebackground.Itissuitableforlong-runningoperations.Thischapterexplainshowtocreateaserviceandprovidesanexample.
OverviewAsalreadymentioned,aserviceisacomponentthatperformalongrunningoperationinthebackground.Aservicewillcontinuetorunevenaftertheapplicationthatstartedithasbeenstopped.Aservicerunsonthesameprocessastheapplicationinwhichtheserviceisdeclaredand in theapplication’smain thread.Assuch, if a service takesa long time tocomplete, it should runon a separate thread.Thegood thing is, running a service on aseparatethreadiseasyifyouextendacertainclassintheServiceAPI.
Aservicecantakeoneoftwoforms.Itcanbestartedorbound.Aserviceisstartedifanother component starts it. It can run in the background indefinitely even after thecomponent that started it is no longer in service or destroyed.A service is bound if anapplication component binds to it.A bound service acts like a server in a client-serverrelationship, taking requests fromotherapplicationcomponentsand returning results.Aservicecanalsobestartedandbound.
Intermsofaccessibility,aservicecanbemadeprivateorpublic.Apublicservicecanbeinvokedbyanyapplication.Aprivateservice,ontheotherhand,canonlybeinvokedbyacomponentinthesameapplicationinwhichtheserviceisdeclared.
TheServiceAPITocreateaserviceyoumustwriteaclassthatextendsandroid.app.Serviceoritssubclassandroid.app.IntentService.SubclassingIntentService is easier because it requires youtooverridefewermethods.However,extendingServiceallowsyoumorecontrol.
IfyoudecidetosubclassService,youmayneedtooverridethecallbackmethodsinit.ThesemethodsarelistedinTable24.1.
Method
Description
onStartCommand
Thismethodiscalledwhenanotherapplicationcomponentcallstheservice’sstartServicetostartit.
onBind Thismethodisinvokedwhenanotherapplicationcomponentcallestheservice’sbindServicetobindwithit.
onCreate
Thismethodisinvokedwhentheserviceisfirstcreated.
onDestroy
Thismethodisinvokedwhentheserviceisbeingdestroyed.
Table24.1:TheServiceclass’scallbackmethods
IfyouextendIntentService, youhave tooverride its abstractmethodonHandleIntent.Hereisthesignatureofthismethod.
protectedabstractvoidonHandleIntent(
android.content.Intentintent)
TheimplementationofonHandleIntentshouldcontaincodethatneedstobeexecutedbytheservice.AlsonotethatonHandleIntentisalwaysrunonaseparateworkerthread.
DeclaringAServiceA service must be declared in the manifest using the service element under<application>.TheattributesthatmayappearintheserviceelementareshowninTable24.2.
Attribute
Description
enabled
Indicateswhethertheserviceshouldbeenabled.Thevalueiseithertrue(default)orfalse.
exported
Acceptsavalueoftrueorfalsetoindicatewhetherornottheservicecanbestartedorinvokedfromotherapplications.
icon
Aniconrepresentingthisservice.
isolatedProcess
Acceptsavalueoftrueorfalseindicatingwhethertheserviceshouldberunasaseparateprocess.
label
Alabelforthisservice.
name
Thefully-qualifiednameoftheserviceclass.
permission
Thenameofapermissionthatthatanentitymusthaveinordertolaunchtheserviceorbindtoit.
process
Thenameoftheprocesswheretheserviceistorun.
Table24.2:Theattributesoftheserviceelement
For example, here is the declaration of a service element that can be invoked by otherapplications.
<application>
…
<serviceandroid:name=“com.example.MyService”
android:exported=“true”/>
</application>
AServiceExampleThisexampleisanAndroidapplicationthatletsyoudownloadwebpagesandstorethemforofflineviewingwhenyouhavenoInternetaccess.
Thereare twoactivitiesandoneservice. In themainactivity (shown inFigure24.1),youcanenterURLsofthewebsiteswhosecontentsyouwanttostoreinyourdevice.Justtype aURL in each line and click theFETCHWEBPAGES button to start theURLService.
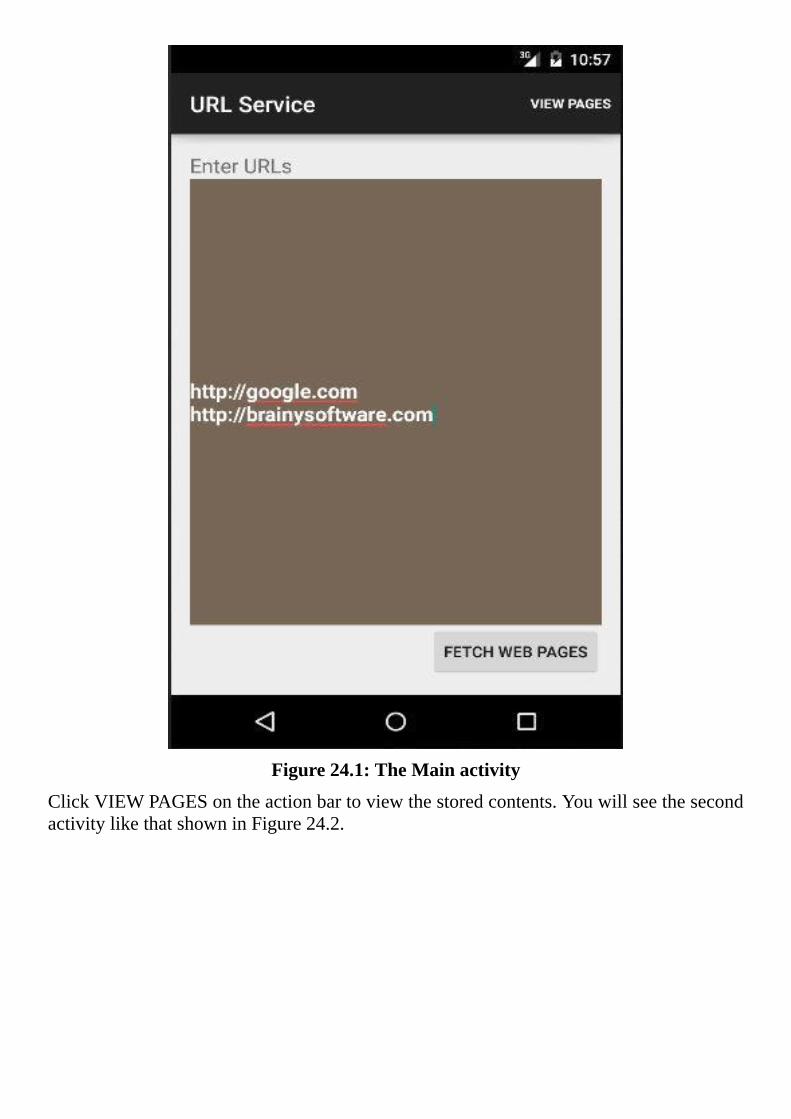
Figure24.1:TheMainactivity
ClickVIEWPAGESontheactionbartoviewthestoredcontents.YouwillseethesecondactivitylikethatshowninFigure24.2.
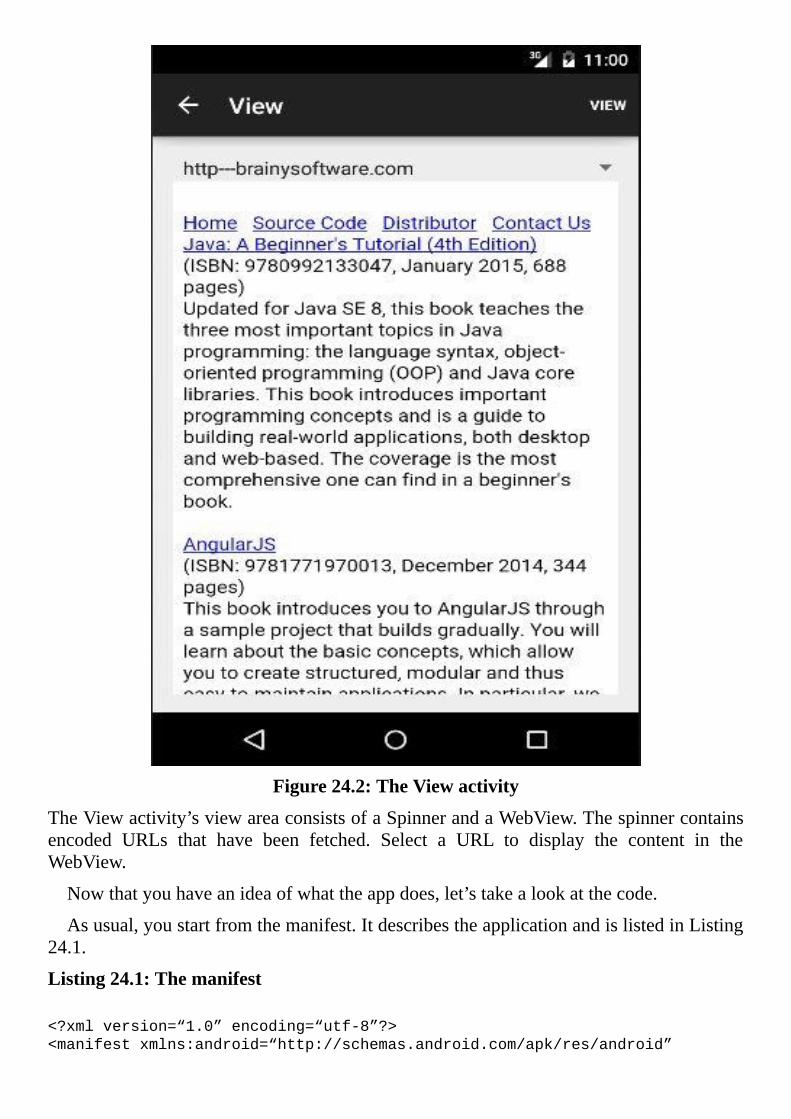
Figure24.2:TheViewactivity
TheViewactivity’sviewareaconsistsofaSpinnerandaWebView.Thespinnercontainsencoded URLs that have been fetched. Select a URL to display the content in theWebView.
Nowthatyouhaveanideaofwhattheappdoes,let’stakealookatthecode.
Asusual,youstartfromthemanifest.ItdescribestheapplicationandislistedinListing24.1.
Listing24.1:Themanifest
<?xmlversion=“1.0”encoding=“utf-8”?>
<manifestxmlns:android=“http://schemas.android.com/apk/res/android”
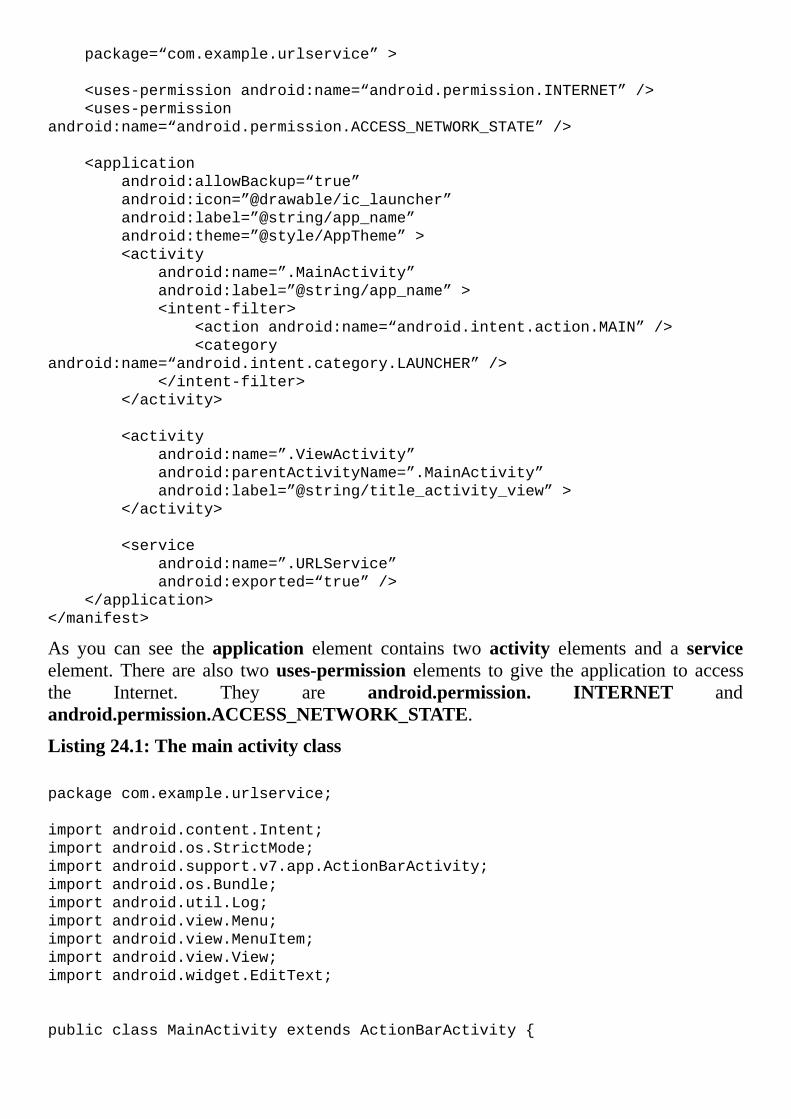
package=“com.example.urlservice”>
<uses-permissionandroid:name=“android.permission.INTERNET”/>
<uses-permission
android:name=“android.permission.ACCESS_NETWORK_STATE”/>
<application
android:allowBackup=“true”
android:icon=”@drawable/ic_launcher”
android:label=”@string/app_name”
android:theme=”@style/AppTheme”>
<activity
android:name=”.MainActivity”
android:label=”@string/app_name”>
<intent-filter>
<actionandroid:name=“android.intent.action.MAIN”/>
<category
android:name=“android.intent.category.LAUNCHER”/>
</intent-filter>
</activity>
<activity
android:name=”.ViewActivity”
android:parentActivityName=”.MainActivity”
android:label=”@string/title_activity_view”>
</activity>
<service
android:name=”.URLService”
android:exported=“true”/>
</application>
</manifest>
As you can see the application element contains two activity elements and a serviceelement.There are also twouses-permission elements togive the application to accessthe Internet. They are android.permission. INTERNET andandroid.permission.ACCESS_NETWORK_STATE.
Listing24.1:Themainactivityclass
packagecom.example.urlservice;
importandroid.content.Intent;
importandroid.os.StrictMode;
importandroid.support.v7.app.ActionBarActivity;
importandroid.os.Bundle;
importandroid.util.Log;
importandroid.view.Menu;
importandroid.view.MenuItem;
importandroid.view.View;
importandroid.widget.EditText;
publicclassMainActivityextendsActionBarActivity{
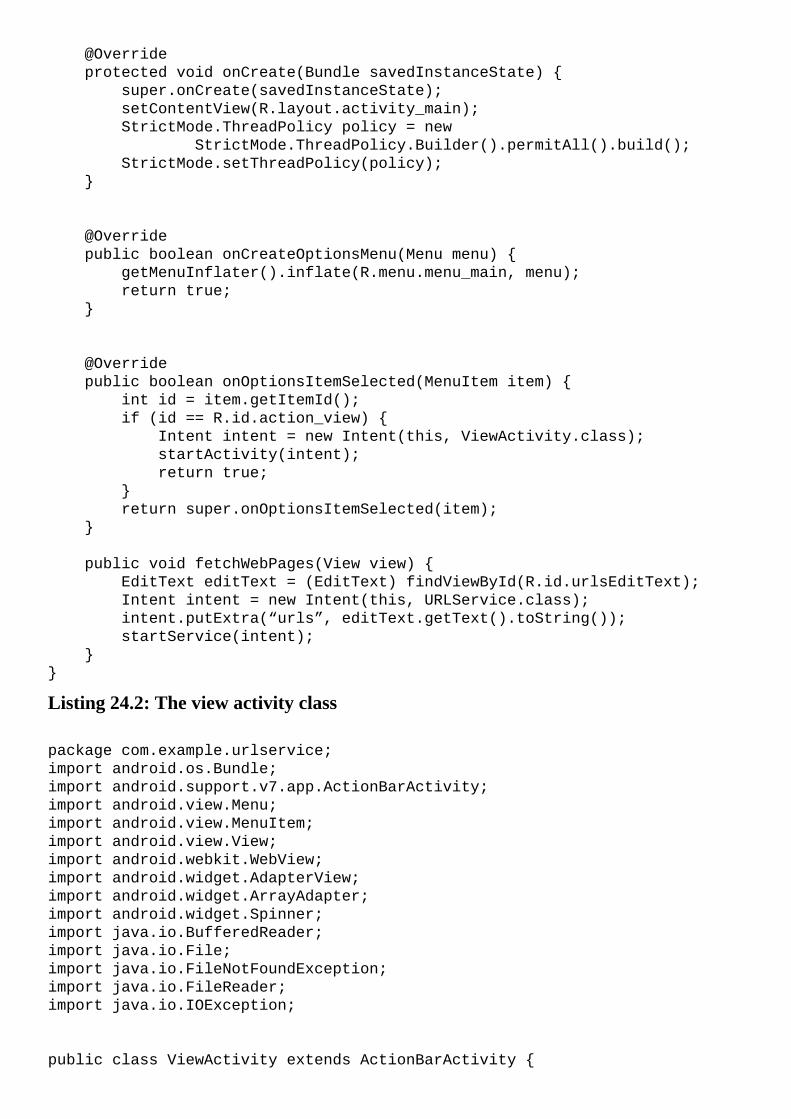
@Override
protectedvoidonCreate(BundlesavedInstanceState){
super.onCreate(savedInstanceState);
setContentView(R.layout.activity_main);
StrictMode.ThreadPolicypolicy=new
StrictMode.ThreadPolicy.Builder().permitAll().build();
StrictMode.setThreadPolicy(policy);
}
@Override
publicbooleanonCreateOptionsMenu(Menumenu){
getMenuInflater().inflate(R.menu.menu_main,menu);
returntrue;
}
@Override
publicbooleanonOptionsItemSelected(MenuItemitem){
intid=item.getItemId();
if(id==R.id.action_view){
Intentintent=newIntent(this,ViewActivity.class);
startActivity(intent);
returntrue;
}
returnsuper.onOptionsItemSelected(item);
}
publicvoidfetchWebPages(Viewview){
EditTexteditText=(EditText)findViewById(R.id.urlsEditText);
Intentintent=newIntent(this,URLService.class);
intent.putExtra(“urls”,editText.getText().toString());
startService(intent);
}
}
Listing24.2:Theviewactivityclass
packagecom.example.urlservice;
importandroid.os.Bundle;
importandroid.support.v7.app.ActionBarActivity;
importandroid.view.Menu;
importandroid.view.MenuItem;
importandroid.view.View;
importandroid.webkit.WebView;
importandroid.widget.AdapterView;
importandroid.widget.ArrayAdapter;
importandroid.widget.Spinner;
importjava.io.BufferedReader;
importjava.io.File;
importjava.io.FileNotFoundException;
importjava.io.FileReader;
importjava.io.IOException;
publicclassViewActivityextendsActionBarActivity{

@Override
protectedvoidonCreate(BundlesavedInstanceState){
super.onCreate(savedInstanceState);
setContentView(R.layout.activity_view);
Spinnerspinner=(Spinner)findViewById(R.id.spinner);
FilesaveDir=getFilesDir();
if(saveDir.exists()){
Filedir=newFile(saveDir,“URLService”);
dir=saveDir;
if(dir.exists()){
String[]files=dir.list();
ArrayAdapter<String>dataAdapter=
newArrayAdapter<String>(this,
android.R.layout.simple_spinner_item,files);
dataAdapter.setDropDownViewResource(
android.R.layout.simple_spinner_dropdown_item);
spinner.setAdapter(dataAdapter);
spinner.setOnItemSelectedListener(
newAdapterView.OnItemSelectedListener(){
@Override
publicvoidonItemSelected(AdapterView<?>
adapterView,Viewview,intpos,
longid){
//openfile
ObjectitemAtPosition=adapterView
.getItemAtPosition(pos);
Filefile=newFile(getFilesDir(),
itemAtPosition.toString());
FileReaderfileReader=null;
BufferedReaderbufferedReader=null;
try{
fileReader=newFileReader(file);
bufferedReader=
newBufferedReader(fileReader);
StringBuildersb=newStringBuilder();
Stringline=bufferedReader.readLine();
while(line!=null){
sb.append(line);
line=bufferedReader.readLine();
}
WebViewwebView=(WebView)
findViewById(R.id.webview);
webView.loadData(sb.toString(),
“text/html”,“utf-8”);
}catch(FileNotFoundExceptione){
}catch(IOExceptione){
}
}
@Override
publicvoidonNothingSelected(AdapterView<?>
adapterView){
}
});
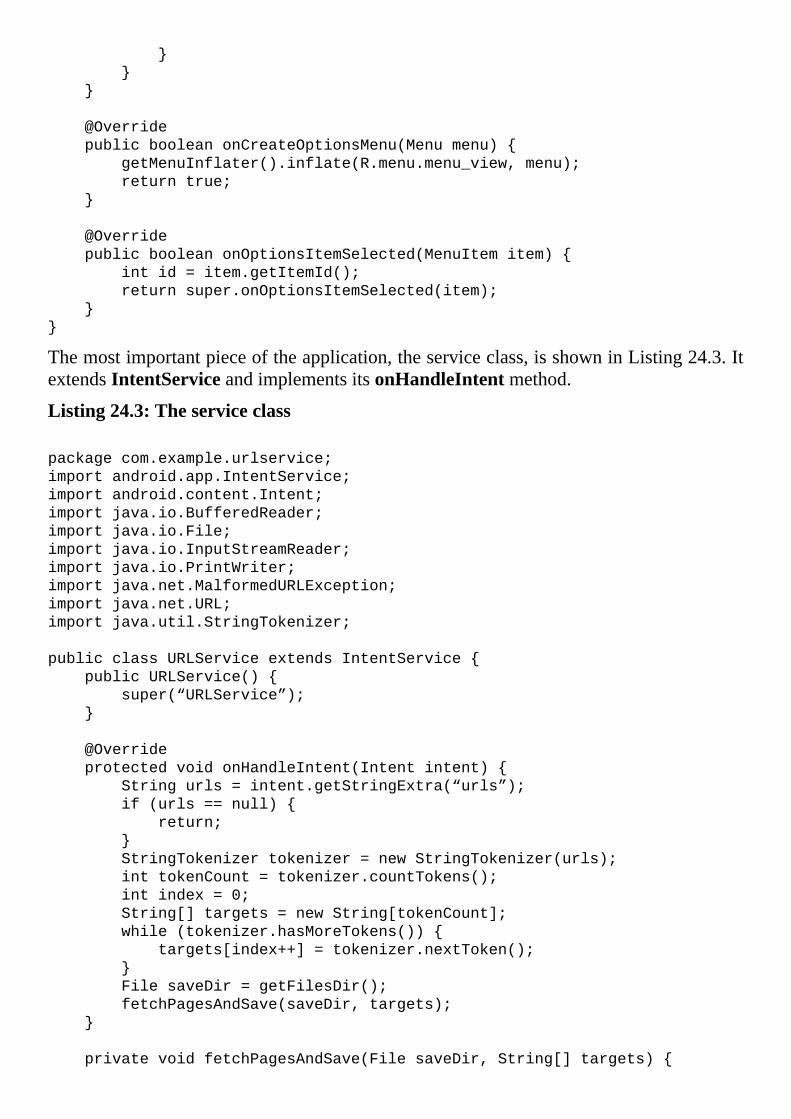
}
}
}
@Override
publicbooleanonCreateOptionsMenu(Menumenu){
getMenuInflater().inflate(R.menu.menu_view,menu);
returntrue;
}
@Override
publicbooleanonOptionsItemSelected(MenuItemitem){
intid=item.getItemId();
returnsuper.onOptionsItemSelected(item);
}
}
Themostimportantpieceoftheapplication,theserviceclass,isshowninListing24.3.ItextendsIntentServiceandimplementsitsonHandleIntentmethod.
Listing24.3:Theserviceclass
packagecom.example.urlservice;
importandroid.app.IntentService;
importandroid.content.Intent;
importjava.io.BufferedReader;
importjava.io.File;
importjava.io.InputStreamReader;
importjava.io.PrintWriter;
importjava.net.MalformedURLException;
importjava.net.URL;
importjava.util.StringTokenizer;
publicclassURLServiceextendsIntentService{
publicURLService(){
super(“URLService”);
}
@Override
protectedvoidonHandleIntent(Intentintent){
Stringurls=intent.getStringExtra(“urls”);
if(urls==null){
return;
}
StringTokenizertokenizer=newStringTokenizer(urls);
inttokenCount=tokenizer.countTokens();
intindex=0;
String[]targets=newString[tokenCount];
while(tokenizer.hasMoreTokens()){
targets[index++]=tokenizer.nextToken();
}
FilesaveDir=getFilesDir();
fetchPagesAndSave(saveDir,targets);
}
privatevoidfetchPagesAndSave(FilesaveDir,String[]targets){
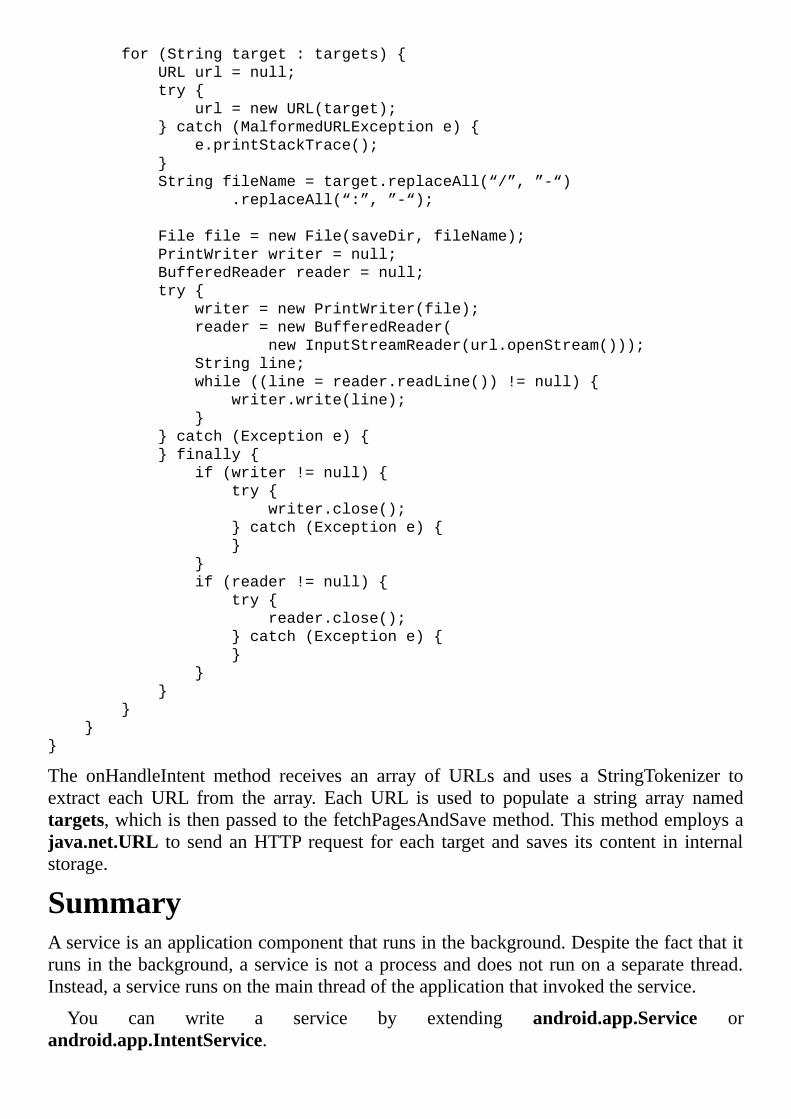
for(Stringtarget:targets){
URLurl=null;
try{
url=newURL(target);
}catch(MalformedURLExceptione){
e.printStackTrace();
}
StringfileName=target.replaceAll(“/”,”-“)
.replaceAll(“:”,”-“);
Filefile=newFile(saveDir,fileName);
PrintWriterwriter=null;
BufferedReaderreader=null;
try{
writer=newPrintWriter(file);
reader=newBufferedReader(
newInputStreamReader(url.openStream()));
Stringline;
while((line=reader.readLine())!=null){
writer.write(line);
}
}catch(Exceptione){
}finally{
if(writer!=null){
try{
writer.close();
}catch(Exceptione){
}
}
if(reader!=null){
try{
reader.close();
}catch(Exceptione){
}
}
}
}
}
}
The onHandleIntent method receives an array of URLs and uses a StringTokenizer toextract each URL from the array. Each URL is used to populate a string array namedtargets,whichisthenpassedtothefetchPagesAndSavemethod.Thismethodemploysajava.net.URL to sendanHTTPrequest foreach targetandsaves itscontent in internalstorage.
SummaryAserviceisanapplicationcomponentthatrunsinthebackground.Despitethefactthatitrunsinthebackground,aserviceisnotaprocessanddoesnotrunonaseparatethread.Instead,aservicerunsonthemainthreadoftheapplicationthatinvokedtheservice.
You can write a service by extending android.app.Service orandroid.app.IntentService.
Chapter25BroadcastReceivers
TheAndroid system constantly broadcasts intents that occur during the running of theoperating system and applications. In addition, applications can also broadcast user-defined intents.Youcancapitalizeon thesebroadcastsbywritingbroadcast receivers inyourapplication.
Thischapterexplainshowtocreatebroadcastreceivers.
OverviewAbroadcastreceiver,orareceiverforshort,isanapplicationcomponentthatlistenstoacertain intent broadcast, similar to Java listeners that listen to events.Table 25.1 showsintent actions defined in the android.content.Intent class for which you can write areceiver.
Action
Description
ACTION_TIME_TICK
Thecurrenttimehaschanged.Senteveryminute.
ACTION_TIME_CHANGED
Thetimehasbeenset.
ACTION_TIMEZONE_CHANGED
Thetimezonehaschanged.
ACTION_BOOT_COMPLETED
Thesystemhasfinishedbooting.
ACTION_PACKAGE_ADDED
Anewapplicationpackagehasbeeninstalledonthedevice.
ACTION_PACKAGE_CHANGED
Anapplicationpackagehasbeenchanged.
ACTION_PACKAGE_REMOVED
Anapplicationpackagehasbeenremoved.

ACTION_PACKAGE_RESTARTED Theuserhasrestartedapackage.
ACTION_PACKAGE_DATA_CLEARED
Theuserhasclearedthedataofapackage.
ACTION_UID_REMOVED
AuserUIDhasbeenremoved.
ACTION_BATTERY_CHANGED
Thebattery’schargingstate,levelorotherdetailhaschanged.
ACTION_POWER_CONNECTED
Externalpowerhasbeenconnectedtothedevice.
ACTION_POWER_DISCONNECTED
Externalpowerhasbeendisconnectedfromthedevice.
ACTION_SHUTDOWN
Thedeviceisabouttoshutdown
Table25.1:Intentactionsforreceivingabroadcast
To create a receiver, youmust extend theandroid.content.BroadcastReceiver class orone of its subclasses. In your class, you must provide an implementation for theonReceivemethod,whichgetscalledwhenanintentforwhichthereceiverisregisteredisbroadcast.ThesignatureofonReceiveisasfollows.
publicabstractvoidonReceive(Contextcontext,Intentintent)
YouthenhavetoregisteryourclassintheapplicationmanifestusingthereceiverelementorprogrammaticallybycallingContext.registerReceiver().
BroadcastReceiver-basedClockAndroidcomeswithwidgetsthatcanshowtime.However,youcanalsocreateyourownclockwidgetthatisbasedontheACTION_TIME_TICKbroadcast.Recallthatthisintentactionisbroadcasteveryminute,whichissuitableforaclock.
The BroadcastReceiverDemo1 project features such a clock. It is a simple app thatconsists of a broadcast receiver and an activity. The receiver class is instantiated andregistered every time the activity’sonResumemethod is called. It is deregisteredwhenonPauseisinvoked.
TheclassforthemainactivityisgiveninListing25.1
Listing25.1:TheMainActivityclass
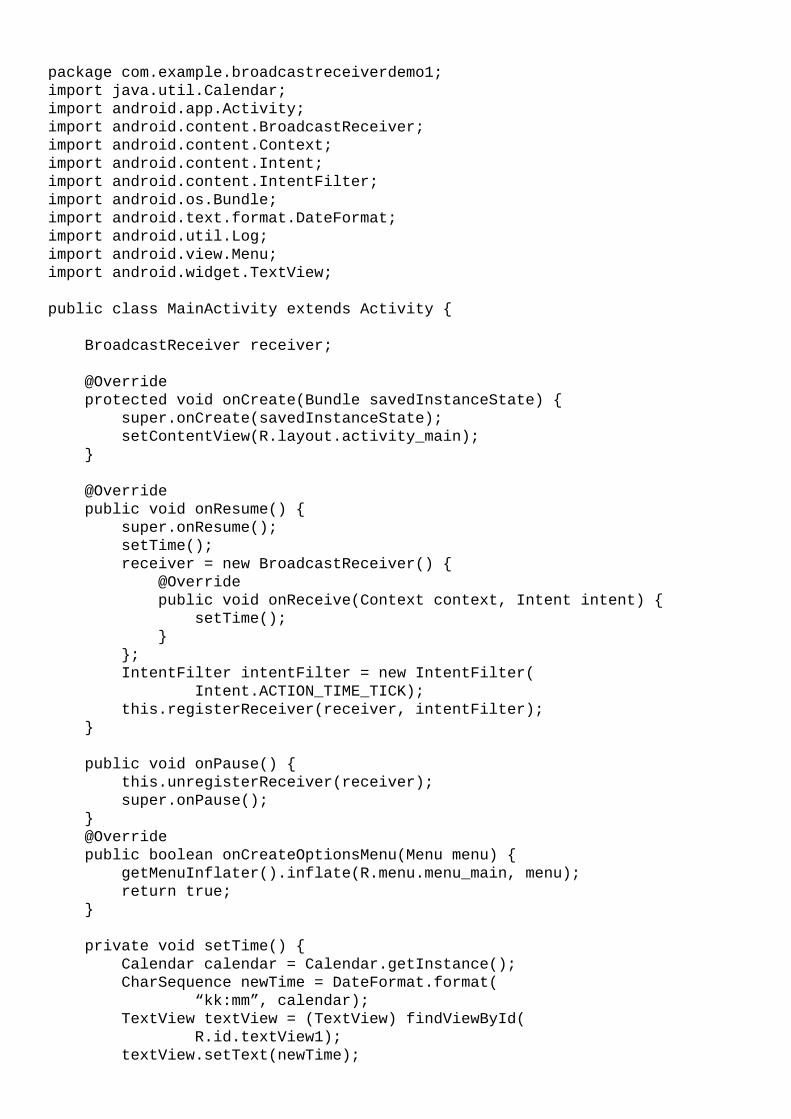
packagecom.example.broadcastreceiverdemo1;
importjava.util.Calendar;
importandroid.app.Activity;
importandroid.content.BroadcastReceiver;
importandroid.content.Context;
importandroid.content.Intent;
importandroid.content.IntentFilter;
importandroid.os.Bundle;
importandroid.text.format.DateFormat;
importandroid.util.Log;
importandroid.view.Menu;
importandroid.widget.TextView;
publicclassMainActivityextendsActivity{
BroadcastReceiverreceiver;
@Override
protectedvoidonCreate(BundlesavedInstanceState){
super.onCreate(savedInstanceState);
setContentView(R.layout.activity_main);
}
@Override
publicvoidonResume(){
super.onResume();
setTime();
receiver=newBroadcastReceiver(){
@Override
publicvoidonReceive(Contextcontext,Intentintent){
setTime();
}
};
IntentFilterintentFilter=newIntentFilter(
Intent.ACTION_TIME_TICK);
this.registerReceiver(receiver,intentFilter);
}
publicvoidonPause(){
this.unregisterReceiver(receiver);
super.onPause();
}
@Override
publicbooleanonCreateOptionsMenu(Menumenu){
getMenuInflater().inflate(R.menu.menu_main,menu);
returntrue;
}
privatevoidsetTime(){
Calendarcalendar=Calendar.getInstance();
CharSequencenewTime=DateFormat.format(
“kk:mm”,calendar);
TextViewtextView=(TextView)findViewById(
R.id.textView1);
textView.setText(newTime);
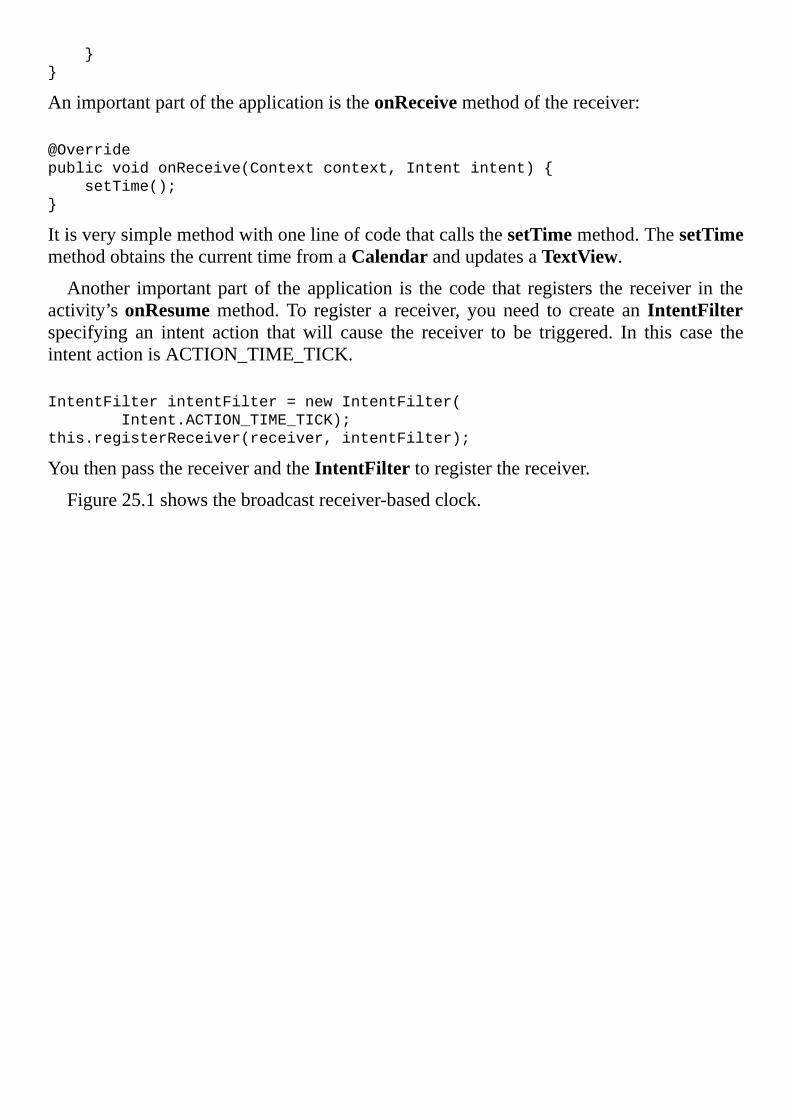
}
}
AnimportantpartoftheapplicationistheonReceivemethodofthereceiver:
@Override
publicvoidonReceive(Contextcontext,Intentintent){
setTime();
}
ItisverysimplemethodwithonelineofcodethatcallsthesetTimemethod.ThesetTimemethodobtainsthecurrenttimefromaCalendarandupdatesaTextView.
Another importantpartof theapplication is thecode that registers the receiver in theactivity’sonResumemethod.To register a receiver, you need to create an IntentFilterspecifying an intent action thatwill cause the receiver to be triggered. In this case theintentactionisACTION_TIME_TICK.
IntentFilterintentFilter=newIntentFilter(
Intent.ACTION_TIME_TICK);
this.registerReceiver(receiver,intentFilter);
YouthenpassthereceiverandtheIntentFiltertoregisterthereceiver.
Figure25.1showsthebroadcastreceiver-basedclock.
Figure25.1:Areceiver-basedclock
CancelingANotificationChapter 3, “UI Components” explains the various Android UI components includingnotifications.Aproblem lingers:Touchinganotification’sactionUIdoesnotcancel thenotification.Onestrategytosolvethisissueisbysendingauser-definedbroadcastwhentheactionUIistouchedandwritingabroadcastforthat.
RecallthatanotificationactionrequiresaPendingIntentandaPendingIntentcanbeprogrammedtosendabroadcast.Tosolvetheproblem,createauser-definedintentactioncalledcancel_notificationandthecorrespondingPendingIntent:
IntentcancelIntent=newIntent(“cancel_notification”);
PendingIntentcancelPendingIntent=
PendingIntent.getBroadcast(this,100,cancelIntent,0);
ThisPendingIntentcanthenbeusedtoregisteranotification.
TheCancelNotificationDemoprojectshowshowthiscanbeachieved.Theapplicationismadesimpleandconsistsofanactivitythatcontainsabroadcastreceiver.
ThelayoutfileforthemainactivityisgiveninListing25.2.
Listing25.2:Thelayoutfileforthemainactivity
<LinearLayout
xmlns:android=“http://schemas.android.com/apk/res/android”
xmlns:tools=“http://schemas.android.com/tools”
android:layout_width=“wrap_content”
android:layout_height=“wrap_content”
android:orientation=“horizontal”>
<Button
android:layout_width=“wrap_content”
android:layout_height=“wrap_content”
android:onClick=“setNotification”
android:text=“SetNotification”/>
<Button
android:layout_width=“wrap_content”
android:layout_height=“wrap_content”
android:onClick=“clearNotification”
android:text=“ClearNotification”/>
</LinearLayout>
Thelayoutfeaturestwobuttons,oneforsettinganotificationandoneforcancalingit.
TheMainActivity class for the application is listed in Listing 25.3. The activity’sonCreate method instantiates a receiver whose onReceive method cancels thenotification.
Listing25.3:TheMainActivityclass
packagecom.example.cancelnotificationdemo;
importandroid.app.Activity;
importandroid.app.Notification;
importandroid.app.NotificationManager;
importandroid.app.PendingIntent;
importandroid.content.BroadcastReceiver;
importandroid.content.Context;
importandroid.content.Intent;
importandroid.content.IntentFilter;
importandroid.os.Bundle;
importandroid.util.Log;
importandroid.view.Menu;
importandroid.view.MenuItem;
importandroid.view.View;
publicclassMainActivityextendsActivity{
privatestaticfinalStringCANCEL_NOTIFICATION_ACTION
=“cancel_notification”;
intnotificationId=1002;
@Override
protectedvoidonCreate(BundlesavedInstanceState){
super.onCreate(savedInstanceState);
setContentView(R.layout.activity_main);
BroadcastReceiverreceiver=newBroadcastReceiver(){
@Override
publicvoidonReceive(Contextcontext,Intentintent){
NotificationManagernotificationManager=
(NotificationManager)getSystemService(
NOTIFICATION_SERVICE);
notificationManager.cancel(notificationId);
}
};
IntentFilterfilter=newIntentFilter();
filter.addAction(CANCEL_NOTIFICATION_ACTION);
this.registerReceiver(receiver,filter);
}
@Override
publicbooleanonCreateOptionsMenu(Menumenu){
getMenuInflater().inflate(R.menu.menu_main,menu);
returntrue;
}
publicvoidsetNotification(Viewview){
IntentcancelIntent=newIntent(“cancel_notification”);
PendingIntentcancelPendingIntent=
PendingIntent.getBroadcast(this,100,
cancelIntent,0);
Notificationnotification=newNotification.Builder(this)
.setContentTitle(“StopPress”)
.setContentText(
“Everyonegetsextravacationweek!”)
.setSmallIcon(android.R.drawable.star_on)
.setAutoCancel(true)
.addAction(android.R.drawable.btn_dialog,
“Dismiss”,cancelPendingIntent)
.build();
NotificationManagernotificationManager=
(NotificationManager)getSystemService(
NOTIFICATION_SERVICE);
notificationManager.notify(notificationId,notification);
}
publicvoidclearNotification(Viewview){
NotificationManagernotificationManager=
(NotificationManager)getSystemService(
NOTIFICATION_SERVICE);
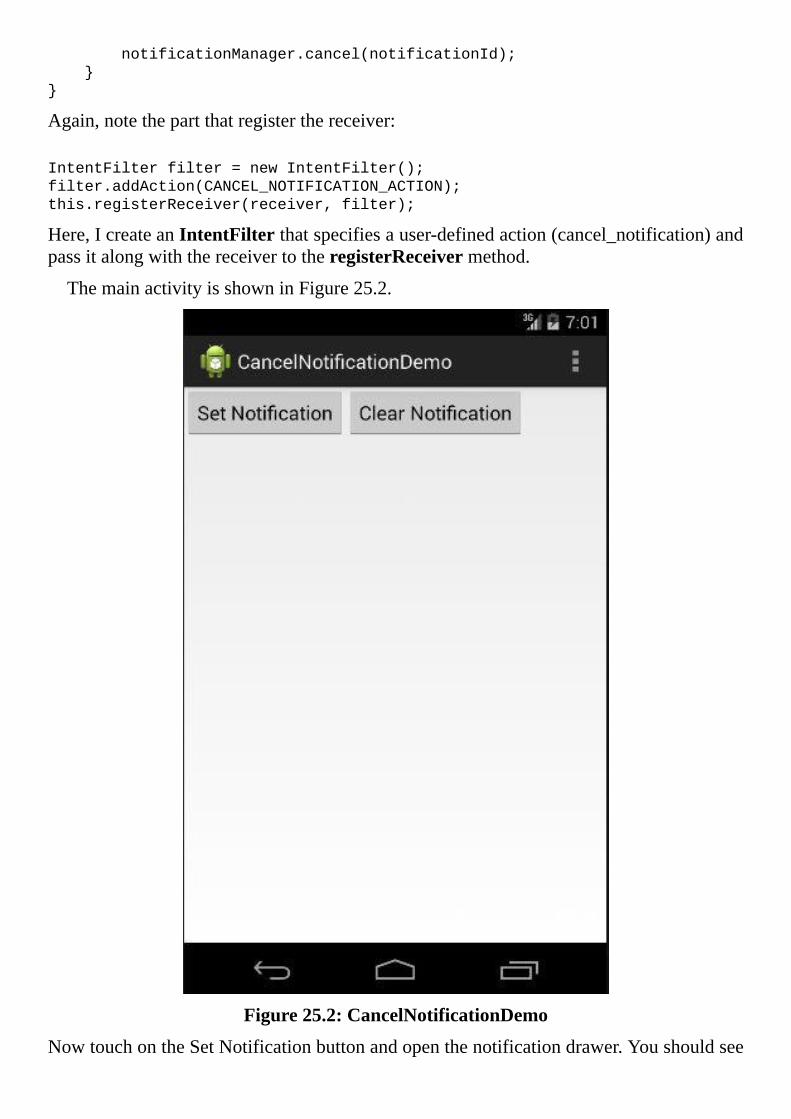
notificationManager.cancel(notificationId);
}
}
Again,notethepartthatregisterthereceiver:
IntentFilterfilter=newIntentFilter();
filter.addAction(CANCEL_NOTIFICATION_ACTION);
this.registerReceiver(receiver,filter);
Here,IcreateanIntentFilterthatspecifiesauser-definedaction(cancel_notification)andpassitalongwiththereceivertotheregisterReceivermethod.
ThemainactivityisshowninFigure25.2.
Figure25.2:CancelNotificationDemo
NowtouchontheSetNotificationbuttonandopenthenotificationdrawer.Youshouldsee
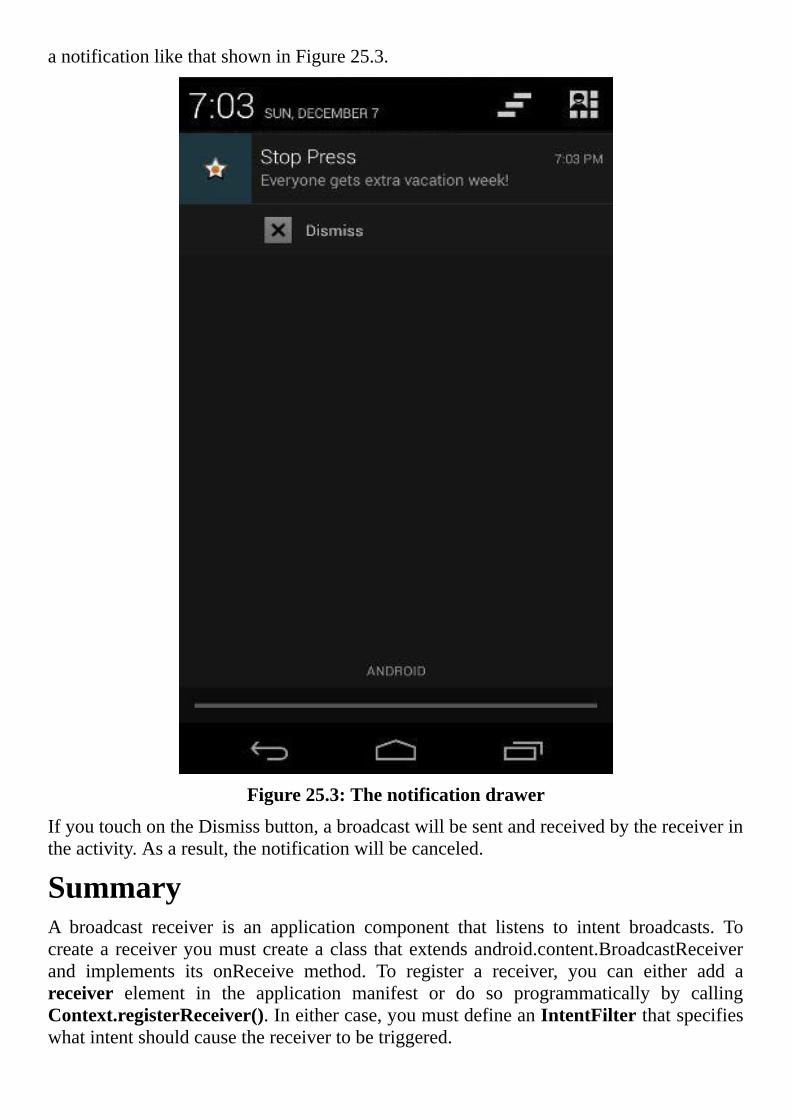
anotificationlikethatshowninFigure25.3.
Figure25.3:Thenotificationdrawer
IfyoutouchontheDismissbutton,abroadcastwillbesentandreceivedbythereceiverintheactivity.Asaresult,thenotificationwillbecanceled.
SummaryA broadcast receiver is an application component that listens to intent broadcasts. Tocreateareceiveryoumustcreateaclass thatextendsandroid.content.BroadcastReceiverand implements its onReceive method. To register a receiver, you can either add areceiver element in the application manifest or do so programmatically by callingContext.registerReceiver().Ineithercase,youmustdefineanIntentFilterthatspecifieswhatintentshouldcausethereceivertobetriggered.
Chapter26TheAlarmService
Android devices maintain an internal alarm service that can be used to schedule jobs.Amazingly, asyouwill findout in this chapter, theAPI isveryeasy touse, seamlesslyhiding the complexity of its lower-level code. This chapter explains how to use it andpresentsanexample.
OverviewOneofthebuilt-inservicesavailabletoallAndroiddevelopersisthealarmservice.Withit you can schedule an action to take place at a later time. The operation can beprogrammed to be carried out once or repeatedly. The Clock application, for example,includesanalarmclockthatreliesonthisservice.
It is extremely easy to use. All you need is encapsulate the operation you intend toscheduleinaPendingIntentandpassittothesystem-wideAlarmManagerinstance.TheAlarmManagerclassispartoftheandroid.apppackageandaninstanceisalreadythere,maintainedbythesystem.YoucanretrievetheAlarmManagerbyusingthislineofcode:
AlarmManageralarmMgr=
(AlarmManager)getSystemService(Context.ALARM_SERVICE);
ThePendingIntent is explained in Chapter 3, “UIComponents,” but basically it is anintent to be invoked at a future time, hence the name PendingIntent. You can use aPendingIntenttostartanactivity,startaservice,orbroadcastanotification.
Toscheduleajob,callthesetorsetExactmethodofAlarmManager.Theirsignaturesareasfollows.
publicvoidset(inttype,longtriggerTime,PendingIntentoperation)
publicvoidsetExact(inttype,longtriggerTime,
PendingIntentoperation)
Asthename implies,setExact causes the system to try todeliver thealarmascloseaspossibletothespecifiedtriggertime.Ontheotherhand,thedeliveryofthejobpassedtosetmaybedeferredbutwillnotbeearlier.
For both methods, the type is one of the following constants declared inAlarmManager.
ELAPSED_REALTIME. The trigger time is a long representing the number ofmillisecondsthathaveelapsedsincethelastboot.Itdoesnowakeupthedeviceifthealarmgoesoffwhilethedeviceisasleep.ELAPSED_REALTIME_WAKEUP. The trigger time is a long representing thenumberofmillisecondsthathaveelapsedsincethelastbootItwakesupthedeviceif

thealarmgoesoffwhilethedeviceisasleep.RTC.The trigger time isa long representing thenumberofmilliseconds thathaveelapsedsinceJanuary1,197000:00:00.0UTC.Itdoesnotwakeupthedeviceifthealarmgoesoffwhilethedeviceisasleep.RTC_WAKEUP.ThetriggertimeisalongrepresentingthenumberofmillisecondsthathaveelapsedsinceJanuary1,197000:00:00.0UTC. Itwakesup thedevice ifthealarmgoesoffwhilethedeviceisasleep.
Forexample,toscheduleanjobtostartfivesecondsfromnow,usethis:
alarmManager.set(AlarmManager.RTC,System.currentTimeMillis()+
5000,pendingIntent)
Toschedulearepeatingjob,use thesetRepeatingorsetInexactRepeatingmethod.Thesignaturesofthesemethodsareasfollows.
publicvoidsetInexactRepeating(inttype,longtriggerAtMillis,
longintervalMillis,PendingIntentoperation)
publicvoidsetRepeating(inttype,longtriggerAtMillis,
longintervalMillis,PendingIntentoperation)
In Android API levels lower than 19, setRepeating delivers an exact delivery time.However, starting the API level 19, setRepeating is also inexact, so it is the same assetInexactRepeating.Foranexactrepeatingjob,scheduleitwithsetExact,andscheduleanewjobattheendoftheexecutionofthecurrentjob.
ExampleThefollowingexampleshowshowtoscheduleanalarmthatsetsoffinfiveminutes.ThisislikethealarmclockintheClockapplication,butsettinganalarmisassimpleasatouchofabutton.Theapplicationalsoshowshowtowakeupanactivitywhenthealarmsetsoffwhilethedeviceisasleep.
Theapplicationhas twoactivities,whicharedeclared in themanifest inListing26.1.ThefirstactivityisthemainactivitythatthatwillbelaunchedwhentheusertouchesontheapplicationiconontheHomescreen.Thesecondactivity,calledWakeUpActivity,istheactivitythatwillbestartedwhenanalarmsetsoff.
Listing26.1:Themanifest
<?xmlversion=“1.0”encoding=“utf-8”?>
<manifest
xmlns:android=“http://schemas.android.com/apk/res/android”
package=“com.example.alarmmanagerdemo1”>
<uses-permissionandroid:name=“android.permission.WAKE_LOCK”/>
<application
android:allowBackup=“true”
android:icon=”@drawable/ic_launcher”
android:label=”@string/app_name”
android:theme=”@style/AppTheme”>
<activity
android:name=”.MainActivity”
android:label=”@string/app_name”>
<intent-filter>
<actionandroid:name=“android.intent.action.MAIN”/>
<category
android:name=“android.intent.category.LAUNCHER”/>
</intent-filter>
</activity>
<activity
android:name=”.WakeUpActivity”
android:label=”@string/title_activity_wake_up”>
</activity>
</application>
</manifest>
Themainactivitycontainsabutton,whichtheusercanpresstosetanalarm.TheactivitylayoutfileisshowninListing26.2.NotethatthebuttondeclarationincludestheonClickattributethatreferstheasetAlarmmethod.
Listing26.2:Thelayoutfileofthemainactivity
<RelativeLayout
xmlns:android=“http://schemas.android.com/apk/res/android”
xmlns:tools=“http://schemas.android.com/tools”
android:layout_width=“match_parent”
android:layout_height=“match_parent”
android:paddingLeft=”@dimen/activity_horizontal_margin”
android:paddingRight=”@dimen/activity_horizontal_margin”
android:paddingTop=”@dimen/activity_vertical_margin”
android:paddingBottom=”@dimen/activity_vertical_margin”
tools:context=”.MainActivity”>
<Button
android:layout_width=“wrap_content”
android:layout_height=“wrap_content”
android:text=“5MinuteAlarm”
android:id=”@+id/button”
android:layout_alignParentLeft=“true”
android:layout_alignParentStart=“true”
android:layout_marginTop=“77dp”
android:onClick=“setAlarm”/>
</RelativeLayout>
Listing26.3presentstheMainActivityclassfortheapplication.
Listing26.3:TheMainActivityclass
packagecom.example.alarmmanagerdemo1;
importandroid.app.Activity;
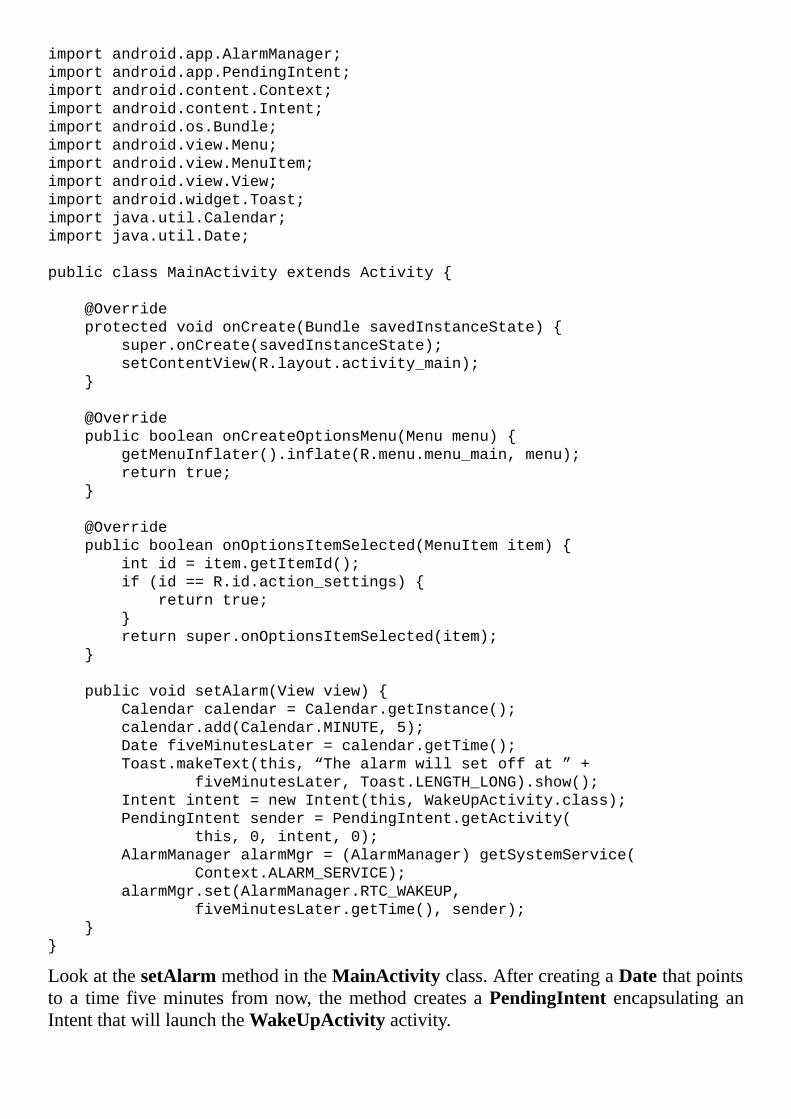
importandroid.app.AlarmManager;
importandroid.app.PendingIntent;
importandroid.content.Context;
importandroid.content.Intent;
importandroid.os.Bundle;
importandroid.view.Menu;
importandroid.view.MenuItem;
importandroid.view.View;
importandroid.widget.Toast;
importjava.util.Calendar;
importjava.util.Date;
publicclassMainActivityextendsActivity{
@Override
protectedvoidonCreate(BundlesavedInstanceState){
super.onCreate(savedInstanceState);
setContentView(R.layout.activity_main);
}
@Override
publicbooleanonCreateOptionsMenu(Menumenu){
getMenuInflater().inflate(R.menu.menu_main,menu);
returntrue;
}
@Override
publicbooleanonOptionsItemSelected(MenuItemitem){
intid=item.getItemId();
if(id==R.id.action_settings){
returntrue;
}
returnsuper.onOptionsItemSelected(item);
}
publicvoidsetAlarm(Viewview){
Calendarcalendar=Calendar.getInstance();
calendar.add(Calendar.MINUTE,5);
DatefiveMinutesLater=calendar.getTime();
Toast.makeText(this,“Thealarmwillsetoffat”+
fiveMinutesLater,Toast.LENGTH_LONG).show();
Intentintent=newIntent(this,WakeUpActivity.class);
PendingIntentsender=PendingIntent.getActivity(
this,0,intent,0);
AlarmManageralarmMgr=(AlarmManager)getSystemService(
Context.ALARM_SERVICE);
alarmMgr.set(AlarmManager.RTC_WAKEUP,
fiveMinutesLater.getTime(),sender);
}
}
LookatthesetAlarmmethodintheMainActivityclass.AftercreatingaDatethatpointsto a time fiveminutes fromnow, themethodcreates aPendingIntent encapsulating anIntentthatwilllaunchtheWakeUpActivityactivity.
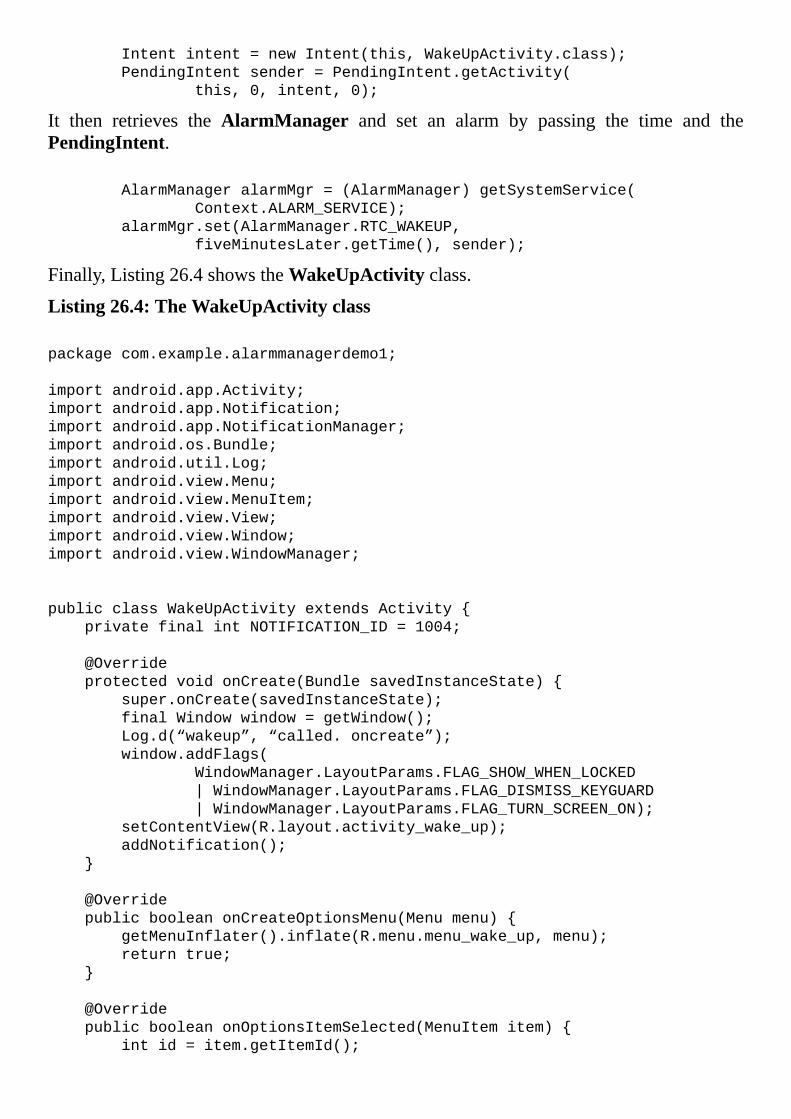
Intentintent=newIntent(this,WakeUpActivity.class);
PendingIntentsender=PendingIntent.getActivity(
this,0,intent,0);
It then retrieves the AlarmManager and set an alarm by passing the time and thePendingIntent.
AlarmManageralarmMgr=(AlarmManager)getSystemService(
Context.ALARM_SERVICE);
alarmMgr.set(AlarmManager.RTC_WAKEUP,
fiveMinutesLater.getTime(),sender);
Finally,Listing26.4showstheWakeUpActivityclass.
Listing26.4:TheWakeUpActivityclass
packagecom.example.alarmmanagerdemo1;
importandroid.app.Activity;
importandroid.app.Notification;
importandroid.app.NotificationManager;
importandroid.os.Bundle;
importandroid.util.Log;
importandroid.view.Menu;
importandroid.view.MenuItem;
importandroid.view.View;
importandroid.view.Window;
importandroid.view.WindowManager;
publicclassWakeUpActivityextendsActivity{
privatefinalintNOTIFICATION_ID=1004;
@Override
protectedvoidonCreate(BundlesavedInstanceState){
super.onCreate(savedInstanceState);
finalWindowwindow=getWindow();
Log.d(“wakeup”,“called.oncreate”);
window.addFlags(
WindowManager.LayoutParams.FLAG_SHOW_WHEN_LOCKED
|WindowManager.LayoutParams.FLAG_DISMISS_KEYGUARD
|WindowManager.LayoutParams.FLAG_TURN_SCREEN_ON);
setContentView(R.layout.activity_wake_up);
addNotification();
}
@Override
publicbooleanonCreateOptionsMenu(Menumenu){
getMenuInflater().inflate(R.menu.menu_wake_up,menu);
returntrue;
}
@Override
publicbooleanonOptionsItemSelected(MenuItemitem){
intid=item.getItemId();
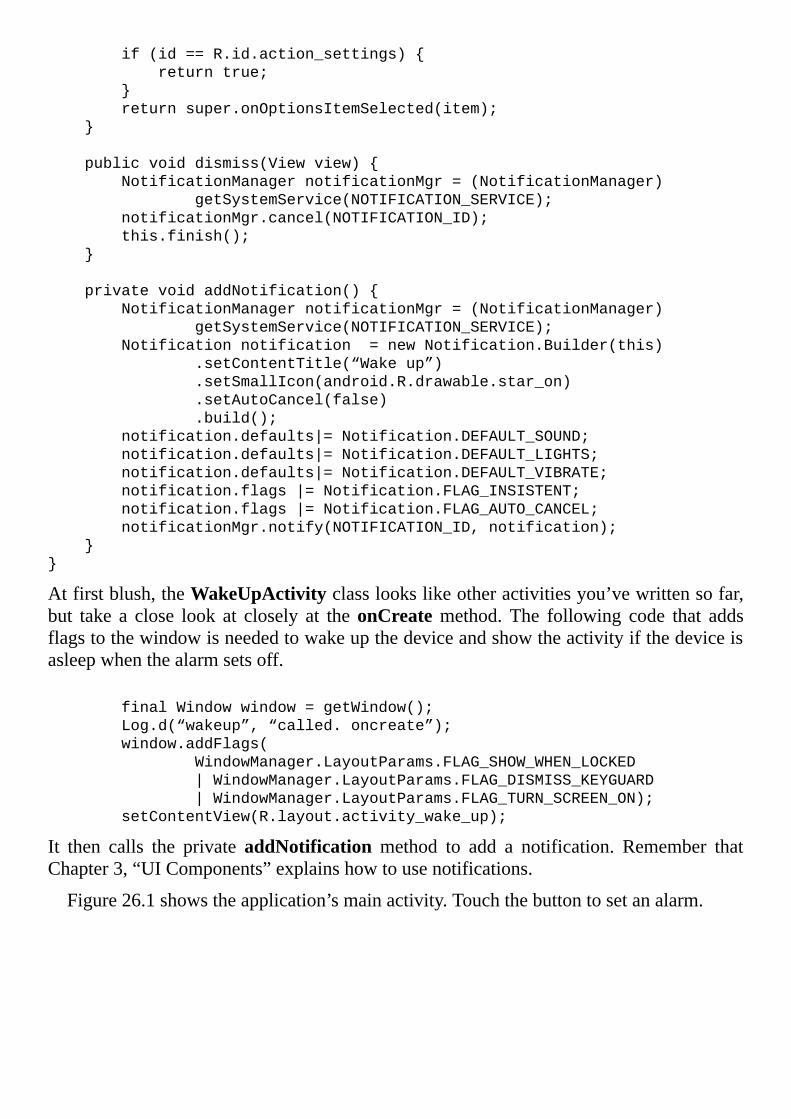
if(id==R.id.action_settings){
returntrue;
}
returnsuper.onOptionsItemSelected(item);
}
publicvoiddismiss(Viewview){
NotificationManagernotificationMgr=(NotificationManager)
getSystemService(NOTIFICATION_SERVICE);
notificationMgr.cancel(NOTIFICATION_ID);
this.finish();
}
privatevoidaddNotification(){
NotificationManagernotificationMgr=(NotificationManager)
getSystemService(NOTIFICATION_SERVICE);
Notificationnotification=newNotification.Builder(this)
.setContentTitle(“Wakeup”)
.setSmallIcon(android.R.drawable.star_on)
.setAutoCancel(false)
.build();
notification.defaults|=Notification.DEFAULT_SOUND;
notification.defaults|=Notification.DEFAULT_LIGHTS;
notification.defaults|=Notification.DEFAULT_VIBRATE;
notification.flags|=Notification.FLAG_INSISTENT;
notification.flags|=Notification.FLAG_AUTO_CANCEL;
notificationMgr.notify(NOTIFICATION_ID,notification);
}
}
Atfirstblush,theWakeUpActivityclasslookslikeotheractivitiesyou’vewrittensofar,but take a close look at closely at theonCreatemethod. The following code that addsflagstothewindowisneededtowakeupthedeviceandshowtheactivityifthedeviceisasleepwhenthealarmsetsoff.
finalWindowwindow=getWindow();
Log.d(“wakeup”,“called.oncreate”);
window.addFlags(
WindowManager.LayoutParams.FLAG_SHOW_WHEN_LOCKED
|WindowManager.LayoutParams.FLAG_DISMISS_KEYGUARD
|WindowManager.LayoutParams.FLAG_TURN_SCREEN_ON);
setContentView(R.layout.activity_wake_up);
It then calls the private addNotification method to add a notification. Remember thatChapter3,“UIComponents”explainshowtousenotifications.
Figure26.1showstheapplication’smainactivity.Touchthebuttontosetanalarm.
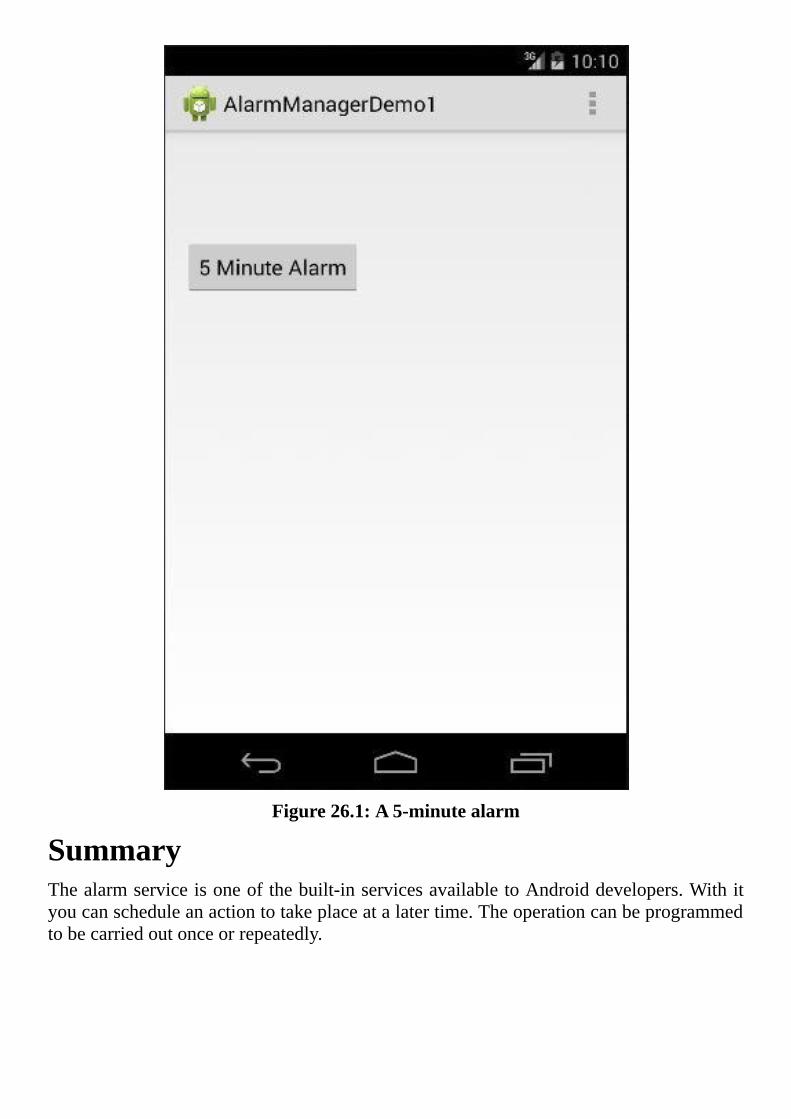
Figure26.1:A5-minutealarm
SummaryThealarmserviceisoneofthebuilt-inservicesavailabletoAndroiddevelopers.Withityoucanscheduleanactiontotakeplaceatalatertime.Theoperationcanbeprogrammedtobecarriedoutonceorrepeatedly.
Chapter27ContentProviders
A content provider is an Android component used for encapsulating data that is to besharedwithotherapplications.Howtheactualdataisstored,beitinarelationaldatabaseora fileoramixofboth, isnot important.What is important is thatacontentprovideroffersastandardwayofaccessingdatainotherapplications.
This chapter discusses the content provider and explains how to access data in aproviderusingacontentresolver.
OverviewYoualreadylearnedhowtostorefilesanddatainarelationaldatabase.Ifyourdataneedsto be sharedwith other applications, you need a content provider that encapsulates thestoreddata.Donotuseacontentprovider ifyourdata is tobeconsumedonlybyothercomponentsinthesameapplication.
Tocreateacontentprovider,youextendtheandroid.content.ContentProviderclass.ThisclassoffersCRUDmethods,namelymethodsforcreating, retrieving,updatinganddeleting data. Then, the subclass of ContentProvider has to be registered in theapplicationmanifestusingtheproviderelement,locatedunder<application>.Thisclassisdiscussedfurtherinthenextsection.
Once a content provider is registered, components under the same application canaccess it, but not other applications. To offer the data to other applications, you mustdeclare a read permission and a write permission. Alternatively, you can declare onepermissionforbothreadandwrite.Hereisanexample:
<provider
android:name=”.provider.ElectricCarContentProvider”
android:authorities=“com.example.contentproviderdemo1”
android:enabled=“true”
android:exported=“true”
android:readPermission=“com.example.permission.READ_DATA”
android:writePermission=“com.example.permission.WRITE_DATA”>
</provider>
Inaddition,youneedtousethepermissionelementtore-declarethepermissionsinyourmanifest:
<permission
android:name=“com.example.permission.READ_DATA”
android:protectionLevel=“normal”/>
<permission
android:name=“com.example.permission.WRITE_DATA”
android:protectionLevel=“normal”/>

<application…/>
Thepermission names can be anything as long as it does not conflictwith the existingones.Assuch,itisagoodideatoincludeyourdomainaspartofyourpermissionnames.
DatainacontentproviderisreferencedbyauniqueURI.TheconsumersofacontentprovidermustknowthisURIinordertoaccessthecontentprovider’sdata.
Theapplicationcontainingacontentproviderdoesnotneedtoberunningforitsdatatobeaccessed.
Androidcomeswithanumberofdefaultcontentproviders,suchasCalendar,Contacts,WordDictionary, etc. To access a content provider, you use theandroid.content.ContentResolver object that you can retrieve by callingContext.getContentResolver(). Among methods in the ContentResolver class aremethods with identical names as the CRUD methods in the ContentProvider class.Calling one of these methods on the ContentResolver invokes the identically-namedmethodinthetargetContentProvider.
Anapplicationneedingaccesstodatainacontentprovidermustdeclarethatitintendstousethedata,sotheuserinstallingtheappisawareofwhatdatawillbeexposedtotheapplication. The consuming application must use the uses-permission element in itsmanifest.Hereisanexample.
<uses-permission
android:name=“com.example.permission.READ_DATA”/>
<uses-permission
android:name=“com.example.permission.WRITE_DATA”/>
TheContentProviderClassThissectionintroducestheCRUDmethodsintheContentProviderclass.Primarily,youneedtoknowhowtoaccesstheunderlyingdatawhenoverridingthesemethods.Youcanstorethedatainanyformat,but,asyouwillsoonfindout,itmakesperfectsensetostorethedatainarelationaldatabase.
ThedatainacontentproviderisidentifiedbyURIshavingthisformat:
content://authority/table
The authority serves as anAndroid internal name and should be your domain name isreverse.Rightafteritisthetablename.
Torefertoasingledataitem,youusethisformat:
content://authority/table/index
Forexample,supposetheauthorityiscom.example.providerandthedata isstoredinarelationaldatabasetablenamedcustomers,thefirstrowisidentifiedbythisURI:
content://com.example.provider/customers/1
The rest of the section discusses ContentProvider methods for accessing andmanipulatingtheunderlyingdata.
ThequeryMethodToaccesstheunderlyingdata,usethequerymethod.Hereisitssignature:
publicabstractandroid.database.Cursorquery(android.net.Uriuri,
java.lang.String[]projection,java.lang.Stringselection,
java.lang.String[]selectionArgs,
java.lang.StringsortOrder)
uri is theURI identifying the data. The projection is an array containing names of thecolumns to be included. The selection defines which data items to select and theselectionArgs contains arguments for the selection. Finally, the sortOrder defines thecolumnbasedonwhichthedataistobesorted.
TheinsertMethodTheinsertmethodiscalledtoaddadataitem.Thesignatureofthismethodisasfollows.
publicabstractandroid.net.Uriinsert(android.net.Uriuri,
ContentValuesvalues)
Youpasscolumnkey/valuepairsinaContentValuesobjecttothismethod.UsetheputmethodsofContentValuestoaddakey/valuepair.
TheupdateMethodYou use thismethod to update a data item or a set of data items. The signature of themethod allows you to pass new values in a ContentValues as well as a selection todeterminewhichdataitemswillbeaffected.Hereisthesignatureofupdate.
publicabstractintupdate(android.net.Uriuri,
ContentValuesvalues,java.lang.Stringselection,
java.lang.String[]selectionArgs)
Theupdatemethodreturnsthenumberofdataitemsaffected.
ThedeleteMethodThedeletemethoddeletesadataitemorasetofdataitems.Youcanpassaselectionandselectionargumentstotellthecontentproviderwhichdataitemsshouldbedeleted.Hereisthesignatureofdelete.
publicabstractintdelete(android.net.Uriuri,
java.lang.Stringselection,
java.lang.String[]selectionArgs)
Thedeletemethodreturnsthenumberofrecordsdeleted.
CreatingAContentProvider
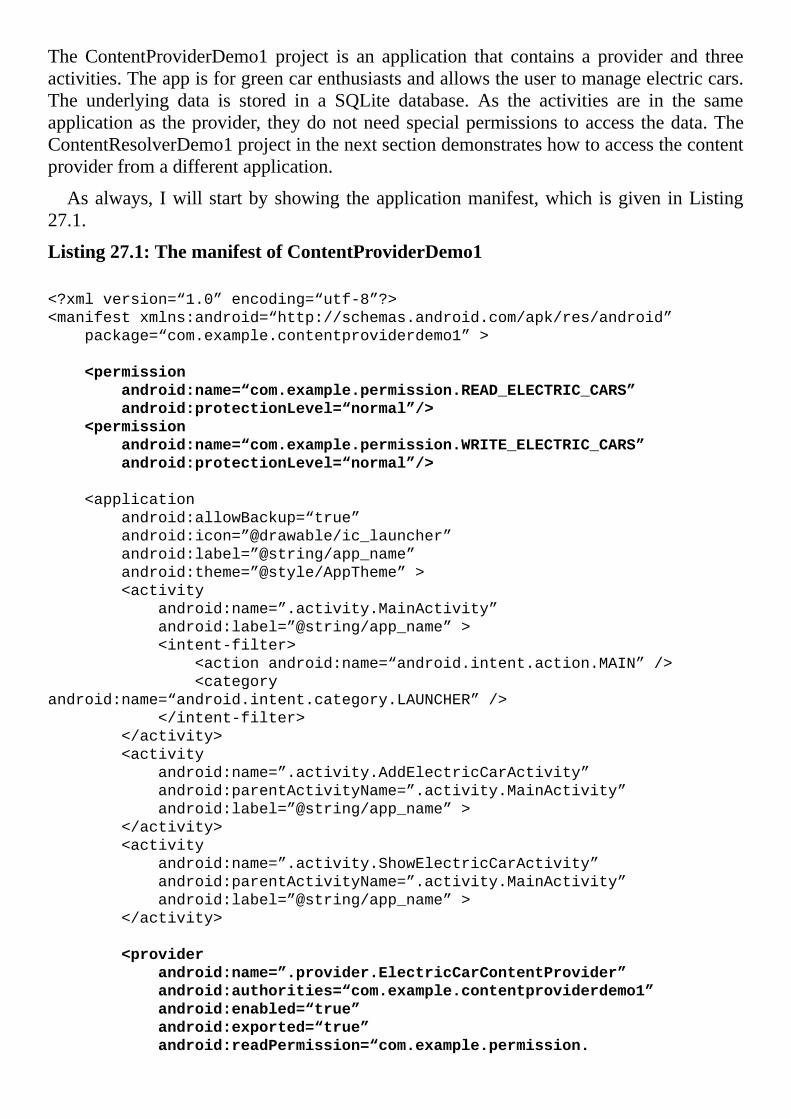
TheContentProviderDemo1 project is an application that contains a provider and threeactivities.Theappisforgreencarenthusiastsandallowstheusertomanageelectriccars.The underlying data is stored in a SQLite database. As the activities are in the sameapplicationas theprovider, theydonotneedspecialpermissionstoaccess thedata.TheContentResolverDemo1projectinthenextsectiondemonstrateshowtoaccessthecontentproviderfromadifferentapplication.
Asalways, Iwillstartbyshowing theapplicationmanifest,which isgiven inListing27.1.
Listing27.1:ThemanifestofContentProviderDemo1
<?xmlversion=“1.0”encoding=“utf-8”?>
<manifestxmlns:android=“http://schemas.android.com/apk/res/android”
package=“com.example.contentproviderdemo1”>
<permission
android:name=“com.example.permission.READ_ELECTRIC_CARS”
android:protectionLevel=“normal”/>
<permission
android:name=“com.example.permission.WRITE_ELECTRIC_CARS”
android:protectionLevel=“normal”/>
<application
android:allowBackup=“true”
android:icon=”@drawable/ic_launcher”
android:label=”@string/app_name”
android:theme=”@style/AppTheme”>
<activity
android:name=”.activity.MainActivity”
android:label=”@string/app_name”>
<intent-filter>
<actionandroid:name=“android.intent.action.MAIN”/>
<category
android:name=“android.intent.category.LAUNCHER”/>
</intent-filter>
</activity>
<activity
android:name=”.activity.AddElectricCarActivity”
android:parentActivityName=”.activity.MainActivity”
android:label=”@string/app_name”>
</activity>
<activity
android:name=”.activity.ShowElectricCarActivity”
android:parentActivityName=”.activity.MainActivity”
android:label=”@string/app_name”>
</activity>
<provider
android:name=”.provider.ElectricCarContentProvider”
android:authorities=“com.example.contentproviderdemo1”
android:enabled=“true”
android:exported=“true”
android:readPermission=“com.example.permission.
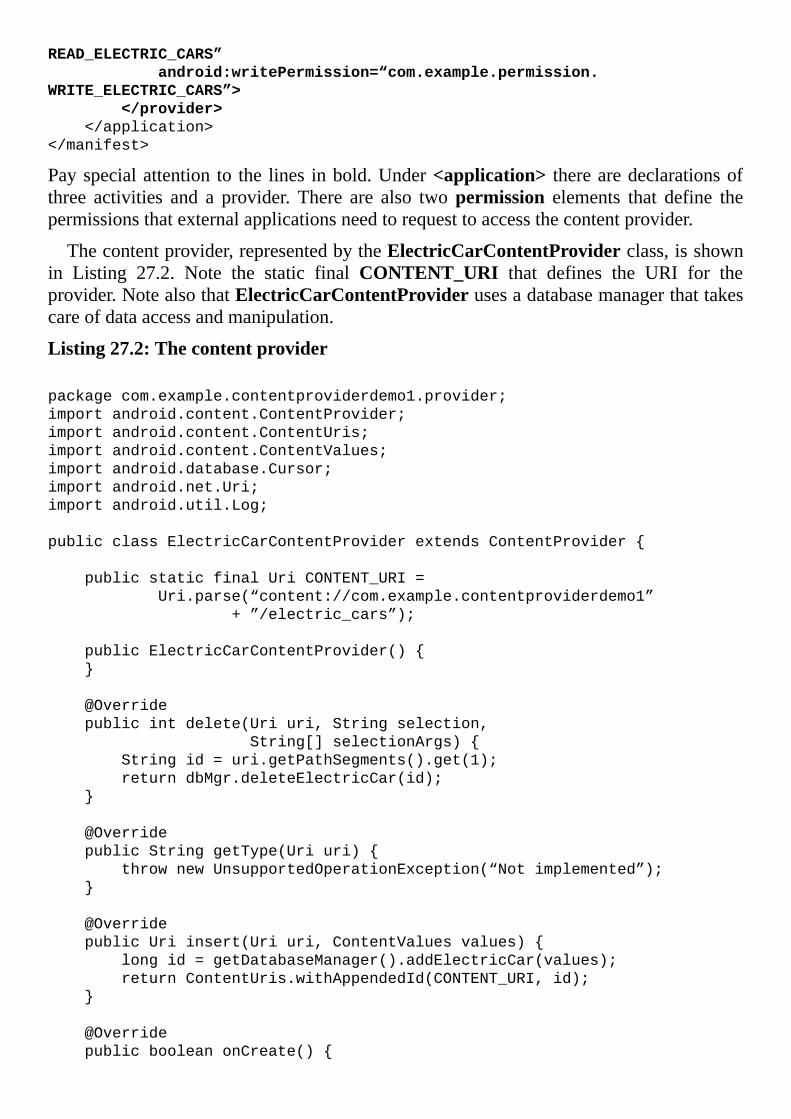
READ_ELECTRIC_CARS”
android:writePermission=“com.example.permission.
WRITE_ELECTRIC_CARS”>
</provider>
</application>
</manifest>
Payspecialattention to the lines inbold.Under<application> therearedeclarationsofthree activities and a provider. There are also twopermission elements that define thepermissionsthatexternalapplicationsneedtorequesttoaccessthecontentprovider.
Thecontentprovider,representedbytheElectricCarContentProviderclass,isshownin Listing 27.2. Note the static final CONTENT_URI that defines the URI for theprovider.NotealsothatElectricCarContentProviderusesadatabasemanagerthattakescareofdataaccessandmanipulation.
Listing27.2:Thecontentprovider
packagecom.example.contentproviderdemo1.provider;
importandroid.content.ContentProvider;
importandroid.content.ContentUris;
importandroid.content.ContentValues;
importandroid.database.Cursor;
importandroid.net.Uri;
importandroid.util.Log;
publicclassElectricCarContentProviderextendsContentProvider{
publicstaticfinalUriCONTENT_URI=
Uri.parse(“content://com.example.contentproviderdemo1”
+”/electric_cars”);
publicElectricCarContentProvider(){
}
@Override
publicintdelete(Uriuri,Stringselection,
String[]selectionArgs){
Stringid=uri.getPathSegments().get(1);
returndbMgr.deleteElectricCar(id);
}
@Override
publicStringgetType(Uriuri){
thrownewUnsupportedOperationException(“Notimplemented”);
}
@Override
publicUriinsert(Uriuri,ContentValuesvalues){
longid=getDatabaseManager().addElectricCar(values);
returnContentUris.withAppendedId(CONTENT_URI,id);
}
@Override
publicbooleanonCreate(){
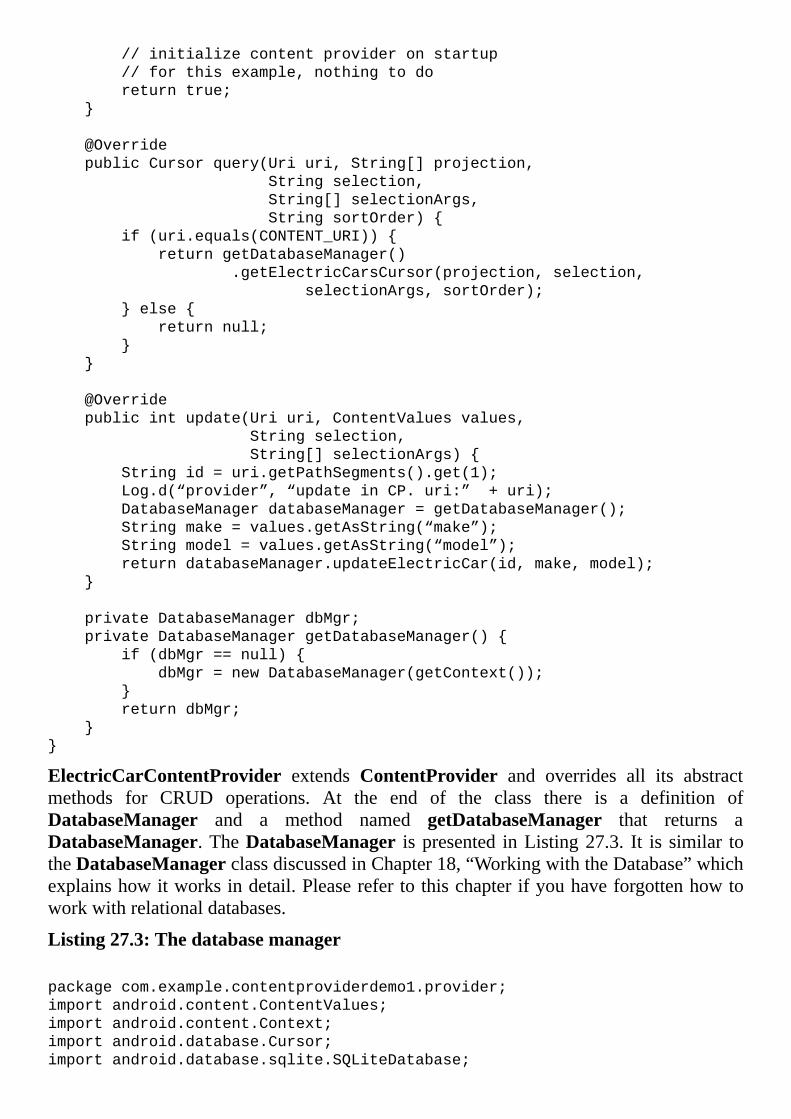
//initializecontentprovideronstartup
//forthisexample,nothingtodo
returntrue;
}
@Override
publicCursorquery(Uriuri,String[]projection,
Stringselection,
String[]selectionArgs,
StringsortOrder){
if(uri.equals(CONTENT_URI)){
returngetDatabaseManager()
.getElectricCarsCursor(projection,selection,
selectionArgs,sortOrder);
}else{
returnnull;
}
}
@Override
publicintupdate(Uriuri,ContentValuesvalues,
Stringselection,
String[]selectionArgs){
Stringid=uri.getPathSegments().get(1);
Log.d(“provider”,“updateinCP.uri:”+uri);
DatabaseManagerdatabaseManager=getDatabaseManager();
Stringmake=values.getAsString(“make”);
Stringmodel=values.getAsString(“model”);
returndatabaseManager.updateElectricCar(id,make,model);
}
privateDatabaseManagerdbMgr;
privateDatabaseManagergetDatabaseManager(){
if(dbMgr==null){
dbMgr=newDatabaseManager(getContext());
}
returndbMgr;
}
}
ElectricCarContentProvider extends ContentProvider and overrides all its abstractmethods for CRUD operations. At the end of the class there is a definition ofDatabaseManager and a method named getDatabaseManager that returns aDatabaseManager.TheDatabaseManager ispresented inListing27.3. It is similar totheDatabaseManagerclassdiscussedinChapter18,“WorkingwiththeDatabase”whichexplainshowitworksindetail.Pleaserefertothischapterifyouhaveforgottenhowtoworkwithrelationaldatabases.
Listing27.3:Thedatabasemanager
packagecom.example.contentproviderdemo1.provider;
importandroid.content.ContentValues;
importandroid.content.Context;
importandroid.database.Cursor;
importandroid.database.sqlite.SQLiteDatabase;
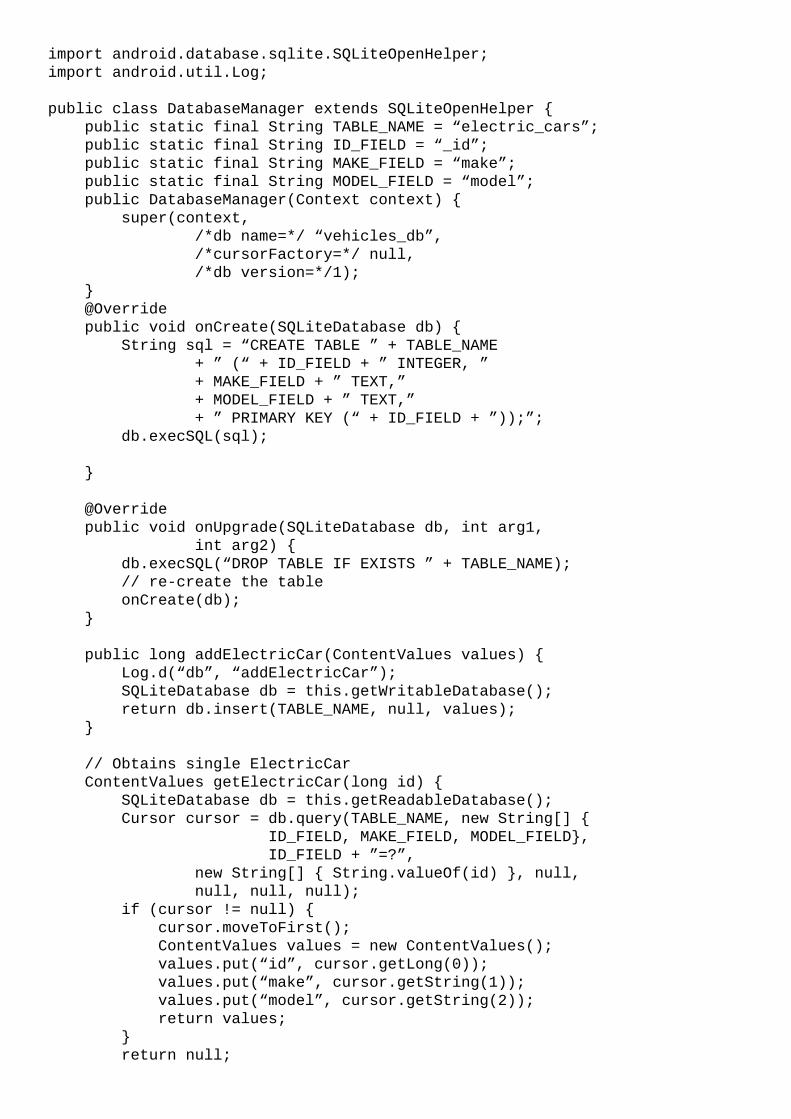
importandroid.database.sqlite.SQLiteOpenHelper;
importandroid.util.Log;
publicclassDatabaseManagerextendsSQLiteOpenHelper{
publicstaticfinalStringTABLE_NAME=“electric_cars”;
publicstaticfinalStringID_FIELD=“_id”;
publicstaticfinalStringMAKE_FIELD=“make”;
publicstaticfinalStringMODEL_FIELD=“model”;
publicDatabaseManager(Contextcontext){
super(context,
/*dbname=*/“vehicles_db”,
/*cursorFactory=*/null,
/*dbversion=*/1);
}
@Override
publicvoidonCreate(SQLiteDatabasedb){
Stringsql=“CREATETABLE”+TABLE_NAME
+”(“+ID_FIELD+”INTEGER,”
+MAKE_FIELD+”TEXT,”
+MODEL_FIELD+”TEXT,”
+”PRIMARYKEY(“+ID_FIELD+”));”;
db.execSQL(sql);
}
@Override
publicvoidonUpgrade(SQLiteDatabasedb,intarg1,
intarg2){
db.execSQL(“DROPTABLEIFEXISTS”+TABLE_NAME);
//re-createthetable
onCreate(db);
}
publiclongaddElectricCar(ContentValuesvalues){
Log.d(“db”,“addElectricCar”);
SQLiteDatabasedb=this.getWritableDatabase();
returndb.insert(TABLE_NAME,null,values);
}
//ObtainssingleElectricCar
ContentValuesgetElectricCar(longid){
SQLiteDatabasedb=this.getReadableDatabase();
Cursorcursor=db.query(TABLE_NAME,newString[]{
ID_FIELD,MAKE_FIELD,MODEL_FIELD},
ID_FIELD+”=?”,
newString[]{String.valueOf(id)},null,
null,null,null);
if(cursor!=null){
cursor.moveToFirst();
ContentValuesvalues=newContentValues();
values.put(“id”,cursor.getLong(0));
values.put(“make”,cursor.getString(1));
values.put(“model”,cursor.getString(2));
returnvalues;
}
returnnull;
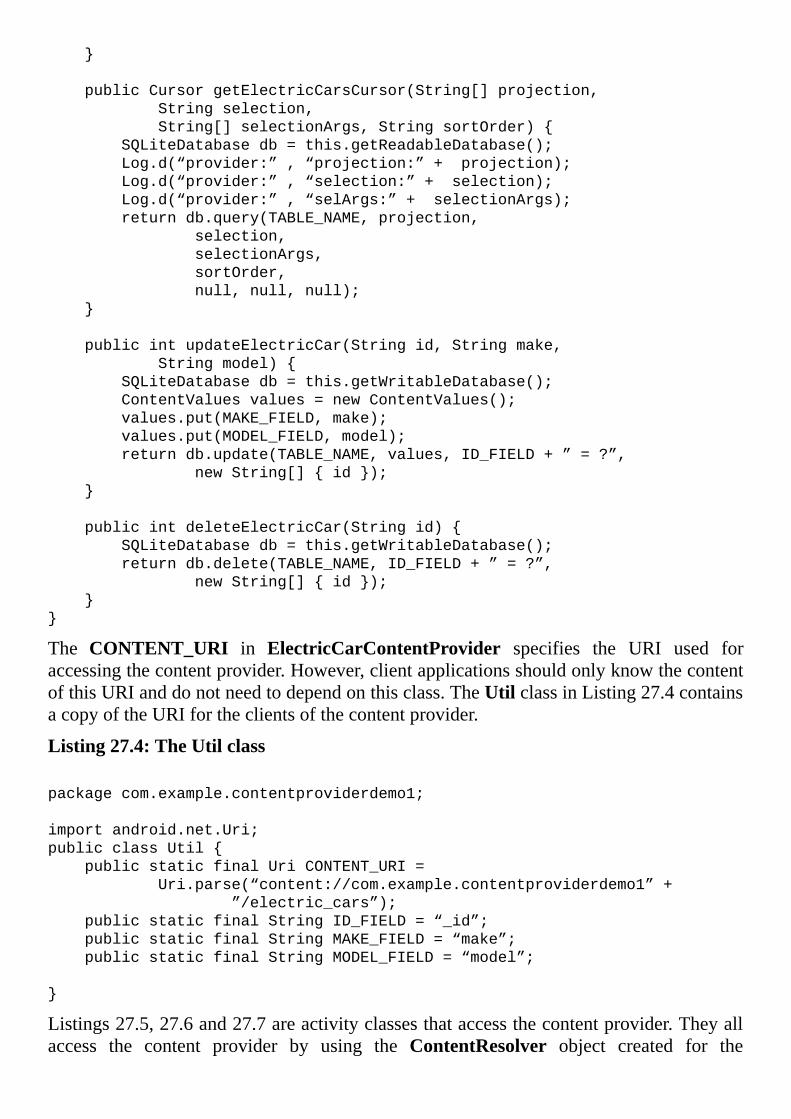
}
publicCursorgetElectricCarsCursor(String[]projection,
Stringselection,
String[]selectionArgs,StringsortOrder){
SQLiteDatabasedb=this.getReadableDatabase();
Log.d(“provider:”,“projection:”+projection);
Log.d(“provider:”,“selection:”+selection);
Log.d(“provider:”,“selArgs:”+selectionArgs);
returndb.query(TABLE_NAME,projection,
selection,
selectionArgs,
sortOrder,
null,null,null);
}
publicintupdateElectricCar(Stringid,Stringmake,
Stringmodel){
SQLiteDatabasedb=this.getWritableDatabase();
ContentValuesvalues=newContentValues();
values.put(MAKE_FIELD,make);
values.put(MODEL_FIELD,model);
returndb.update(TABLE_NAME,values,ID_FIELD+”=?”,
newString[]{id});
}
publicintdeleteElectricCar(Stringid){
SQLiteDatabasedb=this.getWritableDatabase();
returndb.delete(TABLE_NAME,ID_FIELD+”=?”,
newString[]{id});
}
}
The CONTENT_URI in ElectricCarContentProvider specifies the URI used foraccessingthecontentprovider.However,clientapplicationsshouldonlyknowthecontentofthisURIanddonotneedtodependonthisclass.TheUtilclassinListing27.4containsacopyoftheURIfortheclientsofthecontentprovider.
Listing27.4:TheUtilclass
packagecom.example.contentproviderdemo1;
importandroid.net.Uri;
publicclassUtil{
publicstaticfinalUriCONTENT_URI=
Uri.parse(“content://com.example.contentproviderdemo1”+
”/electric_cars”);
publicstaticfinalStringID_FIELD=“_id”;
publicstaticfinalStringMAKE_FIELD=“make”;
publicstaticfinalStringMODEL_FIELD=“model”;
}
Listings27.5,27.6and27.7areactivityclassesthataccessthecontentprovider.Theyallaccess the content provider by using the ContentResolver object created for the

application.YouretrieveitbycallinggetContentResolverfromtheactivityclasses.
Listing27.5:TheMainActivityclass
packagecom.example.contentproviderdemo1.activity;
importandroid.app.Activity;
importandroid.content.Intent;
importandroid.database.Cursor;
importandroid.os.Bundle;
importandroid.view.Menu;
importandroid.view.MenuItem;
importandroid.view.View;
importandroid.widget.AdapterView;
importandroid.widget.AdapterView.OnItemClickListener;
importandroid.widget.CursorAdapter;
importandroid.widget.ListAdapter;
importandroid.widget.ListView;
importandroid.widget.SimpleCursorAdapter;
importcom.example.contentproviderdemo1.R;
importcom.example.contentproviderdemo1.Util;
publicclassMainActivityextendsActivity{
@Override
protectedvoidonCreate(BundlesavedInstanceState){
super.onCreate(savedInstanceState);
setContentView(R.layout.activity_main);
ListViewlistView=(ListView)findViewById(
R.id.listView);
Cursorcursor=getContentResolver().query(
Util.CONTENT_URI,
/*projection=*/newString[]{
Util.ID_FIELD,Util.MAKE_FIELD,
Util.MODEL_FIELD},
/*selection=*/null,
/*selectionArgs=*/null,
/*sortOrder=*/“make”);
startManagingCursor(cursor);
ListAdapteradapter=newSimpleCursorAdapter(
this,
android.R.layout.two_line_list_item,
cursor,
newString[]{Util.MAKE_FIELD,
Util.MODEL_FIELD},
newint[]{android.R.id.text1,android.R.id.text2},
CursorAdapter.FLAG_REGISTER_CONTENT_OBSERVER);
listView.setAdapter(adapter);
listView.setChoiceMode(ListView.CHOICE_MODE_SINGLE);
listView.setOnItemClickListener(
newOnItemClickListener(){
@Override
publicvoidonItemClick(
AdapterView<?>adapterView,
Viewview,intposition,longid){
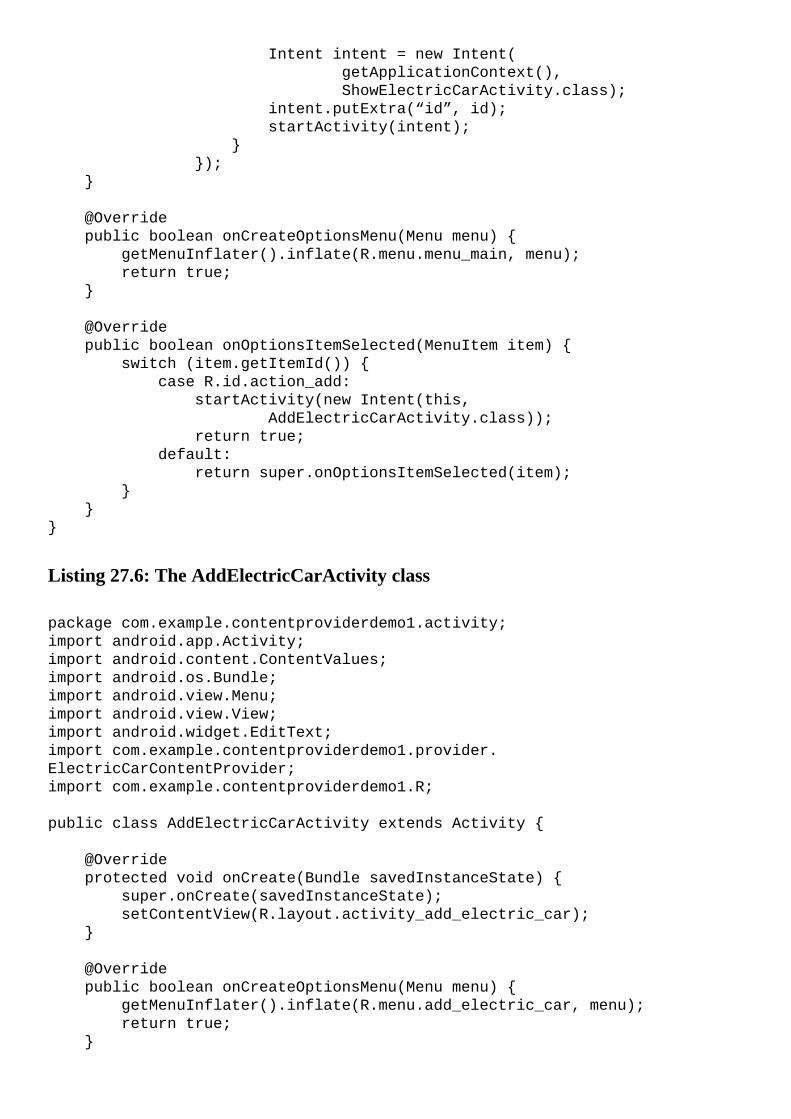
Intentintent=newIntent(
getApplicationContext(),
ShowElectricCarActivity.class);
intent.putExtra(“id”,id);
startActivity(intent);
}
});
}
@Override
publicbooleanonCreateOptionsMenu(Menumenu){
getMenuInflater().inflate(R.menu.menu_main,menu);
returntrue;
}
@Override
publicbooleanonOptionsItemSelected(MenuItemitem){
switch(item.getItemId()){
caseR.id.action_add:
startActivity(newIntent(this,
AddElectricCarActivity.class));
returntrue;
default:
returnsuper.onOptionsItemSelected(item);
}
}
}
Listing27.6:TheAddElectricCarActivityclass
packagecom.example.contentproviderdemo1.activity;
importandroid.app.Activity;
importandroid.content.ContentValues;
importandroid.os.Bundle;
importandroid.view.Menu;
importandroid.view.View;
importandroid.widget.EditText;
importcom.example.contentproviderdemo1.provider.
ElectricCarContentProvider;
importcom.example.contentproviderdemo1.R;
publicclassAddElectricCarActivityextendsActivity{
@Override
protectedvoidonCreate(BundlesavedInstanceState){
super.onCreate(savedInstanceState);
setContentView(R.layout.activity_add_electric_car);
}
@Override
publicbooleanonCreateOptionsMenu(Menumenu){
getMenuInflater().inflate(R.menu.add_electric_car,menu);
returntrue;
}
publicvoidcancel(Viewview){
finish();
}
publicvoidaddElectricCar(Viewview){
Stringmake=((EditText)findViewById(
R.id.make)).getText().toString();
Stringmodel=((EditText)findViewById(
R.id.model)).getText().toString();
ContentValuesvalues=newContentValues();
values.put(“make”,make);
values.put(“model”,model);
getContentResolver().insert(
ElectricCarContentProvider.CONTENT_URI,values);
finish();
}
}
Listing27.7:TheShowElectricCarActivityclass
packagecom.example.contentproviderdemo1.activity;
importandroid.app.Activity;
importandroid.app.AlertDialog;
importandroid.content.ContentUris;
importandroid.content.ContentValues;
importandroid.content.DialogInterface;
importandroid.database.Cursor;
importandroid.net.Uri;
importandroid.os.Bundle;
importandroid.util.Log;
importandroid.view.Menu;
importandroid.view.MenuItem;
importandroid.view.View;
importandroid.widget.EditText;
importandroid.widget.TextView;
importcom.example.contentproviderdemo1.R;
importcom.example.contentproviderdemo1.Util;
publicclassShowElectricCarActivityextendsActivity{
longelectricCarId;
@Override
protectedvoidonCreate(BundlesavedInstanceState){
super.onCreate(savedInstanceState);
setContentView(R.layout.activity_show_electric_car);
getActionBar().setDisplayHomeAsUpEnabled(true);
Bundleextras=getIntent().getExtras();
if(extras!=null){
electricCarId=extras.getLong(“id”);
Cursorcursor=getContentResolver().query(
Util.CONTENT_URI,
/*projection=*/newString[]{
Util.ID_FIELD,Util.MAKE_FIELD,
Util.MODEL_FIELD},
/*selection=*/“_id=?”,
/*selectionArgs*/newString[]{
Long.toString(electricCarId)},
/*sortOrder*/null);
if(cursor!=null&&cursor.moveToFirst()){
Stringmake=cursor.getString(1);
Stringmodel=cursor.getString(2);
((TextView)findViewById(R.id.make))
.setText(make);
((TextView)findViewById(R.id.model))
.setText(model);
}
}
}
@Override
publicbooleanonCreateOptionsMenu(Menumenu){
getMenuInflater().inflate(R.menu.show_electric_car,menu);
returntrue;
}
@Override
publicbooleanonOptionsItemSelected(MenuItemitem){
switch(item.getItemId()){
caseR.id.action_delete:
deleteElectricCar();
returntrue;
default:
returnsuper.onOptionsItemSelected(item);
}
}
privatevoiddeleteElectricCar(){
newAlertDialog.Builder(this)
.setTitle(“Pleaseconfirm”)
.setMessage(
“Areyousureyouwanttodelete”+
“thiselectriccar?”)
.setPositiveButton(“Yes”,
newDialogInterface.OnClickListener(){
publicvoidonClick(
DialogInterfacedialog,
intwhichButton){
Uriuri=ContentUris.withAppendedId(
Util.CONTENT_URI,electricCarId);
getContentResolver().delete(
uri,null,null);
dialog.dismiss();
finish();
}
})
.setNegativeButton(“No”,
newDialogInterface.OnClickListener(){
publicvoidonClick(
DialogInterfacedialog,
intwhich){
dialog.dismiss();
}
})
.create()
.show();
}
publicvoidupdateElectricCar(Viewview){
Uriuri=ContentUris.withAppendedId(Util.CONTENT_URI,
electricCarId);
ContentValuesvalues=newContentValues();
values.put(Util.MAKE_FIELD,
((EditText)findViewById(R.id.make)).getText()
.toString());
values.put(Util.MODEL_FIELD,
((EditText)findViewById(R.id.model)).getText()
.toString());
getContentResolver().update(uri,values,null,null);
finish();
}
}
Asthecontentproviderisaccessedfromcomponentsinthesameapplication,youshouldnotexpecttoencounteranyproblems.Figure27.1showsaListViewinthemainactivity.Ofcourse,whenyoufirstruntheapplication,thelistwillbeempty.
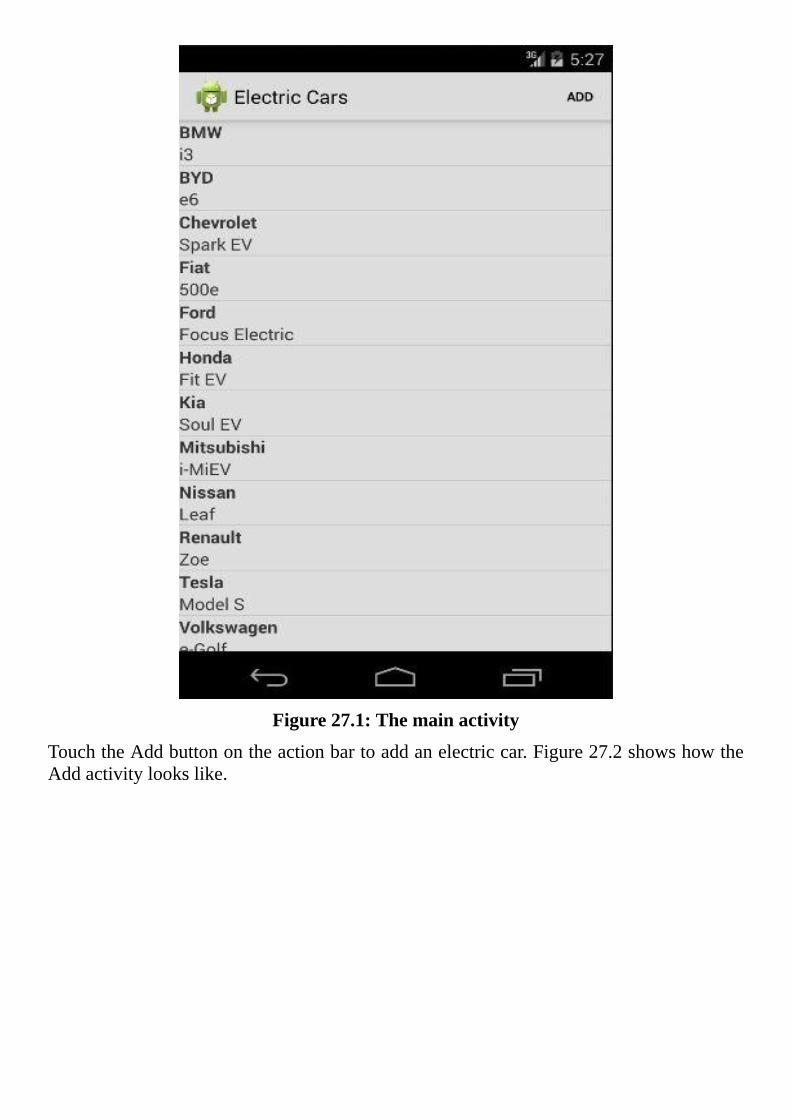
Figure27.1:Themainactivity
TouchtheAddbuttonontheactionbartoaddanelectriccar.Figure27.2showshowtheAddactivitylookslike.
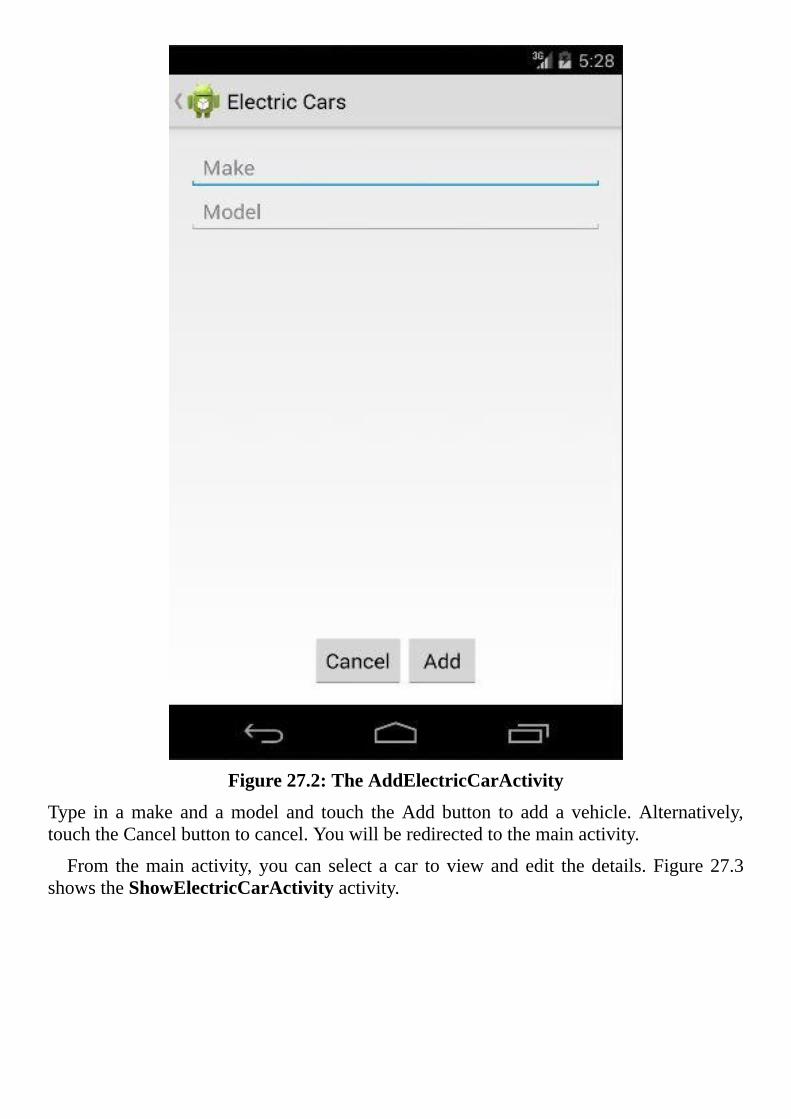
Figure27.2:TheAddElectricCarActivity
Type in amake and amodel and touch theAdd button to add a vehicle.Alternatively,touchtheCancelbuttontocancel.Youwillberedirectedtothemainactivity.
From themainactivity,youcan select a car toviewandedit thedetails.Figure27.3showstheShowElectricCarActivityactivity.
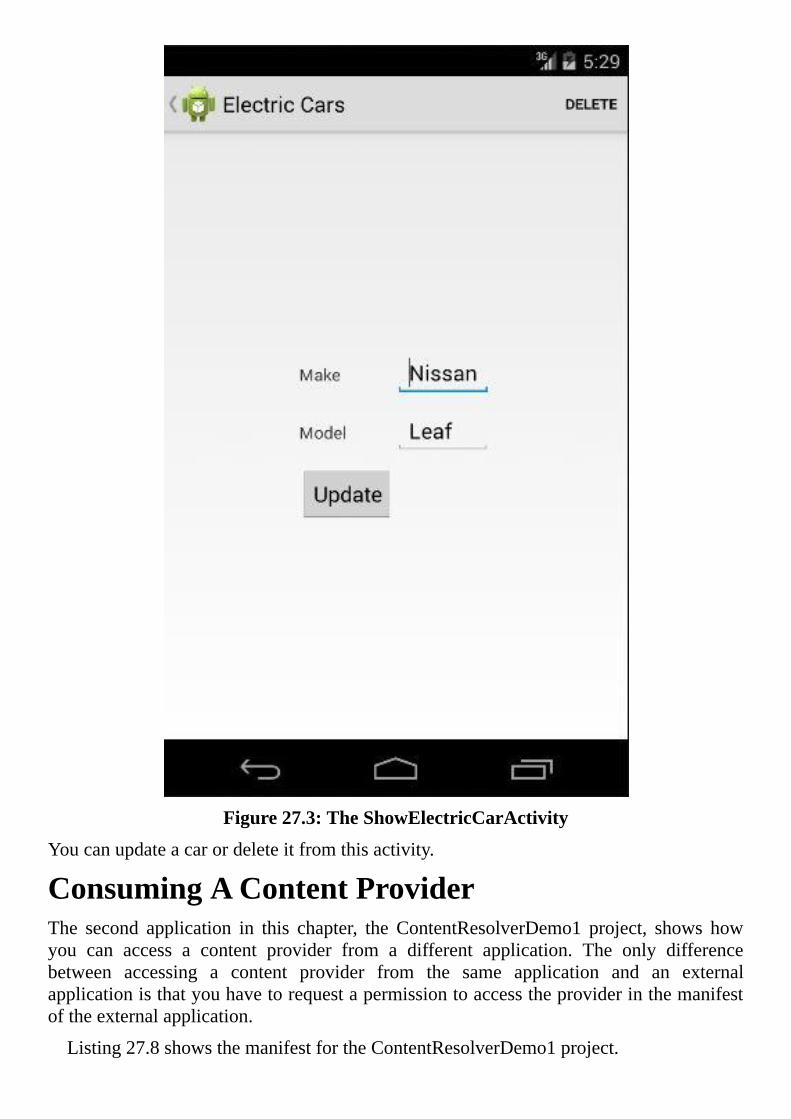
Figure27.3:TheShowElectricCarActivity
Youcanupdateacarordeleteitfromthisactivity.
ConsumingAContentProviderThe second application in this chapter, the ContentResolverDemo1 project, shows howyou can access a content provider from a different application. The only differencebetween accessing a content provider from the same application and an externalapplicationisthatyouhavetorequestapermissiontoaccesstheproviderinthemanifestoftheexternalapplication.
Listing27.8showsthemanifestfortheContentResolverDemo1project.
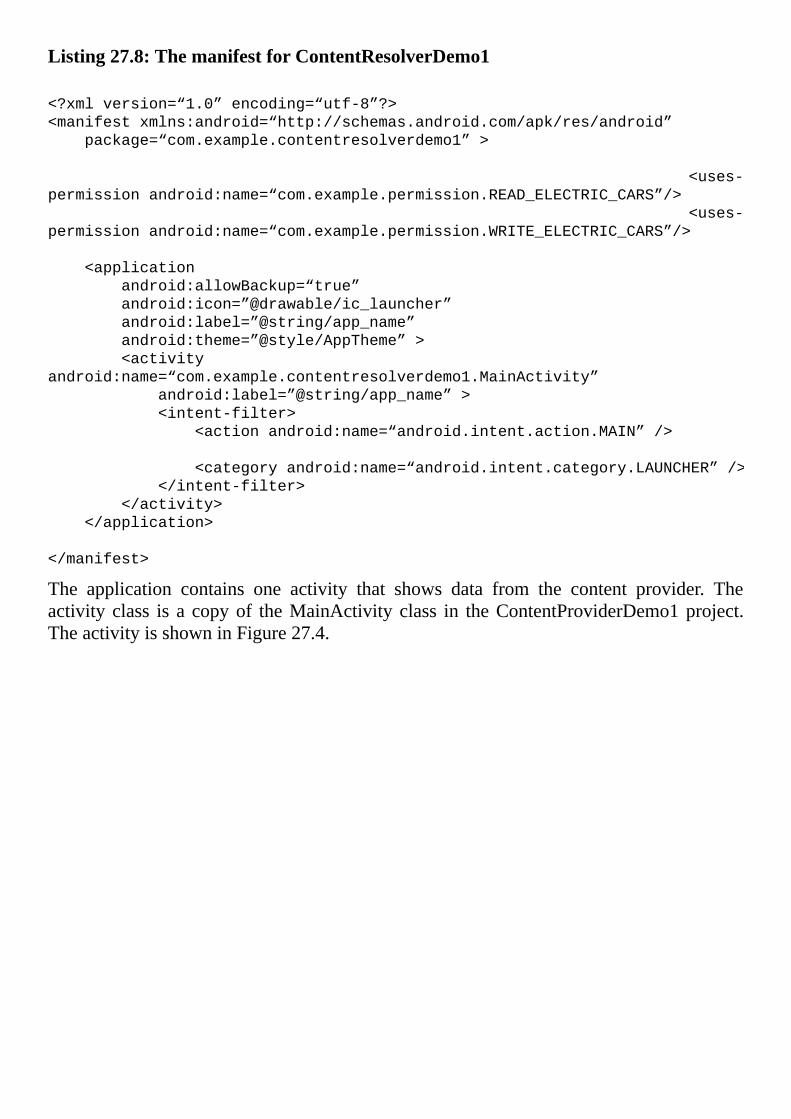
Listing27.8:ThemanifestforContentResolverDemo1
<?xmlversion=“1.0”encoding=“utf-8”?>
<manifestxmlns:android=“http://schemas.android.com/apk/res/android”
package=“com.example.contentresolverdemo1”>
<uses-
permissionandroid:name=“com.example.permission.READ_ELECTRIC_CARS”/>
<uses-
permissionandroid:name=“com.example.permission.WRITE_ELECTRIC_CARS”/>
<application
android:allowBackup=“true”
android:icon=”@drawable/ic_launcher”
android:label=”@string/app_name”
android:theme=”@style/AppTheme”>
<activity
android:name=“com.example.contentresolverdemo1.MainActivity”
android:label=”@string/app_name”>
<intent-filter>
<actionandroid:name=“android.intent.action.MAIN”/>
<categoryandroid:name=“android.intent.category.LAUNCHER”/>
</intent-filter>
</activity>
</application>
</manifest>
The application contains one activity that shows data from the content provider. Theactivity class is a copyof theMainActivity class in theContentProviderDemo1project.TheactivityisshowninFigure27.4.
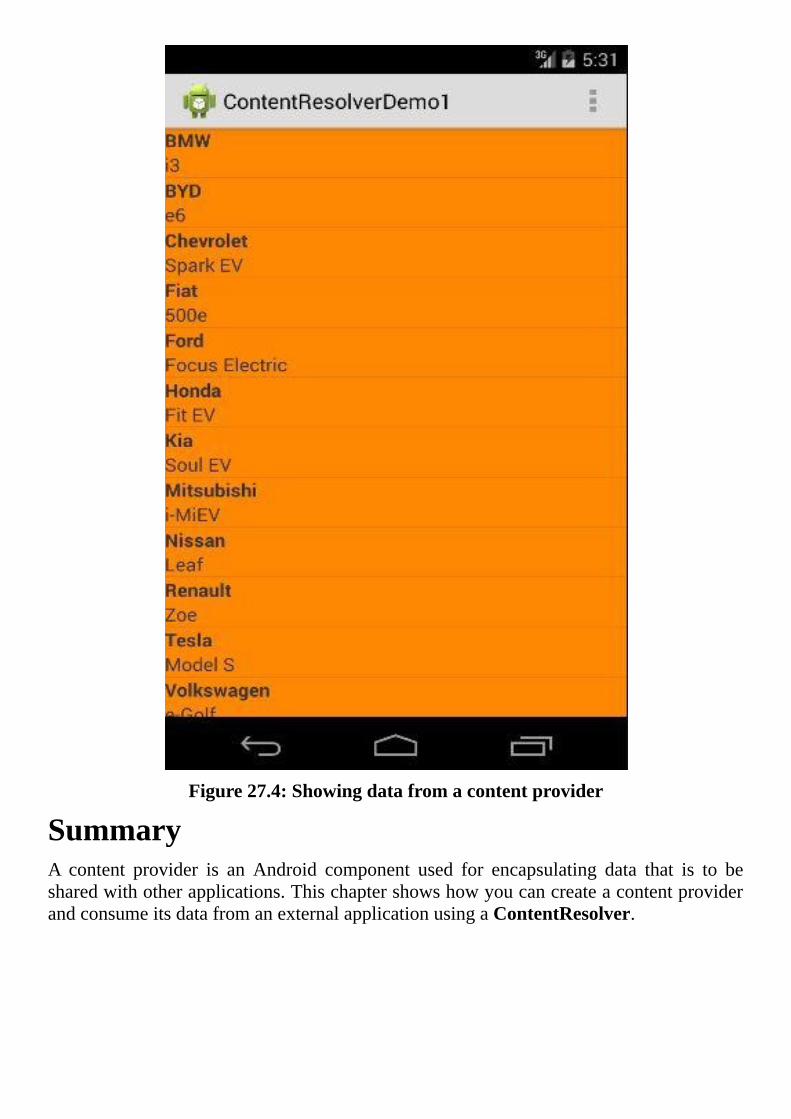
Figure27.4:Showingdatafromacontentprovider
SummaryA content provider is an Android component used for encapsulating data that is to besharedwithotherapplications.ThischaptershowshowyoucancreateacontentproviderandconsumeitsdatafromanexternalapplicationusingaContentResolver.
AppendixAInstallingtheJDK
You need the Java SE Development Kit (JDK) to create Android applications. Thisappendixshowsyouhowtodownloadandinstallit.
DownloadingandInstallingtheJDKBefore you can start compiling and running your programs, you need to download andinstall the JDK as well as configure some system environment variables. You candownload the latest version of the JDK forWindows,Linux, andMacOSX from thisOraclewebsite:
http://www.oracle.com/technetwork/java/javase/downloads/index.html
Ifyouclick theDownload linkon thepage,you’llbe redirected toapage that letsyouselectaninstallationforyourplatform:Windows,Linux,SolarisorMacOSX.ThesamelinkalsoprovidestheJRE.However,fordevelopmentyouneedtheJDKnotonlytheJRE,whichisonlygoodforrunningcompiledJavaclasses.TheJDKincludestheJRE.
AfterdownloadingtheJDK,youneedtoinstallit.Installationvariesfromoneoperatingsystemtoanother.Thesesubsectionsdetailtheinstallationprocess.
InstallingonWindowsInstallingonWindowsiseasy.Simplydouble-clicktheexecutablefileinyoudownloadedinWindowsExplorerandfollowtheinstructions.FigureA.1showsthefirstdialogoftheinstallationwizard.
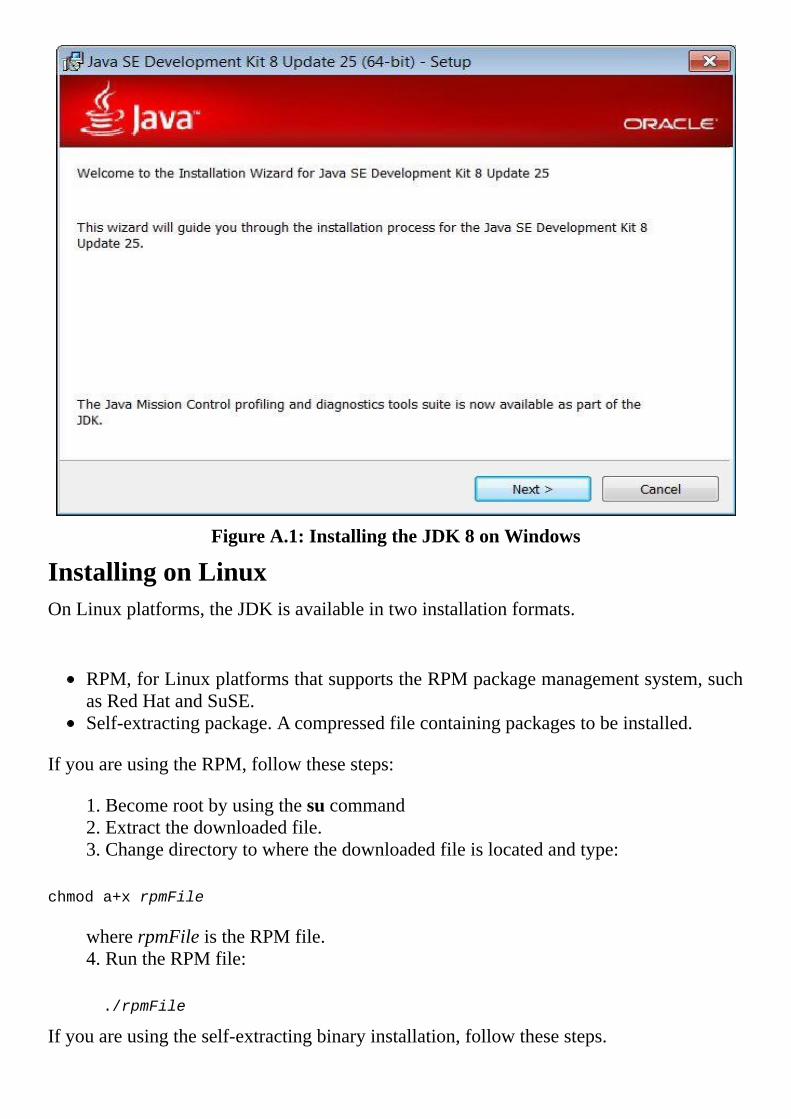
FigureA.1:InstallingtheJDK8onWindows
InstallingonLinuxOnLinuxplatforms,theJDKisavailableintwoinstallationformats.
RPM,forLinuxplatformsthatsupportstheRPMpackagemanagementsystem,suchasRedHatandSuSE.Self-extractingpackage.Acompressedfilecontainingpackagestobeinstalled.
IfyouareusingtheRPM,followthesesteps:
1.Becomerootbyusingthesucommand2.Extractthedownloadedfile.3.Changedirectorytowherethedownloadedfileislocatedandtype:
chmoda+xrpmFile
whererpmFileistheRPMfile.4.RuntheRPMfile:
./rpmFile
Ifyouareusingtheself-extractingbinaryinstallation,followthesesteps.
1.Extractthedownloadedfile.2.Usechmodtogivethefiletheexecutepermissions:
chmoda+xbinFile
Here,binFileisthedownloadedbinfileforyourplatform.3.Changedirectorytothelocationwhereyouwantthefilestobeinstalled.4. Run the self-extracting binary. Execute the downloaded file with the pathprepended to it.For example, if the file is in the currentdirectory, prepend itwith“./”:
./binFile
InstallingonMacOSXToinstalltheJDK8onMacOSX,youneedanIntel-basedcomputerrunningOSX10.8(MountainLion)or later.Youalsoneedadministratorprivileges. Installation is straight-forward.
1.Double-clickonthe.dmgfileyoudownloaded.2.IntheFinderwindowthatappears,double-clickthepackageicon.3.Onthefirstwindowthatappears,clickContinue.4.TheInstallationTypewindowappears.ClickInstall.5.Awindowappearsthatsays“Installeristryingtoinstallnewsoftware.Typeyourpasswordtoallowthis.”EnteryourAdminpassword.6.ClickInstallSoftwaretostarttheinstallation.
SettingSystemEnvironmentVariablesAfteryouinstalltheJDK,youcanstartcompilingandrunningJavaprograms.However,youcanonly invoke thecompiler and the JRE from the locationof the javac and javaprogramsorbyincludingtheinstallationpathinyourcommand.Tomakecompilingandrunningprogramseasier, it is important thatyouset thePATHenvironmentvariableonyourcomputersothatyoucaninvokejavacandjavafromanydirectory.
SettingthePathEnvironmentVariableonWindows
TosetthePATHenvironmentvariableonWindows,dothesesteps:
1.ClickStart,Settings,ControlPanel.2.Double-clickSystem.3.SelecttheAdvancedtabandthenclickonEnvironmentVariables.4.LocatethePathenvironmentvariableintheUserVariablesorSystemVariablespanes.ThevalueofPathisaseriesofdirectoriesseparatedbysemicolons.Now,addthefullpathtothebindirectoryofyourJavainstallationdirectorytotheendoftheexistingvalueofPath.Thedirectorylookssomethinglike:
C:\ProgramFiles\Java\jdk1.8.0_<version>\bin
5.ClickSet,OK,orApply.
SettingthePathEnvironmentVariableonUNIXandLinux
Settingthepathenvironmentvariableontheseoperatingsystemsdependsontheshellyouuse.FortheCshell,addthefollowingtotheendofyour~/.cshrcfile:
setpath=(path/to/jdk/bin$path)
wherepath/to/jdk/binisthebindirectoryunderyourJDKinstallationdirectory.
For the Bourne Again shell, add this line to the end of your ~/.bashrc or~/.bash_profilefile:
exportPATH=/path/to/jdk/bin:$PATH
Here,path/to/jdk/binisthebindirectoryunderyourJDKinstallationdirectory.
TestingtheInstallationTo confirm that you have installed the JDK correctly, type javac on the command linefromanydirectoryonyourmachine.Ifyouseeinstructionsonhowtocorrectlyrunjavac,thenyouhavesuccessfullyinstalledit.Ontheotherhand,ifyoucanonlyrunjavacfromthebindirectoryoftheJDKinstallationdirectory,yourPATHenvironmentvariablewasnotconfiguredproperly.
DownloadingJavaAPIDocumentationWhen programming Java, youwill invariably use classes from the core libraries. Evenseasoned programmers look up the documentation for those libraries when they arecoding.Therefore,youshoulddownloadthedocumentationfromhere.
http://www.oracle.com/technetwork/java/javase/downloads/index.html
(Youneedtoscrolldownuntilyousee“JavaSE8Documentation.”)
TheAPIisalsoavailableonlinehere:
http://download.oracle.com/javase/8/docs/api
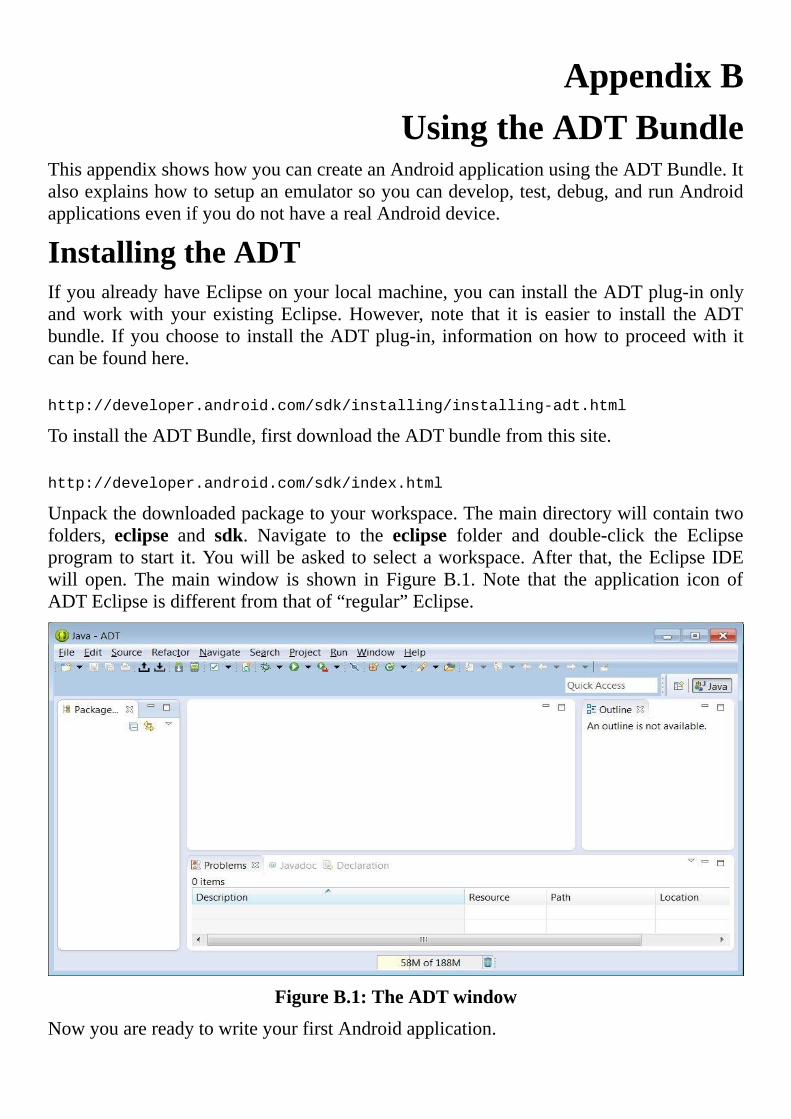
AppendixBUsingtheADTBundle
ThisappendixshowshowyoucancreateanAndroidapplicationusingtheADTBundle.Italsoexplainshowtosetupanemulatorsoyoucandevelop,test,debug,andrunAndroidapplicationsevenifyoudonothavearealAndroiddevice.
InstallingtheADTIfyoualreadyhaveEclipseonyourlocalmachine,youcaninstalltheADTplug-inonlyandworkwith your existingEclipse.However, note that it is easier to install theADTbundle.Ifyouchoosetoinstall theADTplug-in, informationonhowtoproceedwithitcanbefoundhere.
http://developer.android.com/sdk/installing/installing-adt.html
ToinstalltheADTBundle,firstdownloadtheADTbundlefromthissite.
http://developer.android.com/sdk/index.html
Unpackthedownloadedpackagetoyourworkspace.Themaindirectorywillcontaintwofolders, eclipse and sdk. Navigate to the eclipse folder and double-click the Eclipseprogramtostart it.Youwillbeasked toselectaworkspace.After that, theEclipseIDEwill open.Themainwindow is shown in FigureB.1.Note that the application icon ofADTEclipseisdifferentfromthatof“regular”Eclipse.
FigureB.1:TheADTwindow
NowyouarereadytowriteyourfirstAndroidapplication.
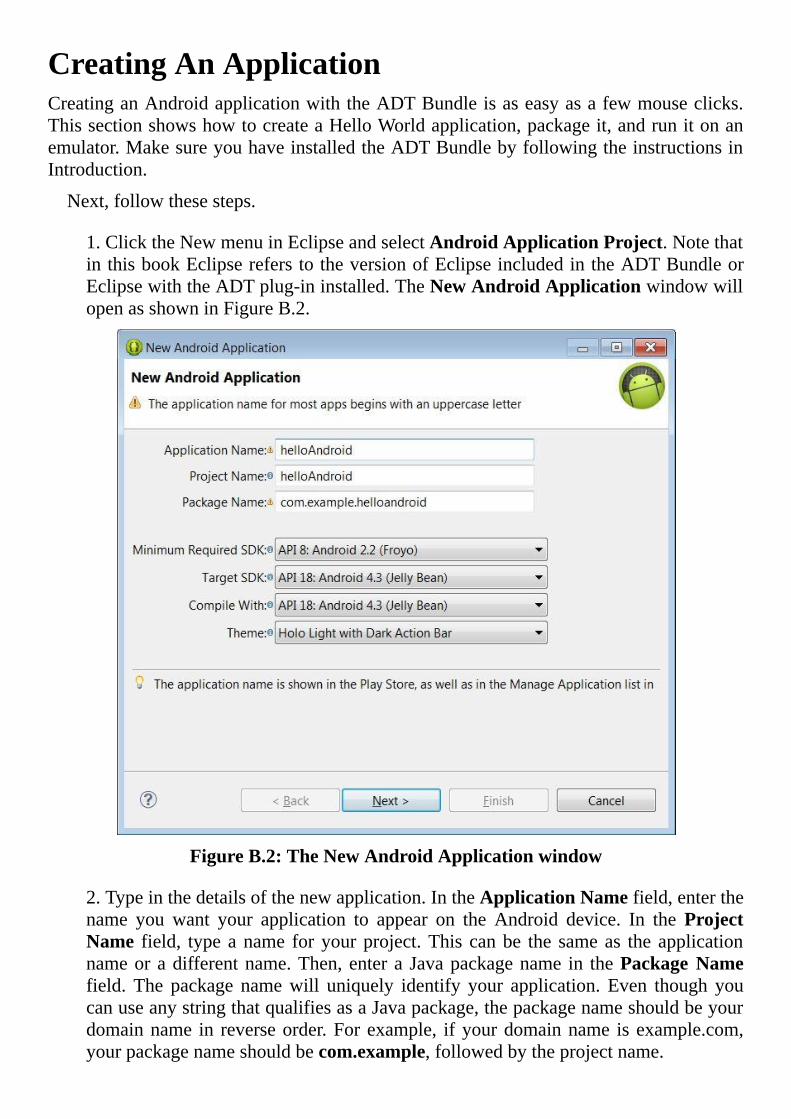
CreatingAnApplicationCreatinganAndroidapplicationwiththeADTBundleisaseasyasafewmouseclicks.ThissectionshowshowtocreateaHelloWorldapplication,packageit,andrunitonanemulator.MakesureyouhaveinstalledtheADTBundlebyfollowingtheinstructionsinIntroduction.
Next,followthesesteps.
1.ClicktheNewmenuinEclipseandselectAndroidApplicationProject.NotethatinthisbookEclipsereferstotheversionofEclipseincludedintheADTBundleorEclipsewiththeADTplug-ininstalled.TheNewAndroidApplicationwindowwillopenasshowninFigureB.2.
FigureB.2:TheNewAndroidApplicationwindow
2.Typeinthedetailsofthenewapplication.IntheApplicationNamefield,enterthename you want your application to appear on the Android device. In theProjectName field, typeaname foryourproject.This canbe the sameas the applicationnameoradifferentname.Then,entera Javapackagename in thePackageNamefield. The package namewill uniquely identify your application. Even though youcanuseanystringthatqualifiesasaJavapackage,thepackagenameshouldbeyourdomainname in reverseorder.Forexample, ifyourdomainname isexample.com,yourpackagenameshouldbecom.example,followedbytheprojectname.
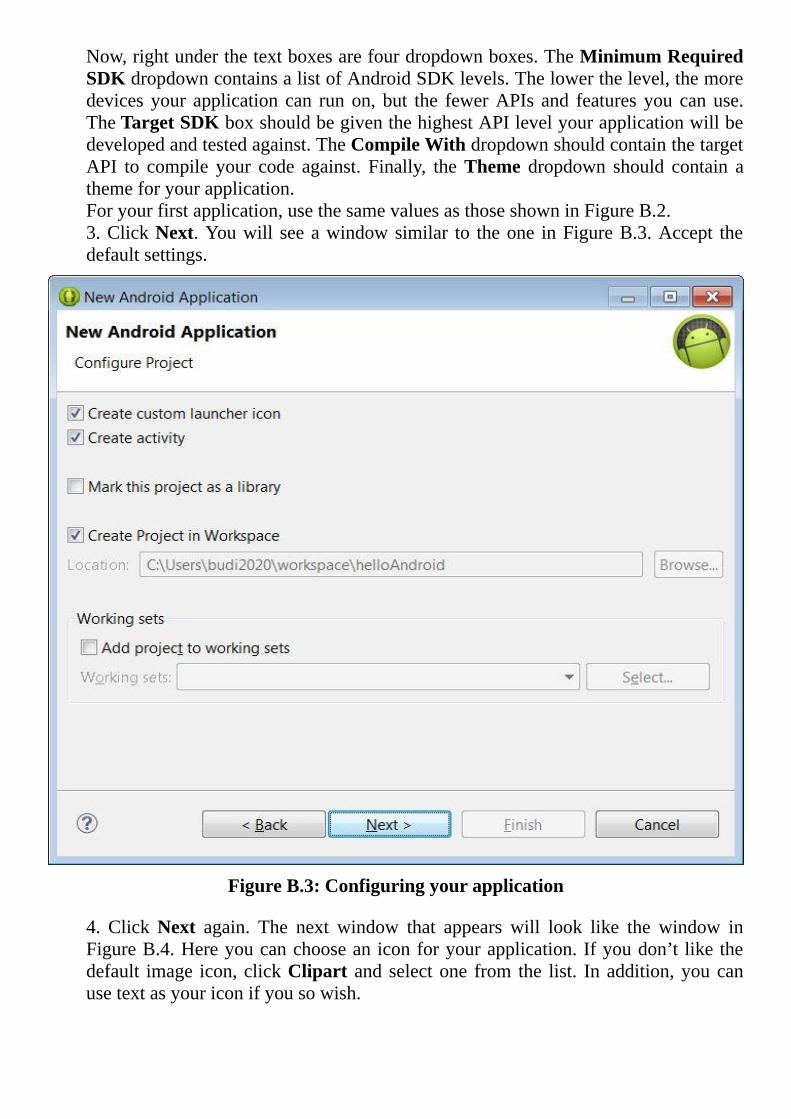
Now,rightunderthetextboxesarefourdropdownboxes.TheMinimumRequiredSDKdropdowncontainsalistofAndroidSDKlevels.Thelowerthelevel,themoredevices your application can runon, but the fewerAPIs and features you canuse.TheTargetSDKboxshouldbegiventhehighestAPIlevelyourapplicationwillbedevelopedandtestedagainst.TheCompileWithdropdownshouldcontainthetargetAPI to compile your code against. Finally, theTheme dropdown should contain athemeforyourapplication.Foryourfirstapplication,usethesamevaluesasthoseshowninFigureB.2.3.ClickNext.Youwill seeawindowsimilar to theone inFigureB.3.Accept thedefaultsettings.
FigureB.3:Configuringyourapplication
4. ClickNext again. The next window that appears will look like the window inFigureB.4.Hereyoucanchooseaniconforyourapplication.Ifyoudon’t likethedefault image icon,clickClipart and selectone from the list. Inaddition,youcanusetextasyouriconifyousowish.
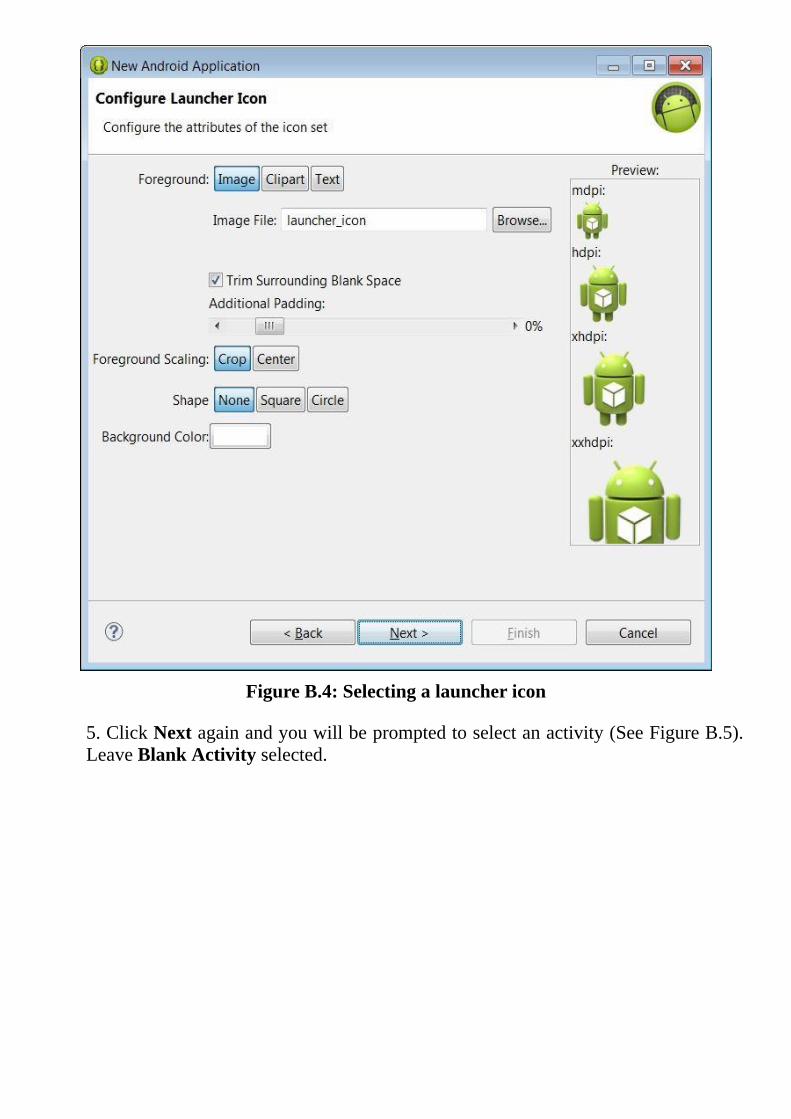
FigureB.4:Selectingalaunchericon
5.ClickNextagainandyouwillbepromptedtoselectanactivity(SeeFigureB.5).LeaveBlankActivityselected.
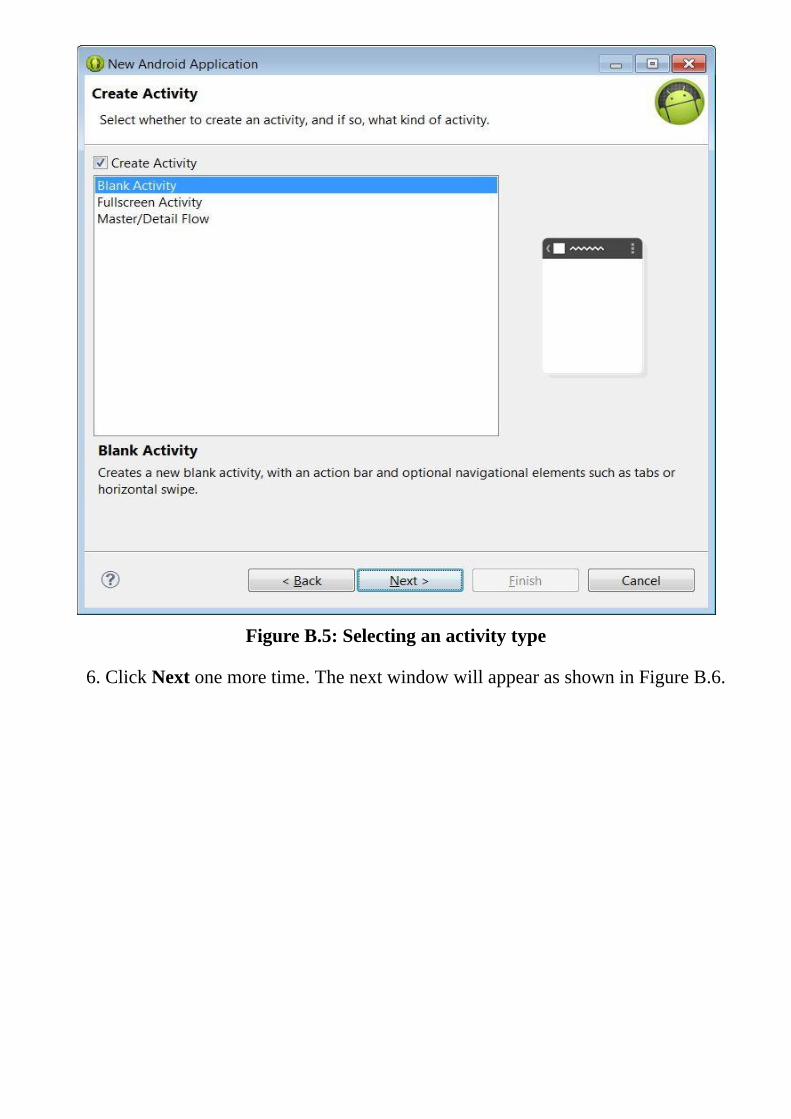
FigureB.5:Selectinganactivitytype
6.ClickNextonemoretime.ThenextwindowwillappearasshowninFigureB.6.
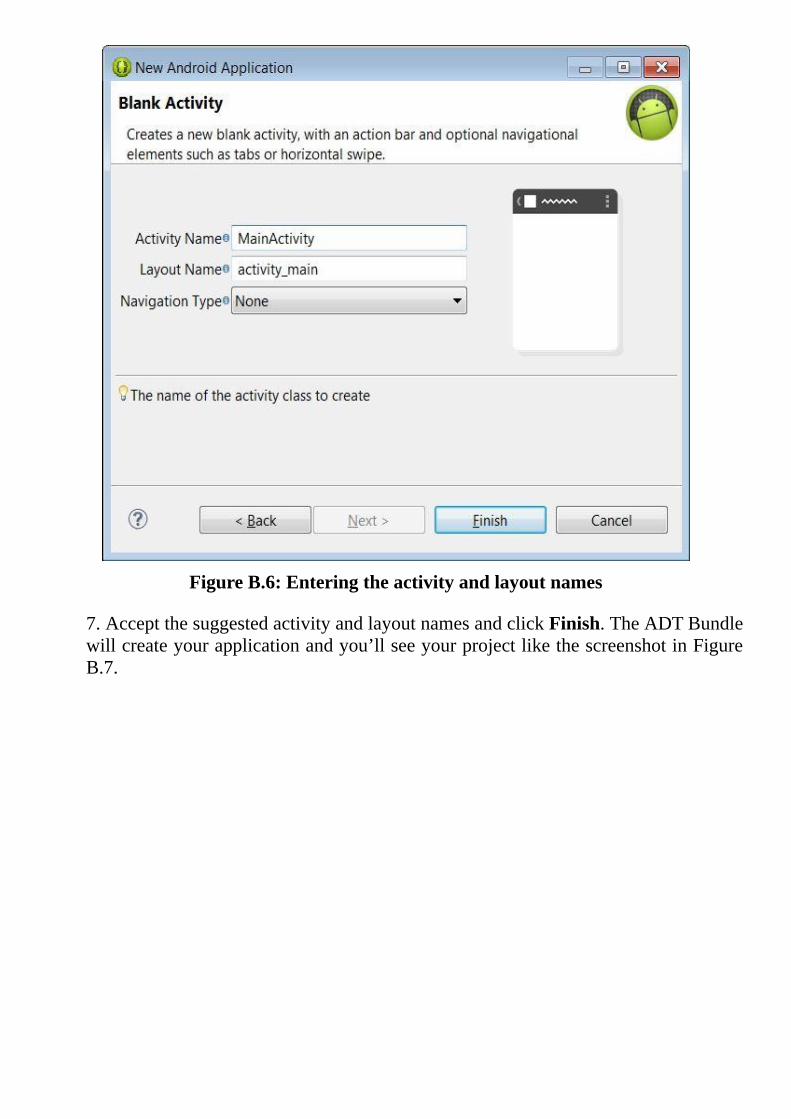
FigureB.6:Enteringtheactivityandlayoutnames
7.AcceptthesuggestedactivityandlayoutnamesandclickFinish.TheADTBundlewillcreateyourapplicationandyou’llseeyourprojectlikethescreenshotinFigureB.7.
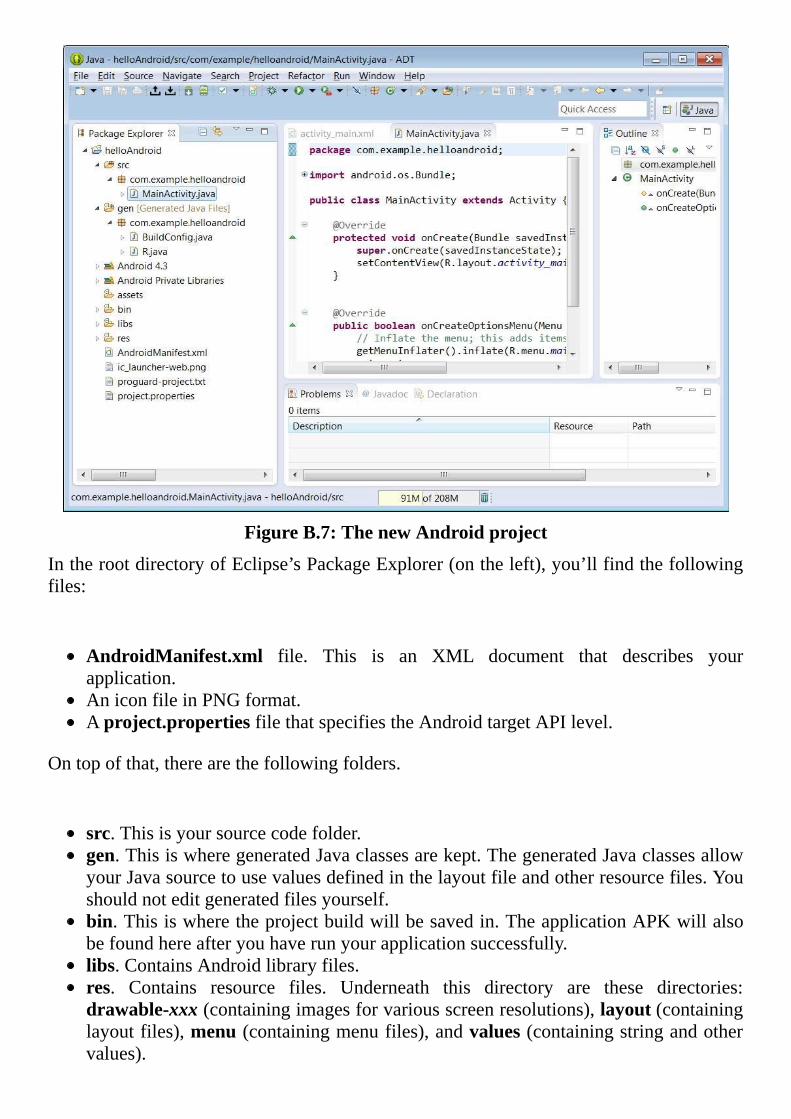
FigureB.7:ThenewAndroidproject
IntherootdirectoryofEclipse’sPackageExplorer(ontheleft),you’llfindthefollowingfiles:
AndroidManifest.xml file. This is an XML document that describes yourapplication.AniconfileinPNGformat.Aproject.propertiesfilethatspecifiestheAndroidtargetAPIlevel.
Ontopofthat,therearethefollowingfolders.
src.Thisisyoursourcecodefolder.gen.ThisiswheregeneratedJavaclassesarekept.ThegeneratedJavaclassesallowyourJavasourcetousevaluesdefinedinthelayoutfileandotherresourcefiles.Youshouldnoteditgeneratedfilesyourself.bin.Thisiswheretheprojectbuildwillbesavedin.TheapplicationAPKwillalsobefoundhereafteryouhaverunyourapplicationsuccessfully.libs.ContainsAndroidlibraryfiles.res. Contains resource files. Underneath this directory are these directories:drawable-xxx(containingimagesforvariousscreenresolutions),layout(containinglayoutfiles),menu(containingmenufiles),andvalues(containingstringandothervalues).
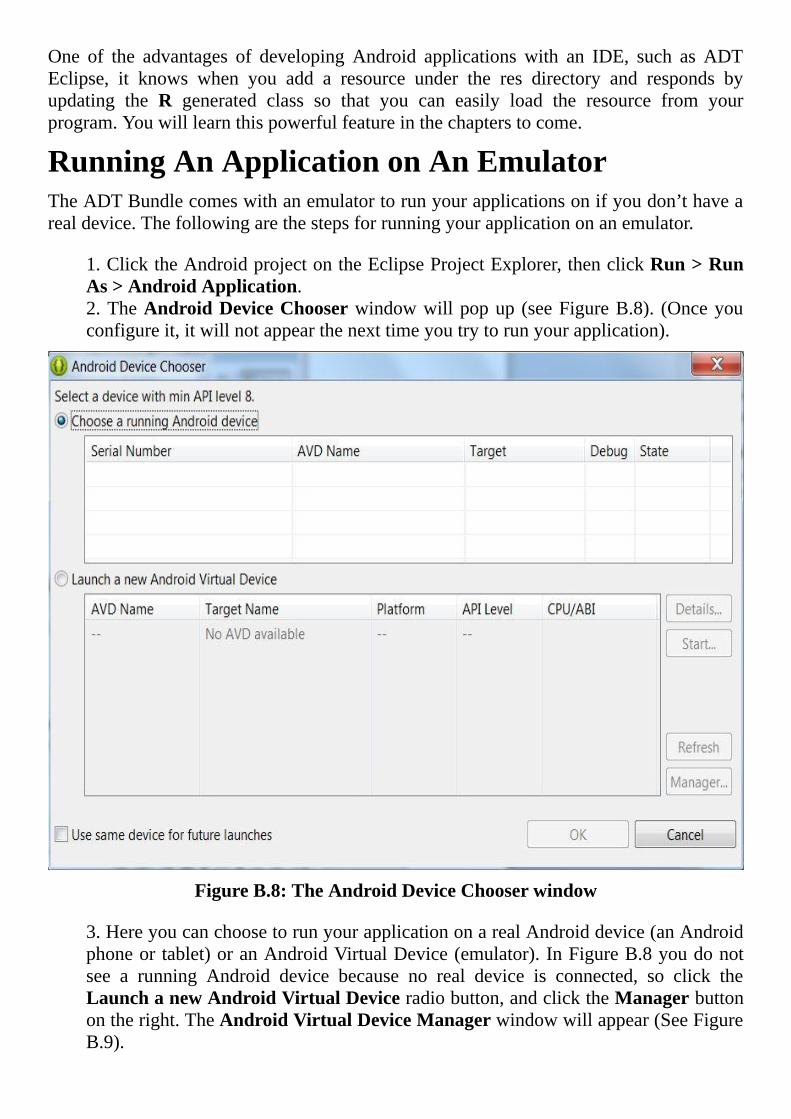
One of the advantages of developingAndroid applications with an IDE, such as ADTEclipse, it knows when you add a resource under the res directory and responds byupdating the R generated class so that you can easily load the resource from yourprogram.Youwilllearnthispowerfulfeatureinthechapterstocome.
RunningAnApplicationonAnEmulatorTheADTBundlecomeswithanemulatortorunyourapplicationsonifyoudon’thavearealdevice.Thefollowingarethestepsforrunningyourapplicationonanemulator.
1.ClicktheAndroidprojectontheEclipseProjectExplorer,thenclickRun>RunAs>AndroidApplication.2.TheAndroidDeviceChooserwindowwillpopup (seeFigureB.8). (Onceyouconfigureit,itwillnotappearthenexttimeyoutrytorunyourapplication).
FigureB.8:TheAndroidDeviceChooserwindow
3.HereyoucanchoosetorunyourapplicationonarealAndroiddevice(anAndroidphoneortablet)oranAndroidVirtualDevice(emulator).InFigureB.8youdonotsee a running Android device because no real device is connected, so click theLaunchanewAndroidVirtualDeviceradiobutton,andclicktheManagerbuttonontheright.TheAndroidVirtualDeviceManagerwindowwillappear(SeeFigureB.9).
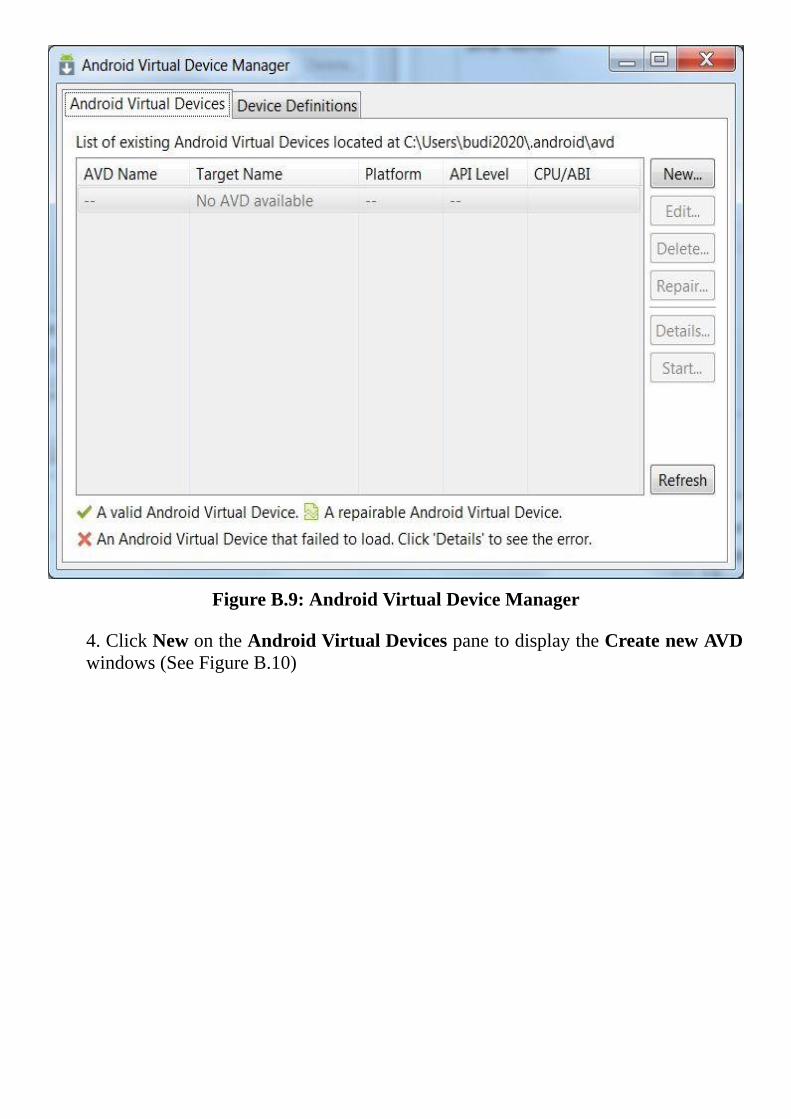
FigureB.9:AndroidVirtualDeviceManager
4.ClickNewontheAndroidVirtualDevicespanetodisplaytheCreatenewAVDwindows(SeeFigureB.10)
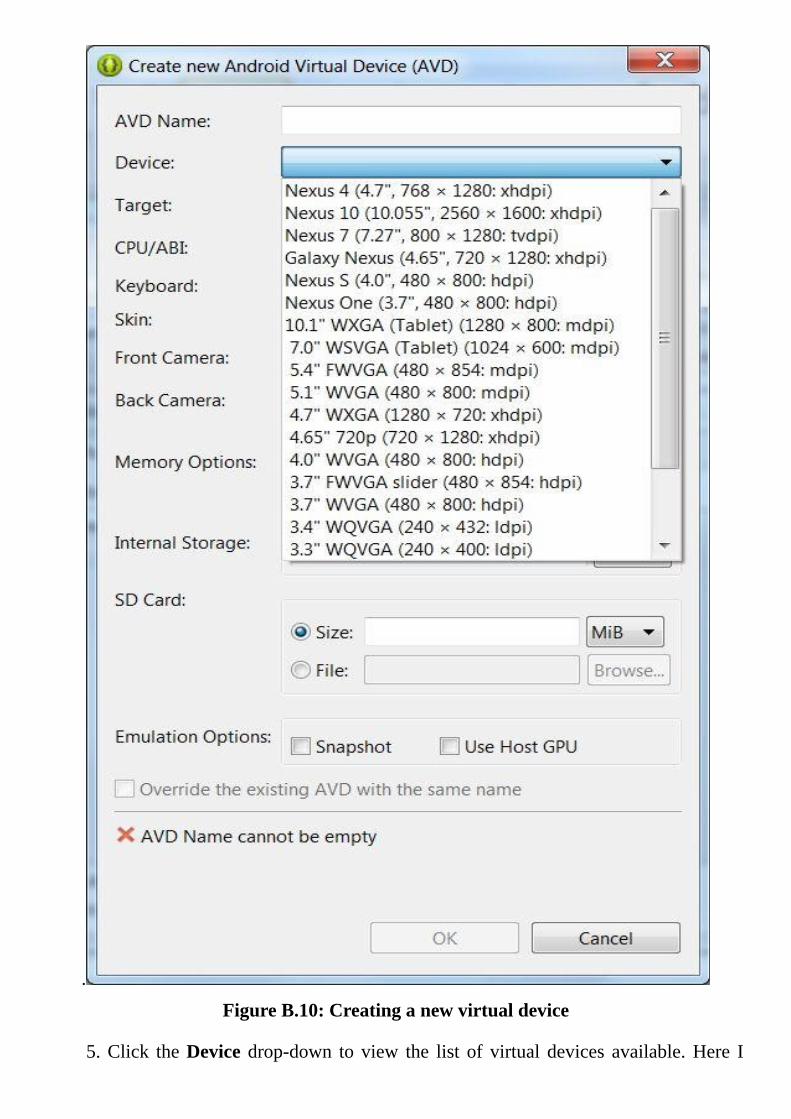
.
FigureB.10:Creatinganewvirtualdevice
5.Click theDevice drop-down to view the list of virtual devices available.Here I
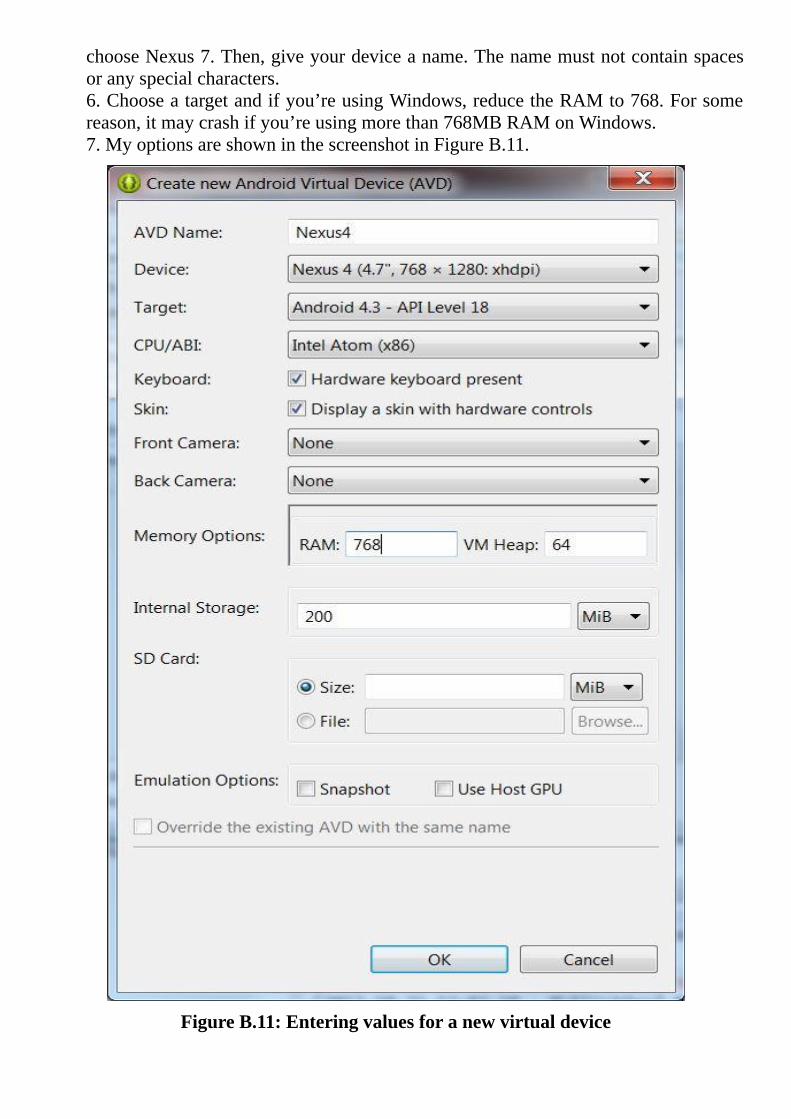
chooseNexus7.Then,giveyourdeviceaname.Thenamemustnotcontainspacesoranyspecialcharacters.6.Chooseatargetandifyou’reusingWindows,reducetheRAMto768.Forsomereason,itmaycrashifyou’reusingmorethan768MBRAMonWindows.7.MyoptionsareshowninthescreenshotinFigureB.11.
FigureB.11:Enteringvaluesforanewvirtualdevice
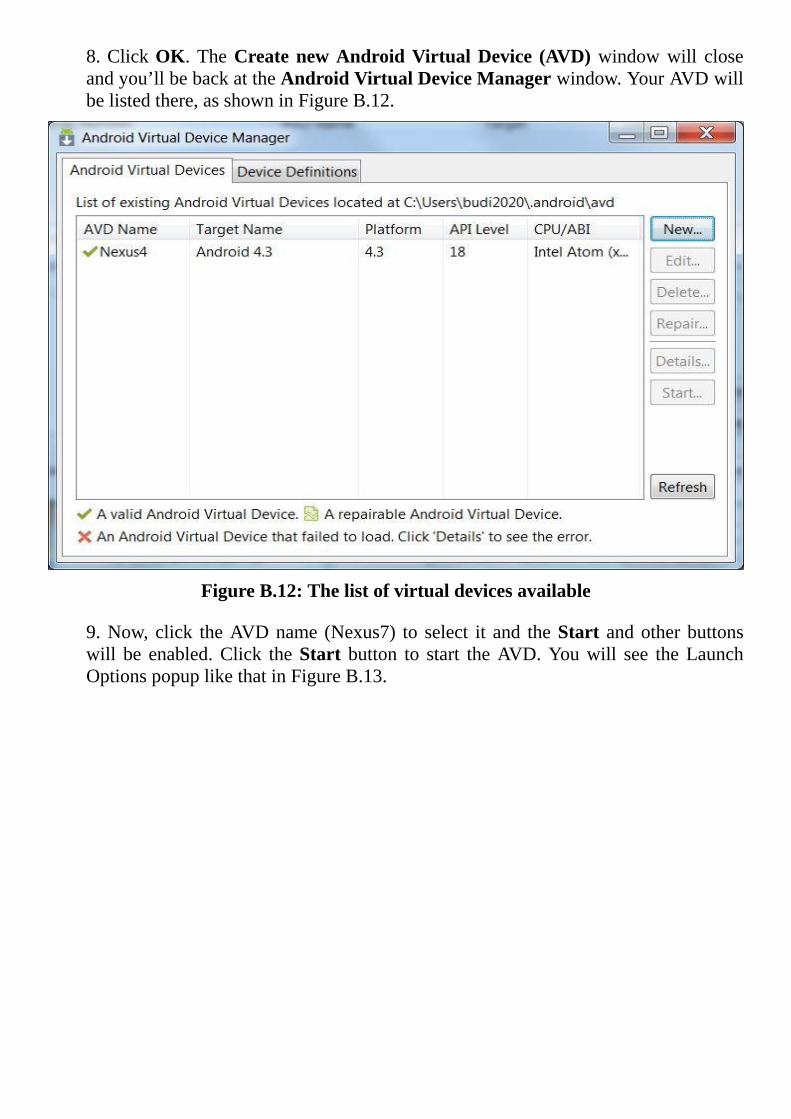
8.ClickOK.TheCreatenewAndroidVirtualDevice (AVD)windowwill closeandyou’llbebackattheAndroidVirtualDeviceManagerwindow.YourAVDwillbelistedthere,asshowninFigureB.12.
FigureB.12:Thelistofvirtualdevicesavailable
9.Now,click theAVDname (Nexus7) to select it and theStart andotherbuttonswill be enabled.Click theStart button to start theAVD.Youwill see theLaunchOptionspopuplikethatinFigureB.13.
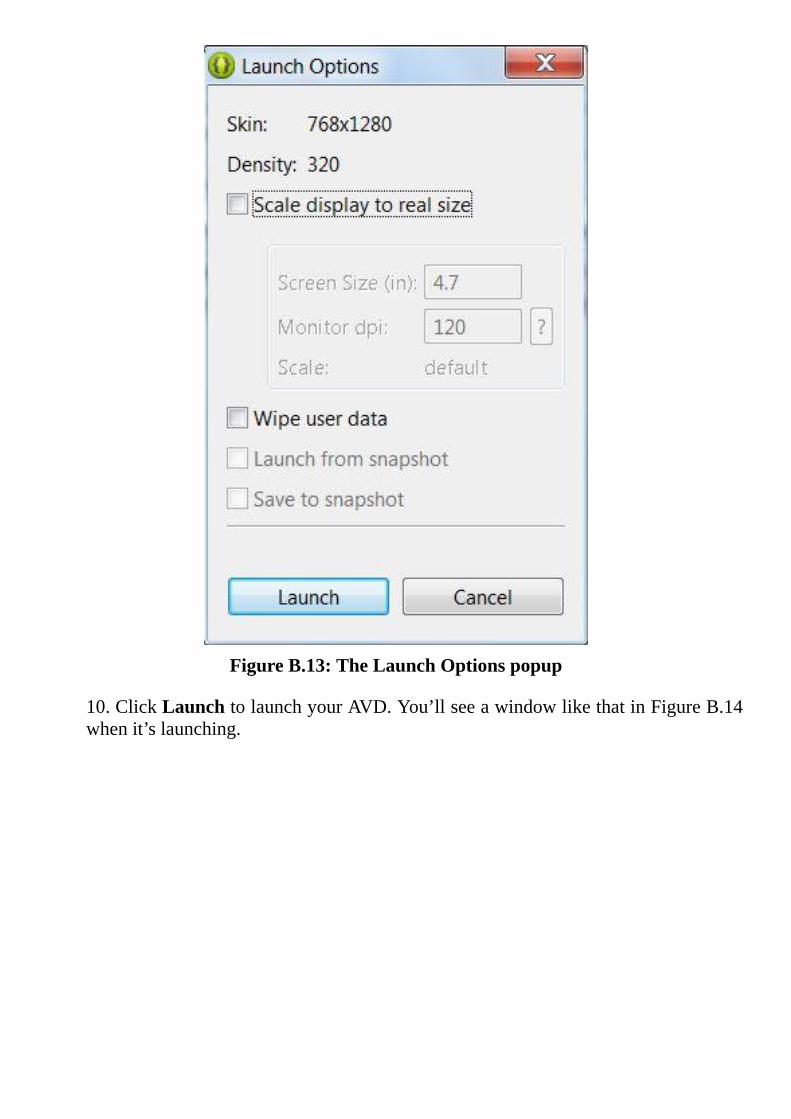
FigureB.13:TheLaunchOptionspopup
10.ClickLaunchtolaunchyourAVD.You’llseeawindowlikethatinFigureB.14whenit’slaunching.

FigureB.14:Startingtheemulator
Itwill takeafewminutesormoredependingonyourcomputerspeed.FigureB.15showstheemulatorwhenitisready.
FigureB.15:TheAndroidemulator
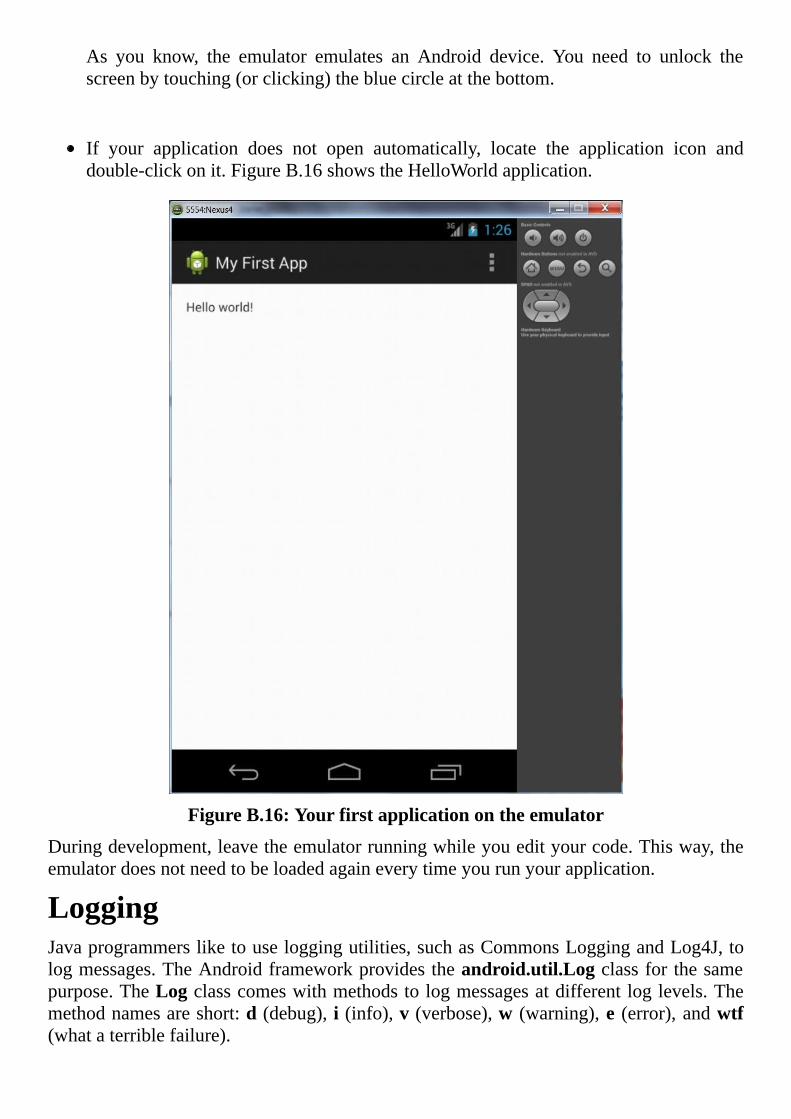
As you know, the emulator emulates an Android device. You need to unlock thescreenbytouching(orclicking)thebluecircleatthebottom.
If your application does not open automatically, locate the application icon anddouble-clickonit.FigureB.16showstheHelloWorldapplication.
FigureB.16:Yourfirstapplicationontheemulator
Duringdevelopment,leavetheemulatorrunningwhileyouedityourcode.Thisway,theemulatordoesnotneedtobeloadedagaineverytimeyourunyourapplication.
LoggingJavaprogrammersliketouseloggingutilities,suchasCommonsLoggingandLog4J,tologmessages.TheAndroidframeworkprovidestheandroid.util.Logclassforthesamepurpose.TheLogclasscomeswithmethodstologmessagesatdifferentloglevels.Themethodnamesareshort:d(debug),i(info),v(verbose),w (warning),e (error),andwtf(whataterriblefailure).
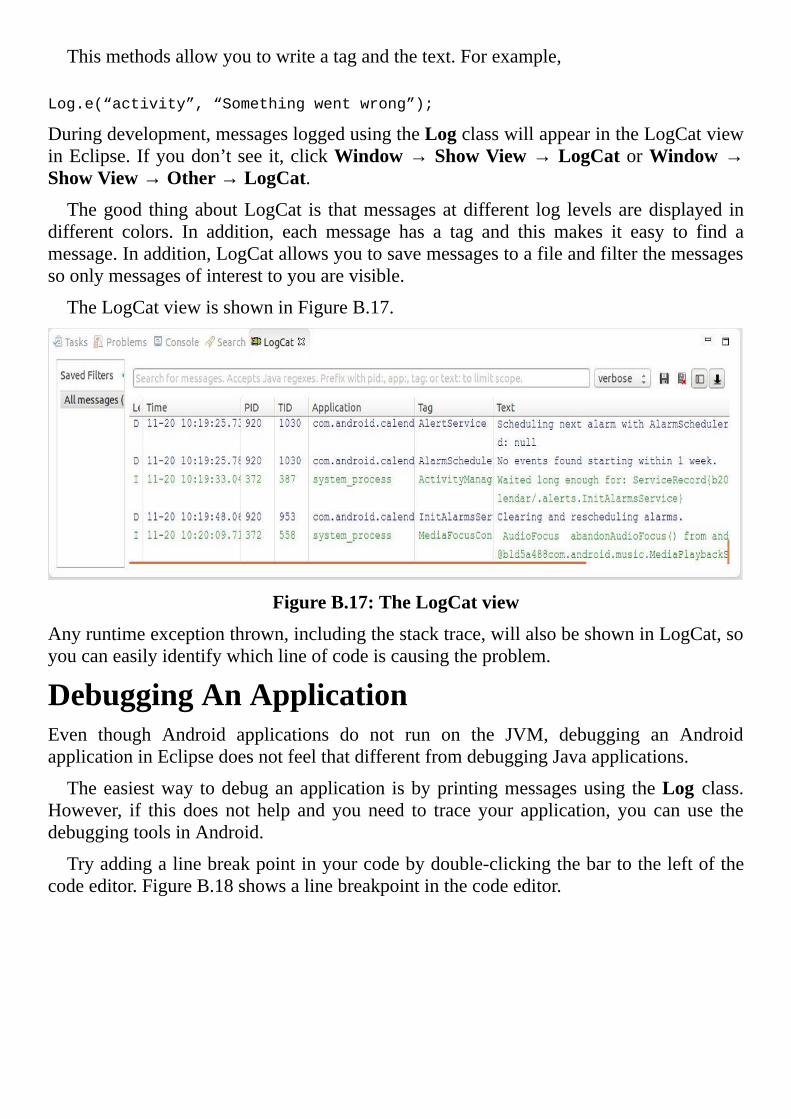
Thismethodsallowyoutowriteatagandthetext.Forexample,
Log.e(“activity”,“Somethingwentwrong”);
Duringdevelopment,messagesloggedusingtheLogclasswillappearintheLogCatviewinEclipse.Ifyoudon’tseeit,clickWindow→ShowView→LogCatorWindow→ShowView→Other→LogCat.
Thegood thingaboutLogCat is thatmessagesatdifferent log levelsaredisplayed indifferent colors. In addition, each message has a tag and this makes it easy to find amessage.Inaddition,LogCatallowsyoutosavemessagestoafileandfilterthemessagessoonlymessagesofinteresttoyouarevisible.
TheLogCatviewisshowninFigureB.17.
FigureB.17:TheLogCatview
Anyruntimeexceptionthrown,includingthestacktrace,willalsobeshowninLogCat,soyoucaneasilyidentifywhichlineofcodeiscausingtheproblem.
DebuggingAnApplicationEven though Android applications do not run on the JVM, debugging an AndroidapplicationinEclipsedoesnotfeelthatdifferentfromdebuggingJavaapplications.
Theeasiestway todebuganapplication isbyprintingmessagesusing theLog class.However, if this does not help andyouneed to trace your application, you canuse thedebuggingtoolsinAndroid.
Tryaddingalinebreakpointinyourcodebydouble-clickingthebartotheleftofthecodeeditor.FigureB.18showsalinebreakpointinthecodeeditor.
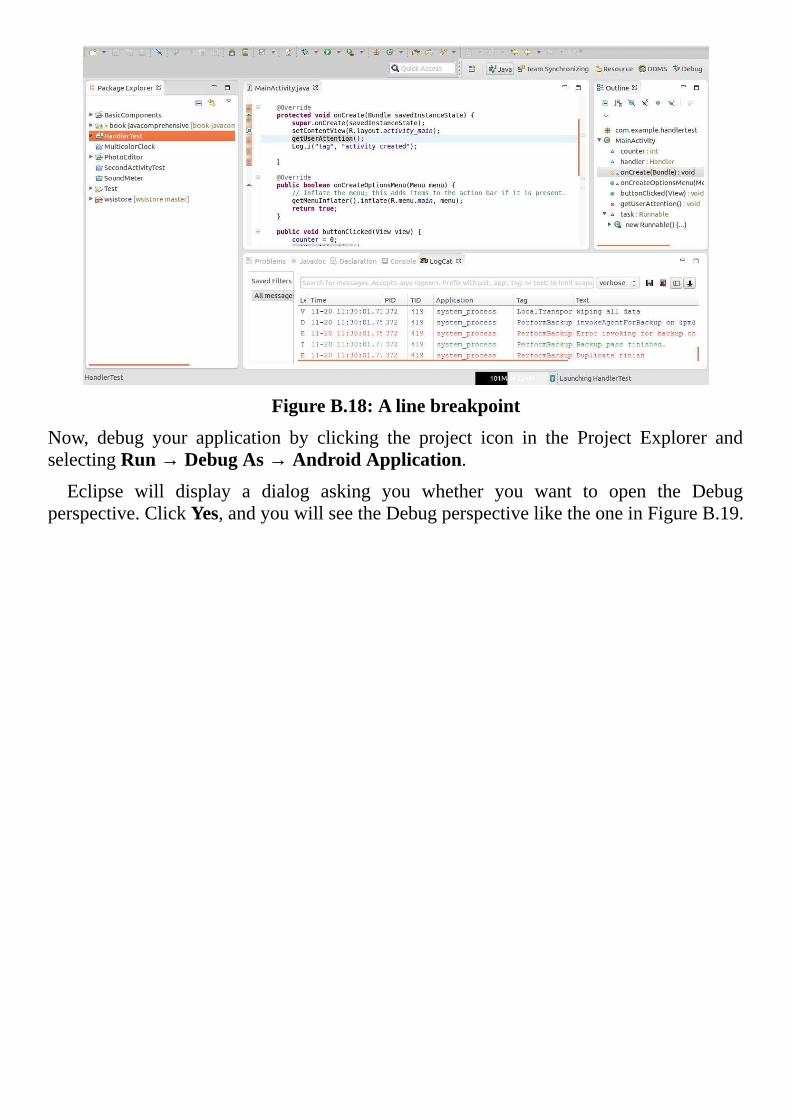
FigureB.18:Alinebreakpoint
Now, debug your application by clicking the project icon in the Project Explorer andselectingRun→DebugAs→AndroidApplication.
Eclipse will display a dialog asking you whether you want to open the Debugperspective.ClickYes,andyouwillseetheDebugperspectiveliketheoneinFigureB.19.

FigureB.19:TheDebugperspective
Here,youcanstepintoyourcode,viewyourvariables,andsoon.
In addition to a debugger, Android also ships with Dalvik Debug Monitor Server(DDMS), which consists of a set of debugging tools. You can display the DDMS inEclipsebyshowingtheDDMSperspective.(SeeFigureB.20).
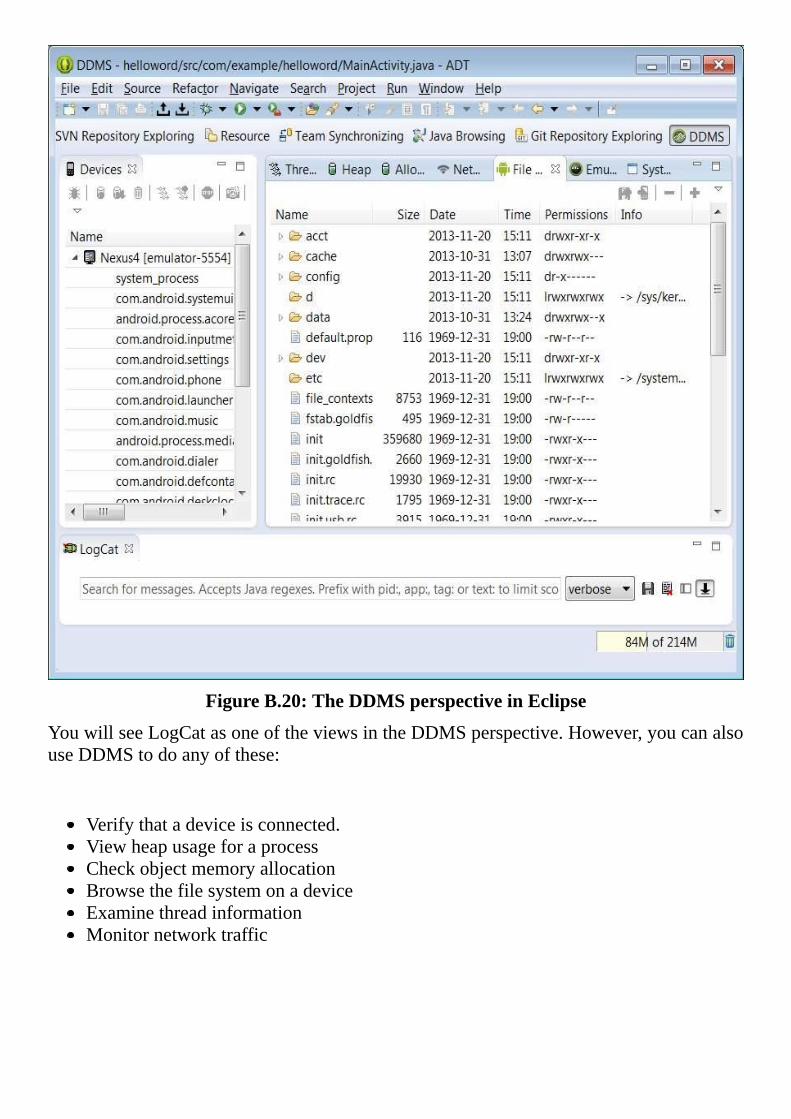
FigureB.20:TheDDMSperspectiveinEclipse
YouwillseeLogCatasoneoftheviewsintheDDMSperspective.However,youcanalsouseDDMStodoanyofthese:
Verifythatadeviceisconnected.ViewheapusageforaprocessCheckobjectmemoryallocationBrowsethefilesystemonadeviceExaminethreadinformationMonitornetworktraffic