Android and Torque Data Log Troubleshooting Procedure and Torque Data Log... · Email:...
12
JM Turbo Coopers, LLC | 530 E. Hunt Hwy Ste 103 San Tan Valley, AZ 85143 Email: [email protected] | ©2013 - 2016 Android and Torque Data Log Troubleshooting Procedure This procedure explains how to data log using the torque application on an android device. We use this to fine tune/optimize the ECU tuning, troubleshoot mechanical issue, and gather data that can help us understand the engine better. 1. Download and Torque App 1. Once you have an android phone or tablet go to google play and download the application torque. It is about $5 https://play.google.com/store/apps/details?id=org.prowl.torque&hl=en Figure 1, Torque App Icon 2. Open the device and click on the settings icon in the lower left corner. Figure 2, Torque Settings 3. Select the Vehicle Profile and Create a New Profile button to create a vehicle profile.
Transcript of Android and Torque Data Log Troubleshooting Procedure and Torque Data Log... · Email:...

JM Turbo Coopers, LLC | 530 E. Hunt Hwy Ste 103 San Tan Valley, AZ 85143 Email: [email protected] | ©2013 - 2016
Android and Torque Data Log Troubleshooting Procedure
This procedure explains how to data log using the torque application on an android device. We use
this to fine tune/optimize the ECU tuning, troubleshoot mechanical issue, and gather data that can
help us understand the engine better.
1. Download and Torque App
1. Once you have an android phone or tablet go to google play and download the
application torque. It is about $5
https://play.google.com/store/apps/details?id=org.prowl.torque&hl=en
Figure 1, Torque App Icon
2. Open the device and click on the settings icon in the lower left corner.
Figure 2, Torque Settings
3. Select the Vehicle Profile and Create a New Profile button to create a vehicle profile.

JM Turbo Coopers, LLC | 530 E. Hunt Hwy Ste 103 San Tan Valley, AZ 85143 Email: [email protected] | ©2013 - 2016
Figure 3, Vehicle Profile and Create a New Profile
4. Select, set, and name all items that matches your car profile and when finished select
the Save button. Once saved the vehicle will have your name and setting for use later.
5. Click the Return button at the bottom of the Android device to the home page of the
torque App.
6. Click on the Settings icon button in the lower left corner (see figure 2) and again on
figure 2.
7. Click on the Data Logging & upload to select the items to logs.

JM Turbo Coopers, LLC | 530 E. Hunt Hwy Ste 103 San Tan Valley, AZ 85143 Email: [email protected] | ©2013 - 2016
Figure 4, Data Logging & Upload
8. Select the button Select What to Log to setup the PID to log.

JM Turbo Coopers, LLC | 530 E. Hunt Hwy Ste 103 San Tan Valley, AZ 85143 Email: [email protected] | ©2013 - 2016
Figure 5, Select What to Log
9. Select the 3 vertical “.” in the corner of screen and select the Add PID to Log button.
Figure 6, Add PID to Log
10. Select the following Air to fuel ratio (measured), Absolute Throttle Position, Absolute
Engine load, Engine RPM, Timing Advance, and Turbo Boost & Vacuum Gauge.
Note; if connected to the ELM327 the active log-able PIDs will be green.
JM Turbo Coopers, LLC | 530 E. Hunt Hwy Ste 103 San Tan Valley, AZ 85143 Email: [email protected] | ©2013 - 2016
Figure 7, PID Selection
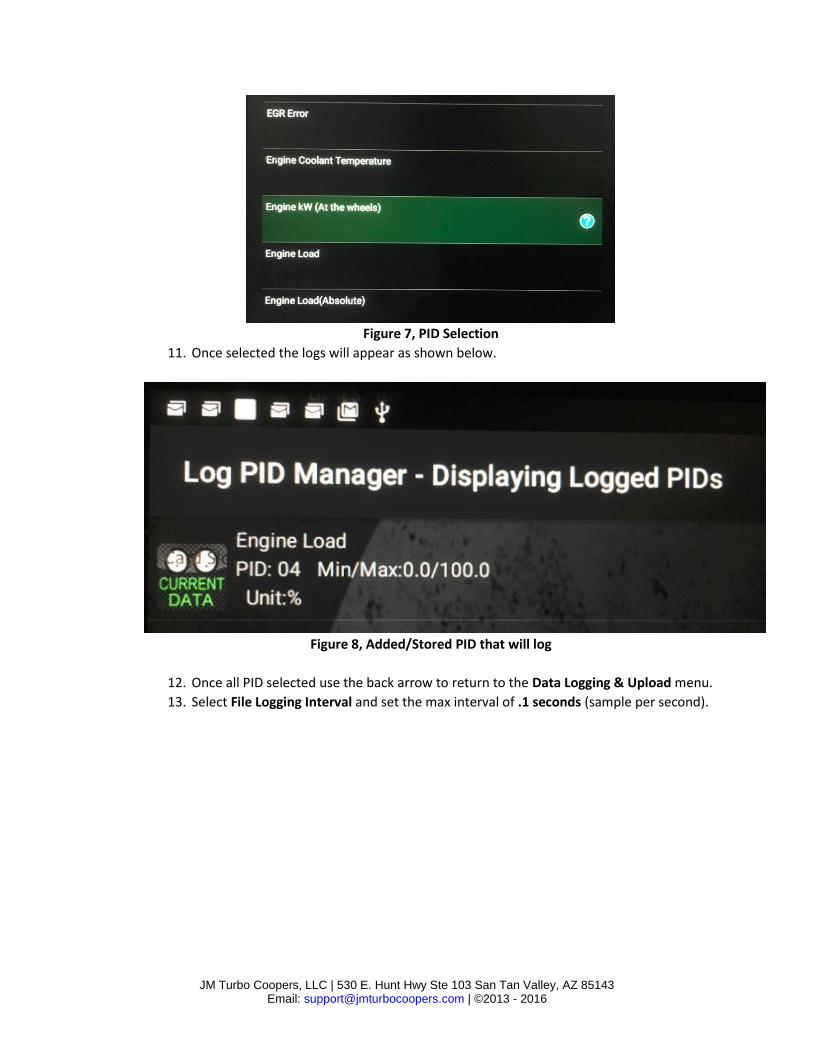
11. Once selected the logs will appear as shown below.
Figure 8, Added/Stored PID that will log
12. Once all PID selected use the back arrow to return to the Data Logging & Upload menu.
13. Select File Logging Interval and set the max interval of .1 seconds (sample per second).

JM Turbo Coopers, LLC | 530 E. Hunt Hwy Ste 103 San Tan Valley, AZ 85143 Email: [email protected] | ©2013 - 2016
Figure 9, Data Logging & Upload Settings
14. Click on the box to Un-check the Automatically Log GPS, Automatically Log G Sensor,
Only When OBD Connected, Automatic trip recording, Log Trip Fuel Consumed, Log to
Twitter, Add Location to tweet, and Only Tweet when ECU Connected. This will slow
down your android device and add a lot of needless data that could impede the function
and quality of the data.
2. Bluetooth and ELM327 Pairing
1. Plug the ELM327 into your OBD connector under the dash, driver side.

JM Turbo Coopers, LLC | 530 E. Hunt Hwy Ste 103 San Tan Valley, AZ 85143 Email: [email protected] | ©2013 - 2016
Figure 10, OBD2 Connector
2. Start the car and click on the Settings Icon/button on the android home screen or in the
Application screen.
Figure 11, Android Settings
3. Select the Bluetooth Icon for more information see the link https://torque-
bhp.com/wiki/Main_Page.
Figure 12 Bluetooth Icon

JM Turbo Coopers, LLC | 530 E. Hunt Hwy Ste 103 San Tan Valley, AZ 85143 Email: [email protected] | ©2013 - 2016
4. Turn on the Bluetooth by clicking or toggling the setting to on in the upper right corner
(see figure 13).
Figure 13, Bluetooth Pair Menu
5. Select the ELM327 under the available devices, it may not be named “ELM327” figure
13 shows the device name as “DB:6A:47:b:56:19”. To eliminate any confusion you may
want to disable all other Bluetooth devices.
6. Once the device is detected select the device and the Pairing will appear below the
device see figure 14.
Figure 14 Bluetooth Device Pairing
7. Depending on the device it may require a password to be entered, most passwords are
either 0000 or 1234 and click OK.
8. Once paired the device will appear under Paired Devices (See Figure 13).
9. Close the settings screen by clicking the back arrow < at the bottom of the android
device (see Figure 9).
3. Data Logging Start, Stop, and Simulated Dyno Pull.
1. Open the Torque app by selecting the Torque icon on your android device (see Figure 1).
2. From the torque home screen select the Realtime Information (small gauge above the
large Acceleration gauge) on the home screen (see Figure 15).

JM Turbo Coopers, LLC | 530 E. Hunt Hwy Ste 103 San Tan Valley, AZ 85143 Email: [email protected] | ©2013 - 2016
Figure 15, Torque Home Screen
3. Once on the Realtime Information screen wait for the Revs (RPM) gauge to display the
real time RPM of your car. If it doesn’t connect in a few moments make sure that the
ELM327 device is installed and working (may have lights that blink), and it is connected
to the Bluetooth and your car is running.
JM Turbo Coopers, LLC | 530 E. Hunt Hwy Ste 103 San Tan Valley, AZ 85143 Email: [email protected] | ©2013 - 2016
Figure 16 Realtime Information Screen
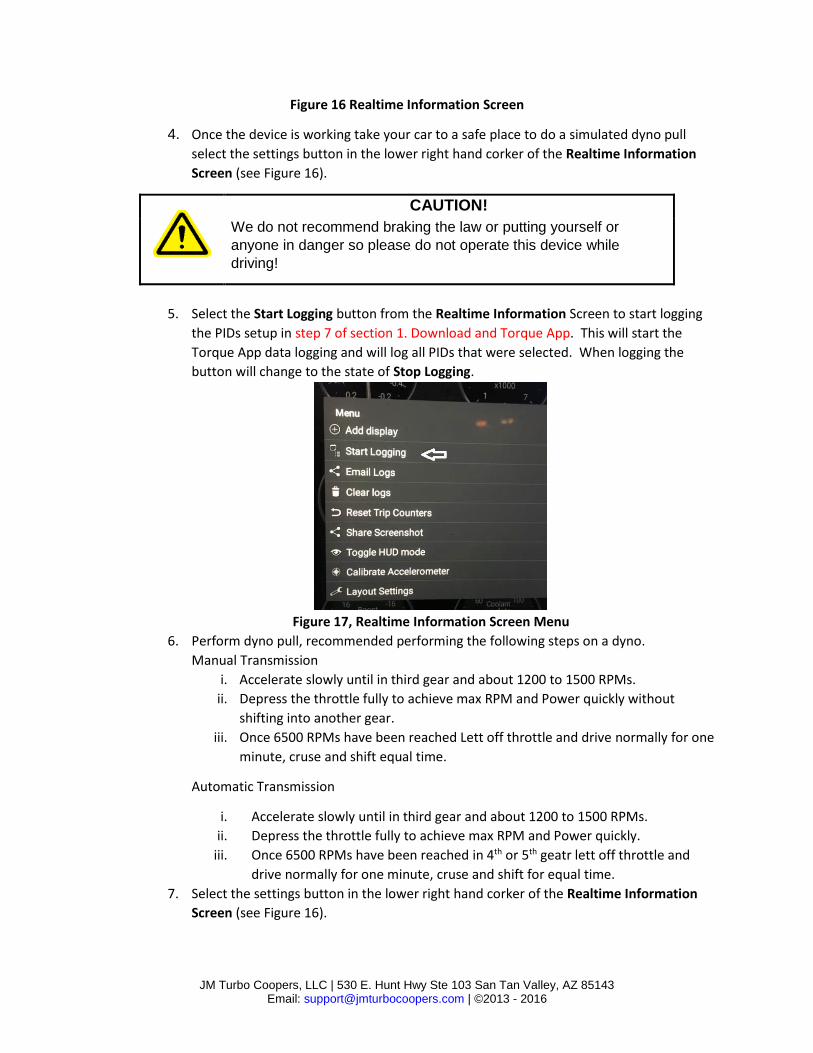
4. Once the device is working take your car to a safe place to do a simulated dyno pull
select the settings button in the lower right hand corker of the Realtime Information
Screen (see Figure 16).
CAUTION!
We do not recommend braking the law or putting yourself or
anyone in danger so please do not operate this device while
driving!
5. Select the Start Logging button from the Realtime Information Screen to start logging
the PIDs setup in step 7 of section 1. Download and Torque App. This will start the
Torque App data logging and will log all PIDs that were selected. When logging the
button will change to the state of Stop Logging.
Figure 17, Realtime Information Screen Menu
6. Perform dyno pull, recommended performing the following steps on a dyno.
Manual Transmission
i. Accelerate slowly until in third gear and about 1200 to 1500 RPMs.
ii. Depress the throttle fully to achieve max RPM and Power quickly without
shifting into another gear.
iii. Once 6500 RPMs have been reached Lett off throttle and drive normally for one
minute, cruse and shift equal time.
Automatic Transmission
i. Accelerate slowly until in third gear and about 1200 to 1500 RPMs.
ii. Depress the throttle fully to achieve max RPM and Power quickly.
iii. Once 6500 RPMs have been reached in 4th or 5th geatr lett off throttle and
drive normally for one minute, cruse and shift for equal time.
7. Select the settings button in the lower right hand corker of the Realtime Information
Screen (see Figure 16).

JM Turbo Coopers, LLC | 530 E. Hunt Hwy Ste 103 San Tan Valley, AZ 85143 Email: [email protected] | ©2013 - 2016
8. Select the Stop Logging Button to Disable/Stop the log function, and the button will
return to its default state of Start Logging (See Figure 17).
Figure 17, Stop Logging
4. Sending the logs to JMTC Support
1. Connect the device to the internet and press the the Email Logs button from the
Realtime Information Screen Menu.
2. Select the CSV (Comma Separated Values) format (See Figure 18).
Figure 18, Comma Separated Values
3. Choose the email you wish to use to send the file (See figure 19) and send it to
Figure 19, Email File

JM Turbo Coopers, LLC | 530 E. Hunt Hwy Ste 103 San Tan Valley, AZ 85143 Email: [email protected] | ©2013 - 2016
4. Fill in the email information and include the following info.
Name,
Date
Symptom of the problem
Year and model of the car
List of the upgrades


![DCMSLink for Xcalibur Troubleshooting Guidetools.thermofisher.com/...DCMSLink-Xcalibur-EN.pdf · V] Service Driver List Event Log No selected 9] Instalation Quaffication Setup Log](https://static.fdocuments.us/doc/165x107/5fc629129d1fb87b7c7629b5/dcmslink-for-xcalibur-troubleshooting-v-service-driver-list-event-log-no-selected.jpg)