An Introduction to Programming with Scratch · 3 Introduction This tutorial will introduce you to...
43
An Introduction to Programming with Scratch Ronald Bourret http://www.rpbourret.com/scratch Table of Contents Introduction .................................................................................................................................3 Chapter 1: Movement and Loops ................................................................................................5 Chapter 2: Conditional Actions and Keyboard Commands ........................................................9 Chapter 3: Messages .................................................................................................................13 Chapter 4: Animation................................................................................................................15 Chapter 5: Practice, practice, practice! .....................................................................................21 Chapter 6: Variables .................................................................................................................23 Chapter 7: Algorithms...............................................................................................................29 Chapter 8: Program Structure ...................................................................................................33 Chapter 9: Advanced Programs ................................................................................................41 Chapter 10: Project ...................................................................................................................43
Transcript of An Introduction to Programming with Scratch · 3 Introduction This tutorial will introduce you to...
An Introduction to Programming with Scratch
Ronald Bourret
http://www.rpbourret.com/scratch
Table of Contents
Introduction .................................................................................................................................3
Chapter 1: Movement and Loops ................................................................................................5
Chapter 2: Conditional Actions and Keyboard Commands ........................................................9
Chapter 3: Messages .................................................................................................................13
Chapter 4: Animation ................................................................................................................15
Chapter 5: Practice, practice, practice! .....................................................................................21
Chapter 6: Variables .................................................................................................................23
Chapter 7: Algorithms...............................................................................................................29
Chapter 8: Program Structure ...................................................................................................33
Chapter 9: Advanced Programs ................................................................................................41
Chapter 10: Project ...................................................................................................................43
2
Scratch
This class introduces programming using the Scratch programming language. The Scratch programming
language and environment are a project of the Lifelong Kindergarten Group at the MIT Media Lab.
They are available free of charge.
You can find Scratch at:
http://scratch.mit.edu
License
This document is available under the Creative Commons Attribution-NonCommercial-ShareAlike 4.0
International (CC BY-NC-SA 4.0) license. Under this license, you may:
Share — copy and redistribute the material in any medium or format
Adapt — remix, transform, and build upon the material
Under the following terms:
Attribution — You must give appropriate credit, provide a link to the license, and indicate if
changes were made. You may do so in any reasonable manner, but not in any way that suggests
the licensor endorses you or your use.
NonCommercial — You may not use the material for commercial purposes.
ShareAlike — If you remix, transform, or build upon the material, you must distribute your
contributions under the same license as the original.
For a human-readable summary of this license, see:
http://creativecommons.org/licenses/by-nc-sa/4.0/
For the complete license, see:
http://creativecommons.org/licenses/by-nc-sa/4.0/legalcode
3
Introduction
This tutorial will introduce you to programming using Scratch from MIT.
Create a Scratch Account
Before you start programming, you will need to create a Scratch account.
1. Go to scratch.mit.edu.
2. Click Join Scratch.
3. Enter the requested information. (Use your real birth month and year. Do not use your school email
address, as it cannot receive email from Scratch.)
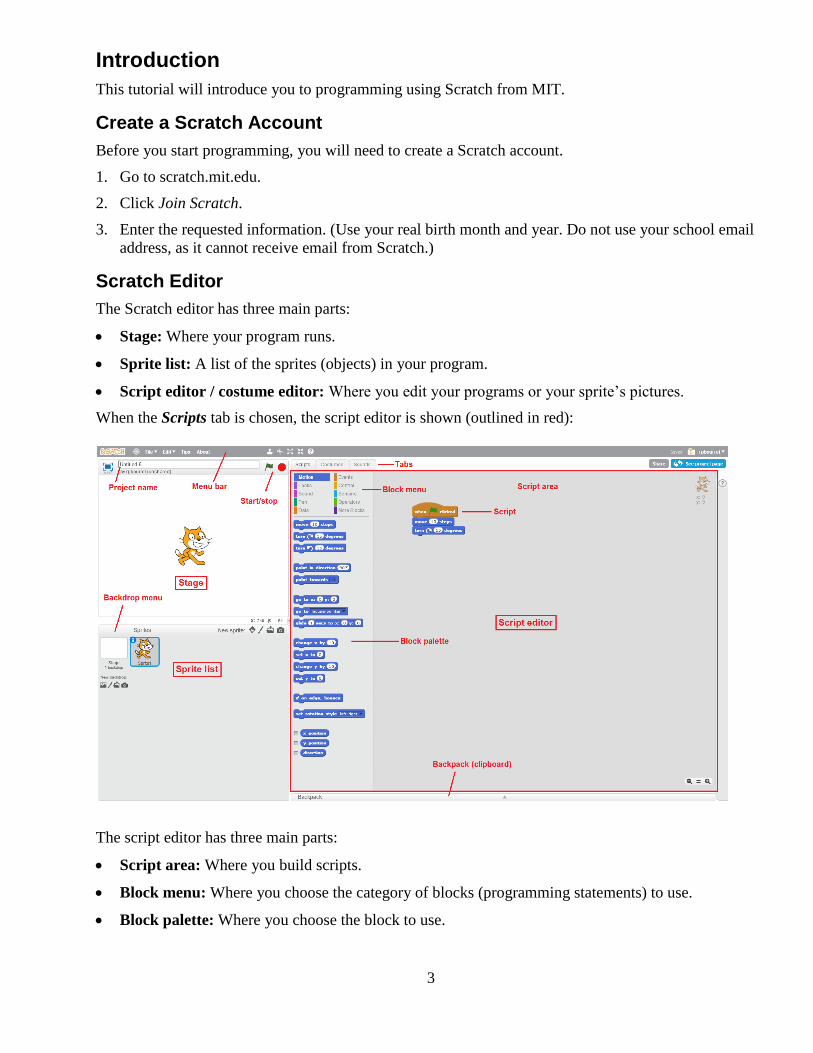
Scratch Editor
The Scratch editor has three main parts:
Stage: Where your program runs.
Sprite list: A list of the sprites (objects) in your program.
Script editor / costume editor: Where you edit your programs or your sprite’s pictures.
When the Scripts tab is chosen, the script editor is shown (outlined in red):
The script editor has three main parts:
Script area: Where you build scripts.
Block menu: Where you choose the category of blocks (programming statements) to use.
Block palette: Where you choose the block to use.
4
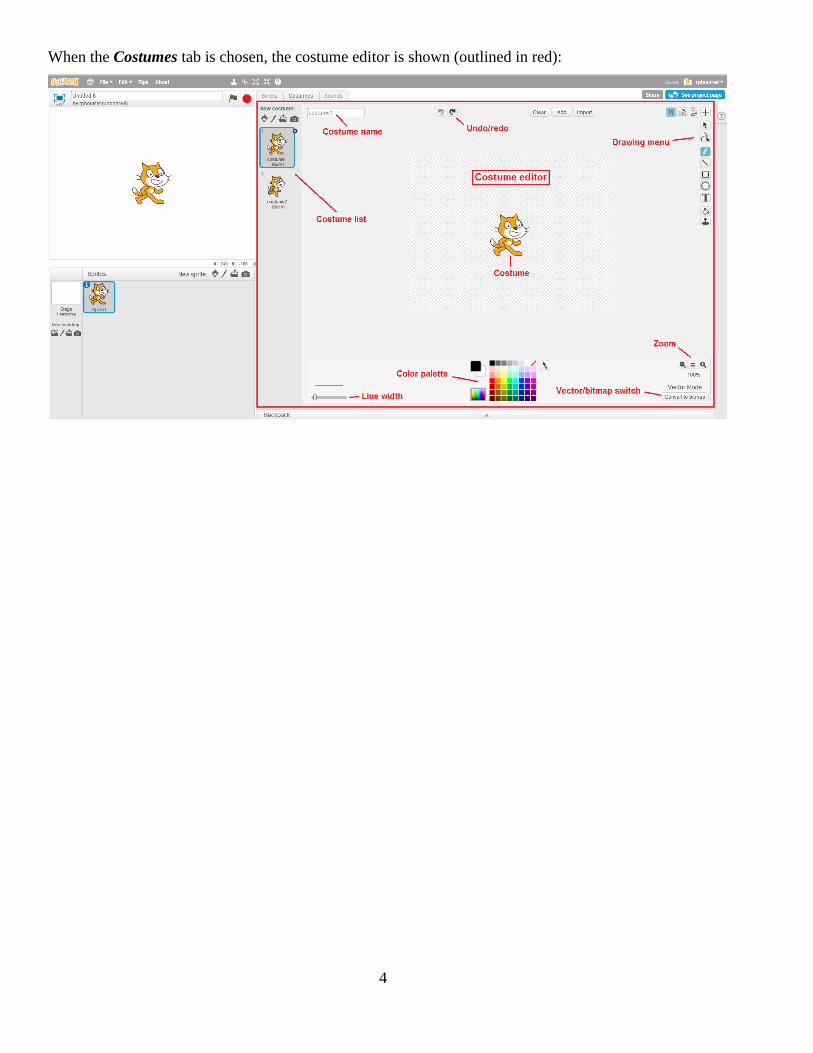
When the Costumes tab is chosen, the costume editor is shown (outlined in red):
5
Chapter 1: Movement and Loops
In this chapter, you will learn how to build simple scripts to make a sprite move around the stage.
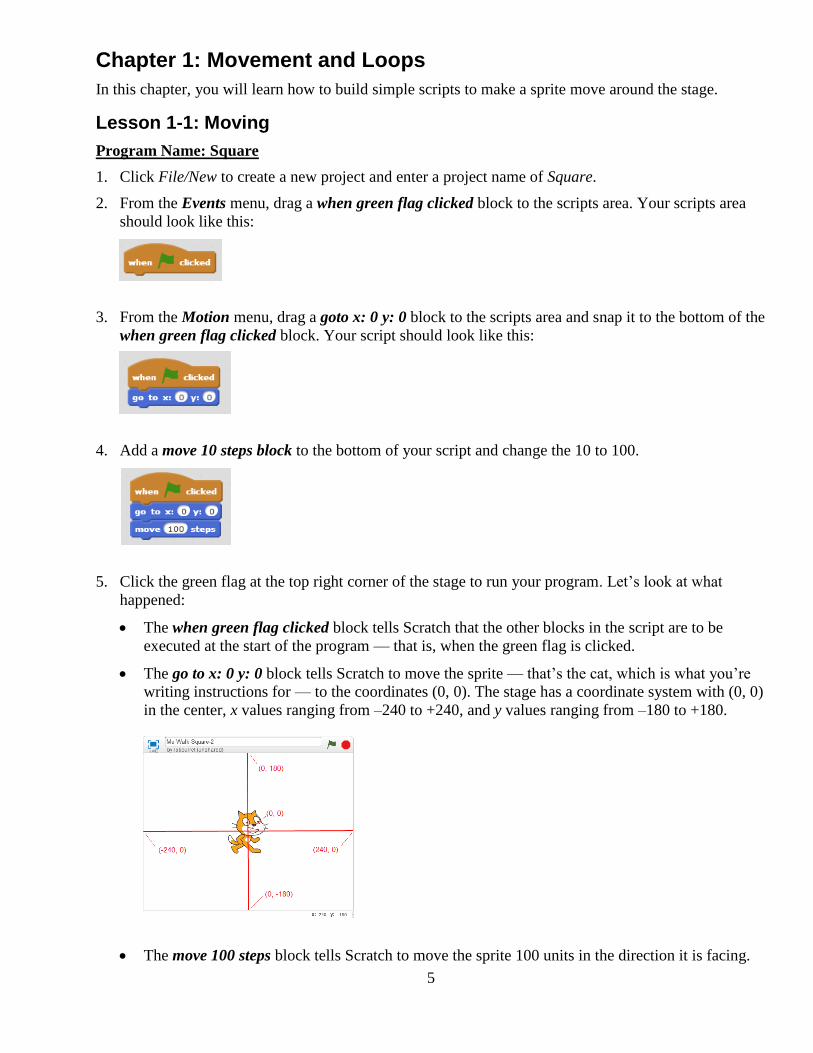
Lesson 1-1: Moving
Program Name: Square
1. Click File/New to create a new project and enter a project name of Square.
2. From the Events menu, drag a when green flag clicked block to the scripts area. Your scripts area
should look like this:
3. From the Motion menu, drag a goto x: 0 y: 0 block to the scripts area and snap it to the bottom of the
when green flag clicked block. Your script should look like this:
4. Add a move 10 steps block to the bottom of your script and change the 10 to 100.
5. Click the green flag at the top right corner of the stage to run your program. Let’s look at what
happened:
The when green flag clicked block tells Scratch that the other blocks in the script are to be
executed at the start of the program — that is, when the green flag is clicked.
The go to x: 0 y: 0 block tells Scratch to move the sprite — that’s the cat, which is what you’re
writing instructions for — to the coordinates (0, 0). The stage has a coordinate system with (0, 0)
in the center, x values ranging from –240 to +240, and y values ranging from –180 to +180.
The move 100 steps block tells Scratch to move the sprite 100 units in the direction it is facing.
6
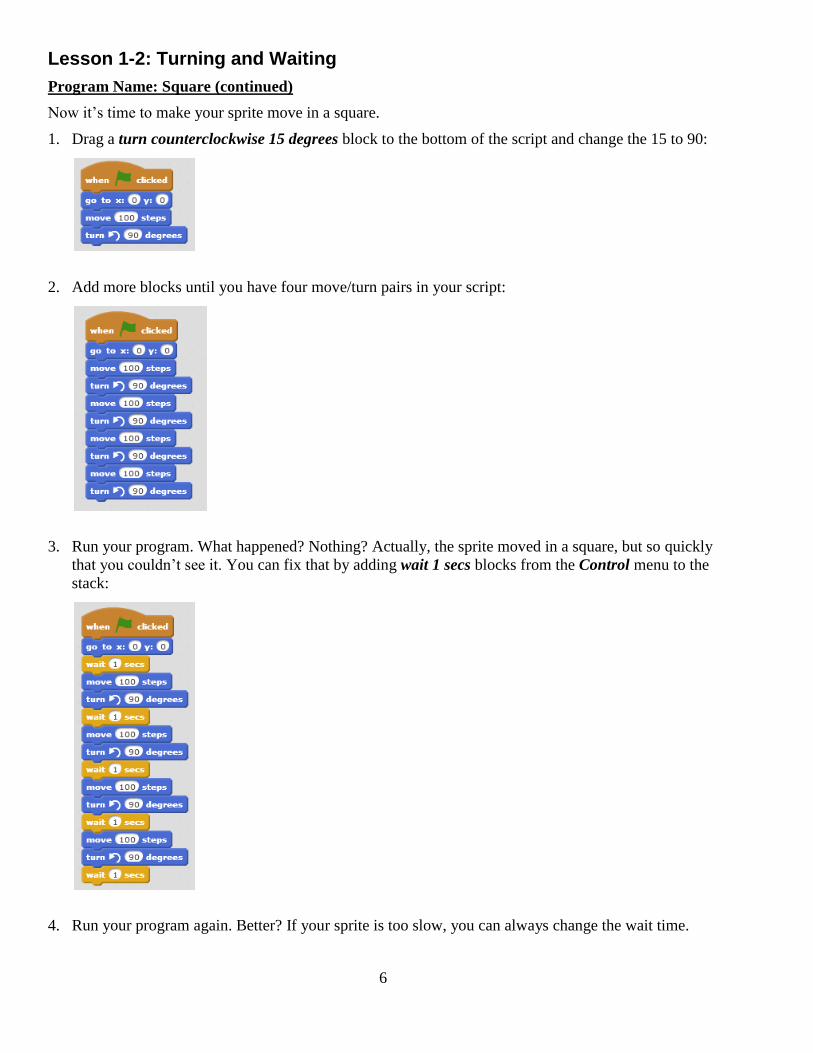
Lesson 1-2: Turning and Waiting
Program Name: Square (continued)
Now it’s time to make your sprite move in a square.
1. Drag a turn counterclockwise 15 degrees block to the bottom of the script and change the 15 to 90:
2. Add more blocks until you have four move/turn pairs in your script:
3. Run your program. What happened? Nothing? Actually, the sprite moved in a square, but so quickly
that you couldn’t see it. You can fix that by adding wait 1 secs blocks from the Control menu to the
stack:
4. Run your program again. Better? If your sprite is too slow, you can always change the wait time.
7
Lesson 1-3: Repeat Loops
Program Name: Square (continued)
Look at your script. One thing that should strike you is that three blocks — move, turn, wait — are
repeated four times. Imagine if you wanted your cat to walk in a square 100 times. You’d need 1,200
blocks! That’s insane. (Not to mention a lot of work.)
Fortunately, there is an easy way to fix this: the repeat loop.
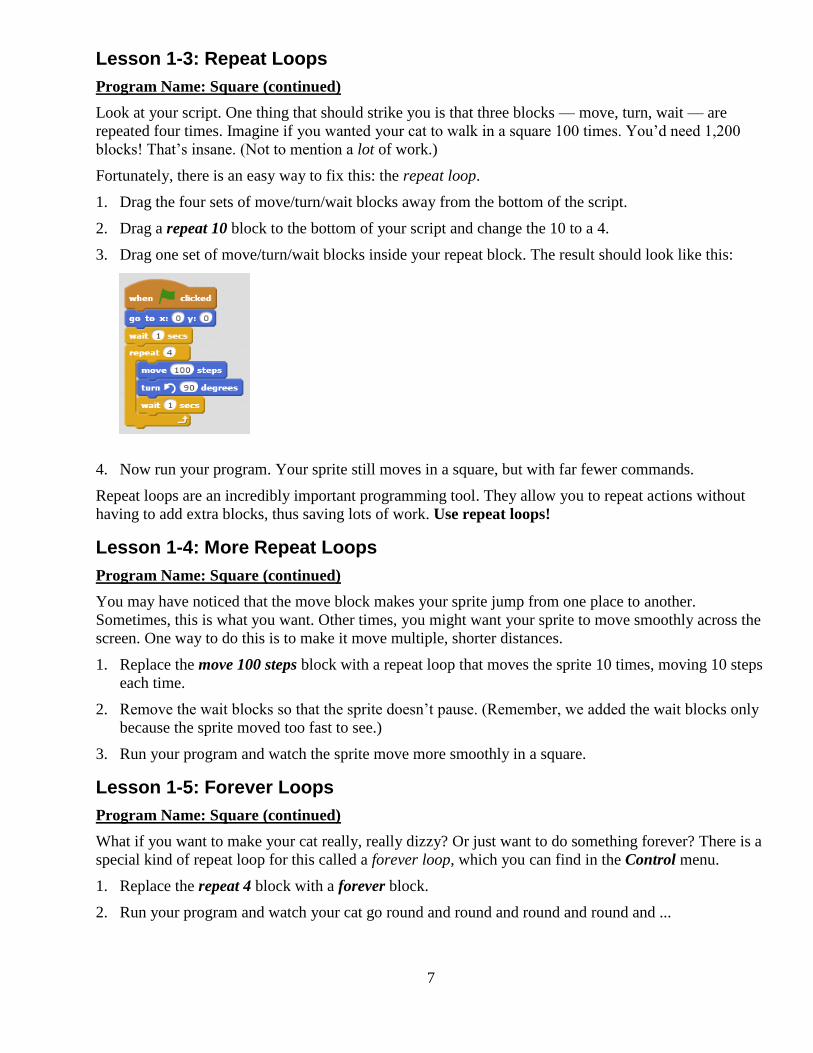
1. Drag the four sets of move/turn/wait blocks away from the bottom of the script.
2. Drag a repeat 10 block to the bottom of your script and change the 10 to a 4.
3. Drag one set of move/turn/wait blocks inside your repeat block. The result should look like this:
4. Now run your program. Your sprite still moves in a square, but with far fewer commands.
Repeat loops are an incredibly important programming tool. They allow you to repeat actions without
having to add extra blocks, thus saving lots of work. Use repeat loops!
Lesson 1-4: More Repeat Loops
Program Name: Square (continued)
You may have noticed that the move block makes your sprite jump from one place to another.
Sometimes, this is what you want. Other times, you might want your sprite to move smoothly across the
screen. One way to do this is to make it move multiple, shorter distances.
1. Replace the move 100 steps block with a repeat loop that moves the sprite 10 times, moving 10 steps
each time.
2. Remove the wait blocks so that the sprite doesn’t pause. (Remember, we added the wait blocks only
because the sprite moved too fast to see.)
3. Run your program and watch the sprite move more smoothly in a square.
Lesson 1-5: Forever Loops
Program Name: Square (continued)
What if you want to make your cat really, really dizzy? Or just want to do something forever? There is a
special kind of repeat loop for this called a forever loop, which you can find in the Control menu.
1. Replace the repeat 4 block with a forever block.
2. Run your program and watch your cat go round and round and round and round and ...
8
Lesson 1-6: Cleanup and Save
Program Name: Square (continued)
You probably have a lot of unused blocks laying around the script area.
1. Drag the unused blocks to the blocks palette to delete them.
2. Click File/Save to save your project.
9
Chapter 2: Conditional Actions and Keyboard Commands
In this chapter, you will learn to execute actions only under certain conditions. You will also learn to
make your sprite respond to keyboard commands.
Lesson 2-1: If Blocks
Program Name: Back and Forth
1. Create a new project (File/New) and name it Back and Forth.
2. Create a script that places the sprite at the center of the stage — the point (0, 0) — and makes it
move 10 steps forever.
3. Run your program. Notice that the sprite gets stuck at the right side of the stage. This is because
Scratch doesn’t ever let sprites go completely off the stage. We would like our sprite to move back
and forth across the stage.
(If your sprite doesn’t do anything at all, make sure you started your script with a when green flag
clicked block.)
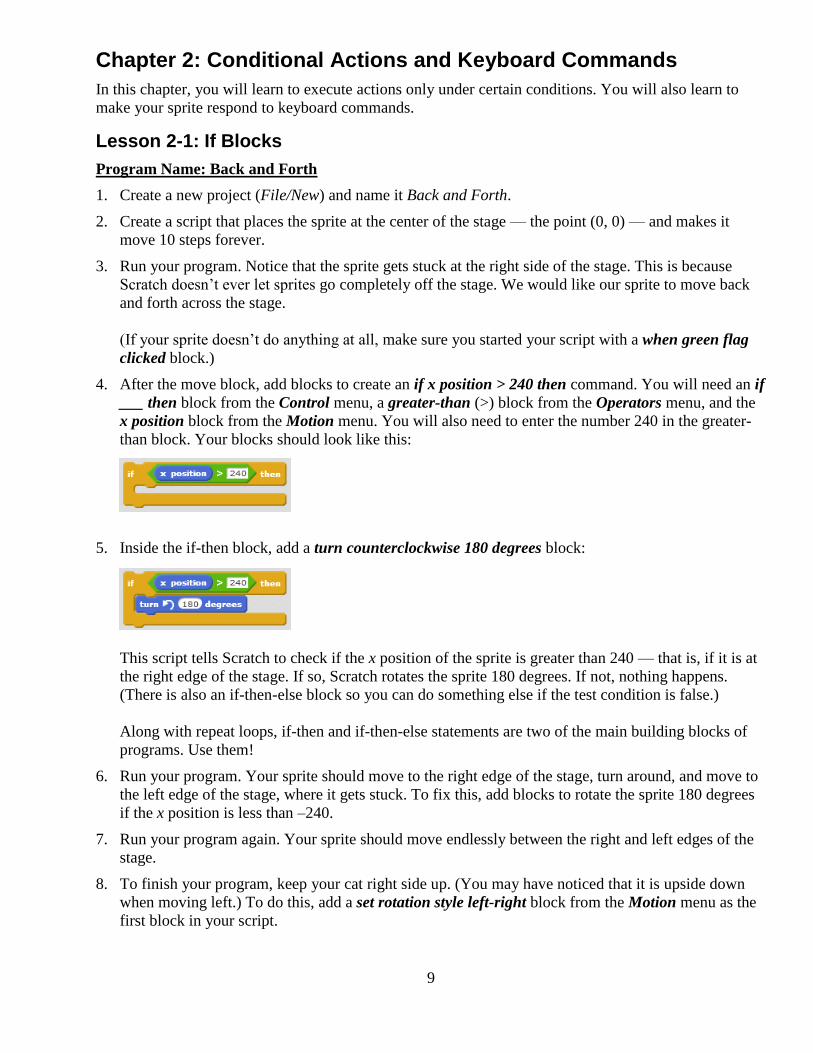
4. After the move block, add blocks to create an if x position > 240 then command. You will need an if
___ then block from the Control menu, a greater-than (>) block from the Operators menu, and the
x position block from the Motion menu. You will also need to enter the number 240 in the greater-
than block. Your blocks should look like this:
5. Inside the if-then block, add a turn counterclockwise 180 degrees block:
This script tells Scratch to check if the x position of the sprite is greater than 240 — that is, if it is at
the right edge of the stage. If so, Scratch rotates the sprite 180 degrees. If not, nothing happens.
(There is also an if-then-else block so you can do something else if the test condition is false.)
Along with repeat loops, if-then and if-then-else statements are two of the main building blocks of
programs. Use them!
6. Run your program. Your sprite should move to the right edge of the stage, turn around, and move to
the left edge of the stage, where it gets stuck. To fix this, add blocks to rotate the sprite 180 degrees
if the x position is less than –240.
7. Run your program again. Your sprite should move endlessly between the right and left edges of the
stage.
8. To finish your program, keep your cat right side up. (You may have noticed that it is upside down
when moving left.) To do this, add a set rotation style left-right block from the Motion menu as the
first block in your script.
10
Lesson 2-2: Keyboard Commands
Program Name: Back and Forth (continued)
Let’s face it. Walking back and forth is boring. Time to make your sprite jump. To do this, you will add
blocks that move the sprite up and down 50 steps when the space bar is pressed.
1. From the Events menu, drag a when space key pressed block to the scripts area:
An event is something that happens. The main events in Scratch are starting the program, pressing
keys, and broadcasting and receiving messages, which are used to communicate between scripts and
between sprites.
2. Beneath the key-pressed block, add blocks to move the sprite up and down 50 steps in increments of
10 steps. You will need to use the change y by 10 block from the Motion menu.
3. Run your program. When you press the space bar, the sprite should jump up and fall back down.
Lesson 2-3: Adding More Sprites
Program Name: Back and Forth (continued)
Time to give your cat a reason to jump. Really, what cat jumps because you press a space bar? Lightning
is a much better motivator.
1. Click the Choose sprite from library icon:
2. Select the Lightning sprite and click OK. This adds a new sprite to the sprite list.
3. Add a script to hide the Lightning sprite when the program starts. You will need the hide block from
the Looks menu.
4. Add a script to make the Lightning strike the cat when the space bar is pressed. The lightning sprite
should move to the cat sprite, show itself, wait 0.1 seconds, and hide itself again. In addition to the
blocks you have already learned, you will need the go to mouse-pointer block on the Motion menu
— you will need to change mouse-pointer to Sprite1 in the drop-down list — and the show block
from the Looks menu.
5. Run your program, press the space bar, and watch the cat jump.
11
Lesson 2-4: Adding Sound
Program Name: Back and Forth (continued)
To finish the program, add a really good mrowr! when the cat gets zapped.
1. Click Sprite1 in the sprite list and click the Sounds tab.
2. Try the meow sound already there. If you don’t like it, click the speaker icon to choose a different
sound from the sound library.
3. Click the Scripts tab and find the play sound block from the Sound menu. Add this block to the
when space key pressed script. (Select the sound you want from the drop-down list.)
4. Run your program. Zap your cat.
Lesson 2-5: An A-maze-ing Exercise
Program Name: A-Maze-ing
In this exercise, you will create a simple maze game. To start, you will need (literally) to set the stage:
1. Create a new project and name it A-maze-ing.
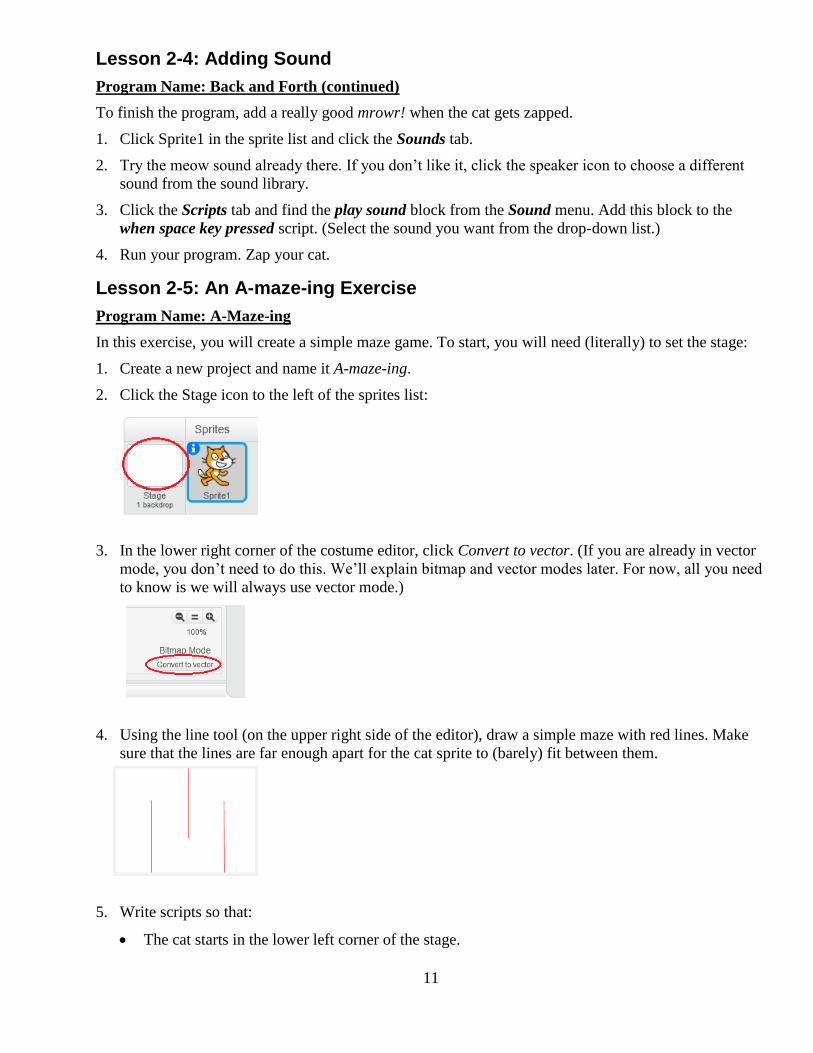
2. Click the Stage icon to the left of the sprites list:
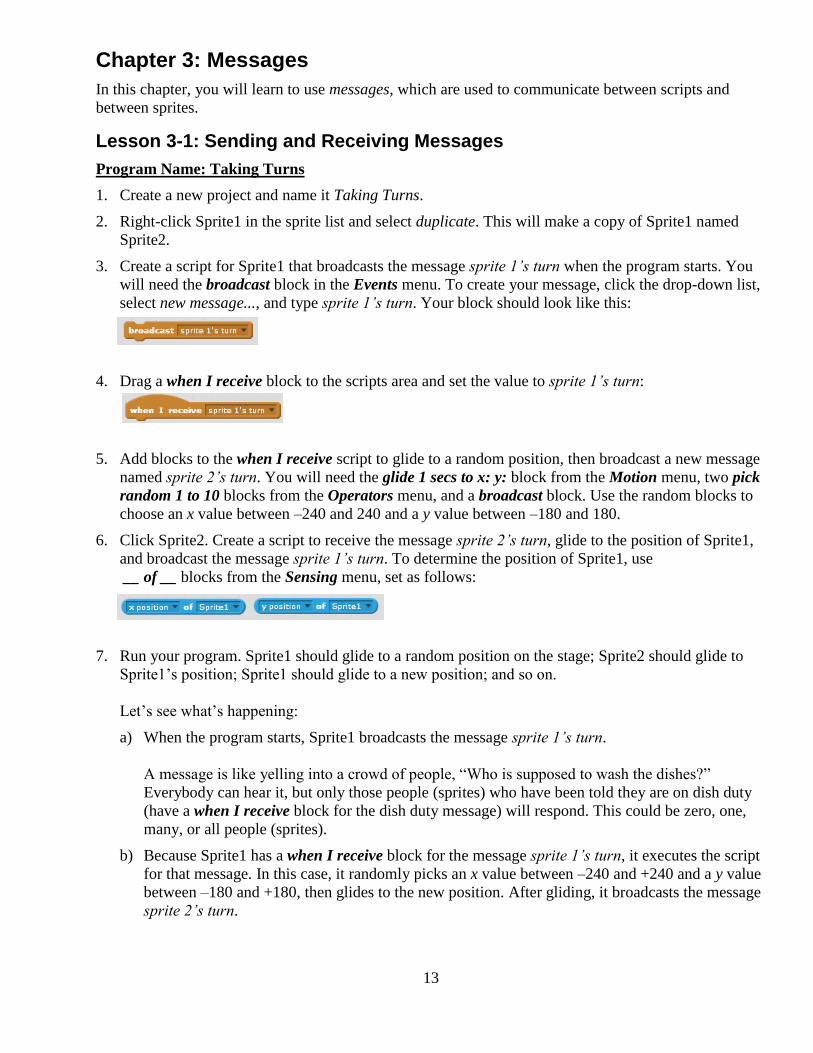
3. In the lower right corner of the costume editor, click Convert to vector. (If you are already in vector
mode, you don’t need to do this. We’ll explain bitmap and vector modes later. For now, all you need
to know is we will always use vector mode.)
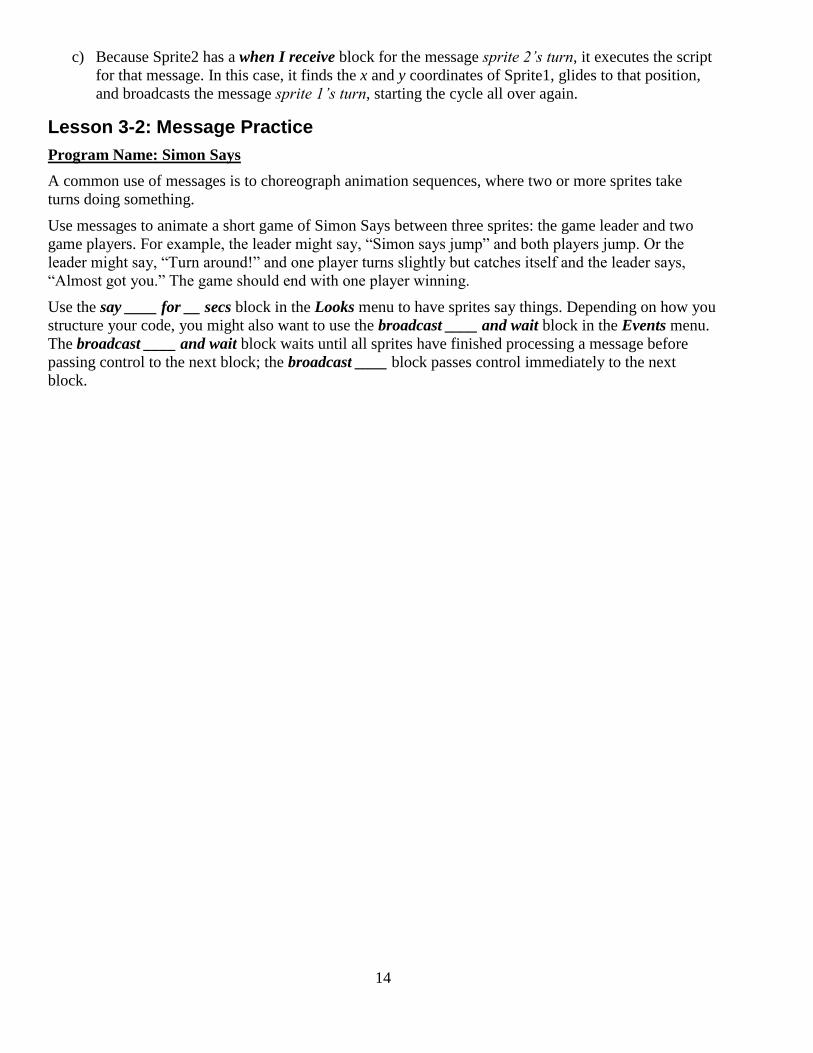
4. Using the line tool (on the upper right side of the editor), draw a simple maze with red lines. Make
sure that the lines are far enough apart for the cat sprite to (barely) fit between them.
5. Write scripts so that:
The cat starts in the lower left corner of the stage.

12
Pressing the arrow keys moves the cat.
If the cat touches the edge or a red line, it goes back to the lower left corner.
In addition to the blocks you already know, you will need the touching ? and touching color ?
blocks from the Sensing menu. To use the touching ? block, select edge from the drop-down list. To
use the touching color ? block, click on the color in the block, then click on the red in the maze. The
color in the block should turn red.
For extra credit, play a sound when the sprite reaches the lower right corner of the maze.
13
Chapter 3: Messages
In this chapter, you will learn to use messages, which are used to communicate between scripts and
between sprites.
Lesson 3-1: Sending and Receiving Messages
Program Name: Taking Turns
1. Create a new project and name it Taking Turns.
2. Right-click Sprite1 in the sprite list and select duplicate. This will make a copy of Sprite1 named
Sprite2.
3. Create a script for Sprite1 that broadcasts the message sprite 1’s turn when the program starts. You
will need the broadcast block in the Events menu. To create your message, click the drop-down list,
select new message..., and type sprite 1’s turn. Your block should look like this:
4. Drag a when I receive block to the scripts area and set the value to sprite 1’s turn:
5. Add blocks to the when I receive script to glide to a random position, then broadcast a new message
named sprite 2’s turn. You will need the glide 1 secs to x: y: block from the Motion menu, two pick
random 1 to 10 blocks from the Operators menu, and a broadcast block. Use the random blocks to
choose an x value between –240 and 240 and a y value between –180 and 180.
6. Click Sprite2. Create a script to receive the message sprite 2’s turn, glide to the position of Sprite1,
and broadcast the message sprite 1’s turn. To determine the position of Sprite1, use
__ of __ blocks from the Sensing menu, set as follows:
7. Run your program. Sprite1 should glide to a random position on the stage; Sprite2 should glide to
Sprite1’s position; Sprite1 should glide to a new position; and so on.
Let’s see what’s happening:
a) When the program starts, Sprite1 broadcasts the message sprite 1’s turn.
A message is like yelling into a crowd of people, “Who is supposed to wash the dishes?”
Everybody can hear it, but only those people (sprites) who have been told they are on dish duty
(have a when I receive block for the dish duty message) will respond. This could be zero, one,
many, or all people (sprites).
b) Because Sprite1 has a when I receive block for the message sprite 1’s turn, it executes the script
for that message. In this case, it randomly picks an x value between –240 and +240 and a y value
between –180 and +180, then glides to the new position. After gliding, it broadcasts the message
sprite 2’s turn.
14
c) Because Sprite2 has a when I receive block for the message sprite 2’s turn, it executes the script
for that message. In this case, it finds the x and y coordinates of Sprite1, glides to that position,
and broadcasts the message sprite 1’s turn, starting the cycle all over again.
Lesson 3-2: Message Practice
Program Name: Simon Says
A common use of messages is to choreograph animation sequences, where two or more sprites take
turns doing something.
Use messages to animate a short game of Simon Says between three sprites: the game leader and two
game players. For example, the leader might say, “Simon says jump” and both players jump. Or the
leader might say, “Turn around!” and one player turns slightly but catches itself and the leader says,
“Almost got you.” The game should end with one player winning.
Use the say ____ for __ secs block in the Looks menu to have sprites say things. Depending on how you
structure your code, you might also want to use the broadcast ____ and wait block in the Events menu.
The broadcast ____ and wait block waits until all sprites have finished processing a message before
passing control to the next block; the broadcast ____ block passes control immediately to the next
block.
15
Chapter 4: Animation
Lesson 4-1: Bitmap Mode
Before learning animation, you need to learn about two different ways to draw with a computer: bitmap
drawing and vector drawing. In this lesson, you will learn about bitmap drawing.
1. Create a new project and name it Bitmap vs. Vector.
2. Click the Costumes tab and click Clear to delete the cat.
3. Look in the lower right hand corner and make sure you are in Bitmap Mode. If you are not in Bitmap
Mode, click Convert to bitmap.
4. Using the line tool, draw an X with a short and a long arm:
5. Now suppose you want to rotate the short line while keeping the long line in place. Using the Select
tool, select the short line:
6. Using the rotation handle (the circle at the top of the line coming out of the selection box), rotate the
short line:
What happened? Both the short line and a segment of the long line in the selection box rotated. This is
because you didn’t actually select just the short line, you selected everything in the selection box.
In bitmap mode, the computer does not understand what a line is. Instead, it just stores a grid of dots.
For example, this is what the computer stores for a short line:
(Actually, the computer stores a grid of numbers, where each number tells the computer what color to
draw each dot in the grid. But it’s easier to think of the computer as just storing a grid of dots.)
Because the computer just stores dots, it doesn’t understand anything about those dots. That is, it doesn’t
realize that the grid shown above is a line, or that a different grid might show a circle or a triangle. All it
sees are dots.
As a result, when you use the select tool, you can’t select a particular line in the grid. You can only
select the dots in the grid. And when you rotate the grid, you rotate all of the dots in the grid.
16
Lesson 4-2: Vector Mode
In the lesson 4-1, you learned about bitmap drawing. In this lesson, you will learn about vector drawing:
1. Click Costume2, clear the canvas, and check that you are in Vector Mode. If you are not in Vector
Mode, click Convert to vector.
2. Using the line tool, draw the same lopsided X you drew in the previous lesson.
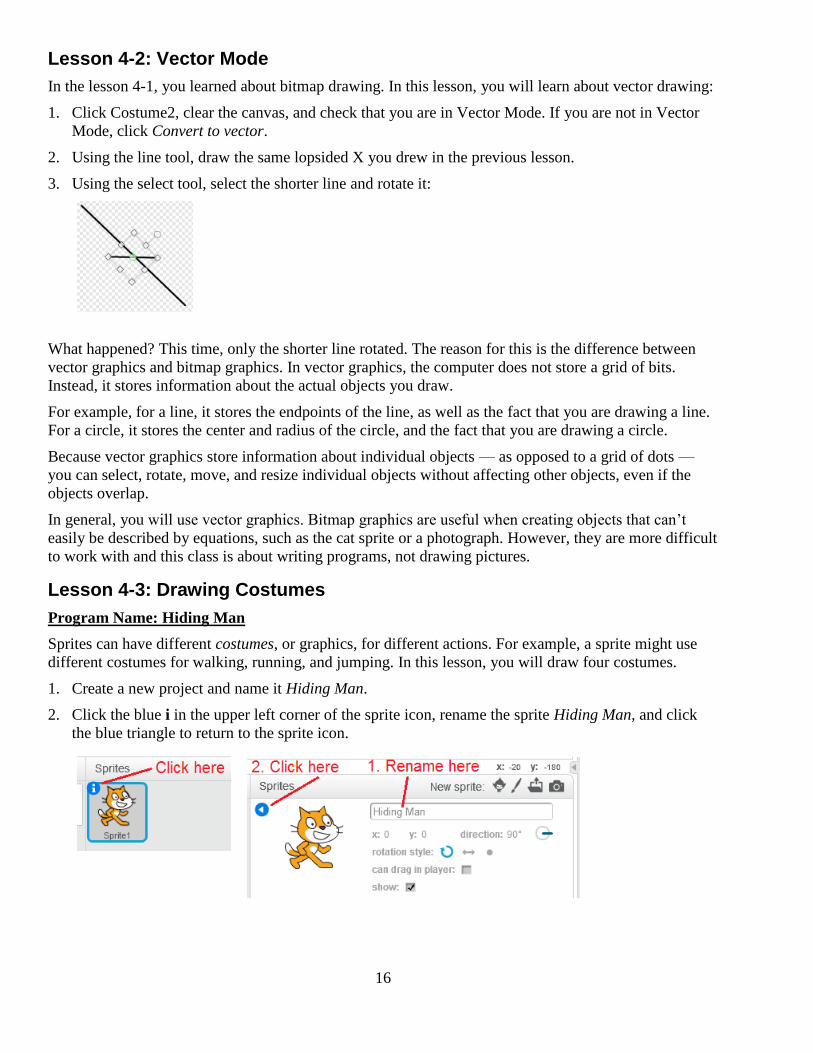
3. Using the select tool, select the shorter line and rotate it:
What happened? This time, only the shorter line rotated. The reason for this is the difference between
vector graphics and bitmap graphics. In vector graphics, the computer does not store a grid of bits.
Instead, it stores information about the actual objects you draw.
For example, for a line, it stores the endpoints of the line, as well as the fact that you are drawing a line.
For a circle, it stores the center and radius of the circle, and the fact that you are drawing a circle.
Because vector graphics store information about individual objects — as opposed to a grid of dots —
you can select, rotate, move, and resize individual objects without affecting other objects, even if the
objects overlap.
In general, you will use vector graphics. Bitmap graphics are useful when creating objects that can’t
easily be described by equations, such as the cat sprite or a photograph. However, they are more difficult
to work with and this class is about writing programs, not drawing pictures.
Lesson 4-3: Drawing Costumes
Program Name: Hiding Man
Sprites can have different costumes, or graphics, for different actions. For example, a sprite might use
different costumes for walking, running, and jumping. In this lesson, you will draw four costumes.
1. Create a new project and name it Hiding Man.
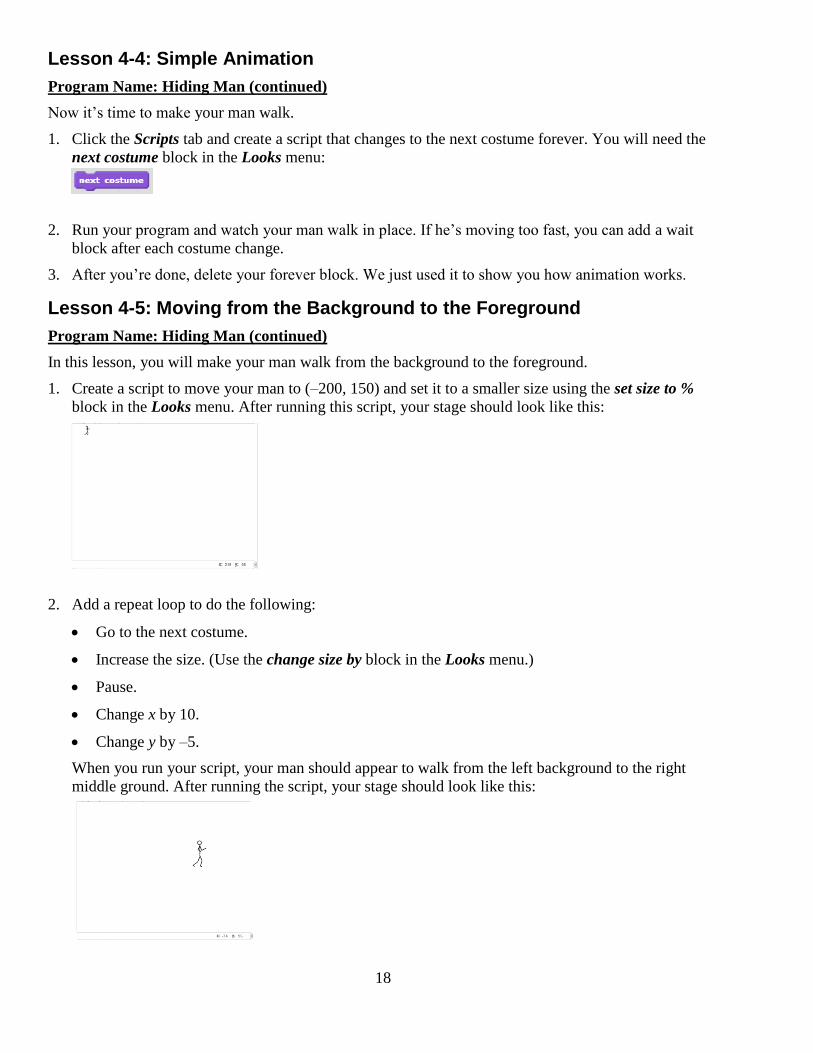
2. Click the blue i in the upper left corner of the sprite icon, rename the sprite Hiding Man, and click
the blue triangle to return to the sprite icon.

17
3. Click the Costumes tab, clear the canvas, make sure you are in Vector Mode, and use the line and
oval tools to draw a simple stick figure of a man walking. Make sure you use separate lines for the
body, arms, and legs. This is because we need to reposition the arms and legs later.
Don’t spend too much time drawing. We’re learning programming, not fine art.
4. Using the Set costume center tool (the plus sign in the upper right corner of the screen), set the
center of the costume to a point on the “ground” just beneath the man’s feet:
A costume’s center is used for movement and rotation. When you tell a sprite to go to a certain
point, its center goes to that point. When you tell a sprite to rotate, it rotates around its center.
5. Click costume2 and delete it, then make two copies of costume1. You can use the stamp tool at the
top of the screen, or right click and select duplicate.
6. Click costume2 and use the zoom controls — the plus and minus in the lower right corner of the
screen — to zoom in on your stick man. Rotate and move his arms and legs:
7. Click costume3 and move the arms and legs again:
8. Finally, click costume2 and duplicate it. You should now have four costumes, with costume2 and
costume 4 being identical:
18
Lesson 4-4: Simple Animation
Program Name: Hiding Man (continued)
Now it’s time to make your man walk.
1. Click the Scripts tab and create a script that changes to the next costume forever. You will need the
next costume block in the Looks menu:
2. Run your program and watch your man walk in place. If he’s moving too fast, you can add a wait
block after each costume change.
3. After you’re done, delete your forever block. We just used it to show you how animation works.
Lesson 4-5: Moving from the Background to the Foreground
Program Name: Hiding Man (continued)
In this lesson, you will make your man walk from the background to the foreground.
1. Create a script to move your man to (–200, 150) and set it to a smaller size using the set size to %
block in the Looks menu. After running this script, your stage should look like this:
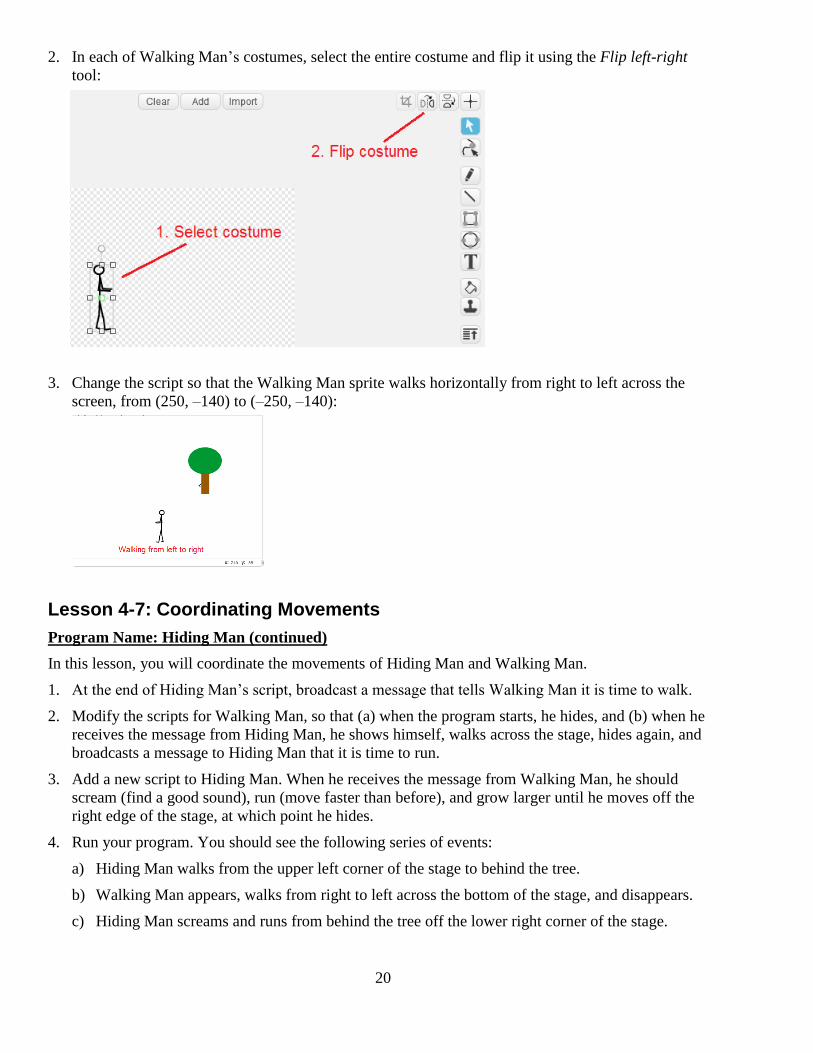
2. Add a repeat loop to do the following:
Go to the next costume.
Increase the size. (Use the change size by block in the Looks menu.)
Pause.
Change x by 10.
Change y by –5.
When you run your script, your man should appear to walk from the left background to the right
middle ground. After running the script, your stage should look like this:
19
You will need to play with the number of repetitions, the pause time, and the amount you change the
size by to get this to look right.
Lesson 4-6: Layers
Program Name: Hiding Man (continued)
Now it’s time for hiding man to hide.
1. Create a new sprite using the Paint new sprite tool and name it Tree.
2. Draw a simple lollipop tree and move it so that it hides the Hiding Man sprite:
Notice that the Tree sprite covers the Hiding Man sprite. This is because of something called layers.
Each sprite has its own layer and the layers are placed in a stack. It’s easiest to think of painting each
sprite on its own sheet of clear plastic (layer). When you place the sheets in a stack, you will only see
those sprites (or parts of sprites) that are not covered by a sprite higher in the stack.
To see layers in action, go to the Looks menu and click the go back 1 layers and go to front blocks.
These will move the tree behind the man and back in front of the man. Although we won’t use these
blocks in this program, you should know they exist.
Lesson 4-7: Flipping Costumes
Program Name: Hiding Man (continued)
In this lesson, you will create another stick figure that walks from left to right.
1. Using right-click/duplicate or the stamp tool, create a copy of the Hiding Man sprite and name it
Walking Man.
20
2. In each of Walking Man’s costumes, select the entire costume and flip it using the Flip left-right
tool:
3. Change the script so that the Walking Man sprite walks horizontally from right to left across the
screen, from (250, –140) to (–250, –140):
Lesson 4-7: Coordinating Movements
Program Name: Hiding Man (continued)
In this lesson, you will coordinate the movements of Hiding Man and Walking Man.
1. At the end of Hiding Man’s script, broadcast a message that tells Walking Man it is time to walk.
2. Modify the scripts for Walking Man, so that (a) when the program starts, he hides, and (b) when he
receives the message from Hiding Man, he shows himself, walks across the stage, hides again, and
broadcasts a message to Hiding Man that it is time to run.
3. Add a new script to Hiding Man. When he receives the message from Walking Man, he should
scream (find a good sound), run (move faster than before), and grow larger until he moves off the
right edge of the stage, at which point he hides.
4. Run your program. You should see the following series of events:
a) Hiding Man walks from the upper left corner of the stage to behind the tree.
b) Walking Man appears, walks from right to left across the bottom of the stage, and disappears.
c) Hiding Man screams and runs from behind the tree off the lower right corner of the stage.

21
Chapter 5: Practice, practice, practice!
Now it’s time to practice what you’ve learned.
IMPORTANT: KEEP YOUR GRAPHICS SIMPLE! Don’t spend more than two or three minutes
drawing pictures. Spend your time writing scripts.
Lesson 5-1: Catch
Program Name: Catch
Two people throw a ball back and forth. Forever. Hints:
Use three sprites: two people and a ball.
Use forever, point in direction, repeat until, touching, and
move 10 steps.
Lesson 5-2: Fleas
Program Name: Fleas
Create a simple animation where a dog walks across the stage.
Halfway across, it scratches itself, then continues walking. Hints:
Use one sprite — the dog — with four costumes, two for
walking and two for scratching.
Lesson 5-3: Archery
Program Name: Archery
Create a simple game where you aim an arrow at a target and shoot
it. Hints:
Start the arrow on the left side of the stage and pick its y value
as a random number between –150 and +150.
Use the up and down arrow keys to aim (rotate) the arrow.
Use the space key to shoot the arrow.
Use the n key to start a new arrow.
Stop the arrow when it touches the target or an edge. Use the repeat until ___ block for this.
22
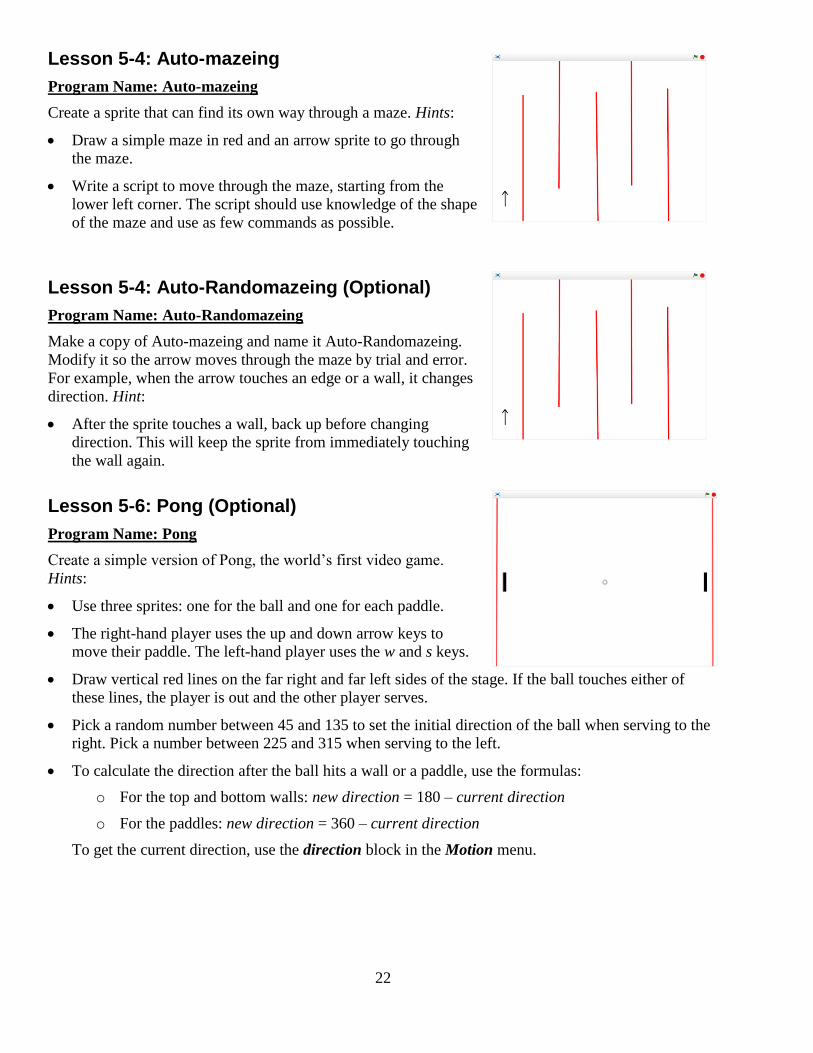
Lesson 5-4: Auto-mazeing
Program Name: Auto-mazeing
Create a sprite that can find its own way through a maze. Hints:
Draw a simple maze in red and an arrow sprite to go through
the maze.
Write a script to move through the maze, starting from the
lower left corner. The script should use knowledge of the shape
of the maze and use as few commands as possible.
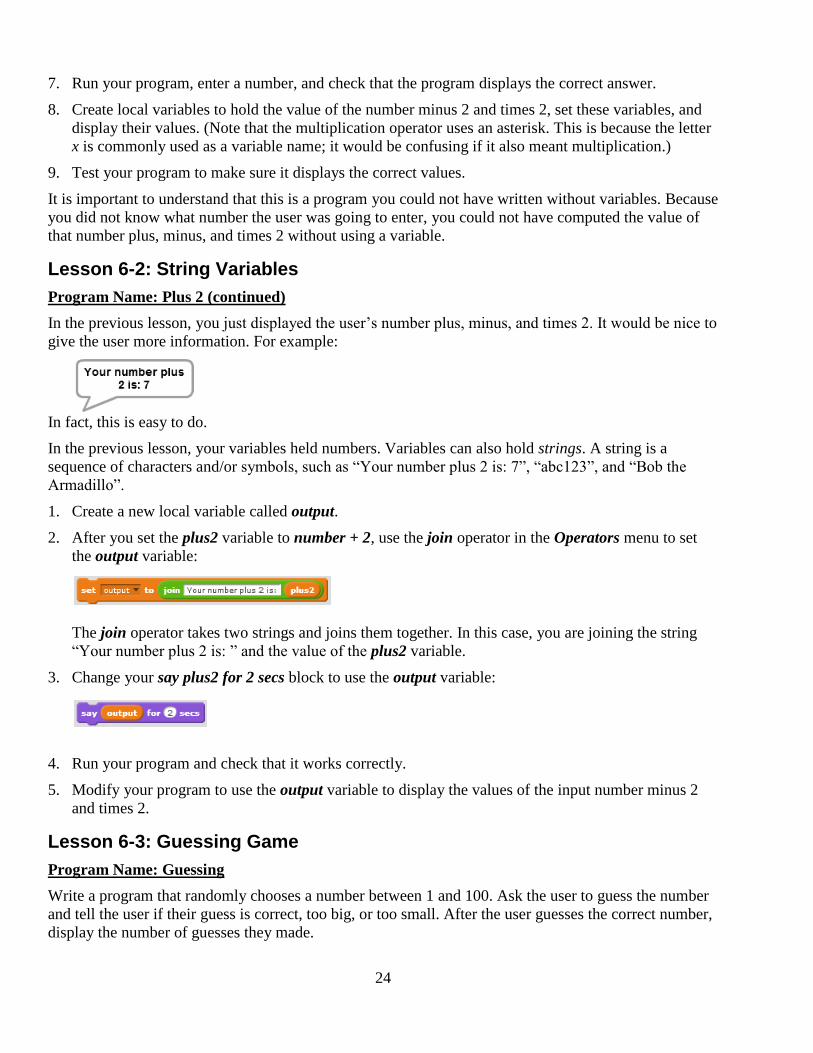
Lesson 5-4: Auto-Randomazeing (Optional)
Program Name: Auto-Randomazeing
Make a copy of Auto-mazeing and name it Auto-Randomazeing.
Modify it so the arrow moves through the maze by trial and error.
For example, when the arrow touches an edge or a wall, it changes
direction. Hint:
After the sprite touches a wall, back up before changing
direction. This will keep the sprite from immediately touching
the wall again.
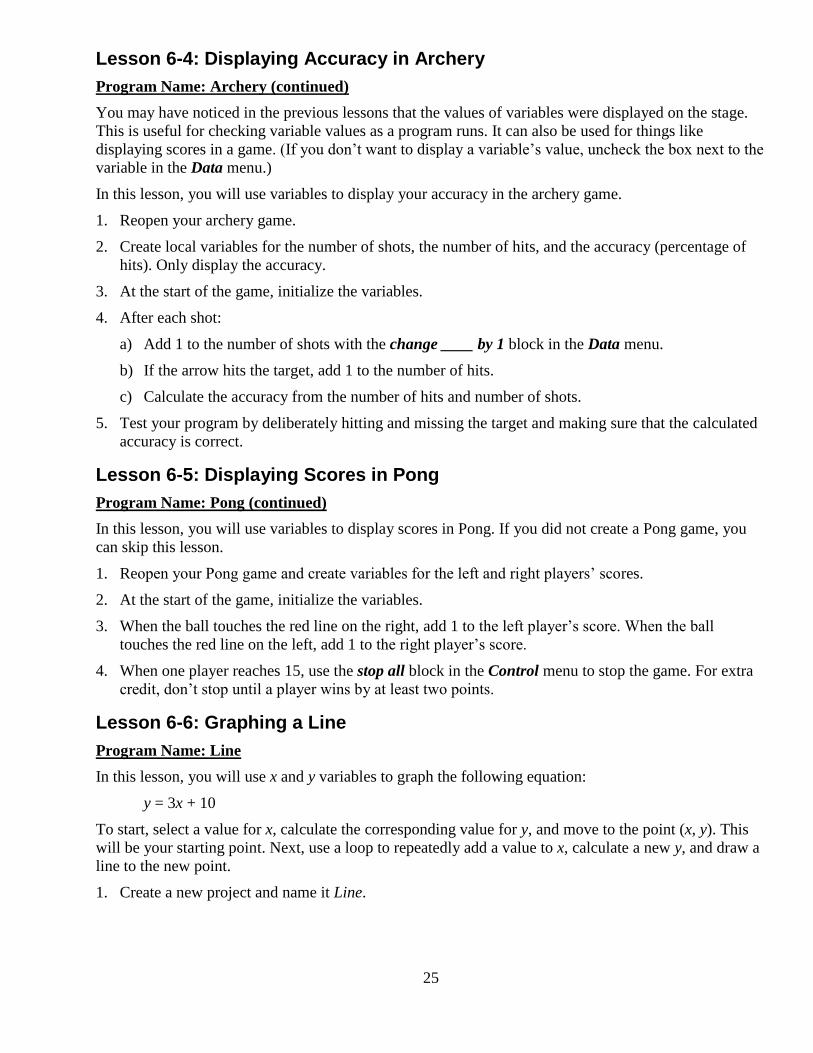
Lesson 5-6: Pong (Optional)
Program Name: Pong
Create a simple version of Pong, the world’s first video game.
Hints:
Use three sprites: one for the ball and one for each paddle.
The right-hand player uses the up and down arrow keys to
move their paddle. The left-hand player uses the w and s keys.
Draw vertical red lines on the far right and far left sides of the stage. If the ball touches either of
these lines, the player is out and the other player serves.
Pick a random number between 45 and 135 to set the initial direction of the ball when serving to the
right. Pick a number between 225 and 315 when serving to the left.
To calculate the direction after the ball hits a wall or a paddle, use the formulas:
o For the top and bottom walls: new direction = 180 – current direction
o For the paddles: new direction = 360 – current direction
To get the current direction, use the direction block in the Motion menu.

23
Chapter 6: Variables
Variables in computing are used to store values. You have already seen some variables. For example, in
the Back and Forth project, you used the variable to determine if the sprite was near an edge.
In Taking Turns, you used the and variables so that Sprite2
could go to the position of Sprite1.
, , and are examples of variables maintained by
Scratch. That is, Scratch stores values in these variables and you can use those values in your programs.
You can also define your own variables and store values in them. For example, you could use variables
to store scores in a game, store the speed of a meteor crashing to earth (so you know how big a hole to
draw when it hits), or calculate the value of y in the equation y = 3x + 10 for a given value of x.
Lesson 6-1: Numeric Variables
Program Name: Plus 2
In this lesson, the user enters a number and the program displays that number plus, minus, and times 2.
1. Create a new project and name it Plus 2.
2. On the Data menu, click Make a Variable. Name the variable number and click For this sprite only,
then click OK.
Variables can be shared by all sprites or used only by one sprite. is an example of a
variable used by only one sprite: it gives the current x position of that sprite. Other sprites have their
own copies of this variable. is an example of a variable shared by all sprites —
any sprite can use it.
Variables that can be used only by one sprite are called local variables. Variables that can be used
by all sprites are called global variables. As a general rule, you should use local variables.
3. When the program starts, use ask _______ and wait in the Sensing menu to ask for a number:
4. Scratch stores the number entered by the user in the answer variable from the Sensing menu. Use
the set ______ to ____ block in the Data menu to store the answer in your number variable:
This is called setting a variable and is a very common thing to do.
5. Now create a local variable called plus2 and set it to the sum of number and 2, using the + operator
from the Operators menu:
6. To show the user what their number plus 2 is, use the say ____ for 2 secs block in the Looks menu:
24
7. Run your program, enter a number, and check that the program displays the correct answer.
8. Create local variables to hold the value of the number minus 2 and times 2, set these variables, and
display their values. (Note that the multiplication operator uses an asterisk. This is because the letter
x is commonly used as a variable name; it would be confusing if it also meant multiplication.)
9. Test your program to make sure it displays the correct values.
It is important to understand that this is a program you could not have written without variables. Because
you did not know what number the user was going to enter, you could not have computed the value of
that number plus, minus, and times 2 without using a variable.
Lesson 6-2: String Variables
Program Name: Plus 2 (continued)
In the previous lesson, you just displayed the user’s number plus, minus, and times 2. It would be nice to
give the user more information. For example:
In fact, this is easy to do.
In the previous lesson, your variables held numbers. Variables can also hold strings. A string is a
sequence of characters and/or symbols, such as “Your number plus 2 is: 7”, “abc123”, and “Bob the
Armadillo”.
1. Create a new local variable called output.
2. After you set the plus2 variable to number + 2, use the join operator in the Operators menu to set
the output variable:
The join operator takes two strings and joins them together. In this case, you are joining the string
“Your number plus 2 is: ” and the value of the plus2 variable.
3. Change your say plus2 for 2 secs block to use the output variable:
4. Run your program and check that it works correctly.
5. Modify your program to use the output variable to display the values of the input number minus 2
and times 2.
Lesson 6-3: Guessing Game
Program Name: Guessing
Write a program that randomly chooses a number between 1 and 100. Ask the user to guess the number
and tell the user if their guess is correct, too big, or too small. After the user guesses the correct number,
display the number of guesses they made.
25
Lesson 6-4: Displaying Accuracy in Archery
Program Name: Archery (continued)
You may have noticed in the previous lessons that the values of variables were displayed on the stage.
This is useful for checking variable values as a program runs. It can also be used for things like
displaying scores in a game. (If you don’t want to display a variable’s value, uncheck the box next to the
variable in the Data menu.)
In this lesson, you will use variables to display your accuracy in the archery game.
1. Reopen your archery game.
2. Create local variables for the number of shots, the number of hits, and the accuracy (percentage of
hits). Only display the accuracy.
3. At the start of the game, initialize the variables.
4. After each shot:
a) Add 1 to the number of shots with the change ____ by 1 block in the Data menu.
b) If the arrow hits the target, add 1 to the number of hits.
c) Calculate the accuracy from the number of hits and number of shots.
5. Test your program by deliberately hitting and missing the target and making sure that the calculated
accuracy is correct.
Lesson 6-5: Displaying Scores in Pong
Program Name: Pong (continued)
In this lesson, you will use variables to display scores in Pong. If you did not create a Pong game, you
can skip this lesson.
1. Reopen your Pong game and create variables for the left and right players’ scores.
2. At the start of the game, initialize the variables.
3. When the ball touches the red line on the right, add 1 to the left player’s score. When the ball
touches the red line on the left, add 1 to the right player’s score.
4. When one player reaches 15, use the stop all block in the Control menu to stop the game. For extra
credit, don’t stop until a player wins by at least two points.
Lesson 6-6: Graphing a Line
Program Name: Line
In this lesson, you will use x and y variables to graph the following equation:
y = 3x + 10
To start, select a value for x, calculate the corresponding value for y, and move to the point (x, y). This
will be your starting point. Next, use a loop to repeatedly add a value to x, calculate a new y, and draw a
line to the new point.
1. Create a new project and name it Line.
26
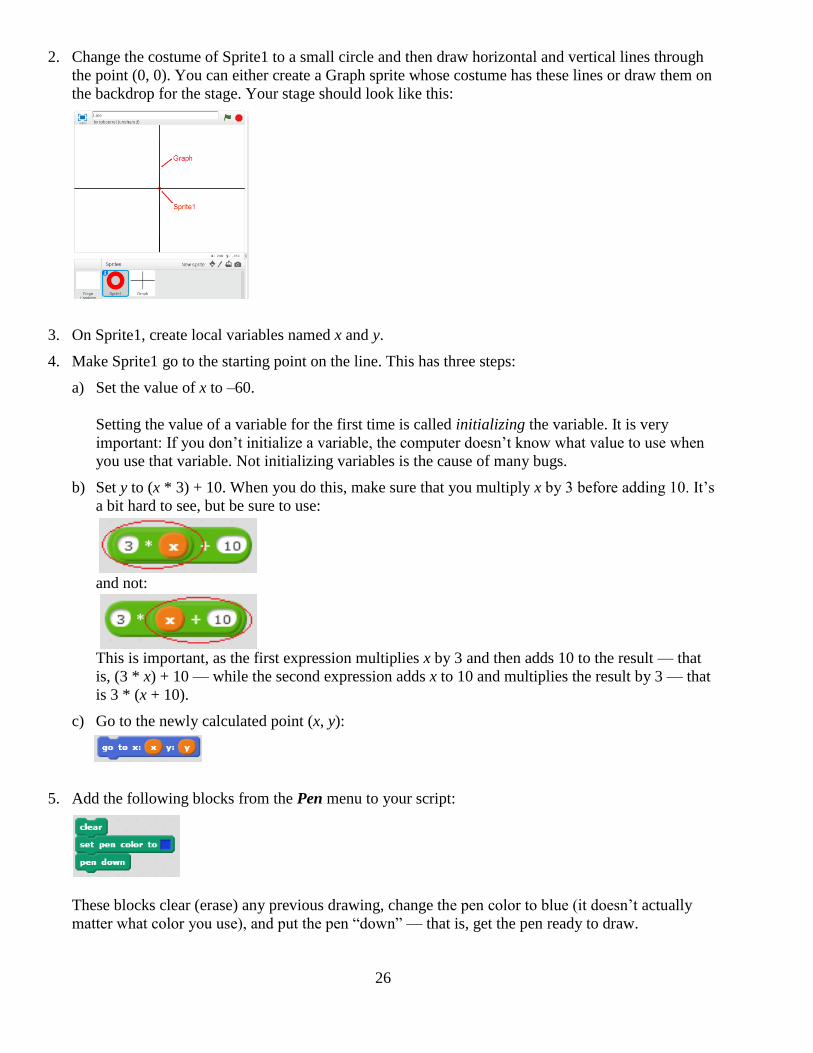
2. Change the costume of Sprite1 to a small circle and then draw horizontal and vertical lines through
the point (0, 0). You can either create a Graph sprite whose costume has these lines or draw them on
the backdrop for the stage. Your stage should look like this:
3. On Sprite1, create local variables named x and y.
4. Make Sprite1 go to the starting point on the line. This has three steps:
a) Set the value of x to –60.
Setting the value of a variable for the first time is called initializing the variable. It is very
important: If you don’t initialize a variable, the computer doesn’t know what value to use when
you use that variable. Not initializing variables is the cause of many bugs.
b) Set y to (x * 3) + 10. When you do this, make sure that you multiply x by 3 before adding 10. It’s
a bit hard to see, but be sure to use:
and not:
This is important, as the first expression multiplies x by 3 and then adds 10 to the result — that
is, (3 * x) + 10 — while the second expression adds x to 10 and multiplies the result by 3 — that
is 3 * (x + 10).
c) Go to the newly calculated point (x, y):
5. Add the following blocks from the Pen menu to your script:
These blocks clear (erase) any previous drawing, change the pen color to blue (it doesn’t actually
matter what color you use), and put the pen “down” — that is, get the pen ready to draw.
27
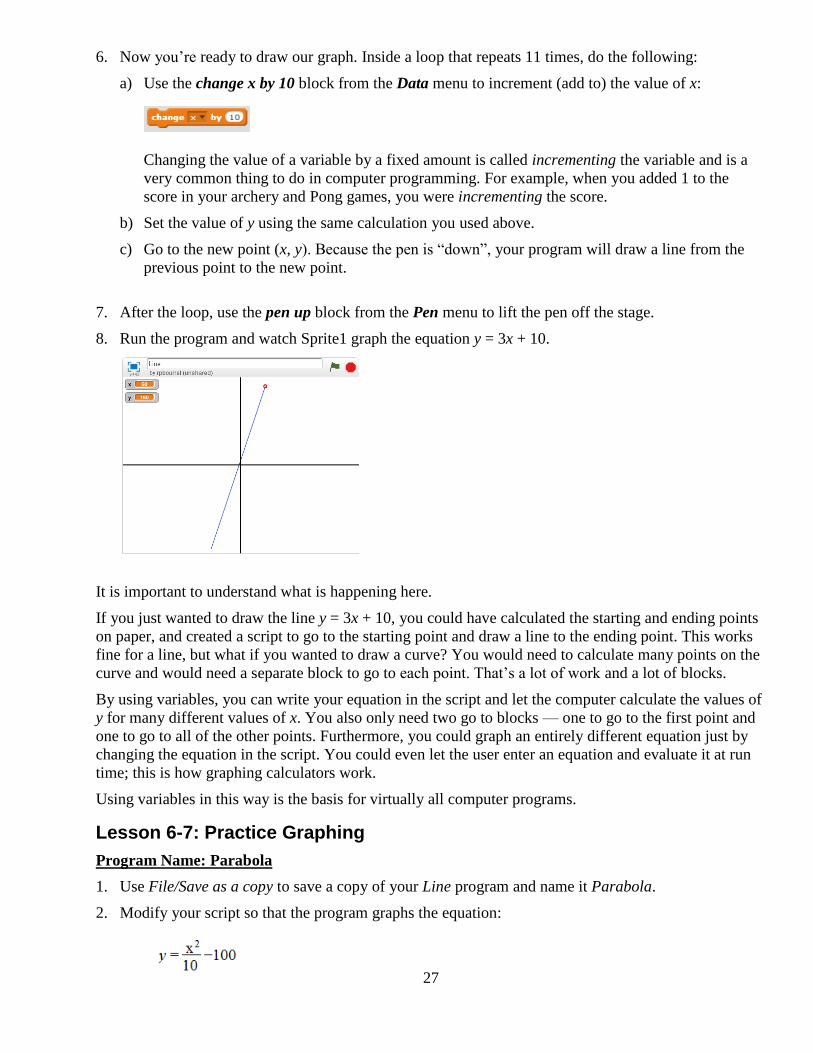
6. Now you’re ready to draw our graph. Inside a loop that repeats 11 times, do the following:
a) Use the change x by 10 block from the Data menu to increment (add to) the value of x:
Changing the value of a variable by a fixed amount is called incrementing the variable and is a
very common thing to do in computer programming. For example, when you added 1 to the
score in your archery and Pong games, you were incrementing the score.
b) Set the value of y using the same calculation you used above.
c) Go to the new point (x, y). Because the pen is “down”, your program will draw a line from the
previous point to the new point.
7. After the loop, use the pen up block from the Pen menu to lift the pen off the stage.
8. Run the program and watch Sprite1 graph the equation y = 3x + 10.
It is important to understand what is happening here.
If you just wanted to draw the line y = 3x + 10, you could have calculated the starting and ending points
on paper, and created a script to go to the starting point and draw a line to the ending point. This works
fine for a line, but what if you wanted to draw a curve? You would need to calculate many points on the
curve and would need a separate block to go to each point. That’s a lot of work and a lot of blocks.
By using variables, you can write your equation in the script and let the computer calculate the values of
y for many different values of x. You also only need two go to blocks — one to go to the first point and
one to go to all of the other points. Furthermore, you could graph an entirely different equation just by
changing the equation in the script. You could even let the user enter an equation and evaluate it at run
time; this is how graphing calculators work.
Using variables in this way is the basis for virtually all computer programs.
Lesson 6-7: Practice Graphing
Program Name: Parabola
1. Use File/Save as a copy to save a copy of your Line program and name it Parabola.
2. Modify your script so that the program graphs the equation:

28
instead of y = 3x + 10. You will need to experiment with the initial value of x, the number of
repetitions, and the amount by which x is incremented to draw a smooth curve that doesn’t go off the
edge of the stage.
Lesson 6-8: Rotten Tomatoes
Program Name: Rotten Tomatoes
The equation in the previous lesson was a simple form of a parabola. Parabolas are very useful
equations, as they tell us the trajectories of things that are hurled through the air, like baseballs, rocks,
and rotten tomatoes.
1. Create a new project and name it Rotten Tomatoes.
2. Change the costumes of Sprite1 to a tomato (red circle) and a splattered tomato (red blob). To create
the splattered tomato, first draw a red circle and then use the Reshape tool — you are in Vector
Mode, aren’t you? — to distort it.
3. Use the following equation to hurl your tomato across the stage:
4. When it reaches the end of its flight, use the second costume to make it go splat.
5. Splat away.
Lesson 6-9: Dripping Rotten Tomatoes (Optional)
Program Name: Rotting Tomatoes (continued)
Have some time on your hands? Here’s a challenge: make your rotten tomato drip rotten tomato juice as
it flies through the air.
1. Add a sprite named Drip to your Rotten Tomatoes project. This should have two costumes: a small,
red drip and a small, red splat.
2. Inside the loop that hurls your tomato through the air, add a create clone of Drip block from the
Control menu. Do this right after the go to block that moves the tomato to its new position. The
create clone block creates a clone of the Drip sprite. Because the loop repeats many times, we will
have many clones.
3. Add a script to the Drip sprite to hide itself when the program starts.
4. Add a second script to the Drip sprite to do the following when the sprite starts as a clone. (Use the
when I start as a clone block from the Control menu.) You will need to create a number of variables
to do this.
a) Find and save the initial position of the clone. This will be the current position of the tomato.
b) Make the Drip clone go to this position and show itself.
c) Use a loop to fall to the ground. The x value will always be the same because the drip is falling in
a vertical line. Calculate the y value using the equation y = initial_y_value – 16t2, where t is the
time in seconds. The loop should stop when the y value is less than 0.
d) When the drip clone hits the ground, it should splat.
5. Enjoy the mess.

29
Chapter 7: Algorithms
Most computer programs use algorithms, which are a set of instructions designed to complete a certain
task, such as tracking the flight of a rotten tomato through the air.
It is usually a good idea to think of your algorithm before you start writing your program. For example,
the algorithm for graphing the points on the line y = 3x + 10 is:
pick a starting value for x
calculate a corresponding value for y using the equation y = 3x + 10
go to (x,y)
repeat some number of times:
increment x
calculate y
go to (x,y)
In this chapter, you will practice thinking of and programming algorithms.
Lesson 7-1: Sum of the Numbers 1 to n
Program Name: Sum 1 to n
Suppose someone asked you what the sum of the numbers from 1 to 3 is. Pretty easy: 1 + 2 + 3 equals 6.
The sum of the numbers from 1 to 6? A bit harder: 1 + 2 + 3 + 4 + 5 + 6 equals 21. From 1 to 52? Time
to write a program.
1. Create a new program and name it Sum 1 to n.
2. Create local variables named number, total, and lastValue.
3. Ask the user for a number and set lastValue to that number.
4. Initialize number to 1 and total to 0.
5. Add the following repeat until loop to your script:
This loop adds the numbers from 1 to the number entered by the user. It is important to understand
how it works.
Remember that we already set lastValue to the number entered by the user and initialized number to
1 and total to 0. Suppose the user entered the number 3.
The first time through the loop, number (1) is less than lastValue (3), so we go inside the loop.
The first block in the loop sets the new value of total to the old value of total (0) plus number
(1). Thus, the new value of total is 0 + 1 = 1.
The second block in the loop changes the value of number by 1. That is, it adds 1 to the current
value of number. Since the current value of number is 1, the new value is 1 + 1 = 2.
Changing the value of a variable by a fixed amount is called incrementing the variable. It is a
very common operation in loops.
30
The second time through the loop, number (2) is still less than lastValue (3), so we go inside. This
time, total is set to 1 (old value) + 2 (number) = 3 and number is incremented to 3.
The third time through the loop, number (3) is equal to lastValue (3), so we go inside. total is set to
3 (old value) + 3 (number) = 6 and number is incremented to 4.
The fourth time through the loop, number (3) is greater than lastValue (3), so we stop.
6. Add blocks to display the output using the string “The sum of the numbers from 1 to n is: m”, where
n is the number entered by the user and m is the total.
7. Test your program.
Lesson 7-2: Sum of the Even/Odd Numbers 1 to n
Program Name: Sum 1 to n Even/Odd
Now that you’ve seen how to use a loop and variables together, write a program to ask the user for a
number (n) and display the sum of the odd numbers from 1 to n, as well as the sum of the even numbers
from 2 to n. For example, if the user entered the number 6, your program would display 9 (which is
equal to 1 + 3 + 5) and 12 (which is equal to 2 + 4 + 6).
Lesson 7-3: Formula for the Sum of the Numbers 1 to n
Program Name: Sum 1 to n Formula
It turns out that there is a formula for finding the sum of the numbers from 1 to n:
sum of numbers from 1 to n = n (n + 1) / 2
Write a program to ask the user for a number and use this formula to calculate and display the sum of
the numbers from 1 to the number entered by the user.
Lesson 7-4: Fibonacci Numbers
Program Name: Fibonacci
Leonardo Bonacci (c. 1170 – c. 1250), also known as Fibonacci, was an Italian mathematician who
popularized the use of Arab numerals — the kind we use today — in Europe. He also rediscovered or
introduced (it is not clear which) the sequence of numbers that bears his name:
0, 1, 1, 2, 3, 5, 8, 13, 21, 34, 55, ...
The sequence is calculated by starting with 0, 1 and then calculating the next number in the sequence by
adding the previous two numbers. Thus, the third number is 0 + 1 = 1, the fourth number is 1 + 1 = 2,
the fifth number is 1 + 2 = 3, the sixth number is 2 + 3 = 5, and so on.
The pattern described by Fibonacci numbers occurs in many places in nature, such as the scales on a
pine cone and the shape of a fern as it uncurls.
Write a program that generates and displays the first 15 Fibonacci numbers. For extra credit, let the user
decide how many Fibonacci numbers to generate and display.
31
Lesson 7-5: Sorting (Optional)
Program Name: Sorting
In computer programming, a list is a kind of variable that can store as many values as you want. The
values are stored in specific positions in the list. For example, in the following list, 3 is stored in the first
position, 5 is stored in the second position, 2 is stored in the third position, and so on.
3, 5, 2, 17, 1
You can insert, delete, or replace values in the list. For example, if you insert the number 43 in the
second position in the list, the list becomes:
3, 43, 5, 2, 17, 1
If you then delete the fourth value in the list, the list becomes:
3, 43, 5, 17, 1
And if you then replace the fifth value in the list with 99, the list becomes:
3, 43, 5, 17, 99
You can create a list with the Make a List button on the Data menu. After you create a list, the Data
menu contains blocks for working with lists. (Note: To delete all of the values in the list, use the delete
__ of ___ block and set the entry number to all.)
Write a program that randomly generates 10 numbers between 0 and 100, stores these in a list, and then
sorts them from lowest to highest.

32
33
Chapter 8: Program Structure
Most of the programs you have created so far have contained a single script. In complex programs, a
single script has two significant problems:
Lack of readability. In a single, long script, it is difficult to understand the overall flow of a
program because you get lost reading all the details.
Lack of flexibility. In a single, long script, it is difficult to modify, rearrange, or reuse parts of the
script.
In this chapter, you will see how to add structure to a program through the use of messages and More
blocks, which are blocks you define yourself.
Lesson 8-1: A Single, Long Script
Program Name: Walk, Jump, Spin
Write a program that uses a single script to:
1. Start on the left side of the stage.
2. Walk 200 steps, moving 10 steps at a time.
3. Jump 25 steps high (and fall back down) three times.
4. Turn around and walk back 100 steps, moving 10 steps at a time.
5. Spin around twice.
6. Turn around and walk 500 steps, moving 10 steps at a time.
Lesson 8-2: Adding Structure with Messages
Program Name: Walk, Jump, Spin (continued)
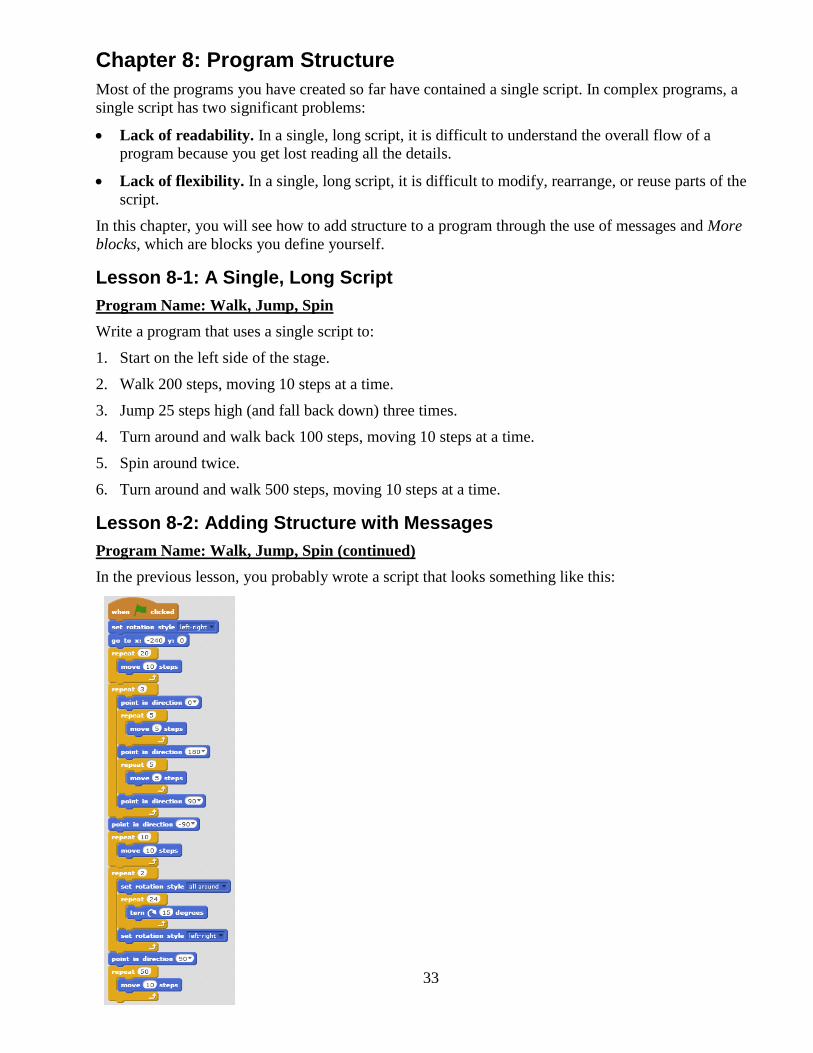
In the previous lesson, you probably wrote a script that looks something like this:
34
At a glance, it’s pretty difficult to see what is happening. This is because the script is a single, long set of
commands with no structure. In computer programming, this is known as spaghetti code and, much as
you might like spaghetti, it’s not a good thing. In addition to being difficult to read, spaghetti code is
hard to rearrange (for example, spinning first and jumping second) and to change (for example, adding a
second group of five jumps).
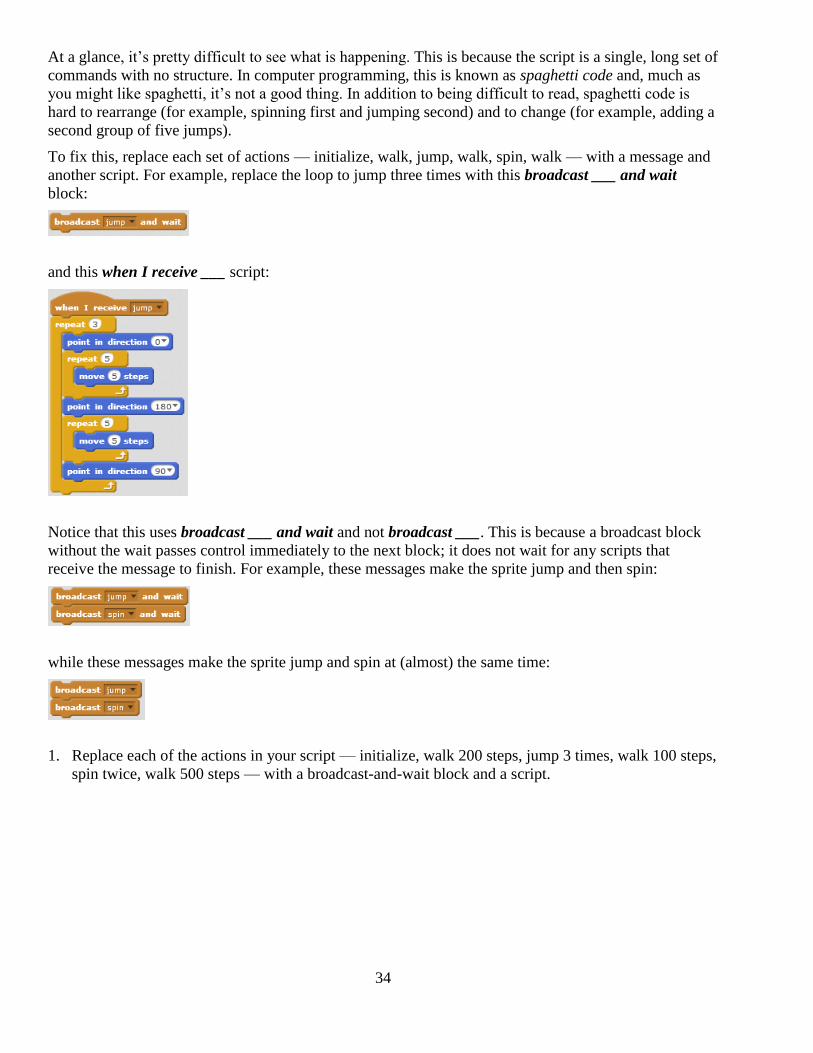
To fix this, replace each set of actions — initialize, walk, jump, walk, spin, walk — with a message and
another script. For example, replace the loop to jump three times with this broadcast ___ and wait
block:
and this when I receive ___ script:
Notice that this uses broadcast ___ and wait and not broadcast ___. This is because a broadcast block
without the wait passes control immediately to the next block; it does not wait for any scripts that
receive the message to finish. For example, these messages make the sprite jump and then spin:
while these messages make the sprite jump and spin at (almost) the same time:
1. Replace each of the actions in your script — initialize, walk 200 steps, jump 3 times, walk 100 steps,
spin twice, walk 500 steps — with a broadcast-and-wait block and a script.
35
Lesson 8-3: More Blocks
Program Name: Walk, Jump, Spin (continued)
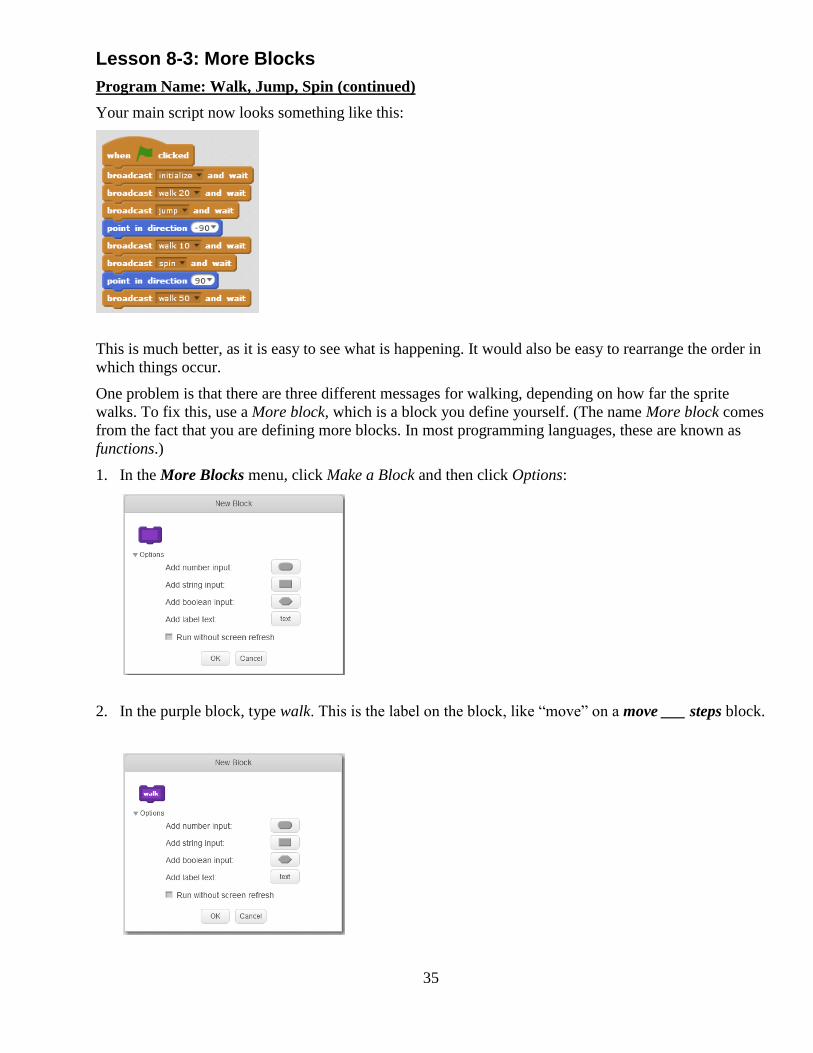
Your main script now looks something like this:
This is much better, as it is easy to see what is happening. It would also be easy to rearrange the order in
which things occur.
One problem is that there are three different messages for walking, depending on how far the sprite
walks. To fix this, use a More block, which is a block you define yourself. (The name More block comes
from the fact that you are defining more blocks. In most programming languages, these are known as
functions.)
1. In the More Blocks menu, click Make a Block and then click Options:
2. In the purple block, type walk. This is the label on the block, like “move” on a move ___ steps block.

36
3. Click Add number input and change the label of the number input to number_of_times. This adds a
parameter to the block, allowing you to send a value to the block. A parameter is a variable used in a
More block. In this case, the parameter specifies the number of sets of 10 steps to walk.
4. Click Add label text. This adds another label to the block. Type times.
5. Click OK. This creates a walk __ times block in the More Blocks menu and a define walk
number_of_times times block in the scripts area. You will use the walk __ times block in your script
to walk, and the define walk number_of_times times block to define what the walk __ times block
actually does.
37
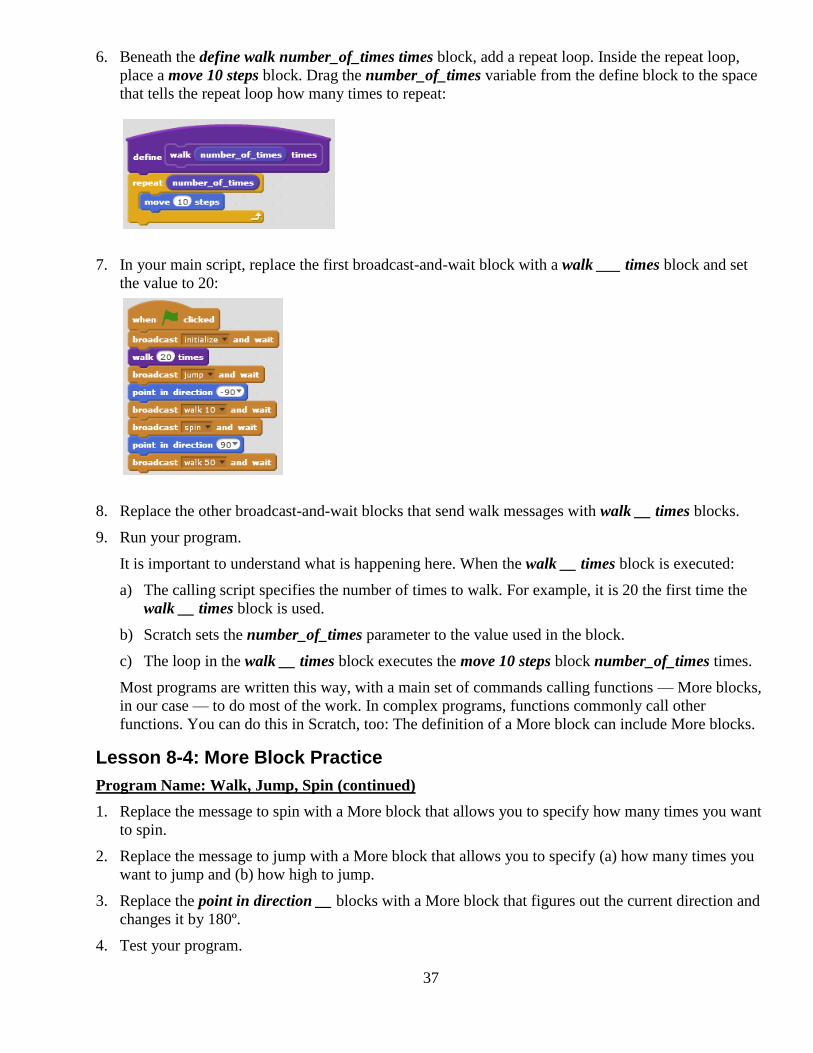
6. Beneath the define walk number_of_times times block, add a repeat loop. Inside the repeat loop,
place a move 10 steps block. Drag the number_of_times variable from the define block to the space
that tells the repeat loop how many times to repeat:
7. In your main script, replace the first broadcast-and-wait block with a walk ___ times block and set
the value to 20:
8. Replace the other broadcast-and-wait blocks that send walk messages with walk __ times blocks.
9. Run your program.
It is important to understand what is happening here. When the walk __ times block is executed:
a) The calling script specifies the number of times to walk. For example, it is 20 the first time the
walk __ times block is used.
b) Scratch sets the number_of_times parameter to the value used in the block.
c) The loop in the walk __ times block executes the move 10 steps block number_of_times times.
Most programs are written this way, with a main set of commands calling functions — More blocks,
in our case — to do most of the work. In complex programs, functions commonly call other
functions. You can do this in Scratch, too: The definition of a More block can include More blocks.
Lesson 8-4: More Block Practice
Program Name: Walk, Jump, Spin (continued)
1. Replace the message to spin with a More block that allows you to specify how many times you want
to spin.
2. Replace the message to jump with a More block that allows you to specify (a) how many times you
want to jump and (b) how high to jump.
3. Replace the point in direction __ blocks with a More block that figures out the current direction and
changes it by 180º.
4. Test your program.
38
Lesson 8-5: Messages vs. More Blocks
One question that might have occurred to you by now is when to use messages and when to use More
blocks. In some cases, the choice is clear:
Use More blocks when you need to pass different values to a script. For example, your script draws
a line between two points you pass or makes a sprite jump in a parabola whose height you pass.
Use messages when you need to tell more than one sprite to do something. (More blocks can only be
used in the sprite they were created in.)
Use messages — in particular, use broadcast message blocks — when you want things to happen
simultaneously, such as spinning and moving at the same time. Scripts wait until More blocks (and
broadcast message and wait blocks) finish before executing the next block. They continue
immediately after executing a broadcast message block.
In other cases, you can use either More blocks or messages but one feels more appropriate:
Use More blocks for “utility” routines that can be used from many different places in your project.
For example, you used a More block in three different places to tell your sprite to walk.
Use messages to control the flow of your project. For example, you used a message to initialize your
program.
Lesson 8-6: Return Values
Program Name: Line (continued)
In most computer programming languages, functions can return a value. For example, functions might:
Return the value of y in the equation y = 3x + 10 for a given value of x.
Return “e” or “o” depending on whether a number is even or odd.
Return the distance between two sprites.
Return the next number in a Fibonacci sequence given the previous two numbers.
In this exercise, you will use a More block to return a y value for a particular x value. That is, the More
block will set the value of the y variable, which can then be used by the calling script.
1. Reopen the Line program.
2. Create a More block that accepts an x value and calculates the value of 3x + 10. It then sets the y
variable to the calculated value.
3. Replace the two blocks that currently set the y value with your new More block.
4. Test your program.
This may not seem like a very exciting change, but having a single copy of the code — that is, placing
the calculation in a More block — has some important advantages:
There is less code because multiple identical calculations are replaced with a single More block.
There is no chance that the calculation is written differently in different places.
It is easier to change the code because there is a single copy of it.
Obviously, these advantages increase with the size of the script defining the More block.
39
Lesson 8-7: Return Value Practice
Program Name: Run Away
The distance between a point (x1, y1) and a point (x2, y2) is:
square root of ( (x1 – x2)2 + (y1 – y2)
2 )
Create a program with two sprites. The sprites are identical except that one starts on the left side of the
screen and walks right and the other starts on the right side of the screen and walks left. The two sprites
should walk until they are within 60 steps of each other, at which point they turn around and run back to
the edge.
Use a More block to calculate and return the distance between the two sprites.
Lesson 8-8: Structure Practice
Program Name: Pong (continued)
Reopen your Pong program and use messages and structures to convert it from spaghetti code to a well-
structured program.
Lesson 8-9: Recursive Functions
Program Name: Spiral
One of the things that a function can do is call itself. This is called recursion and a function used this
way is called a recursive function. Recursion is useful in problems that repeat themselves, using the
current state as input for the next state.
For example, suppose we want to draw a spiral. We start in the center of the stage, pick an initial
direction and length, and draw a line for the chosen direction and length. We then decrease the angle by
a fixed amount (for example, 1º) and increase the length by a fixed amount (for example, 1 step) and
draw again. We continue until we hit the edge of the page.
Drawing a spiral is a recursive problem because the length and direction of the next segment depend on
the length and direction of the current segment. This is different than drawing a square, where all sides
have the same length and you always turn 90º before drawing the next side.
1. Create a new project and name it Spiral.
2. Create a More block that takes the following input:
length
direction
change length by
change direction by
3. In the definition of the More block, set the direction to the input direction and move length steps. If
the sprite is not touching the edge, call the More block using the following values:
length + change length by
direction – change direction by
change length by
change direction by
4. When the program starts, go to (0, 0), put the pen down, and call the More block. You will need to
play with the input values to find values that draw a nice spiral.
40
One thing that is important in writing recursive functions is to have a stopping condition. That is, the
function needs to decide to stop sometime. Otherwise, it will keep calling itself forever. In this case, the
spiral stops when it touches the edge.
Lesson 8-10: Recursive Function Practice
Program Name: Sum 1 to n Recursive
Summing up the numbers from 1 to n is a recursive problem. This is because each sum depends on the
next lower sum. That is, sum(1 to n) = n + sum(1 to n – 1), sum(1 to n – 1) = n – 1 + sum(1 to n – 2)
and so on, until you reach sum(1 to 1), which is 1.
1. Create a new project and name it Sum 1 to n Recursive.
2. Create a More block that accepts a single number, n. Also create a local variable named sum.
3. The More block checks if n is 1. If n is 1, the block sets sum to 1. If n is not 1, the block recursively
calls itself with an input value of n – 1; it then sets sum to n + sum.
4. Ask the user for a value of n, then call the More block with that value of n and display the sum.
5. Test your program.
Lesson 8-11: More Recursive Function Practice
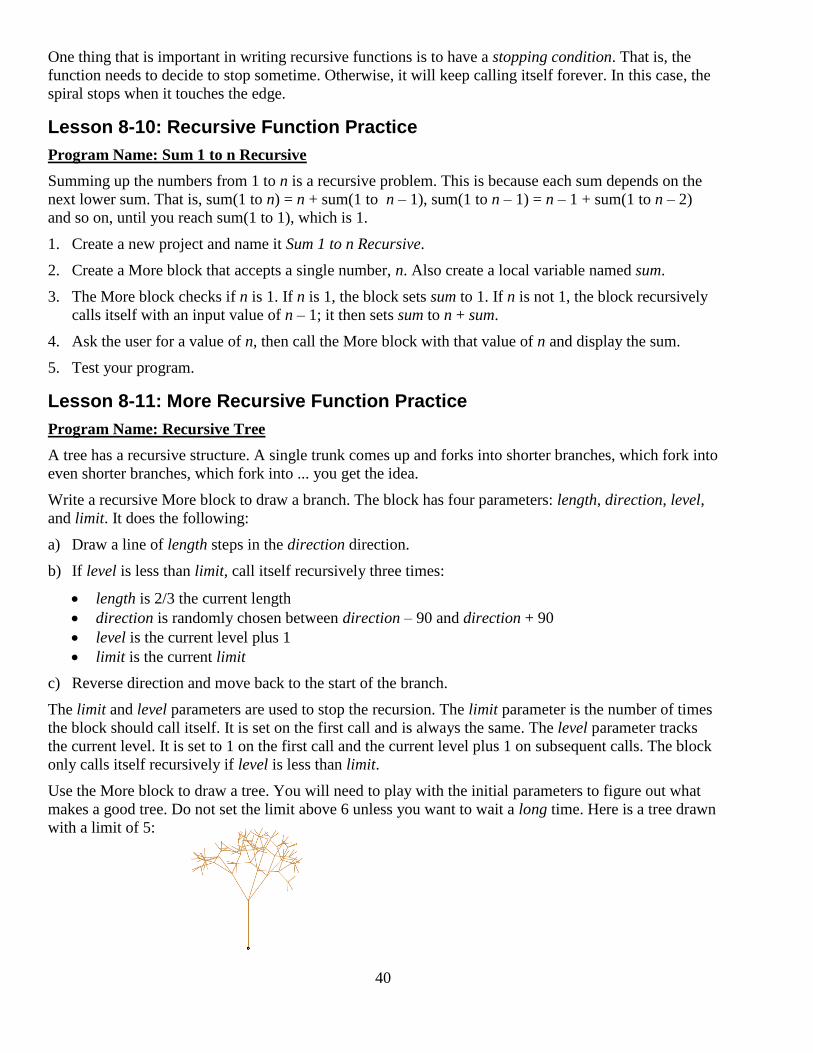
Program Name: Recursive Tree
A tree has a recursive structure. A single trunk comes up and forks into shorter branches, which fork into
even shorter branches, which fork into ... you get the idea.
Write a recursive More block to draw a branch. The block has four parameters: length, direction, level,
and limit. It does the following:
a) Draw a line of length steps in the direction direction.
b) If level is less than limit, call itself recursively three times:
length is 2/3 the current length
direction is randomly chosen between direction – 90 and direction + 90
level is the current level plus 1
limit is the current limit
c) Reverse direction and move back to the start of the branch.
The limit and level parameters are used to stop the recursion. The limit parameter is the number of times
the block should call itself. It is set on the first call and is always the same. The level parameter tracks
the current level. It is set to 1 on the first call and the current level plus 1 on subsequent calls. The block
only calls itself recursively if level is less than limit.
Use the More block to draw a tree. You will need to play with the initial parameters to figure out what
makes a good tree. Do not set the limit above 6 unless you want to wait a long time. Here is a tree drawn
with a limit of 5:
41
Chapter 9: Advanced Programs
In this chapter, you will practice more complicated programs. Use More blocks and messages to break
your program into more manageable pieces. For example, most of these programs need a More block
that can determine if a number is prime.
Lesson 9-1: Prime Numbers
Program Name: Primes
Write a program that asks the user for a number and determines whether it is prime. For extra credit:
Ask the user how many prime numbers they want. Generate the first n prime numbers, where n is the
number the user asked for.
Ask the user for a number and generate all primes less than or equal to that number.
Lesson 9-2: Greatest Common Factor
Program Name: Greatest Common Factor
Write a program that asks the user for two numbers and then calculates and displays their greatest
common factor.
Lesson 9-3: Least Common Multiple
Program Name: Least Common Multiple
Write a program that asks the user for two numbers and then calculates their least common multiple.
Lesson 9-4: Least Common Denominator
Program Name: Least Common Denominator
Write a program that asks the user for two numbers and then calculates their least common denominator.
Lesson 9-5: Tic-Tac-Toe
Program Name: Tic-Tac-Toe
Write a program that allows two people to play tic-tac-toe.

42
43
Chapter 10: Project
The final four class sessions will be used to create a project of your own design. You will spend half a
class designing your project and 3 1/2 classes writing it. In the final class, everybody will present their
project to the class.
Your design should include:
A summary of your project. For example, “My project tells the story of Hansel and Gretel” or “My
project is a game where Mervin the Cucumber runs through the forest and fights vegetables.”
Sketches of the background and sprites in your project and how they fit together.
Descriptions of what the sprites do and how they interact. For example:
o “Hansel, Gretel, the house, and the witch are separate sprites. Hansel and Gretel walk
through the woods and eat the house. The witch then catches and eats them.”
o “Mervin spits cucumber seeds (which are separate sprites) at vegetables, which dodge the
seeds. After five hits, a vegetable explodes into three separate sprites, which fly through the
air. If any of these sprites hit the cucumber, it dies. The cucumber must slay a carrot, an
onion, a rutabaga, and a tomato to win.”
IMPORTANT:
Keep your design simple. You can always add more later.
Spend your time writing code, not drawing costumes.
The teacher must approve your design before you can start writing your project.