An Introduction to Microsoft Word 2003
64
Guide 12 Version 1.0 An Introduction to Microsoft Word 2003 This document provides a hands-on, beginner’s guide to word processing using Microsoft Word. No previous knowledge of word processing is assumed. However, it is essential that you are familiar with the Microsoft Windows interface and know how to use a mouse. If you are using Word on the Networked PC service you will find a file suitable for carrying out the later exercises in the ITS folder on the T: drive.
Transcript of An Introduction to Microsoft Word 2003
Guide 12 Version 1.0
An Introduction to Microsoft Word 2003 This document provides a hands-on, beginner’s guide to word processing using Microsoft Word. No previous knowledge of word processing is assumed. However, it is essential that you are familiar with the Microsoft Windows interface and know how to use a mouse. If you are using Word on the Networked PC service you will find a file suitable for carrying out the later exercises in the ITS folder on the T: drive.
Document code: Guide 12Title: An Introduction to Microsoft Word 2003Version: 1.0Date: May 2007 Produced by: University of Durham Information Technology Service
Copyright © 2007 University of Durham Information Technology Service
Conventions:
In this document, the following conventions are used: • A typewriter font is used for what you see on the screen. • A bold typewriter font is used to represent the actual characters you type at
the keyboard. • A slanted typewriter font is used for items such as filenames which you should
replace with particular instances. • A bold font is used to indicate named keys on the keyboard, for example,
Esc and Enter, represent the keys marked Esc and Enter, respectively. • A bold font is also used where a technical term or command name is used in
the text. • Where two keys are separated by a forward slash (as in Ctrl/B, for example),
press and hold down the first key (Ctrl), tap the second (B), and then release the first key.
Contents
1 Introduction ........................................................................................................1 1.1 The aim of this document...............................................................................1 1.2 Before you begin............................................................................................1
2 Starting up Word................................................................................................1
3 The Word screen................................................................................................2 3.1 Introduction ....................................................................................................2 3.2 Using the help facilities ..................................................................................2
3.2.1 Office Assistant.......................................................................................3 3.3 The screen components ................................................................................3
3.3.1 The Menu Bar .........................................................................................3 3.3.2 The Standard Toolbar.............................................................................4 3.3.3 The Formatting Toolbar ..........................................................................4 3.3.4 The horizontal ruler .................................................................................5 3.3.5 The status bar.........................................................................................6
3.4 The mouse pointer in Word............................................................................6 3.5 Giving commands ..........................................................................................6
4 Creating your first Word document .................................................................7 4.1 Entering text...................................................................................................7 4.2 Saving a document to disk.............................................................................8 4.3 Closing the document ..................................................................................10 4.4 Exiting Word.................................................................................................10 4.5 Opening an existing document ....................................................................10
5 Design decisions about your document........................................................11 5.1 Document presentation................................................................................11
5.1.1 Punctuation...........................................................................................11 5.1.2 Font style and size................................................................................11 5.1.3 Paragraph spacing and line indents .....................................................12
5.2 Decisions about printing...............................................................................12 5.2.1 Selecting the printer..............................................................................13 5.2.2 Paper size and orientation ....................................................................14
6 Editing text .......................................................................................................14 6.1 Insert and Overtype modes..........................................................................14 6.2 Selecting text ...............................................................................................15
6.2.1 Deleting text ..........................................................................................17 6.2.2 Moving text ...........................................................................................17 6.2.3 Copying text ..........................................................................................17
6.3 Word count...................................................................................................18 6.4 Saving as you work......................................................................................18
7 Moving around a larger document .................................................................19 7.1 By direction / location...................................................................................19 7.2 By content — the Find command.................................................................20
8 Formatting text.................................................................................................21 8.1 Character formatting ....................................................................................22
8.1.1 Bold, italic and underlined text ..............................................................22 8.1.2 Changing fonts and character size .......................................................23
8.2 Paragraph formatting ...................................................................................23
Guide 12: An Introduction to Microsoft Word 2003 i
8.2.1 Aligning text .......................................................................................... 24 8.2.2 Adding space before and after paragraphs .......................................... 24 8.2.3 Indenting paragraphs............................................................................ 25 8.2.4 Changing line spacing .......................................................................... 26
9 Completing your document ............................................................................ 26 9.1 Search and Replace .................................................................................... 26 9.2 Using the spellchecker................................................................................. 28 9.3 Inserting and deleting page numbers .......................................................... 30 9.4 Saving your work ......................................................................................... 32
10 Printing your document .................................................................................. 32 10.1 Print preview ................................................................................................ 32 10.2 Printing......................................................................................................... 33
11 Safeguarding your work.................................................................................. 34 11.1 File size........................................................................................................ 34 11.2 Saving your work to disk.............................................................................. 35 11.3 Backing up your disks.................................................................................. 35 11.4 Automatic Save option................................................................................. 35 11.5 Working with other file types........................................................................ 36
11.5.1 Other word processing applications...................................................... 36 11.5.2 Other versions of Word for Windows .................................................... 36
12 Page formatting ............................................................................................... 37 12.1 Inserting page breaks .................................................................................. 37 12.2 Keeping paragraphs together ...................................................................... 38 12.3 Headers and Footers ................................................................................... 38 12.4 Margins ........................................................................................................ 40
13 Miscellaneous topics....................................................................................... 40 13.1 Inserting simple graphics ............................................................................. 40 13.2 Inserting special characters ......................................................................... 41 13.3 Quick move and copy .................................................................................. 41 13.4 Formatting paragraphs using the ruler......................................................... 42 13.5 Inserting fields (such as dates) .................................................................... 43 13.6 Inserting a text watermark ........................................................................... 44 13.7 Automatic correction functions..................................................................... 44
13.7.1 AutoCorrect tab..................................................................................... 44 13.7.2 AutoFormat As You Type tab ............................................................... 44 13.7.3 AutoText tab ......................................................................................... 44 13.7.4 AutoFormat tab ..................................................................................... 44
14 Different views on your document................................................................. 45 14.1 Print layout view........................................................................................... 45 14.2 Normal view ................................................................................................. 45 14.3 Web layout view........................................................................................... 45 14.4 Zoom............................................................................................................ 45 14.5 Outline view ................................................................................................. 46 14.6 Document Map ............................................................................................ 46
15 Working with multiple windows and documents.......................................... 46 15.1 Splitting the document window .................................................................... 46 15.2 Working with multiple documents ................................................................ 47 15.3 Ending your session .................................................................................... 48
Guide 12: An Introduction to Microsoft Word 2003 ii
16 Further information about Word.....................................................................48 16.1 Creating numbered and bulleted lists ..........................................................48 16.2 Creating tables.............................................................................................49 16.3 Creating and editing footnotes .....................................................................49 16.4 Using styles and templates ..........................................................................49 16.5 Using the Equation Editor ............................................................................50 16.6 Using Microsoft Graph .................................................................................50 16.7 Using AutoText ............................................................................................50 16.8 Using the mail merge facilities .....................................................................50 16.9 Importing from other applications.................................................................50 16.10 Manuals and other documents.....................................................................50
Appendix A: Standard Toolbar..............................................................................51
Appendix B: Formatting Toolbar ..........................................................................53
Appendix C: Quick key commands ......................................................................55
Guide 12: An Introduction to Microsoft Word 2003 iii

1 Introduction
1.1 The aim of this document This document provides a hands-on, beginner's guide to word processing using Word. These notes are suitable for people working on the ITS Networked PC service. The exercises have been written so that you can use them to teach yourself.
The structure of the document is as follows:
• The first part provides a description of the components of the Word interface (menu bar, toolbars and so on) with an explanation of their use.
• Sections 4 – 10 cover the basics of word processing (editing and formatting techniques, printing and saving to disk), with practical exercises leading to the creation of a small text document.
• Finally, some further topics are introduced; including references to other ITS Word support materials.
1.2 Before you begin No previous knowledge of word processing is needed before you start this course, but it is essential that you know how to use a mouse and are familiar with the Microsoft Windows interface. You can acquire the necessary skills by working through the ITS document Guide 57: Using Windows which can be obtained from the IT Service Desk.
2 Starting up Word
1 Start up Windows in the usual way.
2 Click on the Start button in the bottom left of the window.
3 Click on Microsoft Word.
or
4 Double click on the Microsoft Word icon on the Desktop.
Guide 12: An Introduction to Microsoft Word 2003 1

3 The Word screen
3.1 Introduction When you start up Word, the initial screen will look something like this:
Notice the title bar at the top of the screen — the document is just called Document1 because you have not yet named it.
3.2 Using the help facilities There are a number of ways to obtain help when using Word. Most of the options are accessed via the Help menu.
1 Click on Help on the menu bar.
2 Select Microsoft Office Word Help (F1) from the pull-down menu.
Note: F1 refers to the shortcut option. By pressing the F1 key this will also open the Help screen.
The Help Topics dialog box appears. It works in the same way as the Help facility in Windows so hopefully will be familiar to you. However, if you need to refresh your memory you can even get help about how to use Help!
1 Click on the Table of Contents option
2 Select Startup and settings.
3 From the list, select Getting Help.
You can now read as much as you need to about how Help works by clicking the various menu items from the list. It is easy to move around in Help and the material is well cross-referenced.
To leave the Help facility:
1 Click the Close window button in the top right of the Help window.
Guide 12: An Introduction to Microsoft Word 2003 2
3.2.1 Office Assistant A quick way to get help is to use the Office Assistant. It can be opened from within the Help menu by choosing Show the Office Assistant.
To get help simply left click on the Assistant, then type the question that you want to be answered. The Office Assistant can be left open if you wish while you use Word so that you can refer to it easily. It can be repositioned by moving the mouse pointer over the Assistant, then left click and drag it to a more suitable position.
To close the Office Assistant, right click on the icon and select Hide.
To turn off the Office Assistant facility, right click, select Options when it appears and deselect the Use the Office Assistant box.
Office Assistant also contains some tips for working with Word. At certain times a lightbulb will appear on top of the Office Assistant. This means that Word, recognising the feature you are currently using, has a tip that might help you with that feature. If you wish to see the tip, click on the Office Assistant button.
The next part of this section will give you the opportunity to use some of the Help facilities described above.
3.3 The screen components Beneath the title bar is the menu bar. Each name contains a drop down menu of commands.
Underneath the menu bar you will see a row of icons which make up the Standard toolbar and beneath this a row of boxes and icons called the Formatting toolbar.
The horizontal ruler is immediately above the document window into which you will enter the text of your document. The vertical ruler runs down the left of the document window.
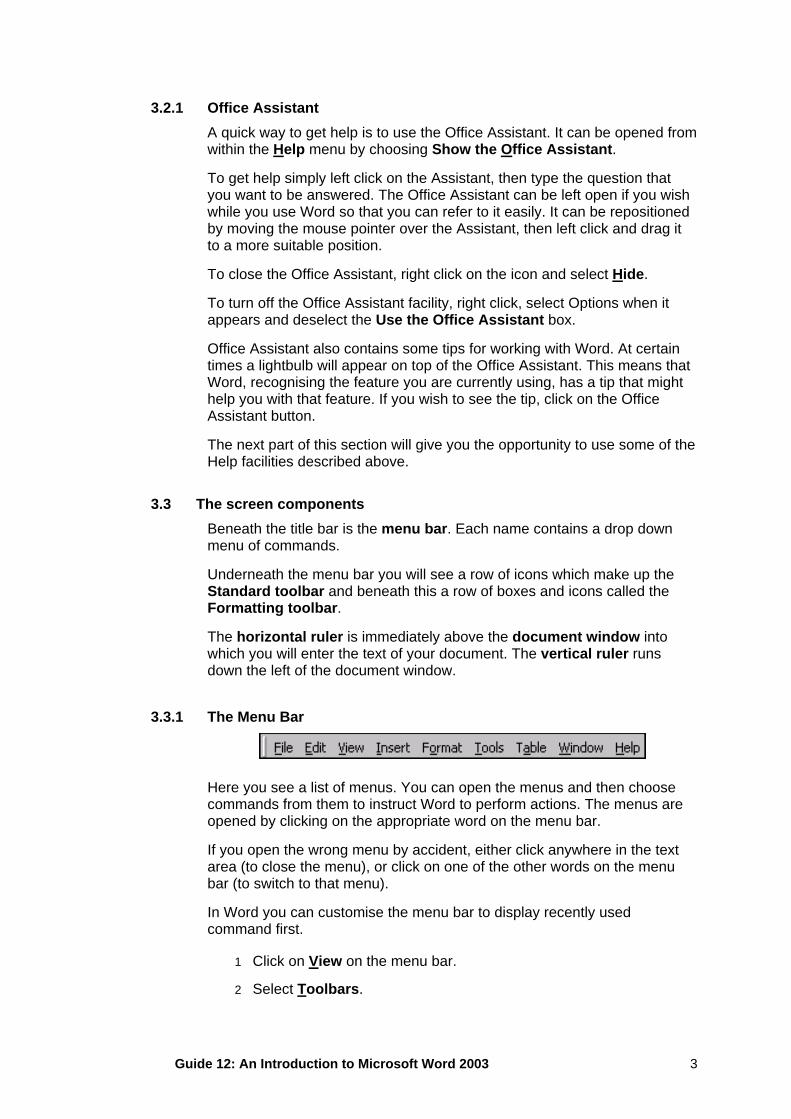
3.3.1 The Menu Bar
Here you see a list of menus. You can open the menus and then choose commands from them to instruct Word to perform actions. The menus are opened by clicking on the appropriate word on the menu bar.
If you open the wrong menu by accident, either click anywhere in the text area (to close the menu), or click on one of the other words on the menu bar (to switch to that menu).
In Word you can customise the menu bar to display recently used command first.
1 Click on View on the menu bar.
2 Select Toolbars.
Guide 12: An Introduction to Microsoft Word 2003 3
3 Select Customize.
4 Click the Options tab.
5 Deselect Always show full menus.
6 Select to Show full menus after a short delay if required.
7 Click Close.
Please note that this feature has been disabled on the Networked PC service.
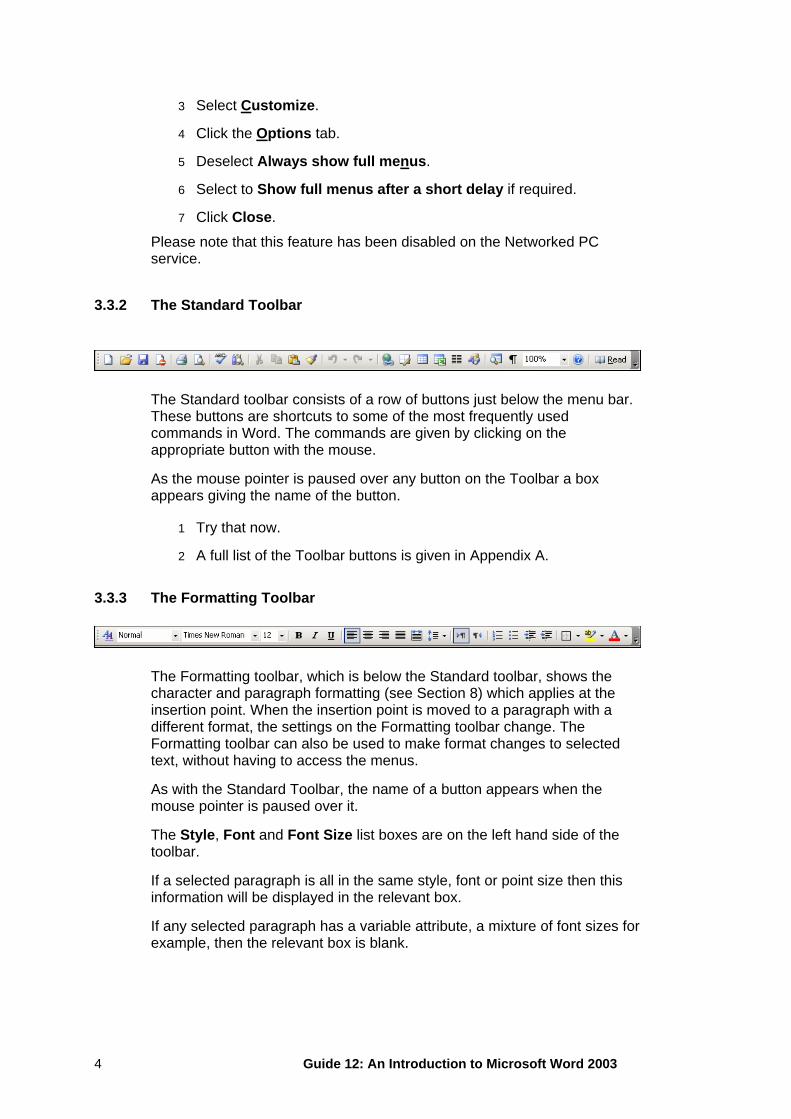
3.3.2 The Standard Toolbar
The Standard toolbar consists of a row of buttons just below the menu bar. These buttons are shortcuts to some of the most frequently used commands in Word. The commands are given by clicking on the appropriate button with the mouse.
As the mouse pointer is paused over any button on the Toolbar a box appears giving the name of the button.
1 Try that now.
2 A full list of the Toolbar buttons is given in Appendix A.
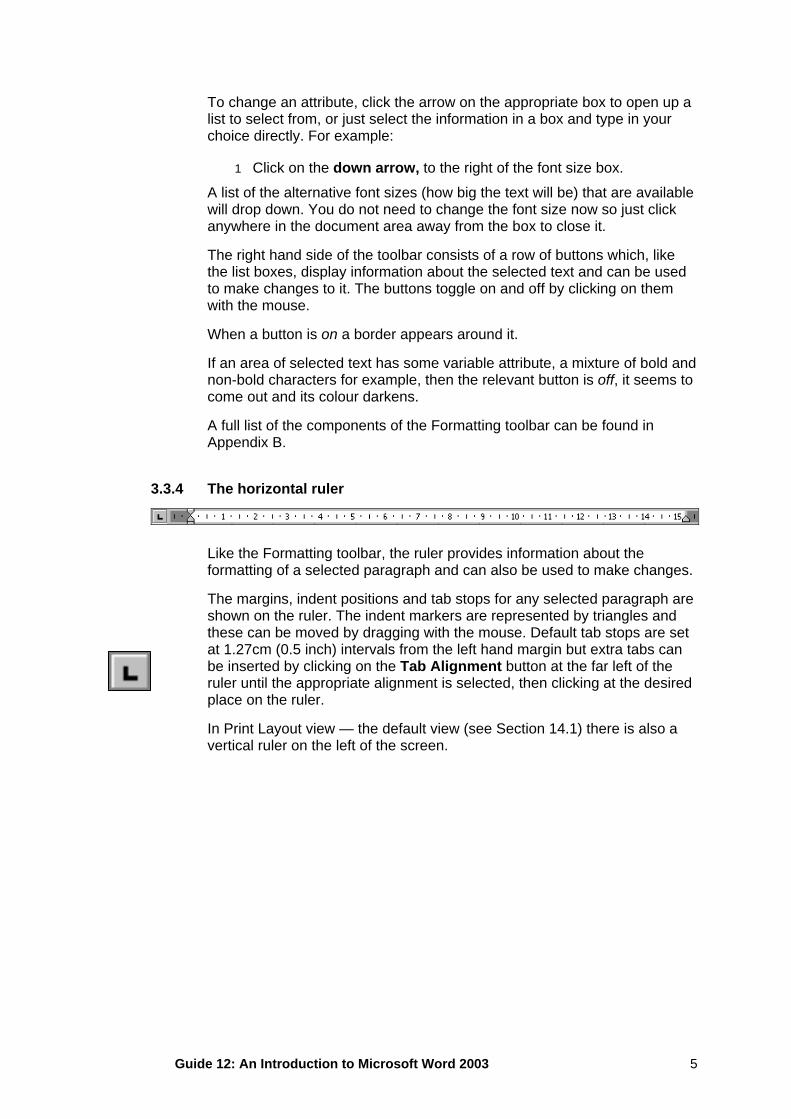
3.3.3 The Formatting Toolbar
The Formatting toolbar, which is below the Standard toolbar, shows the character and paragraph formatting (see Section 8) which applies at the insertion point. When the insertion point is moved to a paragraph with a different format, the settings on the Formatting toolbar change. The Formatting toolbar can also be used to make format changes to selected text, without having to access the menus.
As with the Standard Toolbar, the name of a button appears when the mouse pointer is paused over it.
The Style, Font and Font Size list boxes are on the left hand side of the toolbar.
If a selected paragraph is all in the same style, font or point size then this information will be displayed in the relevant box.
If any selected paragraph has a variable attribute, a mixture of font sizes for example, then the relevant box is blank.
Guide 12: An Introduction to Microsoft Word 2003 4
To change an attribute, click the arrow on the appropriate box to open up a list to select from, or just select the information in a box and type in your choice directly. For example:
1 Click on the down arrow, to the right of the font size box.
A list of the alternative font sizes (how big the text will be) that are available will drop down. You do not need to change the font size now so just click anywhere in the document area away from the box to close it.
The right hand side of the toolbar consists of a row of buttons which, like the list boxes, display information about the selected text and can be used to make changes to it. The buttons toggle on and off by clicking on them with the mouse.
When a button is on a border appears around it.
If an area of selected text has some variable attribute, a mixture of bold and non-bold characters for example, then the relevant button is off, it seems to come out and its colour darkens.
A full list of the components of the Formatting toolbar can be found in Appendix B.
3.3.4 The horizontal ruler
Like the Formatting toolbar, the ruler provides information about the formatting of a selected paragraph and can also be used to make changes.
The margins, indent positions and tab stops for any selected paragraph are shown on the ruler. The indent markers are represented by triangles and these can be moved by dragging with the mouse. Default tab stops are set at 1.27cm (0.5 inch) intervals from the left hand margin but extra tabs can be inserted by clicking on the Tab Alignment button at the far left of the ruler until the appropriate alignment is selected, then clicking at the desired place on the ruler.
In Print Layout view — the default view (see Section 14.1) there is also a vertical ruler on the left of the screen.
Guide 12: An Introduction to Microsoft Word 2003 5
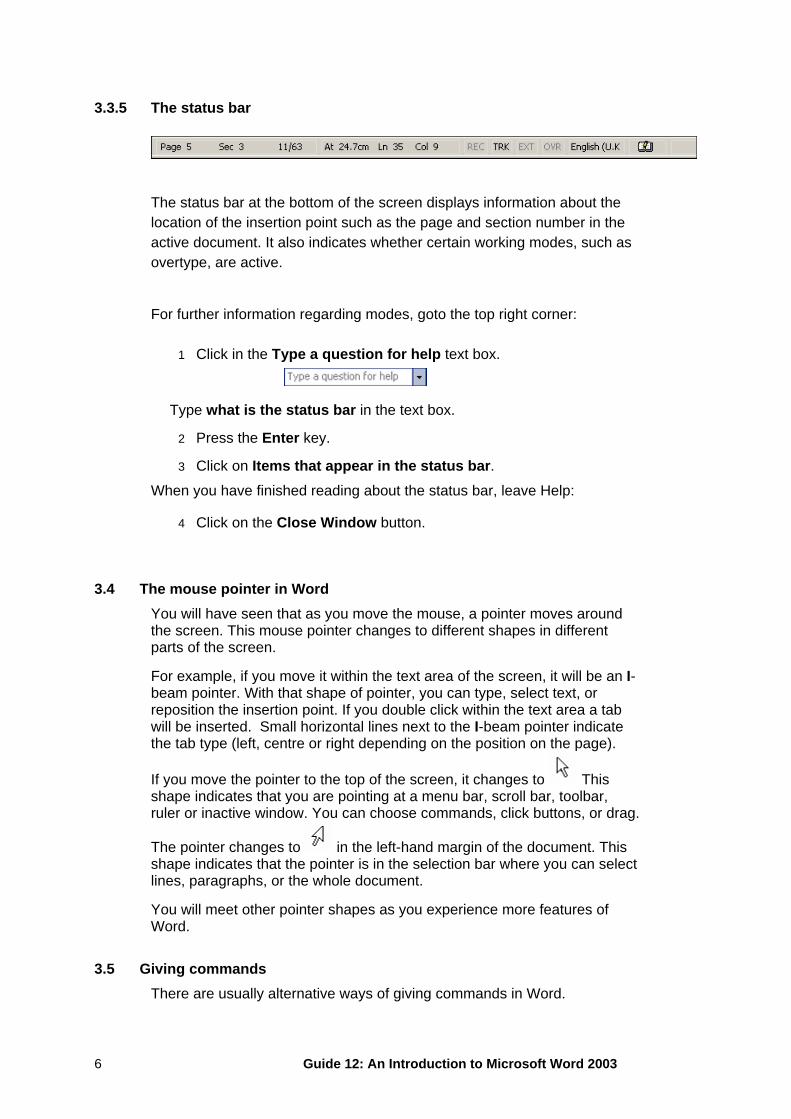
3.3.5 The status bar
The status bar at the bottom of the screen displays information about the location of the insertion point such as the page and section number in the active document. It also indicates whether certain working modes, such as overtype, are active.
For further information regarding modes, goto the top right corner:
1 Click in the Type a question for help text box.
Type what is the status bar in the text box.
2 Press the Enter key.
3 Click on Items that appear in the status bar. When you have finished reading about the status bar, leave Help:
4 Click on the Close Window button.
3.4 The mouse pointer in Word You will have seen that as you move the mouse, a pointer moves around the screen. This mouse pointer changes to different shapes in different parts of the screen.
For example, if you move it within the text area of the screen, it will be an I-beam pointer. With that shape of pointer, you can type, select text, or reposition the insertion point. If you double click within the text area a tab will be inserted. Small horizontal lines next to the I-beam pointer indicate the tab type (left, centre or right depending on the position on the page).
If you move the pointer to the top of the screen, it changes to This shape indicates that you are pointing at a menu bar, scroll bar, toolbar, ruler or inactive window. You can choose commands, click buttons, or drag.
The pointer changes to in the left-hand margin of the document. This shape indicates that the pointer is in the selection bar where you can select lines, paragraphs, or the whole document.
You will meet other pointer shapes as you experience more features of Word.
3.5 Giving commands There are usually alternative ways of giving commands in Word.
Guide 12: An Introduction to Microsoft Word 2003 6
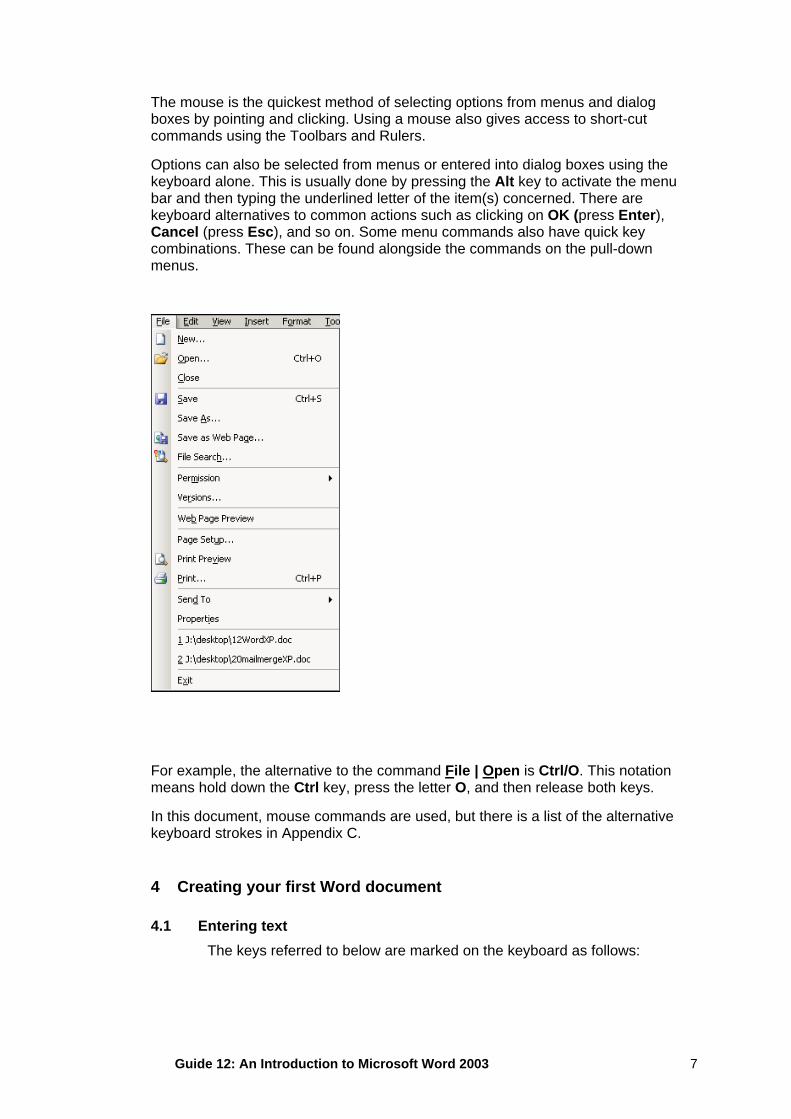
The mouse is the quickest method of selecting options from menus and dialog boxes by pointing and clicking. Using a mouse also gives access to short-cut commands using the Toolbars and Rulers.
Options can also be selected from menus or entered into dialog boxes using the keyboard alone. This is usually done by pressing the Alt key to activate the menu bar and then typing the underlined letter of the item(s) concerned. There are keyboard alternatives to common actions such as clicking on OK (press Enter), Cancel (press Esc), and so on. Some menu commands also have quick key combinations. These can be found alongside the commands on the pull-down menus.
For example, the alternative to the command File | Open is Ctrl/O. This notation means hold down the Ctrl key, press the letter O, and then release both keys.
In this document, mouse commands are used, but there is a list of the alternative keyboard strokes in Appendix C.
4 Creating your first Word document
4.1 Entering text The keys referred to below are marked on the keyboard as follows:
Guide 12: An Introduction to Microsoft Word 2003 7
Shift Enter ↵ Backspace ← (the rectangular key next to + and =)
To type an upper-case (capital) letter, hold down the Shift key and press the letter required. Create a space between words using the Spacebar (the long key at the bottom of the keyboard). To start a new paragraph press the Enter key.
The text that you type will appear to the left of the insertion point. It does not matter if you make mistakes while you are typing. You can press the Backspace key to correct any errors as you go along, or you can use the editing facilities of Word to correct them later.
1 Type in the following text. It does not matter if the lines end at different points to those shown.
When entering text into Word, the program will automatically start a new line when the current one is full. It will not divide a word between two lines. This is called word-wrap.
If you misspell any of the words you will see a wavy red line underneath them. This feature alerts you to the spelling mistake. You may also see green wavy lines, which alert you to a grammatical error. Ignore them for now. (See section 9.2 for further details).
4.2 Saving a document to disk As yet, your document is only temporarily stored in working memory on the PC. If there were to be a power failure, a fault with the machine or a problem with Word itself, the document would be lost.
You are now going to save your document as a file on disk. In the File menu there are different versions of the Save command. These include:
File | Save saves the document under its existing name and will prompt you to supply a name if you have not already done so.
File | Save as Web Page saves the document as an html file, which can then be view on the WWW.
File | Save As enables you to save a document under a different name, in a different format or in a different location. As you are going to change the name of your document (from Document1 to something more meaningful), this is the version of the command that you will use.
1 Click on File on the menu bar.
2 Select Save As from the pull-down menu.
Note: These two actions constitute the File | Save As command, described in the paragraph above.
Guide 12: An Introduction to Microsoft Word 2003 8
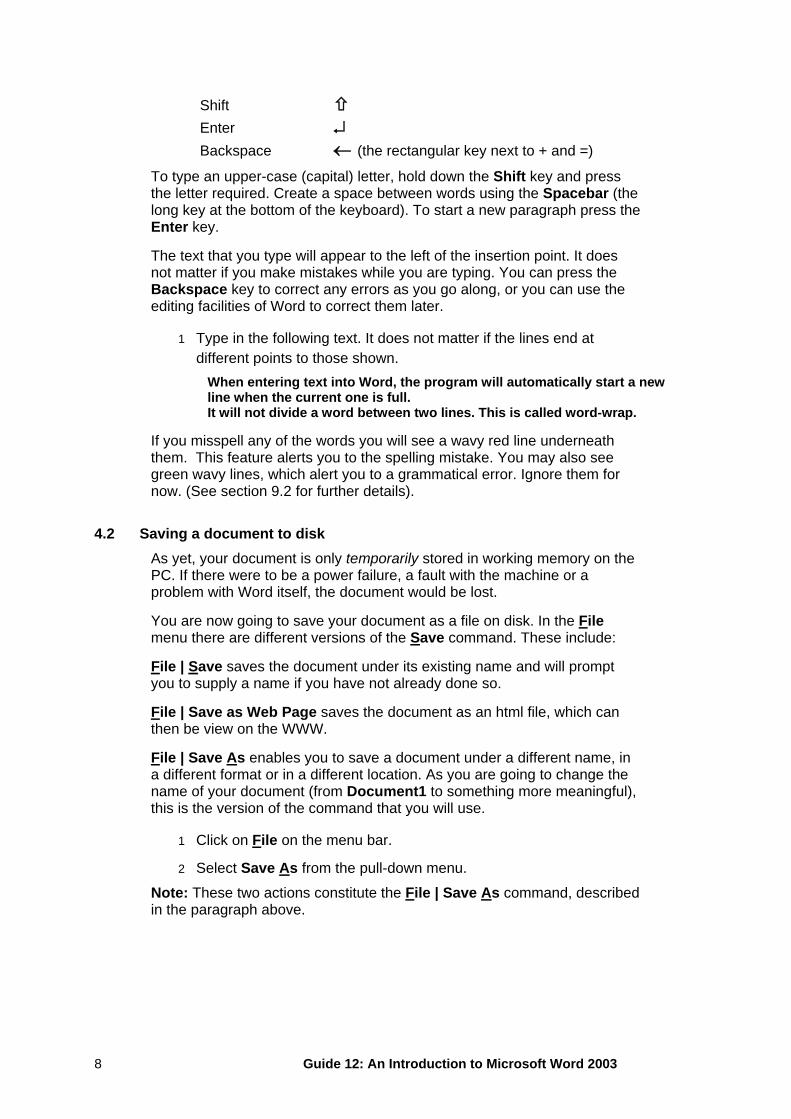
The Save As dialog box appears, showing the contents of your J: drive:
Word has already entered a name in the File name box (highlighted in blue). This is based on the first few words of your document. You should enter a more meaningful filename. If the existing name is not highlighted position the mouse pointer on the name and click the mouse button three times.
1 Type first
in the File name box.
In the Save in box you can see the drive and folder where your file will be stored. These will be different if you are using a stand-alone PC rather than a Networked PC. It is possible to change the drive or folder where your file will be saved by selecting alternative destinations from the drop down menu within the box (click on the arrow on the right of the box).
2 Check that the Save in box is showing the location that you want to use. On the Networked PC service it will be set automatically to your personal file space on the J: drive.
3 Click on Save.
You are now returned to the document window. Notice that the title bar has changed to display the file name you have just given your document (first) and that Word has added a .doc extension. If you do not add an extension to document filenames, the .doc extension is always added by default.
Guide 12: An Introduction to Microsoft Word 2003 9
4.3 Closing the document When a file is opened, Word reads it from disk, loads it into the computer's working memory, and displays it on the screen. When a file is closed, it is written back to disk, purged from the computer's working memory, and it disappears from the screen. The command to close a document is found in the File menu.
1 Click on File on the menu bar.
2 Select Close from the pull-down menu.
If you have made any changes to your document since you saved it, you will be asked if you want to save the changes.
4.4 Exiting Word To end your word processing session (after closing your document files as described in Section 4.3) you need to exit Word.
If you wish to practise this now:
1 Click on File on the menu bar.
2 Select Exit from the pull-down menu.
4.5 Opening an existing document In this exercise, you will open the document that you created earlier.
1 If you exited Word in section 4.4, start it up again. (Refer to Section 2 if you need to remind yourself what to do.)
2 Click on File on the menu bar.
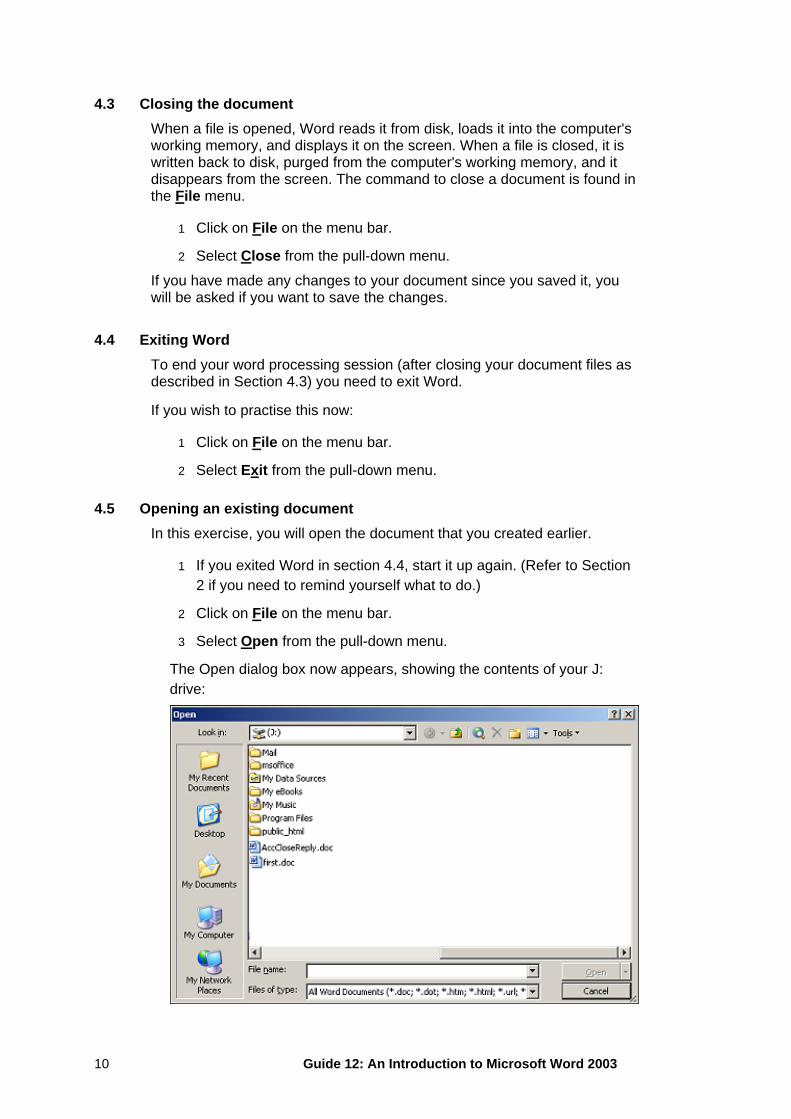
3 Select Open from the pull-down menu.
The Open dialog box now appears, showing the contents of your J: drive:
Guide 12: An Introduction to Microsoft Word 2003 10
4 Click on first.doc in the list of file names (or type the name in the File name box if you prefer).
5 Click on Open. The document that you saved earlier will now appear on the screen ready for you to continue working on it.
5 Design decisions about your document Section 4 covered the basics of starting to work on a text document. Before you begin any new document however there are some decisions that you must take regarding presentation and production. This section details the most important of these.
Any written communication makes an impression first by its appearance. You should aim to produce text that is attractive and readable. Readers will be distracted from the content of the text by incorrect spelling and punctuation, use of inappropriate fonts or poor layout. Personal taste will dictate which general style you adopt, but there are some basic principles and typing conventions that you should observe.
Whatever style you choose for your document — paragraphs, numbering, adding emphasis to headings and so on — you must be consistent. As you become more proficient, you can use styles (see section 16.4) to help you do this.
5.1 Document presentation
5.1.1 Punctuation These are the recommendations for spaces before and after punctuation marks:
• One space after punctuation — full stops (periods), colons, semi-colons, question marks and exclamation marks — is enough using modern word processors. There should not be a space immediately before any of these.
• One space before an opening bracket and one after a closing bracket, unless they are used within a word, as in page(s). There should be no spaces immediately inside the brackets.
5.1.2 Font style and size Many lettering styles (fonts) and sizes are available in word processing applications. Most fonts can be placed in one of two categories — serif and sans serif. The former are fonts like the one used in this paragraph, which have small decorative features on individual letters. The latter are fonts like the one used in the headings of this document, which are plainer and lack the decorations. When choosing which fonts to use, consider the following:
• Some fonts (such as Times New Roman, or Palatino) have a simple but formal appearance and have been designed for good readability;
Guide 12: An Introduction to Microsoft Word 2003 11
others have a more ornate look (such as Algerian) or were designed to be used for posters or notices (such as Brush Script). Choose a style that is appropriate for the document you are producing.
• Don’t use more than a small number (two is usually more than adequate) of different fonts in the same piece of work.
• Although there are no hard and fast rules, several studies seem to indicate that people find it easier to read a lot of text if it is set in a seriffed font (such as Times New Roman). It is conventional to use such fonts for the body text for items such as essays or reports.
• Choose a font size that is neither too small nor too large (font size 10 or 12 is usually suitable).
• Headings should be given some emphasis. They could be set in a larger font than the main text, set in a sans seriffed font such as Arial, and/or made bold. It is not a good idea to use the underlined version of a font for headings (or emphasis) — the line tends to interfere with the letter shapes.
• If you need to add emphasis to a section of text, use the italic or bold version of the font. Don’t put large quantities of your text in capital letters — people find this more difficult to read.
5.1.3 Paragraph spacing and line indents It is the modern trend to left-align all text and not to indent the first line of a paragraph. Paragraphs should be separated from each other by increasing the amount of space before or after each one. (Use the Format | Paragraph command to adjust this — for a fuller explanation of paragraph spacing and line indents see section 8.2)
If you do prefer to indent the first line of each paragraph:
• Indent each paragraph by the same amount. • Don’t use both indents and extra paragraph spacing to separate
paragraphs. • Use the paragraph formatting commands in Word to create the first
line indent (i.e. never use spaces or tabs to indent the paragraphs).
If you are producing an essay or report it is advisable to increase the line spacing (see section 8.2.4) to either 1.5 lines or Double Spacing. Also make sure that your margins are big enough for the person reading the work to be able to add comments. (Use the File | Page Setup command — see section 12.4 –– to adjust your margins.)
You may also need to insert hard page breaks (see section 12.1) into your document if you have footnotes on pages that have 1.5 lines or Double Spacing.
5.2 Decisions about printing You will at some point, wish to print out a document that you have created using Word. The best way to avoid difficulties at the printing stage is to think ahead and make a few fundamental but important decisions at the outset, before the document is even started, or at least before editing and formatting changes are made.
Guide 12: An Introduction to Microsoft Word 2003 12

The main decision that has to be made is which printer is going to be used to print it. This is because the choice of printer may affect the size of paper on which you can print, and also the choice of fonts that are available to you. The position of page and line breaks may also be affected and margins may need adjustment.
5.2.1 Selecting the printer On a stand-alone PC you will probably only have one printer available to you, but if you do have a choice, the best advice is to choose the one you intend to use to print out the final version of the document. If, for example, you are going to print the final version on a laser printer, but run off lower quality draft copies on a dot matrix printer, it does not matter if things like the page breaks appear in the wrong place at that stage. It is far more important to set up the document formatting so that the final version prints out correctly. To select the printer you want to use:
1 Click on File on the menu bar.
2 Select Print from the pull-down menu.
The Print dialog box will appear.
3 Check that the printer you want is shown in the printer Name box. If not, select it from the drop down list in the box. (Note that this list will not necessarily be the same as is shown in the picture.)
4 Since you do not want to print a document now, click on Cancel to close the Print dialog box.
On the Networked PC service most printers are A4 laser printers and the default printer for Word will be a laser printer near you, usually in the same room. If you wish to use the default printer (as you will most times) you do not need to make any changes.
Guide 12: An Introduction to Microsoft Word 2003 13
For further information about printing from the Networked PC service see InfoSheet 82: Printing from the Networked PC service.
5.2.2 Paper size and orientation Once you have chosen the printer you will be using, the appropriate paper size needs to be selected. You can also choose the orientation of the paper — portrait or landscape.
1 Click on File on the menu bar.
2 Select Page Setup from the pull-down menu.
The Page Setup dialog box appears.
3 Click on the Paper tab.
4 If the paper size needs changing, click on the down arrow below the Paper Size box and select the appropriate size.
5 Check that the orientation is correct. Click on the Margins tab and select the appropriate orientation.
6 For now click on Cancel to ignore any changes you may have made.
If you are using the Networked PC service the default print settings are:
Printer The nearest self service laser printer Paper size A4 Paper Orientation Portrait
6 Editing text Using Word it is easy to make changes to the content of your document. You can add or delete text, and copy or move text between locations. Before being copied or moved, text has to be selected.
6.1 Insert and Overtype modes In order to insert additional text into an existing document, it is first necessary to position the insertion point at the place in the document where the new text is to appear. You do this by positioning the mouse pointer (the I symbol) in the correct place and clicking the mouse button. This moves the flashing insertion point to that position.
1 Position the insertion point at the start of the word Word on the first line of your document.
2 Type the letter a then a space.
The new characters have been inserted into your document to the left of the insertion point. This way of working is called insert mode and is the default mode in Word.
Guide 12: An Introduction to Microsoft Word 2003 14
1 Position the insertion point at the end of the characters 2000 and in front of the comma.
2 Type a space, and then the word document. Now change to overtype mode:
3 Press the Insert key on the keyboard.
The letters OVR change to black (rather than grey) in the status bar to indicate that Word is now in overtype mode.
4 Position the insertion point at the start of the word divide in the second paragraph. (Remember: Position the mouse pointer in the correct place and click the mouse button.)
5 Type the word split. Notice that this time, the new characters overtype (i.e., replace) what was there before.
6 Press the Delete key to remove the letter e
The Delete key deletes the character to the right of the insertion point while the Backspace ← key deletes the character to the left of the insertion point. This is true whether you are in insert or overtype mode.
7 Press the Insert key again.
Word is now returned to insert mode. The letters OVR should now be grey (rather than black) on the status bar.
6.2 Selecting text Selecting text is quick and easy using the mouse. However, it is possible to use the keyboard instead and you can find a list of keyboard combinations for text selection in the online help under shortcut keys.
Any amount of text can be selected by dragging with the mouse:
1 Place the mouse pointer at the start of the phrase Word on the first line of your document, click and hold down the left mouse button.
2 Drag the mouse to the end of the phrase and then release the mouse button.
The selected text now appears on the screen as white letters on a dark background. It is possible to extend or reduce a selection.
1 Position the mouse pointer after the word full at the end of your first sentence. (Don’t click the mouse button yet.)
2 Hold down the Shift key and click with the mouse.
To cancel a selection, simply click with the mouse somewhere else in the text.
3 Click the mouse away from the selected text to cancel the selection.
Guide 12: An Introduction to Microsoft Word 2003 15
An alternative way to select text is to place the insertion point at one end of the selection, move to the other end then hold down the Shift key and click with the mouse. This is particularly useful when you need to select a large area of text that does not all fit on the screen.
1 Try selecting all of the first paragraph using this method.
2 Click away from the first paragraph to de-select it.
Some selections require the mouse pointer to be placed in a special area of the screen known as the selection area. The selection area runs down the left-hand side of the screen. When the mouse pointer is in this area, it changes into a upwards right pointing arrow.
3 Move the mouse pointer to the left-hand side of the screen and find the selection area by watching for the arrow to appear.
Now use any areas of your document to practise the remaining selection techniques:
1 Select a single word: point to it and double click with the mouse.
2 Select a line: click in the selection area to the left of the line.
3 Select two or more lines: click in the selection area to the left of the first line and drag the mouse down to select the others.
4 Select a sentence: hold down the Ctrl key and click anywhere in the sentence.
5 Select a paragraph: double click in the selection area to the left of the paragraph.
6 Select the whole document: hold down the Ctrl key and click anywhere in the selection area (or use the Edit | Select All command from the menu bar).
7 Cancel your selection now by clicking away from it.
Important: You must remember to cancel a selection when you have finished with it by clicking away from the selected text. The normal way that Word works is for any typing to replace selected text — that is, if you start typing while some text is selected, the selected text is deleted and replaced by the new text. This is helpful in some circumstances, when typing information into dialog boxes for example. However, it can have unwelcome consequences for the unwary. Also, pressing Enter when text is selected will replace the text with a paragraph mark. If you find that you have accidentally deleted text in this way, you can recover it by using the Edit | Undo command or by clicking on the Undo button on the Toolbar.
Typing replaces selection is an option that can be turned on or off. If you want to change the current setting, select the Tools | Options command, and then the Edit tab. Click in the check box beside Typing replaces selection to turn it on if it is off (or vice versa). If you are working on the Networked PC service, all customisations like this that you make during a session will be lost when you log out. When you log in again you will be working with the default settings.
Guide 12: An Introduction to Microsoft Word 2003 16
6.2.1 Deleting text If you want to delete more than a few characters of text, you can select the text then press the Backspace or Delete key. This is quicker than backspacing character by character through complete sentences or paragraphs.
1 Select the word automatically in the first paragraph of your document and delete it.
6.2.2 Moving text There are four steps to moving text from one location to another:
• Select the text. • Cut the text from its current location. • Position the insertion point at the new location. • Paste the text into its new location.
The cut and paste actions can be carried out using the Edit menu, but it is quicker to use the appropriate buttons on the Toolbar.
1 Select the first sentence of the second paragraph.
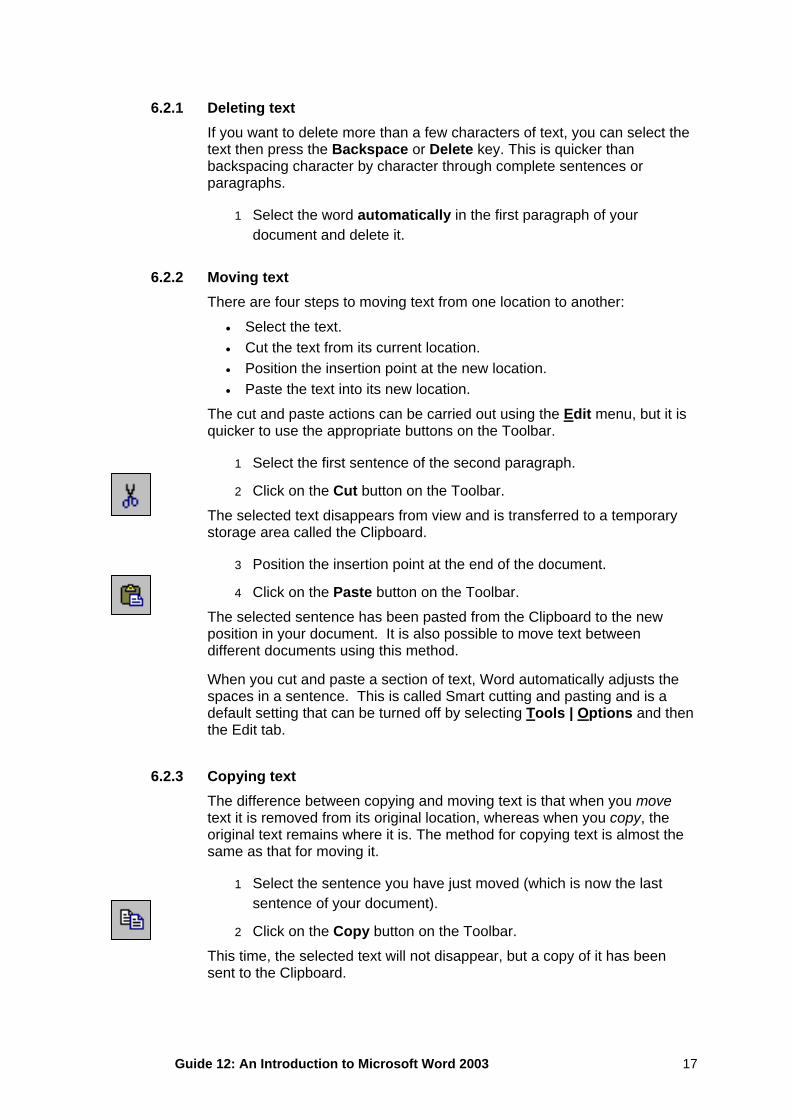
2 Click on the Cut button on the Toolbar.
The selected text disappears from view and is transferred to a temporary storage area called the Clipboard.
3 Position the insertion point at the end of the document.
4 Click on the Paste button on the Toolbar.
The selected sentence has been pasted from the Clipboard to the new position in your document. It is also possible to move text between different documents using this method.
When you cut and paste a section of text, Word automatically adjusts the spaces in a sentence. This is called Smart cutting and pasting and is a default setting that can be turned off by selecting Tools | Options and then the Edit tab.
6.2.3 Copying text The difference between copying and moving text is that when you move text it is removed from its original location, whereas when you copy, the original text remains where it is. The method for copying text is almost the same as that for moving it.
1 Select the sentence you have just moved (which is now the last sentence of your document).
2 Click on the Copy button on the Toolbar.
This time, the selected text will not disappear, but a copy of it has been sent to the Clipboard.
Guide 12: An Introduction to Microsoft Word 2003 17
3 Position the insertion point at the beginning of the document.
4 Click on the Paste button on the Toolbar.
Like the move operation, this method can be used to copy text between different documents.
The Clipboard holds up to twelve pieces of text that have been cut or copied to it. When there is more than one item, you will be given a choice of which you wish to paste into your document. You can paste a piece of text from the Clipboard as many times as you like by placing the insertion point in the required place and clicking the item you wish to paste.
6.3 Word count It is often useful to know how many words there are in your document (or in a selected part of it).
1 Check that no section of your text is selected.
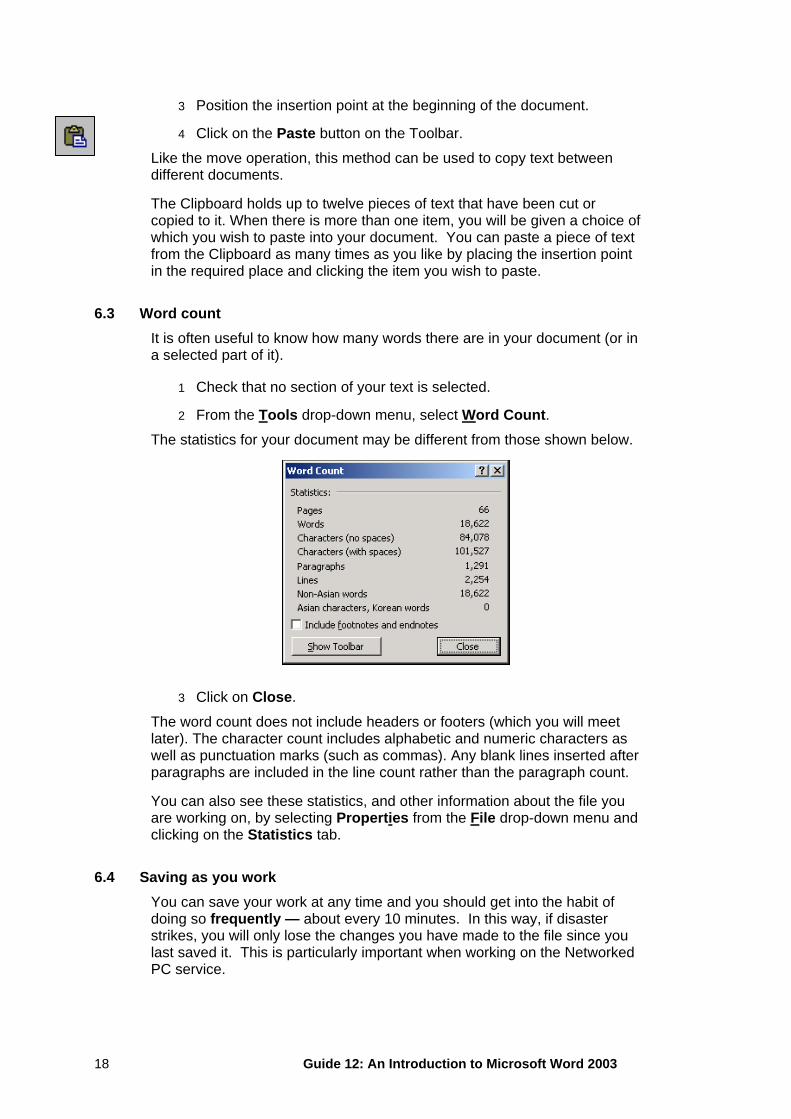
2 From the Tools drop-down menu, select Word Count. The statistics for your document may be different from those shown below.
3 Click on Close.
The word count does not include headers or footers (which you will meet later). The character count includes alphabetic and numeric characters as well as punctuation marks (such as commas). Any blank lines inserted after paragraphs are included in the line count rather than the paragraph count.
You can also see these statistics, and other information about the file you are working on, by selecting Properties from the File drop-down menu and clicking on the Statistics tab.
6.4 Saving as you work You can save your work at any time and you should get into the habit of doing so frequently — about every 10 minutes. In this way, if disaster strikes, you will only lose the changes you have made to the file since you last saved it. This is particularly important when working on the Networked PC service.
Guide 12: An Introduction to Microsoft Word 2003 18
If you would like to practise that now:
1 Click on File in the menu bar.
2 Select Save from the pull-down menu.
This overwrites the existing file on disk with a new version. If you want to keep the old version use the Save As command and give the new version a different file name (you should not use this method for creating backups of files, you should instead copy and paste your files in Windows Explorer).
Note. A quicker way of doing this is to click on the Save button on the toolbar.
7 Moving around a larger document In order to work through the remaining sections of this document, you will need a text file that contains more than one screenful of text. If you do not have anything suitable of your own to work with you can use a file called IrishDancing.doc which has already been prepared for you. This can be opened directly if you are using the Networked PC service. If you are using a stand alone PC you can download a copy of IrishDancing.doc from the ITS WWW pages (http://www.dur.ac.uk/its/info/guides/files/word/).
The instructions below assume that you are using IrishDancing.doc on the Networked PC service.
You do not need to close first.doc if it is still open, as you can have more than one document open at any time. See section 15 for more information on working with multiple documents.
1 Click on File on the menu bar.
2 Select Open from the pull-down menu.
3 Select the T: drive from the list of drives in the Look in box.
4 Double click on ITS from the list of folders displayed below.
5 Double click on word from the list of folders now displayed.
6 Select the file IrishDancing.doc
7 Click on the Open button.
If you are using a file of your own open it now.
Notice the red and green wavy lines underneath some words. These indicate potential spelling and grammar errors. Ignore them for now. (See section 9.2 for more details).
7.1 By direction / location There are a number of quick ways of moving around a document which are particularly useful when working with larger documents.
The following list contains some of the quick keystrokes, which can be used to move around a document.
Guide 12: An Introduction to Microsoft Word 2003 19
Move the insertion point Keystroke To the beginning of the line Home To the end of the line End To the beginning of the document Ctrl/Home To the end of the document Ctrl/End Up one screenful Page Up Down one screenful Page Down
You can also use the vertical scroll bar on the right of the screen to move around the document.
1 Try out each of the above commands on the document you have just opened.
It is possible to jump straight to a specific page in a document with the Edit | Go To command. Although there are only three pages in your sample document, you can still see the effect of this command.
2 Make sure that the insertion point is somewhere in page 1. (Remember that the status bar at the bottom of the screen displays this information.)
3 Click on Edit on the menu bar.
4 Select Go To from the pull-down menu.
The Find and Replace dialog box appears with the Go To tab selected.
5 Check that Page is selected in the Go to what list.
6 Type 2 in the Enter page number box.
7 Click on Go To.
The insertion point jumps to the start of page 2.
8 Click on Close to close the dialog box.
7.2 By content — the Find command Sometimes you may need to locate a particular part of your document but you do not know what page it is on. However, if you know at least some of the words you are looking for, you can use the Edit | Find command to search for the text you need. The search will start at the insertion point and after reaching the end of the document, will wrap round to the beginning and carry on forward to the insertion point if required.
1 Position the insertion point at the start of the document.
2 Click on Edit on the menu bar.
3 Select Find from the pull-down menu.
The Find and Replace dialog box appears, with the Find tab selected.
Guide 12: An Introduction to Microsoft Word 2003 20
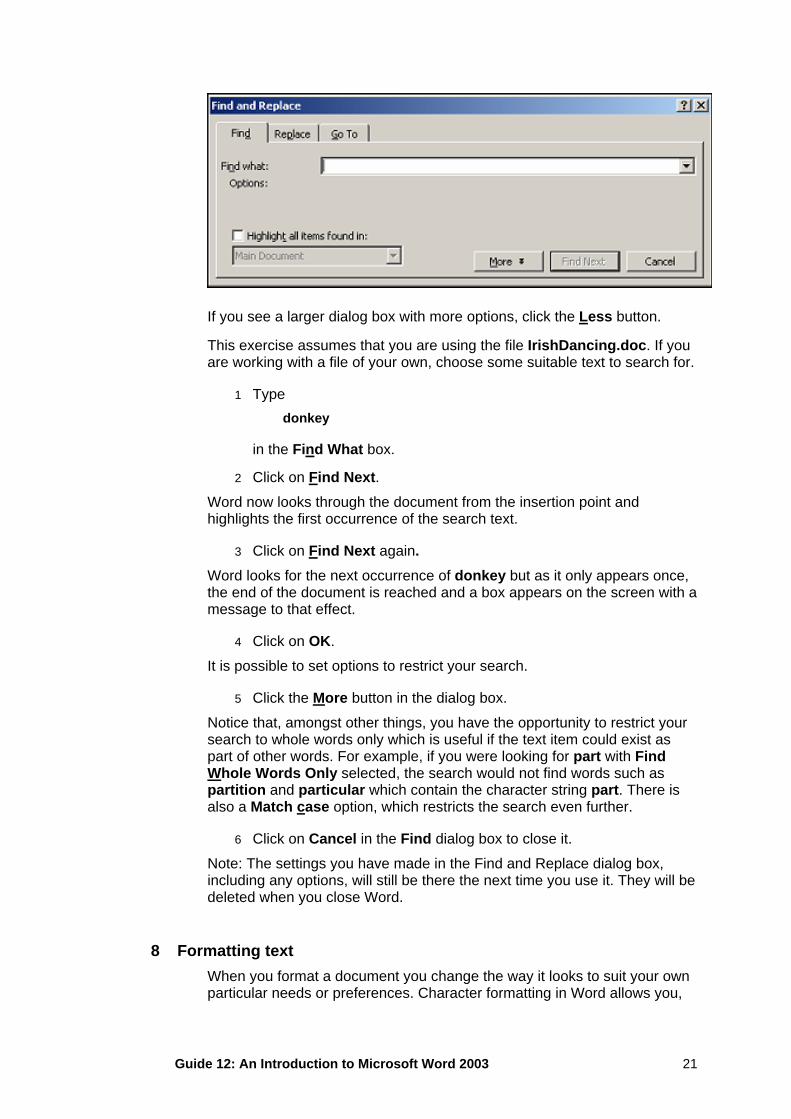
If you see a larger dialog box with more options, click the Less button.
This exercise assumes that you are using the file IrishDancing.doc. If you are working with a file of your own, choose some suitable text to search for.
1 Type donkey
in the Find What box.
2 Click on Find Next. Word now looks through the document from the insertion point and highlights the first occurrence of the search text.
3 Click on Find Next again. Word looks for the next occurrence of donkey but as it only appears once, the end of the document is reached and a box appears on the screen with a message to that effect.
4 Click on OK.
It is possible to set options to restrict your search.
5 Click the More button in the dialog box.
Notice that, amongst other things, you have the opportunity to restrict your search to whole words only which is useful if the text item could exist as part of other words. For example, if you were looking for part with Find Whole Words Only selected, the search would not find words such as partition and particular which contain the character string part. There is also a Match case option, which restricts the search even further.
6 Click on Cancel in the Find dialog box to close it.
Note: The settings you have made in the Find and Replace dialog box, including any options, will still be there the next time you use it. They will be deleted when you close Word.
8 Formatting text When you format a document you change the way it looks to suit your own particular needs or preferences. Character formatting in Word allows you,
Guide 12: An Introduction to Microsoft Word 2003 21
amongst other things, to change the font style and size and make characters bold, italicised or underlined. With paragraph formatting you have control over such things as the alignment and indentation of paragraphs.
8.1 Character formatting The Formatting toolbar provides a quick and easy method of assigning special formatting to text. The rule is the same as for editing — first select the text and then click on the appropriate button on the toolbar.
8.1.1 Bold, italic and underlined text
1 Select the words Ceili Dancing in the fifth paragraph.
2 Click on the Bold button on the Formatting toolbar.
The selected text is made bold and the button on the toolbar appears to go in.
3 Click away from the title with the mouse to move the insertion point away.
Notice that the button comes out again.
4 Select the first paragraph of the document (Irish Dance) and all of the following paragraph.
5 Click on the Italic button on the toolbar.
The whole selection now appears in italics and the words Irish Dance are both bold and italic. Notice how the Bold button has come out to show that the selected text is a mixture of bold and non-bold text. The Italic button is in.
1 Move the insertion point out of, and then back into, the italicised paragraph and notice how the appearance of the Italic button indicates when text is in italics and when it is not.
2 Select the paragraph as before and turn off the italics by clicking on the Italic button again.
3 Click away from the selection.
4 Select the words Irish Dance on the first line.
5 Click on the Underline button on the toolbar.
The phrase Irish Dance is now underlined and bold.
It is not usual to use underlining to emphasize headings in a word-processed document. Bold and/or larger text looks better.
6 Click on the Underline button (to remove the formatting).
Guide 12: An Introduction to Microsoft Word 2003 22
8.1.2 Changing fonts and character size
1 Select the whole document.
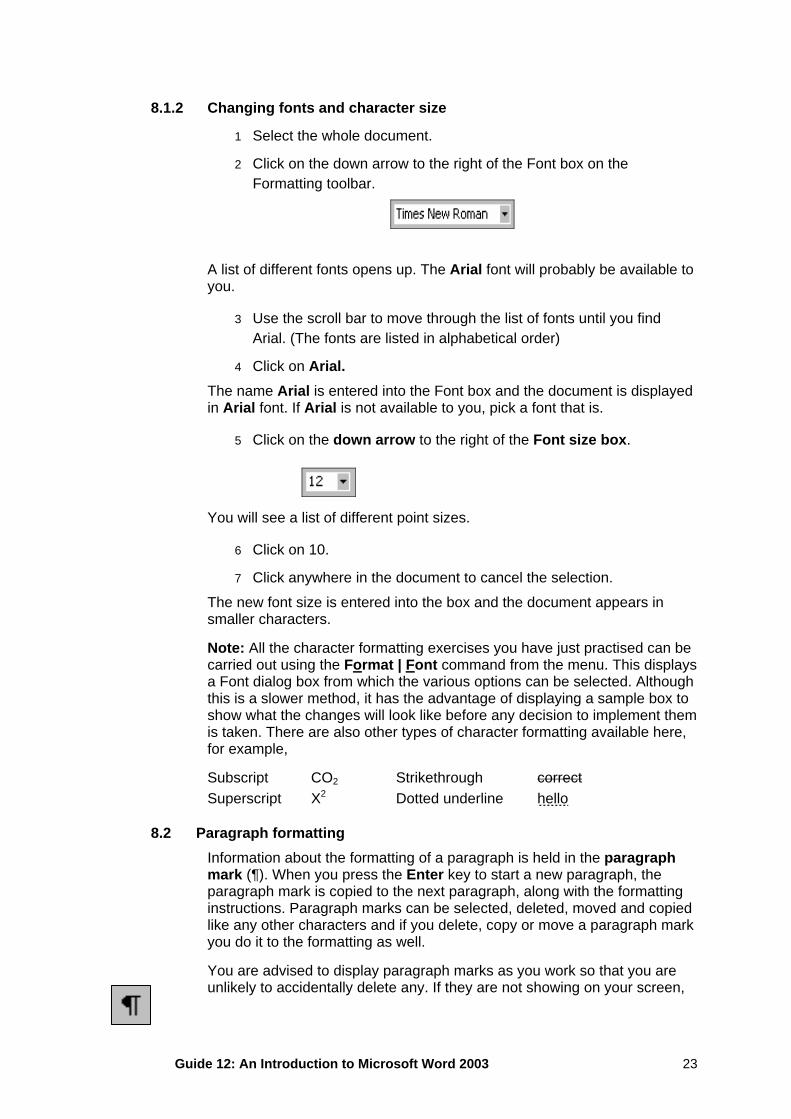
2 Click on the down arrow to the right of the Font box on the Formatting toolbar.
A list of different fonts opens up. The Arial font will probably be available to you.
3 Use the scroll bar to move through the list of fonts until you find Arial. (The fonts are listed in alphabetical order)
4 Click on Arial. The name Arial is entered into the Font box and the document is displayed in Arial font. If Arial is not available to you, pick a font that is.
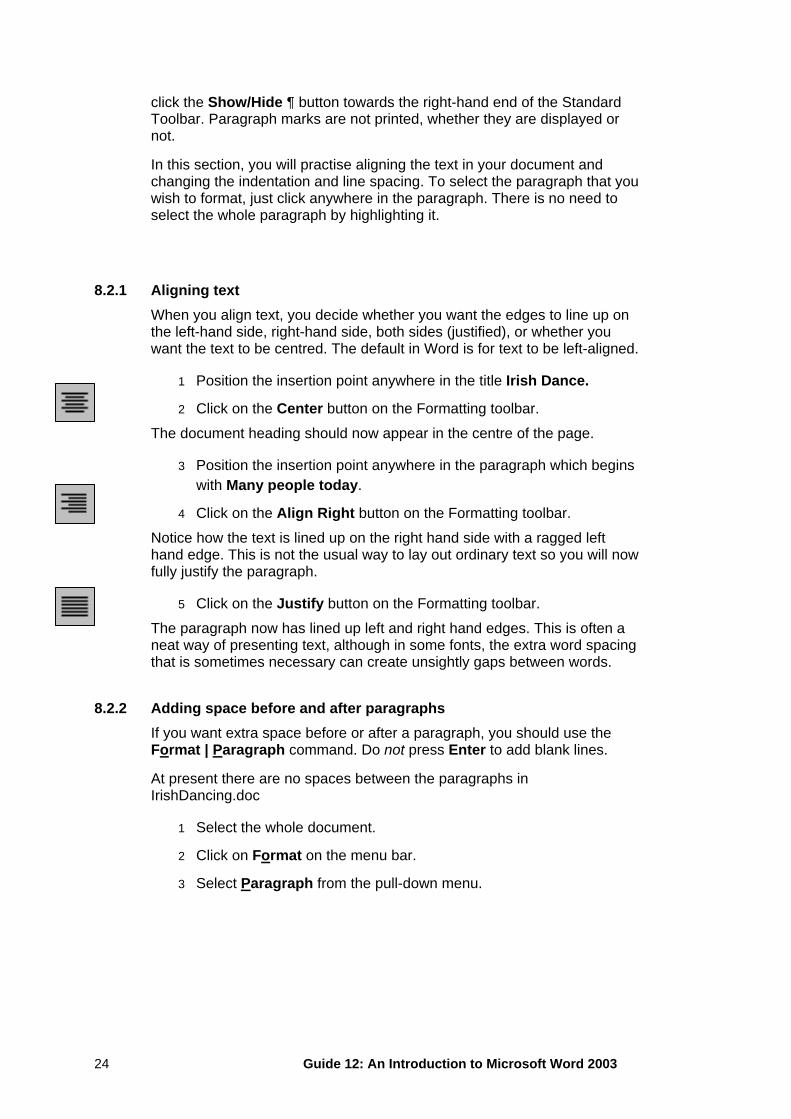
5 Click on the down arrow to the right of the Font size box.
You will see a list of different point sizes.
6 Click on 10.
7 Click anywhere in the document to cancel the selection.
The new font size is entered into the box and the document appears in smaller characters.
Note: All the character formatting exercises you have just practised can be carried out using the Format | Font command from the menu. This displays a Font dialog box from which the various options can be selected. Although this is a slower method, it has the advantage of displaying a sample box to show what the changes will look like before any decision to implement them is taken. There are also other types of character formatting available here, for example,
Subscript CO2 Strikethrough correctSuperscript X2 Dotted underline hello
8.2 Paragraph formatting Information about the formatting of a paragraph is held in the paragraph mark (¶). When you press the Enter key to start a new paragraph, the paragraph mark is copied to the next paragraph, along with the formatting instructions. Paragraph marks can be selected, deleted, moved and copied like any other characters and if you delete, copy or move a paragraph mark you do it to the formatting as well.
You are advised to display paragraph marks as you work so that you are unlikely to accidentally delete any. If they are not showing on your screen,
Guide 12: An Introduction to Microsoft Word 2003 23
click the Show/Hide ¶ button towards the right-hand end of the Standard Toolbar. Paragraph marks are not printed, whether they are displayed or not.
In this section, you will practise aligning the text in your document and changing the indentation and line spacing. To select the paragraph that you wish to format, just click anywhere in the paragraph. There is no need to select the whole paragraph by highlighting it.
8.2.1 Aligning text When you align text, you decide whether you want the edges to line up on the left-hand side, right-hand side, both sides (justified), or whether you want the text to be centred. The default in Word is for text to be left-aligned.
1 Position the insertion point anywhere in the title Irish Dance.
2 Click on the Center button on the Formatting toolbar.
The document heading should now appear in the centre of the page.
3 Position the insertion point anywhere in the paragraph which begins with Many people today.
4 Click on the Align Right button on the Formatting toolbar.
Notice how the text is lined up on the right hand side with a ragged left hand edge. This is not the usual way to lay out ordinary text so you will now fully justify the paragraph.
5 Click on the Justify button on the Formatting toolbar.
The paragraph now has lined up left and right hand edges. This is often a neat way of presenting text, although in some fonts, the extra word spacing that is sometimes necessary can create unsightly gaps between words.
8.2.2 Adding space before and after paragraphs If you want extra space before or after a paragraph, you should use the Format | Paragraph command. Do not press Enter to add blank lines.
At present there are no spaces between the paragraphs in IrishDancing.doc
1 Select the whole document.
2 Click on Format on the menu bar.
3 Select Paragraph from the pull-down menu.
Guide 12: An Introduction to Microsoft Word 2003 24
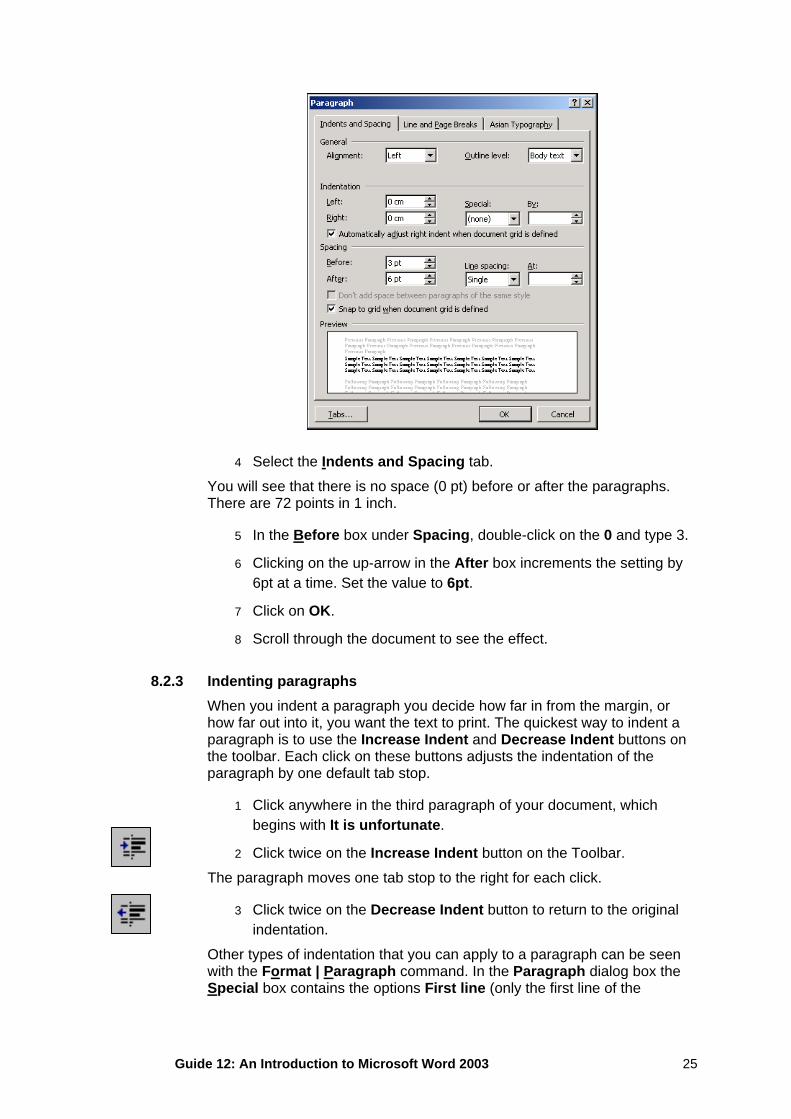
4 Select the Indents and Spacing tab.
You will see that there is no space (0 pt) before or after the paragraphs. There are 72 points in 1 inch.
5 In the Before box under Spacing, double-click on the 0 and type 3.
6 Clicking on the up-arrow in the After box increments the setting by 6pt at a time. Set the value to 6pt.
7 Click on OK.
8 Scroll through the document to see the effect.
8.2.3 Indenting paragraphs When you indent a paragraph you decide how far in from the margin, or how far out into it, you want the text to print. The quickest way to indent a paragraph is to use the Increase Indent and Decrease Indent buttons on the toolbar. Each click on these buttons adjusts the indentation of the paragraph by one default tab stop.
1 Click anywhere in the third paragraph of your document, which begins with It is unfortunate.
2 Click twice on the Increase Indent button on the Toolbar.
The paragraph moves one tab stop to the right for each click.
3 Click twice on the Decrease Indent button to return to the original indentation.
Other types of indentation that you can apply to a paragraph can be seen with the Format | Paragraph command. In the Paragraph dialog box the Special box contains the options First line (only the first line of the
Guide 12: An Introduction to Microsoft Word 2003 25
paragraph is indented) and Hanging (all but the first line of the paragraph is indented).
8.2.4 Changing line spacing Using double or one-and-a-half line spacing is useful for initial drafts of documents that may need to be heavily edited by hand, or for documents to which comments may be added by other people.
1 Position the insertion point in any paragraph of your document.
2 Click on Format on the menu bar.
3 Select Paragraph from the pull-down menu.
4 Click on the down arrow to the right of the word Single in the Line spacing box.
5 Select Double from the list. (The Preview box shows you what the effect will be.)
6 Click on OK.
9 Completing your document When the editing and formatting of a document are complete, it is ready to be checked and printed.
Sometimes you may decide that a term you have been using a lot is not ideal and could be replaced by something better, or you may realise that you have repeatedly misspelled a word all the way through your document. Word provides a useful search and replace facility.
9.1 Search and Replace The Replace command allows you to change all or selected occurrences of a text item in your document very quickly, without having to comb through the document finding and changing each item one by one. The command searches for the required item from the insertion point onwards and, after reaching the end of the document, will wrap round to the insertion point again if required. This command is useful when working on large documents and we shall use it to change traveling (American spelling) to travelling in the IrishDancing.doc file.
1 Position the insertion point at the beginning of your document.
2 Click on Edit on the menu bar.
3 Select Replace from the pull-down menu.
Guide 12: An Introduction to Microsoft Word 2003 26
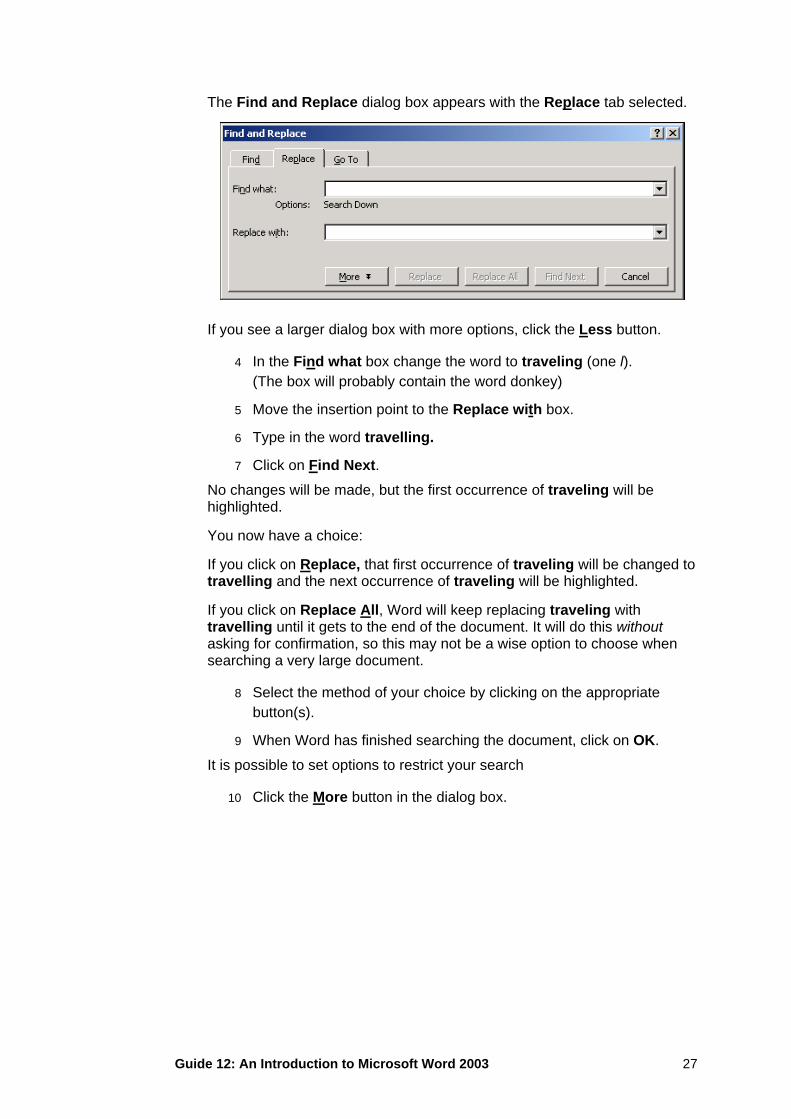
The Find and Replace dialog box appears with the Replace tab selected.
If you see a larger dialog box with more options, click the Less button.
4 In the Find what box change the word to traveling (one l). (The box will probably contain the word donkey)
5 Move the insertion point to the Replace with box.
6 Type in the word travelling.
7 Click on Find Next. No changes will be made, but the first occurrence of traveling will be highlighted.
You now have a choice:
If you click on Replace, that first occurrence of traveling will be changed to travelling and the next occurrence of traveling will be highlighted.
If you click on Replace All, Word will keep replacing traveling with travelling until it gets to the end of the document. It will do this without asking for confirmation, so this may not be a wise option to choose when searching a very large document.
8 Select the method of your choice by clicking on the appropriate button(s).
9 When Word has finished searching the document, click on OK.
It is possible to set options to restrict your search
10 Click the More button in the dialog box.
Guide 12: An Introduction to Microsoft Word 2003 27
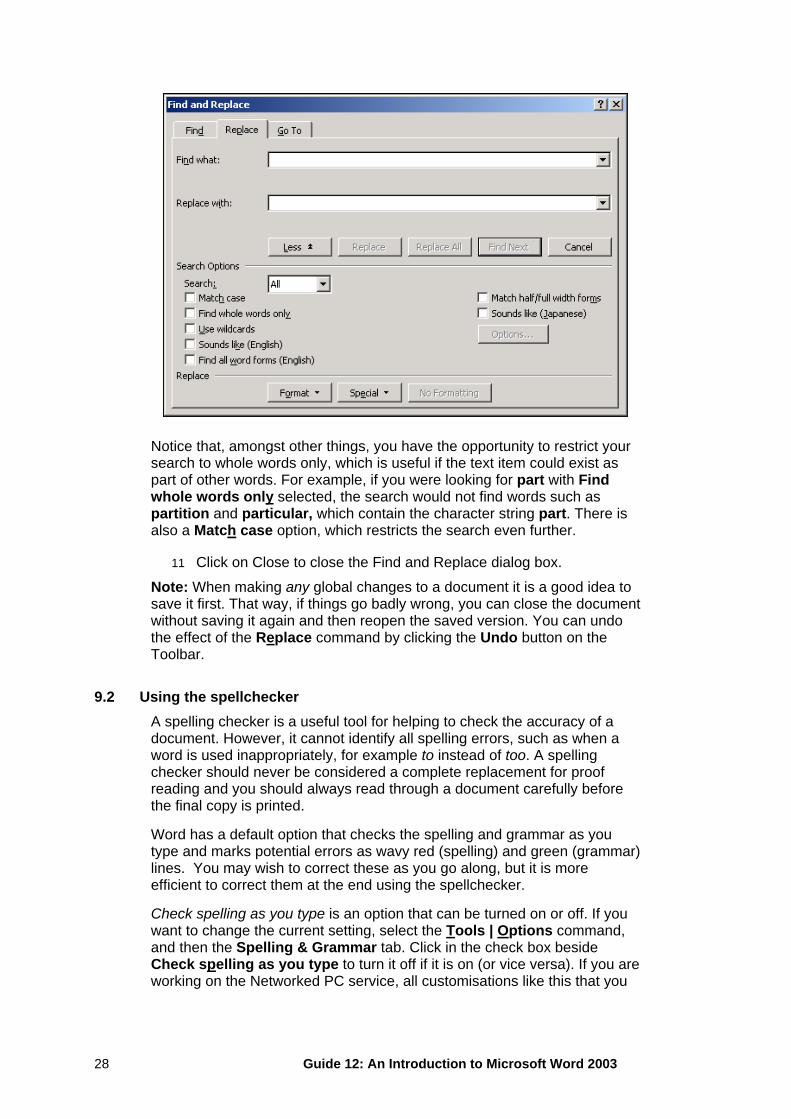
Notice that, amongst other things, you have the opportunity to restrict your search to whole words only, which is useful if the text item could exist as part of other words. For example, if you were looking for part with Find whole words only selected, the search would not find words such as partition and particular, which contain the character string part. There is also a Match case option, which restricts the search even further.
11 Click on Close to close the Find and Replace dialog box.
Note: When making any global changes to a document it is a good idea to save it first. That way, if things go badly wrong, you can close the document without saving it again and then reopen the saved version. You can undo the effect of the Replace command by clicking the Undo button on the Toolbar.
9.2 Using the spellchecker A spelling checker is a useful tool for helping to check the accuracy of a document. However, it cannot identify all spelling errors, such as when a word is used inappropriately, for example to instead of too. A spelling checker should never be considered a complete replacement for proof reading and you should always read through a document carefully before the final copy is printed.
Word has a default option that checks the spelling and grammar as you type and marks potential errors as wavy red (spelling) and green (grammar) lines. You may wish to correct these as you go along, but it is more efficient to correct them at the end using the spellchecker.
Check spelling as you type is an option that can be turned on or off. If you want to change the current setting, select the Tools | Options command, and then the Spelling & Grammar tab. Click in the check box beside Check spelling as you type to turn it off if it is on (or vice versa). If you are working on the Networked PC service, all customisations like this that you
Guide 12: An Introduction to Microsoft Word 2003 28
make during a session will be lost when you log out. When you log in again you will be working with the default settings.
The Word spelling checker compares the whole document, or a selected word or phrase in your document, with the contents of its inbuilt dictionary and report words that do not match. If you do not select anything, Word will check the entire document from the insertion point forward.
1 Position the insertion point at the beginning of your document.
2 Start the spelling checker by clicking the Spelling and Grammar button on the Standard toolbar.
If this is the first time you have used the spelling checker, you will be asked whether you wish to create a customised dictionary.
3 Click on the Yes button.
You can build custom dictionaries to hold vocabulary that you use frequently, but that Word does not recognise, such as names or specialised technical terms. See Help for further information about setting up custom dictionaries.
If you are using the Networked PC service your custom dictionary will be stored as the file Custom.dic in your personal file space on the J: drive so that you can use it in subsequent sessions. Do not delete this file.
If the spell checker does not find any mispelt words it will report that the spell check is complete.
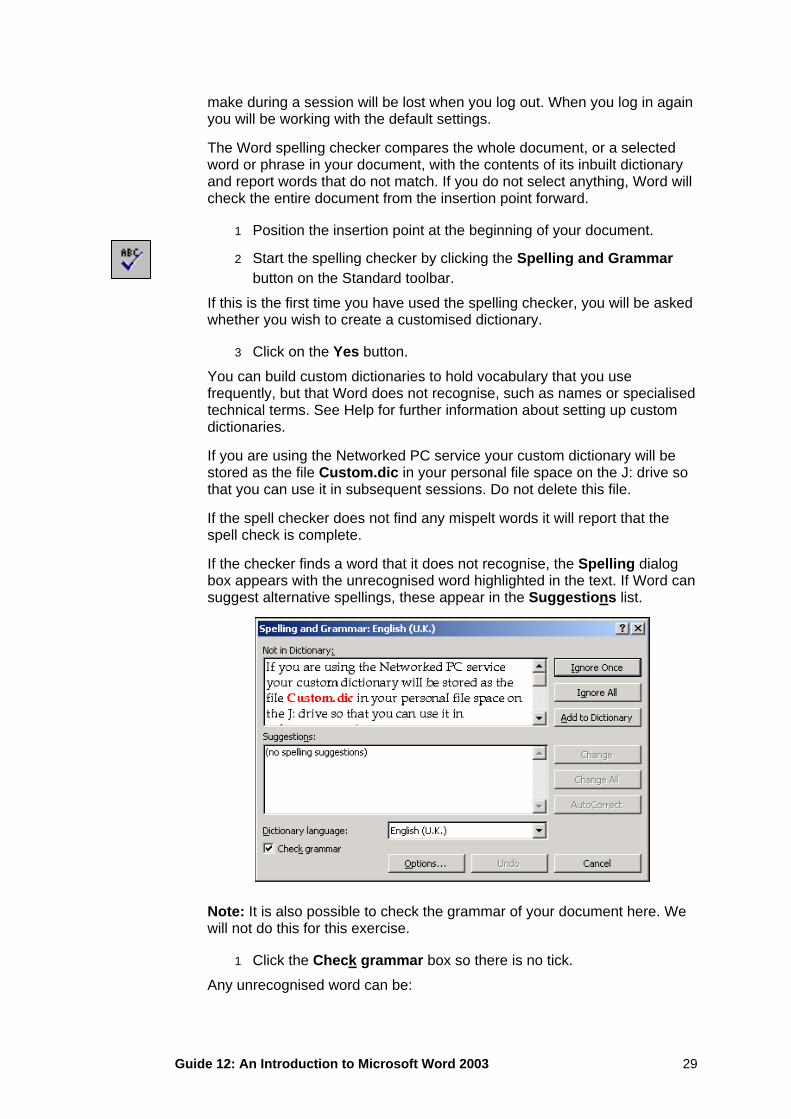
If the checker finds a word that it does not recognise, the Spelling dialog box appears with the unrecognised word highlighted in the text. If Word can suggest alternative spellings, these appear in the Suggestions list.
Note: It is also possible to check the grammar of your document here. We will not do this for this exercise.
1 Click the Check grammar box so there is no tick.
Any unrecognised word can be:
Guide 12: An Introduction to Microsoft Word 2003 29
• corrected directly in the text box • replaced by an alternative word selected from the Suggestions list • left as it is
When the correct spelling has been typed in, or selected from the suggestion list, click Change to make the correction in the document. Clicking Change All will change all occurrences of the mispelt word in the document.
If you wish to leave the word as it is click on Ignore once, or on Ignore All to ignore all future occurrences of the word in the document.
Undo reverses the most recent actions made during the current spell checking session one at a time. When Word finds a correct word that is not in its dictionary, it can be added to the dictionary by choosing the Add button.
The spelling checker also looks for double words (e.g., and and), inappropriate use of capitalisation (e.g., hE), words that should be capitalised and words that should be composed entirely of capitals. When a double word is found, the Not In Dictionary box changes to the Repeated Word box. The Delete button is used to delete the unwanted word.
Now work through IrishDancing.doc.
1 Click on the Ignore once button since Riverdance is probably not a word that will often be in your documents.
The next non-dictionary word that the spell checker finds is the Irish word ceili which should not be changed to anything else.
2 Click on Add to Dictionary to enter it in your own custom dictionary. The spell checker will not then complain if it finds that word in other documents of yours.
Continue experimenting. You may wish to stop before the spell checker completes the document in which case,
3 Click on Cancel or Close (whichever is shown).
9.3 Inserting and deleting page numbers The simplest way to add page numbers to your document is to use the Insert | Page Numbers command.
1 Click on Insert on the menu bar.
2 Select Page Numbers from the pull-down menu.
Guide 12: An Introduction to Microsoft Word 2003 30
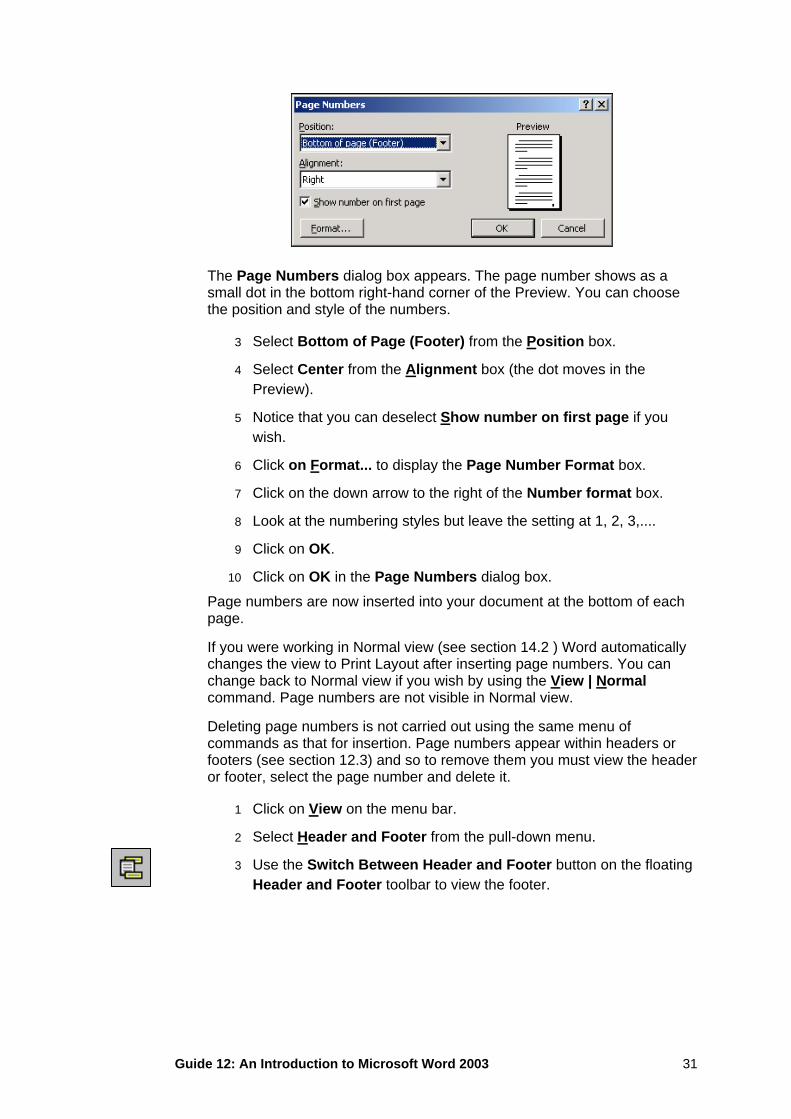
The Page Numbers dialog box appears. The page number shows as a small dot in the bottom right-hand corner of the Preview. You can choose the position and style of the numbers.
3 Select Bottom of Page (Footer) from the Position box.
4 Select Center from the Alignment box (the dot moves in the Preview).
5 Notice that you can deselect Show number on first page if you wish.
6 Click on Format... to display the Page Number Format box.
7 Click on the down arrow to the right of the Number format box.
8 Look at the numbering styles but leave the setting at 1, 2, 3,....
9 Click on OK.
10 Click on OK in the Page Numbers dialog box.
Page numbers are now inserted into your document at the bottom of each page.
If you were working in Normal view (see section 14.2 ) Word automatically changes the view to Print Layout after inserting page numbers. You can change back to Normal view if you wish by using the View | Normal command. Page numbers are not visible in Normal view.
Deleting page numbers is not carried out using the same menu of commands as that for insertion. Page numbers appear within headers or footers (see section 12.3) and so to remove them you must view the header or footer, select the page number and delete it.
1 Click on View on the menu bar.
2 Select Header and Footer from the pull-down menu.
3 Use the Switch Between Header and Footer button on the floating Header and Footer toolbar to view the footer.
Guide 12: An Introduction to Microsoft Word 2003 31
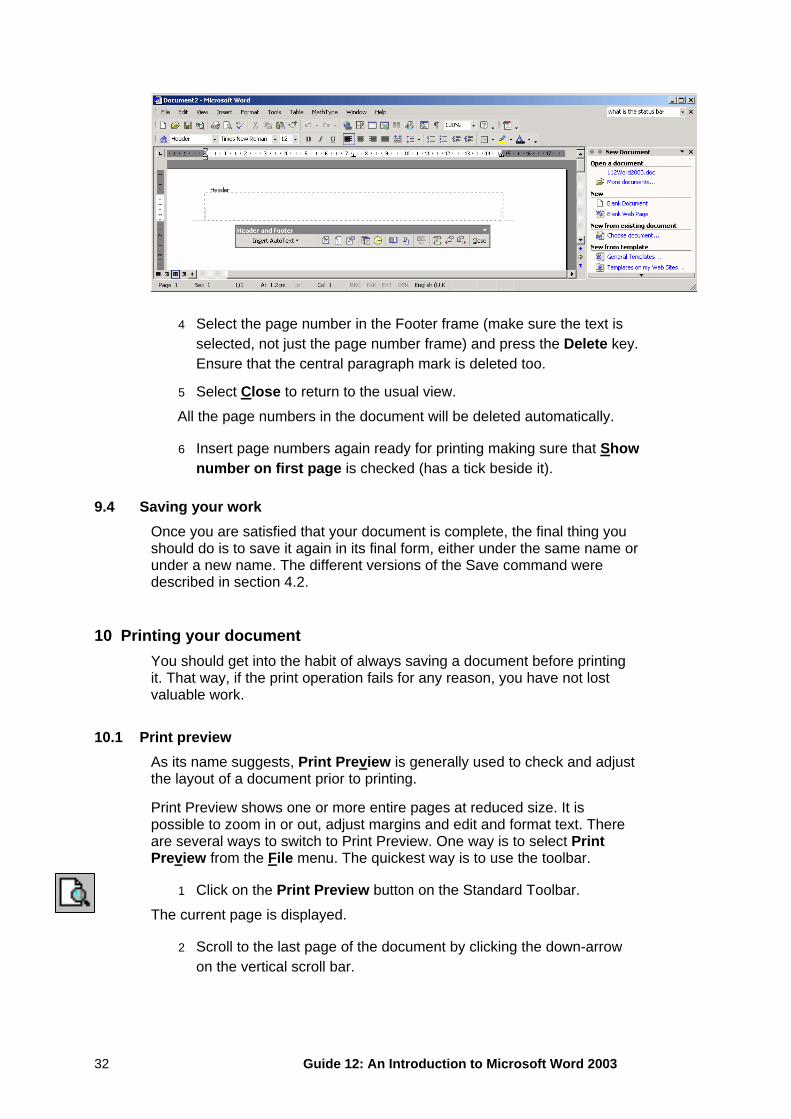
4 Select the page number in the Footer frame (make sure the text is selected, not just the page number frame) and press the Delete key. Ensure that the central paragraph mark is deleted too.
5 Select Close to return to the usual view.
All the page numbers in the document will be deleted automatically.
6 Insert page numbers again ready for printing making sure that Show number on first page is checked (has a tick beside it).
9.4 Saving your work Once you are satisfied that your document is complete, the final thing you should do is to save it again in its final form, either under the same name or under a new name. The different versions of the Save command were described in section 4.2.
10 Printing your document You should get into the habit of always saving a document before printing it. That way, if the print operation fails for any reason, you have not lost valuable work.
10.1 Print preview As its name suggests, Print Preview is generally used to check and adjust the layout of a document prior to printing.
Print Preview shows one or more entire pages at reduced size. It is possible to zoom in or out, adjust margins and edit and format text. There are several ways to switch to Print Preview. One way is to select Print Preview from the File menu. The quickest way is to use the toolbar.
1 Click on the Print Preview button on the Standard Toolbar.
The current page is displayed.
2 Scroll to the last page of the document by clicking the down-arrow on the vertical scroll bar.
Guide 12: An Introduction to Microsoft Word 2003 32
The Multiple Pages button on the toolbar can be used to view more than one page at a time.
You can have a closer look at part of your document.
3 Make sure the Magnifier button on the toolbar is pressed in.
4 Position the mouse (A magnifying glass icon) on the page you want to see.
5 Click to display the page at 100% magnification.
6 Click yet again to return the document view to its original size.
When the Magnifier button is not pressed in (either with the normal or magnified view on screen) editing or formatting changes can be made within Print Preview.
It is also possible to print directly from Print Preview but for now, just cancel the view.
7 Click on Close on the toolbar.
10.2 Printing You can choose to print all or part of a document. This time you will print just the first page.
1 Click on File on the menu bar.
2 Select Print from the pull-down menu.
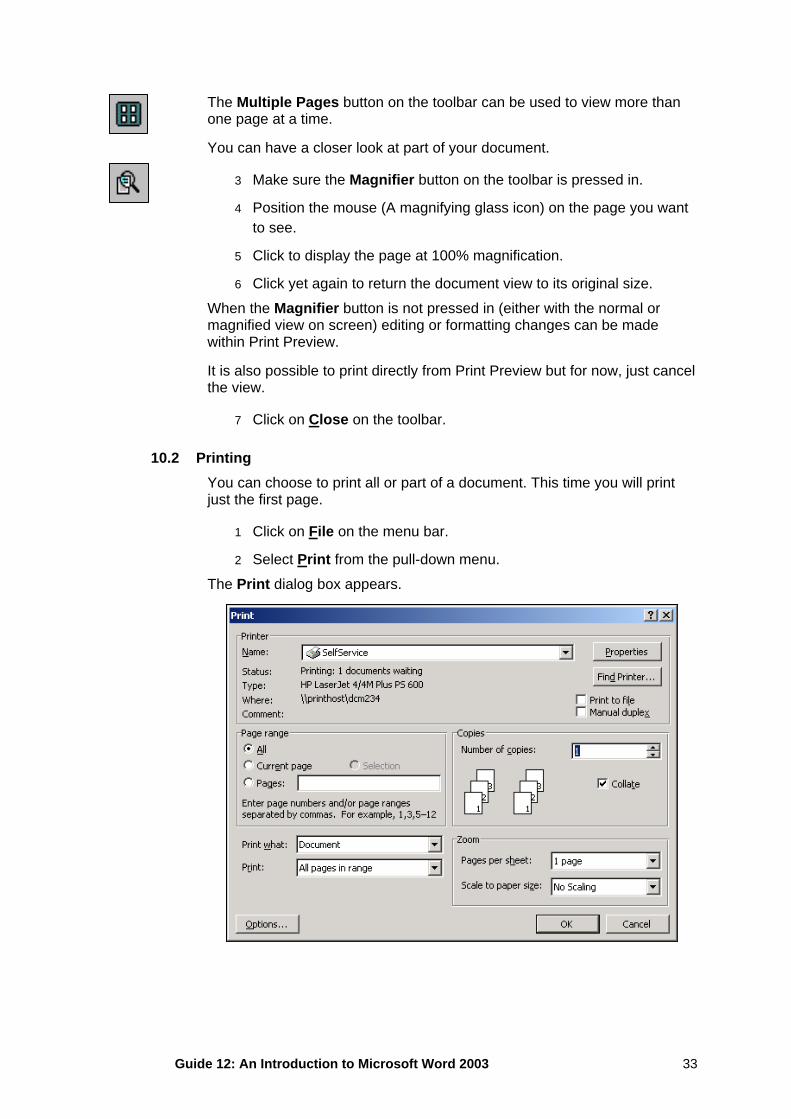
The Print dialog box appears.
Guide 12: An Introduction to Microsoft Word 2003 33
In the box, check that the correct printer is selected (see section 5.2.1). If you are using the Networked PC service the default is to print to the nearest self service laser printer.
Also check that Document is entered in the Print what box and 1 is entered in the Number of copies box.
The Page range is currently set to All (to print the whole document).
3 Click in the Pages: box and type 1 (for the first page only).
4 Click on OK.
A message will appear on the screen to tell you that your document is printing.
5 Click OK.
Once the printing operation is complete, close down IrishDancing.doc.
6 Click on File on the menu bar.
7 Select Close from the pull-down menu.
It is not possible for you to save any changes to IrishDancing.doc as it is a read only file. If you want to keep the changes you have made, save the document, with a new file name, to either the j: or the a: drive. (Use the File | Save As command.)
11 Safeguarding your work It's important to be aware that all sorts of disasters can strike without warning when you are working on a computer. Sometimes these are brought about by some kind of system failure, sometimes by human error. Whatever the reason, you can take steps to safeguard your work so that the undesirable results of such disasters can be minimised. You are the only person who is responsible for doing this! This section offers advice about how to avoid some of the more common pitfalls.
11.1 File size There are a number of reasons why it is not good practice to create very large files.
When you open a file in Word it is loaded into the computer's memory (RAM) before you can work on it. If you try to open a very big file you may find that there is not enough memory available. Even if there is enough memory to enable you to view the document, working near the upper limit of the computer's memory may mean that you are unable to manipulate or edit the contents in any way.
If you are working on a network, another reason for limiting the size of your files is that it is not always possible to send big files to a network printer successfully.
Large computer files can be produced by quite short documents if the documents contain graphics, such as charts or graphs derived from
Guide 12: An Introduction to Microsoft Word 2003 34
spreadsheets that have been imported from other applications. If you are preparing a particularly long document, or one that contains a number of graphics, it can be broken down into a number of smaller files, which will avoid the problems described above. It is possible to link these smaller files together so that a single table of contents, index and set of page numbers can be produced.
11.2 Saving your work to disk You should get into the habit of saving your work to disk at regular intervals and certainly just before events such as making global changes to a document, printing it or leaving your computer for any reason. Then, if anything goes wrong you will only lose the changes you have made to the document since the last time you saved it.
Always make sure that you have enough disk space to save your work. This applies whether you are working on a hard, or a floppy, disk. Even hard disks can become full!
11.3 Backing up your disks The wisdom of making backup copies of disks is usually learned the hard way, the first time you lose a piece of work. Disks, even hard ones, can become corrupted or damaged and there is often very little you can do to recover your files unless you have kept copies of them somewhere else. So, even if you have a hard disk, you should get into the habit of keeping backup copies of your files. Ideally, you should keep two backup copies of any file you are still working on. These should be kept on two separate backup disks, which should be used alternately.
You can set up Word so that it creates a backup copy of a file every time you save it. This means that if something goes wrong while you are working, you will only lose changes you have made to the file since the last time you saved it. You do this by giving the Tools | Options command, selecting the Save category in the Options dialog box and turning on the check box for Always create backup copy. Note that this option requires extra space on your disk and in any case should not be seen as a substitute for backing up files onto another disk.
11.4 Automatic Save option Word provides an Automatic Save option that can help you to recover work if there is a power failure or major network problem. However, you must continue saving your document regularly while you are working on it.
On the Networked PC service, Word has been configured to save a temporary copy of your document every 15 minutes. This temporary document, which is stored on the j: drive, has the extension .asd.
When restarting Word after a crash, all the documents that were open at the time the problem occurred will be displayed. Each window displaying an automatically saved document will have (Recovered) added to its title bar. Having looked at a recovered document, you will have to decide whether it, or the version you saved yourself, is the better one to use.
Guide 12: An Introduction to Microsoft Word 2003 35
A recovered file is stored in a special format so you must save such a document using File | Save As (to give it a new name) or File | Save (to keep its name and so overwrite your own version of the document).
Any recovered documents that you do not save will be deleted when you quit the Word session.
11.5 Working with other file types
11.5.1 Other word processing applications Word is only one of a number of commonly used word processing packages. Each of these saves files in a different format and with a different file extension. It is possible to convert files that were produced using other packages into Word files.
1 Click on File on the menu bar.
2 Select Open from the pull-down menu.
3 Click on down arrow in the Files of type box. Listed here are the applications and file extensions that Word can convert files from (notice that Microsoft Works files are included). Simply select the file type you wish to convert and continue opening the file as normal.
4 Click on Cancel when you have finished looking at the list.
It is also possible to save files using different file formats if you know that you will want to access the file using a different word processing package, for example at home or on your personal computer.
1 Open IrishDancing.doc.
2 Click on File on the menu bar.
3 Select Save As from the pull-down menu.
4 Click on the down arrow in the Save as type box.
Listed here are the applications and file extensions that Word can convert files to. Simply select the file type you wish to save the file as, and continue saving the file as normal.
Notice that one of the options is to save the files as a text file (.txt). This will save the text of the file only, with none of the formatting. Files saved with this format can be read using most text editors even if they are not listed on the conversion list in Word.
5 Click on Cancel when you have finished looking at the list.
11.5.2 Other versions of Word for Windows Files created using earlier versions of Word for Windows can be opened as normal into Word. You do not have to give any special commands. When you save such a file you will be asked if you wish to save it in the original format or as a Word file. Which you choose will depend whether you intend to continue working exclusively in Word or not.
Guide 12: An Introduction to Microsoft Word 2003 36
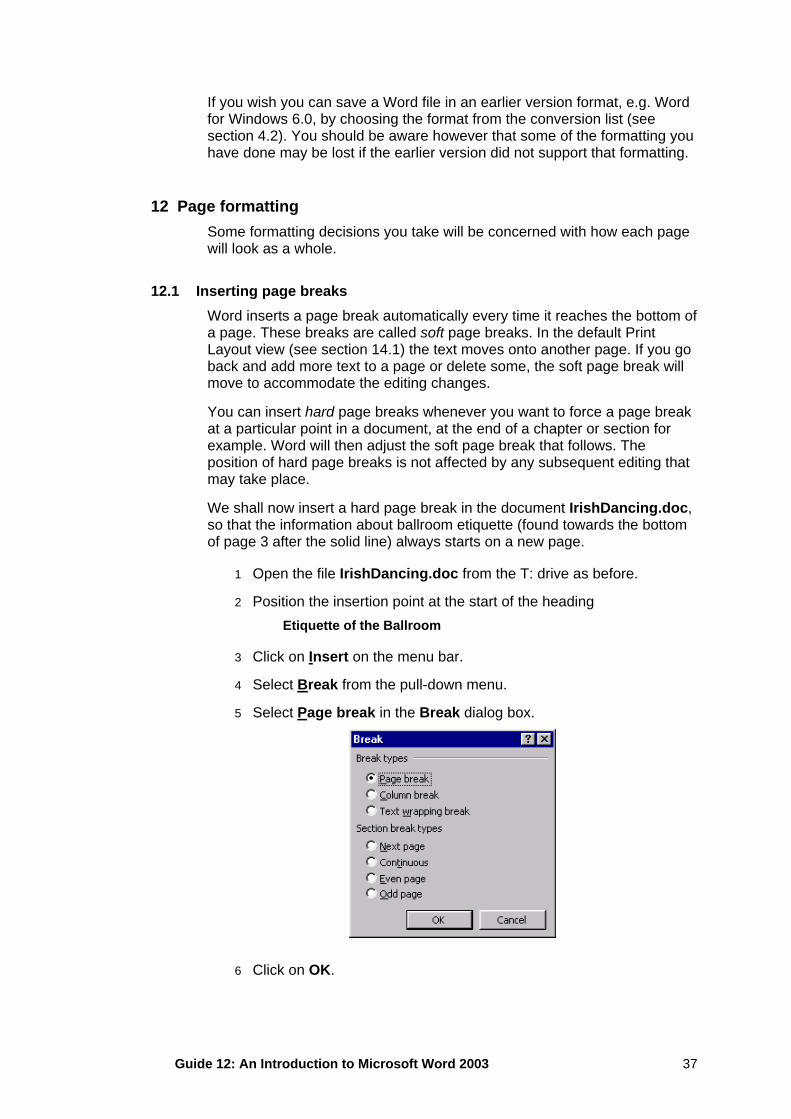
If you wish you can save a Word file in an earlier version format, e.g. Word for Windows 6.0, by choosing the format from the conversion list (see section 4.2). You should be aware however that some of the formatting you have done may be lost if the earlier version did not support that formatting.
12 Page formatting Some formatting decisions you take will be concerned with how each page will look as a whole.
12.1 Inserting page breaks Word inserts a page break automatically every time it reaches the bottom of a page. These breaks are called soft page breaks. In the default Print Layout view (see section 14.1) the text moves onto another page. If you go back and add more text to a page or delete some, the soft page break will move to accommodate the editing changes.
You can insert hard page breaks whenever you want to force a page break at a particular point in a document, at the end of a chapter or section for example. Word will then adjust the soft page break that follows. The position of hard page breaks is not affected by any subsequent editing that may take place.
We shall now insert a hard page break in the document IrishDancing.doc, so that the information about ballroom etiquette (found towards the bottom of page 3 after the solid line) always starts on a new page.
1 Open the file IrishDancing.doc from the T: drive as before.
2 Position the insertion point at the start of the heading Etiquette of the Ballroom
3 Click on Insert on the menu bar.
4 Select Break from the pull-down menu.
5 Select Page break in the Break dialog box.
6 Click on OK.
Guide 12: An Introduction to Microsoft Word 2003 37
The insertion point is now at the top of a new page. If you scroll back to the previous page you will see that there is now a line, with the words Page Break, underneath the text. Unlike a soft page break, a hard page break can be selected, moved or deleted like any other character.
12.2 Keeping paragraphs together It is sometimes required that adjacent paragraphs always appear on the same page. For example you should never have a heading at the bottom of one page and the subsequent paragraph at the top of the next page. You can “link” such paragraphs together so that Word will not put a soft page break between them.
1 Select the heading Step Dancing (bottom of page 1).
2 Click on Format.
3 Select Paragraph from the drop-down menu.
4 Select the Line and Page Breaks tab.
5 Tick the Keep with next box.
6 Click OK.
Now Word will ensure that the heading always appears on the same page as the following paragraph.
12.3 Headers and Footers Headers and footers are pieces of text that usually appear in the top and bottom margins of each page of a document (as in this document), although Word allows you to position them anywhere on the page. As well as page numbers, items such as titles, revision numbers, date, author's name and so on, all constitute useful headers or footers.
To insert a header or footer you need to use the View menu (not the Insert menu as you might expect!).
1 Click on View on the menu bar.
2 Select Header and Footer. This activates a pane in which you create the header, displays a floating Header and Footer toolbar and dims the document so that it cannot be edited.
Guide 12: An Introduction to Microsoft Word 2003 38
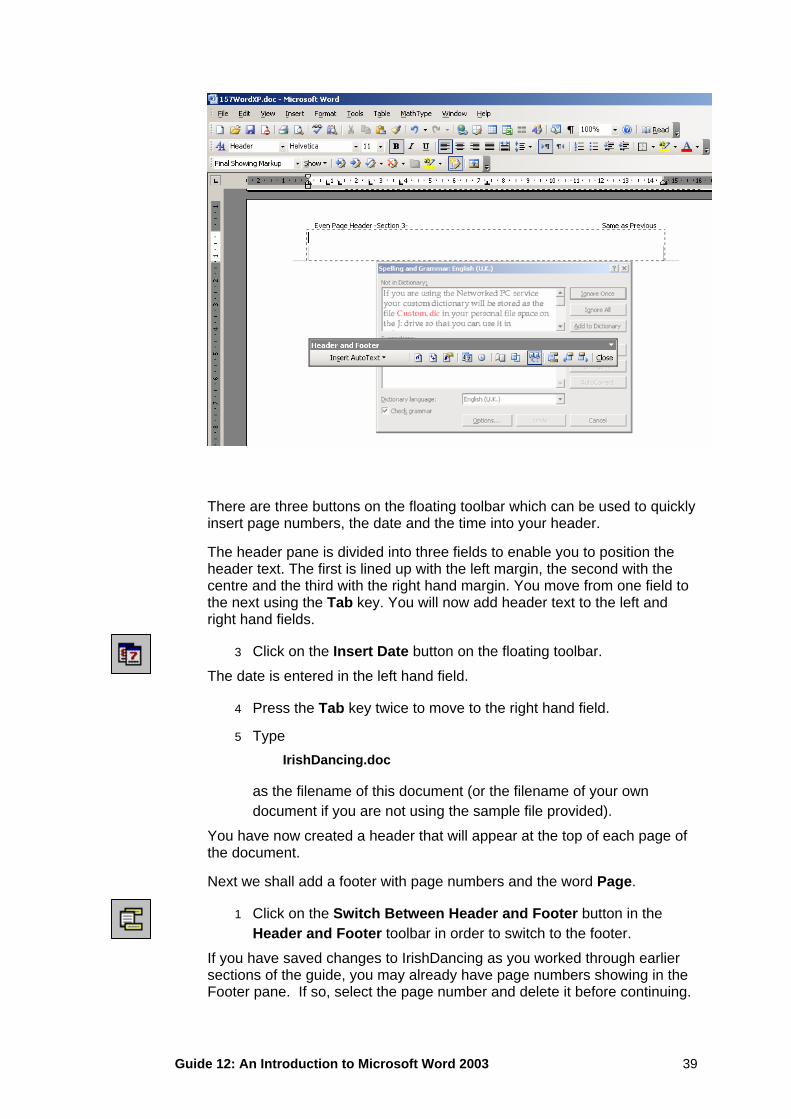
There are three buttons on the floating toolbar which can be used to quickly insert page numbers, the date and the time into your header.
The header pane is divided into three fields to enable you to position the header text. The first is lined up with the left margin, the second with the centre and the third with the right hand margin. You move from one field to the next using the Tab key. You will now add header text to the left and right hand fields.
3 Click on the Insert Date button on the floating toolbar.
The date is entered in the left hand field.
4 Press the Tab key twice to move to the right hand field.
5 Type IrishDancing.doc
as the filename of this document (or the filename of your own document if you are not using the sample file provided).
You have now created a header that will appear at the top of each page of the document.
Next we shall add a footer with page numbers and the word Page.
1 Click on the Switch Between Header and Footer button in the Header and Footer toolbar in order to switch to the footer.
If you have saved changes to IrishDancing as you worked through earlier sections of the guide, you may already have page numbers showing in the Footer pane. If so, select the page number and delete it before continuing.
Guide 12: An Introduction to Microsoft Word 2003 39
2 Press the Tab key to move to the centre of the page.
3 Type Page
followed by a space.
4 Click on the Insert Page Number button on the Header and Footer toolbar.
5 Click on the Close button at the right hand side of the Header and Footer toolbar.
6 Scroll through the document to see the effect.
Headers and footers can be deleted by displaying the header or footer pane using the View | Header and Footer command as before, selecting the relevant text in the pane and deleting it.
Note that in Normal view (see section 14.2) headers and footers are not visible.
12.4 Margins You can make changes to the default margin settings either by moving the margin settings on the rulers, or by using the File | Page Setup command. The Page Setup dialog box also allows you to change other elements of the page such as the orientation and size of the paper. (See section 5.2.2)
13 Miscellaneous topics
13.1 Inserting simple graphics You may wish to insert simple graphics, such as a picture from file or a piece of clip art, into a document. This can be done using the Insert Picture command. You will now add a picture from the clipart gallery to your document to practice this technique.
1 Open a new document (use the New button).
2 Click Insert on the menu bar.
3 Select Picture then Clip Art from the pull down menu.
The Insert Art task pane will launch. From the options available you can search for pictures, sounds or motion clips, import clips and access clips online.
4 Type a word in the Search for: box and click Search.
5 Click the Clip Art you wish to insert in your document.
You can format the picture by right clicking it and selecting Format Picture from the drop down menu.
6 Close the document. Do not save it.
Guide 12: An Introduction to Microsoft Word 2003 40
13.2 Inserting special characters You may want to insert characters that do not appear on the keyboard, such as foreign language characters (e.g., é, æ or ñ) or mathematical symbols (e.g., �, � or �), into a document. This can be done using the Insert Symbol command. You will now add a short paragraph to your document to practise this technique.
1 Open a new document (use the New button).
2 Type in the words It is possible to insert characters such as
3 Click on Insert on the menu bar.
4 Select Symbol from the pull-down menu.
The Symbol dialog box appears.
You will see from the Font box that there is more than one character set to choose from. Mathematical symbols can be found in the Symbol set and foreign language characters in (normal text).
5 Select the character set you would like to use from the Font box.
6 Click on a symbol of your choice.
7 Click on Insert. The symbol appears in your document at the insertion point.
If you use the (normal text) font, you will notice that when you select a foreign character symbol there is an entry in the Shortcut Key: part of the window. If you are likely to need the character repeatedly, it will save you time if you use this shortcut. For example, the shortcut for é is written as Ctrl+’,e. This means press and hold down the Ctrl key and, whilst holding it down, press in sequence the ‘ and the e keys.
8 Click on Close to close the dialog box.
9 Try inserting é now using the shortcut keys.
10 Insert one or two more symbols using these methods (type in a space between them).
Notice how the last symbol you used is still highlighted when the Symbol dialog box reappears.
If there is a symbol that you use frequently, you can assign a custom shortcut key to it. You do this by selecting Shortcut Key from the Symbol dialog box.
11 Close the document. Do not save it.
13.3 Quick move and copy As an alternative to using cut, copy and paste as described earlier, it is possible to move and copy text by dragging a selection with the mouse. This is a three-step operation:
Guide 12: An Introduction to Microsoft Word 2003 41
• Select the text to be moved or copied. • Drag the selection to a new location. • Choose whether to move or copy the text.
To move a selection to a new location, point the mouse at the selection (the mouse pointer changes to an arrow), then hold down the right mouse button and drag an icon representing the selection to the new location. (The text insertion point appears as a greyed vertical bar.) When the mouse button is released, you are given the option of moving the text, copying the text or cancelling the move. When you choose Move Here the selected text disappears from its original location and reappears in the new location.
NOTE: If you press the left mouse button and drag the text you will not be given the option to copy or cancel — the text will automatically be moved. As it is easy to let go of the mouse button by accident, it is saver to always use the right mouse button.
1 In IrishDancing.doc select the last sentence of the second paragraphs taking care not to include the paragraph mark itself.
2 Right click and drag the selection to the beginning of that paragraph.
3 From the list of options choose Move Here. If you “drop” the paragraph in the wrong place, click on the Cancel option and try again.
Note: This method can be used to move or copy text between different documents if both are displayed together on the screen (see section 15.2).
13.4 Formatting paragraphs using the ruler We met a quick way of indenting paragraphs in section 8.2.3. Indents can also be adjusted using the horizontal ruler. The indent markers appear as small triangles on the ruler at each end. Either indent marker can be moved by dragging with the mouse.
The left-hand indent marker is made up of two triangles, one above the other, with a box below the lower one. Dragging the upper triangle on its own changes the indentation of just the first line of the selected paragraph. Dragging the lower one on its own changes the indentation of all but the first line of the paragraph to create a hanging indent. Dragging on the box causes both triangles to move and the overall paragraph indent to change
1 Make sure that the insertion point is positioned somewhere in a paragraph.
2 Point at the top triangle of the left-hand indent marker on the horizontal ruler.
3 Drag the triangle to the right, to the 2cm (or half inch if you are using imperial measurements) marker on the ruler.
The first line of the paragraph is now indented by two centimetres.
4 Point at the box below the bottom triangle of the marker.
Guide 12: An Introduction to Microsoft Word 2003 42
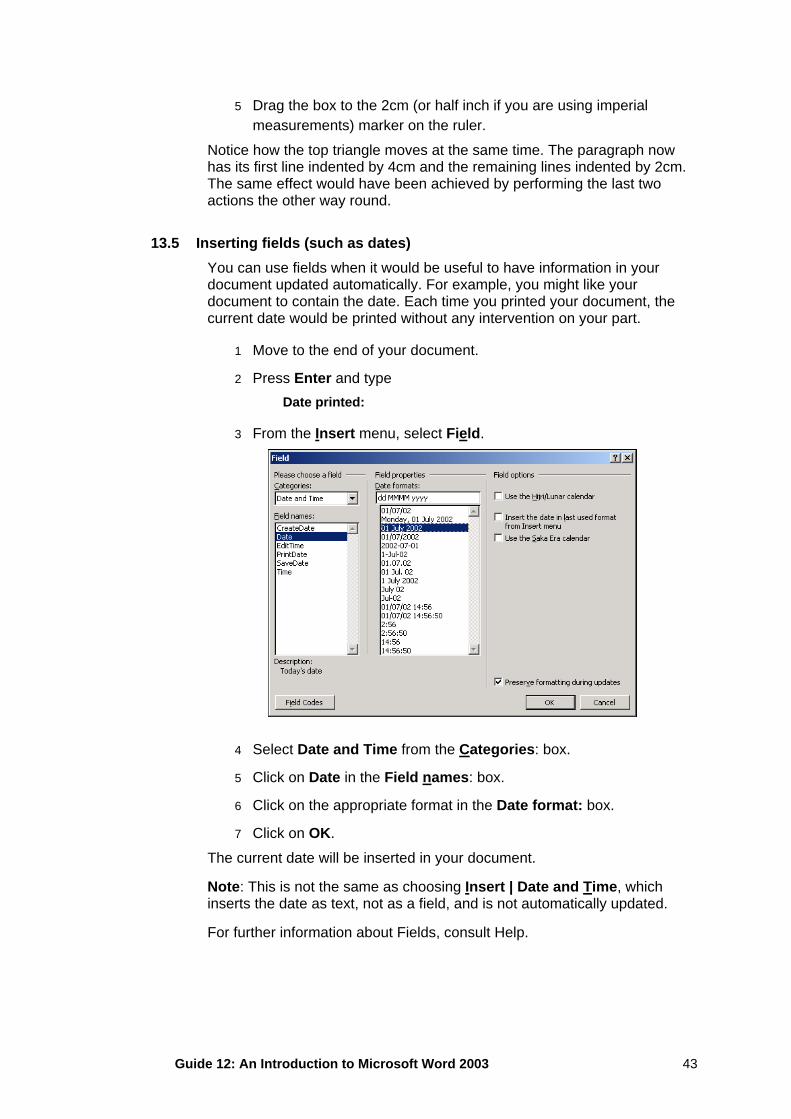
5 Drag the box to the 2cm (or half inch if you are using imperial measurements) marker on the ruler.
Notice how the top triangle moves at the same time. The paragraph now has its first line indented by 4cm and the remaining lines indented by 2cm. The same effect would have been achieved by performing the last two actions the other way round.
13.5 Inserting fields (such as dates) You can use fields when it would be useful to have information in your document updated automatically. For example, you might like your document to contain the date. Each time you printed your document, the current date would be printed without any intervention on your part.
1 Move to the end of your document.
2 Press Enter and type Date printed:
3 From the Insert menu, select Field.
4 Select Date and Time from the Categories: box.
5 Click on Date in the Field names: box.
6 Click on the appropriate format in the Date format: box.
7 Click on OK.
The current date will be inserted in your document.
Note: This is not the same as choosing Insert | Date and Time, which inserts the date as text, not as a field, and is not automatically updated.
For further information about Fields, consult Help.
Guide 12: An Introduction to Microsoft Word 2003 43
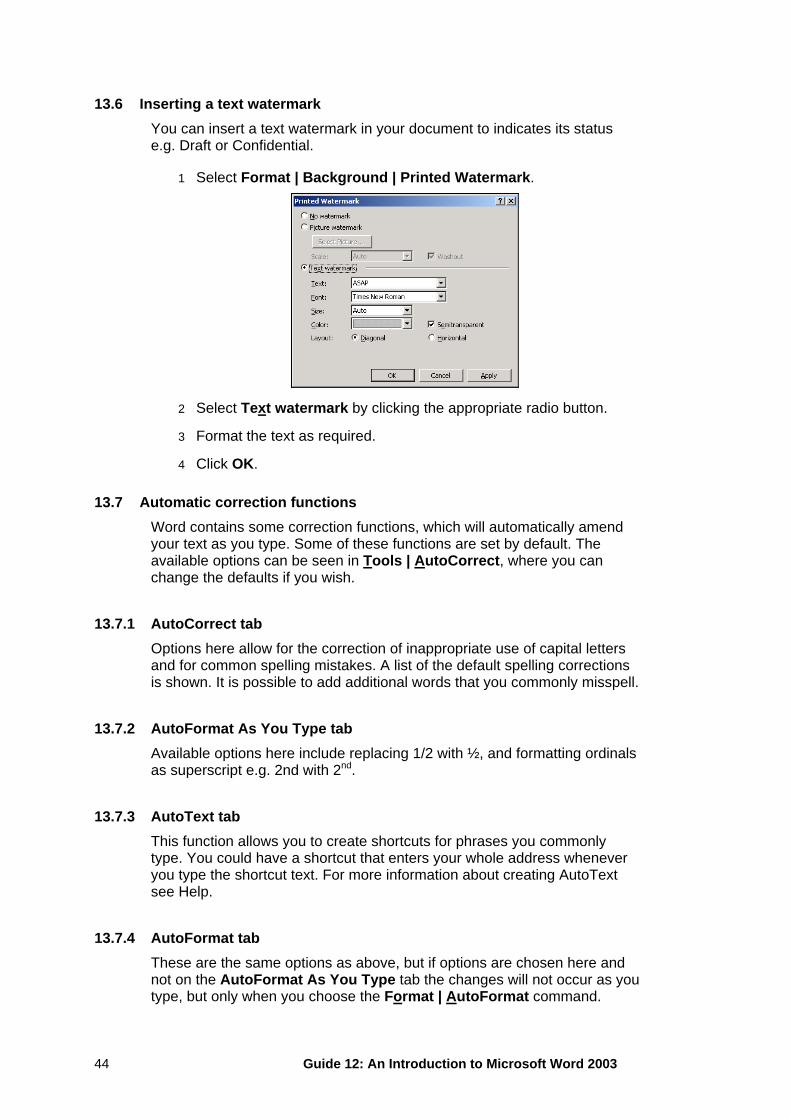
13.6 Inserting a text watermark You can insert a text watermark in your document to indicates its status e.g. Draft or Confidential.
1 Select Format | Background | Printed Watermark.
2 Select Text watermark by clicking the appropriate radio button.
3 Format the text as required.
4 Click OK.
13.7 Automatic correction functions Word contains some correction functions, which will automatically amend your text as you type. Some of these functions are set by default. The available options can be seen in Tools | AutoCorrect, where you can change the defaults if you wish.
13.7.1 AutoCorrect tab Options here allow for the correction of inappropriate use of capital letters and for common spelling mistakes. A list of the default spelling corrections is shown. It is possible to add additional words that you commonly misspell.
13.7.2 AutoFormat As You Type tab Available options here include replacing 1/2 with ½, and formatting ordinals as superscript e.g. 2nd with 2nd.
13.7.3 AutoText tab This function allows you to create shortcuts for phrases you commonly type. You could have a shortcut that enters your whole address whenever you type the shortcut text. For more information about creating AutoText see Help.
13.7.4 AutoFormat tab These are the same options as above, but if options are chosen here and not on the AutoFormat As You Type tab the changes will not occur as you type, but only when you choose the Format | AutoFormat command.
Guide 12: An Introduction to Microsoft Word 2003 44
14 Different views on your document Word offers a number of different options for viewing a document to suit various purposes. The most commonly used of those viewing options are described below. The view that you choose to work in does not affect the appearance of the printed document.
14.1 Print layout view Print Layout view is the default view and displays the layout of a document as it looks when printed. Multiple columns, graphics, headers and footers, page numbers and footnotes are shown as they will appear on the printed page.
The View menu is used to select view options.
1 Click on View on the menu bar.
The Print Layout option is currently selected.
14.2 Normal view In Normal view most of the text formatting, such as the font, point size, bold, italicised or underlined text, is shown as it will look when printed. However, the arrangement of text and graphics on the page is simplified. For example, multiple columns appear in their correct width, but are displayed as one continuous column down the page rather than side-by-side.
1 Click on View on the menu bar.
2 Click on Normal on the pull-down menu.
Scroll through your document now to see what effect the change of view has had.
In Normal view the soft page breaks are shown as thin dotted lines across the screen. Hard page break are represented by dark dotted lines labelled Page Break.
14.3 Web layout view In Web layout the document is shown as it would appear if it were to saved as a Web page. Formatting not supported by HTML, such as page breaks, would be lost.
1 Click on View on the menu bar.
2 Click on Web Layout on the pull-down menu.
14.4 Zoom Zoom view allows you to magnify or reduce the size of your document on the screen. A display size can be chosen from 10 percent to 200 percent of the original.
1 Click on View on the menu bar.
Guide 12: An Introduction to Microsoft Word 2003 45
2 Select Zoom from the pull-down menu.
3 Select a different magnification from the Zoom dialog box.
4 Click on OK.
You could try the different views now if you wish. Finish by clicking Zoom to 100%.
The view that you choose for the screen does not affect how the document appears when printed.
14.5 Outline view In addition to the Normal, Print Layout and Web Layout views there is also an Outline view in which you can collapse a document to see only the main headings, or expand it to see the entire document. This view makes it easy to move text a long way and to change the order of topics. It is used mainly when working with long documents.
14.6 Document Map Turning on the Document Map, using View | Document Map, or the Document Map button will open a pane down the left side of the screen showing the main headings in your document (this only works when you have used Styles for the headings). You can move around your document quickly by clicking on headings in the map pane. You can switch off the document map by clicking again on the Document Map button.
15 Working with multiple windows and documents
15.1 Splitting the document window Sometimes it is desirable to be able to view two different areas of the same document at the same time. You may find this helpful when working with a very long document. Any document window can be split into two panes using the window split box. This is the small box immediately above the up arrow on the vertical scroll bar. When the mouse pointer is in the split box it changes from an arrow to a split bar. Try splitting your screen now:
1 Make sure you are looking at the document in Print Layout View.
2 Point to the window split box, check that the pointer has changed to a split bar, and double click.
The window is now split into two equal panes by a thick line and a ruler. An alternative method of splitting the screen is to drag the split box down the screen until the two areas are the size you want.
3 Click in either part to choose which one to work in.
4 Scroll through the document to see the effect. The text in the other pane does not move.
To return to the unsplit window:
Guide 12: An Introduction to Microsoft Word 2003 46
5 Point to the thick line (the pointer changes to a split bar) and double click.
You can also remove a pane by dragging the split box up or down out of the document area. The pane that is removed depends upon which way the box is dragged.
Remember that splitting a window just gives two views of the same document so any changes you make in one pane will occur in the other even though you are viewing a different area of the document.
15.2 Working with multiple documents It is possible to have more than one document open at once (you probably have two open at the moment) and to switch between them. You can only work on one of the documents at a time and this is known as the active document. You will now open another document and practise the methods for switching between the two. The new document will be an empty one.
1 Click on the New Document button at the left hand side of the Toolbar.
A new document window appears. It will be called Document1 (or Document2, Document3, ...) because you have not given it a name. It fills the screen so that IrishDancing.doc is no longer visible. There are two ways of switching between different documents. If you wish to continue to view each document in a full screen, you can switch between them using the Window menu.
2 Click on Window on the menu bar.
The bottom of the pull-down menu displays a list of current documents. The one with the tick beside it is the active document. Up to nine documents can be listed in this window although more than nine can be open at the same time.
3 Click on IrishDancing.doc.
IrishDancing.doc is now displayed on the screen.
4 Click on Window on the menu bar again.
Notice that IrishDancing.doc now has a tick by it.
As each open document is displayed as a button on the Task Bar at the bottom of the screen, an alternative method of moving between documents is to click on these buttons.
Often it is helpful to view more than one document simultaneously. You may, for example, wish to transfer text between them.
1 Check that the Window menu is still open.
2 Select Arrange All. The documents are arranged one above the other on the screen. The title bar of IrishDancing.doc is highlighted to show that it is the active
Guide 12: An Introduction to Microsoft Word 2003 47
document. You can now make another document active simply by clicking anywhere in it with the mouse.
3 Click in Document1 and notice the effect on the title bar.
4 Click back in the IRISHDANCING.DOC window.
Copying and moving text between these two different documents would now be easy using the techniques discussed in sections 6.2.2 and 6.2.3.
To return the active window to full screen you use the maximise button.
1 Click on the maximise button near the right-hand end of the IrishDancing.doc title bar.
With multiple windows on the screen, you can resize and reposition them as you wish using the usual Windows techniques.
15.3 Ending your session When you have finished experimenting, you should end your session.
1 Close all your open documents (see section 4.3).
2 Exit from Word (see section 4.4).
3 If you are using the Networked PC service be sure to exit from Windows.
16 Further information about Word
16.1 Creating numbered and bulleted lists Both numbered and bulleted lists have been used throughout this Guide. They are an attractive way of displaying information and can add clarity to your document.
There are different numbering styles that can be adopted but they should always have the text indented as shown on the right below.
1. This is an incorrect example of how a list should appear 2. The lines of text should not align in this way
1. This is a correct example of how a list should appear
2. The lines of text should all start at the same position
The correct alignment will be done automatically if you use the numbering facility in Word.
There are many types of bulleted lists; a typical one is shown below.
The birds seen by the children included:
• Sparrows • Robins • Thrushes • Doves • Blackbirds
Guide 12: An Introduction to Microsoft Word 2003 48
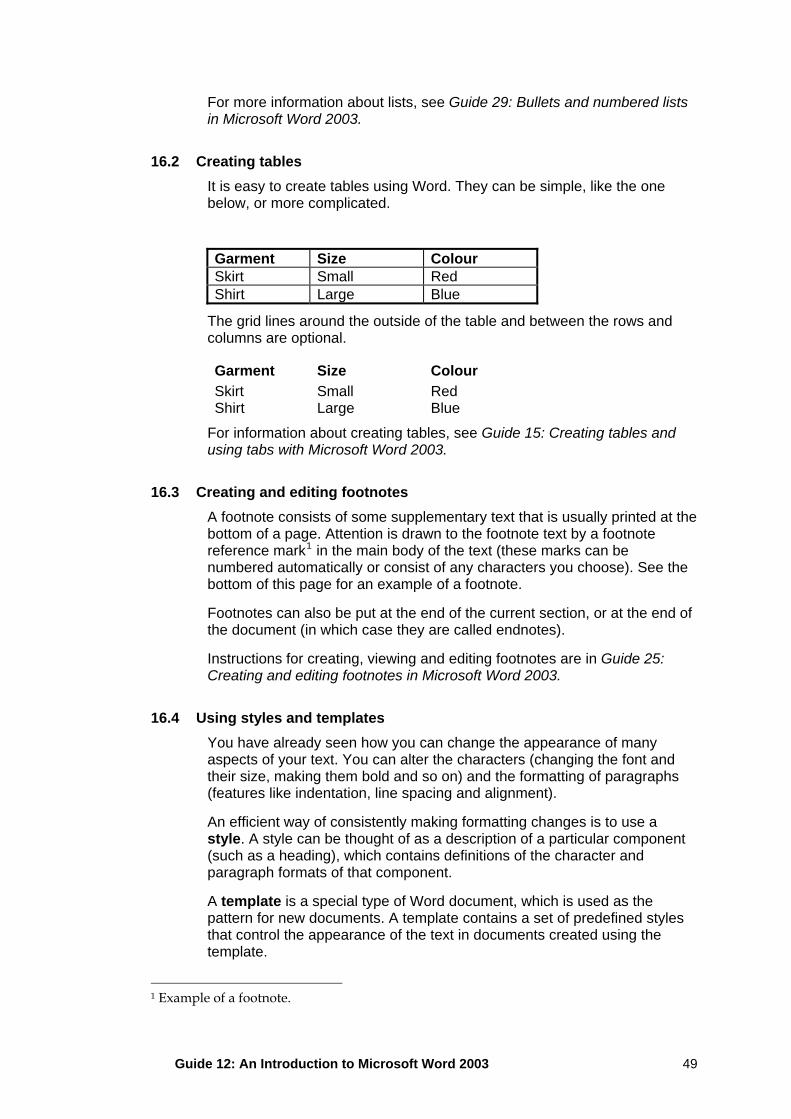
For more information about lists, see Guide 29: Bullets and numbered lists in Microsoft Word 2003.
16.2 Creating tables It is easy to create tables using Word. They can be simple, like the one below, or more complicated.
Garment Size Colour Skirt Small Red Shirt Large Blue
The grid lines around the outside of the table and between the rows and columns are optional.
Garment Size Colour Skirt Small Red Shirt Large Blue
For information about creating tables, see Guide 15: Creating tables and using tabs with Microsoft Word 2003.
16.3 Creating and editing footnotes A footnote consists of some supplementary text that is usually printed at the bottom of a page. Attention is drawn to the footnote text by a footnote reference mark1 in the main body of the text (these marks can be numbered automatically or consist of any characters you choose). See the bottom of this page for an example of a footnote.
Footnotes can also be put at the end of the current section, or at the end of the document (in which case they are called endnotes).
Instructions for creating, viewing and editing footnotes are in Guide 25: Creating and editing footnotes in Microsoft Word 2003.
16.4 Using styles and templates You have already seen how you can change the appearance of many aspects of your text. You can alter the characters (changing the font and their size, making them bold and so on) and the formatting of paragraphs (features like indentation, line spacing and alignment).
An efficient way of consistently making formatting changes is to use a style. A style can be thought of as a description of a particular component (such as a heading), which contains definitions of the character and paragraph formats of that component.
A template is a special type of Word document, which is used as the pattern for new documents. A template contains a set of predefined styles that control the appearance of the text in documents created using the template.
1 Example of a footnote.
Guide 12: An Introduction to Microsoft Word 2003 49
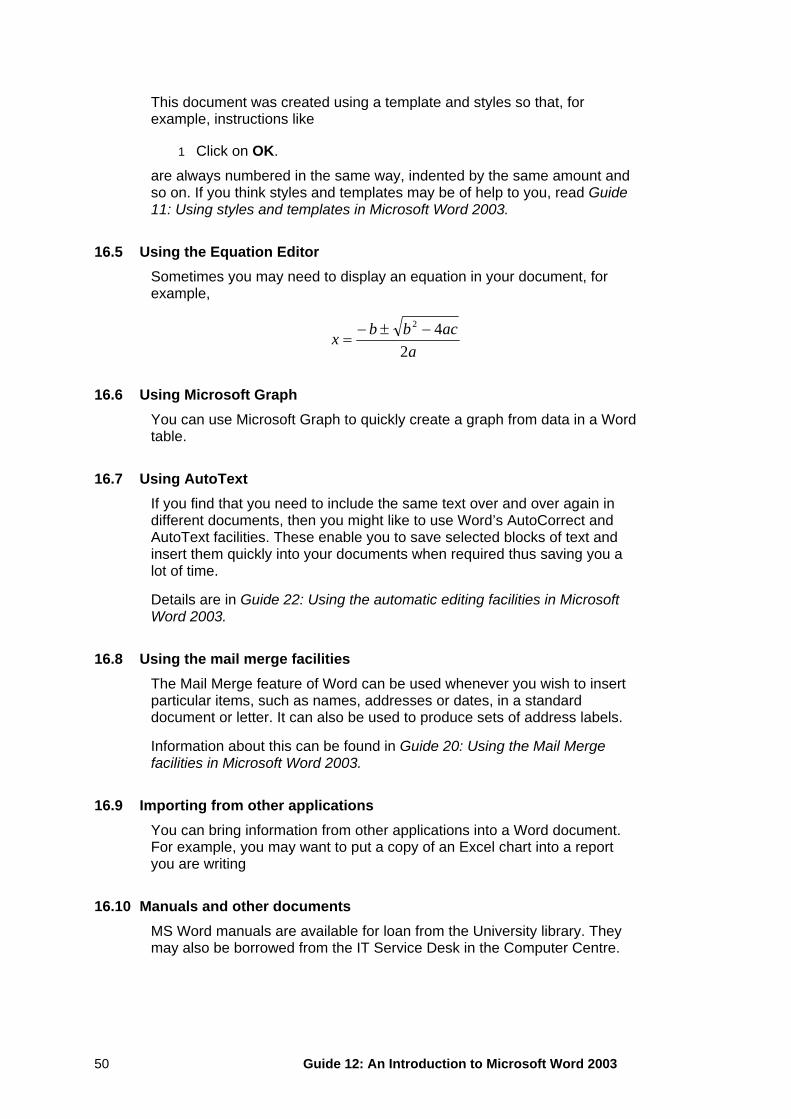
This document was created using a template and styles so that, for example, instructions like
1 Click on OK.
are always numbered in the same way, indented by the same amount and so on. If you think styles and templates may be of help to you, read Guide 11: Using styles and templates in Microsoft Word 2003.
16.5 Using the Equation Editor Sometimes you may need to display an equation in your document, for example,
aacbbx
242 −±−
=
16.6 Using Microsoft Graph You can use Microsoft Graph to quickly create a graph from data in a Word table.
16.7 Using AutoText If you find that you need to include the same text over and over again in different documents, then you might like to use Word’s AutoCorrect and AutoText facilities. These enable you to save selected blocks of text and insert them quickly into your documents when required thus saving you a lot of time.
Details are in Guide 22: Using the automatic editing facilities in Microsoft Word 2003.
16.8 Using the mail merge facilities The Mail Merge feature of Word can be used whenever you wish to insert particular items, such as names, addresses or dates, in a standard document or letter. It can also be used to produce sets of address labels.
Information about this can be found in Guide 20: Using the Mail Merge facilities in Microsoft Word 2003.
16.9 Importing from other applications You can bring information from other applications into a Word document. For example, you may want to put a copy of an Excel chart into a report you are writing
16.10 Manuals and other documents MS Word manuals are available for loan from the University library. They may also be borrowed from the IT Service Desk in the Computer Centre.
Guide 12: An Introduction to Microsoft Word 2003 50
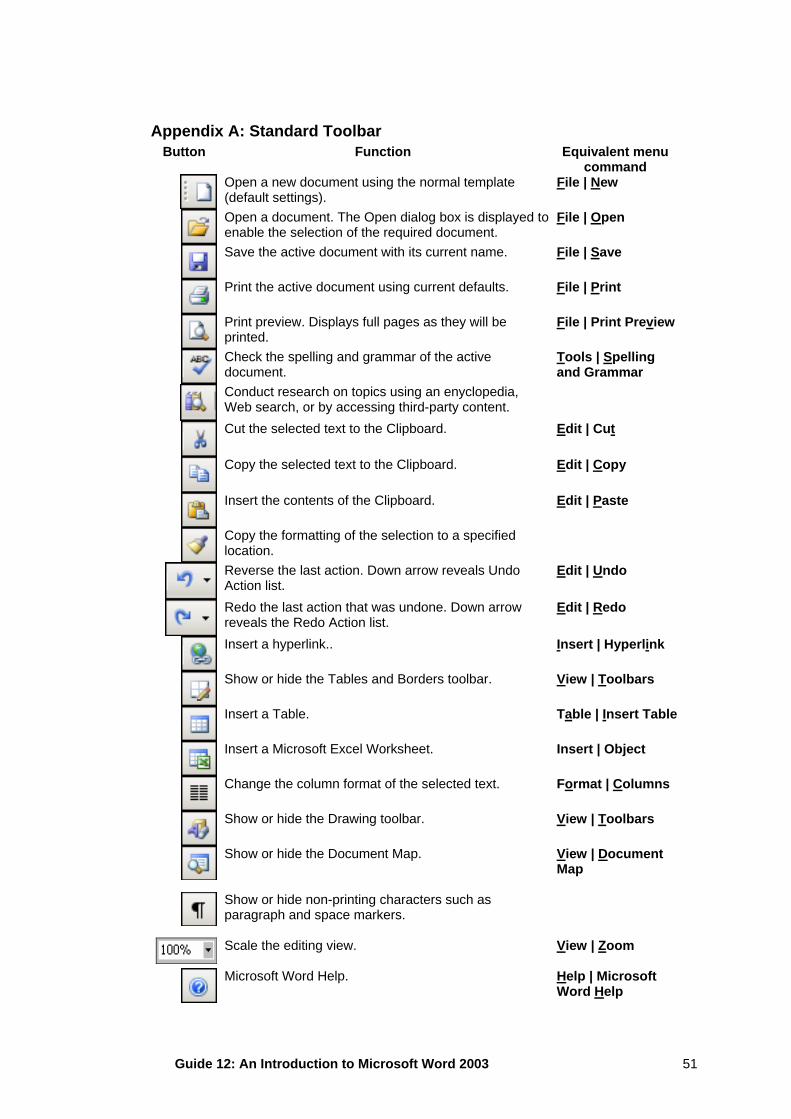
Appendix A: Standard Toolbar Button Function Equivalent menu
command Open a new document using the normal template (default settings).
File | New
Open a document. The Open dialog box is displayed to enable the selection of the required document.
File | Open
Save the active document with its current name. File | Save
Print the active document using current defaults. File | Print
Print preview. Displays full pages as they will be printed.
File | Print Preview
Check the spelling and grammar of the active document.
Tools | Spelling and Grammar
Conduct research on topics using an enyclopedia, Web search, or by accessing third-party content.
Cut the selected text to the Clipboard. Edit | Cut
Copy the selected text to the Clipboard. Edit | Copy
Insert the contents of the Clipboard. Edit | Paste
Copy the formatting of the selection to a specified location.
Reverse the last action. Down arrow reveals Undo Action list.
Edit | Undo
Redo the last action that was undone. Down arrow reveals the Redo Action list.
Edit | Redo
Insert a hyperlink.. Insert | Hyperlink
Show or hide the Tables and Borders toolbar. View | Toolbars
Insert a Table. Table | Insert Table
Insert a Microsoft Excel Worksheet. Insert | Object
Change the column format of the selected text. Format | Columns
Show or hide the Drawing toolbar. View | Toolbars
Show or hide the Document Map.
View | Document Map
Show or hide non-printing characters such as paragraph and space markers.
Scale the editing view.
View | Zoom
Microsoft Word Help.
Help | Microsoft Word Help
Guide 12: An Introduction to Microsoft Word 2003 51

Optimizes the display for your screen size and resolution.
Guide 12: An Introduction to Microsoft Word 2003 52
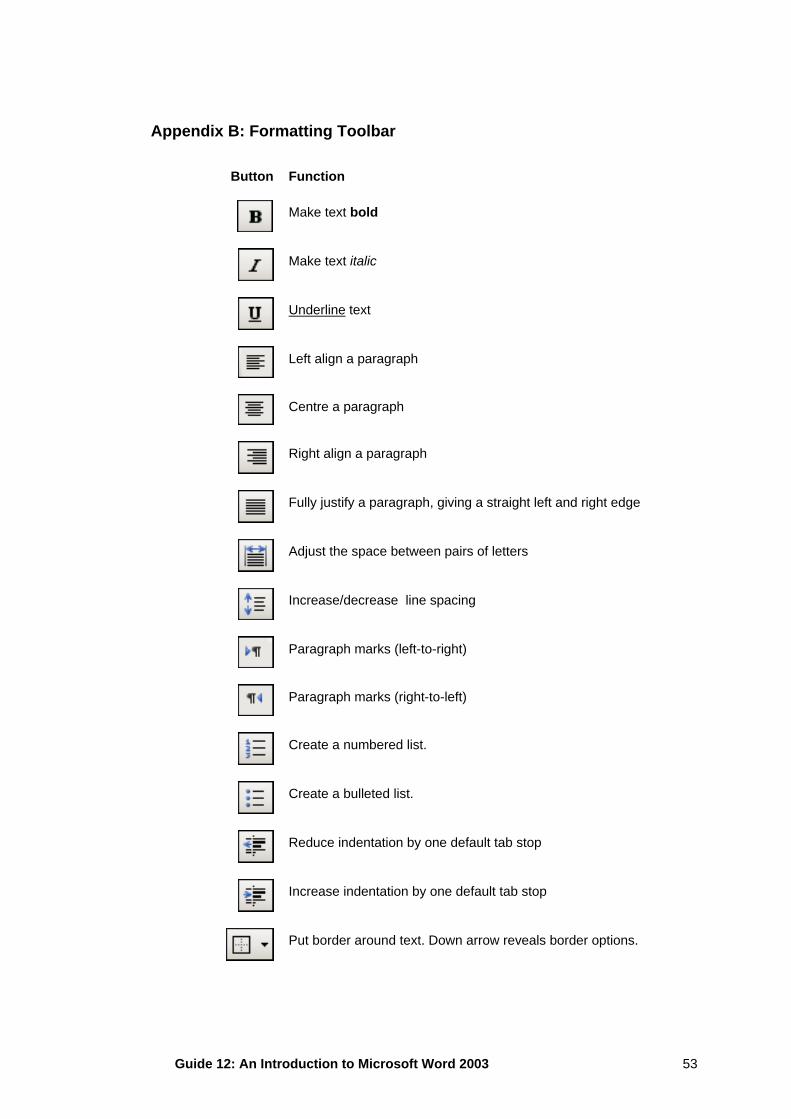
Appendix B: Formatting Toolbar
Button Function
Make text bold
Make text italic
Underline text
Left align a paragraph
Centre a paragraph
Right align a paragraph
Fully justify a paragraph, giving a straight left and right edge
Adjust the space between pairs of letters
Increase/decrease line spacing
Paragraph marks (left-to-right)
Paragraph marks (right-to-left)
Create a numbered list.
Create a bulleted list.
Reduce indentation by one default tab stop
Increase indentation by one default tab stop
Put border around text. Down arrow reveals border options.
Guide 12: An Introduction to Microsoft Word 2003 53
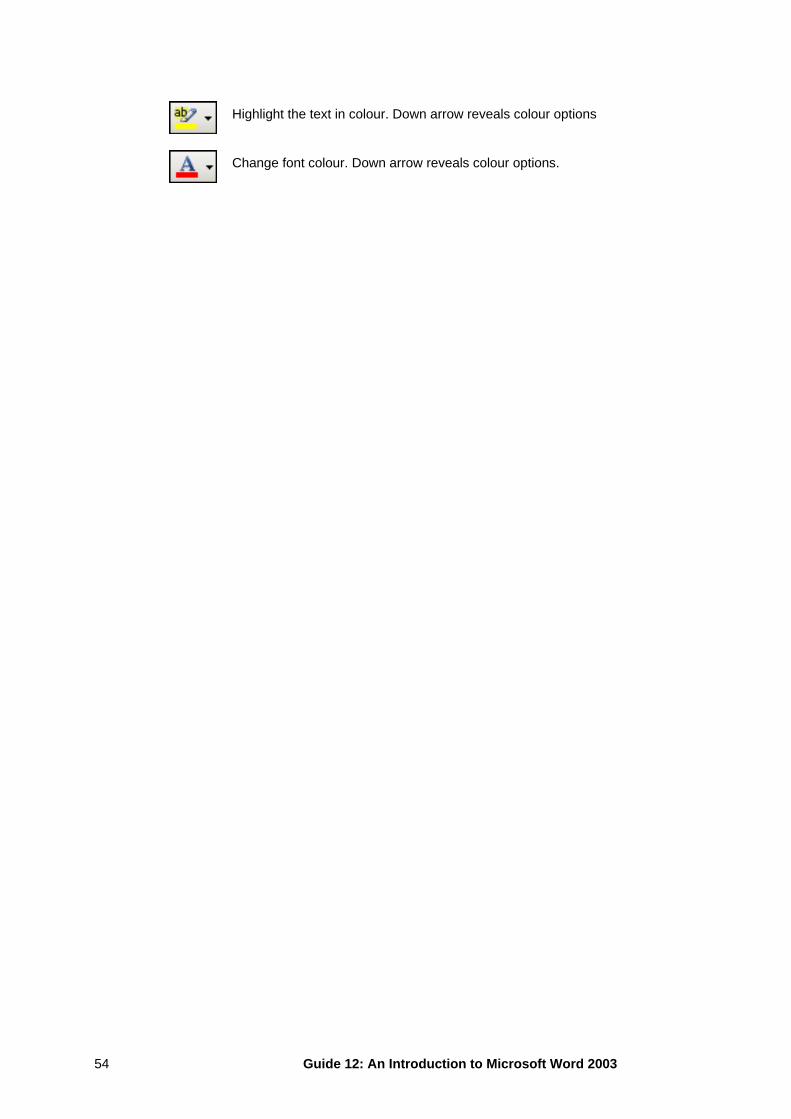
Highlight the text in colour. Down arrow reveals colour options
Change font colour. Down arrow reveals colour options.
Guide 12: An Introduction to Microsoft Word 2003 54
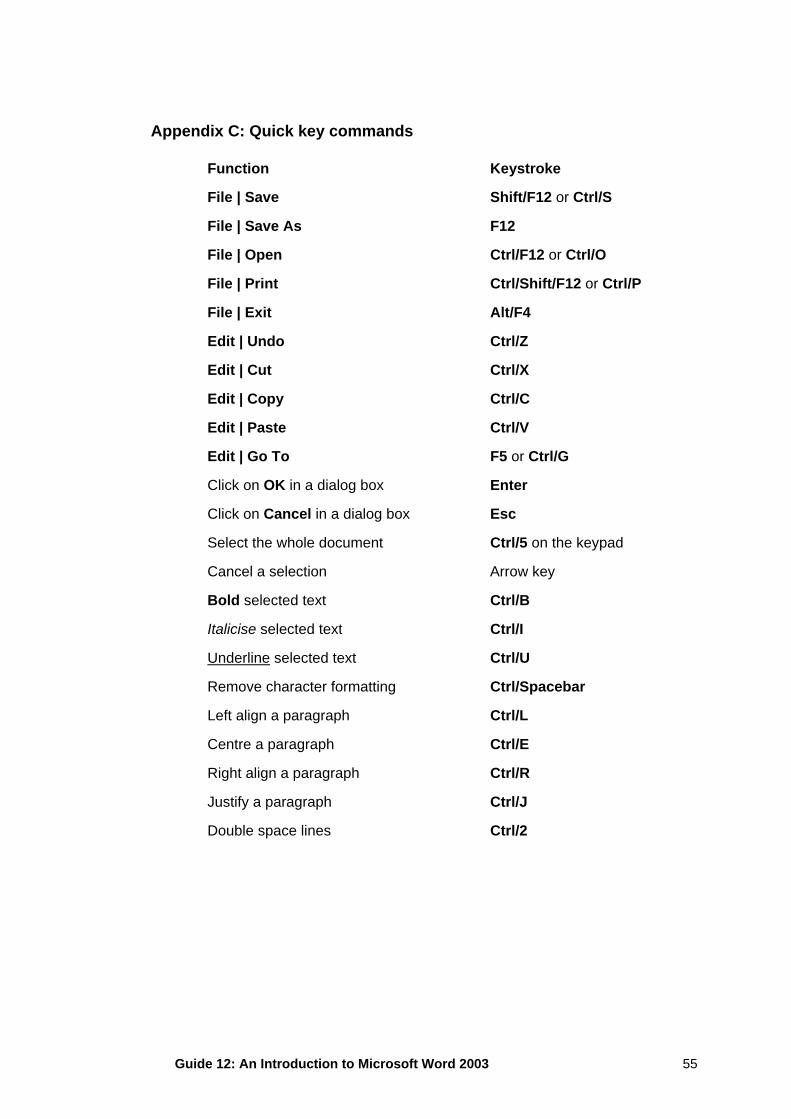
Appendix C: Quick key commands
Function Keystroke
File | Save Shift/F12 or Ctrl/S
File | Save As F12
File | Open Ctrl/F12 or Ctrl/O
File | Print Ctrl/Shift/F12 or Ctrl/P
File | Exit Alt/F4
Edit | Undo Ctrl/Z
Edit | Cut Ctrl/X
Edit | Copy Ctrl/C
Edit | Paste Ctrl/V
Edit | Go To F5 or Ctrl/G
Click on OK in a dialog box Enter
Click on Cancel in a dialog box Esc
Select the whole document Ctrl/5 on the keypad
Cancel a selection Arrow key
Bold selected text Ctrl/B
Italicise selected text Ctrl/I
Underline selected text Ctrl/U
Remove character formatting Ctrl/Spacebar
Left align a paragraph Ctrl/L
Centre a paragraph Ctrl/E
Right align a paragraph Ctrl/R
Justify a paragraph Ctrl/J
Double space lines Ctrl/2
Guide 12: An Introduction to Microsoft Word 2003 55
double spacing ......................................27 Index dragging a selection ..............................43
A E
active document ....................................48 Edit | Find command ............................21 adding space before a paragraph .........25 Edit | Go To command.........................21 address labels .......................................52 Edit | Select All command....................17 Align Right button ................................25 Edit | Undo command...........................17 aligning text ...........................................25 editing text .............................................15 Alt key .....................................................7 Enter key.................................................8 AutoCorrect .....................................45, 52 Equation Editor ....................................51 AutoFormat............................................46 exiting Word 97......................................10 Automatic correction functions ..............45 extending a selection.............................16 AutoText ..........................................46, 52 F B File | Open ..............................................7 Backspace key ...........................8, 16, 17 File | Save ...............................................8 backup copies........................................36 File | Save As .........................................8 Bold button............................................23 file size...................................................35 bold text .................................................23 file types.................................................37 bulletted lists..........................................50 Find command ......................................21 button off..................................................5 Find dialog box......................................21 button on..................................................5 Font box.................................................23
font size .................................................12 C Font size box........................................24 fonts .......................................................12 Center button ........................................25 footers....................................................39 changing character size.........................23 footnote reference mark ........................51 changing fonts .......................................23 footnote text ...........................................51 changing line spacing ............................27 footnotes................................................51 character count......................................19 foreign language characters ..................42 character formatting...............................22 Format | Font command.......................24 Clipboard ...............................................18 Format | Paragraph command.............25 closing a document................................10 formatting paragraphs ...........................43 commands ...............................................6 formatting text ........................................22 Copy button...........................................18 Formatting toolbar ...............................3, 4 copying text ...........................................18 Formatting Toolbar ..................................4 creating and editing footnotes ...............51
creating numbered and bulletted lists....50 H creating tables .......................................50 custom dictionaries................................30 hard page breaks...................................38 customised dictionary ............................30 header pane ..........................................40 Cut button..............................................18 headers..................................................39
headings ................................................11 D help .........................................................2 date........................................................44 I date button ............................................40 Decrease Indent button........................26 I-beam pointer .........................................6 default tab stops ......................................5 importing from other applications ..........52 Delete key .......................................16, 17 including the same text..........................52 deleting page numbers ..........................32 Increase Indent button .........................26 deleting text ...........................................17 indent markers...................................5, 43 design decisions ....................................11 indent positions........................................5 different views........................................46 indentation .............................................12 DOC extension ........................................9 indenting a paragraph............................26 Document Map ................................47, 53 indents ...................................................43 document presentation ..........................12 Insert | Page Numbers command........31 document window....................................3 Insert key ..............................................15 Document1 ..............................................2 insert mode............................................15
Guide 12: An Introduction to Microsoft Word 2003 58
Insert Symbol command...................... 42 P inserting a page break........................... 38 page formatting ..................................... 38 inserting dates....................................... 44 page numbers ................................... 5, 31 inserting fields ....................................... 44 Page Numbers button .......................... 41 inserting page numbers......................... 31 Page Setup dialog box ......................... 14 inserting special characters................... 42 paper orientation ................................... 14 Italic button ........................................... 23 paper size.............................................. 14 italic text ................................................ 23 paragraph count .................................... 19
paragraph formatting............................. 24 J paragraph mark (¶)................................ 24 Justify button........................................ 25 Paste button.......................................... 18 pointer ..................................................... 6 K portrait ................................................... 14 Keep with next....................................... 39 Print dialog box..................................... 34 Keeping paragraphs together................ 39 Print Layout ............... 5, 32, 38, 46, 47, 48 Print Layout View .................................. 46 L Print Preview ....................................... 33
landscape.............................................. 14 Print Preview button ............................ 33 left-align................................................. 12 Print Setup dialog box.......................... 14 lettering styles ....................................... 12 printer selection..................................... 13 line count ............................................... 19 printing................................................... 34
printing decisions .................................. 13 M punctuation............................................ 12
magnification ......................................... 47 Q Magnifier button ................................... 34
Mail Merge............................................. 52 quick move and copy ............................ 43 manuals................................................. 52
R margins.................................................... 5 Margins.................................................. 41 reducing a selection .............................. 16 mathematical symbols........................... 42 Replace command................................ 27 maximise button .................................... 49 ruler ............................................... 3, 5, 43 menu bar ................................................. 3
S Menu Bar ................................................ 3 Microsoft Graph..................................... 51 Save As dialog box................................. 9 mouse pointer ......................................... 6 Save button........................................... 19 moving around a document................... 20 saving a document .................................. 8 moving around a larger document ........ 20 screen components................................. 3 moving text ...................................... 17, 18 screen, initial Word.................................. 2 multiple columns ................................... 46 search.................................................... 21 multiple documents ............................... 48 Search and Replace.............................. 27 Multiple Pages button .......................... 34 section number........................................ 5 multiple windows ................................... 48 select a line ........................................... 17
select a paragraph ................................ 17 N select a sentence .................................. 17 Networked PC service........... 9, 17, 19, 30 select a single word............................... 17 New Document button ......................... 48 select the whole document.................... 17 Normal view .......................................... 46 selecting text ......................................... 16 numbered lists....................................... 50 selection area........................................ 16 Shift key.................................................. 8 O Show/Hide button................................ 24
Office Assistant ................................. 3, 54 Smart cutting and pasting ..................... 18 Open dialog box .................................... 10 soft page breaks.................................... 47 opening an existing document .............. 10 Spacebar ................................................. 8 orientation.............................................. 14 Spelling button ..................................... 30 Outline view........................................... 47 spelling checker .................................... 29 overtype................................................... 6 split bar ................................................ 48 overtype mode ...................................... 15 splitting the document window .............. 48 OVR....................................................... 15 Standard toolbar.................................. 3, 4
statistics................................................. 19
Guide 12: An Introduction to Microsoft Word 2003 59
Statistics button....................................19 Undo button...........................................29 status bar.................................................5 using styles and templates ....................51 style .......................................................51 V T versions of Word for Windows...............38 Tab Alignment button ..............................5 W tab stops ..................................................5 tables .....................................................50 watermark..............................................45 template.................................................51 Web Layout View...................................47 tips ...........................................................3 window split box..................................48 title bar .....................................................2 word count .............................................19 Toolbar buttons........................................4 Word Help index .....................................2 Tools | Options command........17, 29, 36 word-wrap................................................8 Tools|Options command......................18 Z Typing replaces selection......................17
Zoom view .............................................47 U
Underline button ...................................23
Guide 12: An Introduction to Microsoft Word 2003 60


![[MS-OFFDI]: Microsoft Office File Format Documentation … · 2017-09-19 · Microsoft Word 97 Microsoft Word 2000 Microsoft Word 2002 Microsoft Office Word 2003 Microsoft Office](https://static.fdocuments.us/doc/165x107/5edde022ad6a402d66691993/ms-offdi-microsoft-office-file-format-documentation-2017-09-19-microsoft-word.jpg)