An Introduction to Herb Dryers
9
ers, however, do not have access to forced air tobacco dryers based on the agricul- tural history of the area. In this case, a dryer can be constructed from a new or existing shed outfitted with a heater, fan, and dehumidi- fier. Additionally, a grower may choose to construct one from scratch. air flow and the plant mate- rial dries evenly. The shelves should be con- structed of food grade screens or covered with an acceptable food grade mate- rial. The dryer should be free of dust, dirt, insects, and rodents. Evidence of any of these in the final product can lower its value or render it unmarketable. The dryer should be able to hold an entire harvest and dry it fast enough that the crop does not spoil. Effi- ciency and economic con- cerns must be taken into consideration to ensure the cost-effectiveness of its op- eration. Many different kinds of commercial herb dryers are available for purchase and can be fairly expensive, rang- ing from $15,000 used to $30,000 new. In eas tern North Carolina, existing forced air tobacco dryers (kilns) can be used to dry herbs. Most mountain farm- Most medicinal and culi- nary herbs are sold dried. When drying large quanti- ties of herbs for commer- cial sale, growers should use a forced-air dryer to preserve their color, fla- vor, oil content, and me- dicinal properties. To achieve this, good air cir- culation within the dryer is important, as it reduces drying time and allows the use of lower tempera- tures, both of which can prevent the degradation of chemical constituents during the drying process. There- fore, dependable temperature control and the ability to provide high air flow throughout the plant mate- rial is important. Drying temperatures and times differ by plants, plant parts, and ambient conditions. In gen- eral, most herbs should be dried at low temperatures, ideally around 90-100° F. When outside conditions are hot and humid, however, it may be necessary to raise temperatures to as high as 130°F. The size of the dryer should be based on the herb produc- tion area and how much will be harvested at one time. For example, we found that slightly less than one-fourth acre of skullcap herb (foliage) required 700 ft 2 of flat drying space. The dryer should have well-spaced racks to ensure that all sides of the plant receive sufficient Colorful Celosia flowers, for demonstration, are supported by screens shelves in this herb dryer. An Introduction to Herb Dryers October 2008 Things to Remember: • Most herbs and roots are sold dried. • Good quality dryers preserve herb quality. • Clean thoroughly between crops to avoid adulteration. D r y e r s f o r C o m m e r c i a l H e r b G r o w e r s : A C o n s t r u c t i o n G u i d e N O R T H C A R O L I N A S T A T E U N I V E R S I T Y Introduction to Herb Dryers 1 Small Dryer Guideline 2 Large Dryer Guidelines 5 Drying Methods 7 What’s Inside?
-
Upload
pdxpharris -
Category
Documents
-
view
218 -
download
0
Transcript of An Introduction to Herb Dryers

8/6/2019 An Introduction to Herb Dryers
http://slidepdf.com/reader/full/an-introduction-to-herb-dryers 1/8
ers, however, do not haveaccess to forced air tobaccodryers based on the agricul-tural history of the area. Inthis case, a dryer can beconstructed from a new orexisting shed outfitted with a
heater, fan, and dehumidi-fier. Additionally, a growermay choose to construct onefrom scratch.
air flow and the plant mate-rial dries evenly. Theshelves should be con-structed of food gradescreens or covered with anacceptable food grade mate-rial. The dryer should be
free of dust, dirt, insects, androdents. Evidence of any of these in the final product canlower its value or render itunmarketable.The dryer should be able to
hold an entire harvest anddry it fast enough that thecrop does not spoil. Effi-ciency and economic con-cerns must be taken intoconsideration to ensure thecost-effectiveness of its op-
eration.Many different kinds of commercial herb dryers areavailable for purchase andcan be fairly expensive, rang-ing from $15,000 used to$30,000 new. In easternNorth Carolina, existingforced air tobacco dryers(kilns) can be used to dryherbs. Most mountain farm-
Most medicinal and culi-nary herbs are sold dried.When drying large quanti-ties of herbs for commer-cial sale, growers shoulduse a forced-air dryer topreserve their color, fla-vor, oil content, and me-dicinal properties. Toachieve this, good air cir-culation within the dryeris important, as it reducesdrying time and allowsthe use of lower tempera-tures, both of which canprevent the degradation of chemical constituents duringthe drying process. There-fore, dependable temperaturecontrol and the ability toprovide high air flowthroughout the plant mate-
rial is important. Dryingtemperatures and times differby plants, plant parts, andambient conditions. In gen-eral, most herbs should bedried at low temperatures,ideally around 90-100° F.When outside conditions arehot and humid, however, itmay be necessary to raisetemperatures to as high as130°F.The size of the dryer should
be based on the herb produc-tion area and how much willbe harvested at one time. Forexample, we found thatslightly less than one-fourthacre of skullcap herb(foliage) required 700 ft2 of flat drying space. The dryershould have well-spacedracks to ensure that all sidesof the plant receive sufficient
Colorful Celosia flowers, for demonstration, are supported by screens shelves inthis herb dryer.
An Introduction to Herb Dryers
October 2008
Things to Remember:
• Most herbs and roots are sold dried.• Good quality dryers preserve herb quality.• Clean thoroughly between crops to avoid adulteration.
D r y e r s
f o r
C o m m e r c i a
l H e r b
G r o w e r s :
A C o n s t r u c t i o n
G u i d e
N O R T H
C A R O L I N A
S T A T E
U N I V E R S
I T Y
Introduction to Herb Dryers
Small Dryer Guideline
Large Dryer Guidelines
Drying Methods
What’s Inside?

8/6/2019 An Introduction to Herb Dryers
http://slidepdf.com/reader/full/an-introduction-to-herb-dryers 2/8
the exterior with a high qual-ity primer/sealer, and paintit with an exterior semi-glosslatex paint. Cut a 34” by 5”rectangular hole 5” from thebottom of the removableside to serve as an air intakevent. Position another small
hole (5” diameter) severalinches from the top of thedryer on the left side. At-tach a small electric fan tothe inside of the unit, facingoutward. This serves as anexhaust vent for moist airduring the drying process.Mount the fan with ½” plas-tic staples or something simi-lar. Both vent holes, as wellas the roof gable, should be
covered with plastic gutterfilters cut to size. Place aportable electric baseboardheater in the bottom of theunit as a heat source ( Figure2 ). The heater should be pro-tected from above with a finescreen to prevent introduc-tion of dried material intothe vents. Position wooden
bled and hinged on one sidefor easy access when load-ing and unloading. Prime
The design of this dryer isbased on a prototype origi-
nally created by Anita Hay-den of Native AmericanBotanics for use in her re-search on medicinal herbs.This dryer was designed toserve relatively small-scalegrowers. In 2006, this dryercost roughly $300 in materi-als, labor not included.The dryer is constructed of plywood framed by 1”x1”lumber. It is 8’ long, 4 ½’
wide, and 4 ½’ tall. It has afloor lifted a few inches off the ground with framinglumber, three stationarysides, and one removable sideserving as an access door (seeFigure 1 .). The roof is ga-
Small Indoor Dryer Guidelines
S IDE SECTION V IEW
1” S CALE
Figure 1: Schematic depicting the front view of the small dryer(Illustrated by Agatha Grimsley)
Materials:• 4’ by 8’ Plywood sheets
(5/8” thick)
• 1”x1” lumber for
framing the structure
and framing the shelves
• Screws
• Hinges (3 ½” by 1 ½”
weather resistant
hinges, 3 on each roof)
• Aluminum window
screen
• 4” personal fan
• Large plastic staples
(1/2”, 12.7 mm) for
attaching fan inside unit
• Electric baseboard
heater ( $60 Honeywell
Low Profile Silent
Comfort Heater,
portable electric
baseboard heater with
cord, model number HZ-
515)
• Gutter guards for vents(5 Gutter World snap-in
gutter filters costing
approximately $9.00
total - Lowe’s item
number 179783)
• Staples for attaching the
gutter guard & screens
• Thermometer ($10)
• Outdoor outlet with
timer ($21 Heavy duty
outdoor timer with 6
receptacles. Intermatic.
15 amps. From Lowe’s.)
• Primer and paint (Kilz
premium primer-sealer-
stainblocker – interior/
exterior water-base,
and white exterior
semigloss latex paint)
• Fine screen (to protect
baseboard heater)
Page 2 DRYERS FOR COMMERCIAL HERB GROWERS:
Figure 2: Baseboard heater with chord

8/6/2019 An Introduction to Herb Dryers
http://slidepdf.com/reader/full/an-introduction-to-herb-dryers 3/8
tact with buyers to be kept
informed about as new regu-lations and standards emerge
aluminum shelving has notbeen noted as a contaminantproblem in this industry.
Visitwww.atsdr.cdc.gov/tfacts22.html for more infor-mation about the safety of aluminum shelves. You mayalso line the aluminumscreens with another mate-rial, such as cheesecloth tokeep the herbs from being incontact with the screening,or you can research alterna-tive screening to use in your
dryer. Finally, growersshould maintain good con-
“stops” on the floor of theunit to keep the heater safelyaway from the walls of the
dryer. A thermometer with atemperature range up to120° F should be mountedinside the unit ( Figure 3 ).An outdoor outlet box fittedwith a timer can be used toplug in both the fan and theheater . The outlet box isthen plugged into a regular110 outlet. Alternatively, thefan and heater can each beplugged into a regular 110
outlet.Three or more levels of re-movable shelves can be con-structed inside the unit (SeeFigure 4 & Figure 6 ) toprovide a flat surface for dry-ing the plant material. Twoshelves sit side by side oneach level to allow for easyloading and removal. Alumi-num window screening canbe used to line each shelf toallow air flow around theplant material as it dries. Tothe best of our knowledge,
FRONT SECTION V IEW SHOWING FLOOR AND
R IDGE SUPPORT , FRAME , AND SHEATHING
1’ S CALE
Figure 4: Schematic of small dryer front and schematic o f a small dryer removablerack.
Plan View of One Removable Rack
1’ Scale
Figure 6: Completed small dryer with herb material (Photo courtesy of Anita Hayden)
Small Indoor Dryer Guidelines (cont.)
The small herb
dryer is not
weather-proof.
Remember to store
it indoors or under
cover.
Page 3
PLAN V IEW SHOWING FRAME AND
BRIDGE SUPPORT , WITH 1/4” PLY ‐
WOOD SHEATHING .
1’ SCALE
Figure 5: Schematic depicting the top view ofthe shelf for the small dryer
Figure 3: 120 oF Thermometer mounted insidethe drying unit..
8/6/2019 An Introduction to Herb Dryers
http://slidepdf.com/reader/full/an-introduction-to-herb-dryers 4/8
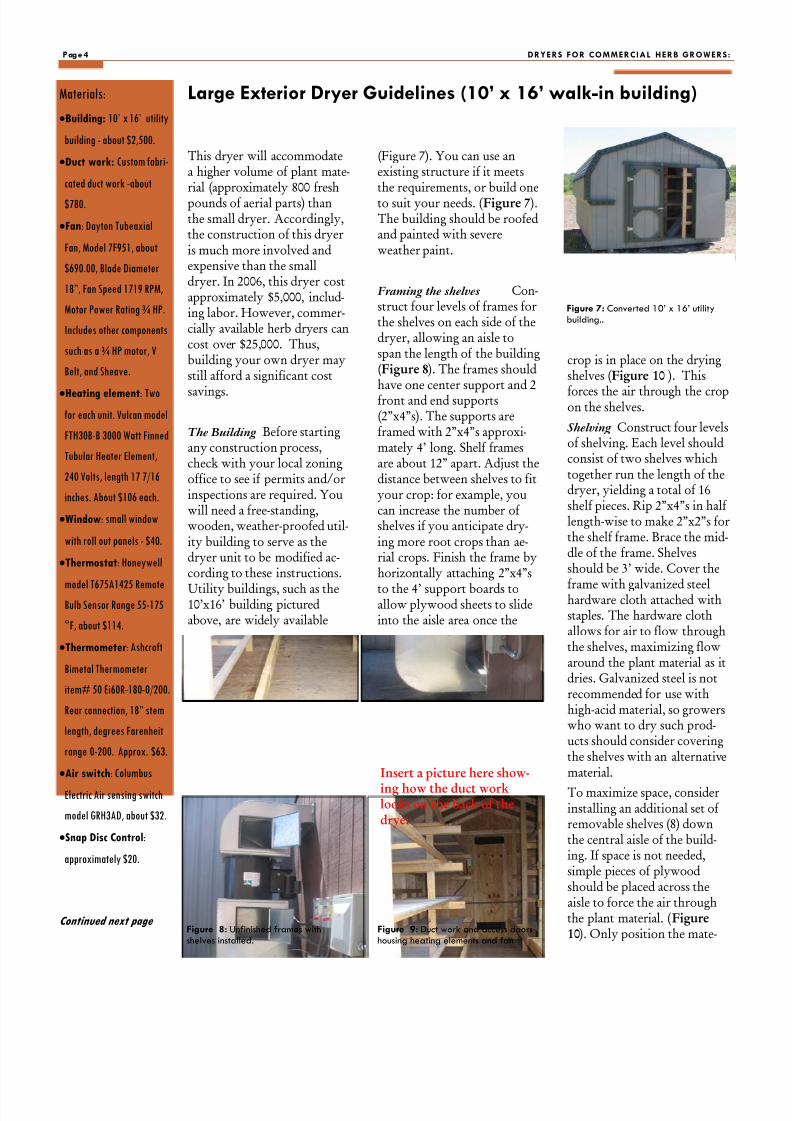
This dryer will accommodatea higher volume of plant mate-rial (approximately 800 freshpounds of aerial parts) thanthe small dryer. Accordingly,the construction of this dryeris much more involved andexpensive than the smalldryer. In 2006, this dryer costapproximately $5,000, includ-ing labor. However, commer-cially available herb dryers cancost over $25,000. Thus,building your own dryer maystill afford a significant cost
savings.
The Building Before startingany construction process,check with your local zoningoffice to see if permits and/orinspections are required. Youwill need a free-standing,wooden, weather-proofed util-ity building to serve as thedryer unit to be modified ac-cording to these instructions.
Utility buildings, such as the10’x16’ building picturedabove, are widely available
(Figure 7). You can use anexisting structure if it meetsthe requirements, or build oneto suit your needs. ( Figure 7 ).The building should be roofedand painted with severeweather paint.
Framing the shelves Con-struct four levels of frames forthe shelves on each side of thedryer, allowing an aisle tospan the length of the building( Figure 8 ). The frames shouldhave one center support and 2front and end supports(2”x4”s). The supports areframed with 2”x4”s approxi-mately 4’ long. Shelf framesare about 12” apart. Adjust thedistance between shelves to fityour crop: for example, youcan increase the number of shelves if you anticipate dry-ing more root crops than ae-rial crops. Finish the frame byhorizontally attaching 2”x4”s
to the 4’ support boards toallow plywood sheets to slideinto the aisle area once the
crop is in place on the dryingshelves ( Figure 10 ). This
forces the air through the cropon the shelves.Shelving Construct four levelsof shelving. Each level shouldconsist of two shelves whichtogether run the length of thedryer, yielding a total of 16shelf pieces. Rip 2”x4”s in half length-wise to make 2”x2”s forthe shelf frame. Brace the mid-dle of the frame. Shelvesshould be 3’ wide. Cover the
frame with galvanized steelhardware cloth attached withstaples. The hardware clothallows for air to flow throughthe shelves, maximizing flowaround the plant material as itdries. Galvanized steel is notrecommended for use withhigh-acid material, so growerswho want to dry such prod-ucts should consider coveringthe shelves with an alternativematerial. To maximize space, considerinstalling an additional set of removable shelves (8) downthe central aisle of the build-ing. If space is not needed,simple pieces of plywoodshould be placed across theaisle to force the air throughthe plant material. ( Figure10 ). Only position the mate-
Large Exterior Dryer Guidelines (10’ x 16’ walk-in building)
Page 4 DRYERS FOR COMMERCIAL HERB GROWERS:
Materials:
• Building: 10’ x 16’ utility
building - about $2,500.
• Duct work: Custom fabri-
cated duct work -about
$780.
• Fan: Dayton Tubeaxial
Fan, Model 7F951, about
$690.00, Blade Diameter
18”, Fan Speed 1719 RPM,
Motor Power Rating ¾ HP.
Includes other components
such as a ¾ HP motor, V
Belt, and Sheave.
• Heating element : Twofor each unit. Vulcan model
FTH30B-B 3000 Watt Finned
Tubular Heater Element,
240 Volts, length 17 7/16
inches. About $106 each.
• Window: small window
with roll out panels - $40.
• Thermostat : Honeywell
model T675A1425 RemoteBulb Sensor Range 55-175
°F, about $114.
• Thermometer : Ashcroft
Bimetal Thermometer
item# 50 Ei60R-180-0/200.
Rear connection, 18” stem
length, degrees Farenheit
range 0-200. Approx. $63.
• Air switch: Columbus
Electric Air sensing switch
model GRH3AD, about $32.
• Snap Disc Control:
approximately $20.
Continued next page
Figure 7: Converted 10’ x 16’ utilitybuilding..
Figure 8: Unfinished frames withshelves installed.
Insert a picture here show-ing how the duct worklooks on the back of thedryer
Figure 9: Duct work and access doorshousing heating elements and fan

8/6/2019 An Introduction to Herb Dryers
http://slidepdf.com/reader/full/an-introduction-to-herb-dryers 5/8

8/6/2019 An Introduction to Herb Dryers
http://slidepdf.com/reader/full/an-introduction-to-herb-dryers 6/8

8/6/2019 An Introduction to Herb Dryers
http://slidepdf.com/reader/full/an-introduction-to-herb-dryers 7/8
CFM (Cubic Feet per Minute)output, or consider installinghigh R-value windows on thesouthern side to increase theincoming solar heat. The win-dows would need to bepainted to protect the herbsfrom UV radiation. Finally,look into solar energy op-tions. Using passive solar de-sign and energy would allowfor placement of herb dryersdirectly beside the field fromwhich the herb material willbe gathered. This would re-
duce the amount of time be-tween harvest and dryingwhich is an important factorin post-harvest processing.There are some models of so-lar greenhouse dryers availableonline. Another benefit of using solar energy is that theunit does not have to be lo-cated adjacent to a powersource, nor would the addi-tional costs of connecting to amore distant power source beincurred. Converting a green-house to a dryer would be
Large Exterior Dryer Guidelines (10’ x 16’ walk-in building)cont.
Page 7
C
A B
Figure 14: Wiring diagrams for the fan motor, the heaters, and the thermostat were commissioned by an electrical contrac-
tor.
tain chlorophyll. This will be less impor-tant for roots or other low-chlorophyllparts. Start with higher temperaturesand decrease them over time. It is a goodidea to maintain high temperatures forat least the first 24 hours.When are my plants dry? Aerial parts willbe dry when you can break a piece of itand it “snaps.” When drying roots, keepin mind that you want the roots to dryfrom the inside out. If temperatures aretoo high, the roots will dry on the out-side first and seal in moisture on the in-side. This would result in a moldy, infe-rior product that would be rejected by abuyer. Instead, keep temperatures lowenough to dry the root from the inside
Drying Methods Once you have estab-lished your herb dryer, some generalinstructions for drying are in order.The best method to dry your herb willdepend largely on the physical charac-teristics of the material, the volume of herb in the dryer, the relative humidityof the outside air, and the physicalproperties that are important to yourcommercial buyer(s). Methods varyonly slightly when using the small ver-sus the large herb dryer. Keeping the Green.Most commercialbuyers want green color to be main-tained in the dried product that theybuy. This is especially important forabove ground plant parts which con-
out more slowly. Depending on theplant, some roots may need to be cutin half or quartered in order to thor-oughly. What temperature should I use? Differ-ent herbs will require different tem-peratures. In the mountains, expectherbs to dry at somewhere around 90-105o F. In the Piedmont and Coastalareas of North Carolina, temperaturesmay need to be around 110-130o F.Typically, the higher the ambient hu-midity, the higher the temperaturethat is required to dry the materialthoroughly. One report recommendsthe following temperatures based onthe major medicinal chemical composi-
Drying Methods

8/6/2019 An Introduction to Herb Dryers
http://slidepdf.com/reader/full/an-introduction-to-herb-dryers 8/8
No matter what your scale of medicinal herb production, quality ofyour final product will depend, in part, on your ability to efficientlyand adequately dry your harvested material. We hope that these twodryer designs will serve as a starting point for you as you develop adryer to suit the particular needs of your farm. Please contact us ifyou come up with innovative modifications to these designs toimprove quality in your final product or overall efficiency ofthe dryer itself. Additionally, please contact us with ques-tions or seeking advice as you build your own dryer.Other Resources:www.ncspecialtycrops.org/medherbs -for general herbal information www.agf.gov.bc.ca -for general drying information
www.library.wur.nl/frontis/medicinal_aromatic_plants/17_muller.pdFor a detailed report on drying specific medicinal herbs
oped. In our experience, fol-lowing the general guidelinesset forth in this documentresulted in a high qualityproduct.Check the material often tomonitor its progress and ad- just the temperature as neces-sary. Unless your dryer isequipped with a thermostat,you will need to adjust thismanually as needed. For thefirst 24 hours or so, keep thefan on and vents open. Forthe large dryer, you will needto open the intake vent on theduct (seeFigure 9 ) to intro-duce drier air and force themore humid air out throughthe front vents. This will helpremove moisture and lowerthe humidity in the dryer. Asthe material dries, the vents
tion of the plant: for glycoside contentdry at a maximum of 212oF; for muci-lage content dry at a maximum of 149oF; and for essential oil content dryat a maximum of 95o. It is believed thateach herb requires a specific procedure,including temperature regime and dura-tion of drying, yet these procedureshave only recently begun to be devel-
may beprogressively reduced. This isextremely important. Intro-ducing drier air will reduce theamount of time the material isin the dryer, thus reducing thecost of drying the material. Besure to turn the material gen-tly at least once during theinitial phase of drying.Depending on the plant mate-rial and your buyer’s specifica-tions, the final product shouldbe between 8 -12% moisture.This means that approxi-mately 2/3 of the fresh weightwill be lost in the drying proc-ess.
It is important to get harvestedplant material from the field tothe dryer as quickly as possi-
Drying Methods (cont.)
Authors:Jeanine DavisAmy HamiltonMtn. Hort. Crops Research & Extension Ctr455 Research Drive,Mills River, NC 28759
Nor th Caro l ina S ta t eU n i v e r s i t y
Contact:Phone: 828-684-3562Fax: 828-684-8715E-mail: [email protected]
W e ’ r e o n t h e W e b
h t t p :// n c s p e c i a l t y c r o p s. o r g
Drying Rules of Thumb1. Aerial material should be dried at
higher temperatures at first, followedby decreased temperatures.
2. Root material can be maintained at aconstant temperature throughout the drying proc-ess.
3. Keep in mind that these are “general rules.”Please verify the drying needs of your productprior to starting the process.
Thank you to Laura Duffie and LibbyHinsley for their assistance with thispublication.
Thank you to Dr. Grant Ellington,Extension Specialist in Biological andAgricultural Engineering, for assistingwith the technical components of thispublications.